Showing 81 items
matching temporary track
-
 Melbourne Tram Museum
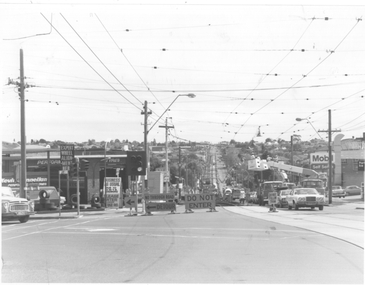
Photograph - Burke Road and High Street, North Balwyn Trackwork, The Met, c1980
... a temporary track deviation method. Two trams can be seen... section of track being rebuilt, using a temporary track deviation ...Photograph of the intersection of Burke Road and High Street, North Balwyn, looking back towards Kew and the city. Shows the inbound section of track being rebuilt, using a temporary track deviation method. Two trams can be seen on this track. Also note the additional temporary overhead lighting install above the track relay. Photo c1980. Has Kevin Donnellan tyre and a Mobil service station in the view. The overhead work being done by two bucket trucks.Yields information about High St North Balwyn and track reconstruction.Black and White Photograph with notes on rear.On rear of photograph in ink "High St Balwyn ?"trams, tramways, high st, north balwyn, burke rd, tram track, reconstruction, east kew, mmtb, tower trucks -
 Melbourne Tram Museum
Slide - Set of 2, Keith Kings, 24/12/1967 12:00:00 AM
... "", with details of exposure. .1 - SW6 car on temporary track at St Kilda..." and "15-5"", with details of exposure. .1 - SW6 car on temporary ...Set of two 35mm Kodak white cardboard colour slide by Keith Kings of 24/12/1967 - .1 - St Kilda Junction, looking north along St Kilda Road, showing the nature of the diversion from the junction for Wellington St. .2 - Dandenong Road, showing the track diversion work for Dandenong Road/Queensway, Windsor.Keith Kings stamp and number "15-1" and "15-5"", with details of exposure. .1 - SW6 car on temporary track at St Kilda Junction looking north from turnout during freeway work .2 - Dandenong Road west from Hornsby St with section of straight track ready to replace curves onto new b.v.w. track to Chapel St - 907 coming off soon to be abandoned street track.trams, tramways, st kilda junction, trackwork, road works, dandenong road, queensway, tram 907 -
 Melbourne Tram Museum
Slide - Set of 4, John Webster, 14/12/1959 12:00:00 AM
... -59 - KFL3 - temporary track during building of the Flinders... Trams tramways Trackwork Flinders St King St Track Construction ...Set of four Colour slides, Kodak, white cardboard, .4 brown cardboard of trams using the Flinders St overpass of King St, 14-12-1959 .1 - SW6 854 at the top of the new bridge. .2 - SW6 854 at the bottom of the new bridge, has destination of Hawthorn route 27, and adverts for Biro pens, Lindeman's sherry, Knights Jewellery and KSP ? .3 - SW6 854 trailing photo with William St, nearing the intersection with William St. with the Yarra Family Hotel and a shop selling Oysters and Crayfish. .4 - Photo showing a W2 and W5? climbing the bridge. Note the overhead has been set up for a junction. In the background are adverts for Penfolds Wines, Bushels, the Flinders St viaduct, Nestles Milk, Girlings, Barrow Bros, Store.Hand writing on rear in ink; .1 - 14-12-59 - KFL2 - Flinders St flyover, Melbourne Vic. .2 - 14-12-59 - KFL2a - Trams coming over the Flinders St flyover, Melbourne Vic. .3 - 14-12-59 - KFL3 - temporary track during building of the Flinders St flyover, Melbourne. .4 - 14-12-59 - KFL3a - Flinders St flyover, Melbourne Vic.trams, tramways, trackwork, flinders st, king st, track construction, bridges, sw6 class, hawthorn, route 27, tram 854 -
 Melbourne Tram Museum
Photograph - Digital Image, Kevin O'Reilly, series of three images of the Hawthorn Bridge over the Yarra, c1930, c1930's
... . Temporary track on the north side of the steel bridge and crossings.... Temporary track on the north side of the steel bridge and crossings ...Image from CD (Compact Diskette for use in computers) - see Reg Item 135. A series of three images of the Hawthorn Bridge over the Yarra, c1930, during the era with problems with the bridge. See separate article for more details. Richmond 6, Richmond, Richmond 3 on the CD as original files. .1 - Looking from the south west, at the Hawthorn bridge with the temporary wooden bridge being constructed on the south side. Has the cable tram depot in the photo and part of the Burnley racing course. Temporary track on the north side of the steel bridge and crossings can be seen. .2 - Looking along Bridge Road to the east with Hawthorn Bridge in the middle of the photograph. Shows the industrial and residential areas, Hawthorn Railway Station and part of the Burnley Race course, the cable tram depot building. W class tram in Church St Hawthorn and W class tram crossing the bridge on the north side temporary track. Note the cable tram used as a shelter on the north east corner of the bridge. .3 - Looking south along River St towards Bridge Road, with the Yarra River and Hawthorn Bridge on the left side of the photograph. Shows the industry in the area at the time, wool and skin Merchants, north side of the cable depot, housing and the outlook to the river!trams, tramways, hawthorn, yarra river, burnley, richmond, hawthorn bridge -
 Melbourne Tram Museum
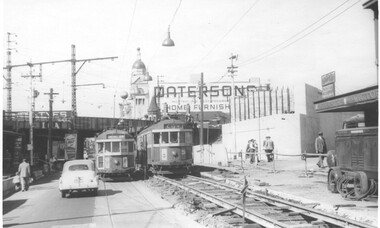
Photograph - Black and White - Swan Street track lowering, John Alfred, 1957
... as well as the temporary track. Shows the abutment for a new... as well as the temporary track. Shows the abutment for a new ...Photo shows - works in Swan Street Richmond to lower the tram tracks under the Railway bridge which were later replaced by an open web girder truss bridge. The track on the left has been completed while on the right, the original road surface can be seen as well as the temporary track. Shows the abutment for a new railway bridge on the right, for the six tracks to South Yarra. Tram W2 330 (left, Camberwell Depot, route 76) and 339 (City, route 77) are passing each other. In the background is a large advertisement for Pattersons home furnishings. Photo dated 1957.Yields information about alterations to tram services during road reconstruction project.Photograph - Black and White - Swan Street track lowering Has details handwritten on rear, date stamp and John Alfred Stamp. tramways, tramcars, swan street, richmond, route 77, railways, bridges, tram 330, tram 339 -
 Melbourne Tram Museum
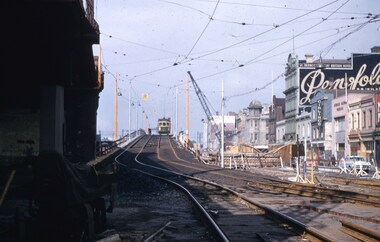
Slide - Set of 2, John Webster, 21/07/1959 12:00:00 AM
... viaduct over Spencer St, looking east. Shows the temporary track... viaduct over Spencer St, looking east. Shows the temporary track ...Set of two Colour slides, Kodak, white cardboard of trams of the construction of the Flinders St overpass over King St from the railway viaduct over Spencer St, looking east. Shows the temporary track on the south side of the bridge and the large car park under construction from the former cool stores on this site. Also shows the former track into Spencer St. Note the cross over at the base of the bridge. .1 - possibly 357 running a route 27 to Spencer St. Has the Great Southern Hotel on the left side. .2 - similar photo taken from the viaduct, further along - has the Bushels and Penfolds Wines signs in the background.Hand writing on rear in ink; .1 and .2 - "2-4-60 - Tracks - Flinders St Melbourne" Both slides have the speed and the f reading on the left hand side.trams, tramways, trackwork, flinders st, king st, track construction, bridges, w2 class, route 27, tram 357? -
 Melbourne Tram Museum
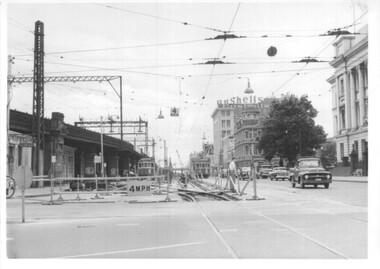
Photograph - Black & White Photograph/s, Melbourne & Metropolitan Tramways Board (MMTB), Jan. 1926
... trackwork, the temporary track for the electric trams with 276..., the temporary track for the electric trams with 276 inbound ...Black and white photograph of the conversion of the intersection of Domain Road, St Kilda Road, Domain Junction from cable tram to electric tram. Shows the Toorak Road Tram remaining trackwork, the temporary track for the electric trams with 276 inbound with the destination of North Coburg and another W class tram outbound to St Kilda Beach. Note the temporary platform and the temporary board crossing. Has "The Foundation Company Engineers and Contractors" sign in the view and the petrol? powered roller. Photo from the Collection of the Department of Infrastructure now with the Public Records Office - image number H101. Note: this photo is now out of copyright and was not an original VR photograph, but one copied from another source and collected as their Heritage series.Has Department of Infrastructure copy right stamp on rear and number "H513" in ink on rear and "2-5".trams, tramways, swanston st, cable trams, trackwork, new tramway, flinders st, conversion -
 Ballarat Tramway Museum
Photograph - Black & White Photograph/s, Jul. 1972
... Black and white photograph - of the temporary access track... a photograph of the temporary track laid by the BTPS to enable ...Yields information through a photograph of the temporary track laid by the BTPS to enable the access to the depot to move trams to the new depot in 1972. Poor quality photograph.Black and white photograph - of the temporary access track to move the trams from the SEC depot to the BTPS depot - during 1973. Shows the track from the door with a tram in the distance. Taken mid July 1972, see Reg Item 3022 for other photographs. Not well exposed or printed - dark. Image has been adjusted for exposure.tramways, trams, moving trams, depot, btps -
 Ballarat Tramway Museum
Photograph - Black & White Photograph/s, Jul. 1972
... Black and white photograph - of the temporary access track... a photograph of the temporary track laid by the BTPS to enable ...Yields information through a photograph of the temporary track laid by the BTPS to enable the access to the depot to move trams to the new depot in 1972. Not a good quality photograph. Shows the distance of track laid.Black and white photograph - of the temporary access track to move the trams from the SEC depot to the BTPS depot - during 1973. Shows the track from Wendouree Parade with a tram and the depot in the distance. Taken mid July 1972, see Reg Item 3022 for other photographs. Not well exposed or printed - dark. Image has been adjusted for exposure.tramways, trams, moving trams, depot, btps -
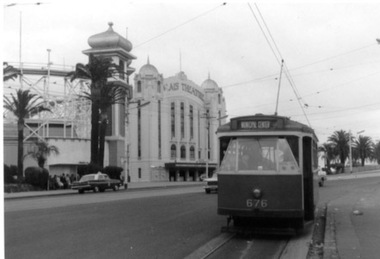 Ballarat Tramway Museum
Photograph - Black & White Photograph/s, 31/10/1965 12:00:00 AM
... 869 alongside. 676 on temporary track - during... Kilda. Note the track is alongside the north side kerb. Has ...Set of three Black and white photographs on Kodak paper of an Association of Railway Enthusiasts tram tour with X2 676. The tour featured the use of a Washington DC destination roll. Date of Tour 31/10/1965. 1422.1 - X2 at the terminus of route 69/79 routes at the Esplanade, St Kilda. Note the track is alongside the north side kerb. Has Palais Theatre in the background and Luna Park. Tram showing destination of "Municipal Center" 1422.2 - Hawthorn Road, just north of Balaclava road, looking south. SW6 869 alongside. 676 on temporary track - during the reconstruction of Hawthorn Road - permanent track has been completed alongside. Tram showing destination of "Racecourse" 1422.3 - X2 676 on "Bang Road" Coldblo Road at Malvern depot entry looking east. Tram showing destination of "Friendship Hts". See P.Winspur notes, data sheet for Reg. Item 1418 and Dave Macartneytrams, tramways, tram tours, are, trackwork, mmtb, tram 676, tram 869 -
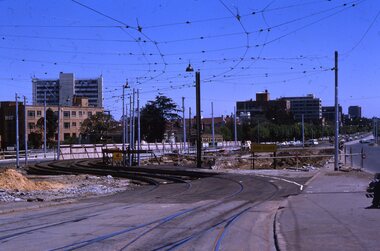
 Melbourne Tram Museum
Slide - Set of 5, Keith Kings, 15/11/1959 12:00:00 AM
... of Spencer with temporary track ready for trams on the overpass... with temporary track ready for trams on the overpass. .2 - track being ...Set of five Colour slides, Kodak, white cardboard mount of track laying and the construction of the Flinders Street overpass during November 1959. .1 - Photo showing the tram line in the pre location position with the new track over the first stage of the overpass read to be cut in. 15/11/1959. Tram running a route 46. Keith notes - 317 to Spencer St terminus in Flinders St from Cnr of Spencer with temporary track ready for trams on the overpass. .2 - track being tested on 21/11/1959 - has the Flinders St station and signal gantry in the background. On the bridge is a sign for Coffey Ford. Keith notes - 903 stranded on temporary track as test car for Kings St bridge overpass Flinders St between William and Market Sts. .3 - tram 903 testing the track, has a number of workers in the view - 22/11/1959 Keith's notes - 903 first tram (on its second use) testing Flinders St overpass track and approach curves on east side. .4 - trams 939 (route 46) and 350 (route 27, Spencer St) at the east end of the new bridge with people watching. Note the "cars stop here" on the orange pole near the bottom of the ramp. 22/11/1959 Keith's notes - 939 - first passenger tram over Flinders St overpass on return journey and 350 second passenger tram. .5 - tram 939 first passenger car over the bridge at the western end of the new bridge with many workers in the background. Also Markillies Hotel. Also shows the reinforcing in the side of the bridge for the next section of the bridge to be built following this stage. 22/11/1959 Keith's notes - 939 first passenger tram over Flinders St overpass over King St. Slide Number K(l)(287), K(m)(275), K(m)(278), K(m)(287), K(m)(282) respectively.Extensive handwriting on rear in ink giving the photographic details of exposure.trams, tramways, flinders st, track equipment, track construction, trackwork, route 46, testing, king st, tram 371, tram 903, tram 939, tram 350 -
 Ballarat Tramway Museum
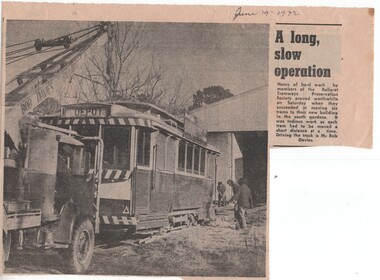
Newspaper, The Courier Ballarat, "A long slow operation", 19/06/1972 12:00:00 AM
... June. The other trams were not moved until temporary track had... were not moved until temporary track had been laid between ...Newspaper cutting from The Courier, Ballarat 19/6/1972 of the moving of tram 26 into the depot. Has photo of tram 26 being moved into the depot using steel channels and rails on their side. Also Bob Davies crane in photo assisting with move. The method of moving 26 was slow and difficult, having derailed it at the depot access road and dragged it up the road and then onto steel channels pushing it into the shed. Information to members for June-July 1972 gives the moving date as 16 June and completed on 17 June. The other trams were not moved until temporary track had been laid between the depot and the kerb in Wendouree Parade, roughly along the same route as the depot access track. The September 1972 issue gives full details of the move and the date. The photo was taken on Sat. 17 June. See Reg Item No. 1858 for Courier Print of the photo. Second copy added 5/11/2018 from donation of Glenise Kellett. See Information for Members (BTPS) - June-July 1972 and Sept. 1972."June 19 -1972" in top right hand cornerbtps, moving trams -
 Ballarat Tramway Museum
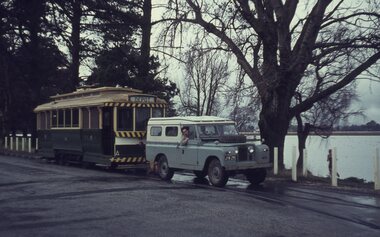
Slide - 35mm slide/s - set of 11, Eldon Hogan, 15/07/1972 12:00:00 AM
... SEC depot onto the temporary access track to the BTPS depot... onto the temporary access track to the BTPS depot on Saturday ...Set of 11 No. 35mm Agfa colour blue and white plastic mount slide - of the move of Ballarat trams 27, 28 and 14 from the old SEC depot onto the temporary access track to the BTPS depot on Saturday 15 July 1972 and Sunday 16 July 1972 (slides .10 and .11) .1 - John Withers and his land rover, towing No. 14 from the old depot - depot junction. .2 - No. 27 moves from Wendouree Parade onto the depot access track. .3 - ditto .4 - and onto the access track being pushed by hand. .5 - No. 28 being lifted onto the steel channels in order to slew it across Wendouree Parade .6 - being slewed across the road .7 - being readied to lift up onto the access track .8 - all three trams on the access track that evening. .9 - ditto Taken on 16 July 1972 .10 - No. 27 being winched up to the level crossing - Campbell Duncan ? on the winch. Note the mud! .11 - No. 14 being winched up the temporary access track - Rolf Jinks on the Winch. See Fares Please!, September 1972. tramways, trams, depot, btps, moving trams, wendouree parade, tram 27, tram 14, tram 28 -
 Melbourne Tram Museum
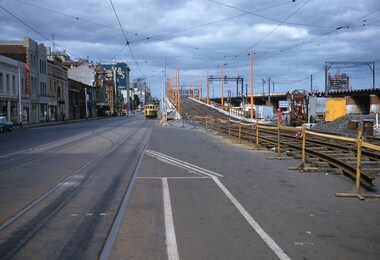
Photograph - Set of 12 - construction of King St overpass in Flinders St, 1959
... prior to the introduction of the temporary tracks on the south... prior to the introduction of the temporary tracks on the south ...Photos show the construction of King St overpass in Flinders St which was part of the project to construct a bridge over the Yarra River and provide a new southern outlet road between the city and eventually St Kilda Junction. The overpass construction was commenced in 1959 with tramway works first commencing. It was demolished in 2005. 1 - looking west at Market St. 2 - looking east from Spencer and Flinders St with the railway viaduct behind. 3 - Tram lines diverted onto the new overpass. Note the hand-powered overhead tower on the left behind the compressor. 4 - Tracks partially diverted. 5 - Looking east at Spencer and Flinders St with a Dunlop tyre truck in the view. 6 - prior to the diversion onto the new bridge. 7 - Looking east near William St. with W2 451 (Route 48, North Balwyn) in the view. 8 - Bridge works near King St. Original tracks still in use. 9 - Looking east prior to the introduction of the temporary tracks on the south side of the new overpass. 10 - SW6 852 and a W2 on new overpass trackwork - old trackwork being demolished. 11 - Cross over at Spencer St in Flinders St, prior to change over. 12 - Looking west at Flinders and Spencer St with SW6 853 turning into Spencer St.Yields information about the construction of the King St overpass in Flinders St during 1959.Set of 12 black and white prints of the construction of the King St overpass in Flinders St.trams, tramways, flinders st, king st overpass, construction, bridges, w2 class, sw6 class, tram 451, tram 853, tram 852 -
 Ballarat Tramway Museum
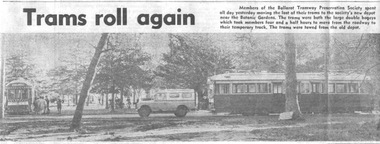
Newspaper, The Courier Ballarat, "Trams Roll again", 19/07/1972 12:00:00 AM
... behind John Withers Land Rover and tram 38 on the temporary... on the temporary access track the previous day, while being moved ...Yields information about the relocation of the bogie trams from the old SEC depot to the new BTPS depot in the gardens and partly how it was done.Newspaper cutting from The Courier, Ballarat, titled "Trams roll again", Wednesday 19/7/1972 of tram 40 in Wendouree Parade behind John Withers Land Rover and tram 38 on the temporary access track the previous day, while being moved into the new depot. A "Warning Oncoming Trams" lies against a tree near 40. Was on the front page of the newspaper. See Reg. item 1788, 1789 and 1790 for further references. See Reg Item 3820 for a print of the actual photograph and Information for Members (BTPS) - June-July 1972 and Sept. 1972.btps, moving trams, depot junction -
 Melbourne Tram Museum
Photograph - Set of 4 prints of Cable Car set No. 1 being installed in Russell St display 1975, K S Kings, April and May 1975
... , at Cnr Lt Lonsdale St, Melbourne. Not the temporary track. Sunday... St, at Cnr Lt Lonsdale St, Melbourne. Not the temporary track ...Photographs show the installation process and official unveiling of Cable Tram set No.1, the first cable tram set to operate in Melbourne from 1885. It marked the 90th anniversary since its appearance on the cable network. This set was preserved by Alf Twentyman for many decades.Yields information about the provenance of Melbourne's first cable tram Black and white prints with notes on the rear.On rear in ink or pencil: "Melbourne. Official unveiling of Cable Tram set No. 1 at the Science Museum 1/5/75, Thurs, 3.30pm, Russell St, Cnr Lt Lonsdale St, City" "Melbourne. Undergear being fitted to Cable Trailer No.1 at the Science Museum, before it joins Grip Car No.1 in the glass display case. Russell St, at Cnr Lt Lonsdale St, Melbourne. Not the temporary track. Sunday 20/4/75. (Stamp): K S Kings 140-10. Copyright reserved" "Melbourne. Cable Tram Grip Car No.1 is unloaded after overhaul at Preston W/S at the Science Museum, Russell St, at Cnr Lt Lonsdale St, City. Sunday 20/4/75. (Stamp): K S Kings 140-8. Copyright reserved" "Cable Car No.1 being moved into display case, Russell St, Melbourne, 9am Sunday 20 April 1975. (Stamp): Graeme S Breydon, 204 Carlisle St, Balaclava. 3183 B48-22" tramways, trams, cable trams, cable tram set no.1, science museum, russell st, alf twentyman -
 Melbourne Tram Museum
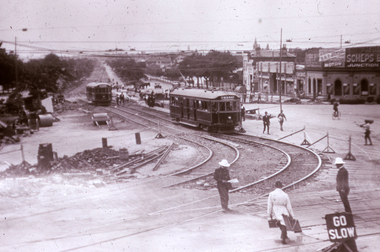
Slide, Melbourne & Metropolitan Tramways Board (MMTB), c1926
... Junction, possibly soon after a change over to the new track in St.... Has W 366 (St Kilda Beach) on the temporary or new track ...35mm colour slide TMSV copy slide of trackwork at St Kilda Junction, possibly soon after a change over to the new track in St Kilda Road. Has W 366 (St Kilda Beach) on the temporary or new track pending the construction of a road surface and the link to Wellington St. Photo may be from a photo held in the Public Records Office series. On the corner of Punt and St Kilda Road is s building advertising Schweppes Junction Motor service station."MP 30" in pencil on the side.trams, tramways, st kilda junction, trackwork, new tramways, w class, road works, tram 366 -
 Ballarat Tramway Museum
Photograph - Black & White Photograph/s, mid to Late 1965
... of bridge looking east. Shows temporary single track arrangement... of bridge looking east. Shows temporary single track arrangement ...Set of two Black and white photographs of the pile driving for the reconstruction of the Maribyrnong River Bridge from a tramway only bridge to a dual road/tram bridge. The road bridge is in the background. On Kodak paper. Photo during the 2nd half of 1965. 1419.1 - Early in the process of pile driving - Bridge tram track has been reduced to single track and the former outbound line is in use for construction purposes. 1419.2 - Roadway west of bridge looking east. Shows temporary single track arrangement which allowed the operating track to switch to the south side when piling completed. W5 682 West Maribyrnong on route 57 coming off the bridge. See P.Winspur note - and Rail News Victoria May 2000, page 50. Features a photograph of a tour on the bridge on 1/10/1966.trams, tramways, maribyrnong river bridge, bridge construction, trackwork, mmtb, tram 682 -
 Ballarat Tramway Museum
Slide - 35mm slide/s - set of 20, Eldon Hogan, 18/07/1972 12:00:00 AM
... Depot to the new BTPS depot, via the temporary access track... to the new BTPS depot, via the temporary access track on Tuesday 18 ...Set of 20 No. 35mm Agfa colour blue and white plastic mount slide - of the move of Ballarat trams 38 and 40 from the old SEC Depot to the new BTPS depot, via the temporary access track on Tuesday 18 July 1972. .1 - Front of SEC depot with 38 and 40 still in shed, with back part demolished. .2 - No. 40 towed out of the depot by John Withers land rover. Noel Gipps taking photo. .3 - ditto .4 - No. 38 being towed out. .5 - No. 40 being towed out .6 - No. 38 departing Depot Junction .7 - No. 40 departing Depot Junction - the last tram. .8 - ditto, being towed along Wendouree Parade .9 - ditto tow .10 - being towed through Gardens Loop .11 - No. 38 being slewed across Wendouree Parade on channels .12 - No. 38 onto the access track. .13 - ditto, with 40 still on Wendouree Parade. .14 - No. 40 is being readied. .15 - No. 38 well up the access track. .16 - No. 40 is slewed across the road. .17 - No. 40 at right angles to the track - note the pole. .18 - No. 38 near the level crossing, with 28 and 14 outside the depot. .19 - No. 14, Bob Davies truck, 38 and 40 on the access track. .20 - Nos. 28 and 14 waiting to go into No. 1 road. See Fares Please!, September 1972.tramways, trams, depot, btps, moving trams, wendouree parade, tram 38, tram 40, tram 28, tram 14 -
 Ballarat Tramway Museum
Administrative record - Memorandum, Hal Cain, moving of trams to the new depo, Dec. 1971
... to the laying of a temporary access track to the edge of the Wendouree... of a temporary access track to the edge of the Wendouree Parade, which ...Copies of reports and notes prepared by Hal Cain on the moving of trams to the new depot, depot access track construction and the construction of the depot. All on foolscap sheets, toner photocopies, with punched holes on the left hand edge. 914.1 - copy of a memo on the method of moving tramcars from the old SEC Depot to the Society's new building. Written on BTPS letterhead (see item 913) over two sheets of paper. Photocopied onto a single foolscap sheet of paper. In top right hand corner has notation "written by HAL 22/12/71". Last point - number 9 did not copy well and has lost most of last line - see 914.2 (Note by WAD - basis of method used for the movement of the first tram, but found to be very difficult and likely to damage the tramcars. Led to the laying of a temporary access track to the edge of the Wendouree Parade, which was used for the movement of the following five tramcars.) 914.2 - as for 914.1 but includes good text of point 9. 914.3 - copy of a report written by Hal Cain about the "Construction of connecting track in South Gardens Reserve from the Society's Depot to Wendouree Parade". On foolscap paper, with two punch holes in the left hand edge. In top right hand corner has notation "written by HAL 22/12/71". (two copies held) 914.4 - copy of a report written by Hal Cain on the: a - quotation received by the Society for the erection of the its Tram Depot b - Formation of the BTPS Cooperative c - Progress of the Preservation Society to date. On foolscap paper, with two punch holes in the left hand edge. In top right hand corner has notation "written by HAL 22/12/71". (two copies held) trams, tramways, btps, btps depot, track construction, btps co-operative -
 Melbourne Tram Museum
Album - Charles Craig - part 1 of 2, 1950s to 1970s
... beams and old track CC39 Looking down showing temporary single... beams and old track CC39 Looking down showing temporary single ...Photo - see pdf file for further information. Number Brief Description CC1 S178 at Elsternwick level crossing track works CC2 Building East Preston Depot 1955 CC3 Camberwell depot – post WW2 – lots of trams and a black cat CC4 W2 584 and SW6 958 northbound – Chapel St and Brighton Road CC5 W2 357 – southbound, Chapel St Brighton Road CC6 Pascoe Vale Road, Raceday working – note the signal CC7 The Preston Workshops - The Argus, post WW2, 223, 647 et al CC8 923 or is it 922 being built at Preston – The Argus photo - CC8A 832 being positioned onto trucks at Preston after an overhaul – Argus Photo – see also CC306 CC9 Footscray depot` CC10 W5 797 in St Kilda Road during track works – 1950s CC11 W2 457 at Kew Post Office CC12 Wellington Parade – W2 432, 492 and 337 – special event CC13 Swan St line up of trams – football? Or other special event – Sinclair’s bus on the right side. CC14 W2 630 being washed at a depot – The Argus photo CC15 Royal Park line at Flemington Road – W2 355 and W5 786 CC16 Nicholson St track construction from a tram cab CC17 T181 on tour at Gordon St CC18 T181 on Maribyrnong Bridge CC19 Ditto at River St just off bridge CC20 As for CC18 CC21 At Raleigh Rd CC22 T181 at Footscray depot CC23 Track construction, Nicholson, just north of Gertrude CC24 Commissioning overhead Bourke St tram 988 CC25 Queens Parade – 997 and 994 CC26 Swapping trolley wheel to skid – commissioning CC27 Track construction in Gertrude St CC28 985 in Queens Parade running special CC29 997 in Queens Parade CC30 1033 at North Fitzroy – AETA Special CC31 Bourke St at Elizabeth St – has passengers on board CC32 W6 985, 996 Queens Parade, Mk 3 bus 333 CC33 As above CC34 Showing construction at Nicholson & Gertrude – Bourke St CC35 W2 223 on Burnley temporary bridge – VR track expansion CC36 W5 823 – ditto CC37 Tram on old bridge prior to removal CC38 W2 433 on temporary bridge with new bridge beams and old track CC39 Looking down showing temporary single track – Swan St CC40 Tait train passing under tram bridge CC41 SW6 on single line – off loading CC42 W2 547 at City Road Junction CC43 City Road Jtn – 1969 – 596 and 771 CC44 City Road Jtn – 1969 – 596 and 771 (same as CC45 438 in Flinders St CC46 355 somewhere CC47 552 somewhere CC47A 364 at Preston Workshops? CC48 W2 334 on Traverser – Preston Workshops CC49 Wellington pade – large line up of trams, c1950 925, and 611 CC50 W2 493 Franklin st – advertising for Savings Certificates CC51 Possibly 551 with advertising for fund raising for Blind institute CC52 249 at Hawthorn – Riversdale Junction – with a Tally Ho and Village Fair Aux. board CC53 MMTB Postcard of 511 CC54 Wattle Park terminus with Single line warning sign CC55 Wattle Park Duplication CC56 36 at Domain Junction – 833 CC57 36 at Domain Junction CC58 36 at Domain Junction with 810 and 833 CC59 36 in Swanston by Flinders St Station CC60 36 in Spencer St at A’Beckett CC61 36 crossing Collins St CC62 36 crossing Collins St CC63 36 northbound in St Kilda Road with Shrine in background CC64 36 northbound in Swanston St at Flinders St CC65 Postcard – Ballarat 36 in Domain Road CC66 Postcard - Stampshow – Hawthorn Horse tram CC67 Postcard - Stampshow – Peace cable tram CC68 Postcard - 1041 and cable car set 1 at Preston CC69 Postcard - Colins & Elizabeth – greetings from old Melbourne CC70 Postcard - Cable car set at Preston CC71 Postcard - Twentyman’s cable cars CC72 Postcard - Nu-color-vue – horse tram 256 CC73 Cable car set – Market & Flinders CC74 Cable trams at Twentymans’ in their shed CC75 Cable tram track at Bourke & Spencer prior to removal CC76 Cable tram bogie at Preston Workshops – used as a dolly CC77 Cable trams at Twentymans’ CC78 Postcard - Valentines – Bourke looking west from Swanston CC79 Postcard - Rose 3938 – Bourke at Swanston – the Leviathan building CC80 Postcard - Valentines – Elizabeth St looking south from Collins – No. 19 CC81 Postcard - Rose P4765 – Bourke St Melbourne CC82 Postcard - Rose 4090 – cable tram passing Parliament house CC83 Postcard - Valentines – GPO Elizabeth St CC84 Interior of cable trailer with clothing on a set CC85 Elizabeth St looking north CC86 Cigarette card - Collins St No. 41- WD HO Wills CC87 Postcard - Rialto building with cable set CC88 Postcard - Valentines - Swanston at Flinders looking north CC89 CC90 Q 150 Hanna St – dated on rear CC91 176 turning – photo ex Alan Jungworth CC92 161 on Princes Bridge – minimum fare 4d sign and Inspector CC93 459 at Point Ormond CC94 158 at Gordon St – side on view CC95 X 217 in Swanston St CC96 X 217 in Swanston St with an East Brighton destination CC97 T177 CC98 T177 Peel St – no destination roll – being transferred? CC99 X1 462 in Glenhuntly Road to Point Ormond CC100 X1 462 in Glenhuntly Road to Elsternwick Rly Station CC101 X1 462 in Glenhuntly Road to Point Ormond CC102 Q 150 Hanna St CC103 190 at Camberwell Depot CC104 T182 at Footscray CC105 X1 466 and W2 at Footscray CC106 190 at Camberwell Depot CC107 X1 467 Barkly St Footscray CC108 X2 679 turning into William St from La Trobe St CC109 X2 677 Glenhuntly Road with Point Ormond Destination CC110 Postcard T180 CC111 Postcard format – X1 467 on a truck – see also CC178 CC112 Postcard format – X1 467 at Wantirna South CC113 Q200 and SW6 896 at Thornbury – has labels on rear CC114 T177, Ballarat Road – has labels on rear CC115 T178 at Point Ormond CC116 Postcard X1 465 and 466 CC117 Postcard – X2 676 CC118 Postcard – TMSV X2 217 CC119 810 on temporary bridging – 24-12-67 CC120 W2 575 – Queens Parade junction in, still temporary bridging, substation under construction CC121 Forming Queens Parade Junction base slab CC122 W2 596 prior to tramway works – all tracks still in position CC123 It’s a mass of reinforcing – bridging being formed CC124 Looking north with substation being built CC125 Looking east with some rather tight curves, Wellington St still in use CC126 SW6 958 ex Wellington St with all tracks and signal box and buildings. CC127 Victoria Pde at Gisborne looking east – at least 4 cars CC128 SW6 893? With dash canopy lights and SW6 862 and a man with a newspaper CC129 SW6 894 on the S curves, with tram in Wellington St CC130 Similar photo CC131 W2 564 turning into Wellington St – the concrete tracks are not that old CC132 W2 552 running out of Wellington St CC133 W5 732 from Fitzroy St into St Kilda Road with next iteration in position – very wonky CC134 W5 764 turning into Fitzroy St CC135 SW6 947 turning from Wellington St CC136 W2 586 running out of High St CC137 W2 500 turning into Wellington St CC138 W2 543 in Wellington St inbound CC139 L103 with St Kilda Junction destination, and a tower truck on right CC140 Workmen – new track in Queensway in use CC141 Ditto CC142 L103 in Queensway, and another car in bound CC143 Looking east along Wellington St which has been taken out of use. Also a MMTB Roller CC144 W5 824 and a W2 and all types of wobbly temporary track CC145 W2 354 to High St CC146 Sw6 947 on the S bends CC147 W2 500 looking north – tram on the S bends CC148 SW6 896 leaving the S bend CC149 W2 357 and a MMTB City bus with trees/gardens on the side CC150 W5 817 Elliot Ave – see also CC302 CC151 W2 552 – note the large trolley bridge CC152 W2 550 at depot or workshops CC153 1B truck CC154 SW2 432 CC155 W2 155 at Glenhuntly CC156 SW6 937 on AETA tour? CC157 X2 677 on Footscray service – Ballarat Rd? CC158 W2 641 – High St Kew? CC159 SW6 847 – Power St Hawthorn CC160 Simpson St – big line up CC161 W2 546 truck No. 1? CC162 W2s at Glenhuntly depot CC163 No. 15 truck under 899 CC164 206 and other junk at Preston Workshops CC165 W in Swanston St Melbourne – Rose series card CC166 Y1 613 Batman Ave?? or William St at Collins CC167 Tram plans CC168 X 217 Swanston St – see also 95 and 96 CC169 217 in Swanston St – same as 95 CC169A 192 in St Kilda Road at Princes bridge CC170 192 in St Kilda Road at Princes bridge CC171 Bendigo 3 arriving Malvern depot – being unloaded CC172 Ditto CC173 T180 at a depot CC174 X1 463 wheel set CC175 C30 – dog car side view – close up CC176 C30 dog car CC177 206 and 30 at Preston Workshops CC178 X1 467 on a truck – see CC111 also CC179 42 CC180 42 at a depot, no destination box CC181 W2 556 1A type truck CC182 Flinders St Station – Rose Series CC183 W7 1035 Spring – Nicholson St CC184 W7 1022 MMTB Post Card CC185 Adelaide 178 – has on rear – R. Lilburn 4/82 CC186 Adelaide 175 – has on rear – R. Lilburn 4/82 CC187 Y1 610 on AETA tour CC188 Y1 610 on AETA tour with large group – Point Ormond CC189 AETA display – has GH55-32 in pencil on rear CC190 AETA display – has GH55-29 in pencil on rear CC191 Y1 610 on AETA tour with large group – Point Ormond CC192 VR 53 at Footscray CC193 VR cars 40 and 34 at Elwood wash dock CC194 W7 1024 as the 1970 Christmas tram CC195 Geelong – loading a set of 22E trucks CC196 Geelong 10 and 23 running an AETA special CC197 Geelong – AETA special CC198 Geelong 7 at Junction CC199 Geelong 10, in the city CC200 Geelong 33 with Belmont destination CC201 Geelong 15 Eastern Park destination 29-3-1948 CC202 Geelong 23 at Railway Station – 29-3-1948 CC203 Geelong 23 at Railway Station – 29-3-1948 CC204 Geelong – loading a bogie tram CC205 Geelong – loading a bogie tram CC206 Geelong 40 – loaded on truck CC207 Geelong 40 – on jacks CC208 Geelong 40 on jacks – 19 behind CC209 Geelong 38 with two workers on either side CC210 – 214 Australian Historic Tramways stamp folder and set CC215 Bendigo 17 at depot – has dup JBS on rear CC216 Bendigo 20, 29 bogie and straight sill car at Charing Cross CC217 Bendigo one man bogie Pall Mall CC218 Bendigo – Bogie 23, other cars and welding truck at depot CC219 Bendigo 7 with Quarry Hill destination CC220 Bendigo 21 with Lake Weerona destination CC221 ESCo 18 Ballarat CC222 Ballarat bogie 22 on AETA special CC223 Ditto CC224 Ballarat 34 at Stones Corner – R Lilburn CC225 Ballarat 15 in Bridge St – R Lilburn CC226 Ballarat 40 at Gardens – R Lilburn CC227 Ballarat 37 running out of depot – R Lilburn CC228 Postcard – Valentines – Sturt St with loaded horse tram trailer CC229 AETA Geelong tram tour ticket – 29-3-1948 CC230 Postcard – Geelong – Valentine 2114 – T&G building CC231 Postcard – PMTT ! – High St Malvern CC232 Postcard – Empire – Glenferrie Road, Malvern at Wattletree Rd CC233 Postcard Y469, MMTB CC234 Postcard Z2 Spring St CC235 Postcard – Z1 MMTB CC236 Postcard – Stamp Show W1 431 CC237 Postcard – Stamp show B2005 CC238 Postcard – Stamp show W6 982 CC239 Postcard – Valentines 1264 – Johnstone Park with tram in distance CC240 Postcard – Rose 10711 – Swanston and Lonsdale – Hospital and W232 CC241 Postcard – Rose 4827 – Fitzroy St St Kilda W2 362 and 548 CC242 Postcard – Valentines – 939 – St Kilda War Memorial, W and a R? CC243 Postcard – Valentines – 572 – St Kilda War Memorial, W 413 and 140? CC244 Postcard – Valentines – 938 – Uper and Lower Esplanade – L 104 CC245 Postcard – St Kilda Rd at Princes Bridge Y1 and W CC246 Postcard – Biscay BG82 – W5 814 - CC247 Postcard – Biscay 796112 – Bourke St looking west CC248 Postcard – Biscay 796109 – Bourke St looking east CC249 Postcard – Biscay 2AUS58 – Z5 Bourke St CC250 Postcard – Biscay BG 249 – Swanston St CC251 Postcard – National View – St Kilda Rd – shrine and Prince Henrys W2 405 CC252 Postcard – Nu color vue – 11 ML 156 – St Kilda Rd CC253 Postcard – Nu color vue – 11 ML 153 – Swanston St CC254 Postcard – Nu Color vue – Collins St 442 CC255 Postcard – Pitt card – Adelaide – H 364 at Victoria St CC256 Postcard – SPER L/P 154 CC257 Postcard – BTMS – 550 CC258 Postcard – SPER – Brisbane 295 CC259 Adelaide 131 at Burnside – has R Lilburn on card, c1911 CC260 Adelaide 194 CC261 Adelaide 235, with two crew, The News photo CC262 Rockhampton, outside post office – has source of photo details CC263 Sydney – 2086 and 2062 arriving Circular Quay CC264 Sydney – P class – Pitt St? CC265 Sydney – 1610 at Circular Quay CC266 Brisbane 99 and 468 CC267 Sydney with bridge behind CC268 Steam tram Paramatta Park – 103 CC269 Sydney – Museum Station =- Elizabeth St CC270 Sydney – weed burner 137S at a loop Demonstrates the work of Charles Craig in photography and collection of prints.Assembled album in a black presentation folder of 270 photographs from the Charles Craig Collection - 86 sleeves - part 1 of 2. All photographs have been scanned and placed on the Museum's G drive. A list of all photographs with details where possible has been compiled. Victorian Provincial, Launceston, Hobart and Sydney tram photos have been transferred to other Museums, image files retained.melbourne, tramways, tramcars, trams, charles craig, st kilda junction, trackworks -
 Flagstaff Hill Maritime Museum and Village
Gun Emplacement, 1890's
The Warrnambool Battery on Flagstaff Hill has embankments for 3 guns. Those on the left and right still have cannon in place but in the centre is an empty embankment, apart from this concrete ring with metal threaded studs. In 1898 a 5 inch breech loading gun (BL) was installed here. The gun had a hydro-pneumatic disappearing carriage (hence the sign on the concrete wall "5" BL HP").. This type of gun was faster to load and fire that the 80 pound RML’s installed on either side of it. Its arrival spelt the end of the 80 pound RML guns’ useful life, although they continued to be used for practice sessions. The 5 inch BL was the main defensive weapon of the Warrnambool Battery until the Battery was downgraded in importance. It was removed in 1904 and recalled to Melbourne in 1910. The gun emplacement ring is all that remains of the mounting for a 5 inch Armstrong rifled breech loading gun. HISTOR of the WARRNAMBOOL GUNS & CANNON In the years following the Crimean War (1854-1857J) there was a great concern in the Colony that Imperial Russia would attempt an invasion. Coastal defences in the colony of Victoria were greatly strengthened by the Government as a result. Warrnambool was originally protected by cannons at Cannon Hill, approximately 1 kilometer west of the Flagstaff Hill Fortifications. The cannons included two 1866 guns, both 80 Pound Rifled Muzzle Loaders (RML) purchased by Victoria’s Colonial Government. They were part of a shipment of 26 such guns sent from England in December 1866. They are registered as No. 23 (80cwt-2qr-0lbs) - Gun 1, and No.13 (81cwt-1qr-12lbs) - Gun 2. They were cast at the Royal Gun Factory, Woolwich Arsenal, in 1866 and have a 6.3 inch bore. Both barrels carry the Royal Cypher of Queen Victoria, Insignia of the Royal Engineers, within the Garter and Motto surmounted by the Crown, with the Royal Cypher of Queen Victoria within the Garter (letters in centre “VR”, motto “HONI SOIT QUI MAL Y PENSE”, "Shame be to him who thinks evil of it."). The guns were originally supplied with wooden carriages. (The Royal Arsenal at Woolwich, England, was established eleven years after the Restoration of King Charles II. It was the principal supplier of armaments to the British and Empire Governments. At the height of its operations during World War One the factory covered 1300 acres and employed very nearly 80,000 workers. Woolwich was the Headquarters of the Royal Artillery since the raising of that Regiment in 1716. The Arsenal was closed in the late 1960’s.) These two 80pdr cannons were transferred to the Warrnambool Garrison Artillery Battery Fortifications erected at Flagstaff Hill in 1887 as part of Victoria’s Coastal Defences. The original wooden carriages were subsequently replaced with the present iron garrison carriages in 1888. They are a “C” pivot. The ‘racers’ or curved track set into the floor of the gun emplacement (which enabled the guns to be traversed more quickly) are as specified for guns up to 10 inch, being of wrought iron 2.78 inches wide. A temporary third gun, now no longer on Flagstaff Hill’s site, was the 5 inch Rifled Breech Loading (BL) Armstrong gun mounted on an Elswick hydro pneumatic disappearing carriage and installed in this very concrete base or pad. The State of Victoria took over the ownership of the guns at the time of Australian Federation in 1901. In about 1901/1902 the Garrison Battery was converted to the Warrnambool Battery of the Australian Field Artillery (No 4 Field Battery). It was equipped with 4.7 inch naval guns mounted on field carriages. They were now a mobile unit but continued to use the Warrnambool Garrison area at Flagstaff Hill for practice. When the Fortifications were declared obsolete the two 80 Pounder RML were relocated to Cannon Hill in 1910. On the outbreak of World War One the 4.7 inch guns were recalled to Melbourne, and the Battery was disbanded. Most of the personnel probably re-enlisted in the local 4th Australian Light Horse Regiment. The two 80 Pounder RML were moved back to the Fortifications in 1973. They were both fully restored by Army First Year Apprentices at the Ordinance Factory in Bendigo in time for the centenary year of the fortifications in 1987. The guns are capable of firing 80 pound (32.3kg) armour piercing exploding shells 3.65kms out to sea. They were originally manned by volunteers before a paid Garrison was established. Now the Guns are again fired by volunteers on Special Event days. Since restoration the Gun Number 1 had been fired on a regular basis but Gun Number 2 hadn’t been fired since the mid 1990’s. In April 2015 Gun Number 2 was serviced in preparation for the firing of both cannons on the ANZAC Centenary commemorations on April 25th 2015. Other guns from the original Cannon Hill location were obsolete by the time the 1887 Warrnambool Garrison Artillery Battery was built. These guns are (1) a 32 Pounder Muzzle Loading Smooth Bore (SB) cast in 1813 at the famous Carron Foundry, number 80837 and now located in the Warrnambool Botanic Gardens. It is now mounted on a replica carriage due to the original carriage being in a fragile condition (the original carriage stored under cover at Flagstaff Hill). (2) a 68 Pounder Muzzle Loading Smooth Bore cast in 1861 at the equally august Low Moor Foundry, number 10310 and now located on the lawn area at the entrance to Flagstaff Hill Maritime Village. It is still mounted on its original wooden garrison carriage. Its wooden slide compressor mechanism is fragile and now kept in Flagstaff Hill’s storage. There are only seven 32 Pounder SB made by Carron and fifteen 68 Pounder SB made at Low Moor known to exist in the State of Victoria [references; Flagstaff Hill Maritime Village interpretation boards, information sheets and other documents; South Western Victoria Guns and Cannon report, May 2008, ref W/F/08] The Gun embankment is contained within the heritage listed Lady Bay Lighthouse Comples, on the Victorian Heritage Register VHR H1520. The gun emplacement base is evidence of the last defences installed on this stretch of coastline. The Warrnambool Garrison has been added to the Victorian Heritage Register H1250 “for its intact battery and guns, a strong reminder of Victoria’s wealth and determination to protect itself from the perceived threat of invasion in the 1880’s.” The City of Warrnambool is one of several custodians of a collection of artillery pieces of heritage significance at a state, national and international level. These pieces are directly related to the defence of south-west Victoria in the 19th century. The care and preservation come under the Heritage Act 1995. Gun emplacement; the remains of the mounting platform of a temporary third gun installed in 1898 in the centre of the battery. This consists of a circular concrete well or sump surrounded by two rings of mounting bolts, the inner of 10 and the outer of 20. The base once held a 5 inch Armstrong rifled breech loading gun with hydro-pneumatic disappearing. In the centre of the ring on the ground is a keyhole shaped space. The gun was removed in 1904. flagstaff hill, warrnambool, shipwrecked coast, flagstaff hill maritime museum, maritime museum, shipwreck coast, flagstaff hill maritime village, great ocean road, colonial defences, victoria’s coastal defences, warrnambool fortification, warrnambool garrison battery, warrnambool volunteer corps, ordinance, armaments, cannon hill fortifications, flagstaff hill fortifications, 4th australian light horse regiment, garrison gun, 5 inch breech loading gun, emplacement for hydro-pneumatic disappearing carriage, gun emplacement -
 Flagstaff Hill Maritime Museum and Village
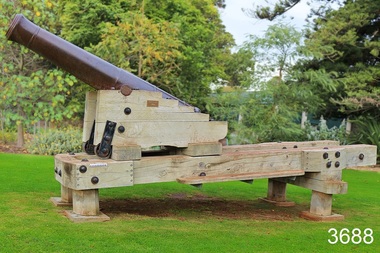
Weapon - Cannon, 1813
This 1813 cannon is classified as a carronade, having been made by the Carron Ironworks foundry in Stirling, Scotland in 1813. It is a large calibre, short range, gun mainly used on ships. The carronade model of cannon was first used when introduced into the British Royal Navy in the American War of the Revolution (1775-1883). This cannon was originally a 28pdr, 48cwt, 8ft gun. The date ‘1837’ on the barrel probably indicates the date that the Board of Ordinance accepted the change in size to a 32pdr. It may originally have been a naval gun and the conversion undertaken when it was brought ashore. It is very probably one of the 15 guns that are known to have constituted the defences of Victoria in 1860. This group of 32pdrs was the shorter model of the 4800width and 8ft length cannon and as such are different from the 32pdrs found in NSW. It was originally located on Cannon Hill in Warrnambool when it was the site of the Warrnambool Battery Western Artillery, formed in 1866. It was obsolete by the time of the 1887 fortifications, and was moved from the Warrnambool Fortifications to the Botanic Gardens in 1910, when the Fortifications were declared obsolete. HISTORIC INFORMATION ABOUT THE CANNON IN THE WARRNAMBOOL AREA In the years following the Crimean War (1854-1857J) there was a great concern in the Colony that Imperial Russia would attempt an invasion. Coastal defences in the colony of Victoria were greatly strengthened by the Government as a result. Warrnambool was originally protected by cannons at Cannon Hill, approximately 1 kilometer west of the Flagstaff Hill Fortifications. The cannons included two 1866 guns, both 80 Pound Rifled Muzzle Loaders (RML) purchased by Victoria’s Colonial Government. They were part of a shipment of 26 such guns sent from England in December 1866. They are registered as No. 23 (80cwt-2qr-0lbs) - Gun 1, and No.13 (81cwt-1qr-12lbs) - Gun 2. They were cast at the Royal Gun Factory, Woolwich Arsenal, in 1866 and have a 6.3 inch bore. Both barrels carry the Royal Cypher of Queen Victoria, Insignia of the Royal Engineers, within the Garter and Motto surmounted by the Crown, with the Royal Cypher of Queen Victoria within the Garter (letters in centre “VR”, motto “HONI SOIT QUI MAL Y PENSE”, "Shame be to him who thinks evil of it."). The guns were originally supplied with wooden carriages. (The Royal Arsenal at Woolwich, England, was established eleven years after the Restoration of King Charles II. It was the principal supplier of armaments to the British and Empire Governments. At the height of its operations during World War One the factory covered 1300 acres and employed very nearly 80,000 workers. Woolwich was the Headquarters of the Royal Artillery since the raising of that Regiment in 1716. The Arsenal was closed in the late 1960’s.) The two 80pdr cannons were transferred to the Warrnambool Garrison Artillery Battery Fortifications erected at Flagstaff Hill in 1887 as part of Victoria’s Coastal Defences. The original wooden carriages were subsequently replaced with the present iron garrison carriages in 1888. They are a “C” pivot. The ‘racers’ or curved track set into the floor of the gun emplacement (which enabled the guns to be traversed more quickly) are as specified for guns up to 10 inch, being of wrought iron 2.78 inches wide. A temporary third gun, now no longer on Flagstaff Hill’s site, was a 5 inch Rifled Breech Loading (BL) Armstrong gun mounted on an Elswick hydro pneumatic disappearing carriage It was faster to load and fire than the 80 pound RMLs and its arrival spelt the end of the older 80 pound guns’ useful life, apart from being used for practice sessions. The 5 inch BL gun was the main defensive weapon of the Warrnambool Battery until the Battery was downgraded in importance and the gun was recalled to Melbourne in 1910. The gun emplacement still remains in place set between the 2 80pdr cannon. The State of Victoria took over the ownership of the guns at the time of Australian Federation in 1901. In about 1901/1902 the Garrison Battery was converted to the Warrnambool Battery of the Australian Field Artillery (No 4 Field Battery). It was equipped with 4.7 inch naval guns mounted on field carriages. They were now a mobile unit but continued to use the Warrnambool Garrison area at Flagstaff Hill for practice. When the Fortifications were declared obsolete the two 80 Pounder RML were relocated to Cannon Hill in 1910. On the outbreak of World War 1 the 4.7 inch guns were recalled to Melbourne, and the Battery was disbanded. Most of the personnel probably re-enlisted in the local 4th Australian Light Horse Regiment. The two 80 Pounder RML were moved back to the Fortifications in 1973. They were both fully restored by Army First Year Apprentices at the Ordinance Factory in Bendigo in time for the centenary year of the fortifications in 1987. The guns are capable of firing 80 pound (32.3kg) armour piercing exploding shells 3.65kms out to sea. They were original manned by volunteers before a paid Garrison was established. Now the Guns are again fired by volunteers on Special Event days. Since restoration the Gun Number 1 had been fired on a regular basis but Gun Number 2 hadn’t been fired since the mid 1990’s. In April 2015 Gun Number 2 was serviced in preparation for the firing of both cannons on the ANZAC Centenary commemorations on April 25th 2015. Other guns from the original Cannon Hill location were obsolete by the time the 1887 Warrnambool Garrison Artillery Battery was built. These guns are (1) a 32 Pounder Muzzle Loading Smooth Bore (SB) cast in 1813 at the famous Carron Foundry, number 80837 and now located in the Warrnambool Botanic Gardens. It is now mounted on a replica carriage due to the original carriage being in a fragile condition (the original carriage stored under cover at Flagstaff Hill). (2) a 68 Pounder Muzzle Loading Smooth Bore cast in 1861 at the equally august Low Moor Foundry, number 10310 and now located on the lawn area at the entrance to Flagstaff Hill Maritime Village. It is still mounted on its original wooden garrison carriage. Its wooden slide compressor mechanism is fragile and now kept in Flagstaff Hill’s storage. There are only seven 32 Pounder SB made by Carron and fifteen 68 Pounder SB made at Low Moor known to exist in the State of Victoria Plaque attached to the carriage “This replica carriage was constructed by the Warrnambool Tritan Woodworkers club in conjunction with the generosity of local businesses and the Warrnambool community. The original carriage (circa 1860) was removed for restoration and is now located at Flagstaff Hill Maritime Village. The timber used for the replica carriage is Monterey Cypress, which was an early planting in the gardens. 2010 marked the centenary of the cannon’s relocation in the Warrnambool Botanic Gardens.” (Reference; Victorian Guns and Cannons, South Western Victoria Assessment, May 2008, item W/B/01; Flagstaff Hill Maritime Village datasheets and archives). There are only seven 32 Pounder SB made by Carron known to exist in the State of Victoria and this is one of them. On a world level, this cannon represents a high level of rarity. Further, as it has been modified (bored up) it is representative of the historical process of amending artillery in order to ensure a longer usefulness of each piece despite rapidly advancing artillery technology. The number of surviving carriages with traversing slides in this group in South Western Victoria is unique in Australia and probably in the World. Out of 10 such platforms surviving in Australia, the South Western Victorian group has half. Several survive around the world but probably not in such a large group. The wooden sliding compressor mechanism belonging to this cannon is extremely rare, and the only one in this South Western Victorian group of Guns and Cannons. As a whole, this cannon has undergone very little restoration or modification, giving it a high level of integrity. The City of Warrnambool is one of several custodians of a collection of artillery pieces of heritage significance at a state, national and international level. These pieces are directly related to the defence of south-west Victoria in the 19th century. The care and preservation come under the Heritage Act 1995. (Reference; Victorian Guns and Cannons, South Western Victoria Assessment, May 2008).Cannon, or carronade, 32pdr with wheels. Muzzle loading smooth bore (SB) cannon. Cannon has original wooden Burmese Teak carriage and slide with wrought iron fittings and iron wheels. Manufactured by Carron in Scotland, in 1813. It has been converted from a 28pdr. There is a loop for a rope on the cascabel, which was part of the original casting. Re-bored in 1837. Marks include Serial Number, Royal Cypher of King George III, broad arrow of proofing, and numbers to represent the weight. NOTE: The cannon is displayed in the Warrnambool Botanic Gardens and is mounted on a replica wooden carriage; the original wooden carriage is now stored under cover at Flagstaff Hill Maritime Village. This carriage has 4 wheels on swivel attachments and a central gear that allows the wheels to turn on rails. Pressed into left trunnion “80837 / CARRON / 1813”, cast on barrel“symbol (Royal Cypher of King George III”, “symbol (broad arrow of proofing)” and numbers “45-3-24 / 1837” . Cascable “CV” and marks with gradations from nought to three in quarters on each side, On the carriage the end of one of the main slide members carries the mark “W symbol (broad arrow) D” incised into the timber. Plaque attached to the carriage by the Warrnambool Tritan Woodworkers club, 2010, marking the centenary of the cannon’s relocation in the Warrnambool Botanic Gardens and the addition of the replica carriage. flagstaff hill, warrnambool, shipwrecked coast, flagstaff hill maritime museum, maritime museum, shipwreck coast, flagstaff hill maritime village, great ocean road, victoria’s coastal defences, warrnambool fortification, warrnambool garrison battery, ordinance, armaments, cannon hill fortifications, victorian colonial government, carron ironwroks foundary, 32pdr smooth bore cannon, 28pdr smooth bore cannon, 1813 cannon, carronade -
 Kiewa Valley Historical Society
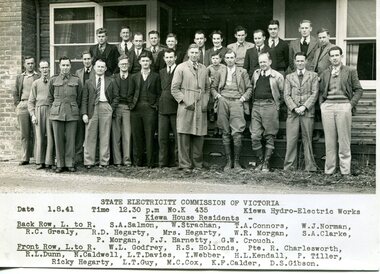
Photographs – Set of 10 black and white photographs and photocopies of original photographs documenting early residents of Bogong Village
Bogong Village, which was known as “The Junction”, is well recorded. The first tent camp was at the junction of Pretty Valley and Rocky Valley streams in the early 40’s. Further downstream were the sawmill, stables and blacksmith’s forge. Horses were the main mode of transport in the early days. The road to Bogong had reached the lookout spur just beyond Roper’s Spur track just before the 1939 fires. The early forties saw rapid growth of the village, with single and married men’s quarters, workshops, mess huts and administrative offices. The facilities necessary for communal living were quickly in place- a post office, police station, co-op store, medical centre, community hall/theatre, tennis courts and school. Much of the temporary accommodation that housed groups such as the Albion Quarrying Company were in the area now under water.This group of photographs are a pictorial record of the early history of the Kiewa Hydro Scheme, the people who worked in the background supplying administrative support and the workers and their families. It also shows a glimpse into how a large group of people from very diverse backgrounds came together to enjoy social activities and share each others companyGroup of 10 black and white photographs and photocopies of original photographs of varying sizes (some official SECV photos) Some Photos are labelled with the date and the names of SECV staff members. Depicting early life at Bogong Village 1. Group photo – Kiewa House Residents 1.8.41 (SECV official photo) 2. Female staff residents 3. Female office staff 4. Kitchen staff – Junction Mess (SECV official photo) 5. Male administration staff Bogong 6. Bogong Social Club fancy dress ball, 1940 7. Wives and children of SECV workers 8. Children in fancy dress 9. Opening of Volunteer Air Observers post 1943 10. Flag raising at opening of Volunteer Air Observers post 1. Printed under photo: STATE ELECTRICITY COMMISSION OF VICTORIA Date: 1.8.41 Time: 12.30pm No:K 435 Kiewa Hydro-Electric Works. Kiewa House Residents Back Row L to R: S.A. Salmon, W. Strachn, T.A Connors, W.J Norman, R.C Grealey, R.D Hegarty, Mrs Hegarty, W.R Morgan, S.A Clarke, P. Morgan, P.J. Harnetty, G.W Crouch. Front Row L to R: W.L Godfrey, R.S Hollands, Pte. R Charlesworth, R.L Dunn, N Caldwell, L.T Davies, I Webber, H.L Kendall, P Tiller, Ricky Hegarty, L.T Guy, M.C Cox, K.F Calder, D.S Gibson 2. Printed on bottom: Staff who lived at Kiewa House and worked in the Administration Office c 1943 Handwritten at bottom Priscilla Johnson (nee Reid) At top of page A GOOD LIFE: WOMEN’S RECOLLECTIONS OF LIFE IN THE UPPER KIEWA VALLEY 3. Printed under photo- Office Staff – Bogong 4. Printed under photo: STATE ELECTRICITY COMMISSION OF VICTORIA Date: 18.5.40 Time: 11.05am No:K 103. Kiewa Hydro-Electric Works. Kitchen Staff- Junction Mess. Opening night of the new staff mess Bogong. 5. Printed under photo -Administration staff Bogong 6. Printed under photo- The social club raised money for patriotic fund from fancy dress nights. (1st Fancy Dress Ball, Bogong 1940) 7. Printed above photo: ---- and family life begins (1942 Bogong) 8. Printed under photo: A favourite photograph 9. Printed under photo: STATE ELECTRICITY COMMISSION OF VICTORIA Date: 24.5.43 Time: 2.8pm No:K 1151 Kiewa Hydro-Electric Works. Bogong- Squadron Leader Leggett speaking at opening of Air Observer’s Post 10. Printed under photo: Raising the flag at the opening of the Volunteer Air Observer’s Post at Bogong - 1943 bogong village; kiewa hydro electric scheme; social activities; community clubs -
 Kiewa Valley Historical Society
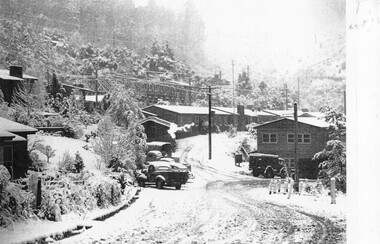
Photographs – Set of 9 black and white photographs and photocopies of original photographs depicting the early days of Bogong Village during the 1940’s, circa 1940's
Bogong Village, which was known as “The Junction”, is well recorded. The first tent camp was at the junction of Pretty Valley and Rocky Valley streams in the early 40’s. Further downstream were the sawmill, stables and blacksmith’s forge. Horses were the main mode of transport in the early days. The road to Bogong had reached the lookout spur just beyond Roper’s Spur track just before the 1939 fires. The early forties saw rapid growth of the village, with single and married men’s quarters, workshops, mess huts and administrative offices. The facilities necessary for communal living were quickly in place- a post office, police station, co-op store, medical centre, community hall/theatre, tennis courts and school. Much of the temporary accommodation that housed groups such as the Albion Quarrying Company were in the area now under water.Pictorial history of the early years of Bogong Village including one photo taken following the devastating fires of 1939. Photos show the terrain in which Bogong Village was built, the early construction used for the temporary buildings and the housing and the amount of infrastructure required to accommodate the needs of the residents of the area including workers, their families and other support staff. Set of 9 black and white photographs and photocopies of photographs depicting early buildings at Bogong Village . Photos show very early construction buildings as well as the village in various weather conditions, including snowing and after bush fires. (some official SECV photographs) 1. Bogong Village in heavy snow 2. Bogong Township during heavy snow (SECV Official Photo) 3. VIP Lodge at Bogong in the snow 4. Bogong Village - circa 1940’s 5. Bogong Village under street lights 6. Lewis Construction Camp (SECV Official Photo) 7. Albion Quarrying Co. Camp (SECV Official Photo) 8. Tent camp and early buildings following 1939 fires 9. Typical house – Bogong Village 1. Handwritten under photo – August 1948 2. Printed under photo: STATE ELECTRICITY COMMISSION OF VICTORIA Date: 25.8.48 Time: 9am No:K 4680 Kiewa Hydro-Electric Works. Bogong Township 3. Handwritten on back of photo- V.I.P. Lodge, Bogong 4 – 5. No markings 6. Printed under photo: STATE ELECTRICITY COMMISSION OF VICTORIA Date: 28.11.40 Time: 1.40pm No:K284 Kiewa Hydro-Electric Works. Lewis Construction Camp 7. Printed under photo: STATE ELECTRICITY COMMISSION OF VICTORIA Date: 11.1.41 Time: 10.40am No:K294 Kiewa Hydro-Electric Works. Albion Quarrying Co. Camp – Bogong. Handwritten on back of photo: On the floor of the present dam 8. No markings 9. Printed under photo: STATE ELECTRICITY COMMISSION OF VICTORIA Date: 11.1.46 Time: 1.23pm No:K2181 Kiewa Hydro-Electric Works. Bogong – Typical House bogong village; 1939 fires; kiewa hydro electric scheme; -
 Port of Echuca
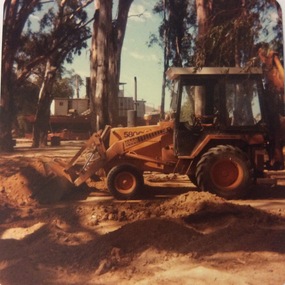
Coloured Photograph, 04/03/1984
The P.S Adelaide was launched on 21st July 1866. It was owned by J.G.Grassie from Poon Boon Station and the Officer Family of Murray Downs Station Swan Hill. The Adelaide was named after the niece of the Officer Bros, Adelaide Blackwood. The shipwright who built her was George Linklater. The Adelaide brought wool and passengers from the wool stations on the Murray and Darling Rivers down to the Echuca Wharf. In 1872 she was sold to David Blair & Sons. She was used to bring timber from the Barmah Forest to the Echuca Wharf. She did this work for the next 80 years. In 1953 she was tied up near the Mill and left. In 1958 she went to Paringa South Australia to work in the sawmill industry again. In 1960 the Echuca Apex Club and The Echuca Historical Society raised enough funds to buy the P.S. Adelaide and return her to Echuca. In November 1963 she was lifted out of the water and placed in Hopwood Gardens as this was thought to be a way of preserving her. In 1984 it was decided to return her to the water to resume work as a passenger vessel. In that time the Port of Echuca and the Echuca Wharf had been restored as a Tourist Precinct. This photograph shows the beginning of the task to return her to the river. It took several weeks in March 1984.The P.S Adelaide is extremely significant as it it the oldest known wooden hulled paddle steamers in the world. She was built in Echuca in 1866 and still operates on the Murray River today. She has worked in the Wool Industry, the Timber Industry and the Tourist Industry.This is a coloured square photograph of an orange front end loader clearing a track from Hopwood Gardens down to the river. The track was used to bring the P.S Adelaide from the gardens back into the river. The P.S Adelaide is in the background. The paddle steamer appears to be up on a trailer of some sort and is surrounded but plastic orange temporary fencing. There are small mounds of soil in the foreground.On the orange front end loader are the numbers "5900" and the word "case." p.s. adelaide, grassie, j.g, port of echuca, linklater, george, poon boon station, blair, david, murray river, darling river, logging industry, officer brothers., barmah forest, fulton & shaw, hutchinson, kevin, murray downs station, blackwood, adelaide -
 Flagstaff Hill Maritime Museum and Village
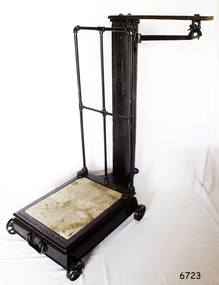
Functional object - Platform Scales
Thaddeus Fairbanks (1796 –1886) was an American inventor. of heating and cook stoves, cast iron ploughs, and other items. His greatest success was the invention and manufacture of the platform scale, which allowed the weighing of large objects accurately. Fairbanks was born in Brimfield, Massachusetts, on January 17, 1796, the son of Joseph Fairbanks (1763–1846) and Phebe (Paddock) Fairbanks (1760–1853). His uncle was Ephraim Paddock, the brother of Phebe Paddock. In 1815 he moved to St. Johnsbury, Vermont, and set up a wheelwright's shop above his father's gristmill. In 1820 he married Lucy Peck Barker and In 1824 he built an iron foundry. his brother Erastus joined him to establish E. and T. Fairbanks, a partnership to manufacture heating stoves, cast iron ploughs a design for which he patented in 1826. In 1830 Fairbanks and Erastus became interested in the raising and processing of hemp. Fairbanks went on to patent a hemp and flax dressing machine and became the manager of the St. Johnsbury Hemp Company. He also built a set of scales that would measure large loads of hemp accurately, as there were no reliable scales at the time. Upon the success of building these scales, his brothers recommended that he make and sell these for general use. Fairbanks' most famous invention then became the platform scale for weighing heavy objects. These are commonly known as the Fairbanks Scales, for which he patented his original design in 1830. Before this time, accurate weighing of objects required hanging them from a balancing beam as a result, particularly heavy or ungainly objects could not be weighed accurately. A platform scale, if large enough, could weigh an entire wagon. By placing a full wagon on the scale, unloading it, and then placing it on the scale when empty, it became possible to easily and accurately calculate the weight and value of farm produce and other loads. In 1834 Fairbanks and his brother formed "E. and T. Fairbanks and Company" to manufacture and sell these platform scales. These scales were well known in the United States and around the world resulting in the company doubling in volume every three years from 1842 to 1857. There was a temporary slow down during the American Civil War, however, the business took off again after the war. Their partnership was incorporated in 1874 into a firm known as "Fairbanks Scale Company". These platform scales revolutionized weighing methods of large loads and have been in use ever since. Portable platform scales are found in almost every hardware store, physician's office, and manufacturing factory throughout the United States and the world. The first railway track platform scale patent was granted to Fairbanks on January 13, 1857, as Patent No. 16,381. In 1916 the company was purchased by ”Fairbanks, Morse and Company”. Ownership of the company has since changed several times, but Fairbanks Scales continue to be made in St. Johnsbury Vermont to this day. Fairbanks had received 43 patents in his lifetime with the last one at the age of 91. He died on April 12, 1886, and is buried at St. Johnsbury, Vermont, at the Mount Pleasant Cemetery. An early example of the first type of platform scale that revolutionised the weighing of goods throughout the world made in the USA around the turn of the 19th century. Commercially built platform scale on wheels. Cast iron base supports iron weighing platform with wooden floor. At back, square hollow wooden post supports a hooded rod which bears the weight of the platform and which hooks onto a brass balancing arm, marked in pounds up to 50. There is a cylindrical sliding weight and on the end a loop for a metal weight holder. The holder is designed for three circular pieces of metal with a slit to the centre. The weights used are 50, 100 and 200 lbs.Embossed to base Fairbanks Patent No 11 1/2, flagstaff hill, warrnambool, shipwrecked-coast, flagstaff-hill, flagstaff-hill-maritime-museum, maritime-museum, shipwreck-coast, flagstaff-hill-maritime-village, platform scales -
 Flagstaff Hill Maritime Museum and Village
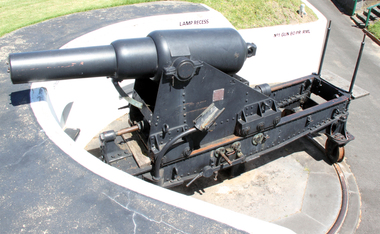
Weapon - Cannon, 1866
In the years following the Crimean War (1854-1857J) there was a great concern in the Colony that Imperial Russia would attempt an invasion. Coastal defences in the colony of Victoria were greatly strengthened by the Government as a result. Warrnambool was originally protected by cannons at Cannon Hill, approximately 1 kilometer west of the Flagstaff Hill Fortifications. These cannons included two 1866 guns, both 80 Pound Rifled Muzzle Loaders (RML) purchased by Victoria’s Colonial Government. They were part of a shipment of 26 such guns sent from England in December 1866. They are registered as No. 23 (80cwt-2qr-0lbs) - Gun 1, and No.13 (81cwt-1qr-12lbs) - Gun 2. They were cast at the Royal Gun Factory, Woolwich Arsenal, in 1866 and have a 6.3 inch bore. Both barrels carry the Royal Cypher of Queen Victoria, Insignia of the Royal Engineers, within the Garter and Motto surmounted by the Crown, with the Royal Cypher of Queen Victoria within the Garter (letters in centre “VR”, motto “HONI SOIT QUI MAL Y PENSE”, "Shame be to him who thinks evil of it."). The guns were originally supplied with wooden carriages. (The Royal Arsenal at Woolwich, England, was established eleven years after the Restoration of King Charles II. It was the principal supplier of armaments to the British and Empire Governments. At the height of its operations during World War One the factory covered 1300 acres and employed very nearly 80,000 workers. Woolwich was the Headquarters of the Royal Artillery since the raising of that Regiment in 1716. The Arsenal was closed in the late 1960’s.) These two cannons were transferred to the Warrnambool Garrison Artillery Battery Fortifications erected at Flagstaff Hill in 1887 as part of Victoria’s Coastal Defences. The original wooden carriages were subsequently replaced with the present iron garrison carriages in 1888. They are a “C” pivot. The ‘racers’ or curved track set into the floor of the gun emplacement (which enabled the guns to be traversed more quickly) are as specified for guns up to 10 inch, being of wrought iron 2.78 inches wide. A temporary third gun, now no longer on Flagstaff Hill’s site, was a 5 inch Rifled Breech Loading (BL) Armstrong gun mounted on an Elswick hydro pneumatic disappearing carriage It was faster to load and fire than the 80 pound RMLs and its arrival spelt the end of the older 80 pound guns’ useful life, apart from being used for practice sessions. The 5 inch BL gun was the main defensive weapon of the Warrnambool Battery until the Battery was downgraded in importance and the gun was recalled to Melbourne in 1910. The State of Victoria took over the ownership of the guns at the time of Australian Federation in 1901. In about 1901/1902 the Garrison Battery was converted to the Warrnambool Battery of the Australian Field Artillery (No 4 Field Battery). It was equipped with 4.7 inch naval guns mounted on field carriages. They were now a mobile unit but continued to use the Warrnambool Garrison area at Flagstaff Hill for practice. When the Fortifications were declared obsolete the two 80 Pounder RML were relocated to Cannon Hill in 1910. On the outbreak of World War One the 4.7 inch guns were recalled to Melbourne, and the Battery was disbanded. Most of the personnel probably re-enlisted in the local 4th Australian Light Horse Regiment. The two 80 Pounder RML were moved back to the Fortifications in 1973. They were both fully restored by Army First Year Apprentices at the Ordinance Factory in Bendigo in time for the centenary year of the fortifications in 1987. The guns are capable of firing 80 pound (32.3kg) armour piercing exploding shells 3.65kms out to sea. They were original manned by volunteers before a paid Garrison was established. Now the Guns are again fired by volunteers on Special Event days. Since restoration the Gun Number 1 had been fired on a regular basis but Gun Number 2 hadn’t been fired since the mid 1990’s. In April 2015 Gun Number 2 was serviced in preparation for the firing of both cannons on the ANZAC Centenary commemorations on April 25th 2015. Other guns from the original Cannon Hill location were obsolete by the time the 1887 Warrnambool Garrison Artillery Battery was built. These guns are (1) a 32 Pounder Muzzle Loading Smooth Bore (SB) cast in 1813 at the famous Carron Foundry, number 80837 and now located in the Warrnambool Botanic Gardens (2) a 68 Pounder Muzzle Loading Smooth Bore cast in 1861 at the equally august Low Moor Foundry, number 10310 and now located on the lawn area at the entrance to Flagstaff Hill Maritime Village. Both of these guns are mounted on their original wooden garrison carriages. There are only seven 32 Pounder SB made by Carron and fifteen 68 Pounder SB made at Low Moor known to exist in the State of Victoria (Conservation Management Plan for Victorian Guns and Cannon, South Western Victoria, May 2008, ref W/F/04)The Warrnambool Garrison has been added to the Victorian Heritage Register H1250 “for its intact battery and guns, a strong reminder of Victoria’s wealth and determination to protect itself from the perceived threat of invasion in the 1880’s.” The City of Warrnambool is one of several custodians of a collection of artillery pieces of heritage significance at a state, national and international level. These pieces are directly related to the defence of south-west Victoria in the 19th century. The care and preservation come under the Heritage Act 1995. Cannon. 80 Pounder Rifled Muzzle Loading (RML) Gun on iron carriage and slide, installed in the Battery at Flagstaff Hill’s Fortifications.. Made in 1866 at the Royal Gun Factory (R-G-F), Woolich, England. Gun Reg No - 23. Flagstaff Hill Garrison Gun 1 (Gun No. 1) Insignia of the Royal Engineers, and the weight of the gun, stamped on top of the gun’s barrel. There is a brass plate on the side of the gun with the details of 1987 restoration.Stamped on axle cover on side of barrel “R-G-F / No 23 / 1866”. Stamped into the metal on top of the barrel, Insignia of the Royal Engineers; Garter and Motto “HONI SOIT QUI MAL Y PENSE”, surmounted by the Crown, with the Royal Cypher of Queen Victoria “VR” within the Garter. Also stamped on top of the gun are 2 inward pointing arrows above the weight ”81-2-0”. Brass plate “RESTORATION / BY / FIRST YEAR / APPRENTICES / ORDANANCE FACTORY / BENDIGO 1987”flagstaff hill, warrnambool, shipwrecked coast, flagstaff hill maritime museum, maritime museum, shipwreck coast, flagstaff hill maritime village, great ocean road, cannon, 80 pounder, rifled muzzle, loading, royal gun factory, woolich -
 Flagstaff Hill Maritime Museum and Village
Weapon - Cannon, 1866
In the years following the Crimean War (1854-1857J) there was a great concern in the Colony that Imperial Russia would attempt an invasion. Coastal defences in the colony of Victoria were greatly strengthened by the Government as a result. Warrnambool was originally protected by cannons at Cannon Hill, approximately 1 kilometer west of the Flagstaff Hill Fortifications. These cannons included two 1866 guns, both 80 Pound Rifled Muzzle Loaders (RML) purchased by Victoria’s Colonial Government. They were part of a shipment of 26 such guns sent from England in December 1866. They are registered as No. 23 (80cwt-2qr-0lbs) - Gun 1, and No.13 (81cwt-1qr-12lbs) - Gun 2. They were cast at the Royal Gun Factory, Woolwich Arsenal, in 1866 and have a 6.3 inch bore. Both barrels carry the Royal Cypher of Queen Victoria, Insignia of the Royal Engineers, within the Garter and Motto surmounted by the Crown, with the Royal Cypher of Queen Victoria within the Garter (letters in centre “VR”, motto “HONI SOIT QUI MAL Y PENSE”, "Shame be to him who thinks evil of it."). The guns were originally supplied with wooden carriages. (The Royal Arsenal at Woolwich, England, was established eleven years after the Restoration of King Charles II. It was the principal supplier of armaments to the British and Empire Governments. At the height of its operations during World War One the factory covered 1300 acres and employed very nearly 80,000 workers. Woolwich was the Headquarters of the Royal Artillery since the raising of that Regiment in 1716. The Arsenal was closed in the late 1960’s.) These two cannons were transferred to the Warrnambool Garrison Artillery Battery Fortifications erected at Flagstaff Hill in 1887 as part of Victoria’s Coastal Defences. The original wooden carriages were subsequently replaced with the present iron garrison carriages in 1888. They are a “C” pivot. The ‘racers’ or curved track set into the floor of the gun emplacement (which enabled the guns to be traversed more quickly) are as specified for guns up to 10 inch, being of wrought iron 2.78 inches wide. A temporary third gun, now no longer on Flagstaff Hill’s site, was a 5 inch Rifled Breech Loading (BL) Armstrong gun mounted on an Elswick hydro pneumatic disappearing carriage It was faster to load and fire than the 80 pound RMLs and its arrival spelt the end of the older 80 pound guns’ useful life, apart from being used for practice sessions. The 5 inch BL gun was the main defensive weapon of the Warrnambool Battery until the Battery was downgraded in importance and the gun was recalled to Melbourne in 1910. The State of Victoria took over the ownership of the guns at the time of Australian Federation in 1901. In about 1901/1902 the Garrison Battery was converted to the Warrnambool Battery of the Australian Field Artillery (No 4 Field Battery). It was equipped with 4.7 inch naval guns mounted on field carriages. They were now a mobile unit but continued to use the Warrnambool Garrison area at Flagstaff Hill for practice. When the Fortifications were declared obsolete the two 80 Pounder RML were relocated to Cannon Hill in 1910. On the outbreak of World War One the 4.7 inch guns were recalled to Melbourne, and the Battery was disbanded. Most of the personnel probably re-enlisted in the local 4th Australian Light Horse Regiment. The two 80 Pounder RML were moved back to the Fortifications in 1973. They were both fully restored by Army First Year Apprentices at the Ordinance Factory in Bendigo in time for the centenary year of the fortifications in 1987. The guns are capable of firing 80 pound (32.3kg) armour piercing exploding shells 3.65kms out to sea. They were original manned by volunteers before a paid Garrison was established. Now the Guns are again fired by volunteers on Special Event days. Since restoration the Gun Number 1 had been fired on a regular basis but Gun Number 2 hadn’t been fired since the mid 1990’s. In April 2015 Gun Number 2 was serviced in preparation for the firing of both cannons on the ANZAC Centenary commemorations on April 25th 2015. Other guns from the original Cannon Hill location were obsolete by the time the 1887 Warrnambool Garrison Artillery Battery was built. These guns are (1) a 32 Pounder Muzzle Loading Smooth Bore (SB) cast in 1813 at the famous Carron Foundry, number 80837 and now located in the Warrnambool Botanic Gardens (2) a 68 Pounder Muzzle Loading Smooth Bore cast in 1861 at the equally august Low Moor Foundry, number 10310 and now located on the lawn area at the entrance to Flagstaff Hill Maritime Village. Both of these guns are mounted on their original wooden garrison carriages. There are only seven 32 Pounder SB made by Carron and fifteen 68 Pounder SB made at Low Moor known to exist in the State of Victoria (Conservation Management Plan for Victorian Guns and Cannon, South Western Victoria, May 2008, ref W/F/05)The Warrnambool Garrison has been added to the Victorian Heritage Register H1250 “for its intact battery and guns, a strong reminder of Victoria’s wealth and determination to protect itself from the perceived threat of invasion in the 1880’s.” The City of Warrnambool is one of several custodians of a collection of artillery pieces of heritage significance at a state, national and international level. These pieces are directly related to the defence of south-west Victoria in the 19th century. The care and preservation come under the Heritage Act 1995. Cannon. 80 Pound Rifled Muzzle Loading (RML) Gun on iron carriage and slide, installed in the Battery at Flagstaff Hill’s Fortifications. Made in 1866 at the Royal Gun Factory (R-G-F), Woolich, England. Gun Reg No 13. Flagstaff Hill Garrison Gun 2 (Gun No. 2). Insignia of the Royal Engineers, and the weight of the gun, stamped on top of the gun’s barrel. There is a brass plate on the side of the gun with the details of 1987 restoration.Stamped into the metal on top of the barrel, Insignia of the Royal Engineers; Garter and Motto “HONI SOIT QUI MAL Y PENSE”, surmounted by the Crown, with the Royal Cypher of Queen Victoria “VR” within the Garter. Also stamped on top of the gun are 2 inward pointing arrows above the weight ”81-1-12”. Brass plate “RESTORATION / BY / FIRST YEAR / APPRENTICES / ORDANANCE FACTORY / BENDIGO 1987”flagstaff hill, warrnambool, shipwrecked coast, flagstaff hill maritime museum, maritime museum, shipwreck coast, flagstaff hill maritime village, great ocean road, colonial defences, victoria’s coastal defences, warrnambool fortification, warrnambool garrison battery, warrnambool volunteer corps, ordinance, armaments, cannon hill fortifications, 4th australian light horse regiment, no 4 field battery, 80 pound cannon rifled muzzle loaders (rml), victorian colonial government, royal gun factory england, woolwich arsenal, royal cypher of queen victoria, garrison gun -
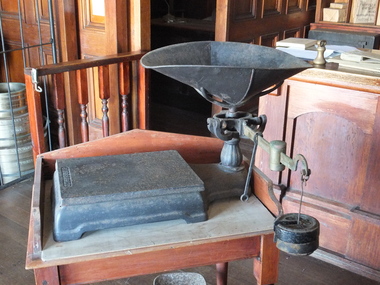 Flagstaff Hill Maritime Museum and Village
Functional object - Platform Scales, Thaddeus Fairbanks, 1880-1910
Thaddeus Fairbanks (1796 –1886) was an American inventor. of heating and cook stoves, cast iron ploughs, and other items. His greatest success was the invention and manufacture of the platform scale, which allowed the weighing of large objects accurately. Fairbanks was born in Brimfield, Massachusetts, on January 17, 1796, the son of Joseph Fairbanks (1763–1846) and Phebe (Paddock) Fairbanks (1760–1853). His uncle was Ephraim Paddock, the brother of Phebe Paddock. In 1815 he moved to St. Johnsbury, Vermont, and set up a wheelwright's shop above his father's gristmill. In 1820 he married Lucy Peck Barker and In 1824 he built an iron foundry. his brother Erastus joined him to establish E. and T. Fairbanks, a partnership to manufacture heating stoves, cast iron ploughs a design for which he patented in 1826. In 1830 Fairbanks and Erastus became interested in the raising and processing of hemp. Fairbanks went on to patent a hemp and flax dressing machine and became the manager of the St. Johnsbury Hemp Company. He also built a set of scales that would measure large loads of hemp accurately, as there were no reliable scales at the time. Upon the success of building these scales, his brothers recommended that he make and sell these for general use. Fairbanks' most famous invention then became the platform scale for weighing heavy objects. These are commonly known as the Fairbanks Scales, for which he patented his original design in 1830. Before this time, accurate weighing of objects required hanging them from a balancing beam as a result, particularly heavy or ungainly objects could not be weighed accurately. A platform scale, if large enough, could weigh an entire wagon. By placing a full wagon on the scale, unloading it, and then placing it on the scale when empty, it became possible to easily and accurately calculate the weight and value of farm produce and other loads. In 1834 Fairbanks and his brother formed "E. and T. Fairbanks and Company" to manufacture and sell these platform scales. These scales were well known in the United States and around the world resulting in the company doubling in volume every three years from 1842 to 1857. There was a temporary slow down during the American Civil War, however, the business took off again after the war. Their partnership was incorporated in 1874 into a firm known as "Fairbanks Scale Company". These platform scales revolutionized weighing methods of large loads and have been in use ever since. Portable platform scales are found in almost every hardware store, physician's office, and manufacturing factory throughout the United States and the world. The first railway track platform scale patent was granted to Fairbanks on January 13, 1857, as Patent No. 16,381. In 1916 the company was purchased by ”Fairbanks, Morse and Company”. Ownership of the company has since changed several times, but Fairbanks Scales continue to be made in St. Johnsbury Vermont to this day. Fairbanks had received 43 patents in his lifetime with the last one at the age of 91. He died on April 12, 1886, and is buried at St. Johnsbury, Vermont, at the Mount Pleasant Cemetery. An early example circa 1900 of the first type of platform scales used in a grocery store. This design for accurately measuring goods that were sold over the counter revolutionised the weighing of goods throughout the world. Platform scale metal black with removable tray & pan. Has horizontal brass arm with a brass slide weight black removable weight hook and 2 x 2 lb. weights. Fairbanksflagstaff hill, warrnambool, shipwrecked-coast, flagstaff-hill, flagstaff-hill-maritime-museum, maritime-museum, shipwreck-coast, flagstaff-hill-maritime-village