Showing 57 items
matching hard surfacing
-
 Flagstaff Hill Maritime Museum and Village
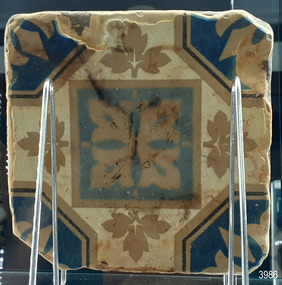
Ceramic - Floor Tile, circa 1878
This Minton floor tile is from the wreck of the Loch Ard. The iron-hulled clipper ship from the Loch Line was heading for Port Phillip from London, when it ran into the cliffs of Mutton Bird Island near Port Campbell. The Loch Ard was laden with high-value cargo including luxury goods intended for display at the Melbourne International Exhibition in 1880. One notable survivor from the ship’s freight manifest was the well-packed Minton porcelain peacock, a two-meter high ceramic masterpiece of vivid glazed colours. (This is also on display in the Great Circle Gallery). The almost total loss of life and property from the Loch Ard registered as a shocking tragedy for the Colony of Victoria, at a time when social confidence and economic optimism were otherwise high. The wealth generated from Gold and Wool was increasingly being spent on grandiose private residences and imposing public buildings. The demand for quality furnishings and fittings was therefore strong. Among the products consigned to burgeoning colonial markets by the Milton Pottery at Stoke upon Trent, were their new range of colourfully patterned but very durable floor tiles ideal for the high-traffic spaces in the large civic buildings then being constructed in Australia and America. These floor tiles were “encaustic”, meaning that their designs and colours were encased “within” the depth of the tile. Rather than their decorative patterns being glazed onto the surface of the tile, their inlaid designs were created during the manufacturing process, as “coloured slips” (or liquid clay) were poured into a deep pre-moulded casting. When fired, the resulting tile was colour-fast and design-fast. The Minton floor tile is significant for its hard-wearing yet attractive design. The shipwreck of the Loch Ard is of significance for Victoria and is registered on the Victorian Heritage Register ( S 417). Flagstaff Hill has a varied collection of artefacts from Loch Ard and its collection is significant for being one of the largest accumulations of artefacts from this notable Victorian shipwreck of which the subject items are a small part. The collections of objects give us a snapshot of how we can interpret the story of this tragic event. The collection is also archaeologically significant as it represents aspects of Victoria's shipping history that allows us to interpret Victoria's social and historical themes of the time. Through is associated with the worst and best-known shipwreck in Victoria's history. A square Minton floor tile with a white background, and beige, dark blue, light blue and black geometric pattern as well as leaves in the design. The tile has corner broken off and some chipping along the edges. The reverse has five rows of five evenly spaced holes. The back of the tile has inscriptions. Made by Minton & Co. at Stoke upon Trent. This encaustic floor tile was recovered from the shipwreck of the LOCH ARD. Branded "... MINTON&CO / PATENT / STOKE UPON TRENT"flagstaff hill, warrnambool, flagstaff hill maritime museum, shipwreck coast, flagstaff hill maritime village, great ocean road, loch line, loch ard, captain gibbs, eva carmichael, tom pearce, glenample station, mutton bird island, minton floor tile, encaustic tile, melbourne international exhibition, floor tile, minton tile, minton & co., stoke upon trent -
 Flagstaff Hill Maritime Museum and Village
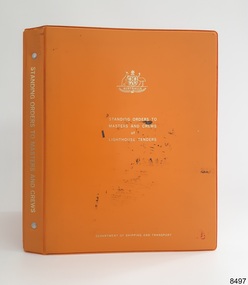
Book - Manual, Standing Orders, Department of Shipping and Transport, Standing Orders to Masters and Crews of Lighthouse Tenders, 1968
... Book, orange vinyl surface sealed cover on hard covered... TENDERS" "No 1/1968" "No.2/1968" Book, orange vinyl surface sealed ...This book is a mid-20th century updated version of a manual with regulations and instructions for lighthouse staff and the supply of equipment and other goods that are necessary. It includes lists such as protective clothing required, fuel, when to raise a flag at half-mast, how communication must be carried out, the testing of equipment, and other similar information. It also contains templates for the Certificates of Service of various ranks such as Master and Mate. Australia no longer has manned lighthouses although some still have caretakers that report on the weather. The last manned lighthouse was in Tasmania and was de-manned in December 1995.The ultimate purpose of the book was to set down instructions that would be used to carry out life saving procedures, and to avoid shipwrecks. It confirms some earlier methods and updates others. The information within the book is similar to the information referred to by the 19th century and early 20th century lighthouse keepers and staff, and others involved in the preservation of life, such as those published by the Department of Ports and Harbours. The book is a valuable resource to those researching the evolving of maritime history from Colonial Australia to the modern day.Book, orange vinyl surface sealed cover on hard covered ring-binder. Gold embossed title on spine and front cover. Contains cream loose-leaf pages with rounded corners. Pages are printed with text, tables and diagrams, and are numbered with serial page and paragraph numbers. There is a Table of Contents and an Index. The cover displays the Coat of Arms of the Commonwealth of Australia. Published by the Commonwealth of Australia in 1968 for the Department of Shipping and Transport, the book contains the Standing Orders to Masters and Crews of Lighthouse Tenders. It has examples for Certificates of Service for various ranks, a list of books and forms, protective clothing, rates for passengers, and a Scheme of Colour Painting for Lighthouse Tenders.Coat of Arms [Commonwealth of Australia] "COMMONWEALTH OF AUSTRALIA" "DEPARTMENT OF SHIPPING AND TRANSPORT" "STANDING ORDERS / TO / MASTERS AND CREWS OF LIGHTHOUSE TENDERS" "No 1/1968" "No.2/1968"flagstaff hill, flagstaff hill maritime museum and village, warrnambool, maritime museum, maritime village, great ocean road, shipwreck coast, shipwrecks, life saving, lifesaving, shiipping and transport, commonwealth of australia, standing orders, lighthouse crew, lighthouse tenders, masters and crews, 1968 -
 Federation University Historical Collection
Book, Arthur W. French et al, Stereotomy, 1902, 1902
Brown hard covered book of 119 pages. Contents include building stones, quarrying, stone-cutting tools, finishing surfaces, masonry, bridge abutment, Butress, arches, ovals, cloistered arch, descending arch, cow's-horn method, Skew-arch. , Includes illustrations and indexstereotomy, stone, bridges -
 Flagstaff Hill Maritime Museum and Village
Domestic object - Plate
The Process of Making Pottery Decorating, Firing, Glazing, Making, Technical There is a rhythm and flow to clay. It can’t be done all at once! Even the making process! It can take weeks to get everything done, especially if you can only work on your pottery once a week! Even though we have three hour classes, it’s often just not enough time! Here is an overview of some of the processes so you have a bit more grasp on some of the technical stuff! Step One – Design There are SO many ideas out there for making stuff in clay! From delicate porcelain jewellery, through to heavy sculptural work and everything in between. Deciding your direction is sometimes not that easy – when you first start, try everything, you will naturally gravitate to the style that you enjoy! The options and variations are endless and can get a wee bit overwhelming too! Check in with me before you start to ensure your ideas will work, what order you might do things, how you could achieve the look you are seeking and any other technical data required! Step Two – Making Clay is thixotropic. This means that as you work with it, the clay first gets sloppier and wetter, before is begins to dry in the atmosphere. For most things, you simply can’t do all parts of the project at once. An example of work order might look like: Get last weeks work out from the shelves Prepare clay for today’s work – roll your clay, prepare balls for throwing, make the first stage of a pinch pot) Clean up last week’s work and put it on the shelf for bisque firing Check that you have any glazing to do – and do enough of it that you will have time to finish your main project Do the next step of your next project – there might be a further step that can’t be complete immediately, in that case, wrap your work well and put onto the shelves. Letting your work rest for a while can really help keep your work clean and professional looking. Many things require bagging under plastic to keep it ready for work the next week – put your name on the outside of the bag so you can find your work easily. We have stickers and markers. Consider how you want to decorate your work – coloured slip can be applied at a fairly wet stage (remembering that it will make your work even wetter!). Trying to apply slip to dry clay won’t work! If you want to do sgraffito – you will need to keep the work leather hard (a state of dryness where you can still work the clay with a little effort and a little water and care). Step Three – Drying Most of the time your work can go into the rack uncovered to let it dry out for the following week. If you want to continue forming or shaping you will need to double bag your work – put your work on a suitable sized bat and put the bat in a bag so the base of the bag is under the bat, then put another bag over the top of the work and tuck the top of the bag under the bat. If you want to trim (or turn) your thrown work the following week, it should also be double bagged. If your work is large, delicate, or of uneven thicknesses, you should lightly cover your work for drying. When considering the drying process, bare in mind the weather, humidity and wind! The hotter and dryer, the faster things dry and work can dry unevenly in the shelves – this can lead to cracking – another time to lightly cover your work for drying. Step Four – Trimming and Cleaning Up Your work is dry! It is called greenware now and it is at it’s most fragile! Handle everything with two hands. I often refer to soft hands – keep everything gentle and with your fingers spread as much as possible. Try to not pick up things like plates too much, and always with both hands! Before your work can be bisque fired it should be “cleaned up”. You work won’t go into the kiln if it has sharp edges – when glazed, sharp edges turn into razor blades! Use a piece of fly wire to rub the work all over – this will scratch a little so be light handed. Use a knife or metal kidney to scrape any areas that require a bit more dynamic treatment than the fly wire offers! Finally, a very light wipe over with a slightly damp sponge can help soften and soothe all of your edges and dags! Trimming thrown work: If you are planning to trim (or turn) your thrown work (and you should be), make sure you bag it well – your work should be leather hard to almost dry for easiest trimming. Use this step to finish the work completely – use a metal kidney to polish the surface, or a slightly damp sponge to give a freshly thrown look. Wipe the sponge around the rim after trimming, and check the inside of the pot for dags! Trimming slip cast work: Usually I will trim the rims of your work on the wheel the following day to make that stage easier, however you will still need to check your work for lumps and bumps. Last but not least – check that your name is still clearly on the bottom of your work. Step Five – Bisque Firing When the work is completely dry it can go into the bisque kiln. The bisque kiln is fired to 1000°C. This process burns off the water in the clay as well as some of the chemically bound water. The structure of the clay is not altered that much at this temperature. Inside the bisque kiln, the work is stacked a little, small bowl inside a larger bowl and onto a heavy plate. Smaller items like decorations or drink coasters might get stacked several high. Consideration is paid to the weight of the stack and shape of the work. A bisque kiln can fire about one and a half times the amount of work that the glaze kiln can fire. The firing takes about 10 hours to complete the cycle and about two days to cool down. Once it has been emptied the work is placed in the glaze room ready for you to decorate! Step Six – Glazing Decorating your work with colour can be a lot of fun – and time consuming! There are three main options for surface treatment at this stage: Oxide Washes Underglazes Glazes Washes and underglazes do not “glaze” the work – It will still need a layer of glaze to fully seal the clay (washes don’t need glaze on surfaces not designed for food or liquid as they can gloss up a little on their own). Underglazes are stable colourants that turn out pretty much how they look in the jar. They can be mixed with each other to form other colours and can be used like water colours to paint onto your work. Mostly they should have a clear glaze on top to seal them. Oxides are a different species – the pink oxide (cobalt) wash turns out bright blue for instance. They don’t always need a glaze on top, and some glazes can change the colour of the wash! The glazes need no other “glaze” on top! Be careful of unknown glaze interactions – you can put any combination of glaze in a bowl or on a plate, but only a single glaze on the outside of any vertical surface! Glazes are a chemical reaction under heat. We don’t know the exact chemicals in the Mayco glazes we use. I can guess by the way they interact with each other, however, on the whole, you need to test every idea you have, and not run the test on a vertical surface! Simply put, glaze is a layer of glass like substance that bonds with the clay underneath. Clay is made of silica, alumina and water. Glaze is made of mostly silica. Silica has a melting point of 1700°C and we fire to 1240°C. The silica requires a “flux” to help it melt at the lower temperature. Fluxes can be all sorts of chemicals – a common one is calcium – calcium has a melting point of 2500°C, however, together they both melt at a much lower temperature! Colourants are metal oxides like cobalt (blue), chrome (green through black), copper (green, blue, even red!), manganese (black, purple and pink) iron (red brown), etc. Different chemicals in the glaze can have dramatic effects. for example, barium carbonate (which we don’t use) turns manganese bright pink! Other elements can turn manganese dioxide brown, blue, purple and reddish brown. Manganese dioxide is a flux in and of itself as well. So, glazes that get their black and purple colours, often interact with other glazes and RUN! Our mirror black is a good example – it mixes really well with many glazes because it fluxes them – causes them to melt faster. It will also bring out many beautiful colours in the glazes because it’s black colouring most definitely comes from manganese dioxide! Glaze chemistry is a whole subject on it’s own! We use commercial Mayco glazes on purpose – for their huge range of colour possibilities, stability, cool interactions, artistic freedom with the ability to easily brush the glazes on and ease of use. We currently have almost 50 glazes on hand! A major project is to test the interactions of all glazes with each other. That is 2,500 test tiles!!!! I’m going to make the wall behind the wheels the feature wall of pretty colours! Step Seven – Glaze (Gloss or sometimes called “Glost”) Firing Most of the time this is the final stage of making your creation (but not always!) The glaze kiln goes to 1240°C. This is called cone 6, or midrange. It is the low end of stoneware temperatures. Stoneware clays and glazes are typically fired at cone 8 – 10, that is 1260 – 1290°C. The energy requirement to go from 1240°C to 1280°C is almost a 30% more! Our clay is formulated to vitrify (mature, turn “glass-like”) at 1240°, as are our glazes. A glaze kiln take around 12 hours to reach temperature and two to three days to cool down. Sometimes a third firing process is required – this is for decoration that is added to work after the glaze firing. For example – adding precious metals and lustres. this firing temperature is usually around 600 – 800°C depending upon the techniques being used. There are many students interested in gold and silver trims – we will be doing this third type of firing soon! After firing your work will be in the student finished work shelves. Remember to pay for it before you head out the door! There is a small extra charge for using porcelain clay (it’s more than twice the price of regular clay), and for any third firing process! Once your work has been fired it can not turn back into clay for millennia – so don’t fire it if you don’t like it! Put it in the bucket for recycling. https://firebirdstudios.com.au/the-process-of-making-pottery/Ceramics have evolved over thousands of years.White earthenware dinner plate. Crazing evident all over.Backstamped ‘Made in England S LTD’flagstaff hill, warrnambool, shipwrecked-coast, flagstaff-hill, flagstaff-hill-maritime-museum, maritime-museum, shipwreck-coast, flagstaff-hill-maritime-village, ceramics, tableware -
 Flagstaff Hill Maritime Museum and Village
Domestic object - Plate, Johnson Bros
The Process of Making Pottery Decorating, Firing, Glazing, Making, Technical There is a rhythm and flow to clay. It can’t be done all at once! Even the making process! It can take weeks to get everything done, especially if you can only work on your pottery once a week! Even though we have three hour classes, it’s often just not enough time! Here is an overview of some of the processes so you have a bit more grasp on some of the technical stuff! Step One – Design There are SO many ideas out there for making stuff in clay! From delicate porcelain jewellery, through to heavy sculptural work and everything in between. Deciding your direction is sometimes not that easy – when you first start, try everything, you will naturally gravitate to the style that you enjoy! The options and variations are endless and can get a wee bit overwhelming too! Check in with me before you start to ensure your ideas will work, what order you might do things, how you could achieve the look you are seeking and any other technical data required! Step Two – Making Clay is thixotropic. This means that as you work with it, the clay first gets sloppier and wetter, before is begins to dry in the atmosphere. For most things, you simply can’t do all parts of the project at once. An example of work order might look like: Get last weeks work out from the shelves Prepare clay for today’s work – roll your clay, prepare balls for throwing, make the first stage of a pinch pot) Clean up last week’s work and put it on the shelf for bisque firing Check that you have any glazing to do – and do enough of it that you will have time to finish your main project Do the next step of your next project – there might be a further step that can’t be complete immediately, in that case, wrap your work well and put onto the shelves. Letting your work rest for a while can really help keep your work clean and professional looking. Many things require bagging under plastic to keep it ready for work the next week – put your name on the outside of the bag so you can find your work easily. We have stickers and markers. Consider how you want to decorate your work – coloured slip can be applied at a fairly wet stage (remembering that it will make your work even wetter!). Trying to apply slip to dry clay won’t work! If you want to do sgraffito – you will need to keep the work leather hard (a state of dryness where you can still work the clay with a little effort and a little water and care). Step Three – Drying Most of the time your work can go into the rack uncovered to let it dry out for the following week. If you want to continue forming or shaping you will need to double bag your work – put your work on a suitable sized bat and put the bat in a bag so the base of the bag is under the bat, then put another bag over the top of the work and tuck the top of the bag under the bat. If you want to trim (or turn) your thrown work the following week, it should also be double bagged. If your work is large, delicate, or of uneven thicknesses, you should lightly cover your work for drying. When considering the drying process, bare in mind the weather, humidity and wind! The hotter and dryer, the faster things dry and work can dry unevenly in the shelves – this can lead to cracking – another time to lightly cover your work for drying. Step Four – Trimming and Cleaning Up Your work is dry! It is called greenware now and it is at it’s most fragile! Handle everything with two hands. I often refer to soft hands – keep everything gentle and with your fingers spread as much as possible. Try to not pick up things like plates too much, and always with both hands! Before your work can be bisque fired it should be “cleaned up”. You work won’t go into the kiln if it has sharp edges – when glazed, sharp edges turn into razor blades! Use a piece of fly wire to rub the work all over – this will scratch a little so be light handed. Use a knife or metal kidney to scrape any areas that require a bit more dynamic treatment than the fly wire offers! Finally, a very light wipe over with a slightly damp sponge can help soften and soothe all of your edges and dags! Trimming thrown work: If you are planning to trim (or turn) your thrown work (and you should be), make sure you bag it well – your work should be leather hard to almost dry for easiest trimming. Use this step to finish the work completely – use a metal kidney to polish the surface, or a slightly damp sponge to give a freshly thrown look. Wipe the sponge around the rim after trimming, and check the inside of the pot for dags! Trimming slip cast work: Usually I will trim the rims of your work on the wheel the following day to make that stage easier, however you will still need to check your work for lumps and bumps. Last but not least – check that your name is still clearly on the bottom of your work. Step Five – Bisque Firing When the work is completely dry it can go into the bisque kiln. The bisque kiln is fired to 1000°C. This process burns off the water in the clay as well as some of the chemically bound water. The structure of the clay is not altered that much at this temperature. Inside the bisque kiln, the work is stacked a little, small bowl inside a larger bowl and onto a heavy plate. Smaller items like decorations or drink coasters might get stacked several high. Consideration is paid to the weight of the stack and shape of the work. A bisque kiln can fire about one and a half times the amount of work that the glaze kiln can fire. The firing takes about 10 hours to complete the cycle and about two days to cool down. Once it has been emptied the work is placed in the glaze room ready for you to decorate! Step Six – Glazing Decorating your work with colour can be a lot of fun – and time consuming! There are three main options for surface treatment at this stage: Oxide Washes Underglazes Glazes Washes and underglazes do not “glaze” the work – It will still need a layer of glaze to fully seal the clay (washes don’t need glaze on surfaces not designed for food or liquid as they can gloss up a little on their own). Underglazes are stable colourants that turn out pretty much how they look in the jar. They can be mixed with each other to form other colours and can be used like water colours to paint onto your work. Mostly they should have a clear glaze on top to seal them. Oxides are a different species – the pink oxide (cobalt) wash turns out bright blue for instance. They don’t always need a glaze on top, and some glazes can change the colour of the wash! The glazes need no other “glaze” on top! Be careful of unknown glaze interactions – you can put any combination of glaze in a bowl or on a plate, but only a single glaze on the outside of any vertical surface! Glazes are a chemical reaction under heat. We don’t know the exact chemicals in the Mayco glazes we use. I can guess by the way they interact with each other, however, on the whole, you need to test every idea you have, and not run the test on a vertical surface! Simply put, glaze is a layer of glass like substance that bonds with the clay underneath. Clay is made of silica, alumina and water. Glaze is made of mostly silica. Silica has a melting point of 1700°C and we fire to 1240°C. The silica requires a “flux” to help it melt at the lower temperature. Fluxes can be all sorts of chemicals – a common one is calcium – calcium has a melting point of 2500°C, however, together they both melt at a much lower temperature! Colourants are metal oxides like cobalt (blue), chrome (green through black), copper (green, blue, even red!), manganese (black, purple and pink) iron (red brown), etc. Different chemicals in the glaze can have dramatic effects. for example, barium carbonate (which we don’t use) turns manganese bright pink! Other elements can turn manganese dioxide brown, blue, purple and reddish brown. Manganese dioxide is a flux in and of itself as well. So, glazes that get their black and purple colours, often interact with other glazes and RUN! Our mirror black is a good example – it mixes really well with many glazes because it fluxes them – causes them to melt faster. It will also bring out many beautiful colours in the glazes because it’s black colouring most definitely comes from manganese dioxide! Glaze chemistry is a whole subject on it’s own! We use commercial Mayco glazes on purpose – for their huge range of colour possibilities, stability, cool interactions, artistic freedom with the ability to easily brush the glazes on and ease of use. We currently have almost 50 glazes on hand! A major project is to test the interactions of all glazes with each other. That is 2,500 test tiles!!!! I’m going to make the wall behind the wheels the feature wall of pretty colours! Step Seven – Glaze (Gloss or sometimes called “Glost”) Firing Most of the time this is the final stage of making your creation (but not always!) The glaze kiln goes to 1240°C. This is called cone 6, or midrange. It is the low end of stoneware temperatures. Stoneware clays and glazes are typically fired at cone 8 – 10, that is 1260 – 1290°C. The energy requirement to go from 1240°C to 1280°C is almost a 30% more! Our clay is formulated to vitrify (mature, turn “glass-like”) at 1240°, as are our glazes. A glaze kiln take around 12 hours to reach temperature and two to three days to cool down. Sometimes a third firing process is required – this is for decoration that is added to work after the glaze firing. For example – adding precious metals and lustres. this firing temperature is usually around 600 – 800°C depending upon the techniques being used. There are many students interested in gold and silver trims – we will be doing this third type of firing soon! After firing your work will be in the student finished work shelves. Remember to pay for it before you head out the door! There is a small extra charge for using porcelain clay (it’s more than twice the price of regular clay), and for any third firing process! Once your work has been fired it can not turn back into clay for millennia – so don’t fire it if you don’t like it! Put it in the bucket for recycling. https://firebirdstudios.com.au/the-process-of-making-pottery/Ceramics have evolved over thousands of years.A white earthenware side plate with a gadroon edge. Has water marks and chips on front.‘Johnson Bros England Reg No 15587’flagstaff hill, warrnambool, shipwrecked-coast, flagstaff-hill, flagstaff-hill-maritime-museum, maritime-museum, shipwreck-coast, flagstaff-hill-maritime-village, johnson bros, ceramics, tableware -
 Flagstaff Hill Maritime Museum and Village
Domestic object - Plate, Alfred Meakin
The Process of Making Pottery Decorating, Firing, Glazing, Making, Technical There is a rhythm and flow to clay. It can’t be done all at once! Even the making process! It can take weeks to get everything done, especially if you can only work on your pottery once a week! Even though we have three hour classes, it’s often just not enough time! Here is an overview of some of the processes so you have a bit more grasp on some of the technical stuff! Step One – Design There are SO many ideas out there for making stuff in clay! From delicate porcelain jewellery, through to heavy sculptural work and everything in between. Deciding your direction is sometimes not that easy – when you first start, try everything, you will naturally gravitate to the style that you enjoy! The options and variations are endless and can get a wee bit overwhelming too! Check in with me before you start to ensure your ideas will work, what order you might do things, how you could achieve the look you are seeking and any other technical data required! Step Two – Making Clay is thixotropic. This means that as you work with it, the clay first gets sloppier and wetter, before is begins to dry in the atmosphere. For most things, you simply can’t do all parts of the project at once. An example of work order might look like: Get last weeks work out from the shelves Prepare clay for today’s work – roll your clay, prepare balls for throwing, make the first stage of a pinch pot) Clean up last week’s work and put it on the shelf for bisque firing Check that you have any glazing to do – and do enough of it that you will have time to finish your main project Do the next step of your next project – there might be a further step that can’t be complete immediately, in that case, wrap your work well and put onto the shelves. Letting your work rest for a while can really help keep your work clean and professional looking. Many things require bagging under plastic to keep it ready for work the next week – put your name on the outside of the bag so you can find your work easily. We have stickers and markers. Consider how you want to decorate your work – coloured slip can be applied at a fairly wet stage (remembering that it will make your work even wetter!). Trying to apply slip to dry clay won’t work! If you want to do sgraffito – you will need to keep the work leather hard (a state of dryness where you can still work the clay with a little effort and a little water and care). Step Three – Drying Most of the time your work can go into the rack uncovered to let it dry out for the following week. If you want to continue forming or shaping you will need to double bag your work – put your work on a suitable sized bat and put the bat in a bag so the base of the bag is under the bat, then put another bag over the top of the work and tuck the top of the bag under the bat. If you want to trim (or turn) your thrown work the following week, it should also be double bagged. If your work is large, delicate, or of uneven thicknesses, you should lightly cover your work for drying. When considering the drying process, bare in mind the weather, humidity and wind! The hotter and dryer, the faster things dry and work can dry unevenly in the shelves – this can lead to cracking – another time to lightly cover your work for drying. Step Four – Trimming and Cleaning Up Your work is dry! It is called greenware now and it is at it’s most fragile! Handle everything with two hands. I often refer to soft hands – keep everything gentle and with your fingers spread as much as possible. Try to not pick up things like plates too much, and always with both hands! Before your work can be bisque fired it should be “cleaned up”. You work won’t go into the kiln if it has sharp edges – when glazed, sharp edges turn into razor blades! Use a piece of fly wire to rub the work all over – this will scratch a little so be light handed. Use a knife or metal kidney to scrape any areas that require a bit more dynamic treatment than the fly wire offers! Finally, a very light wipe over with a slightly damp sponge can help soften and soothe all of your edges and dags! Trimming thrown work: If you are planning to trim (or turn) your thrown work (and you should be), make sure you bag it well – your work should be leather hard to almost dry for easiest trimming. Use this step to finish the work completely – use a metal kidney to polish the surface, or a slightly damp sponge to give a freshly thrown look. Wipe the sponge around the rim after trimming, and check the inside of the pot for dags! Trimming slip cast work: Usually I will trim the rims of your work on the wheel the following day to make that stage easier, however you will still need to check your work for lumps and bumps. Last but not least – check that your name is still clearly on the bottom of your work. Step Five – Bisque Firing When the work is completely dry it can go into the bisque kiln. The bisque kiln is fired to 1000°C. This process burns off the water in the clay as well as some of the chemically bound water. The structure of the clay is not altered that much at this temperature. Inside the bisque kiln, the work is stacked a little, small bowl inside a larger bowl and onto a heavy plate. Smaller items like decorations or drink coasters might get stacked several high. Consideration is paid to the weight of the stack and shape of the work. A bisque kiln can fire about one and a half times the amount of work that the glaze kiln can fire. The firing takes about 10 hours to complete the cycle and about two days to cool down. Once it has been emptied the work is placed in the glaze room ready for you to decorate! Step Six – Glazing Decorating your work with colour can be a lot of fun – and time consuming! There are three main options for surface treatment at this stage: Oxide Washes Underglazes Glazes Washes and underglazes do not “glaze” the work – It will still need a layer of glaze to fully seal the clay (washes don’t need glaze on surfaces not designed for food or liquid as they can gloss up a little on their own). Underglazes are stable colourants that turn out pretty much how they look in the jar. They can be mixed with each other to form other colours and can be used like water colours to paint onto your work. Mostly they should have a clear glaze on top to seal them. Oxides are a different species – the pink oxide (cobalt) wash turns out bright blue for instance. They don’t always need a glaze on top, and some glazes can change the colour of the wash! The glazes need no other “glaze” on top! Be careful of unknown glaze interactions – you can put any combination of glaze in a bowl or on a plate, but only a single glaze on the outside of any vertical surface! Glazes are a chemical reaction under heat. We don’t know the exact chemicals in the Mayco glazes we use. I can guess by the way they interact with each other, however, on the whole, you need to test every idea you have, and not run the test on a vertical surface! Simply put, glaze is a layer of glass like substance that bonds with the clay underneath. Clay is made of silica, alumina and water. Glaze is made of mostly silica. Silica has a melting point of 1700°C and we fire to 1240°C. The silica requires a “flux” to help it melt at the lower temperature. Fluxes can be all sorts of chemicals – a common one is calcium – calcium has a melting point of 2500°C, however, together they both melt at a much lower temperature! Colourants are metal oxides like cobalt (blue), chrome (green through black), copper (green, blue, even red!), manganese (black, purple and pink) iron (red brown), etc. Different chemicals in the glaze can have dramatic effects. for example, barium carbonate (which we don’t use) turns manganese bright pink! Other elements can turn manganese dioxide brown, blue, purple and reddish brown. Manganese dioxide is a flux in and of itself as well. So, glazes that get their black and purple colours, often interact with other glazes and RUN! Our mirror black is a good example – it mixes really well with many glazes because it fluxes them – causes them to melt faster. It will also bring out many beautiful colours in the glazes because it’s black colouring most definitely comes from manganese dioxide! Glaze chemistry is a whole subject on it’s own! We use commercial Mayco glazes on purpose – for their huge range of colour possibilities, stability, cool interactions, artistic freedom with the ability to easily brush the glazes on and ease of use. We currently have almost 50 glazes on hand! A major project is to test the interactions of all glazes with each other. That is 2,500 test tiles!!!! I’m going to make the wall behind the wheels the feature wall of pretty colours! Step Seven – Glaze (Gloss or sometimes called “Glost”) Firing Most of the time this is the final stage of making your creation (but not always!) The glaze kiln goes to 1240°C. This is called cone 6, or midrange. It is the low end of stoneware temperatures. Stoneware clays and glazes are typically fired at cone 8 – 10, that is 1260 – 1290°C. The energy requirement to go from 1240°C to 1280°C is almost a 30% more! Our clay is formulated to vitrify (mature, turn “glass-like”) at 1240°, as are our glazes. A glaze kiln take around 12 hours to reach temperature and two to three days to cool down. Sometimes a third firing process is required – this is for decoration that is added to work after the glaze firing. For example – adding precious metals and lustres. this firing temperature is usually around 600 – 800°C depending upon the techniques being used. There are many students interested in gold and silver trims – we will be doing this third type of firing soon! After firing your work will be in the student finished work shelves. Remember to pay for it before you head out the door! There is a small extra charge for using porcelain clay (it’s more than twice the price of regular clay), and for any third firing process! Once your work has been fired it can not turn back into clay for millennia – so don’t fire it if you don’t like it! Put it in the bucket for recycling. https://firebirdstudios.com.au/the-process-of-making-pottery/Ceramics have evolved over thousands of years.Earthenware dessert plate, cream colour. Made by Alfred Meakin, England. Backstamped ‘Alfred Meakin England’. flagstaff hill, warrnambool, shipwrecked-coast, flagstaff-hill, flagstaff-hill-maritime-museum, maritime-museum, shipwreck-coast, flagstaff-hill-maritime-village, alfred meakin, ceramics, earthenware, kitchenware -
 Flagstaff Hill Maritime Museum and Village
Domestic object - Jug
The Process of Making Pottery Decorating, Firing, Glazing, Making, Technical There is a rhythm and flow to clay. It can’t be done all at once! Even the making process! It can take weeks to get everything done, especially if you can only work on your pottery once a week! Even though we have three hour classes, it’s often just not enough time! Here is an overview of some of the processes so you have a bit more grasp on some of the technical stuff! Step One – Design There are SO many ideas out there for making stuff in clay! From delicate porcelain jewellery, through to heavy sculptural work and everything in between. Deciding your direction is sometimes not that easy – when you first start, try everything, you will naturally gravitate to the style that you enjoy! The options and variations are endless and can get a wee bit overwhelming too! Check in with me before you start to ensure your ideas will work, what order you might do things, how you could achieve the look you are seeking and any other technical data required! Step Two – Making Clay is thixotropic. This means that as you work with it, the clay first gets sloppier and wetter, before is begins to dry in the atmosphere. For most things, you simply can’t do all parts of the project at once. An example of work order might look like: Get last weeks work out from the shelves Prepare clay for today’s work – roll your clay, prepare balls for throwing, make the first stage of a pinch pot) Clean up last week’s work and put it on the shelf for bisque firing Check that you have any glazing to do – and do enough of it that you will have time to finish your main project Do the next step of your next project – there might be a further step that can’t be complete immediately, in that case, wrap your work well and put onto the shelves. Letting your work rest for a while can really help keep your work clean and professional looking. Many things require bagging under plastic to keep it ready for work the next week – put your name on the outside of the bag so you can find your work easily. We have stickers and markers. Consider how you want to decorate your work – coloured slip can be applied at a fairly wet stage (remembering that it will make your work even wetter!). Trying to apply slip to dry clay won’t work! If you want to do sgraffito – you will need to keep the work leather hard (a state of dryness where you can still work the clay with a little effort and a little water and care). Step Three – Drying Most of the time your work can go into the rack uncovered to let it dry out for the following week. If you want to continue forming or shaping you will need to double bag your work – put your work on a suitable sized bat and put the bat in a bag so the base of the bag is under the bat, then put another bag over the top of the work and tuck the top of the bag under the bat. If you want to trim (or turn) your thrown work the following week, it should also be double bagged. If your work is large, delicate, or of uneven thicknesses, you should lightly cover your work for drying. When considering the drying process, bare in mind the weather, humidity and wind! The hotter and dryer, the faster things dry and work can dry unevenly in the shelves – this can lead to cracking – another time to lightly cover your work for drying. Step Four – Trimming and Cleaning Up Your work is dry! It is called greenware now and it is at it’s most fragile! Handle everything with two hands. I often refer to soft hands – keep everything gentle and with your fingers spread as much as possible. Try to not pick up things like plates too much, and always with both hands! Before your work can be bisque fired it should be “cleaned up”. You work won’t go into the kiln if it has sharp edges – when glazed, sharp edges turn into razor blades! Use a piece of fly wire to rub the work all over – this will scratch a little so be light handed. Use a knife or metal kidney to scrape any areas that require a bit more dynamic treatment than the fly wire offers! Finally, a very light wipe over with a slightly damp sponge can help soften and soothe all of your edges and dags! Trimming thrown work: If you are planning to trim (or turn) your thrown work (and you should be), make sure you bag it well – your work should be leather hard to almost dry for easiest trimming. Use this step to finish the work completely – use a metal kidney to polish the surface, or a slightly damp sponge to give a freshly thrown look. Wipe the sponge around the rim after trimming, and check the inside of the pot for dags! Trimming slip cast work: Usually I will trim the rims of your work on the wheel the following day to make that stage easier, however you will still need to check your work for lumps and bumps. Last but not least – check that your name is still clearly on the bottom of your work. Step Five – Bisque Firing When the work is completely dry it can go into the bisque kiln. The bisque kiln is fired to 1000°C. This process burns off the water in the clay as well as some of the chemically bound water. The structure of the clay is not altered that much at this temperature. Inside the bisque kiln, the work is stacked a little, small bowl inside a larger bowl and onto a heavy plate. Smaller items like decorations or drink coasters might get stacked several high. Consideration is paid to the weight of the stack and shape of the work. A bisque kiln can fire about one and a half times the amount of work that the glaze kiln can fire. The firing takes about 10 hours to complete the cycle and about two days to cool down. Once it has been emptied the work is placed in the glaze room ready for you to decorate! Step Six – Glazing Decorating your work with colour can be a lot of fun – and time consuming! There are three main options for surface treatment at this stage: Oxide Washes Underglazes Glazes Washes and underglazes do not “glaze” the work – It will still need a layer of glaze to fully seal the clay (washes don’t need glaze on surfaces not designed for food or liquid as they can gloss up a little on their own). Underglazes are stable colourants that turn out pretty much how they look in the jar. They can be mixed with each other to form other colours and can be used like water colours to paint onto your work. Mostly they should have a clear glaze on top to seal them. Oxides are a different species – the pink oxide (cobalt) wash turns out bright blue for instance. They don’t always need a glaze on top, and some glazes can change the colour of the wash! The glazes need no other “glaze” on top! Be careful of unknown glaze interactions – you can put any combination of glaze in a bowl or on a plate, but only a single glaze on the outside of any vertical surface! Glazes are a chemical reaction under heat. We don’t know the exact chemicals in the Mayco glazes we use. I can guess by the way they interact with each other, however, on the whole, you need to test every idea you have, and not run the test on a vertical surface! Simply put, glaze is a layer of glass like substance that bonds with the clay underneath. Clay is made of silica, alumina and water. Glaze is made of mostly silica. Silica has a melting point of 1700°C and we fire to 1240°C. The silica requires a “flux” to help it melt at the lower temperature. Fluxes can be all sorts of chemicals – a common one is calcium – calcium has a melting point of 2500°C, however, together they both melt at a much lower temperature! Colourants are metal oxides like cobalt (blue), chrome (green through black), copper (green, blue, even red!), manganese (black, purple and pink) iron (red brown), etc. Different chemicals in the glaze can have dramatic effects. for example, barium carbonate (which we don’t use) turns manganese bright pink! Other elements can turn manganese dioxide brown, blue, purple and reddish brown. Manganese dioxide is a flux in and of itself as well. So, glazes that get their black and purple colours, often interact with other glazes and RUN! Our mirror black is a good example – it mixes really well with many glazes because it fluxes them – causes them to melt faster. It will also bring out many beautiful colours in the glazes because it’s black colouring most definitely comes from manganese dioxide! Glaze chemistry is a whole subject on it’s own! We use commercial Mayco glazes on purpose – for their huge range of colour possibilities, stability, cool interactions, artistic freedom with the ability to easily brush the glazes on and ease of use. We currently have almost 50 glazes on hand! A major project is to test the interactions of all glazes with each other. That is 2,500 test tiles!!!! I’m going to make the wall behind the wheels the feature wall of pretty colours! Step Seven – Glaze (Gloss or sometimes called “Glost”) Firing Most of the time this is the final stage of making your creation (but not always!) The glaze kiln goes to 1240°C. This is called cone 6, or midrange. It is the low end of stoneware temperatures. Stoneware clays and glazes are typically fired at cone 8 – 10, that is 1260 – 1290°C. The energy requirement to go from 1240°C to 1280°C is almost a 30% more! Our clay is formulated to vitrify (mature, turn “glass-like”) at 1240°, as are our glazes. A glaze kiln take around 12 hours to reach temperature and two to three days to cool down. Sometimes a third firing process is required – this is for decoration that is added to work after the glaze firing. For example – adding precious metals and lustres. this firing temperature is usually around 600 – 800°C depending upon the techniques being used. There are many students interested in gold and silver trims – we will be doing this third type of firing soon! After firing your work will be in the student finished work shelves. Remember to pay for it before you head out the door! There is a small extra charge for using porcelain clay (it’s more than twice the price of regular clay), and for any third firing process! Once your work has been fired it can not turn back into clay for millennia – so don’t fire it if you don’t like it! Put it in the bucket for recycling. https://firebirdstudios.com.au/the-process-of-making-pottery/The form of the jug has been in use for many centuries.Stoneware jug. Two tone brown glaze with pierced lip behind spout. Spout chipped.None.flagstaff hill, warrnambool, shipwrecked-coast, flagstaff-hill, flagstaff-hill-maritime-museum, maritime-museum, shipwreck-coast, flagstaff-hill-maritime-village, jug, ceramic jug -
 Federation University Historical Collection
Book, Engineering Production Convention, 1951
Blue hard covered book of 157 pages.engineering, geoff biddington, a.s> plowman, limits and fits, gauging principals, screw threads, surface finish, industrial design -
 Federation University Historical Collection
Book, Interfacial phenomena, 1961
This is a first edition.Light grey cloth covered hard covered book of 473 pages. On the spine is gold lettering on a dark brown rectangular background. There are photographs and diagrams throughout the book.Written in pencil on fly - M Can; (pound symbol) 8-10-0 Stamped on fly - Department of Mining University of Melbourne.interfacial phenomena, book, j t davies, e k rideal, chemical engineering, physics of surfaces -
 City of Moorabbin Historical Society (Operating the Box Cottage Museum)
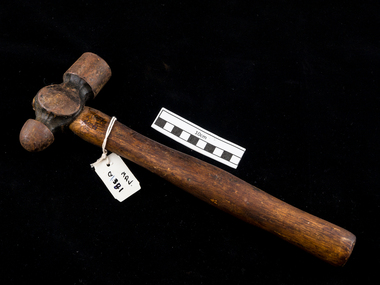
Tool - Hammer, Ball & Peen , metal wood c1900, c1900
Among the early settlers in Moorabbin Shire were blacksmiths who made tools for the other settlers who were establishing the homes, market gardens, farms, orchards and various businesses. Early settlers were self reliant and repaired their own equipment for kitchen,dairy, farm, horses, carts using various tools . Besides for peening (surface hardening by impact), the ball-peen hammer is useful for many tasks, such as striking punches and chisels - usually performed with the flat face of the hammer. The peening face is useful for rounding off edges of metal pins and fasteners, such as rivets. The ball face of the hammer can also be used to make gaskets for mating surfaces. A suitable gasket material is held over the surface where a corresponding gasket is desired, and the operator will lightly tap around the edges of the mating surface to perforate the gasket materialThis hammer is typical of the type used by early settlers in Moorabbin Shire c1900A hard faced ball & peen hammer, also known as a machinist's hammer,[ is a type of peening hammer used in metalworking. It has two heads, one flat and the other, called the peen, rounded.early settlers, market gardeners, blacksmiths, tools, building equipment, hammers, moorabbin shire, bentleigh, mckinnon, highett, cheltenham,mcewan james pty ltd, melbourne, bunnings pty ltd, -
 City of Moorabbin Historical Society (Operating the Box Cottage Museum)
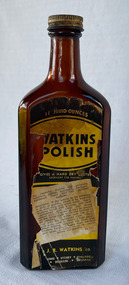
Domestic object - Watkins Polish, J. R. Watkins Co (USA), 20thC
The J. R. Watkins Co. opened its first overseas branch in Australia in 1935. The J. R. Watkins built a large factory at Highett on a six acres on the east side of Nepean Highway (no. 1123) in 1954. The J. R. Watkins company was founded in 1868 in Plainview, Minnesota USA, moving to Winona in 1885, by J. R. Watkins.Example of industry in the City of Moorabbin.Amber glass bottle with a metal screw on lid. A paper label is on the front of the bottle 'Watkins Polish" printed in yellow, black and white.PRINTED ON LABEL: 11 Fluid ounces - WATKINS POLISH - Gives a hard dry lustre excellent for Dusting For cleaning, dusting and polishing furniture, pianos, woodwork, linoleum, hardwood floors and all polished surfaces. Directions: If the article to be polished is dirty or gummy, clean it by washing with mild soap and warm water. Apply Watkins Polish with a damp, soft cloth (Dampened with water and wrung almost dry). The Polish may be poured on the damp cloth or on the surface to be polished. In either case rub it all with a dry cloth to obtain a high polish. When dusting, dampen the cloth with Watkins Polish - it keeps down the dust and gives a lustre which is neither greasy not gummy. The J. R. Watkins Co. Melbourne - Sydney - Adelaide - Kogarah EMBOSED ON BOTTLE: "The J.R.Watkins co. Made in Australia" the j. r. watkins co, highett, polish -
 Bendigo Historical Society Inc.
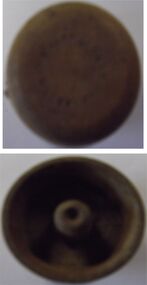
Functional object - WOODEN KNOB
Light brown round wooden knob 2.8 H x 4.2. Knob is hollow with a raised circular tapered piece in the middle which has an indentation in it. Centre piece is slightly higher than the edges. Has a small split in one side. It has a name printed into the top surface which is a little hard to read. It is: T. S. N?arpison ? Co. Melbourne.wooden knob -
 Royal Australian and New Zealand College of Obstetricians & Gynaecologists (RANZCOG)
Hewitt's cradle pessary associated with Dr Frank Forster, c. 1870 to 1930
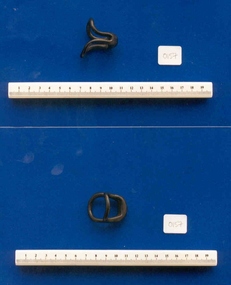
The pessary was first made of hard rubber then later from vulcanite. A major manufacturer was Allen & Hanburys, London. They were made in six sizes. The pessary was used to support the uterus in cases of prolapse of the uterus or assisted the conditions of relaxation of the vagina and reduction of vaginal hernia. The designer of this pessary was William Morse Graily Hewitt (1828-1893), a British gynaecologist, obstetrician and physician.Pessary is made out of black vulcanite. Has two hinged wings with a hole through the centre, and when placed on a flat surface the object forms the shape of a "V".intrauterine device, pessary -
 National Wool Museum
Tool - Stencil, c.2018
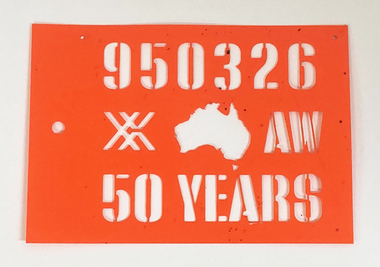
The story of 90 years of wool classing between father & son begins in 1936, when a young boy by the name of Stanley James Hucker walked through the doors of the Gordon Technical School in Geelong. Born in 1921, Stanley was 15 years of age when he began his 3-year course in Wool Classing. 30 years later, Stanley’s second son Denis completed the same 3-year wool classing course. Beginning in 1966, Denis attended the same Gordon Technical School and walked the same halls as his father before him. Stanley finished his course in 1938. He went back to the family farm in Lake Bolac for a brief period before enrolling in the Second World War. At the completion of the war, Stanley returned home and married before gaining a soldier settler allotment, north of Willaura. This enabled Stan to use his wool classing knowledge. He ran between 1,500 and 2,000 sheep for many years, while his wool classer stencil also allowed him to go out and class at various sheds around the area. He held his stencil from 1938 until he retired at the age of 60 in 1981. On retirement, his second son Denis was working in the district, managing a local property while also leasing land himself. Upon his father’s retirement, Denis had the opportunity to lease his father’s farm, an opportunity he could not refuse. Denis had finished his wool classing course at the Gordon Technical School in 1968, graduating dux of his class. He began working with a local contractor and started classing wool in his team. Denis gained a great deal of experience working as part of this team in big sheds of up to 8 stands servicing between 10 & 20,000 sheep. It was not all smooth sailing for Denis however, and he soon learnt an important lesson. Class wool the way you’re taught, don’t listen to the owner standing over your shoulder. At a clip of Corriedales near Casterton, Denis was pushing too many fleeces into the line of fine wool. This resulted in a notice from the Australian Wool Exchange (AWEX) “mixing counts too much, submit three clips for inspection”. Denis was able to submit 3 clips with no further complaints, however, this proved a valuable lesson he would never forget over his long career classing wool. In the early 1980s, when Denis was leasing two properties including his father’s, things were going well until drought struck. February 1983 was the date of the Ash Wednesday bushfires, and saw Melbourne have three days over 40 °C for only the second time on record. This period saw Denis give away farming, turning towards contracting work instead. After the difficult times of the early 1980s, the next two decades were a good time for the sheep industry. 15 micron wool was selling for prices between 4 to 5,000 cents per kilo, double what you’d expect for the same wool in 2022. In 1995 a single bale of wool sold for a million dollars. This was a good time for Denis too. His contracting work saw him employing local shearers and shed staff. His team was involved with the shearing and classing of more than 130,000 sheep. After 20 years of contracting, it was time for Denis to transition into the next phase of his life. He gave up independent contracting, preferring instead to return to being a member of someone else’s team. In 2018, having completed 50 years of wool classing, it was time to call it a day and retire completely. At the annual Gordon Wool School Old Students Association dinner held in 2018, Denis was presented with his 50 years as a registered wool classer stencil awarded by the Australian Wool Exchange (AWEX). This is a rare honour achieved by few. As of February 2020, a total of 430 wool classers had achieved this 50-year milestone. For Denis however, his proudest achievement is achieving 90 years of wool classing with his father. The National Wool Museum is proud to share the collection of objects gained from 90 years in the wool classing industry by Stanley and Denis. This ranges from Stanley’s first stencil and Wool Sample book, started when he first attended the Gordon in 1936. The collection concludes 90 years later with Denis’ 50 years of wool classing Stencil. The collection contains many more objects, all telling the story of these 90 years, and the hard work invested by this dedicated father and son duo. Thin sheet of orange plastic with letters and numbers moulded to produce a consistent pattern for the surface below through the application of ink. This wool classing stencil once belonged to Denis Hucker. The top number is Denis’ Wool Classing Stencil Number. On the next line is the emblem of the Australian Wool Exchange, followed by an image of Australia, and finally the letters AW. The final line reads 50 years, indicating Denis’ experience in the profession of wool classing. This stencil is reserved for wool classers who have held their stencil and been actively classing wool in Australia for more than 50 years. Wool classers sort, classify, and grade wool into various lines so that it can be sold at best market price. They also manage and supervise wool-handling teams. The stencil is used in the final step of preparing a bale of wool for sale. It is branded across the front of a wool bale to indicate the quality of the wool, with the classers number used as a seal of approval. Accompanying the stencil are two sheets of white A4 paper with printing in gold and black ink. The first sheet was presented by the Australian Council of Wool Exporters & Processors to Denis Hucker for achieving 50 years of wool classing. Surrounded by a thin gold boarder, the page is made up of black text with gold headings. In the top right corner, an image of a sheep with an outline of Australia is found. The second piece of paper was presented by the Australian Wool Exchange to Denis Hucker for achieving 50 years of wool classing. Two thirds of the page is made up of a gold stencil which reads “50 years”. Accompanying the stencil is black text. Moulded letters, numbers, emblem, and imagery. “950326 / (emblem AWEX) (Image Australia) AW / 50 Years” A4 Paper. Printed. See Multimedia A4 Paper. Printed See Multimedia wool classing, stencil, 90 years wool classing between father & son -
 National Wool Museum
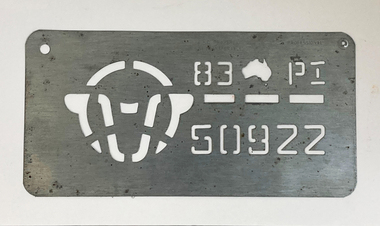
Tool - Stencil, 1983
The story of 90 years of wool classing between father & son begins in 1936, when a young boy by the name of Stanley James Hucker walked through the doors of the Gordon Technical School in Geelong. Born in 1921, Stanley was 15 years of age when he began his 3-year course in Wool Classing. 30 years later, Stanley’s second son Denis completed the same 3-year wool classing course. Beginning in 1966, Denis attended the same Gordon Technical School and walked the same halls as his father before him. Stanley finished his course in 1938. He went back to the family farm in Lake Bolac for a brief period before enrolling in the Second World War. At the completion of the war, Stanley returned home and married before gaining a soldier settler allotment, north of Willaura. This enabled Stan to use his wool classing knowledge. He ran between 1,500 and 2,000 sheep for many years, while his wool classer stencil also allowed him to go out and class at various sheds around the area. He held his stencil from 1938 until he retired at the age of 60 in 1981. On retirement, his second son Denis was working in the district, managing a local property while also leasing land himself. Upon his father’s retirement, Denis had the opportunity to lease his father’s farm, an opportunity he could not refuse. Denis had finished his wool classing course at the Gordon Technical School in 1968, graduating dux of his class. He began working with a local contractor and started classing wool in his team. Denis gained a great deal of experience working as part of this team in big sheds of up to 8 stands servicing between 10 & 20,000 sheep. It was not all smooth sailing for Denis however, and he soon learnt an important lesson. Class wool the way you’re taught, don’t listen to the owner standing over your shoulder. At a clip of Corriedales near Casterton, Denis was pushing too many fleeces into the line of fine wool. This resulted in a notice from the Australian Wool Exchange (AWEX) “mixing counts too much, submit three clips for inspection”. Denis was able to submit 3 clips with no further complaints, however, this proved a valuable lesson he would never forget over his long career classing wool. In the early 1980s, when Denis was leasing two properties including his father’s, things were going well until drought struck. February 1983 was the date of the Ash Wednesday bushfires, and saw Melbourne have three days over 40 °C for only the second time on record. This period saw Denis give away farming, turning towards contracting work instead. After the difficult times of the early 1980s, the next two decades were a good time for the sheep industry. 15 micron wool was selling for prices between 4 to 5,000 cents per kilo, double what you’d expect for the same wool in 2022. In 1995 a single bale of wool sold for a million dollars. This was a good time for Denis too. His contracting work saw him employing local shearers and shed staff. His team was involved with the shearing and classing of more than 130,000 sheep. After 20 years of contracting, it was time for Denis to transition into the next phase of his life. He gave up independent contracting, preferring instead to return to being a member of someone else’s team. In 2018, having completed 50 years of wool classing, it was time to call it a day and retire completely. At the annual Gordon Wool School Old Students Association dinner held in 2018, Denis was presented with his 50 years as a registered wool classer stencil awarded by the Australian Wool Exchange (AWEX). This is a rare honour achieved by few. As of February 2020, a total of 430 wool classers had achieved this 50-year milestone. For Denis however, his proudest achievement is achieving 90 years of wool classing with his father. The National Wool Museum is proud to share the collection of objects gained from 90 years in the wool classing industry by Stanley and Denis. This ranges from Stanley’s first stencil and Wool Sample book, started when he first attended the Gordon in 1936. The collection concludes 90 years later with Denis’ 50 years of wool classing Stencil. The collection contains many more objects, all telling the story of these 90 years, and the hard work invested by this dedicated father and son duo. Thin sheet of metal with letters and numbers cut to produce a consistent pattern for the surface below through the application of ink. In small text on the top edge of the stencil two separate phrases are engraved.” A.W.C. PROPERTY NOT TRANSFERABLE” and “PROFESSIONAL“. This wool classing stencil belonged to Stanley Hucker. It was his last Wool Classing Stencil. Dated to 1983, it is 45 years older than his first stencil. The role of a Wool Classer is to sort, classify, and grade wool into various ‘lines’ so that it can be sold for best market price. Wool Classers are typically also tasked with the managing and supervising of wool-handling teams. The stencil is used in the final step of preparing a bale of wool for sale. It is branded across the front of a wool bale to indicate the quality of the wool, with the classers number used as a seal of guarantee.Engraved letters. “A.W.C. PROPERTY / NOT TRANSFERABLE” Engraved letters. “PROFESSIONAL“. Cut imagery. Sheep’s head Cut letters, numbers, and imagery. “83 (Image Australia) P I / 50922”wool classing, stencil, 90 years wool classing between father & son -
 National Wool Museum
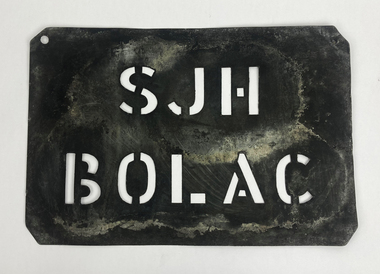
Tool - Stencil, 1938
The story of 90 years of wool classing between father & son begins in 1936, when a young boy by the name of Stanley James Hucker walked through the doors of the Gordon Technical School in Geelong. Born in 1921, Stanley was 15 years of age when he began his 3-year course in Wool Classing. 30 years later, Stanley’s second son Denis completed the same 3-year wool classing course. Beginning in 1966, Denis attended the same Gordon Technical School and walked the same halls as his father before him. Stanley finished his course in 1938. He went back to the family farm in Lake Bolac for a brief period before enrolling in the Second World War. At the completion of the war, Stanley returned home and married before gaining a soldier settler allotment, north of Willaura. This enabled Stan to use his wool classing knowledge. He ran between 1,500 and 2,000 sheep for many years, while his wool classer stencil also allowed him to go out and class at various sheds around the area. He held his stencil from 1938 until he retired at the age of 60 in 1981. On retirement, his second son Denis was working in the district, managing a local property while also leasing land himself. Upon his father’s retirement, Denis had the opportunity to lease his father’s farm, an opportunity he could not refuse. Denis had finished his wool classing course at the Gordon Technical School in 1968, graduating dux of his class. He began working with a local contractor and started classing wool in his team. Denis gained a great deal of experience working as part of this team in big sheds of up to 8 stands servicing between 10 & 20,000 sheep. It was not all smooth sailing for Denis however, and he soon learnt an important lesson. Class wool the way you’re taught, don’t listen to the owner standing over your shoulder. At a clip of Corriedales near Casterton, Denis was pushing too many fleeces into the line of fine wool. This resulted in a notice from the Australian Wool Exchange (AWEX) “mixing counts too much, submit three clips for inspection”. Denis was able to submit 3 clips with no further complaints, however, this proved a valuable lesson he would never forget over his long career classing wool. In the early 1980s, when Denis was leasing two properties including his father’s, things were going well until drought struck. February 1983 was the date of the Ash Wednesday bushfires, and saw Melbourne have three days over 40 °C for only the second time on record. This period saw Denis give away farming, turning towards contracting work instead. After the difficult times of the early 1980s, the next two decades were a good time for the sheep industry. 15 micron wool was selling for prices between 4 to 5,000 cents per kilo, double what you’d expect for the same wool in 2022. In 1995 a single bale of wool sold for a million dollars. This was a good time for Denis too. His contracting work saw him employing local shearers and shed staff. His team was involved with the shearing and classing of more than 130,000 sheep. After 20 years of contracting, it was time for Denis to transition into the next phase of his life. He gave up independent contracting, preferring instead to return to being a member of someone else’s team. In 2018, having completed 50 years of wool classing, it was time to call it a day and retire completely. At the annual Gordon Wool School Old Students Association dinner held in 2018, Denis was presented with his 50 years as a registered wool classer stencil awarded by the Australian Wool Exchange (AWEX). This is a rare honour achieved by few. As of February 2020, a total of 430 wool classers had achieved this 50-year milestone. For Denis however, his proudest achievement is achieving 90 years of wool classing with his father. The National Wool Museum is proud to share the collection of objects gained from 90 years in the wool classing industry by Stanley and Denis. This ranges from Stanley’s first stencil and Wool Sample book, started when he first attended the Gordon in 1936. The collection concludes 90 years later with Denis’ 50 years of wool classing Stencil. The collection contains many more objects, all telling the story of these 90 years, and the hard work invested by this dedicated father and son duo. Thin sheet of metal with letters cut to produce a consistent pattern for the surface below through the application of ink. This wool classing stencil belonged to Stanley Hucker. It was his first Wool Classing Stencil. It was used on Stanley’s property named “Yohhatnbu” in Willaura. Stanley gained the property as part of the Returned Soldiers Settlement Scheme for his service in World War 2. The role of a Wool Classer is to sort, classify, and grade wool into various ‘lines’ so that it can be sold for best market price. Wool Classers are typically also tasked with the managing and supervising of wool-handling teams. The stencil is used in the final step of preparing a bale of wool for sale. It is branded across the front of a wool bale to indicate the quality of the wool, with the classers number used as a seal of guarantee.Cut letters. “SJH / BOLAC ”wool classing, stencil, 90 years wool classing between father & son -
 National Wool Museum
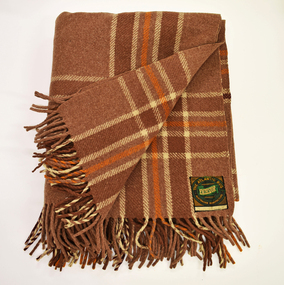
Textile - Blanket, Godfrey Hirst and CO. Pty Ltd, The Atlantic Rug, 1930s
The Excelsior Woollen and Worsted Mills were controlled by Godfrey Hirst & Co. Pty. Ltd. The Excelsior name originated from the union in the one enterprise of two of the earliest mills established in Victoria, the Old Victorian Mill, and the Old Barwon Mill. Godfrey Hirst combined his expertise with the capital of Charles Shannon to purchase the Barwon Mill in 1890 and the Victorian Mill in 1899. They commenced production of high-quality flannels in readiness for an anticipated lifting of tariff barriers in 1901, the year of federation. These were the first flannels to be produced in Australia rather than imported from England. In April 1912 the No.2 Excelsior Mill burnt down during the installation of electricity and was rebuilt. The No.1 Excelsior Mill was closed in 1930, with most hands moving to the No.2 Mill. In 1966 the firm changed ownership and became a subsidiary of the McKendrick family and commenced manufacturing of tufted carpets. Godfrey Hirst has since emerged as Australia’s leading manufacturer of tufted carpets. It has also expanded into hard flooring, including timber, laminate, and other surfaces. In 2018, the Godfrey Hirst business was acquired by Mohawk Industries, the world’s largest flooring company. Brown blanket featuring a design of four lines of cream, and a single line of orange, spanning the blanket vertically and horizontally, to form a plaid pattern. At the vertical ends, the blanket ends in a fringe.Label. Stitched. "The Atlantic Rug / Excelsior/ Guaranteed Product / Australian Manufacture"godfrey hirst & co. pty. ltd., excelsior mill, the atlantic rug -
 Queenscliffe Maritime Museum
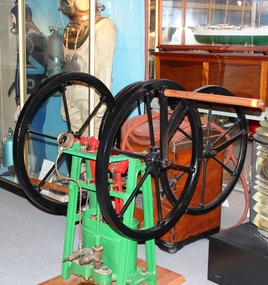
Equipment - Hand operated divers air pump
Standard diving dress (also known as hard-hat or copper hat equipment, or heavy gear) is a type of diving suit that was formerly used for all relatively deep underwater work that required more than breath-hold duration, which included marine salvage, civil engineering, pearl shell diving and other commercial diving work, and similar naval diving applications. Standard diving dress has largely been superseded by lighter and more comfortable equipment. Standard diving dress consists of a diving helmet made from copper and brass or bronze, an air hose from a surface-supplied manually operated PUMP or low pressure breathing air compressor, a waterproofed canvas suit, a diving knife, and weights to counteract buoyancy, generally on the chest, back and shoes. Later models were equipped with a diver's telephone for voice communications with the surface.Hand operated divers air pump for one or two diversdiving, air pump -
 Wodonga & District Historical Society Inc
Album - Hume Reservoir Australia Album - Plans and Progress Photos - River Murray Water Scheme, Department of Public Works, N.S.W, 1927
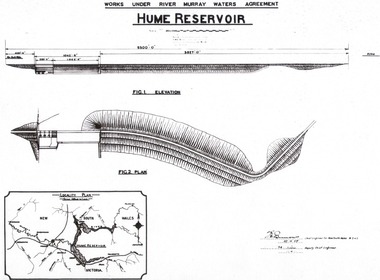
This set of photos is from a leather bound album bearing the inscription "HUME RESERVOIR AUSTRALIA" plus 'The Rt. Hon. L. C. M. S. Amery, P. C., M .P.' all inscribed in gold. It was presented to The Rt. Hon. L. C. M. S. Amery, P. C., M. P, Secretary of State for Dominion Affairs on the occasion of his visit to the Hume Reservoir on 2nd November 1927. This album is of local and national significance as it documents the planning and development of the Hume Reservoir up to 1927. It was the largest water reservoir in the British Empire. The album records the pioneering engineering work that went into its construction.1. Locality Plan and Plan of Dam. The dam is about ten miles by road upstream from Albury and about three-quarters of a mile below the confluence of the Mitta Mitta River and the Murray River. Its main features consist of a concrete portion across the bed of the river with earth embankment at both ends. The foundations throughout are on hard granite, found at an average depth of about 40 feet below the surface, the centre line being located to take advantage of the most favourable rock levels.Heading on page "WORKS UNDER RIVER MURRAY WATERS AGREEMENT/HUME RESERVOIR" Beneath top diagram "FIG. 1. ELEVATION" Beneath second diagram "FIG. 2. PLAN" On map "LOCALITY PLAN"hume reservoir australia, river murray waters scheme, hume weir diagrams, hume weir location -
 Wodonga & District Historical Society Inc
Functional object - Edison Phonograph Records
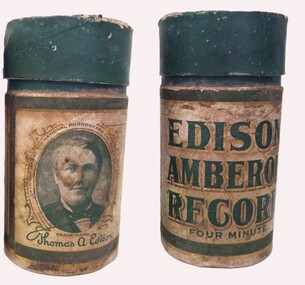
Edison cylinders were the earliest commercial medium for recording and reproducing sound. These hollow cylindrical objects have an audio recording engraved on the outside surface which can be reproduced when they are played on a mechanical cylinder phonograph. Beginning in 1889, pre-recorded wax cylinders were marketed. These have professionally made recordings of songs, instrumental music or humorous monologues in their grooves. The earliest cylinders were made from soft wax and later hard wax was utilised. Further developments by several companies, led to the introduction of celluloid cylinders. In late 1908, Thomas Edison had introduced wax cylinders that played for about four minutes (instead of the usual two) under the Amberol brand. The Amberols were manufactured with flat rim-ends, to prevent confusion with the earlier bevel-edged two-minute version. In 1912, the Edison company eventually acquired patents to the celluloid technology, and almost immediately started production under new brand as Edison Blue Amberol Records. Cylinder records continued to compete with the growing disc record market into the 1910s. In 1912, Columbia Records, which had been selling both discs and cylinders, dropped the cylinder format, while Edison introduced his Diamond Disc format, played with a diamond stylus. From 1915, new Edison cylinders were re-recordings from Edison discs. Although his cylinders continued to be sold in steadily dwindling quantities, Edison continued to support the owners of cylinder phonographs by making new titles available in that format until the company ceased manufacturing all records and phonographs in November 1929.This item is significant because it is representative of home entertainment in the late 19th and early 20th century.Two phonograph cylinders in cardboard boxes. The first cylinder is an earlier 2 minute Edison Gold Moulded Record with Issue Number 9184. It features a recording of "Paddle your own Canoe" by Arthur F. Collins and Byron G. Harlan and was released in January 1906. The second cylinder is a 4 minute Edison Amberol Record (NO. 647) featuring the Levy-Athan Polka performed by Charles Daab on xylophone and accompanied by an orchestra. It was released in February 1911. The case is cylindrical in shape and made of cardboard. It is coloured green, white, and black on the outside, while the base is not coloured. The tube is open at the top, and sealed at the base. Inside the tube is a white fabric lining. The top section of the outside of the tube is dark green. Below this is an outer sleeve. The outer sleeve has a half white, half green background with a black stripe, with gold outline, running horizontally around the top and bottom. The words "Thomas A. Edison" are printed in green cursive along the band. In the centre of the sleeve is the text " EDISON AMBEROL RECORD FOUR MINUTE" in green ink. To the left of that text is a green-toned image of Thomas Edison in an ornate, gold border. This is surrounded by the words “Copyright 1900 by the National Phonograph Co. Orange N.J. U.S.A". To the right of the text is a rectangular text box with a black border, which contains patent information in green text. edison phonograph, home entertainment, music early 20th century -
 Wodonga & District Historical Society Inc
Functional object - Edison Home Phonograph
Thomas Edison was one of the world’s most prolific inventors, holding over 2,000 different patents. One of his earliest inventions was the phonograph. The Edison Phonograph Company was formed on October 8, 1887, to market Edison's machine. The original machine went through many modifications. The Patent information on this machine indicates that it was manufactured after May 1906. Sound was recorded on wax cylinders. Edison cylinders were the earliest commercial medium for recording and reproducing sound. These hollow cylindrical objects have an audio recording engraved on the outside surface which can be reproduced when they are played on a mechanical cylinder phonograph Beginning in 1889, pre-recorded wax cylinders were marketed. They featured professionally made recordings of songs, instrumental music or humorous monologues in their grooves. The earliest cylinders were made from soft wax and later hard wax was utilised. Further developments by several companies, led to the introduction of celluloid cylinders. In late 1908, Thomas Edison had introduced wax cylinders that played for about four minutes (instead of the usual two) under the Amberol brand. The Amberols were manufactured with flat rim-ends, to prevent confusion with the earlier bevel-edged two-minute version. In 1912, the Edison company eventually acquired patents to the celluloid technology, and almost immediately started production of the new brand as Edison Blue Amberol Records. Cylinder records continued to compete with the growing disc record market into the 1910s. In 1912, Columbia Records, which had been selling both discs and cylinders, dropped the cylinder format, while Edison introduced his Diamond Disc format, played with a diamond stylus. From 1915, new Edison cylinders were re-recordings from Edison discs. Although his cylinders continued to be sold in steadily dwindling quantities, Edison continued to support the owners of cylinder phonographs by making new titles available in that format until the company ceased manufacturing all records and phonographs in November 1929.This item is significant because it is representative of early home entertainment in the late 19th and early 20th century.An Edison Home Phonograph in a wooden case. No trumpet included.On outer case' Edison On metal plate: Thomas A Edison TRADE MARK On large metal plate: Detailed inscription of Patent informationphonograph, thomas edison -
 Bendigo Historical Society Inc.
Document - POPPET LEGS AND ENGINES -WHERE SHIFTED TO
Handwritten notes where poppet legs and engines were taken. New Chum Goldfields - To Golden Fleece. To Deborah. To Central Deb. Carlisle Poppet Heads - to Guilford Plateau, then to Nell Gwynne Reefs. Williams United Engine (Sq Con Reds) - To Ulster then North Blue, then Nth Deborah. Central Blue Engine, with Corliss valves, to Deborah. Windmill Hill Legs to Sebastian, then to Deborah. Big Blue Legs - to Central Deborah. (Legs) South Moon to South Virginia. (Engine) Sth Moon to South Virginia, & driver put on side of drums. Fortuna Hustlers Engine - to ? ?, then to Bird's Reef, then to Herc No 1. Then to Nth Virginia. New Oswald (Malson) Engine left at Sth Moon, not allowed to put in, as it was a loose eccentric. Unity Legs - to Herc. No 1. Then to Ironbark. Ironbark Engine - To Wattle Gully. (Converted to electric winder). 222 - Several Compressors. The fire at the Unity mine in 1907. The fire at the Garden Gully mine in 1911. The fire at the Princess Dagmar in 1913. The light on the Ellenborough flagpole. Tambour Major. Joe Sheard in diving suit. Lansell's Little 180 - Vertical engine. Driver to right side and at floor level. Lansell's bit 180 - Vertical engine. Driver on top of engine. Floor between. Lansell's Needle. - Wooden legs with crossstays reaching from top of legs to close to bottom. Winder - Single Link engine. Hard to get drivers. Confidence Extended. Koch's Pioneer. - Shaft a big angle. Central Blue - Old Sheepshead - same. Vict Catherine - Winder - one drum in front of other, shaft at such an angle. Very hard to see which cage or tank at surface. Specimen Hill and Carlisle - Back-handed first motion engines. Central Nell - Winder from Lord Nelson mine, St Arnaud - Driver behind drums. Turned valve opp. To usual to turn steam on and off.document, gold, poppet legs and engines, shifting about - poppet legs and engines, new chum goldfields, golden fleece, deborah, central deborah, carlisle, guilford plateau, nell gwynne reefs, williams united, ulster, north blue, nth deborah, central blue, windmill hill, sebastian, big blue, south moon, south virginia, fortuna hustlers, tambour major, bird's reef, herc no 1, nth virginia, new oswald (maldon), unity, ironbark, wattle gully, 222, garden gully, princess dagmar, ellenborough, joe sheard, lansell's little 180, lansell's big 180, lansell's needle, confidence extended, koch's pioneer, central blue, old sheepshead, vict catherine, specimen hill, carlisle, central nell, lord nelson mine (st arnaud) -
 Bendigo Historical Society Inc.
Document - PRINCESS ALEXANDRA COY & TRIBUTORS - EXTRACTS ON PRINCESS ALEXANDRA MINE
Handwritten notes on the Princess Alexandra Mine. 24/11/1900 Shaft sunk 7 feet & timbered 15 feet total from plat 26 feet and from surface 2,311 feet. 8/12/1900 Finished sinking shaft, removed penthouse and cistern, fixed skids, ladders etc & are now enlarging 2225 ft plat. 16/2/1901 West x cut at 2285 ft. driven 17 feet, total 41 ft passed through 3 lavas and in the end have a back underlying west and carrying stone. Winze below 2225 feet, sunk 13 feet, total 18 feet - - at 15 ft saw a couple of colours of gold. Last Report 21/12/1901 Xcut east from 2165 ft in 13 ft in hard sandstone spurs - - Expect to get more stone near the black leader which is about 20 ft up. Next report as 'United Devonshire' on 4/1/1902. Notes prepared by Albert Richardson.document, gold, princess alexandra coy & tributors, princess alexandra coy & tributors, extracts on princess alexandra mine, united devonshire, mm reports -
 Bendigo Historical Society Inc.
Newspaper - JENNY FOLEY COLLECTION: HARD YAKKA
BHS CollectionBendigo Advertiser ''The way we were'' from 2002. Hard yakka: miners in front of the Central Nell Gwyne Mine in Bendigo. The man second from left is Delty Arthur Robins, who was the underground manager of the mine. He brought the first gold to the surface. Date unknown. The clip is in a folder.newspaper, bendigo advertiser, the way we were -
 Bendigo Historical Society Inc.
Photograph - AUSTIN COLLECTION: Operating rock drill, Central Deborah Gold Mine, Possibly 1990's
Central Deborah Gold Mine history: At its peak, Central Deborah Gold Mine reached a depth of 412 metres. It has 17 separate levels and 15 kilometres of drives and cross cuts (tunnels). The Central Deborah was very much a hands-on mine and the conditions that the miners worked in would be considered shocking by today's standards – being lowered underground in a cage with only two sides, often working ankle to knee deep in water, filling up to 32 ore trucks a shift by hand which were then pushed a mile or more along rails in the drives, working by carbide lamp, breathing in the fumes and rock dust and communication by bells. Geez, they were ironmen. However, at the time working conditions were considered to be among the best on the goldfields at Central Deborah, after all it was one of the only mines that had hot showers. Following Central Deborah Gold Mine's closure, the Bendigo skyline began to noticeably change. Obvious remnants of mining such as poppet heads, engine rooms, service quarters, battery houses and chimneys were steadily disappearing. After intense lobbying by the local community, the Bendigo City Council purchased the still very much intact Central Deborah Gold Mine in 1970 for a mere $6,000 to ensure that a vital link to Bendigo's historic golden past was maintained. The Bendigo Trust was then formed to oversee the operations of the Central Deborah Gold Mine, which led to the surface of the mine being opened to the public in 1971. Initially the surface was open for just 12 hours a week and as the demand for viewing a part of Bendigo's history increased, so did the opening hours. In 1974 the mine was gazetted as a Public Historical Purposes Reserve and attracted such visitors as H.R.H Prince Charles. By far the greatest shortcoming at this stage was that no one could view the underground workings, as these had become flooded. After what could only be described as a monumental effort by everyone involved, Level 2 of the mine was officially opened to the public by the Premier of Victoria, the Honourable John Cain, on 20 June 1986, which brought to fruition a long standing dream.Black and white photograph. Two men with hard hats and lights standing in front of underground rock surface at Central Deborah Gold Mine. Man on left hand side of image is operating a small rock drill. Man on right hand side is observing the procedure. gold mining, central deborah gold mine, rock drill, underground -
 Flagstaff Hill Maritime Museum and Village
Wood encrustation, 1855
The object is a mass of small shipwreck debris that has been concreted together by sediment and marine growth. It was retrieved from the wreck-site of the SCHOMBERG, which ran aground near the mouth of the Curdies River near Peterborough in 1855. The conglomerate of preserved wood impressions, rusted metal pieces, a small square of copper alloy, and black glass-like stones, presents too disjointed a collection to provide information on their purpose or function on the ship. The natural and gradual process of limestone accretion is a significant feature of the wreck-site, which was rediscovered by fishermen and skindivers in 1973. In his book “Exploring Shipwrecks of Western Victoria”, experienced diver and former director at Flagstaff Hill, Peter Ronald writes that the SCHOMBERG’s “triple layered wooden hull has disintegrated almost without trace…The turbulent shallow waters have promoted particularly heavy marine growth which tend to disguise the wreckage…the most prominent feature being a corroded mass of railway iron…Close inspection reveals small artefacts firmly embedded in the marine concretion which…is quite literally as hard as iron”. The huge oblong mass of concretion that now distinguishes the site covers the remains of this heavy cargo. A contemporary account of the SCHOMBERG’s fate (told by two of her passengers to the Melbourne Argus) alleges the ship “was overloaded, drawing over 25 feet when she left, and the cargo was chiefly iron and plant for the Geelong Railway”. The SCHOMBERG was a 2,000 ton clipper ship, specifically designed for the Australian immigration trade (back-loading wool for Britain’s mills), and constructed in Hall’s shipyard in Aberdeen, Scotland. She was owned by the Black Ball Line and launched in 1855. Alexander Hall & Son were renowned builders of sleek and fast 1,000 ton clippers for the China trade (opium in, tea out) and were keen to show they could also outclass the big North American ships built by Donald Mackay. Consequently the SCHOMBERG was ‘overbuilt’. Her hull featured five ‘skins’ of Scotch Larch and Pitch Pine overlaying each other in a diagonal pattern against a stout frame of British Oak. Oak has been favoured by builders of wooden ships for centuries. Its close, dense grain made it harder to work, but also gave it great strength and durability. In addition, the lateral spread of its branches supplied a natural curvature for the ribs of a vessel’s hull, as well as providing the small corner or curved pieces (‘knees’ and ‘elbows’) that fit them together. The shape and texture of this wood sample suggests a dense hardwood like Oak. The timber has been cut off at one end since its recovery from the sea, exposing a smooth and almost shiny surface. Seasoned English Oak has a similar light brown colour and tight grained finish. At the launch the SCHOMBERG’s 34 year old master, Captain ‘Bully’ Forbes, had promised Melbourne in 60 days, "with or without the help of God." James Nicol Forbes was born in Aberdeen in 1821 and rose to fame with his record-breaking voyages on the famous Black Ball Line ships; MARCO POLO and LIGHTNING. In 1852 in the MARCO POLO he made the record passage from London to Melbourne in 68 days. There were 53 deaths on the voyage but the great news was of the record passage by the master. In 1954 Captain Forbes took the clipper LIGHTNING to Melbourne in 76 days and back in 63 days, this was never beaten by a sailing ship. He often drove his crew and ship to breaking point to beat his own records. He cared little for the comfort of the passengers. On this, the SCHOMBERG’s maiden voyage, he was going to break records. SCHOMBERG departed Liverpool on her maiden voyage on 6 October 1855 flying the sign “Sixty Days to Melbourne”. She departed with 430 passengers and 3000 tons cargo including iron rails and equipment intended to build the Melbourne to Geelong Railway and a bridge over the Yarra from Melbourne to Hawthorn. She also carried a cow for fresh milk, pens for fowls and pigs, 90,000 gallons of water for washing and drinking. It also carried 17,000 letters and 31,800 newspapers. The ship and cargo was insured for $300,000, a fortune for the time. The winds were poor as she sailed across the equator, slowing SCHOMBERG’s journey considerably. Land was first sighted on Christmas Day, at Cape Bridgewater near Portland, and Captain Forbes followed the coastline towards Melbourne. Forbes was said to be playing cards when called by the Third Mate Henry Keen, who reported land about 3 miles off, Due in large part to the captain's regarding a card game as more important than his ship, it eventually ran aground on a sand spit near Curdie's Inlet (about 56 km west of Cape Otway) on 26 December 1855, 78 days after leaving Liverpool. The sand spit and the currents were not marked on Forbes’s map. Overnight, the crew launched a lifeboat to find a safe place to land the ship’s passengers. The scouting party returned to SCHOMBERG and advised Forbes that it was best to wait until morning because the rough seas could easily overturn the small lifeboats. The ship’s Chief Officer spotted SS QUEEN at dawn and signalled the steamer. The master of the SS QUEEN approached the stranded vessel and all of SCHOMBERG’s passengers and crew were able to disembark safely. The SCHOMBERG was lost and with her, Forbes’ reputation. The Black Ball Line’s Melbourne agent sent a steamer to retrieve the passengers’ baggage from the SCHOMBERG. Other steamers helped unload her cargo until the weather changed and prevented the salvage teams from accessing the ship. Later one plunderer found a case of Wellington boots, but alas, all were for the left foot! Local merchants Manifold & Bostock bought the wreck and cargo, but did not attempt to salvage the cargo still on board the ship. They eventually sold it on to a Melbourne businessman and two seafarers. In 1864 after two of the men drowned when they tried to reach SCHOMBERG, salvage efforts were abandoned. Parts of the SCHOMBERG were washed ashore on the south island of New Zealand in 1870, nearly 15 years after the wreck. The wreck now lies in almost 9 metres of water. Although the woodwork is mostly disintegrated the shape of the ship can still be seen due to the remaining railway irons, girders and the ship’s frame. A variety of goods and materials can be seen scattered about nearby. Flagstaff Hill holds many items salvaged from the SCHOMBERG including a ciborium (in which a diamond ring was concealed), communion set, ship fittings and equipment, personal effects, a lithograph, tickets and photograph from the SCHOMBERG. One of the SCHOMBERG bells is in the Warrnambool Library. This object is listed on the Shipwreck Artefact Register, No S/49, and is significant because of its association with the ship SCHOMBERG. The SCHOMBERG collection as a whole is of historical and archaeological significance at a State level, listed on the Victorian Heritage Register VHR S612. Flagstaff Hill’s collection of artefacts from the SCHOMBERG is significant for its association with the Victorian Heritage Registered shipwreck. The collection is primarily significant because of the relationship between the objects, as together they have a high potential to interpret the story of the SCHOMBERG. The SCHOMBERG collection is archaeologically significant as the remains of an international passenger ship. The shipwreck collection is historically significant for representing aspects of Victoria’s shipping history and its potential to interpret sub-theme 1.5 of Victoria’s Framework of Historical Themes (living with natural processes). The collection is also historically significant for its association with the shipwreck and the ship, which was designed to be fastest and most luxurious of its day. The SCHOMBERG collection meets the following criteria for assessment: Criterion A: Importance to the course, or pattern, of Victoria’s cultural history. Criterion B: Possession of uncommon, rare or endangered aspects of Victoria’s cultural history. Criterion C: Potential to yield information that will contribute to an understanding of Victoria’s cultural history. The object is an aggregate of limestone sediment that formed at the wreck-site of the SCHOMBERG (1855). It is an irregularly shaped conglomerate of sand, shell-grit and marine worm casings from the ocean floor, but also incorporates an assortment of manufactured metal pieces and pipe fittings (corroded with red rust), a small rectangular piece of copper sheet, some ‘petrified’ wood remains (hardened and a soft brown colour), and pieces of black shiny stone (roughly cube shaped and possibly glass or porcelain remnants). There is an impression left in the stone of a joist or plank end but the original timber that the sediment formed around has since been dispersed by the sea.flagstaff hill, warrnambool, shipwrecked-coast, flagstaff-hill, flagstaff-hill-maritime-museum, maritime-museum, shipwreck-coast, flagstaff-hill-maritime-village, schomberg, shipwreck timber, alexander hall and son, shipwreck debris, black ball line, 1855 shipwreck, aberdeen clipper ship, captain forbes, peterborough shipwreck, ss queen -
 Flagstaff Hill Maritime Museum and Village
Wood sample, 1855
The artefact is a piece of ship’s timber from the wreck-site of the SCHOMBERG, a vessel which collided with the Peterborough reef on her maiden voyage in December 1855. This small wooden remnant of the disaster has been concreted on one side by the accrual of marine sediment while submerged. The build-up of sediment over the remains of the vessel is typical of the site as a whole. This artefact illustrates the reclaiming power of the ocean and the gradual disappearance of timber constructed vessels that have come to grief along this coastline (for example, the THISTLE in 1837, and the CHILDREN in 1838). The SCHOMBERG was a 2,000 ton clipper ship, specifically designed for the Australian immigration trade (back-loading wool for Britain’s mills), and constructed in Hall’s shipyard in Aberdeen, Scotland. She was owned by the Black Ball Line and launched in 1855. Alexander Hall & Son were renowned builders of sleek and fast 1,000 ton clippers for the China trade (opium in, tea out) and were keen to show they could also outclass the big North American ships built by Donald Mackay. Consequently the SCHOMBERG was ‘overbuilt’. Her hull featured five ‘skins’ of Scotch Larch and Pitch Pine overlaying each other in a diagonal pattern against a stout frame of British Oak. Oak has been favoured by builders of wooden ships for centuries. Its close, dense grain made it harder to work, but also gave it great strength and durability. In addition, the lateral spread of its branches supplied a natural curvature for the ribs of a vessel’s hull, as well as providing the small corner or curved pieces (‘knees’ and ‘elbows’) that fit them together. The shape and texture of this wood sample suggests a dense hardwood like Oak. The timber has been cut off at one end since its recovery from the sea, exposing a smooth and almost shiny surface. Seasoned English Oak has a similar light brown colour and tight grained finish. At the launch the SCHOMBERG’s 34 year old master, Captain ‘Bully’ Forbes, had promised Melbourne in 60 days, "with or without the help of God." James Nicol Forbes was born in Aberdeen in 1821 and rose to fame with his record-breaking voyages on the famous Black Ball Line ships; MARCO POLO and LIGHTNING. In 1852 in the MARCO POLO he made the record passage from London to Melbourne in 68 days. There were 53 deaths on the voyage but the great news was of the record passage by the master. In 1954 Captain Forbes took the clipper LIGHTNING to Melbourne in 76 days and back in 63 days, this was never beaten by a sailing ship. He often drove his crew and ship to breaking point to beat his own records. He cared little for the comfort of the passengers. On this, the SCHOMBERG’s maiden voyage, he was going to break records. SCHOMBERG departed Liverpool on her maiden voyage on 6 October 1855 flying the sign “Sixty Days to Melbourne”. She departed with 430 passengers and 3000 tons cargo including iron rails and equipment intended to build the Melbourne to Geelong Railway and a bridge over the Yarra from Melbourne to Hawthorn. She also carried a cow for fresh milk, pens for fowls and pigs, 90,000 gallons of water for washing and drinking. It also carried 17,000 letters and 31,800 newspapers. The ship and cargo was insured for $300,000, a fortune for the time. The winds were poor as she sailed across the equator, slowing SCHOMBERG’s journey considerably. Land was first sighted on Christmas Day, at Cape Bridgewater near Portland, and Captain Forbes followed the coastline towards Melbourne. Forbes was said to be playing cards when called by the Third Mate Henry Keen, who reported land about 3 miles off, Due in large part to the captain's regarding a card game as more important than his ship, it eventually ran aground on a sand spit near Curdie's Inlet (about 56 km west of Cape Otway) on 26 December 1855, 78 days after leaving Liverpool. The sand spit and the currents were not marked on Forbes’s map. Overnight, the crew launched a lifeboat to find a safe place to land the ship’s passengers. The scouting party returned to SCHOMBERG and advised Forbes that it was best to wait until morning because the rough seas could easily overturn the small lifeboats. The ship’s Chief Officer spotted SS QUEEN at dawn and signalled the steamer. The master of the SS QUEEN approached the stranded vessel and all of SCHOMBERG’s passengers and crew were able to disembark safely. The SCHOMBERG was lost and with her, Forbes’ reputation. The Black Ball Line’s Melbourne agent sent a steamer to retrieve the passengers’ baggage from the SCHOMBERG. Other steamers helped unload her cargo until the weather changed and prevented the salvage teams from accessing the ship. Later one plunderer found a case of Wellington boots, but alas, all were for the left foot! Local merchants Manifold & Bostock bought the wreck and cargo, but did not attempt to salvage the cargo still on board the ship. They eventually sold it on to a Melbourne businessman and two seafarers. In 1864 after two of the men drowned when they tried to reach SCHOMBERG, salvage efforts were abandoned. Parts of the SCHOMBERG were washed ashore on the south island of New Zealand in 1870, nearly 15 years after the wreck. The wreck now lies in almost 9 metres of water. Although the woodwork is mostly disintegrated the shape of the ship can still be seen due to the remaining railway irons, girders and the ship’s frame. A variety of goods and materials can be seen scattered about nearby. Flagstaff Hill holds many items salvaged from the SCHOMBERG including a ciborium (in which a diamond ring was concealed), communion set, ship fittings and equipment, personal effects, a lithograph, tickets and photograph from the SCHOMBERG. One of the SCHOMBERG bells is in the Warrnambool Library. The SCHOMBERG collection as a whole is of historical and archaeological significance at a State level, listed on the Victorian Heritage Register VHR S612. Flagstaff Hill’s collection of artefacts from the SCHOMBERG is significant for its association with the Victorian Heritage Registered shipwreck. The collection is primarily significant because of the relationship between the objects, as together they have a high potential to interpret the story of the SCHOMBERG. The SCHOMBERG collection is archaeologically significant as the remains of an international passenger ship. The shipwreck collection is historically significant for representing aspects of Victoria’s shipping history and its potential to interpret sub-theme 1.5 of Victoria’s Framework of Historical Themes (living with natural processes). The collection is also historically significant for its association with the shipwreck and the ship, which was designed to be fastest and most luxurious of its day. The SCHOMBERG collection meets the following criteria for assessment: Criterion A: Importance to the course, or pattern, of Victoria’s cultural history. Criterion B: Possession of uncommon, rare or endangered aspects of Victoria’s cultural history. Criterion C: Potential to yield information that will contribute to an understanding of Victoria’s cultural history. A piece of wood, concreted in sediment, from the wreck of the SCHOMBERG (1855). The limestone accretion includes sand, shell grit and marine worm casings. The exposed surface of the wood is broken and worn smooth along the grain. One end of the timber has been cut or sawn off across the grain, presenting a smooth and shiny surface.flagstaff hill, warrnambool, shipwrecked-coast, flagstaff-hill, flagstaff-hill-maritime-museum, maritime-museum, shipwreck-coast, flagstaff-hill-maritime-village, wood segment, schomberg, shipwreck timber, alexander hall and son, limestone concretion, oak-framed hull