Showing 102 items matching "metal testing"
-
 Flagstaff Hill Maritime Museum and Village
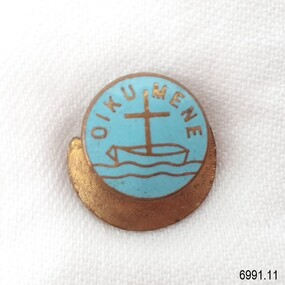
Badge - World Council of Churches, OIKUMENE, 1940s
This small label badge carries the symbol of the World Council of Churches (WCC), which was established in 1948. The WCC states on its website "The World Council of Churches (WCC) is the broadest and most inclusive among the many organized expressions of the modern ecumenical movement, a movement whose goal is Christian unity. " The 'V' on the back of the badge possibly stands for Victoria. The word on the logo of this badge has the spelling "OIKUMENE" but in many other WCC logos, the Greek word "Oikoumene" is used. The term is translated as "inhabited earth" and is used fifteen times in the original Greek New Testament, including in Matthew 24:14, which says "And the gospel of the kingdom shall be preached in all the world for a witness unto all nations and then shall the end come." The WCC explains that the logo uses early Christian symbols to portray its message, with the church portrayed as a boat afloat on the sea of the world with the mast in the form of a cross. This badge is part of a set of eleven badges collected from the 1920s to the 1940s by Dr W. R. Angus. The set represents various organisations that he had interests in. It was donated to Flagstaff Hill Maritime Village by the family of Doctor Angus, Surgeon and Oculist. The set of badges is part of the “W.R. Angus Collection” which includes historical medical equipment, surgical instruments and material once belonging to Dr Edward Ryan and Dr Thomas Francis Ryan, (both of Nhill, Victoria) as well as Dr Angus’ own belongings. The Collection’s history spans the medical practices of the two Doctors Ryan, from 1885-1926 plus that of Dr Angus, up until 1969. ABOUT THE “W.R.ANGUS COLLECTION” Doctor William Roy Angus M.B., B.S., Adel., 1923, F.R.C.S. Edin.,1928 (also known as Dr Roy Angus) was born in Murrumbeena, Victoria in 1901 and lived until 1970. He qualified as a doctor in 1923 at the University of Adelaide, was Resident Medical Officer at the Royal Adelaide Hospital in 1924 and for a period was a house surgeon to Sir (then Mr.) Henry Simpson Newland. Dr Angus was briefly an Assistant to Dr Riddell of Kapunda, then commenced private practice at Curramulka, Yorke Peninsula, SA, where he was a physician, surgeon and chemist. In 1926, he was appointed as the new Medical Assistant to Dr Thomas Francis Ryan (T.F. Ryan, or Tom), in Nhill, Victoria, where his experiences included radiology and pharmacy. In 1927 he was Acting House Surgeon in Dr Tom Ryan’s absence. Dr Angus married Gladys in 1927 at Ballarat, the nearest big city to Nhill where he began as a Medical Assistant. He was also Acting House surgeon at the Nhill hospital where their two daughters were born. During World War II He served as a Military Doctor in the Australian Defence Forces. Dr Angus and his family moved to Warrnambool in 1939, where Dr Angus operated his own medical practice. He later added the part-time Port Medical Officer responsibility and was the last person appointed to that position. Both Dr Angus and his wife were very involved in the local community, including the planning stages of the new Flagstaff Hill and the layout of the gardens there. Dr Angus passed away in March 1970.This religious lapel badge of the World Council of Churches represents one of the organisations in which Dr Angus had an interest. The set of badges is significant for connecting Doctor Angus with Australian organisations of the early-to-mid 20th century, including those relating to military service support. The W.R. Angus Collection is significant for still being located at the site it is connected with, Doctor Angus being the last Port Medical Officer in Warrnambool. The Collection includes historical medical objects that date back to the late 1800s.Lapel badge; a small round blue enamel badge with gold image and text. The image contains the symbol of a cross above a small boat on waves. The image is the logo of the World Council of Churches.This badge is part of a set of badges collected by Dr W R Angus. the set represents organisations that he was involved in, and is part of the W.R. Angus Collection.Test above Logo: “OIKUMENE” Logo; [cross] above [small boat] above [waves] Text under clip; “V” flagstaff hill, warrnambool, maritime museum, maritime village, great ocean road, shipwreck coast, oikumene, w.r. angus, metal badge, enamel badge, organisation badges, religious badge, lapel badge, oikoumene, world council of churches, wcc, christian unity -
 Federation University Historical Collection
Annual Report, Ballarat School of Mines Annual Report, 1970
... . The materials testing laboratory secured and retained registration.... The materials testing laboratory secured and retained registration ...The Ballarat School of Mines was founded in 1970 and was the first institution of formal technical education in Australia. 1970 marked the centenary of the School and that of technical Education in Australia. A centenary commitee was established to plan activities and projecty sot celebrate the occasion. These included five centenary lectures fro secondary school students, a film of the School to be made and shown on National Television, a centenary medallion centenary posters, a dinner for local organisations with Council and staff as hosts, an historical notebook on the school, a plaque mounted to mark the site of the original school, opening of the Mt Helen Campus, Relocating the Old SMB battery ot mt Helen, student reunion, Art display of present and former students, Mt Helen Open Days and distribution of car stickers. A Centenary Appeal was established to finance a Great Hall and Sports Centre at the Mt Helen Campus. The Appeal President was Cr W.J.C. North. The materials testing laboratory secured and retained registration by the National Association of Testing Authorities for a range of tests on concrete and metals. The student accommodation at Mt Helen 23 Page report (with supplementary finances) in a soft cover showing a picture of the Former Ballarat Circuit Courthouse which was used as the first building of the Ballarat School of Mines. The report includes a page of stamps produced to commemorate the centenary of Technical Education in Australia through the Ballarat School of Mines. The report was presented by Council President Morgan Bevan John. The report includes information on the new campus for the Tertiary Division at Mt Helen, including information on the buildings being constructed by local builders. The site plan was developed by G.J. Harrison and L.H. Vernon and Associates. The following staff resigned: E.R. McGrath (deceased), E.W. Ryan, I.L. Hunter. The following new appointments were made: R.l. Martin, G.K. Tampi, T.F. Norwood, K.M. Llewellyn, M.J. Evans, J.F. Clark, K.G. Millar, B.R. Rollins, L.G. Shome, C.I. Dowling, M.H. Pitfield, G.M. Pearson, J.P. Murray, J.R. Thyer. Page 10 lists diplomas awarded and page 11 lists scholarships and prizes including the Ballarat has Company Scholarship, the Josephine Brelaz Scholarship, The Frank Pinkerton Scholarship, The Mica Smith/Serjeant/Ironworkers Scholarship, Martha Pinkerton Scholarship, Ballarat City Council Scholarship, Junior Art Scholarship, C.R.A. Scholarship, B.H.P. Scholarship, S.E.C. Scholarship, Alexander Rushal Scholarship, Russell and Shirley Evans Scholarship. The R.W. Richards Medal for 1969 was awarded to Peter Hensley. A new I.C.L. 1901A computer and associated equipment was purchased for the Computer Centre. Page 15 has information on the Victorian Institute of Colleges (VIC). Governor of Victoria, Sir Rohan Delacombe, with VIC's Dr Philip Law visited the Ballarat School of Mines and inspected both the old and new facilities. ballarat school of mines, m.b. john, centenary, anniversary -
 Federation University Historical Collection
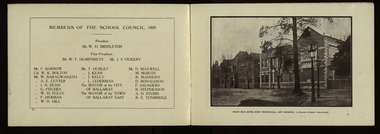
Booklet, The Ballarat School of Mines and Industries 1870-1920 Jubilee Booklet, 1920 (estimated)
The first school of Mines in Australia was established at Ballarat in 1870. At the time of its jubilee (1930) the following people were members of the School Council: W.H. Middleton (President), W.T. Humphreys (VP), J.S. Vickery (VP), F. Barrow, Col. W.K. Bolton, William Baragwanath, A.E. Cutter, J.N. Dunn, G. Fitches, W.H. Fleay, F. Herman. W.D. Hill, T. Hurley, K. Kean. J. Kelly, L. Lederman, Mayor of Ballarat, Mayour of Ballarat East, D. Maxwell, M. Martin, R. Maddern, D. Ronaldson, F. Saunders, R. Stephenson, A.O. Stubbs, R.E. Tunbridge. The School Staff in 1920 comprised: Herbert H. Smith, Walter Rowbotham, Reginald L. Cutter, M.C. Young, Hilda Wardle, M. Wiliamson, P.S. Richards, L.H. Archibald, J. Woods, Ken Moss, W. Kenneth, Mrs McIlvena. B. Robinson, S. Rowe, E. Hope-Jones, Miss Abrams, L.St.G.P. Austin, Alfred Mica Smith, J.R. Pound, Herbert R. Murphy, N.H. Junner, Maurice Copland, L.H. Archibald, E.J.A. McConnon, Newton King, D.m. Hull, T.R. Gordon, John M. Sutherland, T.K. Jebb, Dick Richards, C. Tonkin, A.W. Steane, J. Paterson, H.W. Malin, R.V. Maddison, S.M. Mayo, F.A. King, W.H. Steane, T.R. Gordon, T.A. Williams, H. Waldron, G. Black, E.J. McConnon, R.V. Duncan. R. Cutter, E.G. Vawdrey, Hilda WardleWhite stapled booklet - landscape format - 20pp + soft covers with blue writing. Includes an historical sketch of the Ballarat School of Mines. Contains images of the school from around 1920. The history outlined in the booklet follows: 'Ballarat has helped to influence the life and destinies of Australia in many ways, the recital of which would perhaps prove tedious to the citizens of less favoured localities! However, it can be said, without much fear of contradiction, that only less known thought Australia than its fame as a gold field is the reputation won for it by its school of Mines, ... Ballarat was still quite a new place when the School was founded, but a very propserous and popular place all the same, with a go-ahead lot of citizens brim full of the spirit of enterprise which seemsto animate mining populations generally. Money was plentiful, and they launched out into ventures, which later, were to develop and take the place of the gold mines, while what is more to the point, they understood the value of education. the old digging days were passing away. So far as Ballarat itself was concerned the day of the cradle and tin dish had already passed into an antiquity "as dead and distant as the age of the Tubal Caon," said dir redmond Barry on declaring the School open. Mining had become a serious business, and the mining engineer, the metallurgist, and the geologist had become a power in the land. In these circumstances the suggestions to found a School of Mines met with ready acceptance. The late Mr James M. Bickett had the honor of bringing forward the proposition at a meeting of the Ballarat Mining Board in October, 1869. it was agreed to, and the Government, having been approached for assistance, granted a lease of the old Supreme Court buildings at a nominal reantal. A modest sum, including 100 pounds from the Borough Council of Ballarat West, was subscribed by a number of sympathisers, and on the 26th October, 1870, the inaugural address was delivered by Sir Redmond Barry, the first President of the School. Classes were commenced on the 23rd January, 1871. The students at first were mostly adults. They were chiefly men emloyed at the mines, who had the wisdom and energy to devote their spare time to study, and, though their attendance was somewhat irregular, they made very good progress. Old prints which have been preserved show them at work at furnaces, big bearded men of the old-fashioned type of miner. It is interesting to note that among those who gave evidence and encouragement was Sir Roderick Murchison, who many years before had advised Cornish miners to emigrate to Australia to search for gold, and who in 1848 was in possession of gold ore sent from this country. Sir Roderick sent a parcel of books for the library, and gave useful advice as to the curriculum which should be adopted. The Museum, which now contains a most valuable collection of minerals, was one of the first things attended to, and the reports presented to the Council from time to time speak of additions being made from all parts of the world. New equipment was constantly being added to the School, a good deal of assay work was done, and some specimens were sent from the East Indies for examination as far back as 1873. By this time there was a difficulty in providing accomodation for the students who wished to enrol, and the number of instructors had grown from two to four. In 1882 the first building was being erected on what was then part of the gaol reserve. A little more than ten years afterwards a buildnig formerly serving as a Methodist Church was absorbed, while later on, the demand for accomodation increasing, the attack upon the gaol was renewed. The School continued to grow in reputation and size, and became the science centre of the district, and in 1889 a learge new building was opened by Sir Alexander Peacock. Students came from over seas as well as from all the States of Australia, and after going through their courses they took with them the name and fame of the old School to all parts of the globe. School of Mines boys have played a great part in developing the mining fields of Western Australia, South Australia, and africa, while old students who have made a name in their profession are constantly dropping in to see how the old place is getting along. It was not to be expected, however, that the Ballarat School would be left without rivals, its very success inspiring competition. Mining Schools were started in other parts of Australia, and, at the same time, Victoria ceased to hold first place as a mining state. On the other hand there was a great advance in manufacturing, and the demand for technicaly trained men became a great and as insistent as ever it had been for trained mining men. The Council was quick to adapt the school to the new conditions, and the result is seen in the institution, which is one of Ballarat's proudest possession. Instruction is given in all branches of technical work, and the classes are filled with students who are building up for Ballarat a reputation as an industrial centre, which promises to equal that which it formerly held as a mining town. Owing to its bracing climate, its abundant opportunities for recreations, and its accessibilty, Ballarat as a city is an ideal place for educational purposed, and is yearly becoming more and more appreciated throughout the State. The chairman of one of Ballarat's biggests industries claims that the workman can do twice the day's work here that he can do in Melbourne. he was a little enthusiastic over it, perhaps, but it is a well-known fact that the healthy and invigourating Ballarat climate is conducive to both physical and mental activity, and the records of the School provide ample proof of it. One of the most interesting and successful branches of the School of Mines and Industries - if the name be enlarged with the enlargement of its scope - is the Technical Art School. "The City of Statues" has from its earliest days been a stronghold of art. Art schools have flourised here, and in 1905 the Education Department came to the conclusion that the best thing to do with them was to place them under the management of the School of Mines Council. A magnificent new Technical Art School was built at a cost of some 12,000 pounds on the site of the old Supreme Court building, and was formally opened on the 23rd July, 1915. The results have not only been justified but surpassed all anticipations. The most comprehensive list of subjects is taught, and this list is constantly added to. Students have flocked to the art School, which may be said to occupy a unique position in Australia, and its record of success is really astonishing. Its students supply art teachers for the newer schools that are being built, and many occupy leading positinos in important business houses. So well is its reputation known that orders are constantly being received, not only from Victoria, but from other States, for honor boards and challenge shields to be designed and made. The most recent addition to the School of Mines and Industries is the Junior Technical School, for which a new building is now being erected on a portion of the gaol site, transferred to the School of Mines Counci by the Government. At the present moment temporary quarters are being occupied. Some students after passing through the Junior School go straight to employment, continuing perhaps to attend the evening trade classes, while others move on to the senior School. In a review of the work of the School of Mines mention must be made of a series of industrial research carried out under supervision of the Principal. One in particular, regarding the suitability of the local ores for the manufacture of pigments attracted much attention, while the experiemtns on the manufacture of white potery from Victorian clayes were considered of sufficient importance by the Federal Advisory Council of Science and Industry to warrant the appointment of a special investigator. The results of these have been most encouraging, and may have far-reaching consequences. The vocational training of returned soldiers also should not be overlooked. The work was taken in hand from the first, before the Repatriation Department gave assistance, and now with the help of the department of the School has become one of the largest vocational training centres in Victoria outside of Melbourne. The soldiers, trained in a variety of occupations, have made remarkable progress, and already considerable numbers have found employment in local workshops and factories. To sum up, the School is divided into the following departments, each well staffed and equipped: - The School of Mines, science, and Engineering; the Techncial Art School, the Boys' Junior Technical School, the Girl's Preparatory Technical Classes, Trade Classes, and the Commercial School. The school of Mines, science and Engineering, comprises the following branches: - Mining, Metallurgy, Geology, Electrical Engineering, Civil Engineering, Mechanical Engineering, Applied Chemistry, and Pharmacy. Battery treatments, Cyanide Testing, Smelting, Assays, and Clay Testing from a regular part of the School's work. Students gaining qualifications obtain concession in their courses at the university, should they proceed there to continue their studies. The technical Art school curriculum includes training in all branches of pictorial and applied art, an Architectural Diploma Course, a Draughtman's Course, technical Art teachers' Course, Photography,Ticket Writing, Art Metal Work, Woodcarving, Needlework, and Leather work. The Trade Classes give instruction in Telephone Mechanics, telegraphy, Carpentry, Cabinet Making, Plumbing, Blacksmithing, Fitting, Electric Wiring, and Printing. Numerous Scholarships are offered every year, and altogether students will find few places to equal the Ballarat School of Mines and Industries as a training place for their life's work. One of the first in the continent to be established, its Jubilee finds it still in the front rank, keeping pace with the times, and offering to the youths of this country the means of taking advantage of Australia's teeming opportunities. william, battery, smith, herbert, drawing from the antique, ballarat school of mines botanical gardens, ballarat school of mines, redmond barry, alfred mica smith, james bickett, museum, dick richards, ballarat junior technical school, s m b, ballarat school of mines and industries, ballarat technical art school, model mine, james m bickett, j m bickett, roderick murchison, vocational training rooms, wesley church, methodist church, alexander peacock, lathes, repatriation, repatriatin department, war service, school council, baragwanath, gold mining, mining laboratory, plaster cast, r.w. richards, anniversary, jubilee -
 Federation University Historical Collection
Scientific Instrument
Glass tube attached capped with metal and with a green plastic coated copper wire attached to conduct electricity. The other end of the tube narrows and has a metal 'prod' attached. The tube as a nother tube inside it which includes a spring made of fine wire. A small amount of thick liquid is present between both tubes.laboratory, testing, graham hood -
Federation University Historical Collection
Tool - Object, J.K. Dey & Sons, Mining Safety Lamp, c1967
The Mining Safety Lamp is used in flammable atmospheres, and consists of a wick lamp with a mesh screen enclosing the flame. It was created for use in coal mines, to reduce the danger of explosions due to the presence of methane and other flammable gases, called firedamp or minedamp. J. K. DEY & SONS was established in 1947 and manufactures Safety Lamps, Torches and Carbide Lamps. In 1967 the Mining Authority of India issued approval of the Velox GL5 Flame Safety Lamp ( Kerosene burning ) self-extinguishing type. At that time J.K. Dey captured the whole mining market of safety lamps in India. (http://www.jkdey.com/history.html, accessed 06/05/2015)Metal mining safety lamp with copper bas and hanging hook. The Dey Velox GL5 Gas Testing Flame Safety Lamp boasts sharp detection of methane gas; detection of the shortage of oxygen; detection of the presence of Carbon-dioxide, is magnetically unlocked; ncludes a top feed device for testing Methane Gas close to the roof; contains an auto extinguisher. J.K. Dey & Sons Calcutta Velox Velox Gmining lamp, safety lamp, miners lamp, calcutta, india, mining -
 Flagstaff Hill Maritime Museum and Village
Domestic object - Plate
The Process of Making Pottery Decorating, Firing, Glazing, Making, Technical There is a rhythm and flow to clay. It can’t be done all at once! Even the making process! It can take weeks to get everything done, especially if you can only work on your pottery once a week! Even though we have three hour classes, it’s often just not enough time! Here is an overview of some of the processes so you have a bit more grasp on some of the technical stuff! Step One – Design There are SO many ideas out there for making stuff in clay! From delicate porcelain jewellery, through to heavy sculptural work and everything in between. Deciding your direction is sometimes not that easy – when you first start, try everything, you will naturally gravitate to the style that you enjoy! The options and variations are endless and can get a wee bit overwhelming too! Check in with me before you start to ensure your ideas will work, what order you might do things, how you could achieve the look you are seeking and any other technical data required! Step Two – Making Clay is thixotropic. This means that as you work with it, the clay first gets sloppier and wetter, before is begins to dry in the atmosphere. For most things, you simply can’t do all parts of the project at once. An example of work order might look like: Get last weeks work out from the shelves Prepare clay for today’s work – roll your clay, prepare balls for throwing, make the first stage of a pinch pot) Clean up last week’s work and put it on the shelf for bisque firing Check that you have any glazing to do – and do enough of it that you will have time to finish your main project Do the next step of your next project – there might be a further step that can’t be complete immediately, in that case, wrap your work well and put onto the shelves. Letting your work rest for a while can really help keep your work clean and professional looking. Many things require bagging under plastic to keep it ready for work the next week – put your name on the outside of the bag so you can find your work easily. We have stickers and markers. Consider how you want to decorate your work – coloured slip can be applied at a fairly wet stage (remembering that it will make your work even wetter!). Trying to apply slip to dry clay won’t work! If you want to do sgraffito – you will need to keep the work leather hard (a state of dryness where you can still work the clay with a little effort and a little water and care). Step Three – Drying Most of the time your work can go into the rack uncovered to let it dry out for the following week. If you want to continue forming or shaping you will need to double bag your work – put your work on a suitable sized bat and put the bat in a bag so the base of the bag is under the bat, then put another bag over the top of the work and tuck the top of the bag under the bat. If you want to trim (or turn) your thrown work the following week, it should also be double bagged. If your work is large, delicate, or of uneven thicknesses, you should lightly cover your work for drying. When considering the drying process, bare in mind the weather, humidity and wind! The hotter and dryer, the faster things dry and work can dry unevenly in the shelves – this can lead to cracking – another time to lightly cover your work for drying. Step Four – Trimming and Cleaning Up Your work is dry! It is called greenware now and it is at it’s most fragile! Handle everything with two hands. I often refer to soft hands – keep everything gentle and with your fingers spread as much as possible. Try to not pick up things like plates too much, and always with both hands! Before your work can be bisque fired it should be “cleaned up”. You work won’t go into the kiln if it has sharp edges – when glazed, sharp edges turn into razor blades! Use a piece of fly wire to rub the work all over – this will scratch a little so be light handed. Use a knife or metal kidney to scrape any areas that require a bit more dynamic treatment than the fly wire offers! Finally, a very light wipe over with a slightly damp sponge can help soften and soothe all of your edges and dags! Trimming thrown work: If you are planning to trim (or turn) your thrown work (and you should be), make sure you bag it well – your work should be leather hard to almost dry for easiest trimming. Use this step to finish the work completely – use a metal kidney to polish the surface, or a slightly damp sponge to give a freshly thrown look. Wipe the sponge around the rim after trimming, and check the inside of the pot for dags! Trimming slip cast work: Usually I will trim the rims of your work on the wheel the following day to make that stage easier, however you will still need to check your work for lumps and bumps. Last but not least – check that your name is still clearly on the bottom of your work. Step Five – Bisque Firing When the work is completely dry it can go into the bisque kiln. The bisque kiln is fired to 1000°C. This process burns off the water in the clay as well as some of the chemically bound water. The structure of the clay is not altered that much at this temperature. Inside the bisque kiln, the work is stacked a little, small bowl inside a larger bowl and onto a heavy plate. Smaller items like decorations or drink coasters might get stacked several high. Consideration is paid to the weight of the stack and shape of the work. A bisque kiln can fire about one and a half times the amount of work that the glaze kiln can fire. The firing takes about 10 hours to complete the cycle and about two days to cool down. Once it has been emptied the work is placed in the glaze room ready for you to decorate! Step Six – Glazing Decorating your work with colour can be a lot of fun – and time consuming! There are three main options for surface treatment at this stage: Oxide Washes Underglazes Glazes Washes and underglazes do not “glaze” the work – It will still need a layer of glaze to fully seal the clay (washes don’t need glaze on surfaces not designed for food or liquid as they can gloss up a little on their own). Underglazes are stable colourants that turn out pretty much how they look in the jar. They can be mixed with each other to form other colours and can be used like water colours to paint onto your work. Mostly they should have a clear glaze on top to seal them. Oxides are a different species – the pink oxide (cobalt) wash turns out bright blue for instance. They don’t always need a glaze on top, and some glazes can change the colour of the wash! The glazes need no other “glaze” on top! Be careful of unknown glaze interactions – you can put any combination of glaze in a bowl or on a plate, but only a single glaze on the outside of any vertical surface! Glazes are a chemical reaction under heat. We don’t know the exact chemicals in the Mayco glazes we use. I can guess by the way they interact with each other, however, on the whole, you need to test every idea you have, and not run the test on a vertical surface! Simply put, glaze is a layer of glass like substance that bonds with the clay underneath. Clay is made of silica, alumina and water. Glaze is made of mostly silica. Silica has a melting point of 1700°C and we fire to 1240°C. The silica requires a “flux” to help it melt at the lower temperature. Fluxes can be all sorts of chemicals – a common one is calcium – calcium has a melting point of 2500°C, however, together they both melt at a much lower temperature! Colourants are metal oxides like cobalt (blue), chrome (green through black), copper (green, blue, even red!), manganese (black, purple and pink) iron (red brown), etc. Different chemicals in the glaze can have dramatic effects. for example, barium carbonate (which we don’t use) turns manganese bright pink! Other elements can turn manganese dioxide brown, blue, purple and reddish brown. Manganese dioxide is a flux in and of itself as well. So, glazes that get their black and purple colours, often interact with other glazes and RUN! Our mirror black is a good example – it mixes really well with many glazes because it fluxes them – causes them to melt faster. It will also bring out many beautiful colours in the glazes because it’s black colouring most definitely comes from manganese dioxide! Glaze chemistry is a whole subject on it’s own! We use commercial Mayco glazes on purpose – for their huge range of colour possibilities, stability, cool interactions, artistic freedom with the ability to easily brush the glazes on and ease of use. We currently have almost 50 glazes on hand! A major project is to test the interactions of all glazes with each other. That is 2,500 test tiles!!!! I’m going to make the wall behind the wheels the feature wall of pretty colours! Step Seven – Glaze (Gloss or sometimes called “Glost”) Firing Most of the time this is the final stage of making your creation (but not always!) The glaze kiln goes to 1240°C. This is called cone 6, or midrange. It is the low end of stoneware temperatures. Stoneware clays and glazes are typically fired at cone 8 – 10, that is 1260 – 1290°C. The energy requirement to go from 1240°C to 1280°C is almost a 30% more! Our clay is formulated to vitrify (mature, turn “glass-like”) at 1240°, as are our glazes. A glaze kiln take around 12 hours to reach temperature and two to three days to cool down. Sometimes a third firing process is required – this is for decoration that is added to work after the glaze firing. For example – adding precious metals and lustres. this firing temperature is usually around 600 – 800°C depending upon the techniques being used. There are many students interested in gold and silver trims – we will be doing this third type of firing soon! After firing your work will be in the student finished work shelves. Remember to pay for it before you head out the door! There is a small extra charge for using porcelain clay (it’s more than twice the price of regular clay), and for any third firing process! Once your work has been fired it can not turn back into clay for millennia – so don’t fire it if you don’t like it! Put it in the bucket for recycling. https://firebirdstudios.com.au/the-process-of-making-pottery/Ceramics have evolved over thousands of years.White earthenware dinner plate. Crazing evident all over.Backstamped ‘Made in England S LTD’flagstaff hill, warrnambool, shipwrecked-coast, flagstaff-hill, flagstaff-hill-maritime-museum, maritime-museum, shipwreck-coast, flagstaff-hill-maritime-village, ceramics, tableware -
 Flagstaff Hill Maritime Museum and Village
Domestic object - Plate, Johnson Bros
The Process of Making Pottery Decorating, Firing, Glazing, Making, Technical There is a rhythm and flow to clay. It can’t be done all at once! Even the making process! It can take weeks to get everything done, especially if you can only work on your pottery once a week! Even though we have three hour classes, it’s often just not enough time! Here is an overview of some of the processes so you have a bit more grasp on some of the technical stuff! Step One – Design There are SO many ideas out there for making stuff in clay! From delicate porcelain jewellery, through to heavy sculptural work and everything in between. Deciding your direction is sometimes not that easy – when you first start, try everything, you will naturally gravitate to the style that you enjoy! The options and variations are endless and can get a wee bit overwhelming too! Check in with me before you start to ensure your ideas will work, what order you might do things, how you could achieve the look you are seeking and any other technical data required! Step Two – Making Clay is thixotropic. This means that as you work with it, the clay first gets sloppier and wetter, before is begins to dry in the atmosphere. For most things, you simply can’t do all parts of the project at once. An example of work order might look like: Get last weeks work out from the shelves Prepare clay for today’s work – roll your clay, prepare balls for throwing, make the first stage of a pinch pot) Clean up last week’s work and put it on the shelf for bisque firing Check that you have any glazing to do – and do enough of it that you will have time to finish your main project Do the next step of your next project – there might be a further step that can’t be complete immediately, in that case, wrap your work well and put onto the shelves. Letting your work rest for a while can really help keep your work clean and professional looking. Many things require bagging under plastic to keep it ready for work the next week – put your name on the outside of the bag so you can find your work easily. We have stickers and markers. Consider how you want to decorate your work – coloured slip can be applied at a fairly wet stage (remembering that it will make your work even wetter!). Trying to apply slip to dry clay won’t work! If you want to do sgraffito – you will need to keep the work leather hard (a state of dryness where you can still work the clay with a little effort and a little water and care). Step Three – Drying Most of the time your work can go into the rack uncovered to let it dry out for the following week. If you want to continue forming or shaping you will need to double bag your work – put your work on a suitable sized bat and put the bat in a bag so the base of the bag is under the bat, then put another bag over the top of the work and tuck the top of the bag under the bat. If you want to trim (or turn) your thrown work the following week, it should also be double bagged. If your work is large, delicate, or of uneven thicknesses, you should lightly cover your work for drying. When considering the drying process, bare in mind the weather, humidity and wind! The hotter and dryer, the faster things dry and work can dry unevenly in the shelves – this can lead to cracking – another time to lightly cover your work for drying. Step Four – Trimming and Cleaning Up Your work is dry! It is called greenware now and it is at it’s most fragile! Handle everything with two hands. I often refer to soft hands – keep everything gentle and with your fingers spread as much as possible. Try to not pick up things like plates too much, and always with both hands! Before your work can be bisque fired it should be “cleaned up”. You work won’t go into the kiln if it has sharp edges – when glazed, sharp edges turn into razor blades! Use a piece of fly wire to rub the work all over – this will scratch a little so be light handed. Use a knife or metal kidney to scrape any areas that require a bit more dynamic treatment than the fly wire offers! Finally, a very light wipe over with a slightly damp sponge can help soften and soothe all of your edges and dags! Trimming thrown work: If you are planning to trim (or turn) your thrown work (and you should be), make sure you bag it well – your work should be leather hard to almost dry for easiest trimming. Use this step to finish the work completely – use a metal kidney to polish the surface, or a slightly damp sponge to give a freshly thrown look. Wipe the sponge around the rim after trimming, and check the inside of the pot for dags! Trimming slip cast work: Usually I will trim the rims of your work on the wheel the following day to make that stage easier, however you will still need to check your work for lumps and bumps. Last but not least – check that your name is still clearly on the bottom of your work. Step Five – Bisque Firing When the work is completely dry it can go into the bisque kiln. The bisque kiln is fired to 1000°C. This process burns off the water in the clay as well as some of the chemically bound water. The structure of the clay is not altered that much at this temperature. Inside the bisque kiln, the work is stacked a little, small bowl inside a larger bowl and onto a heavy plate. Smaller items like decorations or drink coasters might get stacked several high. Consideration is paid to the weight of the stack and shape of the work. A bisque kiln can fire about one and a half times the amount of work that the glaze kiln can fire. The firing takes about 10 hours to complete the cycle and about two days to cool down. Once it has been emptied the work is placed in the glaze room ready for you to decorate! Step Six – Glazing Decorating your work with colour can be a lot of fun – and time consuming! There are three main options for surface treatment at this stage: Oxide Washes Underglazes Glazes Washes and underglazes do not “glaze” the work – It will still need a layer of glaze to fully seal the clay (washes don’t need glaze on surfaces not designed for food or liquid as they can gloss up a little on their own). Underglazes are stable colourants that turn out pretty much how they look in the jar. They can be mixed with each other to form other colours and can be used like water colours to paint onto your work. Mostly they should have a clear glaze on top to seal them. Oxides are a different species – the pink oxide (cobalt) wash turns out bright blue for instance. They don’t always need a glaze on top, and some glazes can change the colour of the wash! The glazes need no other “glaze” on top! Be careful of unknown glaze interactions – you can put any combination of glaze in a bowl or on a plate, but only a single glaze on the outside of any vertical surface! Glazes are a chemical reaction under heat. We don’t know the exact chemicals in the Mayco glazes we use. I can guess by the way they interact with each other, however, on the whole, you need to test every idea you have, and not run the test on a vertical surface! Simply put, glaze is a layer of glass like substance that bonds with the clay underneath. Clay is made of silica, alumina and water. Glaze is made of mostly silica. Silica has a melting point of 1700°C and we fire to 1240°C. The silica requires a “flux” to help it melt at the lower temperature. Fluxes can be all sorts of chemicals – a common one is calcium – calcium has a melting point of 2500°C, however, together they both melt at a much lower temperature! Colourants are metal oxides like cobalt (blue), chrome (green through black), copper (green, blue, even red!), manganese (black, purple and pink) iron (red brown), etc. Different chemicals in the glaze can have dramatic effects. for example, barium carbonate (which we don’t use) turns manganese bright pink! Other elements can turn manganese dioxide brown, blue, purple and reddish brown. Manganese dioxide is a flux in and of itself as well. So, glazes that get their black and purple colours, often interact with other glazes and RUN! Our mirror black is a good example – it mixes really well with many glazes because it fluxes them – causes them to melt faster. It will also bring out many beautiful colours in the glazes because it’s black colouring most definitely comes from manganese dioxide! Glaze chemistry is a whole subject on it’s own! We use commercial Mayco glazes on purpose – for their huge range of colour possibilities, stability, cool interactions, artistic freedom with the ability to easily brush the glazes on and ease of use. We currently have almost 50 glazes on hand! A major project is to test the interactions of all glazes with each other. That is 2,500 test tiles!!!! I’m going to make the wall behind the wheels the feature wall of pretty colours! Step Seven – Glaze (Gloss or sometimes called “Glost”) Firing Most of the time this is the final stage of making your creation (but not always!) The glaze kiln goes to 1240°C. This is called cone 6, or midrange. It is the low end of stoneware temperatures. Stoneware clays and glazes are typically fired at cone 8 – 10, that is 1260 – 1290°C. The energy requirement to go from 1240°C to 1280°C is almost a 30% more! Our clay is formulated to vitrify (mature, turn “glass-like”) at 1240°, as are our glazes. A glaze kiln take around 12 hours to reach temperature and two to three days to cool down. Sometimes a third firing process is required – this is for decoration that is added to work after the glaze firing. For example – adding precious metals and lustres. this firing temperature is usually around 600 – 800°C depending upon the techniques being used. There are many students interested in gold and silver trims – we will be doing this third type of firing soon! After firing your work will be in the student finished work shelves. Remember to pay for it before you head out the door! There is a small extra charge for using porcelain clay (it’s more than twice the price of regular clay), and for any third firing process! Once your work has been fired it can not turn back into clay for millennia – so don’t fire it if you don’t like it! Put it in the bucket for recycling. https://firebirdstudios.com.au/the-process-of-making-pottery/Ceramics have evolved over thousands of years.A white earthenware side plate with a gadroon edge. Has water marks and chips on front.‘Johnson Bros England Reg No 15587’flagstaff hill, warrnambool, shipwrecked-coast, flagstaff-hill, flagstaff-hill-maritime-museum, maritime-museum, shipwreck-coast, flagstaff-hill-maritime-village, johnson bros, ceramics, tableware -
 Flagstaff Hill Maritime Museum and Village
Domestic object - Plate, Alfred Meakin
The Process of Making Pottery Decorating, Firing, Glazing, Making, Technical There is a rhythm and flow to clay. It can’t be done all at once! Even the making process! It can take weeks to get everything done, especially if you can only work on your pottery once a week! Even though we have three hour classes, it’s often just not enough time! Here is an overview of some of the processes so you have a bit more grasp on some of the technical stuff! Step One – Design There are SO many ideas out there for making stuff in clay! From delicate porcelain jewellery, through to heavy sculptural work and everything in between. Deciding your direction is sometimes not that easy – when you first start, try everything, you will naturally gravitate to the style that you enjoy! The options and variations are endless and can get a wee bit overwhelming too! Check in with me before you start to ensure your ideas will work, what order you might do things, how you could achieve the look you are seeking and any other technical data required! Step Two – Making Clay is thixotropic. This means that as you work with it, the clay first gets sloppier and wetter, before is begins to dry in the atmosphere. For most things, you simply can’t do all parts of the project at once. An example of work order might look like: Get last weeks work out from the shelves Prepare clay for today’s work – roll your clay, prepare balls for throwing, make the first stage of a pinch pot) Clean up last week’s work and put it on the shelf for bisque firing Check that you have any glazing to do – and do enough of it that you will have time to finish your main project Do the next step of your next project – there might be a further step that can’t be complete immediately, in that case, wrap your work well and put onto the shelves. Letting your work rest for a while can really help keep your work clean and professional looking. Many things require bagging under plastic to keep it ready for work the next week – put your name on the outside of the bag so you can find your work easily. We have stickers and markers. Consider how you want to decorate your work – coloured slip can be applied at a fairly wet stage (remembering that it will make your work even wetter!). Trying to apply slip to dry clay won’t work! If you want to do sgraffito – you will need to keep the work leather hard (a state of dryness where you can still work the clay with a little effort and a little water and care). Step Three – Drying Most of the time your work can go into the rack uncovered to let it dry out for the following week. If you want to continue forming or shaping you will need to double bag your work – put your work on a suitable sized bat and put the bat in a bag so the base of the bag is under the bat, then put another bag over the top of the work and tuck the top of the bag under the bat. If you want to trim (or turn) your thrown work the following week, it should also be double bagged. If your work is large, delicate, or of uneven thicknesses, you should lightly cover your work for drying. When considering the drying process, bare in mind the weather, humidity and wind! The hotter and dryer, the faster things dry and work can dry unevenly in the shelves – this can lead to cracking – another time to lightly cover your work for drying. Step Four – Trimming and Cleaning Up Your work is dry! It is called greenware now and it is at it’s most fragile! Handle everything with two hands. I often refer to soft hands – keep everything gentle and with your fingers spread as much as possible. Try to not pick up things like plates too much, and always with both hands! Before your work can be bisque fired it should be “cleaned up”. You work won’t go into the kiln if it has sharp edges – when glazed, sharp edges turn into razor blades! Use a piece of fly wire to rub the work all over – this will scratch a little so be light handed. Use a knife or metal kidney to scrape any areas that require a bit more dynamic treatment than the fly wire offers! Finally, a very light wipe over with a slightly damp sponge can help soften and soothe all of your edges and dags! Trimming thrown work: If you are planning to trim (or turn) your thrown work (and you should be), make sure you bag it well – your work should be leather hard to almost dry for easiest trimming. Use this step to finish the work completely – use a metal kidney to polish the surface, or a slightly damp sponge to give a freshly thrown look. Wipe the sponge around the rim after trimming, and check the inside of the pot for dags! Trimming slip cast work: Usually I will trim the rims of your work on the wheel the following day to make that stage easier, however you will still need to check your work for lumps and bumps. Last but not least – check that your name is still clearly on the bottom of your work. Step Five – Bisque Firing When the work is completely dry it can go into the bisque kiln. The bisque kiln is fired to 1000°C. This process burns off the water in the clay as well as some of the chemically bound water. The structure of the clay is not altered that much at this temperature. Inside the bisque kiln, the work is stacked a little, small bowl inside a larger bowl and onto a heavy plate. Smaller items like decorations or drink coasters might get stacked several high. Consideration is paid to the weight of the stack and shape of the work. A bisque kiln can fire about one and a half times the amount of work that the glaze kiln can fire. The firing takes about 10 hours to complete the cycle and about two days to cool down. Once it has been emptied the work is placed in the glaze room ready for you to decorate! Step Six – Glazing Decorating your work with colour can be a lot of fun – and time consuming! There are three main options for surface treatment at this stage: Oxide Washes Underglazes Glazes Washes and underglazes do not “glaze” the work – It will still need a layer of glaze to fully seal the clay (washes don’t need glaze on surfaces not designed for food or liquid as they can gloss up a little on their own). Underglazes are stable colourants that turn out pretty much how they look in the jar. They can be mixed with each other to form other colours and can be used like water colours to paint onto your work. Mostly they should have a clear glaze on top to seal them. Oxides are a different species – the pink oxide (cobalt) wash turns out bright blue for instance. They don’t always need a glaze on top, and some glazes can change the colour of the wash! The glazes need no other “glaze” on top! Be careful of unknown glaze interactions – you can put any combination of glaze in a bowl or on a plate, but only a single glaze on the outside of any vertical surface! Glazes are a chemical reaction under heat. We don’t know the exact chemicals in the Mayco glazes we use. I can guess by the way they interact with each other, however, on the whole, you need to test every idea you have, and not run the test on a vertical surface! Simply put, glaze is a layer of glass like substance that bonds with the clay underneath. Clay is made of silica, alumina and water. Glaze is made of mostly silica. Silica has a melting point of 1700°C and we fire to 1240°C. The silica requires a “flux” to help it melt at the lower temperature. Fluxes can be all sorts of chemicals – a common one is calcium – calcium has a melting point of 2500°C, however, together they both melt at a much lower temperature! Colourants are metal oxides like cobalt (blue), chrome (green through black), copper (green, blue, even red!), manganese (black, purple and pink) iron (red brown), etc. Different chemicals in the glaze can have dramatic effects. for example, barium carbonate (which we don’t use) turns manganese bright pink! Other elements can turn manganese dioxide brown, blue, purple and reddish brown. Manganese dioxide is a flux in and of itself as well. So, glazes that get their black and purple colours, often interact with other glazes and RUN! Our mirror black is a good example – it mixes really well with many glazes because it fluxes them – causes them to melt faster. It will also bring out many beautiful colours in the glazes because it’s black colouring most definitely comes from manganese dioxide! Glaze chemistry is a whole subject on it’s own! We use commercial Mayco glazes on purpose – for their huge range of colour possibilities, stability, cool interactions, artistic freedom with the ability to easily brush the glazes on and ease of use. We currently have almost 50 glazes on hand! A major project is to test the interactions of all glazes with each other. That is 2,500 test tiles!!!! I’m going to make the wall behind the wheels the feature wall of pretty colours! Step Seven – Glaze (Gloss or sometimes called “Glost”) Firing Most of the time this is the final stage of making your creation (but not always!) The glaze kiln goes to 1240°C. This is called cone 6, or midrange. It is the low end of stoneware temperatures. Stoneware clays and glazes are typically fired at cone 8 – 10, that is 1260 – 1290°C. The energy requirement to go from 1240°C to 1280°C is almost a 30% more! Our clay is formulated to vitrify (mature, turn “glass-like”) at 1240°, as are our glazes. A glaze kiln take around 12 hours to reach temperature and two to three days to cool down. Sometimes a third firing process is required – this is for decoration that is added to work after the glaze firing. For example – adding precious metals and lustres. this firing temperature is usually around 600 – 800°C depending upon the techniques being used. There are many students interested in gold and silver trims – we will be doing this third type of firing soon! After firing your work will be in the student finished work shelves. Remember to pay for it before you head out the door! There is a small extra charge for using porcelain clay (it’s more than twice the price of regular clay), and for any third firing process! Once your work has been fired it can not turn back into clay for millennia – so don’t fire it if you don’t like it! Put it in the bucket for recycling. https://firebirdstudios.com.au/the-process-of-making-pottery/Ceramics have evolved over thousands of years.Earthenware dessert plate, cream colour. Made by Alfred Meakin, England. Backstamped ‘Alfred Meakin England’. flagstaff hill, warrnambool, shipwrecked-coast, flagstaff-hill, flagstaff-hill-maritime-museum, maritime-museum, shipwreck-coast, flagstaff-hill-maritime-village, alfred meakin, ceramics, earthenware, kitchenware -
 Flagstaff Hill Maritime Museum and Village
Domestic object - Jug
The Process of Making Pottery Decorating, Firing, Glazing, Making, Technical There is a rhythm and flow to clay. It can’t be done all at once! Even the making process! It can take weeks to get everything done, especially if you can only work on your pottery once a week! Even though we have three hour classes, it’s often just not enough time! Here is an overview of some of the processes so you have a bit more grasp on some of the technical stuff! Step One – Design There are SO many ideas out there for making stuff in clay! From delicate porcelain jewellery, through to heavy sculptural work and everything in between. Deciding your direction is sometimes not that easy – when you first start, try everything, you will naturally gravitate to the style that you enjoy! The options and variations are endless and can get a wee bit overwhelming too! Check in with me before you start to ensure your ideas will work, what order you might do things, how you could achieve the look you are seeking and any other technical data required! Step Two – Making Clay is thixotropic. This means that as you work with it, the clay first gets sloppier and wetter, before is begins to dry in the atmosphere. For most things, you simply can’t do all parts of the project at once. An example of work order might look like: Get last weeks work out from the shelves Prepare clay for today’s work – roll your clay, prepare balls for throwing, make the first stage of a pinch pot) Clean up last week’s work and put it on the shelf for bisque firing Check that you have any glazing to do – and do enough of it that you will have time to finish your main project Do the next step of your next project – there might be a further step that can’t be complete immediately, in that case, wrap your work well and put onto the shelves. Letting your work rest for a while can really help keep your work clean and professional looking. Many things require bagging under plastic to keep it ready for work the next week – put your name on the outside of the bag so you can find your work easily. We have stickers and markers. Consider how you want to decorate your work – coloured slip can be applied at a fairly wet stage (remembering that it will make your work even wetter!). Trying to apply slip to dry clay won’t work! If you want to do sgraffito – you will need to keep the work leather hard (a state of dryness where you can still work the clay with a little effort and a little water and care). Step Three – Drying Most of the time your work can go into the rack uncovered to let it dry out for the following week. If you want to continue forming or shaping you will need to double bag your work – put your work on a suitable sized bat and put the bat in a bag so the base of the bag is under the bat, then put another bag over the top of the work and tuck the top of the bag under the bat. If you want to trim (or turn) your thrown work the following week, it should also be double bagged. If your work is large, delicate, or of uneven thicknesses, you should lightly cover your work for drying. When considering the drying process, bare in mind the weather, humidity and wind! The hotter and dryer, the faster things dry and work can dry unevenly in the shelves – this can lead to cracking – another time to lightly cover your work for drying. Step Four – Trimming and Cleaning Up Your work is dry! It is called greenware now and it is at it’s most fragile! Handle everything with two hands. I often refer to soft hands – keep everything gentle and with your fingers spread as much as possible. Try to not pick up things like plates too much, and always with both hands! Before your work can be bisque fired it should be “cleaned up”. You work won’t go into the kiln if it has sharp edges – when glazed, sharp edges turn into razor blades! Use a piece of fly wire to rub the work all over – this will scratch a little so be light handed. Use a knife or metal kidney to scrape any areas that require a bit more dynamic treatment than the fly wire offers! Finally, a very light wipe over with a slightly damp sponge can help soften and soothe all of your edges and dags! Trimming thrown work: If you are planning to trim (or turn) your thrown work (and you should be), make sure you bag it well – your work should be leather hard to almost dry for easiest trimming. Use this step to finish the work completely – use a metal kidney to polish the surface, or a slightly damp sponge to give a freshly thrown look. Wipe the sponge around the rim after trimming, and check the inside of the pot for dags! Trimming slip cast work: Usually I will trim the rims of your work on the wheel the following day to make that stage easier, however you will still need to check your work for lumps and bumps. Last but not least – check that your name is still clearly on the bottom of your work. Step Five – Bisque Firing When the work is completely dry it can go into the bisque kiln. The bisque kiln is fired to 1000°C. This process burns off the water in the clay as well as some of the chemically bound water. The structure of the clay is not altered that much at this temperature. Inside the bisque kiln, the work is stacked a little, small bowl inside a larger bowl and onto a heavy plate. Smaller items like decorations or drink coasters might get stacked several high. Consideration is paid to the weight of the stack and shape of the work. A bisque kiln can fire about one and a half times the amount of work that the glaze kiln can fire. The firing takes about 10 hours to complete the cycle and about two days to cool down. Once it has been emptied the work is placed in the glaze room ready for you to decorate! Step Six – Glazing Decorating your work with colour can be a lot of fun – and time consuming! There are three main options for surface treatment at this stage: Oxide Washes Underglazes Glazes Washes and underglazes do not “glaze” the work – It will still need a layer of glaze to fully seal the clay (washes don’t need glaze on surfaces not designed for food or liquid as they can gloss up a little on their own). Underglazes are stable colourants that turn out pretty much how they look in the jar. They can be mixed with each other to form other colours and can be used like water colours to paint onto your work. Mostly they should have a clear glaze on top to seal them. Oxides are a different species – the pink oxide (cobalt) wash turns out bright blue for instance. They don’t always need a glaze on top, and some glazes can change the colour of the wash! The glazes need no other “glaze” on top! Be careful of unknown glaze interactions – you can put any combination of glaze in a bowl or on a plate, but only a single glaze on the outside of any vertical surface! Glazes are a chemical reaction under heat. We don’t know the exact chemicals in the Mayco glazes we use. I can guess by the way they interact with each other, however, on the whole, you need to test every idea you have, and not run the test on a vertical surface! Simply put, glaze is a layer of glass like substance that bonds with the clay underneath. Clay is made of silica, alumina and water. Glaze is made of mostly silica. Silica has a melting point of 1700°C and we fire to 1240°C. The silica requires a “flux” to help it melt at the lower temperature. Fluxes can be all sorts of chemicals – a common one is calcium – calcium has a melting point of 2500°C, however, together they both melt at a much lower temperature! Colourants are metal oxides like cobalt (blue), chrome (green through black), copper (green, blue, even red!), manganese (black, purple and pink) iron (red brown), etc. Different chemicals in the glaze can have dramatic effects. for example, barium carbonate (which we don’t use) turns manganese bright pink! Other elements can turn manganese dioxide brown, blue, purple and reddish brown. Manganese dioxide is a flux in and of itself as well. So, glazes that get their black and purple colours, often interact with other glazes and RUN! Our mirror black is a good example – it mixes really well with many glazes because it fluxes them – causes them to melt faster. It will also bring out many beautiful colours in the glazes because it’s black colouring most definitely comes from manganese dioxide! Glaze chemistry is a whole subject on it’s own! We use commercial Mayco glazes on purpose – for their huge range of colour possibilities, stability, cool interactions, artistic freedom with the ability to easily brush the glazes on and ease of use. We currently have almost 50 glazes on hand! A major project is to test the interactions of all glazes with each other. That is 2,500 test tiles!!!! I’m going to make the wall behind the wheels the feature wall of pretty colours! Step Seven – Glaze (Gloss or sometimes called “Glost”) Firing Most of the time this is the final stage of making your creation (but not always!) The glaze kiln goes to 1240°C. This is called cone 6, or midrange. It is the low end of stoneware temperatures. Stoneware clays and glazes are typically fired at cone 8 – 10, that is 1260 – 1290°C. The energy requirement to go from 1240°C to 1280°C is almost a 30% more! Our clay is formulated to vitrify (mature, turn “glass-like”) at 1240°, as are our glazes. A glaze kiln take around 12 hours to reach temperature and two to three days to cool down. Sometimes a third firing process is required – this is for decoration that is added to work after the glaze firing. For example – adding precious metals and lustres. this firing temperature is usually around 600 – 800°C depending upon the techniques being used. There are many students interested in gold and silver trims – we will be doing this third type of firing soon! After firing your work will be in the student finished work shelves. Remember to pay for it before you head out the door! There is a small extra charge for using porcelain clay (it’s more than twice the price of regular clay), and for any third firing process! Once your work has been fired it can not turn back into clay for millennia – so don’t fire it if you don’t like it! Put it in the bucket for recycling. https://firebirdstudios.com.au/the-process-of-making-pottery/The form of the jug has been in use for many centuries.Stoneware jug. Two tone brown glaze with pierced lip behind spout. Spout chipped.None.flagstaff hill, warrnambool, shipwrecked-coast, flagstaff-hill, flagstaff-hill-maritime-museum, maritime-museum, shipwreck-coast, flagstaff-hill-maritime-village, jug, ceramic jug -
 Federation University Historical Collection
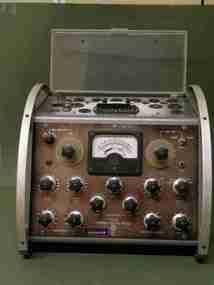
Book - Scientific Instument, Valve Characteristic Meter, c1960
The test rig is contained in a metal frame with sloping front panel that contains the indicator and number seting knobs. A pespex lift-up lid coves numerous valve sockets and a set of coding wheels. Both sides and back covered with pespex. Metal surfaces panted hammerton grey. abbreviated working instructions and AVO Valve data manual.Serial Number 1961scientific instrument, ballarat school of mines, valve characteristic meter -
 Federation University Historical Collection
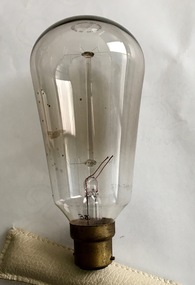
Scientific instrument, Globe
First type of metal filament lamp. Used as spot lights or a bank of these bulbs were used for load when testing the generators at SMB or University of Ballarat.Royal Ediswan, 240 V 60 W, pear shaped, wire filament bayonet light bulb.ballarat school of mines, globes, ediswan, lamps, light bulbs, bayonet -
Glenelg Shire Council Cultural Collection
Photograph - Photograph - Portland Harbour, Jun-92
Port of Portland Authority ArchivesFront: Back- 7/92- Blue pen Back: Testport of portland archives, reclamation area -
Glenelg Shire Council Cultural Collection
Photograph - Photograph - Main Breakwater construction, Portland, 1959
Port of Portland AuthorityFront: ' View-southwest showing test on pile. '1959'-Black biro Back: View Southwest showing test on pile. 1959- Black biroport of portland archives, main breakwater, construction, harbour development -
Glenelg Shire Council Cultural Collection
Photograph - Photograph - Main Breakwater construction, Portland, n.d
Port of Portland ArchivesFront: Testing a driven concrete pile with 150 tons load. Photo B. Learmonth. Illustration used in 'The story of a Port' by Noel Learmonth.'- Pencil '1/2 p' '1855'- Blue Biro 'KSA'- Pencil Back: Testing a driven concrete pile with 150 tons load. Photo B. Learmonth. Ill ustration used in the story of a Port by Noel Learmonth - Pencil 1/2 P 1855- Blue Byro Ksa Pencilport of portland archives, breakwater, construction, harbour development -
Port Melbourne Historical & Preservation Society
Article - Deliverette van, 19 Mar 1987
The van was last registered in 1948, and forgotten when the factory began building Sabre jets. The van spent a number of years in Sir Lawrence's garage. It was rescued from local scrap metal dealers by Rosebus car dealer Barry Patterson.Newspaper article about Deliverette van which had a collapsible drivers seat instead of standing room only driving. The parcel van was designed and built by Sir Lawrence Hartnell in the early 1940s at the Commonwealth Aircraft Factory. Also a photocopy with the following notation "750 cc BMW engine on test bench at C.A.C. June 1941. Technician Rob Robinson, photographer Norm Robinson.built environment - industrial, transport - motor vehicles, sir lawrence hartnett, general motors-holden, gmh, ron robinson, norm robinson, commonwealth aircraft corporation, cac -
 National Vietnam Veterans Museum (NVVM)
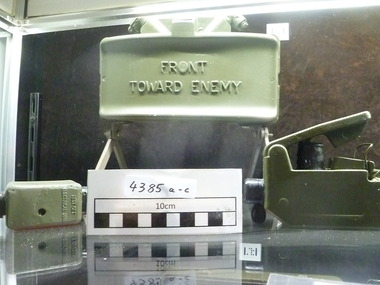
Weapon, M18 Claymore Mine
Three part exhibit featuring mine body, curved block of C4 explosive and firing device. Olive drab in colour and metal composition.Front towards enemy - on mine body. Test set electrical M18. Firing device electrical.m18 claymore mine, sas -
 National Vietnam Veterans Museum (NVVM)
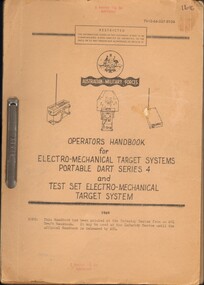
Booklet, Australian Army, Australian Army: Operator's Booklet for Electro-Mechanical Target Systems Portable Dart Series 4 amd Test Set Electro-Mechanical Target System (2 copies), 1969
A cream coloured cover with black writing and sketches of equipment also in black. the booklet is held together by a metal clasp.australia - armed forces - service manuals, electro-mechanical target system -
 Coal Creek Community Park & Museum
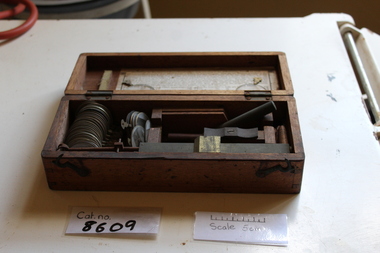
Optomitrists eye testing kit
8610.1 - Wooden box 8610.2 - Metal ruler 8610.3 - Brittle paper 8610.4 - Broken wood piece 8610.5 - Directions manual 8610.6 - Small pencil 8610.7 to 8610.38 - Eye testing lenses.(Direction manual in lid). -
 Maffra Sugarbeet Museum
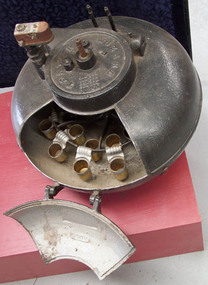
Centrifuge
Owned by Mervin Buckram (of Rochester), used for private use on the farm at Mewburn Park. Used approx 1940s.An important survivor from the early dairy industry. Maffra has always held a leading role in Herd testing, so it has considerable community significance. An earlier example is held at Stratford, with another, between the two, and less intact, at Old Gippstown.A round, black herd-testing centrifuge with a flat top and bottom. It has a hinged flap that opens and stands on three legs. There is a smaller round piece on top of the centrifuge which has a thick cylindrical shaped piece of metal in the centre. An apparatus at the top allows water to be driven through an impeller and there is an internal carrier to hold bottles for centrifuging."Grand prize St. Louise 1904" on side,"Wizard Tester" on top."The creamery package MFG. company Chicago. U.S.A. No. 3785" on brass plaque.herd testing -
The Ed Muirhead Physics Museum
MicroscopeSlides with box
2 slides (54.1 & 54.2) wrapped in paper and stored in a small hinged metal chemist’s pill box (54.3). ;Also an unidentified 8.5 cm (graphite?) stick (54.4) Slide 54.1 is wrapped in paper and identified as “very precious”. On the slide is printed: ONE INCH divided into hundredths. In ink: “Dup. Beck. Retain.” Next: 1-14 in. cover glass. Then printed: Ruled on glass. H.J. Grayson. No. 2 Slide 54.2 is also wrapped in paper. Ruling can be seen under 3/4 iin. cover glass. Carries labels: “760 or 1/60 xxxx” and “60,000 # good”. On the wrapping paper: “Grayson Test Ruling, given to me by the late Mr W Stone.” Signed: W.M. Holmes, 18.9.50 In differnet penmanship: “Labelled 60,000 gtooves #. White sticker with red bars. Placed in display cabinet 13.8.71 J J McNeill.(All this transcription by EGM)Label On 54.1: “One inc divide into hundredths Dup Beck Retain. Ruled on glass H.J. Grayson No.2” Labels on 54.2: “60”, “60,000# good”. Label on box (54.3): “Grayson Test Rulings 60,000 from W.A. Holmes, Balmoral Ave, Kew”. On metal stick (54.5): “S.F.342” (Prior description by Anna) -
 Royal Australian and New Zealand College of Obstetricians & Gynaecologists (RANZCOG)
Spirit burner, 1940s
... . Urine testing Spirit burner, metal container with thick woven ...This belonged to Dr Bill Rawling's and was in a medical bag that he was used in the 1940s and 1950s. It was donated by Dr Geoff Bishop.Spirit burner, metal container with thick woven cotton wick. No fuel present in container. Used by Bill Rawlings in process of testing urine.urine testing -
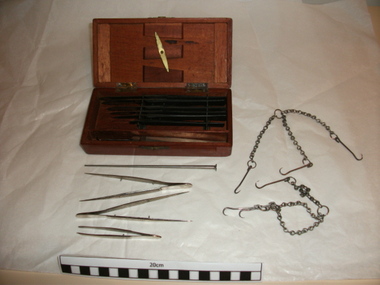 Royal Australian and New Zealand College of Obstetricians & Gynaecologists (RANZCOG)
Surgical kit used by Lord Joseph Lister, Archibald Young of Edinburgh, 1870s
This surgical instrument kit, c1870s, originally belonged to Lord Joseph Lister. On his retirement in 1892, Lord Lister presented the instrument kit to his friend Dr Alexander Matthew. The donor of the surgical kit, Professor Ian Stewart Fraser, is the great grandson of Dr Alexander Matthew. The donor, Ian Fraser, checked with his mother about the inscription "Ethel Livie". There was no one of that name in his mother's family tree and the instruments were passed down from his mother's family.This surgical kit, made by Young of Edinburgh Scotland in the 1870s is significant because it belonged to and was most likely used by an internationally important figure in modern medicine, Lord Joseph Lister. Joseph Lister, 1st Baron Lister, Bt., OM, FRS, PC (5 April 1827 – 10 February 1912), known as Sir Joseph Lister, Bt., between 1883 and 1897, was a British surgeon and a pioneer of antiseptic surgery. By applying Louis Pasteur's advances in microbiology, he promoted the idea of sterile surgery while working at the Glasgow Royal Infirmary. Lister successfully introduced carbolic acid (now known as phenol) to sterilise surgical instruments and to clean wounds, which led to a reduction in post-operative infections and made surgery safer for patients. Surgical instruments in original timber case, containing two steel sharp hooks with the manufacturer's stamp,"YOUNG EDINBURGH" on the handles, five steel scalpels with ebony handles in assorted sizes. Also included separately are autopsy hooks, one metal blowpipe [commonly used with urine testing apparatus] and two dissector forceps. "YOUNG EDINBURGH"; "ETHEL LIVIE"surgery -
Moorabbin Air Museum
Manual (item) - Aircraft manufacture, materials, The Testing of Metals and Alloys
... Moorabbin melbourne The Testing of Metals and Alloys Manual Aircraft ... -
Moorabbin Air Museum
Document (item) - Mirage III Computer Diagnostic Test Printout, A3-45
Mirage A3-45 is currently on display at the Moorabbin Air Museum. At time of the test, this aircraft was probably being used by 77 Squadron, RAAF.Relevant to aircraft currently preserved for museum display. -
Moorabbin Air Museum
Document (item) - Bristol Beaufort and Beaufighter Report on Airbrakes, Tests with Split Trailing Edge Air Brakes (Beaufighter I) June 1942
... booklet bound with metal clasps Tests with Split Trailing Edge Air ...Report No. AAEE/758. File No. 14.A. -
 Wannon Water
Brush
The brush/comb was used for identifying coating defects in steel mains. It was attached to a low voltage electrical supply and then used to brush along the steel pipe to test for faults in the coatings. If there is a fault in the coating, a spark would occur. The coating was propably coal tar Possibly used in the Otway Water Supply SystemRusted metal comb/brush, one side top half painted black to avoid conductivity of electrical currentpipes. maintenance -
Moorabbin Air Museum
Booklet (item) - CAC Marketing booklets - see Description
-
 Puffing Billy Railway
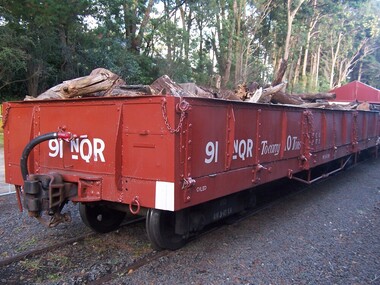
91 NQR - Open Medium Truck with drop ends, 15/ 2/1907
The NQRs were the standard Medium open goods wagon. Generally the sides and ends were removable thus providing a totally flat truck. Three long drop-down doors formed the sides thus allowing easy loading and unloading. 218 of these goods vehicles were built between 1898 and 1914 ? numbered 1 - 218. Originally, these wagons carried the code letter R as they were built with sides and ends. They later had the R removed. Unlike the Broad Gauge, VR's 2 ft 6 in (762 mm) narrow gauge network never had four-wheeled wagons (aside from a handful of trolleys). Because of this, a single design of open wagon emerged and this was the only type of wagon ever used on these lines. This was the NQR class, a wagon with the same length and loading capacity as a Broad Gauge four-wheeled open wagon to make transferring freight between the gauges easier. The wagons, numbered 1 through 218, were built between 1898 and 1914. The wagons used the same underframe as most other non-locomotives on the VR Narrow Gauge. Letters and numbers were originally painted only on the end bulkheads and doors, both of which could be removed as traffic dictated, and this made wagon identification difficult until the decals were transferred to the underframes of each wagon In the 1910s some NQRs were provided with removable wood and steel frameworks with canvas roof canopies and side curtains, and internal seating to supplement the rest of the passenger stock during busy holiday periods. Puffing Billy has re-created these for emergency capacity. Five more NQRs, numbered 219-223, were built between 1990 and 1992 initially for passenger use so were fitted with the removable frames In the 1960s the Puffing Billy Railway added grids in the floor of some to enable them to be used to drop ballast on the track where needed. Vehicle Length 25 feet 2 inches ( 7671 mm) Coupled Length 27 feet 4 inches (8330 mm) Width 6 feet 3 inches (1905 mm) Weight 5 tons Capacity 11 tons Built 1898 - 1915 (1992) Number Built 218 (223) In use 14 To be restored 6 91 NQR - Open Medium Truck VR Service History 15/ 2/1907 NWS Built new Vehicle Length 25 feet 2 inches ( 7671 mm) Coupled Length 27 feet 4 inches (8330 mm) Width 6 feet 3 inches (1905 mm) Weight 5 tons Capacity 11 tons Built 1898 - 1915 (1992) Number Built 218 (223) In use 14 To be restored 6 *NQR 91.VA - 15/ 2/1907 NWS Built new - / /1926 - To NQ 91.VA - Puffing Billy Service History or Notes April 2016 - New Bogie has been assembled and awaits testing under 91NQR May 2016 - New Bogie has been assembled and awaits testing under 91NQR July 2016 - New Bogie has been assembled and awaits testing under 91NQR Aug 2016 - New Bogie has been assembled and awaits testing under 91NQR Sept 2016 - New Bogie has been assembled and awaits testing under 91NQR Oct 2016 - New Bogie has been assembled and awaits testing under 91NQR Nov 2016 - New Fox bogie Under 91NQR - Flats Link to Heritage / Period Photos PBR Workshop Blog Report Friday, May 20, 2016 Bogie in Brief - on NQR 91 http://puffingbillyworkshops.blogspot.com.au/2016/05/bogie-in-brief.htmlHistoric - Victorian Railways - Narrow Gauge Rolling Stock - NQR Open Medium Truck with drop ends91 NQR narrow gauge Open Medium Truck with drop ends made of Steel and metal91 NQRpuffing billy, pbr, rolling stock , 91 nqr, narrow gauge rolling stock, nqr wagon, victorian railways, 91 nqr -
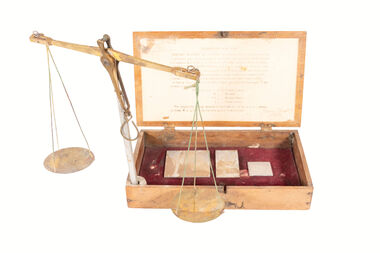 National Wool Museum
Instrument - Scales, 1880-1898
At the time of sale, the last of the Hirst family to work in the mill located in Geelong gave Donald (donor Bruce's father) Doherty a set of scales that had been used by several generations of Hirsts and adapted by them over time for specific use in their mill. These Scales were saved from waste and being thrown away at the time of sale to remain in use in the industry in the hands of someone who knew how to use them. The scales were used in calculating the weight of cloth and simultaneously calculating the amount of yarn required to weave it following the instructions printed within the box. The box bears the signatures of two Hirst family members, one being Lewis Hirst dated at 1898. The original brass pole has been replaced with a replica metal somewhere throughout the years after the brass pole broke through use. Hirst was brought by McKendrick in the 1960s and these scales sat for 12 months as part of the 12 month "cooling off" period. The scales were then handed to Donald rather than being disposed of.Scales used for weighing and calculating weight and thread count of textile samples. Originated from Godfrey Hirst Mills in Geelong. Writing describes how to utilise scales. Scales are made from brass, pole for holding scales once brass now replaced with metal pole. Scales held inside wooden box with black text in ink depicting use of scales on paper located inside and outside of box.Outside of box. Wording: APPARTUS for TESTING the WEIGHT per YARD of CLOTHS & COUNT of YARN from a small SAMPLE. -------------------------------------------------------------------------------------------------------------------------------------------------- Indispensable to Manufactures, Merchants & handling Woollen, Worsted, Cotton, Linen, Jute, Hemp, Flannel, Felt, Army, Navy, Police, Railway, Sail & other Cloths -------------------------------------------------------------------------------------------------------------------------------------------------- USED IN GOVERNMENT DEPARTMENTS -------------------------------------------------------------------------------------------------------------------------------------------------- The apparatus consists of Scales, Weights, 1, 2 & 4 sq. inch Cutting Templates & Book of Tables --------------------------------------------------------------------------------------------------------------------------------------------------By weighing a small Sample the accurate Weight in Ounces of a yard of Cloth any width from 18 to 64 inches, the Weight per Square Metre in Grams, the Counts* of Warp and Weft, and the approximate length of full & short ends of pieces of fabrics, [without unrolling and measuring for stocktaking & other purposes] can be ascertained without any Calculation --------------------------------------------------------------------------------------------------------------------------------------------------Price in United Kingdom, 25s., Carriage Paid. Price to Canada & U.S.A. $6.75 do. H. Lord. 10, And Place, Bradford, England. --------------------------------------------------------------------------------------------------------------------------------------------------*When ordering, state on what system you base your YARN COUNTS. Inside of box. Wording: DIRECTIONS FOR USE --------------------------------------------------------------------------------------------------------------------------------------------------TESTING WEIGHT OF CLOTHS. Place sample to be tested on a piece of cardboard, put a Cutting Template on it, cut card and cloth round template with scissors and weigh it according to instructions given in Book of Tables. TESTING FOR YARN COUNTS. Cut out 1 square inch of cloth, draw out wrap or weft threads, according to which is being tested, and the number of inches so drawn, that balance respective weight is the approximate Count. The same rule holds good when number of inches are drawn from a bobbin. In testing from the cloth, allowance has to be made for loss or gain in the process of manufacture. Weight marked C is for Cotton Counts " " W " " Worsted " " " WS " " Woollen Skeins " " L " " Linen Counts. The weights for testing samples of cloth are 20, 10, 10, 5, 3, 2, 1, grains in brass & '5, '3, '2, '1 [tenths of a grain] in aluminium. Inside of box. Signtures, handwritten: Bottom right: Lewis Hirst !898 Top Left (Smudge ?) W Hirst !935godfrey hirst, hirst family, textile design, textile creation -
 National Wool Museum
Machine - Wrap Reel
Wrap reel manufactured at Valley Worsted Mill and possibly used in the laboratory. "Wrap reels were used to check the yarn count in a spinning mill. A set length of yarn was wound off several test bobbins and weighed, if the weight was not the correct amount expected the spinning machines draft could be re calculated and the machine draft wheel ( cog ) changed to achieve the required count". - Greg AldridgeA small hand operated wrap reel. The reel is on a wooden base, the winding mechanism is metal and turned by a wooden handle. There is a metal plaque on the base inscribed MAKERS VWM. A wood and metal yarn feeder has broken off its mount.MAKERS/ VWMtextile machinery textile production weaving, valley worsted mill valley worsted mill, warping machinery, textile machinery, textile production, weaving, wrap reel, skein winder