Showing 80 items
matching railway quarry
-
 Bendigo Historical Society Inc.
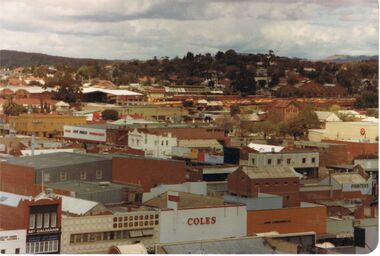
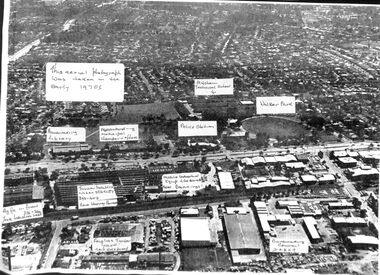
Photograph - VIEW FROM OLD BENDIGO POST OFFICE CLOCK TOWER LOOKING SOUTHWEST TOWARDS QUARRY HILL
View from old Bendigo Post Office Clock Tower South West in the direction of Quarry Hill. Names that appear on buildings are Coles, McCalmans, Bolton printers, New World Supermarket, Hopetoun hotel Target, and above these show buildings on the Bendigo Railway Station site.bendigo, history, buildings/streetscapes, coles, mccalmans, printers (boltons), new world supermarket, target, hopetoun hotel, and railway yards and buildings. -
 Tramway Heritage Centre
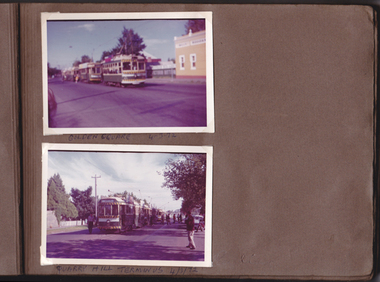
Photograph Album (part of), Ray Pearson's Photo Album - Trams of Victorian Railways, Ballarat, Bendigo, Geelong
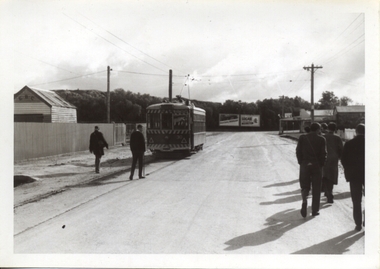
Page 9 of Ray Pearson's Photo Album. Brown card page with two photographs (landscape format) placed on page using clear plastic photo corners. Both photographs depict trams around Bendigo. Hand written inscriptions are located beneath each photo. The brown paper has some minor damage to top and bottom right corners from what appears to be the removal of adhesive photo corners.Hand written inscription in biro - Between top and bottom photograph: GOLDEN SQUARE 4/3/72 At base of page: QUARRY HILL TERMINUS 4/3/72 -
 Bendigo Historical Society Inc.
Document - VICTORIA HILL - BENDIGO BRANCH HISTORICAL SOCIETY - MINE TOUR
Typed notes for a tour of the area. Areas mentioned are: Hospital Hill, The Central Deborah Mine, New Chum Railway Mine, The Rocks, New Chum Hill, Victoria Hill, Central Nell Gwynne, Rae's Open Cut, Housing Commission Homes and Latham and Watson's. Description of machinery at the Central Deborah Mine, yields, dividends, depth of shafts and directions to get ot the various places is included.document, gold, victoria hill, victoria hill, bendigo branch historical society mine tour, all saints church, joseph la trobe, bendigo's first hospital, sacred heart cathedral, the central deborah mine, city council, londonderry west shaft, new red, white and blue consolidated (big blue), a roberts & sons, big deborah, the new golden fleece, new chum goldfields, central wattle gully mine chewton, virginia consols, black's quarries coldstream, thompson's engineering and pipe co ltd castlemaine, new chum railway mine, golden square methodist church, the rocks, e j dunn, gold monument, shamrock mine, mt alvernia hospital, j b lazarus, john brown knitwear factory, gold fmines hotel, david sterry, new chum hill, fortuna villa, geo lansell, theodore ballerstedt, a h q survey regiment headquarters, old chum mine, central nell gwynne, rae's open cut, theodore ballerstedt, new chum syncline, little 180 mine, victoria quartz, wittcheibe's 'jeweller's shop', adventure, advance, cinderella, j n macartney, bendigo goldfields registry 1870, wm rae, johnson's devonshire mine, snobs hill mine, ellenborough mullock heap, belmont mullock heap, sadowa, st mungo, united devonshire, mechanic's institute, log lock-up, court house, j b watson, housing commission homes, hustlers hill, latham and watsons', the great extended hustlers, a richardson -
Bendigo Historical Society Inc.
Document - LONG GULLY HISTORY GROUP COLLECTION: HISTORICAL GUIDE TO BENDIGO
Brochure with an invitation to visit Historical and Mining Museum in Mechanic's Institute, Eaglehawk. Drawing of poppet legs on the front with The Royal Historical Society of Victoria Bendigo Branch. Historical Guide to Bendigo including Self Tours of Bendigo's Famous Goldfields. Forward by John Hattam. Contributors are: H Biggs, Miss L J Parry, A Richardson, L C Bennetts and Edith Checcucci. Credits - The Bendigo Advertiser, Cambridge Press, Mines Department (Bendigo) and J R W Purves. Items include Bendigo Tramways Compiled by H Biggs, Early Bendigo Hotels Compiled by L C Bennetts, Eaglehawk Compiled by H Biggs, Noted Events Compiled by June Parry,The Bendigo Post Office Compiled by LC Bennetts, The Bendigo Goldfield .. Introduction to Field and Guide to Some Famous Mines Compiled by A Richardson. Photos include: Pall Mall Bendigo, Ravenswood Homestead, An Early Battery at Kangaroo Flat,Historic High Street Golden Square, The Lonely Grave, Battery Tram c1888, Steam Tram c1892, Electric Tram c1903, Teh New Chum Railway Golden Square, United Hustlers and Redan Mine Sandhurst Road, Central Deborah Violet Street, Deborah Mine Quarry Hill, Deborah Mine 1000 ft level, First Motion Winding Engine at Central Deborah, Victoria Hill Area, and Looking south from New Chum Hill in 1890's. Also 11010.254, 255, 268, 288a, 288b, and 289.bendigo, history, long gully history group, the long gully history group - historical guide to bendigo, the royal historical society of victoria bendigo branch, historical and mining museum, mechanic's institute eaglehawk, librarian mechanic's institute, miss j parry, john hattam, h biggs, a richardson, l c bennetts, edith checcucci, bendigo advertiser, cambridge press, mines department (bendigo), j r w purves, mr a o'keefe, shire of marong, the sandhurst and eaglehawk tramway company, mr j taylor, mr j hanson, the bendigo tramway company, electric supply company, coliban water suply, juvenile industrial exhibition, geo lansell, cr a harkness, salvation army, vine and fruitgrowers association, decentralisation league, constable thomas ryan, miners association, art gallery, post office, miss broadfoot, bendigo hospital, opera company, bendigo development league, victorian women's franchise league, ana hall, the bendigonian, law courts, temperance hall, trades hall (old wardens court), roman catholic cathedral, shamrock hotel, bendigo philosophical society, old bendigonian society, bendigo fire brigade, bendigo volunteers to south african war, hawkins, porcupine inn, criterion hotel, royal hotel, bendigo hotel, black swan hotel, gillies bakery, hibernian hotel, sandhurst hotel, freemasons hotel, courthouse hotel, shamrock hotel, governor hotham, heffernan & crowley, new chum railway, victoria quartz, shenandoah, shamrock mine, hercules no 1 (originally pearl east), hercules new chum (late pearl), carlisle mine, mr arblaster, meurer, sandhurst bee, benevolent asylum, bendigo gas company, a lloyd, coliban water supply scheme, cr w v simons, eaglehawk council, j mouat, sir henry barkly, agricultural and horticultural exhibition, sandhurst and eaglehawk boroughs, cr john mcintyre, latham and watson's mine, galatea (model ship), st paul's church of england, rev g p despard, fine arts exhibition and exposition, bendigo rifle association, strathfieldsaye shire hall, corporate high school, bendigonian society, richard andrews, easter fair, g aspinall, j burnsides, sir h manners sutton, beehive stores, mining exchanges, bendigo water works, city family hotel, bendigo united friendly society medical institute and dispensary, benevolent asylum, jewish synagogue, masonic hall, school of mines, mr j h abbott, australian natives association, royal princess theatre, albion hall, central state school, high school, gravel hill state school, electricity commission, james mouat, warring natives, the rocks, joseph crook, gold discovery, marong district roads board, camp hotel, mr charles sherratt, city of bendigo, mt alexander north run, grice and heape, ravenswood, gibson and fenton, mrs john kennedy, mrs patrick farrel, mr j a paton, mr lachlan mclachlan, theatre royal, sir charles and lady hotham, harney's bridge, e j ennor, sandhurst fire brigade, the health of towns act, mr townsend, cornish & co, bendigo pottery, bendigo agricultural society, pike or pyke, baby health centre, sandhurst post office, government survey office, sandhurst trustees company, mr h b briston, savings bank, telegraph office, sir henry brougham lock, hon sir john nimmo, sandhurst public offices, the new prince of wales mine, new prince of wales no 2, the whip and jersey, lansell's big 180, new chum and victoria mine and battery, new chum railway, koch's pioneer, south new moon, catherine reef united, new moon, virginia mine, south belle vue, new chum railway, central nell gwynne, north nell gwynne, ironbark mine, new chum syncline, hercules, herculesl energetic, roberts & sons, harkness & co, horwoods, great southern, ulster, carlisle, cornish, new st mungo, duchess tribute, south devonshire, hopewell mine, saxby mine, mcnair & co, mr king, bourke and wills, sandhurst hotel, the dascombe nugget, victoria nugget, r r haverfield, ballerstedt, rae, wittscheibe, lazarus, cave and amos, bendigo amalgamated goldfields, bendigo mines limited, the deborah, north deborah, central deborah, the new red white and blue consolidated (big blue), union, lansell's new red white and blue 9later no 3 shaft), h harkness & co, thompson & co, central deborah, lansell's bendigo battery, north red white and blue, central red white and blue, roberts and sons, little 180 (originally lansell's 180 no 2 shaft), john brown knitwear factory, south ironbark originally victoria consols east shaft, ironbark (originally ironbark east shaft), manchester arms hotel, wattle gully mine chewton, hercules, old wheal-owl, central nell gwynne, gold mines hotel, bendigo city council, jack barker, the new chum syncline, the courier of the mines, telegraph office, bendigo cemetery, white hills cemetery, eaglehawk cemetery, kangaroo flat cemetery, new moon, suffolk united, north new moon, fortuna hustlers, buckell & jeffrey's, royal hustlers reserve no 2 (city and park shafts), jonathan harris, latham and watson, great hustlers, great extended hustlers, j hustler, latham, watson, tribute or pups shaft, bendigo's worst mining disaster, hustlers reef (old hustlers), hustlers reef no 1, lansell's comet, the old comet (cooper's claim), united hustlers and redan, comet hill state school, k k shaft, north or new hustlers (agnew hustler), johnson's no 3, south johnson's, lansell's sandhurst needle, cleopatra needle top, british american, collman and tacchi, south virginia, saddle reefs and spurs, pall mall bendigo, ravenswood homestead, an early battery at kangaroo flat, historic high street golden square, the lonely grave, battery tram c1888, steam tram c1892, electric tram c1903, teh new chum railway golden square, united hustlers and redan mine sandhurst road, central deborah violet street, deborah mine quarry hill, deborah mine 1000 ft level, first motion winding engine at central deborah, victoria hill area, looking south from new chum hill in 1890's -
 Puffing Billy Railway
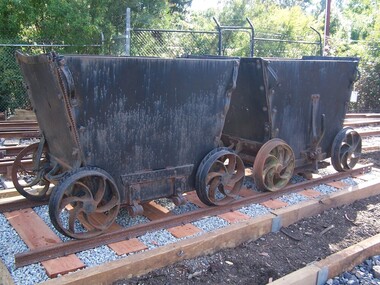
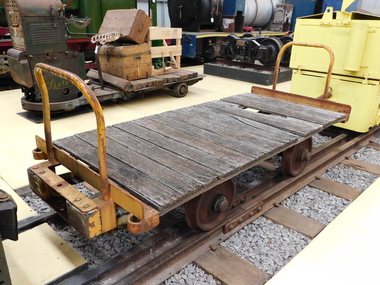
Drop Bottom Clay Trucks - 800mm gauge
These trucks are over 100 years old and are constructed to a similar design to the coke wagons used in the English Midlands region during the 1800's. The trucks were used for the cartage of clay from the quarry to the clay bins, prior to crushing and molding into bricks. These came from Fritsch, Holzer & Company, Brickworks, Hawthorn, Victoria, Australia Historic - Industrial Narrow gauge Railway Fritsch, Holzer & Company Brickworks , Hawthorn, Victoria, Australia - Rolling stock Drop Bottom Clay Trucks - Square like clay truck that has a very deep bottom floor.drop bottom, clay trucks, 2'7.5" gauge, puffing billy, fritsch, holzer & company, brickworks -
 Puffing Billy Railway
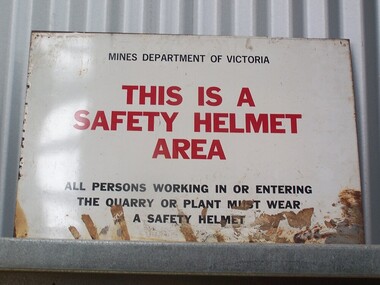
Sign - Safety Helmet Area
Sign - Safety Helmet Area, Mines Dept. of VictoriaHistoric - Safety Sign used by Mines Dept. of Victoriametal sign - Sign - Safety Helmet Area Mines Department of Victoria This is a Safety Helmet Area All persons working in or Entering The Quarry or Plant must wear A Safety Helmetpuffing billy, sign - safety helmet area,, mines dept. of victoria -
 Puffing Billy Railway
Explosives Wagon, unkown
This 2 foot 6 inch (762mm) gauge wagon was used for carrying explosives and was used with the Greenbat Battery loco. It was donated to the Walhalla Goldfields Railway on long term loan in 2013 along with a large quantity of narrow gauge trollies and light rail from Orica’s now closed munitions factory in Melbourne’s western suburbs. Orica - Deer Park Munitions factory Orica Deer Park in Melbourne’s west has been used since circa 1875 for various forms of manufacturing and storage of chemicals. Although the site is bounded by Ballarat Road, Station Street, Tilburn Road and the Western Ring Road, the current entry point for industrial operations is situated at Gate 6 of Tilburn Road. Operations include: • a specialty chemicals facility producing products for mining services operations • quarry services • other chemical manufacture activities. The Deer Park factory complex The factory complex is of historical significance for the major role it played in Australia's manufacturing and mining industries through the development of progressively more efficient and safer explosives. It also contributed to wartime production in ammunition, initiators and the development of synthetic ammonia production and construction of the Defence Explosives Annexe No 5 (later the Albion Explosives Factory) during World War Two. The factory complex is also of technical significance for the unusual and specialised design of many of the buildings and structures, both in the layout of the works and the individual design of buildings. Blast protection and safety measures such as mounds around the buildings, 'cleanways' and buffer zones between production areas were employed extensively. A characteristic of many production buildings was the elimination of cavities where explosive compounds could lodge. The combination of concrete barriers and light-weight construction was designed to direct explosion debris away from operators or other buildings. The narrow gauge tramway, which ran through the explosives section, is a rare survivor of nineteenth century materials-handling methods. Historic - Industrial Narrow Gauge Railway - Wagon for carrying Explosives at the Orica - Deer Park Munitions factory, Deer park, Victoria, Australia Wagon for carrying explosives made from Timber and steelwagon for carrying explosives, puffing billy, industrial narrow gauge railway, orica - deer park munitions factory, explosives wagon -
 Stawell Historical Society Inc
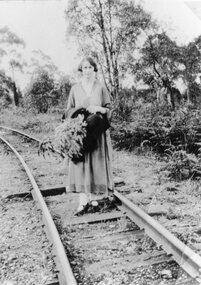
Photograph, Heatherlie Quarry with Miss Margaret Frawley & later Mrs John Alexander Hall on the rail track
Heatherlie Quarry. Lady on rail track is Margaret Frawley later Mrs John Alexander Hall. Holding a bunch of Thryptomene.Black and white Photographs of Lady standing on Railway tracks, holding a bunch of Thyrptomein stawell grampians industry -
 Stawell Historical Society Inc
Photograph, Train Photographs
-1 K Class Seaby Street Crossing c.1960 -2 Melbourne bound X Class passing B Box Stawell 1985 -3 Arial View of picnic train Heatherlie Quarry 1929 -4 Stawell circa 1993 N Class Loco with N set passenger carriages. From left Kevin Neville, train conductor, Craig Pitcher & Trevor Skurrie -5 Horsham bound Goods train Glenorchy J Class -6 West bound goods train 1980's Great Western T Class -7 N Class Steam Hauling Short Goods Train Stawell -8 N Class from Grant St Bridge same as -7Eight Colour photographs of trainsrailways -
 Stawell Historical Society Inc
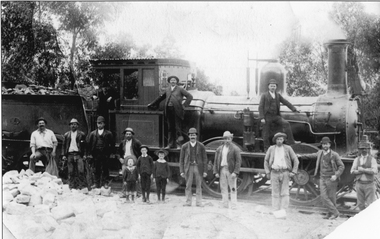
Photograph, Steam Engine -- Stationary with men & boys standing beside engine
Steam Engine with 12 men and 3 young children standing along side the train engine. based on the surrounds, its presumed the photo was taken at Heatherlie Quarry. No names are known of people.Black & white copy of photo of Steam engine with 12 men and 3 young boys standing alongside the engine presumed the photo was taken at Heatherlie quarry. railways -
 Whitehorse Historical Society Inc.
Photograph, Aerial View of Mitcham, C.1925
Large Aerial View of Mitcham showing Railway and South side. In particular, The Australian Tesselated Tile Co. Works and Quarry. Also Monarch Works, better known as Builders' Trade and Roofing Co. and their Quarry.australian tesselated tile co. pty ltd, aerial photographs, monarch pottery, builders trading and roofing co. ltd -
 Ballarat Heritage Services
Photograph - Photograph - Colour, Clare Gervasoni, Nimon's Bridge, 1999, 04/10/1999
Nimons Bridge was built in 1890, as part of the then Ballarat-Linton railway. The bridge is 17 spans with tall timber piers of four driven piles each, with triple sets of diagonal cross-bracing and walers and a single row of longitudinal horizontal bracing between piers. The spans are of a uniform twenty feet (6.1 metres), originally supported by four 21-inch x 9-inch (535 mm x 230 mm) Kauri timber beams per span, following the standard V.R. design of the period. When the superstructure was rebuilt after the 1953 fire, the timber beams were replaced with two 24-inch (610mm) deep rolled-steel-joists on each span. These are marked 'Lancashire Steel Co., Scotland' and are believed to have been second-hand. The deck of transverse-timber planks is 103.6 metres in length. Overall the bridge has an impressive appearance with its exceptionally tall triple-cross-braced piers creating a 'three-tiered' effect, with the deck 19.2 metres above the Woady Yaloak River. The Ballarat-Skipton line closed in 1985. Nimons Bridge has been recently restored, as part of the Ballarat-Skipton Rail Trail. How is it significant? Nimons Bridge is significant for technical, historic and aesthetic reasons at a State level. Why is it significant? Nimons Bridge is technically significant as Victoria's fourth-tallest timber trestle bridge when built, and as the third-tallest surviving example. It is also the second-largest composite bridge combining traditional timber piers with RSJ spans and a timber deck and falls within a select group of fewer than ten timber railway bridges with horizontal longitudinal bracing between the piers and three sets of double cross-bracing on its tallest piers, creating a visually striking 'three tiered' effect that enhances its viaduct form. Nimons Bridge is historically significant as having served initially the mining community at Linton, then the Western District agricultural area and in later years a kaolin quarry at Pittong. Nimons Bridge is historically significant as a representative of the 'light' branch line methodology that stimulated the explosion of railway construction in Victoria during the 1880s, and provides an interesting contrast with the more solid and vastly more expensive railway viaducts built in similar terrain on Victorian main lines, at Moorabool and Taradale, in the late 1850s. Approached by a deep cutting and high embankment at either end, the bridge represents a very cost-effective late 19th century engineering solution to the characteristic physiography of western Victoria with flat basalt plains intersected by deep wide valleys occasionally subject to severe flooding. Nimons Bridge is aesthetically significant for its visually impressive viaduct form, crossing a deep and steep-sided valley that is part of a rich cultural landscape. Within close proximity of the bridge are mullock dumps, tailings, shaft sites and other relics of the deep-lead alluvial mining era. The bridge is the most visually spectacular timber-trestle rail bridge in Western Victoria and is among the most spectacular timber-trestle rail bridges surviving anywhere in Victoria. It is part of the Ballarat-Skipton Rail Trail. Classified by the National Trust :02/10/2000 (http://vhd.heritagecouncil.vic.gov.au/places/67986)Colour photograph of a log bridge known as Nimon's Bridge.ballarat-linton, nimons bridge, nimon's bridge, log bridge, viaduct, timber-trestle rail bridge -
 Ballarat Tramway Museum
Slide - 35mm slide/s - set of 17, Noel Simons, 20/11/1962 12:00:00 AM
Set of 17 transparencies taken on 20/11/1962 on Kodak mounts. 1187.1 - Bendigo No. 2 at the Quarry Hill terminus, showing destination of Quarry Hill. Has Cohns Drinks and Streets Ice Cream ads on dash panel, a SEC 'electric cooking' roof ad and another roof ad. Shows the Y terminus at this location, but tram standing just before it. Overhead in position. 1187.2 - as above, but closer up. 1187.3 - as above, but from the north side, showing cemetery in the background. 1187.4 - Bendigo No.3 at Eaglehawk terminus. Tram showing destination of Quarry Hill. Has the various buildings at Eaglehawk in the background including the Foodland store. Has Streets Ice cream and White Horse Whiskey ads on the dash panel. 1187.5 - Bendigo No. 18 at Garden Gully crossing loop, in bound, with destination of Eaglehawk. Passengers waiting for an Eaglehawk tram at the stop. Has a white horse whiskey ad on dash panel and SEC roof ads. Conductor standing in doorway looking out. 1187.6 - Bendigo No. 7 inbound in Nolan St. at cnr of McCrae St. showing destination of Golden Square. Has Streets Ice cream ad on dash panel and a Castrol Roof ad. 1187.7 - Bendigo No. 19 at the North Bendigo terminus with railway level crossing in background. Tram has a Cohns Drinks ad and an SEC 'Electric Cooking' roof ad. 1187.8 - Bendigo No. 2 at the Quarry Hill terminus, looking back into Bendigo, showing destination of Eaglehawk. 1187.9 - Bendigo No. 21 in McCrae St, near Nolan St outbound for North Bendigo. Photo taken after tram has passed photographer. 1187.10 - Bendigo Nos. 4 and 26 at Charing Cross in View St. with fountain alongside and the Beehive, Ezywalkin Buildings in the background. No. 26 has a Sandhurst Milk and SEC 'Electric Cooking' roof ad. 1187.11 - close up of 22E maximum traction truck and folded footstep. 1187.12 - Bendigo No. 19 at Charing Cross terminus, after tram has passed photographer, showing destination of North Bendigo, with the Beehive building in the background and passengers boarding tram. 1187.13 - Bendigo No. 11, turning from View St. into Pall Mall, showing Special with the conductor holding point bar. Has the Beehive and Ezywalkin Buildings in the background. 1187.14 - No. 7 at Charing Cross terminus, in Pall Mall, bound for Golden Square. Has the Beehive and Ezywalkin buildings in the background and passengers waiting at the tram stop. 1187.15 - No. 18 at the Charing Cross terminus, bound for Eaglehawk. Has the Beehive and Ezywalkin buildings in the background and passengers waiting at the tram stop. Also has the 'Safety Zone' sign in the photograph. 1187.16 - No. 2 at Quarry Hill terminus, night or dusk photo. Tram showing destination of Depot. 1187.17 - No. 26 at Charing Cross, night photo. Tram has destination of Quarry Hill, but is on the line for Eaglehawk. Photo looks along Mitchell St. Also shows Safety Zone sign. Information written on in black ink and date stamped on purple ink. 1187.1 - "No. 2 at Quarry Hill terminus Bendigo" 1187.2 - "No. 2 at Quarry Hill terminus Bendigo" 1187.3 - "No. 2 at Quarry Hill terminus Bendigo" 1187.4 - "No. 3 at Eaglehawk terminus" 1187.5 - "No. 18 in Mt Korong Road, Long Gully at cnr of Havilah Road (Eaglehawk Route)" 1187.6 - "No. 7 in Nolan St. Bendigo, at Cnr of McCrae St., near lake Weeroona, (North Bendigo Route)' 1187.7 - "No. 19 at North Bendigo terminus" 1187.8 - "No. 2 at Quarry Hill terminus" 1187.9 - "No. 21 in McCrae St. Bendigo, near Nolan St. (North Bendigo Route) 1187.10 - "4 and 26 at Alexandra Fountain, Charing Cross Bendigo" 1187.11 - "Truck of Bogie Car, Bendigo Tramways" 1187.12 - "No. 19 in Pall Mall at Charing Cross, Bendigo" 1187.13 - "Birney car No. 11 entering Pall Mall from View St. at Charing Cross Bendigo" 1187.14 - "No. 7 in Pall Mall at Charing Cross, Bendigo" 1187.15 - "No. 18 at Alexandra Fountain, Charing Cross, Bendigo" 1187.16 - "No. 2 at Quarry Hill terminus, Bendigo" 1187.17 - "No. 26 at Alexandra Fountain, Charing Cross, Bendigo" tramways, trams, bendigo, quarry hill, eaglehawk, north bendigo, maximum traction, night photo, tram 2, tram 3, tram 4, tram 7, tram 11, tram 18, tram 19, tram 21, tram 26 -
 Ballarat Tramway Museum
Slide - 35mm slide/s - set of 20, Noel Simons, 21/05/1971 12:00:00 AM
Set of 20 transparencies taken on 21/5/1971 on Kodak mounts. 1197.1 - Bendigo No. 5 en route to Eaglehawk at Creeth St Long Gully. Tram has a SEC roof ad and Cinzano roof ad. 1197.2 - No 5 approaching Needle Loop between Long Gully and California Gully. On left hand side is the City of Bendigo sign, indicating city boundary. 1197.3 - As for 1197.2 but actually entering loop. Photo taken after tram has passed photographer. 1197.4 - No. 26 bound for Eaglehawk descending the railway bridge near Eaglehawk, at Jobs Gully. 1197.5 - as for 1197.4, but after crossing bridge, now ascending a hill. Photo taken after tram has passed photographer. 1197.6 - No. 26 climbing High St. hill Eaglehawk, nearing end of Double track, bound for Quarry Hill. Shows centre of the road poles. 1197.7 - As for 1197.6, with tram entering single track section. Photo taken after tram has passed photographer. Has a BP service station in the background. 1197.8 - No. 26 (bound for Quarry Hill) crossing No. 17 (Eaglehawk) at Job's Gully Loop. 1197.9 - No. 17 climbing railway bridge at Job's Gully, en route to Eaglehawk. Photo taken after tram has passed photographer. 1197.10 - No.26 bound for Quarry Hill, leaving Long Gully Loop? Has the Creeth St. church in l197.l in the far background. Photo taken after tram has passed photographer. 1197.11 - Tramway Point work at the northern end of Long Gully Loop. 1197.12 - No. 17 en route for Quarry Hill turning into View St. from Bamard St. Tram has SEC roof ads "Everything fine in my all electric Kitchen' and 'Electric Cooking is Matchless'. 1197.13 - as for 1197.12, but tram has turned into View St and about to enter the double line track. Photo taken after tram has passed photographer. 1197.14 - No. 21 enters Nolan St after turning from MacRae St. en route to Bendigo. Note sign on its own post noting tram turns "Beware Tram Turns" and stop sign on adjacent pole "Trams stop on Request". No. 21 has two SEC roof ads. 1197.15 - No. 21 in Nolan St. after turning from Bridge St. (White Hills Road). Note signal light for Bridge St. loop on pole corner of street. Photo taken after tram has passed photographer. 1197.16 - No. 2 bound for Eaglehawk at unknown location. 1197.17 - Tram stop sign on a pole "CARS STOP BY REQUEST" 1197.18 - No. 5 in Carpenter St.? en route to Quarry Hill. 1197.19 - No. 28 has just arrive at Golden Square terminus, passengers are disembarking and the trolley pole is being turned. Golden Square Hotel in the background. 1197.20 - No. 28 at Golden Square terminus. Has a "Nothing beats Briquettes for hear roof ad. Information written on in black ink and date stamped on purple ink. 1197.1 - "No. 5 at Creeth St. Long Gully" 1197.2 - "No. 5 approaching Needle Loop between Long Gully and California Gully" 1197.3 - "No. 5 at Needle Loop between Long Gully and California Gully" 1197.4 - "No. 26 crossing railway bridge at Job's Gully near Eaglehawk" 1197.5 - "No. 26 just after crossing railway bridge at Job's Gully near Eaglehawk/ 1197.6 - "No. 26 in High St. Eaglehawk" 1197.7 - "No. 26 at end of double track in High St. Eaglehawk" 1197.8 - "Nos. 26 and 17 crossing at Job's Gully Loop" 1197.9 - "No. 17 crossing railway bridge at Job's Gully near Eaglehawk". 1197.10 - "No. 26 at Long Gully" 1197.11 - 'Northern end of points at Long Gully Loop". 1197.12 - "No. 17 turning into View St. from Bamard St. Bendigo". 1197.13 -'No. 17 at beginning of double track in View St. after leaving Bamard St. Bendigo. 1197.14 - "No. 21 enters Nolan St. from MacRae St. Bendigo." 1197.15 - "No. 21 in Nolan St. Bendigo just after leaving White Hills Road." 1197.16 - "No. 2" 1197.18 - "No. 5" 1197.19 - "Birney car No. 28 at Golden Square Terminus" 1197.20 "Birney car No. 28 at Golden Square Terminus" tramways, trams, bendigo, long gully, railway bridge, jobs gully, trackwork, nolan st, quarry hill, tram stops, golden square, tram 2, tram 5, tram 17, tram 21, tram 26, tram 28 -
 Ballarat Tramway Museum
Slide - 35mm slide/s - set of 4, Noel Simons, Apr. 1972
Set of 4 transparencies - copy slides - possibly ARE film strip dated March 1972. 1209.2 and 1209.4 on Kodak Readymount mounts. 1209.1 - Bendigo 5, 6 and 28 on a special tram service in bound to the City on a tour in Caledonia St. about to enter Lucan St, or White Hills Road or Weeroona Ave. (mis match in names in various maps). Gas works in the background. No. 5 has a white disk on the rear of the tram. 1209.2 - Nos 2 and 26 at Charing Cross with the Fountain Plaza in the background. Both trams have the destination of Quarry Hill, though 26 is on the Eaglehawk bound track. 1209.3 - No. 19 at the Golden Square terminus, with the conductor or driver swinging the pole and Billy Rodda's Golden Square hotel in the background. 1209.4 - No. 7 at Fire Station loop, en route to North Bendigo, picking up a passenger with a pram. Part of a set of 20 slides made by the Association of Railway Enthusiast Provincial Tramways film strip. Reference Item 2560 details the ARE Film Strip and provide references to other slides.Information written on in blue ink and date stamped on purple ink. 1209.1 - "Nos 5, 6 and 28 in Caledonia St. about to enter Weeroona Ave." 1209.2 - "Nos 2 and 26 at Charing Cross." 1209.3 - "Swinging the pole on No. 19 at Golden Square Terminus." 1209.4 - "No. 7 inward bound from Golden Square stops at Fire Station Loop."tramways, trams, bendigo, charing cross, golden square, gas works, special trams, tram 2, tram 5, tram 6, tram 7, tram 19, tram 28 -
 Ballarat Tramway Museum
Slide - 35mm slide/s - set of 4, Noel Simons, Apr. 1972
Set of 4 transparencies - copy slides - possibly ARE film strip dated April 1972. 1210.3 on Kodak Readymount mount. 1210.1 - No. 3 arriving at Quarry Hill terminus. 1210.2 - Bogie car at Long Gully Loop, in the far distance, with a Hotel and the ESSO service station in between. Has Fosters Lager and Carlton signs on hotel. Note sign on the closet pole - "No standing between Notices" 1210.3 - Nos. 26 (Quarry Hill) and 25 (Eaglehawk) at Jobs Gully Loop. 1201.4 - No. 5 showing Charing Cross in bound for Charing Cross and No. 3 en route for Eaglehawk in View St. near the end of the double track. Appears to be SEC employee at the rear of No. 3. Part of a set of 20 slides made by the Association of Railway Enthusiast Provincial Tramways film strip. Reference Item 2560 details the ARE Film Strip and provide references to other slides.Information written on in blue ink and date stamped on purple ink. 1210.1 - "No. 3 arriving at Quarry Hill terminus." 1210.2 - "Bogie car at Long Gully Loop." 1210.3 - "Nos. 26 and 25 at Jobs Gully Loop." 1210.4 - "Nos 5 and 3 in View St. near the end of the double track."tramways, trams, bendigo, long gully, quarry hill, view st., tram 3, tram 5, tram 25, tram 26 -
 Ballarat Tramway Museum
Photograph - Illustration/s, Bendigo Charing Cross
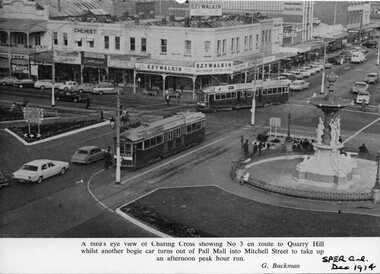
Black and white illustration from the South Pacific Electric Railway Co-op (Sydney Tramway Museum) - Dec.. 1974 calendar of Charing Cross Bendigo from an elevated viewpoint. Overlooks intersection has tram 3 waiting to proceed to Quarry Hill while another bogie tram turns from Pall Mall into Mitchell St. Photo undated, but most likely during the early 1970's. Photo by G. Buckman Has the EZYWALKIN store and other stores in the background.On bottom right hand corner "SPER Calendar Dec. 1974"trams, tramways, bendigo, charing cross, pall mall, mitchell st. -
 Ballarat Tramway Museum
Slide - 35mm slide/s - set of 2, Peter Moses, Jan. 1969
... Eaglehawk tram service. .2 - No. 17, with destination of "Quarry... Eaglehawk tram service. .2 - No. 17, with destination of "Quarry ...Set of two photos of SEC Bendigo No. 17 in Mitchell St. Bendigo. .1 - No. 17 using the crossover. Has destination of "Eaglehawk". In the background are the Plaza theatre, Maples store and Coles store. Advised that the Sunday run outs in the late morning, early afternoon used this crossover to form the first Eaglehawk tram service. .2 - No. 17, with destination of "Quarry Hill", near the Railway station. Has a Wilkinson Sword and SEC "Electric Cooking serves you best", roof advertisements. Kodak cardboard mount slide, taken by Peter Moses, Jan. 1969.On the rear of the slide: .1 - in red ink "Bendigo Mitchell St." , "6" and "P. Moses" in black ink. .2 - "3" in red ink and "P. Moses" in black ink.tramways, trams, bendigo, mitchell st, quarry hill, tram 17 -
 Ballarat Tramway Museum
Slide - 35mm slide/s, Wal Jack, 17/06/1962 12:00:00 AM
Bendigo, Birney No. 28 turning into Mitchell St from Pall Mall, heading for Quarry Hill. Photo taken after tram has passed, looks along Mitchell Street towards railway station, with centre of the road poles. Not well in focus. Tram has Briquettes roof ad.'SEC Bendigo, Birney No. 28 in Mitchell St. 17-6-62'tramways, trams, bendigo, mitchell st, tram 28 -
 Ballarat Tramway Museum
Slide - 35mm slide/s, Bob Wilson, May. 1972
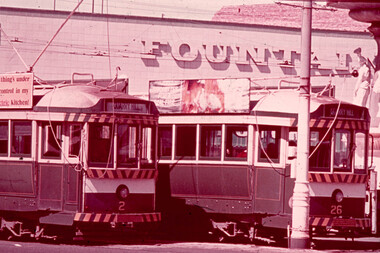
White cardboard mount, 35mm slide, from the Association of Railway Enthusiast's film strip titled "Provincial Tramway Film Strip" of Bendigo bogie tramcars Nos. 2 and 26 at Charing Cross, with the Fountain Plaza building in the background. Both trams have the destination of "Quarry Hill" No. 26 has the older type of destination roll and is fitted with a SEC Briquettes roof advertisement. The film strip notes (Reg. Item 2560), provided the following caption details: "The hub of the Bendigo system was at Charing Cross, where the "Quarry HILL" - "EAGLEHAWK "and "'GOLDEN SQUARE" - "NORTH BENDIGO" routes crossed at right angles. It was customary for trams for all four routes to meet at the CROSS. Here cars 2 & 26 (showing a wrong dest- -ination) meet by the fountain. -Mar '72 (Bob Wilson)" See image btm2580p.tif for high level scan of image. Stamped on base of slide "11789" and written in ink on top edge "No. 2 & 26 Charing Cross Bendigo"tramways, trams, are, film strip, charing cross, bendigo, tram 2, tram 26 -
 Ballarat Tramway Museum
Slide - 35mm slide/s, Graham Evans, Apr. 1972
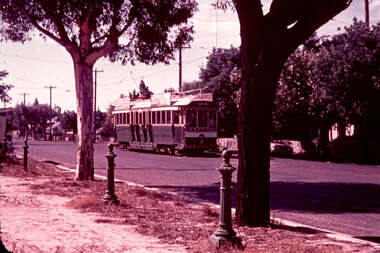
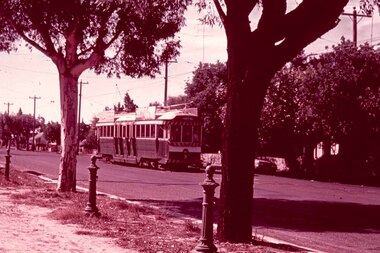
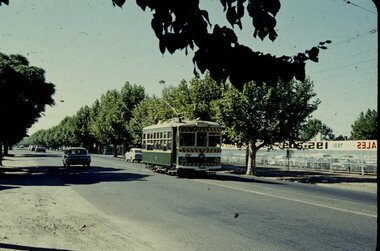
White cardboard mount, 35mm slide, from the Association of Railway Enthusiast's film strip titled "Provincial Tramway Film Strip" of Bendigo No. 3 at Quarry Hill terminus. Tram has the destination of Quarry Hill. The film strip notes (Reg. Item 2560), provided the following caption details: "Bogie No. 3 arrives at "QUARRY HILL" terminus beside the cast iron hitching posts that lined the roadside outside the dominant feature of the area - the Cemetery. Apr. '72 (Graham Evans)" See image btm2586p.tif for high level scan of image. Stamped on base of slide "11796" and written in ink on top edge "No. 3 Quarry Hill"tramways, trams, are, film strip, quarry hill, cemetery, tram 3 -
 Ballarat Tramway Museum
Slide - 35mm slide/s, Graham Evans, Apr. 1972
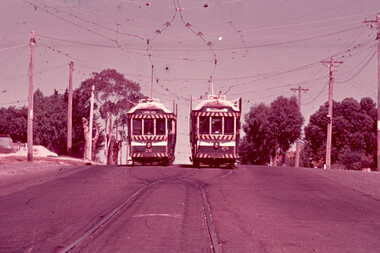
White cardboard mount, 35mm slide, from the Association of Railway Enthusiast's film strip titled "Provincial Tramway Film Strip" of a Bendigo Nos. 26 (Quarry Hill) and 25 (Eaglehawk) at Jobs Gully Loop. The film strip notes (Reg. Item 2560), provided the following caption details: "Bogie cars 26 & 25 meet at Jobs Gully loop about a mile from the terminus. Apr ' 72 (Graham Evans)" See image btm2595p.tif for high level scan of image. Stamped on base of slide "11805" and written in ink on top edge "26 & 25 Jobs Gully Eaglehawk"tramways, trams, are, film strip, jobs gully, eaglehawk, tram 26, tram 25 -
 Ballarat Tramway Museum
Slide - 35mm slide/s, Graham Evans, Apr. 1972
White cardboard mount, 35mm slide, from the Association of Railway Enthusiast's film strip titled "Provincial Tramway Film Strip" of a Bendigo No. 26 descending the Bendigo end of the bridge over the railway near Eaglehawk near Jobs Gully loop. Tram has the destination of Quarry Hill and has four roof advertisements. The film strip notes (Reg. Item 2560), provided the following caption details: "Bogie cars 26 drops down the Bendigo side of the bridge over the Eaglehawk railway, on the long journey to "QUARRY HILL". - Apr ' 72 (Graham Evans)" See image btm2596p.tif for high level scan of image. Stamped on base of slide "11806" and written in ink on top edge "26 Eaglehawk"tramways, trams, are, film strip, jobs gully, eaglehawk, railway bridge, tram 26 -
 Ballarat Tramway Museum
Negative, Travis Jeffrey, 5/08/1962 12:00:00 AM
Colour Negative No. N406, of the Bendigo No. 7, showing Quarry Hill, crossing over the railway bridge, in Mitchell St with the railway bridge structure in the background. Tram has a Castrol Oil roof advertisement. Photo taken possibly on 5/8/1962. Colour laser printed copy of image stored in box 73. Original negative hires scan and image updated 28/5/2020.In red pen on folder that contained negative, "NR96B" and "5 Aug 62". trams, tramways, bendigo, railway station, mitchell st, tram 7 -
 Ballarat Tramway Museum
Photograph - Black & White Photograph/s - set of 32, Eldon Hogan, 4/06/1965 12:00:00 AM
Yields information about a 1924 Jelbart Engine manufacturing display in Sturt St and the street scene and peoples clothing at the time.Set of 32 black and white photographs of an Association of Railway Enthusiasts tour to Bendigo and trams 4/7/1965. The photos are not necessarily in photographic order. .1 - 30 on the Eaglehawk terminal track, beyond the normal terminus. .2 - 30 & 29 High St Eaglehawk. .3 - ditto with a poppet head in the background. .4 - 30 at one of the crossing loops .5 - 30 at Eaglehawk terminus extension .6 - ditto. .7 - ditto .8 - cleaning out the track .9 - showing the location of the track at Eaglehawk terminus and its extension .10 - cleaning out track .11 - a portable shed adjacent to the track .12 - A view of the two Birneys travelling in the empty country. .13 - ditto .14 - 19 and 18 at Golden Square .15 - Bendigo tram depot - creek crossing .16 - Scrubber at the depot .17 - 28 and 19 at the North Bendigo terminus .18 - 18 and 30 on the Golden Sq line .19 - 28 and 19 at the North Bendigo terminus .20 - ditto. .21 - 28 and 19 near the depot entry. .22 - 28 and 30 Pall Mall .23 - 28 at North Bendigo .24 - 17 and 19 and 6 at Quarry Hill .25 - 28 and 30 Mitchell St .26 - 19, 6 and 21 Quarry Hill .27 - 19 and 6 Quarry Hill .28 - 28 and 6 at the depot entry .29 - ditto .30 - 18 and 30, Golden Sq line .31 - 25 at depot .32 - 6 and 19 Charing Cross. Photographer Eldon Hogan. Printed on Kodak Paper .33 - roll of negatives of some of the above photos - stored in box 83 as well. trams, tramways, are, bendigo, eaglehawk, quarry hill, golden square, north bendigo, tram 30, tram 29, tram 28, tram 6, tram 19, tram 25, tram 17, tram 18 -
 Ballarat Tramway Museum
Photograph - Digital image Set of 20, 16/04/1972 12:00:00 AM
Set of 20 digital images of Bendigo Tramways, of the last running day of the Eaglehawk to Quarry Hill line 16 April 1972, .1 - No. 24 outbound to Eaglehawk .2 - No. 3? at Manchester Loop .3 - No. 24 outbound to Eaglehawk .4 - bogie tram crossing the rail over bridge from Eaglehawk .5 - No. 18 in View St .6 - No. 24 outbound to Eaglehawk .7 - No 18 at Eaglehawk with destination roll being changed, and shopping centre in the background. .8 - No. 24 crossing the railway overbridge, going to Eaglehawk .9 - No. 3 outbound to Eaglehawk .10 - No. 24 crossing the railway overbridge, going to Eaglehawk .11 - No. 3 and 24 crossing at Long Gully .12 - No. 18 at Eaglehawk with Leo A Hughes photographer building in the background and a CFA truck passing the tram. Tram SEC roof advertisement and a banner for "German -?- Circus" at Eaglehawk and dates. .13 - No. 3 inbound on the Eaglehawk line. .14 - No. 18 outbound to Eaglehawk .15 - ditto .16 - No. 18 at Eaglehawk terminus with the Mechanics Institute in the background. .17 - No. 24 at the Eaglehawk terminus .18 - No 24 at the intersection with Taylor St .19 - No. 24 at the Eaglehawk terminus .20 - dittotrams, tramways, bendigo, eaglehawk, long gully, manchester loop, tram 24, tram 18, tram 3 -
 Ballarat Tramway Museum
Photograph - Digital image Set of 20, 16/04/1972 12:00:00 AM
... running day of the Eaglehawk to Quarry Hill line 16 April 1972... running day of the Eaglehawk to Quarry Hill line 16 April 1972 ...Set of 22 digital images of Bendigo Tramways, of the last running day of the Eaglehawk to Quarry Hill line 16 April 1972, .1 - No. 3 and 24 crossing at Long Gully .2 - No. 3 turning at the Cricket ground, Barnard and View Sts, inbound to the City and Quarry Hill .3 - No. 3 in bound to the City and Quarry Hill, Long Gully area .4 - No. 18 inbound to the City and Quarry Hill crossing the railway bridge from Eaglehawk. .5 - Manchester Loop .6 - No. 18 inbound to the City and Quarry Hill crossing the railway bridge from Eaglehawk. .7 - No. 18 about to enter Jobs Gully Loop .8 - No. 3 about to turn at the Cricket ground, Barnard and View Sts inbound to the City and Quarry Hill .9 - No. 3 turning at the Cricket ground, Barnard and View Sts, inbound to the City and Quarry Hill .10 - No. 18 at Eaglehawk terminus with the Mechanics Institute in the background. .11 - No. 3 in bound, Ironbark area. .12 - No. 3 at Long Gully Loop .13 - No. 3 outbound to Eaglehawk. .14 - No. 18 at Eaglehawk with German circus banner on tram .15 - No. 18 on the Eaglehawk line at Jobs Gully Loop .16 - No. 24 outbound to Eaglehawk at Taylor St .17 - No. 18 inbound to the City and Quarry Hill crossing the railway bridge from Eaglehawk. .18 - No. 3 at Manchester Loop .19 - No. 18 at Eaglehawk terminus .20 - No. 18 at Eaglehawk with German circus banner on tram .21 - bogie tram at Long Gully Loop. .22 - No. 24 outbound to Eaglehawk at Taylor Sttrams, tramways, bendigo, eaglehawk, long gully, jobs gully, manchester loop, tram 24, tram 18, tram 3 -
 Ballarat Tramway Museum
Photograph - Black & White Photograph/s, Wal Jack, 12/04/1959 12:00:00 AM
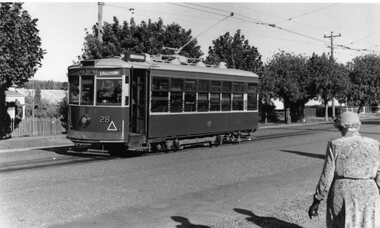
Yields information about Ballarat's trams, and the City centre area and motor vehicles late 1950's.Black and white print of Bendigo 28 at the Quarry Hill terminus, 12/4/1959, photo by Wal Jack. Has a lady walking across to the tram - dressed in gloves and hat. Tram has the destination of Eaglehawk. Photo print courtesy of Port Dock Railway Museum, now the National Railway Museum. See worksheet 4311 for letter and details of prints sent to Bill Scott, 19/10/2001. Any photo credit to mention NRM Collection.On rear of copy "SEC Bendigo #28 / Quarry Hill terminus / 12/4/59 / Wal Jack photo / National Railway Museum.trams, tramways, bendigo, quarry hill, tram 28 -
 Ballarat Tramway Museum
Slide - 35mm slide/s - set of 10, Campbell Duncan, Jan. 1971
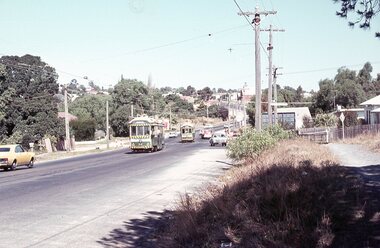
... Square High St Nolan St North Bendigo Quarry Hill Long Gully ...Set of 10 Ferraniacolor slides - cardboard mounts taken on either 10/1/71 or 16/1/71. .1 - Birney No. 30, Golden Square line, inbound near Cathedral with car yard in background. .2 - ditto, with Cathedral gardens in background. .3 - single trucker, with two SEC roof adverts, entering Nolan St enroute to North Bendigo. Shows the driver sitting in a side on shot. A 4 square store in the background, with a fading advert for "Peeled Tomatoes". .4 - No. 6 turning from Nolan St into McCrae St with 4 square store in background. .5 - No. 26 at Quarry Hill with cemetery in background. .6 - No. 6 at the North Bendigo Terminus .7 - No. 26 outbound to Eaglehawk on the Railway Overbridge, Mt Korong Road. .8 - No. 17 (inbound to City and Quarry Hill) and another bogie crossing at a loop on the Eaglehawk line. Both trams have SEC roof adverts. The driver of the outbound car is boarding the tram. Based on .9, it is No. 3 at Long Gully. .9 - No. 3 waiting at Long Gully Loop . .10 - No. 26 at Quarry Hill terminus, with destination of Eaglehawk.In ink on slide: .1 - "1/2 mile out on Golden Square line - 10/1/71 (Sun)." .2 - "1/2 mile out on Golden Square line - 10/1/71" .3 - "Has just rounded curve near lake Weeroona on North Bendigo line - 10/1/71 (Sun)." .4 - "16/1/71" .5 - " 10/1/71 (Sun)." .6 - "North Bendigo terminus, 16/1/71 (Sat)" .7 - "10/1/71 (Sun) c 3pm" .8 - "Cross Eaglehawk line - 10/1/71 (Sun)." .9 - "Jackson St Loop on E'Hk line awaiting up - 10/1/71 " .10 - "Quarry Hill terminus Bendigo - - 10/1/71"tramways, trams, bendigo, golden square, high st, nolan st, north bendigo, quarry hill, long gully, railway bridge, tram 30, tram 6, tram 26, tram 17, tram 3 -
 Ballarat Tramway Museum
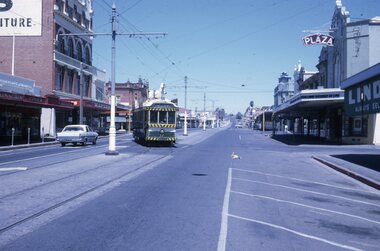
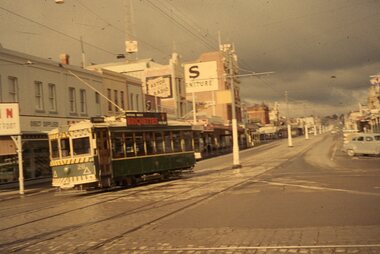
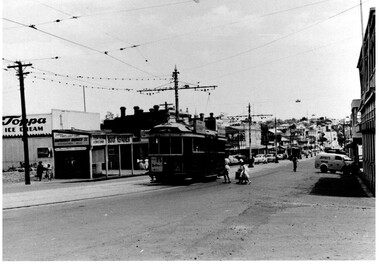
Photograph - Black & White, Bendigo 3 climbing Mitchell St, late 1950's
Black and White photograph, of Bendigo 3 climbing Mitchell St, near the Railway Station with the Destination of Quarry Hill. Has a Hutton's Ham ad on the front drivers panel and two rood ads. In the background are Sandhurst Dairies shop advertising Toppa Ice Cream, a boot repairer and a van marked Jeffreys Bread parked on the north side of Mitchell St. Nearing the point where the double track became single - see the signal wire insulators in the overhead. Printed on Fujichrome paper. Two copies held."TMSV Sales" stamp on rear. On rear of in ink 'HTT16 = MM N 102 = Geel 32 = BED 3"trams, tramways, bendigo, mitchell st, quarry hill, overhead, tram 3