Showing 251 items
matching route signs
-
 Melbourne Tram Museum
Album - Robert Thomson Slide Collection - box 16
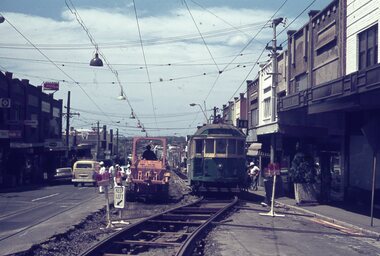
... – route 19 RT378 24-1-1980 Z37 (route 19) and a W route 20... line Truganini Road – note the single track signs. Both route ...Photo - see pdf file for further information. Number Date Brief Description Box 16 RT372 23-1-1980 W2 271, High St Kew reconstruction trackwork – route 48 RT373 23-1-1980 W2 504 Burwood Road RT374 23-1-1980 Z7 East Burwood terminus RT375 23-1-1980 Z26 Burwood Highway, route 75 RT376 23-1-1980 W2 255 North Balwyn terminus, route 48 RT377 24-1-1980 W5 at North Coburg terminus – route 19 RT378 24-1-1980 Z37 (route 19) and a W route 20 at North Coburg terminus RT379 24-1-1980 W2 378? Park St St Kilda terminus, route 12 RT380 24-1-1980 Z121 route 88 at Bourke St terminus with Spencer St station in background RT381 25-1-1980 Z1 118 and another Z81? At East Preston terminus – both route 88 RT382 26-1-1980 SW5 812 route 67 at Carnegie terminus RT383 28-1-1980 MMTB Austerity bus No. 301 RT384 26-1-1980 SW5 818? And SW6 965 at Carnegie Glen Huntly Road at start of the single line Truganini Road – note the single track signs. Both route 67. RT385 26-1-1980 W2 504 at East Malvern Darling Road – route 3 RT386 26-1-1980 SW5 787 route 52, Mathews Ave. RT387 26-1-1980 SW5 684? Airport West terminus, route 52, RT388 26-1-1980 High St Kew track reconstruction, W6 986, route 48 RT389 26-1-1980 SW6 965 route 67, Glen Huntly Road level crossing RT390 27-1-1980 SW6 962 Collins St route 42 Spencer St terminus RT391 27-1-1980 Z3 121, route 88 Bourke St Mal with parked cars. RT392 27-1-1980 Z3 188? Bourke St route 96 RT393 27-1-1980 3MP tram Camberwell Route 72 at Gardiner level crossing RT394 28-1-1980 MMTB Bus 370, Leyland OPS1 on display RT395 28-1-1980 MAN Bus 103, on display showing Doncaster Depot Demonstrates the work of Robert Thomson in photography, collection and/or production of slidesAssembled album in a black presentation folder of 24 colour slides, collected or produced by Robert Thomson. A list of all photographs with details has been compiled. All rights reserved for all photos., melbourne, tramways, trams, tram 271, high st kew, trackworks, route 48, tram 504, tram 7, east burwood, tram 26, tram 255, north coburg, route 19, tram 37, park st st kilda, tram 121, bourke st, spencer st, tram 118, east preston, route 88, route 12, route 67, carnegie, tram 812, tram 67, buses, tram 965, truganini road, route 3, route 52, tram 787, tram 986, level crossings, glen huntly rd, matthews ave, tram 962, collins st, route 42, tram 188, route 72, gardiner -
 Ballarat Tramway Museum
Ephemera, Wal Jack, Wal Jack notebook, 1940's
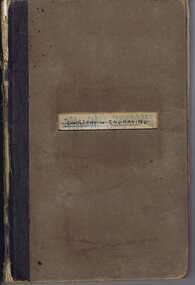
... destination signs 41 72 Notes on MMTB routes, cable and other... and colours and NMETL colours, trams and route destination signs 41 ...Demonstrates Wal Jack's records, hand written in a recycled notebook. Note - several sheets have been cut from the book - appear to be done before use by Wal. The crossed out sheets have not been imaged - these have been transferred by Wal to Reg Item 5507 and re-ordered. Image 30 shows a sample of a crossed out page. See related documents for a pdf file of the contents. Scan No. BTM5623iX Page No. Title or Subject Notes 1 Front 2 Inside Cover Addresses for Jack McLean, John Buckland Trooper Larsen Inside front cover. 3 1 Note re NSWT steam tram motor, MMTB PCC import issues, Peter Duckett seeking info and Photo of Julien’s battery tram on test in Melbourne 4 2 MMTB No. 8, 4, photos, Tyrell’s of Sydney photos, Perth 63 dimensions and MMTB plans for Domain Road & St Kilda Rd Jtn. 5 3 Notes re NSWGR P32, VR locos at Wodonga 13/10/1941, SAR V Class V143, SAR locos – W and Wx 6 4 NSW Private locos, Woy Woy quarry and AGL at Mortlake 5 Blank 6 Blank 7 7 First cable trams – links to photos T154, 29, 154 (Adelaide) 8 8 T156, Powelltown, Ray Pearson Negs 9 9 QR B18 ¼ locos, Ray Pearson’s scrap book, PMTT Zeppelin style trams, MMTB T class locations and 178/179 rebuilding. 10 10 Hawthorn horse tramway, VR Black Rock terminus sketch 11 11 NSW Tramways, Ryde, MMTB L class, Geelong tramway notes 12 12 Locomotive “Ballarat” in WA, Brisbane and various contacts. 13 13 Notes re VR News – 1943, H class, derailments, max speeds, Koondrook tramway and Geelong level crossing. Individual typed sheets pasted onto page – loose within book. 14 to 17 14/17 List of MMTB trams to 877 and work trams Some errors noted. 18 18 Newspaper cutting – Tram Record Day revenue (Brisbane 10/1943), Steam Trams at Journey’s end – Sydney – 6/1943 list of equipment being sold by Sydney Ferries, at Parramatta, 6/1943. MMTB Tram crossings in Melbourne, list of Sydney photos sent to Wal. Cuttings and Individual typed sheets pasted onto page. 19 19 Midland locos WA, VR open wagon stencils and a siding at Mt. Evelyn. Individual typed sheets pasted onto page. 20 20 Note re Sydney four wheel tourist trams and Hawthorn Max. Traction cars locations c1945. 21 to 23 21/23 Notes on Geelong Bogie trams and carrying flags for declaration of Newtown and Chilwell as a city – 1/10/1949 (See also Reg Item 5641) 24 to 26 24/26 Notes on Wellington Corporation Tramcars 37 27 Kelburn – Karoi cable line Wellington 28 to 29 28/29 Auckland Tramway Board tramcars notes 30/31 Blank 30 32/33 Notes on Ballarat tramcars – ESCo Crossed out 34/37 Ditto – SEC Crossed out 38 Music for the people notes Crossed out 39 Notes on Ballarat trams with tail lights Crossed out 40/43 Notes on Ballarat bogie trams Crossed out 44/45 Notes on SEC tram controllers, dead man and truck lengths. Crossed out 31 45 List of Ballarat Destination roll – Dec 1949 32, 33 46/47 Notes on Bendigo Bogie Trams – 1940’s 34 48 Bendigo Destination roll on a Birney tram Easter 1950, notes on tram tail lights and fares on the Bendigo system. 49 Blank – though headed “Bendigo Birney Trams” 50 Notes trams used on special days in Ballarat Crossed out 51 Ditto and No. 24 and 23 Crossed out 52 Ditto, 15, 11, 23 and Gold tram Crossed out 53 Notes on 34 caused delays, 5/1950, and use of 23 as gold tram Crossed out 54 Notes on repair to track at Sturt and Drummond 6/1951 Crossed out - see Reg Item 7720. 55 Notes on track work in Ballarat early 1950’s Crossed out 56/57 Notes on 33, 37, pay as you enter signs and 1953 special workings Crossed out 58/60 Notes trams used on special days in Ballarat Crossed out 61/64 Blank 35 65 “Salute to the Cable Tram” – transcription of text from Truck and Bus Transportation (July 1948) 36, 37 66/67 Continued from above and list cable tram routes, opening, closing, length and route colours. 38 68 List of photos in Truck and Bus Transportation, Anniversary Issue July 1948 of cable trams. 69 Blank 39 70 Notes on Brunswick TT, Fitzroy TT colours, Adelaide Service trams and MMTB route lengths. 40 71 Notes on HTT colours, tramcars, PMTT trams and colours and NMETL colours, trams and route destination signs 41 72 Notes on MMTB routes, cable and other Melbourne tram disposals, and sale of cable trams and storage at Brunswick. 42 73 Blank - page was headed Lugarno, Switzerland and Italian border 42 Handwritten sheet – photos to get – R. Field and Peter Duckett. 43, 44 74/75 Listing of trains on all lines leaving Ballarat and days run. 45 77 Listing of negatives sent to K. Rogers in 1944 and list of MMTB Max. Traction bogie trams 117 to 138 and disposal 46 77 Listing of MMTB trams, - appears to be something to do with photos or negs held. 47 78 Listing of Ray’s (Pearson) negs /photos of Brisbane trams and other railway photos. 79 Blank 48 80 Prices of pine timber in 4/1942, list of photos “I want”, notes re VR Train length, Ironbark Gully bridge, 3817 in Harden smash 7/1948 and 1948 Ballarat destination roll. Partly crossed out. Rear Cover. Has a strong association with Wal Jack, his work to collect and record both railway and tramway information. Yields information about tramways in Ballarat, Bendigo, Geelong and other cities tramways and railways.Grey covered book with black binding containing 40 lined sheets (80 pages) with handwritten notes with the front cover partly cut out and the words "Jewellery & Engraving" book written in. Contains some newspaper clippings and pasted typed notes as listed below. The image number of each sheet is given. See individual pdf files. trams, tramways, mmtb, ballarat, bendigo, sydney, brisbane, railways, geelong, new zealand, victorian railways, sec, esco -
 Ballarat Tramway Museum
Photograph - Colour Photograph/s, Austin Brehaut, Mar. 1999
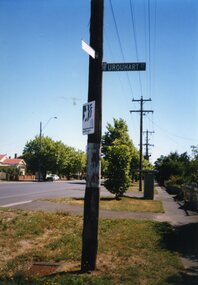
... and April 1999 of power poles along the former tram routes... 1999 of power poles along the former tram routes that still ...Set of 23 photographs taken by Austin Brehaut during March and April 1999 of power poles along the former tram routes that still have signs of the former tram stops. An accompanying note (scanned) written by Austin Brehaut is reproduced below in Other Information - see related documents. 1096.1 - Sturt St at Doveton St., south (down) side. .2 - Drummond St. Sth (east side) outside St. Patrick's School between Dana and Eyre St. .3 - Drummond St. Sth, cnr Urquhart St. (east side) .4 - Drummond St. Sth, cnr South St. (east side) .5 - Drummond St. Sth, cnr Sebastopol St. (east side) .6 - Drummond St. Sth, cnr Latrobe St. (east side) .7 - Drummond St. Sth, cnr Darling St. .8 - Sturt St. cnr Ripon St. (North East side) .9 - Ripon St. Nth, cnr Sussex St. .10 - Ripon St. Nth, cnr Mair St. (South West Corner) .11 - Ripon St. Nth, cnr Mair St. (North East Corner) .12 - Macarthur St. cnr Burbank St. (up side) .13 - Lydiard St. Nth, cnr Clarendon St. (east side) .14 - Lydiard St. Nth, cnr Howard St. (west side) .15 - Lydiard St. Nth, cnr Gregory St. (west side) .16 - Lydiard St. Nth, cnr Howitt St. (west side) .17 - Lydiard St. Nth, near Walker St., (east side) .18 - Lydiard St. Nth, cnr Landsborough St. (east side) .19 - Barkly St. cnr Main Road (up side) .20 - Barkly St. near Haymes Cres (down side) .21 - Barkly St., near Young St. (down side) .22 - Barkly St, Cameron St (up side) .23 - Barkly St., at Cobden St. terminus (west side) .1 - April 99, .2 > .10, 9/3/99, .11 > .18 - March 1999, .19 > .23 - April 1999. See also Reg. Item 768.1 > 768.6 for another group of tram stop photos in Drummond St. in 1997. On Fujifilm paper.On rear of each photo in blue ink is location at date at the top of the photo and in the bottom right hand corner - initials "APB"tram stops, power poles, barkly st., lydiard st. nth, ripon st., sturt st., drummond st. sth -
 Ballarat Tramway Museum
Slide - 35mm slide/s - set of 20, Noel Simons, 21/05/1971 12:00:00 AM
... . 1197.1 - Bendigo No. 5 en route to Eaglehawk at Creeth St Long... route to Bendigo. Note sign on its own post noting tram turns ...Set of 20 transparencies taken on 21/5/1971 on Kodak mounts. 1197.1 - Bendigo No. 5 en route to Eaglehawk at Creeth St Long Gully. Tram has a SEC roof ad and Cinzano roof ad. 1197.2 - No 5 approaching Needle Loop between Long Gully and California Gully. On left hand side is the City of Bendigo sign, indicating city boundary. 1197.3 - As for 1197.2 but actually entering loop. Photo taken after tram has passed photographer. 1197.4 - No. 26 bound for Eaglehawk descending the railway bridge near Eaglehawk, at Jobs Gully. 1197.5 - as for 1197.4, but after crossing bridge, now ascending a hill. Photo taken after tram has passed photographer. 1197.6 - No. 26 climbing High St. hill Eaglehawk, nearing end of Double track, bound for Quarry Hill. Shows centre of the road poles. 1197.7 - As for 1197.6, with tram entering single track section. Photo taken after tram has passed photographer. Has a BP service station in the background. 1197.8 - No. 26 (bound for Quarry Hill) crossing No. 17 (Eaglehawk) at Job's Gully Loop. 1197.9 - No. 17 climbing railway bridge at Job's Gully, en route to Eaglehawk. Photo taken after tram has passed photographer. 1197.10 - No.26 bound for Quarry Hill, leaving Long Gully Loop? Has the Creeth St. church in l197.l in the far background. Photo taken after tram has passed photographer. 1197.11 - Tramway Point work at the northern end of Long Gully Loop. 1197.12 - No. 17 en route for Quarry Hill turning into View St. from Bamard St. Tram has SEC roof ads "Everything fine in my all electric Kitchen' and 'Electric Cooking is Matchless'. 1197.13 - as for 1197.12, but tram has turned into View St and about to enter the double line track. Photo taken after tram has passed photographer. 1197.14 - No. 21 enters Nolan St after turning from MacRae St. en route to Bendigo. Note sign on its own post noting tram turns "Beware Tram Turns" and stop sign on adjacent pole "Trams stop on Request". No. 21 has two SEC roof ads. 1197.15 - No. 21 in Nolan St. after turning from Bridge St. (White Hills Road). Note signal light for Bridge St. loop on pole corner of street. Photo taken after tram has passed photographer. 1197.16 - No. 2 bound for Eaglehawk at unknown location. 1197.17 - Tram stop sign on a pole "CARS STOP BY REQUEST" 1197.18 - No. 5 in Carpenter St.? en route to Quarry Hill. 1197.19 - No. 28 has just arrive at Golden Square terminus, passengers are disembarking and the trolley pole is being turned. Golden Square Hotel in the background. 1197.20 - No. 28 at Golden Square terminus. Has a "Nothing beats Briquettes for hear roof ad. Information written on in black ink and date stamped on purple ink. 1197.1 - "No. 5 at Creeth St. Long Gully" 1197.2 - "No. 5 approaching Needle Loop between Long Gully and California Gully" 1197.3 - "No. 5 at Needle Loop between Long Gully and California Gully" 1197.4 - "No. 26 crossing railway bridge at Job's Gully near Eaglehawk" 1197.5 - "No. 26 just after crossing railway bridge at Job's Gully near Eaglehawk/ 1197.6 - "No. 26 in High St. Eaglehawk" 1197.7 - "No. 26 at end of double track in High St. Eaglehawk" 1197.8 - "Nos. 26 and 17 crossing at Job's Gully Loop" 1197.9 - "No. 17 crossing railway bridge at Job's Gully near Eaglehawk". 1197.10 - "No. 26 at Long Gully" 1197.11 - 'Northern end of points at Long Gully Loop". 1197.12 - "No. 17 turning into View St. from Bamard St. Bendigo". 1197.13 -'No. 17 at beginning of double track in View St. after leaving Bamard St. Bendigo. 1197.14 - "No. 21 enters Nolan St. from MacRae St. Bendigo." 1197.15 - "No. 21 in Nolan St. Bendigo just after leaving White Hills Road." 1197.16 - "No. 2" 1197.18 - "No. 5" 1197.19 - "Birney car No. 28 at Golden Square Terminus" 1197.20 "Birney car No. 28 at Golden Square Terminus" tramways, trams, bendigo, long gully, railway bridge, jobs gully, trackwork, nolan st, quarry hill, tram stops, golden square, tram 2, tram 5, tram 17, tram 21, tram 26, tram 28 -
 The Beechworth Burke Museum
Photograph, c1970
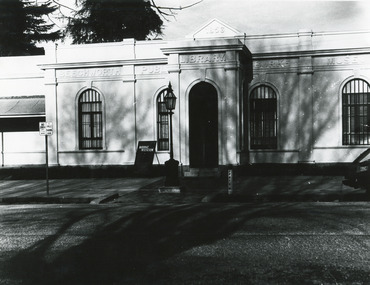
Historical photograph taken of the frontage of the Burke Museum in Beechworth. As Australia’s oldest regional museum, the building used for the Burke Museum was originally built as the Beechworth Athenaeum, and was later dedicated as a museum in memorial to the explorer Robert O’Hara Burke, who died on the Burke and Wills expeditions in 1861. The Burke and Wills exhibitions were a significant colonial event that was memorialised in paintings, buildings, monuments, and statues. The photograph has historical significance, connecting with various themes such as exploring, establishing pathways, and significant colonial events or persons. The photograph depicts the frontage of the Burke Museum, which was dedicated as a memorial to the explorer Robert O’Hara Burke, who died on the Burke and Wills expeditions in 1861. Robert O’Hara Burke was a significant person who was connected to both Beechworth and to an important colonial event, the Burke and Wills expeditions. Born in Ireland, Burke migrated to Australia in 1853 and nearly a year later, was appointed to senior inspector at Beechworth. Described as quick-tempered yet generous, Burke later joined an expedition to explore the interior of the Victorian colony, which was later termed the Burke and Wills expeditions. While the expeditions generated a significant amount of interest, the objectives of the Burke and Wills expeditions were hazy, as was its planned route, leading to disaster on the trip as group infighting, poor provisions, and a lack of clear instructions ultimately resulted in Burke’s death. Regardless, the Burke and Wills expeditions promoted discovery and endures today in popular memory.Black and white rectangular photograph printed on paper.Obverse: 1856/ BEECHWORTH/ PUBLIC/ LIBRARY/ BURKE/ MUSEUM/ BURK MUSEUM/ (parking signs illegible) Reverse: BMM 84-2-1/ A02989 1997 2696/ BMM 84-2-3burke museum, beechworth, beechworth athenaeum, athenaeum, memorial, robert o'hara burke, robert burke, burke and wills exhibitions -
 Port of Echuca
Letter (Item) - On the Darling, 1892
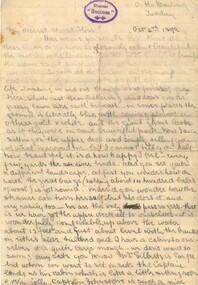
This pencilled letter from 1892, was written on the steamer 'Success' by Mr Terry Davidson's grandmother, Frances Edith Ashe was posted to her sister, Florence (Floss) when the steamer arrived at Pooncarrie en route to the Murray and Echuca. Frances Edith (who signs the letter with her nickname 'Yeeds') was finishing her employment as a governess at the Teryawynia Station in the employ of the Gilberts. Teryawynia is situated on the Talyawalka Creek some 30 kms from the Darling River. The beginning point for the river journey recorded as being Henley Outstation - this being some 50 kms upstream from Menindee. At the time of writing this letter, she was 20 years old and on her second job as a governess. Her sister Floss was three years older. The references to 'George' withint the letter relate to a 24-year old George Alecander Davisdon, w worker on Teryawynia while she was therre - she was to marry Geroge some six years later. the description of life onboard and of the river journey (more than family chit chat) make up the valuable historical elements to thi sletter. It is appropriate that this letter will reside within a collection that tells the story of the paddlesteamers and their part in our Australian history. Steamer "Success" stampp.s. success, darling river, pooncarrie n.s.w -
 Greensborough Historical Society
Journal - Article, Journal, Victorian Historical Journal, Batman's route revisited: his exact steps to a new treaty site, 2014_06
Article from the Victorian Historical Journal Vol.85, No.1, June 2014. Discusses John Batman's 1835 visit to Port Phillip and possible alternative sites for signing his treaty with Indigenous people of the area.21 pages, maps.john batman, batmans treaty -
 Halls Gap & Grampians Historical Society
Photograph - B/W, C 1960s (?)
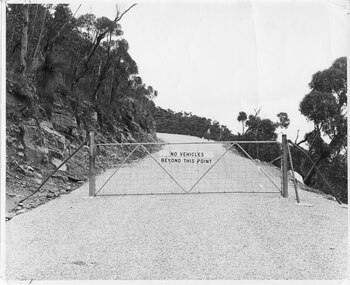
A photo of the gate barring vehicle access to the top portion of the Mt William Road. The photo is part of a Ministry of Tourism campaign.The photo shows an iron gate across a road (Mt William Road). There is a man standing on the edge of the road in the background. A sign on the gate reads 'No vehicles beyond this point'.'Ministry of Tourism of Victoria, 276 Collins St., Melbourne, Nag. No.... , Date ..., Locality Grampians, Subject Gate-Mount William Road.' stamped on back.access routes, roads, scenery, mount william -
 Eltham District Historical Society Inc
Photograph, Liz Pidgeon, Heritage Excursion; Back-track walk to Fitzsimons Lane, 2 July 2016, 2 July 2016
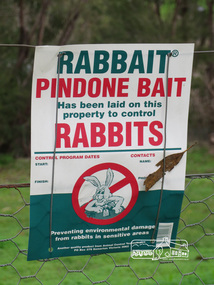
Sign attached to wire fence stating "RABBAIT PINDONE BAIT has been laid on this property to control RABBITS" Newsletter No., 228, June 2016 Heritage Excursion – Back-track walk to Fitzsimons Lane – Saturday 2nd July Our July heritage excursion will be a walk to Yarra Hill Close and Fitzsimons Lane Bridge, based on the story on pages 3 and 4. Although the route is close to Fitzsimons Lane it will follow streets and paths that may not be familiar to many local residents. It will include commentary on the history of this corner of the Town of Eltham. This walk on Saturday 2nd July will follow a “there and back” route, that is returning over much the same course. It is about 2.5 km in length and will take 2 to 2.5 hours. It includes some hills. It will start at 2pm at the corner of Bolton Street and Old Eltham Road (Melway ref.21 F10).Born Digitalelection day, heritage excursion, activities, eltham district historical society, fitzsimons lane, poison, rabbits -
 Marysville & District Historical Society
Photograph (Item) - Black and white photograph, Unknown
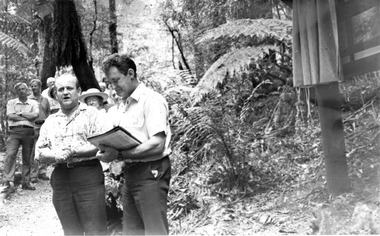
A black and white photograph taken at the unveiling of the sign placed at The Big Culvert.A black and white photograph taken at the unveiling of the sign placed at The Big Culvert. The Big Culvert is a historic granite and bluestone arch along the Yarra Track, a major route to Melbourne through the 1800s. Built in 1870 and a major piece of infrastructure for its time, the heritage listed culvert allowed water to flow under often-flooded the road. The Yarra Track is the former name of the gold fields road from Healesville to the Woods Point and Jordan Goldfields, in Victoria, Australia. A direct route via the Yarra River and the Great Divide was discovered by Rieck in September 1862 and became known as the Yarra Track. Early in 1863, the Victorian Government decided to construct a 193-kilometre (120 mile) road along the route. Its original width varied between 4 and 6 metres (12 and 20 feet), and was designed to accommodate horse-drawn vehicles. The Track involved the climbing of the Black Spur, descent into the Acheron Valley, and then through Marysville to the Cumberland where it followed the existing route.Unveiling of sign/ at "Big Culvert" In front Max Cockerrell and - Rear: second back Geoff Pope R.H.S. rear: Nancy "/ Anne "the big culvert, yarra track, victoria, healesville, wood's point goldfields, jordan goldfields, black spur, acheron valley, cumberland valley -
 Flagstaff Hill Maritime Museum and Village
Functional object - Ship's Wheel
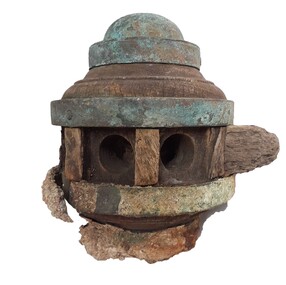
This wooden ship's wheel originally had eight spokes but four are no longer in their sockets. One of the spokes has been shaped. Both sides of the wheel have a brass cap over the centre of the hub, covering the wooden hub. The wood is split and cracked, and parts of it have small holes, a sign of being affected by the sea worm. Thick encrustations are on parts of the wheel, showing that it has been on the sea bed for quite some time. The donor is a Warrnambool resident. Years ago he was cray fishing at King Island, which is in Bass Strait, northwest of Tasmania. His craypot got stuck in a reef so a diver helped him by retrieving the craypot for him. While the diver was underwater he also stumbled across the ship's wheel, which he gave to the donor. The Bass Strait is a very narrow route that was difficult and dangerous to navigate in the early 19th century, before good maps, communications and lighthouses were installed. The area, including King Island, is the graveyard of many ships that almost made it to their destination of Melbourne along Australia's treacherous coastline. Around King Island alone, many ships and lives were lost. There is no information about the history of this ship's wheel. Its condition shows that the item has been under the water for a long time. However, there is no evidence that it came from a shipwreck. It could even have been an old ship that could have been scuttled or destroyed as it was no longer useful. The wheel is significant as a sign of shipping around King Island. It is part of the island's history, and of maritime history. It is an example of an item manufactured by hand.Ship's wheel; segment of a wooden ship's wheel. It once had eight spokes but only portions of four spokes remain. The outer centres of the hub and the reinforcing bands around the hub are brass. The wheel is heavily encrusted in parts. It was recovered from an unknown shipwreck in the waters of King Island.great ocean road, warrnambool, shipwreck artefact, artefact, ship's wheel, ship's wheel segment, portion of a ship's wheel, flagstaff hill, maritime museum, maritime village, flagstaff hill divers, marine technology, navigation, steering wheel, eight spoke wheel, king island, craypot, diver -
 Federation University Historical Collection
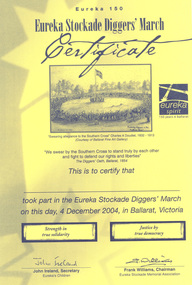
Certificate, Eureka Stockade Diggers' March Certificate, 2004
2004 was the 150th anniversary of the Eureka Stockade. The 'Eureka Stockade Diggers' March' was part of the 150th anniversary. The certificate was collected by Kathleen Gervasoni, Great Grand-daughter of Michael O'Dea who was associated with those at Eureka in 1854.Yellow card certificate with blue writing. The front features an image of Charles Doudiet's 'Swearing Allegiance to the Southern Cross', and the recerse shows a map of the 2004 Diggers' March Route and a facsimile of a gold license. The Certificate was signed by John Ireland (Eureka's Children) and Frank Williams (Eureka Stockade Memorial Association)eureka, eureka stockade, eureka rebellion, eureka aniversary, eureka 150, john ireland, frank williams, eureka stockade memorial association, eurekas childrenn -
 Ringwood and District Historical Society
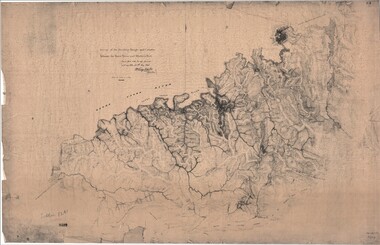
Map, Survey of Dividing Range between Yarra Yarra and Western Port - William Wedge Darke, 1843
Extract - Ringwood, Place of Many Eagles - Hugh Anderson (1974): William Wedge Darke, from Hereford, England, was a nephew of John Helder Wedge of the Port Phillip Association, who was also a surveyor. William's most important work was probably his survey of the Dividing Range and the country between the Yarra River and Western Port, completed in May 1843, and during which he made a traverse between the Mullum and Dandenong creeks along the higher ground that he labelled the "best line of road from Melbourne". This road was for many years the major route to Gippsland and to the higher country about Alexandra and Mansfield, sometimes known as White Horse Road, and now Maroondah Highway.Surveyor's relief map of features to the east of Melbourne including Yarra Yarra River, Mullum Mullum Creek, Anderson's Creek, Dandenong Creek.Transmitted to the Surveyor General with my letter of 10th May 1843 (signed) Wm Wedge Drake, Assistant Surveyor. Scale: two inches to a mile. Descriptive remarks include upstream area of Yarra River - "impassable, appears to have been formerly a lake", and to the south - "barren and scrubby swamps of the Western Port Country". Marked tracks include "best line of road from Melbourne", "track to Dandenong", "Road to Port Albert may probably be found on this range", "Best line to Upper Yarra". Several huts also marked. -
 Bendigo Historical Society Inc.
Book - BENDIGO'S VINTAGE TALKING TRAMS, 1996
100 page soft cover booklet describing the history of the Bendigo tramways. Includes a brief history of Bendigo, illustrated descriptions of the tramways fleet, map of the talking tram route and a script for the tram tour. Edited by Keith S Kings. Published by the Bendigo Trust, December 1996 and printed by Bendigo Modern Press. Signed by Keith Kings 20/2/97 Copy originally owned by RW & M Birrell Inside front cover are 2 tickets for the inaugural tram trip of the restored tram No. 7Keith S Kings -
 Bendigo Historical Society Inc.
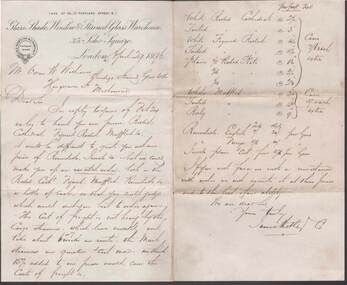
Document - W.D.MASON COLLECTION: QUOTE, 29 April 1896
Cream coloured Document dated 29.March ? .1896 signed James Hetley & Co, W.D.Mason Collection, Quote from Glass Shade Windows & Stained Glass Warehouse,35, Soho Square London,a seal says Sole Agents for W.E. Chance & Co Antique Glass Letter to Mr Owen W. Williams stating various prices for their products including costs for freight etc. Also mentioned is the time taken by Cargo steamers -6-7 weeks en route - the mail steamers are quicker.business, retail, w d mason -
 Peterborough History Group
Book, Don Charlwood, Settlers Under Sail, 1999, Third edition
... charlwood great circle route sailing ships Signed by the author ...Describes The Great Circle Route and includes information about Bully Forbes, Captain of the Schomberg.Significant as information compiled by a respected maritime historian and includes information about local shipwreck.Signed by the authorbully forbes, the schomberg, peterborough, shipwrecks, great ocean road, the shipwreck coast, don charlwood, great circle route, sailing ships -
 Ballarat Heritage Services
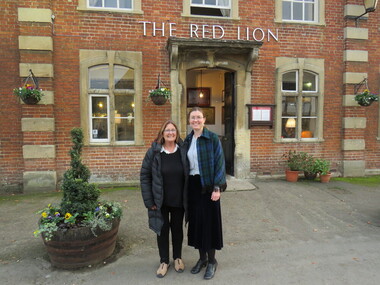
Photograph - Digital photograph, Wayne Phillipson, Peta Knott and Dorothy Wickham at Lacock National Trust Village, United Kingdom, 30/1072016
Lacock was on the main London to Bristol road until the road was re-routed through Chippenham. There are no obvious signs of the 21st century in this National Trust village, except the motor car. It has been run by the National Trust since 1944 and residents are on a lease. The oldest house in the village is King John's Hunting Lodge, parts of which date back to the 13th century. In this village there are buildings from every century since right up until the 18th century. The abbey was founded in 1229 by Ela, Countess of Salisbury. Lacock village and abbey were used as the set in the Harry Potter films.Dorothy Wickham and Peta Knott, formerly of Museums Australia (Vic) currently working as a marine archaeologist in England. Taken at Lacock National Trust Village, United Kingdomdorothy wickham, peta knott, lacock national trust village -
 Ballarat Tramway Museum
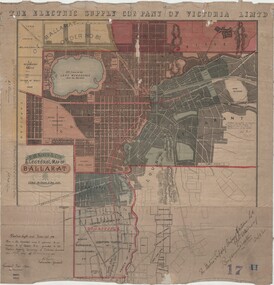
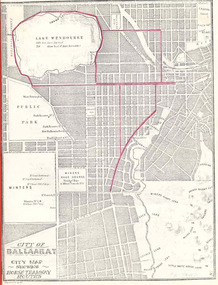
Map, Electric Supply Co. of Vic (ESCo), Ballarat Electoral Map - ESCo, 1900
Document prepared by the Electric Supply Co of Victoria, as part of an order under the Electric Light and Power Act 1896, section 5 of order No. 17 granted to company. Dated 19/2/1901 and signed by the Postmaster-General. Shows the order area being parts of the City of Ballaarat, Sebastopol and Ballarat East. Shows the street names, boundaries, principal power line routes, land reserves, parks, mine locations, railways and Lake Wendouree. Signed by R L Williams Town Clerk City of Ballarat, J R Hall for the Borough of Sebastopol, and John Gent for the Town of Ballarat EastYields information about the power supply to the Ballarat area.Cloth backed paper map, coloured and marked up as exhibit 17.Notes in ink including the signature of Benjamin Deakin 24/9/00 and certified by the three involved municipal Town Clerks.ballarat power supply, esco, electric supply co of victoria, city of ballaarat, east ballarat, sebastopol, orders, power lines, power supply -
 Ballarat Tramway Museum
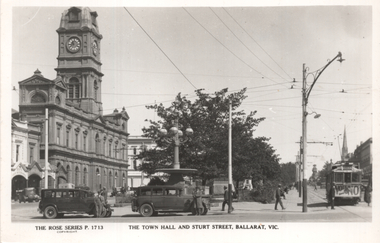
Postcard, Rose Stereograph Co, "The Town Hall and Sturt Street Ballarat Vic", 1930s
Rose Series - P1713, titled "The Town Hall and Sturt St, Ballarat Vic" with an ESCo tram with a "Vote No" on the front dash panel, two taxis mid-block, and the Town Hall in the background. Drivers standing along both taxis. On the rear in pencil in a note to Ken Magor of Newcastle, Wal Jack has written: "Ballarat old type No. 6. Note route colors square coloured sheet right hand side above driver's head & lower destination sign. Also note side adverts boards on car roof. See item 3581 for a copy negative and 5177 for a digital image of this postcard. Yields information about Ballarat 's trams in the 1930's and three street scene at the City Centre with the Town Hall in the background. Shows nature of the area with street lights and parked motor vehicles and a sign on the tram regarding prohibition and a vote on the banning of the sale of alcohol.Postcard black and white, divided back, with a handwritten note on rear.See image 2 for details of the handwritten note by Wal Jack on the rear. tramways, trams, esco, sturt st, lydiard st, taxis, town hall, tram 6 -
 Ballarat Tramway Museum
Photograph - Black & White Photograph/s, Charles Craig, 1971
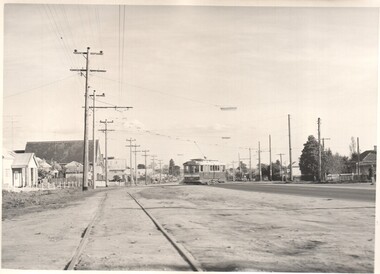
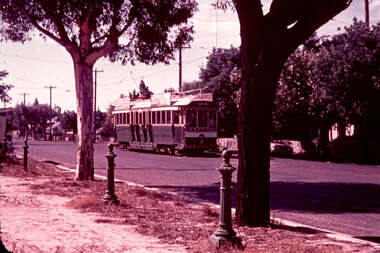
Yields information about the appearance of Albert St where the tram crossed at Ophir St, Sebastopol. Black and White photograph of a single trucker tram, with a Twin Lakes sign crossing Albert St, near Ophir St en route to Sebastopol. Shows the street scene at the time. Photo by Charles Craig - during 1971. trams, tramways, albert st, sebastopol, ophir st -
 Ballarat Tramway Museum
Photograph - Digital image, Dick Jones, Jul. 1965
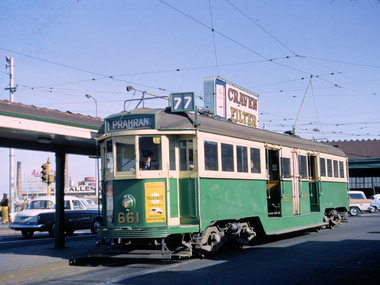
Digital Image of MMTB tram W3 661 at the Batman Ave terminus, July 1965. Tram has the destination of Prahran, Route 77, advertisement for Proofkote (rain wear protection?) In the background is a large sign for Craven Filter and a sign for Allen's Sweets. Photo reference from Dick Jones - 661_BatmanAve_DickJones_6507M.34.07trams, tramways, batman ave, w3 class, shelters, prahran, route 77, tram 661 -
 Ballarat Tramway Museum
Photograph - Black & White Photograph/s, c1956
Black and white photograph of W6 994 in Smith St. Collingwood/Fitzroy, in bound on route 90 to City - Spencer St., picking up passengers at a tram stop. Pole obscuring front of tram. Tram has destination "City Spencer St" and run number "P44" Tram appears to be fairly crowded already. Photo taken c1956 with a number of motor cars in the street including some Holdens. In the background are a number of shop fronts, with signs for "Singer Sewing Machines", "Freddo frogs", "Peters Ice Cream", Davies Hardware, John Cornish. On the side of the photograph is the first part of a Woolworths store front. The address of the John Cornish, Mercer, was 205 Smith St. Fitzroy and Woolworths were at 182 -184 Smith St. Collingwood. See 1968 Sands and McDougal Director of Victoria for Smith St. details.trams, tramways, mmtb, smith st., w6 class, bourke st., tram w6 994 -
 Ballarat Tramway Museum
Slide - 35mm slide/s - set of 4, Noel Simons, Apr. 1967
Set of 2 slides made from the Association of Railway Enthusiast Provincial Tramways film strip, possibly during April 1967. 1192.1 and 1192.3 mounted in Kodak Ready Mounts. The others in plain white mounts. Slides dated Dec. 1968. 1192.1 - No. 21 out bound to Golden Square in High St., between Wattle and Vine Streets. Photo taken after tram has passed photographer. Has a sign for "Reid's Furnituorium" in the background. 1192.2 - Bendigo No. 28 dressed up as Myers Christmas tram, passing the Post Office and Courts in Pall Mall. 1192.3 - Bendigo No. 23 at Needle Loop en route to Eaglehawk. Tram has two SEC roof ads, one "Electric Cooking" and the other "Everything fine in my all electric kitchen". 1192.4 - Bendigo scrubber parked at the end of the main depot lead, alongside the depot office buildings.Details in blue ink, date hand stamped in purple ink. 1192.1 - "No. 21 heads along High St for Golden Square between Wattle and Vine Streets." 1192.2 - "Birney No. 28 in Christmas Garb, traverses Pall Mall en route to North Bendigo". 1192.3 - "No. 23 at Needle Loop on its run to Eaglehawk". 1192.4 - "Scrubber car at Bendigo Depot".tramways, trams, north bendigo, bendigo, bridge st loop, depot, tram 21, tram 23, tram 28, tram scrubber -
 Ballarat Tramway Museum
Slide - 35mm slide/s - set of 32, Noel Simons, 25/02/1971 12:00:00 AM
Set of 31 transparencies taken on 25/2/1972 on Kodak mounts. 1201.1 - Bendigo No. 26 in Bond St. just after leaving Long Gully en route for Quarry Hill. Has Norris Supermarket in background. Has two SEC roof ads. 1201.2 - No. 26 climbing View St. from Charing Cross en route to Eaglehawk. Has ANZ bank and AMOCO service station in background. 1201.3 - as for 1201.3, but after tram has passed photographer. Has buildings west of Mackenzie St. in photograph. 1201.4 - Tram stop and centre of the road pole with two "CARS STOP BY REQUEST" signs mounted on pole at the corner of Mackenzie St. 1201.5 - same position as for 1201.3, but with No. 5 descending the street. 1201.6 - same position as for 1201.2, but with No. 5 descending the street. Photo taken after tram has passed photographer. 1201.7 - No. 7 in Nolan St. from across the park at Lake Weeroona. 1201.8 - No. 7 entering McCrae St from Nolan St. - distant view. Note "TRAM "sign on left hand side under tree and overhead in McCrae St. from former track that once was in this street. 1201.9 - No. 7 in High St. with Cathedral in background. Tram en route to North Bendigo. Note scaffolding around Cathedral main spire area. 1201.10 - No. 7 crossing Bendigo Creek bridge in High St. near Golden Square. Has a Caltex Service station in the background. 1201.11 - No. 7 at Golden Square terminus with Sunburst Fruit Juices and a Peters Ice cream delivery vans alongside. 1201.12 - as for 1201.11 but photo taken from behind tram, with the end of the rails in the photograph. 1201.13 - No. 7 and 21 in Pall Mall at Charing Cross with No. 5 in the background. Taken some distance away from the location. 1201.14 - No. 7 at Golden Square terminus, taken a short distance from the tram terminus. Shows Milk Bar on right hand side and the hotel on the left hand side. Taken from the south side of the roadway. 1201.15 - as from 1201.14 but taken from the north side of the roadway. 1201.16 - No 5 waiting at California Gully loop. Distant photo showing surrounds 1201.17 - No. 5 en route for Quarry Hill crossing No. 26 at California Gully. 1201.18 - No. 26 at Eaglehawk terminus with Eaglehawk Town Hall and Post Office in background. 1201.19 - No. 21 arriving at Charing Cross en route to North Bendigo. Has Alexandra Fountain in the background, ANZ bank RACV building, and other buildings on the north side of Pall Mall or Nolan St. 1201.20 - No. 26 en route for Quarry Hill at Charing Cross, with crew standing by front door. Has Colonial Mutual life building, Armstrong Tyre Service (Firestone) and a sign for Cohns Drinks in the background. 1201.21 - as for 1201.20 but with No. 5 en route to Eaglehawk now in photograph. 1201.22 - No. 26 at Quarry Hill terminus. 1201.23 - No. 26 at Quarry Hill terminus, view of front portion of tram only from a gate at the Bendigo cemetery. 1201.24 - Track at the end of the Quarry Hill line showing the point blades of the former "Y" terminus and the overhead for this. 1201.25 - No. 2 at the Quarry Hill terminus, looking along the former Trackwork. 1201.26 - as for 1201.25 1201.27 - number not used. 1201.28 - Golden Square terminus from some distance from the actual terminus, showing the Warning sign "TRAM" for motorists from the south. No. 7 at the terminus. 1201.29 - No. 7 passing through the Golden Square shopping centre. Numerous cars and pedestrians. Tram en route for North Bendigo. 1201.30 - No. 7 in High St. Golden Square, en route for North Bendigo. Photo taken after tram has passed photographer. 1201.31 - No. 7 in High St. just past Wattle St. with the Cathedral in the background. Tram has two SEC roof ads good side on photo, 'Everything's fine in my all electric kitchen' and 'Electrical cooking - clean, quick, economical'. 1201.32 - No. 7 in High St. nearing Wattle St. Has Cathedral in the background. Photo taken after tram has passed photographer.Information written on in black ink and date stamped on purple ink. 1201.1 - "No. 26 in Bond St just after leaving Long Gully" 1201.2 - "No. 26 climbing View St. from Charing Cross" 1201.3 - "No. 26 ascending View St. from Charing Cross (At Mackenzie St.)" 1201.4 - "View St. & Mackenzie St." 1201.5 - "No. 5 in View St. near Mackenzie St." 1201.6 - "No. 5 in View St. nearing Charing Cross." 1201.7 - "No. 7 in Nolan St. seen from Lake Weeroona Park." 1201.8 - "No. 7 entering McRae St. from Nolan St. Note "TRAM" warning sign on left. 1201.9 - "No. 7 in High St. passing Short St." 1201.10 - "No. 7 crossing Bendigo Creek bridge in High St. near Golden Square." 1201.11 - "No. 7 at Golden Square terminus" 1201.12 - "No. 7 at Golden Square terminus" 1201.13 - "No 7, 21 and 5 at Charing Cross" 1201.14 - "No. 7 at Golden Square terminus" 1201.15 - "No. 7 at Golden Square terminus" 1201.16 - "No 5 waiting at California Gully loop." 1201.17 - "Nos. 5 and 26 crossing at California Gully loop" 1201.18 - "No. 26 at Eaglehawk terminus" 1201.19 - "No. 21 arriving at Charing Cross from Golden Square" 1201.20 - "No. 26 at Charing Cross" 1201.21 - "Nos. 5 and 26 at Charing Cross." 1201.22 - "No. 26 at Quarry Hill terminus" 1201.23 - "No. 26 at Quarry Hill terminus seen through the gates of the Bendigo Cemetery." 1201.24 - "Quarry Hill terminus showing remains for former double track layout abandoned before 1964." 1201.25 - "No. 2 at Quarry Hill terminus" 1201.26 - "No. 2 at Quarry Hill terminus" 1201.28 - "The Southern approach to Golden Square with No. 7 standing at the terminus, "TRAM" warning sign on the left. 1201.29 - "No. 7 passing through Golden Square Shopping Centre" 1201.30 - "No. 7 in High St. Golden Square" 1201.31 - "No. 7 in High St. passing Wattle St." 1201.32 - "No. 7 in High St. nearing Wattle St."tramways, trams, bendigo, bond st., view st., nolan st., high st., eaglehawk, california gully, charing cross, quarry hill, trackwork, tram 2, tram 5, tram 7, tram 21, tram 26 -
 Ballarat Tramway Museum
Slide - 35mm slide/s - set of 4, Noel Simons, Apr. 1972
Set of 4 transparencies - copy slides - possibly ARE film strip dated April 1972. 1210.3 on Kodak Readymount mount. 1210.1 - No. 3 arriving at Quarry Hill terminus. 1210.2 - Bogie car at Long Gully Loop, in the far distance, with a Hotel and the ESSO service station in between. Has Fosters Lager and Carlton signs on hotel. Note sign on the closet pole - "No standing between Notices" 1210.3 - Nos. 26 (Quarry Hill) and 25 (Eaglehawk) at Jobs Gully Loop. 1201.4 - No. 5 showing Charing Cross in bound for Charing Cross and No. 3 en route for Eaglehawk in View St. near the end of the double track. Appears to be SEC employee at the rear of No. 3. Part of a set of 20 slides made by the Association of Railway Enthusiast Provincial Tramways film strip. Reference Item 2560 details the ARE Film Strip and provide references to other slides.Information written on in blue ink and date stamped on purple ink. 1210.1 - "No. 3 arriving at Quarry Hill terminus." 1210.2 - "Bogie car at Long Gully Loop." 1210.3 - "Nos. 26 and 25 at Jobs Gully Loop." 1210.4 - "Nos 5 and 3 in View St. near the end of the double track."tramways, trams, bendigo, long gully, quarry hill, view st., tram 3, tram 5, tram 25, tram 26 -
 Ballarat Tramway Museum
Book, City of Ballaarat, "Mayors Special Report Ballarat Tramways", Sep. 1971
Historically significant for at the time it demonstrated aspects of the evolution of Ballarat Tramways and yields information about the formation of the tramways, the Councils viewpoint and has a strong association with the Mayor of the time.Twenty two page book, produced by photocopying, side stapled and bound with a red plastic binding, titled "Mayor's Special Report Ballarat Tramways", dated 20 September 1971 for presentation to the City of Ballaarat Council Meeting 27 Sept. 1971 and signed by the Mayor, J.A.Chisholm. Note pages 18 and 19 have been reversed. Comprises: Page 1 - map (image 1829i1) - of Ballarat (Ballaarat) showing the horse tram routes in red (appear to have been drawn in with a red pencil). Note the Sebastopol route terminates at Rubicon St. Page 3 - letter to the City Councillors from the Mayor Page 4 - Outline of the "The Ballarat Tramway System" Pages 5 - 7 - Conditions for tendering the horse tram system within the City of Ballarat" Pages 8 - 11 - Specifications and Agreement for the Ballaarat Tramways (horse trams). pages 12 - 19 - Memorandum of Agreement with the British Insulated Wire Company (later ESCo) Page 20 - Copy of letter from the Secretary of the SEC to the Minister of Fuel and Power, dated 10 Sept. 1971 advising of the formal abandonment of the Ballarat and Bendigo tramway systems. Page 21 - five photos (image 1829i3) of trams in Ballarat, including the bogie tram decorated for the Queens visit, courtesy of Mr. L. J. Denmead, Tramways Superintendent. Page 22 - Plan (image 1829i2) of Ballarat Bus Services, showing route numbers, destinations and existing tramway routes. 3rd copy added 16/7/2010trams, tramways, city of ballaarat, mayor's reports, ballaarat tramway company, british insulated wire company, esco, bus services, sec -
 Ballarat Tramway Museum
Postcard, Biscay Greetings, Bourke St Melbourne
Colour postcard with serrated edges of Bourke St. Melbourne from Parliament house with MMTB Z8 and about 6 W7's in photo, along with many motor vehicles. Also shown are the Safety Zones and stops. In image are buildings along either side of Bourke St., featuring the sign of the Salvation Army City Temple in the top left hand corner, Mittys, and a Kwikasair van by the outbound safety zone. Tram Z8 has destination of "CITY - SPENCER ST." and showing route 89. On rear of card is name of company "Biscay" and caption "New Z class tram in Bourke Street, Melbourne Victoria." and card number BG98 in dark brown ink, along with space for stamp and address. See Destination City re introduction of Z class trams (1975)trams, tramways, bourke st, melbourne, z class trams, tram 2 -
 Ballarat Tramway Museum
Newspaper, The Courier Ballarat, "No longer needed", 7/09/1971 12:00:00 AM
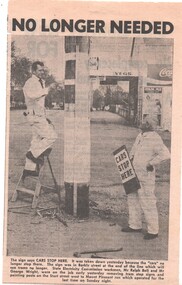
Yields information about the closure of the system and how the various small tasks, eg removal of tram stop signs were undertaken. The newspaper item details the name of the people.Newspaper clipping from The Courier, 7/9/1971 titled ""No longer needed" with a photo of two SEC workmen removing tram stop signs and painting poles on the Mt Pleasant route in Barkly St. Photo taken the previous day, following the closure of the route on Sunday. Has a photo of Mr. Ralph Bell and Mr George Wright. At corner with Cobden St. Has a Milk Bar in the background, advertising Streets Ice creek, Coca Cola, Briquettes and Vincent's Cold and Flu tablets. See Reg Item 3771 for a copy of the original photograph and a larger view of the scene. Second copy added 27/10/05. trams, tramways, mt pleasant, closure, tram stops, barkly st. -
 Ballarat Tramway Museum
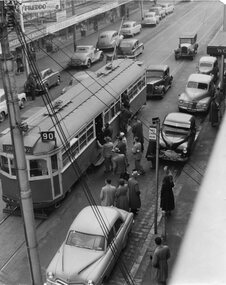
Photograph - Black & White Photograph/s, Geoff Grant, 7/04/1956 12:00:00 AM
Black and white photograph of Melbourne trams 1033 (on an Australian Electric Traction Association tour) and tram 957 at the Bourke St. terminus, dated 7/04/1956. 1033 showing SPECIAL, has AETA sign and poster on rear bumper bar. Tram 957 showing destination of "Northcote - Dundas St." route "90". Tramway buildings in background.On rear stamped in bottom rh corner "Geoff Grant / 7 Apr 1956 / Victoria"trams, tramways, melbourne, bourke st, aeta, tours, tram 1033, 957 -
 Ballarat Tramway Museum
Photograph - Colour Photograph/s set of 6, Neville Gower, 15/02/1997 12:00:00 AM
Group of six photographs taken on 15/2/1997 of some power poles in Drummond St. south that still carry the paintwork, faded and worn, of the SEC tramway system tram stops. 768.1 Drummond St. Sth & Urquhart St. - east side, looking north, with Neighbourhood Watch sign and bus stop shelter in background, with street name signs. 768.2 - Drummond St. South between Eyre & Dana St., east side, looking north. 768.3 - as for 768.1, but looking south. 768.4 - Drummond St. South & South Street. Pole photographed is at the north east corner of the intersection. 768.5 - as for 768.4 768.6 - as for 768.2, but looking south with Foundry Hotel in background. On rear in blue ink: 768.3 - "D.S. South E.side 15/2/97 & Urquhart St." 768.4 - "D.S.South East Side 15/2/97, south" 768.6 = "15/2/1997 D.S.Sth between Eyre & Dana E.Side"tram stops, drummond st. sth, sebastopol route