Showing 511 items
matching war at sea
-
 Mission to Seafarers Victoria
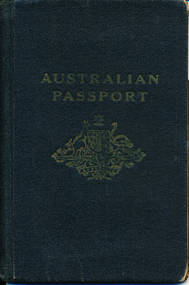
Document - Passport, 1949
This passport was issued to Allan Quinn in 1949, by the Australian Consulate General, in New York, U.S.A. It expired on the 14th of September 1954. The passport contains information about Allan, such as his date of birth in N.S.W, his hair colour as brown and eye colour as blue. Several of the pages have been stamped.This passport belonged to Allan Charles Quinn and is part of a collection of letters and photograph depicting aspects of life at sea for a young man in the era immediately following World War II. It details the places Allan visited in the fifteen years it was valid.A black covered Australian passport with sixteen pages, issued in 1949. The top left hand corner of the back cover has been cut off. Front: AUSTRALIAN / PASSPORT printed in faded gold/yellow ink. Below this is the Australian coat of arms, printed in the same colour.allan-quinn, passport, 1949-1954, quinn collection, allan charles quinn, seamen, seafarers, sailors -
 Flagstaff Hill Maritime Museum and Village
Gun Emplacement, 1890's
The Warrnambool Battery on Flagstaff Hill has embankments for 3 guns. Those on the left and right still have cannon in place but in the centre is an empty embankment, apart from this concrete ring with metal threaded studs. In 1898 a 5 inch breech loading gun (BL) was installed here. The gun had a hydro-pneumatic disappearing carriage (hence the sign on the concrete wall "5" BL HP").. This type of gun was faster to load and fire that the 80 pound RML’s installed on either side of it. Its arrival spelt the end of the 80 pound RML guns’ useful life, although they continued to be used for practice sessions. The 5 inch BL was the main defensive weapon of the Warrnambool Battery until the Battery was downgraded in importance. It was removed in 1904 and recalled to Melbourne in 1910. The gun emplacement ring is all that remains of the mounting for a 5 inch Armstrong rifled breech loading gun. HISTOR of the WARRNAMBOOL GUNS & CANNON In the years following the Crimean War (1854-1857J) there was a great concern in the Colony that Imperial Russia would attempt an invasion. Coastal defences in the colony of Victoria were greatly strengthened by the Government as a result. Warrnambool was originally protected by cannons at Cannon Hill, approximately 1 kilometer west of the Flagstaff Hill Fortifications. The cannons included two 1866 guns, both 80 Pound Rifled Muzzle Loaders (RML) purchased by Victoria’s Colonial Government. They were part of a shipment of 26 such guns sent from England in December 1866. They are registered as No. 23 (80cwt-2qr-0lbs) - Gun 1, and No.13 (81cwt-1qr-12lbs) - Gun 2. They were cast at the Royal Gun Factory, Woolwich Arsenal, in 1866 and have a 6.3 inch bore. Both barrels carry the Royal Cypher of Queen Victoria, Insignia of the Royal Engineers, within the Garter and Motto surmounted by the Crown, with the Royal Cypher of Queen Victoria within the Garter (letters in centre “VR”, motto “HONI SOIT QUI MAL Y PENSE”, "Shame be to him who thinks evil of it."). The guns were originally supplied with wooden carriages. (The Royal Arsenal at Woolwich, England, was established eleven years after the Restoration of King Charles II. It was the principal supplier of armaments to the British and Empire Governments. At the height of its operations during World War One the factory covered 1300 acres and employed very nearly 80,000 workers. Woolwich was the Headquarters of the Royal Artillery since the raising of that Regiment in 1716. The Arsenal was closed in the late 1960’s.) These two 80pdr cannons were transferred to the Warrnambool Garrison Artillery Battery Fortifications erected at Flagstaff Hill in 1887 as part of Victoria’s Coastal Defences. The original wooden carriages were subsequently replaced with the present iron garrison carriages in 1888. They are a “C” pivot. The ‘racers’ or curved track set into the floor of the gun emplacement (which enabled the guns to be traversed more quickly) are as specified for guns up to 10 inch, being of wrought iron 2.78 inches wide. A temporary third gun, now no longer on Flagstaff Hill’s site, was the 5 inch Rifled Breech Loading (BL) Armstrong gun mounted on an Elswick hydro pneumatic disappearing carriage and installed in this very concrete base or pad. The State of Victoria took over the ownership of the guns at the time of Australian Federation in 1901. In about 1901/1902 the Garrison Battery was converted to the Warrnambool Battery of the Australian Field Artillery (No 4 Field Battery). It was equipped with 4.7 inch naval guns mounted on field carriages. They were now a mobile unit but continued to use the Warrnambool Garrison area at Flagstaff Hill for practice. When the Fortifications were declared obsolete the two 80 Pounder RML were relocated to Cannon Hill in 1910. On the outbreak of World War One the 4.7 inch guns were recalled to Melbourne, and the Battery was disbanded. Most of the personnel probably re-enlisted in the local 4th Australian Light Horse Regiment. The two 80 Pounder RML were moved back to the Fortifications in 1973. They were both fully restored by Army First Year Apprentices at the Ordinance Factory in Bendigo in time for the centenary year of the fortifications in 1987. The guns are capable of firing 80 pound (32.3kg) armour piercing exploding shells 3.65kms out to sea. They were originally manned by volunteers before a paid Garrison was established. Now the Guns are again fired by volunteers on Special Event days. Since restoration the Gun Number 1 had been fired on a regular basis but Gun Number 2 hadn’t been fired since the mid 1990’s. In April 2015 Gun Number 2 was serviced in preparation for the firing of both cannons on the ANZAC Centenary commemorations on April 25th 2015. Other guns from the original Cannon Hill location were obsolete by the time the 1887 Warrnambool Garrison Artillery Battery was built. These guns are (1) a 32 Pounder Muzzle Loading Smooth Bore (SB) cast in 1813 at the famous Carron Foundry, number 80837 and now located in the Warrnambool Botanic Gardens. It is now mounted on a replica carriage due to the original carriage being in a fragile condition (the original carriage stored under cover at Flagstaff Hill). (2) a 68 Pounder Muzzle Loading Smooth Bore cast in 1861 at the equally august Low Moor Foundry, number 10310 and now located on the lawn area at the entrance to Flagstaff Hill Maritime Village. It is still mounted on its original wooden garrison carriage. Its wooden slide compressor mechanism is fragile and now kept in Flagstaff Hill’s storage. There are only seven 32 Pounder SB made by Carron and fifteen 68 Pounder SB made at Low Moor known to exist in the State of Victoria [references; Flagstaff Hill Maritime Village interpretation boards, information sheets and other documents; South Western Victoria Guns and Cannon report, May 2008, ref W/F/08] The Gun embankment is contained within the heritage listed Lady Bay Lighthouse Comples, on the Victorian Heritage Register VHR H1520. The gun emplacement base is evidence of the last defences installed on this stretch of coastline. The Warrnambool Garrison has been added to the Victorian Heritage Register H1250 “for its intact battery and guns, a strong reminder of Victoria’s wealth and determination to protect itself from the perceived threat of invasion in the 1880’s.” The City of Warrnambool is one of several custodians of a collection of artillery pieces of heritage significance at a state, national and international level. These pieces are directly related to the defence of south-west Victoria in the 19th century. The care and preservation come under the Heritage Act 1995. Gun emplacement; the remains of the mounting platform of a temporary third gun installed in 1898 in the centre of the battery. This consists of a circular concrete well or sump surrounded by two rings of mounting bolts, the inner of 10 and the outer of 20. The base once held a 5 inch Armstrong rifled breech loading gun with hydro-pneumatic disappearing. In the centre of the ring on the ground is a keyhole shaped space. The gun was removed in 1904. flagstaff hill, warrnambool, shipwrecked coast, flagstaff hill maritime museum, maritime museum, shipwreck coast, flagstaff hill maritime village, great ocean road, colonial defences, victoria’s coastal defences, warrnambool fortification, warrnambool garrison battery, warrnambool volunteer corps, ordinance, armaments, cannon hill fortifications, flagstaff hill fortifications, 4th australian light horse regiment, garrison gun, 5 inch breech loading gun, emplacement for hydro-pneumatic disappearing carriage, gun emplacement -
 Flagstaff Hill Maritime Museum and Village
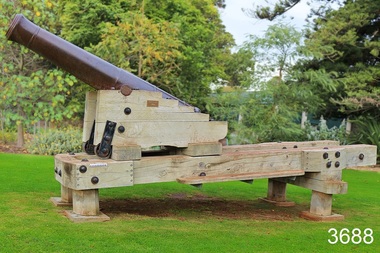
Weapon - Cannon, 1813
This 1813 cannon is classified as a carronade, having been made by the Carron Ironworks foundry in Stirling, Scotland in 1813. It is a large calibre, short range, gun mainly used on ships. The carronade model of cannon was first used when introduced into the British Royal Navy in the American War of the Revolution (1775-1883). This cannon was originally a 28pdr, 48cwt, 8ft gun. The date ‘1837’ on the barrel probably indicates the date that the Board of Ordinance accepted the change in size to a 32pdr. It may originally have been a naval gun and the conversion undertaken when it was brought ashore. It is very probably one of the 15 guns that are known to have constituted the defences of Victoria in 1860. This group of 32pdrs was the shorter model of the 4800width and 8ft length cannon and as such are different from the 32pdrs found in NSW. It was originally located on Cannon Hill in Warrnambool when it was the site of the Warrnambool Battery Western Artillery, formed in 1866. It was obsolete by the time of the 1887 fortifications, and was moved from the Warrnambool Fortifications to the Botanic Gardens in 1910, when the Fortifications were declared obsolete. HISTORIC INFORMATION ABOUT THE CANNON IN THE WARRNAMBOOL AREA In the years following the Crimean War (1854-1857J) there was a great concern in the Colony that Imperial Russia would attempt an invasion. Coastal defences in the colony of Victoria were greatly strengthened by the Government as a result. Warrnambool was originally protected by cannons at Cannon Hill, approximately 1 kilometer west of the Flagstaff Hill Fortifications. The cannons included two 1866 guns, both 80 Pound Rifled Muzzle Loaders (RML) purchased by Victoria’s Colonial Government. They were part of a shipment of 26 such guns sent from England in December 1866. They are registered as No. 23 (80cwt-2qr-0lbs) - Gun 1, and No.13 (81cwt-1qr-12lbs) - Gun 2. They were cast at the Royal Gun Factory, Woolwich Arsenal, in 1866 and have a 6.3 inch bore. Both barrels carry the Royal Cypher of Queen Victoria, Insignia of the Royal Engineers, within the Garter and Motto surmounted by the Crown, with the Royal Cypher of Queen Victoria within the Garter (letters in centre “VR”, motto “HONI SOIT QUI MAL Y PENSE”, "Shame be to him who thinks evil of it."). The guns were originally supplied with wooden carriages. (The Royal Arsenal at Woolwich, England, was established eleven years after the Restoration of King Charles II. It was the principal supplier of armaments to the British and Empire Governments. At the height of its operations during World War One the factory covered 1300 acres and employed very nearly 80,000 workers. Woolwich was the Headquarters of the Royal Artillery since the raising of that Regiment in 1716. The Arsenal was closed in the late 1960’s.) The two 80pdr cannons were transferred to the Warrnambool Garrison Artillery Battery Fortifications erected at Flagstaff Hill in 1887 as part of Victoria’s Coastal Defences. The original wooden carriages were subsequently replaced with the present iron garrison carriages in 1888. They are a “C” pivot. The ‘racers’ or curved track set into the floor of the gun emplacement (which enabled the guns to be traversed more quickly) are as specified for guns up to 10 inch, being of wrought iron 2.78 inches wide. A temporary third gun, now no longer on Flagstaff Hill’s site, was a 5 inch Rifled Breech Loading (BL) Armstrong gun mounted on an Elswick hydro pneumatic disappearing carriage It was faster to load and fire than the 80 pound RMLs and its arrival spelt the end of the older 80 pound guns’ useful life, apart from being used for practice sessions. The 5 inch BL gun was the main defensive weapon of the Warrnambool Battery until the Battery was downgraded in importance and the gun was recalled to Melbourne in 1910. The gun emplacement still remains in place set between the 2 80pdr cannon. The State of Victoria took over the ownership of the guns at the time of Australian Federation in 1901. In about 1901/1902 the Garrison Battery was converted to the Warrnambool Battery of the Australian Field Artillery (No 4 Field Battery). It was equipped with 4.7 inch naval guns mounted on field carriages. They were now a mobile unit but continued to use the Warrnambool Garrison area at Flagstaff Hill for practice. When the Fortifications were declared obsolete the two 80 Pounder RML were relocated to Cannon Hill in 1910. On the outbreak of World War 1 the 4.7 inch guns were recalled to Melbourne, and the Battery was disbanded. Most of the personnel probably re-enlisted in the local 4th Australian Light Horse Regiment. The two 80 Pounder RML were moved back to the Fortifications in 1973. They were both fully restored by Army First Year Apprentices at the Ordinance Factory in Bendigo in time for the centenary year of the fortifications in 1987. The guns are capable of firing 80 pound (32.3kg) armour piercing exploding shells 3.65kms out to sea. They were original manned by volunteers before a paid Garrison was established. Now the Guns are again fired by volunteers on Special Event days. Since restoration the Gun Number 1 had been fired on a regular basis but Gun Number 2 hadn’t been fired since the mid 1990’s. In April 2015 Gun Number 2 was serviced in preparation for the firing of both cannons on the ANZAC Centenary commemorations on April 25th 2015. Other guns from the original Cannon Hill location were obsolete by the time the 1887 Warrnambool Garrison Artillery Battery was built. These guns are (1) a 32 Pounder Muzzle Loading Smooth Bore (SB) cast in 1813 at the famous Carron Foundry, number 80837 and now located in the Warrnambool Botanic Gardens. It is now mounted on a replica carriage due to the original carriage being in a fragile condition (the original carriage stored under cover at Flagstaff Hill). (2) a 68 Pounder Muzzle Loading Smooth Bore cast in 1861 at the equally august Low Moor Foundry, number 10310 and now located on the lawn area at the entrance to Flagstaff Hill Maritime Village. It is still mounted on its original wooden garrison carriage. Its wooden slide compressor mechanism is fragile and now kept in Flagstaff Hill’s storage. There are only seven 32 Pounder SB made by Carron and fifteen 68 Pounder SB made at Low Moor known to exist in the State of Victoria Plaque attached to the carriage “This replica carriage was constructed by the Warrnambool Tritan Woodworkers club in conjunction with the generosity of local businesses and the Warrnambool community. The original carriage (circa 1860) was removed for restoration and is now located at Flagstaff Hill Maritime Village. The timber used for the replica carriage is Monterey Cypress, which was an early planting in the gardens. 2010 marked the centenary of the cannon’s relocation in the Warrnambool Botanic Gardens.” (Reference; Victorian Guns and Cannons, South Western Victoria Assessment, May 2008, item W/B/01; Flagstaff Hill Maritime Village datasheets and archives). There are only seven 32 Pounder SB made by Carron known to exist in the State of Victoria and this is one of them. On a world level, this cannon represents a high level of rarity. Further, as it has been modified (bored up) it is representative of the historical process of amending artillery in order to ensure a longer usefulness of each piece despite rapidly advancing artillery technology. The number of surviving carriages with traversing slides in this group in South Western Victoria is unique in Australia and probably in the World. Out of 10 such platforms surviving in Australia, the South Western Victorian group has half. Several survive around the world but probably not in such a large group. The wooden sliding compressor mechanism belonging to this cannon is extremely rare, and the only one in this South Western Victorian group of Guns and Cannons. As a whole, this cannon has undergone very little restoration or modification, giving it a high level of integrity. The City of Warrnambool is one of several custodians of a collection of artillery pieces of heritage significance at a state, national and international level. These pieces are directly related to the defence of south-west Victoria in the 19th century. The care and preservation come under the Heritage Act 1995. (Reference; Victorian Guns and Cannons, South Western Victoria Assessment, May 2008).Cannon, or carronade, 32pdr with wheels. Muzzle loading smooth bore (SB) cannon. Cannon has original wooden Burmese Teak carriage and slide with wrought iron fittings and iron wheels. Manufactured by Carron in Scotland, in 1813. It has been converted from a 28pdr. There is a loop for a rope on the cascabel, which was part of the original casting. Re-bored in 1837. Marks include Serial Number, Royal Cypher of King George III, broad arrow of proofing, and numbers to represent the weight. NOTE: The cannon is displayed in the Warrnambool Botanic Gardens and is mounted on a replica wooden carriage; the original wooden carriage is now stored under cover at Flagstaff Hill Maritime Village. This carriage has 4 wheels on swivel attachments and a central gear that allows the wheels to turn on rails. Pressed into left trunnion “80837 / CARRON / 1813”, cast on barrel“symbol (Royal Cypher of King George III”, “symbol (broad arrow of proofing)” and numbers “45-3-24 / 1837” . Cascable “CV” and marks with gradations from nought to three in quarters on each side, On the carriage the end of one of the main slide members carries the mark “W symbol (broad arrow) D” incised into the timber. Plaque attached to the carriage by the Warrnambool Tritan Woodworkers club, 2010, marking the centenary of the cannon’s relocation in the Warrnambool Botanic Gardens and the addition of the replica carriage. flagstaff hill, warrnambool, shipwrecked coast, flagstaff hill maritime museum, maritime museum, shipwreck coast, flagstaff hill maritime village, great ocean road, victoria’s coastal defences, warrnambool fortification, warrnambool garrison battery, ordinance, armaments, cannon hill fortifications, victorian colonial government, carron ironwroks foundary, 32pdr smooth bore cannon, 28pdr smooth bore cannon, 1813 cannon, carronade -
 Flagstaff Hill Maritime Museum and Village
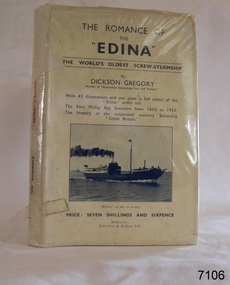
Book, The Romance of The Edina, 1935
This book is titled "The Romance of the "Edina" and was written by author C. Dickson Gregory (Charles Dickson Gregory) in 1935. The author has also written, "Australian Steamships Past and Present". This book also contains (1) The Port Phillip Bay Steamers from 1850 to 1935 (2) The history of the celebrated auxiliary steamship "Great Britain." ABOUT THE S S EDINA The three-masted iron screw steamer SS Edina was built in Glasgow, Scotland, in 1854 by Barclay and Curle. She was adorned with the figurehead of ‘fair maid of Judea’. The many years of service made SS Edina famous world-wide as the longest-serving screw steamer. (The term screw steamer comes from being driven by a single propeller, sometimes called a screw, driven by a steam engine.) SS Edina’s interesting history includes English Chanel runs, serving in the Crimean Ware carrying ammunition, horses and stores to the Black Sea, and further service in the American Civil War and later, serving in the western district of Victoria as well as in Queensland and carried gold, currency and gold prospectors Australia to New Zealand. SS Edina had the privilege of being an escort vessel to H.R.H. the Duke of Edinburgh during his visit to Australia in 1867. In March 1863 SS Edina arrived in Port Phillip Bay, Melbourne and was bought by Stephen Henty, of Portland fame, to work the cargo and passenger run from Melbourne – Warrnambool – Port Fairy - Portland. After a short time of working the run from Australia to New Zealand, with passengers and cargo that included gold and currency, she returned to her Melbourne - Warrnambool – Port Fairy run, with cargo including bales of wool produced in the western district of Victoria. The Warrnambool Steam Packet Company purchased SS Edina in 1867; she was now commanded by Captain John Thompson and Chief Engineer John Davies. She survived several mishaps at sea, had a complete service and overhaul and several changes of commanders. In 1870 SS Edina was in Lady Bay, Warrnambool, when a gale sprung up and caused a collision with the iron screw steamer SS Dandenong. SS Edina’s figurehead was broken into pieces and it was not ever replaced. SS Edina was re-fitted in 1870 than was used as a coastal trader in Queensland for a period. She was then brought to Melbourne to carry cargo and passengers between Melbourne and Geelong and performed this service 1880-1938. During this time (1917) she was again refitted with a new mast, funnel, bridge and promenade deck, altering her appearance. In 1938, after more collisions, SS Edina was taken out of service. However, she was later renamed Dinah and used as a ‘lighter’ (a vessel without engine or superstructure) to be towed and carry wool and general cargo between Melbourne and Geelong. In 1957, after 104 years, the SS Edina was broken up at Footscray, Melbourne. Remains of SS Edina’s hull can be found in the Maribyrnong River, Port Phillip Bay. [Reference: A Brief Review of Steam Navigation in Victoria; C Dickson Gregory; Centenary Maritime Exhibition catalogue, 1934; published by Shiplovers' Society of Victoria Dandenong, Passengers in History, http://passengersinhistory.sa.gov.au/node/924034 Edina, Victorian Heritage Database VHR S199 http://vhd.heritage.vic.gov.au/shipwrecks/heritage/199 SS Edina, Coastal Trader and Passenger Ship 1853-1938, Museum Victoria Collections, https://collections.museumvictoria.com.au/articles/6227 SS ‘Edina’ – the Longest Serving Screw Steamer in the World, POI Australia, https://poi-australia.com.au/ss-edina-the-longest-serving-steamer-in-the-world/ ]This book about the SS Edina is significant for its association with the screw steamer SS Edina. The SS Edina is heritage listed on the Victorian Heritage Database VHR S199. She had endeared herself to the people of Port Phillip Bay as a passenger ferry, part of their history and culture. She played a significant role in the Crimean War, the American Civil War and the gold rush in New Zealand. She also served western Victoria for many years in her cargo and passenger runs. The SS Edina is famous for being the longest serving screw steamer in the world. After spending her first nine years overseas she arrived in Melbourne and her work included running the essential service of transporting cargo and passengers between Melbourne and the western Victoria ports of Warrnambool, Port Fairy and Portland. The SS Edina was purchased in the late 1860’s by local Warrnambool business, the Warrnambool Steam Packet Co. and continued trading from there as part of the local business community. The SS Edina’s original ‘fair maid of Judea’ figurehead was broken to pieces in a collision with another vessel (the SS Dandenong) in a gale off Warrnambool, Victoria, in 1870.The Romance of The "Edina"; the World's oldest screw-steamship, by C Dickson Gregory (Charles Dickson Gregory). Hard cover book with black print on cream coloured jacket, covered in clear plastic. Front cover has a black and white photograph of the steamship and is titled " "Edina" as she is today." With chapters on the Auxiliary Steamship "Great Britain" and the Port Phillip Bay Steamers Past and Present. Published in Melbourne by Robertson & Mullens Ltd. Opposite fly page is a picture from a painting by C. Dickson Gregory titled "Edina in the "roaring forties" in Feburary 1863" The book contains 43 illustrations and one plate in full colour showing the Edina in full sail. The price is printed on the jacket "PRICE: SEVEN SHILLINGS AND SIXPENCE"warrnambool, shipwrecked coast, flagstaff hill, flagstaff hill maritime museum, maritime museum, shipwreck coast, flagstaff hill maritime village, shipwrecked artefact, barclay & curle, figurehead 'fair maid of judea', centenary maritime exhibition 1934, a brief review of steam navigation in victoria, pleasure steamer edina, trade and travel late 19th and early 20th century, trade melbourne to geelong, screw steamer edina, coastal trader edina, lighter dinah, cargo carrying for cremean war, cargo carrying for american civil war, passenger and trade in western district of victoria, export gold and currency and gold diggers to new zealand, export vessel to h r h the duke of edinburgh, melbourne - warrnambool - port fairy - portland cargo run, warrnambool steam packet company, stephen henty, captain john thompson, chief engineer john davies, lady bay warrnambool, lighter edina, shipping victoria, port phillip bay steamers, steamship great britain, edina, vhr s199 victorian heritage database, book, the romance of the edina, c dickson gregory, robertson & mullens melbourne -
 Bendigo Military Museum
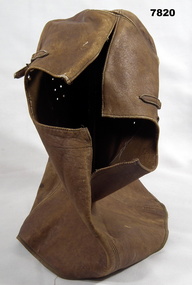
Headwear - FLYING HELMET WW1, C.WW1
Leather flying helmet worn by John Arthur Remington Alexander. He had pre War service in Area 67B Senior Cadets as Lt Commanding C Coy in Bendigo. Enlisted in the AIF No 2237 in 14th Reinforcements (August)1.8.1917 in the Aust Flying Corp (AFC) age 31 years 5 months with the rank 2nd Class Air Mechanic. Embark for England 30.10.1917, hospital at sea with Influenza, posted to 3 Sqd AFC, embark for France 8.3.1918, as a Photographer in civilian life he flew Photographic missions over enemy occupied trenches and lines. Embark for Aust 6.5 1919, discharged from the AIF 9.7.1919. Brown leather flying helmet worn to keep warm. Fully enclosed down to shoulders with an opening for the face. Small buckle on each side at the point of the ears. Series of six holes around each ear. Some seams are coming apart.flying helmet, uniform -
 Bendigo Military Museum
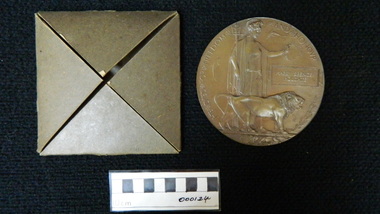
Medal - MEDAL, SERVICE to AUSTRALIA & BOX, Royal Australian Mint
Medallion was produced by the Royal Australian Mint and given to members who served with Australian Forces or her Allies between 1939 - 1945. This was on the 60th Anniversary of the end of WW2. Given to Tony Cork who was in the Merchant Navy, England 1939-45.1. Gold coloured coin medallion produced by Royal Mint. On one side of the coin is the Commonwealth Coat of Arms with the reverse side symbolising the Navy, Army and AirForce through the depiction of sea, land and air over a stylized map of Australia. 2. Contained in a hard cardboard black box inscribed with gold writing and Commonwealth emblem and medal lays in a felt recess within the box. 1. One side inscribed "World War 2", "60 years""1945 - 2005". and stylized map of Australia. Other side inscribed around Rim "World War 2"and "Service to Australia" with Commonwealth of Australia emblem in centre. 2. Box on top has Commonwealth Emblem and "Australian Govt", "Dept of Veteran Affairs". Inside "60th Ann of WW2".medal, 60th anniversary ww2 -
 Bendigo Military Museum
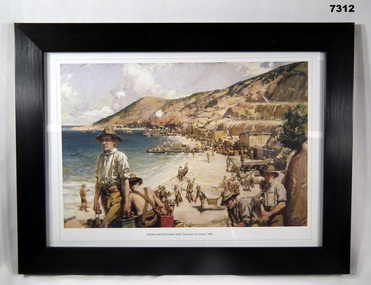
Print - PRINT, FRAMED WW1, Reader's Digest (Australia) Pty Limited, 2015
From information book - " Reader's Digest/ Gallipoli/ 25th April 1915 - 9th January 1916/ Centenary Commemorative Prints". Collection of 20 prints. Refer Cat No. 7300.Framed print. Print - colour print on paper. Copy of an oil painting on canvas. This painting depicts Anzac Cove - with soldiers going about various activities, some unloading crates, stacking crates and moving supplies. Background of sea, sand and hills. Frame - Black plastic framing with glass front and MDF board backing with adhered black paper.Details below print - in black ink. " FRANK CROZIER (1883 - 1948) The Beach at Anzac 1919". Frank Crozier - enlisted with the Australian Imperial Force, 22nd Battalion in March 1915. Trained in Egypt before serving in Gallipoli. Appointed an official war artist in 1918.framed accessories, prints, ww1, gallipoli, centenary -
 Bendigo Military Museum
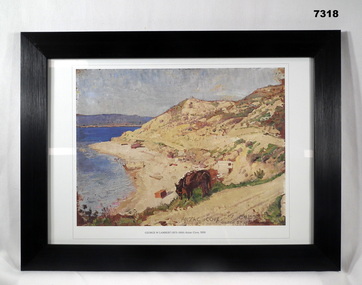
Print - PRINT, FRAMED WW1, Reader's Digest (Australia) Pty Limited, 2015
From Information book; "Reader's Digest/ Gallipoli/ 25th April 1915 - 9th January 1916/ Centenary Commemorative Prints". Collection of 20 prints. Refer Cat No. 7300.Framed print. Print - colour print on paper. Copy of an oil painting with pencil on wood. Depicts a cove with sea, sand and hills. Ruined buildings and structures visible on the beach. Horse eating grass in the foreground. Frame - Black plastic framing with glass front and MDF board backing with adhered black paper.Details below print - in black ink; " GEORGE W LAMBERT (1873-1930) Anzac Cove, 1919" “GEORGE W LAMBERT, unable to enlist in the Australian Imperial Force in London, joined Voluntary Training Corps". Appointed an official Australia War Artist, Australian Imperial Force 1917. framed accessories, prints, ww1, gallipoli, centenary -
 Warrnambool and District Historical Society Inc.
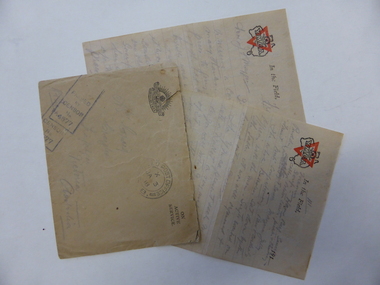
Letter, Carter 1.Letter 2.Envelope Mrs Craig Jan 3 1918, 1917
This letter has been written from France in 1917 by Private Edwin Johnson Carter to his friend Mrs Maggie Craig. It gives details of events in his life at the time – in the trenches in World War One. Private Edwin Johnson was a farmer from Nullawarre who enlisted in 1916 and served in France. He was drowned when the mail boat R.M.S. Leinster was torpedoed by a German submarine in the Irish Sea in October 1918. Private Johnson was returning from a visit to Ireland while on leave. This is an original letter from World War One It was written by a soldier from Nullawarre and has a particular poignancy as he writes: “My work brings me in contact with all that hurts in war. I am somewhat calm to it now but if I am spared to return I fear it shall be my nightmare.” He did not return but we have this letter to remind us of the horrors men such as Private Carter endured. This is an envelope containing a letter of two pages sent by a soldier on active service in France in World War One. Both the envelope and the letter are buff-coloured. The envelope has an image of an Australian Military Forces Y.M.C.A. logo, a Post Office stamp and a Censor stamp. The address is handwritten in pencil. The letter has an image of a Y.M.C.A. logo in red and black and the handwritten material is in pencil. Envelope: ‘On Active Service’ ‘Mrs Craig, Craiglea Trafalgar Victoria Australia’ Letter: ‘In the Field, France Dec 27 1917’world war one, private edwin carter, warrnambool history -
 Kiewa Valley Historical Society
Document - WW1 Memorial, 3rd June 1919
Albert Charles Andersen. Service Number 60326, 16th N.S.W. General Service. Place of Birth Lavington, N.S.W. Place of Enlistment Henty, N.S.W. Farm labourer. Son of Thorwald of Lavington and mother deceased. Aged 22 years and 9 months. Albert died at sea. Memorial Hollybrook Memorial, Southampton, United Kingdom. His name is on the Australian War Memorial - Panel 185. Note on the back "Enlisted 12th July 1918, died 17 Oct. 1918. Aged 19 years 11 months. (Different to Australian Archives) Perhaps Albert was a farm labourer in the district of Kiewa hence the Memorial.A large cardboard sheet with Memorial for Pte. Albert Charles Andersen, 16th N.S.W. Gen. Service, Reinforcements on a white sheet with brown writing with a photo of Charles in the middle, between the cardboard and the sheet.charles andersen. ww!. memorial. aif. -
 Warrnambool and District Historical Society Inc.
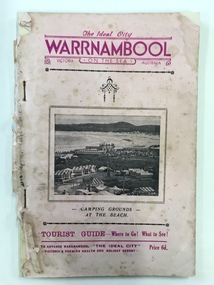
Booklet - The Ideal City Warrnambool On the Sea, Modern Print, 1940
This booklet has been issued in 1940 by the Warrnambool Progress and Tourist Association established in 1927. Warrnambool was the winner of the Sun News Pictorial Quest in 1928, the ‘Ideal City’ and used this title to promote the city. There had been several Tourist Associations in Warrnambool prior to 1927 and all of them promoted Warrnambool as a health resort and an ideal holiday destination with the Sea Baths in Gilles Street and the beach close by. This guide has been produced during World War Two with rationing of petrol and other goods and most people in Victoria would not have been contemplating long and expensive holidays so Warrnambool with its rail service and beach facilities would have been seen as a possible holiday destination. This Warrnambool Tourist Guide is of considerable interest both for its content regarding Warrnambool’s attractions in World War Two and for its 1940s advertisements and photographs. This is a booklet of 33 pages stapled together. It is a Warrnambool Tourist Guide from the 1940s. The pages are mostly white but there are a couple of blue and buff-coloured pages. The cover is pink with mauve and black printed material and a photograph on the front cover of the Warrnambool camping ground on the foreshore. The back cover has become detached. The booklet contains information on the tourist attractions of Warrnambool and district, black and white photographs of buildings, events and scenic spots and advertisements for local businesses. Many of the advertisements also contain photographs of business premises. Front Cover: ‘The Ideal City, Warrnambool On The Sea, , Victoria, Australia, Camping Grounds at the Beach, Tourist Guide – Where to Go! What to See! To Advance Warrnambool, The Ideal City, Victoria’s Premier Health and Holiday Resort, Price 6d.’ tourism in warrnambool, warrnambool, sun news pictorial quest, warrnambool tourist guide, the ideal city -
 Warrnambool and District Historical Society Inc.
World War One Certificate (Coulstock), WW1 Certificate of Service, 1914
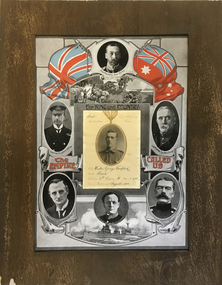
This item is a World War One certificate featuring Walter Coulstock. Private Walter George Coulstock, an engineer, was born in Warrnambool and educated at the Warrnambool Academy. He enlisted at the age of 21 in August 1914, embarked in October 1914 and while travelling to Egypt he entered the machine gun section. He was wounded on the afternoon of the Landing and died of wounds in May 1915. He was buried at sea while in transit to Alexandria. Walter Coulstock was one of the many men and women from Warrnambool and district who enlisted in World War One and who died on active service.This certificate is of considerable significance as it is memento of Walter Coulstock who died in World War One. The Coulstock family was a prominent one in the Warrnambool district in the 19th and early 20th centuries and Walter is one of the local heroes of the Great WarThis is a paper certificate mounted on a frame of plywood. The mount indicates that the certificate has previously been framed. The certificate has a grey background and contains images of the British and Australian flags in red, white and blue, six black and white photographs, an image of H.M.A.S. Australia, an image of a battle scene with artillerymen and black and red lettering. Pasted on to the centre part of the certificate is a yellow piece of paper with a photograph and information on Walter Coulstock. The plywood is broken at the bottom edge and is somewhat stained."For King and Country' 'The Empire Called Us' 'Walter George Coulstock, Private, 8th Battalion, Company B. Reg. No.481, Date of Enlistment August 1914walter coulstock, world war 1 certificate -
 Warrnambool and District Historical Society Inc.
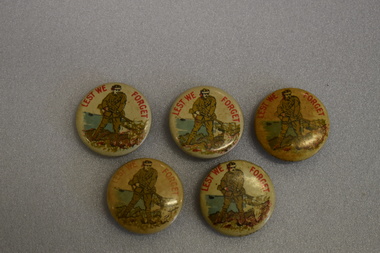
Badges x 5, Lest We Forget
These badges appear to date from World War One. These badges are of interest as early badges issued to raise funds for the war effort in World War OneCircular concave metal badges featuring an image of an armed soldier standing on a headland with the sea beyond.. The background is cream coloured with red text. There is a clip pin on the reverse. Some are discoloured..LEST WE FORGET -
 Waverley RSL Sub Branch
Photo Album, Charles Harold Dix 119700 RAAF Photos of the War Years
Photos taken by Charles Dix 119700 RAAF 2 SQN. at Darwin Adelaide River Morotai and Balikpapan during WWII and 2 photos of later dateCharles Dix 119700 RAAF 2 Sqn. was a member of RSL Waverley Sub Branch for many years. He Joined the RAAF on 8th October 1942 and was discharged from the 83rd. Operational base unit on 30th. January 1946. During WWII and served at Darwin, Adelaide River Morotai Island and made a "beach Landing" under fire at Balikpapan to set up RAAF signals station at the newly captured airstrip Vic Morgan is thought to be MORGAN, Victor Allen - (Leading Aircraftman); Service Number - 88726; File type - Casualty - Repatriation; Aircraft - Mitchell A47-37; Place - Arafura Sea; Date - 14 August 1945Photo Album of mainly black and white photos from WWII Darwin Morotai Island and Balikpapancharles harold dix, darwin wwii, adelaide river wwii, frognal air base, raaf, balikpapan, dix, photos wwii, darwin hospital, jeep, morotai island, 2 squadron r.a.a.f., 2nd squadron raaf, wwii -
 Waverley RSL Sub Branch
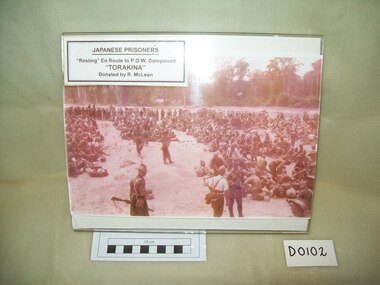
Print Torakina, Torakina
August 1945 saw Major Hugh St Clair Brockway accepting the surrender of a Marine Brigade of Japanese, at Bonis Northern Bougainville, from Naval Commander Takahashi the representative of the Japanese High Command. For a month Major Brockway concentrated on transporting the Japanese out and returning the area, as far as possible, to a pre-war condition. "The Japanese were in a bad way, saying no ship had resupplied them since 1942. They had lived off fish from the sea and what they could grow. Many were sick and they had few medicines. "Our job was basically to evacuate the Japanese and ship the troops out to a POW compound at Torakina, on the mid-eastern coast of Bougainville." Major Brockway had a small group of about 30 to execute the operation, which included destroying all Japanese arms and ammunition of the 3000 strong naval brigade. "They had been cut off since about 1942 and we had to clean the place up for civilian occupation again." Source "the Wargin Argus" BY VEANA SCOTT 27 Apr, 2005 09:36 AM Wagin Argus cnr Tavistock and Ranford Streets Wagin WA 6315 [email protected] Phone: 08 9861 1200Photograph in very faded colour (mainly pale pink with a square of colour visible under label) of Japanese P.O.W's resting en-route to compound at Torakina Digitally rescanned in greyscale -
 Running Rabbits Military Museum operated by the Upwey Belgrave RSL Sub Branch
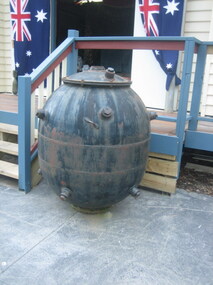
World War 2 Era Contact Sea Mine
... World War 2 Era Contact Sea Mine... e.g. TNT, Minol or Amatol. mines sea mines World War 2 Era ...These mines were tethered to the sea bed and were detonated when a ship came into contact with the "Horns" that protruded from the mines exterior surface (removed in this example although the fixing points are clearly visible.) The mines were usually laid by ships or submarines in "Fields" across harbour entrances or in busy shipping lanes. They were tethered so that they floated several feet below the water. This type of mine carried enough exlposive to sink even the largest of ships. Floating mines typically have a mass of around 200 kg,including 80 kg of explosives e.g. TNT, Minol or Amatol.mines sea mines -
 Federation University Historical Collection
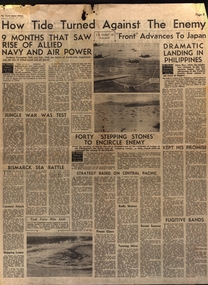
Newspaper, Jungle War and Bismark Sea Battle, 1945, 1945
... Jungle War and Bismark Sea Battle, 1945... War 2 Japanese Jungle War Bismark Sea Battle US Fleet ...world war 2, japanese, jungle war, bismark sea battle, us fleet, phillipines, burma, munition workers, land army, ration books -
 Federation University Historical Collection
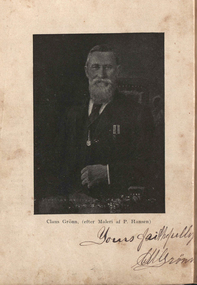
Book, Claus Gronn, Erindringer fra Sö og Land (Memories from Sea and Land), 1906
From the age of 23, Claus Gronn kept a diary/account book to record his daily events and expenditures. In his old age, he used his diary to compile a book, all written in Danish, for his family detailing his many adventurers as a sailor and a gold-digger and his visits to his home-town of Mels as an old man. Eleven copies were printed, one for each of his surviving children. The book was later translated and published by Claus' grand-daughter, Cora McDougall, in the book "Gold, Gold! Diary of Claus Gronn, A Dane on the Diggings". Claus Grönn (1832-1909) was born in Mels, Oksbol Sogn, Schleswig (then still a part of Denmark), the son of blacksmith Claus Mathiesen Gronn. He married Mary Ann Priestley Horsfall at Newstead, Victoria, in 1856. Claus was sent to sea at the age of 14, returning two years later when he took part in the first Schleswig war between Prussia and Denmark as a cadet in the Danish Marine Service. He spent the next four years at sea sailing to Iceland, Russia, Spain and British Guinea. Adopting an anglicised name, Charles Edward Sinclair (which he used until his marriage in 1856 when he resumed his own names), Claus' last voyage was destined for Australia. On June 10, 1854, on board the Koh-i-noor, Claus arrived in Sandridge (now known as Port Melbourne), Victoria. Deciding to try his luck in the goldfields Claus Gronn hoped to earn enough money to be able to return to Denmark with a certain wealth. He purchased some basic tools, he walked 100 km to the Mount Alexander goldfields, trying his luck at Campbell's Creek. He went into partneship with another Dane, Peter Hansen. On 30 September 1909 Claus Gronn died aged 77, at his farm "Leavoldston" located north of Oakleigh, and is buried in the Burwood Cemetery.Green hard covered book. Plate 1 is a signed image of Claus Gronn. Another plate depicts Claus Smed, and Dr Preshaw's tent in Castlemaine. With the book is some cutting, including 'Cuttings from various journals about Claus Gronn and HIs Memoirs by Jens Lyng, as well as hair samples from Margaret Billyeald, Gladstone Procter's second wife. There is also a family tree, and a copy of the details on the Horsfall family from the family bible. non-fictionFrom the age of 23, Claus Gronn kept a diary/account book to record his daily events and expenditures. In his old age, he used his diary to compile a book, all written in Danish, for his family detailing his many adventurers as a sailor and a gold-digger and his visits to his home-town of Mels as an old man. Eleven copies were printed, one for each of his surviving children. The book was later translated and published by Claus' grand-daughter, Cora McDougall, in the book "Gold, Gold! Diary of Claus Gronn, A Dane on the Diggings". Claus Grönn (1832-1909) was born in Mels, Oksbol Sogn, Schleswig (then still a part of Denmark), the son of blacksmith Claus Mathiesen Gronn. He married Mary Ann Priestley Horsfall at Newstead, Victoria, in 1856. Claus was sent to sea at the age of 14, returning two years later when he took part in the first Schleswig war between Prussia and Denmark as a cadet in the Danish Marine Service. He spent the next four years at sea sailing to Iceland, Russia, Spain and British Guinea. Adopting an anglicised name, Charles Edward Sinclair (which he used until his marriage in 1856 when he resumed his own names), Claus' last voyage was destined for Australia. On June 10, 1854, on board the Koh-i-noor, Claus arrived in Sandridge (now known as Port Melbourne), Victoria. Deciding to try his luck in the goldfields Claus Gronn hoped to earn enough money to be able to return to Denmark with a certain wealth. He purchased some basic tools, he walked 100 km to the Mount Alexander goldfields, trying his luck at Campbell's Creek. He went into partneship with another Dane, Peter Hansen. On 30 September 1909 Claus Gronn died aged 77, at his farm "Leavoldston" located north of Oakleigh, and is buried in the Burwood Cemetery.claus grönn 1832-1909, leavoldston, claus gronn, peter hansen, campbell's creek, peter skjellerup, mary ann horsfal, sandon, dr preshaw, claus smed, ship, immigraion, family history, danish, biography -
 Ballarat Clarendon College
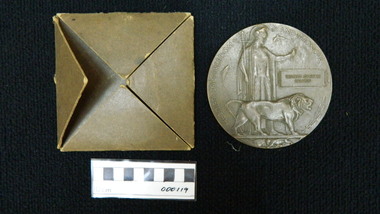
Memorial plaque
The WWI Death Plaque (Death Penny) was issued to the next of kin of servicemen/women who fell in the Great War 1914 -1918.The memorial plaque would be accompanied by a Memorial Scroll, a letter from Buckingham Palace and often a letter from the deceased's commanding officer. They would not usually arrive as a single package, but as a series of separate mailings. In this case we have the letter from Buckingham Palace. Wilfred (Wiff) Graham Salmon attended Ballarat College 1902 - 1910. He enlisted in 1915 and embarked as a driver with the 4th Field Artillery Brigade. He transferred to the Royal Flusing Corps in 1916. He was killed fighting raiders over the Thames Valley near London on 7 July 1917. 'Wiff' was reputedly the first person to die defending London from a foreign invader since the time of the Norman Conquest. His brother Robert Arthur Salmon was also an old collegian. Other possible family members who are old collegians include Nellie Florence Salmon (ent CPLC 1907; DB 1.8.1899), John Walter Salmon (ent BC 1898; DB 22.11.1889), Geoffrey Salmon (ent BC 1910; DB 3/11/1896). Wilfred's brother Robert (Bob) Salmon is mentioned in the school's 1964 history by Gordon Meins p.68..."Captain (then Lieut) Bob Salmon M.C. on one occasion worked for 7 nights straight in No Man's Land and is credited with rescuing nearly 300 of our wounded." Round disk cast in bronze gunmetal, which incorporates the following; an image of Britannia holding an oak spray with leaves and acorns, an imperial lion, two dolphins representing Britain's sea power, the emblem of Imperial Germany's eagle being torn to pieces by another lion. The medallion is incased in a heavy card envelope and is accompanied by a letter signed by King George Inscribed around face of medallion: He died for freedom and honour A rectangular tablet cast on front of medallion inscribed 'Wilfred Graham Salmon'.wiff-salmon, world-war-one, death-penny, king-george, war-memorabilia, ballarat-college, royal-flying-corps, 1912, wilfred-graham-salmon -
 Ballarat Clarendon College
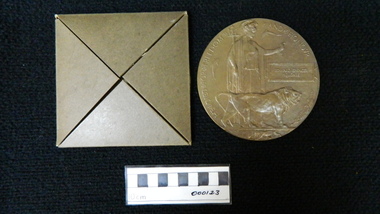
Memorial plaque
The WWI Death Plaque (Dead Man's Penny) was issued to the next of kin of servicemen/women who had fallen in the Great War between 1914 and 1918.Edward S Holgate entered Ballarat College in 1894. On leaving school he became on auctioneer with the family firm S Holgate & Son, Ballarat. Before enlistment he was secretary of the Ballarat College Old Collegians Society. 'Ted' was killed at Villers-Bretonneux on 27 April 1918 two dats after his commendation in military dispatches for 'gallantry in the field on 24-25 April 1918'. Edward's brother Harry Spencer Holgate also enlisted and was killed at Zonnebeke on 11 October 1917. Of the 305 Ballarat College old collegians who enlisted in WW1 65 gave their lives for their country. This 'death penny' is representative of the incredible sacrifice given by this huge percentage of the school's community. Round disk cast in bronze gunmetal, which incorporates the following; an image of Britannia holding an oak spray with leaves and acorns, an imperial lion, two dolphins representing Britain's sea power, the emblem of Imperial Germany's eagle being torn to pieces by another lion. The medallion is incased in a heavy card envelopeInscribed around face of medallion: He died for freedom and honour A rectangular tablet cast on front of medallion inscribed: Edward Spencer Holgate.edward-spencer-holgate, ballarat-college, world-war-one, death-penny, -
 Ballarat Clarendon College
Memorial plaque
The WWI Death Plaque (Dead Man's Penny) was issued to the next of kin of servicemen/women who had fallen in the Great War between 1914 and 1918.This plaque was given to honour the service of Ballarat College old collegian Harry Spencer Holgate who entered the school in 1894. On leaving school he became an auctioneer at Muswellbrook and Scone. He enlisted on 24 May 1916 and was awarded the Military Medal at Polygon Wood in September 1917. He was killed at Zonnebeke on 11 October 1917. His brother Edward Spencer Holgate was also killed while serving his country during World War 1. Of the 305 Ballarat College old collegians who enlisted in WW1 65 gave their lives for their country. This 'death penny' is representative of the incredible sacrifice given by this huge percentage of the school's community. Round disk cast in bronze gunmetal, which incorporates the following; an image of Britannia holding an oak spray with leaves and acorns, an imperial lion, two dolphins representing Britain's sea power, the emblem of Imperial Germany's eagle being torn to pieces by another lion. The medallion is packaged in a heavy card envelope.Inscribed around face of medallion: He died for freedom and honour. A rectangular tablet cast on front of medallion inscribed 'Harry Edward Spencer'. harry-spencer-holgate, ballarat-college, world-war-one, death-penny, -
 Ballarat Clarendon College
Memorial plaque
The WWI Death Plaque (Dead Man's Penny) was issued to the next of kin of servicemen/women who had fallen in the Great War between 1914 and 1918. John Mercer Walker entered ballarat College in 1902 and was Dux of the school in 1904. He enlisted as a Private in the 3rd Light Horse Field Ambulance and served on Gallipoli. He transferred to 21st Squadron AFC in November 1917 and served in Palestine. He was killed a 22 August 1918 and buried at the Ramleh War Cemetery. Of the 305 Ballarat College old collegians who enlisted in WW1 65 gave their lives for their country. This 'death penny' is representative of the incredible sacrifice given by this huge percentage of the school's community. Round disk cast in bronze gunmetal, which incorporates the following; an image of Britannia holding an oak spray with leaves and acorns, an imperial lion, two dolphins representing Britain's sea power, the emblem of Imperial Germany's eagle being torn to pieces by another lion. The medallion is incased in a heavy card envelope. The medallion is accompanied with Walker's wings RFC and RAAF,Inscribed around face of medallion: He died for freedom and honour A rectangular tablet cast on front of medallion inscribed: John Mercer Walkerjohn-mercer-walker, death-penny, ballarat-college, w-w-1, world-war-one, -
 Lara RSL Sub Branch
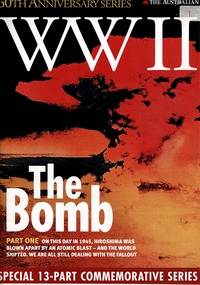
Magazine, WWII, 2005
Magazines depicting WWII Part 1 The Bomb Part 2 Battle of Britain Part 3 Pearl Harbour Part 4 Stalingrad Part 5 D-Day Part 6 Fall of Berlin Part 7 Australia's War Part 8 Home Front Part 9 Singapore and the POW's Part 10 El Alamein Part 11 Battle of Coral Sea Part 12 Kokoda and New Guinea Part 13 PeaceThe Magazine is made from paper and came in various colours and front pages.WWIIwwii, ww2, world war 2, atomic bomb, battle of britain, pearl harbour, stalingrad, d-day, fall of berlin, australia's war, home front, singapore, el alamein, battle of coral sea, kokoda, peace -
 Lara RSL Sub Branch
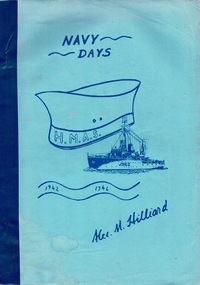
Navy Days Booklet
Navy Days makes no claim to be a great story. It is simply my story (Alec. M .Hilliard) recording nearly four years in the Australian navy during World War ll, and written primarily for my family, to whom, along with my ship mates, it is dedicated.These memoirs have three major sources. First: My home letters, which my mother kept. These provide the skeleton for the contents, hopefully preserving the personal and informal aspects of my story. Second: Covering my sea-time, the " Monthly Reports of Proceedings " from H.M.A.S. " Junee " to the Naval Board, as subsequently released. These contain the details of " where " , " when " and "" why", naturally absent from my correspondence for security reasons. Third: My memory, such as it is nearly sixty years after the events, offering other inclusions, I would wish to share.Rectangular shaped booklet, light blue in colour with a navy blue spine.NAVY DAYS Alec. M. Hilliardbooklet, ww2, navy days 1942-1946,alec.m.hilliard. -
 Lara RSL Sub Branch
Newspaper - The Sun Newspaper Dated 9/5/1942 - Special _ My Wr Part 25 - 10 Japanese Warships Sunk - Battle of The Coral Sea, Local Newspaper Dated 9/5/1942 - My War Part 25 - Battle Of The Coral Sea
... of The Coral Sea Local Newspaper reporting World War 2 Events - My War ...Local Newspaper reporting On World War 2 Events dated 9/5/1942 - My War Part 25Newspaper Reporting on World War 2 Events - My War Part 25 - dated 9/5/1942Local Newspaper reporting World War 2 Events - My War Part 25 - Battle Of The Coral Sea10 Japanese Warships Sunk - Battle of The Coral Seabattle of te coral sea - 10 japanese warships sunk - enter the general -
 Bendigo Military Museum
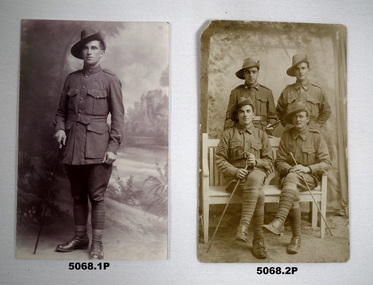
Photograph - PHOTOGRAPHS 38th BN, 1) post 2008, .2) 1916
.1) Norman Victor Harbourd No 908. Norman had pre war service. Enlisted 16.2.1916 in C Coy 38th Bn age 21 years, embarked for England 20.6.1916, hospital with Chill at sea, hospital 24.8.1916 with Measles then Influenza, embark for France 22.11.1916, made Cpl 14.12.1916, hospital 27.1.1917 with Gastro Enteritis, rejoin unit 4.2.1917, WIA 25.2.1917 GSW Face & Right Thigh, medically downgraded, RTA with Defective Vision, discharged from the AIF 9.2.1919 Medically unfit. .2) Sitting on left is Norman, rear right is Lachlan Wells Harbourd, the others unknown at this point. Lachlan Wells Harbourd No 909. Lachlan had pre War service. Enlisted 16.2.1916 in C Coy 38th Bn age 18 years 5 months, embark for England 20.6.1916, hospital at sea with Tonsilitis, embark for France 22.11.1916, hospital 23.11.16 with Mumps, rejoin unit 4.1.1917, WIA 7/9.6.1917 GSW Chest, rejoin unit 27.10.1917, made L/Cpl 17.8.1918, WIA 2nd occasion 24.8.1918 GSW Right Thigh, RTA 2.3.1919, discharged from the AIF 3.8.1919.Photos,1 sepia, 1 B & W, soldiers in uniform in studio background. .1) Soldier standing with Cpl stripes on arm holding a crop. .2) Four soldiers, two standing 2 sitting one with Cpl stripes, both sitting have crops..2) on rear, “With best love from your loving Bro’s Norman, Lachlan”photographs, 38th bn, c coy -
 Bendigo Military Museum
Photograph - PHOTOGRAPH 38th BN, C. 1999
Edward Thomas Code. Edward had 8 years pre war service in the 8th Bn and 18 months in the Naval Reserve. Enlisted in the AIF 15.3.1916 No 14 in HQ 38th BN age 33 years 3 months, he was a Stretcher Bearer/Bandsman, embark for England 20.6.1916, hospital at sea with Influenza, embark for France 22.11.1916, WIA 8.6.1917 Gas poisoning eyes, throat, chest, hospital 20.6.1918 with Influenza, medically down graded, RTA 11.12.1918 with Defective Vision, discharged from the AIF 30.3.1919 medically unfit.Photo B & W rectangular shape, soldier in uniform holding a musical instrument and feathers in slouch hat, studio back ground.photographs, 38th bn, -
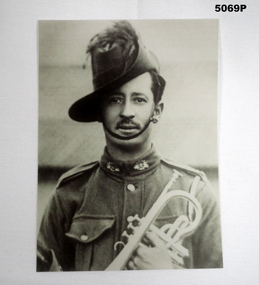
 Bendigo Military Museum
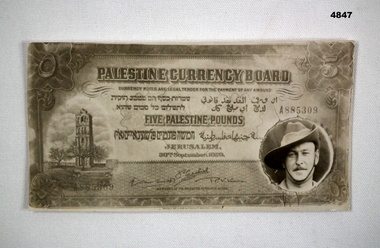
Postcard - POSTCARD, CURRENCY, C.1941 - 2
This was reasonably common thing to have a photo inset done by Soldiers. Photo inset re; Albert Edward Corrie, pre war he was a Postal employee. Enlisted 25.7.1940 Regt No VX47191 age 30 years, 27.7.1940 he was posted to 7th Div Postal Unit, embark for Eygpt 15.9.1940, hospital at sea 10.10.1940 with Otitis Media, on deck again 13.10.1940, During his time in the Middle East he had various Postal transfers including HQ AIF Postal, he rose through the ranks to W.O 2 by 18.2.1942, disembark Australia 7.8.1942, then two more overseas postings, NG 2.11.1942 - 9.2.1943, posted to 6th Div Postal Unit25.9.1943, NG 29.12.1944 - 7.8.1945, discharged from the 2nd AIF 5.9.1945. Total overseas service 1014 days.Post card “Palestine Currency Board” Five Palestine pounds A88509, in English and Arabic script, card has inset for a personal photo being Albert Corrie, dated 1029.On rear, “With best of love from Albert”palestine, currency, post cards -
 Bendigo Military Museum
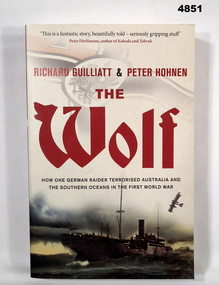
Book - BOOK, WW1 NAVAL HISTORY, GUILLIATT Richard & HOHNEN Peter, " THE WOLF', 2009
"THE WOLF' How one German raider terrorised Australia and the Southern Oceans in the First World War.Soft cover book. Soft cover - cardboard, red and black print on front, spine and back. Cover - colour illustrated - front - top German symbol, bottom, ship at sea. Back - sepia photograph - sailor and girl. 366 pages - cut, plain, off white paper. Illustrated black and white photographs and maps.Nilbook, ww1, naval operations -
 Bendigo Military Museum
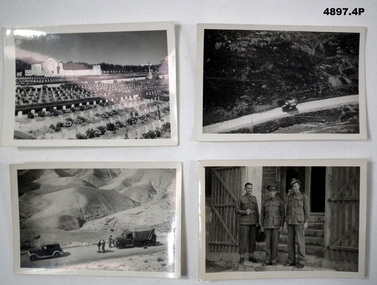
Photograph - PHOTOGRAPHS, 1939-45
Albert Edward Corrie VX47191, 6th Div Postal Unit.1. Black & White Photograph - Cemetery, Memorial, Headstones. 2. Black & White Photograph - Truck on Road 3. Black & White Photograph - Sand Hils, vehicles and 3 men on road, 4. Black & White Photograph - 3 uniformed soldiers.1. War Cemetery Jerusalem. 2. On the road to the Dead Sea. 3. Some of the hills on the road to the Dead Sea. 4. Hec McKinnon, CAPRT Cohen, Kirk White.photographs, ww2, postal unit