Showing 1238 items
matching world war two in australia
-
 Orbost & District Historical Society
identity discs
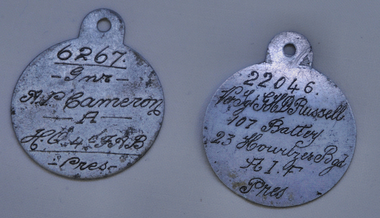
The identity discs of Australian soldiers of the First World War were initially made of aluminum and then made of a fibre material. Like other soldiers of the Great War the Australian 'Diggers' were issued an identity tag or disc. The first official disc was a small flat metal disc of aluminum, then there were two identity discs issued, made of a fibre one was a red disc the other was grey and octagonal. The discs were usually stamped with the information that the Military required. The Regimental number, Regimental name, soldiers' surname and initials and his religion were on the tag. Douglas Russell was a farmer, the son of John Russell, director of the Orbost Butter Factory for 50 years. Alex Pullar Cameron died from injuries in 1919.Two World War 1 identity tags. Both are aluminium and engraved on front. There are loops at the top for a chain around the neck..1 22046 Vet Sgt G.H D. Russell.........Pres. .2 6267 GNR A.P. Cameron................Presworld-war-1 identity-disc russell-g.h.d. cameron-a.p. -
 The Beechworth Burke Museum
Photograph
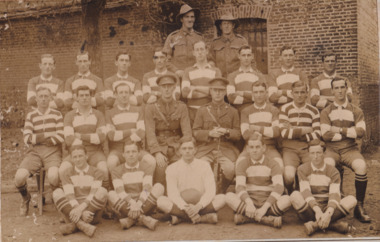
Taken some time between 1914-18, depicted is a large group of unidentified males. Four of them are dressed in Australian military uniforms. The remaining 19 men are dressed in striped uniforms. The male in the centre of the front row is cradling a football, suggesting that the group was part of a football or rugby league team. It is believed that the soldiers in this photograph were part of the Australian Imperial Force. This can be inferred by the chevron rank insignia visible on their uniforms. The placement of this insignia on the sleeve of the right arm suggests that this soldier was either a Warrant Officer or a Non-Commissioned Officer (NCO). Additionally, they are also wearing 'Rising Sun' collar badges on their coats. Australia, unlike most other Commonwealth countries, did not adopt metal regimental badges during the First World War. All units were issued with the Australian Army General Service Badge, better known as the 'Rising Sun’ badge. This insignia is almost always identified with the Australian Imperial Force. Sport has always been entwined with war. Both sport and war demand peak physical fitness, camaraderie, strategy, and allegiance to a team collaboratively working towards a common goal: to win. The connection between sport and war is especially strong in Australia since these two concepts form the basis of our national identity. The Australian War Memorial has a number of World War I recruitment posters linking war and sport in its collection. One of the posters produced in 1915 by the State Parliamentary Recruiting Committee in Victoria attempted to shame young men into enlisting by juxtaposing the image of an Australian soldier standing guard over his deceased mate with a photograph of a Victorian Football League match. Another poster, produced in 1917, features vignettes of different sports including cricket, bowling, boxing, kayaking and golf. Its slogan reads, "Join Together - Train Together - Embark Together - Fight Together: Enlist in the Sportman's 1000".The record is historically significant due to its connection to World War I. This conflict is integral to Australian culture as it was the single greatest loss of life and the greatest repatriation of casualties in the country's history. Australia’s involvement in the First World War began when the Australian government established the Australian Imperial Force (AIF) in August 1914. Immediately, men were recruited to serve the British Empire in the Middle East and on the Western Front. The record has strong research potential. This is due to the ongoing public and scholarly interest in war, history, and especially the ANZAC legend, which is commemorated annually on 25 April, known as ANZAC Day. Additionally, the record presents a unique opportunity to further explore the relationship between the arts, sport and war. This statement of significance has already established that war is integral to Australia's national identity - and sport is of equal importance. Specifically, the record begs to question how the peak physical fitness and camaraderie valued in team sports were creatively translated into military recruitment campaigns during World War I. Evidently, this record and its historic context demonstrates that there is potential here, and if further research is completed on this topic, it may provide insight into Australian military recruitment tactics used in the past and present, and into the future.Sepia rectangular photograph printed on matte photographic paper mounted on card.Reverse: 6529 / hyossest (?) / (?)1/11/1 /military album, army, military, war, wwi, world war i, sport, football, rugby, aif, australian imperial force -
 The Beechworth Burke Museum
Photograph
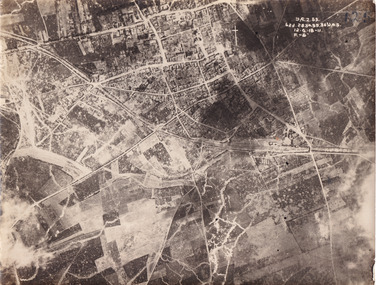
Taken some time between 1914-18, the photograph depicts an aerial view of Villers-Bretonneux in France, a region which was part of the Western Front during World War I. The image mostly shows rural landscape. The Western Front was the main theatre of war during World War I. Following the outbreak of war in August 1914, the German Army opened the Western Front by invading Luxembourg and Belgium, then gaining military control of important industrial regions in France. The German advance was halted with the Battle of the Marne. Following the Race to the Sea, both the French-British and German armies dug in along a meandering line of fortified trenches, stretching from the North Sea to the Swiss frontier with France. The First Battle of Villers-Bretonneux occurred between 30 March - 5 April 1918. It took place during Operation Michael, part of the German Spring Offensive on the Western Front. The offensive began against the British Fifth Army and the Third Army on the Somme, and pushed back the British and French reinforcements on the north side of the Somme. The capture of Villers-Bretonneux, close to Amiens, a strategically important road and rail-junction, would have brought the Germans within artillery-range. In late March, troops from the Australian Imperial Force were brought south from Belgium as reinforcements to help shore up the line. In early April, the Germans launched an attack to capture Villers-Bretonneux. After a determined defence by British and Australian troops, the attackers were close to success until a counter-attack by the 9th Australian Infantry Brigade and British troops late in the afternoon of 4 April restored the situation and halted the German advance on Amiens. The Second Battle of Villers-Bretonneux occurred between 24 - 27 April 1918, during the German Spring Offensive to the east of Amiens. It is notable for being the first occasion on which tanks fought against each other. A counter-attack by two Australian brigades and a British brigade during the night of 24 April partly surrounded Villers-Bretonneux, and on 25 April, the town was recaptured. On 26 April, the role of the Moroccan division of the French army was crucial in pushing back German units. Australian, British and French troops nearly restored the original front line by 27 April.The record is historically significant due to its connection to World War I. This conflict is integral to Australian culture as it was the single greatest loss of life and the greatest repatriation of casualties in the country's history. Australia’s involvement in the First World War began when the Australian government established the Australian Imperial Force (AIF) in August 1914. Immediately, men were recruited to serve the British Empire in the Middle East and on the Western Front. Additionally, the record's significance is enhanced by its depiction of Villers-Bretonneux. The battles that occurred in this town during World War I are especially historically significant to Australia as this is where the Australian Imperial Force had one their greatest World War I victories. An Australian flag still flies over Villers-Bretonneux in the present. Furthermore, a plaque outside the Villers-Bretonneux Town Hall recounts the battles fought to save the town in 1918. Kangaroos feature over the entrance to the Town Hall, and the main street is named Rue de Melbourne. More officially, recognition of the significance of the battle in Villers-Bretonneux is found at the Australian National Memorial, which was built just outside the town. It commemorates all Australians who fought in France and Belgium and includes the names of 10,772 who died in France and have no known grave. Each year, a small ceremony is held at the memorial to mark the sacrifice made by the soldiers. Lastly, the record has strong research potential. This is due to the ongoing public and scholarly interest in war, history, and especially the ANZAC legend, which is commemorated annually on 25 April, known as ANZAC Day.Sepia rectangular photograph printed on matte photographic paper.Obverse: yAE.2.35. / 125 / 62d.2834.35.36.VA.5. / 12.G.18-11 / F.-(?)" /military album, wwi, world war i, villers-bretonneux, australian imperial force, aif, france, war, army, conflict, germany, 1918, battle -
 The Beechworth Burke Museum
Newspaper - Photograph, c.1950
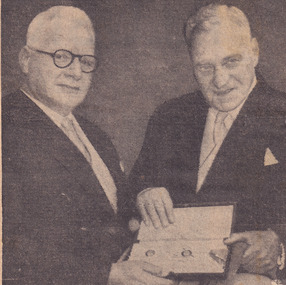
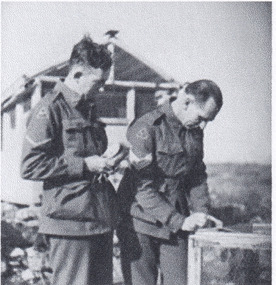
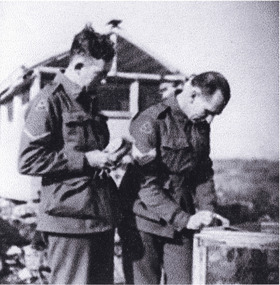
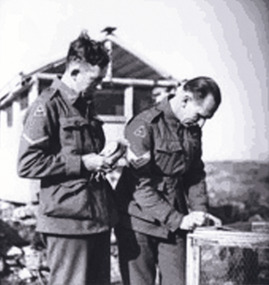
Taken in the 1950s, this picture is of two veterans of the First World War, Colonel Sir William Leggatt and Brigadier Sir Lionel Harris who fought together in France over 30 years prior. The two men were invested by the Queen at Buckingham palace as Knights, a prestigious honour for Australian soldiers, who for another 20 years would have no official recognition by the Australian government through the 'Order of Australia.' This image showcases the role of Australian service members who fought during the first world war being honoured by the British Government, personally meeting the Queen. Black and white photograph accompanied by text below taken from a NewspaperObverse: VICTORIA'S Agent-General, Colonel Sir William Leggatt (right) and his old / cobber's Brigadier Sir Lionel Harris, outside Buckingham Palace yesterday after hav- / ing received the accolade form the Queen. Thirty-two years ago as sergeant and private / they shared a trench in France. Yesterday as they waited to be knighted by the / Queen, Sir William said, "if anyone had told us then that we were ever going to / meet like this, we would have thought he was off his block. - Today's radiophoto / Reverse: 6539 (in pencil) / burke museum, beechworth, beechworth museum, world war one, military album, trenches, nighted, queen, buckingham palace, wwi, sir william leggatt, sir lionel harris -
 The Beechworth Burke Museum
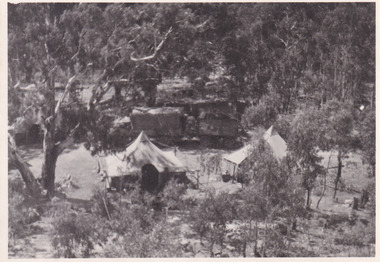
Photograph, 1944
Taken in 1944, depicted is an aerial view of an Australian military camp set up at Mt. Stanley in Victoria. There are two large tents along with a vehicle and trailer surrounded by bushland. A secret experimental micro-wave radio station was established and tested at this site by the Army Signal Detachment Unit during World War II. It was part of an experimental Ultra High Frequency (UHF) link between Melbourne and Sydney. At the time, it was highly classified. It intended to enquire into the hitherto unexplored transmission of micro-waves; that is, a radio signal which could only be transmitted by line of sight, and thus required hill-top to hill-top location.The photograph is historically significant as it pertains to World War II; the largest global conflict in history. This significance is enhanced by Australia's prominent involvement in campaigns across the Pacific, particularly on land in New Guinea and across the Huon Peninsula. It was also the first time that the Australian mainland came under direct attack by the Axis, with Japanese forces targeting north-west Australia and Sydney Harbour. These battles became Australia's largest and most complex offensives during the war. The record is also historically significant as it relates to the Royal Australian Corps of Signals, or "RA Sigs". This significance is strengthened by Australia's unique distinction of having the first established signal unit under the British Empire. This unit provides electronic warfare. They enable commanders to implement highly dynamic battle control against opposing forces by using a number of methods including radio, fibre optic, micro-wave, information systems and satellite links. The record has strong research potential. This is due to the ongoing scholarly and public interest in war, military history, the ANZAC legend, and the continuing existence of the RA Sigs. The historic context of this record can provide insight into Australia's history, military, technological innovation and advancements, as well as national economic, defence and foreign policies after 1945.Black and white rectangular photograph printed on matte photographic paper.Reverse: BMM5095.11 / Our camp / From the top. / (?) (?) /military album, army album, australian royal corps of signals, army signal detachment unit, mt. stanley, victoria, beechworth, wwii, world war ii, melbourne, sydney -
 The Beechworth Burke Museum
Photograph, 1944
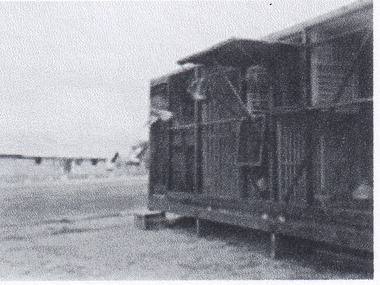
Taken in 1944 in Bonegilla, Victoria, this photograph depicts soldiers of the 1st Australian Corps Signals training battalion releasing carrier pigeons from a portable loft for their daily exercise.The 1st Australian Corps Signals was a branch of the Australian Imperial Airforce that was active during World War Two. One of the tasked carried out by 1st Australian Corps Signals was to send messages through the use of carrier pigeons. Carrier pigeons were most commonly used by the Allied Forces to send messages from the front line trenches or advancing units.Black and white square reproduced photograph on rectangular archival paperObverse: Negative Number: 066265/ thumbnail/ image 066265/ purchased from Australian War Memorial/ Bonegilla Victoria 1944*05-03 Carrier pigeons being released for their/ daily exercise from a portable loft of the 1st Signals training Battlion/ Reverse: 7993/military album, beechworth, burke museum, military, world war 2, ww2, australian army, bonegilla, pigeons -
 The Beechworth Burke Museum
Photograph, 1944
Taken in 1944 in Bonegilla, Victoria, this photograph depicts soldiers of the 1st Australian Corps Signals training battalion releasing carrier pigeons from a portable loft for their daily exercise.The 1st Australian Corps Signals was a branch of the Australian Imperial Airforce that was active during World War Two. One of the tasked carried out by 1st Australian Corps Signals was to send messages through the use of carrier pigeons. Carrier pigeons were most commonly used by the Allied Forces to send messages from the front line trenches or advancing units.Black and white square reproduced photograph on rectangular archival paperObverse: Bonegilla Victoria 1944 - 05 - 03 Carrier pigeons being released for their daily exercise/ from a portable loft of the 1st Signals training Battlion/ copied from the Australian War Memorial No 066265 Order No 2319835 Copyright/ permission for the collection of/ Robert O'Hara Burke Memorial Museum Beechworth/ Reverse: 7993.1military album, beechworth, burke museum, military, world war 2, ww2, australian army, bonegilla, pigeons -
 The Beechworth Burke Museum
Photograph, 03/05/1944
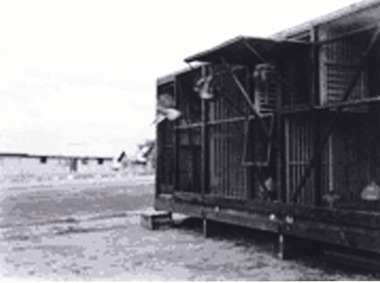
Taken in 1944 in Bonegilla, Victoria by Captain E.C. Johnston, this photograph depicts soldiers of the 1st Australian Corps Signals training battalion releasing carrier pigeons from a portable loft for their daily exercise.The 1st Australian Corps Signals was a branch of the Australian Imperial Airforce that was active during World War Two. One of the tasked carried out by 1st Australian Corps Signals was to send messages through the use of carrier pigeons. Carrier pigeons were most commonly used by the Allied Forces to send messages from the front line trenches or advancing units. Edgar Charles Johnston (1896-1988) was an aviator and public servant. In WW1 he served with the Australian Imperial Force, and later joined the Royal Flying Corps. For his service in the Royal Flying Corps he was awarded the Distinguished Flying Cross, which assisted him in becoming the assistant director-general in 1939 of the Commonwealth Department of Aviation. During World War II he was heavily engaged in the department’s activities in support of the war effort.Black and white square reproduced photograph on rectangular archival paperObverse: Bonegilla Victoria 1944-05-03/ Carrier Pigeons being released for their daily exercise/ from a portable loft of the 1st Signals training Battalion/ Photograph made 3 May 1944, by E.C. Johnston/ copied from CD Image supplied from/ Australian War Memorial collection/ Copyright/ Use of this image for the/ Robert O'Hara Burke Memorial Museum, Beechworth/ enhanced to remove moir effect/ Reverse: 7993.2/military album, beechworth, burke museum, military, world war 2, ww2, australian army, bonegilla, pigeons, edgar charles johnston -
 The Beechworth Burke Museum
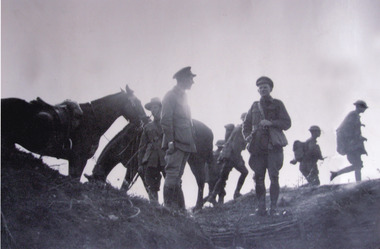
Photograph, 31/08/1918
Taken on the 31st of August ,1918, this photograph depicts Gunner Wilson, Lieutenant Driscoll, and Lieutenant Clark (facing camera) of the 12th Battery of Australian Field Artillery, choosing a site for new battery positions, as members of the 52nd Australian Battalion move past to a new sector north of the Somme, before Mont St Quentin.The Battle of Mont St Quentin commenced on the 31st of August 1918 and ended on the 3rd of September 1918. The battle saw Australian troops storm, seize and hold the key height of Mont St Quentin (overlooking Peronne), a pivotal German defensive position on the line of the Somme.Black and white rectangular reproduced photograph on matte photographic paperReverse: 5144/military album, beechworth, burke museum, ww2, world war two, france, somme, 12th battery of australian field artillery, 52nd australian battalion, military, mont st quentin -
 The Beechworth Burke Museum
Photograph, 1941
Taken in Syria in 1941, this photograph depicts Sergeant Theodore Arthur Horton, dressed in his military uniform, writing down a message to be sent by carrier pigeon. Standing next to Sergeant Horton is an unknown soldier, dressed in his military uniform, holding a carrier pigeon. Both man are standing in front of a large pigeon loft.The 1st Australian Corps Signals was a branch of the Australian Imperial Airforce that was active during World War Two. One of the tasked carried out by 1st Australian Corps Signals was to send messages through the use of carrier pigeons. Carrier pigeons were most commonly used by the Allied Forces to send messages from the front line trenches or advancing units.Black and white square reproduced photograph on rectangular archival paperObverse: Negative Number: 022213/ purchased from Australian War Memorial/ thumbnail 022213/ Syria 1941-12 Sergeant T A Horton of 1st Australian Corps Signals/ writing a message to be sent by carrier pigeon/ Reverse: 7992/ military album, beechworth, burke museum, military, world war 2, ww2, australian army, sergeant horton, theodore arthur horton -
 The Beechworth Burke Museum
Photograph, 1941
Taken in Syria in 1941, this photograph depicts Sergeant Theodore Arthur Horton, dressed in his military uniform, writing down a message to be sent by carrier pigeon. Standing next to Sergeant Horton is an unknown soldier, dressed in his military uniform, holding a carrier pigeon. Both man are standing in front of a large pigeon loft. The 1st Australian Corps Signals was a branch of the Australian Imperial Airforce that was active during World War Two. One of the tasked carried out by 1st Australian Corps Signals was to send messages through the use of carrier pigeons. Carrier pigeons were most commonly used by the Allied Forces to send messages from the front line trenches or advancing units. Black and white square reproduced photograph on rectangular archival paperObverse: Syria 1941-12 Sergeant T A Horton of 1st Australian Corps Signals writing a message/ to be sent by carrier pigeon/ copied from the Australian War Memorial No 2319835 Copyright Neg No 022213/ permission for the collection of/ Robert O;Hara Burke Memorial Museum Beechworth/ Reverse: 7992.1/ archival paper/military album, beechworth, burke museum, military, world war 2, ww2, australian army, sergeant horton, theodore arthur horton -
 The Beechworth Burke Museum
Photograph, 1941
Taken in Syria in 1941, this photograph depicts Sergeant Theodore Arthur Horton, dressed in his military uniform, writing down a message to be sent by carrier pigeon. Standing next to Sergeant Horton is an unknown soldier, dressed in his military uniform, holding a carrier pigeon. Both man are standing in front of a large pigeon loft.The 1st Australian Corps Signals was a branch of the Australian Imperial Airforce that was active during World War Two. One of the tasked carried out by 1st Australian Corps Signals was to send messages through the use of carrier pigeons. Carrier pigeons were most commonly used by the Allied Forces to send messages from the front line trenches or advancing units.Black and white square reproduced photograph on rectangular archival paperObverse: Syria 1941-12/ Sergeant T A Horton of 1st Australian Corps Signals/ writing a message to be sent by carrier pigeon/ copied from CD Image supplied from/ Australian War Memorial collection/ Copyright/ Use of this image only for the/ Robert O'Hara Burke Memorial Museum, Beechworth/ enhanced to remove moir effect/ Reverse: 7992.3/ archival paper/military album, beechworth, burke museum, military, world war 2, ww2, australian army, sergeant horton, theodore arthur horton -
 The Beechworth Burke Museum
Postcard
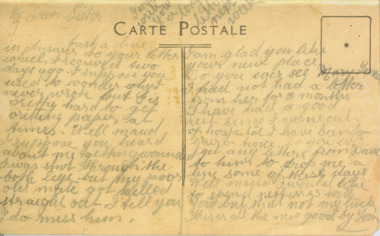
Depicted is a handwritten note written by Thomas "Tom" Lacey. It is addressed to his sister, Maude. This letter accompanies a portrait of Tom dressed in an Australian army uniform (record number 3417.1). Tom was a resident of Beechworth, and was only nineteen years old when he fought in World War I.The record is historically significant due to its connection to World War I. This conflict is integral to Australian culture as it was the single greatest loss of life and the greatest repatriation of casualties in the country's history. Australia’s involvement in the First World War began when Britain and Germany went to war on 4 August 1914. The first significant Australian action of the war was the Australian Naval and Military Expeditionary Force’s (ANMEF) landing on Rabaul on 11 September 1914. The ANMEF took possession of German New Guinea at Toma on 17 September 1914 and of the neighbouring islands of the Bismarck Archipelago in October 1914. On 9 November 1914, the Royal Australian Navy made a major contribution when HMAS Sydney destroyed the German raider SMS Emden. On 25 April 1915, members of the Australian Imperial Force (AIF) landed on Gallipoli in Turkey with troops from New Zealand, Britain, and France. This began a campaign that ended with an evacuation of allied troops beginning in December 1915. The next year, Australian forces fought campaigns on the Western Front and in the Middle East. The record has strong research potential. This is due to the ongoing public and scholarly interest in war, history, and especially the ANZAC legend, which is commemorated annually on 25 April, known as ANZAC Day.Sepia rectangular postcard printed on paper.Obverse: My Dear Sister / I will / write / you / a long / letter / next / week / CARTE POSTALE / Just a line / in (?) to your letter / which I received two / days ago. I suppose you / used to wonder why I / never wrote but it is / pretty hard to get / writting paper at / (?). Well maud / I suppose you heard / about me getting around / I was shot through the / both legs but my poor / old mate got killed / straight out. I tell you / I do miss him. / I am glad you like / your new place. / Do you ever see Mary Y(?) / I had not had a letter / from her for 3 months / I have had a good / rest since I came out / of hospital I have been to / Cairo twice. Do you ever / get any letters from Dave / (?) him to drop me a / line some of these days / Well Maud I would like / to spend next XMAS with / you but that not my luck / this is all the new good by Tom /military album, beechworth, tom lacey, army, world war i, wwi, letter, thomas lacey -
 The Beechworth Burke Museum
Postcard
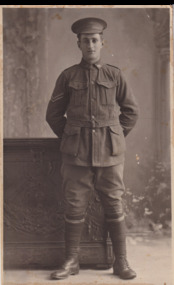
Taken on an unknown date, depicted is a full-length portrait of a young, unidentified male soldier. He is dressed in an Australian military uniform. It is believed that this soldier was part of The Australian Imperial Force during World War I. This can be inferred by the chevron rank insignia visible on the uniform. The placement of this insignia on the sleeve of the right arm suggests that this soldier was either a Warrant Officer or a Non-Commissioned Officer (NCO). Specifically, the number of chevron stripes - here, there are two - are believed to signify a Corporal rank. The man in this photograph is also wearing a 'Rising Sun' collar badge on his coat. Australia, unlike most other Commonwealth countries, did not adopt metal regimental badges during the First World War. All units were issued with the Australian Army General Service Badge, better known as the 'Rising Sun’ badge. This insignia is almost always identified with the Australian Imperial Force.The record is historically significant due to its connection to World War I. This conflict is integral to Australian culture as it was the single greatest loss of life and the greatest repatriation of casualties in the country's history. Australia’s involvement in the First World War began when the Australian government established the Australian Imperial Force (AIF) in August 1914. Immediately, men were recruited to serve the British Empire in the Middle East and on the Western Front. The first significant Australian action of the war was the Australian Naval and Military Expeditionary Force’s (ANMEF) landing on Rabaul on 11 September 1914. The ANMEF took possession of German New Guinea at Toma on 17 September 1914 and of the neighbouring islands of the Bismarck Archipelago in October 1914. On 25 April 1915, members of the AIF landed on Gallipoli in Turkey with troops from New Zealand, Britain, and France. This specific event holds very strong significance within Australian history. The record has strong research potential. This is due to the ongoing public and scholarly interest in war, history, and especially the ANZAC legend, which is commemorated annually on 25 April, known as ANZAC Day.Black and white rectangular postcard printed on card.Reverse: Mendelssohn & Co., / Swanston St., Melbourne / POST CARD / KODAK / CORRESPONDENCE / ADDRESS ONLY / AUSTRAL / AUSTRAL / KODAK / BMM 2640.3 /military album, world war i, wwi, corporal, portrait, soldier, australian imperial force, aif, postcard, uniform -
 The Beechworth Burke Museum
Postcard
Taken on an unknown date, depicted is a portrait of a young, unidentified male soldier. He is dressed in an Australian military uniform. It is believed that this soldier was part of The Australian Imperial Force during World War I. This can be inferred by the chevron rank insignia visible on the uniform. The placement of this insignia on the sleeve of the right arm suggests that this soldier was either a Warrant Officer or a Non-Commissioned Officer (NCO). Specifically, the number of chevron stripes - here, there are two - are believed to signify a Corporal rank. The man in this photograph is also wearing a 'Rising Sun' collar badge on his coat. Australia, unlike most other Commonwealth countries, did not adopt metal regimental badges during the First World War. All units were issued with the Australian Army General Service Badge, better known as the 'Rising Sun’ badge. This insignia is almost always identified with the Australian Imperial Force.The record is historically significant due to its connection to World War I. This conflict is integral to Australian culture as it was the single greatest loss of life and the greatest repatriation of casualties in the country's history. Australia’s involvement in the First World War began when the Australian government established the Australian Imperial Force (AIF) in August 1914. Immediately, men were recruited to serve the British Empire in the Middle East and on the Western Front. The first significant Australian action of the war was the Australian Naval and Military Expeditionary Force’s (ANMEF) landing on Rabaul on 11 September 1914. The ANMEF took possession of German New Guinea at Toma on 17 September 1914 and of the neighbouring islands of the Bismarck Archipelago in October 1914. On 25 April 1915, members of the AIF landed on Gallipoli in Turkey with troops from New Zealand, Britain, and France. This specific event holds very strong significance within Australian history. The record has strong research potential. This is due to the ongoing public and scholarly interest in war, history, and especially the ANZAC legend, which is commemorated annually on 25 April, known as ANZAC Day.Sepia rectangular postcard printed on card.Reverse: BMM 2640.4 / P RD / Write here for Inland Postage on /military album, aif, australian imperial force, corporal, war, wwi, world war i, rising sun, badge, uniform, military -
 Mission to Seafarers Victoria
Badge, Wallace Bishop, MN Australia, circa 1940
WW2 Merchant Navy Australia, issued by the Commonwealth Government 1940 MN War Service officially-numbered silver lapel badge. A company called Bishop also manufactured badges in Melbourne .Intended as a form of service badge for Australian Merchant Seafarers especially those perhaps serving on the newly armed civilian craft. The term Merchant Navy was coined by King George V in 1919, as recognition of the sacrifice made by merchant seafarers during the First World War.WW2 Merchant Navy war service solid (silver) badge. Initials ‘MN’ enclosed by oval rope motif with crown above. The word ‘Australia’ (UC) displayed beneath. Retains original two-loop lapel fixtures. Officially-numbered 10910 on the back. Inscribed "issued by the Commonwealth Government 1940". "Wallace-Bishop Brisbane".ww2, merchant navy, commonwealth government 1940, badge, war service, australia, mn -
 Supreme Court of Victoria Library
Portrait, Sir Edmund Herring, 1964
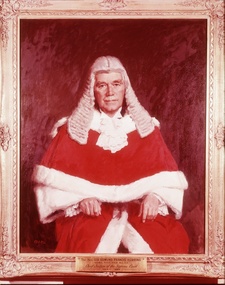
The portrait of Chief Justice Sir Edmund Herring is significant because of whom it portrays and who painted it. Sir Edmund Herring (1892-1982), had a military career before becoming the Chief Justice of Victoria in 1944. Sir Edmund served as an artillery officer with the British Army in World War One and was awarded the Military Cross. While he returned to the Law between the wars, becoming Kings Counsel in 1936, he continued his military associations through the Australian Militia forces rising to colonel by the start of the Second World War. At the outset of World War Two Herring was appointed as Commander of the Royal Artillery for the Australian Sixth Division. Herring saw service in North Africa and Greece and was in charge of Australian Northern forces in 1942, afterwards working with General Blamey in Papua New Guinea. It was at this time that Herring confirmed the death sentences of 22 Papuans who had been found guilty of murder and treason. Sir Edmund was appointed Chief Justice, straight from his army command in 1944. As Chief Justice he quickly established the Law Reform Committee and after the war oversaw the extension of the Supreme Court buildings, with the creation of new Courts. He was considered an able administrator, but his refusal to appoint Joan Rosanove a Queen’s Counsel throughout the 1950s, did not sit well with many legal practitioners. After his retirement from the Bench, he continued in his many public activities, including trustee of the Shrine of Remembrance and the Australian War Memorial and a member of the Melbourne Grammar School Council, as well as Lieutenant Governor of the State of Victoria a position he held from 1945 to 1972. Herring was also an outspoken social critic, between the wars he had been a member of the White Guard, who were a far right group acting against communism. During the Cold War period of the 1950s, Herring spoke out in favour of the British Empire and the American alliance. The portrait of Chief Justice Sir Edmund Herring is significant because of whom it portrays and who painted it. The portrait of Sir Edmund Herring is the second one that Sir William Dargie (1912-2003), completed of Sir Edmund, his first effort in 1944/45 won the Archibald prize. Dargie won the Archibald prize a record eight times.Portrait in oils of Sir Edmund Herring, Chief Justice of the Supreme Court of Victoria (1944-1964). Sir Edmund is seated, this is a half portrait, dressed in his red judicial robes. The sitter takes up most of the frame and there is very little extra information in the picture. signed lower left "Dargie'. Plaque with the following details : Sir Edmund Francis Herring, KCMG, KBE, DSO, MC, ED. Chief Justice of the Supreme Court, 1944-1964.judges, herring -
 Rye RSL Sub Branch
Cork helmet wolesley, Embelton & Co. Melbourne Australia, Twentieth Century
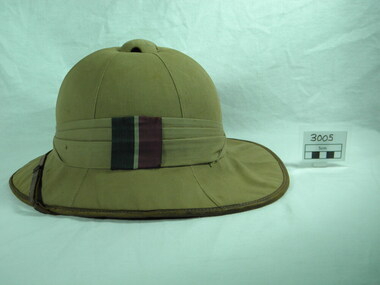
This type of head dress was very commonly worn by British Commonwealth Forces in the Sub Continent and other tropical areas. This particular example would have been a common sight in Northern Australia during the time frame, as well as Africa, Middle East and the Pacific. It is a light weight ventilated helmet offering good air circulation via the vent in the top of the crown, and shade to the back of the neck. As well as protection by the peaked front for the eyes reducing glare, preventing sun and heat stroke. It also created an image of gentlemanly dress and pride in appearance. It conformed to an ideal and was considered quite fashionable and a little dashing, often worn at a jaunty angle, creating a rakish air, far from today's simplistic view of pure functionality and at as low as possible cost. Whether worn with a tropical uniform with jacket and trousers, or open necked shirt and shorts, the wearer was easily identifiable as British or one of the Commonwealth countries.WW2 RAAF Wolsley cork helmet. Helmet Khaki cotton six (6) panel outer, with three (3) fold pugaree. Colour patch on left side approximately 6cm X 5.5cm, Dark blue,2.5cm, Light blue, 0.5cm and Maroon 2.5cm. Tan leather trim around brim, tan leather chin strap. Traditional pith helmet four (4) hole domed type vent on top of crown. Beige leather sweat band pierced around the top and with a cotton cord adjustment threaded around. Fixed to shell in four points diagonally. Interior is also covered in Khaki cotton. Hand written in brown ink. A1917 F/Lt C KERR GRANTworld war two, head dress, helmet, pith, cork, cloth covered, leather trimmed, royal australian air force, officer, flight lieutenant, khaki, pith helmet, air force, tropical, hat -
 Flagstaff Hill Maritime Museum and Village
Gun Emplacement, 1890's
The Warrnambool Battery on Flagstaff Hill has embankments for 3 guns. Those on the left and right still have cannon in place but in the centre is an empty embankment, apart from this concrete ring with metal threaded studs. In 1898 a 5 inch breech loading gun (BL) was installed here. The gun had a hydro-pneumatic disappearing carriage (hence the sign on the concrete wall "5" BL HP").. This type of gun was faster to load and fire that the 80 pound RML’s installed on either side of it. Its arrival spelt the end of the 80 pound RML guns’ useful life, although they continued to be used for practice sessions. The 5 inch BL was the main defensive weapon of the Warrnambool Battery until the Battery was downgraded in importance. It was removed in 1904 and recalled to Melbourne in 1910. The gun emplacement ring is all that remains of the mounting for a 5 inch Armstrong rifled breech loading gun. HISTOR of the WARRNAMBOOL GUNS & CANNON In the years following the Crimean War (1854-1857J) there was a great concern in the Colony that Imperial Russia would attempt an invasion. Coastal defences in the colony of Victoria were greatly strengthened by the Government as a result. Warrnambool was originally protected by cannons at Cannon Hill, approximately 1 kilometer west of the Flagstaff Hill Fortifications. The cannons included two 1866 guns, both 80 Pound Rifled Muzzle Loaders (RML) purchased by Victoria’s Colonial Government. They were part of a shipment of 26 such guns sent from England in December 1866. They are registered as No. 23 (80cwt-2qr-0lbs) - Gun 1, and No.13 (81cwt-1qr-12lbs) - Gun 2. They were cast at the Royal Gun Factory, Woolwich Arsenal, in 1866 and have a 6.3 inch bore. Both barrels carry the Royal Cypher of Queen Victoria, Insignia of the Royal Engineers, within the Garter and Motto surmounted by the Crown, with the Royal Cypher of Queen Victoria within the Garter (letters in centre “VR”, motto “HONI SOIT QUI MAL Y PENSE”, "Shame be to him who thinks evil of it."). The guns were originally supplied with wooden carriages. (The Royal Arsenal at Woolwich, England, was established eleven years after the Restoration of King Charles II. It was the principal supplier of armaments to the British and Empire Governments. At the height of its operations during World War One the factory covered 1300 acres and employed very nearly 80,000 workers. Woolwich was the Headquarters of the Royal Artillery since the raising of that Regiment in 1716. The Arsenal was closed in the late 1960’s.) These two 80pdr cannons were transferred to the Warrnambool Garrison Artillery Battery Fortifications erected at Flagstaff Hill in 1887 as part of Victoria’s Coastal Defences. The original wooden carriages were subsequently replaced with the present iron garrison carriages in 1888. They are a “C” pivot. The ‘racers’ or curved track set into the floor of the gun emplacement (which enabled the guns to be traversed more quickly) are as specified for guns up to 10 inch, being of wrought iron 2.78 inches wide. A temporary third gun, now no longer on Flagstaff Hill’s site, was the 5 inch Rifled Breech Loading (BL) Armstrong gun mounted on an Elswick hydro pneumatic disappearing carriage and installed in this very concrete base or pad. The State of Victoria took over the ownership of the guns at the time of Australian Federation in 1901. In about 1901/1902 the Garrison Battery was converted to the Warrnambool Battery of the Australian Field Artillery (No 4 Field Battery). It was equipped with 4.7 inch naval guns mounted on field carriages. They were now a mobile unit but continued to use the Warrnambool Garrison area at Flagstaff Hill for practice. When the Fortifications were declared obsolete the two 80 Pounder RML were relocated to Cannon Hill in 1910. On the outbreak of World War One the 4.7 inch guns were recalled to Melbourne, and the Battery was disbanded. Most of the personnel probably re-enlisted in the local 4th Australian Light Horse Regiment. The two 80 Pounder RML were moved back to the Fortifications in 1973. They were both fully restored by Army First Year Apprentices at the Ordinance Factory in Bendigo in time for the centenary year of the fortifications in 1987. The guns are capable of firing 80 pound (32.3kg) armour piercing exploding shells 3.65kms out to sea. They were originally manned by volunteers before a paid Garrison was established. Now the Guns are again fired by volunteers on Special Event days. Since restoration the Gun Number 1 had been fired on a regular basis but Gun Number 2 hadn’t been fired since the mid 1990’s. In April 2015 Gun Number 2 was serviced in preparation for the firing of both cannons on the ANZAC Centenary commemorations on April 25th 2015. Other guns from the original Cannon Hill location were obsolete by the time the 1887 Warrnambool Garrison Artillery Battery was built. These guns are (1) a 32 Pounder Muzzle Loading Smooth Bore (SB) cast in 1813 at the famous Carron Foundry, number 80837 and now located in the Warrnambool Botanic Gardens. It is now mounted on a replica carriage due to the original carriage being in a fragile condition (the original carriage stored under cover at Flagstaff Hill). (2) a 68 Pounder Muzzle Loading Smooth Bore cast in 1861 at the equally august Low Moor Foundry, number 10310 and now located on the lawn area at the entrance to Flagstaff Hill Maritime Village. It is still mounted on its original wooden garrison carriage. Its wooden slide compressor mechanism is fragile and now kept in Flagstaff Hill’s storage. There are only seven 32 Pounder SB made by Carron and fifteen 68 Pounder SB made at Low Moor known to exist in the State of Victoria [references; Flagstaff Hill Maritime Village interpretation boards, information sheets and other documents; South Western Victoria Guns and Cannon report, May 2008, ref W/F/08] The Gun embankment is contained within the heritage listed Lady Bay Lighthouse Comples, on the Victorian Heritage Register VHR H1520. The gun emplacement base is evidence of the last defences installed on this stretch of coastline. The Warrnambool Garrison has been added to the Victorian Heritage Register H1250 “for its intact battery and guns, a strong reminder of Victoria’s wealth and determination to protect itself from the perceived threat of invasion in the 1880’s.” The City of Warrnambool is one of several custodians of a collection of artillery pieces of heritage significance at a state, national and international level. These pieces are directly related to the defence of south-west Victoria in the 19th century. The care and preservation come under the Heritage Act 1995. Gun emplacement; the remains of the mounting platform of a temporary third gun installed in 1898 in the centre of the battery. This consists of a circular concrete well or sump surrounded by two rings of mounting bolts, the inner of 10 and the outer of 20. The base once held a 5 inch Armstrong rifled breech loading gun with hydro-pneumatic disappearing. In the centre of the ring on the ground is a keyhole shaped space. The gun was removed in 1904. flagstaff hill, warrnambool, shipwrecked coast, flagstaff hill maritime museum, maritime museum, shipwreck coast, flagstaff hill maritime village, great ocean road, colonial defences, victoria’s coastal defences, warrnambool fortification, warrnambool garrison battery, warrnambool volunteer corps, ordinance, armaments, cannon hill fortifications, flagstaff hill fortifications, 4th australian light horse regiment, garrison gun, 5 inch breech loading gun, emplacement for hydro-pneumatic disappearing carriage, gun emplacement -
 Flagstaff Hill Maritime Museum and Village
Weapon - Cannon, 1813
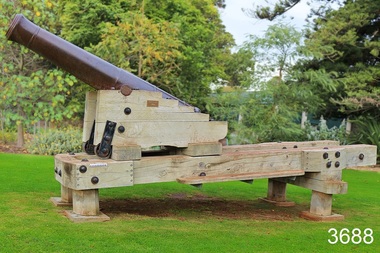
This 1813 cannon is classified as a carronade, having been made by the Carron Ironworks foundry in Stirling, Scotland in 1813. It is a large calibre, short range, gun mainly used on ships. The carronade model of cannon was first used when introduced into the British Royal Navy in the American War of the Revolution (1775-1883). This cannon was originally a 28pdr, 48cwt, 8ft gun. The date ‘1837’ on the barrel probably indicates the date that the Board of Ordinance accepted the change in size to a 32pdr. It may originally have been a naval gun and the conversion undertaken when it was brought ashore. It is very probably one of the 15 guns that are known to have constituted the defences of Victoria in 1860. This group of 32pdrs was the shorter model of the 4800width and 8ft length cannon and as such are different from the 32pdrs found in NSW. It was originally located on Cannon Hill in Warrnambool when it was the site of the Warrnambool Battery Western Artillery, formed in 1866. It was obsolete by the time of the 1887 fortifications, and was moved from the Warrnambool Fortifications to the Botanic Gardens in 1910, when the Fortifications were declared obsolete. HISTORIC INFORMATION ABOUT THE CANNON IN THE WARRNAMBOOL AREA In the years following the Crimean War (1854-1857J) there was a great concern in the Colony that Imperial Russia would attempt an invasion. Coastal defences in the colony of Victoria were greatly strengthened by the Government as a result. Warrnambool was originally protected by cannons at Cannon Hill, approximately 1 kilometer west of the Flagstaff Hill Fortifications. The cannons included two 1866 guns, both 80 Pound Rifled Muzzle Loaders (RML) purchased by Victoria’s Colonial Government. They were part of a shipment of 26 such guns sent from England in December 1866. They are registered as No. 23 (80cwt-2qr-0lbs) - Gun 1, and No.13 (81cwt-1qr-12lbs) - Gun 2. They were cast at the Royal Gun Factory, Woolwich Arsenal, in 1866 and have a 6.3 inch bore. Both barrels carry the Royal Cypher of Queen Victoria, Insignia of the Royal Engineers, within the Garter and Motto surmounted by the Crown, with the Royal Cypher of Queen Victoria within the Garter (letters in centre “VR”, motto “HONI SOIT QUI MAL Y PENSE”, "Shame be to him who thinks evil of it."). The guns were originally supplied with wooden carriages. (The Royal Arsenal at Woolwich, England, was established eleven years after the Restoration of King Charles II. It was the principal supplier of armaments to the British and Empire Governments. At the height of its operations during World War One the factory covered 1300 acres and employed very nearly 80,000 workers. Woolwich was the Headquarters of the Royal Artillery since the raising of that Regiment in 1716. The Arsenal was closed in the late 1960’s.) The two 80pdr cannons were transferred to the Warrnambool Garrison Artillery Battery Fortifications erected at Flagstaff Hill in 1887 as part of Victoria’s Coastal Defences. The original wooden carriages were subsequently replaced with the present iron garrison carriages in 1888. They are a “C” pivot. The ‘racers’ or curved track set into the floor of the gun emplacement (which enabled the guns to be traversed more quickly) are as specified for guns up to 10 inch, being of wrought iron 2.78 inches wide. A temporary third gun, now no longer on Flagstaff Hill’s site, was a 5 inch Rifled Breech Loading (BL) Armstrong gun mounted on an Elswick hydro pneumatic disappearing carriage It was faster to load and fire than the 80 pound RMLs and its arrival spelt the end of the older 80 pound guns’ useful life, apart from being used for practice sessions. The 5 inch BL gun was the main defensive weapon of the Warrnambool Battery until the Battery was downgraded in importance and the gun was recalled to Melbourne in 1910. The gun emplacement still remains in place set between the 2 80pdr cannon. The State of Victoria took over the ownership of the guns at the time of Australian Federation in 1901. In about 1901/1902 the Garrison Battery was converted to the Warrnambool Battery of the Australian Field Artillery (No 4 Field Battery). It was equipped with 4.7 inch naval guns mounted on field carriages. They were now a mobile unit but continued to use the Warrnambool Garrison area at Flagstaff Hill for practice. When the Fortifications were declared obsolete the two 80 Pounder RML were relocated to Cannon Hill in 1910. On the outbreak of World War 1 the 4.7 inch guns were recalled to Melbourne, and the Battery was disbanded. Most of the personnel probably re-enlisted in the local 4th Australian Light Horse Regiment. The two 80 Pounder RML were moved back to the Fortifications in 1973. They were both fully restored by Army First Year Apprentices at the Ordinance Factory in Bendigo in time for the centenary year of the fortifications in 1987. The guns are capable of firing 80 pound (32.3kg) armour piercing exploding shells 3.65kms out to sea. They were original manned by volunteers before a paid Garrison was established. Now the Guns are again fired by volunteers on Special Event days. Since restoration the Gun Number 1 had been fired on a regular basis but Gun Number 2 hadn’t been fired since the mid 1990’s. In April 2015 Gun Number 2 was serviced in preparation for the firing of both cannons on the ANZAC Centenary commemorations on April 25th 2015. Other guns from the original Cannon Hill location were obsolete by the time the 1887 Warrnambool Garrison Artillery Battery was built. These guns are (1) a 32 Pounder Muzzle Loading Smooth Bore (SB) cast in 1813 at the famous Carron Foundry, number 80837 and now located in the Warrnambool Botanic Gardens. It is now mounted on a replica carriage due to the original carriage being in a fragile condition (the original carriage stored under cover at Flagstaff Hill). (2) a 68 Pounder Muzzle Loading Smooth Bore cast in 1861 at the equally august Low Moor Foundry, number 10310 and now located on the lawn area at the entrance to Flagstaff Hill Maritime Village. It is still mounted on its original wooden garrison carriage. Its wooden slide compressor mechanism is fragile and now kept in Flagstaff Hill’s storage. There are only seven 32 Pounder SB made by Carron and fifteen 68 Pounder SB made at Low Moor known to exist in the State of Victoria Plaque attached to the carriage “This replica carriage was constructed by the Warrnambool Tritan Woodworkers club in conjunction with the generosity of local businesses and the Warrnambool community. The original carriage (circa 1860) was removed for restoration and is now located at Flagstaff Hill Maritime Village. The timber used for the replica carriage is Monterey Cypress, which was an early planting in the gardens. 2010 marked the centenary of the cannon’s relocation in the Warrnambool Botanic Gardens.” (Reference; Victorian Guns and Cannons, South Western Victoria Assessment, May 2008, item W/B/01; Flagstaff Hill Maritime Village datasheets and archives). There are only seven 32 Pounder SB made by Carron known to exist in the State of Victoria and this is one of them. On a world level, this cannon represents a high level of rarity. Further, as it has been modified (bored up) it is representative of the historical process of amending artillery in order to ensure a longer usefulness of each piece despite rapidly advancing artillery technology. The number of surviving carriages with traversing slides in this group in South Western Victoria is unique in Australia and probably in the World. Out of 10 such platforms surviving in Australia, the South Western Victorian group has half. Several survive around the world but probably not in such a large group. The wooden sliding compressor mechanism belonging to this cannon is extremely rare, and the only one in this South Western Victorian group of Guns and Cannons. As a whole, this cannon has undergone very little restoration or modification, giving it a high level of integrity. The City of Warrnambool is one of several custodians of a collection of artillery pieces of heritage significance at a state, national and international level. These pieces are directly related to the defence of south-west Victoria in the 19th century. The care and preservation come under the Heritage Act 1995. (Reference; Victorian Guns and Cannons, South Western Victoria Assessment, May 2008).Cannon, or carronade, 32pdr with wheels. Muzzle loading smooth bore (SB) cannon. Cannon has original wooden Burmese Teak carriage and slide with wrought iron fittings and iron wheels. Manufactured by Carron in Scotland, in 1813. It has been converted from a 28pdr. There is a loop for a rope on the cascabel, which was part of the original casting. Re-bored in 1837. Marks include Serial Number, Royal Cypher of King George III, broad arrow of proofing, and numbers to represent the weight. NOTE: The cannon is displayed in the Warrnambool Botanic Gardens and is mounted on a replica wooden carriage; the original wooden carriage is now stored under cover at Flagstaff Hill Maritime Village. This carriage has 4 wheels on swivel attachments and a central gear that allows the wheels to turn on rails. Pressed into left trunnion “80837 / CARRON / 1813”, cast on barrel“symbol (Royal Cypher of King George III”, “symbol (broad arrow of proofing)” and numbers “45-3-24 / 1837” . Cascable “CV” and marks with gradations from nought to three in quarters on each side, On the carriage the end of one of the main slide members carries the mark “W symbol (broad arrow) D” incised into the timber. Plaque attached to the carriage by the Warrnambool Tritan Woodworkers club, 2010, marking the centenary of the cannon’s relocation in the Warrnambool Botanic Gardens and the addition of the replica carriage. flagstaff hill, warrnambool, shipwrecked coast, flagstaff hill maritime museum, maritime museum, shipwreck coast, flagstaff hill maritime village, great ocean road, victoria’s coastal defences, warrnambool fortification, warrnambool garrison battery, ordinance, armaments, cannon hill fortifications, victorian colonial government, carron ironwroks foundary, 32pdr smooth bore cannon, 28pdr smooth bore cannon, 1813 cannon, carronade -
 Flagstaff Hill Maritime Museum and Village
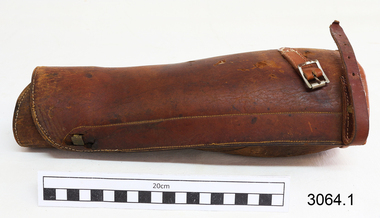
Clothing - Leather Leggings, 1899 to 1918
The subject leather leggings are associated with mounted troops known as the Australian Light Horse that served in the South African War from 1899 to 1902. After the war, Britain wanted to use fewer mounted troops and restructured its force around a style of combat that needed more infantry. But the defence of Australia still relied upon mounted military units as these were more mobile than infantry and could travel faster over long distances. Light Horse brigades in the Australian Imperial Force (AIF) mostly contained recruits who served in the Light Horse regiments of the Citizen Forces. Many young men from rural areas of Australia volunteered for the Light Horse regiments. They had to pass a riding test to join, this test was easier for men from the bush because horses were still the main method of transport on farms and in country towns. The army did not officially accept First Australians into the AIF until May 1917 when enlistment standards were relaxed to include 'half-castes' with a parent of European origin. Indigenous soldiers served as valuable members of the Light Horse and many possessed excellent horse handling skills and specialist tracking knowledge.The subject items are part of the uniform for the Light Horse Units that served in the Australian army from 1899 until 1918. These leggings were worn by soldiers on horseback and are significant as they represent a noteworthy time in Australia's early military history. It was a time when many young men gave their lives during the South African and First World Wars in the defence of the then British Empire as part of the Imperial Forces that were gathered from many British-controlled Colonial countries.A pair of two Leather Leggings used by Mounted Australian soldiers during the first world war. The leggings are dark tan in colour with stitching to attach buckles and fastener straps. The strap buckles are made of brass and the leather legging straps are of same leather as leggings. Noneflagstaff hill, warrnambool, flagstaff hill maritime museum, shipwreck coast, flagstaff hill maritime village, great ocean road, leggings, leather leggings, protective leggings, protective clothing, australian mounted light horse units, military equipment -
 Orbost & District Historical Society
black and white photograph, 1910
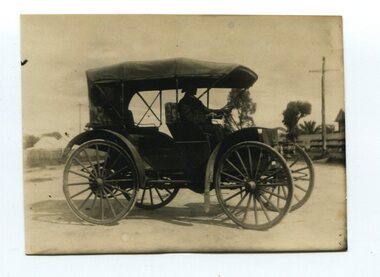
Alan Richardson was born in 1853 and died in 1936. He was a sawmiller at Tabbara who built and held the ticket for the Paddle Steamer Curlip. PS Curlip was registered in 1893 and the Passenger Certificate issued on 30th January 1903 to Captain Alan Richardson by the Marine Board of Victoria entitled her to carry 25 passengers and only 10 passengers when engaged in towage service. Two children under 12 years of age to be reckoned as one passenger. He had the first horseless motor buggy in Orbost. Alan Richardson was married to Emily Dawson and had two children - Alan Jnr and Ruth.Before the First World War, few people in Australia owned or knew how to drive cars before they bought them. This International auto buggy was promoted as a useful vehicle for station owners, farmers, doctors, and town and country salesmen. It was said to be the cheapest automobile in Australia (at one third the cost of a conventional car), required much less maintenance, had durable solid rubber tyres rather than troublesome pneumatic ones, and didn’t need a chauffeur. This is a pictorial record of a "horseless buggy" which would have been a novelty in the early 20th century in Orbost. The item is associated with the Richardson family, early Orbost settlers.A small black / white photograph of a motor vehicle with a man seated at the steering wheel. The vehicle has large buggy wheels with mud guards. It is open with no windows.transport motor-vehicle horseless-buggy richardson-alan -
 Bendigo Military Museum
Map - Map Extract - Charterhouse of Mendip, John James Raisbeck, Unknown
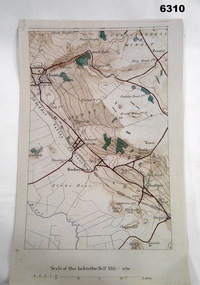
Map extract showing the towns of Cheddar, Rodney Stoke, Westbury and a smaller town of Easton. The area depicted is part of Somerset, England. Map is hand drawn by J.J. Raisbeck date unknown. John James RAISBECK was born on 4 July 1880 at Christchurch New Zealand. He served 4 years (Citizen Military Force - CMF) in 9th Australian Light Horse Regiment in Central VIC with the rank 2nd Lieutenant. He was the first Australian appointed to the Survey Section RAE, on 16 April 1910, as a draughtsman which was his civilian profession, with the rank Warrant Officer, honorary 2nd Lieutenant. He was required to resign his commission in the CMF. He supervised the draughting work of the Section in Melbourne and was largely responsible for the mapping standards and specifications set in the production of the Cowes one-inch-to-one-mile military map, which became the enduring Australian standard. He was also responsible for supervising the printing of the maps by the Victorian Government Printer. He was appointed 2nd Lieutenant in the AIF Survey Corps draft on 6 December 1917 (from Melbourne) embarking for England on 22 December 17. He was attached to the Australian Corps Topographic Section in France from 21 April 1918 to 5 March 1919 serving as Second-in-Command and as Officer Commanding. He was promoted Lieutenant 15 October 1918, attending the AIF Survey School, Southampton in 1919, returning to Australia 23 June 1919, before his AIF appointment was terminated 17 July 1919. He went on to serve the Survey Section RAE and Australian Survey Corps, including in the Second World War, having been promoted Captain then Major and Officer Commanding Army Headquarters Cartographic Section until February 1940. He retired after 33 years of service to military survey, and after serving the Corps in two world wars, on 4 July 1943 with the retired rank Lieutenant-Colonel. He was the author of the article ‘A Short History of the Military Survey of Australia, 1907-1936’, published in The Australian Surveyor, Sept 1, 1937Map extract slightly larger than A4. Scale: One Inch to One and a half Mile. 1:31680, 9 x copiesSignature of "J.J. Raisbeck" bottom right-hand cornerroyal australian survey corps, rasvy, fortuna, army survey regiment, army svy regt, asr -
 Bendigo Military Museum
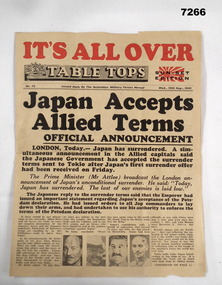
Newspaper - NEWSPAPER WW2, Australian Military Forces, Table Tops, 15 Aug 1945
This is Issue No. 73. Issued by Aust. Military Forces abroad.This is a single sheet of paper folded once to make four pages. It is printed in black ink, except for the Mast Head line. Top RHS it shows a Japanese Rising Sun flag, over printed with the phrase: - "Sun-set Edition". It has two images - one of world leaders and one of four AWAS sisters (from NSW). It covers war news from all over the world. Article about finding shipping to bring soldiers home. End of War parties are also mentioned.ww2, peace, end of war, newspaper -
 Warrnambool and District Historical Society Inc.
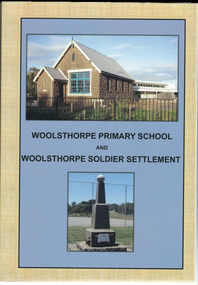
Book, Woolsthorpe Primary School and Woolsthorpe Soldier Settlement
History of the Woolsthorpe Primary School and Woolsthorpe Soldier SettlementThis is a soft-cover book with a blue and buff- coloured front cover featuring photographs of the Woolsthorpe Primary School and the Woolsthorpe War Memorial. The back cover has photographs of the R.S.L. Badge and the Woolsthorpe Primary School. It has 160 pages. non-fictionHistory of the Woolsthorpe Primary School and Woolsthorpe Soldier Settlementwarrnambool, woolsthorpe, soldier settlement -
 Warrnambool and District Historical Society Inc.
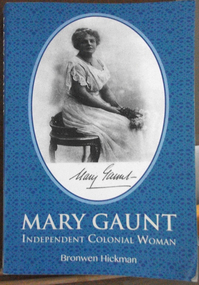
Book, Bronwen Hickman, Mary Gaunt: independent colonial woman, 2014
Biography of novelist and travel writer, Mary Gaunt (1862-1942)This is a soft cover book of 304 pages. It has a blue cover with a black and white photograph of Mary Gaunt in an oval shape on the front cover. There is white lettering on the front cover and black lettering in an oval shape on the back cover. The book has an introduction, 35 chapters, acknowledgements, endnotes, a list of publications and an index. It has several illustrations, sketches, maps and black and white and colour photographs,non-fictionBiography of novelist and travel writer, Mary Gaunt (1862-1942)mary gaunt, australian literature, history of warrnambool -
 Warrnambool and District Historical Society Inc.
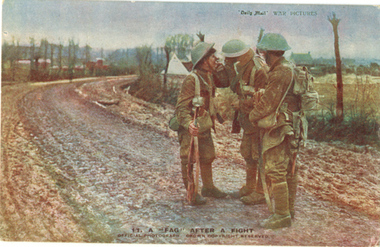
Postcard - A fag after a fight, !914-1918
This is number 13 of 27 items in the Daisy Vickers collection of World War One memorabilia. These items were sent or given to Daisy Ogier (nee Vickers) during World War One by Corporal Arthur Anderson who enlisted from Warrnambool in 1915 at the age of 21. He served in Egypt and France and returned to Australia in 1919. Daisy Ogier (1907-1987) was a student and then a teacher at Warrnambool Technical School with her early teaching years there from 1925 to 1936 and in 1949. She became the head mistress from 1950 to 1963 and in 1968. She officially retired in 1976. Daisy Vickers was one of the best loved and dedicated teachers that the school ever had. She married the Reverend Fred Ogier and continued her association with the school after her husband's death.This card is interesting because of its association with World War One and with two local people: Daisy Vickers and Arthur Anderson. This is a colour postcard from World War One with a coloured picture showing three British soldiers in battle dress smoking cigarettes. The background is a road leading to a small settlement probably in France.There is text on both sides and on the back space for correspondence, an address and a stamp. A "FAG" AFTER A FIGHT "Daily Mail" WAR PICTURESdaisy ogier nee vickers, world war one, world war one postcards, daisy vickers -
 Warrnambool and District Historical Society Inc.
Postcard - Les Grenades, 1914-1918
This is number 22 of 27 items in the Daisy Vickers collection of World War One memorabilia. These items were sent or given to Daisy Ogier (nee Vickers) during World War One by Corporal Arthur Anderson who enlisted from Warrnambool in 1915 at the age of 21. He served in Egypt and France and returned to Australia in 1919. Daisy Ogier (1907-1987) was a student and then a teacher at Warrnambool Technical School with her early teaching years there from 1925 to 1936 and in 1949. She became the head mistress from 1950 to 1963 and in 1968. She officially retired in 1976. Daisy Vickers was one of the best loved and dedicated teachers that the school ever had. She married the Reverend Fred Ogier and continued her association with the school after her husband's death. This card is interesting because of its association with World War One and with two local people: Daisy Vickers and Arthur Anderson. This is a coloured postcard with a sketch of three children dressed in military outfits. The child dressed as a nurse is giving a piece of fruit to a child dressed as a wounded soldier. On the back it has space for correspondence and an address.Les Grenadesdaisy vickers, warrnambool, world war one post card, postcard ww1 -
 Warrnambool and District Historical Society Inc.
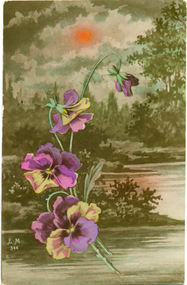
Postcard - Pansies, 1914-1918
This is number 19 of 27 items in the Daisy Vickers collection of World War One memorabilia. These items were sent or given to Daisy Ogier (nee Vickers) during World War One by Corporal Arthur Anderson who enlisted from Warrnambool in 1915 at the age of 21. He served in Egypt and France and returned to Australia in 1919. Daisy Ogier (1907-1987) was a student and then a teacher at Warrnambool Technical School with her early teaching years there from 1925 to 1936 and in 1949. She became the head mistress from 1950 to 1963 and in 1968. She officially retired in 1976. Daisy Vickers was one of the best loved and dedicated teachers that the school ever had. She married the Reverend Fred Ogier and continued her association with the school after her husband's death.This card is interesting because of its association with World War One and two local people Daisy Vickers ans Arthur AndersonThis postcard features pansies and an idyllic sylvan background. On the back it has space for correspondence and an address. There are initials and lettering on the front.E.M. 344 Fabrication Francaise daisy ogier nee vickers, arthur anderson, warrnambool technical school, world war one postcard -
 Warrnambool and District Historical Society Inc.
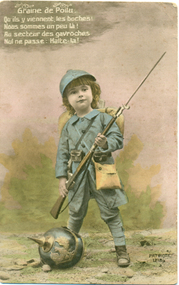
Postcard - Child Soldier, 1914-1918
Daisy Vickers collection: Item 5 of 27Historical Information This is number 24 of 27 items in the Daisy Vickers collection of World War One memorabilia. These items were sent or given to Daisy Ogier (nee Vickers) during World War One by Corporal Arthur Anderson who enlisted from Warrnambool in 1915 at the age of 21. He served in Egypt and France and returned to Australia in 1919. Daisy Ogier (1907-1987) was a student and then a teacher at Warrnambool Technical School with her early teaching years there from 1925 to 1936 and in 1949. She became the head mistress from 1950 to 1963 and in 1968. She officially retired in 1976. Daisy Vickers was one of the best loved and dedicated teachers that the school ever had. She married the Reverend Fred Ogier and continued her association with the school after her husband's death.This card is interesting because of its association with World War One and two local people Daisy Vickers and Arthur AndersonThis postcard has an image of a child soldier holding a gun with a helmet at his foot, There is printing in French on the front and on the back space for correspondence and an address.Graine de Poilu Qu'ils y viennente les boches Nous sommes un peu la! An secteur des gavroches Nul ne passe Halte - la! ! daisy vickers, arthur anderson, world war one, world war one postcard