Showing 486 items
matching chemicals
-
 Bendigo Historical Society Inc.
Document - BILL ASHMAN COLLECTION: ALFLOC SYSTEM
Eleven page article titled Water Softening in the Boiler by the 'Alfloc' System. This is an internal method of conditioning boiler feed water and the use of coagulants designed to prevent scale formation in the boiler and accessory plant, to reduce corrosion to a minimum, and further to provide for those conditions in the boiler water which from present experience are believed to prevent the occurrence of caustic ombrittlement. Different chemicals were used to suit different types of water in different areas. Items discussed are: Summary, Introduction, External treatment, Internal Treatment, General Principles of the 'Alfloc' Internal Treatment, Precipitation of the Scale-forming Salts, Temporary Hardness, Permanent Hardness, Conditioning of the Precipitate - Floc Formation, Efficient Control of the Concentration of both Dissolved and Suspended Solids by Blowdown, Prevention of Corrosion, Testing and Control, The 'Alfloc' Reagents for Internal Treatment, 'Alfloc' Liquors, 'Alfloc' Briquettes, Alfloc' Powders, Methods of Application, Liquors - Stationary boilers and Locomotive boilers, Briquettes - Stationary boilers and Locomotive boilers, Powders, Blowdown, Sludge, Caustic Embrittlement, Control of 'Alfloc' System, Cost and Economies of 'Alfloc' Internal Treatment and 'Alfloc' Water Treatment Service. Listed on page 11 are ICIANZ Sales Offices the Australian States. Between pages 7 and 8 is a page of diagrams. They are: Showing method of feeding liquors to the feed tank of boilers for 'Alfloc' internal treatment, typical arrangement of pressure vessel and typical arrangement of 'Alfloc' by-pass feeder.sciences, instruments - general, scalebuoy, bill ashman collection, alfloc system, imperial chemical industries limited alkali division, alfloc liquors, alfloc briquettes, alfloc powders, imperial chemical industries of australia and new zealand limited, elder smith & co limited, chemical & textile agencies pty ltd -
 Bendigo Historical Society Inc.
Administrative record - Abbott Collection: July to Dec 1904: records and receipts for purchases by J.H. Abbott & Co from a number of companies
various (July to Dec) 1904 company letterhead invoices which have supplied predominantly gelignite and fuses to J.H. Abbott .Abbott Collection: July to Dec 1904: records and receipts for purchases gelignite, fuses, etc.; by J.H. Abbott & Co from a wide range of generally Melbourne based companies: 2403.89a five invoices from Bickford, Smith & Co. gelignite and fuses, from 31 July to 30 Nov 1904 2403.89b five invoices from Morris & Meeks, Melbourne, gelignite, from 1 Aug to 1 Dec 1904 2403.89c 33 invoices from Gibbs, Bright & Co., gelignite, from 27 Jun to 24 Dec 1904 2403.89d 17 invoices from Richard Linton, gelatine dynamite, from 7 Jul to 31 Dec 1904 2403.89e 24 invoices from McMicking & Co., from 2 Jul to 30 Dec 1904 2403.89f 21 invoices from Perks Bros. & Co., from 27 Jul to 31 Dec 1904 2403.89g 27 invoices from Dalgety and Company Limited, from 21 Jul to 31 Dec 1904 2403.89g 11 invoices from Briscoe & Company Limited, Wholesale Ironmongers & Hardware Merchants, from 25 Oct 1904 to 30 dec 1904 2403.89h 27 invoices from Dalgety and Company Limited, from 21 Jil to 31 Dec 1904 2403.89i 36 invoices from Australian Explosives and Chemicals Compy. Ltd, from 1 Jul to 31 Dec 1904trade company invoices 1904 -
 Orbost & District Historical Society
black and white photograph, Warren, Mrs H, first half 20th century
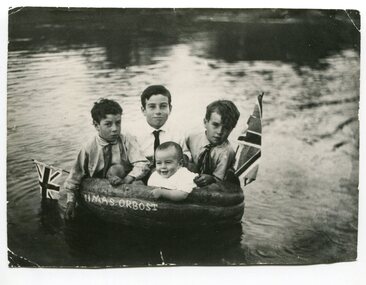
This is a photograph of Alan, Keith, Preston and Jim Nixon. George Nixon (1862-1941) selected land in Bete Bolong in the 1890's. He married Emily Warren in 1889 in Orbost. He was a shire councillor. He was a prominent breeder of Clydesdales and after a serious fall off a horse walked with a walking stick and special boot for the rest of his life. He was well-known for his interest in cars, horse-racing and politics.He was married to Emily Warren in 1889 in Orbost. Mrs Nixon (Emily)was the first Red Cross president during WW1. They had ten children.both George and Emily are buried in the Orbost Cemetery. (ref:From White Knowle to Pumpkin Point by Hon Peter Nixon A.O.) The photographer was Warren, Helena (1871-1962) who was a self-taught photographer who became both the local press correspondent and a producer of humorous trompe l'oeil postcard images. Helena Warren was a thirty-two year old settler living on a small mixed farm with her husband, William, at Newmerella, near Orbost in Gippsland, Victoria, when she bought her first camera, an Austral Box quarter-plate. Her family says she was entirely self-taught, like many women photographers who started out with nothing but the instructions on the packets of film and chemicals. In over fifty years practice she graduated from the total novice, who opened all her first mail order plates in bright sunlight and ruined them, to a competent photographer who became both the local press correspondent and an inveterate producer of humorous trompe l’oeil postcard images.This photograph has significance in its association with Helen Frances Warren, a popular Orbost identity who was well known as an accomplished photographer and needleworker, This item is also associated with a prominent Orbost family. George Nixon was the son of James and Alice Nixon. The Nixon families were among the earliest settlers on the Snowy River. It is an example of the early book-keeping of an Orbost business in the early 20th century.A black / white photograph of three boys and a baby in a carved out pumpkin with a flag at each end and "HMAS ORBOST" carved in the front.warren-helena pumpkins nixon -
 Federation University Historical Collection
Book, A Descriptive Catalogue of the Minerals in the Museum of the School of Mines, Ballaarat, 1882, 1882
The Museum of the Ballarat School of Mines was established in 1872. The curator in 1882 was Ferdinand M. Krause. Prefatory Notice by James Oddie). The want of a guide through the technical collections of The School Mines has long been felt by visitors and students - a guide , not so much to those who merely 'look' at the various exhibits in the Museum, but an instructor to those who desire to take away with them some practical information on the natural occurrence and economical value of the objects exhibited. This want is being filled by the labour of Mr. Krause, whose first installment - 'A Descriptive Catalogue of the Minerals' - is herewith represented to the visiting public." Introduction to the catalogue: " The collection is still in its early growth, and far from being a complete representation of the Mineral Kingdom; many varieties, species, and even whole groups are absent. This state of incompleteness will, no doubt, be adjusted in the sequence, and progressive lists issued from time to time. 'Ad interin' the present catalogue will, be found useful to students and visitors of the School. As far as practicable, the classifications of the minerals accords with that adopted at the Royal School of Mines, London. The numbers prefixed to the species in the catalogue agree with those on the descriptive labels which accompany each specimen, and also with those attached to the specimens themselves. On the descriptive labels the chemical composition of the minerals is expressed in formulae usually employed in standard mineralogical works. Students who have note paid attention to mineralogical chemistry will note that each dot over a symbol is equivalent to one atom of oxygen, .... A bar through a symbol denotes a double atom of the base, .... " In 1882 the collection was housed in 33 cases. The catalogue outlines the specimen types housed in each case. The classification of minerals accords with that adopted at the Royal School of Mines, London. Leather covered book of 94 pages with gold lettering on the front, including "F.M. Krause". The book includes a plan of the museum layout, plan of the grounds and buildings of the Ballarat School of Mines and a prefatory notice by James Oddie.ballarat school of mines, ballarat school of mines museum, museum, krause, ferdinand krause, fm krause, oddie, james oddie, geology, mineralogy, charles boyd, f.m. krause, minerals, curator -
 Federation University Historical Collection
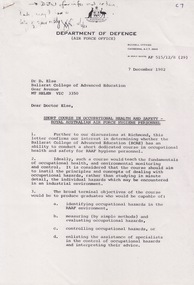
Document - Document - Correspondence, VIOSH: Department of Defence - Air Force Office, Canberra, December 1982
Victorian Institute of Occupational Safety and Health (VIOSH) Australia is the Asia-Pacific centre for teaching and research in occupational health and safety (OHS) and is known as one of Australia's leaders on the field. VIOSH has a global reputation for its innovative approach within the field of OHS management. VIOSH had its first intake of students in 1979. At that time the Institution was known as the Ballarat College of Advanced Education. In 1990 it became known as Ballarat University College, then in 1994 as University of Ballarat. It was 2014 that it became Federation University. VIOSH Australia students are safety managers, senior advisors and experienced OHS professionals. They come from all over Australia and industry. Students are taught active research and enquiry; rather than textbook learning and a one-size fits all approach. VIOSH accepts people into the Graduate Diploma of Occupational Hazard Management who have no undergraduate degree - on the basis of extensive work experience and knowledge Letter from the Department of Defence to Dennis Else looking at the possibility of Ballarat College of Advanced Education conducting a short course in occupational health and safety for RAAF hygiene personnel. It would teach the fundamentals of occupational health and environmental monitoring and control. Better use of the practical time allocated is needed. Noise induced hearing loss is the most widespread occupational health risk in the RAAF. Industrial chemicals used and hazardous industrial procedures in the repair and maintenance of aircraft are an issue needing resolution. Existing terminal objectives for basic hygiene inspectors course in occupational health and safety are provided for comment. Information provided by K R Stone, Flight Lieutenant for Director General of Air Force Health Services. Eight A4 pages,typed. Handwritten note top left cornerLetterhead of Department of Defence - Air Force Office.Signature of K R Stoneviosh, victorian institute of occupational safety and health, department of defence, air force office, raaf, ballarat college of advanced education, dennis else, k r stone, flight lieutenant, director general of air force health services, short course in occupational health and safety, raaf hygiene personnel, hearing loss, industrial chemicals, hazardous industrial procedures -
 Federation University Historical Collection
Book, A Descriptive Catalogue of the Minerals in the Museum of the School of Mines, Ballaarat, 1882, 1882
The Museum of the Ballarat School of Mines was established in 1872. The curator in 1882 was Ferdinand Krause. Prefatory Notice by James Oddie). The want of a guide through the technical collections of The School Mines has long been felt by visitors and students - a guide, not so much to those who merely 'look' at the various exhibits in the Museum, but an instructor to those who desire to take away with them some practical information on the natural occurrence and economical value of the objects exhibited. This want is being filled by the labour of Mr. Krause, whose first installment - 'A Descriptive Catalogue of the Minerals' - is herewith represented to the visiting public." Introduction to the catalogue: " The collection is still in its early growth, and far from being a complete representation of the Mineral Kingdom; many varieties, species, and even whole groups are absent. This state of incompleteness will, no doubt, be adjusted in the sequence, and progressive lists issued from time to time. 'Ad interin' the present catalogue will, be found useful to students and visitors of the School. As far as practicable, the classifications of the minerals accords with that adopted at the Royal School of Mines, London. The numbers prefixed to the species in the catalogue agree with those on the descriptive labels which accompany each specimen, and also with those attached to the specimens themselves. On the descriptive labels the chemical composition of the minerals is expressed in formulae usually employed in standard mineralogical works. Students who have note paid attention to mineralogical chemistry will note that each dot over a symbol is equivalent to one atom of oxygen, .... A bar through a symbol denotes a double atom of the base, .... " In 1882 the collection was housed in 33 cases. The catalogue outlines the specimen types housed in each case. Brown soft covered book of 94 pages with gold lettering on the front. The book includes a plan of the museum layout, plan of the grounds and buildings of the Ballarat School of Mines and a prefatory notice by James Oddie. It also includes handwritten notes by Curator Ferdinand Krause. .2) Business card of I.H. Barbery, engraver with F.W. Niven. The lithography of the plan of the Ballarat School of Mines at the back of the catalogue was undertaken by F.W. Niven.Handwritten inclusion of extra entries (probably by Ferdinand Krause).ballarat school of mines, ballarat school of mines museum, museum, krause, ferdinand krause, fm krause, oddie, james oddie, geology, mineralogy, charles boyd, royal school of mines london, london school of mines, classification -
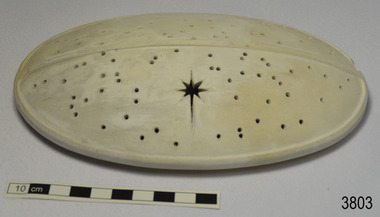 Flagstaff Hill Maritime Museum and Village
Ceramic - Cover, circa 1883
This ceramic cover was recovered from the wreck of the 1882-1883 George Roper between the late 1960’s to early 1970’s. It is one of the shipwreck artefacts in the John Chance Collection. The purpose of the cover is unclear. The holes could be for ventilation. The cover may have been used to protect food or keep it at an even temperature. It may also have been used for covering fragrant petals, allowing some scent to escape through the holes. The residue around the underside of the holes and their random placement indicate that the cover could be partially handmade. The discolouration could have come from its time in the sea. The GEORGE ROPER 1882 - 1883 - The George Roper was a 4-masted iron sailing ship built in Liverpool, England, in 1882 for fast international trade with Australia. The large vessel was launched in February 1883. The ship was on its first trip, departing Liverpool for Melbourne, captained by John Ward and a crew of 31. She had almost reached her destination on July 4 1883, approaching Port Phillip Bay and being towed by the steam tug William. The weather changed to rough with fog and both the George Roper and the William hit the dangerous Lonsdale Reef at Port Phillip Heads. The Captain and crew were eventually rescued and taken to Queenscliff. Salvage syndicates were able to recover a lot of the cargo before the George Roper broke up and sank. Amongst the cargo was soft goods, draperies, household items, spirits of malt and distilled liquors, chemicals, dynamite, and 1,400 tons of steel rails for the Victorian Government. Also in the hold were Russell Stourbridge bricks, as paying ballast. The ventilated cover is as an example of domestic ceramic ware of the 1880s. The cover also holds significance as it was recovered by John Chance, a diver from the wreck of the George Groper in the 1960s-70s. Items that come from several wrecks along Victoria's coast have since been donated to the Flagstaff Hill Maritime Village’s museum collection by his family, illustrating this item’s level of historical value. The George Roper is considered historically and archaeologically significant and as such, is listed on the Victorian Heritage Database, VHR S286. It is an example of a vessel built specifically for fast travel to and from Australia with a large shipment of cargo. The George Roper’s cargo of steel rails adds to the historical significance of international trade to the growing colony of Australia and Victoria in particular, with rail transportation soon to become a faster and safer form of transportation between colonial towns. Divers can still access parts of the scattered wreck and other artefacts recovered in the 1970s and 1980s can be viewed in both public and private collections. Cover; unglazed white ceramic, oval shape. The cover has holes randomly poked through its surface, one large hole is a six pointed star shape. Underneath there is a narrow rim placed slightly inside the edge. There is residue on the underneath around the holes. There is orange-brown discolouration and areas where the surface is lighter coloured. flagstaff hill, warrnambool, flagstaff hill maritime museum, maritime museum, shipwreck coast, flagstaff hill maritime village, great ocean road, john chance, west coast trader, george roper, w. h. potter & sons, w.t. dickson and son, captain john ward, russell stourbridge bricks, port phillip heads, lonsdale reef, dive wreck, vhr s286, coastal trader, ceramic, vintage, ventilated cover, domestic item -
 Flagstaff Hill Maritime Museum and Village
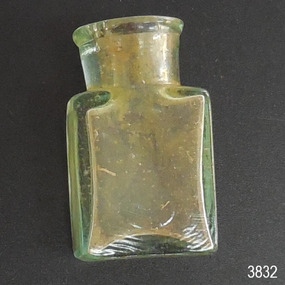
Container - Pill bottle, from mid-19th century to 1902
This small handmade bottle possibly dates from the mid-1840s. It may have been used as a traveller's ink bottle, due to its wide mouth. It was recovered from the wreck of the Inverlochy and is part of the John Chance collection. Small glass ink bottles similar to this one were handmade, blown into a cup shaped mould, and sharply broken off from the blow-pipe at the neck and sealed with a cork or wax. The mouth of this bottle appears to have been added after it was blown. INVERLOCHY 1895-1902 - The Inverlochy was a steel sailing barque built in Scotland in 1895 for international trade. In 1902 the Inverlochy left Liverpool under the command of Captain E.R. Kendrick. There were 21 officers and crew and the captain’s wife Mrs Kendrick, on board, bound for Australia with cargo that included tools, chemicals, liquor (beer, whisky, stout, rum, and brandy), steel, iron, wire netting, hoop iron, tinplate and pig iron), and steel wire for the Melbourne Tramway Company, tiles, soap, soft goods and earthenware. On December 18 almost at their destination, the Inverlochy ran aground on Ingoldsby Reef at Point Addis, near Anglesea. The crew and passengers left the ship via lifeboat and landed at Thompson’s Creek, then walked about 20 kilometres to Barwon Heads. Salvagers were interested in the 10 miles of cable in the hold. Mrs Kendrick’s ‘high grade’ bicycle was amongst the items salvaged but she lost her jewellery and two pianos. By February 1903 the ship had broken up and objects such as bottles and casks of liquor were washed ashore. Bad weather shook the wreck in June 1903, causing the ship’s spars and figurehead to be washed ashore. This handmade bottle is historically significant for its association with being made and used during the mid-to-late 19th century. This handmade glass bottle is significant for its connection with the John Chance Collection, which is historically significant as an example of artefacts from wrecks that had been lost in the coastal waters of Victoria from thirty to over one hundred years before John Chance and others discovered them. These artefacts are a sample of goods carried as cargo or personal possessions, and of ship hardware of that era. The bottle is significant through its connection with the barque, Inverlochy, The Inverlochy is significant for its cargo, which is a snapshot of the array of goods imported into Australia at the turn of the 19th century, including cable for the Melbourne Tramway Company. The Inverlochy is historically significant and is registered on the Victorian Heritage Database, VHR S338. The wreck of the Inverlochy is important as an accessible dive site that shows the remains of a large international trading vessel and its contents. It is valuable for an insight into Victorian era of shipping and maritime history.Bottle, clear glass, handmade, mould-blown. Small pill bottle has round mouth and neck, straight sides, rectangular base, no seams, shiny surface. Thickness of glass varies. Mouth is lop-sided and lip varies in width. Inscription of logo on both wide sides. Inscription embossed on sides [tear drop] logo. flagstaff hill, warrnambool, flagstaff hill maritime museum, maritime museum, shipwreck coast, flagstaff hill maritime village, great ocean road, john chance, inverlochy, scotland, captain e.r. kendrick, melbourne tramway company, tramway cable, ingoldsby reef, point addis, anglesea, thompson’s creek, barwon heads, victorian, antique, handmade, mould blown, small glass bottle, rectangular glass bottle, pill bottle -
 Ballarat Tramway Museum
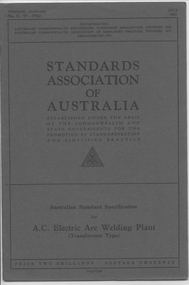
Book, Australian Commonwealth Engineering Standards Association, "AC Electric Arc Welding Plant - Transformer type", "Brass water fittings - stop, bib, globe and ferrule or main taps", "Vegetable tanned leather belting", "Rubber Conveyor and Power Transmission Belting", "Maintenance of Portable Chemical Fire Extinguishers of the Acid-Alkali and Foam Types", "Copper Tubes", "Portland Cement", 1928 - 1942
.1 - Book - 12 pages + brown covers, side stapled, issued by the Australian Standards Association, "AC Electric Arc Welding Plant - Transformer type", C97-1942, July 1942. .2 - Book - 40 pages + grey covers, side stapled, issued by the Australian Commonwealth Engineering Standards Association, Tentative Australian Standard B1 - "Brass water fittings - stop, bib, globe and ferrule or main taps", B1-1928, August 1928. .3 - Book - 20 pages + grey covers, side stapled, issued by the Australian Commonwealth Engineering Standards Association, Tentative Australian Standard B4 - "Vegetable tanned leather belting", B4 - 1929, January 1929. .4 - Book - 16 pages + grey covers, side stapled, issued by the Australian Commonwealth Engineering Standards Association, Tentative Australian Standard B3 - Rubber Conveyor and Power Transmission Belting", B3 - 1929, March 1929. .5 - Book - 8 pages + green covers, side stapled, issued by the Australian Standards Association, "Maintenance of Portable Chemical Fire Extinguishers of the Acid-Alkali and Foam Types", CA 18-1941, May 1941. .6 - Book - 16 pages + grey covers, side stapled, issued by the Australian Commonwealth Engineering Standards Association, Tentative Australian Standard B2 - "Copper Tubes", B2 - 1928, July 1928. .7 - Book - 28 pages + grey covers, side stapled, issued by the Australian Commonwealth Engineering Standards Association, Australian Standard A2 - "Portland Cement", includes tests, A2-1926, December 1926. On top right hand corner has the date stamp of the "The Electric Supply Co. of Victoria Ltd Ballarat" .2 - 3 Sep 1928 .3 - 19 Jan 1929 .4 - 3 Apr 1929 .5 - SEC Stamp - ? 1941 .6 - 20 July 1928 .7 - 17 Apr 1934trams, tramways, power station, standards, materials -
 Department of Energy, Environment and Climate Action
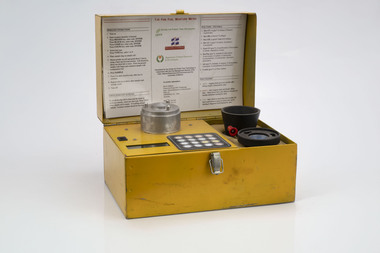
Prototype fuel moisture meter
Bushfire behaviour is influenced by many things including temperature, relative humidity, forest type, fuel quantity and fuel dryness, topography and even slope. Wind has a dominant effect on the Rate of Spread (ROS), and also bushfire size, shape and direction. Fuel arrangement is as important as fuel quantity (tonnes/ha). Fibrous and ribbon bark, together with elevated and near-surface scrub fuels act as ladders which lead flames into the tree canopy. But the availability of fuel to burn depends largely on its moisture content. When it exceeds 20-25% not much will burn, whereas 12-15% is generally ideal for fuel reduction burning, but if the moisture content drops as low as 7-10% virtually everything will ignite, and fire behaviour becomes extreme. During the afternoon of the Ash Wednesday bushfires on 16 February 1983 fuel moisture contents were recorded at Stawell as low as 2.7%. Fine fuels like leaves and bark can rapidly absorb moisture after a shower of rain, or from the air when the Relative Humidity (RH) is high, and the temperature is low. Conversely, they can also dry out very quickly. So even though the overall fuel quantity in the forest doesn’t change, the fine fuel availability can increase rapidly from zero after rain to many tonnes per hectare as the fuel dries out. This can happen over a few hours on hot and windy days. Heavy fuels like logs on the ground take longer to dry out. Since the 1930s foresters, firefighters and researchers have been working to develop quick and reliable techniques for measuring fuel moisture content. One of the most accurate methods is slowly drying a sample of fuel in a conventional oven for 24-48 hours to remove all the moisture and measuring the weight difference, but this takes time and is not practical in the field when rapid measurements are needed. But oven drying is often used as a benchmark to compare other methods. Microwave ovens are faster but can cause uneven drying and even char the fuel. They are also not very practical for use in the field. Some mathematical models rely on weather records such as rainfall, wind speed, evaporation, cloud cover, shading, relative humidity, slope, aspect and season of the year to predict soil and fuel moisture. The Keetch-Byram Drought Index of soil dryness is the most common. But complex fuels with leaves, twigs, grass etc make the predictive models often inadequate for fine fuels. The most common technique in Victorian forests until recently was the trusty Speedy Moisture Meter. Originally developed in England during the 1920s for measuring moisture in wheat and other grains it was adapted for Australian forest fuels in the 1950s (I think). Fuel was first ground using a Spong mincer, often attached to the bullbar of a vehicle, and a small sample placed into the Speedy together with a measure of calcium carbide and then sealed. A chemical reaction created gas pressure which was read on the external dial. There were important techniques with cleaning, mincing and using the chemicals with the Speedy to give reliable readings, but it was quick, inexpensive, robust, portable and practical in the field. It was used routinely before igniting a fuel reduction burn or measuring fuel moisture differentials on slash burns. But in about 1996, Karen Chatto and Kevin Tolhurst from the Department’s Creswick Research Station developed the Wiltronics Fuel Moisture meter which measured electrical resistance. Wiltronics is an Australian owned company operating from Ballarat. The final result was a kit that was portable, accurate and could reliably measure fuel moisture contents between 3% and 200%. Although expensive, it is now widely used by fire agencies around the world which has virtually relegated the Speedy to the back cupboard.Prototype Fuel moisture meterT-H Fine Fuel Meterforests commission victoria (fcv), bushfire, forest measurement -
 Federation University Historical Collection
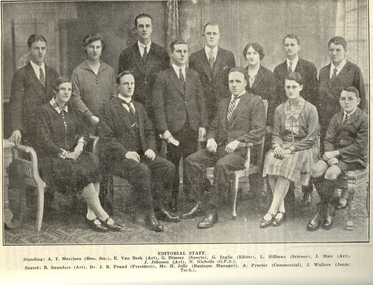
Booklet - Magazines, Ballarat School of Mines Magazine, 1924-1930, 1924-1930
The Ballarat School of Mines is a predecessor institution of Federation University Australia. Bound copies of the Ballarat School or Mines Students' Magazine. 1924 * Dr J.R. Pound * Noel Hay Obituary * The History of Chemistry * Literary Society * Herald B. Herbert * Chemistry in Modern Life by Val G. Anderson * Chemistry in Literature by J.R. Pound * School Literary Society * Ladies in Pharmacy * Musings on Modern Literature - Mainly Drama (W.G. C.) * Trip to Newcastle * Appreciation of the Masterpieces of Art * The Antique Room * Dressmaking * Pottery * Sloyd * The Mystery of the Atom *Inorganic Evolution by R.S. Russell * Photography * First Aid Club 1926 * The Trip to Morwell * Chemical Excursions (Yallourn) * Eastern Life and Customs by Rex Warrillow * Organic Evolution by Edwin A. Brophy * Chemistry in the Kitchen * Obituary for Professor Alfred Mica Smith * The Historical Development of Patterns i Silk Fabrics * Pottery * Literary Society * Early Evidence of Metallurgy in Britain * Brief Description of the Magnet Silver Mine, Tasmania * The manufacture of Leather Photographs * SMB Athletics Team, winners of the Herald Shield (M. Timmings, L. Evans, F. Sheahan, R. Collins, A. Murfett, W. Hughes, L. Hillman * SMB Football Team * Ballarat Technical Art School Tennis Four * SMB Girls' Basketball Team * SMB GIrls Hockey Team * Ballarat Junior Technical School Scholarship and Studentship Winners * On Punctuation Advertisements: Sunshine Biscuits, Harris Powell and Sandford, W. Gribble & Co., Gilbert Motors, T.J. Haymes The Wallpaper King, C. Marks and Co., Wilson's Tailors and Mercers, George S. Grant, Miss A. Corin Art Worker, Tunbridges, Felton, Grimwade & Co., Hasten and Ewins, Ballarat Wireless Stores, Fred A. Reed, Suttons, E. Hall-Jones, Stansfield and Smith, Ballarat Gas Company, Richards and Co Studio, F.H. Drew, Adam Scott, R.A. Hudson, Huttons, J.A. Holland, A.E. White, F. Barrow Monumental Sculptor, R. Young, H.A. Evans, Alexandria Tea Rooms, W. Cornell Chemist, Black Cat Tea Rooms, J.A. Reynolds, A.M. Palmer, Morris Cars and Trucks, Mrs Stones, Millers The Clothiers, T.G. Skewes, Wattle TEa Rooms, H.B. Selby, Middleton and Morris, C.P.A. Taylor, Thornton Studios, Fred Irwin, Isaac Abraham, Ballarat Radio Listening-In, Baxter and Stubbs 1927 * Chemists Trip to Melbourne (Mount Lyell Chemical Works, Footscray, Yarraville * Literary Society * Mr J.N. Rowell 1928 * Prohibition in U.S.A. by Ed A. Brophy * Dr. J.W. Mellor and His Work at Stoke, England by Reginald C. Callister * The Science of Chemistry by C.A. Schache * Trip to Yallourn (Brown Coal Deposits, Steam Plant at Yallourn, Switchgear and Transformers, Briquette Factory * Walhalla Past and Present by G.E.B. * The Hand Loom * Precious Stones 1929 * The Old Brewery * The History of Chemistry by J.R. Pound * Occurrence of Mineral Oil in Gippsland * Experiences with Malayan Chinese by R. Warrillow * Organise Colors (Dyestuff Pigments) in Rubber Goods 1930 * News from Chine by Henry Kum Yuen * L'Art Moderne * The Story of Clay by T.H. Trengrove * A Glimpse of England * The Beginnings of Arithmeticballarat school of mines, pottery, ceramics, reginald callister, metallurgy, chemistry, j. pound, alfred mica smith, herald shield, harold herbert, lindsay hillman, john rowell, j.r. pound, noel hay, drawing from antique, yallourn excusion, walhalla, sunshine biscuits, harris powell and sandford, w. gribble & co., gilbert motors, t.j. haymes, the wallpaper king, c. marks and co., wilson's tailors and mercers, george s. grant, miss a. corin art worker, tunbridges, felton, grimwade & co., hasten and ewins, ballarat wireless stores, fred a. reed, suttons, e. hall-jones, stansfield and smith, ballarat gas company, richards and co studio, r.a. hudson, huttons, j.a. holland, a.e. white, f. barrow monumental sculptor, r. young, h.a. evans, alexandria tea rooms, w. cornell chemist, black cat tea rooms, j.a. reynolds, a.m. palmer, morris cars and trucks, mrs stones, millers the clothiers, t.g. skewes, wattle tea rooms, h.b. selby, middleton and morris, c.p.a. taylor, thornton studios, fred irwin, isaac abraham, ballarat radio listening-in, baxter and stubbs, mount lyell chemical works, footscray, c.a. schache, yallourn briquette factory, t.h. trengrove, history of chemistry, excursions, morwell, morwell excursion, women in pharmacy, mt lyall, excursion, slloyd, drawing from the antique, james pound, yallourn, yallourn excursion, ballarat arch of victory, mt macedon, f.h. drew, adam scott, university women -
 Flagstaff Hill Maritime Museum and Village
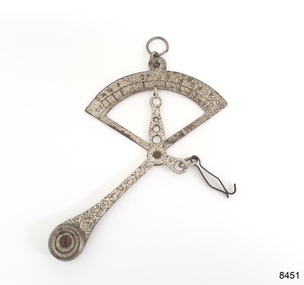
Instrument - Letter Scale, Ca. early 20th century
This handheld portable pendulum quadrant scale was used to weigh small paper items such as letters and documents, powdered chemicals or metals like gold, and animal fleece samples. This mechanical scale can weigh up to a maximum of 10 ounces, which is about 285 grams or one-and-a-half cups of brown sugar. The operator holds the scale’s ring and connects the item to be weighed onto the wire clip. The weight of the item causes the pendulum to pivot, and the scale measures the weight of the object, indicated by the arrow. This scale belonged to Dr William Roy Angus and is now part of Flagstaff Hill’s comprehensive W.R. Angus Collection, donated by the family of Dr W R Angus, 1901-1970, surgeon and oculist. The W.R. Angus Collection: - The W.R. Angus Collection includes historical medical equipment, surgical instruments and material belonging to Dr Edward Ryan and Dr Thomas Francis Ryan, (both of Nhill, Victoria) and Dr Angus’ own belongings. The Collection’s history spans the medical practices of the two Doctors Ryan, from 1885-1926 plus that of Dr Angus, up until 1969. It includes historical medical and surgical equipment and instruments from the doctors Edward and Thomas Ryan of Nhill, Victoria. Dr Angus married Gladys in 1927 at Ballarat, the nearest big city to Nhill where he began as a Medical Assistant. He was also Acting House surgeon at the Nhill hospital where their two daughters were born. During World War II He served as a Military Doctor in the Australian Defence Force. Dr Angus and his family moved to Warrnambool in 1939, where Dr Angus operated his own medical practice. He later added the part-time Port Medical Officer responsibility and was the last person appointed to that position. Both Dr Angus and his wife were very involved in the local community, including the planning stages of the new Flagstaff Hill and the layout of the gardens there. Dr Angus passed away in March 1970.This letter scale is the only one of its type in our collection. It is an example of objects belonging to Dr. W. R. Angus, 1901-1970, surgeon and oculist. The W.R. Angus Collection is significant for still being located at the site it is connected with, Doctor Angus being the last Port Medical Officer in Warrnambool. The Collection includes historical medical objects that date back to the late 1800s.Letter scale, a handheld quadrant fixed pendulum scale made from silver-plated metal. This small weighing instrument is shaped like a quarter-circle with a metal ring, a fixed pendulum counterweight and a decorative pivoting arrow indicator. A hanger clip is attached to a short arm of the scale. Measurements are embossed on the arc of the circle, labelled in ounces (oz) and ranging from 0 to 10 at unequal distances apart. The scale is part of the W.R. Angus Collection.Scale measurements, "OZ" (ounces), "0 /14 1/2 1 2 3 4 5 6 7 8 9 10 "flagstaff hill, warrnambool, maritime village, maritime museum, shipwreck coast, great ocean road, flagstaff hill maritime museum and village, dr w r angus, mira hospital, w.r. angus collection, scale, weighing instrument, measure weight, postal scale, chemist scale, letter, weigh, post, office, quadrant scale, letter scale, handheld, portable, mechanical scale, pendulum scale, fixed balance scale -
 Coal Creek Community Park & Museum
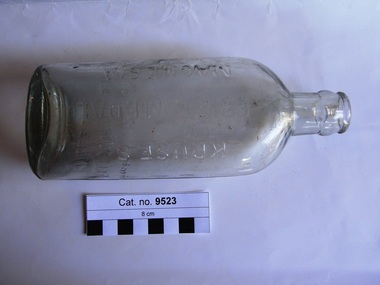
Bottle, glass, c 1929-1950's ref: AGM mark on bottle base
TROVE : The Argus (Melbourne, Vic. : 1848 - 1957) Thursday 14 February 1867 p 1 Article 'THE EXHIBITION. OFFICIAL DISTRIBUTION OF PRIZES. The culminating point in the history of the Intercolonial Exhibition of 1866-7, was reached yesterday, when His Excellency Sir Henry Manners Sutton, Governor of Victoria, publicly received the reports of the jurors, and formally declared their awards. .........................CHEMICAL AND METALLURGICAL PRODUCTS AND PROCESSES....................... MEDALS - VIctoria .............John Kruse, chemist, Melbourne - For his fluid magnesia...........................'. Haines, Gregory, 1994, Á History of Pharmacy in Victoria, The Australian Pharmaceutical Publishing Company in association with the Pharmaceutical Society of Australai (Victoria) Ltd, Melbourne, Australia.opp. page 54, photo of 'John Kruse' and of 'John Kruse's pharmacy, Russell Street, Melbourne, 1866'. TROVE : Melbourne Punch (Vic. : 1855 - 1900) Thursday 21 January 1897 p 3 Article A Musical Genius. BY X. THERE is a chemist's shop in Hawthorn in the drawingroom over which some of the best, music that has ever been heard under the Southern Cross has been discoursed. Here John Kruse, the famous violinist , has delighted his late father with his violin. Here Nellie Mitchell's (Madame Melba's) voice found appreciative admiration long before she became famous. It is the shop of John Kruse, chemist and druggist, the inventor of fluid magnesia, insecticide and a world of well-known articles of daily consumption. The old mail died some time back, but lived long enough to gratify his chief wish, viz,, to see his famous son, Herr Johann Kruse. John journeyed from Germany to see his dying father. His brief but brilliant sojourn amongst us will be remembered by all lovers of music. TROVE: Colac Herald Friday 1 September 1876, page 4, Article. TROVE: The Argus Tuesday 2 July 1867, page 3, Advertisement. 'Felton Grimwade, 125 Russell Street, Melbourne'Clear glass bottle, oval shaped in section with text embossed on both sides and on base. Embossed on base 'M65' over '1923 6' over 'AGM'. Side 1 : 'KRUSES PRIZE MEDAL MAGNESIA' Side 2 : 'THIS BOTTLE IS THE PROPERTY OF FELTON GRIMWADE & CO PTY. LTD. MELBOURNE'. Over the numeral '1'.chemist, magnesia -
 Coal Creek Community Park & Museum
Bottle, glass, C. 1866 - 1895
TROVE : The Argus (Melbourne, Vic. : 1848 - 1957) Thursday 14 February 1867 p 1 Article 'THE EXHIBITION. OFFICIAL DISTRIBUTION OF PRIZES. The culminating point in the history of the Intercolonial Exhibition of 1866-7, was reached yesterday, when His Excellency Sir Henry Manners Sutton, Governor of Victoria, publicly received the reports of the jurors, and formally declared their awards. .........................CHEMICAL AND METALLURGICAL PRODUCTS AND PROCESSES....................... MEDALS - VIctoria .............John Kruse, chemist, Melbourne - For his fluid magnesia...........................'. Haines, Gregory, 1994, Á History of Pharmacy in Victoria, The Australian Pharmaceutical Publishing Company in association with the Pharmaceutical Society of Australai (Victoria) Ltd, Melbourne, Australia.opp. page 54, photo of 'John Kruse' and of 'John Kruse's pharmacy, Russell Street, Melbourne, 1866'. TROVE : Melbourne Punch (Vic. : 1855 - 1900) Thursday 21 January 1897 p 3 Article A Musical Genius. BY X. THERE is a chemist's shop in Hawthorn in the drawingroom over which some of the best, music that has ever been heard under the Southern Cross has been discoursed. Here John Kruse, the famous violinist , has delighted his late father with his violin. Here Nellie Mitchell's (Madame Melba's) voice found appreciative admiration long before she became famous. It is the shop of John Kruse, chemist and druggist, the inventor of fluid magnesia, insecticide and a world of well-known articles of daily consumption. The old mail died some time back, but lived long enough to gratify his chief wish, viz,, to see his famous son, Herr Johann Kruse. John journeyed from Germany to see his dying father. His brief but brilliant sojourn amongst us will be remembered by all lovers of music. TROVE: Colac Herald Friday 1 September 1876, page 4, Article. TROVE: The Argus Tuesday 2 July 1867, page 3, Advertisement. 'Felton Grimwade, 125 Russell Street, Melbourne' Clear glass ellipse in section bottle, with embossed text on both sides and initials and numerals on base.'KRUSES PRIZE MEDAL MAGNESIA', 'This bottle is the property of FELTON GRIMWADE & CO Pty Ltd Melbourne on sides. 'S1935' 'AGM' on base.magnesia, kruse, felton, grimwade, chemist -
 Department of Energy, Environment and Climate Action
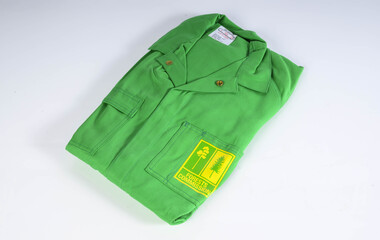
Protective Bushfire overalls
At the time of the 1982-83 bushfire season FCV firefighters wore either navy blue issue overalls or their own clothing, generally a checked flannel shirt and jeans. Uncomfortable safety boots and hardhats were issued. The CFA had switched from white overalls to their distinctive yellow kit by 1983. In about 1980, in a far-sighted corporate move for the time, Alan Threader, who was the Chairman of the FCV, established a departmental safety committee, which he personally chaired. The Committee, among other things, wanted to upgrade fire safety clothing. Alan also initiated a radical colour idea after a work trip to the UK in about 1981 and brought home a small sample swatch. Alan believed that the now distinctive bright yellow-green was a good colour contrast to the Victorian bush which is a blue-green hue. Trevor Brown from Stores Branch scored the task to make the change and letters were sent to the UK seeking information about the pigment. The FCV worked with the Commonwealth Dyers Association and Cushen Clothing to replicate the shade on cotton drill, which presented darker when it was treated with the flame-retardant chemical, Proban. The first of the new Kermit Suits were rolled-out in late 1984, and the stylish colour was initially registered and patented to the Department. But it's also fair to say that the new gaudy shade of apparel wasn’t universally popular with staff. The lime green overalls were an Australian first, and forest agencies in other states followed a few years later. In the early 1990s, armed with a pair of dressmaker’s scissors, the baggy one-piece Kermit boilersuits were tailored by Peter Billing from Fire Protection Branch and Trevor Brown in conjunction with the family-owned business, Top Level Workwear, which saw numerous enhancements and prototypes. The two-piece Kermit suits were available in the late 1990s after many years of argy-bargy and complaints from field firefighters. Protective overalls Two types - early FCV (c 1983) and later CNR (1992) forests commission victoria (fcv), protective clothing, safety equipment -
 Flagstaff Hill Maritime Museum and Village
Domestic object - Bowl, Late 19th or early 20th Century
The Process of Making Pottery Decorating, Firing, Glazing, Making, Technical There is a rhythm and flow to clay. It can’t be done all at once! Even the making process! It can take weeks to get everything done, especially if you can only work on your pottery once a week! Even though we have three hour classes, it’s often just not enough time! Here is an overview of some of the processes so you have a bit more grasp on some of the technical stuff! Step One – Design There are SO many ideas out there for making stuff in clay! From delicate porcelain jewellery, through to heavy sculptural work and everything in between. Deciding your direction is sometimes not that easy – when you first start, try everything, you will naturally gravitate to the style that you enjoy! The options and variations are endless and can get a wee bit overwhelming too! Check in with me before you start to ensure your ideas will work, what order you might do things, how you could achieve the look you are seeking and any other technical data required! Step Two – Making Clay is thixotropic. This means that as you work with it, the clay first gets sloppier and wetter, before is begins to dry in the atmosphere. For most things, you simply can’t do all parts of the project at once. An example of work order might look like: Get last weeks work out from the shelves Prepare clay for today’s work – roll your clay, prepare balls for throwing, make the first stage of a pinch pot) Clean up last week’s work and put it on the shelf for bisque firing Check that you have any glazing to do – and do enough of it that you will have time to finish your main project Do the next step of your next project – there might be a further step that can’t be complete immediately, in that case, wrap your work well and put onto the shelves. Letting your work rest for a while can really help keep your work clean and professional looking. Many things require bagging under plastic to keep it ready for work the next week – put your name on the outside of the bag so you can find your work easily. We have stickers and markers. Consider how you want to decorate your work – coloured slip can be applied at a fairly wet stage (remembering that it will make your work even wetter!). Trying to apply slip to dry clay won’t work! If you want to do sgraffito – you will need to keep the work leather hard (a state of dryness where you can still work the clay with a little effort and a little water and care). Step Three – Drying Most of the time your work can go into the rack uncovered to let it dry out for the following week. If you want to continue forming or shaping you will need to double bag your work – put your work on a suitable sized bat and put the bat in a bag so the base of the bag is under the bat, then put another bag over the top of the work and tuck the top of the bag under the bat. If you want to trim (or turn) your thrown work the following week, it should also be double bagged. If your work is large, delicate, or of uneven thicknesses, you should lightly cover your work for drying. When considering the drying process, bare in mind the weather, humidity and wind! The hotter and dryer, the faster things dry and work can dry unevenly in the shelves – this can lead to cracking – another time to lightly cover your work for drying. Step Four – Trimming and Cleaning Up Your work is dry! It is called greenware now and it is at it’s most fragile! Handle everything with two hands. I often refer to soft hands – keep everything gentle and with your fingers spread as much as possible. Try to not pick up things like plates too much, and always with both hands! Before your work can be bisque fired it should be “cleaned up”. You work won’t go into the kiln if it has sharp edges – when glazed, sharp edges turn into razor blades! Use a piece of fly wire to rub the work all over – this will scratch a little so be light handed. Use a knife or metal kidney to scrape any areas that require a bit more dynamic treatment than the fly wire offers! Finally, a very light wipe over with a slightly damp sponge can help soften and soothe all of your edges and dags! Trimming thrown work: If you are planning to trim (or turn) your thrown work (and you should be), make sure you bag it well – your work should be leather hard to almost dry for easiest trimming. Use this step to finish the work completely – use a metal kidney to polish the surface, or a slightly damp sponge to give a freshly thrown look. Wipe the sponge around the rim after trimming, and check the inside of the pot for dags! Trimming slip cast work: Usually I will trim the rims of your work on the wheel the following day to make that stage easier, however you will still need to check your work for lumps and bumps. Last but not least – check that your name is still clearly on the bottom of your work. Step Five – Bisque Firing When the work is completely dry it can go into the bisque kiln. The bisque kiln is fired to 1000°C. This process burns off the water in the clay as well as some of the chemically bound water. The structure of the clay is not altered that much at this temperature. Inside the bisque kiln, the work is stacked a little, small bowl inside a larger bowl and onto a heavy plate. Smaller items like decorations or drink coasters might get stacked several high. Consideration is paid to the weight of the stack and shape of the work. A bisque kiln can fire about one and a half times the amount of work that the glaze kiln can fire. The firing takes about 10 hours to complete the cycle and about two days to cool down. Once it has been emptied the work is placed in the glaze room ready for you to decorate! Step Six – Glazing Decorating your work with colour can be a lot of fun – and time consuming! There are three main options for surface treatment at this stage: Oxide Washes Underglazes Glazes Washes and underglazes do not “glaze” the work – It will still need a layer of glaze to fully seal the clay (washes don’t need glaze on surfaces not designed for food or liquid as they can gloss up a little on their own). Underglazes are stable colourants that turn out pretty much how they look in the jar. They can be mixed with each other to form other colours and can be used like water colours to paint onto your work. Mostly they should have a clear glaze on top to seal them. Oxides are a different species – the pink oxide (cobalt) wash turns out bright blue for instance. They don’t always need a glaze on top, and some glazes can change the colour of the wash! The glazes need no other “glaze” on top! Be careful of unknown glaze interactions – you can put any combination of glaze in a bowl or on a plate, but only a single glaze on the outside of any vertical surface! Glazes are a chemical reaction under heat. We don’t know the exact chemicals in the Mayco glazes we use. I can guess by the way they interact with each other, however, on the whole, you need to test every idea you have, and not run the test on a vertical surface! Simply put, glaze is a layer of glass like substance that bonds with the clay underneath. Clay is made of silica, alumina and water. Glaze is made of mostly silica. Silica has a melting point of 1700°C and we fire to 1240°C. The silica requires a “flux” to help it melt at the lower temperature. Fluxes can be all sorts of chemicals – a common one is calcium – calcium has a melting point of 2500°C, however, together they both melt at a much lower temperature! Colourants are metal oxides like cobalt (blue), chrome (green through black), copper (green, blue, even red!), manganese (black, purple and pink) iron (red brown), etc. Different chemicals in the glaze can have dramatic effects. for example, barium carbonate (which we don’t use) turns manganese bright pink! Other elements can turn manganese dioxide brown, blue, purple and reddish brown. Manganese dioxide is a flux in and of itself as well. So, glazes that get their black and purple colours, often interact with other glazes and RUN! Our mirror black is a good example – it mixes really well with many glazes because it fluxes them – causes them to melt faster. It will also bring out many beautiful colours in the glazes because it’s black colouring most definitely comes from manganese dioxide! Glaze chemistry is a whole subject on it’s own! We use commercial Mayco glazes on purpose – for their huge range of colour possibilities, stability, cool interactions, artistic freedom with the ability to easily brush the glazes on and ease of use. We currently have almost 50 glazes on hand! A major project is to test the interactions of all glazes with each other. That is 2,500 test tiles!!!! I’m going to make the wall behind the wheels the feature wall of pretty colours! Step Seven – Glaze (Gloss or sometimes called “Glost”) Firing Most of the time this is the final stage of making your creation (but not always!) The glaze kiln goes to 1240°C. This is called cone 6, or midrange. It is the low end of stoneware temperatures. Stoneware clays and glazes are typically fired at cone 8 – 10, that is 1260 – 1290°C. The energy requirement to go from 1240°C to 1280°C is almost a 30% more! Our clay is formulated to vitrify (mature, turn “glass-like”) at 1240°, as are our glazes. A glaze kiln take around 12 hours to reach temperature and two to three days to cool down. Sometimes a third firing process is required – this is for decoration that is added to work after the glaze firing. For example – adding precious metals and lustres. this firing temperature is usually around 600 – 800°C depending upon the techniques being used. There are many students interested in gold and silver trims – we will be doing this third type of firing soon! After firing your work will be in the student finished work shelves. Remember to pay for it before you head out the door! There is a small extra charge for using porcelain clay (it’s more than twice the price of regular clay), and for any third firing process! Once your work has been fired it can not turn back into clay for millennia – so don’t fire it if you don’t like it! Put it in the bucket for recycling. https://firebirdstudios.com.au/the-process-of-making-pottery/ The bowl is an example of kitchenware used in the 19th century and still in use today.Bowl white ceramic. Crack on side. Badly stained.Backstamp very faint and unable to be read.flagstaff hill, warrnambool, shipwrecked-coast, flagstaff-hill, flagstaff-hill-maritime-museum, maritime-museum, shipwreck-coast, flagstaff-hill-maritime-village, mixing bowl, food preparation, kitchen equipment, ceramic -
 Flagstaff Hill Maritime Museum and Village
Domestic object - Bowl
The Process of Making Pottery Decorating, Firing, Glazing, Making, Technical There is a rhythm and flow to clay. It can’t be done all at once! Even the making process! It can take weeks to get everything done, especially if you can only work on your pottery once a week! Even though we have three hour classes, it’s often just not enough time! Here is an overview of some of the processes so you have a bit more grasp on some of the technical stuff! Step One – Design There are SO many ideas out there for making stuff in clay! From delicate porcelain jewellery, through to heavy sculptural work and everything in between. Deciding your direction is sometimes not that easy – when you first start, try everything, you will naturally gravitate to the style that you enjoy! The options and variations are endless and can get a wee bit overwhelming too! Check in with me before you start to ensure your ideas will work, what order you might do things, how you could achieve the look you are seeking and any other technical data required! Step Two – Making Clay is thixotropic. This means that as you work with it, the clay first gets sloppier and wetter, before is begins to dry in the atmosphere. For most things, you simply can’t do all parts of the project at once. An example of work order might look like: Get last weeks work out from the shelves Prepare clay for today’s work – roll your clay, prepare balls for throwing, make the first stage of a pinch pot) Clean up last week’s work and put it on the shelf for bisque firing Check that you have any glazing to do – and do enough of it that you will have time to finish your main project Do the next step of your next project – there might be a further step that can’t be complete immediately, in that case, wrap your work well and put onto the shelves. Letting your work rest for a while can really help keep your work clean and professional looking. Many things require bagging under plastic to keep it ready for work the next week – put your name on the outside of the bag so you can find your work easily. We have stickers and markers. Consider how you want to decorate your work – coloured slip can be applied at a fairly wet stage (remembering that it will make your work even wetter!). Trying to apply slip to dry clay won’t work! If you want to do sgraffito – you will need to keep the work leather hard (a state of dryness where you can still work the clay with a little effort and a little water and care). Step Three – Drying Most of the time your work can go into the rack uncovered to let it dry out for the following week. If you want to continue forming or shaping you will need to double bag your work – put your work on a suitable sized bat and put the bat in a bag so the base of the bag is under the bat, then put another bag over the top of the work and tuck the top of the bag under the bat. If you want to trim (or turn) your thrown work the following week, it should also be double bagged. If your work is large, delicate, or of uneven thicknesses, you should lightly cover your work for drying. When considering the drying process, bare in mind the weather, humidity and wind! The hotter and dryer, the faster things dry and work can dry unevenly in the shelves – this can lead to cracking – another time to lightly cover your work for drying. Step Four – Trimming and Cleaning Up Your work is dry! It is called greenware now and it is at it’s most fragile! Handle everything with two hands. I often refer to soft hands – keep everything gentle and with your fingers spread as much as possible. Try to not pick up things like plates too much, and always with both hands! Before your work can be bisque fired it should be “cleaned up”. You work won’t go into the kiln if it has sharp edges – when glazed, sharp edges turn into razor blades! Use a piece of fly wire to rub the work all over – this will scratch a little so be light handed. Use a knife or metal kidney to scrape any areas that require a bit more dynamic treatment than the fly wire offers! Finally, a very light wipe over with a slightly damp sponge can help soften and soothe all of your edges and dags! Trimming thrown work: If you are planning to trim (or turn) your thrown work (and you should be), make sure you bag it well – your work should be leather hard to almost dry for easiest trimming. Use this step to finish the work completely – use a metal kidney to polish the surface, or a slightly damp sponge to give a freshly thrown look. Wipe the sponge around the rim after trimming, and check the inside of the pot for dags! Trimming slip cast work: Usually I will trim the rims of your work on the wheel the following day to make that stage easier, however you will still need to check your work for lumps and bumps. Last but not least – check that your name is still clearly on the bottom of your work. Step Five – Bisque Firing When the work is completely dry it can go into the bisque kiln. The bisque kiln is fired to 1000°C. This process burns off the water in the clay as well as some of the chemically bound water. The structure of the clay is not altered that much at this temperature. Inside the bisque kiln, the work is stacked a little, small bowl inside a larger bowl and onto a heavy plate. Smaller items like decorations or drink coasters might get stacked several high. Consideration is paid to the weight of the stack and shape of the work. A bisque kiln can fire about one and a half times the amount of work that the glaze kiln can fire. The firing takes about 10 hours to complete the cycle and about two days to cool down. Once it has been emptied the work is placed in the glaze room ready for you to decorate! Step Six – Glazing Decorating your work with colour can be a lot of fun – and time consuming! There are three main options for surface treatment at this stage: Oxide Washes Underglazes Glazes Washes and underglazes do not “glaze” the work – It will still need a layer of glaze to fully seal the clay (washes don’t need glaze on surfaces not designed for food or liquid as they can gloss up a little on their own). Underglazes are stable colourants that turn out pretty much how they look in the jar. They can be mixed with each other to form other colours and can be used like water colours to paint onto your work. Mostly they should have a clear glaze on top to seal them. Oxides are a different species – the pink oxide (cobalt) wash turns out bright blue for instance. They don’t always need a glaze on top, and some glazes can change the colour of the wash! The glazes need no other “glaze” on top! Be careful of unknown glaze interactions – you can put any combination of glaze in a bowl or on a plate, but only a single glaze on the outside of any vertical surface! Glazes are a chemical reaction under heat. We don’t know the exact chemicals in the Mayco glazes we use. I can guess by the way they interact with each other, however, on the whole, you need to test every idea you have, and not run the test on a vertical surface! Simply put, glaze is a layer of glass like substance that bonds with the clay underneath. Clay is made of silica, alumina and water. Glaze is made of mostly silica. Silica has a melting point of 1700°C and we fire to 1240°C. The silica requires a “flux” to help it melt at the lower temperature. Fluxes can be all sorts of chemicals – a common one is calcium – calcium has a melting point of 2500°C, however, together they both melt at a much lower temperature! Colourants are metal oxides like cobalt (blue), chrome (green through black), copper (green, blue, even red!), manganese (black, purple and pink) iron (red brown), etc. Different chemicals in the glaze can have dramatic effects. for example, barium carbonate (which we don’t use) turns manganese bright pink! Other elements can turn manganese dioxide brown, blue, purple and reddish brown. Manganese dioxide is a flux in and of itself as well. So, glazes that get their black and purple colours, often interact with other glazes and RUN! Our mirror black is a good example – it mixes really well with many glazes because it fluxes them – causes them to melt faster. It will also bring out many beautiful colours in the glazes because it’s black colouring most definitely comes from manganese dioxide! Glaze chemistry is a whole subject on it’s own! We use commercial Mayco glazes on purpose – for their huge range of colour possibilities, stability, cool interactions, artistic freedom with the ability to easily brush the glazes on and ease of use. We currently have almost 50 glazes on hand! A major project is to test the interactions of all glazes with each other. That is 2,500 test tiles!!!! I’m going to make the wall behind the wheels the feature wall of pretty colours! Step Seven – Glaze (Gloss or sometimes called “Glost”) Firing Most of the time this is the final stage of making your creation (but not always!) The glaze kiln goes to 1240°C. This is called cone 6, or midrange. It is the low end of stoneware temperatures. Stoneware clays and glazes are typically fired at cone 8 – 10, that is 1260 – 1290°C. The energy requirement to go from 1240°C to 1280°C is almost a 30% more! Our clay is formulated to vitrify (mature, turn “glass-like”) at 1240°, as are our glazes. A glaze kiln take around 12 hours to reach temperature and two to three days to cool down. Sometimes a third firing process is required – this is for decoration that is added to work after the glaze firing. For example – adding precious metals and lustres. this firing temperature is usually around 600 – 800°C depending upon the techniques being used. There are many students interested in gold and silver trims – we will be doing this third type of firing soon! After firing your work will be in the student finished work shelves. Remember to pay for it before you head out the door! There is a small extra charge for using porcelain clay (it’s more than twice the price of regular clay), and for any third firing process! Once your work has been fired it can not turn back into clay for millennia – so don’t fire it if you don’t like it! Put it in the bucket for recycling. https://firebirdstudios.com.au/the-process-of-making-pottery/ This bowl is an example of kitchenware used in the 19th century and still in use today.Bowl white ceramic plain that has two sets of edging around lip. Inside bowl has plaster designed to look like cooking mixture.flagstaff hill, warrnambool, shipwrecked-coast, flagstaff-hill, flagstaff-hill-maritime-museum, maritime-museum, shipwreck-coast, flagstaff-hill-maritime-village, kitchen equipment, ceramic -
 Flagstaff Hill Maritime Museum and Village
Domestic object - Bowl, J & G Meakin, Late 19th or early 20th Century
The Process of Making Pottery Decorating, Firing, Glazing, Making, Technical There is a rhythm and flow to clay. It can’t be done all at once! Even the making process! It can take weeks to get everything done, especially if you can only work on your pottery once a week! Even though we have three hour classes, it’s often just not enough time! Here is an overview of some of the processes so you have a bit more grasp on some of the technical stuff! Step One – Design There are SO many ideas out there for making stuff in clay! From delicate porcelain jewellery, through to heavy sculptural work and everything in between. Deciding your direction is sometimes not that easy – when you first start, try everything, you will naturally gravitate to the style that you enjoy! The options and variations are endless and can get a wee bit overwhelming too! Check in with me before you start to ensure your ideas will work, what order you might do things, how you could achieve the look you are seeking and any other technical data required! Step Two – Making Clay is thixotropic. This means that as you work with it, the clay first gets sloppier and wetter, before is begins to dry in the atmosphere. For most things, you simply can’t do all parts of the project at once. An example of work order might look like: Get last weeks work out from the shelves Prepare clay for today’s work – roll your clay, prepare balls for throwing, make the first stage of a pinch pot) Clean up last week’s work and put it on the shelf for bisque firing Check that you have any glazing to do – and do enough of it that you will have time to finish your main project Do the next step of your next project – there might be a further step that can’t be complete immediately, in that case, wrap your work well and put onto the shelves. Letting your work rest for a while can really help keep your work clean and professional looking. Many things require bagging under plastic to keep it ready for work the next week – put your name on the outside of the bag so you can find your work easily. We have stickers and markers. Consider how you want to decorate your work – coloured slip can be applied at a fairly wet stage (remembering that it will make your work even wetter!). Trying to apply slip to dry clay won’t work! If you want to do sgraffito – you will need to keep the work leather hard (a state of dryness where you can still work the clay with a little effort and a little water and care). Step Three – Drying Most of the time your work can go into the rack uncovered to let it dry out for the following week. If you want to continue forming or shaping you will need to double bag your work – put your work on a suitable sized bat and put the bat in a bag so the base of the bag is under the bat, then put another bag over the top of the work and tuck the top of the bag under the bat. If you want to trim (or turn) your thrown work the following week, it should also be double bagged. If your work is large, delicate, or of uneven thicknesses, you should lightly cover your work for drying. When considering the drying process, bare in mind the weather, humidity and wind! The hotter and dryer, the faster things dry and work can dry unevenly in the shelves – this can lead to cracking – another time to lightly cover your work for drying. Step Four – Trimming and Cleaning Up Your work is dry! It is called greenware now and it is at it’s most fragile! Handle everything with two hands. I often refer to soft hands – keep everything gentle and with your fingers spread as much as possible. Try to not pick up things like plates too much, and always with both hands! Before your work can be bisque fired it should be “cleaned up”. You work won’t go into the kiln if it has sharp edges – when glazed, sharp edges turn into razor blades! Use a piece of fly wire to rub the work all over – this will scratch a little so be light handed. Use a knife or metal kidney to scrape any areas that require a bit more dynamic treatment than the fly wire offers! Finally, a very light wipe over with a slightly damp sponge can help soften and soothe all of your edges and dags! Trimming thrown work: If you are planning to trim (or turn) your thrown work (and you should be), make sure you bag it well – your work should be leather hard to almost dry for easiest trimming. Use this step to finish the work completely – use a metal kidney to polish the surface, or a slightly damp sponge to give a freshly thrown look. Wipe the sponge around the rim after trimming, and check the inside of the pot for dags! Trimming slip cast work: Usually I will trim the rims of your work on the wheel the following day to make that stage easier, however you will still need to check your work for lumps and bumps. Last but not least – check that your name is still clearly on the bottom of your work. Step Five – Bisque Firing When the work is completely dry it can go into the bisque kiln. The bisque kiln is fired to 1000°C. This process burns off the water in the clay as well as some of the chemically bound water. The structure of the clay is not altered that much at this temperature. Inside the bisque kiln, the work is stacked a little, small bowl inside a larger bowl and onto a heavy plate. Smaller items like decorations or drink coasters might get stacked several high. Consideration is paid to the weight of the stack and shape of the work. A bisque kiln can fire about one and a half times the amount of work that the glaze kiln can fire. The firing takes about 10 hours to complete the cycle and about two days to cool down. Once it has been emptied the work is placed in the glaze room ready for you to decorate! Step Six – Glazing Decorating your work with colour can be a lot of fun – and time consuming! There are three main options for surface treatment at this stage: Oxide Washes Underglazes Glazes Washes and underglazes do not “glaze” the work – It will still need a layer of glaze to fully seal the clay (washes don’t need glaze on surfaces not designed for food or liquid as they can gloss up a little on their own). Underglazes are stable colourants that turn out pretty much how they look in the jar. They can be mixed with each other to form other colours and can be used like water colours to paint onto your work. Mostly they should have a clear glaze on top to seal them. Oxides are a different species – the pink oxide (cobalt) wash turns out bright blue for instance. They don’t always need a glaze on top, and some glazes can change the colour of the wash! The glazes need no other “glaze” on top! Be careful of unknown glaze interactions – you can put any combination of glaze in a bowl or on a plate, but only a single glaze on the outside of any vertical surface! Glazes are a chemical reaction under heat. We don’t know the exact chemicals in the Mayco glazes we use. I can guess by the way they interact with each other, however, on the whole, you need to test every idea you have, and not run the test on a vertical surface! Simply put, glaze is a layer of glass like substance that bonds with the clay underneath. Clay is made of silica, alumina and water. Glaze is made of mostly silica. Silica has a melting point of 1700°C and we fire to 1240°C. The silica requires a “flux” to help it melt at the lower temperature. Fluxes can be all sorts of chemicals – a common one is calcium – calcium has a melting point of 2500°C, however, together they both melt at a much lower temperature! Colourants are metal oxides like cobalt (blue), chrome (green through black), copper (green, blue, even red!), manganese (black, purple and pink) iron (red brown), etc. Different chemicals in the glaze can have dramatic effects. for example, barium carbonate (which we don’t use) turns manganese bright pink! Other elements can turn manganese dioxide brown, blue, purple and reddish brown. Manganese dioxide is a flux in and of itself as well. So, glazes that get their black and purple colours, often interact with other glazes and RUN! Our mirror black is a good example – it mixes really well with many glazes because it fluxes them – causes them to melt faster. It will also bring out many beautiful colours in the glazes because it’s black colouring most definitely comes from manganese dioxide! Glaze chemistry is a whole subject on it’s own! We use commercial Mayco glazes on purpose – for their huge range of colour possibilities, stability, cool interactions, artistic freedom with the ability to easily brush the glazes on and ease of use. We currently have almost 50 glazes on hand! A major project is to test the interactions of all glazes with each other. That is 2,500 test tiles!!!! I’m going to make the wall behind the wheels the feature wall of pretty colours! Step Seven – Glaze (Gloss or sometimes called “Glost”) Firing Most of the time this is the final stage of making your creation (but not always!) The glaze kiln goes to 1240°C. This is called cone 6, or midrange. It is the low end of stoneware temperatures. Stoneware clays and glazes are typically fired at cone 8 – 10, that is 1260 – 1290°C. The energy requirement to go from 1240°C to 1280°C is almost a 30% more! Our clay is formulated to vitrify (mature, turn “glass-like”) at 1240°, as are our glazes. A glaze kiln take around 12 hours to reach temperature and two to three days to cool down. Sometimes a third firing process is required – this is for decoration that is added to work after the glaze firing. For example – adding precious metals and lustres. this firing temperature is usually around 600 – 800°C depending upon the techniques being used. There are many students interested in gold and silver trims – we will be doing this third type of firing soon! After firing your work will be in the student finished work shelves. Remember to pay for it before you head out the door! There is a small extra charge for using porcelain clay (it’s more than twice the price of regular clay), and for any third firing process! Once your work has been fired it can not turn back into clay for millennia – so don’t fire it if you don’t like it! Put it in the bucket for recycling. https://firebirdstudios.com.au/the-process-of-making-pottery/This bowl was made by renowned pottery company J & G Meakin of England. The firm was established in the mid-1800's. The bowl is an example of kitchenware used in the 19th century and still in use today.Bowl; white ceramic, round and tapering inwards towards base. Made by J and G Meakin England.On base, 'Ironstone China Reg SOL 391413' with symbolflagstaff hill, flagstaff hill maritime museum and village, warrnambool, maritime museum, maritime village, great ocean road, shipwreck coast, mixing bowl, food preparation, j & g meakin, pottery, stoke-on-trent, kitchen equipment, ceramic -
 Flagstaff Hill Maritime Museum and Village
Domestic object - Plate
The Process of Making Pottery Decorating, Firing, Glazing, Making, Technical There is a rhythm and flow to clay. It can’t be done all at once! Even the making process! It can take weeks to get everything done, especially if you can only work on your pottery once a week! Even though we have three hour classes, it’s often just not enough time! Here is an overview of some of the processes so you have a bit more grasp on some of the technical stuff! Step One – Design There are SO many ideas out there for making stuff in clay! From delicate porcelain jewellery, through to heavy sculptural work and everything in between. Deciding your direction is sometimes not that easy – when you first start, try everything, you will naturally gravitate to the style that you enjoy! The options and variations are endless and can get a wee bit overwhelming too! Check in with me before you start to ensure your ideas will work, what order you might do things, how you could achieve the look you are seeking and any other technical data required! Step Two – Making Clay is thixotropic. This means that as you work with it, the clay first gets sloppier and wetter, before is begins to dry in the atmosphere. For most things, you simply can’t do all parts of the project at once. An example of work order might look like: Get last weeks work out from the shelves Prepare clay for today’s work – roll your clay, prepare balls for throwing, make the first stage of a pinch pot) Clean up last week’s work and put it on the shelf for bisque firing Check that you have any glazing to do – and do enough of it that you will have time to finish your main project Do the next step of your next project – there might be a further step that can’t be complete immediately, in that case, wrap your work well and put onto the shelves. Letting your work rest for a while can really help keep your work clean and professional looking. Many things require bagging under plastic to keep it ready for work the next week – put your name on the outside of the bag so you can find your work easily. We have stickers and markers. Consider how you want to decorate your work – coloured slip can be applied at a fairly wet stage (remembering that it will make your work even wetter!). Trying to apply slip to dry clay won’t work! If you want to do sgraffito – you will need to keep the work leather hard (a state of dryness where you can still work the clay with a little effort and a little water and care). Step Three – Drying Most of the time your work can go into the rack uncovered to let it dry out for the following week. If you want to continue forming or shaping you will need to double bag your work – put your work on a suitable sized bat and put the bat in a bag so the base of the bag is under the bat, then put another bag over the top of the work and tuck the top of the bag under the bat. If you want to trim (or turn) your thrown work the following week, it should also be double bagged. If your work is large, delicate, or of uneven thicknesses, you should lightly cover your work for drying. When considering the drying process, bare in mind the weather, humidity and wind! The hotter and dryer, the faster things dry and work can dry unevenly in the shelves – this can lead to cracking – another time to lightly cover your work for drying. Step Four – Trimming and Cleaning Up Your work is dry! It is called greenware now and it is at it’s most fragile! Handle everything with two hands. I often refer to soft hands – keep everything gentle and with your fingers spread as much as possible. Try to not pick up things like plates too much, and always with both hands! Before your work can be bisque fired it should be “cleaned up”. You work won’t go into the kiln if it has sharp edges – when glazed, sharp edges turn into razor blades! Use a piece of fly wire to rub the work all over – this will scratch a little so be light handed. Use a knife or metal kidney to scrape any areas that require a bit more dynamic treatment than the fly wire offers! Finally, a very light wipe over with a slightly damp sponge can help soften and soothe all of your edges and dags! Trimming thrown work: If you are planning to trim (or turn) your thrown work (and you should be), make sure you bag it well – your work should be leather hard to almost dry for easiest trimming. Use this step to finish the work completely – use a metal kidney to polish the surface, or a slightly damp sponge to give a freshly thrown look. Wipe the sponge around the rim after trimming, and check the inside of the pot for dags! Trimming slip cast work: Usually I will trim the rims of your work on the wheel the following day to make that stage easier, however you will still need to check your work for lumps and bumps. Last but not least – check that your name is still clearly on the bottom of your work. Step Five – Bisque Firing When the work is completely dry it can go into the bisque kiln. The bisque kiln is fired to 1000°C. This process burns off the water in the clay as well as some of the chemically bound water. The structure of the clay is not altered that much at this temperature. Inside the bisque kiln, the work is stacked a little, small bowl inside a larger bowl and onto a heavy plate. Smaller items like decorations or drink coasters might get stacked several high. Consideration is paid to the weight of the stack and shape of the work. A bisque kiln can fire about one and a half times the amount of work that the glaze kiln can fire. The firing takes about 10 hours to complete the cycle and about two days to cool down. Once it has been emptied the work is placed in the glaze room ready for you to decorate! Step Six – Glazing Decorating your work with colour can be a lot of fun – and time consuming! There are three main options for surface treatment at this stage: Oxide Washes Underglazes Glazes Washes and underglazes do not “glaze” the work – It will still need a layer of glaze to fully seal the clay (washes don’t need glaze on surfaces not designed for food or liquid as they can gloss up a little on their own). Underglazes are stable colourants that turn out pretty much how they look in the jar. They can be mixed with each other to form other colours and can be used like water colours to paint onto your work. Mostly they should have a clear glaze on top to seal them. Oxides are a different species – the pink oxide (cobalt) wash turns out bright blue for instance. They don’t always need a glaze on top, and some glazes can change the colour of the wash! The glazes need no other “glaze” on top! Be careful of unknown glaze interactions – you can put any combination of glaze in a bowl or on a plate, but only a single glaze on the outside of any vertical surface! Glazes are a chemical reaction under heat. We don’t know the exact chemicals in the Mayco glazes we use. I can guess by the way they interact with each other, however, on the whole, you need to test every idea you have, and not run the test on a vertical surface! Simply put, glaze is a layer of glass like substance that bonds with the clay underneath. Clay is made of silica, alumina and water. Glaze is made of mostly silica. Silica has a melting point of 1700°C and we fire to 1240°C. The silica requires a “flux” to help it melt at the lower temperature. Fluxes can be all sorts of chemicals – a common one is calcium – calcium has a melting point of 2500°C, however, together they both melt at a much lower temperature! Colourants are metal oxides like cobalt (blue), chrome (green through black), copper (green, blue, even red!), manganese (black, purple and pink) iron (red brown), etc. Different chemicals in the glaze can have dramatic effects. for example, barium carbonate (which we don’t use) turns manganese bright pink! Other elements can turn manganese dioxide brown, blue, purple and reddish brown. Manganese dioxide is a flux in and of itself as well. So, glazes that get their black and purple colours, often interact with other glazes and RUN! Our mirror black is a good example – it mixes really well with many glazes because it fluxes them – causes them to melt faster. It will also bring out many beautiful colours in the glazes because it’s black colouring most definitely comes from manganese dioxide! Glaze chemistry is a whole subject on it’s own! We use commercial Mayco glazes on purpose – for their huge range of colour possibilities, stability, cool interactions, artistic freedom with the ability to easily brush the glazes on and ease of use. We currently have almost 50 glazes on hand! A major project is to test the interactions of all glazes with each other. That is 2,500 test tiles!!!! I’m going to make the wall behind the wheels the feature wall of pretty colours! Step Seven – Glaze (Gloss or sometimes called “Glost”) Firing Most of the time this is the final stage of making your creation (but not always!) The glaze kiln goes to 1240°C. This is called cone 6, or midrange. It is the low end of stoneware temperatures. Stoneware clays and glazes are typically fired at cone 8 – 10, that is 1260 – 1290°C. The energy requirement to go from 1240°C to 1280°C is almost a 30% more! Our clay is formulated to vitrify (mature, turn “glass-like”) at 1240°, as are our glazes. A glaze kiln take around 12 hours to reach temperature and two to three days to cool down. Sometimes a third firing process is required – this is for decoration that is added to work after the glaze firing. For example – adding precious metals and lustres. this firing temperature is usually around 600 – 800°C depending upon the techniques being used. There are many students interested in gold and silver trims – we will be doing this third type of firing soon! After firing your work will be in the student finished work shelves. Remember to pay for it before you head out the door! There is a small extra charge for using porcelain clay (it’s more than twice the price of regular clay), and for any third firing process! Once your work has been fired it can not turn back into clay for millennia – so don’t fire it if you don’t like it! Put it in the bucket for recycling. https://firebirdstudios.com.au/the-process-of-making-pottery/Ceramics have evolved over thousands of years.White earthenware dinner plate. Crazing evident all over.Backstamped ‘Made in England S LTD’flagstaff hill, warrnambool, shipwrecked-coast, flagstaff-hill, flagstaff-hill-maritime-museum, maritime-museum, shipwreck-coast, flagstaff-hill-maritime-village, ceramics, tableware -
 Flagstaff Hill Maritime Museum and Village
Domestic object - Plate, Johnson Bros
The Process of Making Pottery Decorating, Firing, Glazing, Making, Technical There is a rhythm and flow to clay. It can’t be done all at once! Even the making process! It can take weeks to get everything done, especially if you can only work on your pottery once a week! Even though we have three hour classes, it’s often just not enough time! Here is an overview of some of the processes so you have a bit more grasp on some of the technical stuff! Step One – Design There are SO many ideas out there for making stuff in clay! From delicate porcelain jewellery, through to heavy sculptural work and everything in between. Deciding your direction is sometimes not that easy – when you first start, try everything, you will naturally gravitate to the style that you enjoy! The options and variations are endless and can get a wee bit overwhelming too! Check in with me before you start to ensure your ideas will work, what order you might do things, how you could achieve the look you are seeking and any other technical data required! Step Two – Making Clay is thixotropic. This means that as you work with it, the clay first gets sloppier and wetter, before is begins to dry in the atmosphere. For most things, you simply can’t do all parts of the project at once. An example of work order might look like: Get last weeks work out from the shelves Prepare clay for today’s work – roll your clay, prepare balls for throwing, make the first stage of a pinch pot) Clean up last week’s work and put it on the shelf for bisque firing Check that you have any glazing to do – and do enough of it that you will have time to finish your main project Do the next step of your next project – there might be a further step that can’t be complete immediately, in that case, wrap your work well and put onto the shelves. Letting your work rest for a while can really help keep your work clean and professional looking. Many things require bagging under plastic to keep it ready for work the next week – put your name on the outside of the bag so you can find your work easily. We have stickers and markers. Consider how you want to decorate your work – coloured slip can be applied at a fairly wet stage (remembering that it will make your work even wetter!). Trying to apply slip to dry clay won’t work! If you want to do sgraffito – you will need to keep the work leather hard (a state of dryness where you can still work the clay with a little effort and a little water and care). Step Three – Drying Most of the time your work can go into the rack uncovered to let it dry out for the following week. If you want to continue forming or shaping you will need to double bag your work – put your work on a suitable sized bat and put the bat in a bag so the base of the bag is under the bat, then put another bag over the top of the work and tuck the top of the bag under the bat. If you want to trim (or turn) your thrown work the following week, it should also be double bagged. If your work is large, delicate, or of uneven thicknesses, you should lightly cover your work for drying. When considering the drying process, bare in mind the weather, humidity and wind! The hotter and dryer, the faster things dry and work can dry unevenly in the shelves – this can lead to cracking – another time to lightly cover your work for drying. Step Four – Trimming and Cleaning Up Your work is dry! It is called greenware now and it is at it’s most fragile! Handle everything with two hands. I often refer to soft hands – keep everything gentle and with your fingers spread as much as possible. Try to not pick up things like plates too much, and always with both hands! Before your work can be bisque fired it should be “cleaned up”. You work won’t go into the kiln if it has sharp edges – when glazed, sharp edges turn into razor blades! Use a piece of fly wire to rub the work all over – this will scratch a little so be light handed. Use a knife or metal kidney to scrape any areas that require a bit more dynamic treatment than the fly wire offers! Finally, a very light wipe over with a slightly damp sponge can help soften and soothe all of your edges and dags! Trimming thrown work: If you are planning to trim (or turn) your thrown work (and you should be), make sure you bag it well – your work should be leather hard to almost dry for easiest trimming. Use this step to finish the work completely – use a metal kidney to polish the surface, or a slightly damp sponge to give a freshly thrown look. Wipe the sponge around the rim after trimming, and check the inside of the pot for dags! Trimming slip cast work: Usually I will trim the rims of your work on the wheel the following day to make that stage easier, however you will still need to check your work for lumps and bumps. Last but not least – check that your name is still clearly on the bottom of your work. Step Five – Bisque Firing When the work is completely dry it can go into the bisque kiln. The bisque kiln is fired to 1000°C. This process burns off the water in the clay as well as some of the chemically bound water. The structure of the clay is not altered that much at this temperature. Inside the bisque kiln, the work is stacked a little, small bowl inside a larger bowl and onto a heavy plate. Smaller items like decorations or drink coasters might get stacked several high. Consideration is paid to the weight of the stack and shape of the work. A bisque kiln can fire about one and a half times the amount of work that the glaze kiln can fire. The firing takes about 10 hours to complete the cycle and about two days to cool down. Once it has been emptied the work is placed in the glaze room ready for you to decorate! Step Six – Glazing Decorating your work with colour can be a lot of fun – and time consuming! There are three main options for surface treatment at this stage: Oxide Washes Underglazes Glazes Washes and underglazes do not “glaze” the work – It will still need a layer of glaze to fully seal the clay (washes don’t need glaze on surfaces not designed for food or liquid as they can gloss up a little on their own). Underglazes are stable colourants that turn out pretty much how they look in the jar. They can be mixed with each other to form other colours and can be used like water colours to paint onto your work. Mostly they should have a clear glaze on top to seal them. Oxides are a different species – the pink oxide (cobalt) wash turns out bright blue for instance. They don’t always need a glaze on top, and some glazes can change the colour of the wash! The glazes need no other “glaze” on top! Be careful of unknown glaze interactions – you can put any combination of glaze in a bowl or on a plate, but only a single glaze on the outside of any vertical surface! Glazes are a chemical reaction under heat. We don’t know the exact chemicals in the Mayco glazes we use. I can guess by the way they interact with each other, however, on the whole, you need to test every idea you have, and not run the test on a vertical surface! Simply put, glaze is a layer of glass like substance that bonds with the clay underneath. Clay is made of silica, alumina and water. Glaze is made of mostly silica. Silica has a melting point of 1700°C and we fire to 1240°C. The silica requires a “flux” to help it melt at the lower temperature. Fluxes can be all sorts of chemicals – a common one is calcium – calcium has a melting point of 2500°C, however, together they both melt at a much lower temperature! Colourants are metal oxides like cobalt (blue), chrome (green through black), copper (green, blue, even red!), manganese (black, purple and pink) iron (red brown), etc. Different chemicals in the glaze can have dramatic effects. for example, barium carbonate (which we don’t use) turns manganese bright pink! Other elements can turn manganese dioxide brown, blue, purple and reddish brown. Manganese dioxide is a flux in and of itself as well. So, glazes that get their black and purple colours, often interact with other glazes and RUN! Our mirror black is a good example – it mixes really well with many glazes because it fluxes them – causes them to melt faster. It will also bring out many beautiful colours in the glazes because it’s black colouring most definitely comes from manganese dioxide! Glaze chemistry is a whole subject on it’s own! We use commercial Mayco glazes on purpose – for their huge range of colour possibilities, stability, cool interactions, artistic freedom with the ability to easily brush the glazes on and ease of use. We currently have almost 50 glazes on hand! A major project is to test the interactions of all glazes with each other. That is 2,500 test tiles!!!! I’m going to make the wall behind the wheels the feature wall of pretty colours! Step Seven – Glaze (Gloss or sometimes called “Glost”) Firing Most of the time this is the final stage of making your creation (but not always!) The glaze kiln goes to 1240°C. This is called cone 6, or midrange. It is the low end of stoneware temperatures. Stoneware clays and glazes are typically fired at cone 8 – 10, that is 1260 – 1290°C. The energy requirement to go from 1240°C to 1280°C is almost a 30% more! Our clay is formulated to vitrify (mature, turn “glass-like”) at 1240°, as are our glazes. A glaze kiln take around 12 hours to reach temperature and two to three days to cool down. Sometimes a third firing process is required – this is for decoration that is added to work after the glaze firing. For example – adding precious metals and lustres. this firing temperature is usually around 600 – 800°C depending upon the techniques being used. There are many students interested in gold and silver trims – we will be doing this third type of firing soon! After firing your work will be in the student finished work shelves. Remember to pay for it before you head out the door! There is a small extra charge for using porcelain clay (it’s more than twice the price of regular clay), and for any third firing process! Once your work has been fired it can not turn back into clay for millennia – so don’t fire it if you don’t like it! Put it in the bucket for recycling. https://firebirdstudios.com.au/the-process-of-making-pottery/Ceramics have evolved over thousands of years.A white earthenware side plate with a gadroon edge. Has water marks and chips on front.‘Johnson Bros England Reg No 15587’flagstaff hill, warrnambool, shipwrecked-coast, flagstaff-hill, flagstaff-hill-maritime-museum, maritime-museum, shipwreck-coast, flagstaff-hill-maritime-village, johnson bros, ceramics, tableware -
 Flagstaff Hill Maritime Museum and Village
Domestic object - Plate, Alfred Meakin
The Process of Making Pottery Decorating, Firing, Glazing, Making, Technical There is a rhythm and flow to clay. It can’t be done all at once! Even the making process! It can take weeks to get everything done, especially if you can only work on your pottery once a week! Even though we have three hour classes, it’s often just not enough time! Here is an overview of some of the processes so you have a bit more grasp on some of the technical stuff! Step One – Design There are SO many ideas out there for making stuff in clay! From delicate porcelain jewellery, through to heavy sculptural work and everything in between. Deciding your direction is sometimes not that easy – when you first start, try everything, you will naturally gravitate to the style that you enjoy! The options and variations are endless and can get a wee bit overwhelming too! Check in with me before you start to ensure your ideas will work, what order you might do things, how you could achieve the look you are seeking and any other technical data required! Step Two – Making Clay is thixotropic. This means that as you work with it, the clay first gets sloppier and wetter, before is begins to dry in the atmosphere. For most things, you simply can’t do all parts of the project at once. An example of work order might look like: Get last weeks work out from the shelves Prepare clay for today’s work – roll your clay, prepare balls for throwing, make the first stage of a pinch pot) Clean up last week’s work and put it on the shelf for bisque firing Check that you have any glazing to do – and do enough of it that you will have time to finish your main project Do the next step of your next project – there might be a further step that can’t be complete immediately, in that case, wrap your work well and put onto the shelves. Letting your work rest for a while can really help keep your work clean and professional looking. Many things require bagging under plastic to keep it ready for work the next week – put your name on the outside of the bag so you can find your work easily. We have stickers and markers. Consider how you want to decorate your work – coloured slip can be applied at a fairly wet stage (remembering that it will make your work even wetter!). Trying to apply slip to dry clay won’t work! If you want to do sgraffito – you will need to keep the work leather hard (a state of dryness where you can still work the clay with a little effort and a little water and care). Step Three – Drying Most of the time your work can go into the rack uncovered to let it dry out for the following week. If you want to continue forming or shaping you will need to double bag your work – put your work on a suitable sized bat and put the bat in a bag so the base of the bag is under the bat, then put another bag over the top of the work and tuck the top of the bag under the bat. If you want to trim (or turn) your thrown work the following week, it should also be double bagged. If your work is large, delicate, or of uneven thicknesses, you should lightly cover your work for drying. When considering the drying process, bare in mind the weather, humidity and wind! The hotter and dryer, the faster things dry and work can dry unevenly in the shelves – this can lead to cracking – another time to lightly cover your work for drying. Step Four – Trimming and Cleaning Up Your work is dry! It is called greenware now and it is at it’s most fragile! Handle everything with two hands. I often refer to soft hands – keep everything gentle and with your fingers spread as much as possible. Try to not pick up things like plates too much, and always with both hands! Before your work can be bisque fired it should be “cleaned up”. You work won’t go into the kiln if it has sharp edges – when glazed, sharp edges turn into razor blades! Use a piece of fly wire to rub the work all over – this will scratch a little so be light handed. Use a knife or metal kidney to scrape any areas that require a bit more dynamic treatment than the fly wire offers! Finally, a very light wipe over with a slightly damp sponge can help soften and soothe all of your edges and dags! Trimming thrown work: If you are planning to trim (or turn) your thrown work (and you should be), make sure you bag it well – your work should be leather hard to almost dry for easiest trimming. Use this step to finish the work completely – use a metal kidney to polish the surface, or a slightly damp sponge to give a freshly thrown look. Wipe the sponge around the rim after trimming, and check the inside of the pot for dags! Trimming slip cast work: Usually I will trim the rims of your work on the wheel the following day to make that stage easier, however you will still need to check your work for lumps and bumps. Last but not least – check that your name is still clearly on the bottom of your work. Step Five – Bisque Firing When the work is completely dry it can go into the bisque kiln. The bisque kiln is fired to 1000°C. This process burns off the water in the clay as well as some of the chemically bound water. The structure of the clay is not altered that much at this temperature. Inside the bisque kiln, the work is stacked a little, small bowl inside a larger bowl and onto a heavy plate. Smaller items like decorations or drink coasters might get stacked several high. Consideration is paid to the weight of the stack and shape of the work. A bisque kiln can fire about one and a half times the amount of work that the glaze kiln can fire. The firing takes about 10 hours to complete the cycle and about two days to cool down. Once it has been emptied the work is placed in the glaze room ready for you to decorate! Step Six – Glazing Decorating your work with colour can be a lot of fun – and time consuming! There are three main options for surface treatment at this stage: Oxide Washes Underglazes Glazes Washes and underglazes do not “glaze” the work – It will still need a layer of glaze to fully seal the clay (washes don’t need glaze on surfaces not designed for food or liquid as they can gloss up a little on their own). Underglazes are stable colourants that turn out pretty much how they look in the jar. They can be mixed with each other to form other colours and can be used like water colours to paint onto your work. Mostly they should have a clear glaze on top to seal them. Oxides are a different species – the pink oxide (cobalt) wash turns out bright blue for instance. They don’t always need a glaze on top, and some glazes can change the colour of the wash! The glazes need no other “glaze” on top! Be careful of unknown glaze interactions – you can put any combination of glaze in a bowl or on a plate, but only a single glaze on the outside of any vertical surface! Glazes are a chemical reaction under heat. We don’t know the exact chemicals in the Mayco glazes we use. I can guess by the way they interact with each other, however, on the whole, you need to test every idea you have, and not run the test on a vertical surface! Simply put, glaze is a layer of glass like substance that bonds with the clay underneath. Clay is made of silica, alumina and water. Glaze is made of mostly silica. Silica has a melting point of 1700°C and we fire to 1240°C. The silica requires a “flux” to help it melt at the lower temperature. Fluxes can be all sorts of chemicals – a common one is calcium – calcium has a melting point of 2500°C, however, together they both melt at a much lower temperature! Colourants are metal oxides like cobalt (blue), chrome (green through black), copper (green, blue, even red!), manganese (black, purple and pink) iron (red brown), etc. Different chemicals in the glaze can have dramatic effects. for example, barium carbonate (which we don’t use) turns manganese bright pink! Other elements can turn manganese dioxide brown, blue, purple and reddish brown. Manganese dioxide is a flux in and of itself as well. So, glazes that get their black and purple colours, often interact with other glazes and RUN! Our mirror black is a good example – it mixes really well with many glazes because it fluxes them – causes them to melt faster. It will also bring out many beautiful colours in the glazes because it’s black colouring most definitely comes from manganese dioxide! Glaze chemistry is a whole subject on it’s own! We use commercial Mayco glazes on purpose – for their huge range of colour possibilities, stability, cool interactions, artistic freedom with the ability to easily brush the glazes on and ease of use. We currently have almost 50 glazes on hand! A major project is to test the interactions of all glazes with each other. That is 2,500 test tiles!!!! I’m going to make the wall behind the wheels the feature wall of pretty colours! Step Seven – Glaze (Gloss or sometimes called “Glost”) Firing Most of the time this is the final stage of making your creation (but not always!) The glaze kiln goes to 1240°C. This is called cone 6, or midrange. It is the low end of stoneware temperatures. Stoneware clays and glazes are typically fired at cone 8 – 10, that is 1260 – 1290°C. The energy requirement to go from 1240°C to 1280°C is almost a 30% more! Our clay is formulated to vitrify (mature, turn “glass-like”) at 1240°, as are our glazes. A glaze kiln take around 12 hours to reach temperature and two to three days to cool down. Sometimes a third firing process is required – this is for decoration that is added to work after the glaze firing. For example – adding precious metals and lustres. this firing temperature is usually around 600 – 800°C depending upon the techniques being used. There are many students interested in gold and silver trims – we will be doing this third type of firing soon! After firing your work will be in the student finished work shelves. Remember to pay for it before you head out the door! There is a small extra charge for using porcelain clay (it’s more than twice the price of regular clay), and for any third firing process! Once your work has been fired it can not turn back into clay for millennia – so don’t fire it if you don’t like it! Put it in the bucket for recycling. https://firebirdstudios.com.au/the-process-of-making-pottery/Ceramics have evolved over thousands of years.Earthenware dessert plate, cream colour. Made by Alfred Meakin, England. Backstamped ‘Alfred Meakin England’. flagstaff hill, warrnambool, shipwrecked-coast, flagstaff-hill, flagstaff-hill-maritime-museum, maritime-museum, shipwreck-coast, flagstaff-hill-maritime-village, alfred meakin, ceramics, earthenware, kitchenware -
 Flagstaff Hill Maritime Museum and Village
Domestic object - Jug
The Process of Making Pottery Decorating, Firing, Glazing, Making, Technical There is a rhythm and flow to clay. It can’t be done all at once! Even the making process! It can take weeks to get everything done, especially if you can only work on your pottery once a week! Even though we have three hour classes, it’s often just not enough time! Here is an overview of some of the processes so you have a bit more grasp on some of the technical stuff! Step One – Design There are SO many ideas out there for making stuff in clay! From delicate porcelain jewellery, through to heavy sculptural work and everything in between. Deciding your direction is sometimes not that easy – when you first start, try everything, you will naturally gravitate to the style that you enjoy! The options and variations are endless and can get a wee bit overwhelming too! Check in with me before you start to ensure your ideas will work, what order you might do things, how you could achieve the look you are seeking and any other technical data required! Step Two – Making Clay is thixotropic. This means that as you work with it, the clay first gets sloppier and wetter, before is begins to dry in the atmosphere. For most things, you simply can’t do all parts of the project at once. An example of work order might look like: Get last weeks work out from the shelves Prepare clay for today’s work – roll your clay, prepare balls for throwing, make the first stage of a pinch pot) Clean up last week’s work and put it on the shelf for bisque firing Check that you have any glazing to do – and do enough of it that you will have time to finish your main project Do the next step of your next project – there might be a further step that can’t be complete immediately, in that case, wrap your work well and put onto the shelves. Letting your work rest for a while can really help keep your work clean and professional looking. Many things require bagging under plastic to keep it ready for work the next week – put your name on the outside of the bag so you can find your work easily. We have stickers and markers. Consider how you want to decorate your work – coloured slip can be applied at a fairly wet stage (remembering that it will make your work even wetter!). Trying to apply slip to dry clay won’t work! If you want to do sgraffito – you will need to keep the work leather hard (a state of dryness where you can still work the clay with a little effort and a little water and care). Step Three – Drying Most of the time your work can go into the rack uncovered to let it dry out for the following week. If you want to continue forming or shaping you will need to double bag your work – put your work on a suitable sized bat and put the bat in a bag so the base of the bag is under the bat, then put another bag over the top of the work and tuck the top of the bag under the bat. If you want to trim (or turn) your thrown work the following week, it should also be double bagged. If your work is large, delicate, or of uneven thicknesses, you should lightly cover your work for drying. When considering the drying process, bare in mind the weather, humidity and wind! The hotter and dryer, the faster things dry and work can dry unevenly in the shelves – this can lead to cracking – another time to lightly cover your work for drying. Step Four – Trimming and Cleaning Up Your work is dry! It is called greenware now and it is at it’s most fragile! Handle everything with two hands. I often refer to soft hands – keep everything gentle and with your fingers spread as much as possible. Try to not pick up things like plates too much, and always with both hands! Before your work can be bisque fired it should be “cleaned up”. You work won’t go into the kiln if it has sharp edges – when glazed, sharp edges turn into razor blades! Use a piece of fly wire to rub the work all over – this will scratch a little so be light handed. Use a knife or metal kidney to scrape any areas that require a bit more dynamic treatment than the fly wire offers! Finally, a very light wipe over with a slightly damp sponge can help soften and soothe all of your edges and dags! Trimming thrown work: If you are planning to trim (or turn) your thrown work (and you should be), make sure you bag it well – your work should be leather hard to almost dry for easiest trimming. Use this step to finish the work completely – use a metal kidney to polish the surface, or a slightly damp sponge to give a freshly thrown look. Wipe the sponge around the rim after trimming, and check the inside of the pot for dags! Trimming slip cast work: Usually I will trim the rims of your work on the wheel the following day to make that stage easier, however you will still need to check your work for lumps and bumps. Last but not least – check that your name is still clearly on the bottom of your work. Step Five – Bisque Firing When the work is completely dry it can go into the bisque kiln. The bisque kiln is fired to 1000°C. This process burns off the water in the clay as well as some of the chemically bound water. The structure of the clay is not altered that much at this temperature. Inside the bisque kiln, the work is stacked a little, small bowl inside a larger bowl and onto a heavy plate. Smaller items like decorations or drink coasters might get stacked several high. Consideration is paid to the weight of the stack and shape of the work. A bisque kiln can fire about one and a half times the amount of work that the glaze kiln can fire. The firing takes about 10 hours to complete the cycle and about two days to cool down. Once it has been emptied the work is placed in the glaze room ready for you to decorate! Step Six – Glazing Decorating your work with colour can be a lot of fun – and time consuming! There are three main options for surface treatment at this stage: Oxide Washes Underglazes Glazes Washes and underglazes do not “glaze” the work – It will still need a layer of glaze to fully seal the clay (washes don’t need glaze on surfaces not designed for food or liquid as they can gloss up a little on their own). Underglazes are stable colourants that turn out pretty much how they look in the jar. They can be mixed with each other to form other colours and can be used like water colours to paint onto your work. Mostly they should have a clear glaze on top to seal them. Oxides are a different species – the pink oxide (cobalt) wash turns out bright blue for instance. They don’t always need a glaze on top, and some glazes can change the colour of the wash! The glazes need no other “glaze” on top! Be careful of unknown glaze interactions – you can put any combination of glaze in a bowl or on a plate, but only a single glaze on the outside of any vertical surface! Glazes are a chemical reaction under heat. We don’t know the exact chemicals in the Mayco glazes we use. I can guess by the way they interact with each other, however, on the whole, you need to test every idea you have, and not run the test on a vertical surface! Simply put, glaze is a layer of glass like substance that bonds with the clay underneath. Clay is made of silica, alumina and water. Glaze is made of mostly silica. Silica has a melting point of 1700°C and we fire to 1240°C. The silica requires a “flux” to help it melt at the lower temperature. Fluxes can be all sorts of chemicals – a common one is calcium – calcium has a melting point of 2500°C, however, together they both melt at a much lower temperature! Colourants are metal oxides like cobalt (blue), chrome (green through black), copper (green, blue, even red!), manganese (black, purple and pink) iron (red brown), etc. Different chemicals in the glaze can have dramatic effects. for example, barium carbonate (which we don’t use) turns manganese bright pink! Other elements can turn manganese dioxide brown, blue, purple and reddish brown. Manganese dioxide is a flux in and of itself as well. So, glazes that get their black and purple colours, often interact with other glazes and RUN! Our mirror black is a good example – it mixes really well with many glazes because it fluxes them – causes them to melt faster. It will also bring out many beautiful colours in the glazes because it’s black colouring most definitely comes from manganese dioxide! Glaze chemistry is a whole subject on it’s own! We use commercial Mayco glazes on purpose – for their huge range of colour possibilities, stability, cool interactions, artistic freedom with the ability to easily brush the glazes on and ease of use. We currently have almost 50 glazes on hand! A major project is to test the interactions of all glazes with each other. That is 2,500 test tiles!!!! I’m going to make the wall behind the wheels the feature wall of pretty colours! Step Seven – Glaze (Gloss or sometimes called “Glost”) Firing Most of the time this is the final stage of making your creation (but not always!) The glaze kiln goes to 1240°C. This is called cone 6, or midrange. It is the low end of stoneware temperatures. Stoneware clays and glazes are typically fired at cone 8 – 10, that is 1260 – 1290°C. The energy requirement to go from 1240°C to 1280°C is almost a 30% more! Our clay is formulated to vitrify (mature, turn “glass-like”) at 1240°, as are our glazes. A glaze kiln take around 12 hours to reach temperature and two to three days to cool down. Sometimes a third firing process is required – this is for decoration that is added to work after the glaze firing. For example – adding precious metals and lustres. this firing temperature is usually around 600 – 800°C depending upon the techniques being used. There are many students interested in gold and silver trims – we will be doing this third type of firing soon! After firing your work will be in the student finished work shelves. Remember to pay for it before you head out the door! There is a small extra charge for using porcelain clay (it’s more than twice the price of regular clay), and for any third firing process! Once your work has been fired it can not turn back into clay for millennia – so don’t fire it if you don’t like it! Put it in the bucket for recycling. https://firebirdstudios.com.au/the-process-of-making-pottery/The form of the jug has been in use for many centuries.Stoneware jug. Two tone brown glaze with pierced lip behind spout. Spout chipped.None.flagstaff hill, warrnambool, shipwrecked-coast, flagstaff-hill, flagstaff-hill-maritime-museum, maritime-museum, shipwreck-coast, flagstaff-hill-maritime-village, jug, ceramic jug -
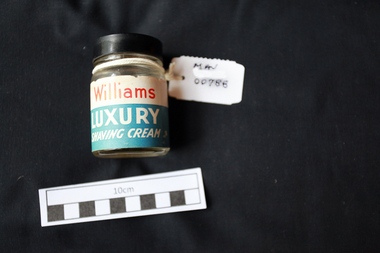 City of Moorabbin Historical Society (Operating the Box Cottage Museum)
Containers,Shaving cream, J.B.Williams Co, mid 20thC
Shaving cream is a cream applied to the face, or wherever else hair grows, to facilitate shaving. The use of cream achieves three effects: lubricates the cutting process; swells keratin; and de-sensitizes skin. Shaving creams commonly consist of an emulsion of oils, soaps or surfactants, and water. James Baker Williams was born in 1818 in Lebanon, Connecticut USA and, in 1834, began employment with F. and H.C. Woodbridge, a general store located in Manchester. Williams was offered half-interest in the store in 1838, after which its name was changed to Keeny and Williams. Two years later, Williams sold his interest in the store, but retained his share in the drug department. He began experimenting with various soaps to determine which were best for shaving, and eventually developed Williams' Genuine Yankee Soap, the first manufactured soap for use in shaving mugs. In 1847, Williams moved his enterprise to a rented gristmill on William Street in Glastonbury, Connecticut, and his brother, William S. Williams, joined the firm around 1848, when the firm's name was changed to the James B. Williams and Company. William's shaving soaps were sold throughout the United States and Canada and James Williams supervised many aspects of the company until shortly before his death in 1907 at the age of eighty-eight. The Williams family continued to manage the company until it was sold in 1957. By the early 1900s, the company was known throughout the world. In addition to its line of shaving creams, the firm produced talcum powder, toilet soaps, and other toilet preparations. The original 1847 factory is still standing in Glastonbury and, in 1979, was converted into a condominium complex. I In 1983 it was placed on the National Register of Historic Places. 1927 - 1990 Salmond and Spraggon (Australia) Limited , Sydney , New South Wales, was registered as a company on 10 June 1927 following the liquidation of Salmond and Spraggon (Australia) Limited known as the Old Company. The company distributed household cleaning and mineral, metal and chemical wholesaling, pharmaceutical wholesaling throughout Australia on behalf of manufacturers. In 1990 the company was taken over by Alberto Culver, a manufacturer of hair and skin products. A clear glass jar with a screw lid containing 'Williams Shaving Cream' Front Label : J.B WILLIAMS / LUXURY / SHAVING CREAM Back Label : The contents of this jar are guaranteed to be / The J.B.WILLIAMS Luxury Shaving Cream Jar has been changed to meet the Wartime conditions but / the cream is of the same high quality / made in Australia for / J.B. WILLIAMS COMPANY / Glastonbury, Conn. U.S.A. / Vendors / SALMOND & SPRAGGON (AUST.) PTY.LTD. / All Statesshaving equipment, razors, safety razors, cutthroat razors, soap, world war 11 1939-1945, moorabbin, bentleigh, cheltenham, early settlers, shaving cream, williams j.b. company ltd, connecticut usa, glastonbury connecticut usa, salmond & spraggon pty ltd, sydney, new south wales, toiletries, shaving soap, -
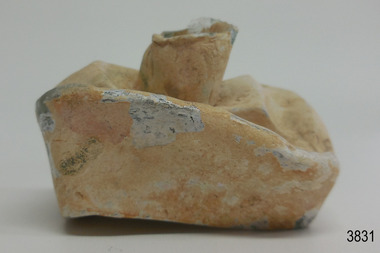 Flagstaff Hill Maritime Museum and Village
Container - Ink Bottle, from mid-19th century to 1902
This ink bottle is ‘boat’ shaped, which was a common design from the mid-1840s. It was crudely made; maybe it was rejected as a practice bottle or perhaps heat or pressure has distorted it. The bottle was recovered from the wreck of the Inverlochy and is part of the John Chance collection. Ink in the 1700s ink could be purchased in powdered or block form from apothecary shops, to be mixed with water as needed. Then in the mid-1800s chemists began selling ink in liquid form, in small, inexpensive and often attractive bottles. The small glass ink bottles were handmade, blown into a cup shaped mould, and sharply broken off from the blow-pipe at the neck, referred to as the English-made ‘burst-off’ finish. The neck was then filed, filled with liquid ink and sealed with a cork or wax. It was a quick, affordable container and made pen and ink writing available to the public. The name ‘penny ink’ bottles was a common title due to their low cost. INVERLOCHY 1895-1902 - The Inverlochy was a steel sailing barque built in Scotland in 1895 for international trade. In 1902 the Inverlochy left Liverpool under the command of Captain E.R. Kendrick. There were 21 officers and crew and the captain’s wife Mrs Kendrick, on board, bound for Australia with cargo that included tools, chemicals, liquor (beer, whisky, stout, rum, and brandy), steel, iron, wire netting, hoop iron, tinplate and pig iron), and steel wire for the Melbourne Tramway Company, tiles, soap, soft goods and earthenware. On December 18 almost at their destination, the Inverlochy ran aground on Ingoldsby Reef at Point Addis, near Anglesea. The crew and passengers left the ship via lifeboat and landed at Thompson’s Creek, then walked about 20 kilometres to Barwon Heads. Salvagers were interested in the 10 miles of cable in the hold. Mrs Kendrick’s ‘high grade’ bicycle was amongst the items salvaged but she lost her jewellery and two pianos. By February 1903 the ship had broken up and objects such as bottles and casks of liquor were washed ashore. Bad weather shook the wreck in June 1903, causing the ship’s spars and figurehead to be washed ashore. This boat shaped handmade ink bottle is historically significant for its association with communications and record keeping in the mid-to-late 19th century. The bottle is socially significant as an example of making a useful product affordable to every day people. This handmade glass ink bottle is significant for its connection with the John Chance Collection, which is historically significant as an example of artefacts from wrecks that had been lost in the coastal waters of Victoria from thirty to over one hundred years before John Chance and others discovered them. These artefacts are a sample of goods carried as cargo or personal possessions, and of ship hardware of that era. The ink bottle is significant through its connection with the barque, Inverlochy, The Inverlochy is significant for its cargo, which is a snapshot of the array of goods imported into Australia at the turn of the 19th century, including cable for the Melbourne Tramway Company. The Inverlochy is historically significant and is registered on the Victorian Heritage Database, VHR S338. The wreck of the Inverlochy is important as an accessible dive site that shows the remains of a large international trading vessel and its contents. It is valuable for an insight into Victorian era of shipping and maritime history.Ink bottle, thick clear glass, rectangular base with small round mouth, long sides have have a U shaped groove along the shoulders (used for resting pen handles). The outside surface has a white clay-type reside over it. Bottle is very bent and distorted. flagstaff hill, warrnambool, flagstaff hill maritime museum, maritime museum, shipwreck coast, flagstaff hill maritime village, great ocean road, john chance, inverlochy, scotland, captain e.r. kendrick, melbourne tramway company, tramway cable, ingoldsby reef, point addis, anglesea, thompson’s creek, barwon heads, boat ink bottle, cottage ink, penny ink, glass ink bottle, pen rest, writing accessory, victorian, antique, ink well, sheer lip, distorted body, handmade, mould blown, statoionery -
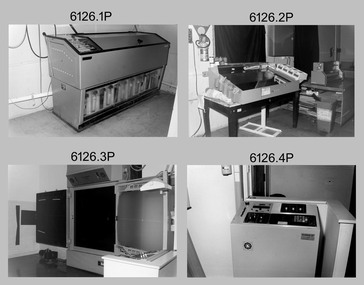 Bendigo Military Museum
Photograph - Photo Troop, Lithographic Squadron – Army Survey Regiment, Fortuna, Bendigo, 1986
This collection of 18 photos was most likely taken at Lithographic Squadron, Army Survey Regiment, Fortuna, Bendigo in 1986. The main tasks undertaken by technicians in Photo Troop were most likely enlargements, reductions and duplication of map reproduction material, and processing of aerial photography.This is a set of 18 photographs of Photo Troop personnel and equipment from Lithographic Squadron at the Army Survey Regiment, Fortuna, Bendigo, 1986. The photographs were on 35mm negative film and were scanned at 96 dpi. They are part of the Army Survey Regiment’s Collection. .1) - Photo, black & white, 1986, Film developer. .2) - Photo, black & white, 1986, Chromalin Proof equipment. .3) - Photo, black & white, 1986, KLIMSCH Commodore camera. .4) - Photo, black & white, 1986, KLIMSCH Commodore camera operator’s console. .5) - Photo, black & white, 1986, Film contact frame. .6) - Photo, black & white, 1986, Film processing chemicals. .7) - Photo, black & white, 1986, Unidentified technician. .8) - Photo, black & white, 1986, L to R: Unidentified technician, SPR Russell Pajank, SPR Carmel (Butler) Fauth. .9) - Photo, black & white, 1986, SPR Carmel (Butler) Fauth. .10) - Photo, black & white, 1986, SPR Carmel (Butler) Fauth. .11) - Photo, black & white, 1986, L to R: CPL Paul Baker, SGT Rob Bougumil. .12) - Photo, black & white, 1986, CPL Paul Baker. .13) - Photo, black & white, 1986, CPL Paul Baker. .14) - Photo, black & white, 1986, L to R: CPL Paul Baker, CPL Brian Paul. .15) - Photo, black & white, 1986, L to R: CPL Frank Lenane, SGT Rob Bougumil. .16) - Photo, black & white, 1986, CPL Brian Fauth. .17) - Photo, black & white, 1986, WO1 Trevor Osborne. .18) - Photo, black & white, 1986, L to R: SPR Kerron South, SGT Rob Bogumil.No personnel are identifiedroyal australian survey corps, rasvy, army survey regiment, army svy regt, fortuna, asr, litho -
 The Beechworth Burke Museum
Geological specimen - Feldspathic Sandstone
Feldspathic arenites are sandstones that contain less than 90% quartz, and more feldspar than unstable lithic fragments, and minor accessory minerals.Feldspathic sandstones are commonly immature or sub-mature.These sandstones occur in association with cratonic or stable shelf settings. Feldspathic sandstones are derived from granitic-type, primary crystalline, rocks. If the sandstone is dominantly plagioclase, then it is igneous in origin Sandstone features prominently in public buildings throughout Victoria. Most of the sandstone used as dimension stone in the State came from three sources: the Heatherlie quarry in the Grampians (Silurian), the Bacchus Marsh area (Permian), and the Barrabool Hills near Geelong (Cretaceous).Sandstone features prominently in public buildings throughout Victoria, making this specimen special as it shows the materials used by Victorian building companies. Sandstone can also be crushed, crushed stone is used in the construction of roadways and road structures such as bridges, and in buildings, both commercial and residential. This specimen is part of a larger collection of geological and mineral specimens collected from around Australia (and some parts of the world) and donated to the Burke Museum between 1868-1880. A large percentage of these specimens were collected in Victoria as part of the Geological Survey of Victoria that begun in 1852 (in response to the Gold Rush) to study and map the geology of Victoria. Collecting geological specimens was an important part of mapping and understanding the scientific makeup of the earth. Many of these specimens were sent to research and collecting organisations across Australia, including the Burke Museum, to educate and encourage further study. A feldspar-rich sandstone, a sandstone intermediate in composition between an arkosic sandstone and a quartz sandstone, containing 10% to 25% feldspar and less than 20% matrix material of clay, sericite, and chlorite. Feldspathic arenite containing less than 90 percent of the composition of quartz. Feldspar is the main composition. Feldspathic arenite may contain fragments of unstable rock, and a little amount of other minerals such as mica and heavy minerals. Some feldspathic arenite have pink or red color because of the presence of potassium feldspar or iron oxide. There are also colored light gray to white. These sandstones are usually medium to coarse grained and can contain a high percentage of granules with angular until subangular roundness. The content of the matrix can appear as the rest up to more than 15 percent, and sorting of grains can present as moderate to poorly sorted. Feldspathic sandstones are generally immature in textural maturity. Feldspathic arenite can not be judged from the structure of the sediment. Bedding can emerge from the laminate parallel to the crossbed. Fossils may appear in the layer deposited on the sea. Feldspathic arenites usually appear on the craton or the continental shelf, which can be associated with conglomerate, quartz lithic arenite, carbonate rock, or evaporites. This sandstone may also appear on the succession of sedimentary basins deposited on an unstable or deep sea, and moving arc setting. According to Pettijohn (1963) Arkose make up about 15 percent of all sandstones. Some Arkose formed in situ when the granite and related rocks disintegrate and generate granular sediments. Most of the material feldspathic sandstones derived from primary crystalline granitic rocks, such as granite or metasomatic rocks containing abundant potassium feldspar. Mineral contained in sandstones is mostly a form of plagioclase feldspar derived from quartz diorite or volcanic rock. Feldspar contained on this sandstone comes from arid to cool climates when the chemical weathering process is reduced.sandstone, natural stone, feldspathic sandstone, burke museum, geology, geological, geological specimen -
 Federation University Historical Collection
Booklet - Magazine, Ballarat School of Mines Students' Magazine, 1927
Every year the Ballarat School of Mines (S.M.B) produced a magazine, between 1898-1967. The 1927 magazine Editorial Staff- A.T Morrison, E. Van Beek, G. Dimsey, G. Inglis, L. Hillman, J. Muir, J. Johnson, N. Nicholls, B. Saunders, Dr. J. R. Pound, Mr. H. Jolly, A. Proctor, and J. Walters. Contains list of course students for 1927. Listing of School Council and staff for 1927 (inside front cover). Listing of departments, courses and fees (approximate) available at S.M.B . (inside back cover) *Articles -Mr. John Rowell regarding his receiving the Crouch Memorial Prize -S.M.B. Procession, 1927 -S.M.B. Ball July 20th at the City Hall -Letter to Editor 'The Chemists' Trip to Melbourne mentioning a tour of the Footscray Technical School; an exploration of the Mount Lyell Chemical Works; visits to the Colonial Sugar Refining Company, The Melbourne Mint, the Deer Park Explosive Works (met with former S.M.B. students, A. Perry and H. R. Kofoed), Nobel (Australasia) Ltd. -Mentions of Literary Society activities -Geelong trip by school football team July 18th to play Gordon Tech. -Extract from the 'People's Paper', July 14 regarding the S.M.B Gala Night and the election of Miss S.M.B. -Mentions of the Mica Smith Scholarship -4th Annual reunion for Past Students Association, 23rd October -Descriptive article on Port Arthur -Tour of the Mount Lyell District, with mentions of the North Lyell Mine, Port Kembla, Lake Margaret Hydro Electric Works -Paper making -A brief description of the rubber industry -Decorating for the Gala Ball -Sporting activities, 1926 and 1927 -The Junior Techs class and sporting activities. Mentions of their participation in the Procession *Prints -S.M.B. Botanical Gardens by Graham Hopwood, awarded first prize -Caricatures unknown subjects, though to be staff and students at the school *Photographs -Editorial Staff -S.M.B. Athletic Team, 1926- Winners of the Herald Shield -S.M.B. Football Team, 1927 -School of Mines Girls' Basket Ball team, 1927 -Girls' Hockey Team, Ballarat School of Mines, 1927 -Winners of the Thompson Shield, 1926. Premiers N.C.D.- J.T.S.A. (Junior Technical School Association) *Advertisements -A.N.A. Hall, Camp St. 'The Rollicking English Company- "The Rivals", presented by the School of Mines Dramatic Company. Wednesday, 14th September, 1927.Green soft covered book relating to the Ballarat School of Mines student activities for the year 1927. smb, ballarat school of mines, hockey, ballarat school of mines botanical gardens, graham hopwood, basketball, netball, a.t morrison, e. van beek, g. dimsey, g. inglis, l. hillman, j. muir, j. johnson, n. nicholls, b. saunders, dr. j. r. pound, mr. h. jolly, a. proctor, j. walters -
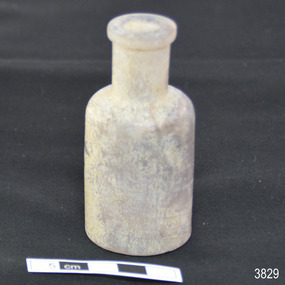 Flagstaff Hill Maritime Museum and Village
Container - Glass Bottle, mid-19th century to 1902
This handmade glass bottle was recovered from the wreck of the 1895-1902 ship Inverlochy and is part of the John Chance Collection. The bottle has side seams that extend from base to mouth, indicating that it would have been made in a mould. The parallel, diagonal lines are likely to have been made by the molten glass being mouth-blown into the mould. The mould would have also had the pattern for the embossed numbers in the base. The seamless applied mouth would have been added after the bottle was removed from the two-piece mould. The even neck of the bottle would have probably been sealed with a cork or glass stopper. Bottles similar to this one were used for medical (apothecary) and cosmetic purposes. Bottles with these features date from around the late 19th to early 20th century. Bottles began to have embossed numbers on the bases from the late 19th century and the practice continues into modern times. The numbers may represent the date of manufacture i.e. “4188” may be 4th January 1888. It may instead be the date of the patent or design pattern number. This bottle may have been made around 1888 and the latest it could have been made was 1902, the year of the wreck of the Inverlochy. THE INVERLOCHY (1895-1902) - The Inverlochy was a steel sailing barque built in Scotland in 1895 for international trade. In 1902 the Inverlochy left Liverpool under the command of Captain E.R. Kendrick. There were 21 officers and crew and the captain’s wife Mrs Kendrick, on board, bound for Australia with cargo that included tools, chemicals, liquor (beer, whisky, stout, rum, and brandy), steel, iron, wire netting, hoop iron, tinplate and pig iron), and steel wire for the Melbourne Tramway Company, tiles, soap, soft goods and earthenware. On December 18 almost at their destination, the Inverlochy ran aground on Ingoldsby Reef at Point Addis, near Anglesea. The crew and passengers left the ship via lifeboat and landed at Thompson’s Creek, then walked about 20 kilometres to Barwon Heads. Salvagers were interested in the 10 miles of cable in the hold. Mrs Kendrick’s ‘high grade’ bicycle was amongst the items salvaged but she lost her jewellery and two pianos. By February 1903 the ship had broken up and objects such as bottles and casks of liquor were washed ashore. Bad weather shook the wreck in June 1903, causing the ship’s spars and figurehead to be washed ashore. This glass bottle is historically significant as it represents methods of storage and manufacture that were used from the 19th century and into the early-20th century, before machine made bottles were becoming common. The shape and size of the bottle are similar to bottles used for medical and cosmetic purposes in that period. The glass bottle also has significant as it was recovered by John Chance, a diver from the wreck of the Inverlochy in the late 1960s to early 1970s. Items that come from several wrecks along Victoria's coast have since been donated to the Flagstaff Hill Maritime Village’s museum collection by his family, illustrating this item’s level of historical value. This glass bottle is significant because of its historical connection to the barque Inverlochy, which is an example of a commercial international steel sailing barque and is listed on the Victorian Heritage Database VHR S338. The Inverlochy is significant for its cargo, which is a snapshot of the kind of goods imported into Australia at the turn of the 19th century, including cable for the Melbourne Tramway Company. The wreck of the Inverlochy is important as an accessible dive site that shows the remains of a large international trading vessel and its contents. It is valuable for an insight into Victorian era of shipping and maritime history. Bottle; clear glass, round, handmade. Narrow lip is flat across top and on side edge, neck is straight, about a third of the bottle’s height. The shoulder is rounded, and the body has straight sides with two side seams from below the lip to the base, which is shallow. Outer glass surface is rough, inner surface has areas of dried, light coloured substance. The body has several diagonal parallel lines and areas with opalescent shine. Base has embossed inscription. Embossed inscription on base "4188".flagstaff hill, warrnambool, flagstaff hill maritime museum, maritime museum, shipwreck coast, flagstaff hill maritime village, great ocean road, john chance, inverlochy, scotland, captain e.r. kendrick, melbourne tramway company, ingoldsby reef, handmade, glass bottle, apothecary, cosmetic, mould blown, vintage, two-piece bould, point addis, medicine -
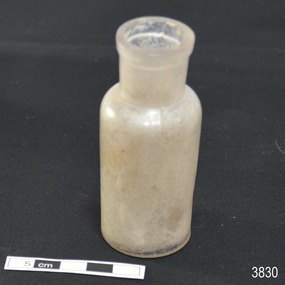 Flagstaff Hill Maritime Museum and Village
Container - Glass Bottle, mid-19th century to 1902
This handmade glass bottle was recovered from the wreck of the 1895-1902 ship Inverlochy and is part of the John Chance Collection. The bottle has side seams that extend from base to mouth, indicating that it would have been made in a mould. The parallel, diagonal lines are likely to have been made by the molten glass being mouth-blown into the mould. The mould would have also had the pattern for the embossed numbers in the base. The seamless applied mouth would have been added after the bottle was removed from the two-piece mould. The even neck of the bottle would have probably been sealed with a cork or glass stopper. Bottles similar to this one were used for medical (apothecary) and cosmetic purposes. Bottles with these features date from around the late 19th to early 20th century. Bottles began to have embossed numbers on the bases from the late 19th century and the practice continues into modern times. The numbers may represent the date of manufacture i.e. “463” may be April 1863. It may instead be the date of the patent or design pattern number. This bottle may have been made around 1863 and the latest it could have been made was 1902, the year of the wreck of the Inverlochy. THE INVERLOCHY (1895-1902) - The Inverlochy was a steel sailing barque built in Scotland in 1895 for international trade. In 1902 the Inverlochy left Liverpool under the command of Captain E.R. Kendrick. There were 21 officers and crew and the captain’s wife Mrs Kendrick, on board, bound for Australia with cargo that included tools, chemicals, liquor (beer, whisky, stout, rum, and brandy), steel, iron, wire netting, hoop iron, tinplate and pig iron), and steel wire for the Melbourne Tramway Company, tiles, soap, soft goods and earthenware. On December 18 almost at their destination, the Inverlochy ran aground on Ingoldsby Reef at Point Addis, near Anglesea. The crew and passengers left the ship via lifeboat and landed at Thompson’s Creek, then walked about 20 kilometres to Barwon Heads. Salvagers were interested in the 10 miles of cable in the hold. Mrs Kendrick’s ‘high grade’ bicycle was amongst the items salvaged but she lost her jewellery and two pianos. By February 1903 the ship had broken up and objects such as bottles and casks of liquor were washed ashore. Bad weather shook the wreck in June 1903, causing the ship’s spars and figurehead to be washed ashore. This glass bottle is historically significant as it represents methods of storage and manufacture that were used from the 19th century and into the early-20th century, before machine made bottles were becoming common. The shape and size of the bottle are similar to bottles used for medical and cosmetic purposes in that period. The glass bottle also has significant as it was recovered by John Chance, a diver from the wreck of the Inverlochy in the late 1960s to early 1970s. Items that come from several wrecks along Victoria's coast have since been donated to the Flagstaff Hill Maritime Village’s museum collection by his family, illustrating this item’s level of historical value. This glass bottle is significant because of its historical connection to the barque Inverlochy, which is an example of a commercial international steel sailing barque and is listed on the Victorian Heritage Database VHR S338. The Inverlochy is significant for its cargo, which is a snapshot of the kind of goods imported into Australia at the turn of the 19th century, including cable for the Melbourne Tramway Company. The wreck of the Inverlochy is important as an accessible dive site that shows the remains of a large international trading vessel and its contents. It is valuable for an insight into Victorian era of shipping and maritime history. Bottle; clear glass with opalescent shine in places, round, handmade. Narrow lip is flat across top and on side edge, neck is straight, about a third of the bottle’s height. The shoulder is rounded, and the body has straight sides with two pronounced side seams from below the lip to the base, which is shallow. Outer glass surface is smooth, inner surface has areas of dried, light coloured substance. Base has embossed inscription. Embossed "463" and logo symbol [trident]flagstaff hill, warrnambool, flagstaff hill maritime museum, maritime museum, shipwreck coast, flagstaff hill maritime village, great ocean road, john chance, inverlochy, scotland, captain e.r. kendrick, melbourne tramway company, ingoldsby reef, handmade, glass bottle, apothecary, cosmetic, mould blown, vintage, two-piece bould, point addis, medicine -
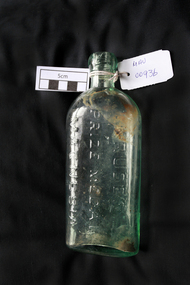 City of Moorabbin Historical Society (Operating the Box Cottage Museum)
Manufactured Glass, bottle 'Kruse's Magnesia', 20thC
Johann August (John) Kruse was instrumental in the development of the pharmaceutical industry and pharmacy training in Victoria. He was a driving force behind the creation of the Pharmaceutical Society of Victoria and was appointed a founding member of the Society's inaugural council in 1857. He manufactured many pharmaceuticals and health products such as mineral waters and 'Kruse's Fluid Magnesia' (1863) which is still in use today. He later went on to produce insecticides and dynamite, then established his own analytical chemistry service. In 1878 Kruse established Victoria's first pharmacy training facility - the Melbourne School of Pharmacy. There pharmacy apprentices were taught chemistry, botany, materia medica and Latin, while country students could study by correspondence. The School was endorsed and monitored by the Pharmacy Board of Victoria to which Kruse was appointed in 1880. Kruse's pharmacy school was the forerunner of the Victorian College of Pharmacy, Monash University, which remains Victoria's only pharmacy training institute. In 1853, shortly after qualifying as pharmacist at the University of Göttingen, Johann August (John) Kruse, moved to London. The medical practitioner Dr S. Weil sent Kruse to Victoria, Australia to manage a new pharmacy and tobacconist's shop which he was having built at 136 Bridge Rd in Richmond. In 1856 Kruse opened a second pharmacy 'John Kruse and Company Chemists and Druggists' at 207 Bourke Street. 1857 the Richmond shop was destroyed by fire, so all pharmaceutical production was moved to the Bourke St premises and later to his new location at 184 Bourke St.. Kruse was forced to sell his business in 1868 to Felton Grimwade and Company and work for them as manager of their chemical works. By the early 1870s he had regained financial independence so left the company to establish his own businesses again. He opened up a pharmacy at 31 Swanston St and in c1874 leased Victoria's premier natural springs, Clifton Springs, on the northern side of the Bellarine Peninsula, where he established a bottling plant. Suspensions of magnesium hydroxide in water, often called Milk of Magnesia, are used as an antacid to neutralize stomach acid, and as a laxative. Milk of magnesia is sold for medical use as chewable tablets, capsules, and as liquids having various added flavours Kruses Fluid Magnesia 300ml Extralife Kruse’s Fluid Magnesia, Magnesium supplement. Rapidly absorbed, easily digested. Improves general well being, corrects magnesium deficiency. Helps relieve indigestion, when due to acidity. In 1878 Kruse established Victoria's first pharmacy training facility - the Melbourne School of Pharmacy, the forerunner of the Victorian College of Pharmacy, Monash University, which remains Victoria's only pharmacy training institute. A glass bottle containing ‘Kruse’s’ Magnesia’ medicineKRUSE’S / PRIZE MEDAL / MAGNESIA/ K / FELTON-GRIMWADE & CO. MELBOURNE Directions for use ......glass works, pharmaceutical glass, pharmacy, kruse johann august (john), dr weil s, ., victorian college of pharmacy, monash university, university of göttingen, felton grimwade and company, magnesium bicarbonate, magnesium oxide