Showing 878 items
matching route 2
-
 Ballarat Tramway Museum
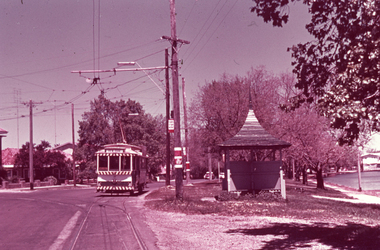
Slide - 27 mm sq slide/s - set of 7, Lilian Butler, Mt Pleasant line, Sep. 1971
Yields information about the streetscapes of Stones Corner to Mt Pleasant route and in particular buildings and people that crewed the trams.Set of seven Colour 27 x 27 mm slide in a Kodachrome cardboard mount. .1 - Tram turning onto the Mt Pleasant line at Stones Corner - Bridge St, Main Road .2 - Main Road looking south with Inland Body Works building on the left and Ampol Service Station .3 - Mt Pleasant terminus with the butcher shop on the left and the diary on the right - shows the terminating tram track .4 - Conductor changing pole. .5 - Putting pole on the overhead .6 - Conductor (D O'Leary - No. 38) standing in front of tram and Motorman or driver (N. Hall - No. 43) .7 - ditto with number visible. See Reg item 3425 for crew lists. Slide mount date September 1971. Photo from the collection of Lilian Butler.ballarat, tramways, trams, stones corner, main road, mt pleasant, crews, drivers, conductors, trolley poles, tram 41 -
 Ballarat Tramway Museum
Photograph - Black & White Photograph/s - set of 5, Charles Craig, 1971
Yields information about the intersection of Sturt St and Drummond St and its use by trams in the period before the closure of the SEC system. Shows the Southern Cross Hotel.Set of five Black and White photographs of trams near the intersection of Sturt St and Drummond St South, Hospital Corner. All have the Southern Cross Hotel in the background .1 - No. 31 crosses Drummond St, Gardens via Sturt St West, with two Johnnie Walker Roof adverts. .2 - No. 40 turns from Drummond St South en route to Lydiard St North, while another bogie car waits. Both trams have an electric cooking roof advert. .3 - No. 17 crosses Sturt St with two bogie trams in the view - appears to have been taken before .2. Note the passengers getting off the tram on the south side. .4 - No. 21 turning into Drummond St south, with destination of Sebastopol. Tram has an electric cooking roof advert. .5 - No. 33 crosses Sturt St from Sebastopol while another tram waits at the Sturt St stop. Photo by Charles Craig - during 1971. trams, tramways, sturt st, hospital corner, drummond st sth, tram 31, tram 40, tram 17, tram 21, tram 33 -
 Ballarat Tramway Museum
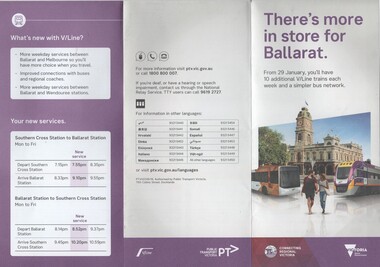
Pamphlet, Public Transport Corporation (PTC), "There's more in store for Ballarat", Jan. 2017
Set of two pamphlets distributed at the time of the introduction of revised routing of Ballarat bus services and the introduction of further trains on the Ballarat line - and the opening of Caroline Springs Station on 29.1.2017. .1 - 6 fold to DL size from an A3 sheets - titled "There's more in store for Ballarat", colour on white paper showing the new Ballarat bus network map, discontinued routes, additional train services and a summary of changes. .2 - a grab rail pamphlet listing the new bus routes for use on the buses - piece of heavy card with a round top and a slit to enable it to be placed on a grab rail within the bus itself. Two copies of each held.trams, tramways, ballarat public transport, buses, ptv, public transport victoria, timetables -
 Ballarat Tramway Museum
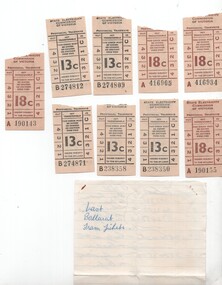
Ephemera - Ticket/s, State Electricity Commission of Victoria (SECV), Set of 8 tickets - closure of Mt Pleasant, 1971
Provides information about the last tickets issued on the Mt Pleasant route at the time of closure and sample tickets.Set of 8 tickets and handwritten notes regarding the last tickets issued on 5/9/1971 when the Mt Pleasant - Gardens via Sturt St west route closed. .1 - hand written noted on a ruled sheet of paper from a note book - listing the last tickets for 4c, 5, 7c and 13c on the route for both the last tram to and from the city. .2 - Set of 4 No. 18c - brown print on off white paper, ticket nos. A190143, 190155, 416905 and 416934 - not listed on the above sheet. .3 - set 5 No. 13c - black print on off-white paper, ticket nos. B274809, 812, 871 and B238350 and 358. Collected and noted by Keith Kings at the time.trams, tramways, secv, closure, tickets, last tram, mt pleasant, gardens -
 Ballarat Tramway Museum
Programme, Ballarat Begonia Festival, "Ballaarat 70 Begonia Festival", Feb. 1970
Yields information about the City of Ballarat and its involvement in the promotion of the city through the Begonia Festival. Yields information about the tramway through a map.Programme or book, 16 Quarto pages, centre stapled full colour on semi gloss paper, titled "Ballaarat 70 Begonia Festival" for the 1970 Begonia Festival. 27/2/1970 to 9/3/1970. Gives details of the city, the begonias, industry, how to grow them, Festival activities, agriculture, map showing the city roads, a suggested tour route, tram lines, Eureka stockade, Historical Park (Sovereign Hill), 3BA, The Courier, BTV6, Education and sporting facilities. Really a City spruiking document with many colour photos. Note all words with Ballarat in them are spelt with the aatrams, tramways, begonia festival, ballarat, map -
 Ballarat Tramway Museum
Slide - 35mm slide/s - set of 2, Keith Caldwell, 16/03/1963 12:00:00 AM
Yields information about 12 and the Barkly St Mt Pleasant route.Set of two Agfa colour slides, white cardboard mount, photo by Keith Caldwell on 16/3/1963 of: .1 - Tram 12 in Barkly St, with destination of Mt Pleasant. Tram has adverts for Dancing at Civic Hall and Whitehorse Whiskey on the front dash panel. .2 - on the return trip - has the same adverts. In ink "16.3.63"tramways, trams, mt pleasant, barkly st, tram 12 -
 Ballarat Tramway Museum
Photograph - Black & White Photograph/s - set of 2, Dave Macartney, Sep. 1971
Yields information about the storage of SEC tram 36 at South Melbourne depot when it visited Melbourne following the closure of the SEC system and the advertising of Ballarat Tourism.Set of two black and white photographs of SEC tram No. 36 in Melbourne advertising Ballarat Tourism Week, September 1971. Both photos by Dave Macartney. .1 - No. 36 and W2 257 out bound St Kilda Road near Domain Road. No. 257 has destination of Malvern Bourke Rd, route 5. Tram 36 has destination of Sebastopol. .2 - No. 36 in bound passing Victoria Barracks in the background. trams, tramways, st kilda road, melbourne, melbourne, tourism, mmtb, tram 36 -
 Ballarat Tramway Museum
Photograph - Colour Photograph/s, Austin Brehaut, Mar. 1999
Set of 23 photographs taken by Austin Brehaut during March and April 1999 of power poles along the former tram routes that still have signs of the former tram stops. An accompanying note (scanned) written by Austin Brehaut is reproduced below in Other Information - see related documents. 1096.1 - Sturt St at Doveton St., south (down) side. .2 - Drummond St. Sth (east side) outside St. Patrick's School between Dana and Eyre St. .3 - Drummond St. Sth, cnr Urquhart St. (east side) .4 - Drummond St. Sth, cnr South St. (east side) .5 - Drummond St. Sth, cnr Sebastopol St. (east side) .6 - Drummond St. Sth, cnr Latrobe St. (east side) .7 - Drummond St. Sth, cnr Darling St. .8 - Sturt St. cnr Ripon St. (North East side) .9 - Ripon St. Nth, cnr Sussex St. .10 - Ripon St. Nth, cnr Mair St. (South West Corner) .11 - Ripon St. Nth, cnr Mair St. (North East Corner) .12 - Macarthur St. cnr Burbank St. (up side) .13 - Lydiard St. Nth, cnr Clarendon St. (east side) .14 - Lydiard St. Nth, cnr Howard St. (west side) .15 - Lydiard St. Nth, cnr Gregory St. (west side) .16 - Lydiard St. Nth, cnr Howitt St. (west side) .17 - Lydiard St. Nth, near Walker St., (east side) .18 - Lydiard St. Nth, cnr Landsborough St. (east side) .19 - Barkly St. cnr Main Road (up side) .20 - Barkly St. near Haymes Cres (down side) .21 - Barkly St., near Young St. (down side) .22 - Barkly St, Cameron St (up side) .23 - Barkly St., at Cobden St. terminus (west side) .1 - April 99, .2 > .10, 9/3/99, .11 > .18 - March 1999, .19 > .23 - April 1999. See also Reg. Item 768.1 > 768.6 for another group of tram stop photos in Drummond St. in 1997. On Fujifilm paper.On rear of each photo in blue ink is location at date at the top of the photo and in the bottom right hand corner - initials "APB"tram stops, power poles, barkly st., lydiard st. nth, ripon st., sturt st., drummond st. sth -
 Ballarat Tramway Museum
Newspaper, The Courier Ballarat, "Tram carries Ballarat message to City Circle", 24/02/1996 12:00:00 AM
Newspaper cutting from The Courier, Ballarat, Saturday 24/2/1996 of City of Ballarat Tram W4 671 leaving the depot on a low loader bound for Melbourne. Has front page colour photo of truck and tram at the rear of the depot in Gilles St. Tram has destination of 'City Circle'. Photo by Herman Ruyg. Accompanying item written by Ian Haberfield quoting Peter Hiscock about the tram and the running on the City Circle route in Melbourne. Also mentions Alan Brown, Public Transport Minister.trams, tramways, 671, btm, city of ballarat, city circle, melbourne -
 Ballarat Tramway Museum
Ephemera - Timetable/s, Melbourne and Metropolitan Tramways Board (MMTB), Set of 14 MMTB Melbourne bus timetables, 1969
Set of 14 MMTB timetables for various bus routes, dated July 1969. Generally includes Sat and Suns, Good Friday and Christmas day as well as weekdays, unless noted otherwise. Also includes a map of the route, detailed time points, sections, connecting services, fares, and organisation address - 616 Little Collins St. Melbourne. Have been folded into eight or ten portions. All on white paper unless noted otherwise. Items shown with an # - have a sticker modifying timetable information details on the front page. Items shown with a % are larger size sheets of paper, folded into 10. 1155.1 - Clifton Hill - Elsternwick # .2 - Garden City - City # .3 - Fishermen's Bend - City .4 - Box Hill - East Doncaster via Blackburn, Mitcham via Donvale PO and Mitcham - Ringwood via Eastland .5 - Warrandyte via Templestowe, via East Doncaster, Donvale PO - City % .6 - Warrandyte, Park Orchards Ringwood .7 - Williamstown Rd., Footscray Railway Station, Ballarat Rd # .8 - Latrobe University, Northland, West Heidelberg - City # % .9 - Deer Park, Sunshine Park, Sunshine, Footscray - City # .10 - as above, but for Saturdays and Sundays on pink paper # .11 - Box Hill, Heidelberg, Templestowe .12 - Box Hill, North Blackburn .13 - East Kew, Box Hill, Doncaster .14 - Bullen, North Kew - City # % Images of a sample of documents added 16-11-2013. mmtb, timetables, melbourne -
 Ballarat Tramway Museum
Slide - 35mm slide/s - set of 2, Noel Simons, Nov. 1970
Set of 2 Kodak Ready-mount with slides made from the Association of Railway Enthusiast Provincial Tramways film strip. 1166.1 - No. 31 at the View Point terminus, corner of Wendouree Parade and Macarthur St., shows tram and section arrangements on poles. Also has SEC tramway shelter alongside stop. Tram has destination of "View Point" 1166.2 - No. 38 crossing Albert St. en route to Sebastopol.1166.1 - "No. 21 at View Point terminus. Line of left is that for cars on "Gardens via Drummond St. Nth" route." 1166.2 - "No. 38 crossing Albert St. near Sebastopol terminus" All have date stamp of "Nov. 1970" in blue ink. Writing in blue ink.tramways, trams, view point, wendouree parade, albert st, sebastopol, tram 21, tram 38 -
 Ballarat Tramway Museum
Slide - 35mm slide/s - set of 17, Noel Simons, 20/11/1962 12:00:00 AM
Set of 17 transparencies taken on 20/11/1962 on Kodak mounts. 1187.1 - Bendigo No. 2 at the Quarry Hill terminus, showing destination of Quarry Hill. Has Cohns Drinks and Streets Ice Cream ads on dash panel, a SEC 'electric cooking' roof ad and another roof ad. Shows the Y terminus at this location, but tram standing just before it. Overhead in position. 1187.2 - as above, but closer up. 1187.3 - as above, but from the north side, showing cemetery in the background. 1187.4 - Bendigo No.3 at Eaglehawk terminus. Tram showing destination of Quarry Hill. Has the various buildings at Eaglehawk in the background including the Foodland store. Has Streets Ice cream and White Horse Whiskey ads on the dash panel. 1187.5 - Bendigo No. 18 at Garden Gully crossing loop, in bound, with destination of Eaglehawk. Passengers waiting for an Eaglehawk tram at the stop. Has a white horse whiskey ad on dash panel and SEC roof ads. Conductor standing in doorway looking out. 1187.6 - Bendigo No. 7 inbound in Nolan St. at cnr of McCrae St. showing destination of Golden Square. Has Streets Ice cream ad on dash panel and a Castrol Roof ad. 1187.7 - Bendigo No. 19 at the North Bendigo terminus with railway level crossing in background. Tram has a Cohns Drinks ad and an SEC 'Electric Cooking' roof ad. 1187.8 - Bendigo No. 2 at the Quarry Hill terminus, looking back into Bendigo, showing destination of Eaglehawk. 1187.9 - Bendigo No. 21 in McCrae St, near Nolan St outbound for North Bendigo. Photo taken after tram has passed photographer. 1187.10 - Bendigo Nos. 4 and 26 at Charing Cross in View St. with fountain alongside and the Beehive, Ezywalkin Buildings in the background. No. 26 has a Sandhurst Milk and SEC 'Electric Cooking' roof ad. 1187.11 - close up of 22E maximum traction truck and folded footstep. 1187.12 - Bendigo No. 19 at Charing Cross terminus, after tram has passed photographer, showing destination of North Bendigo, with the Beehive building in the background and passengers boarding tram. 1187.13 - Bendigo No. 11, turning from View St. into Pall Mall, showing Special with the conductor holding point bar. Has the Beehive and Ezywalkin Buildings in the background. 1187.14 - No. 7 at Charing Cross terminus, in Pall Mall, bound for Golden Square. Has the Beehive and Ezywalkin buildings in the background and passengers waiting at the tram stop. 1187.15 - No. 18 at the Charing Cross terminus, bound for Eaglehawk. Has the Beehive and Ezywalkin buildings in the background and passengers waiting at the tram stop. Also has the 'Safety Zone' sign in the photograph. 1187.16 - No. 2 at Quarry Hill terminus, night or dusk photo. Tram showing destination of Depot. 1187.17 - No. 26 at Charing Cross, night photo. Tram has destination of Quarry Hill, but is on the line for Eaglehawk. Photo looks along Mitchell St. Also shows Safety Zone sign. Information written on in black ink and date stamped on purple ink. 1187.1 - "No. 2 at Quarry Hill terminus Bendigo" 1187.2 - "No. 2 at Quarry Hill terminus Bendigo" 1187.3 - "No. 2 at Quarry Hill terminus Bendigo" 1187.4 - "No. 3 at Eaglehawk terminus" 1187.5 - "No. 18 in Mt Korong Road, Long Gully at cnr of Havilah Road (Eaglehawk Route)" 1187.6 - "No. 7 in Nolan St. Bendigo, at Cnr of McCrae St., near lake Weeroona, (North Bendigo Route)' 1187.7 - "No. 19 at North Bendigo terminus" 1187.8 - "No. 2 at Quarry Hill terminus" 1187.9 - "No. 21 in McCrae St. Bendigo, near Nolan St. (North Bendigo Route) 1187.10 - "4 and 26 at Alexandra Fountain, Charing Cross Bendigo" 1187.11 - "Truck of Bogie Car, Bendigo Tramways" 1187.12 - "No. 19 in Pall Mall at Charing Cross, Bendigo" 1187.13 - "Birney car No. 11 entering Pall Mall from View St. at Charing Cross Bendigo" 1187.14 - "No. 7 in Pall Mall at Charing Cross, Bendigo" 1187.15 - "No. 18 at Alexandra Fountain, Charing Cross, Bendigo" 1187.16 - "No. 2 at Quarry Hill terminus, Bendigo" 1187.17 - "No. 26 at Alexandra Fountain, Charing Cross, Bendigo" tramways, trams, bendigo, quarry hill, eaglehawk, north bendigo, maximum traction, night photo, tram 2, tram 3, tram 4, tram 7, tram 11, tram 18, tram 19, tram 21, tram 26 -
 Ballarat Tramway Museum
Slide - 35mm slide/s, Noel Simons, 21/11/1962 12:00:00 AM
Set of 6 transparencies taken on 21/11/1962 on Kodak mounts. 1189.1 - Bendigo No.11 at Quarry Hill terminus. Photo taken looking in along the route. Tram has destination of North Bendigo. 1189.2 - No. 21 in Pall Mall bound for North Bendigo. Tram has roof ads for Mamouney's furniture and SEC. In the background are the National Bank building, Dad and Dave's Cafe and the Beehive Buildings and the London Pharmacy. 1189.3 - No. 2 in Mitchell St, just after crossing over railway bridge. Photo taken after tram has passed photographer. Has what appears to be an SEC road works crew in the background. Has destination of Quarry Hill. 1189.4 - No. 17 climbing Mitchell St. on the start of the single track section, just before crossing the railway bridge. Has destination of Quarry Hill and the large Maples building sign in the background. 1189.5 - as for 1189.4 but after tram has passed photographer. Has an Ilford film roof ad and an SEC roof ad. Railway bridge in the background. 1189.6 - No. 21 at Charing Cross with passengers boarding. Tram has destination of North Bendigo and roof ads for SEC 'Electric Cooking' and Sandhurst Milk. In background are the buildings on the south side of High St. Also has a SEC worker in white overalls sweeping the track.Information written on in black ink and date stamped on purple ink. 1189.1 - "Birney car No. 11 in High St. Bendigo at Golden Square terminus" 1189.2 - "No. 21 in Pall Mall Bendigo near Charing Cross" 1189.3 - "No. 2 in Mitchell St. Bendigo, just after crossing bridge over railway line (Quarry Hill route)" 1189.4 - "No. 17 in Mitchell St. Bendigo, climbing the hill the bridge over the railway line. (Quarry Hill route)" 1189.5 - "No. 17 in Mitchell St., Bendigo approaching bridge over Railway line (Quarry Hill route)" 1189.6 - "No. 21 at Charing Cross, Bendigo"tramways, trams, bendigo, golden square, pall mall, mitchell st., quarry hill, tram 2, tram 11, tram 17, tram 21 -
 Ballarat Tramway Museum
Slide - 35mm slide/s - set of 4, Noel Simons, Apr. 1967
Set of 2 slides made from the Association of Railway Enthusiast Provincial Tramways film strip, possibly during April 1967. 1192.1 and 1192.3 mounted in Kodak Ready Mounts. The others in plain white mounts. Slides dated Dec. 1968. 1192.1 - No. 21 out bound to Golden Square in High St., between Wattle and Vine Streets. Photo taken after tram has passed photographer. Has a sign for "Reid's Furnituorium" in the background. 1192.2 - Bendigo No. 28 dressed up as Myers Christmas tram, passing the Post Office and Courts in Pall Mall. 1192.3 - Bendigo No. 23 at Needle Loop en route to Eaglehawk. Tram has two SEC roof ads, one "Electric Cooking" and the other "Everything fine in my all electric kitchen". 1192.4 - Bendigo scrubber parked at the end of the main depot lead, alongside the depot office buildings.Details in blue ink, date hand stamped in purple ink. 1192.1 - "No. 21 heads along High St for Golden Square between Wattle and Vine Streets." 1192.2 - "Birney No. 28 in Christmas Garb, traverses Pall Mall en route to North Bendigo". 1192.3 - "No. 23 at Needle Loop on its run to Eaglehawk". 1192.4 - "Scrubber car at Bendigo Depot".tramways, trams, north bendigo, bendigo, bridge st loop, depot, tram 21, tram 23, tram 28, tram scrubber -
 Ballarat Tramway Museum
Slide - 35mm slide/s - set of 24, Noel Simons, 20/05/1971 12:00:00 AM
Set of 24 transparencies taken on 20/5/1971 on Kodak mounts. 1195.1 - Bendigo 19 arriving at Charing Cross en route to North Bendigo with Fountain Plaza and the City Family Hotel in the background. No. 19 has two roof ads for the SEC. -'Electricity better for cooking' and 'Everything's under control in my all electric kitchen' 1195.2 - as above, but standing at the Charing cross stop, with the Beehive Stores and other buildings along the east side of Pall Mall in the background. 1195.3 - No 21 ex Golden Square crossing View St. trackwork in front of No. 25 waiting to depart for Quarry Hill. No.21 has two roof ads (as for No.19 in 1195.1) and No.25 has one SEC roof ad and another. Ezywalkin sign in the background, and Fountain Plaza. 1195.4 - as for 1195.3, but after 21 has arrived and 25 left for Quarry Hill. Has Ezywalkin store and the Beehive store in the background. 1195.5 - No. 5 at the Eaglehawk terminus. Photo taken with a cannon in foreground looking along High St. Eaglehawk. Has shops on the west side of High St. in the background. 1195.6 - No. 5 at the Eaglehawk terminus, close up of the rear of the tram - note tow bar arrangement. Has destination of Quarry Hill. 1195.7-Nos.25 and 5 crossing at the Thorpe St. Loop, California Gully. No. 25 bound for Eaglehawk (has SEC Briquette and electric cooking roof ads) and 5 en route for Quarry Hill with a SEC and Cinzano roof ad. 1195.8 - as for 1195.7, but after trams have passed each other. Has Borough Auto Service building in the background. 1195.9 - No. 5 in Mt Korong Road, towards Bamard Street, photo taken after tram has passed photographer. 1195.10 - No. 30 at the Golden Square terminus with the Milk Bar on the right hand side of the photograph. 1195.11 - No. 30 inbound at Fire Station Loop, High St. Golden Square. Has old fire station in the background. Passengers are boarding the tramcar. 1195.12 - No. 30 in High St, bound for North Bendigo between Vine and Wattle Streets. 1195.13 - No. 5 bound for Eaglehawk waits at Iron Bark Gully Loop, at Hayes St. 1195.14 - No. 5 and No. 2 crossing at Iron Bark Gully Loop. 1195.15 - No. 5 bound for Eaglehawk leaving the Manchester Loop, Long gully. 1195.16 - No. 5 passing William Street, Long Gully en route to Eaglehawk. 1195.17 - No. 5 just before the California Gully Crossing Loop. 1195.18 - Nos. 5 and 26 crossing at California Gully crossing Loop. No. 5 heading to Eaglehawk, 26, Quarry Hill. 1195.19 - No. 5 in High St. Eaglehawk with Bob Moyle's Victoria Hotel and the TAB in the background. 1195.20 - No. 5 in High St. Eaglehawk approaching the terminus. Photo taken after the tram has passed the photographer. Has Foodland store and J. Best Fruit supply in the background, along with Eaglehawk Town Hall. 1195.21 - No. 5 at the Eaglehawk terminus, photo taken along seldom used track along High St. 1195.22 - as for 1195.22 - but at the very end of the track. 1195.23 - No. 5 en route for Quarry Hill climbs High St. Eaglehawk with the Victoria Hotel and Eaglehawk Town Hall in the background. 1195.24 - No. 5 and 25 crossing at Jobs Gully Loop. Note 25 has a black on white destination roll, while No. 5 has a white on black destination roll. Information written on in black ink and date stamped on purple ink. 1195.1 - "No. 19 arrives at Charing Cross Bendigo from Golden Square" 1195.2 - "No. 19 about to leave Charing Cross for North Bendigo" 1195.3 - "No. 25 awaiting departure for Quarry Hill, watches No. 21 arrive at Charring Cross from Golden Square" 1195.4 - "No. 21 on North Bendigo service and No. 25 on Quarry Hill run await departure at Charing Cross" 1195.5 - "No. 5 at Eaglehawk terminus" 1195.6 - "No. 5 at Eaglehawk terminus" 1195.7 - "Nos. 5 and 25 crossing at Thorpe St. Loop, California". 1195.8 - "Nos. 25 and 5 crossing Thorpe St. Loop, California Gully". 1195.9 - "No. 5 descending Mt Korong Rd. towards Bamard St." 1195.10 - "Birney car No. 30 at Golden Square terminus" 1195.11 - "Birney car No. 30 in High Street near Thistle Street (Fire Station Loop)" 1195.12 - "No. 30 in High St. between vine and Wattle Streets" 1195.13 - "No. 25 at Hayes Street Loop Iron Bark". 1195.14 - "Nos. 2 and 5 crossing at Hayes Street Loop Iron Bark" 1195.15 - "No. 5 at Manchester Loop opposite Havilah Road, Long Gully" 1195.16 - "No. 5 passing William Street, Long Gully". 1195.17 - "No. 5 at California Gully" 1195,18 - "Nos. 26 and 5 at Thorpe St. Loop, California Gully". 1195.19 - "No. 5 in High St. Eaglehawk". 1195.20 - "No. 5 approaching Eaglehawk terminus" 1195.21 - "No. 5 at Eaglehawk terminus" 1195.22 - "No. 5 at Eaglehawk terminus" 1195.23 - "No. 5 in High St. Eaglehawk" tramways, trams, bendigo, charing cross, eaglehawk, california gully, golden square, iron bark gully, jobs gully, tram 2, tram 5, tram 19, tram 21, tram 25, tram 26, tram 30 -
 Ballarat Tramway Museum
Slide - 35mm slide/s - set of 20, Noel Simons, 21/05/1971 12:00:00 AM
Set of 20 transparencies taken on 21/5/1971 on Kodak mounts. 1197.1 - Bendigo No. 5 en route to Eaglehawk at Creeth St Long Gully. Tram has a SEC roof ad and Cinzano roof ad. 1197.2 - No 5 approaching Needle Loop between Long Gully and California Gully. On left hand side is the City of Bendigo sign, indicating city boundary. 1197.3 - As for 1197.2 but actually entering loop. Photo taken after tram has passed photographer. 1197.4 - No. 26 bound for Eaglehawk descending the railway bridge near Eaglehawk, at Jobs Gully. 1197.5 - as for 1197.4, but after crossing bridge, now ascending a hill. Photo taken after tram has passed photographer. 1197.6 - No. 26 climbing High St. hill Eaglehawk, nearing end of Double track, bound for Quarry Hill. Shows centre of the road poles. 1197.7 - As for 1197.6, with tram entering single track section. Photo taken after tram has passed photographer. Has a BP service station in the background. 1197.8 - No. 26 (bound for Quarry Hill) crossing No. 17 (Eaglehawk) at Job's Gully Loop. 1197.9 - No. 17 climbing railway bridge at Job's Gully, en route to Eaglehawk. Photo taken after tram has passed photographer. 1197.10 - No.26 bound for Quarry Hill, leaving Long Gully Loop? Has the Creeth St. church in l197.l in the far background. Photo taken after tram has passed photographer. 1197.11 - Tramway Point work at the northern end of Long Gully Loop. 1197.12 - No. 17 en route for Quarry Hill turning into View St. from Bamard St. Tram has SEC roof ads "Everything fine in my all electric Kitchen' and 'Electric Cooking is Matchless'. 1197.13 - as for 1197.12, but tram has turned into View St and about to enter the double line track. Photo taken after tram has passed photographer. 1197.14 - No. 21 enters Nolan St after turning from MacRae St. en route to Bendigo. Note sign on its own post noting tram turns "Beware Tram Turns" and stop sign on adjacent pole "Trams stop on Request". No. 21 has two SEC roof ads. 1197.15 - No. 21 in Nolan St. after turning from Bridge St. (White Hills Road). Note signal light for Bridge St. loop on pole corner of street. Photo taken after tram has passed photographer. 1197.16 - No. 2 bound for Eaglehawk at unknown location. 1197.17 - Tram stop sign on a pole "CARS STOP BY REQUEST" 1197.18 - No. 5 in Carpenter St.? en route to Quarry Hill. 1197.19 - No. 28 has just arrive at Golden Square terminus, passengers are disembarking and the trolley pole is being turned. Golden Square Hotel in the background. 1197.20 - No. 28 at Golden Square terminus. Has a "Nothing beats Briquettes for hear roof ad. Information written on in black ink and date stamped on purple ink. 1197.1 - "No. 5 at Creeth St. Long Gully" 1197.2 - "No. 5 approaching Needle Loop between Long Gully and California Gully" 1197.3 - "No. 5 at Needle Loop between Long Gully and California Gully" 1197.4 - "No. 26 crossing railway bridge at Job's Gully near Eaglehawk" 1197.5 - "No. 26 just after crossing railway bridge at Job's Gully near Eaglehawk/ 1197.6 - "No. 26 in High St. Eaglehawk" 1197.7 - "No. 26 at end of double track in High St. Eaglehawk" 1197.8 - "Nos. 26 and 17 crossing at Job's Gully Loop" 1197.9 - "No. 17 crossing railway bridge at Job's Gully near Eaglehawk". 1197.10 - "No. 26 at Long Gully" 1197.11 - 'Northern end of points at Long Gully Loop". 1197.12 - "No. 17 turning into View St. from Bamard St. Bendigo". 1197.13 -'No. 17 at beginning of double track in View St. after leaving Bamard St. Bendigo. 1197.14 - "No. 21 enters Nolan St. from MacRae St. Bendigo." 1197.15 - "No. 21 in Nolan St. Bendigo just after leaving White Hills Road." 1197.16 - "No. 2" 1197.18 - "No. 5" 1197.19 - "Birney car No. 28 at Golden Square Terminus" 1197.20 "Birney car No. 28 at Golden Square Terminus" tramways, trams, bendigo, long gully, railway bridge, jobs gully, trackwork, nolan st, quarry hill, tram stops, golden square, tram 2, tram 5, tram 17, tram 21, tram 26, tram 28 -
 Ballarat Tramway Museum
Slide - 35mm slide/s - set of 32, Noel Simons, 25/02/1971 12:00:00 AM
Set of 31 transparencies taken on 25/2/1972 on Kodak mounts. 1201.1 - Bendigo No. 26 in Bond St. just after leaving Long Gully en route for Quarry Hill. Has Norris Supermarket in background. Has two SEC roof ads. 1201.2 - No. 26 climbing View St. from Charing Cross en route to Eaglehawk. Has ANZ bank and AMOCO service station in background. 1201.3 - as for 1201.3, but after tram has passed photographer. Has buildings west of Mackenzie St. in photograph. 1201.4 - Tram stop and centre of the road pole with two "CARS STOP BY REQUEST" signs mounted on pole at the corner of Mackenzie St. 1201.5 - same position as for 1201.3, but with No. 5 descending the street. 1201.6 - same position as for 1201.2, but with No. 5 descending the street. Photo taken after tram has passed photographer. 1201.7 - No. 7 in Nolan St. from across the park at Lake Weeroona. 1201.8 - No. 7 entering McCrae St from Nolan St. - distant view. Note "TRAM "sign on left hand side under tree and overhead in McCrae St. from former track that once was in this street. 1201.9 - No. 7 in High St. with Cathedral in background. Tram en route to North Bendigo. Note scaffolding around Cathedral main spire area. 1201.10 - No. 7 crossing Bendigo Creek bridge in High St. near Golden Square. Has a Caltex Service station in the background. 1201.11 - No. 7 at Golden Square terminus with Sunburst Fruit Juices and a Peters Ice cream delivery vans alongside. 1201.12 - as for 1201.11 but photo taken from behind tram, with the end of the rails in the photograph. 1201.13 - No. 7 and 21 in Pall Mall at Charing Cross with No. 5 in the background. Taken some distance away from the location. 1201.14 - No. 7 at Golden Square terminus, taken a short distance from the tram terminus. Shows Milk Bar on right hand side and the hotel on the left hand side. Taken from the south side of the roadway. 1201.15 - as from 1201.14 but taken from the north side of the roadway. 1201.16 - No 5 waiting at California Gully loop. Distant photo showing surrounds 1201.17 - No. 5 en route for Quarry Hill crossing No. 26 at California Gully. 1201.18 - No. 26 at Eaglehawk terminus with Eaglehawk Town Hall and Post Office in background. 1201.19 - No. 21 arriving at Charing Cross en route to North Bendigo. Has Alexandra Fountain in the background, ANZ bank RACV building, and other buildings on the north side of Pall Mall or Nolan St. 1201.20 - No. 26 en route for Quarry Hill at Charing Cross, with crew standing by front door. Has Colonial Mutual life building, Armstrong Tyre Service (Firestone) and a sign for Cohns Drinks in the background. 1201.21 - as for 1201.20 but with No. 5 en route to Eaglehawk now in photograph. 1201.22 - No. 26 at Quarry Hill terminus. 1201.23 - No. 26 at Quarry Hill terminus, view of front portion of tram only from a gate at the Bendigo cemetery. 1201.24 - Track at the end of the Quarry Hill line showing the point blades of the former "Y" terminus and the overhead for this. 1201.25 - No. 2 at the Quarry Hill terminus, looking along the former Trackwork. 1201.26 - as for 1201.25 1201.27 - number not used. 1201.28 - Golden Square terminus from some distance from the actual terminus, showing the Warning sign "TRAM" for motorists from the south. No. 7 at the terminus. 1201.29 - No. 7 passing through the Golden Square shopping centre. Numerous cars and pedestrians. Tram en route for North Bendigo. 1201.30 - No. 7 in High St. Golden Square, en route for North Bendigo. Photo taken after tram has passed photographer. 1201.31 - No. 7 in High St. just past Wattle St. with the Cathedral in the background. Tram has two SEC roof ads good side on photo, 'Everything's fine in my all electric kitchen' and 'Electrical cooking - clean, quick, economical'. 1201.32 - No. 7 in High St. nearing Wattle St. Has Cathedral in the background. Photo taken after tram has passed photographer.Information written on in black ink and date stamped on purple ink. 1201.1 - "No. 26 in Bond St just after leaving Long Gully" 1201.2 - "No. 26 climbing View St. from Charing Cross" 1201.3 - "No. 26 ascending View St. from Charing Cross (At Mackenzie St.)" 1201.4 - "View St. & Mackenzie St." 1201.5 - "No. 5 in View St. near Mackenzie St." 1201.6 - "No. 5 in View St. nearing Charing Cross." 1201.7 - "No. 7 in Nolan St. seen from Lake Weeroona Park." 1201.8 - "No. 7 entering McRae St. from Nolan St. Note "TRAM" warning sign on left. 1201.9 - "No. 7 in High St. passing Short St." 1201.10 - "No. 7 crossing Bendigo Creek bridge in High St. near Golden Square." 1201.11 - "No. 7 at Golden Square terminus" 1201.12 - "No. 7 at Golden Square terminus" 1201.13 - "No 7, 21 and 5 at Charing Cross" 1201.14 - "No. 7 at Golden Square terminus" 1201.15 - "No. 7 at Golden Square terminus" 1201.16 - "No 5 waiting at California Gully loop." 1201.17 - "Nos. 5 and 26 crossing at California Gully loop" 1201.18 - "No. 26 at Eaglehawk terminus" 1201.19 - "No. 21 arriving at Charing Cross from Golden Square" 1201.20 - "No. 26 at Charing Cross" 1201.21 - "Nos. 5 and 26 at Charing Cross." 1201.22 - "No. 26 at Quarry Hill terminus" 1201.23 - "No. 26 at Quarry Hill terminus seen through the gates of the Bendigo Cemetery." 1201.24 - "Quarry Hill terminus showing remains for former double track layout abandoned before 1964." 1201.25 - "No. 2 at Quarry Hill terminus" 1201.26 - "No. 2 at Quarry Hill terminus" 1201.28 - "The Southern approach to Golden Square with No. 7 standing at the terminus, "TRAM" warning sign on the left. 1201.29 - "No. 7 passing through Golden Square Shopping Centre" 1201.30 - "No. 7 in High St. Golden Square" 1201.31 - "No. 7 in High St. passing Wattle St." 1201.32 - "No. 7 in High St. nearing Wattle St."tramways, trams, bendigo, bond st., view st., nolan st., high st., eaglehawk, california gully, charing cross, quarry hill, trackwork, tram 2, tram 5, tram 7, tram 21, tram 26 -
 Ballarat Tramway Museum
Slide - 35mm slide/s - set of 25, Noel Simons, 26/02/1972 12:00:00 AM
Set of 25 transparencies taken on 26/2/1972 on Kodak mounts. 1204.1 - Bendigo No. 5 - just arrived at Manchester Loop near Havilah Road, Long Gully. Photo taken after tram has passed photographer. 1204.2 - No. 26 in Backhaus St. Long Gully passing William St, en route to Quarry Hill. Photo taken after tram has passed photographer. 1204.3 - No. 5 climbing the High St. Hill Eaglehawk, heading for Quarry Hill with the buildings on the West side of High St. in the background, including the Eaglehawk Town Hall. 1204.4 - as for 1204.3, but tram close up. 1204.5 - as for 1204.3, but after tram has passed photographer. 1204.6 - No. 5 at intersection of Mt Korong Road Ironbark and Calder Highway, with the AMPOL service 'station in the background. Photo taken after tram has passed photographer. 1204.7 - No. 26 en route to Quarry Hill shortly after leaving Needle Loop, passing William St., Long Gully. 1204.8 - No. 5 at California Gully Loop, picking up a passenger, with the shops at Long Gully in the background. Photo taken after tram has passed photographer. 1204.9 - No. 5 in Long Gully, en route to Quarry Hill. Photo taken after tram has passed photographer. 1204.10 - No. 2 at Eaglehawk terminus with the Eaglehawk Town Hall and Post Office in the background. Tram has two SEC roof ads. 1204.11 - No. 2 at Eaglehawk terminus, close up. 1204.12 - as for 1204.11, but through the park gates. 1204.13 - as for 1204.11, but with tram stop shelters in the foreground and buildings on the West side of High St in the background. 1204.14 - No. 2 in Mt. Korong Rd, midway between California Gully Loop and Needle Loop. Photo taken after tram has passed photographer. 1204.15 - No. 5 in Long Gully, en route to Quarry Hill. 1204.16 - as for 1204.15, but with trams departed loop. Has an ESSO service station in the background. 1204.17 - No. 26 leaves Charing Cross up View St.. Photo taken after tram has passed photographer. Has Armstrong Tyre Service, Cohns Drinks ad on a building and the T&G building in the background. Also Firestone ads on the tyre service building. 1204.18 - No. 5 waits at Charing Cross with the Alexandra Fountain in the background. Tram has two SEC roof ads, 'Everything s fine in my all electric kitchen' and 'Electricity Best for Cooking'. Has RACV, Colonial Mutual Life buildings in the background and the planting areas around Charing Cross gardens in the foreground. 1204.19 - No. 21 en route to North Bendigo arrives at Charing Cross, with passengers waiting to board. No. 5 in the background. In the background is the Fountain Gate Plaza building and the City Family Hotel. 1204.20 - as for 1204.19, but with No. 7 en route to Golden Square. 1204.21 - as for 1204.19, but closer up. 1204.22 - as for 1204.18 1204.23 - No. 25 in Nolan St. near the crossing of Bendigo Creek, running a special tram tour. 1204.24 - No. 25 on a special charter, in Weeroona Ave. at Cnr of Caledonia St. passing the Gas works. 1204.25 - Nos. 25 (showing Golden Square), 7 and 26 at Charing Cross. Has fountain in the background.Information written on in blue ink and date stamped on purple ink. 1204.1 - "No. 5 at Manchester Loop, near Havilah Rd. Long Gully." 1204.2 - "No. 26 in Backhaus St. Long Gully passing William St." 1204.3 - "No. 5 in High St. Eaglehawk." 1204.4 - "No. 5 in High St. Eaglehawk." 1204.5 - "No. 5 in High St. Eaglehawk." 1204.6 - "No. 5 in Mt. Korong Rd., Ironbark, passing Calder Highway Junctn." 1204.7 - "No. 26 shortly after leaving Needle Loop, passing William St., Long Gully. No. 5 cresting hill in distance." 1204.8 - "No. 5 at California Gully Loop." 1204.9 - "No. 5 in Long Gully" 1204.10 - "No. 2 at Eaglehawk terminus." 1204.11 - "No. 2 at Eaglehawk terminus." 1204.12 - "No. 2 at Eaglehawk terminus." 1204.13 - "No. 2 at Eaglehawk terminus." 1204.14 - "No. 2 in Mt. Korong Rd, midway between California Gully Loop and Needle Loop. 1204.15 - "Nos. 2 and 26 crossing at Long Gully." 1204.16 - "No. 26 leaves Long Gully loop for Eaglehawk as No. 2 pulls out of the far end towards Bendigo" 1204.17 - "No. 26 beginning the climb up View St. from Charing Cross." 1204.18 - "No. 5 at Charing Cross." 1204.19 - "No 21 arrives at Charing Cross from Golden Square while No. 5 awaits departure time for Eaglehawk." 1204.20 - "Nos. 7, 21, and 2 (behind which is No. 5) at Charing Cross." 1204.21 - "Nos. 7, 21, and 2 at Charing Cross." 1204.22 - "No. 5 at Charing Cross." 1204.23 - "No. 25 in Nolan St. near Bendigo creek crossing" 1204.24 - "No. 25 in Weeroona Ave. at cnr of Caledonia St." 1204.25 - "Nos. 25, 7, 26 and 2 (behind 26) at Charing Cross."tramways, trams, bendigo, eaglehawk, long gully, california gully, charing cross, north bendigo, tram 2, tram 5, tram 7, tram 21, tram 25, tram 26 -
 Ballarat Tramway Museum
Slide - 35mm slide/s - set of 23, Noel Simons, 26/02/1972 12:00:00 AM
Set of 23 transparencies taken on 26/2/1972 on Kodak mounts. 1205.1 - Bendigo No. 25 on a special tour at Fire Station Loop, en route to Golden Square. 1205.2 - No. 21 and 25 crossing at Fire Station Loop, note photographers on the ground. No. 21 bound for North Bendigo. 1205.3 - as for 1205.3, but with trams departing loop and fire station in the background. 1205.4 - No. 25 at Golden Square Hotel with 'Rodda's Golden Square Hotel' in the background. Tram on a special tour, but showing destination of North Bendigo. 1205.5 - as for 1205.4 - but showing special. Has the end of the track in the photograph. 1205.6 - Nos. 7 and 25 (on a special tour) crossing at Myrtle St. Loop. 1205.7 - No. 7 leaving Myrtle St. loop with the mine poppet head in the background. Photo taken after tram has passed photographer. (Print made of this slide 10/2001 for use in the Gold Gold Gold exhibition of 10/2001 - See Reg. item 1979. 1205.8 - No. 25 entering depot. Tram showing 'special'. Tennis court on right has players. Photo taken after tram has passed photographer. 1205.9 - No. 24 (showing 'special') and No. 20 (showing 'Long Gully') at Bendigo Depot. 1205.10 - No. 24 on a special charter, leaving Bendigo depot. Tram has two 'Johnnie Walker' roof ads. 1205.11 - Bendigo depot with 29, 25 and a bogie car inside the depot doors. 1205.12 - As for 1205.11, but with 28 and 29. 1205.13 - No. 24 standing at front entrance of Bendigo depot with No. 20 in the background. 1205.14 - No. 24 running out into McCrae St showing special, with conductor on front step. 1205.15 - No. 24 in Caledonia St. at corner of Thunder St with the Gasworks in the background. 1205.16 - No. 5 en route for Quarry Hill at Charing cross with No. 26 (en route for Eaglehawk) about to arrive. Has former crossover at this location in the foreground. Has the Ezywalkin building in the background. 1205.17 - No. 5 and 26 at Charing Cross, with the Alexandra Fountain in the foreground and the Beehive and Ezywalkin buildings in the background. No.26 has two SEC roof ads. 1205.18 - Charing Cross looking along Pall Mall with trams 7 and 21 and 26 in the picture. 1205.19 - Charing Cross, with 21 departing for Golden Square and No. 5 heading for Quarry Hill. Has the Ezywalkin and the Beehive buildings in the background. 1205.20 - as for 1205.19, but a few moments later. Adjacent pole has a "NO ROAD" letter in reflectors vertically. 1205.21 - Charing Cross with Nos. 25, 21, 26 and 7, looking south from Pall Mall end. 1205.22 - No. 24 crossing Mitchell St. en route for Golden Square, showing 'special' with the Beehive and Ezywalkin buildings in the background. 1205.23 - Charing Cross with Nos. 24, 21 and 7 in the photo and Fountain Plaza in the background. Print of 1205.7 - stored in box D1.Information written on in blue ink and date stamped on purple ink. 1205.1 - "No. 25 at Fire Station Loop High Street, Golden Square." 1205.2 - "Nos. 25 and 21 crossing at Fire Station Loop, near Golden Square." 1205.3 - "Nos. 25 and 21 crossing at Fire Station Loop, near Golden Square." 1205.4 - "No. 25 at Golden Square terminus." 1205.5 - "No. 25 at Golden Square terminus." 1205.6 - "Nos. 7 and 25 crossing at Myrtle St. Loop." 1205.7 - "No. 7 leaving Myrtle St. Loop." 1205.8 - "No 25, entering Bendigo Depot." 1205.9 - "Nos. 20 and 24 at Bendigo Depot." 1205.10 - "No. 24 at Bendigo Depot." 1205.11 - "Nos. 25 and 29 at Bendigo Depot." 1205.12 - "Birney cars 29 and 28 at Bendigo Depot." 1205.13 - "No. 24 (with 20 beyond) at Bendigo Depot." 1205.14 - "No. 24 entering McCrae St. from Arnold St." 1204.15 - "No. 24 in Caledonia St. at cnr of Thunder St." 1204.16 - "No. 5 waits at Charing Cross as No. 26 arrives from Quarry Hill. Note remains of crossover abandoned on relocation in 1965." 1204.17 - "Nos. 5 and 26 at Charing Cross." 1204.18 - "Nos. 26, 7 and 21 at Charing Cross (No. 5 just visible behind No. 26)." 1204.19 - "No. 21 leaves Charing Cross for Golden Square as No. 5 starts off for Quarry Hill." 1204.20 - "No. 21 swings onto the single track Golden Square line as No. 5 heads into Mitchell St. towards Quarry Hill." 1204.21 - "Nos. 25, 21 and 26 watch No. 7 arrive at Charing Cross from Golden Square." 1204.22 - "No. 24 at Charing Cross crossing Mitchell St." 1204.23 - "Nos. 24, 21 and 7 at Charing Cross."tramways, trams, bendigo, golden square, myrtle st., fire station, depot, charing cross, tram 5, tram 7, tram 20, tram 21, tram 24, tram 25, tram 28, tram 29 -
 Ballarat Tramway Museum
Slide - 35mm slide/s - set of 6, Noel Simons, 28 Feb. 1972
Set of 6 transparencies taken on 28/2/1972 on Kodak mounts. 1206.1 - Bendigo No. 5 at Hayes St. Loop, en route for Quarry Hill. 1206.2 - No. 5 at Garden Gully Loop, Mt. Korong road, Ironbark. en route to Quarry Hill. Note the water column in the background. 1206.3 - No. 5 in View St. Bendigo, with the Commodore Motel in the background. 1206.4 - No. 6 en route for Golden Square in Fire Station loop, with the fire station building in the background. Photo taken after tram has passed photographer. 1206.5 - No. 6 in High St., running through Golden Square Shopping Centre, en route for Golden Square. Photo taken after tram has passed photographer. 1206.6 - No. 6 arriving at Charing Cross, bound for North Bendigo, with the City Family Hotel, ANZ bank and the Cenotaph (war memorial) in the background.Information written on in blue ink and date stamped on purple ink. 1206.1 - "No. 5 at Hayes Loop, Ironbark." 1206.2 - "No. 5 at Garden Gully Loop, Mt. Korong road, Ironbark." 1206.3 - "No. 5 in View St. just after start of double track near Barnard St." 1206.4 - "No. 6 in High St. at Fire Station loop." 1206.5 - "No. 6 in High St. running through Golden Square shopping centre." 1206.6 - "No. 6 arriving at Charing Cross from Golden Square."tramways, trams, bendigo, hayes st. loop, garden gully loop, view st., golden square, charing cross, tram 5, tram 6 -
 Ballarat Tramway Museum
Slide - 35mm slide/s set of 7, Noel Simons, 29 Feb. 1972
Set of 7 transparencies taken on 29/2/1972 on Kodak mounts. 1208.1 - Bendigo 18 (en route to Quarry Hill) and 2 (Eaglehawk) in the early morning at Charing cross with the Alexandra fountain and the Fountain Plaza building in the background. 1208.2 - No. 2 descending View St. Photo taken after tram has passed the photographer. 1208.3 - as for 1208.2 at Mackenzie St. intersection 1208.4 - No. 26 ascending View St. with the ANZ bank, T& G in the background. 1208.5 - as for 1208.4, but at Mackenzie St. intersection. Photo taken after tram has passed the photographer. 1208.6 - No. 18 in View St. seen from the lookout tower in Rosalind Park. 1208.7 - No. 7 en route to North Bendigo in Nolan St. Photographed across the Centenary Oval.Information written on in blue ink and date stamped on purple ink. 1208.1 - "Nos. 18 and 2 in the early morning sun at Charing Cross." 1208.2 - "No. 2 descending View St. towards Charing Cross." 1208.3 - "No. 2 in View St. passing Mackenzie St." 1208.4 - "No. 26 in View St. just after leaving Charing Cross." 1208.5 - "No. 26 climbing View St. past Mackenzie St." 1208.6 - "No. 18 climbing View St. seen from lookout tower in Rosalind Park." 1208.7 - "No. 7 in Nolan St. heading towards North Bendigo. / Last picture of a Bendigo tram."tramways, trams, bendigo, charing cross, view st., nolan st., tram 2, tram 7, tram 18, tram 26 -
 Ballarat Tramway Museum
Slide - 35mm slide/s - set of 4, Noel Simons, Apr. 1972
Set of 4 transparencies - copy slides - possibly ARE film strip dated March 1972. 1209.2 and 1209.4 on Kodak Readymount mounts. 1209.1 - Bendigo 5, 6 and 28 on a special tram service in bound to the City on a tour in Caledonia St. about to enter Lucan St, or White Hills Road or Weeroona Ave. (mis match in names in various maps). Gas works in the background. No. 5 has a white disk on the rear of the tram. 1209.2 - Nos 2 and 26 at Charing Cross with the Fountain Plaza in the background. Both trams have the destination of Quarry Hill, though 26 is on the Eaglehawk bound track. 1209.3 - No. 19 at the Golden Square terminus, with the conductor or driver swinging the pole and Billy Rodda's Golden Square hotel in the background. 1209.4 - No. 7 at Fire Station loop, en route to North Bendigo, picking up a passenger with a pram. Part of a set of 20 slides made by the Association of Railway Enthusiast Provincial Tramways film strip. Reference Item 2560 details the ARE Film Strip and provide references to other slides.Information written on in blue ink and date stamped on purple ink. 1209.1 - "Nos 5, 6 and 28 in Caledonia St. about to enter Weeroona Ave." 1209.2 - "Nos 2 and 26 at Charing Cross." 1209.3 - "Swinging the pole on No. 19 at Golden Square Terminus." 1209.4 - "No. 7 inward bound from Golden Square stops at Fire Station Loop."tramways, trams, bendigo, charing cross, golden square, gas works, special trams, tram 2, tram 5, tram 6, tram 7, tram 19, tram 28 -
 Ballarat Tramway Museum
Document - Report, Melbourne and Metropolitan Tramways Board (MMTB), "Report and Statement of Accounts" for year ended 30 June 1958, 1959, 1960, 1958-1960
1215.1 - Annual report of the MMTB for the year end 30/6/1958 - No. 39 - buff heavy paper cover with 56 pages on inside giving details of the MMTB Board, Officers, Balance Sheet, Statement of funds, operation, schedule of debenture, investments, Auditors reports, record of Annual traffic receipts, passengers, miles etc, tram and bus routes operated, statistical information, graphs and photographs. Photos include 2 of Influenza inoculations, traffic congestion in Collins St., new tram track in Malvern area, and new depot entrance at Camberwell. Has an insert inside front cover "With the Compliments of the Melbourne and Metropolitan Tramways Board." 1215.2 - 2 copies - Annual report of the MMTB for the year end 30/6/1959 - No. 40 - light green heavy paper cover with 60 pages on inside giving details of the MMTB Board, Officers, Balance Sheet, Statement of funds, operation, schedule of debenture, investments, Auditors reports, record of Annual traffic receipts, passengers, miles etc, tram and bus routes operated, statistical information, graphs and photographs. Photos include reconstruction of Batman Ave., laying special work at Kew Junction, pouring concrete in Johnston St., cable tramway abandonment, new thermit welding process, new dressing sheds at Wattle Park, illuminated tramcar for the City of Fitzroy centenary. Has an insert inside front cover "With the Compliments of the Melbourne and Metropolitan Tramways Board." 1215.3 - Annual report of the MMTB for the year end 30/6/1960 - No. 41 - light grey heavy paper cover with 60 pages on inside giving details of the MMTB Board, Officers, Balance Sheet, Statement of funds, operation, schedule of debenture, investments, Auditors reports, record of Annual traffic receipts, passengers, miles etc, tram and bus routes operated, statistical information, graphs and photographs. Photos include new St Kilda junction trackwork being assembled in Sth Melbourne yard, Flinders St. overpass under construction, - temporary trackwork, wheel welding machine at Preston, bus drivers school, new golf club house at Wattle Park, Q class tram decorated for Myers Christmas 1959. Has an insert inside front cover "With the Compliments of the Melbourne and Metropolitan Tramways Board." Printer not given on 1215.31215.1 - in ink on the front cover "Mr Major". On page 34 in pencil some notations re figures. 1215.2 - copy 2 - in ink on the front cover "Mr Major". 1215.3 - in light colour ink on front cover "Mr. B.F.Becher"trams, tramways, mmtb, melbourne, annual reports, operations, trackwork -
 Ballarat Tramway Museum
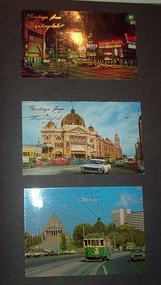
Album - Photo Album, Newstar, 1960s to 1970's
Photographic album containing 39 Colour postcards of Melbourne trams. The album consists of 30 leaves of dark grey heavy paper with three creases on left hand side of sheet, bound into a heavy bluey grey folder, embossed in gold 'Scrap Book" and bound with bluey grey string with two holes. The cover has been embossed with a the blue grey in swirls. Inside of back cover is a white label, "A New Star Product", with a please ask for No. with "425" stamped on. Postcards have been glued into the album. Entries have been kept to a single line - cards are able to be dated from buildings, whether the trams have marker lights, types of motor cars and general Melbourne history. Image files in page number order. Image 15 is of book. All taken with a electronic camera. Page 1 - Night photo - Flinders and Swanston St. - with "Greetings from Huntingdale" embossed in gold. Flinders St. station, with "Greetings from Huntingdale" embossed in gold. (post 1972 ) St. Kilda road with the Shrine of Remembrance in the background and W2 453 inbound on route 6. (post 1974) Page 2 - Bourke St, looking from Parliament House westwards, with Z8 inbound - after 13/8/1975 on route 89. Bourke St, looking east from Queen St., night photo, early 1970's. Princes Bridge looking towards Flinders St. Station Page 3 - Flinders St. Station, from Princes Gate buildings, - Photo E. Ludwig, John Hinde Studios. Bourke St. from Queen St, looking east, late 1960's - all W's. - W7 1026 east bound on route 88. Flinders St and Swanston St. corner, from Princes Bridge - night photo - W5 756 northbound route 15. Page 4 - W2 584 inbound route 64, St. Kilda Road and Nolan St., late 1960s - photograph. Princes Bridge, looking over Yarra River to the east. (pre Concert Hall) St. Kilda Road, with Shine of Remembrance in background, W2 303 inbound route 4D, mid 1960's. Page 5 - Flinders and Swanston St, W2 530 outbound route 8, early 1970's. Swanston and Collins St., W2 596 westbound in Collins St. City Square built - 1st version. (post 1972) St Kilda Road, with Shine in background, W2 298 and others, route 8 and 72. (post 1972) Page 6 - Flinders and Swanston St., W2, inbound route 5 on a wet evening. (mid 1970's) W2 515 outbound, Collins St., late 1960's, with Town Hall in background. (early 1970's, prior to lights) Collins St. looking west at Russell St with W2 637outbound route 42, early 1960's. Page 7 - Swanston St looking south at Little Bourke, W2's 373 route 67 and 374?(route 5), southbound, early 1970's Flinders St. Station, looking west in Flinders St., early 1970's, at dusk. Melbourne Town Hall with City Square from the North West (early 1970's) Page 8 - Bourke St looking east from Queen St. with W7 1005 inbound on route 96 - early 1970's. Bourke St. looking west from Exhibition St. with W6 976 outbound on route 95 - early 1970's. Swanston St. looking south from Lonsdale, with W2 484 on route 64, W2 228 and W2 364 in photo - early 1970's. Page 9 - Swanston looking south from north of Lonsdale St with many tramcars in photo - mid 1970's. St Kilda Road, with Shrine in background, W2 345 outbound route 4, SW6 913 inbound route 4 - prior to 1970. St Kilda Road, with Shrine in background, with trams in photo - early 1970's. (Photo loose in album - National View postcard by Murfett Ltd. Aust.) Page 10 - Postcard - TMSV? of 1041 and cable car set at Preston Workshops. 1041 in Bourke St., looking east from Queen St. - early 1970's - 1974? Collins St. looking east from Elizabeth St. with W2 253 inbound route 11, and W2 224 outbound - rout 47, early 1970's Page 11 - TMSV Postcard, X217 in Dandenong Road with L class in background. Shrine of Remberance from BP building, looking towards the city with St. Kilda Road on the left. Princes Gate and Flinders St. from the SEC buildings in Flinders St. looking south east - mid 1960's. Page 12 - Swanston St. at Flinders St. looking north at dusk. Flinders St. station at Swanston St with trams crossing at intersection - late 1960's Flinders St. station with W2 327 outbound. Page 13 - Temporary City Square at Collins and Swanston St. with tramcars at intersection. Wellington Parade (Mugs Alley), looking towards the City, with W2 546 inbound on route 38 - mid to late 1960's. Page 14 - Swanston St. looking south, at Lonsdale St, W2 432 inbound route 7 - late 1960's or early 1970's. Partly loose in album - National View postcard by Murfett Ltd. Aust. trams, tramways, photo album, melbourne, postcards -
 Ballarat Tramway Museum
Postcard, Biscay Greetings, Bourke St Melbourne
Colour postcard with serrated edges of Bourke St. Melbourne from Parliament house with MMTB Z8 and about 6 W7's in photo, along with many motor vehicles. Also shown are the Safety Zones and stops. In image are buildings along either side of Bourke St., featuring the sign of the Salvation Army City Temple in the top left hand corner, Mittys, and a Kwikasair van by the outbound safety zone. Tram Z8 has destination of "CITY - SPENCER ST." and showing route 89. On rear of card is name of company "Biscay" and caption "New Z class tram in Bourke Street, Melbourne Victoria." and card number BG98 in dark brown ink, along with space for stamp and address. See Destination City re introduction of Z class trams (1975)trams, tramways, bourke st, melbourne, z class trams, tram 2 -
 Ballarat Tramway Museum
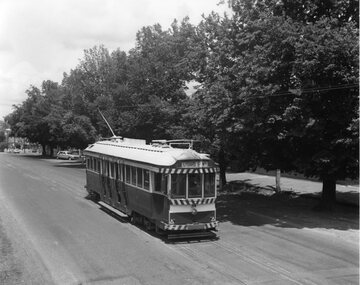
Photograph - Black & White Photograph/s set of 19, Mar. 1972
Set of 19 black and white prints, all 89mm square of Bendigo trams, date machine printed on print is "Mar 1972". 981.1 - Tram 21 at North Bendigo terminus, with level crossing in background. Has destination "Golden Square" and two SEC roof ads. 981.2 - tram 2? at Eaglehawk, with destination "Depot", two SEC roof ads and "Leo A. Hughes Photographer" on side of building in background. 981.3 - tram 2? at Eaglehawk, side on view. 981.4 - tram 26 at Quarry Hill terminus looking back into city. 981.5 - tram 7 en route to North Bendigo at the site of the Bridge St. loop. Has a Peters Ice Cream truck and Sandhurst Fruit Juices truck on right side of photograph. 981.6 - tram 2 at Quarry Hill terminus. 981.7 - tram 2? at one of the loops on the Eaglehawk line, inbound? 981.8 - bogie tram at Charing Cross with fountain in background. Side on view looking south. 981.9 -trams 7 and 21 on Golden Square/North Bendigo line with bogie tram in background, at Charing Cross. Same as item 972. 981.10 - bogie tram at Charing Cross - has buildings in south west corner in background, including Colonial Mutual Life and an advertisement for the Herald newspaper. 981.11 - trams 25, 7 and two other trams at Charing Cross. 981.12 - trams 2 and 26 and three others at Charing Cross. 981.13 - tram 25 at Golden Square terminus, with Rodda's Golden Square Hotel in the background. Tram showing destination of "Nth Bendigo" 981.14 - tram 24, showing "Special" on depot access track. Has two Johnnie Walker roof ads on side. 981.15 - as above, but tram on bridge outside depot. 981.16 - trams 25 and 28 at depot 981.17 - tram 24 showing "Special" on depot access track with a single truck car in background. 981.18 - trams 2 and 26 at Charing Cross. Has advertisements for "Armstrong Tyre Service" and "Cohn's drinks" on buildings in background. 981.19 - Bendigo 2 at location?, about to enter a loop or double track section. Has hotel in background. On rear of each photo in the top left hand corner is a print number 1 to 19 in ink and location notes, generally "Bendigo"trams, tramways, charing cross, bendigo, golden square, quarry hill, tram 2, tram 21, tram 7, tram 24, tram 26 -
 Ballarat Tramway Museum
Photograph - Black & White Photograph/s, Chris Wurr, late 1960's or early 1970's
Yields information about the tramway and the street scene in Lydiard St Nth during the last few years of tramway operation.Black and White photograph of SEC tram 34 travelling along Lydiard St. North, bound for the Lydiard St. North terminus. Photo shows the tree lined route and how the road surfaces was not fully sealed to the gutter, but with a crushed rock edge. Photo taken by Chris Wurr during late 1960's or early 1970's. Photocopy made 4/1999 for display purposes. Copy 2 - as above, ex Alan Bradley 5/2007 - added 27/7/2007.Copy 1 - On rear, in black stamp ink "Photo by Chris Wurr / 12 Truscott Street, Ararat 3377 / (053) 523403. Copy 2 - Additional words to above "Donated to BTPS by and"trams, tramways, lydiard st. nth, tram 34 -
 Ballarat Tramway Museum
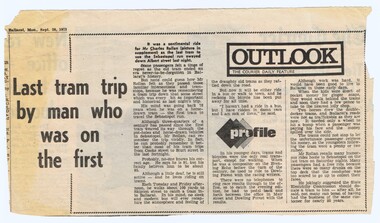
Newspaper, The Courier Ballarat, "Last tram trip by man who was on the first", 20/09/1971 12:00:00 AM
Newspaper clipping from The Courier, 20/9/1971 about Mr. Charles Rollan (picture in supplement - see Reg. item 269) who was on the first horse drawn tram to Sebastopol 78 years ago. In the Outlook - Profile section of The Courier. Gives details of Mr Rollan's life, his riding of the trams to and from the city and his thoughts on the trams, compared to buses and riding a bicycle and on the days of the horse trams on the Sebastopol route. 2nd copy and image added 2/9/2014.trams, tramways, sebastopol, horse trams, charles rollan, stories -
 Ballarat Tramway Museum
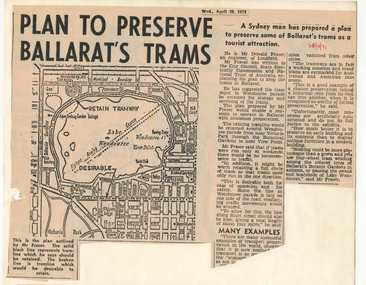
Newspaper, The Courier Ballarat, "Plan to Preserve Ballarat's trams", "Horse drawn trams may be revived for tourists", 28/04/1971 12:00:00 AM
Two Newspaper clippings pasted onto a single sheet of paper with two Punch holes on the left hand side, with one hole through each cutting. First clipping from The Courier, Ballarat, Monday, 28/4/1971 about a plan by Mr Donald Fraser of Lindfield (NSW) to retain the tramway around Lake Wendouree and use Sturt St. as well as Ripon St. Item has map (see image) showing the proposed route and some comments about tramway museums, museums in general and static preservation. Part of the item in the first column is missing. Second cutting dated 3/5/1971 with headline about the possible revival of horse drawn trams in Ballarat. Item also looks at Council's Tourism Committee considerations for retaining trams in Ballarat, relaying lines, reconditioning overhead, looks at costs of running horse drawn trams versus electric trams. Quotes Cr. J.Chisholm, Committee chairman. 1072.2 - duplicate of second cutting added 26/2/2017 from donation of Ruth NelsonIn red ink in upper right hand corner of first cutting "28/4/71" and in upper left hand corner of second, in pencil, "3/5/71". On rear has various pencil marks from former use at perhaps Donor's employer, Ronaldson and Tippet. 1072.2 - in ink on top edge "Courier 3/5/71"trams, tramways, lake wendouree tramway, horse trams, museum establishment, tramway museums -
 Ballarat Tramway Museum
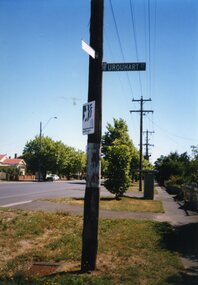
Photograph - Colour Photograph/s set of 6, Neville Gower, 15/02/1997 12:00:00 AM
Group of six photographs taken on 15/2/1997 of some power poles in Drummond St. south that still carry the paintwork, faded and worn, of the SEC tramway system tram stops. 768.1 Drummond St. Sth & Urquhart St. - east side, looking north, with Neighbourhood Watch sign and bus stop shelter in background, with street name signs. 768.2 - Drummond St. South between Eyre & Dana St., east side, looking north. 768.3 - as for 768.1, but looking south. 768.4 - Drummond St. South & South Street. Pole photographed is at the north east corner of the intersection. 768.5 - as for 768.4 768.6 - as for 768.2, but looking south with Foundry Hotel in background. On rear in blue ink: 768.3 - "D.S. South E.side 15/2/97 & Urquhart St." 768.4 - "D.S.South East Side 15/2/97, south" 768.6 = "15/2/1997 D.S.Sth between Eyre & Dana E.Side"tram stops, drummond st. sth, sebastopol route