Showing 532 items matching "charing cross bendigo"
-
 Bendigo Historical Society Inc.
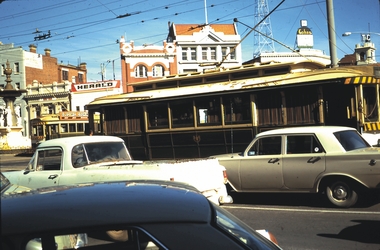
Slide - CASTLEMAINE HISTORICAL SOCIETY COLLECTION, ALEXANDRA FOUNTAIN, MITCHELL ST, 1955
Slide. Alexandra Fountain Charing Cross, looking towards Mitchell St. Trelor Watchmaker with clock at top of building. Dated 28.5.55slide, bendigo, alexandra fountain, castlemaine historical society collection alexandra fountain bendigo mitchell street -
 Bendigo Historical Society Inc.
Slide - BENDIGO BUILDINGS, Oct 1970
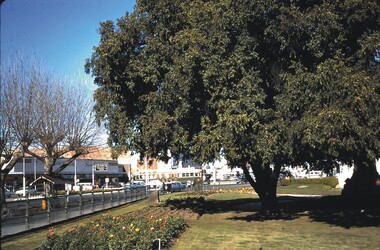
... Slide. Bendigo Buildings. Looking towards Charing Cross.... Bendigo Buildings. Looking towards Charing Cross from the gardens ...Slide. Bendigo Buildings. Looking towards Charing Cross from the gardens of the RSLMemorial Hall.slide, bendigo, bendigo buildings., bendigo buildings. -
 Bendigo Historical Society Inc.
Slide - BENDIGO BUILDINGS, Jan 1970
Slide. Bendigo Buildings. View from north Charing Cross to Lyric Theatre on the Sth side.slide, bendigo, bendigo buildings., bendigo buildings. -
 Bendigo Historical Society Inc.
Slide - BENDIGO BUILDINGS, Oct 1964
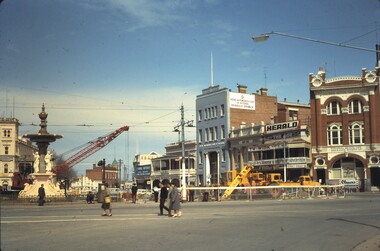
Slide. Bendigo Buildings. A red crane doing construction work at Charing Cross, between the fountain and cenotaph, with the City Family Hotel on the left, the View Point Hotel, RACV Building, Colonial Mutual Life Building on right.slide, bendigo, bendigo buildings., bendigo buildings. -
 Bendigo Historical Society Inc.
Slide - BENDIGO TRAMS, Dec 1972
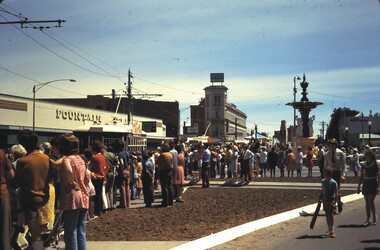
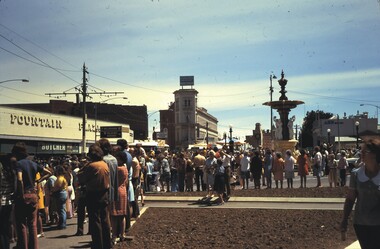
... Slide. Bendigo Trams. Crowds around Charing Cross..... Crowds around Charing Cross. Slide BENDIGO TRAMS. ...Slide. Bendigo Trams. Crowds around Charing Cross.slide, bendigo, bendigo trams., bendigo trams. -
 Bendigo Historical Society Inc.
Slide - BENDIGO TRAMS, Dec 1972
... . Crowds lined up for the event, at Charing Cross. Slide BENDIGO ...Slide. Bendigo Trams. Crowds lined up for the event, at Charing Cross.slide, bendigo, bendigo trams., bendigo trams. -
 Bendigo Historical Society Inc.
Slide - BENDIGO TRAMS, Oct 1970
Slide. Bendigo Trams. Three trams at Charring Cross, One tram heading towards Eaglehawk; another towards Golden Square; and the other towards North Bendigo.slide, bendigo, bendigo trams., bendigo trams. -
 Bendigo Historical Society Inc.
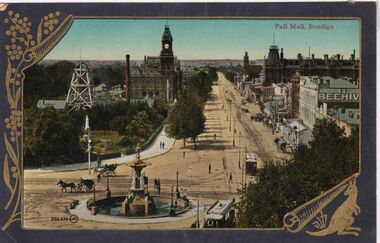
Photograph - CARWARDINE COLLECTION: PALL MALL BENDIGO
Coloured postcard, embellished with wattle left hand side, and kangaroo bottom Rh corner. Image shows Pall Mall, looking northwards. Post Office, Hustler's mine with brick chimney visible on left. Alexandra Fountain in centre bottom, horse drawn vehicles and two trams at Charing Cross. Henderson and Goode Beehive building and Shamrock Hotel on right. Receipt number 355/16bendigo, business, carwardine soap and candle -
 Bendigo Art Gallery
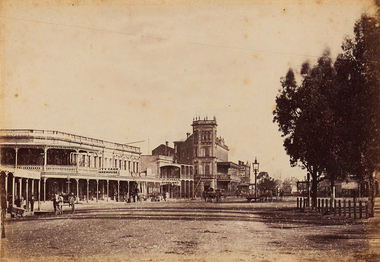
Photograph - Work on paper, Nicholas CAIRE, View of Charing Cross, Sandhurst, 1875
(on mount) l.l; N.J.CAIREwork on paper, photograph, photographer, albumen, sandhurst, bendigo, central goldfields, street, town city, victoria, regional victoria -
 Bendigo Art Gallery
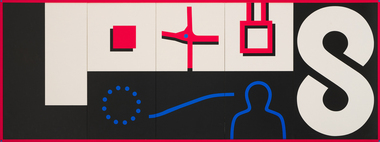
Painting, Peter TYNDALL, A Person Looks At A Work Of Art/someone looks at something LOGOS/HA HA/ The Triumph of Charing Cross over Bednego Creek/ (after The Triumph of Christianity over Paganism,/ by Tommaso Siciliano), 1997
... Bendigo central victoria Charing Cross Not signed Not dated ...Not signed Not datedcontemporary art, conceptual art, australian artist, painting, looking, bendigo, central victoria, charing cross -
 Ballarat Heritage Services
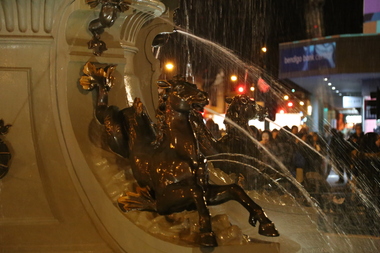
Photograph - Photograph - Colour, Clare Gervasoni, Alexandra Fountain during White Night Bendigo, 2018, 01/09/2018
... bendigo charing cross alexandra fountain horse William Vahland ...The Alexandra Fountain was designed by William Vahland and is constructed of Harcourt Granite.Charing Cross buildings illuminated during White Night Bendigo, and featuring the Alexandra Fountain.white night bendigo, charing cross, alexandra fountain, horse, william vahland -
 Ballarat Tramway Museum
Photograph - Set of 7 photographs of a Bendigo Tram tour with Birney trams, Vance Findlay, c1971
Set of 7 photographs taken during a tram tour using Birney's 30 and 28. Possibly 1971 or early 1972 prior to closure. 1 - High St Eaglehawk with Primary School hall behind. 2 - Tram 28 from another tram's window - note no driver. 3 - trams 28 and 30 in McCrae St with the Bendigo Technical College building in the background. 4 - Tour trams turning from Bernard St into View St with the Five Lions Hotel in the background with a Fosters Lager advertisement. This hotel has since been demolished. 5 - Tram 30 on the single-track extension at Eaglehawk. 6 - Tram 6 and another single trucker at Charing Cross - note the sag on the second tram - a spring possibly has failed. 7 - Tram 19 running out the depot lead into McCrae St with an SEC Cooking roof and a Briquettes dash canopy advertisements.Yields information about Bendigo tram tours prior to the closure of the SEC operated system.Black and White photographs on Ilford Paper - undated - set of 7trams, tramways, sec, bendigo, tram 28, tram 30, high st, eaglehawk, tram 6, mccrae st, view st, five lions hotel, tram 19, tours, birney tramcars -
 Ballarat Tramway Museum
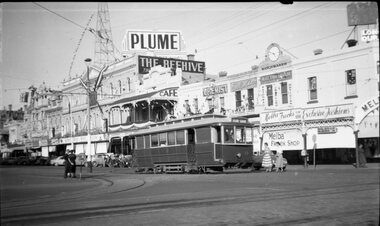
Negative, Wal Jack, 7/03/1954 12:00:00 AM
... Mall Charing Cross Royal Visit tram 19 Negative and Digital ...Negative and Digital images of the Wal Jack Bendigo Negative file of tram 19 at Charing Cross. Tram has the destination of Charing Cross. In the background is are decoration for the Royal Visit (on The Beehive building), Evelyn Amor, A. G. Trelor watchmaker, Melba Frocks, the latter with a sign provided by the RACV pointing towards Melbourne. A large Plume sign is on The Beehive building. Assumed taken on the same day as Reg Item 7878 - Royal Visit.trams, tramways, bendigo, pall mall, charing cross, royal visit, tram 19 -
 Ballarat Tramway Museum
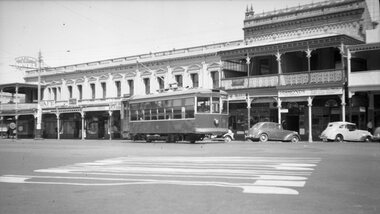
Negative - Birney No. 28 after leaving Charing Cross, Wal Jack, 7/03/1954 12:00:00 AM
Negative and Digital images of the Wal Jack Bendigo Negative file of Bendigo Birney No. 28 after leaving Charing Cross. Photo by Wal Jack, 7-3-54, mostly like the same date as other photographs using the 125 film format. In the background are signs or shops for City Club Hotel, a Cafe, Greys cigarettes, Marshalls Fruit Supply, Desmond's electrical appliances.trams, tramways, bendigo, birney, tram 28 -
 Ballarat Tramway Museum
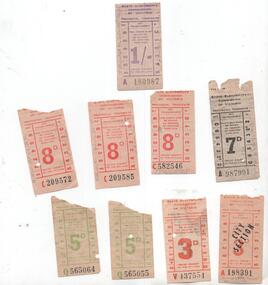
Ephemera - Ticket/s, State Electricity Commission of Victoria (SECV), Set of 9 pre-decimal or imperial currency, 1959 to 1965
Has a strong association with the Ballarat and Bendigo tramway system as being identified as being used on the system and for which trip on a specific date and demonstrates the ticket style prior to the time of decimal conversion in Australia.Set of 9 pre-decimal or imperial currency tickets used on the Ballarat or the Bendigo tramway system with three of them noted as to their use on the rear. 1 - 3d - orange ticket, over printed "City Section" - A 198391 - used "Charing Cross to Station - tram 23 - Sat 22 May 1965" 2 - 3d - orange - V437554 - on rear "Tram 34 Going to Mt Pleasant Easter Tuesday 31 March 1959". 3 - 5d - green - Q565064 - on rear in pencil "Quarry Hill to Charing Cross (No. 3) 4 - 5d - green - Q565055 - ditto, with addition of "2nd tram" 5 - 7d - black A987991 - on side in pencil' "Eaglehawk to Q Hill No. 3" 6 - 8d - red C209572 - "18 Drummond from L St N Sun 8 Nov. 1964" 7 - 8d- red - C209585 - "ditto" 8 - 8d - red - C582546 - "Q Hill to station tram 23, Sat 22 May 1965" 9 - 1/- purple - A 180987 - "18 decorated for Sebastopol Gold Cent. Sun 8 Nov. 1964 to Sebastopol" trams, tramways, tickets, secv, ballarat, bendigo, gold, sebastopol, quarry hill, mt pleasant, lydiard st north -
 Ballarat Tramway Museum
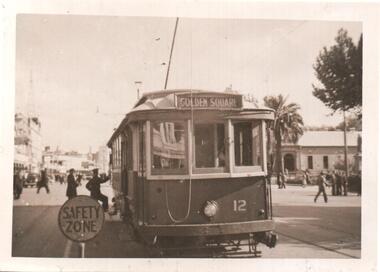
Photograph - Black & White Photograph/s, Lee A Ratten, late 1940's to early to mid 1950's
Black and white photograph of Bendigo 12 in Pall Mal, the stop before Charing Cross. Tram stop has a safety zone sign and two crew members at the front of the tram. Photograph late 1940's to early to mid 1950's. Tram has the destination of Golden Square. Photo possibly Lee A Ratten - see related document and Reg Item 7185.trams, tramways, bendigo, pall mall, safety zone, tram 12 -
 Ballarat Tramway Museum
Photograph - Black & White Photograph/s, Lee A Ratten, 6/06/1928 12:00:00 AM
... Mall Charing Cross tram 9 Black and white photograph of Bendigo ...Black and white photograph of Bendigo No. 9 Pall Mall 6/6/1928 at the intersection with Mitchell St, Charing Cross with the City Club Hotel in the background. Behind No. 9 is No. 12 or 18? No. 9 has a roof advertisement for Lyric Lightning. On the left hand side is a horse drawn cart and shows a verandah on the building on the North East corner of the intersection. On the rear of copy 1 has the photo stamp of Lee A Ratten of 51 Cotham Road Kew. On the second print is a hand written note which matches the writing of Lee Ratten. trams, tramways, bendigo, pall mall, charing cross, tram 9 -
 Ballarat Tramway Museum
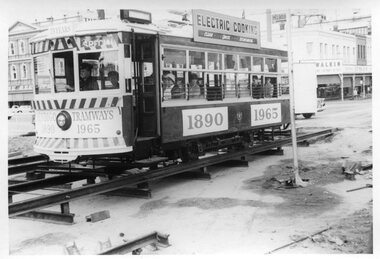
Photograph, Tramway Museum Society of Victoria (TMSV), Bendigo Birney 28 - bridgework, 1965
Photo shows Bendigo 28 decorated for the 75th anniversary of Bendigo trams (1890 to 1965) crossing temporary track at Charing Cross during the reconstruction of the Bendigo Creek bridge during early 1965 - see Electric Traction Vol. 20, No. 6, June 1965. The front cover has a photo by H R Clark of the decorated car. The photo shows the method of supporting the rails during the work prior to completion of concreting. Yields inforamation about bridge reconstruction in Bendigo and their 75th anniversary.Black and white photograph printTMSV Shop stamptrams, tramways, bendigo, birney, tram 28, bridgeworks, charing cross, 75th anniversary -
 Ballarat Tramway Museum
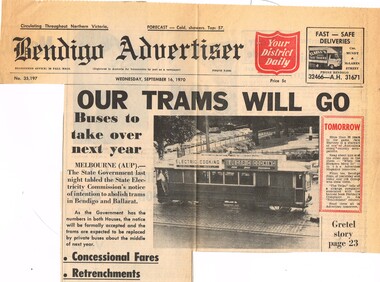
Newspaper, Bendigo Advertiser, "Our trams will go - buses to take over next year", 16/09/1970 12:00:00 AM
Newspaper cutting - Bendigo Advertiser - Wednesday 16/9/1970 tilted "Our trams will go - buses to take over next year" about the tabling of the SEC Notice to abandon or abolish the tramways in both Ballarat and Bendigo. Notes the intention for concession fares on the buses, actual fares, revised bus routes, subsidy from the SEC to the Transport Regulation Board (TRB) for concession fares for a period of five years and service frequency. Has a photo of a single trucker at Charing Cross. Quotes the Minister for Fuel and Power - Mr. Balfourbendigo, transport regulation board, closure, buses, fares, sec -
 Ballarat Tramway Museum
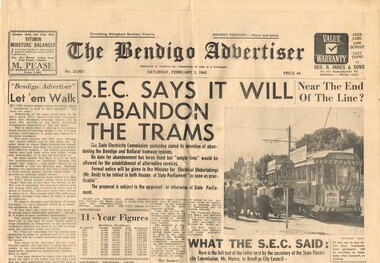
Newspaper, Bendigo Advertiser, "SEC Says it will abandon the trams" "Near the end of the Line?" "Let 'em Walk", "What the SEC Said", "Lost City Without Trams", 3/02/1962 12:00:00 AM
Yields information about the 1962 proposal of the SEC to closure the Bendigo tramway system and notes the impact on the city, with references to Ballarat and Geelong.Newspaper - The Bendigo Advertiser, Saturday 3/2/1962, 14 broad sheet pages, with the main headline ""SEC Says it will abandon the trams" about the notice given in Parliament the previous day by the Minister for Electrical Undertakings Mr. Reid following notice by the SEC. Includes the text of a letter to the City of Bendigo, by the Secretary of the SEC, Mr. D. H. Munro. Has an editorial titled "Let 'em Walk", a photo of the No. 2 en route to Eaglehawk at Charing Cross and further article reporting on comments from four civic leaders "Lost City Without Trams". Quotes two local MLA's - L. W. Galvin, C.P. Stoneham, Cr. W. Mathrick of Eaglehawk and the K.H. Gordon,Chamber of Commerce. Notes impact on the city, Ballarat and Geelong bus system. See Reg Item 6950 for the Ballarat The Courier Report. Full copy of the newspaper collected for style and adverts - has a Briquette advert on page 14.sec, closure, bendigo, parliament, eaglehawk, geelong, ballarat -
 Ballarat Tramway Museum
Slide - 35mm slide/s - set of 32, Noel Simons, 25/02/1971 12:00:00 AM
Set of 31 transparencies taken on 25/2/1972 on Kodak mounts. 1201.1 - Bendigo No. 26 in Bond St. just after leaving Long Gully en route for Quarry Hill. Has Norris Supermarket in background. Has two SEC roof ads. 1201.2 - No. 26 climbing View St. from Charing Cross en route to Eaglehawk. Has ANZ bank and AMOCO service station in background. 1201.3 - as for 1201.3, but after tram has passed photographer. Has buildings west of Mackenzie St. in photograph. 1201.4 - Tram stop and centre of the road pole with two "CARS STOP BY REQUEST" signs mounted on pole at the corner of Mackenzie St. 1201.5 - same position as for 1201.3, but with No. 5 descending the street. 1201.6 - same position as for 1201.2, but with No. 5 descending the street. Photo taken after tram has passed photographer. 1201.7 - No. 7 in Nolan St. from across the park at Lake Weeroona. 1201.8 - No. 7 entering McCrae St from Nolan St. - distant view. Note "TRAM "sign on left hand side under tree and overhead in McCrae St. from former track that once was in this street. 1201.9 - No. 7 in High St. with Cathedral in background. Tram en route to North Bendigo. Note scaffolding around Cathedral main spire area. 1201.10 - No. 7 crossing Bendigo Creek bridge in High St. near Golden Square. Has a Caltex Service station in the background. 1201.11 - No. 7 at Golden Square terminus with Sunburst Fruit Juices and a Peters Ice cream delivery vans alongside. 1201.12 - as for 1201.11 but photo taken from behind tram, with the end of the rails in the photograph. 1201.13 - No. 7 and 21 in Pall Mall at Charing Cross with No. 5 in the background. Taken some distance away from the location. 1201.14 - No. 7 at Golden Square terminus, taken a short distance from the tram terminus. Shows Milk Bar on right hand side and the hotel on the left hand side. Taken from the south side of the roadway. 1201.15 - as from 1201.14 but taken from the north side of the roadway. 1201.16 - No 5 waiting at California Gully loop. Distant photo showing surrounds 1201.17 - No. 5 en route for Quarry Hill crossing No. 26 at California Gully. 1201.18 - No. 26 at Eaglehawk terminus with Eaglehawk Town Hall and Post Office in background. 1201.19 - No. 21 arriving at Charing Cross en route to North Bendigo. Has Alexandra Fountain in the background, ANZ bank RACV building, and other buildings on the north side of Pall Mall or Nolan St. 1201.20 - No. 26 en route for Quarry Hill at Charing Cross, with crew standing by front door. Has Colonial Mutual life building, Armstrong Tyre Service (Firestone) and a sign for Cohns Drinks in the background. 1201.21 - as for 1201.20 but with No. 5 en route to Eaglehawk now in photograph. 1201.22 - No. 26 at Quarry Hill terminus. 1201.23 - No. 26 at Quarry Hill terminus, view of front portion of tram only from a gate at the Bendigo cemetery. 1201.24 - Track at the end of the Quarry Hill line showing the point blades of the former "Y" terminus and the overhead for this. 1201.25 - No. 2 at the Quarry Hill terminus, looking along the former Trackwork. 1201.26 - as for 1201.25 1201.27 - number not used. 1201.28 - Golden Square terminus from some distance from the actual terminus, showing the Warning sign "TRAM" for motorists from the south. No. 7 at the terminus. 1201.29 - No. 7 passing through the Golden Square shopping centre. Numerous cars and pedestrians. Tram en route for North Bendigo. 1201.30 - No. 7 in High St. Golden Square, en route for North Bendigo. Photo taken after tram has passed photographer. 1201.31 - No. 7 in High St. just past Wattle St. with the Cathedral in the background. Tram has two SEC roof ads good side on photo, 'Everything's fine in my all electric kitchen' and 'Electrical cooking - clean, quick, economical'. 1201.32 - No. 7 in High St. nearing Wattle St. Has Cathedral in the background. Photo taken after tram has passed photographer.Information written on in black ink and date stamped on purple ink. 1201.1 - "No. 26 in Bond St just after leaving Long Gully" 1201.2 - "No. 26 climbing View St. from Charing Cross" 1201.3 - "No. 26 ascending View St. from Charing Cross (At Mackenzie St.)" 1201.4 - "View St. & Mackenzie St." 1201.5 - "No. 5 in View St. near Mackenzie St." 1201.6 - "No. 5 in View St. nearing Charing Cross." 1201.7 - "No. 7 in Nolan St. seen from Lake Weeroona Park." 1201.8 - "No. 7 entering McRae St. from Nolan St. Note "TRAM" warning sign on left. 1201.9 - "No. 7 in High St. passing Short St." 1201.10 - "No. 7 crossing Bendigo Creek bridge in High St. near Golden Square." 1201.11 - "No. 7 at Golden Square terminus" 1201.12 - "No. 7 at Golden Square terminus" 1201.13 - "No 7, 21 and 5 at Charing Cross" 1201.14 - "No. 7 at Golden Square terminus" 1201.15 - "No. 7 at Golden Square terminus" 1201.16 - "No 5 waiting at California Gully loop." 1201.17 - "Nos. 5 and 26 crossing at California Gully loop" 1201.18 - "No. 26 at Eaglehawk terminus" 1201.19 - "No. 21 arriving at Charing Cross from Golden Square" 1201.20 - "No. 26 at Charing Cross" 1201.21 - "Nos. 5 and 26 at Charing Cross." 1201.22 - "No. 26 at Quarry Hill terminus" 1201.23 - "No. 26 at Quarry Hill terminus seen through the gates of the Bendigo Cemetery." 1201.24 - "Quarry Hill terminus showing remains for former double track layout abandoned before 1964." 1201.25 - "No. 2 at Quarry Hill terminus" 1201.26 - "No. 2 at Quarry Hill terminus" 1201.28 - "The Southern approach to Golden Square with No. 7 standing at the terminus, "TRAM" warning sign on the left. 1201.29 - "No. 7 passing through Golden Square Shopping Centre" 1201.30 - "No. 7 in High St. Golden Square" 1201.31 - "No. 7 in High St. passing Wattle St." 1201.32 - "No. 7 in High St. nearing Wattle St."tramways, trams, bendigo, bond st., view st., nolan st., high st., eaglehawk, california gully, charing cross, quarry hill, trackwork, tram 2, tram 5, tram 7, tram 21, tram 26 -
 Ballarat Tramway Museum
Slide - 35mm slide/s - set of 8, Noel Simons, 25/02/1972 12:00:00 AM
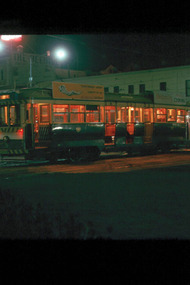
... . 1202.1 - Night photo of Bendigo 5 at Charing Cross, waiting... Photo Charing Cross Quarry Hill Mitchell St. tram 2 tram 5 tram ...Set of 8 transparencies taken on 25/02/72 on Kodak mounts. 1202.1 - Night photo of Bendigo 5 at Charing Cross, waiting to depart to Quarry Hill. Tram has two SEC roof ads. Has Ezywalkin and the Beehive buildings in the background. 1202.2 - as for 1202.1 1202.3 - as for 1202.1 but further back and 7 and 21 waiting for their runs as well in Pall Mall. 1202.4 - 5 and 2 at Charing Cross, night photo, looking along Mitchell St. with Fountain Plaza on right of photo and Ezywalkin store. 1202.5 - No. 2 at Charing cross, bound for Eaglehawk. Tram has two SEC ads. 1202.6 - No. 26 at Quarry Hill terminus with the cemetery in the background. Tram has two SEC roof ads. 1202.7 - No. 26 in Mitchell St. bound for Eaglehawk, at Wills St. with the Hopetoun Hotel in the background. 1202.8 - as for 1202.6Information written on in blue ink and date stamped on purple ink. 1202.1 - "No. 5 at Charing Cross" 1202.2 - "No 5. at Charing Cross" 1202.3 - "Nos. 7, 21 and 5 at Charing Cross" 1202.4 - "Nos. 5 and 2 at Charing Cross" 1202.5 - "No. 2 at Charing Cross" 1202.6 - "No. 26 at Quarry Hill" 1202.7 - "No. 26 in Mitchell St. opposite Wills St." 1202.8 - "No. 26 at Quarry Hill" tramways, trams, bendigo, night photo, charing cross, quarry hill, mitchell st., tram 2, tram 5, tram 7, tram 21, tram 26 -
 Ballarat Tramway Museum
Slide - 35mm slide/s - set of 19, Noel Simons, 26/02/1972 12:00:00 AM
Set of 18 transparencies taken on 26/2/1972 on Kodak mounts. 1203.1 - Bendigo 5 at Eaglehawk terminus - with new traffic works. 1203.2 - No. 5 climbing the High St. hill Eaglehawk with the buildings on the east side in the photo. 1203.3 - No 2 descending the road over rail bridge at Job's Gully, heading for Quarry Hill. 1203.4 - as for 1202.3, but more side on. Tram has two SEC roof ads. 1203.5 - as for 1202.4 1203.6 - No. 26 entering Garden Gully Loop, Mt. Korong Road, Ironbark. Tram en route to Eaglehawk. Water column on right hand side of photograph. 1203.7 - No. 2 on the Eaglehawk route, Iron Bark area?, bound for Quarry Hill. 1203.8 - as for 1202.7, but photo taken after tram has past photographer. 1203.9 - No. 5 at Eaglehawk terminus, night photo. Tram has arrived at terminus, showing Quarry Hill, pole turned, but the tram lights have yet to be turned around. 1203.10 - as for 1202.9, but lights have been turned around. 1203.11 - No. 26 climbing the View St. Hill near the Commodore Hotel. Has Campbells Electrical Services building in the background. Photo taken after the tram has passed the photographer. 1203.12 - No. 7 end on photograph, at Golden Square, destination showing Golden Square - night photo. 1203.13 - number not used. 1203.14 - as for 1202.12, but partially side on, has a passenger looking out the tram. 1203.15 - as for 1202.12, but with hotel in the background. 1203.16 - No. 26 and 2 at Charing Cross, night photo. Tram 26 en route to Quarry Hill, 2 to Eaglehawk. 1203.17 - Interior photo of No. 26, at night. 1203.18 - No. 26 at the Quarry Hill terminus as night. 1203.19 - as for 1202.18, but central portion of the tramcar.Information written on in blue ink and date stamped on purple ink. 1203.1 - "No. 5 at Eaglehawk terminus" 1203.1 - "No. 5 in High St. Eaglehawk" 1203.3 - "No. 2" 1203.4 - "No. 2" 1203.5 - "No. 2" 1203.6 - "No. 26 at Garden Gully Loop Mt Korong Rd., Ironbark" 1203.7 - "No. 2" 1203.8 - "No. 2" 1203.9 - "No. 5 at Eaglehawk terminus" 1203.10 - "No. 5 at Eaglehawk terminus" 1203.11 - "No. 26 in View St. Near the Commodore Motel" 1203.12 - "No. 7 at Golden Square Terminus" 1203.14 - "No. 7 at Golden Square Terminus" 1203.15 - "No. 7 at Golden Square Terminus" 1203.16 - "Nos. 26 and 2 at Charing Cross" 1203.17 - "Interior of No. 26" 1203.18 - "No. 26 at the Quarry Hill terminus" 1203.19 - "No. 26 at the Quarry Hill terminus "tramways, trams, bendigo, eaglehawk, bridges, iron bark gully, night photo, quarry hill, golden square, tram 2, tram 5, tram 7, tram 26 -
 Ballarat Tramway Museum
Slide - 35mm slide/s - set of 23, Noel Simons, 26/02/1972 12:00:00 AM
Set of 23 transparencies taken on 26/2/1972 on Kodak mounts. 1205.1 - Bendigo No. 25 on a special tour at Fire Station Loop, en route to Golden Square. 1205.2 - No. 21 and 25 crossing at Fire Station Loop, note photographers on the ground. No. 21 bound for North Bendigo. 1205.3 - as for 1205.3, but with trams departing loop and fire station in the background. 1205.4 - No. 25 at Golden Square Hotel with 'Rodda's Golden Square Hotel' in the background. Tram on a special tour, but showing destination of North Bendigo. 1205.5 - as for 1205.4 - but showing special. Has the end of the track in the photograph. 1205.6 - Nos. 7 and 25 (on a special tour) crossing at Myrtle St. Loop. 1205.7 - No. 7 leaving Myrtle St. loop with the mine poppet head in the background. Photo taken after tram has passed photographer. (Print made of this slide 10/2001 for use in the Gold Gold Gold exhibition of 10/2001 - See Reg. item 1979. 1205.8 - No. 25 entering depot. Tram showing 'special'. Tennis court on right has players. Photo taken after tram has passed photographer. 1205.9 - No. 24 (showing 'special') and No. 20 (showing 'Long Gully') at Bendigo Depot. 1205.10 - No. 24 on a special charter, leaving Bendigo depot. Tram has two 'Johnnie Walker' roof ads. 1205.11 - Bendigo depot with 29, 25 and a bogie car inside the depot doors. 1205.12 - As for 1205.11, but with 28 and 29. 1205.13 - No. 24 standing at front entrance of Bendigo depot with No. 20 in the background. 1205.14 - No. 24 running out into McCrae St showing special, with conductor on front step. 1205.15 - No. 24 in Caledonia St. at corner of Thunder St with the Gasworks in the background. 1205.16 - No. 5 en route for Quarry Hill at Charing cross with No. 26 (en route for Eaglehawk) about to arrive. Has former crossover at this location in the foreground. Has the Ezywalkin building in the background. 1205.17 - No. 5 and 26 at Charing Cross, with the Alexandra Fountain in the foreground and the Beehive and Ezywalkin buildings in the background. No.26 has two SEC roof ads. 1205.18 - Charing Cross looking along Pall Mall with trams 7 and 21 and 26 in the picture. 1205.19 - Charing Cross, with 21 departing for Golden Square and No. 5 heading for Quarry Hill. Has the Ezywalkin and the Beehive buildings in the background. 1205.20 - as for 1205.19, but a few moments later. Adjacent pole has a "NO ROAD" letter in reflectors vertically. 1205.21 - Charing Cross with Nos. 25, 21, 26 and 7, looking south from Pall Mall end. 1205.22 - No. 24 crossing Mitchell St. en route for Golden Square, showing 'special' with the Beehive and Ezywalkin buildings in the background. 1205.23 - Charing Cross with Nos. 24, 21 and 7 in the photo and Fountain Plaza in the background. Print of 1205.7 - stored in box D1.Information written on in blue ink and date stamped on purple ink. 1205.1 - "No. 25 at Fire Station Loop High Street, Golden Square." 1205.2 - "Nos. 25 and 21 crossing at Fire Station Loop, near Golden Square." 1205.3 - "Nos. 25 and 21 crossing at Fire Station Loop, near Golden Square." 1205.4 - "No. 25 at Golden Square terminus." 1205.5 - "No. 25 at Golden Square terminus." 1205.6 - "Nos. 7 and 25 crossing at Myrtle St. Loop." 1205.7 - "No. 7 leaving Myrtle St. Loop." 1205.8 - "No 25, entering Bendigo Depot." 1205.9 - "Nos. 20 and 24 at Bendigo Depot." 1205.10 - "No. 24 at Bendigo Depot." 1205.11 - "Nos. 25 and 29 at Bendigo Depot." 1205.12 - "Birney cars 29 and 28 at Bendigo Depot." 1205.13 - "No. 24 (with 20 beyond) at Bendigo Depot." 1205.14 - "No. 24 entering McCrae St. from Arnold St." 1204.15 - "No. 24 in Caledonia St. at cnr of Thunder St." 1204.16 - "No. 5 waits at Charing Cross as No. 26 arrives from Quarry Hill. Note remains of crossover abandoned on relocation in 1965." 1204.17 - "Nos. 5 and 26 at Charing Cross." 1204.18 - "Nos. 26, 7 and 21 at Charing Cross (No. 5 just visible behind No. 26)." 1204.19 - "No. 21 leaves Charing Cross for Golden Square as No. 5 starts off for Quarry Hill." 1204.20 - "No. 21 swings onto the single track Golden Square line as No. 5 heads into Mitchell St. towards Quarry Hill." 1204.21 - "Nos. 25, 21 and 26 watch No. 7 arrive at Charing Cross from Golden Square." 1204.22 - "No. 24 at Charing Cross crossing Mitchell St." 1204.23 - "Nos. 24, 21 and 7 at Charing Cross."tramways, trams, bendigo, golden square, myrtle st., fire station, depot, charing cross, tram 5, tram 7, tram 20, tram 21, tram 24, tram 25, tram 28, tram 29 -
 Ballarat Tramway Museum
Slide - 35mm slide/s - set of 12, Noel Simons, 28 Feb. 1972
... - Bendigo 26 and 2 at Charing Cross. 26 en route for Eaglehawk, 2 ...Set of 12 transparencies taken on 28/2/1972 on Kodak mounts. 1207.1 - Bendigo 26 and 2 at Charing Cross. 26 en route for Eaglehawk, 2 for Quarry Hill. Has the Colonial Mutual Life, Armstrong Tyre Service, and Australian Mutual Provident Society buildings and a Cohns Drinks ad. in the background. 1207.2 - as for 1207.1 but with Alexandra fountain in the foreground. 1207.3 - No. 2 in Mitchell St. heading for Quarry Hill. Photo taken after tram has passed photographer. Has buildings on either side of Mitchell St. in the background, including the Plaza Theatre. 1207.4 - No. 6 en route for Golden Square departing Charing Cross. Has the RACV and ANZ bank in the background. 1207.5 - No. 2 crossing Pall Mall to enter Charing Cross ex Quarry Hill, with the Fountain Plaza in the background. 1207.6 - No. 6 arriving Charing Cross ex Golden Square with No. 21 alongside. No. 21 has the SEC ad. 'Everything's fine in my all electric kitchen.' Has the City Family Hotel and the Fountain Plaza shopping centre in the background. 1207.7 - No. 5 at Charing Cross en route for Quarry Hill with No. 2 behind. No. 2 has two SEC roof ads, 'Everything s fine in my all electric kitchen' and 'Electricity best for cooking'. RACV building in the background. Tram crews are discussing the day in the front of the tram. 1207. 8 - No. 21 in High St. Bendigo with the Cathedral in the background. No. 21 has two SEC roof ads, 'Everything's fine in my all electric kitchen' and 'Electricity best for cooking'. 1207.9 - No. 6 in High St. Bendigo with the Cathedral in the background. 1207.10 - No. 6 in High St. Bendigo, just past Wattle St. Photo taken after the tram has passed the photographer from within the Highway Car Sales yard. 1207.11 - No. 26 bound for Eaglehawk at the end of the double track in View St., note signal contactors, tram stop and section signs mounted on pole. 1207.12 - No. 26 turning from View St. into Barnard St.Information written on in blue ink and date stamped on purple ink. 1207. 1- "Nos. 26 and 2 at Charing Cross." 1207.2 - "Nos. 26 and 2 at Charing Cross." 1207.3 - "No. 2 in Mitchell St. just after leaving Charing Cross." 1207.4 - "No.6 leaving Charing Cross for Golden Square." 1207.5 - "No. 2 arriving at Charing Cross from Quarry Hill." 1207.6 - "No. 21 waits at Charing Cross as No. 6 arrives from Golden Square." 1207.7 - "No 5 at Charing Cross with No. 2 lurking behind." 1207.8 - "No. 21 in High St. at cnr of Wattle St." 1207.9 - "No. 6 in High St. at cnr of Wattle St." 1207.10 - "No. 6 in High St. between Wattle and Vine Sts." 1207.11 - "No. 26 at end of double track in View St. near Barnard. St. 1207.12 - "No. 26 seen at dusk turning from View St. into Barnard St."tramways, trams, bendigo, charing cross, high st, view st., tram 2, tram 5, tram 6, tram 21, tram 26 -
 Ballarat Tramway Museum
Slide - 35mm slide/s set of 7, Noel Simons, 29 Feb. 1972
... Charing Cross View St. Nolan St. tram 2 tram 7 tram 18 tram 26 ...Set of 7 transparencies taken on 29/2/1972 on Kodak mounts. 1208.1 - Bendigo 18 (en route to Quarry Hill) and 2 (Eaglehawk) in the early morning at Charing cross with the Alexandra fountain and the Fountain Plaza building in the background. 1208.2 - No. 2 descending View St. Photo taken after tram has passed the photographer. 1208.3 - as for 1208.2 at Mackenzie St. intersection 1208.4 - No. 26 ascending View St. with the ANZ bank, T& G in the background. 1208.5 - as for 1208.4, but at Mackenzie St. intersection. Photo taken after tram has passed the photographer. 1208.6 - No. 18 in View St. seen from the lookout tower in Rosalind Park. 1208.7 - No. 7 en route to North Bendigo in Nolan St. Photographed across the Centenary Oval.Information written on in blue ink and date stamped on purple ink. 1208.1 - "Nos. 18 and 2 in the early morning sun at Charing Cross." 1208.2 - "No. 2 descending View St. towards Charing Cross." 1208.3 - "No. 2 in View St. passing Mackenzie St." 1208.4 - "No. 26 in View St. just after leaving Charing Cross." 1208.5 - "No. 26 climbing View St. past Mackenzie St." 1208.6 - "No. 18 climbing View St. seen from lookout tower in Rosalind Park." 1208.7 - "No. 7 in Nolan St. heading towards North Bendigo. / Last picture of a Bendigo tram."tramways, trams, bendigo, charing cross, view st., nolan st., tram 2, tram 7, tram 18, tram 26 -
 Ballarat Tramway Museum
Slide - 35mm slide/s - set of 4, Noel Simons, Apr. 1972
... Charing Cross Golden Square Gas Works Special Trams tram 2 tram 5 ...Set of 4 transparencies - copy slides - possibly ARE film strip dated March 1972. 1209.2 and 1209.4 on Kodak Readymount mounts. 1209.1 - Bendigo 5, 6 and 28 on a special tram service in bound to the City on a tour in Caledonia St. about to enter Lucan St, or White Hills Road or Weeroona Ave. (mis match in names in various maps). Gas works in the background. No. 5 has a white disk on the rear of the tram. 1209.2 - Nos 2 and 26 at Charing Cross with the Fountain Plaza in the background. Both trams have the destination of Quarry Hill, though 26 is on the Eaglehawk bound track. 1209.3 - No. 19 at the Golden Square terminus, with the conductor or driver swinging the pole and Billy Rodda's Golden Square hotel in the background. 1209.4 - No. 7 at Fire Station loop, en route to North Bendigo, picking up a passenger with a pram. Part of a set of 20 slides made by the Association of Railway Enthusiast Provincial Tramways film strip. Reference Item 2560 details the ARE Film Strip and provide references to other slides.Information written on in blue ink and date stamped on purple ink. 1209.1 - "Nos 5, 6 and 28 in Caledonia St. about to enter Weeroona Ave." 1209.2 - "Nos 2 and 26 at Charing Cross." 1209.3 - "Swinging the pole on No. 19 at Golden Square Terminus." 1209.4 - "No. 7 inward bound from Golden Square stops at Fire Station Loop."tramways, trams, bendigo, charing cross, golden square, gas works, special trams, tram 2, tram 5, tram 6, tram 7, tram 19, tram 28 -
 Ballarat Tramway Museum
Slide - 35mm slide/s, Noel Simons, Dec. 1972
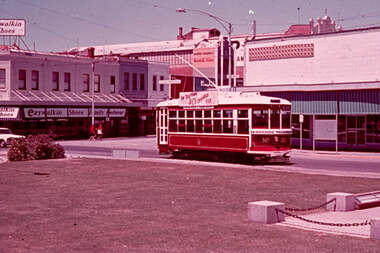
... Charing Cross tram 30 Information written on in blue ink and date ...One transparency on a Kodak Readymount mount, with dark blue border. Photo of Bendigo Trust No. 30 after repainting to the Bendigo trust colour scheme. Has a BCV Television roof ad. Has Fountain Plaza and Ezywalkin buildings in the background. Slide dated Dec. 1972.Information written on in blue ink and date stamped on purple ink. "Birney No. 30 restored to former livery at Charing Cross."tramways, trams, bendigo, charing cross, tram 30 -
 Ballarat Tramway Museum
Slide - 35mm slide/s set of 7, Noel Simons, 1972
Set of 7 transparencies undated on PAKON mounts - appear to be early 1970's. 1212.1 - No. 18 about to enter the Long Gully loop with ESSO service station on the right hand side. 1212.2 - No. 6 in Mitchell Street bound for Charing Cross. Tram has destination of "Rly Station". Has buildings on the east side of Mitchell St. in the background. 1212.3 - No. 7 (North Bendigo) and 29 (Golden Square) crossing. Actual location? 1212.4 - "No 6 showing 'SPECIAL' at Eaglehawk terminus. Has the Foodland store and Fruit shop in the background. 1212.5 - No. 19 at Eaglehawk terminus, on the extension to the normal Eaglehawk terminus. Tram has showing 'Eaglehawk'. Tram has two SEC roof ads. 1212.6 - No. 25 and another Bogie car at Quarry Hill terminus on last day. 1212.7 - No. 18 and 29 at Quarry Hill terminus. No.. 18 showing 'Quarry Hill' - has two SEC roof ads 'Electric Cooking - Matchless' and 'Everything's fine in my all electric kitchen' and No. 29 has a briquettes roof ad.Information typed onto a white label stuck on the slide. 1212.1 - "No. 18 at Long Gully" 1212.2 - "No. 6 in Mitchell Street." 1212.3 - "7 and 29 Lake View Hotel" 1212.4 - "No. 6 at Eaglehawk" 1212.5 - "No. 19 at Eaglehawk Term." 1212.6 - "Last cars Quarry Hill." 1212.7 - "18 & 29 Quarry Hill"tramways, trams, bendigo, long gully, mitchell st., eaglehawk, quarry hill, last tram, tram 6, tram 7, tram 18, tram 19, tram 25, tram 29 -
 Ballarat Tramway Museum
Photograph - Colour print of donated negatives - set of 4, Ron E. Fluck, 1/12/1989 12:00:00 AM
... Parade Ballarat Ballarat goldfields Birney Bendigo Depot Charing ...Set of four colour laser printed copies of colour 16mm negatives featuring photographs of trams taken by Ron Fluck in Bendigo during Dec. 1989. Quality of prints poor - scanned from negative at 300dpi. 1759.1 - Negative Number 258 - General scene at Charing Cross, looking south. 1759.2 - NN258A - Tram 44 crossing Charing Cross from Central Deborah Mine. 1759.3 - NN259 - Tram 17 at Bendigo Depot 1759.4 - NN259A - Birney ?? tram at Bendigo Depot No. XX birney, bendigo, depot, charing cross, tram 44, tram 17