Showing 550 items matching "chemical"
-
 University of Melbourne, School of Chemistry
Microbalance
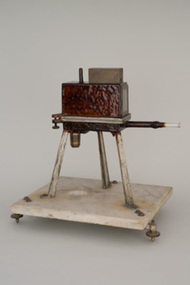
... s lecturing style surged with enthusiasm and he employed the use of screen projections to demonstrate chemical phenomena to large undergraduate classes. ...s lecturing style surged with enthusiasm and he employed the use of screen projections to demonstrate chemical phenomena to large undergraduate classes. ...An original Kerr-Grant Microbalance, modified by E.J.Hartung This balance was invented in the chemistry department by Bertram Dillon Steele, later first Professor of Chemistry at the University of Queensland 1910-1930, in collaboration with Professor Kerr Grant, Physics. The design was widely used by other chemists, including Masson's mentor, Professor Ramsay, working in London on newly discovered rare gases (especially Radon), and Professor Hartung in Melbourne, investigating the chemistry of the decomposition of silver salts in photographic processes. The principle of the microbalance was to measure the change in density of a gas by the shift in the balancing beam due to a change in pressure of the gas in the balance case. The quartz balancing beam was made by Bertram Steele who was particularly skilled in glassblowing. A quartz beam is the beam of the Aston microbalance based on the Steele/Grant instrument, and described by F.W. Aston, the inventor of the mass spectrometer. The bulb at one end of the beam contained a fixed amount of air, so that a change in the pressure of gas in the balance case changed the buoyancy of the beam, yielding a displacement in the beam which could be measured. By this means, differences in weight of about 10 nanogram could be measured, in amounts of up to 0.1 gram. Such differences are significant the increase in weight of a metal sample due to surface oxidation (Steele's interest) in the weight loss due to radioactive decay of Radium (Ramsay's work), and in the estimates of density change due to the isotopic distribution of Neon (Aston). Ernst Johannes Hartung was a chemist and astronomer. Educated at the University of Melbourne (BSc 1913, DSc 1919), he became lecturer in 1919, associate professor in 1924, and succeeded Rivett as chair of chemistry in 1928, remaining in this position until 1953. Hartung?s lecturing style surged with enthusiasm and he employed the use of screen projections to demonstrate chemical phenomena to large undergraduate classes. In 1935 he recorded Brownian movement in colloidal solutions on 35 mm cinefilm, which was later copied onto 16 mm film for the Eastman Kodak Co. World Science Library. This can be viewed in the Chemistry laboratory. He researched the photo decomposition of silver halides, and was awarded the David Syme Prize in 1926. He devoted time to the design and construction of a large, new chemistry building for the School of Chemistry (built 1938?1939). During World War II he was approached by Professor Thomas Laby, chairman of the Optical Munitions Panel, to chair the advisory committee on optical materials, to produce high quality optical glass in Australia. This was successful, with large-scale production achieved within ten months at a reasonable cost. Hartung served three terms as general President of the (Royal) Australian Chemical Institute, was an ex-officio councillor of the Council for Scientific and Industrial Research, and a Trustee of the Museum of Applied Science (now part of Museum Victoria).An original Kerr-Grant Microbalance, modified by E.J. Hartung. -
 Federation University Historical Collection
Programme - Programme - Seminar, VIOSH: Hawthorn Institute of Education; Occupational Health and Safety Seminar, 1983
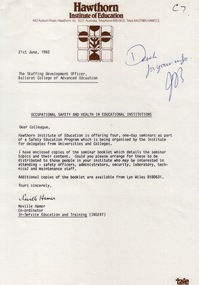
... Topics include Ergonomics in the Workplace, Accident Investigation Techniques, Emergency Preparedness, Flammability and Toxicity of Chemicals. VIOSH Australia students are safety managers, senior advisors and experienced OHS professionals. ...Topics include Ergonomics in the Workplace, Accident Investigation Techniques, Emergency Preparedness, Flammability and Toxicity of Chemicals. VIOSH Australia students are safety managers, senior advisors and experienced OHS professionals. ...Victorian Institute of Occupational Safety and Health (VIOSH) Australia is the Asia-Pacific centre for teaching and research in occupational health and safety (OHS) and is known as one of Australia's leaders on the field. VIOSH has a global reputation for its innovative approach within the field of OHS management. VIOSH had its first intake of students in 1979. At that time the Institution was known as the Ballarat College of Advanced Education. In 1990 it became known as Ballarat University College, then in 1994 as University of Ballarat. It was 2014 that it became Federation University. Hawthorn Institute of Education information on four, one-day seminars as part of a Safety Education Program. This was sent to Ballarat College of Advanced Education along with other Institutions. The Seminar centres around Occupational Safety and Health in Educational Institutions. Speakers include James Coe, Eric Wigglesworth, Derek Viner, A Giles, J Welch, G Carter and Tony Morgan. Topics include Ergonomics in the Workplace, Accident Investigation Techniques, Emergency Preparedness, Flammability and Toxicity of Chemicals. VIOSH Australia students are safety managers, senior advisors and experienced OHS professionals. They come from all over Australia and industry. Students are taught active research and enquiry; rather than textbook learning and a one-size fits all approach. VIOSH accepts people into the Graduate Diploma of Occupational Hazard Management who have no undergraduate degree - on the basis of extensive work experience and knowledge. Eleven A4 sheets of coloured paper - each colour indicates different seminar day.Hawthorn Institute of Education letterhead sign ature of Neville Hamer - co-ordinator, In-Service Education and Training Comment in blue pen. viosh, victorian institute of occupational safety and health, safety education program, one-day seminars, occupational safety and health, james coe, eric wigglesworth, derek viner, a giles, j welch, g carter, tony morgan, ergonomics in the workplace, accident investigation techniques, emergency preparedness, flammability and toxicity of chemicals -
 The Beechworth Burke Museum
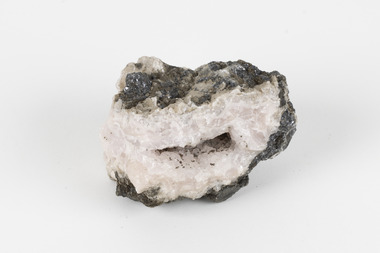
Geological specimen - Chalcopyrite
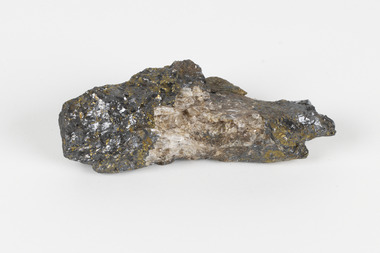
... Chalcopyrite is a copper iron sulfide mineral with a chemical composition of CuFeS2. Its name derives from the Greek words for copper (chalco-) and brass (pyrite). ...Chalcopyrite is a copper iron sulfide mineral with a chemical composition of CuFeS2. Its name derives from the Greek words for copper (chalco-) and brass (pyrite). ...This specimen was recovered from Mica Schist, Canada. Chalcopyrite is a copper iron sulfide mineral with a chemical composition of CuFeS2. Its name derives from the Greek words for copper (chalco-) and brass (pyrite). It can be found in shades of yellow, green and grey, and, when exposed to acid, it can change to purple, blue, violet and yellow tones. Weathering can cause loss of its metallic luster and its brass-yellow colour. Chalcopyrite forms under various conditions, with the most significant deposits being hydrothermal in their origin. It is known globally as the most important ore of copper for thousands of years, and is thus considered a very important mineral formation. Given its golden appearance, it is often confused for the mineral gold, earning it the popular reputation as 'fool's gold' or 'yellow copper'. However, it can be straightforwardly distinguished from gold; the latter is soft, with higher specific gravity and a yellow streak, whereas chalcopyrite is brittle, easily scratched by a nail, and has a greenish grey streak. Copper was the first metal that was used by people. It was discovered by the Neolithic man about 9,000 years ago and it gradually replaced stone as it was easier to be shaped. In Australia, search for copper began after the European settlement, leading to the discovery of substantial deposits, like the one at the Olympic Dam in South Australia, which is regarded as one of the largest copper deposits in the world. Chalcopyrite has been used for copper since smelting processes began approximately five thousand years ago. Although by no means rare, this the specimen of this mineral can be used to reflect a wider history of industrial uses of copper for a significant portion of human history. This specimen is part of a larger collection of geological and mineral specimens collected from around Australia (and some parts of the world) and donated to the Burke Museum between 1868-1880. A large percentage of these specimens were collected in Victoria as part of the Geological Survey of Victoria that begun in 1852 (in response to the Gold Rush) to study and map the geology of Victoria. Collecting geological specimens was an important part of mapping and understanding the scientific makeup of the earth. Many of these specimens were sent to research and collecting organisations across Australia, including the Burke Museum, to educate and encourage further study.A solid hand-sized copper iron sulfide mineral of brass yellow, often with an iridescent tarnish, with greenish-black streak and submetallic luster. Chalcopyrite can be formed in several ways, including crystalizing from accessory minerals in igneous rocks, or from magma or within volcano sulfide deposits. Most commonly, chalcopyrite are found in hydrothermal conditions, where it forms in hydrothermal veins. As a member of the tetragonal crystal system, it often takes the shape of tetra-headed crystals, often with striations along the sides of the crystals. #18 Copper pyrites/(chalcopyrite) in/Laurentian Slate/(page 315 of inventory)/page missing from/descriptive catalogue/ Other label: 81 /fool's gold, chalcopyrite, mineral, rock, geology, geological, hydrothermal, neolithic, european settlement, olympic dam, south australia, stone, deposits, specific gravity, greenish grey streak, brittle, mineral gold, metallic luster, cufes2, greek words -
 The Beechworth Burke Museum
Geological specimen - Sphalerite, Unknown
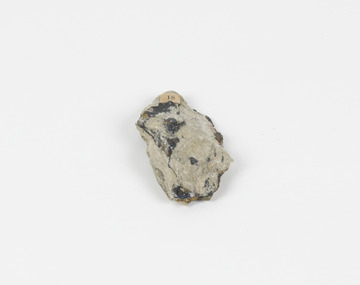
... It is a zinc sulfide with the chemical composition (Zn,Fe)S, the most important ore of zinc. ...It is a zinc sulfide with the chemical composition (Zn,Fe)S, the most important ore of zinc. ...Sphalerite or sphaelerite is named from the Greek word for 'treacherous' or 'deceiver' as specimens can vary widely in appearance, making them hard to visually identify. It is a zinc sulfide with the chemical composition (Zn,Fe)S, the most important ore of zinc. Specimens of sphalerite can contain iron as a substitute for up to 25% of the usual zinc present, as well as trace elements of gallium, cadmium, geranium and indium. Small amounts of arsenic and manganese may also be detected. Sphalerite is found in igneous, sedimentary and metamorphic rocks. It forms when carbonate rock encounters acidic, zinc-bearing fluid. It often forms in veins or in fissures of the existing rock, with colours and crystal shapes dependent on the composition of the the combining elements. It forms isometric crystal shapes including cubes, tetrahedrons, octahedrons, dodecahedrons. This specimen was collected in approximately 1852, in Broken Hill, NSW, as an adjunct to the Geological Survey of Victoria. It was donated to the Museum in 1868. Victoria and other regions of Australia were surveyed for sites of potential mineral wealth throughout the 19th Century. The identification of sites containing valuable commodities such as gold, iron ore and gemstones in a locality had the potential to shape the development and history of communities and industries in the area. The discovery of gold in Victoria, for instance, had a significant influence on the development of the area now known as 'the goldfields', including Beechworth; the city of Melbourne and Victoria as a whole.The specimen is significant as an examples of surveying activity undertaken to assess and direct the development of the mineral resource industries in Victoria and Australia, as well as the movement to expand human knowledge of earth sciences such as mineralogy and geology in the nineteenth century.A pipe-shaped specimen of sulfide-mineral zinc ore displaying patches of black, brown, beige and gold colouring. The main item has associated broken pieces. geological specimen, geology, geology collection, burke museum, beechworth, mineralogy, indigo shire, geological survey, sphalerite, sphaelerite, zinc ore, broken hill, nsw, victoria, galena, fluorite, chalcopyrite, lead, cadmium, gallium, germanium, indium, iron -
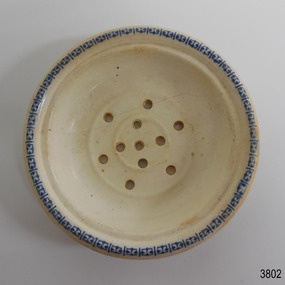 Flagstaff Hill Maritime Museum and Village
Ceramic - Soap dish, circa 1883
... Amongst the cargo was soft goods, draperies, household items, spirits of malt and distilled liquors, chemicals, dynamite, and 1,400 tons of steel rails for the Victorian Government. ...Amongst the cargo was soft goods, draperies, household items, spirits of malt and distilled liquors, chemicals, dynamite, and 1,400 tons of steel rails for the Victorian Government. ...This ceramic soap dish was recovered from the wreck of the 1882-1883 George Roper between the late 1960’s to early 1970’s. It is one of the shipwreck artefacts in the John Chance Collection. Soap dishes were often part of a wash set that also included a water jug and wash bowl. The holes in the dish allowed water to drain out of the dish, keeping the soap dry for next use. The GEORGE ROPER 1882 - 1883 - The George Roper was a 4-masted iron sailing ship built in Liverpool, England, in 1882 for fast international trade with Australia. The large vessel was launched in February 1883. The ship was on its first trip, departing Liverpool for Melbourne, captained by John Ward and a crew of 31. She had almost reached her destination on July 4 1883, approaching Port Phillip Bay and being towed by the steam tug William. The weather changed to rough with fog and both the George Roper and the William hit the dangerous Lonsdale Reef at Port Phillip Heads. The Captain and crew were eventually rescued and taken to Queenscliff. Salvage syndicates were able to recover a lot of the cargo before the George Roper broke up and sank. Amongst the cargo was soft goods, draperies, household items, spirits of malt and distilled liquors, chemicals, dynamite, and 1,400 tons of steel rails for the Victorian Government. Also in the hold were Russell Stourbridge bricks, as paying ballast. This 1880s soap dish is an example of personal hygiene accessories and may have been part of a set comprising jug, bowl and dish.. The soap dish is also significant as it was recovered by John Chance, a diver from the wreck of the George Roper in the 1960s-70s. Items that come from several wrecks along Victoria's coast have since been donated to the Flagstaff Hill Maritime Village’s museum collection by his family, illustrating this item’s level of historical value. The soap dish is significant for its association with the barque George Roper, which is considered historically and archaeologically significant and as such, is listed on the Victorian Heritage Database, VHR S286. The George Roper is an example of a vessel built specifically for fast travel to and from Australia with a large shipment of cargo. Its cargo of steel rails adds to the historical significance of international trade to the growing colony of Australia and Victoria in particular, with rail transportation soon to become a faster and safer form of transportation between colonial towns. Divers can still access parts of the scattered wreck and other artefacts recovered in the 1970s and 1980s can be viewed in both public and private collections. Soap dish; glazed white porcelain. Round shallow bowl with blue patterned border, resembling butterflies. Two raised, concentric rings are moulded into the base. Six pierced holes are evenly spaced between the rings, five holes are in the centre of the dish.flagstaff hill, warrnambool, flagstaff hill maritime museum, maritime museum, shipwreck coast, flagstaff hill maritime village, great ocean road, john chance, west coast trader, george roper, captain john ward, russell stourbridge bricks, port phillip heads, lonsdale reef, dive wreck, vhr s286, coastal trader, ceramic, vintage, personal hygiene, bathroom accessory, soap dish -
 Flagstaff Hill Maritime Museum and Village
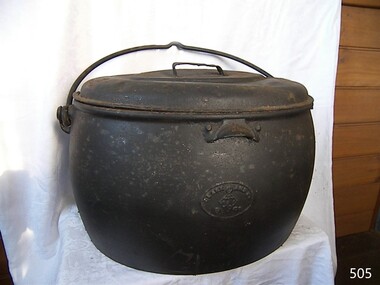
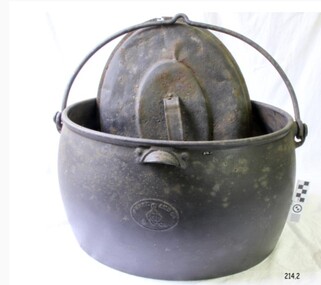
Domestic object - Cooking pot and lid, T & C Clarke and Co Ltd, 1880 to1910
... The company is listed as enamelled chemical plant manufacturers in Kelly's 1962 Wolverhampton Directory, but within a few years, the company had ceased trading. ...The company is listed as enamelled chemical plant manufacturers in Kelly's 1962 Wolverhampton Directory, but within a few years, the company had ceased trading. ...T & C Clark & Company Limited, based at Shakespeare Foundry, was founded in 1795 by Thomas and Charles Clark and grew to be one of the largest iron foundries in Wolverhampton. The firm was the pioneers of Enamelled Cast ironware and the founder Charles Clerk went on to became mayor of Wolverhampton in 1860 after also serving as a Councilor, Alderman, and later Chief Magistrate. The company exhibited many products at the International Exhibition of 1862 at South Kensington, alongside the gardens of the Royal Horticultural Society. The company was also awarded the silver medal for its products at the International Paris Exhibition in 1878. The company's product range included thousands of items, both domestic and industrial. T & C Clark pioneered the use of enamelled cast ironware, after taking out a patent in 1839 guaranteed to be free of lead or arsenic. In the late 1940s and 1950s the company produced acid-resisting enamelled cast iron boiling pans; steam-jacketed pans; stills; square and rectangular tanks; open and closed mixing vessels; flanged pipes; bends and tees; laboratory equipment; small scale plant; evaporating bowls; beakers; sulphonates; and glass-lined mild steel tanks for beer, mineral water, and food. The company is listed as enamelled chemical plant manufacturers in Kelly's 1962 Wolverhampton Directory, but within a few years, the company had ceased trading. The cooking pot is significant because it demonstrates one of the social norms founded by early settlers to this region. That close ties to "Mother England" and the "establishment" was still very strong. The social and family values from the British way of life was ingrained in colonial society until well past Australian Federation in July of 1900. It was not until the friendly "American soldier" invasion during World War II that the Empire mindset was slowly being eroded away. This change was the slowest in semi remote rural areas such as the Warrnambool district. Cast iron open fire cooking pot with lidCLARK & Co. PATENT", Below this a six star triangle with the letter "C" in the middleflagstaff hill museum, cooking appliance, camp fire pot, cast iron, t & c clark & co, drovers cooking pot -
 City of Moorabbin Historical Society (Operating the Box Cottage Museum)
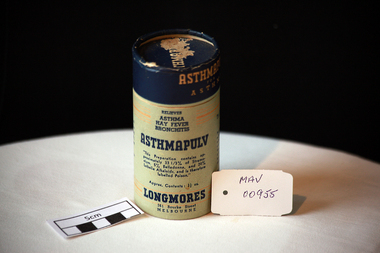
Containers, cardboard, ‘Longmores’ ‘Asthmapulv’, mid 20thC
... Longmore’s was a manufacturing chemical pharmacy of many over-the-counter preparations, including Sulphur Hair Restorer, Strengthening Tonic, Blood and Liver Pills, Asthmacur (for asthma) and Hoyle’s Miraculous Oil (for miracles unknown), He was a native of New South Wales, but his father, Mr. ...City of Moorabbin Historical Society (Operating the Box Cottage Museum) Joyce Park Jasper Road Ormond melbourne Longmore’s was a manufacturing chemical pharmacy of many over-the-counter preparations, including Sulphur Hair Restorer, Strengthening Tonic, Blood and Liver Pills, Asthmacur (for asthma) and Hoyle’s Miraculous Oil (for miracles unknown), He was a native of New South Wales, but his father, Mr. ...Longmore’s was a manufacturing chemical pharmacy of many over-the-counter preparations, including Sulphur Hair Restorer, Strengthening Tonic, Blood and Liver Pills, Asthmacur (for asthma) and Hoyle’s Miraculous Oil (for miracles unknown), He was a native of New South Wales, but his father, Mr. Joseph Longmore settled in Melbourne in the late 1850s. Mr Longmore was educated at the Melbourne Grammar School, and leaving early, he studied and qualified as a chemist. Argus “12 October 1921, Mr. Francis Longmore, chemist of Bourke Street was at his business on Saturday but he had a chill which developed into pneumonia, and he died yesterday morning. The funeral will leave from his residence Wontravell, Gower Street, Kensington. He was a widower, his wife having died a year ago and he leaves a grownup family of 2 sons and 6 daughters. Carlisle Francis Longmore and his certificate number as a pharmacist was No. 1440; he qualified as a pharmacist at his final exam in Victoria on 11 September 1905. He had three pharmacies in addition to the address on the covers, one on the corner of Flinders and King Streets, Melbourne, one at 130 Bourke Street East and one Brunswick Street, North Fitzroy. He also had another sideline in addition to his pharmaceuticals and this was White Crow Jelly Crystals made at his Food Products division in Melbourne A cardboard cylindrical container with a lift-off lid for 'Longmores Asthmapulv'.Lid ASTHMAPULV. Around Lid ASTHMAPULV /FOR / ASTHMA Relieves/ ASTHMA / HAY FEVER / BRONCHITIS / ASTHMAPULV / "This preparation contains......... labelled Poison" / Approx. Contents 3 1/2 oz. / LONGMORES / 361 Bourke Street / MELBOURNE / For Inhalation Only / DIRECTIONS ................ / Invaluable in severe cases of Asthma. ......... / (Patent Medicine) Act 1942........* pharmacy, medicines, longmore c.. francis, longmore joseph, asthma, hospitals, nursing, containers, moorabbin, bentleigh, cheltenham, melbourne -
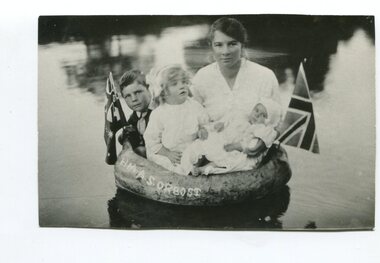 Orbost & District Historical Society
black and white photograph, first half 20th century
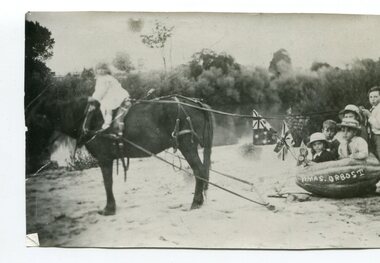
... Her family says she was entirely self-taught, like many women photographers who started out with nothing but the instructions on the packets of film and chemicals. In over fifty years practice she graduated from the total novice, who opened all her first mail order plates in bright sunlight and ruined them, to a competent photographer who became both the local press correspondent and an inveterate producer of humorous trompe l’oeil postcard images. ...Her family says she was entirely self-taught, like many women photographers who started out with nothing but the instructions on the packets of film and chemicals. In over fifty years practice she graduated from the total novice, who opened all her first mail order plates in bright sunlight and ruined them, to a competent photographer who became both the local press correspondent and an inveterate producer of humorous trompe l’oeil postcard images. ...This photograph shows Ina Warren with Jack warren, Linda Warren and Cora Lynn. The photographer was Warren, Helena (1871-1962) who was a self-taught photographer who became both the local press correspondent and a producer of humorous trompe l'oeil postcard images. Helena Warren was a thirty-two year old settler living on a small mixed farm with her husband, William, at Newmerella, near Orbost in Gippsland, Victoria, when she bought her first camera, an Austral Box quarter-plate. Her family says she was entirely self-taught, like many women photographers who started out with nothing but the instructions on the packets of film and chemicals. In over fifty years practice she graduated from the total novice, who opened all her first mail order plates in bright sunlight and ruined them, to a competent photographer who became both the local press correspondent and an inveterate producer of humorous trompe l’oeil postcard images. Helena Francis Warren (nee McKeown) was married to William John Warren and lived in Newmerella. She supplied the photos for the Back-To-Orbost celebration book in 1937 and also designed the Back-To-Orbost badge. She was known for her soft toy making. (by Ivy Rodwell in from Personalities and Stories of the Early Orbost District by Mary Gilbert). This photograph has significance in its association with Helen Frances Warren, a popular Orbost identity who was well known as an accomplished photographer and needleworker,A black / white photograph of a woman with three small children sitting in a pumpkin on water . There are small flags (Australian and British) at each end. On the pumpkin is "HMAS ORBOST".pumpkins-orbost warren-helena-photographer -
 Orbost & District Historical Society
black and white photographs, Warren, Mrs H, early 20th century
... Her family says she was entirely self-taught, like many women photographers who started out with nothing but the instructions on the packets of film and chemicals. In over fifty years practice she graduated from the total novice, who opened all her first mail order plates in bright sunlight and ruined them, to a competent photographer who became both the local press correspondent and an inveterate producer of humorous trompe l’oeil postcard images. ...Her family says she was entirely self-taught, like many women photographers who started out with nothing but the instructions on the packets of film and chemicals. In over fifty years practice she graduated from the total novice, who opened all her first mail order plates in bright sunlight and ruined them, to a competent photographer who became both the local press correspondent and an inveterate producer of humorous trompe l’oeil postcard images. ...This photograph shows Percy De Forest and his brother, Alfred of McLeod Street, Orbost. The photographer was Warren, Helena (1871-1962) who was a self-taught photographer who became both the local press correspondent and a producer of humorous trompe l'oeil postcard images. Helena Warren was a thirty-two year old settler living on a small mixed farm with her husband, William, at Newmerella, near Orbost in Gippsland, Victoria, when she bought her first camera, an Austral Box quarter-plate. Her family says she was entirely self-taught, like many women photographers who started out with nothing but the instructions on the packets of film and chemicals. In over fifty years practice she graduated from the total novice, who opened all her first mail order plates in bright sunlight and ruined them, to a competent photographer who became both the local press correspondent and an inveterate producer of humorous trompe l’oeil postcard images. Helena Francis Warren (nee McKeown) was married to William John Warren and lived in Newmerella. She supplied the photos for the Back-To-Orbost celebration book in 1937 and also designed the Back-To-Orbost badge. She was known for her soft toy making. (by Ivy Rodwell in from Personalities and Stories of the Early Orbost District by Mary Gilbert). This photograph has significance in its association with Helen Frances Warren, a popular Orbost identity who was well known as an accomplished photographer and needleworker,Two black / white photograohs of two small children sitting in a large pumpkin on water.on front - An Orbost Pumpkinpumpkins-orbost de-forest warren-helena-photography -
 Orbost & District Historical Society
black and white photograph, Warren, Mrs H, first half 20th century
... Her family says she was entirely self-taught, like many women photographers who started out with nothing but the instructions on the packets of film and chemicals. In over fifty years practice she graduated from the total novice, who opened all her first mail order plates in bright sunlight and ruined them, to a competent photographer who became both the local press correspondent and an inveterate producer of humorous trompe l’oeil postcard images. ...Her family says she was entirely self-taught, like many women photographers who started out with nothing but the instructions on the packets of film and chemicals. In over fifty years practice she graduated from the total novice, who opened all her first mail order plates in bright sunlight and ruined them, to a competent photographer who became both the local press correspondent and an inveterate producer of humorous trompe l’oeil postcard images. ...The photograph shows Linda Warren, Enid Eaton, Jim Trewin and Jim Nixon. The photographer was Warren, Helena (1871-1962) who was a self-taught photographer who became both the local press correspondent and a producer of humorous trompe l'oeil postcard images. Helena Warren was a thirty-two year old settler living on a small mixed farm with her husband, William, at Newmerella, near Orbost in Gippsland, Victoria, when she bought her first camera, an Austral Box quarter-plate. Her family says she was entirely self-taught, like many women photographers who started out with nothing but the instructions on the packets of film and chemicals. In over fifty years practice she graduated from the total novice, who opened all her first mail order plates in bright sunlight and ruined them, to a competent photographer who became both the local press correspondent and an inveterate producer of humorous trompe l’oeil postcard images. Helena Francis Warren (nee McKeown) was married to William John Warren and lived in Newmerella. She supplied the photos for the Back-To-Orbost celebration book in 1937 and also designed the Back-To-Orbost badge. She was known for her soft toy making. (by Ivy Rodwell in from Personalities and Stories of the Early Orbost District by Mary Gilbert). This photograph has significance in its association with Helen Frances Warren, a popular Orbost identity who was well known as an accomplished photographer and needleworker,A black / white photograph of a young girl on a horse pulling a group of children in a large pumkin. On the side of the pumpkin is "HMAS ORBOST"pumpkins-orbost warren-helena nixon-jim trewin-jim warren-linda eaton-enid -
 Orbost & District Historical Society
black and white photograph, Warren. Mrs H, late 19th century - early 20th century
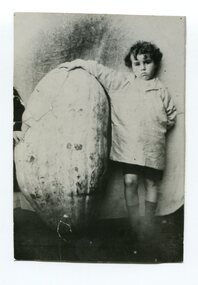
... Her family says she was entirely self-taught, like many women photographers who started out with nothing but the instructions on the packets of film and chemicals. In over fifty years practice she graduated from the total novice, who opened all her first mail order plates in bright sunlight and ruined them, to a competent photographer who became both the local press correspondent and an inveterate producer of humorous trompe l’oeil postcard images. ...Her family says she was entirely self-taught, like many women photographers who started out with nothing but the instructions on the packets of film and chemicals. In over fifty years practice she graduated from the total novice, who opened all her first mail order plates in bright sunlight and ruined them, to a competent photographer who became both the local press correspondent and an inveterate producer of humorous trompe l’oeil postcard images. ...This photograph is of Percy Nixon, son of James Nixon and Alice Roberts Percy Nixon married Evelyn Harding. The photographer was Warren, Helena (1871-1962) who was a self-taught photographer who became both the local press correspondent and a producer of humorous trompe l'oeil postcard images. Helena Warren was a thirty-two year old settler living on a small mixed farm with her husband, William, at Newmerella, near Orbost in Gippsland, Victoria, when she bought her first camera, an Austral Box quarter-plate. Her family says she was entirely self-taught, like many women photographers who started out with nothing but the instructions on the packets of film and chemicals. In over fifty years practice she graduated from the total novice, who opened all her first mail order plates in bright sunlight and ruined them, to a competent photographer who became both the local press correspondent and an inveterate producer of humorous trompe l’oeil postcard images. Helena Francis Warren (nee McKeown) was married to William John Warren and lived in Newmerella. She supplied the photos for the Back-To-Orbost celebration book in 1937 and also designed the Back-To-Orbost badge. She was known for her soft toy making. (by Ivy Rodwell in from Personalities and Stories of the Early Orbost District by Mary Gilbert). This item is associated with a prominent Orbost family. George Nixon was the son of James and Alice Nixon. The Nixon families were among the earliest settlers on the Snowy River. This photograph also has significance in its association with Helen Frances Warren, a popular Orbost identity who was well known as an accomplished photographer and needleworker.A black / white photograph of a young boy standing next to a very large pumpkin. His right arm is resting on the top.pumpkins-orbost warren-helena-photography nixon-percy -
 Flagstaff Hill Maritime Museum and Village
Glue Pot, T & C Clark, Late 19th Century
... The company is listed as enameled chemical plant manufacturers in Kelly's 1962 Wolverhampton Directory, but within a few years, the company had ceased trading....The company is listed as enameled chemical plant manufacturers in Kelly's 1962 Wolverhampton Directory, but within a few years, the company had ceased trading. ...T. & C. Clark & Company Limited, based at Shakespeare Foundry, was founded in 1795 by Thomas and Charles Clark and grew to be one of the largest iron foundries in Wolverhampton. The firm was the pioneers of Enameled Cast ironware and the founder Charles Clerk went on to became mayor of Wolverhampton in 1860 after also serving as a Councillor, Alderman, and later Chief Magistrate. The company exhibited many products at the International Exhibition of 1862 at South Kensington, alongside the gardens of the Royal Horticultural Society. The company was also awarded the silver medal for its products at the International Paris Exhibition in 1878. The company's product range included thousands of items, both domestic and industrial. T & C Clark pioneered the use of enameled cast ironware, after taking out a patent in 1839 guaranteed to be free of lead or arsenic. In the late 1940s and 1950s the company produced acid-resisting enameled cast iron boiling pans; steam-jacketed pans; stills; square and rectangular tanks; open and closed mixing vessels; flanged pipes; bends and tees; laboratory equipment; small scale plant; evaporating bowls; beakers; sulphonates; and glass-lined mild steel tanks for beer, mineral water, and food. The company is listed as enameled chemical plant manufacturers in Kelly's 1962 Wolverhampton Directory, but within a few years, the company had ceased trading.An item that was made by a British foundry that was a pioneer and innervated many new processes in the manufacture of enamel ware, producing many items for every day use.Glue pot with inner pot, metal, corroded, both pots have handles."T & C CLARK & Co Ltd, ENGLAND, 55279 RD" and "FIRST QUALITY No. 4/0"flagstaff hill, warrnambool, shipwrecked-coast, flagstaff-hill, flagstaff-hill-maritime-museum, maritime-museum, shipwreck-coast, flagstaff-hill-maritime-village, t& c clarke, cast iron, foundry, sanitary ware, ironware -
 Flagstaff Hill Maritime Museum and Village
Container - Round Metal Shaker
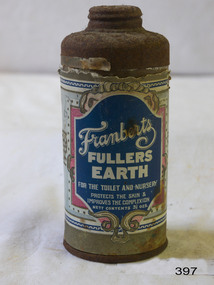
... https://www.shilohplastics.com.au/history-of-metal-packaging/ Fuller's Earth is any clay material that has the capability to bleach or dissolve oil or other liquids without the use of harsh chemical treatment. Modern uses of Fuller's Earth include as absorbents for oil, grease, and animal waste (cat litter) and as a carrier for pesticides and fertilisers. ...https://www.shilohplastics.com.au/history-of-metal-packaging/ Fuller's Earth is any clay material that has the capability to bleach or dissolve oil or other liquids without the use of harsh chemical treatment. Modern uses of Fuller's Earth include as absorbents for oil, grease, and animal waste (cat litter) and as a carrier for pesticides and fertilisers. ...The history of metal packaging began in Bohemia in the 1200s. Metal has been produced for a very long time. But the first metal used for packaging was tin. In particular, it was the process of tin plating that was invented in Bohemia. Before this no other metal was economically able to be used for packaging. Later, in 1667 Andrew Yarranton, and English engineer, and Ambrose Crowley brought the method to England. Here it was improved by ironmasters including Philip Foley. Then by 1697, John Hanbury had a rolling mill at Pontypool in South Wales. The method they developed involved rolling iron plates using cylinders. This process enabled more uniform blank plates to be produced than was possible by just hammering the tin. https://www.shilohplastics.com.au/history-of-metal-packaging/ Fuller's Earth is any clay material that has the capability to bleach or dissolve oil or other liquids without the use of harsh chemical treatment. Modern uses of Fuller's Earth include as absorbents for oil, grease, and animal waste (cat litter) and as a carrier for pesticides and fertilisers. Minor uses include filtering, clarifying, and decolorising; active and inactive ingredient in beauty products; and as a filler in paint, plaster, adhesives, and pharmaceuticals. Fulling is an important step in the production of woollen garments, and can be traced back to ancient times. Cuneiform texts from Mesopotamia mention a raw material, which was delivered to fullers for the finishing of cloth. https://en.wikipedia.org/wiki/Fuller%27s_earth The use of tin to protect and store items, revolutionised the world. Fuller's Earth is a widely used product.Container of cylindrical sheet metal with perforated lid, used by Duerdin and Sainsbury Ltd, Sellers of Franbert's Fuller's Earth. Colour printed paper deteriorating. ‘Nett Contents 3½ oz.’ Ingredients still inside.Tin very rusty.'Franbert's Fuller's Earth. For the Toilet and Nursery. Protects the skin & Improves the Complexion. Nett Contents 3½ oz.'flagstaff hill, warrnambool, shipwrecked-coast, flagstaff-hill, flagstaff-hill-maritime-museum, maritime-museum, shipwreck-coast, flagstaff-hill-maritime-village, tin, tin plating, containers -
 Flagstaff Hill Maritime Museum and Village
Domestic object - Cooking pot and lid, T & C Clark, 1880-1910
... The company is listed as enamelled chemical plant manufacturers in Kelly's 1962 Wolverhampton Directory, but within a few years, the company had ceased trading....The company is listed as enamelled chemical plant manufacturers in Kelly's 1962 Wolverhampton Directory, but within a few years, the company had ceased trading. ...T & C Clark & Company Limited, based at Shakespeare Foundry, was founded in 1795 by Thomas and Charles Clark and grew to be one of the largest iron foundries in Wolverhampton. The firm was the pioneers of Enamelled Cast ironware and the founder Charles Clerk went on to became mayor of Wolverhampton in 1860 after also serving as a Councilor, Alderman, and later Chief Magistrate. The company exhibited many products at the International Exhibition of 1862 at South Kensington, alongside the gardens of the Royal Horticultural Society. The company was also awarded the silver medal for its products at the International Paris Exhibition in 1878. The company's product range included thousands of items, both domestic and industrial. T & C Clark pioneered the use of enamelled cast ironware, after taking out a patent in 1839 guaranteed to be free of lead or arsenic. In the late 1940s and 1950s the company produced acid-resisting enamelled cast iron boiling pans; steam-jacketed pans; stills; square and rectangular tanks; open and closed mixing vessels; flanged pipes; bends and tees; laboratory equipment; small scale plant; evaporating bowls; beakers; sulphonates; and glass-lined mild steel tanks for beer, mineral water, and food. The company is listed as enamelled chemical plant manufacturers in Kelly's 1962 Wolverhampton Directory, but within a few years, the company had ceased trading.The item is significant as it was used as a domestic kitchen or camp fire item used to cook food safely without the concern that the metal may contain lead or arsenic as earlier cooking utensils had. T C Clark innervates the first manufacturing process of cast iron cook ware to have enamel lining in his products to alleviate the possibility of lead or arsenic contamination of food.Oval cast iron boiler or cooking pot, with lid, pot is oval shaped lid is dented and handle buckled.Inscription on base "Clark & Co Patent", "Best Quality", "9 Gallons" and a Trade Mark of a "C" inside two triangles to side of potflagstaff hill, warrnambool, shipwrecked coast, flagstaff hill maritime museum, flagstaff hill maritime village, great ocean road, cooking pot, stew pot, food, kitchen utensil, shakespeare foundry, tc clark -
 University of Melbourne, School of Chemistry
Gold Assay Balance
... Born in Ireland, John Drummond Kirkland trained as a chemical analyst through apprenticeship in a medical laboratory in Dublin, before migrating to Australia in 1852 and moving to Melbourne in 1855. ...University of Melbourne, School of Chemistry University of Melbourne Grattan St Melbourne melbourne Born in Ireland, John Drummond Kirkland trained as a chemical analyst through apprenticeship in a medical laboratory in Dublin, before migrating to Australia in 1852 and moving to Melbourne in 1855. ...Born in Ireland, John Drummond Kirkland trained as a chemical analyst through apprenticeship in a medical laboratory in Dublin, before migrating to Australia in 1852 and moving to Melbourne in 1855. While still an undergraduate medical student at the University of Melbourne, he was appointed lecturer in chemistry following the sudden death of John Macadam in 1865. Due to the enthusiastic support of his fellow students this temporary role became a permanent appointment the following year. Kirkland continued his studies, graduating in medicine in 1873 and surgery in 1880. His son, John Booth Kirkland, was appointed as his assistant in 1878, later leading to accusations of nepotism. In 1882 John Drummond Kirkland became the University?s first professor of chemistry and metallurgy, continuing until his death in 1885. Today?s researchers use a high performance computing facility named ?Kirkland? after the first Professor of Chemistry at the University of Melbourne. Chemistry was still controlled by the medical school during Kirkland?s career, but became part of the science degree from 1886, along with the appointment of David Orme Masson as professor. Kirkland struggled for University funding to buy new apparatus. To compensate, he bought much from his own personal funds, including analytical chemistry equipment. Chemistry was first taught at Melbourne in the medical school, located in the area now occupied by Physics and the Ian Potter Museum of Art.Gold Assay Balance, almost certainly Kirkland's own. -
 City of Greater Bendigo - Civic Collection
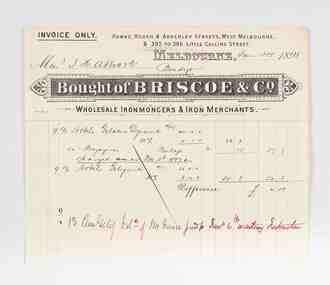
Financial record - Invoice, Briscoe & Co, 1898
... Abbott and Co acted as agents for larger Melbourne based suppliers such as Briscoe & Co and the Australian Explosives & Chemical Co. ...Abbott and Co acted as agents for larger Melbourne based suppliers such as Briscoe & Co and the Australian Explosives & Chemical Co. City of Bendigo Mayor Shire of Strathfieldsaye Mayor Abbott City of Greater Bendigo Commerce Making a Nation exhibition Briscoe & Co Printed and handwritten paper invoice from Briscoe & Co to JH Abbott & Co dated Jan 31st, 1898 for the purchase of dynamite and gelynite. ...Joseph Henry Abbott arrived in Australia from Birmingham England in 1852 aged 22 hoping to make his fortune on the goldfields. In 1853 he opened a store in Bendigo, Abbott and Co and from there began a lengthy career as a business man supplying the local community with goods and services including owning and operating the New Times Boot Market & Factory in Pall Mall, Sandhurst, run by his wife, Anne (nee Deague). J H Abbott’s main ambitions were to serve on the local and state councils. He was elected Chairman of the Sandhurst Borough Council in 1860, Mayor of the City of Bendigo in 1891 and was gazetted a Justice of the Peace in 1864. Over his lifetime J H Abbott was closely linked to nearly all the leading institutions in Bendigo and worked for the benefit of local charities. He was trustee of the Bendigo Art Gallery and a Freemason and was said to be the first person in Bendigo to have a telephone installed in1882 between his residence and his business in Pall Mall. After JH Abbott died in 1904 he passed on his businesses to his son JH Abbott Jnr and adopted son RHS Abbott. These businesses continued to trade under the name JH Abbott & Co and today still operates under the name Abbott Supply although the last of the family interests ceased in 1986. Abbott and Co acted as agents for larger Melbourne based suppliers such as Briscoe & Co and the Australian Explosives & Chemical Co. Printed and handwritten paper invoice from Briscoe & Co to JH Abbott & Co dated Jan 31st, 1898 for the purchase of dynamite and gelynite.city of bendigo mayor, shire of strathfieldsaye, mayor abbott, city of greater bendigo commerce, making a nation exhibition, briscoe & co -
 Flagstaff Hill Maritime Museum and Village
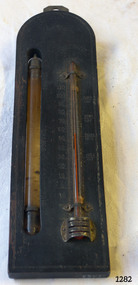
Thermometer, Early 20th Century
... The Storm Glass (or weather glass, or chemical weather glass) is suspended in a long oval shaped hole in the wood on left side, held in place at top and at bottom with 2 metal bands secured by nails. ...The Storm Glass (or weather glass, or chemical weather glass) is suspended in a long oval shaped hole in the wood on left side, held in place at top and at bottom with 2 metal bands secured by nails. ...A Storm Glass and Thermometer such as this one would be used in predicting or forecasting the weather. Farmers used predictions they read from their Storm Glass to prepare for stormy weather or for choosing a good time for planting or harvesting their crops. This could mean to them the difference between a good year and a year without income. This design has been in use since the early 1800’s. According to Admiral Fitzroy (who studied the storm glass and wrote instructions on its use) the liquid in the glass changes composition and appearance according to the direction of the air moving around it. He advised the user to disturb the contents once or twice a year by tipping it upside down and shaking it gently. Item is a good example of a barometer/thermometer that would have been in most homes and farms from the late 19th century and early 20th century. This item would have been massed produced at the time therefore easily available and quite cheap to purchase making this particular item not very significant as not associated with a historic person or property or with a known manufacturer or date.Storm Glass and Thermometer, commonly called a 'Cottage Barometer', mounted on a rectangular dark rectangle of wood, top corners rounded. The Storm Glass (or weather glass, or chemical weather glass) is suspended in a long oval shaped hole in the wood on left side, held in place at top and at bottom with 2 metal bands secured by nails. The glass of this gauge is hand blown, sealed at the top with another layer of glass. The watery fluid in the storm glass is opaque brownish colour with dark particles floating in it. (Storm glasses were usually filled with a variation of a mix of camphor, distilled water, ethyl alcohol and silver nitrate.) The alcohol thermometer is mounted on the right side of the wood, bulb resting in a hollow, attached at top and near base by 2 thin metal strips, with clover-leaf shaped ends, nailed into place. Over the bulb is nailed a metal guard with 3 ventilation slits cut into it. On left of thermometer is a scale, stamped into wood, 30 below zero to 130 above zero, in 2 degree intervals. A border of 2 thin parallel lines, with remnants of light coloured paint, is around the block of wood. On the reverse side, a metal plate is nailed to the top with a mounting hole in it. Impressed sideways along edge of barometer is "STORMY" "CHANGE" "FAIR". Across the top of the thermometer is a fleur de leis in the wood, and above this it is stamped "FAHRENHEIT". On right of the thermometer, stamped into the wood, is "BLOOD/HEAT", "SUMR/HEAT", "TEMPE/RATE", "FREEZ/ING". On the back of the wood, at the base, are remnants of a white sticker with "...111.73". Carved into the wood is "HOLLAND / AV". flagstaff hill, warrnambool, shipwrecked coast, flagstaff hill maritime museum, maritime museum, shipwreck coast, flagstaff hill maritime village, great ocean road, barometer, cottage barometer, storm glass, thermometer, chemical weather glass -
 Royal Australian and New Zealand College of Obstetricians & Gynaecologists (RANZCOG)
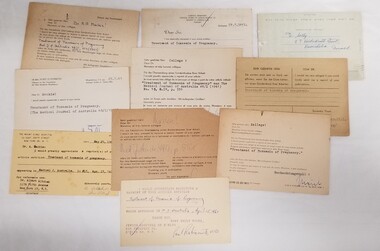
Document - Collection of requests for reprints of the article, 'Treatment of Toxaemia of Pregnancy', by Dr Margaret Alison Mackie, Treatment of Toxaemia of Pregnancy, 1961
... Fekete, Scientific Department, Chemical Works of Gedeon Richter, Budapest, Hungary, July 29 1961 j. ...Fekete, Scientific Department, Chemical Works of Gedeon Richter, Budapest, Hungary, July 29 1961 j. ...Requesting reprints of articles published overseas is a common medical practice, as can be seen by the templates used in this collection. See 2024.40.6 for a copy of the article that is being requested on these notices. Dr Margaret Alison Mackie (1910-1991) was in active practice between 1936 and 1970. She was a Fellow of the College, and was appointed a Commander of the Order of St Michael and St George (CMG) for services to medicine in 1975. Collection of ten notices (a-j) received by Dr Margaret Alison Mackie via mail from the United States, Germany, Hungary, and Israel requesting a copy of her published article 'Treatment of Toxaemia of Pregnancy.' Notes are either printed on cardboard or on paper. Requests are from the following: a. Paul Rabinowitz, MD, Jewish Hospital of Brooklyn, NY, United States, June 1961 b. Dr. Joachim Reich, Kinderklick der Karl Marx Universitat, Leipzig, Germany, August 1 1961 c. Dr. Judith Erneszt, Budapest, Hungary d. Dr. Reinhold Schwarz, Universitats Frauenklinik, Rostock, Germany e. Dr W. Selby, Beershiba, Israel f. Dr. Albert Altchek, Mount Sinai Hospital, NY, United States, May 29 1961 g. Dr. Horst Echtermeyer, Frauenklinik der. Med. Academie, Magdeburg, Germany, July 25 1961 h. Dr. H. Spitzbart, Universitats Frauenklinik, Leipzig, Germany, July 26 1961 i. Dr. G. Fekete, Scientific Department, Chemical Works of Gedeon Richter, Budapest, Hungary, July 29 1961 j. Dr. Max v. Clarmann, Munich, Germany, 20 June 1961 obstetrics -
 Bendigo Historical Society Inc.
Administrative record - Abbott Collection: 32 invoices from Jan to Dec 1918, from a range of businesses; addressed to J.H. Abbott & Co
... . - 3 invoices & receipts The Dalgety Company Limited - 2 receipted invoices Guthridge & Co. invoice The Royal Agricultural Society of Victoria correspondence Eliza Tinsley, steel merchants Melbourne - invoice The Australian Explosives and Chemical Company Limited invoice & receipt The Gair Manufacturing Co. - 2 invoices & receipt C. .... - 3 invoices & receipts The Dalgety Company Limited - 2 receipted invoices Guthridge & Co. invoice The Royal Agricultural Society of Victoria correspondence Eliza Tinsley, steel merchants Melbourne - invoice The Australian Explosives and Chemical Company Limited invoice & receipt The Gair Manufacturing Co. - 2 invoices & receipt C. ...32 invoices from Jan to Dec 1918, from a range of businesses; addressed to J.H. Abbott & Co. Abbott Collection: 32 invoices from Jan to Dec 1918, from a range of businesses; addressed to J.H. Abbott & Co. J.H. Abbott & Co. Bendigo invoice The State Assurance Co Ltd (of Liverpool) - 2 renewal receipts The British imperial Oil Co. Ltd. - 2 invoices & receipts The Lion Rolling Mills - 4 invoices & receipts McPhersons Pty. Ltd. - 2 invoices & receipts Miller & Co. Pty. Ltd. - 2 invoices & receipts George Russell, 454-460 Flinders Str Melbourne. - 3 invoices & receipts Ullathorne Hartridge Co. Ltd. invoice The Dunlop Rubber Co. of AUS. Ltd. - 3 invoices & receipts The Dalgety Company Limited - 2 receipted invoices Guthridge & Co. invoice The Royal Agricultural Society of Victoria correspondence Eliza Tinsley, steel merchants Melbourne - invoice The Australian Explosives and Chemical Company Limited invoice & receipt The Gair Manufacturing Co. - 2 invoices & receipt C. S. Green & Son, 368-370 Post Office Place, Melbourne, hardware merchants' invoice Barnet Glass Rubber Co. Ltd. - receipted invoice C. Harper, saddle & harness Manufacturer & Importer, Bath Corner, Charing Cross, Bendigo - invoiceabbott, invoices -
 Bendigo Historical Society Inc.
Financial record - Invoices 1892 - 1902, 31/01/2017
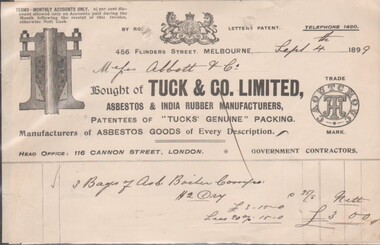
... Abbott, Bendigo for £63/16/00 from The Australian Explosives & Chemical Coy. Ltd on Aug. 5, 1902. Manufacturers and Importers of High Explosives and Detonators, 356 Little Collins Street, Melbourne 8545e Docket / quote from J. ...Wood James Oppy The Australian and Chemical Coy 8545a Docket from Tuck & Co. Limited, Asbestos & India Rubber Manufacturers, 4566 Collins Street, Melbourne; Sept. 4th, 1889; Head Office: 116 Cannon Street, London. ...8545a Docket from Tuck & Co. Limited, Asbestos & India Rubber Manufacturers, 4566 Collins Street, Melbourne; Sept. 4th, 1889; Head Office: 116 Cannon Street, London. Purchased 3 Bags of Asb. Boiler ?? at a cost of £3/- by Messrs. Abbitt & Co. 8545b Docket from G. Wood, General Founder, Kensington Iron Foundry, Macauley Road, dated Dec. 2nd, 1896; due from Mr. J. H. Abbott, For 1 doz. combination parts& 1/2 doz. stands for parts at £1/14/00. 8545c Memorandum James Oppy, Boot and Shoemaker, Fitzroy Street, Kerang, dated Aug. 23rd, 1893. Apology and advice the amount owing will be forwarded on 1st of next month (Sept.). 8545d Docket for six items purchased by Messrs. J.H. Abbott, Bendigo for £63/16/00 from The Australian Explosives & Chemical Coy. Ltd on Aug. 5, 1902. Manufacturers and Importers of High Explosives and Detonators, 356 Little Collins Street, Melbourne 8545e Docket / quote from J. Kennon & Sons, Tanners, Curriers & Leather Merchants, 206 Bridge Road, Richmond. October 19th, 1888, quotation sent to Mr. J H Abbott, Leather Merchant, Sandhurst.bendigo businesses, j. kennon and sons, tuck and co, g. wood, james oppy, the australian and chemical coy -
 The Beechworth Burke Museum
Geological specimen - Dolomite
... Dolomite is a mineral, calcium magnesium carbonate, with the chemical formula CaMg(CO3)2. It is a principle component of various rock types sometimes also referred to as dolomite, including dolostone, dolomitic marble and dolomitic limestone (according to the composition of each type). ...The Beechworth Burke Museum Loch Street Beechworth high-country Dolomite is a mineral, calcium magnesium carbonate, with the chemical formula CaMg(CO3)2. It is a principle component of various rock types sometimes also referred to as dolomite, including dolostone, dolomitic marble and dolomitic limestone (according to the composition of each type). ...Dolomite is a mineral, calcium magnesium carbonate, with the chemical formula CaMg(CO3)2. It is a principle component of various rock types sometimes also referred to as dolomite, including dolostone, dolomitic marble and dolomitic limestone (according to the composition of each type). Dolomite rock is found in sedimentary basins throughout the world, comprising approximately 2% of the Earth's crust. It is formed when lime mud or limestone encounters groundwater containing magnesium. Dolomite can contain elements such as lead, zinc and copper. Dolomite and limestone are used in various construction, landscaping and agricultural processes. This specimen was donated to the Burke Museum in 1868 by Alfred Selwyn as part of the Geological Survey of Victoria. It was donated to the Museum in 1868. Victoria and other regions of Australia were surveyed for sites of potential mineral wealth throughout the 19th Century. The identification of sites containing valuable commodities such as gold, iron ore and gemstones in a locality had the potential to shape the development and history of communities and industries in the area. The discovery of gold in Victoria, for instance, had a significant influence on the development of the area now known as 'the goldfields', including Beechworth; the city of Melbourne and Victoria as a whole. Dolomite and limestone are mined at several locations in Victoria, including sites in the North-East of the state in Bindi and Limestone Creek. There are notable dolomite deposits in most Australian states. The dolomitised form of the mineral tends to come from older limestone deposits, formed during the palaeozoic era in marine settings, so this specimen may have come from a deposit located along a coastline in Victoria or another state. The specimen is significant as an example of surveying activity undertaken to assess and direct the development of the mineral resource industries in Victoria and Australia, as well as the movement to expand human knowledge of earth sciences such as mineralogy and geology in the nineteenth century. This specimen is part of a larger collection of geological and mineral specimens collected from around Australia (and some parts of the world) and donated to the Burke Museum between 1868-1880. A large percentage of these specimens were collected in Victoria as part of the Geological Survey of Victoria that begun in 1852 (in response to the Gold Rush) to study and map the geology of Victoria. Collecting geological specimens was an important part of mapping and understanding the scientific makeup of the earth. Many of these specimens were sent to research and collecting organisations across Australia, including the Burke Museum, to educate and encourage further study.Hand-sized piece of pale pink dolomite (calcium magnesium carbonate) with dark grey rim and hollowed centre. geological specimen, geology, geology collection, burke museum, beechworth, dolomite, mineralogy, geological survey, alfred selwyn, limestone, calcium magnesium carbonate -
 City of Moorabbin Historical Society (Operating the Box Cottage Museum)
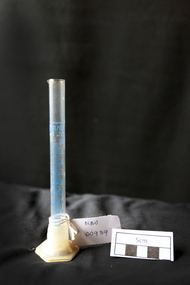
Manufactured glass, graduated cylinder 10ml, c1948 - 1991
... The following year, a crucial discovery was made: borosilicate, a heat and chemically resistant glass.By it’s 25th year anniversary, the company had grown from an experimental glass factory into an internationally renowned manufacturer of optical and industrial glasses. ...The following year, a crucial discovery was made: borosilicate, a heat and chemically resistant glass.By it’s 25th year anniversary, the company had grown from an experimental glass factory into an internationally renowned manufacturer of optical and industrial glasses. ...Otto Schott, a chemist and glass engineer, had the vision of uniform production ie making glass items that would resemble one another. At the end of the eighteenth century, with most glass items still created by hand, the quality of output was still a guessing game. Schott was the first to render this an industrial certainty. 1884 Otto Schott, Ernst Abbe and Carl and Roderich Zeiss found the Schott & Associates Glass Technology Laboratory in Jena, Germany. Glastechnisches Laboratorium Schott & Gen was born. Production started in 1886. The following year, a crucial discovery was made: borosilicate, a heat and chemically resistant glass.By it’s 25th year anniversary, the company had grown from an experimental glass factory into an internationally renowned manufacturer of optical and industrial glasses. Soon to be added was fiolax, tube-shaped glass used for vials, ampoules and syringes thus allowing the company to play a significant role in supplying Europe's nascent pharmaceutical industry. During WW2 Company was taken over for military use, and in 1945 given to the Russians as East Germany - GDR. , US troops transfer the "brain trust" of Jenaer Glas to Mainz in West and In Jena , East Germany, in 1948 the company became a state-owned "property of the people." The West German company becomes Schott Glaswerk, while the people in Jena, GDR, shorten their name to Jenaer Glaswerk. When the Berlin Wall comes down in 1989 Germany is united once again and in 1991 the company is joined and the Jena factory is brought up-to-date by 1994.This 10ml clear glass, graduated cylinder for laboratory tests, set in a plastic pentagonal base, is made of borosilicate glass. It has a pouring lip. The wide pentagonal shaped base provides stability and makes the cylinder roll-resistant. agr / ? TRS 10/0.1 / B Tol + - 0.1 / ml in 20'C / GDR pharmacy, medications, medicines, glass manufacturing, glass works, early settlers, moorabbin, bentleigh, cheltenham, jenaer glaswerk schott & gen company, west germany, east germany, berlin wall, ww2 1939-45, schott otto, zeiss roderich, borosilicate glass, glass cylinders, laboratory glass -
 Orbost & District Historical Society
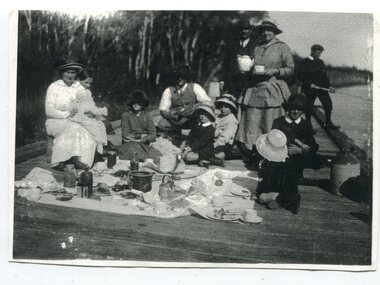
black and white photograph, late 19th - early 20th century
... Her family says she was entirely self-taught, like many women photographers who started out with nothing but the instructions on the packets of film and chemicals. In over fifty years practice she graduated from the total novice, who opened all her first mail order plates in bright sunlight and ruined them, to a competent photographer who became both the local press correspondent and an inveterate producer of humorous trompe l’oeil postcard images. ...Her family says she was entirely self-taught, like many women photographers who started out with nothing but the instructions on the packets of film and chemicals. In over fifty years practice she graduated from the total novice, who opened all her first mail order plates in bright sunlight and ruined them, to a competent photographer who became both the local press correspondent and an inveterate producer of humorous trompe l’oeil postcard images. ...this is a photograph taken at the original jetty at Tabbara on the Brodribb River used by Samuel Richardson who established his mill in 1882. There was a constant demand for timber to supply the growing townships of Orbost , Marlo and surrounds. It was at this mill that the original paddle steamer Curlip was built. More information in "Curlip" by May Leatch. Helena Warrem (1871-1962) was a self-taught photographer who became both the local press correspondent and a producer of humorous trompe l'oeil postcard images. Helena Warren was a thirty-two year old settler living on a small mixed farm with her husband, William, at Newmerella, near Orbost in Gippsland, Victoria, when she bought her first camera, an Austral Box quarter-plate. Her family says she was entirely self-taught, like many women photographers who started out with nothing but the instructions on the packets of film and chemicals. In over fifty years practice she graduated from the total novice, who opened all her first mail order plates in bright sunlight and ruined them, to a competent photographer who became both the local press correspondent and an inveterate producer of humorous trompe l’oeil postcard images. Helena Francis Warren (nee McKeown) was married to William John Warren and lived in Newmerella. She supplied the photos for the Back-To-Orbost celebration book in 1937 and also designed the Back-To-Orbost badge. She was known for her soft toy making. (by Ivy Rodwell in from Personalities and Stories of the Early Orbost District by Mary Gilbert).This photograph is a pictorial record of a typical family activity in the late 19th - early 20th century in the Orbost area, The clothing and manners are reflective of that time, This photograph also has significance in its association with Helen Frances Warren, a popular Orbost identity who was well known as an accomplished photographer and needleworker,A black / white photograph of a family group seated on a wooden jetty. There is a man on the right with a fishing rod. A man is standing next to woman holding a teapot and cup and saucer. On the left a woman is sitting and holding a baby on her knee. The rest are sitting or kneeling with a picnic cloth spread in front of them. There are bottles, jars, plates and cups on the cloth. on back - "The Warren Family Tabara Jetty"tabbara-jetty warren-family-orbost recreation-picnic -
 Coal Creek Community Park & Museum
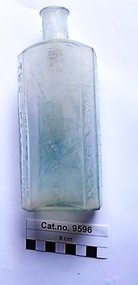
Bottle, glass, post 1856
... IMPORTERS OF Drugs, Chemicals, Patent Medicines, Surgical Instruments, And Surgical and Medical Appliances generally, H, FRANCIS & Co. solicit attention to their large and complete stock of WATER AND AIR-PROOF GOODS, Beds, Cushions, Mattresses. ...IMPORTERS OF Drugs, Chemicals, Patent Medicines, Surgical Instruments, And Surgical and Medical Appliances generally, H, FRANCIS & Co. solicit attention to their large and complete stock of WATER AND AIR-PROOF GOODS, Beds, Cushions, Mattresses. ...Henry Francis was previously in business at the goldfields at Ballarat, before coming to Melbourne in 1856. TROVE : Advocate (Melbourne, Vic. : 1868 - 1954), Saturday 19 July 1879, page 11. H. F R A N C I S & CO (Late FRANCIS & SWIFT) DISPENSING AND FAMILY CHEMISTS, M , 31 BOURKE ST. EAST, Melbourne. IMPORTERS OF Drugs, Chemicals, Patent Medicines, Surgical Instruments, And Surgical and Medical Appliances generally, H, FRANCIS & Co. solicit attention to their large and complete stock of WATER AND AIR-PROOF GOODS, Beds, Cushions, Mattresses. Pillows, Hot Water Bottles, Bed Sheeting, Portable Baths, Elastic Stockings, Ladies' Abdominal Belts, Shoulder Braces, Trusses, &c., Which, owing to their buying Direct from the Manufacturer, through their London agents, they are now able to supply at much' more reasonable rates than have hitherto obtained. THE GERMAN & FRENCH MINERAL WATERS Hunyadi Janos, Friedrichshall, Carlebad, Vichy, Pullna, Vale, &c., &c., Continually in stock, and supplied in quantities to suit purchasers. DISPENSARY AND RETAIL ESTABLISHMENT: 31 Bourke Street East; Melbourne. Wholesale Laboratory—Dawson Place, Swanston St, MEDICINE CHESTS SUPPLIED & REFITTED. TROVE : Argus (Melbourne, Vic. : 1848 - 1957), Thursday 17 January 1957, page 9 'ANTINOIS EAR PLUGS Ensure mental rest; soothe the nerves in factories, plane, or train travel 3 pairs, 2/6, post free H. Francis & Co., Box 5Ó2H, Melb.' Aqua tinted clear glass rectangular with angled corners in section bottle for stopper seal, with graduations on two sides for dosage quantities. Embossed text on front , angled sides and base.Embossed on base 'K' over '4616'. On one angled side graduation marks for one tablespoon doses, on other side graduation marks for two tablespoon doses, on front 'H. FRANCIS & Co'. -
 Wodonga & District Historical Society Inc
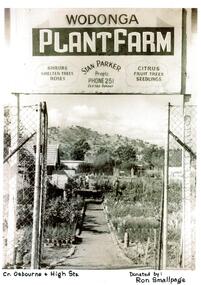
Photograph - Wodonga Plant Farm
... This included a large showroom, a water shop which specialises in pool equipment, chemicals and water testing, a children's playground and an outdoor blind centre. ...This included a large showroom, a water shop which specialises in pool equipment, chemicals and water testing, a children's playground and an outdoor blind centre. ...Stan and Mary Parker commenced the Plant Farm in Smythe Street Wodonga in February 1949. The nursery consisted of two blocks, on one of which their house was built. They started off with approximately £70 and a 1939 Singer mini-Ute. In the early days most customers came from the farming community. In late 1951 the Parkers purchased to a new site on the corner of High and Osburne Streets. Business went well and in 1957 they purchased the adjoining block. They later demolished the old house on the corner of High Street and Osburne Street, building a new home lower on the same block. As the nursery prospered Stan and Mary built a shop and showrooms with glassed-in portion for the indoor plants and a large shaded area for the display of shrubs. In 1978 they sold the nursery to Mr. & Mrs. John Gale. In 1981 the Wodonga Plant farm was purchased Geoff and Kay Pollard and they moved to its current location at the corner of Beechworth Road and Huon Creek Road. Initially they brought it as an investment but it soon got into their blood and chose to not only continue but expand the nursery and its offerings. This included a large showroom, a water shop which specialises in pool equipment, chemicals and water testing, a children's playground and an outdoor blind centre. Further expansions led to the addition of a Tuscan-style cafe on the site which has become a meeting place. The business was nominated the Yates Victorian Best Garden Centre in Australia for many years and won the award in 1997. In 2024, the Wodonga Plant Farm is still a vibrant and popular business being operated by the Pollard Family.These items are significant because they document the story of respected Wodonga Business which has served the community for over 60 years.A selection of photographs and article documenting the story of the Wodonga Plant Farmearly wodonga businesses, wodonga plant farm, pollard family, geoff and kay pollard -
 Bendigo Historical Society Inc.
Administrative record - Abbott Collection: July to Dec 1904: records and receipts for purchases by J.H. Abbott & Co from a number of companies, 1904
... . & Co., from 27 Jul to 31 Dec 1904 2403.89g 27 invoices from Dalgety and Company Limited, from 21 Jul to 31 Dec 1904 2403.89g 11 invoices from Briscoe & Company Limited, Wholesale Ironmongers & Hardware Merchants, from 25 Oct 1904 to 30 Dec 1904 2403.89h 27 invoices from Dalgety and Company Limited, from 21 Jil to 31 Dec 1904 2403.89i 36 invoices from Australian Explosives and Chemicals Compy. Ltd, from 1 Jul to 31 Dec 1904.... & Co., from 27 Jul to 31 Dec 1904 2403.89g 27 invoices from Dalgety and Company Limited, from 21 Jul to 31 Dec 1904 2403.89g 11 invoices from Briscoe & Company Limited, Wholesale Ironmongers & Hardware Merchants, from 25 Oct 1904 to 30 Dec 1904 2403.89h 27 invoices from Dalgety and Company Limited, from 21 Jil to 31 Dec 1904 2403.89i 36 invoices from Australian Explosives and Chemicals Compy. Ltd, from 1 Jul to 31 Dec 1904 Administrative record Abbott Collection: July to Dec 1904: records and receipts for purchases by J.H. ...Various (July to Dec) 1904 company letterhead invoices which have supplied predominantly gelignite and fuses to J.H. Abbott .Abbott Collection: July to Dec 1904: records and receipts for purchases gelignite, fuses, etc.; by J.H. Abbott & Co from a wide range of generally Melbourne based companies: 2403.89a five invoices from Bickford, Smith & Co. gelignite and fuses, from 31 July to 30 Nov 1904 2403.89b five invoices from Morris & Meeks, Melbourne, gelignite, from 1 Aug to 1 Dec 1904 2403.89c 33 invoices from Gibbs, Bright & Co., gelignite, from 27 Jun to 24 Dec 1904 2403.89d 17 invoices from Richard Linton, gelatine dynamite, from 7 Jul to 31 Dec 1904 2403.89e 24 invoices from McMicking & Co., from 2 Jul to 30 Dec 1904 2403.89f 21 invoices from Perks Bros. & Co., from 27 Jul to 31 Dec 1904 2403.89g 27 invoices from Dalgety and Company Limited, from 21 Jul to 31 Dec 1904 2403.89g 11 invoices from Briscoe & Company Limited, Wholesale Ironmongers & Hardware Merchants, from 25 Oct 1904 to 30 Dec 1904 2403.89h 27 invoices from Dalgety and Company Limited, from 21 Jil to 31 Dec 1904 2403.89i 36 invoices from Australian Explosives and Chemicals Compy. Ltd, from 1 Jul to 31 Dec 1904trade company invoices 1904, j h abbott -
 Bendigo Historical Society Inc.
Document - BILL ASHMAN COLLECTION: ALFLOC SYSTEM
... This is an internal method of conditioning boiler feed water and the use of coagulants designed to prevent scale formation in the boiler and accessory plant, to reduce corrosion to a minimum, and further to provide for those conditions in the boiler water which from present experience are believed to prevent the occurrence of caustic ombrittlement. Different chemicals were used to suit different types of water in different areas. ...History House 11 Mackenzie Street Bendigo goldfields SCIENCES Instruments - general scalebuoy Bill Ashman Collection Alfloc System Imperial Chemical Industries Limited Alkali Division Alfloc Liquors Alfloc Briquettes Alfloc Powders Imperial Chemical Industries of Australia and New Zealand Limited Elder Smith & Co Limited Chemical & Textile Agencies Pty Ltd Eleven page article titled Water Softening in the Boiler by the 'Alfloc' System. ...Eleven page article titled Water Softening in the Boiler by the 'Alfloc' System. This is an internal method of conditioning boiler feed water and the use of coagulants designed to prevent scale formation in the boiler and accessory plant, to reduce corrosion to a minimum, and further to provide for those conditions in the boiler water which from present experience are believed to prevent the occurrence of caustic ombrittlement. Different chemicals were used to suit different types of water in different areas. Items discussed are: Summary, Introduction, External treatment, Internal Treatment, General Principles of the 'Alfloc' Internal Treatment, Precipitation of the Scale-forming Salts, Temporary Hardness, Permanent Hardness, Conditioning of the Precipitate - Floc Formation, Efficient Control of the Concentration of both Dissolved and Suspended Solids by Blowdown, Prevention of Corrosion, Testing and Control, The 'Alfloc' Reagents for Internal Treatment, 'Alfloc' Liquors, 'Alfloc' Briquettes, Alfloc' Powders, Methods of Application, Liquors - Stationary boilers and Locomotive boilers, Briquettes - Stationary boilers and Locomotive boilers, Powders, Blowdown, Sludge, Caustic Embrittlement, Control of 'Alfloc' System, Cost and Economies of 'Alfloc' Internal Treatment and 'Alfloc' Water Treatment Service. Listed on page 11 are ICIANZ Sales Offices the Australian States. Between pages 7 and 8 is a page of diagrams. They are: Showing method of feeding liquors to the feed tank of boilers for 'Alfloc' internal treatment, typical arrangement of pressure vessel and typical arrangement of 'Alfloc' by-pass feeder.sciences, instruments - general, scalebuoy, bill ashman collection, alfloc system, imperial chemical industries limited alkali division, alfloc liquors, alfloc briquettes, alfloc powders, imperial chemical industries of australia and new zealand limited, elder smith & co limited, chemical & textile agencies pty ltd -
 Sunshine and District Historical Society Incorporated
Archive - History of Deer Park and district 1850-1991, Several: 1976, 1979, 1980. 1991
... * 'Deer Park- over the years', compiled by S&DHS, 1976 (for Deer Park Community Day, 28 Nov. 1976) * 'History goes on show', in 'Sun-Herald', 1 May 1991, p. 42 and p. 55 * 'The Mount Derrimut Idyll' (source not recorded, probably 'Sunshine Advocate') * Article: Mt Derrimut 1850-1962 by Gwen Mousley * Notes on Deer Park Primary School No.1434 by Gwen Mousley + other notes * Imperial Chemical Industries, Millbank, London, Headquarters of ICI Ltd. ... * 'Deer Park- over the years', compiled by S&DHS, 1976 (for Deer Park Community Day, 28 Nov. 1976) * 'History goes on show', in 'Sun-Herald', 1 May 1991, p. 42 and p. 55 * 'The Mount Derrimut Idyll' (source not recorded, probably 'Sunshine Advocate') * Article: Mt Derrimut 1850-1962 by Gwen Mousley * Notes on Deer Park Primary School No.1434 by Gwen Mousley + other notes * Imperial Chemical Industries, Millbank, London, Headquarters of ICI Ltd. ...Part of Gwen Mousley Collectiondeer park, history -
 City of Moorabbin Historical Society (Operating the Box Cottage Museum)
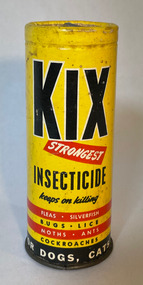
Equipment - 'KIX' Insecticide Powder, DAVID CHEMICALS PTY LTD, for dogs, cats and all animals, 20thC
... Active Constituents: 5% Para Para Dichlorodiphenyltrichloroethane, 2.5% Isobornly Thiocyanoacetate. DAVID CHEMICALS PTY LTD. Clayton, Victoria Contents 1½ ozs...Active Constituents: 5% Para Para Dichlorodiphenyltrichloroethane, 2.5% Isobornly Thiocyanoacetate. DAVID CHEMICALS PTY LTD. Clayton, Victoria Contents 1½ ozs A yellow heavy cardboard container with metal swivel top containing a white powder. for dogs, cats and all animals Equipment 'KIX' Insecticide Powder DAVID CHEMICALS PTY LTD. ...Kix was first manufactured by Clark King & Co.after World War II. The offices were located in 237 Queen Street Melbourne. Clark, King &Co Pty Ltd started business in the early 1920's and were known as the poultry food specialist. The head of the firm, Mr Clive Harrison Clark was know as a successful poultry farmer and exhibitor of prize birds, he was the secretary of the Brighton Poultry Society.KIX was used by citizens of MoorabbinA yellow heavy cardboard container with metal swivel top containing a white powder. Front: KIX - STRONGEST - INSEDTICIDE - keeps on killing - FLEAS - SILVERFISH - BUGS - LICE - MOTHS - ANTS - COCKROACHES - FOR DOGS, CATS AND ALL ANIMALS BACK: DIRECTIONS Fleas and Lice. Kix keeps on killing fleas and lice for weeks. An occasional dusting will FLEA-PROFF dogs and cats. Dust Kix on the hair of dogs commencing at the neck and ru it in with the fingers. If the dog appears irritated after treatment, it will be due to the efforts of fleas to escape and indicates both the effectiveness of Kix and the necessity of treatment. Sprinkle Kix on the head and neck of cats and rub well in. Use Kix on poultry also. In personal hygiene against fleas Kix may may dusted on underwear socks etc. Use Kix also for head lice and body lice. Silverfish, cockroaches, Bugs, Ants. Duct Kix where necessary and it will remain effective for months. These pest take some hours to die, but death is certain. Active Constituents: 5% Para Para Dichlorodiphenyltrichloroethane, 2.5% Isobornly Thiocyanoacetate. DAVID CHEMICALS PTY LTD. Clayton, Victoria Contents 1½ ozskix, insecticide, ddt, pets, moorabbin, poultry -
 Federation University Historical Collection
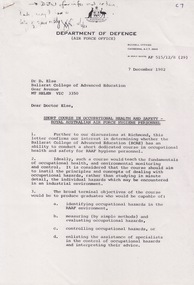
Document - Document - Correspondence, VIOSH: Department of Defence - Air Force Office, Canberra, December 1982
... Noise induced hearing loss is the most widespread occupational health risk in the RAAF. Industrial chemicals used and hazardous industrial procedures in the repair and maintenance of aircraft are an issue needing resolution. ...Noise induced hearing loss is the most widespread occupational health risk in the RAAF. Industrial chemicals used and hazardous industrial procedures in the repair and maintenance of aircraft are an issue needing resolution. ...Victorian Institute of Occupational Safety and Health (VIOSH) Australia is the Asia-Pacific centre for teaching and research in occupational health and safety (OHS) and is known as one of Australia's leaders on the field. VIOSH has a global reputation for its innovative approach within the field of OHS management. VIOSH had its first intake of students in 1979. At that time the Institution was known as the Ballarat College of Advanced Education. In 1990 it became known as Ballarat University College, then in 1994 as University of Ballarat. It was 2014 that it became Federation University. VIOSH Australia students are safety managers, senior advisors and experienced OHS professionals. They come from all over Australia and industry. Students are taught active research and enquiry; rather than textbook learning and a one-size fits all approach. VIOSH accepts people into the Graduate Diploma of Occupational Hazard Management who have no undergraduate degree - on the basis of extensive work experience and knowledge Letter from the Department of Defence to Dennis Else looking at the possibility of Ballarat College of Advanced Education conducting a short course in occupational health and safety for RAAF hygiene personnel. It would teach the fundamentals of occupational health and environmental monitoring and control. Better use of the practical time allocated is needed. Noise induced hearing loss is the most widespread occupational health risk in the RAAF. Industrial chemicals used and hazardous industrial procedures in the repair and maintenance of aircraft are an issue needing resolution. Existing terminal objectives for basic hygiene inspectors course in occupational health and safety are provided for comment. Information provided by K R Stone, Flight Lieutenant for Director General of Air Force Health Services. Eight A4 pages,typed. Handwritten note top left cornerLetterhead of Department of Defence - Air Force Office.Signature of K R Stoneviosh, victorian institute of occupational safety and health, department of defence, air force office, raaf, ballarat college of advanced education, dennis else, k r stone, flight lieutenant, director general of air force health services, short course in occupational health and safety, raaf hygiene personnel, hearing loss, industrial chemicals, hazardous industrial procedures