Showing 1446 items
matching no 2/36
-
 Flagstaff Hill Maritime Museum and Village
Spoon, circa 1878
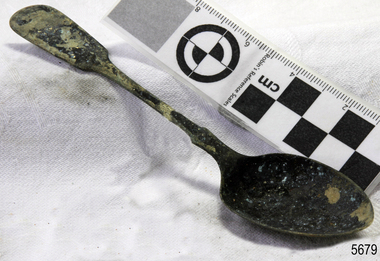
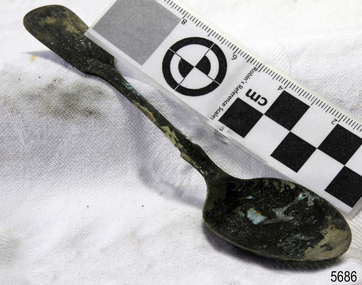
This tea spoon is from the wreck of the LOCH ARD, a Loch Line ship of 1,693 tons which sailed from Gravesend, London, on 2 March 1878 with 17 passengers and a crew of 36 under Captain George Gibbs. “The intention was to discharge cargo in Melbourne, before returning to London via the Horn with wool and wheat”. Instead, on 1 June 1878, after 90 days at sea, she struck the sandstone cliffs of Mutton Bird Island on the south west coast of Victoria, and sank with the loss of 52 lives and all her cargo. The manifest of the LOCH ARD listed an array of manufactured goods and bulk metals being exported to the Colony of Victoria, with a declared value of £53,700. (202 bills of lading show an actual invoice value of £68, 456, with insurance underwriting to £30,000 of all cargo). Included in the manifest is the item of “Tin hardware & cutlery £7,530”. This teaspoon is one of 482 similar items of electro-plated cutlery from the LOCH ARD site, comprising spoons and forks of various sizes but all sharing the same general shape or design and metallic composition. 49 of these pieces display a legible makers’ mark — the initials “W” and “P” placed within a raised diamond outline, which is in turn contained within a sunken crown shape — identifying the manufacturer as William Page & Co of Birmingham. An electroplater’s makers’ marks, unlike sterling silver hallmarks, are not consistent identifiers of quality or date and place of manufacture. A similar line of five impressions was usually made to impress the consumer with an implication of industry standards, but what each one actually signified was not regulated and so they varied according to the whim of the individual foundry. In this case, the maker’s marks are often obscured by sedimentary accretion or removed by corrosion after a century of submersion in the ocean. However sufficient detail has survived to indicate that these samples of electro-plated cutlery probably originated from the same consignment in the LOCH ARD’s cargo. The following descriptions of maker’s marks are drawn from 255 tea spoons, 125 dessert spoons, and 99 table forks. These marks are clearly visible in 66 instances, while the same sequence of general outlines, or depression shapes, is discernible in another 166 examples. 1. A recessed Crown containing a raised Diamond outline and the initials “W” and “P” (the recognised trademark of William Page & Co) 2. An impressed Ellipse containing a raised, pivoted, Triangle in its lower part and bearing a Resurrection Cross on its upper section (a possible dissenting church symbol reflecting religious affiliation); OR a rounded Square impression containing a raised, ‘lazy’, letter “B” (possibly mimicking sterling silver hallmark signifying city of manufacture i.e. Birmingham) 3. An impressed rounded Square filled with a raised Maltese Cross (the base metal composite of nickel silver was also known as ‘German silver’ after its Berlin inventors in 1823) 4. A recessed Circle containing a Crab or Scarab Beetle image; OR a recessed Circle containing a rotated ‘fleur de lys’ or ‘fasces’ design 5. A depressed Diamond shape enclosing a large raised letter “R” and a small raised letter “D” (mimicking the U.K. Patent Office stamp which abbreviated the term ‘registered’ to “RD”, but also included date and class of patent) Suggested trade names for William Page & Co’s particular blend of brass plating are ‘roman silver’ or ‘silverite’. This copper alloy polishes to a lustrous gold when new, discolouring to a murky grey with greenish hue when neglected. HISTORY OF THE LOCH ARD The LOCH ARD belonged to the famous Loch Line which sailed many ships from England to Australia. Built in Glasgow by Barclay, Curdle and Co. in 1873, the LOCH ARD was a three-masted square rigged iron sailing ship. The ship measured 262ft 7" (79.87m) in length, 38ft (11.58m) in width, 23ft (7m) in depth and had a gross tonnage of 1693 tons. The LOCH ARD's main mast measured a massive 150ft (45.7m) in height. LOCH ARD made three trips to Australia and one trip to Calcutta before its final voyage. LOCH ARD left England on March 2, 1878, under the command of Captain Gibbs, a newly married, 29 year old. She was bound for Melbourne with a crew of 37, plus 17 passengers and a load of cargo. The general cargo reflected the affluence of Melbourne at the time. On board were straw hats, umbrella, perfumes, clay pipes, pianos, clocks, confectionary, linen and candles, as well as a heavier load of railway irons, cement, lead and copper. There were items included that intended for display in the Melbourne International Exhibition in 1880. The voyage to Port Phillip was long but uneventful. At 3am on June 1, 1878, Captain Gibbs was expecting to see land and the passengers were becoming excited as they prepared to view their new homeland in the early morning. But LOCH ARD was running into a fog which greatly reduced visibility. Captain Gibbs was becoming anxious as there was no sign of land or the Cape Otway lighthouse. At 4am the fog lifted. A man aloft announced that he could see breakers. The sheer cliffs of Victoria's west coast came into view, and Captain Gibbs realised that the ship was much closer to them than expected. He ordered as much sail to be set as time would permit and then attempted to steer the vessel out to sea. On coming head on into the wind, the ship lost momentum, the sails fell limp and LOCH ARD's bow swung back. Gibbs then ordered the anchors to be released in an attempt to hold its position. The anchors sank some 50 fathoms - but did not hold. By this time LOCH ARD was among the breakers and the tall cliffs of Mutton Bird Island rose behind the ship. Just half a mile from the coast, the ship's bow was suddenly pulled around by the anchor. The captain tried to tack out to sea, but the ship struck a reef at the base of Mutton Bird Island, near Port Campbell. Waves broke over the ship and the top deck was loosened from the hull. The masts and rigging came crashing down knocking passengers and crew overboard. When a lifeboat was finally launched, it crashed into the side of LOCH ARD and capsized. Tom Pearce, who had launched the boat, managed to cling to its overturned hull and shelter beneath it. He drifted out to sea and then on the flood tide came into what is now known as LOCH ARD Gorge. He swam to shore, bruised and dazed, and found a cave in which to shelter. Some of the crew stayed below deck to shelter from the falling rigging but drowned when the ship slipped off the reef into deeper water. Eva Carmichael had raced onto deck to find out what was happening only to be confronted by towering cliffs looming above the stricken ship. In all the chaos, Captain Gibbs grabbed Eva and said, "If you are saved Eva, let my dear wife know that I died like a sailor". That was the last Eva Carmichael saw of the captain. She was swept off the ship by a huge wave. Eva saw Tom Pearce on a small rocky beach and yelled to attract his attention. He dived in and swam to the exhausted woman and dragged her to shore. He took her to the cave and broke open case of brandy which had washed up on the beach. He opened a bottle to revive the unconscious woman. A few hours later Tom scaled a cliff in search of help. He followed hoof prints and came by chance upon two men from nearby Glenample Station three and a half miles away. In a state of exhaustion, he told the men of the tragedy. Tom returned to the gorge while the two men rode back to the station to get help. By the time they reached LOCH ARD Gorge, it was cold and dark. The two shipwreck survivors were taken to Glenample Station to recover. Eva stayed at the station for six weeks before returning to Ireland, this time by steamship. In Melbourne, Tom Pearce received a hero's welcome. He was presented with the first gold medal of the Royal Humane Society of Victoria and a £1000 cheque from the Victorian Government. Concerts were performed to honour the young man's bravery and to raise money for those who lost family in the LOCH ARD disaster. Of the 54 crew members and passengers on board, only two survived: the apprentice, Tom Pearce and the young woman passenger, Eva Carmichael, who lost all of her family in the tragedy. Ten days after the LOCH ARD tragedy, salvage rights to the wreck were sold at auction for £2,120. Cargo valued at £3,000 was salvaged and placed on the beach, but most washed back into the sea when another storm developed. The wreck of LOCH ARD still lies at the base of Mutton Bird Island. Much of the cargo has now been salvaged and some was washed up into what is now known as LOCH ARD Gorge. Cargo and artefacts have also been illegally salvaged over many years before protective legislation was introduced. One of the most unlikely pieces of cargo to have survived the shipwreck was a Minton porcelain peacock - one of only seven in the world. The peacock was destined for the Melbourne International Exhibition in 1880. It had been well packed, which gave it adequate protection during the violent storm. Today, the Minton peacock can be seen at the Flagstaff Hill Maritime Museum in Warrnambool. From Australia's most dramatic shipwreck it has now become Australia's most valuable shipwreck artefact and is one of very few 'objects' on The LOCH ARD shipwreck is of State significance – Victorian Heritage Register S 417. Flagstaff Hill’s collection of artefacts from LOCH ARD is significant for being one of the largest collections of artefacts from this shipwreck in Victoria. It is significant for its association with the shipwreck, which is on the Victorian Heritage Register (VHR S417). The collection is significant because of the relationship between the objects, as together they have a high potential to interpret the story of the LOCH ARD. The LOCH ARD collection is archaeologically significant as the remains of a large international passenger and cargo ship. The LOCH ARD collection is historically significant for representing aspects of Victoria’s shipping history and its potential to interpret sub-theme 1.5 of Victoria’s Framework of Historical Themes (living with natural processes). The collection is also historically significant for its association with the LOCH ARD, which was one of the worst and best known shipwrecks in Victoria’s history. Unrestored tea spoon from the wreck of the LOCH ARD. The spoon design has a flattened fiddle-back handle, with a thin stem or shank, flared collar, and elongated bowl. The spoons metallic composition is a thin layer of brass alloy which has partially corroded back to a nickel-silver base metal. Approximately 25% of original electroplating remains with some verdigris. Three outlines of makers marks visible on lower rear of handle.flagstaff hill, warrnambool, shipwrecked coast, flagstaff hill maritime museum, maritime museum, shipwreck coast, flagstaff hill maritime village, great ocean road, loch line, loch ard, captain gibbs, eva carmichael, tom pearce, glenample station, mutton bird island, loch ard gorge, electroplated cutlery, loch ard shipwreck, nickel silver, william page & co, birmingham, brass plating, makers marks -
 Flagstaff Hill Maritime Museum and Village
Spoon, circa 1878
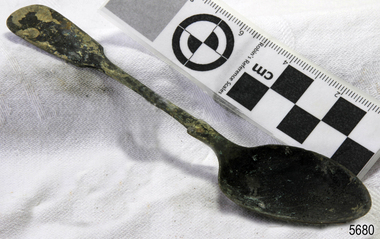
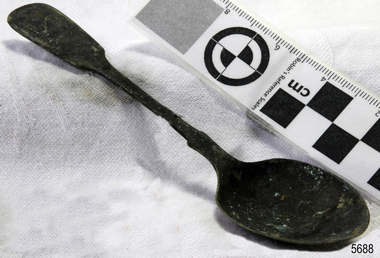
This tea spoon is from the wreck of the LOCH ARD, a Loch Line ship of 1,693 tons which sailed from Gravesend, London, on 2 March 1878 with 17 passengers and a crew of 36 under Captain George Gibbs. “The intention was to discharge cargo in Melbourne, before returning to London via the Horn with wool and wheat”. Instead, on 1 June 1878, after 90 days at sea, she struck the sandstone cliffs of Mutton Bird Island on the south west coast of Victoria, and sank with the loss of 52 lives and all her cargo. The manifest of the LOCH ARD listed an array of manufactured goods and bulk metals being exported to the Colony of Victoria, with a declared value of £53,700. (202 bills of lading show an actual invoice value of £68, 456, with insurance underwriting to £30,000 of all cargo). Included in the manifest is the item of “Tin hardware & cutlery £7,530”. This teaspoon is one of 482 similar items of electro-plated cutlery from the LOCH ARD site, comprising spoons and forks of various sizes but all sharing the same general shape or design and metallic composition. 49 of these pieces display a legible makers’ mark — the initials “W” and “P” placed within a raised diamond outline, which is in turn contained within a sunken crown shape — identifying the manufacturer as William Page & Co of Birmingham. An electroplater’s makers’ marks, unlike sterling silver hallmarks, are not consistent identifiers of quality or date and place of manufacture. A similar line of five impressions was usually made to impress the consumer with an implication of industry standards, but what each one actually signified was not regulated and so they varied according to the whim of the individual foundry. In this case, the maker’s marks are often obscured by sedimentary accretion or removed by corrosion after a century of submersion in the ocean. However sufficient detail has survived to indicate that these samples of electro-plated cutlery probably originated from the same consignment in the LOCH ARD’s cargo. The following descriptions of maker’s marks are drawn from 255 tea spoons, 125 dessert spoons, and 99 table forks. These marks are clearly visible in 66 instances, while the same sequence of general outlines, or depression shapes, is discernible in another 166 examples. 1. A recessed Crown containing a raised Diamond outline and the initials “W” and “P” (the recognised trademark of William Page & Co) 2. An impressed Ellipse containing a raised, pivoted, Triangle in its lower part and bearing a Resurrection Cross on its upper section (a possible dissenting church symbol reflecting religious affiliation); OR a rounded Square impression containing a raised, ‘lazy’, letter “B” (possibly mimicking sterling silver hallmark signifying city of manufacture i.e. Birmingham) 3. An impressed rounded Square filled with a raised Maltese Cross (the base metal composite of nickel silver was also known as ‘German silver’ after its Berlin inventors in 1823) 4. A recessed Circle containing a Crab or Scarab Beetle image; OR a recessed Circle containing a rotated ‘fleur de lys’ or ‘fasces’ design 5. A depressed Diamond shape enclosing a large raised letter “R” and a small raised letter “D” (mimicking the U.K. Patent Office stamp which abbreviated the term ‘registered’ to “RD”, but also included date and class of patent) Suggested trade names for William Page & Co’s particular blend of brass plating are ‘roman silver’ or ‘silverite’. This copper alloy polishes to a lustrous gold when new, discolouring to a murky grey with greenish hue when neglected. HISTORY OF THE LOCH ARD The LOCH ARD belonged to the famous Loch Line which sailed many ships from England to Australia. Built in Glasgow by Barclay, Curdle and Co. in 1873, the LOCH ARD was a three-masted square rigged iron sailing ship. The ship measured 262ft 7" (79.87m) in length, 38ft (11.58m) in width, 23ft (7m) in depth and had a gross tonnage of 1693 tons. The LOCH ARD's main mast measured a massive 150ft (45.7m) in height. LOCH ARD made three trips to Australia and one trip to Calcutta before its final voyage. LOCH ARD left England on March 2, 1878, under the command of Captain Gibbs, a newly married, 29 year old. She was bound for Melbourne with a crew of 37, plus 17 passengers and a load of cargo. The general cargo reflected the affluence of Melbourne at the time. On board were straw hats, umbrella, perfumes, clay pipes, pianos, clocks, confectionary, linen and candles, as well as a heavier load of railway irons, cement, lead and copper. There were items included that intended for display in the Melbourne International Exhibition in 1880. The voyage to Port Phillip was long but uneventful. At 3am on June 1, 1878, Captain Gibbs was expecting to see land and the passengers were becoming excited as they prepared to view their new homeland in the early morning. But LOCH ARD was running into a fog which greatly reduced visibility. Captain Gibbs was becoming anxious as there was no sign of land or the Cape Otway lighthouse. At 4am the fog lifted. A man aloft announced that he could see breakers. The sheer cliffs of Victoria's west coast came into view, and Captain Gibbs realised that the ship was much closer to them than expected. He ordered as much sail to be set as time would permit and then attempted to steer the vessel out to sea. On coming head on into the wind, the ship lost momentum, the sails fell limp and LOCH ARD's bow swung back. Gibbs then ordered the anchors to be released in an attempt to hold its position. The anchors sank some 50 fathoms - but did not hold. By this time LOCH ARD was among the breakers and the tall cliffs of Mutton Bird Island rose behind the ship. Just half a mile from the coast, the ship's bow was suddenly pulled around by the anchor. The captain tried to tack out to sea, but the ship struck a reef at the base of Mutton Bird Island, near Port Campbell. Waves broke over the ship and the top deck was loosened from the hull. The masts and rigging came crashing down knocking passengers and crew overboard. When a lifeboat was finally launched, it crashed into the side of LOCH ARD and capsized. Tom Pearce, who had launched the boat, managed to cling to its overturned hull and shelter beneath it. He drifted out to sea and then on the flood tide came into what is now known as LOCH ARD Gorge. He swam to shore, bruised and dazed, and found a cave in which to shelter. Some of the crew stayed below deck to shelter from the falling rigging but drowned when the ship slipped off the reef into deeper water. Eva Carmichael had raced onto deck to find out what was happening only to be confronted by towering cliffs looming above the stricken ship. In all the chaos, Captain Gibbs grabbed Eva and said, "If you are saved Eva, let my dear wife know that I died like a sailor". That was the last Eva Carmichael saw of the captain. She was swept off the ship by a huge wave. Eva saw Tom Pearce on a small rocky beach and yelled to attract his attention. He dived in and swam to the exhausted woman and dragged her to shore. He took her to the cave and broke open case of brandy which had washed up on the beach. He opened a bottle to revive the unconscious woman. A few hours later Tom scaled a cliff in search of help. He followed hoof prints and came by chance upon two men from nearby Glenample Station three and a half miles away. In a state of exhaustion, he told the men of the tragedy. Tom returned to the gorge while the two men rode back to the station to get help. By the time they reached LOCH ARD Gorge, it was cold and dark. The two shipwreck survivors were taken to Glenample Station to recover. Eva stayed at the station for six weeks before returning to Ireland, this time by steamship. In Melbourne, Tom Pearce received a hero's welcome. He was presented with the first gold medal of the Royal Humane Society of Victoria and a £1000 cheque from the Victorian Government. Concerts were performed to honour the young man's bravery and to raise money for those who lost family in the LOCH ARD disaster. Of the 54 crew members and passengers on board, only two survived: the apprentice, Tom Pearce and the young woman passenger, Eva Carmichael, who lost all of her family in the tragedy. Ten days after the LOCH ARD tragedy, salvage rights to the wreck were sold at auction for £2,120. Cargo valued at £3,000 was salvaged and placed on the beach, but most washed back into the sea when another storm developed. The wreck of LOCH ARD still lies at the base of Mutton Bird Island. Much of the cargo has now been salvaged and some was washed up into what is now known as LOCH ARD Gorge. Cargo and artefacts have also been illegally salvaged over many years before protective legislation was introduced. One of the most unlikely pieces of cargo to have survived the shipwreck was a Minton porcelain peacock - one of only seven in the world. The peacock was destined for the Melbourne International Exhibition in 1880. It had been well packed, which gave it adequate protection during the violent storm. Today, the Minton peacock can be seen at the Flagstaff Hill Maritime Museum in Warrnambool. From Australia's most dramatic shipwreck it has now become Australia's most valuable shipwreck artefact and is one of very few 'objects' on the Victorian State Heritage Register. The LOCH ARD shipwreck is of State significance – Victorian Heritage Register S 417. Flagstaff Hill’s collection of artefacts from LOCH ARD is significant for being one of the largest collections of artefacts from this shipwreck in Victoria. It is significant for its association with the shipwreck, which is on the Victorian Heritage Register (VHR S417). The collection is significant because of the relationship between the objects, as together they have a high potential to interpret the story of the LOCH ARD. The LOCH ARD collection is archaeologically significant as the remains of a large international passenger and cargo ship. The LOCH ARD collection is historically significant for representing aspects of Victoria’s shipping history and its potential to interpret sub-theme 1.5 of Victoria’s Framework of Historical Themes (living with natural processes). The collection is also historically significant for its association with the LOCH ARD, which was one of the worst and best known shipwrecks in Victoria’s history. Unrestored tea spoon from the wreck of the LOCH ARD. The spoon design has a flattened fiddle-back handle, with a thin stem or shank, flared collar, and elongated bowl. The spoons metallic composition is a thin layer of brass alloy which has partially corroded back to a nickel-silver base metal. Traces of original electroplating remain with some verdigris. Outlines of three makers marks are visible on lower rear of handle.flagstaff hill, warrnambool, shipwrecked coast, flagstaff hill maritime museum, maritime museum, shipwreck coast, flagstaff hill maritime village, great ocean road, loch line, loch ard, captain gibbs, eva carmichael, tom pearce, glenample station, mutton bird island, loch ard gorge, electroplated cutlery, loch ard shipwreck, nickel silver, william page & co, birmingham, brass plating, makers marks -
 Flagstaff Hill Maritime Museum and Village
Spoon, circa 1878
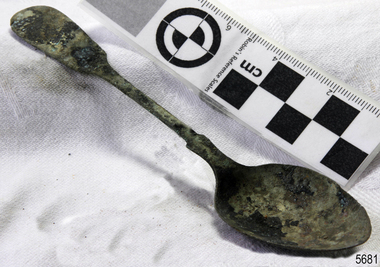
This tea spoon is from the wreck of the LOCH ARD, a Loch Line ship of 1,693 tons which sailed from Gravesend, London, on 2 March 1878 with 17 passengers and a crew of 36 under Captain George Gibbs. “The intention was to discharge cargo in Melbourne, before returning to London via the Horn with wool and wheat”. Instead, on 1 June 1878, after 90 days at sea, she struck the sandstone cliffs of Mutton Bird Island on the south west coast of Victoria, and sank with the loss of 52 lives and all her cargo. The manifest of the LOCH ARD listed an array of manufactured goods and bulk metals being exported to the Colony of Victoria, with a declared value of £53,700. (202 bills of lading show an actual invoice value of £68, 456, with insurance underwriting to £30,000 of all cargo). Included in the manifest is the item of “Tin hardware & cutlery £7,530”. This teaspoon is one of 482 similar items of electro-plated cutlery from the LOCH ARD site, comprising spoons and forks of various sizes but all sharing the same general shape or design and metallic composition. 49 of these pieces display a legible makers’ mark — the initials “W” and “P” placed within a raised diamond outline, which is in turn contained within a sunken crown shape — identifying the manufacturer as William Page & Co of Birmingham. An electroplater’s makers’ marks, unlike sterling silver hallmarks, are not consistent identifiers of quality or date and place of manufacture. A similar line of five impressions was usually made to impress the consumer with an implication of industry standards, but what each one actually signified was not regulated and so they varied according to the whim of the individual foundry. In this case, the maker’s marks are often obscured by sedimentary accretion or removed by corrosion after a century of submersion in the ocean. However sufficient detail has survived to indicate that these samples of electro-plated cutlery probably originated from the same consignment in the LOCH ARD’s cargo. The following descriptions of maker’s marks are drawn from 255 tea spoons, 125 dessert spoons, and 99 table forks. These marks are clearly visible in 66 instances, while the same sequence of general outlines, or depression shapes, is discernible in another 166 examples. 1. A recessed Crown containing a raised Diamond outline and the initials “W” and “P” (the recognised trademark of William Page & Co) 2. An impressed Ellipse containing a raised, pivoted, Triangle in its lower part and bearing a Resurrection Cross on its upper section (a possible dissenting church symbol reflecting religious affiliation); OR a rounded Square impression containing a raised, ‘lazy’, letter “B” (possibly mimicking sterling silver hallmark signifying city of manufacture i.e. Birmingham) 3. An impressed rounded Square filled with a raised Maltese Cross (the base metal composite of nickel silver was also known as ‘German silver’ after its Berlin inventors in 1823) 4. A recessed Circle containing a Crab or Scarab Beetle image; OR a recessed Circle containing a rotated ‘fleur de lys’ or ‘fasces’ design 5. A depressed Diamond shape enclosing a large raised letter “R” and a small raised letter “D” (mimicking the U.K. Patent Office stamp which abbreviated the term ‘registered’ to “RD”, but also included date and class of patent) Suggested trade names for William Page & Co’s particular blend of brass plating are ‘roman silver’ or ‘silverite’. This copper alloy polishes to a lustrous gold when new, discolouring to a murky grey with greenish hue when neglected. HISTORY OF THE LOCH ARD The LOCH ARD belonged to the famous Loch Line which sailed many ships from England to Australia. Built in Glasgow by Barclay, Curdle and Co. in 1873, the LOCH ARD was a three-masted square rigged iron sailing ship. The ship measured 262ft 7" (79.87m) in length, 38ft (11.58m) in width, 23ft (7m) in depth and had a gross tonnage of 1693 tons. The LOCH ARD's main mast measured a massive 150ft (45.7m) in height. LOCH ARD made three trips to Australia and one trip to Calcutta before its final voyage. LOCH ARD left England on March 2, 1878, under the command of Captain Gibbs, a newly married, 29 year old. She was bound for Melbourne with a crew of 37, plus 17 passengers and a load of cargo. The general cargo reflected the affluence of Melbourne at the time. On board were straw hats, umbrella, perfumes, clay pipes, pianos, clocks, confectionary, linen and candles, as well as a heavier load of railway irons, cement, lead and copper. There were items included that intended for display in the Melbourne International Exhibition in 1880. The voyage to Port Phillip was long but uneventful. At 3am on June 1, 1878, Captain Gibbs was expecting to see land and the passengers were becoming excited as they prepared to view their new homeland in the early morning. But LOCH ARD was running into a fog which greatly reduced visibility. Captain Gibbs was becoming anxious as there was no sign of land or the Cape Otway lighthouse. At 4am the fog lifted. A man aloft announced that he could see breakers. The sheer cliffs of Victoria's west coast came into view, and Captain Gibbs realised that the ship was much closer to them than expected. He ordered as much sail to be set as time would permit and then attempted to steer the vessel out to sea. On coming head on into the wind, the ship lost momentum, the sails fell limp and LOCH ARD's bow swung back. Gibbs then ordered the anchors to be released in an attempt to hold its position. The anchors sank some 50 fathoms - but did not hold. By this time LOCH ARD was among the breakers and the tall cliffs of Mutton Bird Island rose behind the ship. Just half a mile from the coast, the ship's bow was suddenly pulled around by the anchor. The captain tried to tack out to sea, but the ship struck a reef at the base of Mutton Bird Island, near Port Campbell. Waves broke over the ship and the top deck was loosened from the hull. The masts and rigging came crashing down knocking passengers and crew overboard. When a lifeboat was finally launched, it crashed into the side of LOCH ARD and capsized. Tom Pearce, who had launched the boat, managed to cling to its overturned hull and shelter beneath it. He drifted out to sea and then on the flood tide came into what is now known as LOCH ARD Gorge. He swam to shore, bruised and dazed, and found a cave in which to shelter. Some of the crew stayed below deck to shelter from the falling rigging but drowned when the ship slipped off the reef into deeper water. Eva Carmichael had raced onto deck to find out what was happening only to be confronted by towering cliffs looming above the stricken ship. In all the chaos, Captain Gibbs grabbed Eva and said, "If you are saved Eva, let my dear wife know that I died like a sailor". That was the last Eva Carmichael saw of the captain. She was swept off the ship by a huge wave. Eva saw Tom Pearce on a small rocky beach and yelled to attract his attention. He dived in and swam to the exhausted woman and dragged her to shore. He took her to the cave and broke open case of brandy which had washed up on the beach. He opened a bottle to revive the unconscious woman. A few hours later Tom scaled a cliff in search of help. He followed hoof prints and came by chance upon two men from nearby Glenample Station three and a half miles away. In a state of exhaustion, he told the men of the tragedy. Tom returned to the gorge while the two men rode back to the station to get help. By the time they reached LOCH ARD Gorge, it was cold and dark. The two shipwreck survivors were taken to Glenample Station to recover. Eva stayed at the station for six weeks before returning to Ireland, this time by steamship. In Melbourne, Tom Pearce received a hero's welcome. He was presented with the first gold medal of the Royal Humane Society of Victoria and a £1000 cheque from the Victorian Government. Concerts were performed to honour the young man's bravery and to raise money for those who lost family in the LOCH ARD disaster. Of the 54 crew members and passengers on board, only two survived: the apprentice, Tom Pearce and the young woman passenger, Eva Carmichael, who lost all of her family in the tragedy. Ten days after the LOCH ARD tragedy, salvage rights to the wreck were sold at auction for £2,120. Cargo valued at £3,000 was salvaged and placed on the beach, but most washed back into the sea when another storm developed. The wreck of LOCH ARD still lies at the base of Mutton Bird Island. Much of the cargo has now been salvaged and some was washed up into what is now known as LOCH ARD Gorge. Cargo and artefacts have also been illegally salvaged over many years before protective legislation was introduced. One of the most unlikely pieces of cargo to have survived the shipwreck was a Minton porcelain peacock - one of only seven in the world. The peacock was destined for the Melbourne International Exhibition in 1880. It had been well packed, which gave it adequate protection during the violent storm. Today, the Minton peacock can be seen at the Flagstaff Hill Maritime Museum in Warrnambool. From Australia's most dramatic shipwreck it has now become Australia's most valuable shipwreck artefact and is one of very few 'objects' on the Victorian State Heritage Register. The LOCH ARD shipwreck is of State significance – Victorian Heritage Register S 417. Flagstaff Hill’s collection of artefacts from LOCH ARD is significant for being one of the largest collections of artefacts from this shipwreck in Victoria. It is significant for its association with the shipwreck, which is on the Victorian Heritage Register (VHR S417). The collection is significant because of the relationship between the objects, as together they have a high potential to interpret the story of the LOCH ARD. The LOCH ARD collection is archaeologically significant as the remains of a large international passenger and cargo ship. The LOCH ARD collection is historically significant for representing aspects of Victoria’s shipping history and its potential to interpret sub-theme 1.5 of Victoria’s Framework of Historical Themes (living with natural processes). The collection is also historically significant for its association with the LOCH ARD, which was one of the worst and best known shipwrecks in Victoria’s history. Unrestored tea spoon from the wreck of the LOCH ARD. The spoon design has a flattened fiddle-back handle, with a thin stem or shank, flared collar, and elongated bowl. The spoons metallic composition is a thin layer of brass alloy which has partially corroded back to a nickel-silver base metal. Approximately 40% of original electroplating remains with some verdigris. Bowl edges are damaged. Three outlines of makers marks are visible on lower rear of handle.flagstaff hill, warrnambool, shipwrecked coast, flagstaff hill maritime museum, maritime museum, shipwreck coast, flagstaff hill maritime village, great ocean road, loch line, loch ard, captain gibbs, eva carmichael, tom pearce, glenample station, mutton bird island, loch ard gorge, electroplated cutlery, loch ard shipwreck, nickel silver, william page & co, birmingham, brass plating, makers marks -
 Flagstaff Hill Maritime Museum and Village
Spoon, circa 1878
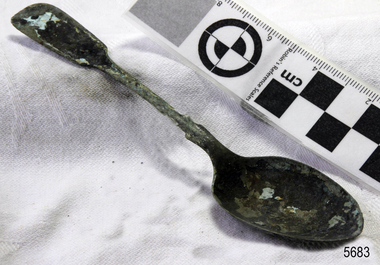
This tea spoon is from the wreck of the LOCH ARD, a Loch Line ship of 1,693 tons which sailed from Gravesend, London, on 2 March 1878 with 17 passengers and a crew of 36 under Captain George Gibbs. “The intention was to discharge cargo in Melbourne, before returning to London via the Horn with wool and wheat”. Instead, on 1 June 1878, after 90 days at sea, she struck the sandstone cliffs of Mutton Bird Island on the south west coast of Victoria, and sank with the loss of 52 lives and all her cargo. The manifest of the LOCH ARD listed an array of manufactured goods and bulk metals being exported to the Colony of Victoria, with a declared value of £53,700. (202 bills of lading show an actual invoice value of £68, 456, with insurance underwriting to £30,000 of all cargo). Included in the manifest is the item of “Tin hardware & cutlery £7,530”. This teaspoon is one of 482 similar items of electro-plated cutlery from the LOCH ARD site, comprising spoons and forks of various sizes but all sharing the same general shape or design and metallic composition. 49 of these pieces display a legible makers’ mark — the initials “W” and “P” placed within a raised diamond outline, which is in turn contained within a sunken crown shape — identifying the manufacturer as William Page & Co of Birmingham. An electroplater’s makers’ marks, unlike sterling silver hallmarks, are not consistent identifiers of quality or date and place of manufacture. A similar line of five impressions was usually made to impress the consumer with an implication of industry standards, but what each one actually signified was not regulated and so they varied according to the whim of the individual foundry. In this case, the maker’s marks are often obscured by sedimentary accretion or removed by corrosion after a century of submersion in the ocean. However sufficient detail has survived to indicate that these samples of electro-plated cutlery probably originated from the same consignment in the LOCH ARD’s cargo. The following descriptions of maker’s marks are drawn from 255 tea spoons, 125 dessert spoons, and 99 table forks. These marks are clearly visible in 66 instances, while the same sequence of general outlines, or depression shapes, is discernible in another 166 examples. 1. A recessed Crown containing a raised Diamond outline and the initials “W” and “P” (the recognised trademark of William Page & Co) 2. An impressed Ellipse containing a raised, pivoted, Triangle in its lower part and bearing a Resurrection Cross on its upper section (a possible dissenting church symbol reflecting religious affiliation); OR a rounded Square impression containing a raised, ‘lazy’, letter “B” (possibly mimicking sterling silver hallmark signifying city of manufacture i.e. Birmingham) 3. An impressed rounded Square filled with a raised Maltese Cross (the base metal composite of nickel silver was also known as ‘German silver’ after its Berlin inventors in 1823) 4. A recessed Circle containing a Crab or Scarab Beetle image; OR a recessed Circle containing a rotated ‘fleur de lys’ or ‘fasces’ design 5. A depressed Diamond shape enclosing a large raised letter “R” and a small raised letter “D” (mimicking the U.K. Patent Office stamp which abbreviated the term ‘registered’ to “RD”, but also included date and class of patent) Suggested trade names for William Page & Co’s particular blend of brass plating are ‘roman silver’ or ‘silverite’. This copper alloy polishes to a lustrous gold when new, discolouring to a murky grey with greenish hue when neglected. HISTORY OF THE LOCH ARD The LOCH ARD belonged to the famous Loch Line which sailed many ships from England to Australia. Built in Glasgow by Barclay, Curdle and Co. in 1873, the LOCH ARD was a three-masted square rigged iron sailing ship. The ship measured 262ft 7" (79.87m) in length, 38ft (11.58m) in width, 23ft (7m) in depth and had a gross tonnage of 1693 tons. The LOCH ARD's main mast measured a massive 150ft (45.7m) in height. LOCH ARD made three trips to Australia and one trip to Calcutta before its final voyage. LOCH ARD left England on March 2, 1878, under the command of Captain Gibbs, a newly married, 29 year old. She was bound for Melbourne with a crew of 37, plus 17 passengers and a load of cargo. The general cargo reflected the affluence of Melbourne at the time. On board were straw hats, umbrella, perfumes, clay pipes, pianos, clocks, confectionary, linen and candles, as well as a heavier load of railway irons, cement, lead and copper. There were items included that intended for display in the Melbourne International Exhibition in 1880. The voyage to Port Phillip was long but uneventful. At 3am on June 1, 1878, Captain Gibbs was expecting to see land and the passengers were becoming excited as they prepared to view their new homeland in the early morning. But LOCH ARD was running into a fog which greatly reduced visibility. Captain Gibbs was becoming anxious as there was no sign of land or the Cape Otway lighthouse. At 4am the fog lifted. A man aloft announced that he could see breakers. The sheer cliffs of Victoria's west coast came into view, and Captain Gibbs realised that the ship was much closer to them than expected. He ordered as much sail to be set as time would permit and then attempted to steer the vessel out to sea. On coming head on into the wind, the ship lost momentum, the sails fell limp and LOCH ARD's bow swung back. Gibbs then ordered the anchors to be released in an attempt to hold its position. The anchors sank some 50 fathoms - but did not hold. By this time LOCH ARD was among the breakers and the tall cliffs of Mutton Bird Island rose behind the ship. Just half a mile from the coast, the ship's bow was suddenly pulled around by the anchor. The captain tried to tack out to sea, but the ship struck a reef at the base of Mutton Bird Island, near Port Campbell. Waves broke over the ship and the top deck was loosened from the hull. The masts and rigging came crashing down knocking passengers and crew overboard. When a lifeboat was finally launched, it crashed into the side of LOCH ARD and capsized. Tom Pearce, who had launched the boat, managed to cling to its overturned hull and shelter beneath it. He drifted out to sea and then on the flood tide came into what is now known as LOCH ARD Gorge. He swam to shore, bruised and dazed, and found a cave in which to shelter. Some of the crew stayed below deck to shelter from the falling rigging but drowned when the ship slipped off the reef into deeper water. Eva Carmichael had raced onto deck to find out what was happening only to be confronted by towering cliffs looming above the stricken ship. In all the chaos, Captain Gibbs grabbed Eva and said, "If you are saved Eva, let my dear wife know that I died like a sailor". That was the last Eva Carmichael saw of the captain. She was swept off the ship by a huge wave. Eva saw Tom Pearce on a small rocky beach and yelled to attract his attention. He dived in and swam to the exhausted woman and dragged her to shore. He took her to the cave and broke open case of brandy which had washed up on the beach. He opened a bottle to revive the unconscious woman. A few hours later Tom scaled a cliff in search of help. He followed hoof prints and came by chance upon two men from nearby Glenample Station three and a half miles away. In a state of exhaustion, he told the men of the tragedy. Tom returned to the gorge while the two men rode back to the station to get help. By the time they reached LOCH ARD Gorge, it was cold and dark. The two shipwreck survivors were taken to Glenample Station to recover. Eva stayed at the station for six weeks before returning to Ireland, this time by steamship. In Melbourne, Tom Pearce received a hero's welcome. He was presented with the first gold medal of the Royal Humane Society of Victoria and a £1000 cheque from the Victorian Government. Concerts were performed to honour the young man's bravery and to raise money for those who lost family in the LOCH ARD disaster. Of the 54 crew members and passengers on board, only two survived: the apprentice, Tom Pearce and the young woman passenger, Eva Carmichael, who lost all of her family in the tragedy. Ten days after the LOCH ARD tragedy, salvage rights to the wreck were sold at auction for £2,120. Cargo valued at £3,000 was salvaged and placed on the beach, but most washed back into the sea when another storm developed. The wreck of LOCH ARD still lies at the base of Mutton Bird Island. Much of the cargo has now been salvaged and some was washed up into what is now known as LOCH ARD Gorge. Cargo and artefacts have also been illegally salvaged over many years before protective legislation was introduced. One of the most unlikely pieces of cargo to have survived the shipwreck was a Minton porcelain peacock - one of only seven in the world. The peacock was destined for the Melbourne International Exhibition in 1880. It had been well packed, which gave it adequate protection during the violent storm. Today, the Minton peacock can be seen at the Flagstaff Hill Maritime Museum in Warrnambool. From Australia's most dramatic shipwreck it has now become Australia's most valuable shipwreck artefact and is one of very few 'objects' on the Victorian State Heritage Register. The LOCH ARD shipwreck is of State significance – Victorian Heritage Register S 417. Flagstaff Hill’s collection of artefacts from LOCH ARD is significant for being one of the largest collections of artefacts from this shipwreck in Victoria. It is significant for its association with the shipwreck, which is on the Victorian Heritage Register (VHR S417). The collection is significant because of the relationship between the objects, as together they have a high potential to interpret the story of the LOCH ARD. The LOCH ARD collection is archaeologically significant as the remains of a large international passenger and cargo ship. The LOCH ARD collection is historically significant for representing aspects of Victoria’s shipping history and its potential to interpret sub-theme 1.5 of Victoria’s Framework of Historical Themes (living with natural processes). The collection is also historically significant for its association with the LOCH ARD, which was one of the worst and best known shipwrecks in Victoria’s history. Unrestored tea spoon from the wreck of the LOCH ARD. The spoon design has a flattened fiddle-back handle, with a thin stem or shank, flared collar, and elongated bowl. The spoons metallic composition is a thin layer of brass alloy which has partially corroded back to a nickel-silver base metal. Only 30% of original electroplating remains with some verdigris. Outlines of five makers marks are visible on lower rear of handle.flagstaff hill, warrnambool, shipwrecked coast, flagstaff hill maritime museum, maritime museum, shipwreck coast, flagstaff hill maritime village, great ocean road, loch line, loch ard, captain gibbs, eva carmichael, tom pearce, glenample station, mutton bird island, loch ard gorge, electroplated cutlery, loch ard shipwreck, nickel silver, william page & co, birmingham, brass plating, makers marks -
 Flagstaff Hill Maritime Museum and Village
Spoon, circa 1878
This tea spoon is from the wreck of the LOCH ARD, a Loch Line ship of 1,693 tons which sailed from Gravesend, London, on 2 March 1878 with 17 passengers and a crew of 36 under Captain George Gibbs. “The intention was to discharge cargo in Melbourne, before returning to London via the Horn with wool and wheat”. Instead, on 1 June 1878, after 90 days at sea, she struck the sandstone cliffs of Mutton Bird Island on the south west coast of Victoria, and sank with the loss of 52 lives and all her cargo. The manifest of the LOCH ARD listed an array of manufactured goods and bulk metals being exported to the Colony of Victoria, with a declared value of £53,700. (202 bills of lading show an actual invoice value of £68, 456, with insurance underwriting to £30,000 of all cargo). Included in the manifest is the item of “Tin hardware & cutlery £7,530”. This teaspoon is one of 482 similar items of electro-plated cutlery from the LOCH ARD site, comprising spoons and forks of various sizes but all sharing the same general shape or design and metallic composition. 49 of these pieces display a legible makers’ mark — the initials “W” and “P” placed within a raised diamond outline, which is in turn contained within a sunken crown shape — identifying the manufacturer as William Page & Co of Birmingham. An electroplater’s makers’ marks, unlike sterling silver hallmarks, are not consistent identifiers of quality or date and place of manufacture. A similar line of five impressions was usually made to impress the consumer with an implication of industry standards, but what each one actually signified was not regulated and so they varied according to the whim of the individual foundry. In this case, the maker’s marks are often obscured by sedimentary accretion or removed by corrosion after a century of submersion in the ocean. However sufficient detail has survived to indicate that these samples of electro-plated cutlery probably originated from the same consignment in the LOCH ARD’s cargo. The following descriptions of maker’s marks are drawn from 255 tea spoons, 125 dessert spoons, and 99 table forks. These marks are clearly visible in 66 instances, while the same sequence of general outlines, or depression shapes, is discernible in another 166 examples. 1. A recessed Crown containing a raised Diamond outline and the initials “W” and “P” (the recognised trademark of William Page & Co) 2. An impressed Ellipse containing a raised, pivoted, Triangle in its lower part and bearing a Resurrection Cross on its upper section (a possible dissenting church symbol reflecting religious affiliation); OR a rounded Square impression containing a raised, ‘lazy’, letter “B” (possibly mimicking sterling silver hallmark signifying city of manufacture i.e. Birmingham) 3. An impressed rounded Square filled with a raised Maltese Cross (the base metal composite of nickel silver was also known as ‘German silver’ after its Berlin inventors in 1823) 4. A recessed Circle containing a Crab or Scarab Beetle image; OR a recessed Circle containing a rotated ‘fleur de lys’ or ‘fasces’ design 5. A depressed Diamond shape enclosing a large raised letter “R” and a small raised letter “D” (mimicking the U.K. Patent Office stamp which abbreviated the term ‘registered’ to “RD”, but also included date and class of patent) Suggested trade names for William Page & Co’s particular blend of brass plating are ‘roman silver’ or ‘silverite’. This copper alloy polishes to a lustrous gold when new, discolouring to a murky grey with greenish hue when neglected. HISTORY OF THE LOCH ARD The LOCH ARD belonged to the famous Loch Line which sailed many ships from England to Australia. Built in Glasgow by Barclay, Curdle and Co. in 1873, the LOCH ARD was a three-masted square rigged iron sailing ship. The ship measured 262ft 7" (79.87m) in length, 38ft (11.58m) in width, 23ft (7m) in depth and had a gross tonnage of 1693 tons. The LOCH ARD's main mast measured a massive 150ft (45.7m) in height. LOCH ARD made three trips to Australia and one trip to Calcutta before its final voyage. LOCH ARD left England on March 2, 1878, under the command of Captain Gibbs, a newly married, 29 year old. She was bound for Melbourne with a crew of 37, plus 17 passengers and a load of cargo. The general cargo reflected the affluence of Melbourne at the time. On board were straw hats, umbrella, perfumes, clay pipes, pianos, clocks, confectionary, linen and candles, as well as a heavier load of railway irons, cement, lead and copper. There were items included that intended for display in the Melbourne International Exhibition in 1880. The voyage to Port Phillip was long but uneventful. At 3am on June 1, 1878, Captain Gibbs was expecting to see land and the passengers were becoming excited as they prepared to view their new homeland in the early morning. But LOCH ARD was running into a fog which greatly reduced visibility. Captain Gibbs was becoming anxious as there was no sign of land or the Cape Otway lighthouse. At 4am the fog lifted. A man aloft announced that he could see breakers. The sheer cliffs of Victoria's west coast came into view, and Captain Gibbs realised that the ship was much closer to them than expected. He ordered as much sail to be set as time would permit and then attempted to steer the vessel out to sea. On coming head on into the wind, the ship lost momentum, the sails fell limp and LOCH ARD's bow swung back. Gibbs then ordered the anchors to be released in an attempt to hold its position. The anchors sank some 50 fathoms - but did not hold. By this time LOCH ARD was among the breakers and the tall cliffs of Mutton Bird Island rose behind the ship. Just half a mile from the coast, the ship's bow was suddenly pulled around by the anchor. The captain tried to tack out to sea, but the ship struck a reef at the base of Mutton Bird Island, near Port Campbell. Waves broke over the ship and the top deck was loosened from the hull. The masts and rigging came crashing down knocking passengers and crew overboard. When a lifeboat was finally launched, it crashed into the side of LOCH ARD and capsized. Tom Pearce, who had launched the boat, managed to cling to its overturned hull and shelter beneath it. He drifted out to sea and then on the flood tide came into what is now known as LOCH ARD Gorge. He swam to shore, bruised and dazed, and found a cave in which to shelter. Some of the crew stayed below deck to shelter from the falling rigging but drowned when the ship slipped off the reef into deeper water. Eva Carmichael had raced onto deck to find out what was happening only to be confronted by towering cliffs looming above the stricken ship. In all the chaos, Captain Gibbs grabbed Eva and said, "If you are saved Eva, let my dear wife know that I died like a sailor". That was the last Eva Carmichael saw of the captain. She was swept off the ship by a huge wave. Eva saw Tom Pearce on a small rocky beach and yelled to attract his attention. He dived in and swam to the exhausted woman and dragged her to shore. He took her to the cave and broke open case of brandy which had washed up on the beach. He opened a bottle to revive the unconscious woman. A few hours later Tom scaled a cliff in search of help. He followed hoof prints and came by chance upon two men from nearby Glenample Station three and a half miles away. In a state of exhaustion, he told the men of the tragedy. Tom returned to the gorge while the two men rode back to the station to get help. By the time they reached LOCH ARD Gorge, it was cold and dark. The two shipwreck survivors were taken to Glenample Station to recover. Eva stayed at the station for six weeks before returning to Ireland, this time by steamship. In Melbourne, Tom Pearce received a hero's welcome. He was presented with the first gold medal of the Royal Humane Society of Victoria and a £1000 cheque from the Victorian Government. Concerts were performed to honour the young man's bravery and to raise money for those who lost family in the LOCH ARD disaster. Of the 54 crew members and passengers on board, only two survived: the apprentice, Tom Pearce and the young woman passenger, Eva Carmichael, who lost all of her family in the tragedy. Ten days after the LOCH ARD tragedy, salvage rights to the wreck were sold at auction for £2,120. Cargo valued at £3,000 was salvaged and placed on the beach, but most washed back into the sea when another storm developed. The wreck of LOCH ARD still lies at the base of Mutton Bird Island. Much of the cargo has now been salvaged and some was washed up into what is now known as LOCH ARD Gorge. Cargo and artefacts have also been illegally salvaged over many years before protective legislation was introduced. One of the most unlikely pieces of cargo to have survived the shipwreck was a Minton porcelain peacock - one of only seven in the world. The peacock was destined for the Melbourne International Exhibition in 1880. It had been well packed, which gave it adequate protection during the violent storm. Today, the Minton peacock can be seen at the Flagstaff Hill Maritime Museum in Warrnambool. From Australia's most dramatic shipwreck it has now become Australia's most valuable shipwreck artefact and is one of very few 'objects' on the Victorian State Heritage Register. The LOCH ARD shipwreck is of State significance – Victorian Heritage Register S 417. Flagstaff Hill’s collection of artefacts from LOCH ARD is significant for being one of the largest collections of artefacts from this shipwreck in Victoria. It is significant for its association with the shipwreck, which is on the Victorian Heritage Register (VHR S417). The collection is significant because of the relationship between the objects, as together they have a high potential to interpret the story of the LOCH ARD. The LOCH ARD collection is archaeologically significant as the remains of a large international passenger and cargo ship. The LOCH ARD collection is historically significant for representing aspects of Victoria’s shipping history and its potential to interpret sub-theme 1.5 of Victoria’s Framework of Historical Themes (living with natural processes). The collection is also historically significant for its association with the LOCH ARD, which was one of the worst and best known shipwrecks in Victoria’s history. Unrestored tea spoon from the wreck of the LOCH ARD. The spoon design has a flattened fiddle-back handle, with a thin stem or shank, flared collar, and elongated bowl. The spoons metallic composition is a thin layer of brass alloy which has partially corroded back to a nickel-silver base metal. Traces of original electroplating remain (15%) with some verdigris (15%). Spoon has worn edges.flagstaff hill, warrnambool, shipwrecked coast, flagstaff hill maritime museum, maritime museum, shipwreck coast, flagstaff hill maritime village, great ocean road, loch line, loch ard, captain gibbs, eva carmichael, tom pearce, glenample station, mutton bird island, loch ard gorge, electroplated cutlery, loch ard shipwreck, nickel silver, william page & co, birmingham, brass plating, makers marks -
 Flagstaff Hill Maritime Museum and Village
Spoon, circa 1878
This tea spoon is from the wreck of the LOCH ARD, a Loch Line ship of 1,693 tons which sailed from Gravesend, London, on 2 March 1878 with 17 passengers and a crew of 36 under Captain George Gibbs. “The intention was to discharge cargo in Melbourne, before returning to London via the Horn with wool and wheat”. Instead, on 1 June 1878, after 90 days at sea, she struck the sandstone cliffs of Mutton Bird Island on the south west coast of Victoria, and sank with the loss of 52 lives and all her cargo. The manifest of the LOCH ARD listed an array of manufactured goods and bulk metals being exported to the Colony of Victoria, with a declared value of £53,700. (202 bills of lading show an actual invoice value of £68, 456, with insurance underwriting to £30,000 of all cargo). Included in the manifest is the item of “Tin hardware & cutlery £7,530”. This teaspoon is one of 482 similar items of electro-plated cutlery from the LOCH ARD site, comprising spoons and forks of various sizes but all sharing the same general shape or design and metallic composition. 49 of these pieces display a legible makers’ mark — the initials “W” and “P” placed within a raised diamond outline, which is in turn contained within a sunken crown shape — identifying the manufacturer as William Page & Co of Birmingham. An electroplater’s makers’ marks, unlike sterling silver hallmarks, are not consistent identifiers of quality or date and place of manufacture. A similar line of five impressions was usually made to impress the consumer with an implication of industry standards, but what each one actually signified was not regulated and so they varied according to the whim of the individual foundry. In this case, the maker’s marks are often obscured by sedimentary accretion or removed by corrosion after a century of submersion in the ocean. However sufficient detail has survived to indicate that these samples of electro-plated cutlery probably originated from the same consignment in the LOCH ARD’s cargo. The following descriptions of maker’s marks are drawn from 255 tea spoons, 125 dessert spoons, and 99 table forks. These marks are clearly visible in 66 instances, while the same sequence of general outlines, or depression shapes, is discernible in another 166 examples. 1. A recessed Crown containing a raised Diamond outline and the initials “W” and “P” (the recognised trademark of William Page & Co) 2. An impressed Ellipse containing a raised, pivoted, Triangle in its lower part and bearing a Resurrection Cross on its upper section (a possible dissenting church symbol reflecting religious affiliation); OR a rounded Square impression containing a raised, ‘lazy’, letter “B” (possibly mimicking sterling silver hallmark signifying city of manufacture i.e. Birmingham) 3. An impressed rounded Square filled with a raised Maltese Cross (the base metal composite of nickel silver was also known as ‘German silver’ after its Berlin inventors in 1823) 4. A recessed Circle containing a Crab or Scarab Beetle image; OR a recessed Circle containing a rotated ‘fleur de lys’ or ‘fasces’ design 5. A depressed Diamond shape enclosing a large raised letter “R” and a small raised letter “D” (mimicking the U.K. Patent Office stamp which abbreviated the term ‘registered’ to “RD”, but also included date and class of patent) Suggested trade names for William Page & Co’s particular blend of brass plating are ‘roman silver’ or ‘silverite’. This copper alloy polishes to a lustrous gold when new, discolouring to a murky grey with greenish hue when neglected. HISTORY OF THE LOCH ARD The LOCH ARD belonged to the famous Loch Line which sailed many ships from England to Australia. Built in Glasgow by Barclay, Curdle and Co. in 1873, the LOCH ARD was a three-masted square rigged iron sailing ship. The ship measured 262ft 7" (79.87m) in length, 38ft (11.58m) in width, 23ft (7m) in depth and had a gross tonnage of 1693 tons. The LOCH ARD's main mast measured a massive 150ft (45.7m) in height. LOCH ARD made three trips to Australia and one trip to Calcutta before its final voyage. LOCH ARD left England on March 2, 1878, under the command of Captain Gibbs, a newly married, 29 year old. She was bound for Melbourne with a crew of 37, plus 17 passengers and a load of cargo. The general cargo reflected the affluence of Melbourne at the time. On board were straw hats, umbrella, perfumes, clay pipes, pianos, clocks, confectionary, linen and candles, as well as a heavier load of railway irons, cement, lead and copper. There were items included that intended for display in the Melbourne International Exhibition in 1880. The voyage to Port Phillip was long but uneventful. At 3am on June 1, 1878, Captain Gibbs was expecting to see land and the passengers were becoming excited as they prepared to view their new homeland in the early morning. But LOCH ARD was running into a fog which greatly reduced visibility. Captain Gibbs was becoming anxious as there was no sign of land or the Cape Otway lighthouse. At 4am the fog lifted. A man aloft announced that he could see breakers. The sheer cliffs of Victoria's west coast came into view, and Captain Gibbs realised that the ship was much closer to them than expected. He ordered as much sail to be set as time would permit and then attempted to steer the vessel out to sea. On coming head on into the wind, the ship lost momentum, the sails fell limp and LOCH ARD's bow swung back. Gibbs then ordered the anchors to be released in an attempt to hold its position. The anchors sank some 50 fathoms - but did not hold. By this time LOCH ARD was among the breakers and the tall cliffs of Mutton Bird Island rose behind the ship. Just half a mile from the coast, the ship's bow was suddenly pulled around by the anchor. The captain tried to tack out to sea, but the ship struck a reef at the base of Mutton Bird Island, near Port Campbell. Waves broke over the ship and the top deck was loosened from the hull. The masts and rigging came crashing down knocking passengers and crew overboard. When a lifeboat was finally launched, it crashed into the side of LOCH ARD and capsized. Tom Pearce, who had launched the boat, managed to cling to its overturned hull and shelter beneath it. He drifted out to sea and then on the flood tide came into what is now known as LOCH ARD Gorge. He swam to shore, bruised and dazed, and found a cave in which to shelter. Some of the crew stayed below deck to shelter from the falling rigging but drowned when the ship slipped off the reef into deeper water. Eva Carmichael had raced onto deck to find out what was happening only to be confronted by towering cliffs looming above the stricken ship. In all the chaos, Captain Gibbs grabbed Eva and said, "If you are saved Eva, let my dear wife know that I died like a sailor". That was the last Eva Carmichael saw of the captain. She was swept off the ship by a huge wave. Eva saw Tom Pearce on a small rocky beach and yelled to attract his attention. He dived in and swam to the exhausted woman and dragged her to shore. He took her to the cave and broke open case of brandy which had washed up on the beach. He opened a bottle to revive the unconscious woman. A few hours later Tom scaled a cliff in search of help. He followed hoof prints and came by chance upon two men from nearby Glenample Station three and a half miles away. In a state of exhaustion, he told the men of the tragedy. Tom returned to the gorge while the two men rode back to the station to get help. By the time they reached LOCH ARD Gorge, it was cold and dark. The two shipwreck survivors were taken to Glenample Station to recover. Eva stayed at the station for six weeks before returning to Ireland, this time by steamship. In Melbourne, Tom Pearce received a hero's welcome. He was presented with the first gold medal of the Royal Humane Society of Victoria and a £1000 cheque from the Victorian Government. Concerts were performed to honour the young man's bravery and to raise money for those who lost family in the LOCH ARD disaster. Of the 54 crew members and passengers on board, only two survived: the apprentice, Tom Pearce and the young woman passenger, Eva Carmichael, who lost all of her family in the tragedy. Ten days after the LOCH ARD tragedy, salvage rights to the wreck were sold at auction for £2,120. Cargo valued at £3,000 was salvaged and placed on the beach, but most washed back into the sea when another storm developed. The wreck of LOCH ARD still lies at the base of Mutton Bird Island. Much of the cargo has now been salvaged and some was washed up into what is now known as LOCH ARD Gorge. Cargo and artefacts have also been illegally salvaged over many years before protective legislation was introduced. One of the most unlikely pieces of cargo to have survived the shipwreck was a Minton porcelain peacock - one of only seven in the world. The peacock was destined for the Melbourne International Exhibition in 1880. It had been well packed, which gave it adequate protection during the violent storm. Today, the Minton peacock can be seen at the Flagstaff Hill Maritime Museum in Warrnambool. From Australia's most dramatic shipwreck it has now become Australia's most valuable shipwreck artefact and is one of very few 'objects' on the Victorian State Heritage Register. The LOCH ARD shipwreck is of State significance – Victorian Heritage Register S 417. Flagstaff Hill’s collection of artefacts from LOCH ARD is significant for being one of the largest collections of artefacts from this shipwreck in Victoria. It is significant for its association with the shipwreck, which is on the Victorian Heritage Register (VHR S417). The collection is significant because of the relationship between the objects, as together they have a high potential to interpret the story of the LOCH ARD. The LOCH ARD collection is archaeologically significant as the remains of a large international passenger and cargo ship. The LOCH ARD collection is historically significant for representing aspects of Victoria’s shipping history and its potential to interpret sub-theme 1.5 of Victoria’s Framework of Historical Themes (living with natural processes). The collection is also historically significant for its association with the LOCH ARD, which was one of the worst and best known shipwrecks in Victoria’s history. Unrestored tea spoon from the wreck of the LOCH ARD. The spoon design has a flattened fiddle-back handle, with a thin stem or shank, flared collar, and elongated bowl. The spoons metallic composition is a thin layer of brass alloy which has partially corroded back to a nickel-silver base metal. Only 15% of original electroplating remains with bright vertigris on 5% of spoon surface.flagstaff hill, warrnambool, shipwrecked coast, flagstaff hill maritime museum, maritime museum, shipwreck coast, flagstaff hill maritime village, great ocean road, loch line, loch ard, captain gibbs, eva carmichael, tom pearce, glenample station, mutton bird island, loch ard gorge, electroplated cutlery, loch ard shipwreck, nickel silver, william page & co, birmingham, brass plating, makers marks -
 Flagstaff Hill Maritime Museum and Village
Domestic object - Spoon, circa 1878
This tea spoon is from the wreck of the LOCH ARD, a Loch Line ship of 1,693 tons which sailed from Gravesend, London, on 2 March 1878 with 17 passengers and a crew of 36 under Captain George Gibbs. “The intention was to discharge cargo in Melbourne, before returning to London via the Horn with wool and wheat”. Instead, on 1 June 1878, after 90 days at sea, she struck the sandstone cliffs of Mutton Bird Island on the south west coast of Victoria, and sank with the loss of 52 lives and all her cargo. The manifest of the LOCH ARD listed an array of manufactured goods and bulk metals being exported to the Colony of Victoria, with a declared value of £53,700. (202 bills of lading show an actual invoice value of £68, 456, with insurance underwriting to £30,000 of all cargo). Included in the manifest is the item of “Tin hardware & cutlery £7,530”. This teaspoon is one of 482 similar items of electro-plated cutlery from the LOCH ARD site, comprising spoons and forks of various sizes but all sharing the same general shape or design and metallic composition. 49 of these pieces display a legible makers’ mark — the initials “W” and “P” placed within a raised diamond outline, which is in turn contained within a sunken crown shape — identifying the manufacturer as William Page & Co of Birmingham. An electroplater’s makers’ marks, unlike sterling silver hallmarks, are not consistent identifiers of quality or date and place of manufacture. A similar line of five impressions was usually made to impress the consumer with an implication of industry standards, but what each one actually signified was not regulated and so they varied according to the whim of the individual foundry. In this case, the maker’s marks are often obscured by sedimentary accretion or removed by corrosion after a century of submersion in the ocean. However sufficient detail has survived to indicate that these samples of electro-plated cutlery probably originated from the same consignment in the LOCH ARD’s cargo. The following descriptions of maker’s marks are drawn from 255 tea spoons, 125 dessert spoons, and 99 table forks. These marks are clearly visible in 66 instances, while the same sequence of general outlines, or depression shapes, is discernible in another 166 examples. 1. A recessed Crown containing a raised Diamond outline and the initials “W” and “P” (the recognised trademark of William Page & Co) 2. An impressed Ellipse containing a raised, pivoted, Triangle in its lower part and bearing a Resurrection Cross on its upper section (a possible dissenting church symbol reflecting religious affiliation); OR a rounded Square impression containing a raised, ‘lazy’, letter “B” (possibly mimicking sterling silver hallmark signifying city of manufacture i.e. Birmingham) 3. An impressed rounded Square filled with a raised Maltese Cross (the base metal composite of nickel silver was also known as ‘German silver’ after its Berlin inventors in 1823) 4. A recessed Circle containing a Crab or Scarab Beetle image; OR a recessed Circle containing a rotated ‘fleur de lys’ or ‘fasces’ design 5. A depressed Diamond shape enclosing a large raised letter “R” and a small raised letter “D” (mimicking the U.K. Patent Office stamp which abbreviated the term ‘registered’ to “RD”, but also included date and class of patent) Suggested trade names for William Page & Co’s particular blend of brass plating are ‘roman silver’ or ‘silverite’. This copper alloy polishes to a lustrous gold when new, discolouring to a murky grey with greenish hue when neglected. HISTORY OF THE LOCH ARD The LOCH ARD belonged to the famous Loch Line which sailed many ships from England to Australia. Built in Glasgow by Barclay, Curdle and Co. in 1873, the LOCH ARD was a three-masted square rigged iron sailing ship. The ship measured 262ft 7" (79.87m) in length, 38ft (11.58m) in width, 23ft (7m) in depth and had a gross tonnage of 1693 tons. The LOCH ARD's main mast measured a massive 150ft (45.7m) in height. LOCH ARD made three trips to Australia and one trip to Calcutta before its final voyage. LOCH ARD left England on March 2, 1878, under the command of Captain Gibbs, a newly married, 29 year old. She was bound for Melbourne with a crew of 37, plus 17 passengers and a load of cargo. The general cargo reflected the affluence of Melbourne at the time. On board were straw hats, umbrella, perfumes, clay pipes, pianos, clocks, confectionary, linen and candles, as well as a heavier load of railway irons, cement, lead and copper. There were items included that intended for display in the Melbourne International Exhibition in 1880. The voyage to Port Phillip was long but uneventful. At 3am on June 1, 1878, Captain Gibbs was expecting to see land and the passengers were becoming excited as they prepared to view their new homeland in the early morning. But LOCH ARD was running into a fog which greatly reduced visibility. Captain Gibbs was becoming anxious as there was no sign of land or the Cape Otway lighthouse. At 4am the fog lifted. A man aloft announced that he could see breakers. The sheer cliffs of Victoria's west coast came into view, and Captain Gibbs realised that the ship was much closer to them than expected. He ordered as much sail to be set as time would permit and then attempted to steer the vessel out to sea. On coming head on into the wind, the ship lost momentum, the sails fell limp and LOCH ARD's bow swung back. Gibbs then ordered the anchors to be released in an attempt to hold its position. The anchors sank some 50 fathoms - but did not hold. By this time LOCH ARD was among the breakers and the tall cliffs of Mutton Bird Island rose behind the ship. Just half a mile from the coast, the ship's bow was suddenly pulled around by the anchor. The captain tried to tack out to sea, but the ship struck a reef at the base of Mutton Bird Island, near Port Campbell. Waves broke over the ship and the top deck was loosened from the hull. The masts and rigging came crashing down knocking passengers and crew overboard. When a lifeboat was finally launched, it crashed into the side of LOCH ARD and capsized. Tom Pearce, who had launched the boat, managed to cling to its overturned hull and shelter beneath it. He drifted out to sea and then on the flood tide came into what is now known as LOCH ARD Gorge. He swam to shore, bruised and dazed, and found a cave in which to shelter. Some of the crew stayed below deck to shelter from the falling rigging but drowned when the ship slipped off the reef into deeper water. Eva Carmichael had raced onto deck to find out what was happening only to be confronted by towering cliffs looming above the stricken ship. In all the chaos, Captain Gibbs grabbed Eva and said, "If you are saved Eva, let my dear wife know that I died like a sailor". That was the last Eva Carmichael saw of the captain. She was swept off the ship by a huge wave. Eva saw Tom Pearce on a small rocky beach and yelled to attract his attention. He dived in and swam to the exhausted woman and dragged her to shore. He took her to the cave and broke open case of brandy which had washed up on the beach. He opened a bottle to revive the unconscious woman. A few hours later Tom scaled a cliff in search of help. He followed hoof prints and came by chance upon two men from nearby Glenample Station three and a half miles away. In a state of exhaustion, he told the men of the tragedy. Tom returned to the gorge while the two men rode back to the station to get help. By the time they reached LOCH ARD Gorge, it was cold and dark. The two shipwreck survivors were taken to Glenample Station to recover. Eva stayed at the station for six weeks before returning to Ireland, this time by steamship. In Melbourne, Tom Pearce received a hero's welcome. He was presented with the first gold medal of the Royal Humane Society of Victoria and a £1000 cheque from the Victorian Government. Concerts were performed to honour the young man's bravery and to raise money for those who lost family in the LOCH ARD disaster. Of the 54 crew members and passengers on board, only two survived: the apprentice, Tom Pearce and the young woman passenger, Eva Carmichael, who lost all of her family in the tragedy. Ten days after the LOCH ARD tragedy, salvage rights to the wreck were sold at auction for £2,120. Cargo valued at £3,000 was salvaged and placed on the beach, but most washed back into the sea when another storm developed. The wreck of LOCH ARD still lies at the base of Mutton Bird Island. Much of the cargo has now been salvaged and some was washed up into what is now known as LOCH ARD Gorge. Cargo and artefacts have also been illegally salvaged over many years before protective legislation was introduced. One of the most unlikely pieces of cargo to have survived the shipwreck was a Minton porcelain peacock - one of only seven in the world. The peacock was destined for the Melbourne International Exhibition in 1880. It had been well packed, which gave it adequate protection during the violent storm. Today, the Minton peacock can be seen at the Flagstaff Hill Maritime Museum in Warrnambool. From Australia's most dramatic shipwreck it has now become Australia's most valuable shipwreck artefact and is one of very few 'objects' on the Victorian State Heritage Register. The LOCH ARD shipwreck is of State significance – Victorian Heritage Register S 417. Flagstaff Hill’s collection of artefacts from LOCH ARD is significant for being one of the largest collections of artefacts from this shipwreck in Victoria. It is significant for its association with the shipwreck, which is on the Victorian Heritage Register (VHR S417). The collection is significant because of the relationship between the objects, as together they have a high potential to interpret the story of the LOCH ARD. The LOCH ARD collection is archaeologically significant as the remains of a large international passenger and cargo ship. The LOCH ARD collection is historically significant for representing aspects of Victoria’s shipping history and its potential to interpret sub-theme 1.5 of Victoria’s Framework of Historical Themes (living with natural processes). The collection is also historically significant for its association with the LOCH ARD, which was one of the worst and best known shipwrecks in Victoria’s history. Unrestored tea spoon from the wreck of the LOCH ARD. The spoon design has a flattened fiddle-back handle, with a thin stem or shank, flared collar, and elongated bowl. The spoons metallic composition is a thin layer of brass alloy which has partially corroded back to a nickel-silver base metal. Only 15% of original electroplating remains with verdigris on 5% of spoon surface. Outlines of five makers marks are visible but details are obscured.flagstaff hill maritime museum, shipwreck coast, great ocean road, loch line, loch ard, mutton bird island, loch ard gorge, electroplated cutlery, loch ard shipwreck, nickel silver, william page & co, birmingham, brass plating, makers marks -
 Flagstaff Hill Maritime Museum and Village
Spoon, circa 1878
This tea spoon is from the wreck of the LOCH ARD, a Loch Line ship of 1,693 tons which sailed from Gravesend, London, on 2 March 1878 with 17 passengers and a crew of 36 under Captain George Gibbs. “The intention was to discharge cargo in Melbourne, before returning to London via the Horn with wool and wheat”. Instead, on 1 June 1878, after 90 days at sea, she struck the sandstone cliffs of Mutton Bird Island on the south west coast of Victoria, and sank with the loss of 52 lives and all her cargo. The manifest of the LOCH ARD listed an array of manufactured goods and bulk metals being exported to the Colony of Victoria, with a declared value of £53,700. (202 bills of lading show an actual invoice value of £68, 456, with insurance underwriting to £30,000 of all cargo). Included in the manifest is the item of “Tin hardware & cutlery £7,530”. This teaspoon is one of 482 similar items of electro-plated cutlery from the LOCH ARD site, comprising spoons and forks of various sizes but all sharing the same general shape or design and metallic composition. 49 of these pieces display a legible makers’ mark — the initials “W” and “P” placed within a raised diamond outline, which is in turn contained within a sunken crown shape — identifying the manufacturer as William Page & Co of Birmingham. An electroplater’s makers’ marks, unlike sterling silver hallmarks, are not consistent identifiers of quality or date and place of manufacture. A similar line of five impressions was usually made to impress the consumer with an implication of industry standards, but what each one actually signified was not regulated and so they varied according to the whim of the individual foundry. In this case, the maker’s marks are often obscured by sedimentary accretion or removed by corrosion after a century of submersion in the ocean. However sufficient detail has survived to indicate that these samples of electro-plated cutlery probably originated from the same consignment in the LOCH ARD’s cargo. The following descriptions of maker’s marks are drawn from 255 tea spoons, 125 dessert spoons, and 99 table forks. These marks are clearly visible in 66 instances, while the same sequence of general outlines, or depression shapes, is discernible in another 166 examples. 1. A recessed Crown containing a raised Diamond outline and the initials “W” and “P” (the recognised trademark of William Page & Co) 2. An impressed Ellipse containing a raised, pivoted, Triangle in its lower part and bearing a Resurrection Cross on its upper section (a possible dissenting church symbol reflecting religious affiliation); OR a rounded Square impression containing a raised, ‘lazy’, letter “B” (possibly mimicking sterling silver hallmark signifying city of manufacture i.e. Birmingham) 3. An impressed rounded Square filled with a raised Maltese Cross (the base metal composite of nickel silver was also known as ‘German silver’ after its Berlin inventors in 1823) 4. A recessed Circle containing a Crab or Scarab Beetle image; OR a recessed Circle containing a rotated ‘fleur de lys’ or ‘fasces’ design 5. A depressed Diamond shape enclosing a large raised letter “R” and a small raised letter “D” (mimicking the U.K. Patent Office stamp which abbreviated the term ‘registered’ to “RD”, but also included date and class of patent) Suggested trade names for William Page & Co’s particular blend of brass plating are ‘roman silver’ or ‘silverite’. This copper alloy polishes to a lustrous gold when new, discolouring to a murky grey with greenish hue when neglected. HISTORY OF THE LOCH ARD The LOCH ARD belonged to the famous Loch Line which sailed many ships from England to Australia. Built in Glasgow by Barclay, Curdle and Co. in 1873, the LOCH ARD was a three-masted square rigged iron sailing ship. The ship measured 262ft 7" (79.87m) in length, 38ft (11.58m) in width, 23ft (7m) in depth and had a gross tonnage of 1693 tons. The LOCH ARD's main mast measured a massive 150ft (45.7m) in height. LOCH ARD made three trips to Australia and one trip to Calcutta before its final voyage. LOCH ARD left England on March 2, 1878, under the command of Captain Gibbs, a newly married, 29 year old. She was bound for Melbourne with a crew of 37, plus 17 passengers and a load of cargo. The general cargo reflected the affluence of Melbourne at the time. On board were straw hats, umbrella, perfumes, clay pipes, pianos, clocks, confectionary, linen and candles, as well as a heavier load of railway irons, cement, lead and copper. There were items included that intended for display in the Melbourne International Exhibition in 1880. The voyage to Port Phillip was long but uneventful. At 3am on June 1, 1878, Captain Gibbs was expecting to see land and the passengers were becoming excited as they prepared to view their new homeland in the early morning. But LOCH ARD was running into a fog which greatly reduced visibility. Captain Gibbs was becoming anxious as there was no sign of land or the Cape Otway lighthouse. At 4am the fog lifted. A man aloft announced that he could see breakers. The sheer cliffs of Victoria's west coast came into view, and Captain Gibbs realised that the ship was much closer to them than expected. He ordered as much sail to be set as time would permit and then attempted to steer the vessel out to sea. On coming head on into the wind, the ship lost momentum, the sails fell limp and LOCH ARD's bow swung back. Gibbs then ordered the anchors to be released in an attempt to hold its position. The anchors sank some 50 fathoms - but did not hold. By this time LOCH ARD was among the breakers and the tall cliffs of Mutton Bird Island rose behind the ship. Just half a mile from the coast, the ship's bow was suddenly pulled around by the anchor. The captain tried to tack out to sea, but the ship struck a reef at the base of Mutton Bird Island, near Port Campbell. Waves broke over the ship and the top deck was loosened from the hull. The masts and rigging came crashing down knocking passengers and crew overboard. When a lifeboat was finally launched, it crashed into the side of LOCH ARD and capsized. Tom Pearce, who had launched the boat, managed to cling to its overturned hull and shelter beneath it. He drifted out to sea and then on the flood tide came into what is now known as LOCH ARD Gorge. He swam to shore, bruised and dazed, and found a cave in which to shelter. Some of the crew stayed below deck to shelter from the falling rigging but drowned when the ship slipped off the reef into deeper water. Eva Carmichael had raced onto deck to find out what was happening only to be confronted by towering cliffs looming above the stricken ship. In all the chaos, Captain Gibbs grabbed Eva and said, "If you are saved Eva, let my dear wife know that I died like a sailor". That was the last Eva Carmichael saw of the captain. She was swept off the ship by a huge wave. Eva saw Tom Pearce on a small rocky beach and yelled to attract his attention. He dived in and swam to the exhausted woman and dragged her to shore. He took her to the cave and broke open case of brandy which had washed up on the beach. He opened a bottle to revive the unconscious woman. A few hours later Tom scaled a cliff in search of help. He followed hoof prints and came by chance upon two men from nearby Glenample Station three and a half miles away. In a state of exhaustion, he told the men of the tragedy. Tom returned to the gorge while the two men rode back to the station to get help. By the time they reached LOCH ARD Gorge, it was cold and dark. The two shipwreck survivors were taken to Glenample Station to recover. Eva stayed at the station for six weeks before returning to Ireland, this time by steamship. In Melbourne, Tom Pearce received a hero's welcome. He was presented with the first gold medal of the Royal Humane Society of Victoria and a £1000 cheque from the Victorian Government. Concerts were performed to honour the young man's bravery and to raise money for those who lost family in the LOCH ARD disaster. Of the 54 crew members and passengers on board, only two survived: the apprentice, Tom Pearce and the young woman passenger, Eva Carmichael, who lost all of her family in the tragedy. Ten days after the LOCH ARD tragedy, salvage rights to the wreck were sold at auction for £2,120. Cargo valued at £3,000 was salvaged and placed on the beach, but most washed back into the sea when another storm developed. The wreck of LOCH ARD still lies at the base of Mutton Bird Island. Much of the cargo has now been salvaged and some was washed up into what is now known as LOCH ARD Gorge. Cargo and artefacts have also been illegally salvaged over many years before protective legislation was introduced. One of the most unlikely pieces of cargo to have survived the shipwreck was a Minton porcelain peacock - one of only seven in the world. The peacock was destined for the Melbourne International Exhibition in 1880. It had been well packed, which gave it adequate protection during the violent storm. Today, the Minton peacock can be seen at the Flagstaff Hill Maritime Museum in Warrnambool. From Australia's most dramatic shipwreck it has now become Australia's most valuable shipwreck artefact and is one of very few 'objects' on the Victorian State Heritage Register. The LOCH ARD shipwreck is of State significance – Victorian Heritage Register S 417. Flagstaff Hill’s collection of artefacts from LOCH ARD is significant for being one of the largest collections of artefacts from this shipwreck in Victoria. It is significant for its association with the shipwreck, which is on the Victorian Heritage Register (VHR S417). The collection is significant because of the relationship between the objects, as together they have a high potential to interpret the story of the LOCH ARD. The LOCH ARD collection is archaeologically significant as the remains of a large international passenger and cargo ship. The LOCH ARD collection is historically significant for representing aspects of Victoria’s shipping history and its potential to interpret sub-theme 1.5 of Victoria’s Framework of Historical Themes (living with natural processes). The collection is also historically significant for its association with the LOCH ARD, which was one of the worst and best known shipwrecks in Victoria’s history. Unrestored tea spoon from the wreck of the LOCH ARD. The spoon design has a flattened fiddle-back handle, with a thin stem or shank, flared collar, and elongated bowl. The spoons metallic composition is a thin layer of brass alloy which has partially corroded back to a nickel-silver base metal. Only 10% of original electroplating remains as a dull bronze colour. Outlines of five makers marks are visible.flagstaff hill, warrnambool, shipwrecked coast, flagstaff hill maritime museum, maritime museum, shipwreck coast, flagstaff hill maritime village, great ocean road, loch line, loch ard, captain gibbs, eva carmichael, tom pearce, glenample station, mutton bird island, electroplated cutlery, loch ard shipwreck, nickel silver, william page & co, birmingham, brass plating, makers marks -
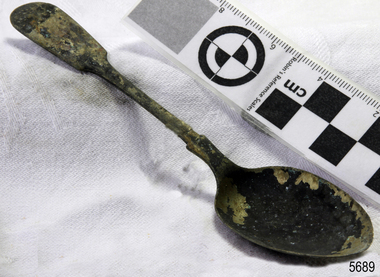 Flagstaff Hill Maritime Museum and Village
Spoon, circa 1878
This tea spoon is from the wreck of the LOCH ARD, a Loch Line ship of 1,693 tons which sailed from Gravesend, London, on 2 March 1878 with 17 passengers and a crew of 36 under Captain George Gibbs. “The intention was to discharge cargo in Melbourne, before returning to London via the Horn with wool and wheat”. Instead, on 1 June 1878, after 90 days at sea, she struck the sandstone cliffs of Mutton Bird Island on the south west coast of Victoria, and sank with the loss of 52 lives and all her cargo. The manifest of the LOCH ARD listed an array of manufactured goods and bulk metals being exported to the Colony of Victoria, with a declared value of £53,700. (202 bills of lading show an actual invoice value of £68, 456, with insurance underwriting to £30,000 of all cargo). Included in the manifest is the item of “Tin hardware & cutlery £7,530”. This teaspoon is one of 482 similar items of electro-plated cutlery from the LOCH ARD site, comprising spoons and forks of various sizes but all sharing the same general shape or design and metallic composition. 49 of these pieces display a legible makers’ mark — the initials “W” and “P” placed within a raised diamond outline, which is in turn contained within a sunken crown shape — identifying the manufacturer as William Page & Co of Birmingham. An electroplater’s makers’ marks, unlike sterling silver hallmarks, are not consistent identifiers of quality or date and place of manufacture. A similar line of five impressions was usually made to impress the consumer with an implication of industry standards, but what each one actually signified was not regulated and so they varied according to the whim of the individual foundry. In this case, the maker’s marks are often obscured by sedimentary accretion or removed by corrosion after a century of submersion in the ocean. However sufficient detail has survived to indicate that these samples of electro-plated cutlery probably originated from the same consignment in the LOCH ARD’s cargo. The following descriptions of maker’s marks are drawn from 255 tea spoons, 125 dessert spoons, and 99 table forks. These marks are clearly visible in 66 instances, while the same sequence of general outlines, or depression shapes, is discernible in another 166 examples. 1. A recessed Crown containing a raised Diamond outline and the initials “W” and “P” (the recognised trademark of William Page & Co) 2. An impressed Ellipse containing a raised, pivoted, Triangle in its lower part and bearing a Resurrection Cross on its upper section (a possible dissenting church symbol reflecting religious affiliation); OR a rounded Square impression containing a raised, ‘lazy’, letter “B” (possibly mimicking sterling silver hallmark signifying city of manufacture i.e. Birmingham) 3. An impressed rounded Square filled with a raised Maltese Cross (the base metal composite of nickel silver was also known as ‘German silver’ after its Berlin inventors in 1823) 4. A recessed Circle containing a Crab or Scarab Beetle image; OR a recessed Circle containing a rotated ‘fleur de lys’ or ‘fasces’ design 5. A depressed Diamond shape enclosing a large raised letter “R” and a small raised letter “D” (mimicking the U.K. Patent Office stamp which abbreviated the term ‘registered’ to “RD”, but also included date and class of patent) Suggested trade names for William Page & Co’s particular blend of brass plating are ‘roman silver’ or ‘silverite’. This copper alloy polishes to a lustrous gold when new, discolouring to a murky grey with greenish hue when neglected. HISTORY OF THE LOCH ARD The LOCH ARD belonged to the famous Loch Line which sailed many ships from England to Australia. Built in Glasgow by Barclay, Curdle and Co. in 1873, the LOCH ARD was a three-masted square rigged iron sailing ship. The ship measured 262ft 7" (79.87m) in length, 38ft (11.58m) in width, 23ft (7m) in depth and had a gross tonnage of 1693 tons. The LOCH ARD's main mast measured a massive 150ft (45.7m) in height. LOCH ARD made three trips to Australia and one trip to Calcutta before its final voyage. LOCH ARD left England on March 2, 1878, under the command of Captain Gibbs, a newly married, 29 year old. She was bound for Melbourne with a crew of 37, plus 17 passengers and a load of cargo. The general cargo reflected the affluence of Melbourne at the time. On board were straw hats, umbrella, perfumes, clay pipes, pianos, clocks, confectionary, linen and candles, as well as a heavier load of railway irons, cement, lead and copper. There were items included that intended for display in the Melbourne International Exhibition in 1880. The voyage to Port Phillip was long but uneventful. At 3am on June 1, 1878, Captain Gibbs was expecting to see land and the passengers were becoming excited as they prepared to view their new homeland in the early morning. But LOCH ARD was running into a fog which greatly reduced visibility. Captain Gibbs was becoming anxious as there was no sign of land or the Cape Otway lighthouse. At 4am the fog lifted. A man aloft announced that he could see breakers. The sheer cliffs of Victoria's west coast came into view, and Captain Gibbs realised that the ship was much closer to them than expected. He ordered as much sail to be set as time would permit and then attempted to steer the vessel out to sea. On coming head on into the wind, the ship lost momentum, the sails fell limp and LOCH ARD's bow swung back. Gibbs then ordered the anchors to be released in an attempt to hold its position. The anchors sank some 50 fathoms - but did not hold. By this time LOCH ARD was among the breakers and the tall cliffs of Mutton Bird Island rose behind the ship. Just half a mile from the coast, the ship's bow was suddenly pulled around by the anchor. The captain tried to tack out to sea, but the ship struck a reef at the base of Mutton Bird Island, near Port Campbell. Waves broke over the ship and the top deck was loosened from the hull. The masts and rigging came crashing down knocking passengers and crew overboard. When a lifeboat was finally launched, it crashed into the side of LOCH ARD and capsized. Tom Pearce, who had launched the boat, managed to cling to its overturned hull and shelter beneath it. He drifted out to sea and then on the flood tide came into what is now known as LOCH ARD Gorge. He swam to shore, bruised and dazed, and found a cave in which to shelter. Some of the crew stayed below deck to shelter from the falling rigging but drowned when the ship slipped off the reef into deeper water. Eva Carmichael had raced onto deck to find out what was happening only to be confronted by towering cliffs looming above the stricken ship. In all the chaos, Captain Gibbs grabbed Eva and said, "If you are saved Eva, let my dear wife know that I died like a sailor". That was the last Eva Carmichael saw of the captain. She was swept off the ship by a huge wave. Eva saw Tom Pearce on a small rocky beach and yelled to attract his attention. He dived in and swam to the exhausted woman and dragged her to shore. He took her to the cave and broke open case of brandy which had washed up on the beach. He opened a bottle to revive the unconscious woman. A few hours later Tom scaled a cliff in search of help. He followed hoof prints and came by chance upon two men from nearby Glenample Station three and a half miles away. In a state of exhaustion, he told the men of the tragedy. Tom returned to the gorge while the two men rode back to the station to get help. By the time they reached LOCH ARD Gorge, it was cold and dark. The two shipwreck survivors were taken to Glenample Station to recover. Eva stayed at the station for six weeks before returning to Ireland, this time by steamship. In Melbourne, Tom Pearce received a hero's welcome. He was presented with the first gold medal of the Royal Humane Society of Victoria and a £1000 cheque from the Victorian Government. Concerts were performed to honour the young man's bravery and to raise money for those who lost family in the LOCH ARD disaster. Of the 54 crew members and passengers on board, only two survived: the apprentice, Tom Pearce and the young woman passenger, Eva Carmichael, who lost all of her family in the tragedy. Ten days after the LOCH ARD tragedy, salvage rights to the wreck were sold at auction for £2,120. Cargo valued at £3,000 was salvaged and placed on the beach, but most washed back into the sea when another storm developed. The wreck of LOCH ARD still lies at the base of Mutton Bird Island. Much of the cargo has now been salvaged and some was washed up into what is now known as LOCH ARD Gorge. Cargo and artefacts have also been illegally salvaged over many years before protective legislation was introduced. One of the most unlikely pieces of cargo to have survived the shipwreck was a Minton porcelain peacock - one of only seven in the world. The peacock was destined for the Melbourne International Exhibition in 1880. It had been well packed, which gave it adequate protection during the violent storm. Today, the Minton peacock can be seen at the Flagstaff Hill Maritime Museum in Warrnambool. From Australia's most dramatic shipwreck it has now become Australia's most valuable shipwreck artefact and is one of very few 'objects' on the Victorian State Heritage Register. The LOCH ARD shipwreck is of State significance – Victorian Heritage Register S 417. Flagstaff Hill’s collection of artefacts from LOCH ARD is significant for being one of the largest collections of artefacts from this shipwreck in Victoria. It is significant for its association with the shipwreck, which is on the Victorian Heritage Register (VHR S417). The collection is significant because of the relationship between the objects, as together they have a high potential to interpret the story of the LOCH ARD. The LOCH ARD collection is archaeologically significant as the remains of a large international passenger and cargo ship. The LOCH ARD collection is historically significant for representing aspects of Victoria’s shipping history and its potential to interpret sub-theme 1.5 of Victoria’s Framework of Historical Themes (living with natural processes). The collection is also historically significant for its association with the LOCH ARD, which was one of the worst and best known shipwrecks in Victoria’s history. Unrestored tea spoon from the wreck of the LOCH ARD. The spoon design has a flattened fiddle-back handle, with a thin stem or shank, flared collar, and elongated bowl. The spoons metallic composition is a thin layer of brass alloy which has partially corroded back to a nickel-silver base metal. 50% of original electroplating remains. Two of five makers marks are legible: (1) Trade Mark (4) Crab Designflagstaff hill, warrnambool, shipwrecked coast, flagstaff hill maritime museum, maritime museum, shipwreck coast, flagstaff hill maritime village, great ocean road, loch line, loch ard, captain gibbs, eva carmichael, tom pearce, glenample station, mutton bird island, loch ard gorge, electroplated cutlery, loch ard shipwreck, nickel silver, william page & co, birmingham, brass plating, makers marks -
 Bendigo Military Museum
Photograph - WW1 PHOTOS 38th BN, Copy, May 2024
The three soldier are all brothers and are listed on the Honour Roll at the Soldiers Memorial Institute Pall Mall Bendigo. .1) William Street No 115 enlisted in the 38th Bn Machine Gun section on 1.3.1916 age 23 years 11 months, embark for England 20..1916, Hospital at sea with Measles, embark for France 22.11.1916, Hospital with Mumps 23.11. 1916, rejoin unit 2.1.1917, Hospital with Scabies 1.2.1917, rejoin unit 16.2 1917,promoted Cpl 25.8.1917, WIA 12.10.1917 Belgium, Head and left side, DOW,s 26.10.1917. .2) Henry Street No 2395 enlisted in the 4th Reinforcements 38th Bn on 14.3.1916 age 36 years 7 months, embark for England 20.6.1916, embark for France 5.4.1917, Hospital with Scabies 11.5.1917, rejoin unit 24.5.1917, WIA 13.7.1917 GSW Left elbow, rejoin unit 20.11.1917, discharged from the AIF 22.2.1919. .3) Herbert Street No 2761 enlisted 16.3.1916 in 4th Reinforcements 38th Bn age 20 years 10 months, discharged Medically unfit with Pluerisy not due to misconduct on 14.12.1916. His records also state that he was in the 5th Reo’s 60th Bn but given his No is 2 days after his brother Henry’s but sounds like 38th. NAA has him also No 45674..1) portrait of a soldier in uniform with peak cap, arms behind his back holding a pace stick.Studio photo. .2) Portrait of a soldier in uniform with peak cap, hands behind back. Studio photo. .3) Portait of a soldier in uniform with peak cap, hands behind back, is wearing basic webbing. Studio photo.street 38th, photo, 38th -
 Bendigo Military Museum
Photograph - Army Survey Regiment – Corps Day Parade and Defence Force Service Medal Presentations, Fortuna Villa, Bendigo, 1987
This set of 36 photographs were taken at a Corps Day Parade held at the Army Survey Regiment, Bendigo on the 1st of July 1987. The Parade Commander was CO LTCOL Don Swiney MBE, and the Reviewing Officer was the Colonel Commandant (honorary appointment) of the Survey Corps - COL Clem Sargent (Retd). The Corps Day Parade was held to commemorate the 72nd anniversary of the formation of the Royal Australian Survey Corps. It was an occasion for great celebration at the Regiment. After 45 years in Bendigo, its future was finally secure. At the traditional anniversary parade, the Colonel Commandant COL Clem Sargent praised the efforts of the Regiment and led the soldiers in three cheers for the record production of the previous 12 months. More information is provided in page 140 of Valerie Lovejoy’s book 'Mapmakers of Fortuna – A history of the Army Survey Regiment’ ISBN: 0-646-42120-4. This set of photos cover the start of the Corps Day Parade, drill movements of the four Squadrons forming up on the parade ground and the formal arrival of the Reviewing Officer. See Item 6376.18P for additional photographs taken at the Corps Day Parade, comprising inspections of the Regiment’s four squadrons, presentations of the Defence Force Service Medal in recognition of 15 years of efficient remunerated service to SSGT Phil Meagher and SGT Wayne Rothwell; and formal group photos of each of the four Squadrons, Officers, and Warrant Officers/Sergeants.This is a set of 36 photographs of a Corps Day Parade held at the Army Survey Regiment, Fortuna, Bendigo in July 1987. The black & white photographs are on 35mm negative film and are part of the Army Survey Regiment’s Collection. The photographs were scanned at 96 dpi. .1) - Photo, black & white, July 1987. Unidentified personnel marching onto parade ground. .2) - Photo, black & white, July 1987. Squadrons marching on parade ground. 1st rank L to R: LCPL Ken Dempster, unidentified (x2), WO2 Neville Stone, remainder unidentified. .3) - Photo, black & white, July 1987. Right file L to R: WO2 George Graham, WO2 Dave Miles, remainder unidentified. .4) - Photo, black & white, July 1987. L to R: WO1 Stevo Hinic, 1st rank – unidentified, CPL Max Watson, unidentified, WO2 Peter Tangey. .5) - Photo, black & white, July 1987. L to R: WO2 Ralph Chant, CPL Gary Drummond, SGT Gary Kerr, unidentified, CPL Dale Hudson, unidentified, LCPL Daryl South, CPL Kerron South, CPL Peter Dillon, SGT Brian Fauth, SGT Graham Johnston, CPL Peter Swandale, CPL Jim Ash, unidentified, CPL Gary Tremain, unidentified, unidentified UK exchange, unidentified WO1 Ken Slater, WO1 Doug Arman. .6) - Photo, black & white, July 1987. L to R: WO2 Alan Bunn, CPL Bob Thrower, SGT Kevin Boehm, CPL Peter Coles, CPL John ‘JJ’ Smith, CPL Laurie Justin, LCPL Bob Sheppard, CPL Steve McGuiness, SGT Bob Garritty, SPR Jim Humphrey, unidentified (x2), SSGT Greg Gilbert, unidentified, WO2 George Graham. .7) - Photo, black & white, July 1987. L to R: CPL Rod Skidmore, SSGT Phil Meagher, WO1 Colin Cuskelly, unidentified, CPL Colin McInnes, unidentified, CPL Jeff Le Fe-Fevre, SPR Richard Arman, CPL Dan Cirsky, CPL Michelle Griffith, LCPL Tom Bloxham, SPR Ailsa (Sorby) Miller, CPL Peter Johnson, unidentified, LCPL Ken Dempster, unidentified (x2), WO2 Neville Stone. .8) - Photo, black & white, July 1987. L to R: CPL Bob Thrower, unidentified (x2), SGT Kevin Boehm, CPL Peter Coles, SGT John ‘Stormy’ Tempest, CPL John ‘JJ’ Smith, unidentified CPL Laurie Justin, unidentified, WO2 Alan Bunn, unidentified (x2), LCPL Bob Sheppard, unidentified, CPL Steve McGuiness, unidentified, SGT Bob Garritty, unidentified, SPR Jim Humphrey. .9) - Photo, black & white, July 1987. Foreground – Acting RSM WO1 Dave Thompson, background L to R: MAJ Daryl Hockings CSM, CAPT Bob Williams, CAPT Laurie Newton, ADJT CAPT Andrew McLoud, MAJ Bob McHenry, CAPT Peter ‘Blue’ Blaskett, MAJ Mick Byrne, MAJ Roger Rix. .10) - Photo, black & white, July 1987. Officers ready to take posts. Background L to R: MAJ Daryl Hockings CSM, CAPT Bob Williams, CAPT Laurie Newton, ADJT CAPT Andrew McLoud, MAJ Bob McHenry, CAPT Peter ‘Blue’ Blaskett, MAJ Mick Byrne, MAJ Roger Rix, LT Vicky Thompson, Foreground – 2IC MAJ Terry Edwards, Acting RSM WO1 Dave Thompson, WO2 Alan Bunn, CPL Bob Thrower, SGT Kevin Boehm, CPL Peter Coles, CPL John ‘JJ’ Smith, CPL Laurie Justin, LCPL Bob Sheppard. .11) to .13) - Photo, black & white, July 1987. Officers ready to take posts. L to R: MAJ Daryl Hockings CSM, CAPT Bob Williams, CAPT Laurie Newton, ADJT CAPT Andrew McLoud, MAJ Bob McHenry, CAPT Peter ‘Blue’ Blaskett, MAJ Mick Byrne, MAJ Roger Rix, LT Vicky Thompson, CAPT John South. .14) - Photo, black & white, July 1987. L to R: WO2 Alan Bunn, MAJ Roger Rix. .15) - Photo, black & white, July 1987. L to R: unidentified personnel, CAPT Laurie Newton, unidentified, CAPT Bob William, MAJ Mick Byrne, WO2 Dave Miles. .16) &.17) - Photo, black & white, July 1987. L to R: 2IC MAJ Terry Edwards handing Parade over to CO LTCOL Don Swiney MBE. .18) - Photo, black & white, July 1987. Arrival of Reviewing Officer- COL COMDT COL Clem Sargent. Saluted by CPL Kevin ‘Chuck’ Berry. .19) - Photo, black & white, July 1987. Arrival of Reviewing Officer- COL COMDT COL Clem Sargent. Saluted by CPL Kevin ‘Chuck’ Berry. MAJ Duncan Burns on right departing vehicle. .20) - Photo, black & white, July 1987, Reviewing Officer - COL COMDT COL Clem Sargent returning salute from CO LTCOL Don Swiney MBE. .21) - Photo, black & white, July 1987, Headquarters Squadron approaching the Dias. L to R: CAPT John South, unidentified, MAJ Roger Rix, unidentified, SPR Tracy (Parker) Ash, unidentified, T Vicky Thompson, CPL Bob Thrower, SGT Kevin Boehm, CPL Peter Coles, CPL John ‘JJ’ Smith, CPL Laurie Justin, LCPL Bob Sheppard, remainder partially obscured, CO LTCOL Don Swiney MBE, COL COMDT COL Clem Sargent. .22) - Photo, black & white, July 1987, Headquarters Squadron’s MAJ Roger Rix salutes the Reviewing Officer. L to R: CAPT John South, MAJ Roger Rix, unidentified, SPR Tracy (Parker) Ash, unidentified, Vicky Thompson, CPL Bob Thrower, SGT Kevin Boehm, CPL Peter Coles, CPL John ‘JJ’ Smith, CPL Laurie Justin, LCPL Bob Sheppard, CPL Steve McGuiness, SGT Bob Garritty, SPR Jim Humphrey, WO2 George Graham. .23) - Photo, black & white, July 1987, Headquarters Squadron’s MAJ Roger Rix salutes the Reviewing Officer. L to R: CAPT John South, MAJ Roger Rix, unidentified, SPR Tracy (Parker) Ash, unidentified, Vicky Thompson, CPL Bob Thrower, SGT Kevin Boehm, CPL Peter Coles, CPL John ‘JJ’ Smith, CPL Laurie Justin, LCPL Bob Sheppard, CPL Steve McGuiness, SGT Bob Garritty, SPR Jim Humphrey, WO2 George Graham, CO LTCOL Don Swiney MBE, COL COMDT COL Clem Sargent, .24) - Photo, black & white, July 1987, Headquarters Squadron continues past the Dias. L to R: unidentified (x3), Vicky Thompson, unidentified, CPL Bob Thrower, SGT Kevin Boehm, CPL Peter Coles, CPL John ‘JJ’ Smith, CPL Laurie Justin, LCPL Bob Sheppard, CPL Steve McGuiness, SGT Bob Garritty, SPR Jim Humphrey, WO2 George Graham. .25) - Photo, black & white, July 1987, Army Survey Regiment senior officers and Air Survey Squadron approaching the Dias. L to R: 2IC MAJ Terry Edwards, ADJT CAPT Andrew McLeod, OC MAJ Daryl Hockings CSM, acting RSM WO1 Dave Thompson, centre file marker CPL Max Watson, right marker CPL Perry Burt, CAPT Bob Williams, remainder unidentified, CO LTCOL Don Swiney MBE, COL COMDT COL Clem Sargent. .26) - Photo, black & white, July 1987, Army Survey Regiment senior officers and Air Survey Squadron salute the Reviewing Officer. L to R: 2IC MAJ Terry Edwards, ADJT CAPT Andrew McLeod, OC MAJ Daryl Hockings CSM, acting RSM WO1 Dave Thompson, centre file marker CPL Max Watson, right marker CPL Perry Burt, CAPT Bob Williams, remainder unidentified, CO LTCOL Don Swiney MBE, COL COMDT COL Clem Sargent. .27) - Photo, black & white, July 1987, Army Survey Regiment senior officers and Air Survey Squadron salute the Reviewing Officer. L to R: 2IC MAJ Terry Edwards, ADJT CAPT Andrew McLeod, unidentified, OC MAJ Daryl Hockings CSM, acting RSM WO1 Dave Thompson, unidentified, SGT Barrie Craymer, CAPT Bob Williams, centre file marker CPL Max Watson, right marker CPL Perry Burt, remainder unidentified, CO LTCOL Don Swiney MBE, COL COMDT COL Clem Sargent. .28) - Photo, black & white, July 1987, Air Survey Squadron salutes the Reviewing Officer. L to R: CPL Steve Hill OAM CSM, unidentified, SSGT Neil ‘Ned’ Kelly, WO2 Peter Tangey, WO1 Dennis Marshall. Followed by Lithographic Squadron L to R: SGT Graham Johnston, SGT Bryan Fauth, CPL Jim Ash, CPL Peter Swandale, CPL Roy Hicks, remainder unidentified. .29) - Photo, black & white, July 1987, Lithographic Squadron’s MAJ Mick Byrne salutes the Reviewing Officer. L to R: WO1 Dennis Marshall (Air Svy Sqn), SGT Graham Johnston, SGT Bryan Fauth, MAJ Mick Byrne, CPL Jim Ash, CPL Peter Swandale, unidentified (x2), CPL Lance Strudwick, CPL John ‘Flash’ Anderson, SGT Alan Virtue, CPL Greg Rowe, unidentified (x2), CPL Graham Hales, unidentified, CPL Paul Baker, SPR Colin Yeats, unidentified, WO1 Ken Slater, WO1 Doug Arman. .30) to .31) - Photo, black & white, July 1987, Lithographic Squadron’s MAJ Mick Byrne salutes the Reviewing Officer. L to R: SGT Graham Johnston, SGT Bryan Fauth, MAJ Mick Byrne, CPL Jim Ash, CPL Peter Swandale, unidentified (x2), CPL Lance Strudwick, CPL John ‘Flash’ Anderson, SGT Alan Virtue, CPL Greg Rowe, unidentified (x2), CPL Graham Hales, unidentified, CPL Paul Baker, SPR Colin Yeats, unidentified, WO1 Ken Slater, WO1 Doug Arman. .32) to .35) - Photo, black & white, July 1987, Cartographic Squadron’s MAJ Bob McHenry salutes the Reviewing Officer. L to R: MAJ Bob McHenry, CAPT Peter ‘Blue Blaskett, left file L to R: SPR Ross Collishaw, SPR Ben Lucas, centre file L to R: SGT Martin Evans, SSGT Ian ‘Rock’ Thistleton, SGT Eddy Jacobs, right file L to R: CPL Rod Skidmore, SSGT Phil Meagher, SPR Craig Kellet, unidentified, CPL Col McInnes, SPR Nick Cowan, unidentified, CPL Jeff Le-Fevre, SPR Richard Arman, CPL Dan Cirsky, SPR Tom Bloxham, CPL Peter Johnson, unidentified, LCPL Kenne Dempster. .36) - Photo, black & white, July 1987, Reviewing Officer - COL COMDT COL Clem Sargent returns salute..1P to .36P – There are no personnel identified.royal australian survey corps, rasvy, army survey regiment, army svy regt, fortuna, asr -
 Bendigo Military Museum
Photograph - FRAMED PHOTO EAGLEHAWK LADIES AUXILIARY, c.1952
Eaglehawk RSL Ladies Auxiliary 1952. Back Row. Mrs Day, Florrie Hutchinson, Mrs Makepeace, Bessie Lightfoot, Elaine Bull, Una Wright, Mavis Claridge, Mrs Morgan, Glad Bull, Betty Boston. Middle row. Fanny Cameron, Mrs Harding, Dolly Hutchinson, Mrs Steinhauser, Mrs .............., Mrs Finch, Mrs Wood, Mabel Neat, Mrs Birthisall, Mrs Murphy, Mrs Betts. Front row. Mrs Meighan, Mrs Boyd, Mrs Shelders, Mrs Trewartha, Mrs Eeles, Esma Wilson, Joyce Bull, Mrs Laurie, Mavis Williams, Mrs Smith, Miss Trevean, Mrs Bourke, Mrs Pearce, Fay Wilson, Doris Bull. Eaglehawk RSL Ladies Auxiliary. Refer Cat No 8111 for their Honor board also 8110.Dark timber frame with gold edgeing with B & W photo inside a white card inset, separate card inset with details. Shows 36 ladies seated and standing with 2 on the floor central."Eaglehawk RSL Ladies Auxiliary 1952"brsl, smirsl, ehrsl, auxiliary -
 Bendigo Military Museum
Booklet - BOOKLETS, BCOF, B.C.O.F. (Japan) ASSOCIATION OF AUSTRALIA (INC)
Booklets are the - "OFFICIAL JOURNAL/ B.C.O.F. (JAPAN)/ ASSOCIATION OF/ AUSTRALIA (INC)/ Since 1972/ (Navy, Army, Air Force, Women's & Auxilliary Forces)" Please note - name change from "SHIBUM to SHIMBUN' on these booklets. Shinbun and Shimbun - is the correct spelling for the word for newspaper in Japanese. Booklets - items in the collection of Richard William McGILVERY, RAAF. Refer Cat No. 7287P for his service details, photos, awards.SOFT COVER BOOKLET. ALL BOOKLETS - PAPER WITH BLACK PRINT ON FRONT AND BACK. CHRISTMAS ISSUES HAVE DECORATIVE TRIM IN GREEN AND/OR RED PRINT. ILLUSTRATED WITH " BRITISH COMMONWEALTH FORCES" WITH CROWN ON FRONT COVER. All booklets 20 to 36 pages, cut, plain, white paper. Illustrated with black and white photographs, maps and cartoons. 1. No. 140 March 2011. 2. No. 141 June 2011. 3. No. 142 September 2011. 4. No. 143 December 2011. 5. No. 144 March 2012. 6. No. 145 June 2012. 7. No. 146 September 2012. 8. No. 147 December 2012. 9. No. 148 March 2013. 10. No. 149 June 2013. 11 No. 150 September 2013. 12. No. 151 December 2013. 13. No. March 2014. 14. No. 153 June 2014. 15. No. 154. September 2014. 16. No. 155 December 2014. 17. No. 156 March 2015. 18. No. 157 June 2015. 19. No. 158 September 2015. 20. No. 159 March 2016. 21. No. 160 September 2016. 22. No. 161 March 2017. 23. No. 161 March 2017. 24. No. 162 September 2017. 25. No. 163 March 2018. 26. No. 164 September 2018. Front cover, handwritten notes, blue or black ink. 1. 2. 3. 4. 8. 13. 1. "All of this book". 2. "Pages 3,5,7,8,9,13,16,17,19 to 24." 3. "Pages 3,4,12,13, to 23." 4. On paper "Pages 3-8, 10, 16, 19 to 24" 8. "26 mags altogether/ the 2 you have already read" 13. "Jane/Danny/ 9915/ 48/ 04". 19. " Lorraine 0353920942=/Willa McGilvery, PO Box 132/Donald/ 3480/ 03 5497 1724". 20. "My letter to sacked MP Stuart Robert". 21. "Please return Willa". 22. "Buloke Times write up". history, booklets, bcof -
 Bendigo Military Museum
Photograph - Army Survey Regiment Summer Ball - Dinner, Staff and Entertainment, 1995
This is a set of 36 photographs taken at the combined Officer, Warrant Officer and Sergeant’s Mess Summer Ball held at the Army Survey Regiment (ASR), Fortuna Villa on the 25th of February 1995. The Summer Ball was one of the last large scale formal functions held at Fortuna Villa before ASR’s closure the following year. Photos of personnel and their guests was taken on their arrival near the Pompeii Fountain in the gardens at the front of the main building. The Ball and Dinner was held at the rear of Fortuna Villa in temporary 20’ x 30’ Army tents set up on the roadway in front of the transport compound. SERCO contract staff provided the catering and the ASR’s Other Ranks performed stewarding and kitchen hand duties. Refer to item 6347 for information on the administrative file held in the collection and items 6370.23P, 6371.33P and 6372.25P for additional photographs taken at the Summer Ball.This is a set of 36 photographs taken at the Officer, Warrant Officer and Sergeant’s Summer Ball held at the Army Survey Regiment, Fortuna Villa on the 25th of February 1995. The colour photographs are on 35mm negative film and are part of the Army Survey Regiment’s Collection. The photographs were scanned at 96 dpi. .1) - Photo, colour, 1995. L to R: Rod Skidmore, Bob Thrower. .2) - Photo, colour, 1995. L to R: Jim Ash, unidentified SERCO-GM staff. .3) - Photo, colour, 1995. L to R: Helen Drummond, Stan Vote, Steve Drummond. .4) - Photo, colour, 1995. L to R: Helen Drummond, Steve Drummond, unidentified, Stan Vote, .5) - Photo, colour, 1995. Sherri and Steve Burke .6) - Photo, colour, 1995. L to R: Dale Hudson and partner. .7) - Photo, colour, 1995. L to R: Alan Dudley, Glenda Stear, Doug Carswell, unidentified, Chris Carswell, John Stear, Angela Dudley, Tony Harder (background). .8) - Photo, colour, 1995. L to R: John Phillips, Maria Harder. .9) - Photo, colour, 1995. L to R: Tracey Phillips, Peter Peterson. .10) - Photo, colour, 1995. L to R: John South, Tracey Phillips, Peter Peterson, John Bath (background), Miss Delfine. .11) - Photo, colour, 1995. Jo and Peter Peterson. .12) - Photo, colour, 1995. Colin Davidson, Jason Selman, Martin Evans (background). .13) - Photo, colour, 1995. L to R: Bill Griggs (background), Colin Cuskelly. .14) - Photo, colour, 1995. Marzipan sculpture of Australia’s Coat of Arms animals surround RA Svy Corps badge. ‘53’ denoted the number of years of RA Svy occupancy since 1942. .15) - Photo, colour, 1995. L to R: unidentified (x3), Sandra Burns, Brianna Burgin (steward in background). .16) - Photo, colour, 1995. L to R: Mrs Willis, Dave and Sue Stephenson, Corey Hill (steward in background), unidentified, Ros and Wolfgang Effenberg, Doug Willis, unidentified, Simon Lemon (background). .17) - Photo, colour, 1995. unidentified SERCO-GM staff. .18) - Photo, colour, 1995. L to R: Hayden Beer, Duncan Burns (background), Simon Lemon, unidentified SERCO staff (x2). .19) & .20) - Photo, colour, 1995. L to R: Duncan Burns, unidentified SERCO-GM staff. .21) - Photo, colour, 1995. L to R: Mrs Willis, Greg Byers. .22) - Photo, colour, 1995. L to R: Brian Sloan, unidentified. .23) - Photo, colour, 1995. Justine (Sachs) Rainey - steward. .24) - Photo, colour, 1995. Marty Stradbrook- steward. .25) - Photo, colour, 1995. Unidentified guests, Corey Hill - steward. .26) - Photo, colour, 1995. L to R: Troy Larkins, Ken Labouchardiere, Marty Stradbrook, Lance Hillier, unidentified. .27) - Photo, colour, 1995. L to R: Glen Norrell, Trevor King, Troy Larkins. .28) to .31) - Photo, colour. 1995. Unidentified string quartet musicians. .32) to .36P) - Photo, colour. 1995, Fortuna Pipes and Drums musicians..1P to .36P There are no personnel or civilians identified.royal australian survey corps, rasvy, army survey regiment, army svy regt, fortuna, asr -
 Bendigo Military Museum
Photograph - PHOTOGRAPHS, GRINTON COLLECTION, FRAMED, 2008 - 2009
Frame 4. Photo 1. Curlu, Hem, Vaux area which can be seen written faintly at the bottom of the photo. These are 3 small villages near where Bert Grinton won his DCM. The villages are along the Somme River. The nearest towns of note are Mont St Quentin and Perrone. Photo 2. Four graves, left to right. 1. Lance Corporal George Grimshaw, No 887 38th Batt, KIA 28/8/1918 aged 24 years. He embarked with C Coy on the Runic and the embarkation rolls state that he was a farm labourer from Gasquil East Victoria. His final resting place is the Hem Farm Military cemetery, Hem Monacu. 2. Corporal Vincent Thomas Stanley Wyniat, No 709, 38th Batt, KIA 28/8/1918 aged 28 years. h embarked with D Coy on the Runic and the embarkation rolls state that he was a labourer of Edenhope, Vic. His final resting place is also Hem Farm. 3. Two graves left to right. Private W McEwan, No 7067, 38th Batt, KIA 31/8/1918 aged 36 years. He was actually William Lowrie Allison from NSW enlisting under the name McEwan. His final resting place is the Perrone Communal Cemetery Extension. he is buried there under the name "Allison". Private Norman John Warren Hoffmeyer, No 2339, 38th Batt, KIA 31/8/1918 aged 23 years. He embarked with the 4th reinforcements to the 38th per HMAT A17 Port Lincoln on 20/10/1916. The embarkation rolls state that he was a farmer from Bendigo, Victoria. His final resting place is also Perrone. 4. Single grave. Private Cyril Edmund Andrew Dunn, No 3058, 38th Batt, KIA 31/8/1918 aged 22 years. He embarked with the 7th reinforcements to the 38th Batt per the HMAT A70 Ballarat on 19/2/1917. the embarkation rolls state that he was a Bank Clerk of East St Kilda. His final resting place is Hem Farm Military Cemetery, Hem Monacu. From other negatives we have identified some 15 graves. All these soldiers were KIA over the period 26 - 31 August 1918. This was during the time Bert won his DCM. Within a month Jack and Bert's Company was down to 20 men. Refer Cat No. 5880P for exhibition details. Refer Cat No. 1280 for Jack GRINTON Service Records. Photographs - black and white on paper. Four photographs, top to bottom. 1. Scene with a village. 2. 4 graves with crosses. 3. 2 graves with crosses. 4. single grave with cross and rifle. Frame - timber with black colour paint, glass front. Mount - black colour cardboard. Backing cardboard with handwritten notation.Backing cardboard, handwritten black felt tip pen "4."framed photographs, grinton collection, ww1, 38th -
 Warrnambool and District Historical Society Inc.
Education kit - Book, The Academic Edition of Pianoforte Studies & Exercises, Circa 1900
Music folio for Senior students. This music folio is an example of studies in music at the beginning of the 20th century. Cream light card cover with title page in various texts in black. Pale red stylised border around text. Back cover has information regarding different grade levels in music. 36 Pages. Pages hand stitched in cotton with cotton cloth binding. Loose brown paper cover.V.E. Adams handwritten in top RH corner of brown paper cover. pianoforte studies and exercises, no 129, gordon saunders -
 Warrnambool and District Historical Society Inc.
Document - David Williams Probate 1889, 1889
Tait collection: item 36 of 62 This document contains the details of the Will and Probate of David Williams of ‘Morgrugyn’ farm near Woodford. He was born in 1804 and died in 1889. He was a pioneer settler in the Woodford area, arriving, according to the Pioneer Honour Board, in 1842. His son, Ivor, was Secretary of the Grasmere Cheese and Butter Factory for some time and Secretary of the Warrnambool Cheese and Butter Factory in 1888. David Williams left real estate to the value of £1540 and personal estate to the value of £1075. The chief beneficiary was his eldest son, David but other sons and grandsons also benefited. His wife, Mary, was left £300, a house to live in rent free during her lifetime, two cows and the right to graze them on the farm, six silver spoons, her bed and bedding, washstand and ware, a dressing table, a table in the dairy and ‘all the crockery and cooking utensils she may require’. The lawyer drawing up this document was James Fletcher who had an office in Port Fairy in the 1870s and an office in Koroit Street, Warrnambool, in the 1880s. In the 1890s and early 1900s he was in partnership with George Mackay. This document was in the possession of the lawyer Ernest Chambers who had drawn up the Williams will. It was then passed down to successive lawyers occupying legal premises in Kepler Street until it was located in 2014 in the Kepler Street building last used as legal premises by the firm of Mackay Taylor. This document is of considerable interest as it contains the will and probate details of a prominent 19th century farmer in the Woodford district. It will be useful for researchers.This is a white piece of parchment paper folded in two with typed material on two pages and handwritten material on one page. The pages are ruled with red ink. The pages include the Will and Probate details of David Williams of ‘Morgrugyn’ farm near Woodford. He died in 1889.In the Supreme Court in the Colony of Victoria in the Probate Jurisdiction In the Will of David Williams Morgrugyn farm near Woodford in the Colony of Victoria Farmer deceasedjames fletcher, david williams, ernest chambers, warrnambool, woodford, morgrugyn farm -
 Warrnambool and District Historical Society Inc.
Book, Simple stories & large pictures, Late 19th century
This book was given as a prize to William Giles in the late 19th century. It came from the Skiddaw Sunday (or Sabbath) School. Skiddaw was the home of the Batterbee family and was situated on the old Princes Highway in East Warrnambool near Simpson Street today. The corner here was known as ‘Batterbees Corner’ and there is a Skiddaw Street in the locality today. George Batterbee had a ham and bacon business in Warrnambool. For 36 years his wife, Mary, conducted a Sunday School at Skiddaw (from 1882 to 1918). This Sunday School was under the auspices of St. John’s Presbyterian Church in Warrnambool. Mrs Batterbee was assisted by her daughter Florinda and other teachers. Florinda and her brother Rex were both artists of note. William Giles and his family lived on the Allansford Road. The Logan family farm was in the vicinity of where Logans Beach is today. This book, though tattered and stained, is most important as the only item we have in our collection that is associated with the Skiddaw Sunday School. Situated in a family home, this Presbyterian-sponsored Sunday School operated for 36 years under the direction of Mary Batterbee. This is a book of 32 pages with the cover and perhaps some of the pages missing. It has been stapled but the staples have been removed. The book has large print and illustrations on all the pages. The illustrations have been coloured in by hand. The first page is loose and scribbled on. The pages are very stained and torn in places. The inscription is handwritten in black ink. ‘Skiddaw S. School, Second Prize, Awarded to William Giles for diligence in class, S. Logan, Teacher’. skiddaw, east warrnambool, batterbee family, giles family, logan family, history of warrnambool -
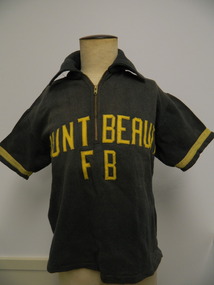 Kiewa Valley Historical Society
T-Shirt - Mt Beauty Fire Brigade x2
Mt Beauty rural fire brigade was established in 1948 by the State Electricity Commission of Victoria as an industry brigade. When Mt Beauty was handed over to the Shire in 1961, the fire brigade became a member of the Country Fire Authority (C.F.A.). Today it is an urban fire brigade. The t-shirt would have been used when members were together during fire drills, competitions, meetings etc. The black shirt was used prior to 1950 and the Red shirt was used after March 1950 The red t-shirt was used in the following yearThe t-shirt was part of the Mt Beauty fire brigade uniform indicating that the fire fighters were part of a team and were able and wanted to be recognised. It also indicates a strong and popular organisation. Black thick cotton t-shirt with collar and short sleeves. A zip is at the top front. Sleeves have yellow strip near their opening. "Mount Beauty F B" has been zig zagged stitched onto the front, also in yellow. Red thick cotton t-shirt with collar and short sleeves. 2 buttons at the top front. Sleeves have a yellow strip near their opening."Mount / Beauty" has been zig zagged stitched onto the front, also in yellow.Tag inside back under collar - "Sportswear / Simpson / of Melbourne / Mr - then P.A.B. handwritten in space provided. also '36' and 'All cotton' tags attached. Tag inside back under the collar - "Haworth Knit / Glen Iris, Melb./ 100% Cotton"mt beauty; fire brigade; clothing; state electricity commission of victoria -
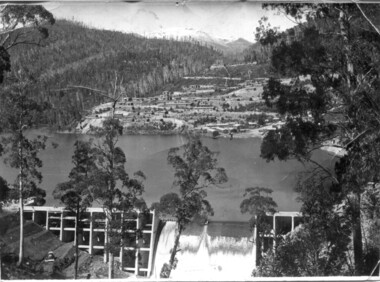 Kiewa Valley Historical Society
Set of 3 black and white photographs of Lake Guy, Bogong Village and single men's quarters, 1943/44
Construction of Bogong Village was commenced in 1940 and was the Field Headquarters for the early part of the construction of the Kiewa Hydro Electric Scheme. In all, a total of 36 houses, medical centre, police station, trading store and primary school were built. As well, there was a hostel for staff personnel and prefabricated units, each 10 feet x 8 feet, with separate dining and recreational facilities for the worker's. This camp was closed in 1962.These photos show the type of accommodation, available in this period, as well as the benched layout of the village. The damage of the 1939 bushfires is still evident.1. Black and white photo of Junction Dam Wall, Lake Guy and Bogong Village. 2.Black and white photo of single men's quarters at Bogong Village. 3.Lake Guy and Bogong Village.1.Back of photo, Left upper corner - K1334 Upper Right corner - mu (very faint) 6-10-43 2.Back of photo, Left upper corner - K1399 Upper right corner - 14 m 1-2-44 3. Back of photo, left upper corner -K1738 Upper right corner - 145 a mus 5-12-44 bogong village, lake guy, secv -
 Kiewa Valley Historical Society
Photograph - Folder of Photographs – Photocopied set of 10 black and white photographs (pages 29 - 38) from the display folder put together by KVHS to document life on the Kiewa Valley Hydro-electric Scheme
Although the Kiewa Hydro-Electric Scheme was first proposed in 1911, construction did not commence until 1938. As part of the push to cut electricity costs and diversify supply, the Victorian Government (circa 1930) initiated the conversion from primarily brown coal supply to hydro – electricity. Field investigations during the 1940’s resulted in a new proposal for a scheme that had more than double the capacity of the 1938 scheme. The Kiewa Hydroelectric Scheme became the largest scheme of its kind in the State Of Victoria and the second largest scheme in Australia. The number of personnel involved in the planning and construction of the scheme increased dramatically. During the late 1940’s, most activity centred around the construction of the West Kiewa Power Station, Rocky Valley Reservoir, McKay Creek Power Station and the Bogong Creek Aqueduct.A common thread across all the larger hydro scheme constructions was the need for workers, both qualified and unqualified who came from around the world seeking a new life for themselves and their families. New accommodation and facilities were required for the army of workers engaged in construction in often remote and wild areas. The SEC had a high demand for timber, and set up the first of a number of sawmills at Bogong Creek in 1939 and set up the first hardwood logging in the headwaters of the Kiewa River. These new ‘towns’ such as Mt Beauty and Bogong, survived, serving the needs of operational personnel and their families, and expanding with growth of new industries. Mount Beauty, and to a lesser extent Bogong, are among these places. Large A3 size spiral bound display folder containing 21 pages of photocopied black and white photographs of various aspects of the early days of the Kiewa Valley Hydro-electric scheme including equipment, various work sites and photographs of workers and their families. 1-Mt Beauty Pondage inlet-Regulating weir 2-Langfords Gap Basalt Hill-Tunnel in quarry face.3-Rocky Valley Camp-from Engineering Office 4-Basalt Hill tunnel portal 5-No 1 Pressure Shaft Works Bench 6-No 1 Power Station 7-Overturned haulage wagons on the side of an embankment 8- Group of workers dressed in wet weather gear inside a tunnel 9-Workmen and vehicle in tunnel 10-Howman’s Gap campsite at 4,150 feet 1-1954 – Mt Beauty Pondage inlet – Regulating weir Page number 29 2-28/10/54 – Langfords Gap Basalt Hill – Tunnel in quarry face K7860 Page number 30 3-STATE ELECTRICITY COMMISSION OF VICTORIA Date: 17.8.55 Time: No K8132 Kiewa Hydro Electric Works ROCKY VALLEY CAMP – FROM ENGINEERING OFFICE Page number 31 4-28/10/54 – Basalt Hill tunnel portal K7859 Page number 32 5-No.1 Pressure Shaft Works Bench 5.7.56 Page number 33 6- No. 1 Power Station 26.4.59 Page number 34 7- No markings Page number 35 8-No markings (Wooden board on ground printed with - POLAR A.N.GELATINE DYNAMITE “75” DE 28.8.40) Page number 36 9-No markings Page number 37 10-Howman’s Gap campsite at 4,150 feet Page number 38 secv; kiewa hydro electric scheme; mt beauty; bogong; construction area -
 Kiewa Valley Historical Society
Silk Sutures
This medical / hospital equipment was used in the Tawonga District General Hospital which was built in the 1950s, specifically for the increase in population due to the Kiewa Hydro Scheme.Historical: Shows the development of scientific hospital equipment. Provenance: Used in the Tawonga District General Hospital which was remote and therefore required good equipment.x 15 packets/sachets of Black braided silk sutures and x 3 packets of Surgical Catgut in a cardboard box with a tray sliding out. The box is labelled. The sachets are standing up in the tray. The packets are labelled and have foil at the back and clear plastic attached at the front. The suture is sterilised and possibly in a sachet of its own behind the label.Box and each sachet: Blue label at end of tray- 684H (top left) 2 metric (3/0) ETHICON / Silk / Black Braided /Silk Suture /45 cm Non-Capillary Sterile / Johnson & Johnson / medical Products Pty. Ltd. Sydney. (on right) Cutting FS-1 / 24mm. Sachet yellow label: Plain 2/0 metric 3.5 / Ethicon / Surgical Catgut, B.P. / Sterile / Non- Boilable / Taper CT-1/ 36 mm / Length 75 cm / Ethnor Pty. Ltd. Sydney. Across the sachet is a dotted line (for cutting?) then across the label Plain 2/0 / 843. Top of box - broken label. Made in Australia /Johnson&Johnson medical equipment. hospital equipment. tawonga. mt beauty. suture. -
 Kiewa Valley Historical Society
Book - Country Women's Association of Victoria, Recipes
The Country Women's Association of Victoria aimed to improve the health, welfare and education for women and children in the country. Many groups in country Victoria existed including one at Allan's Flat in the north east.The ladies of the Tawonga CWA branch supported the Allan's Flat branch as this book was amongst a Tawonga member's belongings. The visiting and communication between other branches supported the aims of the CWA organisation.White book with 36 pages held together with 2 rusting staples. In dark blue the title, CWA logo and Allan's Flat / Victoria are written. The recipes are typed in blue.cwa. recipes. allan's flat. cooking. -
 Warrnambool and District Historical Society Inc.
Booklet - Embroiderers Guild, 1984
This booklet, written by member Rita Williams, gives information on the history of the first decade of the South Western Embroiderers Guild, Warrnambool. The guild was formed in 1974 with an initial membership of 36. In the first ten years the guild members were active, making contact with other embroiderers, holding exhibitions, making a patchwork quilt for the bed at the Lighthouse Keepers’ Cottage at Flagstaff Hill Maritime Museum and making an embroidered mural of Warrnambool presented to the Warrnambool Regional Performing Arts Centre in 1983. This mural features over 80 local buildings, Norfolk Island pines and small figures and other objects. The Embroiderers Guild continues to prosper today. This booklet is of interest as it contains the early history of the South Western Embroiderers Guild, a significant organization in Warrnambool. This is a booklet of 24 pages with a cover in brown and cream tonings featuring an image of the Warrnambool Coat of Arms and a tapestry. The pages contain a sketch and printed material. The booklet was stapled but the staples have been removed.R.Isaacsouth western embroiderers guild, warrnambool, history of warrnambool -
 Warrnambool and District Historical Society Inc.
Booklet, Air Raid Precautions, 1941
... Olive green soft card cover with black text. 36 pages... and Public Health Olive green soft card cover with black text. 36 ...This booklet was published on the recommendation of the Commonwealth government as part of a plan to offer protection to the people in the event of air strikes. Local councils and individuals were called to help to protect themselves in taking precautions,. The booklet itself sets out action to be taken in the event of an air raid happening, lighting restrictions fire prevention, refuge rooms and garden shelters and risks from air raids. It contains the relevant siren signals which denote different types of events and explains in detail various aspects of preparing for possible attack. There was discussion about issues such as evacuation of children should such an event occur with the focus primarily on the larger centres such as Geelong and Melbourne. From 1942 the number of air attacks increased mainly from Japan on the northern and western parts of Australia including over 60 on Darwin. Attacks continued into 1943 and it wasn’t until later in that year that the Prime Minister, John Curtin announced that the threat of invasion had passed.While the link to Warrnambool’s history is tenuous, it was a government publication to all persons in the state of Victoria in 1941.This item relates to a significant period in Australia’s history. All Australians were affected by the war. It has historical and scientific or research interest as it gives a number of diagrams and possible plans and the effectiveness of same. Olive green soft card cover with black text. 36 pages, with 2 extra pages depicting plans for shelters pasted inside back cover. Victorian coat of arms at top of cover.April 1941. H. E. Daw, Government printer. Forward by Sir John Harris KBE MLC Minister of Public Instruction and Public Healthhistory of warrnambool, air raid precautions 1941 -
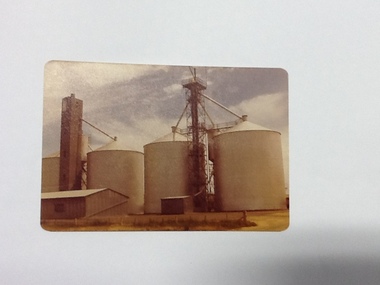 Port of Echuca
Colour Photograph, Approx.1979
This is of historical and social significance in that Echuca was a terminal for rice distribution and processing. The rice mills were located in Annesley st next to the railway line. Here 4 silos and 2 of the conveyor towers are visible, looking to the east. The rice mills employed many people in Echuca. Echuca has historically had many storage silos for grains. The rice mills in Echuca stored and processed rice up until the early 1990s. This photograph clearly shows the rice silos and conveyor towers that were in Annesley street .Colour photograph (postcard size) of rice mill silos, Echuca. Photograph shows 4 silos with 2 conveyor towers.In blue pen on reverse:"35A-36". Printed in red on reverse:"It's Kodak for color. Nov.79. Print made by Kodak. M."rice mills, echuca, echuca-industry -
 Warrnambool and District Historical Society Inc.
Book - Braille Books
These three books contain braille printing and may have come from The Victorian Association of Braille Writers and may have been used by Miss Skirrow in South Warrnambool in 1916. This latter information comes from the loose card in one of the books. Braille writing was invented by the French man Louis Braille in 1824 based on the French alphabet. These books are of historical interest and appear to have local significance..1 A hard cover book with a mottled pattern and black bindings containing 42 pages of braille printing. There is one loose card. .2 and .3 as above except for the card and .2 has 32 pages ,.3 has 36 pages .1 L9 55 .2 L9 53 .3 L9 54warrnambool history, vintage braille books -
 Eltham District Historical Society Inc
Document - Property Binder, 895 Main Road, Eltham
Folder: 895 Main Road, Eltham Contents Listing 1. Certificate of Title; Vol. 8424, Fol. 334, 5 February 1963 2. Certificate of Title; Lot 2, Plan of Subdivision No. 63242, Parish of Nillumbik, Vol. 8479, Fol. 283, 18 May 1964 (Eltham War Memorial Trust) 3. Newspaper article: Extensions to shire offices will benefit all, by Fab Calafuri, Diamond Valley News, Tuesday, July 8, 1986, p6 [Reverse side, p5, Residents rally to save dam by Helen Gillman about Peck’s Dam in Napier Street, Montmorency] 4. Office memo: Temporary Shutdown of Water Supply Shire Offices – Tuesday 9 March 1993; Anthony Guzzo, 5 March 1993 – Melbourne Water advice due to works on new library 5. Plan of Old Municipal Offices, date and creator unknown 6. Newspaper clipping: Move to convert shire office for police use, by Jodie Haythorne, Diamond Valley News, May 1995 7. Newspaper clipping: Sale of Eltham office / Removal of Question time; Nillumbik Happenings, Mountain Views, 15 May 1995 8. Newspaper clipping: Bid for TAFE campus, Mountain Views, 25 September 1995, p8 9. Newspaper clipping: Will the former Shire of Eltham offices become a TAFE college?, The Advertiser, circa September 1995 [Reverse side; Jezza! Photo of football legend Alex Jesaulenko at Watsonia RSL also Advertisement: Maternal and Child Health Centre Timetable] 10. Newspaper clipping: Eltham may get TAFE campus in shire offices, by Fiona Kaegi and Natalie Town, and Nillumbik set for rate cuts, Diamond Valley News, circa September 1995 [Reverse side; Art for hope – article about artist Damien Curtain at Hurstbridge Primary School] 11. Newspaper clipping: More talks on TAFE, The Advertiser, Tuesday, October 17, 1995, p3 – includes photos of Nillumbik Chief Commissioner Don Cordell, Box Hill College of TAFE Executive Director Andrew Jackson and Niillumbik CEO Barry Rochford; Eltham MP Wayne Phillips with Eltham Chamber of Commerce President Norm Williams and Rotary Club of Eltham President Peter Bishop; Eltham College principal John Brennan with St Helena Secondary College head Ken Cunningham and Eltham High School principal Ron Edwards. [On reverse, p4, Sorry sag of botched relations, Jock Kyme] 12. Newspaper clipping: Eltham hails TAFE take-over, by Fiona Kaegi and Council to hold regular briefings, Diamond Valley News, 18 October 1995 13. Newspaper clipping (photocopy): Why no council office at Eltham?, Mark Burns, Letters, Diamond Valley News, 18 October 1995 14. Newspaper clipping: Future of Eltham office?, Mountain Views, Monday, October 23, 1995, p8 15. Newspaper clipping: Council seeks opinions on former shire offices, by Fiona Kaegi, Diamond Valley News, 25 October 1995 16. Newspaper clipping: Shire office move, The Advertiser, December 1995 17. Newspaper clipping: Former shire offices up for sale; possibly Diamond Valley News, December 1995 18. Newspaper clipping: Agents to sell shire office, Mountain Views, Monday, December 18, 1995, p8 19. Newspaper clipping: Advertisement; Nillumbik Shire Council Proposed Sale or Lease of Eltham Municipal Offices, Diamond Valley News, 10 January 1996 20. Newspaper clipping: No Submissions on Eltham Shire Offices, Diamond Valley-Whittlesea Advertiser, 30 January 1996, p1 21. Photocopy: Minutes of Ordinary Council Meeting, 31 January 1996, 7.4 Sale or Lease of Former Eltham Municipal Offices 22. Photocopy: Letter HTW Valuers to Nillumbik Shire Council, Valuation of former Eltham Municipal Offices at $1.45 million, 31 January 1996 23. Newspaper clipping: New G’boro, Eltham places, Diamond Valley-Whittlesea Advertiser, Tuesday, March 26, 1996, p4 [on reverse, p3, ALP Faithful at Montsalvat] 24. Newspaper clipping: Legal costs a hurdle for action group, by Laeta Antonysen, Diamond Valley News, 16 April 1996 25. Photocopy (91 pages): Tender Documents for purchase of Former Eltham Shire Offices 895 Main Road, Eltham, Prepared for Nillumbik Shire Council, Maddock Lonie & Chisholm, Melbourne. Tenders close at 3.00pm on 24 April 1996 26. Newspaper clipping (Photocopy): Building’s asbestos riddle. By Fiona Kaegi, Diamond Valley News, 26 June 1996 27. Photocopy: Minutes of Ordinary Council Meeting, 26 June 1996, 11.43/96 Sale of Eltham Offices, Main Road, Eltham 28. Media Release (Photocopy of facsimile from Barry Rochford, CEO): Community Facilities in New Gateway to Eltham, 28 June 1996 29. Photocopy (A3): TPA1 – Site Plan 1:200 Proposed Convenience Centre At Main Road Eltham, Baldasso Cortese Pty Ltd Architects, Collingwood, July 1996 30. Newspaper clipping: ‘Whopper’ For Eltham?, Letters, Sigmund Jorgensen, The Advertiser, Tuesday, July 2, 1996, p3 31. Newspaper clipping: Ex-shire offices to go, by Fiona Kaegi, Diamond Valley News, 3 July 1996, p1 32. Photocopy Newspaper clipping: Unsuccessful bidders criticise sale of offices, by Fiona Kaegi, Diamond Valley News, 10 July 1996 33. Newspaper clipping: Insensitive proposal, Sue Dyet, Letters, Diamond Valley Newsm 17 July 1996 34. Photocopy: Minutes of Ordinary Council Meeting, 17 July 1996, 7.116/96 Sale of Eltham Offices, Main Road, Eltham 35. Newspaper clipping: Former shire office sale angers residents, Diamond Valley News, 30 July 1996, p3 36. Newspaper clipping: Eltham Offices Demolition, ‘You can’t demolish city hall’, The Advertiser, Tuesday, July 30, 1996, pp14-15 features photos of Eltham protestors, Thelma Barkway, Harry Gilham, Jenni Mitchell, Jock Kyme and David Essex 37. Photocopy (A3): TPA1 – Site Plan Proposed Convenience Centre, Main Road, Eltham, Graeme Bentley Landscape Architects, August 1996 38. Newspaper clipping (Photocopy): Letters; Disbelief at plans, Margaret Jennings; Lack of respect, Mike Jansz; Community opinion, Sigmund Jorgensen, Diamond Valley News, circa August 1996 39. Newspaper clipping (Photocopy): ‘There was no conflict of interest’, The Advertiser, Tuesday, August 4, 1996 40. Newspaper clipping: Chamber supports plans, by Jodie Guest, Diamond Valley News, 7 August 1996 41. Newspaper clipping (Photocopy): Letters; Adding to the price, Kelly Fitzpatrick; Area being torn apart, Jenni Bundy, Diamond Valley News, 7 August 1996 42. Newspaper clipping: Labor joins battle to save offices, by Fiona Kaegi, Diamond Valley News, (7?) August 1996 43. Newspaper clipping: Letters to the Editor; ‘Atrocious assault of commercialism’, Lois Loftus-Hills, The Advertiser, Tuesday, August 13, 1996, p9 44. Newspaper clipping: Letters; Roll up for the show, Kahn Franke; Thanks for turn-out, Margaret Jennings; Way past time, Jenni Bundy; Angry at the vandalism (continued p13 missing), Diamond Valley News, August 14, 1996, p12 45. Newspaper clipping: ‘Enough is enough’ states John Cohen; Letters to the Editor, Diamond Valley-Whittlesea Advertisers, Tuesday, August 20, 1996, p2 [Reverse, p1, Trade boost at Diamond Creek] 46. Newspaper clipping: Public viewing, Diamond Valley News, 4 September 1996, p 47. Newspaper clipping: Letters; Chiefs must resign, Gayle Blackwood; Time to have your say, Margaret Jennings; Sensible balance, Gwen Jakins; Recycling: a fine example, Grace Mitchell; Limits on site use, Stephen Clendinnen; Diamond Valley News, 4 September 1996, p4 48. Newspaper clipping: Letters; A lasting memorial, Ken and Laurel Eckersell; Stripping assets, Jack Lawson; Diamond Valley News, 4 September 1996, p29 49. Newspaper clipping: Letters; Nillumbik: in the eye of the beholder, Sigmund Jorgensen; ‘Crying inside’ over Eltham Shire office, Grace Mitchell; The Advertiser, Tuesday, September 10, 1996, 2 50. Newspaper clipping: Public Notice; Notice of an Application for Planning Permit, Dallas price Homes Pty Ltd, Diamond Valley News, 11 September 1996 51. Newspaper clipping (Photocopy): Timing was the problem: chief, by Laeta Antonysen, Diamond Valley News, 11 September 1996 52. Newspaper clipping: Letters; Architectural monstrosity, Jenni Bundy; Bargain price, Gavin Gray; Paying for road works, Sue Dyet; Diamond Valley News, 11 September 1996 [ on reverse, articles on Queen’s Guide Nicola Blay (photo) and Plenty River and Diamond Creek waterways] 53. Newspaper clipping: Eltham Hub Plans on Show, The Advertiser, Tuesday, September 17, 1996, p1 54. Newspaper clipping: Bleeding halted: Commish and Letters; Sigmund’s credibility gap, David Nolte; ‘Double standards’, Ros Harris, The Advertiser, Tuesday, September 17, 1996, p3 55. Newspaper clipping: Gateway to the future; Plans on display, public comments sought, by Laeta Antonysen, Diamond Valley News, September 18, 1996, p8 [Reverse, p7, Policy limits event signs, and, Council ‘arrogant’ on ward option: MP] 56. Newspaper clipping (Photocopy): 19 on council inquiry list, by Jodie Guest, Diamond Valley News, 18 September 1996 – about council listing 19 people who are only to be dealt with directly by CEO, Barry Rochford 57. Newspaper clipping (Photocopy): Eltham is wonderful, Sigmund Jorgensen, Letters, The Advertiser, Tuesday, September 24, 1996, p4 58. Objection to Grant of Planning Permit (Photocopy): Russell Yeoman per Eltham District Historical Society Inc. re application 960376 for petrol station, convenience shop, retail shop, etc to be issued to Dallas price Homes Pty Ltd, 25 September 1996 59. Newspaper clipping (Photocopy): Public meeting, Eltham Gateway Action Group – to discuss latest plans to develop former shire office site on Sunday 4 September 1996; publication unknown, possibly Diamond Valley News 60. Newspaper clipping: Minister orders sale probe, by Jodie Guest, Diamond Valley News, Wednesday, October 12, 1996, p1 61. Newspaper clipping: Letters; Headline could mislead, Wayne Phillips, Member for Eltham, The Advertiser, Tuesday, October 8, 1996, p3 62. Newspaper clipping: Letters; Few jobs for young, Margaret Jennings; The whole truth, Alan Ramsay, Diamond Valley News, October 9, 1996, p12 63. Newspaper clipping: Public outcry at Abbott veto with ‘reserve power’; 200 residents yell abuse as commissioners give ok to Eltham service station, The Advertiser, Tuesday, October 15, 1996, p1 64. Newspaper clipping: Letters; Eltham Hub briochure has ‘trees that are a fiction’, Lois Lofus-Hills, The Advertiser, Tuesday, October 15, 1996, p2 65. Newspaper clipping: Shrewd tactics row, by Jodie Guest, Diamond Valley News, Wednesday, October 16, 1996, p1 66. Newspaper clipping: Residents have their say on former shire offices, by Jodie Guest, and, Anger over reserve power, by Laeta Antonysen, Diamond Valley News, Wednesday, October 16, 1996, p9 67. Newspaper clipping: Office sale report will not be made public, Diamond Valley News, October 23, 1996 [Reverse, article featuring Youth development officer, Ian Patching] 68. Newspaper clipping: Letters; Happening in a hurry, Peter Dodds; Development unsuitable, Mark Burns; Vale those dreamers, Sigmund Jorgensen, Diamond Valley News, October 23, 1996, two pages unidentified 69. Newspaper clipping: Group to fight council decision on office site, by Laeta Antonysen, Diamond Valley News, October 26, 1996 – re Eltham Gateway Action Group taking Council to the Administrative Appeal Tribunal over approval of controversial development [Reverse, article on Bend of Islands place name] 70. Newspaper clipping: Three days allowed to hear objection, by John Dubois, Diamond Valley New, December 4, 1996 71. Newspaper clipping: Letters; Site traffic dangers, Frank Burgoyne; Thanks for support, Margaret Jennings, Diamond Valley News, noted in pen as 8 December 1996 though probably 11 December 1996 [Reverse, What about that link, asks council, by Natalie Town – about ring road between Greensborough and Ringwood] 72. Newspaper clipping: Minister to rule on proposal, by Fiona Kaegi, Diamond Valley News, December 18, 1996 73. Report (Photocopy, 31 pages): Convenience Centre Development Proposal: Italian Cypress at Former Eltham Shire Offices Site, Main Rd. Eltham, Graeme Butler & Associates, 1997 74. Newspaper clipping: People unite to battle project, by Fiona Kaegi, Diamond Valley News, February 19, 1997 75. Letter (Photocopy): Ms B Martin to Fiona Kaegi to be submitted for Letters to the Editor, Diamond Valley News 26 March 1996 edition 76. Letter (Photocopy): Thelma Barkway to Fiona Kaegi to be submitted for Letters to the Editor, Diamond Valley News 26 March 1996 edition 77. Newspaper clipping: Legal Battle, by Fiona Kaegi, Diamond Valley News, Wednesday, April 2, 1997 78. Newspaper clipping: Site Row Saga, by Laeta Antonysen, Diamond Valley News, Wednesday, April 9, 1997 79. Newspaper clipping: Community fears loss of heritage, by Laeta Antonysen, Diamond Valley News, April 9, 1997 80. Newspaper clipping: Debate erupts over service station plan, by Laeta Antonysen, Diamond Valley News, April 9, 1997 [Reverse, ‘No’ to rates hike proposal] 81. Newspaper clipping: Letter to the Editor; “Your front-page last week is considerable inaccurate … a surplus of $14,000 is expected at 30 June 1977.”, Robert Marshall, The Advertiser, April 28, 1997, p1 82. Newspaper clipping: $1.1m Debt Plan, by Fiona Keagi, Diamond Valley News, Wednesday, April 23, 1997, p1 and continued on p24, Shire to defer works programs 83. Newspaper clipping: Blast for Council, by Laeta Antonysen, Diamond Valley News, Wednesday, April 30, 1997, p1 and continued on p7, ‘Experts’ oppose plans for shire site. 84. Newspaper clipping: Photo – Uncertainty: the future of the former Eltham Shire office site is still to be decided by Planning Minister Rob Maclellan., Diamond Valley News, April 30, 1997 [ Reverse; Not your average convenience store, by Laeta Antonysen] 85. Newspaper clipping: Shire site decision soon, Diamond Valley News, May 28, 1997 86. Newspaper clipping: Letters to the Editor; Features to protect, Ken Eckersell, Diamond Valley News, June 4, 1997 87. Newspaper clipping: Costly bun fight over shire offices, by Laeta Antonysen, Diamond Valley News, July 2, 1997 [reverse, Montsalvat plans season of festivals, by Fiona Kaegi] 88. Newspaper clipping: Shire office shemozzle, Diamond Valley News, July 2, 1997 – provides a brief timeline of events June 1996 to April 22, 1997 89. Newspaper clipping: Law Suit Threat, by Fiona Kaegi and Laeta Antonysen, Diamond Valley News, Wednesday, July 9, 1997, p1 90. Newspaper clipping: Report rejects store plan, and, Residents with panel, Diamond Valley News, Wednesday, July 9, 1997 91. Newspaper clipping: Councillors meet Shell developer, by Laeta Antonysen, Diamond Valley News, July 30, 1997 92. Newspaper clipping: Deadline extended to allow more talks, by Fiona Kaegi, Diamond Valley News, August 8, 1997. Also Curves to stay in link road about Nillumbik’s realignment plans for Diamond Creek’s ‘windy mile’ [Reverse, Shire tightens grants scheme] 93. Newspaper clipping: $10m option for shire office site, by Laeta Antonysen, Diamond Valley News, September 10, 1997 94. Newspaper clipping: New plan for shire office site, by Laeta Antonysen, and , Council refuses to do trade with developer, Diamond Valley News, September 17, 1997, p12 [ Reverse, p11, Mixed reaction to kangaroo culling] 95. Newspaper clipping: Gateway plan review, by Laeta Antonysen, Diamond Valley News, October 22, 1997, p3 96. Newspaper clipping: Top planner calls for rethink on office site, by Jodie Guest, Diamond Valley News (includes photo of John Pizzey) 97. Newspaper clipping: Opposition offers help on planning, by Jamie Duncan, Diamond Valley News, November 5, 1997, p3 (includes photo of Opposition Leader John Brumby and Nillumbik Shire President Robert Marshall at the Eltham Gateway site) 98. Letter (Photocopy): Russell Yeoman, Secretary, Eltham District Historical SAociety to Mr B. Rochford, CEO, Nillumbik Shire Council, 15 November 1997 with specific reference to the health of the three “Shillinglaw” trees 99. Newspaper clipping: Puzzlement over delay on office site, by Laeta Antonysen, Diamond Valley News, November 19, 1997 100. Newspaper clipping: Developer pulls out, by Laeta Antonysen, Diamond Valley News, December 10, 1997, p3, and, Council uproar over officers [Reverse, p4, Final victory – announcing resignation of Jenni Mitchell as president of Etham Gateway Action Group] 101. Newspaper clipping: Letters; Asset of pride, Sigmund Jorgensen, Diamond Valley News, January 14, 1998 102. Newspaper clipping: Minister ‘no’ to plan, by Laeta Antonysen, Diamond Valley News, February 11, 1998, p3 103. Newspaper clipping: Shell shocked as Eltham planning protest is upheld, by Gabrielle Costa, date and publication unknown; possibly The Age, February 1998 104. Newspaper clipping: Land review, by Laeta Antonysen, Diamond Valley News, April 1, 1998 105. Newspaper clipping: Bid to move shire offices to new site, by Laeta Antonysen, Diamond Valley News not specifically about 895 Main Road but former Diamond Valley Shire Offices at Civic Drive, Greensborough, circa June 1998 106. Newspaper clipping: Letters; What about us?, Gayle Blackwood, Diamond Valley News, circa June 10, 1998 107. Letter (Photocopy): Sigmund Jorgensen to Kahn Franke, 1 July 1998 re advertisement and list of contributors 108. Advertisement (Photocopy): Show that democracy is not dead in Nillumbik !!!, Saturday 17 Oct. 1998 109. Newspaper clipping: Arts dream shattered, by Natalie Birch, Diamond Valley Leader, July 17, 2002, p3 – Council about to dump plans for an arts centre on former office site 110. Newspaper clipping: Letters; This site belongs to the people, John Cohen; Pro-development, Jenni Bundy, Diamond Valley Leader, May 21, 2003 111. Discussion Paper: Community Use of Site, 895 Main Road Eltham, 8 pages, Gayle Blackwood, Sue Dyet, Ken Eckersell, 25 August 2003 with supporting drafts dated August 5 and 6. 112. Newspaper clipping: Shire plan ‘sacrilegious’; Residents fight war memorial sale, by Dave Cropssthwaite, Diamond Valley Leader, Nillumbik Edition, Wednesday, August 18, 2004, p1 – about council plans to sell Eltham War memorial and former Shire Office sites 113. Newspaper clipping: Land sales to come under more debate, by Dave Crossthwaite, Diamond Valley Leader, September 15, 2004, p5 114. Newspaper clipping: Council saves ex-office site, axes club plan, Diamond Valley Leader, March 30, 2005 115. Newspaper clipping: Letters; Ask the people, John Cohen, Diamond Valley Leader, April 6, 2005, p20 116. Newspaper clipping: Shire moving for public use zoning on Eltham landmark sites, Diamond Valley Leader, October 25, 2006 117. Newspaper clipping: Letters; Consultation a sham, Carol Doherty; Civic centre excellent, Marguerite Marshall; Only Eltham counts, Carmel Jacobsen, Diamond Valley Leader, May 22, 2007 [Reverse, Disability a test for councillor (Bo Bendtsen)] 118. Newspaper clipping: Advertisement; Nillumbik Planning Scheme, Approval of Amendment C49 – rezoning of 895 and 903-907 Main Road, Diamond Valley Leader, September 5, 2007, p7 119. Newspaper clipping: Illustration; An artist’s impression of the proposed Nillumbik civic centre in Main Rd., Diamond Valley Leader, June 25, 2008 [Reverse, City link with learning – about Eltham College setting up a city campus for Year 9 students, with photo featuring principal Dr David Warner and students] 120. Newspaper clipping: Civic centre forecast withdrawn, Diamond Valley Leader, July 2, 2008 121. Letter: Nillumbik Shire Council, 5 September 2008, re Civic Future Project 122. Letter: Nillumbik Shire Council to EDHS, 5 October 2008, re Civic Future Project 123. Letter (Copy): Mrs D. Bassett-Smith to Mayor and Councillors, 17 April 2009 re former shire office site and future community use 124. Letter (Copy): Eltham District Historical Society to Bill Forrest, CEO, Nillumbik Shire Council, 1 August 2009, in support of D. Bassett-Smith letter of 17 April 2009 and response from Council, 12 August 2009 125. Newspaper clipping: Hotel mooted for site, by Brittany Shanahan, Diamond Valley Leader, July 5, 2017 126. Newspaper clipping: Letters; Fury, surprise and support for Eltham development; Re: Grand plan for Eltham’s jewel (February 7), Cath McLardy, Diamond Valley Leader, February 14, 2008, p14 [Reverse, p13, Learning from the fateful day; the devastation on that day in 2009 will always stay in Steve Warrington’s mind. He recalls the tragedy] 127. Newspaper clipping: Letters; Plan to fight council on land sell-off, Jennifer Ambrudge and others, Diamond Valley Leader, February 14, 2018, p15 – about council plan to sell off reserves and shire office site and Eltham War Memorial 128. Newspaper clipping: Plans for site urged, by Brittany Shanahan, Diamond Valley Leader, September 5, 2018 129. Newspaper clipping: Approach under fire; Council plans for historic shire site raises eyebrows, by Brittany Shanahan, Diamond Valley Leader, September 19, 2018 130. Newspaper clipping: Advertisement; Our plan for a revitalised Eltham, Nillumbik Shire Council, Diamond Valley Leader, Wednesday, October 3, 2018, p7 131. Notice: Eltham Community Town Meeting, Saturday 134th October 2018 – about council plans to sell off community reserves and assets – along with flyer for Eltham Community Action Group 132. Essay A4 18 pages: An essay addressed to the Councillors of Nillumbik Shire, October 2018 (with addendum 7 November), Andrew Lemon 133. Photocopy Marked Up Flyer: The story behind 895 and 903-907 Main Road, Eltham – the heart of Eltham’s Town Centre, with marked up comments by Eltham Community Action Group, collected 9 December 2018 134. Newspaper clipping: Calls to fix ‘outdated’ site; negotiations cease with developers amid renewed push to improve civic space at Main St. Eltham, by Anthony Plovesan, Diamond Valley Leader, May 29, 2019, p5 135. Newspaper clipping: Ex-council site flagged for hospital; Councillor suggests former Eltham headquarters would be ideal spot, by Anthony Plovesan, Diamond Valley Leader, October 30, 2019, p3 136. Concept plan: Proposal; Nillumbik Cultural Gallery with Art Cinema, Restaurant, Tourism, Preliminary Sketch Design G, Barry Pearce Architect and Designer, 8 April 2022, 8 pagesmain road, eltham, property, houses, shops, businesses, shillinglaw trees, eltham shire offices site -
 Eltham District Historical Society Inc
Document - Property Binder, 976 Main Road, Eltham
Newspaper advertisement: Diamond Valley Leader, 2 April 2008, Midway Arcade complex. Newspaper advertisement: Weekly Review, 6-12 June 2018, Miles real estate, 6/976 Main Road Eltham. Newspaper advertising feature: The Age, 22 December 2020, Traditional Italian goodness to cool off in summer, When gelato 'gluttony' comes in 36 flavours.main road, eltham, property, houses, shops, businesses, midway arcade eltham, eltham optical, miles real estate, augustus gelatery, paul vernuccio, joe molinaro -
 Glen Eira Historical Society
Photograph - Mayor Jack Campbell 1987-88 (2 of 2)
36 Colour photographs of an Statutory Meeting at Caulfield Town Hall in 1987caulfield, mayor, jack campbell, felicitie campbell, doug aylen, elizabeth loftus, david bloom, habe mescreau, david spencer, max blair, irene blair, norma doolan, emil braun, yvonne walters, brian rudski, barry boyle, norma polglase, helen freedman, ted freedman, geoffrey conard, pat mcphee, judy brown, john robinson, geoffrey patience, dorothy ford, jean patience, mary blair, robyn erwin, john erwin, lynette campbell, graham gillard, gladys machin