Showing 2677 items
matching year 2
-
 Federation University Historical Collection
Postcard - Postcard - Black and white, Two World War One Soldiers, 1916, 28/08/1916
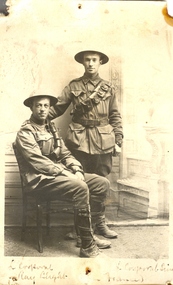
John Raymond (Ray) Blight enlisted on 19 July 1915. He was an electrical engineer, having studied at the Ballarat School of Mines. On 23 June 1916 Ray Blight disembarked at Marseilles. 3 February 1917 he was hospitalised with scabies. Ray Blight's next of kin was his mother, Mary Jane Blight of 116 Lyons Street South, Ballarat. James Leslie Sim enlisted on 13 July 1915, at which time he was an accountant. His next of kin was his father, Charles Robert Sim of Drummond Street North, Ballarat. On 23 June 1916 James Sim disembarked at Marseilles. A year later he received leave to the United Kingdom returning to France 2 weeks later. He received leave to Paris from 18 march 1918 to 4 April 1918. Sim was wounded on 1 June 1918.Two World War One soldiers in military uniform pose for a photograph. The two men are Lance Corporal Ray Blight and Lance Corporal Sim (both of Ballarat). On the back is a personal letter to Ballarat School of Mines Lecturer Daniel Walker. The pin holes in the postcard suggest it was displayed at the Ballarat School of Mines. .1) Verso: " France 25/8/16. Dear Mr Walker, Just a line in sending a photo we had taken in a small photographers, in a town within range of the evenings guns, the other boy is L/Corp Sim, one time an old SMB and son of R. Sim, of Ballarat, we are wearing steel helmuts weight about 4lbs they are protection against shrapnel and steel splinters. We are doing well here, Les Coulter was wounded just near here but did not see him. Best wishes to all. Ray Blight. .2) Verso: Sitting, Ray Blight, from Ballarat, you will know his sister, she helps Miss Brazena a lot with the parcels. Standing, Les Sim, of Sim and co. wood merchants, Ballarat.world war one, world war 1, james sim, ballarat school of mines, blight, james blight, sim, les sim, coulter, les coulter, world war, walker, wwi, great world war, france -
 Lara RSL Sub Branch
Photograph, Set 4 photographs. and others for Torquay Light Horse camp, 1940
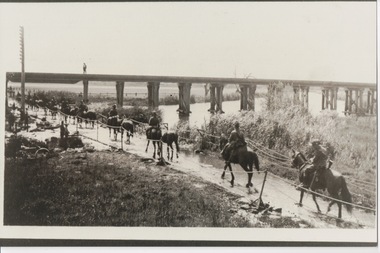
These images capture for all time Light Horsemen travelling through Geelong on their way to camp at Torquay for the last Group meeting in Australia . information following - details obtained from .........https://torquayhistory.com/light-horse-brigade/ On Australia Day, 1997, Sir John Young unveiled this plaque on Point Danger, Torquay. Torquay history, Light Horse Training Camp, WW2 Plaque at Pt. Danger Note----- (See images to view plaque) The plaque identifies a significant event in Torquay’s history and the sentiments of ‘change’ for the Light Horse Brigade – from horses to machines. In 1940 the four Light Horse Regiments (4th, 8th, 13th and 20th), some 5000 Light Horse and 2000 horses camped and trained at Torquay. Three other regiments, formerly mounted on horses, were also at Torquay ‘mounted’ on privately owned trucks and cars. Division troops included Artillery, Engineers, Signals, Field Ambulance and other branches of the Army necessary to enable a Division to function. It wasn’t just the sheer numbers of men coming to this little town that made the event significant, it was also the fact that the men of the Light Horse were dramatic, almost glamorous figures and it is easy to see their exploits as some splendid adventure. Horses have played a special role in the story of Australia. They were the only means of transport across this huge country, so it was necessary for everyone to have the ability to ride a horse. When war broke out in 1899 between Britain and the Boers of South Africa (“Boer” was Dutch for “farmer”) Australia sent troops to fight. At first Britain was wary of using untried, unprofessional colonial cavalrymen but soon saw that the slouch-hatted Australian “bushmen” were a match for the fast-moving and unconventional mounted commandos of the Boers. The Australians proved themselves to be expert rough-riding horsemen and good shots. Bush life had hardened them to go for long periods with little food and water. They also showed remarkable ability to find their way in a strange country and use its features for cover, in both attack and defence. By 1914, when Australia joined the war against Germany, there were 23 Light Horse regiments of militia volunteers. Many men from these units joined the Light Horse regiments of the Australian Imperial Force (AIF). Men were given remounts (if not using their own horses) – army horses bought by Commonwealth purchasing officers from graziers and breeders. These were called “walers” because they were a New South Wales stockhorse type – strong, great-hearted animals with the strains of the thoroughbred and semi-draught to give them speed, strength and stamina. On 1st November, 1914, Australia’s First Infantry Division and the first four Light Horse regiments sailed for England in a fleet of transport ships. The first of the Light Horse arrived at Gallipoli in May without their horses. Back with their horses after Gallipoli, they were formidable combatants across the Sinai and Palestine. Some British commanders observed that the light horseman moved with a “lazy, slouching gait, like that of a sleepy tiger” but described how the promise of battle “changes that careless gait, into a live athletic swing that takes him over the ground much quicker than other troops”. They had Light Horse, Torquay, training campdeveloped a reputation as formidable infantrymen. The Turks called them “the White Ghurkas” – a reference to their deadly skill with the bayonet. The Arabs called them “The Kings of the Feathers”. The plume had originally been a battle honour of the Queensland Mounted Infantry for their work in the shearer’s strike of 1891. During WW1 it was adopted by almost all the Light Horse Regiments. It was the proud badge of the light horseman. The most famous of their battles was the attack on Beersheba- the charge of the 4th Light Horse Brigade. Mounted infantrymen and their superb walers had carried out one of the most successful cavalry charges in history – against what seemed impossible odds. They surprised the Turks by charging cavalry-style, when they would normally have ridden close to an objective then dismounted to fight. The fall of Beersheba swung the battle tide against the Turks in Palestine; and changed the history of the Middle East. While 19 men from the Surf Coast Shire served with the 4th Light Horse over the course of WW1, only four were involved in the charge of Beersheba- John GAYLARD, Philip QUINN.(Winchelsea); Wallace FINDLAY (Anglesea); Harry TRIGG (Bambra). After the war, Light Horse units played a key role in the Australian Government’s compulsory military training programme. The Citizen Military Forces (C.M.F.) thrived on the glamour of the wartime Light Horse tradition, ignoring the possibility that motor vehicles would soon replace the horses. When training was no longer compulsory, the C.M.F. regiments declined and horses became more of a luxury during the 1930s depression years of poverty and unemployment. Some regiments were motorised. Then, in 1939, Australia joined Britain in another world war. Training was increased for the militia at both home bases and regional training camps. The camp at Torquay in 1940, commanded by Major General Rankin, was at Divisional strength. By the end of the camp some felt that the Division was ready for active service. Gradually, over the next four years, the Australian Light Horse units were mounted on wheels and tracks and the horses were retired. Six men enlisted at the Torquay camp and another 57 men and women enlisted at Torquay for service in WW2. Those who served in the Militia provided valuable Officers and NCOs and men for the armed services during the war. Each infantry division of the 2nd AIF had a Light Horse regiment attached to it. But the day of the Australian mounted soldier hadn’t quite passed. During World War II, Australia’s 6th Cavalry Regiment formed a mounted unit they called “The Kelly Gang” which did valuable scouting work. In New Guinea, a mounted Light Horse Troop did patrol duty and helped carry supplies. Some fully equipped walers were flown into Borneo for reconnaissance in rugged mountain country. But by the end of the war, in 1945, the horse had disappeared from the Australian Army. References: Australian Light Horse Association www.lighthorse.org.au National Australia Archives Australian War Memorial Surf Coast Shire WW1 memorials www.togethertheyserved.com The Light horse- a Cavalry under Canvas Light Horse, Training Camp, Torquay, WW2 Late in 1939 it was decided to set up a Lighthorse training camp in Torquay to train both men and horses for the battles of the Second World War. Horses, men and equipment came on special trains from all over Victoria and NSW, and as you would expect horseman came from areas such as Omeo and Sale, the Wimmera and the Western District. They arrived at the Geelong racecourse for watering in the Barwon River and then were ridden across the ford at the breakwater and began their 11 mile trek to Torquay. Light Horse, Training Camp, Torquay, WW2 Tent city By the end of January 1940 the camp at Torquay accommodated some 5000 men and 2500 horses of the Second Cavalry Division. The rows of horses, tents and huts near Blackgate Road were quite a sight. While the cavalrymen engaged in exercises on the land and on the beaches, many of the troops took over the Torquay School for special training of men and officers. Mr Bob Pettit local farmer and Councillor for the Barrabool Shire, wrote about the Light horse in the Surf Coast Community News in 1985 saying “They used to travel about the district riding four abreast in one long convoy. To my annoyance they went through my property and shut all the gates behind them. I had certain gates open to let stock in to the water holes and it would take me three -quarters of an hour to follow the horsemen up and put all the gates right again” he continued “the men from the Light Horse were here when the fire went through in March 1940. He recalled an incident when early one morning, as some one blew the bugle, a soldier putting a white sheet on the line frightened the horses. They panicked and ran off in all directions. Six went over the cliff near Bird Rock, five were never found, and the rest were gathered up after nearly a fortnight in the bush around Addiscott and Anglesea" Light Horse, Training Camp, Torquay, WW2, Geelong Parade Geelong parade The training camp culminated in a parade through the streets of Geelong on March 12th 1940. The salute was given at the Town Hall and the troops continued on a route to the You Yang’s for a training exercise. Note-----(see media section for photograph) The Camp was abandoned in mid 1940 as it was deemed unsuitable for training during winter and the cost of a permanent camp could not be justified if it could not be used all year. Historic.......Rare,,,Interpretive.Sepia photographs.set of four ....post card size ....Horses &LighthorsemenNo 1, Lighthorsemen Regiment Geelong 1940......No 2 Light Horse at Breakwater Geelong 1938 to 1940....No 3 Light Horse at Breakwater Geelong 1938 to 1940.....No 4 Light Horse crossing Breakwater camped at Geelong Showgrounds. These markings are on reverse of photographs.light horsemengeelong 1940., world war 2 -
 Lara RSL Sub Branch
Special General Order.Battle Honours-Citation Of Units,28th June 1951, Circa 1970
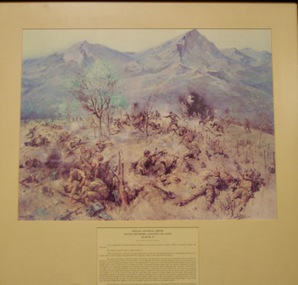
During 1951, the 3rd Battalion, The Royal Australian Regiment (3 RAR), fighting as part of a British Commonwealth Brigade in Korea, was engaged in the two most significant and commemorated battles of the Australian Army’s deployment to the three-year Korean War.The battles of Kapyong (23–24 April 1951) and Maryang San (2–8 October 1951) were significant confrontations with a numerically superior enemy force, and saw 3 RAR win the first honours for the newly formed Royal Australian Regiment.Framed Glass covered Print,Rectangular in Shape showing a painting of Australian soldiers fighting the enemy near Kapyong,Korea,in 1951,with a description underneath. Detailed description of the Special General Order,Battle Honours-Citation of Units. 28th June 1951 General Mathew B Ridgeway, Supreme Commander UNITED NATIONS FORCES prints, framed paintings, korea, lara r.s.l., korean war, battle honours, special general orders, citation of units -
 Federation University Historical Collection
Photograph - Photograph - black and white, Kodak Australia, Sarah and Laura Wright at Laura Villa, Smeaton, 28/1/1922
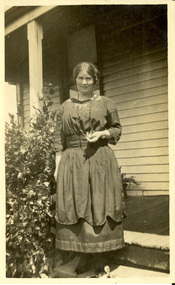
Frank Wright was a renown resident of Smeaton, where he was born. He lived at Laura Villa, and attended Smeaton State School. His father William was a gold miner and his mother's name was Sarah. Their family won many singing and instrumental awards. Frank was tutored by Percy Code and became the Australian Open Cornet Champion by the age of eighteen. A year later, Frank conducted the City of Ballarat Band, and later the Ballarat Soldiers’ Memorial Band. He formed the Frank Wright Frisco Band and Frank Wright and his Coliseum Orchestra. These bands won many South Street awards, and Frank as conductor won many awards in the Australian Band Championship contest. In 1933 Frank Wright sailed to England to conduct the famous St Hilda’s Band and was later appointed Musical Director of the London County Council, where he organized many amazing concerts in parks, in and around the London district. He was made Professor of Brass and Military Band Scoring and conducted at the Guildhall of Music and Drama. Frank was often invited to adjudicate Brass Band Championships around Europe, in Australia, including South Street and in New Zealand. The Frank Wright Medal at the Royal South Street competition is awarded to an individual recognized as making an outstanding contribution to brass music in Australia..1) black and white photograph of a woman dressed in a dark ankle length dress with a scalloped overskirt, wearing beads around her neck. She is standing on the steps of a cottage "Laura Villa" with a shrub to the left of her. The woman is Laura Wright. .2) black and white photograph of a woman wearing a long dark dress and a white cravat with a brooch, standing of the steps of a cottage. The woman is Sarah Wright and the cottage is "Laura Villa". .3) black and white photograph of a woman wearing a long dark dress and a white cravat with a brooch, standing of the steps of a cottage. The woman is Sarah Wright and the cottage is "Laura Villa"..1) Handwritten on back - Laura Wright, aged 25 years. Taken at Smeaton, January 28th 1922, by Frank Wright .2) Handwritten on back Mrs W. Wright, "Laura Villa" Smeaton. Taken by her son, Frank Wright on January 28th, 1922laura wright, sarah wright, laura villa, frank wright, smeaton -
 Federation University Historical Collection
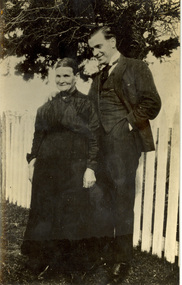
Photograph - Photograph - black and white, Kodak Australia, Sarah Wright and son Alex, circa mid - late 1920's
Alex Wright was the brother ofFrank Wright who was a renown resident of Smeaton. He lived at Laura Villa, and attended Smeaton State School. His father William was a gold miner and his mother's name was Sarah. Their family won many singing and instrumental awards. Frank was tutored by Percy Code and became the Australian Open Cornet Champion by the age of eighteen. A year later, Frank conducted the City of Ballarat Band, and later the Ballarat Soldiers’ Memorial Band. He formed the Frank Wright Frisco Band and Frank Wright and his Coliseum Orchestra. These bands won many South Street awards, and Frank as conductor won many awards in the Australian Band Championship contest. In 1933 Frank Wright sailed to England to conduct the famous St Hilda’s Band and was later appointed Musical Director of the London County Council, where he organized many amazing concerts in parks, in and around the London district. He was made Professor of Brass and Military Band Scoring and conducted at the Guildhall of Music and Drama. Frank was often invited to adjudicate Brass Band Championships around Europe, in Australia, including South Street and in New Zealand. The Frank Wright Medal at the Royal South Street competition is awarded to an individual recognized as making an outstanding contribution to brass music in Australia..1) Black and white photograph of a man and a woman standing in front of a picket fence, with a large tree in the background. The man is wearing a suit and is Frank Wright. The woman is wearing a long dark skirt and long sleeved blouse with a brooch at the neckline. She is his mother Sarah Wright. The man is wearing a suit and is Sarah's son Alex. The picket fence surrounds "Laura Villa". .2) Glass plate for this photographPrinted on the back - Post Card, Kodak Australiafrank wright, sarah wright, picket fence, laura villa, smeaton, cornet -
 Federation University Historical Collection
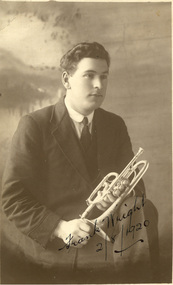
Photograph - sepia, Frank Wright, 02/08/1920
Frank Wright as a 19 year oldPostcard photo signed on lower right corner, Photo of Frank Wright holding a cornet.Frank Wright 2/8/1920 signed on lower right corner, and on back "Frank Wright 2nd August 1920 Aged 19 years "frank wright, cornet. brass band. 1920, trumpet -
 Federation University Historical Collection
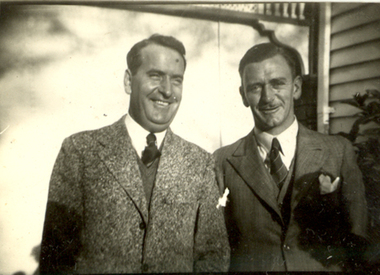
Photograph - Photograph - Black and White, Frank Wright and Friend, 03/1940
Frank Wright was a renown resident of Smeaton, where he was born on 2 August 1901. He lived at Laura Villa, and attended Smeaton State School. His father William was a gold miner and his mother's name was Sarah. Their family won many singing and instrumental awards. Frank was tutored by Percy Code and was awarded a gold medal for the highest marks in the ALCM examinations in the British Colonies at the age of seventeen years. He became the Australian Open Cornet Champion by the age of eighteen. A year later, Frank conducted the City of Ballarat Band, and later the Ballarat Soldiers’ Memorial Band. He formed the Frank Wright Frisco Band and Frank Wright and his Coliseum Orchestra. These bands won many South Street awards, and Frank as conductor won many awards in the Australian Band Championship contest. In 1933 Frank Wright sailed to England to conduct the famous St Hilda’s Band and was later appointed Musical Director of the London County Council, where he organized many amazing concerts in parks, in and around the London district. He was made Professor of Brass and Military Band Scoring and conducted at the Guildhall of Music and Drama. Frank was often invited to adjudicate Brass Band Championships around Europe, in Australia, including South Street and in New Zealand. The Frank Wright Medal at the Royal South Street competition is awarded to an individual recognized as making an outstanding contribution to brass music in Australia.Small black and white photograph of the torsos of two men dressed in light suits. They are standing outside a weatherboard house. The man on the left is Frank Wright and the man on the right is possibly his friend Vernon Holt.Written in pencil on back - March 1940frank wright, vernon holt, conductor, brass band -
 Federation University Historical Collection
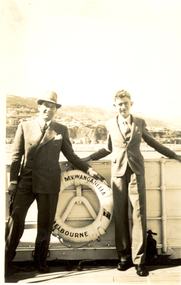
Photograph, Black and White, 13.2.1940
Frank Wright was a renown resident of Smeaton, where he was born. He lived at Laura Villa, and attended Smeaton State School. His father William was a gold miner and his mother's name was Sarah. Their family won many singing and instrumental awards. Frank was tutored by Percy Code and was awarded a gold medal for the highest marks in the ALCM examinations in the British Colonies at the age of seventeen years. He became the Australian Open Cornet Champion by the age of eighteen. A year later, Frank conducted the City of Ballarat Band, and later the Ballarat Soldiers’ Memorial Band. He formed the Frank Wright Frisco Band and Frank Wright and his Coliseum Orchestra. These bands won many South Street awards, and Frank as conductor won many awards in the Australian Band Championship contest. In 1933 Frank Wright sailed to England to conduct the famous St Hilda’s Band and was later appointed Musical Director of the London County Council, where he organized many amazing concerts in parks, in and around the London district. He was made Professor of Brass and Military Band Scoring and conducted at the Guildhall of Music and Drama. Frank was often invited to adjudicate Brass Band Championships around Europe, in Australia, including South Street and in New Zealand. The Frank Wright Medal at the Royal South Street competition is awarded to an individual recognized as making an outstanding contribution to brass music in Australia.Frank Wright on the M.V. Wanganella .1) Black and white photograph of two men standing against the rails of a boat. In the background is the hilly shoreline of Wellington. the boat is the M.V.Wanganella and the man on the left is Frank Wright. .2) Frank Wright on the M.V. WanganellaHandwritten on back - On board Wanganella, Wellington 13-2-40; 15 B frank wright, cornet, conductor, wellington, m.v.wanganella, boat -
 Federation University Historical Collection
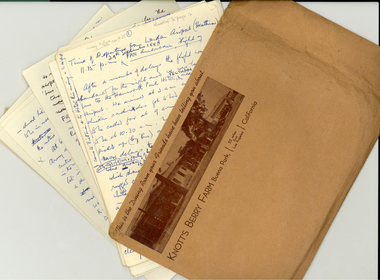
Document, Frank Wright, Handwritten notes (diary) in envelope, 1949
Frank Wright was a renown resident of Smeaton, where he was born on 2 August 1901. He lived at Laura Villa, and attended Smeaton State School. His father William was a gold miner and his mother's name was Sarah. Their family won many singing and instrumental awards. Frank was tutored by Percy Code and was awarded a gold medal for the highest marks in the ALCM examinations in the British Colonies at the age of seventeen years. He became the Australian Open Cornet Champion by the age of eighteen. A year later, Frank conducted the City of Ballarat Band, and later the Ballarat Soldiers’ Memorial Band. He formed the Frank Wright Frisco Band and Frank Wright and his Coliseum Orchestra. These bands won many South Street awards, and Frank as conductor won many awards in the Australian Band Championship contest. In 1933 Frank Wright sailed to England to conduct the famous St Hilda’s Band and was later appointed Musical Director of the London County Council, where he organized many amazing concerts in parks, in and around the London district. He was made Professor of Brass and Military Band Scoring and conducted at the Guildhall of Music and Drama. Frank was often invited to adjudicate Brass Band Championships around Europe, in Australia, including South Street and in New Zealand. The Frank Wright Medal at the Royal South Street competition is awarded to an individual recognized as making an outstanding contribution to brass music in Australia.Brown envelope with photograph of Knott's Berry Farm Buena Park California, containing 42 cream pages with handwritten notes in blue and black ink and some pencil. It appears to be Frank Wright's diary of his trip from London to the United States, finishing with his landing at Essendon aerodrome in Melbourne, beginning on 29 September till 17 October 1949.Handwritten notes throughoutdiary, frank wright, knott's berry farm, california, ireland, essendon aerodrome, essendon, melbourne, new caledonia, arizona, mississippi, missouri -
 Federation University Historical Collection
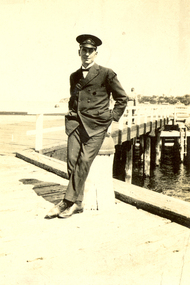
Photograph - Black and White, Frank Wright at a pier, 1920s
Frank Wright was a renown resident of Smeaton, where he was born on 2 August 1901. He lived at Laura Villa, and attended Smeaton State School. His father William was a gold miner and his mother's name was Sarah. Their family won many singing and instrumental awards. Frank was tutored by Percy Code and was awarded a gold medal for the highest marks in the ALCM examinations in the British Colonies at the age of seventeen years. He became the Australian Open Cornet Champion by the age of eighteen. A year later, Frank conducted the City of Ballarat Band, and later the Ballarat Soldiers’ Memorial Band. He formed the Frank Wright Frisco Band and Frank Wright and his Coliseum Orchestra. These bands won many South Street awards, and Frank as conductor won many awards in the Australian Band Championship contest. In 1933 Frank Wright sailed to England to conduct the famous St Hilda’s Band and was later appointed Musical Director of the London County Council, where he organized many amazing concerts in parks, in and around the London district. He was made Professor of Brass and Military Band Scoring and conducted at the Guildhall of Music and Drama. Frank was often invited to adjudicate Brass Band Championships around Europe, in Australia, including South Street and in New Zealand. The Frank Wright Medal at the Royal South Street competition is awarded to an individual recognized as making an outstanding contribution to brass music in Australia.Black and white photograph of a young man with his hands in his pockets, leaning against the bollard of a pier. The man is dressed in the Ballarat City Band uniform and cap. Behind him the pier extends into the water and in the distance on the far side of the water can be seen a headland with houses and buildings. The man is Frank Wright.frank wright, ballarat city band, pier, conductor, brass band -
 Royal Melbourne Yacht Squadron
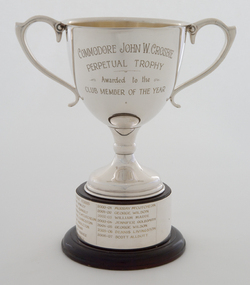
Commodore John W Crosbie Memorial Cup
Following the death of Past Commodore John Crosbie in 1986, his long time friend from College days, Club member George Silley, was left a sum of money with which he was to handle John’s affairs. This George Silley was reluctant to accept, and in turn he offered half each to both R.M.Y.S. and R.B.Y.C. for the purchase of suitable Perpetual Trophies. The conditions agreed upon at R.M.Y.S were:- 1. The trophy to be named ‘Commodore John W. Crosbie Perpetual Trophy’. 2. To be awarded annually for: ‘The Club member of the year for his contribution to the Squadron’s Activities’. 3. Recipients of the Trophy must be nominated and seconded by Members of the Squadron. Selection criteria to be determined by the Committee, Flag Officers and General Committee. On receipt of the Trophy, April 1987, the Squadron then had it suitably engraved to George Silley’s liking by the Squadron’s engraver. In his modesty, for personal reasons, George Silley did not wish to be recognized as the donor. This agreement was not strictly adhered to, as evidenced in Annual Reports for the years 1990 and 1991, both of which rightfully credit G.A. Silley as being the donor. In 1988, for reasons unknown, and contrary to the donor’s conditions agreed upon, a further and as it turned out, erroneous inscription not to George Silley’s liking was added to the Trophy, as above. The first recipient of the Award was Les Williams in season 1986/1987. The award is by nomination from a Proposer and Seconder. General Committee then reviews the nominations received.Deep sectioned silver bowl standing 230mm high to flared lip edge, on thick sectioned stem with annular ring about mid-section, flaring out to shaped, stepped footing. Has large shaped handles, top attachment in form of seahorse heads. Mounted on 85mm high round black base, flaring out to stepped, shaped footing. Silver winners’ inscription band around diameter.Inscription on one side 1987 COMMODORE JOHN W. CROSBIE PERPETUAL TROPHY AWARDED TO THE CLUB MEMBER OF THE YEAR Erroneously added 1988 PRESENTED BY JOHN W. CROSBIE MEMBER ROYAL MELBOURNE YACHT SQUADRON 1934-86 COMMODORE 1970 -72 HONORARY LIFE MEMBERjohn w crosbie, memorial cup, trophy, perpetual -
 Royal Melbourne Yacht Squadron
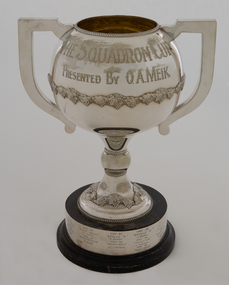
The Squadron Cup
Presented by Commodore Otto A. Meik, September 27, 1971 for a Combined Clubs Round the Bay Race. It was first sailed in the Season 1972 -73 and won by Ricky Laycock in Aquila. Traditionally, this trophy was awarded for the Squadron overnight race held in November each year. In the early 1980’s a decline in the entrants for overnight races forced the shift of the race to a long all- day Around the Bay Race. In November 1990, the race was reinstituted as a Combined Divisions Race, using V.Y.C. handicap system and was won by Ninda – Roger Townley. Prizes are also awarded for winner in C.H.S. and I.M.S. handicaps. In 2007 the Squadron Cup was confirmed as the prize for the overall winner of YV PH Division 1, 2 and 3, open to all clubs for a long race (70nm plus) with a night component. The race was decided on the results from the Big Bay Challenge race from 2007 onwards, won in 2007 by San Miguel – Russell Walton.Spherical shaped bowl 345 mm high to lip edge, with raised grape and leaf decorations around mid-section, flaring down to thick shaped stem, thence out to shaped footing also with raised grape and leaf decorations. Has solid rectangular handles. Shaped lid with raised grape and leaf decorations around edge, surmounted with solid, shaped dome with overall height 100 mm. Bowl stands on 80 mm high, round black base with shaped footing, silver winners inscription band around diameter.THE SQUADRON CUP PRESENTED BY O.A. MEIKsquadron cup, trophy -
 Federation University Historical Collection
Booklet - Student information, Ballarat School of Mines General Information for Diploma Students Booklets, 1 & .2 1963, .3 1959/1960
.1 , .2 & .3 Beige colour booklets of 4, and 11 pages, .4 & .5 pale green booklets of 11 pages and .6 & .7 red booklets of 16 pages, with information about length of courses, the academic year, class times, credit for subjects of course, examinations, exemptions, the awarding of the diploma, conferring of diplomas, entrance to university, extra curricular activities, school boards, enrolment and re enrolment, and payment of fees. ballarat school of mines and industries, diploma information, the diploma school, applied chemistry, metallurgy, geology, electrical engineering, mechanical engineering, civil engineering, mining engineering, applied physics, art -
Federation University Historical Collection
Booklet, Ballarat University College Financial Statements Year Ended December 1991, 1991
.1) Annual Report .2 Brown soft covered financial report of 20 pages.ballarat univesity college, robert hook, shirley falkinder, john sharpham -
Federation University Historical Collection
Document - Article, A Profile of Bella Guerin, Australia's first woman graduate, 1987
Bella Guerin matriculated from the University of Melbourne in 1878, passing in Latin, English, French, Arithmatic, Algebra, Euclif and History She enrolled into the Faculty of Arts at Melbourne University in 1881, the first year women could do so, and graduated in 1883. From January 1887 to June 1891 Bella Guerin taught at the Ballarat School of Mines, during a period of affiliation with the University of Melbourne.Eleven page article from the Victorian Historical Journal (May-August 1987, Vol 53, No 2&3) on Bella Guerin.bella geurin, bella lavendar, bella halloran, henry halloran, women's movement, woman's suffrage, women's political association, anti-conscription -
Federation University Historical Collection
Document - Document - Letter, Ballarat Junior Technical School: Correspondence related to the enrolment of student,1952
Letter from Mrs McDonald requesting her son be enrolled at BJTS for the following year. Understands date has passed for enrolments. Knows there are a number of students from Meredith wishing to come. Would it be possible for the Bus to come to Meredith. Already goes to Elaine, four miles away. Mr Garner explains it is too late to enrol. School is full. Suggests he does Grade VII and then make application before October 1953. Ballarat High School Principal arranges bus travel..1: Lined writing paper - blue ink .2: Cream page, typed.1: Signature of Mrs Les McDonald ballarat junior technical school, head master, l garner, mrs l mcdonald, son, enrol at bjts, meredith, grade vii, ballarat high school, principal, october 31 -
Federation University Historical Collection
Document - Document - Letter, Ballarat Junior Technical School: School correspondence with Messer & Opie Ptd Ltd, re scholarships, 1956
Letters relate to the awarding of the scholarship provided by Messer and Opie Pty Ltd. School informed them of the winner of the 1955 scholarship was Barry Paterson. He has gone to the School of Mines and started a four year course in Electrical Engineering. School also thanks them for the money for the following year's scholarship. .1 and .3: Yellow pages, typed .2: Light orange, typedLetterhead for Messer & Opie Signature of secretary, B McCoyballarat junior technical school, head master, l garner, barry paterson, messer & opie, scholarship, intermediate technical certificate, diploma entrance level, school of mines, electrical engineering -
Ringwood and District Historical Society
Equipment - Printers Blocks, Borough of Ringwood - Printers Blocks for Land Sales (Notice, and Plan). c1850s-60s, 1858
1 Text readsWitness Our Only and Well Beloved Son Sir Henry Berkly Knight Commander of the Most Honourable Order of the Bath, Captain General and Governor-in-Chief of our said Colony and --------- of the same, at Melbourne, Victoria, aforesaid the Eleventh day of May and the Twenty First Year of the Reign and in the Year of Our Lord One Thousand eight hundred and fifty eight.1 Printers block no. top left 1598 Heading : VICTORIA - LAND PURCHASE 2 Printers Block Borough of Ringwood -
Ringwood and District Historical Society
Plastic Container, Ringwood Garden Club Inc - Tub of Artefacts and Documents to be catalogued
RINGWOOD GARDEN CLUB INC. The following is a list of items that are stored at the RDHS Archive site, from the Ringwood Garden Club. This box of items does not include all the archival items from the Club, the Minutes will be kept at the home of the Archive Officer. Medal: From the Royal Horticultural Society of Victoria. Won at Box Hill show, in 1978. Badge: An early Ringwood Horticultural & Agricultural Society badge. Old Photograph: “Judging the Fruit Exhibits”, circa 1908. Certificate: 3rd. Prize at the 2009 Hanging Basket Competition, from the R.H.S.V. Shield: From the National Dahlia Society of Victoria, Annual Inter Society Championship In 1975. Won by the then: Ringwood & District Horticultural Garden Club. Tray: The Bill McDowell Perpetual Trophy for Amateur Cut Flowers: winners from 1973 to 1987. Old Photograph: From the Royal Agricultural Society of Victoria, awarded at the Royal Melbourne Show in 1947, First Prize, Ringwood. Certificate: From the Melbourne City Council: Festival of Progress, held in 1951, to Commemorate the Centenary of Victorian Government. Certificate of Merit: from past winners at shows. (5) Certificates: 2 unused Certificates of Merit, 1 unused Champion certificate. Garden Competition Certificates: from 1959 to 1981. Poster: Early Autumn Show poster displayed in shop Windows. Hortico Prize Certificates: 2 unused, $10.00 & $5.00 value. Tape Recording: Recorded history of the Ringwood Garden Club, talk given by the late Hugh McCall on 23/9/1996, Club’s centenary. Prize Cards: 41 First Prize” cards from Mrs. D. Holloway & 27 “Second Prize” cards, from 1956 to 1960. Prize Cards: 2 First Prize & 1 Second Prize card from Mrs. Holloway at the 1st. Heathmont Boy Scouts in 1958. Prize Cards: 4 Prize Cards from the Upwey & District Garden Club. 3 lsts., 12nd. Prize Card: from the Boronia & District H & A. Society: 1st. Prize, (no other information) Prize Card: from the R.H.S.V.: Second Prize for 1 Vase of Daffodils, Mr W Rosel. Prize Card: from the Dandenong Ranges Floral Festival, Easter Show, First Prize, Mrs Holloway in April, 1957 plus a Second Prize, same year. Prize Card: from the Mitcham Horticultural Society, Autumn Show, Mrs Holloway, 1 Bowl of Floating Flowers in 1958. Laminated Certificates: from the Great Victorian Hanging Basket Competition by the R.H.S.V. (no years mentioned) Club Syllabus: from 1980 to 2015. Photographs: from winners at our shows and judges at those shows. Ribbons: Ringwood Horticultural Society, 1962, Champion, Exhibit in Vegetables. Upwey & District Garden Club, 1977, Jubilee Carnival of Flowers. Ringwood garden Club, Vic. Large Dahlia Championships, 1983,6 Dahlias, D.V.’s. National Dahlia Soc. of Vic., Autumn Show, 1975, Inter-Societies Championship. Upwey & District Garden Club, 1980 Carnival of Flowers, Mountain Dist. Cham’s. “ “ “ “ , Spring Show, 1973. “ “ “ “ , Carnival of Flowers, 1984, Inter Society Exhibit. “ “ “ “ , “ “ “ , 1982. Best Exhibit. Healesville Garden Club: Autumn Show, Best Exhibit, Cut Flower Section. Ringwood Garden Club, Autumn Show, 1964, Best Exhibit in Vegetables. Upwey & District Garden Club, 1974 Carnival of Flowers. Ringwood Garden Club, Spring 1986, Best Exhibit in Junior Cookery. Ringwood & District Hort. & Graden Club, Autumn Show, 1974, Best Floral Art. Ringwood garden Club, Autumn 1989, Ringwood Amateur Dahlia Championship, Ringwood Horticultural Society, Autumn Show, 1963, Best Exhibit in Vegetables. Ringwood H & A Society: Autumn Show, 1957, Best Exhibit Floral Art. Ringwood & District Horticultural & Garden Club, Spring Show, 1973, Best Floral Art Exhibit. Upwey & District Garden Club, Carnival of Flowers, 1985. Mountain District Championships, Inter-Society Exhibit. Yarra Glen A. & H. Society Inc. Annual Show: small blue sash-style ribbon. Small Ribbons: from Victoria 150, a second (red) & 3rd. (green) Felt Badges: 1 green for Secretary: 1 blue for Judge. Rosette: 3rd. Prize at the Hanging Basket Competition in 2009. Blue Folder: contains photographs, prize cards, certificates, awards, etc. Albums: 4 photo, albums of garden shows, floral art, Spring Celebration photos and Newspaper articles. * All items placed in the container were placed there on 2nd. September, 2019. -
Ringwood and District Historical Society
Photographs, Awaiting Cataloguing: Parkwood Secondary College 1986 - 2012 various framed pictures and one wooden box containing slide projector, 1986 - 2012
Parkwood Secondary College 1986 - 2012 various framed pictures and one wooden box containing slide projector (u/s); 3870/1 Framed picture Parkwood Secondary College 2012 Deb Ball; 3870/2 Framed picture Parkwood Secondary College 2003 Presentation Ball; 3870/4 Framed picture Parkwood Secondary College Presentation Ball 2005; 3870/5 Framed picture Parkwood Secondary College Presentation Ball 2004; 3870/6 Framed picture Parkwood Secondary College Year 12 2003; 3870/6 Framed picture Parkwood Secondary College Year 12 2004; 3870/6 Framed picture Parkwood Secondary College Year 12 2006; 3870/6 Framed picture Parkwood Secondary College Year 12 2007; 3870/7 Framed picture Parkwood Secondary College Staff 2003; 3870/8 Framed picture Parkwood Secondary College Staff 2004; 3870/8 Framed picture Parkwood Secondary College House Captains 2001; 3870/8 Framed picture Parkwood Secondary College House Captains 2001; 3870/9 Framed picture Parkwood Secondary College Debutante Ball 4 April 1998; 3870/10 Framed picture Parkwood Secondary College Graduate, Marcus Kruger 1985; 3870/10 Framed picture Parkwood Secondary College Graduate, Shayne Bannard 1999; 3870/10 Framed picture Parkwood Secondary College Graduate, Darren Dunk 1992; 3870/10 Framed picture Parkwood Secondary College Graduate, Paul Lyford 1986 -
Ringwood and District Historical Society
Photographs, Awaiting Cataloguing: Unframed photographs Parkwood Secondary College - Deb Balls etc 1986-2012, 1995 - 2000
Parkwood Secondary College 1986 - 2012 various framed pictures; 3880/1 Framed picture Parkwood Secondary College Debutantes 1996; 3880/1 Framed picture Parkwood Secondary College Debutantes 1997; 3880/2 Framed picture Parkwood Secondary College Debutante Ball 1999; 3880/2 Framed picture Parkwood Secondary College Debutante Ball c.2000; 3880/3 Framed picture Parkwood Secondary College Debutante Ball 1995; 3880/3 Framed picture Parkwood Secondary College Debutante Ball 2000; 3880/4 Framed picture Parkwood Secondary College Year 12 1999; 3880/4 Framed picture Parkwood Secondary College Parkwood hosts Shoyo Senior High School, Hyogo Japan 1999; 3880/5 Framed picture Parkwood Secondary College Miscellaneous - former 1984 graduate Shelly O'Donnell - Basketball Achievements 1985 - 1999; 2880/5 Framed picture Parkwood Secondary College Miscellaneous - Teasdale, J.E. former Principal -
 Australian National Surfing Museum
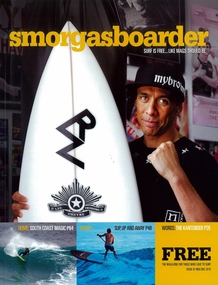
Magazine, Smorgasboarder, 01/11/2010
This is a free surf magazine for all that love surfing. Available 6 times a year. www.smorgasboarder.com.au This issue contains a reference to China Gilberts'memorial paddle out at Torquay and the SurfWorld Revolution exhibition (pg 17)Free full colour surf magazine: SMORGASBOARDER issue #2 Nov/Dec 2010. For all that love surfing. Available from Noosa to Warnambool. 6 times a year. www.smorgasboarder.com.au surfing, smorgasboarder -
Ringwood and District Historical Society
Programme - 2 Programmes, Lynton, E, Grand Variety Concert Programmes, Lynton School of Dancing, Ringwood. 1954 and 1955, 1954-55
Programmes used for the Lynton School Dancing for the end of year concert. Held in the Town Hall.1 1954 pink with black printing 'Grand Variety Concert' .2 1955 orange with black printing 'Grand Variety Concert' +Additional Keywords: Lynton, E -
Ringwood and District Historical Society
Document - History, Ringwood Technical School Short History by J.M. Montgomery (undated but post 1969), Post 1969
2 page typed document (Foolscap) by J.M.Montgomery. No date but post 1969 as that year is mentioned in the text. rts, ringwood tech -
Ringwood and District Historical Society
Document, Ringwood Technical School, 1982 - Policies, Structures, Roles, SRC, Camp Duncan Rules etc, 13/10/1982
Set of Documents describing school policies, structure, roles, SRC, Camp Duncan, subject coding, emergency procedures etc. Scanned in 6 parts due to volume of pages. Most pages are not numbered. Donated by Joan Pickford (nee Dear) 2022. (Prefect 1970-71). The Index pdf lists the contents of each part but is repeated here: Part 1 • General Educational Policy • Procedures Adopted By The Curriculum Board In Order To Implement The Educational Policy Part 2 • School Administrative Structure o Operational Structure - Operations Committee o Curriculum Board o Org Chart • Role of the Senior Teacher • Role of Head of Department • Role of Assistant with Responsibility • Role of Year Level Coordinator • Role of Section Leader Part 3 • Role of the Welfare Officer • Bell Times 1983 • School Layout • Evacuation Procedure and Diagram • Recording of Students’ Attendance • Staff Absences • Concerning School Rules Part 4 - SRC • Students; Representative Council – Constitution and Rules Part 5 – Camp Duncan, Excursion etc • Camp Duncan Disposition of Duties 1983 • Receipts/forms pro-forma • Some Facts About Camp Duncan • Camp Duncan Date 1983 • Student Checklist and Luggage Requirements for Camps and excursions • Confidential Medical Report for School Camps • Parental Permission Form Part 6 • Education Department Victoria o Pay Advice and Allowance Table o Subject Coding o Leave o General Advice on Transfers o Excursion procedure, Approval Form • Student Assembly Points rts, ringwood tech -
Flagstaff Hill Maritime Museum and Village
Domestic object - Fork, c.1878
This fork is from the wreck of the Loch Ard that sailed from Gravesend London. The manifest listed an array of manufactured goods being exported to the Colony of Victoria. Included in the cargo manifest was a large number of hardware & cutlery items. This fork is representative of similar items of silver electro-plated cutlery salvaged from the Loch Ard wreck site, comprising nickel silver electroplated spoons and forks of various sizes but all sharing the same general shape and design. Some of the pieces display their makers’ mark of William Page & Co Birmingham UK. Within the Flagstaff Hills cutlery collection donated from the Loch Ard, maker’s marks are often obscured by sedimentary accretion or verdigris after a century of submersion in the ocean. However sufficient detail has survived to indicate that the collection of samples of electroplated cutlery probably originated from the same cargo consignment from the Loch Ard and were made by William Page & Co. William Page was born in 1811 and died in 1885. He was active as a manufacturer of cutlery from 1829 with premises at 74 Belmont Rd, Dales End as a "close plater" (someone who works sheet metal), and he began electroplating in 1855. William Page & Co was also active from 1880 at Cranemore St, Cattle’s Grove also 55 Albion St, Birmingham, in 1936 the firm became Ltd. The firm used the trademarks "Asrista, Bolivian Silver, Silverite, Roman Silver, Roumanian Silver and Trevor Plate. In 1938 William Page was a supplier to the British Government, marking it's products with the broad arrow symbol and was also present at Sheffield. History of the Loch Ard: The Loch Ard got its name from ”Loch Ard” a loch which lies to the west of Aberfoyle, and the east of Loch Lomond. It means "high lake" in Scottish Gaelic. The vessel belonged to the famous Loch Line which sailed many vessels from England to Australia. The Loch Ard was built in Glasgow by Barclay, Curdle and Co. in 1873, the vessel was a three-masted square-rigged iron sailing ship that measured 79.87 meters in length, 11.58 m in width, and 7 m in depth with a gross tonnage of 1693 tons with a mainmast that measured a massive 45.7 m in height. Loch Ard made three trips to Australia and one trip to Calcutta before its fateful voyage. Loch Ard left England on March 2, 1878, under the command of 29-year-old Captain Gibbs, who was newly married. The ship was bound for Melbourne with a crew of 37, plus 17 passengers. The general cargo reflected the affluence of Melbourne at the time. On board were straw hats, umbrella, perfumes, clay pipes, pianos, clocks, confectionery, linen and candles, as well as a heavier load of railway irons, cement, lead and copper. There were other items included that were intended for display in the Melbourne International Exhibition of 1880. The voyage to Port Phillip was long but uneventful. Then at 3 am on June 1, 1878, Captain Gibbs was expecting to see land. But the Loch Ard was running into a fog which greatly reduced visibility. Captain Gibbs was becoming anxious as there was no sign of land or the Cape Otway lighthouse. At 4 am the fog lifted and a lookout aloft announced that he could see breakers. The sheer cliffs of Victoria's west coast came into view, and Captain Gibbs realised that the ship was much closer to them than expected. He ordered as much sail to be set as time would permit and then attempted to steer the vessel out to sea. On coming head-on into the wind, the ship lost momentum, the sails fell limp and Loch Ard's bow swung back towards land. Gibbs then ordered the anchors to be released in an attempt to hold its position. The anchors sank some 50 fathoms - but did not hold. By this time the ship was among the breakers and the tall cliffs of Mutton Bird Island rose behind. Just half a mile from the coast, the ship's bow was suddenly pulled around by the anchor. The captain tried to tack out to sea, but the ship struck a reef at the base of Mutton Bird Island, near Port Campbell. Waves subsequently broke over the ship and the top deck became loosened from the hull. The masts and rigging came crashing down knocking passengers and crew overboard. When a lifeboat was finally launched, it crashed into the side of Loch Ard and capsized. Tom Pearce, who had launched the boat, managed to cling to its overturned hull and shelter beneath it. He drifted out to sea and then on the flood tide came into what is now known as Loch Ard Gorge. He swam to shore, bruised and dazed, and found a cave in which to shelter. Some of the crew stayed below deck to shelter from the falling rigging but drowned when the ship slipped off the reef into deeper water. Eva Carmichael a passenger had raced onto the deck to find out what was happening only to be confronted by towering cliffs looming above the stricken ship. In all the chaos, Captain Gibbs grabbed Eva and said, "If you are saved Eva, let my dear wife know that I died like a sailor". That was the last Eva Carmichael saw of the captain. She was swept off the ship by a huge wave. Eva saw Tom Pearce on a small rocky beach and yelled to attract his attention. He dived in and swam to the exhausted woman and dragged her to shore. He took her to the cave and broke the open case of brandy which had washed up on the beach. He opened a bottle to revive the unconscious woman. A few hours later Tom scaled a cliff in search of help. He followed hoof prints and came by chance upon two men from nearby Glenample Station three and a half miles away. In a complete state of exhaustion, he told the men of the tragedy. Tom then returned to the gorge while the two men rode back to the station to get help. By the time they reached Loch Ard Gorge, it was cold and dark. The two shipwreck survivors were taken to Glenample Station to recover. Eva stayed at the station for six weeks before returning to Ireland by steamship. In Melbourne, Tom Pearce received a hero's welcome. He was presented with the first gold medal of the Royal Humane Society of Victoria and a £1000 cheque from the Victorian Government. Concerts were performed to honour the young man's bravery and to raise money for those who lost family in the disaster. Of the 54 crew members and passengers on board, only two survived: the apprentice, Tom Pearce and the young woman passenger, Eva Carmichael, who lost her family in the tragedy. Ten days after the Loch Ard tragedy, salvage rights to the wreck were sold at auction for £2,120. Cargo valued at £3,000 was salvaged and placed on the beach, but most washed back into the sea when another storm developed. The wreck of Loch Ard still lies at the base of Mutton Bird Island. Much of the cargo has now been salvaged and some items were washed up into Loch Ard Gorge. Cargo and artefacts have also been illegally salvaged over many years before protective legislation was introduced in March 1982. The shipwreck of the Loch Ard is of significance for Victoria and is registered on the Victorian Heritage Register ( S 417). Flagstaff Hill has a varied collection of artefacts from Loch Ard and its collection is significant for being one of the largest accumulation of artefacts from this notable Victorian shipwreck. The collections object is to also give us a snapshot into history so we can interpret the story of this tragic event. The collection is also archaeologically significant as it represents aspects of Victoria's shipping history that allows us to interpret Victoria's social and historical themes of the time. The collections historically significance is that it is associated unfortunately with the worst and best-known shipwreck in Victoria's history. Silver plated copper alloy table fork from the wreck of the Loch Ard. William Pageflagstaff hill, warrnambool, shipwrecked coast, flagstaff hill maritime museum, maritime museum, shipwreck coast, flagstaff hill maritime village, great ocean road, loch line, loch ard, captain gibbs, eva carmichael, tom pearce, glenample station, mutton bird island, loch ard gorge, fork, electroplated cutlery -
Flagstaff Hill Maritime Museum and Village
Domestic object - Fork
This fork is from the wreck of the Loch Ard, that sailed from Gravesend, London. The manifest listed an array of manufactured goods being exported to the Colony of Victoria. Included in the cargo manifest was a large number of hardware & cutlery items. This fork is representative of similar items of silver electro-plated cutlery salvaged from the Loch Ard wreck site, comprising nickel silver electroplated spoons and forks of various sizes but all sharing the same general shape and design. Some of the pieces display their makers’ mark of William Page & Co Birmingham UK. Within the Flagstaff Hills cutlery collection donated from the Loch Ard, maker’s marks are often obscured by sedimentary accretion or verdigris after a century of submersion in the ocean. However sufficient detail has survived to indicate that the collection of samples of electroplated cutlery probably originated from the same cargo consignment from the Loch Ard and were made by William Page & Co. William Page was born in 1811 and died in 1885. He was active as a manufacturer of cutlery from 1829 with premises at 74 Belmont Rd, Dales End as a "close plater" (someone who works sheet metal), and he began electroplating in 1855. William Page & Co was also active from 1880 at Cranemore St, Cattle’s Grove also 55 Albion St, Birmingham, in 1936 the firm became Ltd. The firm used the trademarks "Asrista, Bolivian Silver, Silverite, Roman Silver, Roumanian Silver and Trevor Plate. In 1938 William Page was a supplier to the British Government, marking it's products with the broad arrow symbol and was also present at Sheffield. History of the Loch Ard: The Loch Ard got its name from ”Loch Ard” a loch which lies to the west of Aberfoyle, and the east of Loch Lomond. It means "high lake" in Scottish Gaelic. The vessel belonged to the famous Loch Line which sailed many vessels from England to Australia. The Loch Ard was built in Glasgow by Barclay, Curdle and Co. in 1873, the vessel was a three-masted square-rigged iron sailing ship that measured 79.87 meters in length, 11.58 m in width, and 7 m in depth with a gross tonnage of 1693 tons with a mainmast that measured a massive 45.7 m in height. Loch Ard made three trips to Australia and one trip to Calcutta before its fateful voyage. Loch Ard left England on March 2, 1878, under the command of 29-year-old Captain Gibbs, who was newly married. The ship was bound for Melbourne with a crew of 37, plus 17 passengers. The general cargo reflected the affluence of Melbourne at the time. Onboard were straw hats, umbrella, perfumes, clay pipes, pianos, clocks, confectionery, linen and candles, as well as a heavier load of railway irons, cement, lead and copper. There were other items included that were intended for display in the Melbourne International Exhibition of 1880. The voyage to Port Phillip was long but uneventful. Then at 3 am on June 1, 1878, Captain Gibbs was expecting to see land. But the Loch Ard was running into a fog which greatly reduced visibility. Captain Gibbs was becoming anxious as there was no sign of land or the Cape Otway lighthouse. At 4 am the fog lifted and a lookout aloft announced that he could see breakers. The sheer cliffs of Victoria's west coast came into view, and Captain Gibbs realised that the ship was much closer to them than expected. He ordered as much sail to be set as time would permit and then attempted to steer the vessel out to sea. On coming head-on into the wind, the ship lost momentum, the sails fell limp and Loch Ard's bow swung back towards land. Gibbs then ordered the anchors to be released in an attempt to hold its position. The anchors sank some 50 fathoms - but did not hold. By this time the ship was among the breakers and the tall cliffs of Mutton Bird Island rose behind. Just half a mile from the coast, the ship's bow was suddenly pulled around by the anchor. The captain tried to tack out to sea, but the ship struck a reef at the base of Mutton Bird Island, near Port Campbell. Waves subsequently broke over the ship and the top deck became loosened from the hull. The masts and rigging came crashing down knocking passengers and crew overboard. When a lifeboat was finally launched, it crashed into the side of Loch Ard and capsized. Tom Pearce, who had launched the boat, managed to cling to its overturned hull and shelter beneath it. He drifted out to sea and then on the flood tide came into what is now known as Loch Ard Gorge. He swam to shore, bruised and dazed, and found a cave in which to shelter. Some of the crew stayed below deck to shelter from the falling rigging but drowned when the ship slipped off the reef into deeper water. Eva Carmichael a passenger had raced onto the deck to find out what was happening only to be confronted by towering cliffs looming above the stricken ship. In all the chaos, Captain Gibbs grabbed Eva and said, "If you are saved Eva, let my dear wife know that I died like a sailor". That was the last Eva Carmichael saw of the captain. She was swept off the ship by a huge wave. Eva saw Tom Pearce on a small rocky beach and yelled to attract his attention. He dived in and swam to the exhausted woman and dragged her to shore. He took her to the cave and broke the open case of brandy which had washed up on the beach. He opened a bottle to revive the unconscious woman. A few hours later Tom scaled a cliff in search of help. He followed hoof prints and came by chance upon two men from nearby Glenample Station three and a half miles away. In a complete state of exhaustion, he told the men of the tragedy. Tom then returned to the gorge while the two men rode back to the station to get help. By the time they reached Loch Ard Gorge, it was cold and dark. The two shipwreck survivors were taken to Glenample Station to recover. Eva stayed at the station for six weeks before returning to Ireland by steamship. In Melbourne, Tom Pearce received a hero's welcome. He was presented with the first gold medal of the Royal Humane Society of Victoria and a £1000 cheque from the Victorian Government. Concerts were performed to honour the young man's bravery and to raise money for those who lost family in the disaster. Of the 54 crew members and passengers on board, only two survived: the apprentice, Tom Pearce and the young woman passenger, Eva Carmichael, who lost her family in the tragedy. Ten days after the Loch Ard tragedy, salvage rights to the wreck were sold at auction for £2,120. Cargo valued at £3,000 was salvaged and placed on the beach, but most washed back into the sea when another storm developed. The wreck of Loch Ard still lies at the base of Mutton Bird Island. Much of the cargo has now been salvaged and some items were washed up into Loch Ard Gorge. Cargo and artefacts have also been illegally salvaged over many years before protective legislation was introduced in March 1982. The shipwreck of the Loch Ard is of significance for Victoria and is registered on the Victorian Heritage Register ( S 417). Flagstaff Hill has a varied collection of artefacts from Loch Ard and its collection is significant for being one of the largest accumulation of artefacts from this notable Victorian shipwreck. The collections object is to also give us a snapshot into history so we can interpret the story of this tragic event. The collection is also archaeologically significant as it represents aspects of Victoria's shipping history that allows us to interpret Victoria's social and historical themes of the time. The collections historically significance is that it is associated unfortunately with the worst and best-known shipwreck in Victoria's history. Silver plated copper alloy table fork from the wreck of the Loch Ard. William Pageflagstaff hill, warrnambool, shipwrecked coast, flagstaff hill maritime museum, maritime museum, shipwreck coast, flagstaff hill maritime village, great ocean road, loch line, loch ard, captain gibbs, eva carmichael, tom pearce, glenample station, mutton bird island, loch ard gorge, fork, electroplated cutlery -
Flagstaff Hill Maritime Museum and Village
Domestic object - Fork, c.1878
This fork is from the wreck of the Loch Ard that sailed from Gravesend London. The manifest listed an array of manufactured goods being exported to the Colony of Victoria. Included in the cargo manifest was a large number of hardware & cutlery items. This fork is representative of similar items of silver electro-plated cutlery salvaged from the Loch Ard wreck site, comprising nickel silver electroplated spoons and forks of various sizes but all sharing the same general shape and design. Some of the pieces display their makers’ mark of William Page & Co Birmingham UK. Within the Flagstaff Hills cutlery collection donated from the Loch Ard, maker’s marks are often obscured by sedimentary accretion or verdigris after a century of submersion in the ocean. However sufficient detail has survived to indicate that the collection of samples of electroplated cutlery probably originated from the same cargo consignment from the Loch Ard and were made by William Page & Co. William Page was born in 1811 and died in 1885. He was active as a manufacturer of cutlery from 1829 with premises at 74 Belmont Rd, Dales End as a "close plater" (someone who works sheet metal), and he began electroplating in 1855. William Page & Co was also active from 1880 at Cranemore St, Cattle’s Grove also 55 Albion St, Birmingham, in 1936 the firm became Ltd. The firm used the trademarks "Asrista, Bolivian Silver, Silverite, Roman Silver, Roumanian Silver and Trevor Plate. In 1938 William Page was a supplier to the British Government, marking it's products with the broad arrow symbol and was also present at Sheffield. History of the Loch Ard: The Loch Ard got its name from ”Loch Ard” a loch which lies to the west of Aberfoyle, and the east of Loch Lomond. It means "high lake" in Scottish Gaelic. The vessel belonged to the famous Loch Line which sailed many vessels from England to Australia. The Loch Ard was built in Glasgow by Barclay, Curdle and Co. in 1873, the vessel was a three-masted square-rigged iron sailing ship that measured 79.87 meters in length, 11.58 m in width, and 7 m in depth with a gross tonnage of 1693 tons with a mainmast that measured a massive 45.7 m in height. Loch Ard made three trips to Australia and one trip to Calcutta before its fateful voyage. Loch Ard left England on March 2, 1878, under the command of 29-year-old Captain Gibbs, who was newly married. The ship was bound for Melbourne with a crew of 37, plus 17 passengers. The general cargo reflected the affluence of Melbourne at the time. On board were straw hats, umbrella, perfumes, clay pipes, pianos, clocks, confectionery, linen and candles, as well as a heavier load of railway irons, cement, lead and copper. There were other items included that were intended for display in the Melbourne International Exhibition of 1880. The voyage to Port Phillip was long but uneventful. Then at 3 am on June 1, 1878, Captain Gibbs was expecting to see land. But the Loch Ard was running into a fog which greatly reduced visibility. Captain Gibbs was becoming anxious as there was no sign of land or the Cape Otway lighthouse. At 4 am the fog lifted and a lookout aloft announced that he could see breakers. The sheer cliffs of Victoria's west coast came into view, and Captain Gibbs realised that the ship was much closer to them than expected. He ordered as much sail to be set as time would permit and then attempted to steer the vessel out to sea. On coming head-on into the wind, the ship lost momentum, the sails fell limp and Loch Ard's bow swung back towards land. Gibbs then ordered the anchors to be released in an attempt to hold its position. The anchors sank some 50 fathoms - but did not hold. By this time the ship was among the breakers and the tall cliffs of Mutton Bird Island rose behind. Just half a mile from the coast, the ship's bow was suddenly pulled around by the anchor. The captain tried to tack out to sea, but the ship struck a reef at the base of Mutton Bird Island, near Port Campbell. Waves subsequently broke over the ship and the top deck became loosened from the hull. The masts and rigging came crashing down knocking passengers and crew overboard. When a lifeboat was finally launched, it crashed into the side of Loch Ard and capsized. Tom Pearce, who had launched the boat, managed to cling to its overturned hull and shelter beneath it. He drifted out to sea and then on the flood tide came into what is now known as Loch Ard Gorge. He swam to shore, bruised and dazed, and found a cave in which to shelter. Some of the crew stayed below deck to shelter from the falling rigging but drowned when the ship slipped off the reef into deeper water. Eva Carmichael a passenger had raced onto the deck to find out what was happening only to be confronted by towering cliffs looming above the stricken ship. In all the chaos, Captain Gibbs grabbed Eva and said, "If you are saved Eva, let my dear wife know that I died like a sailor". That was the last Eva Carmichael saw of the captain. She was swept off the ship by a huge wave. Eva saw Tom Pearce on a small rocky beach and yelled to attract his attention. He dived in and swam to the exhausted woman and dragged her to shore. He took her to the cave and broke the open case of brandy which had washed up on the beach. He opened a bottle to revive the unconscious woman. A few hours later Tom scaled a cliff in search of help. He followed hoof prints and came by chance upon two men from nearby Glenample Station three and a half miles away. In a complete state of exhaustion, he told the men of the tragedy. Tom then returned to the gorge while the two men rode back to the station to get help. By the time they reached Loch Ard Gorge, it was cold and dark. The two shipwreck survivors were taken to Glenample Station to recover. Eva stayed at the station for six weeks before returning to Ireland by steamship. In Melbourne, Tom Pearce received a hero's welcome. He was presented with the first gold medal of the Royal Humane Society of Victoria and a £1000 cheque from the Victorian Government. Concerts were performed to honour the young man's bravery and to raise money for those who lost family in the disaster. Of the 54 crew members and passengers on board, only two survived: the apprentice, Tom Pearce and the young woman passenger, Eva Carmichael, who lost her family in the tragedy. Ten days after the Loch Ard tragedy, salvage rights to the wreck were sold at auction for £2,120. Cargo valued at £3,000 was salvaged and placed on the beach, but most washed back into the sea when another storm developed. The wreck of Loch Ard still lies at the base of Mutton Bird Island. Much of the cargo has now been salvaged and some items were washed up into Loch Ard Gorge. Cargo and artefacts have also been illegally salvaged over many years before protective legislation was introduced in March 1982. The shipwreck of the Loch Ard is of significance for Victoria and is registered on the Victorian Heritage Register ( S 417). Flagstaff Hill has a varied collection of artefacts from Loch Ard and its collection is significant for being one of the largest accumulation of artefacts from this notable Victorian shipwreck. The collections object is to also give us a snapshot into history so we can interpret the story of this tragic event. The collection is also archaeologically significant as it represents aspects of Victoria's shipping history that allows us to interpret Victoria's social and historical themes of the time. The collections historically significance is that it is associated unfortunately with the worst and best-known shipwreck in Victoria's history. Silver plated copper alloy table fork from the wreck of the Loch Ard. William Pageflagstaff hill, warrnambool, shipwrecked coast, flagstaff hill maritime museum, maritime museum, shipwreck coast, flagstaff hill maritime village, great ocean road, loch line, loch ard, captain gibbs, eva carmichael, tom pearce, glenample station, mutton bird island, loch ard gorge, fork, electroplated cutlery -
Flagstaff Hill Maritime Museum and Village
Decorative object - Fork
This fork is from the wreck of the Loch Ard that sailed from Gravesend London. The manifest listed an array of manufactured goods being exported to the Colony of Victoria. Included in the cargo manifest was a large number of hardware & cutlery items. This fork is representative of similar items of silver electro-plated cutlery salvaged from the Loch Ard wreck site, comprising nickel silver electroplated spoons and forks of various sizes but all sharing the same general shape and design. Some of the pieces display their makers’ mark of William Page & Co Birmingham UK. Within the Flagstaff Hills cutlery collection donated from the Loch Ard, maker’s marks are often obscured by sedimentary accretion or verdigris after a century of submersion in the ocean. However sufficient detail has survived to indicate that the collection of samples of electroplated cutlery probably originated from the same cargo consignment from the Loch Ard and were made by William Page & Co. William Page was born in 1811 and died in 1885. He was active as a manufacturer of cutlery from 1829 with premises at 74 Belmont Rd, Dales End as a "close plater" (someone who works sheet metal), and he began electroplating in 1855. William Page & Co was also active from 1880 at Cranemore St, Cattle’s Grove also 55 Albion St, Birmingham, in 1936 the firm became Ltd. The firm used the trademarks "Asrista, Bolivian Silver, Silverite, Roman Silver, Roumanian Silver and Trevor Plate. In 1938 William Page was a supplier to the British Government, marking it's products with the broad arrow symbol and was also present at Sheffield. History of the Loch Ard: The Loch Ard got its name from ”Loch Ard” a loch which lies to the west of Aberfoyle, and the east of Loch Lomond. It means "high lake" in Scottish Gaelic. The vessel belonged to the famous Loch Line which sailed many vessels from England to Australia. The Loch Ard was built in Glasgow by Barclay, Curdle and Co. in 1873, the vessel was a three-masted square-rigged iron sailing ship that measured 79.87 meters in length, 11.58 m in width, and 7 m in depth with a gross tonnage of 1693 tons with a mainmast that measured a massive 45.7 m in height. Loch Ard made three trips to Australia and one trip to Calcutta before its fateful voyage. Loch Ard left England on March 2, 1878, under the command of 29-year-old Captain Gibbs, who was newly married. The ship was bound for Melbourne with a crew of 37, plus 17 passengers. The general cargo reflected the affluence of Melbourne at the time. On board were straw hats, umbrella, perfumes, clay pipes, pianos, clocks, confectionery, linen and candles, as well as a heavier load of railway irons, cement, lead and copper. There were other items included that were intended for display in the Melbourne International Exhibition of 1880. The voyage to Port Phillip was long but uneventful. Then at 3 am on June 1, 1878, Captain Gibbs was expecting to see land. But the Loch Ard was running into a fog which greatly reduced visibility. Captain Gibbs was becoming anxious as there was no sign of land or the Cape Otway lighthouse. At 4 am the fog lifted and a lookout aloft announced that he could see breakers. The sheer cliffs of Victoria's west coast came into view, and Captain Gibbs realised that the ship was much closer to them than expected. He ordered as much sail to be set as time would permit and then attempted to steer the vessel out to sea. On coming head-on into the wind, the ship lost momentum, the sails fell limp and Loch Ard's bow swung back towards land. Gibbs then ordered the anchors to be released in an attempt to hold its position. The anchors sank some 50 fathoms - but did not hold. By this time the ship was among the breakers and the tall cliffs of Mutton Bird Island rose behind. Just half a mile from the coast, the ship's bow was suddenly pulled around by the anchor. The captain tried to tack out to sea, but the ship struck a reef at the base of Mutton Bird Island, near Port Campbell. Waves subsequently broke over the ship and the top deck became loosened from the hull. The masts and rigging came crashing down knocking passengers and crew overboard. When a lifeboat was finally launched, it crashed into the side of Loch Ard and capsized. Tom Pearce, who had launched the boat, managed to cling to its overturned hull and shelter beneath it. He drifted out to sea and then on the flood tide came into what is now known as Loch Ard Gorge. He swam to shore, bruised and dazed, and found a cave in which to shelter. Some of the crew stayed below deck to shelter from the falling rigging but drowned when the ship slipped off the reef into deeper water. Eva Carmichael a passenger had raced onto the deck to find out what was happening only to be confronted by towering cliffs looming above the stricken ship. In all the chaos, Captain Gibbs grabbed Eva and said, "If you are saved Eva, let my dear wife know that I died like a sailor". That was the last Eva Carmichael saw of the captain. She was swept off the ship by a huge wave. Eva saw Tom Pearce on a small rocky beach and yelled to attract his attention. He dived in and swam to the exhausted woman and dragged her to shore. He took her to the cave and broke the open case of brandy which had washed up on the beach. He opened a bottle to revive the unconscious woman. A few hours later Tom scaled a cliff in search of help. He followed hoof prints and came by chance upon two men from nearby Glenample Station three and a half miles away. In a complete state of exhaustion, he told the men of the tragedy. Tom then returned to the gorge while the two men rode back to the station to get help. By the time they reached Loch Ard Gorge, it was cold and dark. The two shipwreck survivors were taken to Glenample Station to recover. Eva stayed at the station for six weeks before returning to Ireland by steamship. In Melbourne, Tom Pearce received a hero's welcome. He was presented with the first gold medal of the Royal Humane Society of Victoria and a £1000 cheque from the Victorian Government. Concerts were performed to honour the young man's bravery and to raise money for those who lost family in the disaster. Of the 54 crew members and passengers on board, only two survived: the apprentice, Tom Pearce and the young woman passenger, Eva Carmichael, who lost her family in the tragedy. Ten days after the Loch Ard tragedy, salvage rights to the wreck were sold at auction for £2,120. Cargo valued at £3,000 was salvaged and placed on the beach, but most washed back into the sea when another storm developed. The wreck of Loch Ard still lies at the base of Mutton Bird Island. Much of the cargo has now been salvaged and some items were washed up into Loch Ard Gorge. Cargo and artefacts have also been illegally salvaged over many years before protective legislation was introduced in March 1982. The shipwreck of the Loch Ard is of significance for Victoria and is registered on the Victorian Heritage Register ( S 417). Flagstaff Hill has a varied collection of artefacts from Loch Ard and its collection is significant for being one of the largest accumulation of artefacts from this notable Victorian shipwreck. The collections object is to also give us a snapshot into history so we can interpret the story of this tragic event. The collection is also archaeologically significant as it represents aspects of Victoria's shipping history that allows us to interpret Victoria's social and historical themes of the time. The collections historically significance is that it is associated unfortunately with the worst and best-known shipwreck in Victoria's history. Silver plated copper alloy table fork from the wreck of the Loch Ard. William Pageflagstaff hill, warrnambool, shipwrecked coast, flagstaff hill maritime museum, maritime museum, shipwreck coast, flagstaff hill maritime village, great ocean road, loch line, loch ard, captain gibbs, eva carmichael, tom pearce, glenample station, mutton bird island, loch ard gorge, electroplated cutlery, fork -
Flagstaff Hill Maritime Museum and Village
Domestic object - Fork, c.1878
This fork is from the wreck of the Loch Ard that sailed from Gravesend London. The manifest listed an array of manufactured goods being exported to the Colony of Victoria. Included in the cargo manifest was a large number of hardware & cutlery items. This fork is representative of similar items of silver electro-plated cutlery salvaged from the Loch Ard wreck site, comprising nickel silver electroplated spoons and forks of various sizes but all sharing the same general shape and design. Some of the pieces display their makers’ mark of William Page & Co Birmingham UK. Within the Flagstaff Hills cutlery collection donated from the Loch Ard, maker’s marks are often obscured by sedimentary accretion or verdigris after a century of submersion in the ocean. However sufficient detail has survived to indicate that the collection of samples of electroplated cutlery probably originated from the same cargo consignment from the Loch Ard and were made by William Page & Co. William Page was born in 1811 and died in 1885. He was active as a manufacturer of cutlery from 1829 with premises at 74 Belmont Rd, Dales End as a "close plater" (someone who works sheet metal), and he began electroplating in 1855. William Page & Co was also active from 1880 at Cranemore St, Cattle’s Grove also 55 Albion St, Birmingham, in 1936 the firm became Ltd. The firm used the trademarks "Asrista, Bolivian Silver, Silverite, Roman Silver, Roumanian Silver and Trevor Plate. In 1938 William Page was a supplier to the British Government, marking it's products with the broad arrow symbol and was also present at Sheffield. History of the Loch Ard: The Loch Ard got its name from ”Loch Ard” a loch which lies to the west of Aberfoyle, and the east of Loch Lomond. It means "high lake" in Scottish Gaelic. The vessel belonged to the famous Loch Line which sailed many vessels from England to Australia. The Loch Ard was built in Glasgow by Barclay, Curdle and Co. in 1873, the vessel was a three-masted square-rigged iron sailing ship that measured 79.87 meters in length, 11.58 m in width, and 7 m in depth with a gross tonnage of 1693 tons with a mainmast that measured a massive 45.7 m in height. Loch Ard made three trips to Australia and one trip to Calcutta before its fateful voyage. Loch Ard left England on March 2, 1878, under the command of 29-year-old Captain Gibbs, who was newly married. The ship was bound for Melbourne with a crew of 37, plus 17 passengers. The general cargo reflected the affluence of Melbourne at the time. On board were straw hats, umbrella, perfumes, clay pipes, pianos, clocks, confectionery, linen and candles, as well as a heavier load of railway irons, cement, lead and copper. There were other items included that were intended for display in the Melbourne International Exhibition of 1880. The voyage to Port Phillip was long but uneventful. Then at 3 am on June 1, 1878, Captain Gibbs was expecting to see land. But the Loch Ard was running into a fog which greatly reduced visibility. Captain Gibbs was becoming anxious as there was no sign of land or the Cape Otway lighthouse. At 4 am the fog lifted and a lookout aloft announced that he could see breakers. The sheer cliffs of Victoria's west coast came into view, and Captain Gibbs realised that the ship was much closer to them than expected. He ordered as much sail to be set as time would permit and then attempted to steer the vessel out to sea. On coming head-on into the wind, the ship lost momentum, the sails fell limp and Loch Ard's bow swung back towards land. Gibbs then ordered the anchors to be released in an attempt to hold its position. The anchors sank some 50 fathoms - but did not hold. By this time the ship was among the breakers and the tall cliffs of Mutton Bird Island rose behind. Just half a mile from the coast, the ship's bow was suddenly pulled around by the anchor. The captain tried to tack out to sea, but the ship struck a reef at the base of Mutton Bird Island, near Port Campbell. Waves subsequently broke over the ship and the top deck became loosened from the hull. The masts and rigging came crashing down knocking passengers and crew overboard. When a lifeboat was finally launched, it crashed into the side of Loch Ard and capsized. Tom Pearce, who had launched the boat, managed to cling to its overturned hull and shelter beneath it. He drifted out to sea and then on the flood tide came into what is now known as Loch Ard Gorge. He swam to shore, bruised and dazed, and found a cave in which to shelter. Some of the crew stayed below deck to shelter from the falling rigging but drowned when the ship slipped off the reef into deeper water. Eva Carmichael a passenger had raced onto the deck to find out what was happening only to be confronted by towering cliffs looming above the stricken ship. In all the chaos, Captain Gibbs grabbed Eva and said, "If you are saved Eva, let my dear wife know that I died like a sailor". That was the last Eva Carmichael saw of the captain. She was swept off the ship by a huge wave. Eva saw Tom Pearce on a small rocky beach and yelled to attract his attention. He dived in and swam to the exhausted woman and dragged her to shore. He took her to the cave and broke the open case of brandy which had washed up on the beach. He opened a bottle to revive the unconscious woman. A few hours later Tom scaled a cliff in search of help. He followed hoof prints and came by chance upon two men from nearby Glenample Station three and a half miles away. In a complete state of exhaustion, he told the men of the tragedy. Tom then returned to the gorge while the two men rode back to the station to get help. By the time they reached Loch Ard Gorge, it was cold and dark. The two shipwreck survivors were taken to Glenample Station to recover. Eva stayed at the station for six weeks before returning to Ireland by steamship. In Melbourne, Tom Pearce received a hero's welcome. He was presented with the first gold medal of the Royal Humane Society of Victoria and a £1000 cheque from the Victorian Government. Concerts were performed to honour the young man's bravery and to raise money for those who lost family in the disaster. Of the 54 crew members and passengers on board, only two survived: the apprentice, Tom Pearce and the young woman passenger, Eva Carmichael, who lost her family in the tragedy. Ten days after the Loch Ard tragedy, salvage rights to the wreck were sold at auction for £2,120. Cargo valued at £3,000 was salvaged and placed on the beach, but most washed back into the sea when another storm developed. The wreck of Loch Ard still lies at the base of Mutton Bird Island. Much of the cargo has now been salvaged and some items were washed up into Loch Ard Gorge. Cargo and artefacts have also been illegally salvaged over many years before protective legislation was introduced in March 1982. The shipwreck of the Loch Ard is of significance for Victoria and is registered on the Victorian Heritage Register ( S 417). Flagstaff Hill has a varied collection of artefacts from Loch Ard and its collection is significant for being one of the largest accumulation of artefacts from this notable Victorian shipwreck. The collections object is to also give us a snapshot into history so we can interpret the story of this tragic event. The collection is also archaeologically significant as it represents aspects of Victoria's shipping history that allows us to interpret Victoria's social and historical themes of the time. The collections historically significance is that it is associated unfortunately with the worst and best-known shipwreck in Victoria's history. Silver plated copper alloy table fork from the wreck of the Loch Ard. William Pageflagstaff hill, warrnambool, shipwrecked coast, flagstaff hill maritime museum, maritime museum, shipwreck coast, flagstaff hill maritime village, great ocean road, loch line, loch ard, captain gibbs, eva carmichael, tom pearce, glenample station, mutton bird island, loch ard gorge, electroplated cutlery, fork