Showing 469 items
matching south pole
-
 Ballarat Tramway Museum
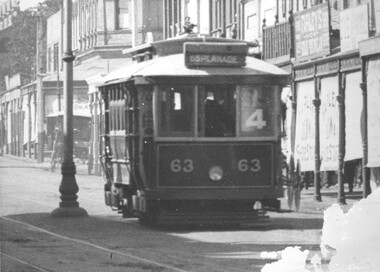
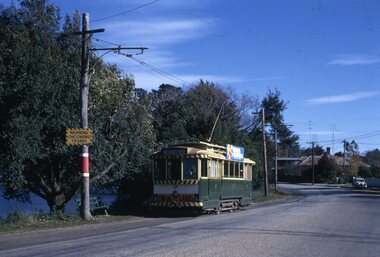
Photograph - Digital image, late 1910's
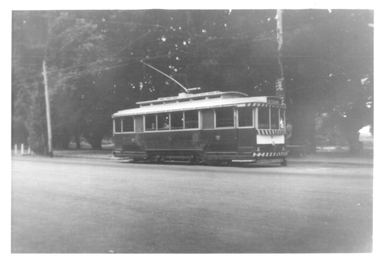
Yields information about a PMTT tramcar that was sold to Ballarat and an operating member of the BTM fleet.Digital Image of Prahran and Malvern Tramway Trust, Maximum Traction tramcar No. 63 in Glenferrie Road, with destination of Esplanade and Route No. 4 in the window of the tram. Tram later became Ballarat No. 18. In the background are shops, centre poles and blinds on the shops, indicating a summer's day perhaps. Detail from a Rose Series postcard. Possibly late 1910's. See image 2 for original enlarged postcard and high res images. Advised by Mal Rowe that he obtained from the Bob Prentice collection. trams, tramways, pmtt, glenferrie rd, tram 63, tram 18 -
 Ballarat Tramway Museum
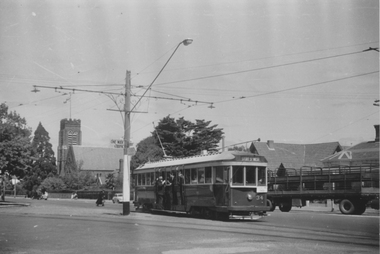
Photograph - Black & White Photograph/s, Nov. 1956
Yields information about Ballarat's bogie trams, Pleasant St and Sturt St and possibly tram services during the Olympics.Black and white photograph of No. 34 outbound in Sturt St at Pleasant St, with the destination Sturt St West. Appears to be a very crowded tram with a man on the running board. Has St Peters Anglican Church in the background. On the tramway pole adjacent to the tram is a "One Way Traffic" and an "Olympics Rings" sign, indicating the photo could have been taken c1956, possibly during the Olympics themselves. Photographer unknown - could be Wal Jack. Based on Wal's notes for the events, could be 24/11/1956 - see Reg Item 5565. trams, tramways, pleasant st, olympics, sturt st, sturt st west, tram 34 -
 Ballarat Tramway Museum
Postcard, Rose Stereograph Co, Ryrie St Geelong, 1930s
Reproduction of Rose Series postcard No. 547 of Ryrie St Geelong with tram No. 7 east bound and another tram in the distance. Photo shows the tramway centre poles. Has the old Geelong Post Office (see reference) on the left side of the image.Yields information about Ryrie St Geelong.Reproduction of Rose series postcard No. P547 trams, tramways, geelong, ryrie st, geelong post office, tram 7 -
Ballarat Tramway Museum
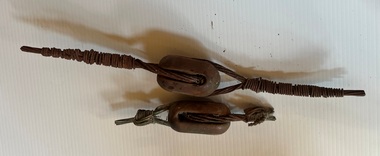
Functional object - Tramway 'Ear' hanger with piece of contact wire
Used to suspend a tramway contact wire from catenary wires, or directly from a span pole. The contact wire is placed between the two halves and clamped in place by fastening the screws.Shows how tramway contact wire is suspended.6 screw Ear with contact wiretramways, trollwywire, equipment, ear -
 Ballarat Tramway Museum
Photograph - Tram 28 Ripon & Sturt Sts, 15-2-1967
Black and white photograph of tram 18 in Ripon St after turning from Sturt St on its way to View Point. Has an Ampol Service station sign on the left-hand side. An adjacent pole has a compulsory tram stop marks. Photographer unknown.Yields information about the intersection of Ripon and Sturt Sts.Black and white photograph with photographer's notes on rear.In ink on rear - "Ripon & Sturt Sts 15-2-67 No 28"trams, tramways, tram 18, ripon st, view point, sturt st, ampol -
 Ballarat Tramway Museum
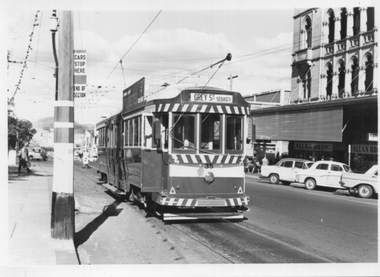
Photograph - Tram 35 - City Centre, c1970
Black and white photograph of tram 35 with the short working destination of Grey St Sebastopol at the tram stop known as the City Centre at Sturt and Lydiard Streets. The pole alongside the tram has the tram stop sign and an End of Section sign. In in the background is the National Mutual building and Allan Bros Jewellers store. Date and photographer unknown.Yields information about tram 35 at the City Centre stop late 1960s or early 1970s.Black and white photograph on plain paper.trams, tramways, tram 35, sturt st, lydiard st, national mutual, city centre -
 Ballarat Tramway Museum
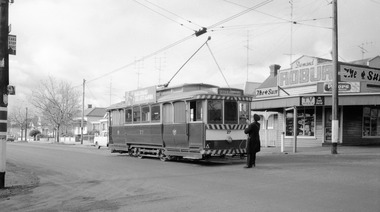
Photograph - Ballarat No. 26 east bound in Sturt St at Drummond St, Wal Jack, 14-3-1953
Print of the Wal Jack Ballarat Negative file of Ballarat No. 26 east bound in Sturt St at Drummond St. Has a pole showing the tram stop and section signs. In the background is the Southern Cross Hotel. See item 7867 for the negative.Yields information about trams at Hospital corner.Photograph, black and white - plain black with Wal Jack's note on rearWal Jack number stamp and number T44PC.tramways, trams, sturt st, drummond st, hospital corner, tram 26 -
 Ballarat Tramway Museum
Photograph - Illustration, WTP, "Sturt Street, Ballarat", c1905
The photo shows an ESCo tram soon after commencement of trams in 1905, at the corner of Armstrong and Sturt Streets, Ballarat. The tram has a destination sign hung from the driver's dash canopy. On the left is the Snows Department store and a pole with telegraph/telephone wires and insulators. The Thomas Moore Statue is adjacent to the tramcar. The median plantation was known as Shoppees Square. See item 8419 for a postcard and 3795 for a copy photograph. Photo by WTP & Co.Yields information about Sturt St soon after the opening of the Ballarat Electric tramwayPrinted photograph on a sheet of plain paper.tramways, trams, sturt st, esco, armstrong st, wtp -
 Ballarat Tramway Museum
Equipment - Part of overhead - corroded span wire, 2024
Items show two different wire terminations - fully wrapped - 7 wires and part wrapped and secured by bending the wire. Shows how the galvanized span wire - 7 strands - can corrode within the insulator and lead to failure if not inspected and replaced. The items were probably erected by the SEC during the mid 1930s and replaced by the BTM 2024. Salvaged from Wendouree Parade during overhead span wire replacement and repair work March 2024 undertaken by the BTM. See also item 9020 for a corroded pole eye bolt.Demonstrates a corroded span wire and a typical egg type insulator.Overhead equipment - two brown egg insulators with associated corroded span wire.overhead, insulators, span wires, btm, tramways -
 Ballarat Tramway Museum
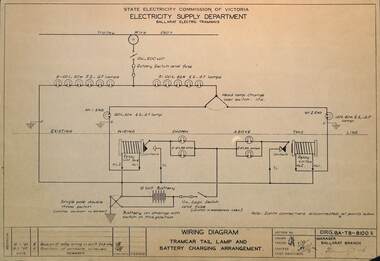
Drawing, State Electricity Commission of Victoria (SECV), "Tramcar tail lamp installation relay modification", 15/11/1949
Set of two drawings (BA-T8-8100/1 and BA-T8-8100B) showing the installation of tail lights on SEC tramcars and modifications to the battery/trolley pole relay and battery. Both are dated 15/11/1949 and signed by the Manager Ballarat Branch. The actual relay used later was a Post Office type relay contained within a wooden box.Yields information about the modifications proposed to the tramcars to provide a rear tail light and lights when at a terminus.Drawing - dyeline print on plain papertramcars, safety, tail lights, lights, ballarat -
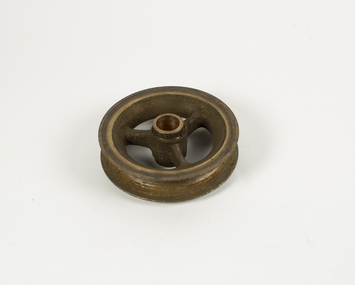 Ballarat Tramway Museum
Functional object - Trolley Wheel
Cast brass, fitted with a cylindrical bush in the centre. Fitted to the end of a trolley pole with another cast item known as a hasp. The wheel runs along the underside of the copper trolley wire, and enables the tram to powered. See item 4809 for a SEC drawing of the item.Demonstrates the mechanism by which the electrical power is transferred from the overhead to the tram itself.Cast brass wheel, with three spokes and hole in the centre for fitting to trolley pole.btm, ballarat tramway museum, trolley wheel -
Ballarat Tramway Museum
Functional object - Tramway overhead wire 'Ear'
Used to suspend a tramway contact wire from catenary wires, or directly from a span pole. The contact wire is placed between the two halves and clamped in place by fastening the screws. Shows how tramway contact wire is suspended.A brass casting with various attachment points. The lower part is cast in two halves, with one side attached to the other with eight brass screws.ballarat, tramways, overhead, wiring, ear -
 Ballarat Tramway Museum
Photograph - Tram 31 Gardens Loop, 1/1966
Photograph - Black and white of Ballarat tram No. 31 parked at Gardens Loop in Wendouree Parade. In the background are the large trees that were a feature of this location and on the pole behind the tram, the timetable boards. Not known who took the photo on a very quiet day during Jan. 1966.Yields information about the appearance of tram No. 31 during Jan 1966 and Gardens Loop.Black and white photograph on Ilford paper.In ink on rear "Gardens 1/66"tramways, wendouree parade, gardens loop, tramcars, tram 31 -
 Ballarat Tramway Museum
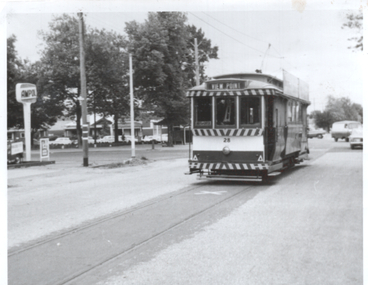
Photograph - Tram 40 at Sebastopol terminus, 1/1966
Photograph - Black and white of Ballarat tram No. 40 parked at the Sebastopol tram terminus. The conductor has lowered the trolley pole and is tying the rope off. The tram has an SEC Electric Cooking roof advertisement and the destination of Lydiard St Nth. In the background is the Royal Mail Hotel. Not known who took the photo during Jan. 1966.Yields information about the appearance of tram No. 40 during Jan 1966 and the Sebastopol terminus.Black and white photograph on Ilford paper.In ink on rear "Gardens 1/66"tramways, wendouree parade, gardens loop, tramcars, tram 40 -
 Ballarat Tramway Museum
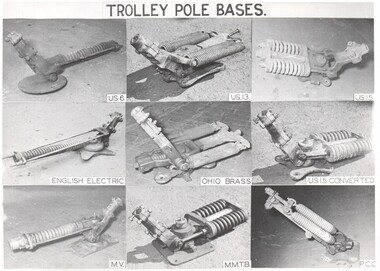
Photograph - Black & White Photograph/s, Melbourne and Metropolitan Tramways Board (MMTB), mid 1960's?
Black and White photograph (montage) of nine type of trolley poles spring bases used by the MMTB, c1970. Provides photos of US6, US13, US15, English Electric, Ohio Brass, US 15 Converted, MV, MMTB and PCC types. Titled "Trolley Pole Bases"trams, tramways, mmtb, trolley poles, trolley pole bases -
 Ballarat Tramway Museum
Slide - 27 mm sq slide/s, Andrew Howlett, SEC Ford Welding truck, complete with Trolley Pole in the Power Station yard, Dec. 1969
Yields information about SEC Ballarat Welding truck fitted with a trolley pole.Colour slides, Kodak white cardboard mount, developed Dec 1969 of the SEC Ford Welding truck, complete with Trolley Pole in the Power Station yard. Welder, weld Note the hand vice on the front bumper bar and the hand operated turn and stop signal device. See Reg Item 2864 for a view of this truck at work.ballarat, tramways, trams, sec, trackwork, welding -
 Ballarat Tramway Museum
Negative, Wal Jack, early 1950's
Yields information about tram services in Sturt St and Grenville St and the building structures.Negative and Digital images of the Wal Jack Ballarat Negative file of tram 39 entering Bridge St, crossing Grenville St after leaving Sturt St. In the background is the Bucks Head Hotel. a Jeweller and Handbags Novelties shop. Note the Forest City signal on the pole and a letter (receiving pillar) box.trams, tramways, bridge st, grenville st, sturt st, signals, forest city signals, tram 39 -
 Ballarat Tramway Museum
Photograph - Digital image Set of 10, Warren Doubleday, Repairs to No. 40, 7/8/2004 to 26/12/2004
Set of 10 Digital Images of the work involved in the repairs to tram No. 40 during the period 7/8/2004 to 26/12/2004. .1 - No. 1 end panel removed .2 - work to sand down underway - not top gutter rail. .3 - Trolley with trolley pole bases .4 - damaged to gutter metal work .5 - close up showing the rust to the metalwork at No. 1 end drivers dash .6 - removed panels .7 - rust to the gutter metal work .8 - Alastair Reither sanding one of the pillars .9 - ditto .10 - work progressing with undercoat and new timber panel - ex the packing case that arrived with the Isolating Transformer.trams, tramways, btm, maintenance, painting, tramcars, trolley poles, tram 40 -
 Ballarat Tramway Museum
Negative, Wal Jack, 6/10/1960 12:00:00 AM
Yields information about Ballarat No. 25 leaving the depot for Bendigo Oct. 1960.Negative and Digital images of the Wal Jack Ballarat Negative file of trams 25 leaving for Bendigo. Shows Yellow Express Mack prime mover GPU 328 with Ballarat Tram No. 25 loaded and leaving the depot. Tram has destination box removed. Also the process of fitting the dash canopy lighting had commenced, with the small white stripe painted under the windows. Also would appear trolley pole base has been removed. Taken 6/10/1960. See also Reg Item 1478 - this is a different image and 7763i for Bendigo 1 in the depot and 7766 for the truck leaving. See Reg Items 1478, 5241, 5242, 7759 and 7766 for a series of 5 photos of this event.trams, tramways, yellow express, transporting trams, moving trams, bendigo, tram 25 -
 Ballarat Tramway Museum
Photograph - Digital image Set of 16, Warren Doubleday, 5/10/1975 12:00:00 AM
Set of 16 digital images of BTPS Operations on 5-10-1975 during the time of the SPER (Sydney Tramway Museum) visit to Ballarat. .1 - 14 and 27 on the depot fan .2 - 27 and 14 on the access track about to cross Wendouree Parade .3 - ditto with 40 in Wendouree Parade .4 - 26 swinging the pole in Wendouree Parade .5 - three single truckers in the Loop .6 - ditto .7 - 14 in the loop .8 - 40 near depot junction .9 - 27 running into the loop. 10 - All four cars in or nearing the loop 11 - ditto 12 - 26 side on view 13 - 26 Gardens North 14 - 14 Gardens North 15 - 14 and 26 descending from Carlton St 16 - 26 dittotrams, tramways, btps, sper, wendouree parade, depot, gardens loop, tram 14, tram 26, tram 27, tram 40 -
 Ballarat Tramway Museum
Photograph - Digital photograph of Tram 18 being moved to new museum, Peter Waugh
Tram being moved by truck prior to track constructionYields information about methods of moving trams at the museum Digital photograph of a large articulated truck moving Tram 18 from the workshop into the new museum building. A man uses a pole to lift the overhead wire to give the tram clearance.btm, moving trams, tram 18, ballarat -
 Ballarat Tramway Museum
Photograph - Set of 8 colour 35mm slides of Ballarat Trams May 1971, Noel J Simons, 24/5/1971
Shows a sample of photographs taken about 3 months before the Ballarat Tramway system commenced to close.Yields information about various Ballarat Trams and the streetscape at the time prior to closure in August and September 1971Set of 8 Kodachrome transparencies taken on 24/5/1971 1172.1 - Tram 27 in Wendouree Parade, near Barrett Ave., with destination of Victoria St., passing a tram stop, with a seat and "Warning Oncoming Trams" sign mounted on the pole. Tram has a Twin Lakes advertisement on the front dash and a unknown roof advertisement. See also Reg. Item No. 1174.3 for a later photograph. 1172.2 - No. 32 entering Bridge St. from Sturt St. Photo taken after tram has passed photographer. Has Woolworths and Dickins stores in the background, and many motor vehicles. Tram has destination of Mt Pleasant 1172.3 - No. 13 in bound along Sturt St. West, near Alfred St. looking west along Sturt St. West. Has destination of Mt. Pleasant. 1172.4 - as for 1172.3, but closer up. 1172.5 - No. 17 west bound along Sturt St. passing the Town Hall, with Myers and Queen Victoria's statue in the background. Taken from the north side of Sturt St. through the median strip. 1172.6 - No. 13 at the City terminus, on the south side of Sturt St. with the National Mutual and other buildings up to the Town Hall in the background, including the fountain and the city terminus shelter. 1172.7 - Bogie tram at the city terminus, on the south side of Sturt St. looking from the central median strip, westwards. Has Town Hall in background along with other buildings. 1172. 8 - as above but with Scrubber car behind a bogie tram. Shows fountain and ESCo control box by a pole.wendouree parade, •tram stops, •bridge st, •sturt st. west, •murray st., •sturt st, •town hall, •scrubber tram, tram 27, tram 32, tran 13, tram 17, ballarat, tramways, trams -
 Ballarat Tramway Museum
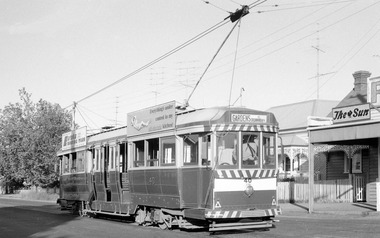
Photograph - Ballarat Tram 27 at Mt Pleasant terminus, Robert Wilson, 13-6-1971
Image of Ballarat tram 27 at the Mt Pleasant terminus with the driver/conductor putting the trolley pole back on the overhead wire. The pole on the left shows two tram stop signs. The shop on the right has adverts for The Sun, Robur Tea, TV Week and Peters Ice Cream. This photograph was used in an interpretative panel at the terminus installed in 2020 by the local history group. See the second image for it use and the mixed business that operated at this location..Demonstrates an event that happened at the tram terminus for about 66 years - from 1905 to 1966 - changing the pole.Digital image of Ballarat Tram 27 at Mt Pleasant terminus 13-06-1971.trams, tramways, mt pleasant, tram 27, ballarat tramways -
 Ballarat Tramway Museum
Photograph - Ballarat Tram 40 at Mt Pleasant terminus, Robert Wilson, 1-12-1970
Image of Ballarat tram 40 at the Mt Pleasant terminus 1-12-1970. The tram has roof adverts for Eureka Roofing Tiles and Electric Cooking. The metal device above the trolley pole, assisted crews to put the pole back on the overhead, especially at night. The mixed business on the right-hand side has an advert for The Sun newspaper.Yields information about the Mt Pleasant terminus in late 1970.Digital image of Ballarat Tram 40 at Mt Pleasant terminus 1-12-1970trams, tramways, mt pleasant, ballarat tramways, tram 40, trolley poles -
 Ballarat Tramway Museum
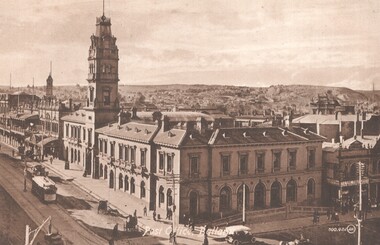
Postcard, Valentine & Sons Publishing Co, Post Office Ballarat, c1910
Image of the intersection of Sturt and Lydiard Streets looking north along Lydiard St. North giving high view of the Post Office building with its tower. Has an ESCo tram southbound in Lydiard St North, a motor car and a number of horse-drawn vehicles. Shows the verandahs along Lydiard St, centre poles, and looks towards a rather desolate Black Hill following extensive mining works. The Post Office time ball is in the down position. Possibly c1910. Summerscales building - photographer, postcards is next door to the Post Office in Sturt St. Has written on the rear, over the full width of the card a message to Ted from Ena? See item 8238 for a colour version. Yields information about the intersection of Sturt and Lydiard Streets in the early ESCo era and the Post Office building.Postcard - sepia toned - divided back, undated - Valentine & Sons, Printed in Great Britain. Card Number "400.401 JV"See Contextsturt street, post office, ballarat, tramways, lydiard st, esco, black hill -
 Ballarat Tramway Museum
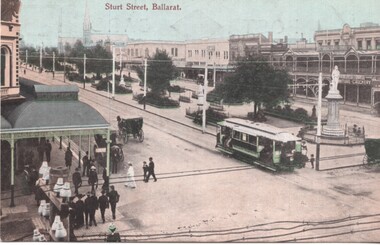
Postcard, Commonwealth of Australia, Sturt St Ballarat, c1910
Image is taken from the National Mutual building on the corner of Sturt and Lydiard Streets, looking east towards Grenville St. Has an ESCo tram with blinds drawn nearing the intersection. The tramcar number could be 12, 13 or 18. There are a number of horse drawn cabs in the photograph. The Burns statue is on the left side. There are telegraph/telephone poles in the photograph along with the buildings on either side of the streetYields information about Sturt Street east of Lydiard St.Black and white postcard with a green (18mm wide) border acting as a frame to the postcard picture. The picture measures 50mm High x 98mm wide. Has a Victorian Two Pence stamp with a "168" cancellation stamp. The card has been published by the Commonwealth of Australia with a coat of Arms. In the bottom left hand corner is a symbol "HB" within an artists paint palette.On rear is a note to a Miss Audersau of Launceston.sturt st, grenville st, esco, horse cabs, trams, tramways, ballarat -
 Ballarat Tramway Museum
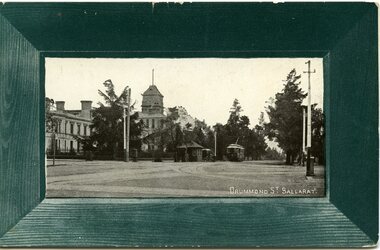
Postcard, Commonwealth of Australia, Drummond St Ballarat, 1909
The photograph is marked "Drummond St. Ballarat" In the background is the Ballarat hospital, with a cab stand/shelter shed with two horse-drawn cabs at either end. Large trees in Drummond St. - conifers. Also shows other tram track and poles at the time of the photograph being taken. The ESCo tram is not fitted with windscreens. The second copy has an undated letter on the rear. with a handwritten note "1911 period"Yields information about the Ballarat Hospital c1909.Black and white postcard with a green (17mm wide) border acting as a frame to the postcard picture. The picture measures 49mm High x 97mm wide. Has a Victorian One Penny stamp with a "168" cancellation stamp and two cancellation stamps, one Ballarat 7/7/09 and the other with a large "5" in the middle.. The card has been published by the Commonwealth of Australia with a coat of Arms. In the bottom left hand corner is a symbol "HB" within an artists paint palette.Short message from "Nell" to her sister Jean Hall of Blackwood.esco, horse cabs, trams, tramways, ballarat, hospital corner, drummond st. -
 Ballarat Tramway Museum
Postcard - ESCo tram at Armstrong, WTP, Sturt St Ballarat, 1905
Postcard shows an ESCo tram soon after commencement in 1905, at the corner of Armstrong and Sturt Streets, Ballarat. The tram has a destination sign hung from the drivers dash canopy. On the left is the Snows Department store and a pole with telegraph/telephone wires and insulators. The Thomas Moore Statue is adjacent to the tramcar. The median plantation was known as Shoppees Square. See item 8999 for a printed colour copy from an illustration, and 3795 for a copy photograph. Yields information about Sturt St, 1905.Postcard - coloured, published by WTP, 1905, Divided back type. trams, tramcars, ballararat, sturt st, esco, armstrong st, wtp -
 Ballarat Tramway Museum
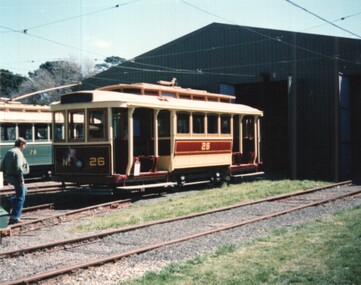
Photograph - Ballarat - BTPS Depot - tram 26, Ian Stanley, 13-10-1986
Photo shows tram 26 nearing completion of the conversion to a California Combination car. Seat backs and trolley pole yet to be fitted. On display at the BTPS depot fan with tram 28. Photographed on the day of the Society's 1986 AGM.Yields information about BTPS Operations and work in 1986Colour print of Kodak paper - Ballarat - BTPS Depot - tram 26Has details of the location and dates on rear along with photographers number.ballarat, tramways, tramcars, btps, tram 26 -
 Ballarat Tramway Museum
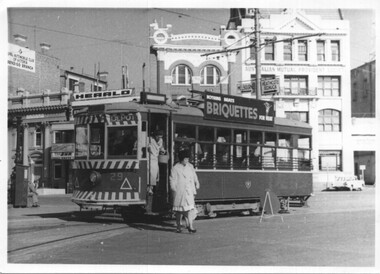
Photograph - Bendigo - Birney 29 Charing Cross, Jim Seletto, 25-9-1961
Photo shows Birney 29 at Charing Cross with the destination of Depot. Tram has a briquette advertisement. Two ladies are alighting. In the background are signs or buildings for the RACV, the Herald newspaper, and the Australian Mutual Provident building. Photo has date of 25 Sep 1961. Photo by Jim Seletto. Note the direction signs on the pole behind the tram.Yields information about Bendigo tram 29 and Charing Cross.Photograph - Bendigo - Birney 29 Charing CrossHas photographer, date stamp and location written on reartramways, tramcars, birney tramcars, tram 29, charing cross, bendigo