Showing 806 items
matching lake view
-
 Ballarat Tramway Museum
Negative - Set of 5, Campbell Duncan, Carey Grammar school visit to Ballarat, 13/09/1969 12:00:00 AM
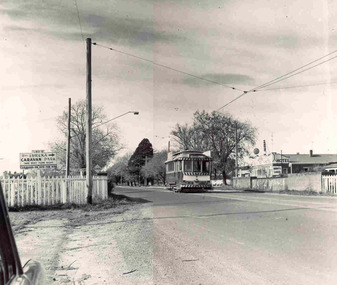
Yields information about the visit of the Carey Grammar school visit to Ballarat and the Eureka siding in 1969.Set of five negatives of the Carey Railway Club visit to Ballarat on Saturday 13/9/1969. .1 - 34 with the destination of Mt Pleasant at Carlton St loop, though running a Special .2 - 17 and 34 with another single trucker at Gardens Loop - 17 has a Twin Lakes sign and destination of Gardens via Sturt St West. 34 showing Special. .3 - side on view of 34 at Carlton St Loop - with a SEC electric cooking roof advert. .4 - DERM entering the Eureka Siding. .5 - DERM leaving the Eureka Siding, has the Millar Bros engineering works in the background.trams, tramways, tours, eureka, wendouree parade, carlton st loop, carlton st, railways, tram 34, tram 17 -
 Ballarat Tramway Museum
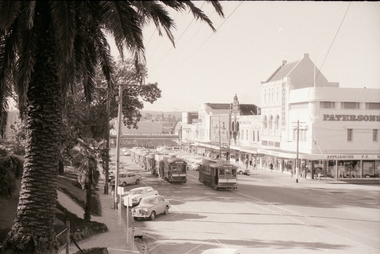
Negative - Set of 3, Campbell Duncan, 10/08/1971 12:00:00 AM
Yields information about tram operations and the street views in the area of the City Loop, Sturt St.Set of 3 photographs taken on 10/8/1971 by Campbell Duncan of trams in the City Loop area of Sturt St. .1 - With 5 trams, headed by No. 40, in the loop, No 26 passes the loop. In the background are the various shops and stores on the south side of Sturt St, the including Patersons store. .2 - No. 26 climbing towards Lydiard St with the Coors Private Hotel, the Commonwealth Bank and the National Mutual building in the view. The tram has the destination of Gardens via Sturt St West, and a Briquettes roof advertisement. .3 - No. 27 - passes the assembled trams in the loop with the Dickins and Thomas buildings in the background. The tram has a Twin Lakes sign.trams, tramways, sturt st, city loop, tram 26 tram 40 tram 27 -
 Ballarat Tramway Museum
Negative - Set of 3, Campbell Duncan, 10/08/1971 12:00:00 AM
Yields information about tram operations and the street views at Stones Corner.Set of 3 photographs taken on 10/8/1971 by Campbell Duncan of trams in the Main of No. 31 approaching the junction with Bridge St and Victoria St. The tram has the destination of Gardens via Drummond North and a Twin Lakes sign. In the background are the Avery Scales store, Wearwell and Stones Corner. Shows the overhead arrangements at this location.trams, tramways, main road, stones corner, tram 31 -
 Ballarat Tramway Museum
Negative - Set of 5, Campbell Duncan, 10/08/1971 12:00:00 AM
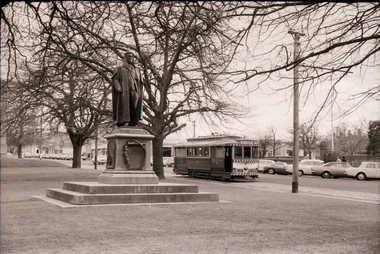
Yields information about tram operations and the street views in Sturt St near Lyons St.Set of 5 photographs taken on 10/8/1971 by Campbell Duncan of trams in Sturt St near Lyons St. .1 - No. 27 inbound with a Twin Lakes and destination of Mt Pleasant, passing the Peter Lalor statue in the median strip. .2 - No. 34 outbound crossing Dawson St with the Golden City Hotel in the background. .3 - No. 21 outbound with St Patrick's Cathedral in the background and the Adam Lindsay Gordon statue (1969) memorial to the horses killed in the First World War. 4. ditto .5 - No. 13 inbound with a Twin Lakes sign and destination of Victoria St, crossing Lyons St, with St Andrews Kirk in the background. For notes on the statues see: http://www.ballarat.vic.gov.au/media/499947/sturt%20street%20gardens%20calm%20plan.pdf (accessed 11/12/16)trams, tramways, sturt st, dawson st, lyons st, statues, tram 27 tram 34 tram 21 -
 Ballarat Tramway Museum
Photograph - Digital image Set of 8, George Coop, 1968 - 1970
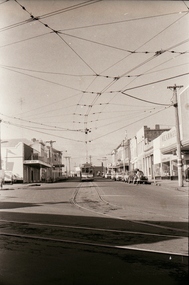
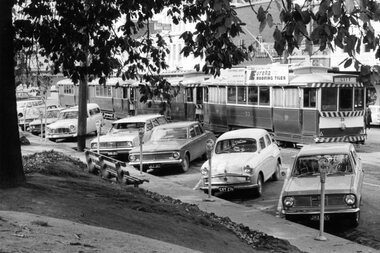
Yields information about the City Loop area and its operation. Eight (8) Digital images taken by George Coop during the period 1968 - 1970, of trams at the City Loop. .1 - 33, 17 and two other single truckers parked in the loop with motor vehicles and parking meters. No. 33 has an Eureka Roofing Tile Advert. .2 - 28? passing two track workers cleaning the west end points with a bogie car and three single truckers in the loop. In the background are Patersons and Dickins Food Store. .3 - No. 12 parked at the east end of the loop, hard up against the tram in front. Shows the Section Insulator. .4 - As for .1, front on photo with the destination of City and a "Pay as You Enter". The Dickins sign can be seen. .5 - as for .2, No. 35 leads the queue. Has the Woolworths Big W store in the background. .6 - view from the rear (12, 30, 17) with No. 33 being driven out of the loop. .7 - View from the rear, 33 has moved out of view. Has the T&G (Temperance and General) building in the view. .8 - No. 31 moves over the points at the west end of the loop. The tram has the Destination of Gardens via Drummond North, a Twin Lakes advert and a SEC Electric Cooking Advert.trams, tramways, city loop, sturt st, trackwork, overhead, tram 33, tram 17, tram 26, tram 12, tram 35, tram 31 -
 Ballarat Tramway Museum
Photograph - Digital image Set of 5, George Coop, 1968 - 1970
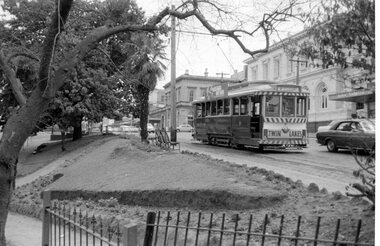
Yields information about the tram operations at or near the Titanic Bandstand in Sturt St.Five (5) Digital images taken by George Coop during the period 1968 - 1970, of SEC trams in Sturt St, between Lydiard and Grenville Streets on the north side of Sturt St. .1 - Tram 11, descending the hill by the Titanic bandstand with the Post Office in the background. Trams has a Twin Lakes advert, Bliss Bombs and the destination of Mt Pleasant. .2 - Tram 31 ditto, except destination of Victoria St. .3 - Tram 13 with bandstand in the view - for Mt Pleasant. .4 - Tram 33, with a lady and man carrying a box descending the footpath. Tram has the destination of Victoria St and a Twin Lakes sign. .5 - Tram 26, at corner of Sturt and Camp Streets, with the Owen Williams store in the background. trams, tramways, sturt st, tram 11, tram 31, tram 13, tram 33, tram 26 -
 Ballarat Tramway Museum
Photograph - Digital image Set of 10, George Coop, 1968 - 1970
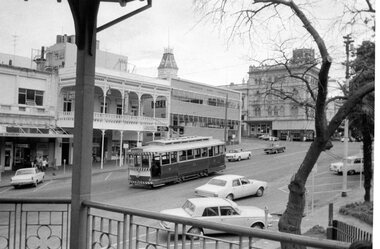
Yields information about the tram operations and the landscape views of the Sturt St median strip.Ten (10) Digital images taken by George Coop during the period 1968 - 1970, of SEC trams in Sturt St, between the City and Pleasant Streets. .1 - Tram 26 climbing the Sturt St hill to Lydiard St, with the Cook's Private Hotel, the Commonwealth Bank and the National Mutual Life building in the background. Photo taken from the Titanic Bandstand. .2 - Tram 40 Sturt St, enough to Lydiard St North just before Raglan St. Has a lady passenger by the tram stop. .3 - Tram 30 - Sturt St north side, near Armstrong St, - has a blue framing line around the photograph. .4 - Tram 39, Sturt St, near Doveton St, shows the rotunda in the median strip. .5 - Tram 18, with median step in view. .6 - Tram 31, with two Johnnie Walker whiskey roof adverts, outside the National Mutual Life building with the Alan Bros Jewellers and Golden Star Chinese Cafe in the view. .7 - Tram 31, Sturt St south side with Town Hall and the Golden City Hotel in the view. Tram has destination of Gardens via Drummond North. .8 - Tram 41 - ditto - going to Sebastopol. .9 - Tram 13, south side, Gardens via Sturt West, about , near Ripon St, with the Ampol service station in the background and about to pick up a lady passenger .10 - Tram 17, near Doveton St. Has a Twin Lakes sign and a Wilkinson Sword Razor Bladese roof advert. trams, tramways, sturt st, raglan st, passengers, doveton st, tram 26, tram 40, tram 30, tram 39, tram 18, tram 31, tram 41, tram 13, tram 17 -
 Ballarat Tramway Museum
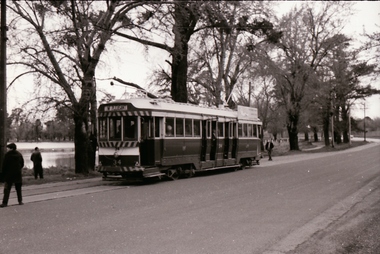
Photograph - Black & White Photograph/s set of 2, Charles Craig, late 1950's
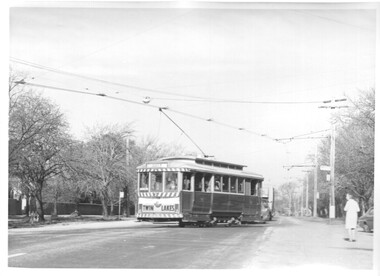
Yields information about the appearance of Lake Wendouree and Wendouree Parade near St Aidans Drive during the late 1950's.Set of two photographs of No. 26 in Wendouree Parade, near St Aidans Drive with Lake Wendouree in the background. Tram has the destination of Gardens via Drummond St North. Photo late 1950's, has an FC Holden? or similar in the view. trams, tramways, wendouree parade, st aidans drive, lake wendouree, tram 26 -
 Ballarat Tramway Museum
Photograph - Black & White Photograph/s set of 2, Charles Craig, Aug. 1971
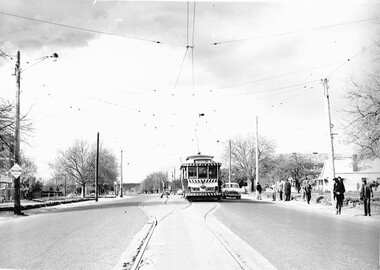
Yields information about the intersection of Sturt St and Hamilton Ave by trams prior to the closure of the SEC operated system.Black and White photograph of Nos 13 and 14 turning from Hamilton Ave into Sturt St west. Both tram have the destination of City. No. 13 has a Twin Lakes sign. Photo by Charles Craig possibly August 1971, prior to closure as the new bus stops signs are in view. trams, tramways, sturt st west, closure, hamilton ave, tram 13, tram 14 -
 Ballarat Tramway Museum
Photograph - Black & White Photograph/s - set of 6, Charles Craig, 1950s
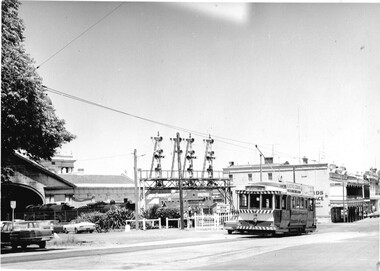
Yields information about the appearance and use of the Ballarat Railway Station level crossing by trams prior to closure.Set of six black and white photographs of trams at the railway level crossing, Ballarat, Lydiard St North featuring the railway station, gates and signals, Reeds Coffee Palace and the Provincial Hotel. .1 - 28 heading south, with an R class and a K class locomotive in the view. .2 - 11, heading north - taken during the 1950's. .3 - 17 parked right up to the gates while K184 shunts at the station. .4 - single trucker (number obscured) - most likely 17 giving the passengers in the previous photo. .5 - Photo with two single truckers in the view and the gates being closed after the tram has passed. .6 - 11, at the gates with a bogie tram behind. No. 11 has a Briquettes roof advert and a Twin Lakes sign. Photo by Charles Craig - during 1971, except for .2, taken during the 1950's. trams, tramways, lydiard st north, railway station, signals, level crossings, tram 28, tram 11, tram 17 -
 Ballarat Tramway Museum
Photograph - Black & White Photograph/s, Charles Craig, 1971
Has a strong association the closure of the Victoria St line and the special trams on the Saturday before. Yields information about the events.Black and white photographs of No. 11, inbound in Victoria St, at King St loop, showing Special. Photo most likely 21 or 22/8/1971 at the time of closure. Has many photographers n the view. Tram has a Twin Lakes sign. Photo by Charles Craig, probably August 1971.trams, tramways, victoria st, king st, closure, special trams, tram 11 -
 Ballarat Tramway Museum
Photograph - Black & White Photograph/s, Charles Craig, 1971
Yields information about the Victoria St terminus just before the closure of the SEC operated system,Black and white photographs of No. 12 at the Victoria St terminus, with the destination Gardens via Drummond St North. Photo most likely 21/8/1971 at the time of closure and possibly during the ARHS / TMSV tour. Has many photographers in the view. Tram has a Twin Lakes sign. Meagher's Hotel in the background with a Victoria Bitter sign. Photo by Charles Craig, probably August 1971.trams, tramways, victoria st, closure, special trams, tram 12 -
 Ballarat Tramway Museum
Photograph - Black & White Photograph/s set of 2, Charles Craig, Aug. 1971
... Set of two Black and white photographs of view of trams... and white photographs of view of trams and Lake Wendouree. .1 ...Yields information about tram operations in Wendouree Parade and Lake Wendouree.Set of two Black and white photographs of view of trams and Lake Wendouree. .1 - single trucker in Wendouree Parade near Convent Corner, Hamilton Ave, north bound, taken from the finish of the rowing course. .2 - No. 17 westbound in Wendouree Parade, near Barrett Ave, with destination of Gardens via Drummond St North. Photo by Charles Camera, at the time of the first closure of the Ballarat system, 23/8/1971 when the Victoria St line closed.trams, tramways, lake wendouree, wendouree parade, tram 17 -
 Ballarat Tramway Museum
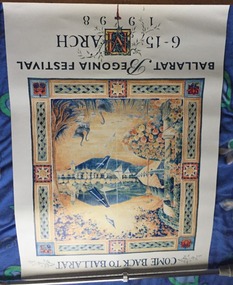
Poster, City of Ballarat Begonia Festival Committee, Begonia Festival program, 1998
... back to Ballarat." with a montage view of the Lake, Town Hall... view of the Lake, Town Hall and Eureka banners. Begonia ...Poster - full colour printed on gloss paper, advertising the 1998 Begonia Festival March 6 - 15, 1998. Has the theme "Come back to Ballarat." with a montage view of the Lake, Town Hall and Eureka banners.trams, tramways, begonia festival, city of ballarat, posters -
 Ballarat Tramway Museum
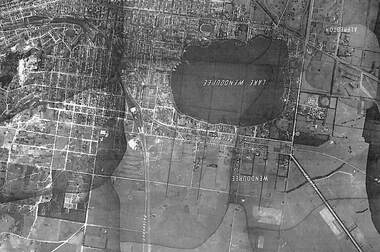
Photograph - Black & White Photograph/s, State of Victoria Lands Department, c1940
... Black and white photograph of an aerial view of the Lake... tramways Lake Wendouree Ballarat Aerial views Black and white ...Yields information about the development and Lake Wendouree from an aerial photograph c1940.Black and white photograph of an aerial view of the Lake Wendouree and the northern part of Ballarat c1940. Shows the photograph join lines, has names of suburbs, Railway lines. Purchased from rusty via Ebay 16/5/2019.trams, tramways, lake wendouree, ballarat, aerial views -
 Ballarat Tramway Museum
Photograph - Black & White Photograph/s - set of 5 - tram operations on the Victoria St, Richard Gilbert, c August 1971
Yields information about the appearance of the Victoria St line shortly before the closure of the Victoria St line. Series of 5 Black and white photographs of tram operations on the Victoria St line prior to its closure in August 1971. .1 - View of the Victoria St terminus as you arrive in Ballarat from Melbourne, with the divided highway and a tram warning sign. Has a tram at the terminus. .2 - Tram 39, running a special tour with St Alipius church in the background. A new bus stop sing has been positioned. Another tram has departed the King St loop. .3 - No. 13, (Gardens via Sturt St West and a Twin Lakes sign) entering the King St loop. .4 - No. 31 (to Gardens crossing No. 39) at the King St loop. .5 - No. 31 leaving Stones Corner for Victoria St with Stones Corner building in the background along with the Caltex service station and Viscount Ambassador caravans.trams, tramways, victoria st, king st, stones corner, tram 39, tram 13, tram 31 -
 Ballarat Tramway Museum
Slide - 35mm slide/s, Robert Thomson?, 27/03/1964 12:00:00 AM
Yields information about Ballarat's trams during 1964 and the depot with the parking of trams.Ilford cardboard mount, colour slide of the front of the depot from Wendouree Parade, 29/3/1964. Has trams 26, 21 and 39 in the view. Tram 21 has a Twin Lakes and Dancing at the Civic Hall adverts, 26 - Twin Lakes and Briquettes adverts."Ballarat Trams Depot No. 29 27.3.64" in ink.tramways, trams, depot, tram 26, tram 21, tram 39 -
 Ballarat Tramway Museum
Slide - 35mm slide/s - set of 17, Noel Simons, 20/11/1962 12:00:00 AM
Set of 17 transparencies taken on 20/11/1962 on Kodak mounts. 1187.1 - Bendigo No. 2 at the Quarry Hill terminus, showing destination of Quarry Hill. Has Cohns Drinks and Streets Ice Cream ads on dash panel, a SEC 'electric cooking' roof ad and another roof ad. Shows the Y terminus at this location, but tram standing just before it. Overhead in position. 1187.2 - as above, but closer up. 1187.3 - as above, but from the north side, showing cemetery in the background. 1187.4 - Bendigo No.3 at Eaglehawk terminus. Tram showing destination of Quarry Hill. Has the various buildings at Eaglehawk in the background including the Foodland store. Has Streets Ice cream and White Horse Whiskey ads on the dash panel. 1187.5 - Bendigo No. 18 at Garden Gully crossing loop, in bound, with destination of Eaglehawk. Passengers waiting for an Eaglehawk tram at the stop. Has a white horse whiskey ad on dash panel and SEC roof ads. Conductor standing in doorway looking out. 1187.6 - Bendigo No. 7 inbound in Nolan St. at cnr of McCrae St. showing destination of Golden Square. Has Streets Ice cream ad on dash panel and a Castrol Roof ad. 1187.7 - Bendigo No. 19 at the North Bendigo terminus with railway level crossing in background. Tram has a Cohns Drinks ad and an SEC 'Electric Cooking' roof ad. 1187.8 - Bendigo No. 2 at the Quarry Hill terminus, looking back into Bendigo, showing destination of Eaglehawk. 1187.9 - Bendigo No. 21 in McCrae St, near Nolan St outbound for North Bendigo. Photo taken after tram has passed photographer. 1187.10 - Bendigo Nos. 4 and 26 at Charing Cross in View St. with fountain alongside and the Beehive, Ezywalkin Buildings in the background. No. 26 has a Sandhurst Milk and SEC 'Electric Cooking' roof ad. 1187.11 - close up of 22E maximum traction truck and folded footstep. 1187.12 - Bendigo No. 19 at Charing Cross terminus, after tram has passed photographer, showing destination of North Bendigo, with the Beehive building in the background and passengers boarding tram. 1187.13 - Bendigo No. 11, turning from View St. into Pall Mall, showing Special with the conductor holding point bar. Has the Beehive and Ezywalkin Buildings in the background. 1187.14 - No. 7 at Charing Cross terminus, in Pall Mall, bound for Golden Square. Has the Beehive and Ezywalkin buildings in the background and passengers waiting at the tram stop. 1187.15 - No. 18 at the Charing Cross terminus, bound for Eaglehawk. Has the Beehive and Ezywalkin buildings in the background and passengers waiting at the tram stop. Also has the 'Safety Zone' sign in the photograph. 1187.16 - No. 2 at Quarry Hill terminus, night or dusk photo. Tram showing destination of Depot. 1187.17 - No. 26 at Charing Cross, night photo. Tram has destination of Quarry Hill, but is on the line for Eaglehawk. Photo looks along Mitchell St. Also shows Safety Zone sign. Information written on in black ink and date stamped on purple ink. 1187.1 - "No. 2 at Quarry Hill terminus Bendigo" 1187.2 - "No. 2 at Quarry Hill terminus Bendigo" 1187.3 - "No. 2 at Quarry Hill terminus Bendigo" 1187.4 - "No. 3 at Eaglehawk terminus" 1187.5 - "No. 18 in Mt Korong Road, Long Gully at cnr of Havilah Road (Eaglehawk Route)" 1187.6 - "No. 7 in Nolan St. Bendigo, at Cnr of McCrae St., near lake Weeroona, (North Bendigo Route)' 1187.7 - "No. 19 at North Bendigo terminus" 1187.8 - "No. 2 at Quarry Hill terminus" 1187.9 - "No. 21 in McCrae St. Bendigo, near Nolan St. (North Bendigo Route) 1187.10 - "4 and 26 at Alexandra Fountain, Charing Cross Bendigo" 1187.11 - "Truck of Bogie Car, Bendigo Tramways" 1187.12 - "No. 19 in Pall Mall at Charing Cross, Bendigo" 1187.13 - "Birney car No. 11 entering Pall Mall from View St. at Charing Cross Bendigo" 1187.14 - "No. 7 in Pall Mall at Charing Cross, Bendigo" 1187.15 - "No. 18 at Alexandra Fountain, Charing Cross, Bendigo" 1187.16 - "No. 2 at Quarry Hill terminus, Bendigo" 1187.17 - "No. 26 at Alexandra Fountain, Charing Cross, Bendigo" tramways, trams, bendigo, quarry hill, eaglehawk, north bendigo, maximum traction, night photo, tram 2, tram 3, tram 4, tram 7, tram 11, tram 18, tram 19, tram 21, tram 26 -
 Ballarat Tramway Museum
Slide - 35mm slide/s - set of 32, Noel Simons, 25/02/1971 12:00:00 AM
Set of 31 transparencies taken on 25/2/1972 on Kodak mounts. 1201.1 - Bendigo No. 26 in Bond St. just after leaving Long Gully en route for Quarry Hill. Has Norris Supermarket in background. Has two SEC roof ads. 1201.2 - No. 26 climbing View St. from Charing Cross en route to Eaglehawk. Has ANZ bank and AMOCO service station in background. 1201.3 - as for 1201.3, but after tram has passed photographer. Has buildings west of Mackenzie St. in photograph. 1201.4 - Tram stop and centre of the road pole with two "CARS STOP BY REQUEST" signs mounted on pole at the corner of Mackenzie St. 1201.5 - same position as for 1201.3, but with No. 5 descending the street. 1201.6 - same position as for 1201.2, but with No. 5 descending the street. Photo taken after tram has passed photographer. 1201.7 - No. 7 in Nolan St. from across the park at Lake Weeroona. 1201.8 - No. 7 entering McCrae St from Nolan St. - distant view. Note "TRAM "sign on left hand side under tree and overhead in McCrae St. from former track that once was in this street. 1201.9 - No. 7 in High St. with Cathedral in background. Tram en route to North Bendigo. Note scaffolding around Cathedral main spire area. 1201.10 - No. 7 crossing Bendigo Creek bridge in High St. near Golden Square. Has a Caltex Service station in the background. 1201.11 - No. 7 at Golden Square terminus with Sunburst Fruit Juices and a Peters Ice cream delivery vans alongside. 1201.12 - as for 1201.11 but photo taken from behind tram, with the end of the rails in the photograph. 1201.13 - No. 7 and 21 in Pall Mall at Charing Cross with No. 5 in the background. Taken some distance away from the location. 1201.14 - No. 7 at Golden Square terminus, taken a short distance from the tram terminus. Shows Milk Bar on right hand side and the hotel on the left hand side. Taken from the south side of the roadway. 1201.15 - as from 1201.14 but taken from the north side of the roadway. 1201.16 - No 5 waiting at California Gully loop. Distant photo showing surrounds 1201.17 - No. 5 en route for Quarry Hill crossing No. 26 at California Gully. 1201.18 - No. 26 at Eaglehawk terminus with Eaglehawk Town Hall and Post Office in background. 1201.19 - No. 21 arriving at Charing Cross en route to North Bendigo. Has Alexandra Fountain in the background, ANZ bank RACV building, and other buildings on the north side of Pall Mall or Nolan St. 1201.20 - No. 26 en route for Quarry Hill at Charing Cross, with crew standing by front door. Has Colonial Mutual life building, Armstrong Tyre Service (Firestone) and a sign for Cohns Drinks in the background. 1201.21 - as for 1201.20 but with No. 5 en route to Eaglehawk now in photograph. 1201.22 - No. 26 at Quarry Hill terminus. 1201.23 - No. 26 at Quarry Hill terminus, view of front portion of tram only from a gate at the Bendigo cemetery. 1201.24 - Track at the end of the Quarry Hill line showing the point blades of the former "Y" terminus and the overhead for this. 1201.25 - No. 2 at the Quarry Hill terminus, looking along the former Trackwork. 1201.26 - as for 1201.25 1201.27 - number not used. 1201.28 - Golden Square terminus from some distance from the actual terminus, showing the Warning sign "TRAM" for motorists from the south. No. 7 at the terminus. 1201.29 - No. 7 passing through the Golden Square shopping centre. Numerous cars and pedestrians. Tram en route for North Bendigo. 1201.30 - No. 7 in High St. Golden Square, en route for North Bendigo. Photo taken after tram has passed photographer. 1201.31 - No. 7 in High St. just past Wattle St. with the Cathedral in the background. Tram has two SEC roof ads good side on photo, 'Everything's fine in my all electric kitchen' and 'Electrical cooking - clean, quick, economical'. 1201.32 - No. 7 in High St. nearing Wattle St. Has Cathedral in the background. Photo taken after tram has passed photographer.Information written on in black ink and date stamped on purple ink. 1201.1 - "No. 26 in Bond St just after leaving Long Gully" 1201.2 - "No. 26 climbing View St. from Charing Cross" 1201.3 - "No. 26 ascending View St. from Charing Cross (At Mackenzie St.)" 1201.4 - "View St. & Mackenzie St." 1201.5 - "No. 5 in View St. near Mackenzie St." 1201.6 - "No. 5 in View St. nearing Charing Cross." 1201.7 - "No. 7 in Nolan St. seen from Lake Weeroona Park." 1201.8 - "No. 7 entering McRae St. from Nolan St. Note "TRAM" warning sign on left. 1201.9 - "No. 7 in High St. passing Short St." 1201.10 - "No. 7 crossing Bendigo Creek bridge in High St. near Golden Square." 1201.11 - "No. 7 at Golden Square terminus" 1201.12 - "No. 7 at Golden Square terminus" 1201.13 - "No 7, 21 and 5 at Charing Cross" 1201.14 - "No. 7 at Golden Square terminus" 1201.15 - "No. 7 at Golden Square terminus" 1201.16 - "No 5 waiting at California Gully loop." 1201.17 - "Nos. 5 and 26 crossing at California Gully loop" 1201.18 - "No. 26 at Eaglehawk terminus" 1201.19 - "No. 21 arriving at Charing Cross from Golden Square" 1201.20 - "No. 26 at Charing Cross" 1201.21 - "Nos. 5 and 26 at Charing Cross." 1201.22 - "No. 26 at Quarry Hill terminus" 1201.23 - "No. 26 at Quarry Hill terminus seen through the gates of the Bendigo Cemetery." 1201.24 - "Quarry Hill terminus showing remains for former double track layout abandoned before 1964." 1201.25 - "No. 2 at Quarry Hill terminus" 1201.26 - "No. 2 at Quarry Hill terminus" 1201.28 - "The Southern approach to Golden Square with No. 7 standing at the terminus, "TRAM" warning sign on the left. 1201.29 - "No. 7 passing through Golden Square Shopping Centre" 1201.30 - "No. 7 in High St. Golden Square" 1201.31 - "No. 7 in High St. passing Wattle St." 1201.32 - "No. 7 in High St. nearing Wattle St."tramways, trams, bendigo, bond st., view st., nolan st., high st., eaglehawk, california gully, charing cross, quarry hill, trackwork, tram 2, tram 5, tram 7, tram 21, tram 26 -
 Ballarat Tramway Museum
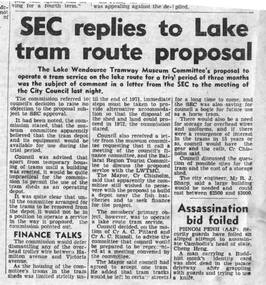
Newspaper, The Courier Ballarat, "SEC replies to Lake Tram route proposal", 14/09/1971 12:00:00 AM
Yields information about the discussions and views of the SEC about operation of historic trams in Ballarat after the closure of the SEC operated system.Newspaper clipping from The Courier, Ballarat, 14/9/1971 about a letter to the City Council from the SEC about the Lake Wendouree Tramway Museum Committee's proposal to operate a tram service on the lake route for a trail period. SEC said that this was not practical and advised that the sheds could only be used to house the trams. Noted that the SEC proposed to sell the land in 1972, and the Council's proposal that certain materials be stored. Quotes Cr. Chisholm (Mayor) and City Engineer (Mr. R. J. Sharp). Image added 20/11/2013In black ink in the top right hand corner of the item - '14/9/71'trams, tramways, museum establishment, btps, depot, city of ballarat -
 Ballarat Tramway Museum
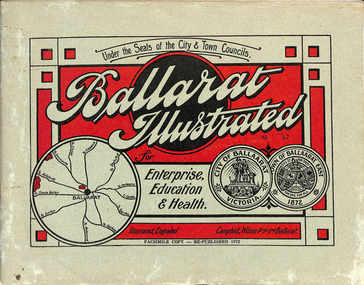
Book, "Ballarat Illustrated", 1972
Original c 1914 (see below), facsimile copy - re-published 1972. Original features photos of Ballarat City and Town, its buildings, parks and the various industries and organisations that were in Ballarat at the time of publication, including ESCo. Many photos features ESCo trams. Photos sepia toned. Has some red colour block printing on the front cover and rear, for Star Oil Engines. On inside back cover is a map with the places of interest and tram route map, marked in red. Pages are un-numbered. Original published by Ballarat East Town Council and Ballaarat City Council. On cover has number stamped in black in, "No. 87" (assume facsimile copy No.). Photos with publication show tram No. 21, built 1913 and ESCo photo page shows Mr. Pringle as Manager. Mr Pringle became manager in January 1911, As there is no photos of the "Avenue of Honour", or other mention of the first world war, assume original published about 1913 or 1914. Original shows Engravings and printing by "Campbell Wilson Prop Ltd, Ballarat". See Other Information as well for more listing details. High Resolution image added 31/8/2012 of i2 of ESCo page and i3 for Ballarat identies and sheet i4 extracted for Mr Pringle. PDF scan of full document added 21/5/2019 - see images btm633-1i.pdf and btm633-2i.pdf Notes on "Ballarat Illustrated" Reg. Item No. 733 From notes made by Neville Gower 12/1/1997 Cover: Inside front cover: Last paragraph, "Facilities for Travelling" - Electric trams serve all parts of Ballarat. Page 3: Street Scene, Municipal Town Hall, showing tram wiring Page 7: Street Scene, Lydiard St. North, intersection and tramway centre, with ESCo tram No. 21 in the bottom photo. Other photos features trams as well in Sturt St and Lydiard St. North. Page 9: Street Scene, Top photo of Sturt St. from Lydiard St. looking east, shows piles on right-hand side of road. Car parked by Post Office has a car registration number "9007". Bottom photo, an tram climbing hill, shows double trolley in the street, with early English type of pull offs. Page 13: Street Scenes and Historic Buildings: One of five photos, shows Victoria St. looking East, with tram track prominent in photo and how stone work was set up about the rails and overhead poles. Page 23: Street scene, Gardens North Entrance gates, shows details of gates near St. Aidans Drive. Note double trolley wire on poles, and style of insulators. No trams in photo, three ladies walking down the track. Page 37: Street Scene; Lydiard St views, top left hand photo, shows Railway station and railway gates with signal gantry and horse drawn vehicles. Tram tracks apparent. Bottom left hand photo shows Lydiard St. North, near Post Office, double track with centre poles - Single wire per track. Top right hand photo, showing Cemetery gates in background. Bottom right hand photo - from north end of Lydiard St. South, looking north, with an ESCo tram in background. Also has a parked car on left hand side. Page 45: Street Scenes - Bridge St; top photo at west end of Bridge St. with ESCo No. 11 with possibly double trolley wire in photo. Bottom photo at east end of Bridge St. with tram in background, shows junction. Double trolley heading out to Mt. Pleasant, single trolley for Victoria St. Page 45: Street Scenes - Bridge St; top photo at west end of Bridge St. with ESCo No. 11 with possibly double trolley wire in photo. Bottom photo at east end of Bridge St. with tram in background, shows junction. Double trolley heading out to Mt. Pleasant, single trolley for Victoria St. Page 61: Street Scenes and Historic Buildings - Public Institutions Ballarat - top left hand photo of the Hospital shows some tram track in foreground, with double trolley wire. Top right photo is of the Orphanage, the name of the tram terminus for many years. Page 68: Electric Supply Co. of Victoria's pages - top photo showing powerhouse in background, across the lake, can hardly see anything for the trees, except for the chimney. Bottom photos of the steam Turbo Generators and the switchboard. Gives Mr. P.J. Pringle as Chief Engineer and General Manager. He took over in Jan. 1911. Page 69: Ballarat East Views - features photo of Black Hill open cut, Ballarat East Railway Station, Ballarat Fire Station and "Victoria St. looking East", repeat of photo printed on page 12, but slightly darker. Image on system includes fire station and railway station, - Ballarat East. Page 78: Series of photos of various Ballarat VIP's of the era, fourth one in on top line features "P.J.Pringle, Electric Supply Co." Inside Back cover - map of Ballarat including tram lines and places of interest marked in red. Gives a detailed photographic presentation of Ballarat in 1914.80 page book with, in addition, light green card covers, titled "Ballarat Illustrated". Loose copy of page 9 and 10 held.trams, tramways, ballarat, local history, heritage buildings, esco -
 Ballarat Tramway Museum
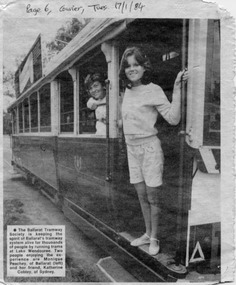
Newspaper, The Courier Ballarat, Ballarat Courier report on interstate visitors, 17/01/1984 12:00:00 AM
Newspaper Clipping, dated Tuesday 17/1/1984, page 6 of the Ballarat Courier. Photograph of the side of tram 27 with two young visitors one from Ballarat and the other a friend from Sydney at the front of the tram - looking along side on view, with a photo caption within the photograph. Tram 27 had a Twin Lakes sign and the APM paper ad on side until repainted into the 1930's colour scheme (DMcC - 25/7/1998) Monique Peachey of Ballarat and Katherine Cobley of Sydney in the photograph.In ink at top of Clipping "Page 6, Courier, Tues 17/1/1984)trams, tramways, btps, visitors, publicity -
 Ballarat Tramway Museum
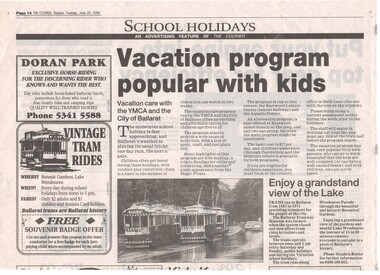
Newspaper, The Courier Ballarat, "Enjoy a grandstand view of the Lake", 20/06/2000 12:00:00 AM
... "Enjoy a grandstand view of the Lake"... a grandstand view of the Lake" Newspaper The Courier Ballarat ...Newspaper cutting from The Courier, Page 14, Tuesday 20/6/2000 detailing operation of the BTM Wendouree Parade service during the June 2000 school holidays. Gives details of the operation, contact details (Stephen Butler). Accompanying is a photo of trams 40, 671, 13 and 26 at the Gardens Loop during Boxing Day 1999 and a two column wide advertisement for the BTM offering a free souvenir Badge Offer. See images for advertisement and photo. (Note very few badges were distributed)btm, school holidays, advertisements, gardens loop -
 Ballarat Tramway Museum
Memorabilia - Scrap Book, Neville Gower, Nov. 1992 to June 1997
Scrap Book - with printed cardboard covers - titled scrap book on outside and reproductions of newspaper clippings printed onto covers, 64 pages off white paper. Scrap book compiled by Neville Gower from Nov. 1992 to June 1997. Primarily consists of newspaper clippings glued to the pages involving the Ballarat Tramway Museum. Also contained are other items of relevant interest, such as BTM brochures. Pages number in pencil by Warren Doubleday 2/2001. Where relevant some items contained in this book have been separately catalogued to enable easier reference. Some items were already in the collection and are thereby reference with their registered number. Also contains registered items 1659, 1654 and 1655. Page Description of item 1 Newspaper clipping - 9/11/1992 - Reg. item No. 1105 Newspaper cutting - "New Life for old tram" - Courier 6/11/1992, p7 forthcoming recommissioning of Horse tram No. 1 at depot on Saturday. Gives details of horse tram and some notes on horse trams. 2 Newspaper cutting -"Where is this tram now", BTPS seeking information on the whereabouts of a former ESCo tram, photo taken in Sept. 1971 - See Reg. No. 1651 - Courier Heritage column 19/1/1993 Newspaper cutting "Collector enjoys his postcards of the past", Courier Heritage column 26/1/1992, about Andrews Kabia's collection of postcards. Has a photo of Bridge St. with a tram, c1950's. 3 Reg Item No. 1659 - Newspaper cutting - "SEC offers historic lake property for sale" 20/2/1993. Postcard - Sovereign Hill reproduction - purchased 2/1993, of Bridge St., looking west. Postcard - Sovereign Hill reproduction - purchased 2/1993, of Bridge St looking east - See Item No. 841 and image i4. Newspaper clipping of BTPS advertisement for 1993 Begonia Festival - Courier 3/3/1993. 4 Newspaper clipping "BUCpower on track" Courier 15/5/1993 - Ballarat University College tram pulling challenge to other schools. Has photo of BUC team lined up in front of No. 26. Ballarat Vintage tram brochures - 2 No. - Reg. Item 294.1 5 Lake Wendouree Caravan Park brochure - c1993 - colour photo of No. 26 at St. Aidans Drive. Registered item No. 1654 Newspaper clipping - "Horse drawn transport heritage" (11/5/1993) 6 Newspaper clipping - Courier 28/6/1993 - "New tramways video shows early Ballarat" - launch of BTM/BTPS video, sales details, quotes R.Gilbert. Has head on photo of No. 40 in Sturt St. showing Sebastopol. Postcard of four scenes of Ballarat, Steve Parish production, featuring BTM No. 27 in Wendouree Parade. Postcard - BTM issue - July 1993 - of three trams - see Reg. Item No. 1657. Separate copy of the cutting re video added 29-3-2016 from donation of Lil Butler - see image i3. 7 Postcard - Ballarat Victoria featuring 9 views of Ballarat, first one is of 27 in SEC late 1960's colour scheme in Wendouree Parade, operated by BTPS. - purchased July 1993. Postcard - Ballarat Vic Aust. - featuring four view of Ballarat, fourth one is of BTM 14 at crossing loop - purchased July 1993. Newspaper clipping - Courier 2/8/1993 "Tram Plan too costly" - quoting Dave Macartney about the costs of bringing trams Ballarat to Ballarat - took costly. Also quotes Ballarat Tourist Assoc. Secretary - Brian Whykes and Peter Hiscock of Sovereign Hill. 8 Newspaper clipping - Courier 28/7/1993 - "Major changes planned for lake" (page 1) and "Lake area changes proposed - Plan to narrow Wendouree Parade" - controlling traffic speed in parade. Newspaper clipping - Courier 21/9/1993 - "Council adopts strategy for lake traffic" - control of traffic in Wendouree Parade. 9 Newspaper clipping - Courier 3/8/1993 - "Lake changes will turn tourists away" - letter from R.A. Nelson about Wendouree Parade traffic control. Newspaper clipping - Courier 3/8/1993 - Council plan for Wendouree Parade - not one way traffic. Newspaper clipping - Courier 31/7/1993 - "Lake traffic strategy raises questions" - letter from L. Holloway. Newspaper clipping - Courier 8/8/1993 - "Strategy will improve access" - letter from Cr. Janet Dale. Newspaper clipping - Courier 15/9/1993 -"City defers action on Lake changes" - traffic plans deferred. 10 Newspaper clipping - Courier 31/8/1993 - "Plans threaten Lake amenities" letter from L. Holloway. Copy of letter from Warren Doubleday, Engineering Manager of BTPS to Andrew O'Brien and Associates re traffic study - dated 26/4/1993. 11 page 2 of above letter. 12 Letter from Jim W. Bell of the Golden City Paddle Steamer Museum Society to Neville Gower forwarding a copy of a submission to the Rotary Club of Ballarat South, in which they mentioned a extension of the tramline around Lake Wendouree. Newspaper clipping - Courier 30/9/1993 - "City's plans to narrow lake road dropped". 13 Poster from the Ballarat Tourist Association - for "Days of Discovery" 14-15 August 1993. Lists "Ballarat Historic Tramways" as one of the attractions. Loose item - Invitation from the "Golden City Paddle Steamer Society" to join as a member. 14 Newspaper clipping - Courier - 9/9/1993 - about the BTPS calling for nominations and forthcoming AGM Newspaper clipping - Courier - 18/9/1993 - about the BTPS launching a new book - "Ballarat's Heritage Tramway" - Stephen Butler holding a copy, with No. 12 in the background. Story by Lorrie Brown. (Image of this cutting added 28/3/2011) 15 Newspaper clipping - Courier 23/9/1993 - Reg. Item No. 1108 and 1109. Newspaper clipping - Courier - undated - c late 1993 - of SES challenging other people to a tram pulling competition in forthcoming Begonia Festival. Has photo of group pulling horse tram No. 1 with Frank Puls looking on. 27 in the background. Story by Dennis Torpy. 16 & 17 -copy of brochure (see Item 1108 for launch details) about Lake Wendouree, its history, ecology, wildlife and other attractions, including a drawing of the lake and locations. Printing sponsored by McDonalds. Produced by City of Ballaarat. 18 Newspaper clipping - Courier 30/10/1993 - review of book titled "Watch for Trams", published by Kangaroo Press . Has a photo of a Melbourne cable car set in Sydney Road Brunswick with bogie trailer. 19 Newspaper clippings - In Retrospect section of The Courier 30/7/1994 - 100 years ago - first shipment of electric light equipment for Ballarat in three weeks 30/7/1994 - 25 years ago - Retirement of Dan Irvin as tram depot foreman 17/9/1994 - 25 years ago - Council asking for abandonment of Ballarat trams 3/12/1994 - 25 years ago - hiring of trams by Jewish Youth group for convention 8/7/1995 - 100 years ago - construction of line along the south side of Sturt St between Ripon and Pleasant - related to horse tramways. 15/7/1995 - 100 years ago - Courier reporting completion of above tram line. 18/10/1994 - 40 years ago - retirement of H. W. Preston, former driver and first person to drive an electric tram over the line from Rubicon St. to Sebastopol. Newspaper clipping - Courier 31/12/1993 - School holidays supplement - and free travel voucher for Ballarat Tramways. 20 Newspaper clipping - Courier 4/1/1994 - Reg. item 1655 - "David Kellett's life on the trams" Newspaper clippings - In Retrospect section of The Courier 25/6/1994 - 50 years ago - raising of funds for patriotic appeal by Sylvia Mitchell - conductress 2/7/1994 - 50 years ago - Mayor the City of Maryborough complaining about Treasure Tram in Maryborough and raising funds for patriotic appeal. 21 Newspaper clipping - Courier 4/8/1994 about Transport Minister Alan Brown offering Ballarat surplus trams at a Ballarat Chamber of Commerce AGM. Newspaper clipping - Courier 6.8.1994 - Seaton Ashton in a column about the tram offer of Alan Brown and suggesting a line around the Lake. Newspaper clipping - Courier 6/9/1994 - Reg. Item 1132 Newspaper clipping - Courier 20/9/1994 - Reg Item 1117. 22 Newspaper clipping - Courier 5/10/1994 - Reg Item 1121 23 BTPS pamphlet (brochure) for tramway - see Reg. Item 300.1 24 Newspaper Clipping - Courier 16/3/1995 - advertising feature - Golden City Paddle Steam restored to service on Lake Wendouree and associated Gill Boat shed. Two separate items. 25 Newspaper Clipping - Courier 3/1/1995 - "Rosella searches for memorabilia" - heritage column - Lorrie Brown - has postcard photo of an ESCo tram turning from Sturt St into Lydiard St. North, taken from Post Office. Newspaper clipping - In Retrospect section of The Courier - 7/2/1995 - "Trams revived" - about opening of BTPS tramway, 20 years ago. 26 Newspaper clipping - Courier - 28/6/1995 - Inside/Out column written by Kim Quinlan - Interview with Peter Hiscock. Mentions that he is passionate about the restoration of tramways to Ballarat. 27 - Newspaper clipping - Courier - 3/6/1995 - item about Sunday Trading in Ballarat - Peters Hiscock saying entertainment needed and possibility of tramways in Ballarat. Quotes Warren Doubleday in item. Has photo of Peter Hiscock on steps of No. 27 - Photo by Ian Wilson. Part of front cover of "This month in Ballarat", July 1995, which has a photo of BTM No. 27. 28 Cutting from July 1995 Royalauto magazine - featuring a picture report by Ron Warren on the AETM museum at St Kilda. 29 Newspaper clipping - Courier - 27/7/1995 - about plan to improve Botanical Gardens, extension of tram tracks to Sturt St. Editorial Opinion column 28/7/1995 about the Botanical Gardens and extension of tramway. 30 Newspaper clipping - Courier - 18/8/1995 - "Public Views invited on Strategy Plan" - item by Angela Barlow, about CBD development in Ballarat. Mentions reinstatement of trams in Ballarat. Letter to Editor - 21/8/1995 - "Who asked for Lake Changes" - A. Simpson of Ballarat - questioning possible changes to the Botanical Gardens. 31 Newspaper clipping - Courier - 9/8/1995 - "City Plans to spend $67m in three years - pages 1 and 2 of Courier - notes reinstatement of "tramway communications" 32 - Brochure by City of Ballarat Central Business Area of the Strategy Plan for area - includes possible developments, - notes reinstatement of trams to provide a linkage mechanism between Bridge St and Central Square shopping area - dated August 1995. Newspaper clipping - Courier - 22/11/1995 - item by Ian Haberfield about the endorsement of the strategy plan for the CBD or CBA strategy plan. 33 Newspaper clipping - Courier - 24/11/1995 - letter to the Editor - about CBA strategy plans - by C. McDonald and noting a tramway to Sovereign Hill. Newspaper clipping - Courier - 4/10/1995 - Reg. item 1104. Newspaper clipping - Courier - 29/11/1995 - "Discussion on final gardens plan tonight" - Ian Haberfield - Gardens Masterplan - draft - notes tramway extensions Newspaper clipping - Courier - 30/11/1995 - "First look at Masterplan" for gardens, item by Andrew Lang. 34 Newspaper clipping - Courier - 19/9/1995 - School Holiday fun supplement advert page - includes an advertisement by the BTM noting operation of Horse tram on 1/10/1995. 35 Newspaper clipping - Courier - 12/12/1995 - Reg item 1450.1 Newspaper clipping - Courier - 11/12/1995 - Reg item 1449 Newspaper clipping - Courier - 1/11/1995 - "New face for City" item by Ian Haberfield - Ballarat Central area plan - quotes Chief Commissioner Vern Robson. 36 Newspaper clipping - Courier - 5/12/1995 - Reg item 1444 37 Newspaper clipping - Courier - 8/11/1995 - Reg item 1446 Newspaper clipping - Courier - 9/12/1995 - Reg item 1447.2 37A Newspaper clipping - Courier - 16/12/1995 - Reg Item 1452.1 and .2 Newspaper clipping - Courier - 23/12/1995 - Reg Item 1448 Newspaper clipping - Courier - 16/12/1995 - Reg Item 1453 Newspaper clipping - Courier - 21/12/1995 - "Railway shops would hurt CBD - letter to Editor from David Peile, about the proposal for a shopping centre at the railway station. 37B Newspaper clipping - Courier - 16/12/1995 - column by the Commissioner - Vern Robson, including a note about the BTM and its members and the work it does. Newspaper clipping - Courier - 28/12/1995 - Reg Item 1455 38 Newspaper clipping - Courier - 22/1/1996 - Reg Item 1456 Newspaper clipping - Courier - 27/1/1996 - Reg Item 1463 Newspaper clipping - Courier - 25 Years ago - suggesting retention of tram line by Brown Hill Progress Association around Lake Wendouree - no date. 39 Newspaper clipping - Courier - 27/1/1996 - Reg Item 1464 Newspaper clipping - Courier - 24/1/1996 - Reg Item 1457 40 Newspaper clipping - Courier - 19/2/1996 - Reg Item 1472 Newspaper clipping - Courier - 31/1/1995 - Reg Item 1468 Newspaper clipping - Courier - 30/1/1996 - Reg Item 1467 Newspaper clipping - Courier - 3/1996 - 50 years ago - Retirement of SEC office manager Mr. W. K. J. Dunstan. Newspaper clipping - Courier - 4/5/1996 - 25 years ago - replacement of trams mooted - announcement by Transport Regulation Board. 41 Newspaper clipping - Courier - 24/2/1996 - Reg Item 1473 Newspaper clipping - Courier - 6/4/1996 - 25 years ago - Brown Hill Progress Association seeking support for retention of trams around Lake Wendouree. Newspaper clipping - Courier - 18/5/1996 - 50 years ago - announcement that tram services would be curtailed as from next Monday due to power restrictions. 42 Newspaper clipping - Courier - 5/4/1996 - "Tram Study Close" - Ken Hill reporting that Peter Hiscock saying that study for tramway should get a go ahead within the next three months. Newspaper clipping - Courier - 26/2/1996 - Reg Item 1475. 43 Fax of newspaper clipping 18/5/1996 - of Reg Item 1493 - item fading. 44 Newspaper clipping - Courier - 8/3/1996 - Reg Item 1126 and 1494.1 Envelope, letter and newsletter from Labor Senator Barney Cooney regarding the 1996 Federal Election. Envelope has a photo reproduction of tram 14. 45 Newspaper clipping - Courier - 24/4/1996 - Reg Item 1496 Newspaper clipping - Courier - 17/9/1996 - "Tram submission lodged" - lodging grant application with Tourism Victoria for support for study. Newspaper clipping - Courier - 27/57/1996 - 25 years ago - about the hijacking of the tram in Barkly St. shortly before closure. Newspaper clipping - Courier - 9/11/1996 - 50 years ago - construction of a shelter at corner of Sturt and Drummond St. for tram passengers. Newspaper clipping - Courier - 22/11/2996 - editorial opinion - regarding roofing of mall and possibility of the return of trams. 46 Newspaper Clipping - Courier - 2/10/1996 - Reg Item 826 Newspaper Clipping - Courier - 11/12/1996 - "Live wires scare after bus hits pole" - item by Elise Sullivan, about a bus backing into a tramway pole in Wendouree Parade and breaking it. 47 Newspaper Clipping - Courier - letter from P.Kervarec - undated - c12/1996 - about Eureka Stockade area and removal of tram tracks. Newspaper Clipping - Courier - 16/11/1996 - Reg Item 1499 Newspaper Clipping - Courier - 24/1/1997 - Reg Item 1459 Newspaper Clipping - Courier - 21/9/1996 - 25 years ago - about Council decision for BTPS tram depot. 48 Newspaper Clipping - Courier - 16/1/1997 - Reg Item 1506 Newspaper Clipping - Courier - 10/1/1997 - "Hiscock wants hard facts to back tram sentiment" - discussing results of a survey of Ballarat residents and future studies. Newspaper Clipping - Courier - 11/1/1997 - Eureka Column - about trams coming back and a boon for car panel beaters. Newspaper Clipping - Courier - 11/1/1997 - 50 years ago - Council meeting and granting of fare concessions to children on trams and buses. Newspaper Clipping - Courier - 11/1/1997 -letter - "Keeping rail gates a matter of desire" 49 Newspaper Clipping - Courier - 10/1/1997 - Editorial - "A great idea but can we afford trams" - about the various studies and care should be taken. Newspaper Clipping - Courier - 10/1/1997 - cartoon - "Easy tram funding" - by Burns. Newspaper Clipping - Courier - 9/1/1997 - Reg item 1503 50 Newspaper Clipping - Courier - 7/1/1997 - Reg Item 1502 Newspaper Clipping - Courier - 13/1/1997 - Reg item 1504 51 Newspaper Clipping - Courier - 4/1/1997 - Reg item 1501 Newspaper Clipping - Courier - 14/1/1997 - Reg Item 1505 52 Horse Tram No. 1 pamphlet - Reg Item 1656 53 Newspaper Clipping - Courier - 3/2/1997 - "Sovereign Hill plans to re-invent itself" - report by Seaton Ashton on Sovereign's Hill's future planning. Newspaper clipping - Courier - 30/1/1997 - Reg item 1509 Newspaper clipping - Courier - letter from M. Buret of Wendouree suggest that Cobb and Co coaches be run in Ballarat. 54 - Newspaper Clipping - Courier - 5/2/1997 - "City decides in close vote to keep rail gates" - article on Lydiard St. North Railway Gates - article by Ian Haberfield. 55 - Newspaper Clipping - Ballarat News - 11/6/1997 - Reg Item 605. Image of Numerous - hand written notes of date etc on many of the cuttings.trams, tramways, newspaper clippings, scrap book, ballarat revival, btm, btps -
 Ballarat Tramway Museum
Postcard - Folder set, Rose Stereograph Co, "Rose Series Picturesque Views of Ballarat Australia", c1940
Set of 12 views of Ballarat printed with six photos on either side of a folded strip of paper contained within a heavy brown paper folder. Published by the Rose Stereograph Co. of Armadale Vic., titled "Rose Series Picturesque Views of Ballarat Australia". Front cover has address area, stamp position, a drawing of roses and publishers details. 1. "The Town Hall and Sturt St. " with two trams eastbound in Sturt St. The first tram is a Sebastopol type tramcar. (see image 4) 2. "Eureka Memorial" 3. "The Conservatory" 4. "The gardens and Town Hall, Sturt Street" 5. "Panorama of " Sturt St. from Town hall, looking east 6. "Avenue of Honour Arch" 7. "The Flight from Pompeii - The Gardens" statue 8. "Bridge Street" - showing an SEC single truck tram in the street (see image 5) 9. "The Statuary Pavilion, Botanical Gardens" 10. "Sturt St." 11. "Lake Wendouree" 12. "Sturt St." (from Grenville St.) - with two ESCo trams in photograph (see image 6) (See also Reg. Item 2268 for a single postcard using this image.) All have words "Ballarat Vic." after the caption. Images 1 of front cover, 2 and 3 are of the object itself. Date of photos seem to be varied over time from early 1930's through to 1940's given the different motor cars in the photographs. On front cover in pencil in stamp area "G $7-"trams, tramways, ballarat, rose postcards, sturt st, bridge st, gardens, esco -
 Ballarat Tramway Museum
Photograph - Black and White photograph/s - mounted set of 2', John Phillips, late 1960's or early 1970's
Yields information about the vicinity of the Victoria St terminus and the bridge over the Buninyong Railway line.Black and White photograph mounted on heavy cardboard backing. Photo of Ballarat No. 31, just after leaving Victoria St. terminus, late 1960's or early 1970s crossing over the Eureka siding railway bridge. Taken by John Phillips. Tram has destination of Gardens via Sturt St. West, Twin Lakes advertisement on the front. In the background is Meagher's Hotel with Abbots Lager and Victoria Bitter sign. On the bridge is graffiti "Smash US Imperialism". On the Ballarat side of the bridge is a sign directing travellers to the "Eureka Caravan Park". Has 6 Velcro dots on rear and marks where mounting devices have been removed on the rear. Note image scanned in two runs through a scanner, resulting in the shading in the image file. .1 - Second copy with 4 black Velcro squares and 4 dots on rear - wider view on the right hand side with an additional pole - not scanned.trams, tramways, victoria st, eureka, twin lakes, tram 31 -
 Ballarat Tramway Museum
Slide - 35mm slide/s - set of 2, Peter Moses, Aug. 1971
Set of two photos of SEC Ballarat tram No. 27 about to turn from Wendouree Parade and then proceeding away from Wendouree Parade in Macarthur St. .1 - shows the shelter at the intersection wit Macarthur St and Wendouree Parade and has Lake Wendouree in the background. .2 - shows the house in Macarthur St. Kodak cardboard mount slide, taken by Peter Moses August 1971.On back of slides: .1 - "N27 Ballarat / Turn off to View Point terminus" in black ink and "P. Moses" near bottom right hand corner. .2 - "Ballarat / Victoria St." and "P. Moses" in bottom right hand corner.tramways, trams, wendouree parade, view point, macarthur st., tram 27 -
 Ballarat Tramway Museum
Slide - 35mm slide/s - set of 13, Peter Moses, 1974
Set of 13 colour slides, 7 on Kodak cardboard mounts and 6 on Agfa colour plastic mounts. .1 - Bendigo Trust, Birney trams 28 and 30 at Central Deborah Mine terminus. No. 30 has a 3BO Roof advertisement. .2 - ditto .3 - ditto with the Central Deborah mine and buildings in the background. .4 - No. 30 inbound in High St. with Sacred Heart Cathedral in the background (spire under construction) .5 - Nos. 30 and 28 crossing at Charing Cross with the Fountain Plaza building and the fountain in the background. .6 - No. 28 north bound in Pall Mall, after leaving Charing Cross with the Shamrock Hotel in the background. .7 - Photo showing track and centre poles in View St. looking west - no overhead. Has AMOCO service station near McKenzie St. .8 - No. 28 taken from cab of No. 30, in McCrae St, at end of double track. .9 - No. 28 turning from McCrae St. into Nolan St. .10 - No. 28 in Nolan St. with Lake Weeroona rowing sheds in the background. .11 - No. 19 in now Tramway Ave (then Arnold St.) running into depot .12 - No. 19 outside Bendigo depot .13 - ditto Slides taken by Peter Moses, during the winter of 1974 (no leaves on the trees).On the rear of all the slides "P. Moses" in black ink. .1 - "1974 Bendigo Central Deborah Mine" in blue ink and in red ink “16”. .2 - "1974 Bendigo two Birney cars / Central Deborah Mine" in blue ink and in red ink “18”. .3 - "1974 Bendigo trams at Central Deborah Mine" in blue ink and in red ink “17”. .4 - "1974 Bendigo High St / tram near Sacred Hearth Cathedral" in blue ink and in red ink “15”. .5 - "1974 Bendigo two Birney cars / Charing Cross" in blue ink and in red ink “20”. .6 - "1974 Bendigo No. 28 Pall Mall" in blue ink and in red ink “8”. .7 - "1974 Bendigo / Old Tramline View St." in black ink and in red ink “5”. .8 - "1974 Bendigo, McRae St. (Pall Mall)" and in red ink "9". .9 - "1974 Bendigo, Lake Weeroona, / tram " and in red ink "10". .10 - "1974 Bendigo, Lake Weeroona" and in red ink “11”. .11 - "1974 Bendigo / Outside depot" and in red ink “24”. .12 - "1974 Bendigo / Outside depot" and in red ink “25”. .13 - "1974 Bendigo / Depot" and in red ink “26”.tramways, trams, bendigo, central deborah, bendigo trust, sacred hearth cathedral, north bendigo, depot, tram 19, tram 28, tram 30 -
 Ballarat Tramway Museum
Postcard - Folder set, Colorscans Richmond, "Ballarat Botanic Gardens and Lake Wendouree", c1980
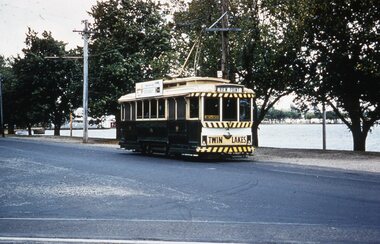
Set of ten colour photos with title photo of Begonias, in a strip suitable for posting in an envelope of views of the Ballarat Botanic Gardens and Lake Wendouree. Made by Colorscans of 123 Dover St. Richmond. Folded so that they form a group that could be posted in a standard envelope. Has a note on the area on a small folding strip at the top. On the inside of the strip: 1. Statue Pomona and Begonia House in the Botanic Gardens 2. The Sarah George Ferry on Lake Wendouree 3. Lake Lodge at dusk 4. Adam Lindsay Gordon's Cottage, Botanic Gardens 5. The Prime Ministers Avenue, Botanic Gardens On the rear 1. Title photo set with Begonias in the Botanic Gardens 2. Vintage tram on the Botanic Gardens Tourist Tramway (No. 27 - in SEC colour scheme with Tram Rides sign). 3. Benzonis 'Flight from Pompeii' 4. Wishing Well in the Botanic Gardens 5. Black swans on the Lake 6. The Mosaic crown at the Shell House (By C.A. Pickford) Photographs by George Hurdes. See Tram 27 repainted by Museum to a different colour scheme in 1983/84. trams, tramways, lake wendouree, wendouree parade, botanical gardens -
 Ballarat Tramway Museum
Slide - 35mm slide/s, late 1960's
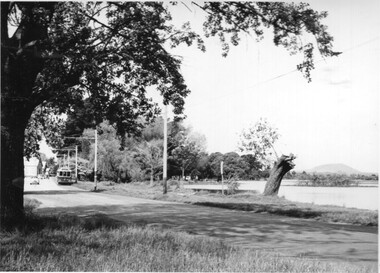
Agfa plastic mount (blue base, white cover) of a photograph of No. 14, at View Point terminus in Wendouree Parade. Has the Macarthur St. track in the foreground. Photo take late 1960's. Has a roof advertisement on the tram that has not been identified. Tram has destination of View Point and has a Twin Lakes sign on the rear end. Trolley pole has been turned to go back into the city. Has the lake in the background. The slide appears to be a copy slide, given the nature of the colour and the additional number WP423. Photographer could be Bill Pearce (WP). Slide rescanned at 3200 dpi 25-10-2020, jpg replaced, tiff file retained. This file was scanned in 2003 and may show colour changes."BAS 58 in penciltramways, trams, view point, wendouree parade, macarthur st., tram 14