Showing 873 items
matching civilians
-
 4th/19th Prince of Wales's Light Horse Regiment Unit History Room
Card - Christmas Card, 1915 (exact)
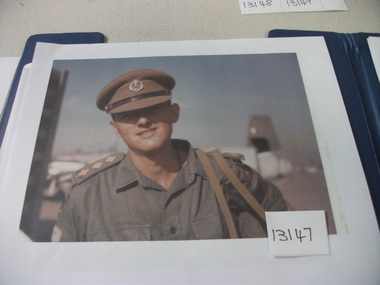
Service of Frank Phillips Prior to the commencement of World War I, Frank Phillips served in the Minyip Troop of the Light Horse militia. His civilian occupation was that of clerk. On 22 August 1914 he enlisted in C Squadron 4th Light Horse Regiment. The 4th Light Horse Regiment embarked on the troop ship “Wiltshire “ for training at Mena Camp, in Egypt. During May 1915 the Regiment was deployed to the Gallipoli campaign in a dismounted role. After seven months, the Gallipoli campaigned was abandoned and the troops withdrawn. On return to Egypt the 4th Light Horse Regiment divided with one component deployed to Palestine and the other to the Western Front. Frank went on to serve in Palestine. He was promoted to Sergeant while at Gallipoli and, in Palestine, was promoted to Captain, serving as Adjutant of the Regiment. He was granted furlough to return to Australia from 14 October 1916 to 12 March 1917. On 16 January 1918 he was Mentioned in Despatches Citation: At Hill 750 near Bir El Esani on 30-4-17 he led an attack on Hill 750 under heavy rifle fire capturing the position and 7 armed Bedouins. On 23-5-17 during reconnaissance, he led and attack on 790 under very heavy rifle and machine gun fire and captured the position, inflicting losses on the Turks. He has, at all times, set a fine example of courage to his men. 22 October: 1918 he was awarded the Military Cross Recommendation of Commanding Officer – For exceptional gallantry and devotion to duty on the 28th September 1918, during the crossing of the JORDAN near EL MIN, this officer (adjutant of the Regiment) personally reconnoitred for crossings under heavy M.G. fire and led the Regiment to the only available crossing, rendering invaluable assistance during the crossing. On 3oth September when the Regiment was advanced guard on to KAUKAB, this officer’s personal reconnaissance to confirm patrol reports was of the highest order and utmost value to his C.O. culminating in the capture of KAUKAB with a mounted attack and the The 4th/19th Prince of Wales’s Light Horse Regiment has a long and distinguished history that pre-dates Federation to colonial Victoria’s mounted troops. Our history parallels that of the nation, including its active participation in some of the most inspiring events in Australian Military History including the Defence of ANZAC and the charge at Beersheba. The Regiment is based on a linkage of the two post-World War II Victorian Army Reserve RAAC units - 4th/19th Prince of Wales’ Light Horse and 8th/13th Victorian Mounted Rifles. From these units we derive our links with the six Light Horse Regiments of Victoria and Southern New South Wales (4th, 8th, 13th, 17th, 19th and 20th Light Horse Regiments.) The Regiment proudly bears the guidon of the 4th Light Horse, with the guidons of the remaining regiments being laid up in the crypt of the Melbourne Shrine of Remembrance. During World War I, the 4th Light Horse Regiment served with distinction on three fronts – Gallipoli, Palestine and the Western Front. Corporal, later Captain, Phillips was a member of the 4th Australian Light Horse Regiment. He created the post card while serving with the Regiment as a Corporal at Gallipoli. Post Card hand made and sent to familyFrom Cpl Frank Phillips, 4th Australian Light Horse Regiment. Entries in pencil Front: Addressed to Andrew Phillips (father) at Minyip, Victoria, Message: “A Merry Christmas and Happy New Year to all, Made while on my day out. Love Frank” Reverse Top Centre – 4 LH Badge Centre – cloth map of Australia stapled to card Bottom – Print of flag stapled to card, Irish green ensign, Union flag in canton, gold coloured Irish harp on fly. Notations: Broadmeadows, Wiltshire (Troop Ship), Shrapnel Gully, Suicide Gully, Courtney’s Post Mena, Mex, Heliopolis, Imbros, Gallipoli, Turkish soil underneath (flag), Australia on Turkey, Lone Pine, Leans Trench, Constantinople, All honour to our Irish comrades, To greet you 1915-16. From the shells, yells, and little Hells, of the Darda Dardenelles 0 – 0 May you enjoy your Xmas dinner as I hope to enjoy my Xmas billy in the trenches.ww1, gallipoli, 4th light horse, post card, frank phillips -
4th/19th Prince of Wales's Light Horse Regiment Unit History Room
Medal, 1939-45 Star
The 1939-45 Star may be awarded for those who undertook operational service during World War II. Eligibility The 1939-45 Star is awarded for service between 3 September 1939 and 2 September 1945 for: a period of six months (180 days) operational service for RAN and Army personnel and RAAF non-air crew personnel a period of two months operational service for air crew personnel a period of six months service at sea for Merchant Navy provided at least one voyage was made through one of the specified areas of active operations The 1939-45 Star is awarded to Australian Civilian Personnel who served afloat with the United States Army Small Ships Section between 8 December 1941 and 2 September 1945. Eligibility is the same as that for Merchant Navy personnel. See required evidence to support a claim. The Medal The 1939-45 Star is a six–pointed star of yellow copper zinc alloy. The obverse has a central design of the Royal and Imperial cypher, surmounted by a crown. The cypher is surrounded by a circlet containing the words ‘The 1939-45 Star'. Stars issued to Australian personnel have recipient names engraved on the plain reverse. The Ribbon The 1939-45 Star ribbon has three vertical stripes of dark blue, red and light blue. The dark blue stripe represents the Naval Forces and the Merchant Navy, the red stripe the Armies and the light blue stripe the Air Forces. Clasps The ‘BATTLE OF BRITAIN' clasp was awarded to eligible air crew involved in the Battle of Britain. When the ribbon is worn alone a gilt rosette ribbon emblem is worn to denote the award of the ‘BATTLE OF BRITAIN' clasp. The ‘BOMBER COMMAND’ clasp was introduced in 2012 and is awarded to eligible Bomber Command aircrew. When the ribbon is worn alone the standard silver rosette ribbon emblem is worn to denote the award of the ‘BOMBER COMMAND’ clasp. Full size and miniature medals with ribbons. Miniature has clasp : Battle of Britainnilmedal 1939-45 star -
 Dandenong/Cranbourne RSL Sub Branch
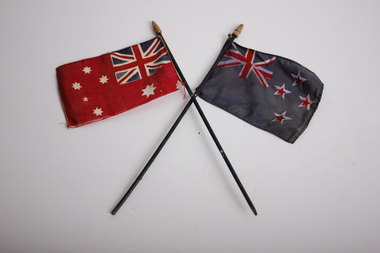
Flag - The Australian Red Ensign Flag and New Zealand Flag, unknown
Likely from WWIPair of miniature flags on small black flag poles with wooden caps. The Australian Red Ensign, or the Australian Civil Ensign, is simply a red version of the Australian National flag. It is for use only at sea and officially never on land, but can be used by private citizens. At sea, it is the only flag allowable for merchant ships registered in Australia under the Navigation and Shipping Act 1912 and The Shipping Registration Act 1981. Pleasure craft, however, may fly either the Red Ensign or the National Flag. The history of the Red Ensign is intertwined with the history of the Australian National flag. From 1901 to 1954 the Red Ensign was used as the National Flag by State and Local Governments, private organisations and individuals. The Blue Ensign was for Government use only, reflecting British practice with its ensigns. The design of the Australian Red Ensign was always kept in step with the Blue Ensign (i.e. with respect to the number of points on the stars, etc.) but there was often public confusion about which was the `correct′ flag to fly. Many thought the choice was merely one of fashion or preference. In 1941, Australia′s Prime Minister Robert Menzies stated that there should be no restrictions on private citizens using the Blue Ensign on land and, in 1947, Prime Minister Ben Chifley reaffirmed this position but it wasn’t until the passage of the Flags Act 1953 that the restriction on civilians flying the Blue Ensign was lifted after which, use of the Red Ensign on land became a rarity. Since 2008, 3 September has been officially commemorated as both Australian National Flag/Merchant Navy Day which allows the Australian Red Ensign to be flown on land for the occasion as a matter of protocol. The blue flag is the New Zealand National Flag.flag, ensign, anzac, new zealand, navy, naval -
 Bendigo Military Museum
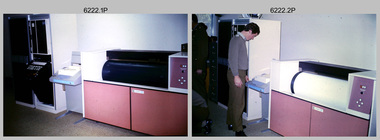
Photograph - AUTOMAP 1 Production – Army Survey Regiment, Fortuna, Bendigo, c1978-1980
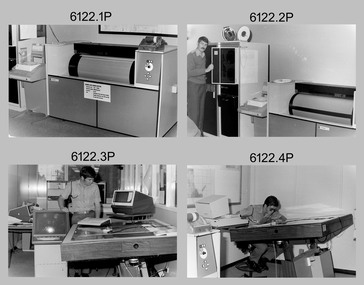
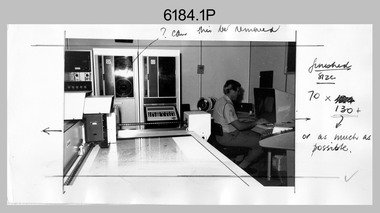
This collection of 17 photos was most likely taken in c1978-1980. The AUTOMAP 1 computer assisted cartography and mapping system was introduced in 1975. The components of AUTOMAP 1 were the Input Sub-System of four Wild B8s stereoplotters and three Gradicon digitising tables, the Optical Line Following Sub-System – Gerber OLF, the Verification Sub-System – Gerber 1442 drum plotter, the General Purpose Sub-system – HP21MX computer and the Output Sub-System – Gerber 1232 flatbed plotter). The first map was published in 1978 (Strickland 3665-3, 1:50,000). AUTOMAP 1 was the first computer assisted cartography and mapping system utilised by the Survey Corps and was the first system used by Australian mapping organisations. The history of the AUTOMAP 1 system is covered in more detail with additional historic photographs, in pages 116-118 of Valerie Lovejoy’s book 'Mapmakers of Fortuna – A history of the Army Survey Regiment’ ISBN: 0-646-42120-4. See items 6122.20P, 6410.24P, 6183.19P, 6184.20P, and 6200.5P for additional photographs of the AUTOMAP 1 system.This is a set of 17 photographs of Air Survey Squadron military and civilian personnel operating AUTOMAP 1 equipment at the Army Survey Regiment at Fortuna, Bendigo, c1978-1980. The photographs were on 35mm colour slides and were scanned at 96 dpi. They are part of the Army Survey Regiment’s Collection. .1) - Photo, colour, c1978-1980, Gerber 1442 verification drum plotter. .2) - Photo, colour, c1978-1980, Gerber 1442 verification drum plotter, SPR Garry Ames. In background - Hewlett Packard (HP) 2100A Minicomputer Input Subsystem controlling Wild B8 Aviograph stereo plotters. .3) - Photo, colour, c1978-1980, Gerber 1442 verification drum plotter. .4) - Photo, colour, c1978-1980, digitising topographic features with a Wild B8 Aviograph stereo plotter, CPL Adrian Rynberk. .5) to .6) - Photo, colour, c1978-1980, Wild PEB8 stereo profiler. .7) - Photo, colour, c1980, HP 9640A Programming System. .8) - Photo, colour, c1980, HP 9640A Programming System, L to R: unidentified, SGT Alan Toogood. .9) - Photo, colour, c1978-1980, Gerber Optical Line Follow (OLF), CAPT Rob Bridge. .10) - Photo, colour, c1978-1980, Gerber OLF. .11.) to .12) - Photo, colour, c1978-1980, Gerber OLF, SPR Gerry Gunn. .13) - Photo, colour, c1978-1980, Gerber OLF. .14) - Photo, colour, c1979, Gradicon edit table. .15) to .16) - Photo, colour, c1981, Gradicon edit table, SPR Chris Gordon. .17) - Photo, colour, c1981, Gradicon edit table, L to R: SPR Chris Brown, unidentified..1P to .17P - Some of the equipment is annotated on the frame of the 35mm slides.royal australian survey corps, rasvy, army survey regiment, army svy regt, fortuna, asr, automap 1 -
 Bendigo Military Museum
Photograph - AUTOMAP 1 Production – Army Survey Regiment, Fortuna, Bendigo, c1979
This collection of 19 photos was most likely taken in 1980. The AUTOMAP 1 computer assisted cartography and mapping system was introduced in 1975. The components of AUTOMAP 1 were the Input Sub-System of four Wild B8s stereoplotters and three Gradicon digitising tables, the Optical Line Following Sub-System – Gerber OLF, the Verification Sub-System – Gerber 1442 drum plotter, the General Purpose Sub-system – HP21MX computer and the Output Sub-System – Gerber 1232 flatbed plotter). The first map was published in 1978 (Strickland 3665-3, 1:50,000). AUTOMAP 1 was the first computer assisted cartography and mapping system utilised by the Survey Corps and was the first system used by Australian mapping organisations. The history of the AUTOMAP 1 system is covered in more detail with additional historic photographs, in pages 116-118 of Valerie Lovejoy’s book 'Mapmakers of Fortuna – A history of the Army Survey Regiment’ ISBN: 0-646-42120-4. See items 6122.20P, 6410.24P, 6184.20P, 6200.5P, and 6222.17P for additional photographs of the AUTOMAP 1 system.This is a set of 19 photographs of Air Survey Squadron military and civilian personnel operating AUTOMAP 1 equipment at the Army Survey Regiment at Fortuna, Bendigo, c1979. The photographs were on 35mm negative film and were scanned at 96 dpi. They are part of the Army Survey Regiment’s Collection. .1) - Photo, colour, c1979, Gradicon edit table, SSGT John Bennett. .2) - Photo, colour, c1979, Gradicon edit table. .3) - Photo, colour, c1979, HP21MX computer General Purpose Sub-system. .4) - Photo, colour, c1979, HP21MX computer General Purpose Sub-system. L to R: CAPT Graham Baker, SPR Ian Belmont. .5) - Photo, colour, c1979, Gerber verification drum plotter. 1130 System administration, unidentified. .6) - Photo, colour, c1979, Gerber Optical Line Follower (OLF). .7) - Photo, colour, c1979, Gerber OLF .8) - Photo, black & white, c1979, Programming and system administration, L to R: WO1 Don Taylor, Robert Cox, Tony Spurling, SSGT John Bennett, SGT Alan Toogood. .9) to .14) - Photo, black & white, c1979, .15) - Photo, black & white, c1979, Gerber OLF, unidentified. .16) - Photo, black & white, c1979, Gerber verification drum plotter, unidentified using Gradicon edit table. .17) to .18) - Photo, black & white, c1979, - Photo, black & white, c1979, Programming and system administration, SSGT John Bennett. .19)- Photo, black & white, c1979, - Photo, black & white, c1979, HP21MX computer General Purpose Sub-system..1P to .19P No personnel are identified.royal australian survey corps, rasvy, army survey regiment, army svy regt, fortuna, asr, automap 1 -
 The Beechworth Burke Museum
Audio - Oral History, Jennifer Williams, Maxwell Pemberton, 23 June 2000
Mr Maxwell Pemberton was born in Goulburn, NSW in 1923 and moved to Beechworth as a child just before the Great Depression. Mr Pemberton's father was a baker who opened a grocery store in Beechworth to support his seven children. The store, which competed with eight other grocery traders in Beechworth for finite local business, delivered goods by horse and cart to customers all over the district, including the hamlet of Stanley. Mr Pemberton's oral history testifies to the sorts of economic struggles faced by the majority of Beechworth's residents during the depression years. Mr Pemberton worked in many different industries in and around Beechworth, including in his father's grocery store, which he later took over with his brother; the Zwar Tannery, where he served as a union representative; and at the Ovens and Murray Hospital for the Aged, formally the Ovens Benovolent Asylum, established in 1862 for care of the district's destitute, disabled and aged people from Euroa to the Murray, among them, homeless people Mr Pemberton referred to as 'river-bankers'. The hospital's founding in the 1860s was driven by a committee headed by the notable figure, G.B Kerford. Beechworth's institutions were a major source of local employment in the twentieth century. Mr Pemberton joined the Australian Navy during WWII and served at Port Moresby in Papua New Guinea. During his period of service, he received an honorary award from the Royal Humane Society of Australia for aiding and saving a drowning civilian at risk to his own life. Mr Pemberton's oral history also touches on the complex relationship between Australian forces and local Papuan people during the war. This oral history recording was part of a project conducted by Jennifer Williams in the year 2000 to capture the everyday life and struggles in Beechworth during the twentieth century. This project involved recording seventy oral histories on cassette tapes of local Beechworth residents which were then published in a book titled: Listen to what they say: voices of twentieth century Beechworth. These cassette tapes were digitised in July 2021 with funds made available by the Friends of the Burke.Mr Maxwell Pemberton's oral history recalls many aspects of life in Beechworth and the Oven's district during the twentieth century and enriches our understanding of the effects of the periods of socio-economic decline and renewal that unfolded as the century progressed. His singular account of his various jobs and colourful memories of life as a youth and young man in Beechworth, and abroad as a serviceman, contributes to our understanding of society's attitudes and expectations regarding ideals of masculinity and Australian national identity. This oral history account is socially and historically significant as it is a part of a broader collection of interviews conducted by Jennifer Williams which were published in the book 'Listen to what they say: voices of twentieth-century Beechworth.' While the township of Beechworth is known for its history as a gold rush town, these accounts provide a unique insight into the day-to-day life of the town's residents during the 20th century, many of which would have been lost if they had not been preserved.This is a digital copy of a recording that was originally captured on a cassette tape. The cassette tape is black with a horizontal white strip and is currently stored in a clear flat plastic rectangular container. It holds up 40 minutes of recordings on each side.Mr Max Pemberton /twentieth century beechworth, benevolent asylums, wwii, beechworth's institutions, local employment, government institutions, listen to what they say, oral history, burke museum, maxwell pemberton, ovens and murray hospital for the aged, zwar tannery, beechworth grocers, australian navy, port morseby, papua new guinea, trade unions, welfare services, homelessness, 'river bankers', aged care, g.b kerford, ovens benevolent asylum, ovens benevolent home -
 Bendigo Military Museum
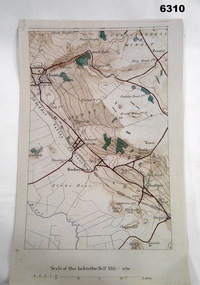
Map - Map Extract - Charterhouse of Mendip, John James Raisbeck, Unknown
Map extract showing the towns of Cheddar, Rodney Stoke, Westbury and a smaller town of Easton. The area depicted is part of Somerset, England. Map is hand drawn by J.J. Raisbeck date unknown. John James RAISBECK was born on 4 July 1880 at Christchurch New Zealand. He served 4 years (Citizen Military Force - CMF) in 9th Australian Light Horse Regiment in Central VIC with the rank 2nd Lieutenant. He was the first Australian appointed to the Survey Section RAE, on 16 April 1910, as a draughtsman which was his civilian profession, with the rank Warrant Officer, honorary 2nd Lieutenant. He was required to resign his commission in the CMF. He supervised the draughting work of the Section in Melbourne and was largely responsible for the mapping standards and specifications set in the production of the Cowes one-inch-to-one-mile military map, which became the enduring Australian standard. He was also responsible for supervising the printing of the maps by the Victorian Government Printer. He was appointed 2nd Lieutenant in the AIF Survey Corps draft on 6 December 1917 (from Melbourne) embarking for England on 22 December 17. He was attached to the Australian Corps Topographic Section in France from 21 April 1918 to 5 March 1919 serving as Second-in-Command and as Officer Commanding. He was promoted Lieutenant 15 October 1918, attending the AIF Survey School, Southampton in 1919, returning to Australia 23 June 1919, before his AIF appointment was terminated 17 July 1919. He went on to serve the Survey Section RAE and Australian Survey Corps, including in the Second World War, having been promoted Captain then Major and Officer Commanding Army Headquarters Cartographic Section until February 1940. He retired after 33 years of service to military survey, and after serving the Corps in two world wars, on 4 July 1943 with the retired rank Lieutenant-Colonel. He was the author of the article ‘A Short History of the Military Survey of Australia, 1907-1936’, published in The Australian Surveyor, Sept 1, 1937Map extract slightly larger than A4. Scale: One Inch to One and a half Mile. 1:31680, 9 x copiesSignature of "J.J. Raisbeck" bottom right-hand cornerroyal australian survey corps, rasvy, fortuna, army survey regiment, army svy regt, asr -
 Bendigo Military Museum
Photograph - RA Svy Project C4 Aerodist Operation, Eastern Arnhem Land, NT, 1967
This is a set of 30 photographs of Royal Australian Survey Corps (RA Svy) personnel from Central Comd Fd Svy Unit (Adelaide) on Aerodist survey operation - Project C4 in Eastern Arnhem Land, Northern Territory in 1967. Photos of personnel were taken either at the operations base at Numbulwar or the main base at Gove (Nhulunbuy). RA Svy conducted nineteen Aerodist operations for 12 years from 1964 to 1975. Aerodist MRC2 was a tellurometer-based system adapted for aircraft to accurately measure distances between non-intervisible ground survey stations, using the aircraft as an intermediate station. Lower order geodetic results could be achieved by survey network trilateration. The measured distances between stations formed survey networks from which each station’s latitude and longitude was computed. Aerodist MRC2 was RA Svy’s major horizontal control survey tool for mainly medium scale topographic mapping (scale 1:100,000 Class A being spatially accurate to within 50 metres) in PNG, northern NT, north-west WA, Kalimantan Barat (West) Indonesia, Sumatra Indonesia, Gulf of Carpentaria and Cape York, QLD. In 1967, the Aerodist MRC2 Master equipment was installed in the aircraft featured in this set of photos, Executive Air Services’ (Essendon VIC) Grand Aero Commander VH-EXX. It was the same aircraft type and company contracted to Division of National Mapping for Aerodist MRC2 surveys. From July to October 1967 the aircraft was attached to Central Comd Fd Svy Unit (Adelaide - Major Don Ridge) on Project C4 eastern-Arnhem Land NT, where 317 Aerodist lines measuring 17,300 line miles were successfully completed. This was the most productive Aerodist project thus far. The most common helicopter used by RA Svy up to 1972 was the civilian Bell 47G-2 and the Sioux Light Observation Helicopters (LOH), the Australian Army’s equivalent featured in this photo set. These light observation helicopters had a limiting load carrying capacity of up to about 500 pounds. By comparison, one Aerodist team including two people weighed up to 1,500 pounds. Source: Royal Australian Survey Corps – Aerodist Years 1964-1975 by Peter Jensen. This is a set of 30 photographs of Royal Australian Survey Corps (RA Svy) personnel on Aerodist survey operations in Eastern Arnhem Land, Northern Territory in 1967. The photographs are on 35mm negative film and scanned at 96 dpi. They are part of the Army Survey Regiment’s Collection. .1) to .4) - black & white, 20th August 1967, Project C4 Aerodist Operations Base - Numbulwar, NT. .5) - Photo, black & white, 1967. Probable wrecked Indonesian fishing vessel. .6) to .8) - Photo, black & white, 1967. Unidentified survey operations base, L to R: unidentified personnel. .9) - Photo, black & white, 1967. Unidentified survey operations base, unidentified soldier driving a Haflinger 4x4 Light utility vehicle. .10) - Photo, black & white, 1967. Unidentified survey operations base, L to R: unidentified technician. .11) - Unidentified technician reading two survey altimeters to compute corrections to the measured distances for atmospheric refraction and to compute the sea level distances from the slope distances aircraft to the ground stations. .12) - Photo, black & white, 1967. Unidentified survey operations base, L to R: unidentified personnel. .13) to .16) - Photo, black & white, 1967. Unidentified personnel operating remote Aerodist MRC2 ground instruments. .17) to .18) - Photo, black & white, 1967. Unknown RA Svy office location. .19) to .20) - Photo, black & white, 1967. Aerodist MRC2 Master equipment. .21) to .22) - Photo, black & white, 1967. Aero Commander VH-EXX probably at Gove, NT, Central Comd Fd Svy Unit (Adelaide) – OC Major Don Ridge. .23) to .25) - Photo, black & white, 1967. Aero Commander VH-EXX probably at Gove, NT. Unidentified personnel. .26) - Photo, black & white, 1967. Aero Commander VH-EXX probably at Gove, NT. Aerodist antenna pods are visible on the aircraft. .27) to .29) - Photo, black & white, 1967. Australian Army Sioux Light Observation Helicopter (LOH) probably at Gove, NT. .30) - Photo, black & white, 1967. Panelled U337 survey station, visible as a white cross on aerial identification photo..1P to .2P – date and location on edge of film negative. .5P to .28P – no annotations .29P - annotated in white ‘RW-JEP Gove NT’ .30P - annotated in white ‘U337 Spool No1 Jun67’royal australian survey corps, rasvy, army survey regiment, army svy regt, fortuna, asr, aerodist, surveying, central comd fd svy unit -
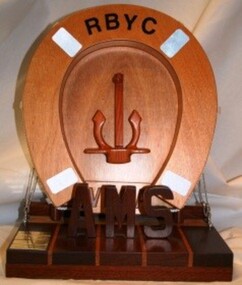 Royal Brighton Yacht Club
Life Ring, Vega Trophy (Mounted Wooden Life Ring)
Vega Trophy (Mounted Wooden Life Ring) Donor: Graham Noel During World War II when the Germans occupied the Channel Islands the local people went through very severe food rationing and were on the verge of starvation. Near the end of the war, the Swedish ship Vega was allowed by the Germans to deliver several shipments of food to the civilian population, easing the critical shortages of food on the islands. Further background detail can be found below. Graham Noel was born on the Islands and lived there during this harsh period. The trophy is awarded to the winner of the Combined Division AMS Aggregate Series. First Winner: Under Capricorn, P. Bedlington 2005/06 Vega – Further historical background Early in the Second World War Jersey was declared “unarmed” and the German military took over, taking quite a few lives in the process, through strafing the main harbour and a few other places which they needlessly considered threatening. A considerable number of locals evacuated to England before the Germans arrived, but more than 60% of the population remained and endured 5 years of very strict and difficult conditions. Not only was the population unable to contact relatives in the UK or elsewhere, but very quickly they found themselves subject to harsh curfews, strictly rationed foodstuffs, no fuel for vehicles, radios confiscated, and homes and hotels commandeered by the military. The military demanded first pick of all foodstuffs and kept meticulous records of all livestock forcing farmers even to show newborn calves and piglets to them, then claiming the new arrivals for their dinner tables. However there are many stories of farmers outwitting their masters when twin calves or suchlike arrived! Lawbreakers were quickly dealt with, mostly with lengthy prison terms in Jersey, but the more serious crimes were punished by being sent to some horrible French prisons, or even some of the notorious German concentration camps. All local Jews were dispatched to concentration camps, and even English born families were similarly shipped through France and on to Germany. Sadly, a considerable number of those deported did not make it back safely to Jersey. In June 1944 the locals were delighted to hear that the Allies had invaded Normandy and very soon they could hear the battles as the Allies worked their way along the French coast. Little did they know they would still have to wait another 11 months for freedom, having to put up with a very demanding German occupation force which was still determined to obey Hitler’s order to “Defend the Channel Islands to the death”. Now that France was in Allied Hands the local military commanders were unable to supplement their food supplies from France and even harsher demands were made on the local population to ensure that all branches of their still very substantial military force were reasonably well fed. As well as the military, Jersey farmers had to provide food for the Allied POWs and the many “forced labourers”, mainly of Russian, Polish and Italian backgrounds who had been directed to the island to build all the concrete bunkers. This included an underground hospital, all this complying with Hitler’s orders to ensure that the Channel Islands would never again be part of Britain. Many requests by the Jersey authorities for Red Cross assistance were rejected, but finally in December 1944 they agreed and on 30th December the Red Cross vessel “Vega” (Swedish Registry) arrived and delivered parcels to the civilian population. These parcels contained a variety of foodstuffs supplied mainly by Canadian authorities, desperately needed medical supplies, flour, oils and soaps, as well as tobacco from New Zealand. Vega made a further 3 or 4 trips and most certainly eased the desperate situation being faced by the locals. In fact, it resulted in the locals having slightly better food supplies than the military and many local farmers tell stories of having to protect their stock from marauding soldiers. Understandably Churchill was reluctant to send in an invading force to retake the Channel Islands, but by May 1945 it was clear that the Third Reich was finished and on May 9th the German Military surrendered, without a fight, to a large British landing force. On a slightly lighter note … in January 1945 Jersey stonemasons were seen in the main town square repairing flagstones … the Germans had never noticed that the name “Vega” had been formed in those flagstones! As a side note Vega is the name of the brightest star in the universe. Furthermore, throughout the occupation, despite German law that demanded confiscation of all radio sets, punishable by long prison terms or deportation to Germany, there were still many sets being listened to. The locals had a well refined news system for the dissemination of news of what was happening in the outside world. vega, graham noel, ams, combined division, aggregate -
 Ballarat Heritage Services
Photograph - Digital Photograph, Dorothy Wickham, Filming Fingal's Finest Day, Malahide Castle, 2016, 09/2016
Generations of the Talbot family have called Malahide Castle home. They played significant roles in Irish political and social life. Set in 260 acres the castle is only 10 minutes from Dublin airport. https://www.malahidecastleandgardens.ie/ According to wikipedia See https://en.wikipedia.org/wiki/Easter_Rising#Fingal In Fingal (or north County Dublin), about 60 Volunteers mobilised near Swords. They belonged to the 5th Battalion of the Dublin Brigade (also known as the Fingal Battalion), and were led by Thomas Ashe and his second in command, Richard Mulcahy. Unlike the rebels elsewhere, the Fingal Battalion successfully employed guerrilla tactics. They set up camp and Ashe split the battalion into four sections: three would undertake operations while the fourth was kept in reserve, guarding camp and foraging for food. The Volunteers moved against the RIC barracks in Swords, Donabate and Garristown, forcing the RIC to surrender and seizing all the weapons. They also damaged railway lines and cut telegraph wires. The railway line at Blanchardstown was bombed to prevent a troop train reaching Dublin. This derailed a cattle train, which had been sent ahead of the troop train. The only large-scale engagement of the Rising, outside Dublin city, was at Ashbourne. On Friday, about 35 Fingal Volunteers surrounded the Ashbourne RIC barracks and called on it to surrender, but the RIC responded with a volley of gunfire. A firefight followed, and the RIC surrendered after the Volunteers attacked the building with a homemade grenade. Before the surrender could be taken, up to sixty RIC men arrived in a convoy, sparking a five-hour gun battle, in which eight RIC men were killed and 18 wounded. Two Volunteers were also killed and five wounded, and a civilian was fatally shot. The RIC surrendered and were disarmed. Ashe let them go after warning them not to fight against the Irish Republic again. Ashe's men camped at Kilsalaghan near Dublin until they received orders to surrender on Saturday. The Fingal Battalion's tactics during the Rising foreshadowed those of the IRA during the War of Independence that followed. Volunteer contingents also mobilised nearby in counties Meath and Louth, but proved unable to link up with the North Dublin unit until after it had surrendered. In County Louth, Volunteers shot dead an RIC man near the village of Castlebellingham on 24 April, in an incident in which 15 RIC men were also taken prisoner.filming, fingal's finest day, malahide castle, ireland -
 National Vietnam Veterans Museum (NVVM)
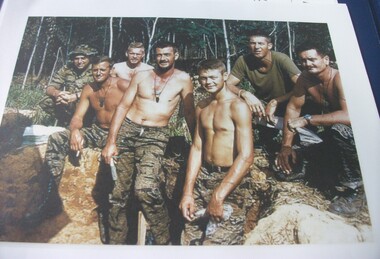
Photograph, Leadership group the day before the Battle of Ngok Tavak, 9/05/1968 12:00:00 AM
Captain John E D White, Australian Army Training Team in Vietnam (AATTV) took over command of 11 Mobile Strike Force (Mike Force) Company in Da Nang, Vietnam, in February 1968. He was 26 years old. The 2 NVA Division was moving from Laos into South Vietnam and his mission was to establish contact with the division and trace its movements south. In mid-March the company was air lifted to the Special Forces camp of Kham Duc, near the Laotian border. They used an old French Foreign Legion fort as a temporary base from which patrols could be sent out. White called it Ngok Tavak after a nearby mountain. Initially, patrols failed to find the enemy, but in late April a patrol clashed with the enemy. At the same time, White received intelligence that the NVA division was closing in. At night they could hear explosions in the distance heading toward them. White decided their best chance was to leave the fort and take to the jungle to adopt guerrilla tactics. However, in the meantime a platoon of United States Marine Corps artillery arrived bringing with them two howitzers and a stockpile of ammunition. To abandon the fort was to abandon the guns. White contacted Da Nang, explaining the predicament, and was ordered to remain where he was. A Civilian Irregular Defense Group (CIDG) platoon was sent to reinforce his numbers. This was a para military force comprised mainly of indigenous highlanders, trained by United States Special Forces. They also brought with them two mortars and their crews. At 3.15am on 10 May 1968 some members of the CIDG chose to assist the NVA to attack the fort instead of supporting Mike Force, and close hand to hand fighting followed, along with grenade attacks and heavy machine gun fire. Air support offered a brief respite from the NVA attack, and some NVA forces were pushed back outside the perimeter by counter attacks, but at 9am White contacted Da Nang to advise that his position was untenable. A second attack was imminent and they could not withstand it, so they would have to withdraw. The wounded were evacuated by helicopter (under orders from Major Mai, the NVA had not attacked the previous medical helicopters that collected the wounded under the cover of air strikes) and at 1pm the rest of the force evacuated east, into the jungle. The NVA did not notice their withdrawal, and continued mortar attacks on the fort for another ninety minutes. Seven kilometres from the fort White called for a helicopter withdrawal of his forces. The force was successfully lifted to Kham Duc and then Da Nang. (Credit AWM)Coloured image of 7 soldiers (5 shirtless) posed on the edge of a foxhole with jungle in background. L-R Willie Swicegood (USA), John White (AATTV-Aus), Ken Benway (USA), Frank Lucas (Aust), Clay Aitkins (USA), Glenn Miller (USA), Don Cameron (Aust)john white, aattv, battle of ngok tavak -
 National Vietnam Veterans Museum (NVVM)
Banner - Banner, framed, 11 Co (Nung)
Captain John E D White, Australian Army Training Team in Vietnam (AATTV) took over command of 11 Mobile Strike Force (Mike Force) Company in Da Nang, Vietnam, in February 1968. He was 26 years old. The 2 NVA Division was moving from Laos into South Vietnam and his mission was to establish contact with the division and trace its movements south. In mid-March the company was air lifted to the Special Forces camp of Kham Duc, near the Laotian border. They used an old French Foreign Legion fort as a temporary base from which patrols could be sent out. White called it Ngok Tavak after a nearby mountain. Initially, patrols failed to find the enemy, but in late April a patrol clashed with the enemy. At the same time, White received intelligence that the NVA division was closing in. At night they could hear explosions in the distance heading toward them. White decided their best chance was to leave the fort and take to the jungle to adopt guerrilla tactics. However, in the meantime a platoon of United States Marine Corps artillery arrived bringing with them two howitzers and a stockpile of ammunition. To abandon the fort was to abandon the guns. White contacted Da Nang, explaining the predicament, and was ordered to remain where he was. A Civilian Irregular Defense Group (CIDG) platoon was sent to reinforce his numbers. This was a para military force comprised mainly of indigenous highlanders, trained by United States Special Forces. They also brought with them two mortars and their crews. At 3.15am on 10 May 1968 some members of the CIDG chose to assist the NVA to attack the fort instead of supporting Mike Force, and close hand to hand fighting followed, along with grenade attacks and heavy machine gun fire. Air support offered a brief respite from the NVA attack, and some NVA forces were pushed back outside the perimeter by counter attacks, but at 9am White contacted Da Nang to advise that his position was untenable. A second attack was imminent and they could not withstand it, so they would have to withdraw. The wounded were evacuated by helicopter (under orders from Major Mai, the NVA had not attacked the previous medical helicopters that collected the wounded under the cover of air strikes) and at 1pm the rest of the force evacuated east, into the jungle. The NVA did not notice their withdrawal, and continued mortar attacks on the fort for another ninety minutes. Seven kilometres from the fort White called for a helicopter withdrawal of his forces. The force was successfully lifted to Kham Duc and then Da Nang. (Credit AWM)Black framed glass covered flag. Red material with gold fringe, gold writing with Blackbird in the centre with parachute holding 2 white swords standing on a gold star. 11Co. in gold underneath. Gold plaque mounted under the flag.GUIDON OF 11 COY (NUNG) MOBILE STRIKE FORCE (MIKE FORCE) /5th SF GROUP, 1 CORPS, SVN/ A Significant number of AATTV personnel served with this Nung Company based in Da Nang./ At the end of the Vietnam War, this flag was taken by a former US SF officer and held until/ when it was given to former Captain John "Jed" White (AATTV), CO 11 Coy (Nung), who led/ the MIKE Forces at the Battle of Ngok Tavak on 10 May 1968.battle of ngok tavak, mobile strike force, nung, john white -
 National Vietnam Veterans Museum (NVVM)
Photograph, Captain John White, AATTV, arrives in Vietnam, January 1968, 1/01/1968 12:00:00 AM
Captain John E D White, Australian Army Training Team in Vietnam (AATTV) took over command of 11 Mobile Strike Force (Mike Force) Company in Da Nang, Vietnam, in February 1968. He was 26 years old. The 2 NVA Division was moving from Laos into South Vietnam and his mission was to establish contact with the division and trace its movements south. In mid-March the company was air lifted to the Special Forces camp of Kham Duc, near the Laotian border. They used an old French Foreign Legion fort as a temporary base from which patrols could be sent out. White called it Ngok Tavak after a nearby mountain. Initially, patrols failed to find the enemy, but in late April a patrol clashed with the enemy. At the same time, White received intelligence that the NVA division was closing in. At night they could hear explosions in the distance heading toward them. White decided their best chance was to leave the fort and take to the jungle to adopt guerrilla tactics. However, in the meantime a platoon of United States Marine Corps artillery arrived bringing with them two howitzers and a stockpile of ammunition. To abandon the fort was to abandon the guns. White contacted Da Nang, explaining the predicament, and was ordered to remain where he was. A Civilian Irregular Defense Group (CIDG) platoon was sent to reinforce his numbers. This was a para military force comprised mainly of indigenous highlanders, trained by United States Special Forces. They also brought with them two mortars and their crews. At 3.15am on 10 May 1968 some members of the CIDG chose to assist the NVA to attack the fort instead of supporting Mike Force, and close hand to hand fighting followed, along with grenade attacks and heavy machine gun fire. Air support offered a brief respite from the NVA attack, and some NVA forces were pushed back outside the perimeter by counter attacks, but at 9am White contacted Da Nang to advise that his position was untenable. A second attack was imminent and they could not withstand it, so they would have to withdraw. The wounded were evacuated by helicopter (under orders from Major Mai, the NVA had not attacked the previous medical helicopters that collected the wounded under the cover of air strikes) and at 1pm the rest of the force evacuated east, into the jungle. The NVA did not notice their withdrawal, and continued mortar attacks on the fort for another ninety minutes. Seven kilometres from the fort White called for a helicopter withdrawal of his forces. The force was successfully lifted to Kham Duc and then Da Nang. (Credit AWM)Coloured image of John (Jed) White, aged 26 arriving at Tan Son Nhut Airport in full uniform, bag straps over left shoulder. Close- up of chest and head with plane visible in the background.AWM - p 11058,001capt john (jed) white, aattv, battle of ngok tavak -
 National Vietnam Veterans Museum (NVVM)
Plaque, Mobile Strike Force Shield
Captain John E D White, Australian Army Training Team in Vietnam (AATTV) took over command of 11 Mobile Strike Force (Mike Force) Company in Da Nang, Vietnam, in February 1968. He was 26 years old. The 2 NVA Division was moving from Laos into South Vietnam and his mission was to establish contact with the division and trace its movements south. In mid-March the company was air lifted to the Special Forces camp of Kham Duc, near the Laotian border. They used an old French Foreign Legion fort as a temporary base from which patrols could be sent out. White called it Ngok Tavak after a nearby mountain. Initially, patrols failed to find the enemy, but in late April a patrol clashed with the enemy. At the same time, White received intelligence that the NVA division was closing in. At night they could hear explosions in the distance heading toward them. White decided their best chance was to leave the fort and take to the jungle to adopt guerrilla tactics. However, in the meantime a platoon of United States Marine Corps artillery arrived bringing with them two howitzers and a stockpile of ammunition. To abandon the fort was to abandon the guns. White contacted Da Nang, explaining the predicament, and was ordered to remain where he was. A Civilian Irregular Defense Group (CIDG) platoon was sent to reinforce his numbers. This was a para military force comprised mainly of indigenous highlanders, trained by United States Special Forces. They also brought with them two mortars and their crews. At 3.15am on 10 May 1968 some members of the CIDG chose to assist the NVA to attack the fort instead of supporting Mike Force, and close hand to hand fighting followed, along with grenade attacks and heavy machine gun fire. Air support offered a brief respite from the NVA attack, and some NVA forces were pushed back outside the perimeter by counter attacks, but at 9am White contacted Da Nang to advise that his position was untenable. A second attack was imminent and they could not withstand it, so they would have to withdraw. The wounded were evacuated by helicopter (under orders from Major Mai, the NVA had not attacked the previous medical helicopters that collected the wounded under the cover of air strikes) and at 1pm the rest of the force evacuated east, into the jungle. The NVA did not notice their withdrawal, and continued mortar attacks on the fort for another ninety minutes. Seven kilometres from the fort White called for a helicopter withdrawal of his forces. The force was successfully lifted to Kham Duc and then Da Nang. (Credit AWM)A wooden shield painted grey/black celebrating the 40th Anniversary of the Battle of Ngok Tavak. There are three messages from mates written in black on the back. The shield was presented to Capt John (Jed) White.Presented to Captain John White, AATTV from the men of the Mobile Strike Force, Danang, Vietnam, 1968.mobile strike force, capt john (jed) white, shield, battle of ngok tavak -
National Vietnam Veterans Museum (NVVM)
Photograph, Sketch of Battle Map, Ngok Tavak, Mary 1968
Captain John E D White, Australian Army Training Team in Vietnam (AATTV) took over command of 11 Mobile Strike Force (Mike Force) Company in Da Nang, Vietnam, in February 1968. He was 26 years old. The 2 NVA Division was moving from Laos into South Vietnam and his mission was to establish contact with the division and trace its movements south. In mid-March the company was air lifted to the Special Forces camp of Kham Duc, near the Laotian border. They used an old French Foreign Legion fort as a temporary base from which patrols could be sent out. White called it Ngok Tavak after a nearby mountain. Initially, patrols failed to find the enemy, but in late April a patrol clashed with the enemy. At the same time, White received intelligence that the NVA division was closing in. At night they could hear explosions in the distance heading toward them. White decided their best chance was to leave the fort and take to the jungle to adopt guerrilla tactics. However, in the meantime a platoon of United States Marine Corps artillery arrived bringing with them two howitzers and a stockpile of ammunition. To abandon the fort was to abandon the guns. White contacted Da Nang, explaining the predicament, and was ordered to remain where he was. A Civilian Irregular Defense Group (CIDG) platoon was sent to reinforce his numbers. This was a para military force comprised mainly of indigenous highlanders, trained by United States Special Forces. They also brought with them two mortars and their crews. At 3.15am on 10 May 1968 some members of the CIDG chose to assist the NVA to attack the fort instead of supporting Mike Force, and close hand to hand fighting followed, along with grenade attacks and heavy machine gun fire. Air support offered a brief respite from the NVA attack, and some NVA forces were pushed back outside the perimeter by counter attacks, but at 9am White contacted Da Nang to advise that his position was untenable. A second attack was imminent and they could not withstand it, so they would have to withdraw. The wounded were evacuated by helicopter (under orders from Major Mai, the NVA had not attacked the previous medical helicopters that collected the wounded under the cover of air strikes) and at 1pm the rest of the force evacuated east, into the jungle. The NVA did not notice their withdrawal, and continued mortar attacks on the fort for another ninety minutes. Seven kilometres from the fort White called for a helicopter withdrawal of his forces. The force was successfully lifted to Kham Duc and then Da Nang. (Credit AWM)Annotated hand-drawn map of the fort at Ngok Tavak, 10 May 1968.battle of ngok tavak, john white, battle map -
 Bendigo Military Museum
Album - SERVICE HISTORY AND RECORDS WW2, C. 1939 - 1951
The items in this Archival folder relate to Arthur Edmund TRANTER V50166, VX52843 POW, his wife Pat and Daughter Brenda. There are two more Archival folders, Cat No's 7957.2 & 7958.2. Refer Cat No 7944 for A.E. Tranters service history..1) Black Archival folder container. .2) Black Archival folder, 3 ring binder with plastic inserts. This has the following: 1. Certificate of Service 2nd AIF 1941 - 45 2. Certificate of service CMF 1939 - 1941 3. Corporals certificate 38th BN 1939. 4. Certificate relating to a "mention in Despatches" 5 &6. Letters re the awards of the "Efficiency Medal" 7. Black and white photo with "Streader, Drake and Tranter" 1939. 8. Ships menu "TMS SIBAKAK" Sept 1941. 9. 2/29th BN reunion menu 50th Anniversary. 10. Document on "How to learn Morse Code". 11. Document, Grant of a War pension, Tranter 1951. 12. Document re War pension Payments. 13. Document re "Return to Civilian life for POW"s. 14. Exercise book from Singapore with names re 2/29th BN. 15. Cartoon copy, Medan Melbourne Frog Cup 1942. 16. Hand drawn sketch black pencil of "Tranter" by E.W. Porter 17th Dec 1942. 17. List of recommendations for an "MID" re POW's in captivity. 18. POW working party list and casualties 8.3.1944 at "Atjeh". 19. POW casualties on the "Harukiki Maru"26.6.1944. 20. Eight newspaper cuttings re casualty lists and War news. 21. List of Australian POW's in Sumatra. 22. Menu Sheraton Hotel 2/29th BN Reunion. 23. Five photos of the Tranter Family re wife Pat and Daughter Brenda. 24. 2/29th BN Xmas card 1942. Card, General Base AIF Malaya 1941 - 42. 25. Twenty four POW Post cards via Australian/Japanese Red Cross. 26. Nineteen telegrams re "Welcome home 1945" 27. Two photos re "Welcome home, Shire of McIvor. 28. Letter written at sea to Pat and Brenda. 29. Welcome home luncheon menu Shire of McIvor 8th April 1946. 30. Letter dated 15.9.1945 to Pat and Brenda. album pow, documents, tranter -
 Bendigo Military Museum
Photograph - Lithographic Squadron Personnel and Equipment, Army Survey Regiment, Fortuna, Bendigo, c1990
These 28 photographs of Lithographic Squadron personnel and equipment was taken at Fortuna, Bendigo circa 1990. The photos were taken on the east side of Fortuna Villa, the Print Room’s map trimming and dispatch work area and the inside and outside Air Survey Support Section (BARCRO).These 28 photographs of Lithographic Squadron Personnel and Equipment was taken at Fortuna, Bendigo circa 1990. The 35mm colour photograph negatives were scanned at 96 dpi and are part of the Army Survey Regiment’s Collection. .1) - Photo, colour, c1990. RAEME and maintenance support, unidentified civilian. .2) - Photo, colour, c1990. Eastern side of Fortuna Villa, unidentified, CPL Le-Anne (Smallshaw) Shirley. .3) - Photo, colour, c1990. Eastern side of Fortuna Villa, SGT Gary Kerr. .4) - Photo, colour, c1990. Eastern side of Fortuna Villa, CPL Roy Hicks. .5) - Photo, colour, c1990. Eastern side of Fortuna Villa, unidentified. .6) - Photo, colour, c1990. Unidentified passing Q-Store & Transport Compound. .7) - Photo, colour, c1990. Data Management & Map Library. .8) - Photo, colour, c1990. Unidentified officer passing Q-Store heading up to Map Library. .9) - Photo, colour, c1990. Eastern side of Fortuna Villa, SPR Michelle Withers. .10) - Photo, colour, c1990. Unidentified RAEME soldier passing Q-Store heading up to Map Library. .11) & .12) - Photo, colour, c1990. Delivery of bulk map printing paper. WO2 Jeff Willey on forklift, unidentified. .13) & .14) - Photo, colour, c1990. Print Room, Wohlenberg MCS-2 guillotine. .15) to .18) - Photo, colour, c1990. Air Survey Support Section (BARCRO), Carl Zeiss Rectifying Enlarger. .19) - Photo, colour, c1990. Air Survey Support Section (BARCRO), film contact frame. .20) - Photo, colour, c1990. Air Survey Support Section (BARCRO), Pakotone film development processors. .21) & .22) - Photo, colour, c1990. Air Survey Support Section (BARCRO) entry/exit. .23) & .24) - Photo, colour, c1990. Air Survey Support Section (BARCRO) miscellaneous equipment. .25) & .26) - Photo, colour, c1990. Air Survey Support Section (BARCRO), CPL Warren ‘Waldo’ Shirley. .27) & .28) - Photo, colour, c1990. Outside Air Survey Support Section (BARCRO), L to R: WO1 Peter Coombes, CPL Warren ‘Waldo’ Shirley..1P to .28P – There are no annotations.royal australian survey corps, rasvy, army survey regiment, army svy regt, fortuna, asr, litho sqn -
 Bendigo Military Museum
photograph - AUTOMAP 1 Production – Army Survey Regiment, Fortuna, Bendigo, c1980
This collection of 20 photos was most likely taken in 1980. The AUTOMAP 1 computer assisted cartography and mapping system was introduced in 1975. The components of AUTOMAP 1 were the Input Sub-System of four Wild B8s stereoplotters and three Gradicon digitising tables, the Optical Line Following Sub-System – Gerber OLF, the Verification Sub-System – Gerber 1442 drum plotter, the General Purpose Sub-system – HP21MX computer and the Output Sub-System – Gerber 1232 flatbed plotter). The first map was published in 1978 (Strickland 3665-3, 1:50,000). AUTOMAP 1 was the first computer assisted cartography and mapping system utilised by the Survey Corps and was the first system used by Australian mapping organisations. The history of the AUTOMAP 1 system is covered in more detail with additional historic photographs, in pages 116-118 of Valerie Lovejoy’s book 'Mapmakers of Fortuna – A history of the Army Survey Regiment’ ISBN: 0-646-42120-4. See items 6410.24P, 6183.19P, 6184.20P, 6200.5P, and 6222.17P for additional photographs of the AUTOMAP 1 system.This is a set of 20 photographs of Air Survey Squadron military and civilian personnel operating AUTOMAP 1 equipment at the Army Survey Regiment at Fortuna, Bendigo, c1980. The photographs were on 35mm negative film and were scanned at 96 dpi. They are part of the Army Survey Regiment’s Collection. Photos .19P and .20P are printed on photographic and scanned at 300 dpi. .1) - Photo, black & white, c1980, Gerber plotter. .2) - Photo, black & white, c1980, Gerber plotter, LT Rob John .3) - Photo, black & white, c1980, Gradicon edit table, SPR Jamie McRae .4) - Photo, black & white, c1980, Gradicon edit table, SPR Steve Linane .5) - Photo, black & white, c1980, 1130 System administration, unidentified. .6) - Photo, black & white, c1980, Wild B8 stereo plotter, SPR Van Dalen? .7) - Photo, black & white, c1980, Wild B8 stereo plotter, SPR Van Dalen? .8) - Photo, black & white, c1980, Gerber Optical Line Follower (OLF). .9) - Photo, black & white, c1980, Gerber OLF. .10) - Photo, black & white, c1980, Gerber OLF. .11) - Photo, black & white, c1980, Gerber OLF. .12) - Photo, black & white, c1980, Gerber OLF. .13) - Photo, black & white, c1980, Data management, CPL Greg Gilbert. .14) - Photo, black & white, c1980, Data management, CPL Greg Gilbert. .15) - Photo, black & white, c1980, 1130 Operating System administration, SGT Denis Marshall. .16) - Photo, black & white, c1980, Programming System, L to R: unidentified, SGT Alan Toogood. .17) - Photo, black & white, c1980, Programming System, L to R: Robert Cox, WO1 Bob Mason, John Dean. .18) - Photo, black & white, c1980, Programming System, L to R: Robert Cox, WO1 Bob Mason, John Dean. .19) - Photo, black & white, c1980, Gradicon edit table, CPL Chris Carter. .20) - Photo, black & white, c1980, Gerber plotter, LT Rob John..1P to .18P - No personnel are identified .19P - ‘CPL Chris Carter’ annotated on backroyal australian survey corps, rasvy, army survey regiment, army svy regt, fortuna, asr, air survey, automap -
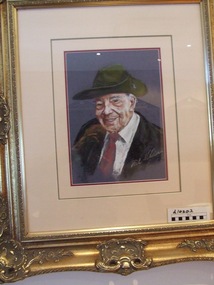 Waverley RSL Sub Branch
Painting Roy Longmore, RoyLongmore
Longmore set aside his life as a farm-hand in Geelong, Victoria, when he enlisted in the Australian Imperial Force at age 21. Private (Pte) Roy Longmore, 3rd Reinforcements, 21st Battalion, of Bannockburn, Victoria enlisted on 13 July 1915; and he embarked from Melbourne aboard HMAT Anchises on 26 August 1915.[2] After training in Egypt, was sent to the Battle of Gallipoli where he was a tunnel digger with the 2nd Division, burrowing underneath the Turkish positions and laying mines. After evacuation from Turkey, he fought at Pozières, Armentières, and Villers-Bretonneux.[1] He was wounded three times in France and was momentarily given up for dead when he was shot as the Armistice in November 1918, approached. He later recalled, "We were patrolling in a gully when suddenly half a dozen Germans appeared over a hill armed with machine guns and opened fire. Jerry riddled me, knocking me flat on my back, and the last I heard was 'Longy's had it, they got him.'" Fortunately, his fellow soldiers saw him move and rescued him.[3] Lance Sergeant (LSgt) and returned to Australia on 16 March 1919 as a member of the 2nd Pioneer Battalion.[2] Civilian life[edit] After returning to Australia in 1919, his injuries made returning to farm work impossible, so he drove a taxi in Melbourne. Another change caused by the war was more telling. Before, he had hunted rabbits; but he later explained that when he returned home, he no longer had an appetite for firing at anything alive.[3] Longmore married and had one son, Eric.[1] The one-time LSgt Longmore died peacefully in his sleep at a Burwood Nursing Home aged 107 on 21 June 2001. He was the second last Anzac to die.[2] At his death, Australia honored him one final time with a state funeral.[3] Australian "legend"[edit] In 2000, Longmore was recognized as one of the "Australian Legends." His name and photograph were honored as part of an annual series of commemorative postage stamps issued by Australia Post since 1997. The stamps commemorate living Australians "who have made lifetime contributions to the development of Australia's national identity and character".[4] Longmore lived to fully enjoy this honor.[3] Longmore's 45-cent Legend stamp displays the soldier's portrait as a young man, photographed just prior to his departure for Gallipoli. Formal photographs of the other two ANZAC centenarians complete this stamp set. In addition, a fourth stamp features the 1914-15 star medal which was presented to all those who fought in campaigns during those war years.[5] These stamps, designed by Cathleen Cram of the Australia Post Design Studio, commemorate the story of events and people shaping contemporary Australia.[6] The Longmore stamp honors him as an individual and as a representative of all 68,000 soldiers at Gallipoli whose actions affected Australia's evolving self-image.[7] http://en.wikipedia.org/wiki/Roy_LongmoreFramed painting of Roy Longmore wooden frame glass fronted -
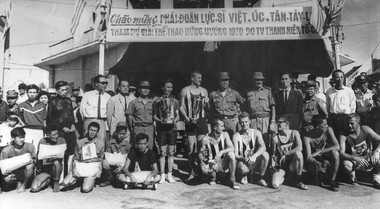 National Vietnam Veterans Museum (NVVM)
Photograph, Gibbons, Denis, Great Hung Vuong Day Road Race
Denis Gibbons (1937 – 2011) Trained with the Australian Army, before travelling to Vietnam in January 1966, Denis stayed with the 1st Australian Task Force in Nui Dat working as a photographer. For almost five years Gibbons toured with nine Australian infantry battalions, posting compelling war images from within many combat zones before being flown out in late November 1970 after sustaining injuries. The images held within the National Vietnam Veterans Museum make up the Gibbons Collection. A black and white photograph of a Group photo of the placed runners in the 5000 metre footrace from the market place at Long Dien. The race was run on the Vietnamese National DayTHE GREAT HUNG VUONG DAY ROAD RACE - 15th APRIL 1970: Hung Vuong Day, 15th April 1970, the Vietnamese National Day commemorating the events of the birth of the Vietnamese Race, is on of the most important festivals of the Vietnamese Memorabilia. The placed contestant athletics in the 5000 metre foot race from the market place at Long Dien, south east of Nui Dat, the 1st Australian Task force Base, along national Route 23 to the town square at Baria (Phuoc Le), the Phuoc Tuy Province Capital. The multi coloured shirts of the various contestants, from the numerous military and civilian units in the province and the Australian Task Force looked out of place in the war zone. It took 17 minutes, 5 seconds for the outright winner to get to the finish, a strapping young SAS soldier, Trooper John Thurgar, from Scone, N.S.W. of the 1st Special Air Service Squadron, one of the Australian contestants. The first prize, silver cup, was presented to Trooper Thrugar by Colonel Tu, The Province Chief, Colonel Peter Falkland, the 1st Australian Task Force Deputy Commander presented the first Vietnamese contestant across the finish line with a silver cup. In all there were trophies for the first siz places by the Vietnamese and the "visitors", SAS took the first three Australian/New Zealand places whilst the last three came from other 1st Australian Task Force Units, the first prize for each of the individual winners was a large silver cup, for the next five runners up, by the Australians there was a smaller silver cup, for the Vietnamese first place there was a silver cup the same size as for the Australian, outright, winner, while the next five Vietnamese runners up received a parcel of clothing and towels.photograph, 1st sas sqn, baria, phuoc tuy province, vietnamese national day, gibbons collection catalogue, great hung vuong day road race, trooper john thurgar, national route 23, nui dat, long dien village, col tu, col peter falkland, 1st special air squandron, the province chief, 1st australian task force, 3390, royal regiment of australian artillery, denis gibbons -
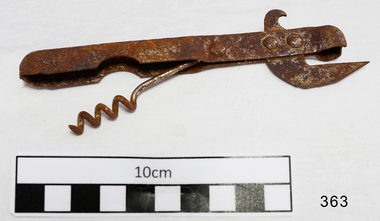 Flagstaff Hill Maritime Museum and Village
Domestic object - Can Opener, Bottle Opener & Corkscrew
It took 15 years to invent the can. It took 100 more to invent a standard way to open it. In the 19th century, decades after the invention of canning, there were virtually no can openers. Canned food, such as sardines, came with its own "key" to peel back the tin lid. Birth of the can One of the oddest things about the can opener is that the can predates it by almost 150 years. Though common today, cans were once military-grade technology. In 1795, Napoleon, to whom the phrase "an army marches on its stomach" is attributed, offered 12,000 francs to anyone who could find a way to preserve food. Without any knowledge of bacteria or their role in food spoilage, scientists didn't even know where to begin. It took 15 years before a chef named Nicholas Appert claimed the prize after successfully jarring food. Soon after that, his countryman Philippe de Girard came up with a variant on Appert's method—metal tins—and sold the idea to the British. Spoiled food, and the sickness it caused, was a widespread problem. The public would have benefited from canned food, but for decades cans were almost exclusively for the army and the navy. The canning process, with its hours of boiling and steaming, its scrupulous cleanliness, its heated metal, and its need for a great deal of disposable material, made canned food far too expensive for anyone but the military. No can openers were needed or even possible. The metal of early cans was too thick to make openers practical. Soldiers and sailors had plenty of sharp objects on hand and made ample use of them when they wanted to eat. During the 19th century, the process of canning was refined and mechanised, and the metal wall of the average can slimmed down enough that a civilian could get it open—if that civilian had the right tool. No one had that tool yet, so early cans had to open themselves. In other words, they came with built-in openers. The result was a confusing but pleasing free-for-all, in terms of product engineering. Each type of food came with its own kind of can, and each kind of can came with its own kind of opener. Tinned fish and meat were often sold in rectangular cans. These cans were fitted with a "key" that would roll down the top of the can. Coffee, beans, and other types of meat were packaged in cylinders with metal strips that could be peeled back with their own kinds of built-in keys. Cans of milk, which didn't need to be completely opened, came with puncture devices. As tinned food became more common, its containers became more regular. A nice cylindrical can became the norm, and, as these cans filled kitchens, more engineers put their minds to finding a convenient way to open all of them. The first standalone can opener worked on a simple principle: point, stab, and pull. From the mid-19th century to the end of World War I, the typical can opener looked roughly like a wrench, if the lower 'jaw' of the wrench were replaced with a blade. People used the blade to puncture the top of the can near its edge, push the upper jaw against the side of the can, and drag the blade through the metal along the rim. Because meat was the first and most popular canned substance, these can openers were often shaped to look like cows and given the nickname 'bully beef can openers'. The bully beef can opener, popular in the mid-19th century, resulted in many lost fingers. Later, a corkscrew was added that was seated in the handle, and could be pulled out for use. Bully beef can openers were so common, effective, and sturdy that they are still frequently available on collectors' sites. Some are advertised as “still working,” and every last one of them is, without a doubt, soaked in the blood of our ancestors. Dragging a sharp blade along the edge of a can is certain to cause injury sooner or later. So once people got a reliable can shape and a reliable way to get the can open, the search was on for a reliable way to get a can open without the possibility of losing a finger. The answer came in 1925, from the Star Can Opener Company of San Francisco. This is probably the first can opener that resembles the one people have in their kitchens today. Instead of using a blade to pry open a metal can, buyers could clamp the edge of the can between two wheels and twist the handle of one of the wheels to move the blade around the lip. The Star can openers weren't perfect. Compared to the bully beef model, they were flimsy and breakable, but they probably prevented a few injuries. Six short years after the Star model came to market, the first electric can opener was invented. It was patented in 1931 by the Bunker Clancey Company of Kansas City, who had already been sued by the Star Can Opener Company for trying sell a double-wheeled can opener like the Star model (the case was dismissed). The electric can opener must have seemed like the wave of the future and a sure-fire seller, but it proved to be too far ahead of its time. In 1931 not that many households had electricity, and those that did weren't interested in buying can openers. The Bunker Clancey Company was subsequently bought by the Rival Company, which still makes small appliances like can openers today. It took another 25 years for electrically powered can openers to become practical. In the 1950s, Walter Hess Bodle and his daughter, Elizabeth Bodle, developed an electric can opener in the family garage. Walter came up with the opener's blades and motor, and Elizabeth sculpted the outside. Their can opener was a free-standing unit that could sit on the kitchen counter. The Udico brand of the Union Die Casting Company put it on the market in time for Christmas in 1956 and had great success with it. Over the next few years it came out in different styles and colours, and, like the bully beef can opener, has become a collector's item. Also like the bully beef model, Udico can openers often still work. They don't make 'em like they used to. Although there have been some design changes and refinements over the last sixty years, there have yet to be any more leaps forward in can opener technology. If you're resentfully opening a can, you are almost certainly doing it using the Star design, manually forcing the can between two wheels, or the Bodle design, clamping the can into a free-standing electrical opener. Whether or not you enjoy your holiday meals, at least you can be happy that you are not getting poisoned by your own food or cutting open your hand with the blade you use to get at it. That's something, right?The can opener, Bottle opener and the corkscrew are still very important and essential items in most kitchens.Metal can opener, chromed, with bottle opener, and a corkscrew seated in the handle.None.flagstaff hill, warrnambool, shipwrecked-coast, flagstaff-hill, flagstaff-hill-maritime-museum, maritime-museum, shipwreck-coast, flagstaff-hill-maritime-village, canning, can opener, corkscrew, bottle opener, kitchen equipment -
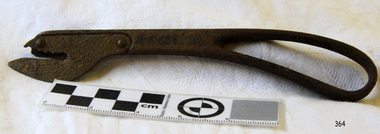 Flagstaff Hill Maritime Museum and Village
Domestic object - Can Opener
It took 15 years to invent the can. It took 100 more to invent a standard way to open it. In the 19th century, decades after the invention of canning, there were virtually no can openers. Canned food, such as sardines, came with its own "key" to peel back the tin lid. Birth of the can One of the oddest things about the can opener is that the can predates it by almost 150 years. Though common today, cans were once military-grade technology. In 1795, Napoleon, to whom the phrase "an army marches on its stomach" is attributed, offered 12,000 francs to anyone who could find a way to preserve food. Without any knowledge of bacteria or their role in food spoilage, scientists didn't even know where to begin. It took 15 years before a chef named Nicholas Appert claimed the prize after successfully jarring food. Soon after that, his countryman Philippe de Girard came up with a variant on Appert's method—metal tins—and sold the idea to the British. Spoiled food, and the sickness it caused, was a widespread problem. The public would have benefited from canned food, but for decades cans were almost exclusively for the army and the navy. The canning process, with its hours of boiling and steaming, its scrupulous cleanliness, its heated metal, and its need for a great deal of disposable material, made canned food far too expensive for anyone but the military. No can openers were needed or even possible. The metal of early cans was too thick to make openers practical. Soldiers and sailors had plenty of sharp objects on hand and made ample use of them when they wanted to eat. During the 19th century, the process of canning was refined and mechanised, and the metal wall of the average can slimmed down enough that a civilian could get it open—if that civilian had the right tool. No one had that tool yet, so early cans had to open themselves. In other words, they came with built-in openers. The result was a confusing but pleasing free-for-all, in terms of product engineering. Each type of food came with its own kind of can, and each kind of can came with its own kind of opener. Tinned fish and meat were often sold in rectangular cans. These cans were fitted with a "key" that would roll down the top of the can. Coffee, beans, and other types of meat were packaged in cylinders with metal strips that could be peeled back with their own kinds of built-in keys. Cans of milk, which didn't need to be completely opened, came with puncture devices. As tinned food became more common, its containers became more regular. A nice cylindrical can became the norm, and, as these cans filled kitchens, more engineers put their minds to finding a convenient way to open all of them. The first standalone can opener worked on a simple principle: point, stab, and pull. From the mid-19th century to the end of World War I, the typical can opener looked roughly like a wrench, if the lower 'jaw' of the wrench were replaced with a blade. People used the blade to puncture the top of the can near its edge, push the upper jaw against the side of the can, and drag the blade through the metal along the rim. Because meat was the first and most popular canned substance, these can openers were often shaped to look like cows and given the nickname 'bully beef can openers'. The bully beef can opener, popular in the mid-19th century, resulted in many lost fingers. Bully beef can openers were so common, effective, and sturdy that they are still frequently available on collectors' sites. Some are advertised as “still working,” and every last one of them is, without a doubt, soaked in the blood of our ancestors. Dragging a sharp blade along the edge of a can is certain to cause injury sooner or later. So once people got a reliable can shape and a reliable way to get the can open, the search was on for a reliable way to get a can open without the possibility of losing a finger. The answer came in 1925, from the Star Can Opener Company of San Francisco. This is probably the first can opener that resembles the one people have in their kitchens today. Instead of using a blade to pry open a metal can, buyers could clamp the edge of the can between two wheels and twist the handle of one of the wheels to move the blade around the lip. The Star can openers weren't perfect. Compared to the bully beef model, they were flimsy and breakable, but they probably prevented a few injuries. Six short years after the Star model came to market, the first electric can opener was invented. It was patented in 1931 by the Bunker Clancey Company of Kansas City, who had already been sued by the Star Can Opener Company for trying sell a double-wheeled can opener like the Star model (the case was dismissed). The electric can opener must have seemed like the wave of the future and a sure-fire seller, but it proved to be too far ahead of its time. In 1931 not that many households had electricity, and those that did weren't interested in buying can openers. The Bunker Clancey Company was subsequently bought by the Rival Company, which still makes small appliances like can openers today. It took another 25 years for electrically powered can openers to become practical. In the 1950s, Walter Hess Bodle and his daughter, Elizabeth Bodle, developed an electric can opener in the family garage. Walter came up with the opener's blades and motor, and Elizabeth sculpted the outside. Their can opener was a free-standing unit that could sit on the kitchen counter. The Udico brand of the Union Die Casting Company put it on the market in time for Christmas in 1956 and had great success with it. Over the next few years it came out in different styles and colours, and, like the bully beef can opener, has become a collector's item. Also like the bully beef model, Udico can openers often still work. They don't make 'em like they used to. Although there have been some design changes and refinements over the last sixty years, there have yet to be any more leaps forward in can opener technology. If you're resentfully opening a can, you are almost certainly doing it using the Star design, manually forcing the can between two wheels, or the Bodle design, clamping the can into a free-standing electrical opener. Whether or not you enjoy your holiday meals, at least you can be happy that you are not getting poisoned by your own food or cutting open your hand with the blade you use to get at it. That's something, right?The can opener is still a very important and essential item in most kitchens.Can opener, right handed, metal, upper blade section serrated, inscription 'Peerless Pat.Feb 11-90'.Peerless Pat.Feb 11-90flagstaff hill, warrnambool, shipwrecked-coast, flagstaff-hill, flagstaff-hill-maritime-museum, maritime-museum, shipwreck-coast, flagstaff-hill-maritime-village, cannning, can opener, kitchen equipment -
 Bendigo Military Museum
Photograph - AUTOMAP 1 Production – Army Survey Regiment, Fortuna, Bendigo, c1978-1980
This collection of 20 photos was most likely taken in c1978. The AUTOMAP 1 computer assisted cartography and mapping system was introduced in 1975. The components of AUTOMAP 1 were the Input Sub-System of four Wild B8s stereoplotters and three Gradicon digitising tables, the Optical Line Following Sub-System – Gerber OLF, the Verification Sub-System – Gerber 1442 drum plotter, the General Purpose Sub-system – HP21MX computer and the Output Sub-System – Gerber 1232 flatbed plotter). The first map was published in 1978 (Strickland 3665-3, 1:50,000). AUTOMAP 1 was the first computer assisted cartography and mapping system utilised by the Survey Corps and was the first system used by Australian mapping organisations. The history of the AUTOMAP 1 system is covered in more detail with additional historic photographs, in pages 116-118 of Valerie Lovejoy’s book 'Mapmakers of Fortuna – A history of the Army Survey Regiment’ ISBN: 0-646-42120-4. See items 6122.20P, 6410.24P, 6183.19P, 6200.5P, and 6222.17P for additional photographs of the AUTOMAP 1 system.This is a set of 20 photographs of Air Survey Squadron military and civilian personnel operating AUTOMAP 1 equipment at the Army Survey Regiment at Fortuna, Bendigo, c1978-1980. Black and white photos .1P to .18P are on photographic paper and were scanned at 300 dpi. Photo .4P is in colour and mounted with a duplicate on manilla card. Black and white photos .19P to .20P are on 35mm negative film and scanned at 96 dpi.They are part of the Army Survey Regiment’s Collection. .1) - Photo, black & white, c1978-1980, Gerber Optical Line Follower (OLF), SSGT John Bennett. .2) - Photo, black & white, c1978-1980, HP21MX computer General Purpose Sub-system. .3) - Photo, black & white, c1978-1980, Gerber OLF .4) - Photo, colour, c1978-1980, unidentified digitising on Gradicon edit table. .5) - Photo, black & white, c1978-1980, Gerber verification drum plotter. .6) - Photo, black & white, c1978-1980, Gerber OLF, CAPT Rob Bridge. .7) - Photo, black & white, c1978-1980, Programming and system administration, SGT Alan Toogood. .8) - Photo, black & white, c1978-1980, Unidentified digitising on Gradicon edit table. .9) - Photo, black & white, c1978-1980, CPL Rick Downie digitising on Gradicon edit table. .10) - Photo, black & white, c1978-1980, SPR Dave Irving digitising on Gradicon edit table. .11) - Photo, black & white, c1978-1980, Gerber OLF and CPL Rick Downie. .12) - Photo, black & white, c1978-1980, 1130 Computer System administration, L to R: unidentified, SSGT Les Dixon, SPR Geoff Havelberg. .13) - Photo, black & white, c1978-1980, AUTOMAP 1 tape administration, Maryanne De Groot. .14) - Photo, black & white, c1978-1980, AUTOMAP 1 tape drive. .15) - Photo, black & white, c1978-1980, HP21MX computer General Purpose Sub-system. .16) - Photo, black & white, c1978-1980, digitising topographic features with a Wild B8 stereo plotter, L to R: unidentified, CPL John Smith. .17) - Photo, black & white, c1978-1980, digitising topographic features with a Wild B8 stereo plotter, CPL John Smith. .18) - Photo, black & white, c1978-1980, digitising topographic features with a Wild B8 stereo plotter, CPL Adrian Rynberk. .19) - Photo, black & white, c1978-1980, Programming and system administration, SGT Alan Toogood. .20) - Photo, black & white, c1978-1980, Gerber OLF, CPL Chris Edwards. .1P to .20P - No personnel are identified.royal australian survey corps, rasvy, army survey regiment, army svy regt, fortuna, asr, automap 1 -
 Bendigo Military Museum
photograph - Fortuna - 1st Year of Army Occupation in Bendigo, 1942
This is a set of 17 photographs taken during the first year of Army occupation at Fortuna, Bendigo in 1942. The photos provide an insight into the preparatory work performed on the Fortuna Villa and surrounding buildings, by the Working Party 5th Army Troop and Ordnance Training Depot, before its occupation by personnel from LHQ Cartographic Company, Royal Australian Survey Corps. The annotation on the back of Photos .9P and .10P is misspelt. The correct spelling is ‘Nell Gwynne’. The poppet head of the Central Nell Gwynne mine is still an iconic landmark in Bendigo, lying just down the road from the poppet head lookout at Victoria Hill. The Central Nell Gwynne was the premier mine of Bendigo's 1930s mining revival and is of high historical value, due to the extensive and relatively intact features which remain at the site. The annotation on the back of Photo .17P is incorrect. The location of HQ 5th Army Troop was ‘Reynard St, Coburg.’ By late 1941 as Japan extended its control throughout Indo-China, resolving the accommodation problem of AHQ Cartographic Company located in Melbourne became more urgent. The steady Japanese advance made the bombing of Melbourne no longer a remote possibility, and in accordance with a general policy of dispersion, the Deputy Chief of the General Staff, Major General Sidney Rowell instructed Major William Sarll, in the interests of security of plant and to provide against possible damage of air attack, to investigate suitable safer inland accommodation for AHQ Cartographic Company. Major Sarll inspected many properties before finding one that would meet the requirements of the Cartographic Company. In late 1941, he came to inspect Fortuna, a rambling old mansion with about fifteen acres of ground in central Bendigo. Initially there was no intention to occupy the site beyond the end of the war, although Major Sarll's report to the Director of Survey noted many advantages in moving the Company to Bendigo. Major General Rowell quickly approved the selection of Fortuna before other authorities, which were investigating the evacuation of school children, could get in ahead of the Cartographic Company. On 23 March 1942, the Commonwealth of Australia, under the provisions of the National Security Act of 1939, took possession of the house, the old battery buildings and the fifteen acres of grounds. Under Warrant Officer J. Trist’s direction, over fifty Parks and Works tradesmen completed building works necessary to accommodate the Survey Corps’ military, map making and printing requirements. The building program was still under way when the first officer, Lieutenant Ralph Westgarth, arrived in May 1942 with the advance party which received and positioned all equipment as it came up from Melbourne in semi-trailers. Once the equipment was installed the rest of the Cartographic Company completed its shift to Bendigo by 11th June 1942. The first year of the Survey Corps’ occupation of Fortuna is covered in more detail with additional historic photographs, in pages 17-22 of Valerie Lovejoy’s book 'Mapmakers of Fortuna – A history of the Army Survey Regiment’ ISBN: 0-646-42120-4.This is a set of 17 photographs taken during the first year of Army Occupation at Fortuna, Bendigo in 1942. The black and white photographs were printed on photographic paper and are part of the Army Survey Regiment’s Collection. The photographs were scanned at 300 dpi. .1) - Photo, black & white, 1942. Bendigo Parks and Works tradesmen at Fortuna. L to R: Cliff Day, Ernie Arnold, Norm? .2) - Photo, black & white, 1942. “Don” - possibly SGT Don Sutcliffe. Fortuna, Bendigo. .3) - Photo, black & white, 1942. Parks and Works tradesmen in garden at Fortuna, Bendigo. L to R: Fred & Ernie. .4) - Photo, black & white, 1942. Benny Jack Williams at Fortuna, Bendigo. Accommodation tents were erected above the lake, which later became the parade ground. .5) - Photo, black & white, 1942. Working dress - Giggle suits. Parks and Works tradesmen at Fortuna, Bendigo. L to R: Cliff and Harry on big roof. .6) - Photo, black & white, 1942. Parks and Works tradesmen at Fortuna, Bendigo. Ted on big roof. .7) - Photo, black & white, 1942. Gold crusher battery just behind Fortuna. .8) - Photo, black & white, 1942. Scene of Bendigo from Fortuna. .9) - Photo, black & white, 1942. Nell Gwynne Mine from mullock heap at Victoria Hill near Fortuna, Bendigo. .10) - Photo, black & white, 1942. Nell Gwynne Mine and crusher near Fortuna, Bendigo. .11) - Photo, black & white, 1942. Sluicing for gold at Eaglehawk. .12) - Photo, black & white, 1942. Fortuna, Bendigo taken from the far side of tennis courts. .13) - Photo, black & white, 1942. Fortuna, Bendigo & its reflection from across the lake. .14) - Photo, black & white, 1942. Fortuna, Bendigo from the fishpond. .15) - Photo, black & white, 1942. Fortuna, Bendigo. .16) - Photo, black & white, 1942. First Fortuna Football Team at unknown location. L to R: 5th Bob Wright, 11th SGT Don Sutcliffe. .17) - Photo, black & white, 1942. Working Party from 5th Army Troop and Ordnance Training Depot at Fortuna, Bendigo.Some personnel are identified. Annotated with date within photos. .1) – Annotated on back ‘Cliff, Ernie, Norm, Dec ‘42. Cliff Day - dairy farmer, plasterers’ labourer. Ernie Arnold – hard plasterer. Norm? - QM Store for tools etc. QM Store was the Stables.’ .2) - Annotated on back ‘Don. Fortuna 1942’ .3) - Annotated on back ‘Fred & Ernie. Dec 1942. Carpenters. Note the state of the gardens.’ .4) - Annotated on back ‘Benny Jack Williams Fortuna Bendigo. Tents were erected where present day parade ground is above the lake.’ .5) - Annotated on back ‘Working dress - Giggle suits. June 42. Cliff and Harry on big roof. This photo was taken as the ventilating ridge was being installed on the building housing the printing machines. The machines were installed later by civilian labour when building was complete.’ .6) - Annotated on back ‘Ted on big roof Fortuna Bendigo.’ .7) - Annotated on back ‘Gold crusher battery – Bendigo for slay heap – 1942. 12 stamp battery. Just behind Fortuna. Was working at night when the “Army” came to Bendigo. Later removed to “Coolgardie - WA. Present site of Southern Cross TV.’ .8) - Annotated on back ‘Scene of Bendigo from Fortuna. June 1942.’ .9) - Annotated on back ‘Nell Gwyne Mine from mullock heap (Victoria Hill) Sept 1942.’ .10) - Annotated on back ‘Nell Gwyne Mine and crusher September 1942.’ .11) - Annotated on back ‘Sluicing for gold at Eaglehawk. August 1942.’ .12) - Annotated on back ‘Fortuna Bendigo 1942. Taken from far side of tennis courts.’ .13) - Annotated on back ‘ “Fortuna” across the lake & reflection.’ .14) - Annotated on back ‘Fortuna from fishpond June 1942.’ .15) - Annotated on back ‘Fortuna Dec 1942.’ .16) - Annotated on front ‘X’ x2. Annotated on back First Fortuna Football Team 1942‘Bob Wright’, ‘SGT Don Sutcliffe’. .17) - Annotated ‘Working Party at Fortuna before one of the drafts’, Working Party 5th Army Troop and Ordnance Training Depot Showgrounds, now the Sportsground Bendigo’, ‘HQ of 5th Army Troop was Reynards Rd, Coburg.’royal australian survey corps, rasvy, army survey regiment, army svy regt, fortuna, asr -
 Australian Commando Association - Victoria
Book, A history of the 2nd Independent Company and 2/2nd Commando Squadron
The history of the No. 2 Independent Commando Company and 2/2 Commando Squadron during World War II – scarce as a 1st edition dated 1986. Having completed its training at Foster, on Wilson’s Promontory, Victoria, the 2nd Independent Company was raised and travelled north to Katherine, in the Northern Territory. However, following Japan’s entry into the war, as with the other independent companies that were sent to the islands off Australia, the 2nd was sent to Timor, where it joined the 2/40th Battalion and the rest of Sparrow Force. Sparrow Force divided itself between west Timor, part of the Netherlands East Indies, and east Timor, which belonged to Portugal. The 2/40th Battalion defended the capital of west Timor, Koepang, and the airfield at Penfui. Most of the independent company moved to the airfield at Dili, in east Timor, and the nearby mountains. Portugal was opposed to the stationing of a Dutch or Australian garrison in case this provoked the Japanese, but despite this opposition, on 17 December 1941, elements of the 2nd Independent Company and Dutch troops landed near Dili. On 20 February 1942 the Japanese invaded the island, attacking east and west Timor simultaneously. The 2/40th Battalion held out for three days, but were overrun and were killed or captured. Similarly, the 2nd could not hold the airfield and were also driven back. But they were not captured and instead retreated to the mountains where they conducted a very successful and pursued a guerrilla war against the Japanese which lasted for over a year. Following the capture of Timor, the 2nd occupation the company was listed as “missing”, the company’s signallers were able to build a wireless transmitter, nicknamed ‘Winnie the War Winner’, and on 18/19 April were able to contact Darwin. At the end of May RAN vessels began landing supplies for the Australians on the south coast of east Timor. These supply runs were very dangerous but they allowed the Australians on Timor to continue fighting. In September the guerillas were reinforced with the 2/4th Independent Company. However, this could not go on indefinitely. In August the Japanese lunched a major offensive against the guerrillas and Japanese reprisals against the civilian population of east Timor reduced their support for the Australians. The 2nd (now named the 2/2nd Independent Company) and 2/4th were withdrawn in December and January 1943 respectively. Although the 2/2nd Independent Company is best known for its time on Timor, it also saw extensive service in New Guinea and New Britain. The independent company reformed at the army’s training centre at Canungra, Queensland, where it was reinforced and reequipped. The company then moved to the Atherton Tableland, where it briefly became part of the 2/6th Cavalry (Commando) Regiment. Due to this reorganisation, in October, the 2/2nd Independent Company was renamed the 2/2nd Cavalry (Commando) Squadron. This name was later simplified to just commando squadron. When this happened though, the 2/2nd was back in action. In June 1943 the 2/2nd sailed from Townsville for Port Moresby and was subsequently flown to Bena Bena, in the Bismark Range in New Guinea’s highlands. Here they supported the 2/7th Independent Company in patrolling the Ramu River area. In the second week of July the 2/2nd moved into position, with its headquarters at Bena Bena and with its platoons’ occupying neighbouring positions. By the end of the month their patrols were skirmishing with the Japanese. The 2/2nd remained in New Guinea until October 1944. After 90 days leave, the squadron reformed at Strathpine in Queensland before sailing to New Britain in April 1945. The 2/2nd landed at Jacquinot Bay on 17 April. The squadron then moved to Wide Bay, in order to support the 13th Brigade of the 5th Division, and was based at Lamarien. Following Japan’s surrender and the end of the war, the ranks of the squadron thinned quickly as men were discharged or transferred to other units. For those who were left, they returned to Australia and in early 1946 the 2/2nd Commando Squadron was disbanded. Includes Nominal Roll Soft Cover without Dust Jacket – 270 pages -
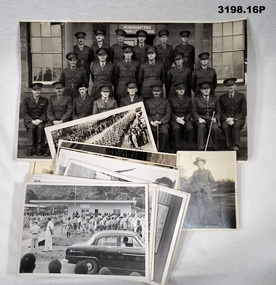 Bendigo Military Museum
Photograph - PHOTOGRAPHS WW1 - WW2, 9) Col H T ALLAN, 1) 11.11.1918; .3) c.Jul-Aug 1940; .4) & .5) c.WWII; .6), .7) & .8) post WWII; .9) - .16) 29.3.1958;
Herbert Trangmar ALLAN, refer Cat No 2755.4 for his extensive service records and awards. .3) Taken during his appointment to Headquarters of the Command & Staff School, 2nd Military District. .7) Col H T ALLAN former commander of the Pacific Islands Regiment. .10) See newspaper articles 3046.52 & 3046.53 a., b., c. .11) - .14) See newspaper articles 3046.52 & 3046.53 a., b., c. .16) The flap staff was donated by the Royal Papua & New Guinea Constabulary. See newspaper articles 3046.52 & 3046.53 a., b., c. Th photos are of various sizes with an average as per the size field. .1) Black & white full length photo of Capt Herbert T ALLAN, 17th Battalion, in Australian Army uniform from WWI, location unknown. .2) Black & white studio portrait of Herbert T ALLAN in suit & tie. Photo is mounted on cream card with a khaki border. Photo is secured in a cream card folder. .3) Black & white photo of a group of Australian Army Officers in uniform. Front row seated, rear / middle rows standing. Herbert T ALLAN seated front row 2nd from right. Headquarters of Command & Staff School in background. .4) Black & white photo of a battalion of soldiers marching down a street with sloped rifles & fixed bayonets. Battalion led by an Officer most likely to be Herbert T ALLAN. Solder on horseback in foreground. Civilian observers line the street. .5) Black & white photo of an Australian Army Officer, most likely Herbert T ALLAN, standing in front of a tent in New Guinea. .6) Black & white photo of Col Herbert T ALLAN seated, taken in New Guinea. .7) Black & white photo of Col H T ALLAN talking to 3 New Guinea natives who are possibly former members of the Pacific Islands Regiment. .8) Black & white photo of Col H T ALLAN & his New Guinean driver in an Australian Base Command jeep. .9) Black & white photo of New Guinean spectators at the opening of the Rabaul Ex-Servicemen's Club. .10) Black & white photo of Col Herbert T ALLAN with a group of PNG Ex-Servicemen. All are wearing medals. To the immediate left of Col Herbert T ALLAN is Raymond Martin, Club President. On wall behind is a rifle donated by Capt R CLAMMER of Rabaul Police. .11) Black & white photo of a presentation table to the Rabaul Ex-Servicemen, by the New Britain Boy Scouts. Club President, Raymond Martin is receiving the table with Colonel Herbert T ALLAN looking on. .12) Black & white photo of Rabaul Ex-Servicemen's Club President, Raymond Martin making a speech at the Club's opening with Colonel Herbert T ALLAN, a Naval Officer & a group looking on. Group is in front of PNG Rabaul Branch of Native Ex-Servicemen's Association building. .13) Black & white photo of the parade of PNG Ex-Servicemen, Boy Scouts & spectators at the opening of the Rabaul Ex-Servicemen's Club. .14) Black & white photo of Colonel Herbert T ALLAN inspecting a parade of PNG Ex-Servicemen at the opening of the Rabaul Ex-Servicemen's Club. .15) Black & white photo of the official party at the opening of the Papua & New Guinea Rabaul Branch Native Ex-Servicemen's Club. .16) Black & white photo of Colonel Herbert T ALLAN raising the Australian flag in front of a parade of PNG Ex-Servicemen, Boy Scouts & spectators at the opening of the Rabaul Ex-Servicemen's Club. .1) Handwritten on back: Armistice Day Nov 11th 1918. Hence the smile. .2) Printed on folder front: Portrait study by Howard Harris. Handwritten on back: Blue Allan. .3) On front: Handwritten 'X' below H T ALLAN. On back: Stamp of S J Hood photographer detailing order No 1. .5) Handwritten in pencil on back: Return to I Marsh Woolgoolga. .6) Stamped in blue ink on back: Photograph No MH 75552 Supplied by Military History Section (SD?) General? LHQ For official purpose ONLY NOT TO BE PUBLISHED .7) Stamped in blue ink on back: Photograph No MH 75553 Supplied by Military History Section (SD?) General? LHQ For official purpose ONLY NOT TO BE PUBLISHED Handwritten in pencil on back: Return to I Marsh Woolgoolga. .8) Stamped in blue ink on back: Photograph No MH 75556 Supplied by Military History Section (SD?) General? LHQ For official purpose ONLY NOT TO BE PUBLISHED photographs, articles, pacific, new guinea -
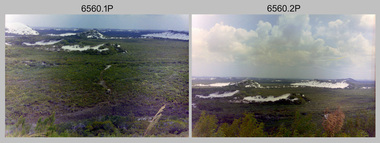 Bendigo Military Museum
Photograph - 4th Field Survey Squadron – Operation ARIGHT 93, Queensland, 1993
This is a set of 42 photographs taken during 4th Field Survey Squadron’s deployment on Operation ARIGHT 93 in North Queensland from the 30th of August to the 8th of October 1993. The Survey Field Completion area of operations was Weipa near the top end of the Cape York Peninsula. Survey parties conducted field checking of topographic maps covering Bamaga, Heathlands, Weipa, Lockhart River and Strathgordon in Perentie 110 Series Survey variant FFR Land Rovers. Hand-held Trimble and Magellan GPS receivers were used to assist with navigation and to position remote isolated features. Three Bell Kiowa LOH helicopters provided by 162 Recce Sqn supported field checking operations. Supplementary and Vital Asset Protection photography was taken by air camera operators in AAAvn Nomad aircraft from 173 Survl Sqn fitted with an RC10 aerial camera.This is a set of 42 photographs taken in 1993 durin8g 4th Field Survey Squadron’s deployment on Operation ARIGHT in North Queensland. The colour photographs are on 35mm negative film and are part of the Army Survey Regiment’s Collection. The photographs were scanned at 96 dpi. .1) - Photo, colour, 1993. Survey party in Perentie 110 Series Land Rover navigates through Cape York Peninsula sand hills. .2) - Photo, colour, 1993. Cape York Peninsula sand hills. .3) - Photo, colour, 1993. Cape York Peninsula Island. .4) - Photo, colour, 1993. Survey party in Perentie 110 Series Land Rover enters a Cape York Peninsula beach. .5) - Photo, colour, 1993. SPR Kim Baker takes a break on a Cape York Peninsula beach. .6) - Photo, colour, 1993. L to R: MAJ Andy Cordova (USA Exchange) from the Army Survey Regiment and unidentified civilians. .7) to .14) - Photo, colour, 1993. Cape York Peninsula topography. .15) - Photo, colour, 1993. Unidentified surveyor in Bell Kiowa LOH helicopter. .16) - Photo, colour, 1993. Bell Kiowa LOH helicopter circles base camp. .17) to .18) - Photo, colour, 1993. Cape York Peninsula topography. .19) - Photo, colour, 1993. Vehicle convoy taking a break. L to R: LT John Bath (Detachment OC), unidentified (x2), SPR Chris Pearse. .20) - Photo, colour, 1993. Vehicle convoy taking a break. .21) - Photo, colour, 1993. Vehicle convoy ready to go. SPR Chris Pearse. .22) - Photo, colour, 1993. Vehicle convoy on the move. .23) - Photo, colour, 1993. Cape York Peninsula topography. .24) - Photo, colour, 1993. Unidentified personnel. .25) - Photo, colour, 1993. SGT Neale ‘Tex’ Houston. .26) - Photo, colour, 1993. Ground below a Bell Kiowa LOH helicopter .27) - Photo, colour, 1993. L to R: SPR Mark Sinderberry and CPL Stuart Adrain in a Bell Kiowa LOH helicopter. .28) & .29) - Photo, colour, 1993. Ground below a Bell Kiowa LOH helicopter. .30) - Photo, colour, 1993. Base camp viewed from a Bell Kiowa LOH helicopter. .31) - Photo, colour, 1993. Cape York Peninsula topography in recovery after burn-off. .32) & .33) - Photo, colour, 1993. SPR Kim Baker contemplates crossing this bridge in his Land Rover. .34) - Photo, colour, 1993. SPR Kim Baker takes a break next to a billabong. .35) - Photo, colour, 1993. Survey party in Perentie 110 Series Land Rover crosses a creek. .36) - Photo, colour, 1993. Cape York Peninsula bush fire in distance. .37) - Photo, colour, 1993. Survey party in Perentie 110 Series Land Rover traverses a sand hill. .38) - Photo, colour, 1993. SPR Kim Baker. .39) - Photo, colour, 1993. Cape York Peninsula bush fire. .40) - Photo, colour, 1993. Cape York Peninsula topography. .41) & .42) - Photo, colour, 1993. Cape York Peninsula sand hills..1P to .42P – There are no personnel identified. ‘1993 OP ARIGHT’ annotated on negative sleeve.royal australian survey corps, rasvy, 4 fd svy sqn, op aright 93 -
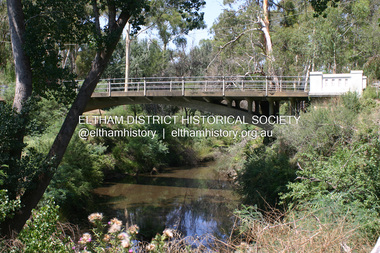 Eltham District Historical Society Inc
Photograph - Digital Photograph, Alan King, Monash Bridge, Hurstbridge, 23 January 2008
Monash Bridge spans the Diamond Creek at Hurstbridge. It was built in 1917 for the Shires of Heidelberg, Eltham and Whittlesea. It is considered Nillumbik Shire's finest engineered bridge and was construced by the engineering company of Sir John Monash. Covered under Heritage Overlay, Nillumbik Planning Scheme. Published: Nillumbik Now and Then / Marguerite Marshall 2008; photographs Alan King with Marguerite Marshall.; p117 Monash Bridge is considered the Shire’s finest engineered bridge and was constructed by the engineering company of that great Australian, Sir John Monash.1 The bridge spans Diamond Creek on the Hurstbridge-Arthurs Creek Road, linking Hurstbridge with Yarrambat and Arthurs Creek. Monash Bridge, also called Hurst’s Bridge, was built in 1917, by the Reinforced Concrete and Monier Pipe Construction Company Pty Ltd, for the Shires of Heidelberg, Eltham and Whittlesea. Although Monash was probably in action overseas during World War One when the bridge was designed and constructed, he evolved the basic design in the 1900s and it was a standard design for the firm. However J A Laing, a designer at the firm, was probably the designer, as his initials are on bridge drawings held by the Eltham District Historical Society.2 The bridge is an excellent early Australian example of an open spandrel reinforced concrete arch bridge and has a single span of 29 metres. It is unusual in Victoria, but similar to many reinforced concrete arch bridges in Europe and America, built from the late 19th century. In Victoria, Monash pioneered the use of reinforced concrete – then a revolutionary construction material. His company, Monash & Anderson, had the exclusive licence for the Monier patent for the system of reinforced concrete construction for Victoria and New South Wales. A well-known example of the Monier arch bridge is the Morell Bridge in South Yarra. The sweeping arch of the Monash Bridge combines grace and utility and blends with the surrounding rural landscape. Its design and construction have allowed it to carry increasing volumes of heavy traffic, but in modern times the one lane is considered by some to prevent easy passage through Hurstbridge. However others consider this an asset to deter too much more traffic, which would diminish Hurstbridge’s charming rural character.3 This is the third bridge across the Diamond Creek at this site. The original bridge was a log bridge upstream, constructed in the 1850s by early settler, Henry Hurst, after whom Hurstbridge was named. The bridge spanned the creek, where it divided his family’s property. In the 1880s a timber bridge replaced it, known as Hurst’s Bridge. However a more permanent bridge was considered necessary when the new railway arrived in 1912, bringing with it expectations of growth in the town and the surrounding fruit-growing district. Monash Bridge’s official opening on November 3, 1917 was a gala occasion, which took place before about 1000 spectators. Two who attended the opening had a particularly sound knowledge of the locality. One was Fred Hurst, Henry’s brother, who used to ford the creek at or near the bridge’s site more than 50 years before. The other was John McDonald of Arthurs Creek, who had built the old wooden bridge over the creek about 40 years earlier.4 Although John Monash was a fine engineer, his fame came from his brilliant war career, rather than from his engineering or his many other achievements. Monash was Corps Commander of the Australian Forces. His brilliance was recognised with his awards: Knight Grand Cross of the Order of St. Michael and St. George, and Knight Commander of the Bath. Monash was also decorated by the French, Belgian, and American Governments.5 After the war, Monash worked in many prominent civilian positions, the most notable as head of the Victorian State Electricity Commission. He was a leading and loved public figure, involved in many public and private organisations. He was president of the Australian Zionist Federation and involved in the Boy Scouts. Monash University is named after him. By the 1920s Monash was probably regarded as the greatest living Australian.6 Despite most of his life working as an administrator and leader, rather than a fighting soldier, he became integral to the ANZAC legend. Monash died in 1931.This collection of almost 130 photos about places and people within the Shire of Nillumbik, an urban and rural municipality in Melbourne's north, contributes to an understanding of the history of the Shire. Published in 2008 immediately prior to the Black Saturday bushfires of February 7, 2009, it documents sites that were impacted, and in some cases destroyed by the fires. It includes photographs taken especially for the publication, creating a unique time capsule representing the Shire in the early 21st century. It remains the most recent comprehenesive publication devoted to the Shire's history connecting local residents to the past. nillumbik now and then (marshall-king) collection, hurstbridge, monash bridge -
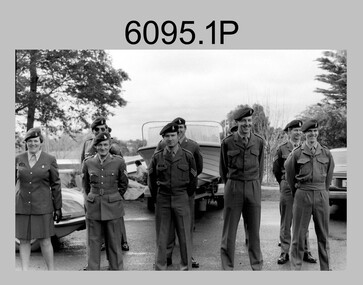 Bendigo Military Museum
Photograph - Army Survey Regiment – Corps Day Parade, 1983
These photographs were taken at the Corps Day parade at the Army Survey Regiment, Bendigo in July 1983. This was the Director of the Survey Corps – COL John Hillier’s last parade at Fortuna before his retirement. COL Hillier, often referred to as ‘NRJ’ (his initials) was Director for five years. COL Alex W. Laing attended the parade as his successor, seen in the foreground of photos .5P and .6P. COL Hillier was appointed a couple of years later to the honorary position of Colonel Commandant of the Royal Australian Survey Corps from 1989 to 1993. COL Laing was Director of RASvy from July 1983 to November 1988. Corps Day Parades were held to commemorate the formation of the Royal Australian Survey Corps in July 1915.This is a set of 19 photographs of a Corps Day parade at the Army Survey Regiment, Bendigo in July 1983. The negatives of the photographs were scanned at 96 dpi. .1) - Photo, black & white, 1983, L to R: CPL Di Chalmers, CPL Dave Cook, unidentified, SGT Bob Bright, unidentified, SPR Dave Wright, SGT Josh Degroot, SPR Chad Hardwick. .2) - Photo, black & white, 1983, L to R: LT Karen (Adams) Byrne, CAPT Roger Rix, RSM WO1 Bob Mason, MAJ Bob Roche, CO LTCOL Jorge Gruszka, CAPT Mick Byrne, Director COL John Hillier, CPL Terry Danger, CPL Paul Richards, CPL Greg Sulman, CPL George Holland, CPL Roger Pearson, LT Terry Lord, CPL Warren ‘Wah’ Hall. .3) - Photo, black & white, 1983, L to R: unidentified personnel, Director COL John Hillier, SPR Ben Tarasenko, CAPT John Bloor, unidentified, RSM WO1 Bob Mason, CPL John Bettridge, SPR Tom Bloxham. .4) - Photo, black & white, 1983, L to R: unidentified, MAJ Bob Roche, CO LTCOL Jorge Gruszka, Director COL John Hillier, MAJ Stan Vote. .5) - Photo, black & white, 1983, L to R: Colonel Alex W. Laing – foreground, CO LTCOL Jorge Gruszka, MAJ Bob Roche. .6) - Photo, black & white, 1983, L to R: Director COL John Hillier, MAJ Jim Mitchell – background, Colonel Alex W. Laing - foreground, CO LTCOL Jorge Gruszka, unidentified, SGT Kevin Boehm, SGT Jim Beard, unidentified, CAPT Dave Sankey .7) - Photo, black & white, 1983, L to R: CAPT John Bloor, CAPT Andy McLeod, SGT Kevin Boehm, MAJ Bob Roche, SGT Jim Beard, CO LTCOL Jorge Gruszka, Director COL John Hillier, SSGT Bill Kemp, CPL Peter (Jack) Elvard, SGT Bob Croxton, CAPT Dave Sankey, CPL Mick Minchin, SGT Bruce Wetzig, CPL Ken Talbot-Smith. .8) - Photo, black & white, 1983, L to R: CAPT John Bloor, RSM WO1 Bob Mason, Director COL John Hillier, CO LTCOL Jorge Gruszka, MAJ Graham Baker. .9) - Photo, black & white, 1983, L to R: CAPT John Bloor, RSM WO1 Bob Mason, Director COL John Hillier, MAJ Bob Roche, CO LTCOL Jorge Gruszka, MAJ Graham Baker. .10) - Photo, black & white, 1983, L to R: CAPT Chris Mazur, CAPT John Bloor, CO LTCOL Jorge Gruszka, MAJ Graham Baker, SPR Steve Coulson, SGT Harald Mai, Director COL John Hillier, SPR Viv (Hawkins) Doherty, unidentified, SPR Tony Grivell, SPR Ross Collishaw, SGT Phil Meagher, SSGT Brett ‘Dutchy’ Van Leeuwen. .11) - Photo, black & white, 1983, L to R: CO LTCOL Jorge Gruszka, MAJ Graham Baker, SPR Tony Grivell, SPR Ross Collishaw, Director COL John Hillier, SGT Phil Meagher, SPR Peter Peterson, SSGT Brett ‘Dutchy’ Van Leeuwen, SGT Bruce Bowers, SGT Mick Davy, SPR Gerry Gates. .12) - Photo, black & white, 1983, L to R: SSGT Bruce ‘Stretch’ Gordon, SGT George Timmins, CO LTCOL Jorge Gruszka, Director COL John Hillier, MAJ Graham Baker, CAPT John Bloor, MAJ Bob Roche, WO2 Ted Burgess, RSM WO1 Bob Mason, WO2 Peter Biorac, WO1 Graeme Birrell. .13) - Photo, black & white, 1983, L to R: CO LTCOL Jorge Gruszka, CAPT John Bloor, Director COL John Hillier, inspecting rank R to L: SSGT Peter Barrett, CPL Gary Drummond, SPR Peter Breukel, CPL Ian Nichols, unidentified personnel. .14) - Photo, black & white, 1983, L to R: CO LTCOL Jorge Gruszka, Director COL John Hillier, MAJ Stan Vote, SSGT Peter Barrett, RSM WO1 Bob Mason, CPL Gary Drummond, SPR Peter Breukel, CPL Ian Nichols, unidentified. .15) - Photo, black & white, 1983, L to R: SGT John Cain, SSGT Jim Cook, CAPT John Bloor, CO LTCOL Jorge Gruszka, MAJ Stan Vote, Director COL John Hillier, CPL Keith Quinton, CPL Mick Gillham, CPL Kim Reynolds, SPR Paul Baker, WO1 Ken Slater, SPR Brian Fauth, SPR Jim Ash, WO2 George Graham, SGT Gavin Neilson. .16) - Photo, black & white, 1983, L to R: MAJ Bob Roche, MAJ Stan Vote, CPL Kim Reynolds, CO LTCOL Jorge Gruszka, Director COL John Hillier, WO2 George Graham, CPL John ‘Flash’ Anderson, SPR Gary Tremain, WO1 Ken Slater. .17) - Photo, black & white, 1983, L to R: MAJ Stan Vote, CO LTCOL Jorge Gruszka, Director COL John Hillier, WO1 Noel ‘Nesty’ Coulthard. .18) - Photo, black & white, 1983, L to R: LTCOL Jorge Gruszka, Director COL John Hillier, unidentified civilians. .19) - Photo, black & white, 1983, L to R: Director COL John Hillier, LTCOL Jorge Gruszka, RSM WO1 Bob Mason..1P to .19P – There are no personnel identifiedroyal australian survey corps, rasvy, army survey regiment, army svy regt, fortuna, asr -
 Bendigo Military Museum
Administrative record - COMPENDIUM WW1 - WW2, 4) A H Pettifer, Government Printer et al, 2) 14.2.1946; .3) 1.3.1919; .4) 30.11.1954 .5) 24.11.19? - WWI; .6) 31.10.1917; .7) 12.6.1917; .8) Page 1: 20.12.1915, Page 2: 10.12.1915, Page 6: 19.1915; .9) 10.9.1918; .10) 18.4.1919; .11) c.2.3.19?; .12) 18.9.1920; .14) post WWI; .15) 24.4.1920; .17) 18.4.1942; .18) 19.6.1943; .19) 18.3.1947; .20) 1944; .21) 1944; .23) 22.10.1941; .26) 13.9.1944; .27) 1.1944; .30) 7.3.1950; .31) 31.7.1944; .32) 16.4.1942; .33) 13.6.1946; .34) 6.5.1946; .36) a) & b) 3.11.1947; .37) 24.10.1951; .38) 24.9.1957; .39) 9.10.1957; .40) 19.2.1958; .41) 26.2.1958; .42) 1.3.1958; .43) & .44) 7.3.1958; .45) 25.2.1958; .46) 3.1.1948; .47) 26.2.1948; .48) 22.4.1958; .49) 24.2.1958; .50) 12.3.1958; .51) 6.1958; .52) c.Mar/Apr 1958; .53) 5.4.1958; .54) c.end WWII; .55) a.b. 13.6.1967; .56) 26.5.1967; .57) 18.2.1954
Herbert Trangmar Allan, refer 2755.4 for his extensive service history and wards. .2) Details gifting of a pair of Japanese binoculars to Col H T ALLAN by Pacific Island Regiment. .3) Certificate issued by Winston Churchill, Secretary of State for War (The War of 1914-1918), awarded to Capt H T ALLAN MC. .4) Herbert Trangman ALLAN born 5.1.1895 at Woolwich, NSW. Middle name misspelled, should be Trangmar not Trangman. .6) Congratulating H T ALLAN on receiving the Military Cross award for leading 2 companies which had lost officers during action on Passchendaele Ridge on 9.10.1917. .7) Describes life behind the lines whilst H T ALLAN's battalion has been resting for a month. Daily life consisted of training drills, sport & entertainment. Writer takes time to describe the countryside & weather. .8) Relate to H T ALLAN's military exam results & his promotion to 2nd Lieutenant in 1915. .9) To Herbert Allan's father, Mr P Allan detailing the citation for awarding of the Military Cross to Herbert ALLAN. Original citation appeared in the London Gazette,5.4.1918. .10) Form addressed to Capt H ALLAN MC, 17th Battalion stating his period of enlistment in the 1st AIF was to expire 26.5.1919. .11) Letter from Lord BIRDWOOD (General) to Herbert ALLAN in response to a letter received 19.11.19?. General BIRDWOOD expresses his opinions on difficulties the allied troops face in their fight against the Japanese. .12) Letter to Capt H T ALLAN advising of MID oak leaves sent to him. Details guidelines for attaching oak leaves to both the larger Victory Medal & the small service dress medal. .13) Form details H T ALLAN's WWII Army No, Rank, Unit & Decorations & Medals held. The form has not been signed & dated. .14) Details service record of Lt Col H T ALLAN NX12229. Includes military service from 1912 - 1944, schools & courses attended, decorations, promotions & overseas service. .16) Form issued to H T ALLAN on 15.12.1939 granting permission to leave New Guinea for Australia & return within a period of 12 months. Issued by Customs Office in Salamaua. Lists H T ALLAN's age as 44, height 5' 10" & occupation. .17) Letter from Major General MORSHEAD GOC, AIF (ME) to Major H T ALLAN, OBE, MC congratulating him on being awarded the OBE for outstanding service at Tobruch. .18) Letter from Major General MORSHEAD to Major H T ALLAN, OBE, MC replying to ALLAN's letter of 15.6.1943. MORSHEAD is congratulating ALLAN on his appointment to New Guinea Force, also acknowledges his excellent service record. .19) Letter acknowledges H T ALLAN's resignation from the Office of Production Member of the Australian New Guinea Production Control Board, effective from 28.8.1946. .20) Major General WINDEYER commanded the 20th Brigade from 1942-1946. .22) Card sent from the CO of the 3rd Australian Anti-Tank Regiment. .23) Menu for Farewell Dinner held in the Officer's Mess of the 20th Infantry Brigade, Tobruch on 22.10.1941. .24) Menu & Toast list for Farewell Dinner to Brigadier J J MURRAY DSO MC VD. Attended by H T ALLAN & held in the Officers Mess, 2/17 Australian Infantry Battalion on 22.12.1941. .25) Invitation to Col H T ALLAN by Lady Gowrie (wife of Governor General Baron Gowrie) to attend a Luncheon at Government House, Canberra, ACT. .26) Letter to Major (T/Lt Col) H T ALLAN from Major W A JENNER advising him of his secondment to 2/17 Australian Infantry Battalion & appointment to command 5 Aust Base Sub Area. .27) Application for Africa Star with Eighth Army Clasp signed by H T ALLAN & approved by Lt Colonel of 2/17 Australian Infantry Battalion. H T ALLAN held the rank of Major (substantive) at the time of qualification, 1.3.1942 - 11.1942. He held the rank of Lt Colonel at the time of application in 2.1944. .28) Detailing changes in command & promotions including that of Lt Col H T ALLAN, dated 1.4.19? .29) For Lt Col H T ALLAN detailing movements required by First Australian Army command. .30) Acknowledgement & confirmation of Col H T ALLAN's application for campaign awards for WWII. .31) Letter addressed to Lt Col H T ALLAN from Lt Gen Stanley Sauige requesting information on New Britain for a forthcoming visit. .32) Certificate was presented to H T ALLAN on 16.4.1942 when he was awarded an OBE by King George VI. .33) Document details H T ALLAN's relinguishing of Command of the HQ of Pacific Islands Regiment. ALLAN also relinguished the rank of temporary Colonel & was transferred to the Reserve of Officers with rank of substantive Lt Colonel. .35) Official letter to Colonel H T ALLAN from Joseph Francis, Minister for the Army. The letter acknowledges Col ALLAN's long & distinguished career during both peace & wartime. .36) a) & b) From H T ALLAN (assumed) to Prime Minister J B CHIFFLEY referring to the production of copra in New Guinea, the actions of the Commonwealth Bank in relation to planters & the collaboration of New Guinea natives with the Japanese. Assumed to be a copy of original. .37) Letter to H T ALLAN indicating he had been placed on the Retired List with the rank of Honorary Colonel. .38) Letter invites H T ALLAN to officially open the State Conference in Lae in late March or early April 1958. Invitation was extended due to H T ALLAN for distinguished service in PNG. .39) Letter to H T ALLAN thanking him for accepting the invitation to open the Papua & New Guinea State Conference in late March or early April 1958. .40) Letter from H T ALLAN to Lt Gen Sir Henry WELLS, Chief of the General Staff, Victoria Barracks, Melbourne. ALLAN requests permission to wear his uniform for official engagements during his upcoming visit to New Guinea. ALLAN also offers advice on how to deal with native troops including serving time with them, learning their language & studying their customs. He suggests that this would help quell & dissent & revolt. .41) Reply from Major General DALY to HT ALLAN thanking him for his offer to spend time with the CO of the Pacific Island Regiment to address concerns with that unit. This meeting would coincide with ALLAN's upcoming visit to PNG. .42) HT ALLAN's reply to Major General T J DALY's letter of 26.2.1958. ALLAN requests an opportunity to discuss PIR issues with Major General DALY prior to his visit to PNG. .43) Major General T J DALY's reply to HT ALLAN's request for a meeting to discuss ongoing issues with the Pacific Island Regiment. .44) Letter from HT ALLAN to Brigadier D M CLELAND notifying him that he will be staying in Port Moresby on his way to the RSS&AILA Congress in Lae. .45) Lieutenant Colonel MCGUINN writes to invite Colonel ALLAN to visit the PIR during his visit to New Guinea at the end of March of the beginning of April 1959. .46) Letter of appreciation to H T ALLAN thanking him for his efforts in presenting the case for the Territory of New Guinea during the post WWII transition period. .47) Letter to H T ALLAN from New Guinea Citizens Association, Lae Branch, thanking him for his service on behalf of the people of the Territory of New Guinea. The association offered to send ALLAN a suitable present in recognition of his service. .48) Major General T J DALY's reply to HT ALLAN's suggestions for handling disquiet amongst the native troops in the Pacific Island Regiment. .49) Reply from Lieutenant General WELLS to H T ALLAN granting him permission to wear his uniform on his forthcoming visit to New Guinea. WELLS also notes that he has passed other requests made by ALLAN to Major General DALY. .50) Copy of H T ALLAN's reply to Lieutenant General WELL's letter of 24.2.1958 [.49)]. .51) A written account of Colonel H T Blue ALLAN's visit to New Guinea in 3.1958. Article appeared on p.65 & 67 of the 6.1958 edition of Pacific Islands Monthly. .52) Newspaper account of Colonel H T Blue ALLAN's opening of the Rabaul Branch of the Native Ex Servicemen's Association. Colonel ALLAN spoke of the involvement of the Pacific Islands Regiment during WWII. .53) The Rabaul Times account of Colonel H T Blue ALLAN's opening of the Rabaul Branch of Native Ex Servicemen's Club. Featured on p1, concluded p3. .54) Biographical account of Colonel H T ALLAN's service in WWI & WWII. In addition an account of his success in New Guinea between the wars is included. .55) a.b. Biography of Colonel H T ALLAN written by R W Robson who was the founder of the Pacific Islands Monthly. Article was written following ALLAN's death on 23.5.1967 aged 72. This item is a pre publication copy of Robson's article which appeared in the Pacific Islands Monthly. .56) Text of a valedictory given at the funeral of Colonel Herbert Trangmar ALLAN OBE, MC, ED, NX12229 held 26.5.1967 following his death on 23.5.1967. The speech summarized his life in both wars & civilian life. 57) Invitation issued to Colonel H T & Mrs ALLAN to attend a Garden Party at Government House on 18.2.1954. At this function Colonel H T & Mrs ALLAN were to be presented to her Majesty Queen Elizabeth II.Herbert T ALLAN Collection. The contents are all of various size, the Album is the size documented. .1) Large teal green album containing 16 plastic pockets each with white card insert. Various documents & photos contained in each pocket. .2) Typed letter, black type on cream paper. .3) Certificate mounted on fawn card backed with dark brown veneer. Presented to Capt H T ALLAN MC for being mentioned in despatches on 7.11.1917. .4) New South Wales Birth Certificate extract, printed on pink paper with watermark. .5) Telegram on tissue paper to a sheet of cream paper. Pin located top L corner. Requests the attendance of Lt Herbert ALLAN, Russell Hotel, Russell Square. .6) Typed letter mounted on grey cardboard. .7) 2 page letter on foolscap paper, secured by pin top L corner. Written from France by Herbert (Bert) ALLAN & addressed to his father. .8) 11 pages secured with a clip top L corner. 1st document typed, 2nd handwritten, remainder printed. Relate to H T ALLAN's military exam results. .9) Typed letter from Department of Defence Base Records Office to P ALLAN. .10) Document, printed form to inform the recipient that their period of enlistment in the 1st AIF had expired. .11) 4 page handwritten letter on 2 sheets of paper. 1st page has a printed letterhead. .12) BR Form No 20. Typed formal letter from AIF Base Records Office to accompany Mentioned in Despatches oak leaves sent to the recipient. .13) Form AAFA36 used for recommending the awarding of an Efficiency Decoration. Form details service record & details of a serving soldier. .14) 1 large / 1 small page, numbered, detailing the service record of Lt Col H T ALLAN. Black type on cream paper. 2 pages are loose but evidence of attachment visible. .15) Bachelor of Arts Degree Certificate (testamur) granted by the University of Sydney, awarded to Herbert Trangmar ALLAN. Printed on cream parchment. .16) Proforma document issued by the Territory of New Guinea permitting leave & return to the Territory. Printed 2 sides, black type on cream paper. .17) Letter on Australian Imperial Force letterhead from Major General MORSHEAD to Major H T ALLAN. .18 Letter on HQ2 Aust Corps letterhead from Major General MORSHEAD to Major H T ALLAN. .19) Typed letter on External Territories letterhead from J R Halligan to H T ALLAN. .20) Cream Christmas card folded in 2, sent to H T ALLAN. On front in black lettering is HQ 20th Australian Infantry Brigade below black Rising Sun emblem. Inside in black lettering is With Best Wishes for Christmas and New Year. Christmas 1944. .21) Cream card folded in 2. Front illustration depicts a devil figure riding a platypus & carrying a pennant with 2/13 on it. The devil is depicted attacking a German & Japanese soldier. Below the devil is a boomerang with Greetings Xmas 1944 printed on it. Illustration is in green & black. Inside on LHS is a message from 2/13 Battalion. On RHS is a list of 2/13 battle honours from 1940-1943. On back in black print is 1944-1945 New Guinea Australia. .22) Cream Christmas card folded in 2. Front illustration in brown with word Greetings in green. RHS inside printing in green & brown letters. Artillery badge on back in brown. .23) Cream card folded in 2. Typed menu on cream paper attached inside. Front cover illustrated with 20th Infantry Brigade colour patch & a rat over a scroll with words - So What? .24) Cream card folded in 2. On front black printing accompanied by 2/17 Battalion colour patch that is black over green diamond shape. Inside a list of Toasts & Dinner Menu printed in black. Back page for autographs. .25) Cream invitation card. Black cursive script printing below gold crown on front. .26) Typed letter on cream paper. .27) Typed foolscap application form to claim the Africa Star. .28) & .29) Message form filled with typed orders. .30) Typed letter acknowledging an application for campaign medals & listing eligible awards. .31) Typed letter on bond paper. .32) Certificate on cream parchment. Black print in cursive script. Text details the awarding of an OBE to the recipient. .33) Typed text on Australian Military Forces letterhead. Cream paper. .34) Typed text. Temporary note for H T ALLAN's discharge from AMF. .35) Typed letter on Commonwealth of Australia, Minister for the Army letterhead. .36) a) & b) 2 page letter in black type on cream paper. Pages are loose, letter unsigned. .37) 1 page typed letter on Australian Military Forces letterhead. .38) & .39) 1 page typed letter on Return Sailors, Soldiers & Airmen's Imperial League of Australia, Papua & New Guinea Branch letterhead. .40) 1 page typed letter, unsigned. .41) Single sided typed letter on Australian Military Forces letterhead on cream paper. .42) 1 page typed letter, unsigned on cream paper. .43) Single sided typed letter on Australian Military Forces, Northern Command, Victoria Barracks, Brisbane letterhead on cream paper. .44) Single sided typed letter on cream paper. .45) 2 page typed letter on folded cream paper bearing the letterhead of the Pacific Islands Regiment. .46) 1 page typed letter on cream, lined paper. .47) 1 page typed letter on cream paper. .48) 1 page typed letter on Australian Military Forces, Northern Command Headquarters, Victoria Barracks, Brisbane letterhead on cream paper. .49) 1 page typed letter on Chief of General Staff, Australian Military Forces, Army Headquarters, Victoria Barracks, Melbourne letterhead on cream paper. .50) 1 page copy of an unsigned letter on cream paper. .51) Magazine article: Building a New Nation in New Guinea : Some advice from Colonel Blue ALLAN. Black & white article with a 2nd small section stapled to the main page. Large page features a black & white captioned photo of a group listening to a uniformed Officer deliver a speech. Also features advertising front & back. .52) Newspaper article: Official Opening of Native Ex Servicemen's Club. Black & white typed newspaper article featuring a captioned black & white photo of a uniformed Australian Officer & a group of New Guinea Ex Servicemen. .53) a. b. c. Newspaper article: Master Blue Came Back to the Islands: 4000 Attend Club Opening. 3 Section article cut from a newspaper. One part is the banner of the newspaper with date published. Other sections contain the text of the article. The larger section features a black & white photo of an Australian Army Officer in uniform. .54) Newspaper article, untitled. Black & white typed newspaper article with black & white caricature of an Australian Army Officer featured. .55) a. b. Magazine article: The Story of a Big Man who Loved Soldiering. 2 page black & white typed article with sub headings. .56) Text of a Speech. 2 page typed text written for a valedictory given at a funeral. Pages connected with a staple in the top L corner. .57) Printed, cream card invitation to a Garden Party for the recipient to meet Queen Elizabeth II & The Duke of Edinburgh. Text is in cursive script under the Coat of Arms of Her Majesty. .2) Signature ? Capt S C PIR. .4) Date of issue typed: 30.11.1954 Name of recipient: Herbert Trangman Allan Stamped: T Wells, Registrar General NSW .5) Handwritten: To Lt Herbert Allan, Russell Hotel, Russell Square. Typed: Buckingham Palace OHS. Your attendance is required at Buckingham Palace on Wednesday next the Twentyeighth inst (28.11.19?) at ten o'clock am service dress please telegraph acknowledgement Lord Chamberlain London. Stamped: Central District 24 NO 19. .6) Signed in pencil: W Birdwood. In pencil on back: 15 x 12. .8) p1: Handwritten signature. Copy dated 29.12.1915. p2 Handwritten in ink: P Allan Esq, Mount Hunter Hill. Military Examination. Copy dated 29.12.1915. Handwritten in pencil: Results: H T Allan. Tactics - Distinction 92% HE Barff p3 Underlined in ink: 38th Infantry Herbert Trangmar Allan to be 2nd Lieutenant (provisionally). Dated 16 June 1914. p5 Handwritten: Total 139. Lieut Allan tied with 15 others for 20 place. p7, 9, 10 & 11underlined in ink: H T Allan. p8 Underlined in ink: Allan HT. .9) & .10) Signature in black ink. .12) Handwritten signature in black ink: On back handwritten signature in black ink: Clive Wilkinson, Buddong, Robinson St, Chatswood. Also ? Rd, Cremorne Pt. .13) Handwritten in black ink: Details of HT Allan's Commission Service from 16.6.1914 - 18.2.1946. .15) Handwritten signature of the University Chancellor, Dean of Faculty of Arts & Registrar. Handwritten name of recipient. Seal of the University of Sydney imprinted bottom LHS. .16) Handwritten in black ink: Details of recipient. Stamped in red ink: New Guinea Customs. Stamped in blue ink: H M Customs, Cooktown, dated 17.12.1939. Handwritten on reverse: Signature. Stamped on reverse in red ink: New Guinea Customs, dated 15.12.1939. .17) & .18) Handwritten signature: Major General Morshead. .19) Handwritten signature in black ink: J R Halligan. .20) Handwritten inside in blue ink: Lt Col Allan. Good wishes from your many friends here. Signed by Major General Windeyer. .21) Inside LHS handwritten in blue ink: Lt Col Allan & an indecipherable signature. .22) Inside RHS handwritten: To Major (Blue) Allan OBE MC from Lt Col? .23) On front handwritten in blue ink: H T Allan?. Inside in black ink & pencil are 19 signatures. .24) On front: 3 signatures in black ink & pencil. On back: 36 signatures in black & blue ink & pencil. .25) On back handwritten in black ink: Colonel H T Allan OBE MC, with 3 ink lines below name. .26) Handwritten in blue/black ink: Signature. Handwritten in blue pencil top R corner: A32/3477. Handwritten in black ink bottom L corner: Cond (?) 15/9A. Handwritten in black ink: Signature. .27) Stamped top R corner: 2/17 Bn Received 9.2.1944. Signature in black ink: H T Allan. Signature in black ink: ? Lt Col 2/17 Aust Inf Bn 10.2.1944 Page bottom in pencil: Blue will keep 1 1/4 for you? .30) Handwritten: Details of eligible medals. Handwritten signature: J C K Miller Capt 7.3.50. Handwritten bottom L corner: Col H T Allan Bottom R corner: OBE, MC, 1914-19, Victory, ED, MID 1914-18, MID 1939-45 On back: Steak & Kidney Morris ) Clark ) Vowood ) 10/- 70215 Maughan ) Allan ) .31) Top of page: Imprinted Coat of Arms Top LHS in black ink: TOP SECRET AND PERSONAL Handwritten signature: Stanley Sauige .32) Embossed top L corner: Seal of the Most Excellent Order of the British Empire. Handwritten: Mary R. .32) Signed: Queen Mary, mother of George VI. .33) Handwritten signature. .34) Handwritten in blue ink: HERBERT TRANGMAR ALLAN 6 MAY 46 Handwritten signature. .35) Handwritten signature in blue ink: Joseph Francis, Minister for the Army. .37) Handwritten signature. .38) & .39) Handwritten signature: J W Knight. .41), .43) & .45) Handwritten signature in blue ink. .46) & .47) Handwritten signature in black ink: Henry G Eckhoff. .48) Handwritten signature in blue ink: With best wishes Yours sincerely T J Daly. .49) Handwritten signature in black ink: Yours sincerely H Wells. .57) Handwritten in black ink: Colonel & Mrs H T Allan.certificates, records, awards, administrative, compendium