Showing 2441 items
matching mounted print
-
 The Beechworth Burke Museum
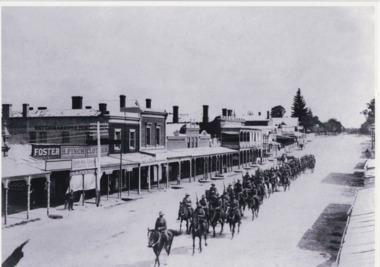
Photograph, 1908
Taken in 1908, the photograph depicts a long line of Australian soldiers riding atop horses. They marching down Ford St, Beechworth. This group were part of the Beechworth Mounted Rifles; a voluntary detachment of the Australian Light Horse Militia. This unit consisted of soldiers from the Euroa, Longwood, Violet Town, Benalla, Thoona, Wangaratta, Rutherglen, and Beechworth Detachments of Victorian Rifles, and subsequently formed into the 8th Australian Light Horse Regiment (Victorian Mounted Rifles). The Victorian Mounted Rifles was gazetted as a volunteer formation on 2 December 1885 with the aim of consolidating all the disparate calvary units dispersed across Victoria into a coordinated and single administrative and military unit. The Victorian Mounted Rifles fought in the Second Boer War (1889 - 1902), although it is unknown if the group depicted in this image were involved in the conflict.The photograph is historically significant due to its connection to the Australian Light Horse Regiment, specifically of the Victorian Mounted Rifles. This unit retains a special significance within Victorian culture, as there is a memorial and monument - erected in 1903 - honouring their service on St. Kilda Road in Melbourne. The record has strong research potential. This is due to the ongoing scholarly and public interest in war, military history, and the ANZAC legend. The historic context of this record can provide insight into Australia's history, military and defence policies. Lastly, as the Victorian Mounted Rifles remain a largely unexplored topic in comparison to other military units and divisions, the record presents a unique opportunity for further and important study and research.Black and white rectangular photograph printed on matte photographic paper.military album, military, war, wwi, world war i, beechworth, ford st, parade, horses, mounted rifles, soldiers, victorian mounted rifles, australian light horse militia -
 Flagstaff Hill Maritime Museum and Village
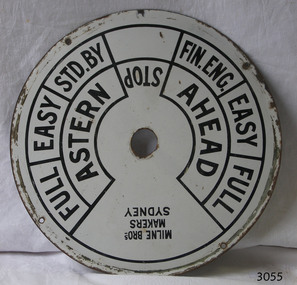
Equipment - Ships' Telegraph section, Milne Brothers, Copper and Brass Works, Early-to mid-20th century
This Engine Room section of a ship's telegraph system was part of the equipment of the Ports and Harbour ship the SS Rip. The vessel serviced and maintained the lights and buoys at Port Phillip Bay and Queenscliffe. The SS Rip was possibly the former gunboat "Albert". The ship’s communication system that was used from the late 19th century to early-to-mid-20th-century is called an Engine Order Telegraph (E.O.T.) or ship’s telegraph. The system has two parts, the Bridge Section and the Engine Room Section. The Bridge Section is usually mounted on top of a pedestal, and the Engine Room Section is often attached to a vertical surface. The standard commands printed or stamped onto the dial are the directions of AHEAD and ASTERN, and the speeds of STOP, FULL, EASY, STD. BY. and FIN. ENG. The ship’s pilot on the Bridge of a vessel sends his Orders for speed and direction to the to the Engine Room with the E.O.T. He moves the lever or levers, depending on the number of engines the ship has, to change the indicator on the Bridge Section’s dial to point in the new direction and speed of travel. This change causes the Orders to be duplicated on the Engine Room Section’s dial and a bell to signal the change simultaneously. The engineer then adjusts the ship’s engines and steering equipment to follow the pilot’s Order. The manufacturer, Mulne Bros., was a copper and brass works at 166 Sussex Street Sydney, in December 1892, and previously from 1870 at 128 to 130 Sussex Street. The company made and sold a wide range of equipment including machinery and gauges for the Railways.The Engine Room section is significant for being part of the communications system on the ship SS Rip, owned by Melbourne's Ports & Harbours department and used to service and maintain the navigation signals of Port Phillip Bay and at Queenscliffe in the mid-20th century. The dial is an example of marine equipment made in Australia and used for the safety of Victorian vessels. It is also significant for being made by an early Australian manufacturer, Milne Brothers of Sydney.Engine Room Section of a ship’s telegraph or Engine Order Telegraph (E.O.T.). The round metal dial has inscriptions stamped around the edges. The inscriptions are nautical terms for direction and speed and include the maker’s details. The dial was made by Milne Bros. of Sydney. It was part of the equipment on the "SS Rip" in Victoria.Black paint around dial: "MILNE BROS. / MAKERS / SYDNEY" "FULL EASY STD. BY " "FIN ENG. EASY FULL" ""ASTERN" "STOP" "AHEAD"flagstaff hill, warrnambool, maritime museum, maritime village, great ocean road, shipwreck coast, marine technology, marine communications, engine order telegraph, e.o.t., ship’s telegraph, bridge section, engine room section, ship’s engine telegraph section, marine telegraph, milne bros., milne brothers, sydney, copper and brass works, ports & harbours ship, ss rip, gunboat albert, service ship, maintenance ship -
 Flagstaff Hill Maritime Museum and Village
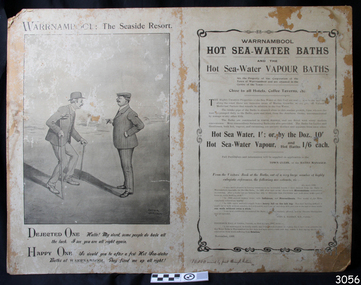
Poster - Recreation, Warrnambool Hot Sea Water Baths, c. November 1908
The poster includes a cartoon by Arthur Jordan, with a conversation between an ailing man and a good man after baths visits. There are several reviews dating from 1906 to 1908 extolling the healing powers of the baths' waters. In February 1877 a Baths Company (1050 shares) was formed in the town of Warrnambool for the establishment of the baths at the south end of Gillies Street. The baths were filled with sea water from Lady Bay, originally pumped by a windmill situated near the current Surf Lifesaving Club and carried by iron pipes to the Public Baths; later the water was pumped by gas motor. Hot and cold fresh water baths were advertised. The gentlemen’s bath was 100 feet long and 50 feet wide, of graduating depth. A second bath, solely for ladies, was 60 feet long by 30 feet wide. Hot Sea-water Baths were also part of the institution, and were sought after for their ‘wonderful curative powers’, and ‘incomparable’ as a ‘tonic for the feeble’. In June 1881 the Hot Sea Baths were opened, and both hot and cold water baths were supplied at reasonable charges. Patrons came from near and far to receive the benefits. The manager of the Baths was J. Kirkpatrick. The Baths Company struggled for several years without success so in 1883 the baths were sold to the Borough Council for 1250 pounds. The original shareholders received nothing for their outlay; the overdraught was over the sale price. In May 1884 the Council announced that an estimated they has spent 1000 pounds in improving the baths since purchasing them and were now returning an income of 11 per cent. The poster promotes the healing powers of the hot sea water baths that were in use in Warrnambool in the late 19th century through to the early 20th century. The baths were a place for fitness, health and social activity, an example of the recreational activities during this period.Poster, black and white, mounted on card. It shows advertising Warrnambool Sea-water Baths and Hot Sea-water Baths. There are several references promoting the health benefits of baths, dating from 1906-1908. The cartoon was sketched by Arthur Jordan. The poster was printed by The Thompson Printing Co. Warrnambool. Handwritten inscription on the lower edge.Handwritten "10,000 mailed by post through Victoria"flagstaff hill, warrnambool, shipwrecked-coast, flagstaff-hill, flagstaff-hill-maritime-museum, maritime-museum, shipwreck-coast, flagstaff-hill-maritime-village, warrnambool salt baths, warrnambool therapudic baths, arthur jordan, baths company, sea water baths, hot sea water, swimming, healing powers, warrnambool baths, advertisement, thompson printing co. warrnambool -
 Flagstaff Hill Maritime Museum and Village
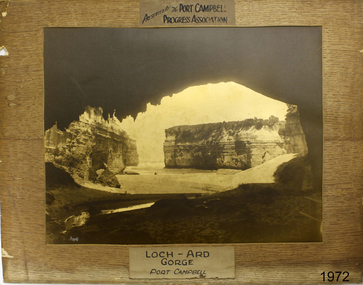
Photograph - Coastal Scene, Foyle Photographic Studio, Loch Ard Gorge Port Campbell, 1889-1919
The photograph shows the popular tourist attraction, Loch Ard Gorge, which is located along the Great Ocean Road in Victoria, near Port Campbell. The gorge is named after the famous sailing ship, the LOCH ARD, that was wrecked there in 1878. Only two of the 54 passengers and crew survived. FOYLE “Foyle” written on the photograph is the name of Foyle’s Photographic studio. At the time of the photograph, the studio was owned by both Charles and Lilian Foyle (sometimes known as Lillian or Lily), either of whom could have taken this photograph. They also worked together at a later date on the photographs, sketches and paintings of the famous and historical Pioneers’ Honour Board, which is currently on view in the Warrnambool Library. Foyles Photography was the studio of James Charles Foyle. He owned “Foyle’s Photo Card Studios” in Liebig St, Warrnambool, which operated between 1889 – 1919. A letter to the editor (by Mr Edward Vidler) in the Melbourne Argus, 3rd August 1907, mentions that in that year Warrnambool would celebrate the 60th anniversary of its proclamation as a town, and that talented local artist Miss Lily Foyle would paint 200 portraits in watercolour of the pioneers who settled in the district prior to 1860. The Pioneer Honour Board can still be seen on display in the Warrnambool Library. In the Warrnambool Standard, Dec. 1917, “Mr Foyle’s studio was awarded the contract to decorate rail cars on newly opened Trans-Continental railway, assisted by his sister, Miss Findlay.” HISTORY OF THE LOCH ARD The LOCH ARD belonged to the famous Loch Line which sailed many ships from England to Australia. Built-in Glasgow by Barclay, Curdle and Co. in 1873, the LOCH ARD was a three-masted square-rigged iron sailing ship. The ship measured 262ft 7" (79.87m) in length, 38ft (11.58m) in width, 23ft (7m) in depth and had a gross tonnage of 1693 tons. The LOCH ARD's main mast measured a massive 150ft (45.7m) in height. LOCH ARD made three trips to Australia and one trip to Calcutta before its final voyage. LOCH ARD left England on March 2, 1878, under the command of Captain Gibbs, a newly married, 29-year-old. She was bound for Melbourne with a crew of 37, plus 17 passengers and a load of cargo. The general cargo reflected the affluence of Melbourne at the time. Onboard were straw hats, umbrella, perfumes, clay pipes, pianos, clocks, confectionary, linen and candles, as well as a heavier load of railway irons, cement, lead and copper. There were items included that intended for display in the Melbourne International Exhibition in 1880. The voyage to Port Phillip was long but uneventful. At 3 am on June 1, 1878, Captain Gibbs was expecting to see land and the passengers were becoming excited as they prepared to view their new homeland in the early morning. But LOCH ARD was running into a fog which greatly reduced visibility. Captain Gibbs was becoming anxious as there was no sign of land or the Cape Otway lighthouse. At 4 am the fog lifted. A man aloft announced that he could see breakers. The sheer cliffs of Victoria's west coast came into view, and Captain Gibbs realised that the ship was much closer to them than expected. He ordered as much sail to be set as time would permit and then attempted to steer the vessel out to sea. On coming head-on into the wind, the ship lost momentum, the sails fell limp and LOCH ARD's bow swung back. Gibbs then ordered the anchors to be released in an attempt to hold its position. The anchors sank some 50 fathoms - but did not hold. By this time LOCH ARD was among the breakers and the tall cliffs of Mutton Bird Island rose behind the ship. Just half a mile from the coast, the ship's bow was suddenly pulled around by the anchor. The captain tried to tack out to sea, but the ship struck a reef at the base of Mutton Bird Island, near Port Campbell. Waves broke over the ship and the top deck was loosened from the hull. The masts and rigging came crashing down knocking passengers and crew overboard. When a lifeboat was finally launched, it crashed into the side of LOCH ARD and capsized. Tom Pearce, who had launched the boat, managed to cling to its overturned hull and shelter beneath it. He drifted out to sea and then on the flood tide came into what is now known as LOCH ARD Gorge. He swam to shore, bruised and dazed, and found a cave in which to shelter. Some of the crew stayed below deck to shelter from the falling rigging but drowned when the ship slipped off the reef into deeper water. Eva Carmichael had raced onto the deck to find out what was happening only to be confronted by towering cliffs looming above the stricken ship. In all the chaos, Captain Gibbs grabbed Eva and said, "If you are saved Eva, let my dear wife know that I died like a sailor". That was the last Eva Carmichael saw of the captain. She was swept off the ship by a huge wave. Eva saw Tom Pearce on a small rocky beach and yelled to attract his attention. He dived in and swam to the exhausted woman and dragged her to shore. He took her to the cave and broke and opened the case of brandy, which had washed up on the beach. He opened a bottle to revive the unconscious woman. A few hours later Tom scaled a cliff in search of help. He followed hoof prints and came by chance upon two men from nearby Glenample Station three and a half miles away. In a state of exhaustion, he told the men of the tragedy. Tom returned to the gorge while the two men rode back to the station to get help. By the time they reached LOCH ARD Gorge, it was cold and dark. The two shipwreck survivors were taken to Glenample Station to recover. Eva stayed at the station for six weeks before returning to Ireland, this time by steamship. In Melbourne, Tom Pearce received a hero's welcome. He was presented with the first gold medal of the Royal Humane Society of Victoria and a £1000 cheque from the Victorian Government. Concerts were performed to honour the young man's bravery and to raise money for those who lost family in the LOCH ARD disaster. Of the 54 crew members and passengers on board, only two survived: the apprentice, Tom Pearce and the young woman passenger, Eva Carmichael, who lost all of her family in the tragedy. Ten days after the LOCH ARD tragedy, salvage rights to the wreck were sold at auction for £2,120. Cargo valued at £3,000 was salvaged and placed on the beach, but most washed back into the sea when another storm developed. The wreck of LOCH ARD still lies at the base of Mutton Bird Island. Much of the cargo has now been salvaged, and some of it was washed up into what is now known as LOCH ARD Gorge. Cargo and artefacts have also been illegally salvaged over many years before protective legislation was introduced. One of the most unlikely pieces of cargo to have survived the shipwreck was a Minton porcelain peacock - one of only nine in the world. The peacock was destined for the Melbourne International Exhibition in 1880. It had been well packed, which gave it adequate protection during the violent storm. Today, the Minton peacock can be seen at the Flagstaff Hill Maritime Museum in Warrnambool. From Australia's most dramatic shipwreck it has now become Australia's most valuable shipwreck artefact and is one of very few 'objects' on the Victorian State Heritage Register.Flagstaff Hill’s collection of artefacts from LOCH ARD is significant for being one of the largest collections of artefacts from this shipwreck in Victoria. It is significant for its association with the shipwreck, which is on the Victorian Heritage Register (VHR S417). The collection is significant because of the relationship between the objects, as together they have a high potential to interpret the story of the LOCH ARD. The LOCH ARD collection is archaeologically significant as the remains of a large international passenger and cargo ship. The LOCH ARD collection is historically significant for representing aspects of Victoria’s shipping history and its potential to interpret sub-theme 1.5 of Victoria’s Framework of Historical Themes (living with natural processes). The collection is also historically significant for its association with the LOCH ARD, which was one of the worst and best-known shipwrecks in Victoria’s history. Foyle's photographs date from the late 19th century to the early 20th century, representing a time of growth in the Warrnambool district and a time when the still relatively new technology of photography was more available to the community.Photograph of Loch Ard Gorge. This sepia coloured rectangular photograph is mounted on a brown cardboard backing that has a wood grain pattern. The photograph has an inscription above it, below it, and in the bottom left corner. It was made for the purpose of a presentation by the Port Campbell Progress Association. Printed above the photograph "PRESENTED BY THE PORT CAMPBELL / PROGRESS ASSOCIATION". Printed below the photograph "LOCH ARD GORGE / PORT CAMPBELL". Hand written on bottom left corner "Foyle". flagstaff hill, warrnambool, shipwrecked coast, flagstaff hill maritime museum, maritime museum, shipwreck coast, flagstaff hill maritime village, great ocean road, loch line, loch ard, captain gibbs, eva carmichael, tom pearce, glenample station, mutton bird island, loch ard gorge, photograph, port campbell, port campbell progress association, foyle photograph, foyle photographic studio warrnambool, warrnambool photo studio -
 Flagstaff Hill Maritime Museum and Village
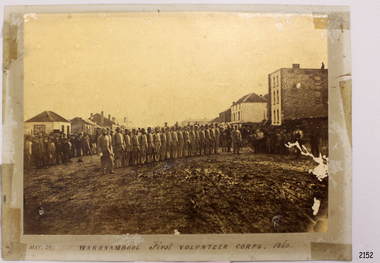
Photograph - Military group, Warrnambool First Volunteer Corps 1860, Taken May 24th, 1860, presented to Mayor in 1887
This Photograph is one of a number of photographs of the Warrnambool Militia. The photograph entitled "Warrnambool First Volunteer Corps" is dated 24th May 1860. (The First Volunteer Corps began in 1855.) It was presented by James Astley Bromfield (former Mayor of Warrnambool) to Major Walter Helpmann, head of Warrnambool’s 1st Volunteer Corps in 1887. The photograph shows the Corps lined up for inspection in Timor Street, Warrnambool. The location is outside what is now the Archie Graham Centre and the camera is looking west towards Liebig Street. The town band is in the right rear corner and spectators surround the Corps. The names listed on the back of the photograph are "1. R.Bushe (Captain in command), 2. Basil Spence, 3. Thomas Mickle, 4. Alfred Davies (Sergeant), 5. Cawthray, 6. Andrew Kerr, 7. Charles Scoborio, 8. Lacy, 9. James Hider, 10. D. O’Mullane, 11. William Norman, 12. Crouthers (or Cowthers ?), 13. Francis Breckon, 14. Russ, 15. Benjamin Wycherley, 16. C. A. Cramer (Sergeant), 17. James Coulstock, 18. Robert Newton (Sergeant), 19. J.A. Bromfield, 20. Singleton (supernumery), 21. Mostyn (Drill Instructor)," On the left of the picture is Billy Adams, Barnes (road contractor) and James Mason (Bootmaker). On the right of the picture is The Band. This is one of a collection of photographs showing the development of the Warrnambool Militia from its inception as the First Volunteer Corps in 1855. The collection is of local significance as it parallels the development of the town and includes images of significant local people. A number of Warrnambool streets are named after members of the Militia. It is also historically significant because of its connection to the unrest that was taking place in Europe at this time. Photograph of Warrnambool First Volunteer Corps 1860, sepia coloured, mounted on cream card. The photograph shows the Corps lined up for inspection in Timor Street Warrnambool. The location is outside what is now the Archie Graham Centre and the camera is looking west towards Liebig Street. The town band is in the right rear corner and spectators surround the Corps. Photograph taken 24th May 1860. Has names listed on reverse side. The protograph was presented to Mayor Helpman, by Bromfield, May 1887. Title printed below base of photo on the mounting board "May. 24. WARRNAMBOOL First VOLUNTEER CORPS. 1860" On the back of the photograph is a numbered list of names, handwritten in ink. Also on the back are presentation details "Presented to Mayor Helpman, by Bromfield, May 1887". warrnambool, wolunteer corps, militia, helpmann, bromfield, flagstaff hill, shipwrecked coast, flagstaff hill maritime museum, maritime museum, shipwreck coast, flagstaff hill maritime village, great ocean road -
 Mission to Seafarers Victoria
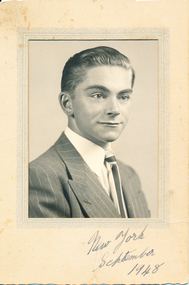
Photograph - Photograph, Black and white, Knox Studios, New York September 1948, September 1948
This is a portrait of Allan Quinn, taken during a visit to New York, U.S.A, in September of 1948, when he was 20 years old. This is one of the few portraits of Allan, professional or otherwise, in the collection.This is a photograph from the Allan Charles Quinn collection which is a collection of letters and photograph depicting aspects of life at sea for a young man in the era immediately following World War II.A black and white portrait photograph of Allan Quinn as a young man. It is mounted on a cream cardboard frame, with a pale blue ornate border around the image. The photograph is held in place with clear and coloured tape. The top edge of the cardboard has been roughly cut, and the bottom edge has been cut with a wave design.Front, right hand bottom corner: NEW YORK / SEPTEMBER / 1948 handwritten in faded blue/black ink. On the reverse is tape printed with the Knox Studio logo.allan-quinn, photograph, portrait, new-york, 1948 -
 Mission to Seafarers Victoria
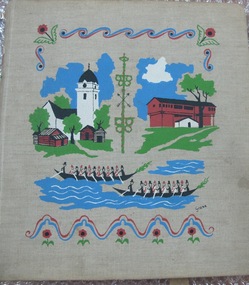
Album - Photographic album, Ports of call with the M/S Mongabarra from December 1st 1949 to July 23rd 1950, 1949
The album tells the story of ports visited by Allan Charles Quinn during his service on board the M/S "Mongabarra". He signed on in San Francisco on December 1, 1949. Note this trip overlapped with the Album (00278) which documents the next trip Quinn made to Africa out of Gothenburg. The album preserves a 1950s perspective of a Merchant Seaman and his experience of the respective Ports at that time. The Collection is especially useful when viewed along with contemporary Quinn family correspondence.Album with metal Metal binder rings at spine and beige fabric cover with gouache printed colour design featuring scandinavian buildings. The album contains 25 pages of b/w mounted photographs. Some are missing. The cover is illustrated with colour screenprinted pictures of a white tower on the left and a brown Barn-like building on the right. There are stylised canoe boats containing rowers in the foreground.. On the inside front cover is a handwritten itinerary of the places visited.On front cover possible designer printed signature in black: "Grane"; On inside front cover on adhered sheet of paper in aqua ink lists intinerary/ index of 20 Ports visited: Title (see above) / "Signed on in San Francisco December 1st 1949 / " then a header line for 4 columns: " PORT COUNTRY ARRIVED DEPARTED / 1. San Francisco U.S.A 10-10-49 4-12-49 / ... / 10. ADELAIDE ... 11-4-50 19-4-50 / .../ 20. HALDEN NORWAY 23-7 - 50 25-7-50" ; Most of the photographs in the Album also annotated and dated ; inside back cover has an embossed letter R.album, photograph, ms mongbarra, san francisco, dunkirk, voyages, allan quinn, barbara quinn, seafaring life, ww2, seafarer, melbourne, sydney, brisbane, san pedro, newcastle, adelaide, port pirie, port lincoln, cape town, las palmas, australia, south africa, canary islands, usa, united states, france, antwerp, belgium, hull, england, hamburg, germany, copenhagen, denmark, gothenburg, norway, sweden, halden, malmö -
 Mission to Seafarers Victoria
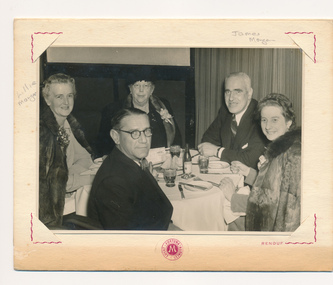
Photograph - Gelatin silver photograph, c. 1960
... with three unidentified friends. The printed image is professionally..." Insignia of the restaurant is printed beneath the photograph ...The photograph shows five seated individuals dining at Marios' restaurant in Carlton, Melbourne. The ladies are wearing finery and corsages which suggests that this may have been a post-marriage celebration following the wedding of Lillie and James Morgan. Their marriage certificate records the date as 26th of April, 1969.This is a photograph of social and historic significance, being part of a sub-collection of material that provides a snapshot of the type of individuals involved in the Ladies Harbour Lights Guild and the activities carried out by that organisation. The image is also an insight into fashions of the time as well as into the relationship between Lillie and James.A professional photograph of Lillie Morgan (nee Duncan) and husband James Morgan dining at Marios' restaurant in Melbourne with three unidentified friends. The printed image is professionally mounted in a Marios' display folder.The front of the display folder reads "Greetings from Marios' Continental Restaurant Melbourne - Australia" Insignia of the restaurant is printed beneath the photograph and the photographer's name 'Renouf' is printed alongside. On the reverse "Fully air-conditioned" and "Photography by Renouf of Marios'" is printed in red ink. There is also a sketch in blue biro of a cat and a horse and rider.lillie duncan, lillie morgan, james morgan, marios', 1960s -
 Mission to Seafarers Victoria
Photograph - Photograph, Black and white, early 20th Century
Headstone inscription: "In Affectionate Remembrance / EBENEZER JAMES / late Chaplain to the Naval Forces of Victoria / and / The Victorian Seamen's Mission/ This stone is erected / by Friends of all nationalities and creeds as a mark of esteem for his unselfish and consistent Christian efforts for the social and moral advancement of our sailors/ and / in recognition of.... his indefatigable and praiseworthy exertions the stamping out in Victoria of the cruel degrading maritime curse of crimping was mainly due. / Born 11th of March 1841 Died 14th of July 1901/ "A good deed is never lost. He who sows / courtesy reaps friendship and he who plants kindness gathers love." Basil. The Headstone was found at the Melbourne Cemetery, Carlton in 2016. Rev James worked at Port Melbourne and Williamstown Missions but was also a regular visit to Geelong and other coastal ports and beside encouraging fortnightly entertainments and Chapel services, actively shipvisiting to meet with Seamen.This image documents in full the inscription on this commissioned marble headstone marking the grave of a significant figure, the second Chaplain at Port Melbourne, and an important figure in the development and story of not only the Mission to Seafarers in Victoria but also in the life of the Naval Force of Victoria prior to Federation. Rev James was not only an influential figure in the stamping out of crimping, the exploitation of seamen, but also actively worked with government and community to improve the quality of life by active lobbying for the controlled licensing of hotels and liquor sources to limit the incidence of drunkeness rife in the Ports and Wharves of Victoria in the late 19th Century. See also MTSV 0030Large Sepia photograph on paper mount features an Inscribed marble Headstone and grave with a stone facing and surround supporting low decorative cast iron railing. There are flowers and ferns on the grave.Across edge of grave in White upper case: J ROBINSON CARLTON appears to be over printed, the Sepia image may be a copy of an original photograph. Inscription on the headstone can be read, see full wording below in History field. on the paper mount below lwr edge of Photograph: "T. TENNENT 'PHOTO-GOLD TS' COLLINGWOOD"ebenezer james, chaplains, seamen exploitation of, naval force, victoria, melbourne cemetery, carlton, maritime crimping, ebenezer james (1841 - 1901), carlton, mission to seamen, seamen's mission, mission to seafarers -
 Ringwood and District Historical Society
Print - Sketches, Ringwood Technical School 30th Anniversary Sketches 1988 by Glenn Duncan
ABOUT THE ARTIST: (Source: Details accompanying the prints, published in 1988 - courtesy Liz Seaton). Glenn Duncan was born around the time that plans for a technical school at Ringwood were being made. For his primary and secondary education, he attended Blackburn North Primary School, and Blackburn and Box Hill North Technical Schools. At tertiary level, he completed a Diploma of Art and Design at Caulfield Institute of Technology, followed by a Diploma of Education at Hawthorn Institute of Education. Glenn worked in printeries, design studios and advertising agencies, and as a freelance Graphic Designer. His teaching career included 3 years at Goroke Consolidated School, and then, from 1986 to 1988, as a member of Ringwood Technical School's Art Department. Glenn Duncan's sketches are a unique tribute to the school on the occasion of its 30th anniversary.Set of 12 prints of sketches of School Buildings and grounds by Resident artist at the school Glenn Duncan. 8 prints are on yellow paper. 4 are mounted on backing boards taken from frames. The image of the Artist's profile is a scan of a sheet accompanying the sketches. See the Title for each image -
 Ringwood and District Historical Society
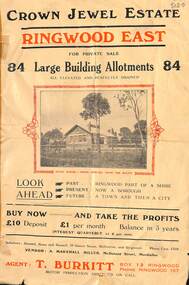
Flyer, Subdivisional Land Sale Brochure, Crown Jewel Estate, Ringwood East, Vic. - c.1925
In May 1884, George Smart of Bulleen Road Kew, brickmaker, bought the 23 acres one rood and twenty nine and three tenths perches, or 9.4834 hctares from Arthur Bailey Clements of Ringwood for the sum of 600 pound sterling. (Extract from The Story of the Crown Jewel Estate in Ringwood East pdf)Double sided folded page with black and red print on both sides advertising auction sale of residential and business sites and highlighting local facilities, services and layout of the estate.Subdivision includes Mount Dandenong Road, Valda Avenue, Evon Avenue, Mirabel Avenue, and Velma Grove. (Agent) T. Burkitt, Box 12 Ringwood, Phone Ringwood 157. Vendor: A. Marshall Miller, McDonald Street, Mordialloc. Solicitors: Russell, Bona and Russell, 19 Queen Street Melbourne, and Ringwood - Phone Cent. 4308. -
 Bendigo Military Museum
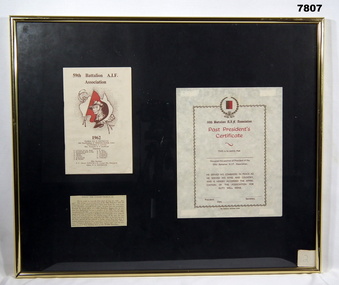
Certificate - CERTIFICATE, FRAMED, 59TH BATTALION, 1962
Certificate, booklet and information article framed together. Certificate - red and brown print on cream coloured paper. This is a "59th Battalion AIF Association/ Past President Certificate" Booklet - red and brown print on cream coloured paper. Title on front "59th A.I.F. Association/1962" Article - black ink print on cream paper with the title "WHAT THE COVER DESIGN IS". Frame - gold coloured aluminium, with black coloured cardboard backing mount, glass front and MDF board on back.framed accessories, certificate, 59th battalion, 8/7 rvr -
 Bendigo Military Museum
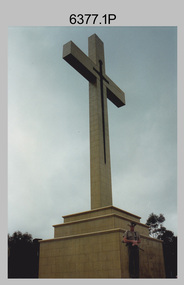
Photograph - Army Survey Regiment Mount Macedon Memorial Cross Ceremony, 1995
This set of six colour photographs of a Catafalque Party from the Army Survey Regiment was taken at the Mount Macedon Memorial Cross on the 19th of November 1995. The ceremony was held to commemorate the 60th anniversary and the refurbishment of the site. The refurbishment entailed the complete replacement of the cross and its surrounds. The cross is also known as the Cameron Memorial Cross and was built in 1935 as a memorial for those who lost their lives in the First World War. The Guest Speaker was Mr Bruce Ruxton AM MBE OBE, who at the time was the president of the Victorian RSL. He served in the 2/1st Australian Topographical Survey Company in WW2 before reallocation to the 2/25th Australian Infantry Battalion. He was the president of the Victorian RSL from 1979 to 2002 and was a staunch vocal advocate for the health and welfare of war veterans and their families. Refer to the Wikepedia web site for more detail on the history of the Mount Macedon Memorial Cross and Mr Bruce Ruxton AM MBE OBE.This set of six colour photographs of a Catafalque Party from the Army Survey Regiment was taken at the Mount Macedon Memorial Cross on the 19th of November 1995. The photographs were printed on photographic paper and are part of the Army Survey Regiment’s Collection. The photographs were scanned at 300 dpi. .1) - Photo, colour, 1995. Mount Macedon Memorial Cross Ceremony, SPR James Commons in foreground. .2) - Photo, colour, 1995. Mount Macedon Memorial Cross Ceremony, Guest Speaker - Mr Bruce Ruxton AM MBE OBE. .3) - Photo, colour, 1995. Mount Macedon Memorial Cross Ceremony, SPR Katie Royce, unidentified soldier in background. .4) - Photo, colour, 1995. Mount Macedon Memorial Cross Ceremony, James Commons. .5) - Photo, colour, 1995. Mount Macedon Memorial Cross Ceremony, L to R: SSGT Peter Coles, SPR James Commons. .6) - Photo, colour, 1995. Mount Macedon Memorial Cross Ceremony, SPR James Commons. Each photo is annotated ‘Mt Macedon Memorial Cross Ceremony 19 Nov 95. Mr Bruce Ruxton AM MBE, OBE, SSGT Peter Coles, SPR Katie Royce and SPR James Commons are identified on the photos. royal australian survey corps, rasvy, army survey regiment, army svy regt, fortuna, asr -
 Bendigo Military Museum
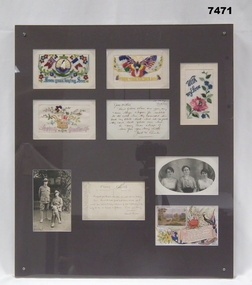
Postcard - POSTCARDS - FRAMED WW1, Postcards WW1- Frame c2008/09
Refer Cat No. 1280 for Jack Grintons service, Cat No 1320P for Bert Grinton DCM.Postcards - collection top to bottom - left to right. Nine (9) cards. Top left: cardboard, insert coloured silk embroidery on cotton, flowers, flags, sailing boat, greeting. Middle: cardboard, inset coloured silk with embroidery on cotton, butterfly, greeting. Right: cardboard, inset coloured silk embroidery on cotton, flowers, greeting. Second row left: cardboard, inset coloured silk embroidery on cotton, basket of flowers, greeting. Middle: cardboard, handwritten greeting and note in black ink. Bottom row left: black and white photograph postcard, cardboard. Two soldiers in uniform. Middle: cardboard, handwritten greeting and note in black ink. Bottom row - top right: black and white photograph postcard, three women. - Lower right - colour printed postcard, with flowers, flags, painting and "Good Luck and Coo-ee" greeting on scroll. Frame - Perspex front, screwed to brown painted MDF backing board. Dark brown mount, cardboard.Greeting silk embroidery. "From your loving son" From your Soldier Boy", "With my love". "Loving Greetings". Handwritten greeting in black ink. 2nd row middle Dated “21.10.17", frame/ “Dear Arthur/ love from your loving brother/ Jack W. Grinton" Bottom Row: Middle - "From your loving/ brother/ Albert V. Grinton". framed accessories, camera on the somme, ww1, 38th bn, grinton -
 Bendigo Military Museum
Book - BOOK, WW1, Lindsay Baly, "Horseman, Pass By", 2003
"Horseman, Pass By. The Australian Light Horse in World War 1".Soft cover book. Cover - cardboard, white, red and grey colour print on front, spine and back. Front and back covers illustrated black and white photograph, a mounted division (of soldiers on horseback) march out. 337 pages, cut, plain white paper. Illustrated in black and white photographs, maps and diagrams.books, ww1, light horse -
 Bendigo Military Museum
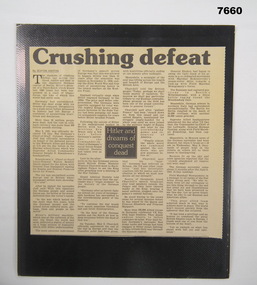
Newspaper - NEWSPAPER CUTTING OF DEFEAT OF GERMANY, "CRUSHING DEFEAT", Possibly 1945
Newspaper cutting, yellowed, printing is in black ink, the title is in large print. In the centre is a black square with the words “Hitler and dreams of Conquest dead”. Mounted on a black plastic board. ww2, german defeat, newspaper cuttings -
 Bendigo Military Museum
Book - BOOK, WW1, Paul DALEY, Beersheba, First published 2009. This edition published 2017
Information - on front cover - "CENTENARY EDITION/ BEERSHEBA/ TRAVELS THROUGH A FORGOTTEN AUSTRALIAN VICTORY/ PAUL DALEY/. A full-bodied, human telling of the deeds of the AUSTRALIAN LIGHT HORSEMAN/ TONY WRIGHT" On back cover. "It was a glorious triumph of arms for Australian/ Forces, a romantic moment of dash and bravura that/ stood out in the tragedy of World War 1. Yet it barely/ registers in Australia's national consciousness."Soft cover book. Cover - cardboard; black, gold and white print on front, spine and back. White background. Illustrated - front - black and white photograph of a trooper mounted on a horse with full kit. 339 pages, cut, plain, white paper. Illustrated - black and white diagrams of maps and centrefold collection of photographs. Inscription - front end paper.Front end paper - handwritten, black ink - donor's name and date, "Donated by Joy Wellings/ 16-8-2023".books, ww1, beersheba, australian army, light horse regiment. -
 Bendigo Military Museum
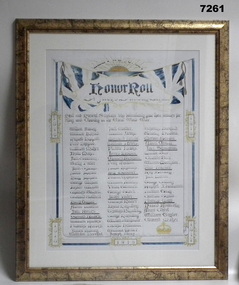
Honour Board - ST JUDES CHURCH HONOUR BOARD WW1, St Jude's Anglican Church, 16 Sept 2023
This item is a reproduction of the Honor Roll for WW1 servicemen associated with St Jude's Anglican Church, California Gully.Memorabilia - on paper, in colour, reproduction of an Honor Roll for WW1. Honor Roll - Servicemen associated with a Church. "LEST WE FORGET", printed above a Rising Sun with decorative banner. Three columns of names in gothic script, top half red, lower section black ink. Copy print very pale and hard to read. Mount - white cardboard. Frame - moulded MDF board with gold and black speckle effect paint, with perspex front. cardboard backing.Title to Poster "HONOR ROLL/ St Jude's Sunday School" Years printed 1914, 1915, 1916, 1917, 1918. Handwritten signature - black ink below names "J.H.B. Grilles."framed accessories, honour roll, anglican church, california gully -
 Bendigo Military Museum
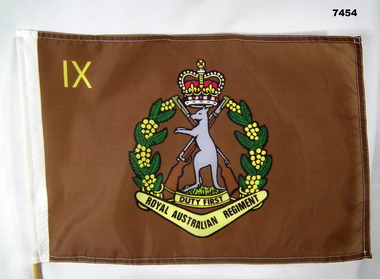
Flag - FLAG, 9 RAR
Possibly made for a 9 RAR reunion. Owner "Frank CHAMBERS" Vietnam, 9 RAR. ,Flag mounted on a timber dowel. Flag - brown polyester fabric, illustrated in colour, yellow, green, grey, brown and red, the regimental crest of 9 RAR.Printed on fabric - yellow and black print. "IX/ DUTY FIRST/ ROYAL AUSTRALIAN REGIMENT"flags, vietnam, 9 rar, frank chambers -
 Bendigo Military Museum
Uniform - SERVICE DRESS, RAAF, 2003
Items in the collection of SQD LEADER "SHANE WRIGHT". Enlisted RAAF 1982 Regiment number 0323963/ 8194842. Became radio technician on Electrical systems on Orion and F111. 1990 became Electrical Systems Specialist promoted to Sgt. 1996 Commissioned as an Officer. Postings: HQ Logistic Command. Aerospace Equipment Systems. OTS as Specialist Military Training Flight Command. 2005 Promoted Sqn Leader. Posted Executive Officer RAAF Williamtown. 2018 Discharged from RAAF.1. 2. 3. Service dress style, dark blue colour wool/polyester fabric. 1. Jacket - collar, four front patch pockets with button down flap. Buttons - gold colour plastic with shank and raised emblem - crown and wings - RAAF. On right pocket, metal RAAF Badge, above metal name badge. Above left pocket - service ribbons. Blue and yellow ribbon - long service with three rosettes, black, red, white ribbon - Defence medal. Sleeves - three rank stripes, black and blue ribbon. Lining - dark blue polyester fabric with concealed pocket. White colour cotton/polyester fabric. Manufacturers label inside left side. 2. Belt - fabric with gold colour plastic buckle with dark blue plastic buttons and strap belt keepers. 3. Trousers - waist band with belt loops, fob pocket, two side pocket and one inset back pocket. Nylon and metal zipper fly and metal closer. Lining - dark blue polyester fabric to waistband and pockets. White colour cotton/polyester fabric. Manufacturers label on back pocket lining.. 4. Shirt - light blue cotton/polyester fabric. Long sleeves, collar, shoulder epaulettes with fabric rank slides - 3 stripes, black and blue ribbon - Sqdn Leader. Top left sleeve - dark blue and white oval shoulder patch, embroidered - wings and "AIR FORCE". Clear plastic buttons. Manufacturers label - illegible. 5. Tie - dark blue colour necktie. polyester/wool. 6. Cap - peaked, Service dress Officer, dark blue colour fabric with black cloth band around exterior of cap. Black colour patent leather chinstrap secured by two gold RAAF buttons around the front half of the brim. RAAF badge on front, Queens Crown with red insert over gold coloured wings over laurel leaves. Interior - black sateen fabric with clear plastic lining. Brown leather look sweatband, White cotton manufacturers label.Manufacturers information - black ink print. 1. "A73/ADA/VICTORIA 2003/ NSN:/ NAME: / SERVICE NO:/ 70% WOOL, 30% POLYESTER/ LAUNDRY INSTRUCTIONS/ DRY CLEAN ONLY/ PRESS ON ORIGINAL CREASES/ USE DAMP CLOTH OR MEDIUM/ TO HOT STEAM IRON/ MADE IN AUSTRALIA" 3. "A72/ADA/ VICTORIA 2003/ NSN:/ NAME: SERVICE NO:/ 70% WOOL 30% POLYESTER/ DRY CLEAN ONLY/ MADE IN AUSTRALIA" 1. 3. Handwritten blue/black ink "S. WRIGHT/ 40594" 5. Black label white embroidered print "NOONE/ IMAGE WEAR/ MADE IN / AUSTRALIA/ 2002" 6. "MOUNT CASTLE PTY LTD/ BRISBANE 1999/ SIZE 59^". Handwritten black ink "S. WRIGHT"uniforms, raaf, service dress, shane wright -
 Bendigo Military Museum
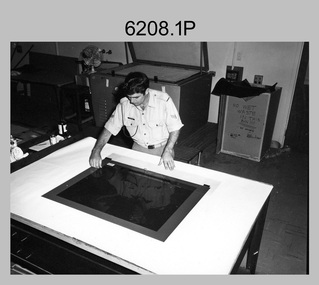
Photograph - Print Troop Equipment and Personnel, Lithographic Squadron – Army Survey Regiment, Fortuna, Bendigo, c1970s
This collection of 17 photos was most likely taken in Lithographic Squadron, Army Survey Regiment, Fortuna, Bendigo, c1970s. Although these photos are not annotated most personnel are positively identified. Some photos are cropped enlargements of previous photos. See item 6060.8P for more information and photos of platemaking. There is more information on the Ultra-MAN-III, Komoni and Planeta Printing Presses on pages 71 and 120 of Valerie Lovejoy’s book 'Mapmakers of Fortuna – A history of the Army Survey Regiment’ ISBN: 0-646-42120-4. For additional photos, refer to item 6062.4P for the Heidelberg press, item 6063.5P for the Komori press, item 6064.9P for the Planeta press and item 6065.10P for Ultra-MAN-III presses. In photos .11P to .14P the technician is applying a UV-sensitive pigmented dye emulating one of the map print colours to a white opaque polyester sheet mounted on a rotating table in a whirler. .12P and .14P are enlargements of previous photos. See item 6059.4P for more information and photos on the map proof making process. The Krause Wohlenberg operated by George Austen in photo .17P was a heavy-duty guillotine to trim bulk printed map stock in the c1970s and c1980s. See item 6069.6P for more information and photos of guillotine equipment.This is a set of 17 photographs of Print Troop personnel and equipment from Lithographic Squadron at the Army Survey Regiment, Fortuna, Bendigo, c1970s. The photographs were printed on photographic paper and are part of the Army Survey Regiment’s Collection. The photographs were scanned at 300 dpi. .1) - Photo, black & white, c1970s, Preparing printing plate, SGT Alvan Howard. .2) to.3) - Photo, black & white, c1970s, Preparing printing plate, unidentified technician. .4) - Photo, black & white, 1979, Planeta Polygraph Printing Press., L to R: SPR Peter Breukel, CPL Lance Strudwick. .5) - Photo, black & white, c1970s, Ultra-MAN-III Printing Press. .6) and .7) - Photo, black & white, c1970s, Ultra-MAN-III Printing Press, unidentified technician. .8) - Photo, black & white, c1970s, Newkoni Komori Printing Press, unidentified technician. .9) - Photo, black & white, c1970s, Original Heidelberg Printing Press, unidentified technician. .10) - Photo, black & white, c1970s, MANN flatbed proof press, unidentified technician. .11) to .14) - Photo, black & white, c1970s, applying dye to a whirl-on proof, unidentified technician. .15) and .16) - Photo, black & white, c1970s, applying diazo coat to a scribe sheet, CPL Colin Hardisty. .17) - Photo, black & white, c1970s, Krause Wohlenberg heavy-duty paper guillotine, George Austen.No personnel are annotated. .2P annotated ‘completed development on a negative working plate.’ .3P annotated ‘a wipe-on plate.’ .4P annotated ‘1979’. .12P annotated ‘Re-coating a proof with the next wanted colour on the vertical whirler.’ .13P annotated ‘has hardened (retained) area required. Done on a vertical whirler.’ .15P and .16P annotated ‘Preparing a sheet of scribe material with a Diazo (light sensitive) coating.’royal australian survey corps, rasvy, army survey regiment, army svy regt, fortuna, printing, litho -
 Bendigo Military Museum
Badge - BADGE, COLLAR, ARMY, Swan & Hudson
Part of the Kevin John Herdman, No. 397661, Collection. See Catalogue No. 5942P for details of his service record.RACT officer's collar badge. Badge is constructed of gold and silver plastic. Silver coloured laurel wreath is mounted on a gold coloured seven-pointed star. A Queen's Crown is located at the top of the star. Laurel wreath encloses a Royal Cypher and blue garter featuring silver lettering. Two metal pins on back for fastening to a collar.Printed on blue garter: ' ROYAL AUSTRALIAN CORPS OF TRANSPORT'. At bottom of wreath: 'PAR ONERI' Stamped on back: 'SWAN & HUDSON'.badge, uniform, royal australian corps of transport, kevin john herdman -
 Bendigo Military Museum
Uniform - BELT, LEATHER
The belt was gifted to Mr. Doug Paxton, of Neale Street, Bendigo c.1951. The donor was a "soldier": who billeted with the Paxton family. Correct date and soldier's name unknown.This is a leather belt, tan coloured. It is 42mm wide and has a brass buckle with one claw. The belt tongue has six holes. At the rear of the belt are two more holes. A larger section of leather is mounted behind the brass buckle.Belt - Printed on belt is an oval and inside the oval is stamped "Genuine Bridie Cowhide". On the left side of the oval are the numbers “217G”. On the right side of the oval are the numbers “36”. On the rear of the buckle, "Solid Brass" is stamped.uniform, leather belt and buckle, soldiers billet -
 Warrnambool and District Historical Society Inc.
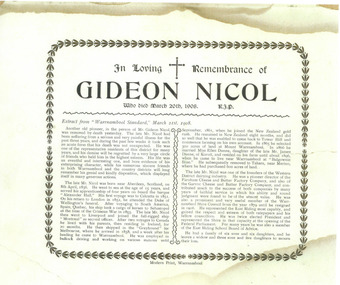
Document - Obituary Gideon Nicol, 2014
Gideon Nicol (1836-1908) was a seaman who came to Warrnambool in 1858. In 1865 he selected land at Mount Warrnambool. He was one of the founders of the Farnham Cheese and Butter Factory and the Garvoc Cheese and Butter Factory and was a Warrnambool Shire Councillor from 1879 to 1906. This scan will be useful to include in the Gideon Nicol fileThis is an A4 sheet of paper (scan). The obituary is printed in black and white with an ornate border with some discoloration on the outer edges.In Loving Remembrance of Gideon Nicol who died March 20th 1908, R.I.P. (an extract from the Warrnambool Standard follows)gideon nicol, warrnambool, gideon nicol obituary -
 Kiewa Valley Historical Society
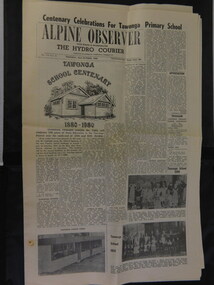
Alpine Observer Newspaper - 23 Oct. 1980 x2, 23 Oct. 1980
The Tawonga Primary School celebrated its centenary with a program including a fete, sports, family dance and combined church service over the weekend of the 25th - 26th Oct. 1980. The newspaper covers the Alpine Shire and included further articles that would interest visitors to the centenary.Tawonga School was one of the earliest schools in the Kiewa Valley supplying an education for the children of the local farming community. The Bogong Hotel at Tawonga, the Tawonga Butter Factory and the town of Mt Beauty articles were printed providing up to date historical information on prime locations nearby. Of interest as the Hotel has burnt down and the Butter factory no longer exists. Alpine Observer newspaper dated Thursday, 23 rd October 1980 with a sketch of the school and articles regarding the Centenary of the Tawonga School on the front page. (The paper consists of 12 pages ie. 6 sheets) 2 copies On page 4 is an article on the history of the Bogong Hotel at Tawonga On page 5 is an article on the history of the Tawonga Butter Factory and an article on the township of Mt Beauty.newspaper articles; tawonga primary school; bogong hotel; tawonga butter factory -
 Kiewa Valley Historical Society
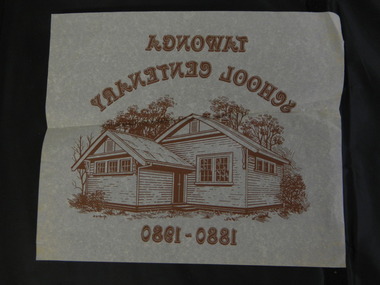
Transfers - Tawonga School Centenary, 1980
The Tawonga Primary School celebrated its centenary on 25 - 26th Oct. 1980 with a program including a fete selling clothing with the option of buying iron-on transfers of the school building.Tawonga School was one of the earliest schools in the Upper Kiewa Valley supplying an education for the children of the farming community. Iron - on transfers were popular at the time.Brown fancy print and sketch of Tawonga School building done back to front on stiff iron-on paper."Tawonga School Centenary at top." '1880 - 1980' at bottom'tawonga primary school; iron-on transfer -
 Kiewa Valley Historical Society
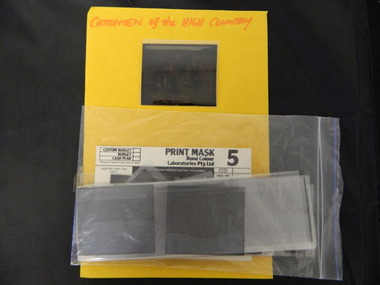
Photo Negatives of Cattlemen of the Bogong High Plains
Photos taken by a professional photographer on the Bogong High Plains.Photos were printed as post cards and sold to tourists.45 colored negatives of Cattlemen of the Bogong High Plains. In plastic strips in a plastic pocket and in a yellow envelope.On envelope: "Cattlemen of the High Country"cattlemen; bogong high plains; professional photographer -
 Kiewa Valley Historical Society
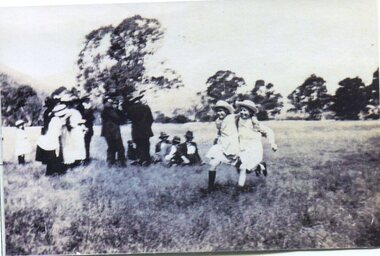
Photograph - Tawonga Sports Day
Tawonga is in the Kiewa Valley, where local farmers lived with their families. The Ryder and Briggs families have been prominent farming families in the local area since early settlement. Vera Ryder and Alli Briggs were pupils at Tawonga Primary School in the early 1920's. Their families were prominent in the settlement of the Kiewa ValleyCopy of black and white photograph of 3 legged race at Tawonga Sports Day circa 1920's (estimate only) Vera Ryder & Allie Briggs racing in the foreground. Various adults and children standing in the background.Printed label attached to rear. Tawonga Sports Day. Vera Ryder and Allie Briggs - 3 legged race. Girls have white aprons over their dresses.tawonga, sports day, kiewa valley farmers -
 Kiewa Valley Historical Society
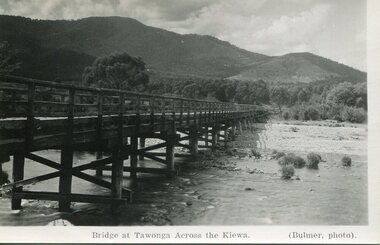
Photograph - Bridge at Tawonga 1936, 22/03/1936
First Tawonga bridge was built in 1884- destroyed by floods in 1916. New bridge constructed 1923 and destroyed in 1953. Present concrete bridge constructed in 1986 and named Ryders BridgeBridge construction over Kiewa River at TawongaBlack and white photographic postcard of the bridge at Tawonga across the Kiewa River.Handwritten in pencil on rear of photograph - Sunday 22nd March, 1936. Printed on front - Bridge at Tawonga across the Kiewa (Blumer, photo)tawonga bridge, kiewa valley -
 Kiewa Valley Historical Society
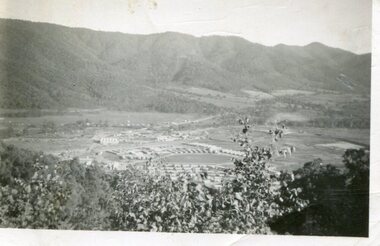
Photograph - Mount Beauty from Bogong Hill, 1950
The new State Electricity Commission construction camp at the head of the Kiewa Valley was for workmen on the second power station in the project expected to be the most modern and best equipped in Australia… In contrast to the early Kiewa days of horses and canvas tents, the new camp, with its modern amenities, compared favourably with any country town. Administration of the Kiewa Scheme was moved from Tawonga to Mount Beauty in 1946. The first house in Mount Beauty, in Hollonds Street, was occupied by the co-op store manager from November 1946. The new Mess Hall at Mt Beauty was opened with much ceremony in early November 1946. The houses up to Nelse street were erected from 1946 onward and then the township was extended beyond Nelse Street in 1950. The workmen's camp was enlarged in 1950 to the extent of providing accommodation for a total of 1,200.Shows early construction of the town of Mt. Beauty surrounded by farmland taken in 1950 during the early stages of construction of the Kiewa Hydro electric SystemBlack and white photograph - aerial view of Mt Beauty taken from Bogong Hill. Photograph framed by 6mm white boarder.Handwritten on back of photograph in black ink - Mt Beauty from Bogong Hill 1950 Printed on rear Volox 2428mt beauty, bogong hill, secv