Showing 5995 items
matching s. white
-
 Bendigo TAFE
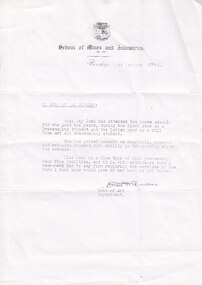
Reference, 14/10/1942
This is a reference written on 14th October, 1942, by the Head of the Art Department at the School of Mines and Industries Bendigo, Ernest H. Duncan, for a former pupil, Miss Ivy Jack. It is a complimentary reference assuring 'To Whom it May Concern' that Miss Jack 'is a fine type of girl possessing many fine qualities...' and that she has '...proved herself an energetic, careful and reliable student with ability in Dressmaking above the average.'This is significant in relation to the history of the Bendigo School of Mines and Industries. It gives an insight into the type of courses being offered by the school in 1942, as well as an insight into how references for individuals were written in the 1940's, as opposed to the way they are written in 2013. This significance has been assessed in-house.White paper photocopy of reference from Ernest H. Duncan, Head of Art Department of the School of Mines and Industries, Bendigo to Miss Ivy Jack, dated 14th October 1942. On School of Mines and Industries, Bendigo letterhead: "School of Mines and Industries, / No. 161 / Bendigo 14th October 1942. / TO WHOM IT MAY CONCERN: / Miss Ivy Jack has attended the above school / for the past two years,... /" Signed, "Ernest H. Duncan / Head of Art / Department."bendigo school of mines and industries, duncan, ernest h., jack, ivy, jack, shirley ivy, dressmaking, art department, 1942, reference -
 Bendigo TAFE
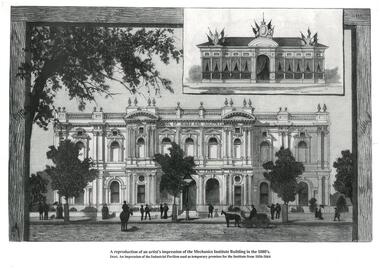
Print, A reproduction of an artist's impression of the Mechanics Institute Building in the 1880's, 20th Century
This is an artist's impression in reproduction of the Mechanics Institute building as it was in the 1880's. It has since changed quite significantly, especially what can be seen of the surrounds. The insert picture is an impression of the Industrial Pavilion which, as is stated, was used between 1856-1864 as temporary premises for the Institute. The print was first published in 'The Australian Sketcher' under the title "Sandhurst Mechanics Institute and free library: the new and old." [Go to the State Library of Victoria and the following link for more details.] http://www.slv.vic.gov.au/miscpics/gid/slv-pic-aab22020This is a significant print in an historical context, portraying the Bendigo School of Mines and Industries as it was in the 1880's, as well as the Industrial Pavilion. It indicates the significance of it to the community that an artist's impression was sought. Significance assessed in-house.A3 print on heavy paper. A reproduction of an artist's impression of the Mechanics Institute Building in the 1880's. The picture is of the building with an insert impression of the Industrial Pavilion used as temporary premises for the Institute from 1856-1864. It is a black and white print of the front of the building with rough depictions of people, horses, a carriage and trees in front of it."A reproduction of an artist's impression of the Mechanics Institute Building in the 1880's. / Insert. An impression of the Industrial Pavilion used as temporary premises for the Institute from 1856-1864"bendigo school of mines and industries, industrial pavilion, mechanics institute, bendigo, 1880, 1856-1864 -
 Maldon Vintage Machinery Museum Inc
Weighing Machine, 20th century
Used for many years outside the Pharmacy in the main street of Maldon.Avery upright weighing scale. Finished in white enamel with grey back plate. Weight is measured in pounds and stones. Platform is grey mosaic. Coin operated.Model No 3809 CFY Serial No S-621044instruments - weighing -
Maldon Vintage Machinery Museum Inc
One Ton Truck
Used in annual Maldon Easter parade.Graham Brothers flat bed one ton truck. In-line four cylinder engine. Blue body with white engine housing, red engine block, cream wheel trim and upholstery maroon chasis. Natural timber seat frame, tray and running boards. Chrome radiator housing and headlights. Retrofitted electric turning indicators.Etched plate on dashboard "1 Ton CAUTION Truck / Over-loading or over-speeding / will void your warranty / Speed 25 miles per hour / Maximum allowable load capacity 2000 lbs / Allowable for weight of body 1000 lbs / Total weight of chassis body -------- / and load not to exceed 5515 lbs / deduct excess body weight from rated load / Graham Brothers Detroit. U. S. A. / A division of Dodge Brothers Inc." On cast wheel hub nuts "GB" -
Maldon Vintage Machinery Museum Inc
Booklet
Paper covered booklet illustrated with photographs in black and white listing Thompsons Engineering & Pipe Co. Ltd.'s work sites and offices in Australia and New Zealand and containing examples of types of equipment produced by the company.documents, pamphlets, trades, metal working, engineering -
Maldon Vintage Machinery Museum Inc
Pens, Boxed
Set of 4 German made drawing pens and 3 attachments in a green plastic box with hinged clear plastic lid and white insert to hold items separately. In original white and green cardboard box.On box "S 1184 / 4N"trades, drafting -
 Surrey Hills Historical Society Collection
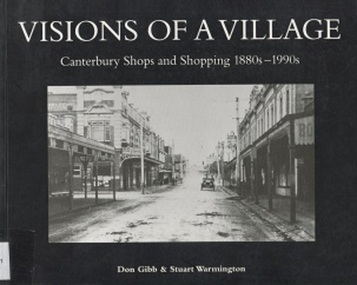
Book, Visions of a Village : Canterbury shops and shopping 1880s-1990s, 1995
Focussing on the growth and activities that took place in the shopping and service centre of Canterbury and Maling Roads in Canterbury from the 1880s to the present, it is partly a guide book to the present buildings of the centre through the streetscapes and brief lives of each of the premises.Focussing on the growth and activities that took place in the shopping and service centre of Canterbury and Maling Roads in Canterbury from the 1880s to the present, it is partly a guide book to the present buildings of the centre through the streetscapes and brief lives of each of the premises. illus. of streetscapes, indexshops, canterbury, maling road, (mr) george robinson, rochester road, j weymouth, railways, m white, hindson buildings, (mrs) - hillier, f g wilson, s huckerby, g cox, (mr) george cornell, lawson brothers, retail trade, commercial development -
 Surrey Hills Historical Society Collection
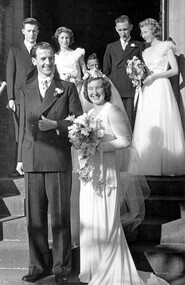
Work on paper - Photograph, Margaret Black's wedding 1st May 1948, 1948
Margaret Johnson was born and raised in the country. She came to Melbourne to attend secondary school at age eleven. She stayed with the family of her uncle, Dr Carrington, in their home / surgery still located at 174 Union Road, the Surrey Hills Medical Centre. Later, whilst waiting to commence her kindergarten training course, she met Jessie Black and they became firm friends and it was through Jessie that Margaret met Jessie’s brother and her future husband, Thorby Black. The Black family had been residents of Mont Albert for many years and Thorby was in the air force at the time. Margaret and Thorby were married at St Stephens Presbyterian Church in Surrey Hills on 1 May 1948. Her wedding dress was bought at Canns on the corner of Elizabeth Street & Flinders Lane. It was one in an exhibition held as part of a Surrey Hills Festival in the early 2000's. Like others in the exhibition, it no longer had its train and the sleeves have been shortened. Margaret recalled that after her wedding she wore it as an evening dress. Her bridesmaids’ dresses were a little unusual for the time, as they too were white and their flowers were subdued pink and blue. According to Margaret, the popular fashion was for brightly coloured dresses and bright flowers for the bridesmaids. The positioning of the garlands of flowers in their hair was also unusual. They were placed at the back so that the congregation could see them during the ceremony. Housing was in very short supply in the years following the war, so after they were married, Margaret and Thorby moved into a small flat created at Dr Carrington’s surgery. They later moved to a house built in 1926 in Black Street, Mont Albert, which continued to be Margaret’s home until her death. weddings, mrs margaret black, miss margaret johnson, mr thorby black, st stephens presbyterian church, bridal wear -
 Surrey Hills Historical Society Collection
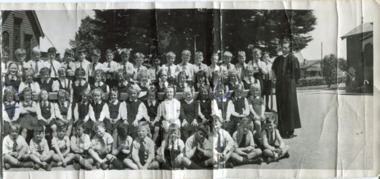
Digital photo, Our Holy Redeemer school photo, late 1950s (Part 2), 1950s
School history - ref https://ourholyredeemer.cam.org.au/history In 1904 Fr. George Robinson erected a weatherboard school-hall where the present hall now stands. It was blessed and opened by Archbishop Carr on 20th November of that year. In January 1905, the Sisters of St Joseph took charge of the school. Archbishop Mannix opened and blessed the new brick school on 10th November 1918. From 1941-1972, Fr Tim Fitzpatrick was parish priest and head of the school. Personal history: Although they lived in Prospect Street, Box Hill, John and Mary Turnbull attended Our Holy Redeemer School, as did Susan Hirst who lived across the road from the Turnbull family with her parents Ray and Shirley Hirst at 29 Prospect Street.Part of a large landscape black and white photo of a priest with a large group of children grouped as follows: Back row: 19 boys Second back row: 14 girls Second row: 15 girls Front row: 12 boys. Behind the group is a large cypress tree and to either side the church and (?) school building. The girl in the 2nd row, first on the left is marked with an 'T' in blue biro; the girl 3rd from the right in the same row is circled in blue biro. There is a Californian bungalow in the background. This is half of a large landscape photo and the 2 pieces should be viewed together. On front 'T' and a circle in blue biro are believed by the donor to have been made by Hugh Turnbull, his father. On rear in black: "OUR HOLY REDEEMER - SURREY HILLS / PROBABLY 1950's" schools, our holy redeemer school, fr tim fitzpatrick, john turnbull, mary turnbull, susan hirst -
 Surrey Hills Historical Society Collection
Photograph, John Reaburn
Identified as John Colin Reaburn, also known as Jack (1899 -1987) - John was born at home in Russell Street, Surrey Hills and grew up in the area, was educated at Surrey Hills State School and University High, becoming an accountant. He moved away as he progressed in business, including to overseas posts. In retirement he returned to the Surrey Hills area and in the early 1980's provided help and encouragement while the Surrey Hills history collection was in its early stages. John had a keen memory and contacted some of his early acquaintances to further reminiscences of some of Surrey Hills while carefully researching material to confirm his own. He was also active in the Surrey Hills Progress Association.John Reaburn was a key figure in the establishment of the Surrey Hills history collection.A black and white photograph of a man dressed in a coat, shirt and tie.surrey hills, surrey hills state school, accountant, surrey hills progress association, mr john reaburn -
 Surrey Hills Historical Society Collection
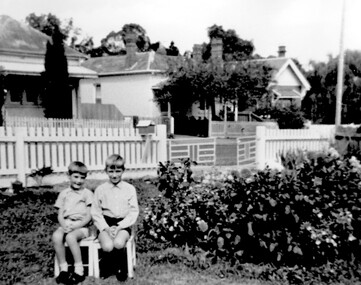
Photograph, Ray & David Theodoridis of Russell Street, 1960s
The boys have been identified as *Rea & David Theodoridis. they being 2 of 5 children of Peter and Ruth (nee Dawson) Theodoridis. Background shows Nos 11, 13 and 15 Russell Street in the 1960's. In the 1920s-1930s these were the homes of the Scott, Daniels & Hendy families. No 11 was the home of the Scott family (dem); no 13 may also have belonged to the Scott family. No 18 Russell Street, the family home of Eleanor (Lena) & Rea Dawson. * spelling authenticated by Theodata Williams Dec 2019A black and white photograph of two young boys sitting on small chairs in a front garden. There are two houses in the background on the other side of the road.russell street, surrey hills, scott family, daniels family, hendy family, (mr) david theodoridis, (mr) george david theodoridis, (mr) rae theodoridis -
 Surrey Hills Historical Society Collection
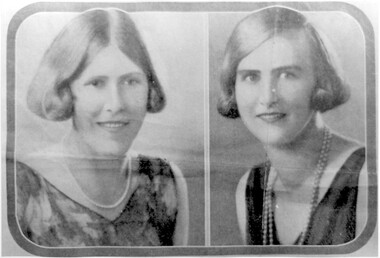
Photograph, Nancy and Hattie Steele
Nancy (Margaret Dillon) Steele born 1906 and Hattie ( Harriette Vevers) Steele were daughters of Charles Henri Dillon Steele (1869-1935) and Sarah Margaret Russell (1873-1944),he was a pioneer of dentistry in Victoria who was in practice in 1890 and later in Collins Street for 40 years. The family lived at ‘Dalriada’ (dem.) on the corner of Bona Vista Avenue and Union Road. Sarah Margaret Steele was President of the local Patriotic League during WW1 and is credited with starting the move to raise funds for the WW1 memorial in the Surrey Gardens. Nancy and Hattie were graduates at Melbourne University in Dentistry and Agricultural Science respectively. They continued their studies in Toronto and obtained their Doctorates. In 1923 Nancy and Hattie started the first girl guide group in Surrey Hills at Holy Trinity Church. Both married and had families. Nancy married Dr William Brayshaw Woodhouse and, while he took up army duties during World War II, Nancy continued his practice. Their son Anthony became a dentist, while Peter was known locally when he became a councillor and Mayor of Camberwell. Their daughter Margaret married Herbert Andrewartha and lived in NSW.A black and white photograph of two portraits of two young ladies. Their dress and hair styles are suggestive of a 1920's date..(miss) nancy (margaret) steele, (miss) hattie vevers steele, dalriada, house names, bona vista avenue, union road, surrey hills, dentists, first girl guide group, 1923, holy trinity church, world war, 1939-1945, mayors, councillors, (miss) margaret brayshaw-woodhouse, dr william brayshaw woodhouse, peter brayshaw woohdhouse, dr charles henri dillon steele, dr anthony brayshaw woodhouse, (miss) nancy steele, (mrs) nancy andrewartha, (miss) hattie steele, (miss) harriette vevers steele, (mrs) margaret brayshaw woodhouse, (miss) margaret dillon steele, (miss) sarah margaet russell, (mes) sarah margaret steele -
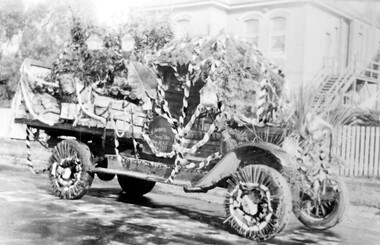 Surrey Hills Historical Society Collection
Photograph, Armitstead Woodyard truck decorated for Empire Day, mid-1930s, 1930
Date is approximate. Donor's connection with Armitstead's Woodyard was that Frank Foley was a long term employee. The Empire Day movement was instituted in England in 1904 and on 24 May 1906 a group of Surrey Hills residents pledged to make Empire Day a success. From 1932-1938 large Empire Day celebrations were held in Surrey Hills and business and commercial vehicles were decorated to take part in large processions held in May each year. These attracted large crowds from all over Melbourne. The truck is parked outside Nethercourt Hospital at 15 Barton Street. The Armitstead family had a business in Union Road which supplied wood in winter and ice in summer. Photos such as this one are evidence of the importance once attached to celebrating Empire Day, which was held on 24 May (Queen Victoria’s birthday). From 1905, a range of patriotic activities across Australia were performed on this day. There was a focus on schoolchildren, who were given a half-holiday, and the occasion was often highlighted with bonfires and fireworks in the evening - in this area at Beckett Park. The parade down Union Road was famous throughout Melbourne and attracted large crowds. Floats in the parade were often decked with British flags. The pro-Empire sentiment in the Surrey Hills area in part reflected the background and strong ties of many families.Black and white photo of a delivery truck with bunting and ferns over the cabin and back. The wheels have straws around the rims and more foliage is on the cabin roof and bonnet. The back of the tray is up and boxes, foliage and possibly a lion's head decorate the tray. Behind is a 2 storey (?) rendered building with an external timber staircase broken in 2 by a landing. The house sits behind a simple picket fence.On the cabin door of the truck: "S ARMITS ....[remainder in shadow] / Surrey Hills / phone 10X1816 / [undecipherable]" On back of the original in pencil in top centre left "446a" in Jocelyn Hall's handwriting; centre on a piece of paper stuck on with tape "Mrs D Foley / 39 Sunbury Cres., / Surrey Hills / Phone 8301163".empire day, festival and celebrations, woodyard, parades, processions, hospitals, nethercourt hospital, stephen godfrey armitstead, frank foley, mrs d foley, barton street -
 Surrey Hills Historical Society Collection
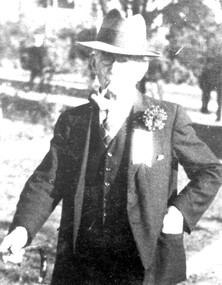
Photograph, Mr Natale Cerini in the Surrey Gardens, c1936, c 1936
Information from the donor, Natale Cerini's daughter: He was a retired accountant who commenced the Surrey Hills Observer, one of the early free local papers, in about 1933 at the request of the Surrey Hills Progress Association of which he was a member. He regarded his solo effort in creating, editing and publishing the paper as a community service for which he received no remuneration. The Observer was self-funding through its advertisements which Mr Cerini personally collected throughout the area. The Observer was issued fort-nightly and printed by the Johnson family at the Triumph Press in Sunbury Crescent until about 1946 when Mr Cerini relinquished it to one of the newly-established post-war local papers. Photo thought to have been taken in 1936 when Mr Natale would have been 69, as he retired in 1932 at 65 years of age. Electoral rolls give the following addresses: 1919: 293 Dandenong Road (accountant) and 1919 Boondara, Croydon (accountant); both with Ethel May also listed. 1924: 167 Union Road, Surrey Hills (accountant) 1931 and 1943: 215 Union Road, Surrey Hills (accountant). Marriage: Natale Benjamin Cerini; Spouse Name: May Ethel Swan; Marriage Place: Victoria; Registration Place: Victoria;Registration Year: 1918; Registration number: 5787. Ethel May Cerini: Death Place: S Hills, Victoria; Age: 69; Father's Name: Ernest Harrison; Mother's Name: Frances Ann Clark; Registration Year: 1951; Registration Place: Victoria; Registration number: 10736; Estimated Birth Year: abt 1882. Natale Benjamin Cerini: Death Place: Glen, Victoria; Age: 89; Father's Name: Joseph Natale; Mother's Name: Sarah Cooke; Registration Year: 1954; Registration Place: Victoria; Registration number: 10612; Estimated Birth Year: abt 1865.Black and white photo of a hatted gentleman with a walking cane and a pipe and wearing glasses. He has a rosette in his suit buttonhole and a ribbon on his lapel. The background is blurred but is reliably identified as the Surrey Gardens during Empire Day celebrations. SH368 on rear in pencilempire day, festivals and celebrations, surrey gardens, newspapers, surrey hills progress association, surrey hills observer, triumph press, natale cerini -
 Surrey Hills Historical Society Collection
Photograph, Bill Willaton in WW2 army uniform, 1942
Date is approximate. His full name was William John Willaton - Service Number - VX68674 : Date of birth - 20 Mar 1909 : Place of birth - SURREY HILLS VIC : Place of enlistment - CAULFIELD VIC : Next of Kin - MURIEL WILLATON He was the son of Herbert Charles Leopold Willaton and Lily Jenkins and had a sister Lille Louise (Lil) who taught callisthenics and dance in Surrey Hills. Photo references also in this collection. Bill married Muriel Pearl Blake in 1935 and they lived at 18 Grovedale Road. He died Heidelberg in 1972. Bill was a driver (carter) for C E Gray & Son, bakers of Canterbury during the 1930's also recorded in this collection.Black and white photo of Bill Willaton in army uniform including a slouch hat. He is standing with his arms behind his back in front of a fairly young deciduous tree beyond which is a boundary fence and a timber building with a tiled roof. A child's pedal-car can be seen adjacent to the house of the garden. world war, 1939-1945, uniforms, william john willaton, bill willaton, -
Surrey Hills Historical Society Collection
Photograph, Wyclif Congregational Church Sunday School Picnic 1921 (1), 1921
Sepia photo of 2 young girls holding ice creams standing against a bushy background on a grassy track. Sepia photo, one of 7, mounted on what appears to be a page from a photo album. The page is olive-brown and it has been ruled into sections using a white ink. This measures 29.75 cm x 24.2 cm. This is mounted on card. This photo measures 5.6 cm x 8.25 cm."WYCLIF S. S. PICNIC AT HAMPTON 1921." in white ink with gold highlights. Photos have been numbered 1-7 in black marker pen at a later date. Individual identification of two men in blue biro - "Right: Ken Shearer" and " R - Harry James" in Jocelyn Hall's writing. On the back of the mount card in Jocelyn Hall's writing: L top: "No 2 - On Right Ken Shearer / Photo No 6 .. At Right: HARVEY JAMES / No 4: Back row holding Tray: / Hillier (Bill) Bayley" L bottom: "Donated by W. Dempsey / Photographer may have been / W. T. Hill of Pembroke St."wyclif congregational church, picnics, sunday schools, hampton, william dempsy, bill dempsey, ken shearer, harry james, harvey james, hillier (bill) bayley -
Surrey Hills Historical Society Collection
Photograph, Wyclif Congregational Church Sunday School Picnic 1921 (2), 1921
Harry James is thought to be a transcription error for Harvey James. See photo 2485 - Man on LHS is possibly Harvey James. See photo 2494 which ? identifies man as ? Breeden - Man 2nd from left in this photo may also be this man.A sepia photo of 6 young men standing on a grassy bank. Four are wearing jackets or blazers, 2 have hats and one is wearing a cap. Notations identify the individual on the RHS as Ken Shearer.Sepia photo, one of 7, mounted on what appears to be a page from a photo album. The page is olive-brown and it has been ruled into sections using a white ink. This measures 29.75 cm x 24.2 cm. This is mounted on card. This photo measures 8.25 cm x 5.6 cm."WYCLIF S. S. PICNIC AT HAMPTON 1921." in white ink with gold highlights. Photos have been numbered 1-7 in black marker pen at a later date. Individual identification of two men in blue biro - "Right: Ken Shearer" and " R - Harry James" in Jocelyn Hall's writing. On the back of the mount card in Jocelyn Hall's writing: L top: "No 2 - On Right Ken Shearer / Photo No 6 .. At Right: HARVEY JAMES / No 4: Back row holding Tray: / Hillier (Bill) Bayley" L bottom: "Donated by W. Dempsey / Photographer may have been / W. T. Hill of Pembroke St."wyclif congregational church, picnics, sunday schools, hampton, ken shearer, harry james, harvey james, bill dempsey, w dempsey -
 Albert Park-South Melbourne Rowing Club
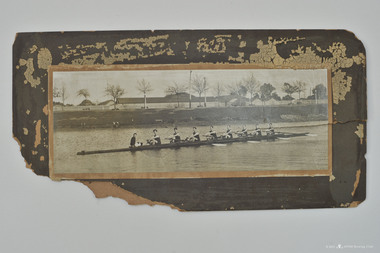
1911 Maiden Eight, Colac Regatta / New Year’s Day 1911 / Maiden Eight / To Harry from the Eight
A black and white staged photograph of the Albert Park Maiden Eight who won at the Colac Regatta. The photograph is in a brown wooden frame with a gilt edge and is on beige cardboard mounting.On reverse: H.R. Duncan (cox), C. Monteath (s), W. Chambers (7), W. McIlroy (6), C.P. Leslie (5), M.B. Harry (4), W. Paxton (3), J. Moorhead (2), J. Faraday (b)rowing, apsm rowing club, albert park rowing club, south melbourne rowing club, albert park lake, monteath, charles, duncan, henry robert, chamber, w, mcilroy, w, leslie, cp, harry, mb, paxman, w, moorhead, j, brady, j -
 Albert Park-South Melbourne Rowing Club
Photograph, Albert Park Rowing Club Champion Eight, 1915
A black and white staged photograph of the winners of the 1915 Champion Eight. The photograph is mounted on cardboard with a separate wood veneer mounting.On reverse: D. Laird (S), J. Hale (7), W. Steinle (6), J. Stewart (5), L.H. McBrien (4), W. Loud (3), R.T. Leslie (2), C.P. Leslie (B), R. Duncan (cox)apsm rowing club, rowing, 1915, champion eight, laird, douglas, hale, jack, steinle, william, stewart, jack, mcbrien, likely herman, loud, william, leslie, rt, leslie, cecil park, duncan, roy, albert park rowing club -
 Albert Park-South Melbourne Rowing Club
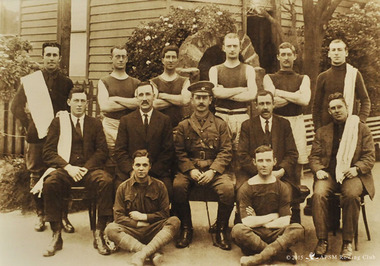
Photograph, "C" Company, No 7 Training Battalion / Albert Park, Melbourne
A black and white studio portrait of the members of "C" Company, No 7 Training Battalion. The photograph is under glass in a wooden frame with a green cardboard mounting.A. Perlestein, F.G. Bartholomew (bow), L.A. Payne (2), A. McLaurin (3), H.H. Macknight (S), W.J. Taylor / T. McManamny, C. Donald (COACH), Capt E.V. Nixon, C. Short, A. McGill / J. Bruce, F.C. Wilson (COX) / Presented to Mr C. Donald / As a small mark of appreciation & as a memento of Sept 18, 1915 -
Albert Park-South Melbourne Rowing Club
Photograph, Winners Double Maiden Eight, Upper Yarra & Albert Park Regattas 1915. Presented to Chas Donald Esq By the Crew as a mark of appreciation in recognition of his services as COACH
A black and white studio portrait of the members of "C" Company, No 7 Training Battalion. The photograph is under glass in a wooden frame with a green cardboard mounting.A. Perlestein, F.G. Bartholomew (bow), L.A. Payne (2), A. McLaurin (3), H.H. Macknight (S), W.J. Taylor / T. McManamny, C. Donald (COACH), Capt E.V. Nixon, C. Short, A. McGill / J. Bruce, F.C. Wilson (COX) / Presented to Mr C. Donald / As a small mark of appreciation & as a memento of Sept 18, 1915 -
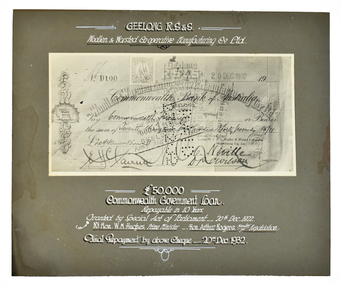 National Wool Museum
Archive - Mounted Cheque, Returned Soldiers and Sailors Mill, 1932
Copy of a cheque celebrating the final repayment by R. S. & S. Woollen and Worsted Co-operative of a Commonwealth Government loan.Copy of a cheque mounted on cardboard with white and black printed text.GEELONG R. S. & S. / Woollen & Worsted Co-operative Manufacturing Co. Ltd. / £50,000 / Commonwealth Government Loan. / Repayable in 10 Years / Granted by Special Act of Parliament 20th Dec. 1922. / Rt. Hon. W. M. Hughes, Prime Minister -- Hon. Arthur Rogers Minister for Repatriation / Final Repayment by above Cheque -- 20th Dec. 1932. -
 National Wool Museum
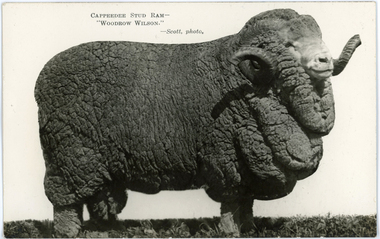
Postcard - 'Woodrow Wilson', Capeedee Stud Ram, Chas P Scott, 1926
This postcard was found loose in the first of three albums compiled and owned by J W Allen, Secretary of New South Wales Grazier's, and is associated with the New South Wales Graziers Association world tour of sheep 1928-1929. The album contains photographs of travel, sheep, farms, stations, people and landscapes from around the world. Locations include Naples, Port Said, Suez, Birregurra (Vic), Alexandra (Vic), Ballangeich (Vic), Keith (SA), Mt Gambier (SA), Buckland Park (SA), Tasmania, Winton (QLD), Sydney Harbour, Canberra (ACT), Toowoomba (QLD), Rockhampton (QLD), Tocal (NSW), Deepwater (NSW), Glen Innes (NSW), Longreach (QLD), Moree (NSW), Barraba (NSW) and Mudgee (NSW). Properties depicted include Mooleric, Turkeith, Woolongoon, Minadale, Crower Station, Merrindie, Koomooloo Station, Cappeedee, Koonoona, Rathmore, Ellenthorpe, Camden Park Station, Glenlegh, Strathmore Station, Ilparran Station, Binneguy, Midkin, Terlings, Ashley, Bereen, Plumthorpe, Mayvale and Havilah. The album was found in a clean out at the Great Southern Agricultural Research Institute and donated to the National Wool Museum, along with other related material such as photographs, glass lantern slides and ephemera.Photographic postcard with black and white image of a ram with white background, and black printed text.Front: CAPPEEDEE STUD RAM - / “WOODROW WILSON” / - Scott, photo Back: POST CARD / CORRESPONDENCE / ADDRESS ONLY / KODAK / AUSTRALIA / KODAK / AUSTRALIA / 16world tour, sheep, graziers, photograph, agriculture, capeedee, rams, stud, south australia, hallett, walter s murray -
 National Wool Museum
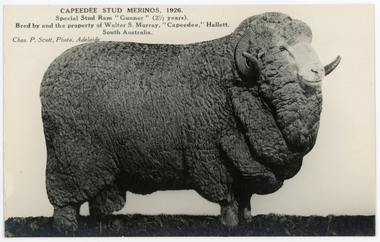
Postcard - 'Gunner', Capeedee Stud Ram, Chas P Scott, 1926
This postcard was found loose in the first of three albums compiled and owned by J W Allen, Secretary of New South Wales Grazier's, and is associated with the New South Wales Graziers Association world tour of sheep 1928-1929. The album contains photographs of travel, sheep, farms, stations, people and landscapes from around the world. Locations include Naples, Port Said, Suez, Birregurra (Vic), Alexandra (Vic), Ballangeich (Vic), Keith (SA), Mt Gambier (SA), Buckland Park (SA), Tasmania, Winton (QLD), Sydney Harbour, Canberra (ACT), Toowoomba (QLD), Rockhampton (QLD), Tocal (NSW), Deepwater (NSW), Glen Innes (NSW), Longreach (QLD), Moree (NSW), Barraba (NSW) and Mudgee (NSW). Properties depicted include Mooleric, Turkeith, Woolongoon, Minadale, Crower Station, Merrindie, Koomooloo Station, Cappeedee, Koonoona, Rathmore, Ellenthorpe, Camden Park Station, Glenlegh, Strathmore Station, Ilparran Station, Binneguy, Midkin, Terlings, Ashley, Bereen, Plumthorpe, Mayvale and Havilah. The album was found in a clean out at the Great Southern Agricultural Research Institute and donated to the National Wool Museum, along with other related material such as photographs, glass lantern slides and ephemera.Photographic postcard with black and white image of a ram with white background, and black printed text.Front: CAPEEDEE STUD MERINOS, 1926 / Special Stud Ram “Gunner” (2 ½ years). / Bred by and the property of Walter S. Murray, “Capeedee,” Hallett, / South Australia / Chas. P. Scott, Photo, Adelaide Back: POST CARD / CORRESPONDENCE / ADDRESS ONLY / KODAK / AUSTRALIA / KODAK / AUSTRALIAworld tour, sheep, graziers, photograph, agriculture, capeedee, rams, stud, south australia, hallett, walter s murray -
 National Wool Museum
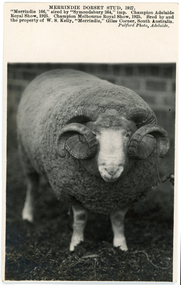
Postcard - Merrindie Dorset Stud, Pulford, 1927
This postcard was found loose in the first of three albums compiled and owned by J W Allen, Secretary of New South Wales Grazier's, and is associated with the New South Wales Graziers Association world tour of sheep 1928-1929. The album contains photographs of travel, sheep, farms, stations, people and landscapes from around the world. Locations include Naples, Port Said, Suez, Birregurra (Vic), Alexandra (Vic), Ballangeich (Vic), Keith (SA), Mt Gambier (SA), Buckland Park (SA), Tasmania, Winton (QLD), Sydney Harbour, Canberra (ACT), Toowoomba (QLD), Rockhampton (QLD), Tocal (NSW), Deepwater (NSW), Glen Innes (NSW), Longreach (QLD), Moree (NSW), Barraba (NSW) and Mudgee (NSW). Properties depicted include Mooleric, Turkeith, Woolongoon, Minadale, Crower Station, Merrindie, Koomooloo Station, Cappeedee, Koonoona, Rathmore, Ellenthorpe, Camden Park Station, Glenlegh, Strathmore Station, Ilparran Station, Binneguy, Midkin, Terlings, Ashley, Bereen, Plumthorpe, Mayvale and Havilah. The album was found in a clean out at the Great Southern Agricultural Research Institute and donated to the National Wool Museum, along with other related material such as photographs, glass lantern slides and ephemera.Photograph postcard with a black and white image of a ram, and printed black text.Front: MERRINDIE DORSET STUD, 1927. / “Merrindie 166” sired by “Symondsbury 264,” imp. Champion Adelaide / Royal Show, 1925. Champion Melbourne Royal Show, 1925. Bred by and / the property of W. S. Kelly, “Merrindie,” Giles Corner, South Australia. / Pulford Photo, Adelaide. Back: POST CARD / CORRESPONDENCE / ADDRESS ONLY / KODAK / AUSTRALIA / KODAK / AUSTRALIAworld tour, sheep, graziers, photograph, agriculture, rams, stud, south australia, merrindie, giles corner, w s kelly, pulford -
 National Wool Museum
Photograph - 'Minadale', Alexandra, Victoria, J W Allen, 1928-1929
This photograph was found loose in the first of three albums compiled and owned by J W Allen, Secretary of New South Wales Grazier's, and is associated with the New South Wales Graziers Association world tour of sheep 1928-1929. The album contains photographs of travel, sheep, farms, stations, people and landscapes from around the world. Locations include Naples, Port Said, Suez, Birregurra (Vic), Alexandra (Vic), Ballangeich (Vic), Keith (SA), Mt Gambier (SA), Buckland Park (SA), Tasmania, Winton (QLD), Sydney Harbour, Canberra (ACT), Toowoomba (QLD), Rockhampton (QLD), Tocal (NSW), Deepwater (NSW), Glen Innes (NSW), Longreach (QLD), Moree (NSW), Barraba (NSW) and Mudgee (NSW). Properties depicted include Mooleric, Turkeith, Woolongoon, Minadale, Crower Station, Merrindie, Koomooloo Station, Cappeedee, Koonoona, Rathmore, Ellenthorpe, Camden Park Station, Glenlegh, Strathmore Station, Ilparran Station, Binneguy, Midkin, Terlings, Ashley, Bereen, Plumthorpe, Mayvale and Havilah. The album was found in a clean out at the Great Southern Agricultural Research Institute and donated to the National Wool Museum, along with other related material such as photographs, glass lantern slides and ephemera.Black and white photograph showing two cars parked with people standing around the cars. A fence, water tower and trees are shown in the background, with a road in the foreground. back: [handwritten] Entrance: Minadale Alexandra (R. S. S. Cameron) / [printed] KODAK PRINT / C 806agriculture, sheep, farming, stations, research, breeding, photography, travel -
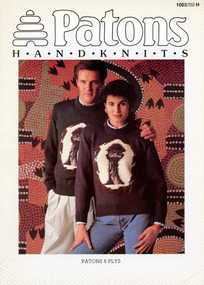 National Wool Museum
Book - Patons Handknits 1003, Patons and Baldwins, c.1980s
Twenty page book with black and white printed text and graphics. The front cover features a colour image of a man and a woman wearing matching knitted jumpers featuring an emu motif. Front: [printed] 1003 / PRICE / CODE / H / Patons / H A N D K N I T S / PATONS 8 PLYSpattern books, pattern, emu, australiana, knitting, patons, handknits, craft, style, design -
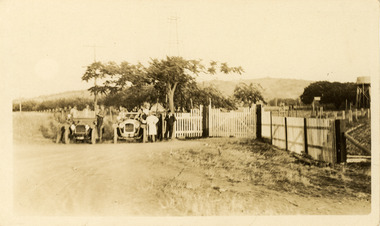
 Vision Australia
Photograph - Image, Possible Queensland Institute for the Blind building
Side view of brick building, possibly a workshop for the Queensland Institute for the Blind. A 1920's car stands to the rear of the building, possibly loading or unloading people or items.1 x black and white photographqueensland institute for the blind, buildings -
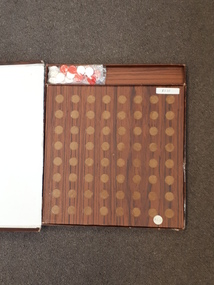 Vision Australia
Object, Reversi, 19
A strategy board game invented in England in the 1880's, it involves placing coloured discs in lines and capturing (or flipping) opponent discs that stand in the way. Sold these days under the name 'Othello' (which links the changing relationship between discs to the Shakespearian play), the red side of the disc is smooth and the white is ridged. RNIB Catalogue no. 9434. 1 wooden box with 64 red/white reversible pieces recreation equipment, games -
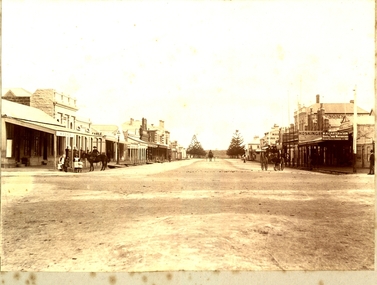 Port Fairy Historical Society Museum and Archives
Photograph
Sackville Street Port Fairy Black and white photograph of Sackville Street in Port Fairy maybe late 1800’s -early 1900’ssackville street, port fairy, town, hosking, carter, shops, earle, printer, bootmaker