Showing 558 items
matching charing cross.
-
 Ballarat Tramway Museum
Slide - 35mm slide/s, Dave Macartney, Dec. 1968
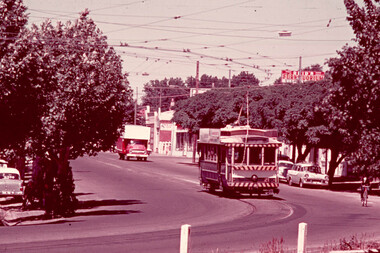
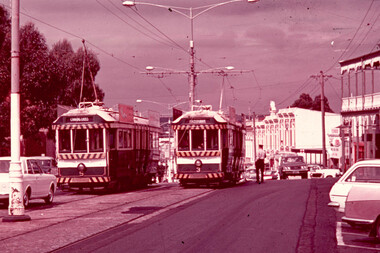
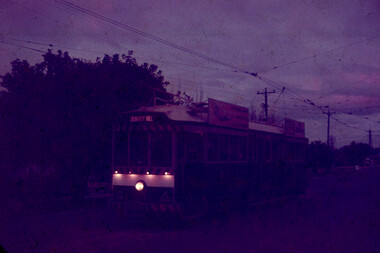
... , 21 is outbound not far from Charing Cross - Dec '68 (Dave... is outbound not far from Charing Cross - Dec '68 (Dave Macartney ...White cardboard mount, 35mm slide, from the Association of Railway Enthusiast's film strip titled "Provincial Tramway Film Strip" of Bendigo No. 21 in High St (Calder Highway), near Short St, outbound to Golden Square. Photo taken after the tram has passed the photographer. Has Reid's Furntuorium sign in the background. The film strip notes (Reg. Item 2560), provided the following caption details: "The "GOLDEN SQUARE" line followed the Calder Highway toward Melbourne for a couple of miles. Here, 21 is outbound not far from Charing Cross - Dec '68 (Dave Macartney)" See image btm2583p.tif for high level scan of image. Stamped on base of slide "11792" and written in ink on top edge "21 on Golden Square"tramways, trams, are, film strip, high st, golden square, tram 21 -
 Bendigo Historical Society Inc.
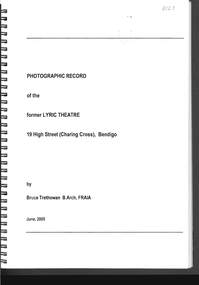
Document - PHOTO RECORD OF THE FORMER LYRIC THEATRE
... Theatre, 19 High Street (Charing Cross), Bendigo, by Bruce... of the former Lyric Theatre, 19 High Street (Charing Cross), Bendigo ...Spring bound photographic record of the former Lyric Theatre, 19 High Street (Charing Cross), Bendigo, by Bruce Trethowan, B.arch, FRAIA, dated June, 2005. A letter in the front of the document mentions as part of the Bendigo Bank Development, it was necessary to demolish the former Lyric Theatre. Before doing so, the Bank commissioned a heritage architect to produce a photographic record of the building. It is addressed to Mr Jim Evans, President, Bendigo Historical Society and dated 10 August 2005. The beginning has the Historical Background, Building Description and three pages of Plans and Elevations. There are sixty colour photographs of the building depicting the front outside of the building, other outside photos and a number of the interior.buildings, commercial, former lyric theatre, photographic record of the former lyric theatre, bruce trethowan, gallagher jeffs consulting, gallagher jeffs pty ltd, jim evans, bendigo bank development, ted gallagher, richard hasseldine, city of greater bendigo planning department, keogh & austen, state savings banks, sydney smith and ogg, godfrey and spowers, colonial life building, johnson morley warehouse, j g austen, muioof building eaglehawk, george austen, backhaus building, allawah, william cowling, taylor, soilleux, overend, plaza theatre, backhaus trust, princess theatre, the annals of bendigo vol 8 p163, the annals vol 8 p180, fernwood women's health club, bendigo real estate -
 Bendigo Historical Society Inc.
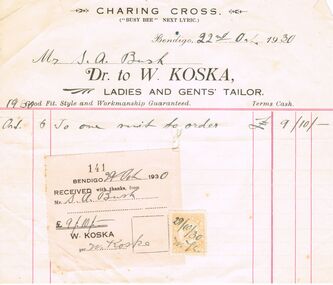
Document - W. KOSKA INVOICE, 22/10/1930
... in the centre. Charing Cross ('Busy Bee' Next Lyric.) Bendigo, 22nd... paper with black and red ink. Hole in the centre. Charing Cross ...W. Koska Invoice: Cream paper with black and red ink. Hole in the centre. Charing Cross ('Busy Bee' Next Lyric.) Bendigo, 22nd October 1930. Mr S.A. Bush. Dr. to W. Koska, Ladies and Gents' Tailor, Good Fit, Style and Workmanship Guaranteed. Terms Cash. 1930 Oct 6, So (sic) one suit to order £9/10/-.Includes receipt no. 141, pink paper black print. Bendigo 29th October 1930. Received with thanks from Mr. S. A,. Bush. W. Koska per W. Koska. Orange Stamp Duty 2 pence dated 29/10/30 and initials W.K. Box 625business, retail, general, w. koska. s.a. bush -
 Bendigo Historical Society Inc.
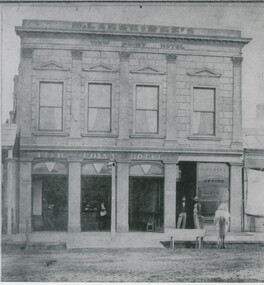
Photograph - VIEW POINT HOTEL: BENDIGO
... Black and white photo: View Point Hotel, Charing Cross...: View Point Hotel, Charing Cross, Bendigo. 2 storey rendered ...Black and white photo: View Point Hotel, Charing Cross, Bendigo. 2 storey rendered building with parapet. 4 rectangular windows at top. 3 large windows and doorway at bottom. Portion of single storey building at left with corrugated roof verandah. At right, single storey building without verandah. At front, slab lined drain, wooden trough at front with horse. 2 males standing in doorway. Inside building at bar, 1 male, 1 female behind bar. Lamp at front centre. In image: M. Langridge's/View Point Hotel/ Imperial Fire Insurance co./Office/Gilles & Co/Stock and Share brokers. ' Williams' on back in pencil '15'.batchelderbuildings, hotel, view point hotel -
 Ballarat Tramway Museum
Slide - 35mm slide/s, Max Michell, Apr. 1972
... destination of Charing Cross. An SEC Employee is standing by the rear... of Charing Cross. An SEC Employee is standing by the rear of No. 3 ...White cardboard mount, 35mm slide, from the Association of Railway Enthusiast's film strip titled "Provincial Tramway Film Strip" of Bendigo trams Nos. 3 and 5 in View St., near Rowan St. No. 3 has destination of Eaglehawk, while No. 5, inbound has destination of Charing Cross. An SEC Employee is standing by the rear of No. 3 The film strip notes (Reg. Item 2560), provided the following caption details: "Bogie cars 3 & 5 (running out of course due to an earlier failure) meet on the double track at the Bendigo end of the "EAGLEHAWK" Line - Apr. '72 (Max Michell)" See image btm2592p.tif for high level scan of image. Stamped on base of slide "11802" and written in ink on top edge "No 3 & 5 Eaglehawk line Bendigo"tramways, trams, are, film strip, view st, bendigo, tram 3, tram 5 -
 Bendigo Historical Society Inc.
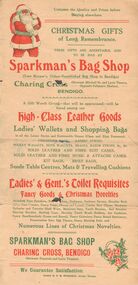
Memorabilia - SPARKMAN'S BAG SHOP CHRISTMAS GIFT BROCHURE
... in Bendigo) Charing Cross (Between Mitchell St and Lyric Theatre... Established Bag Shop in Bendigo) Charing Cross (Between Mitchell St ...BHS CollectionSparkman's Bag Shop Christmas Gift Brochure: Cream paper with red and green print with a Santa Clause left hand corner. Printed on the brochure is * Compare the Quality and Prices before Buying elsewhere. Christmas Gifts of Long Remembrance. Sparkans's Bag Shop (Late Harper's Oldest Established Bag Shop in Bendigo) Charing Cross (Between Mitchell St and Lyric Theatre, Opposite Cabmen's Shelter), Bendigo. High = Class Leather Goods. Ladies Wallets and Shopping Bags etc., Table Centres, Mats & Travelling Cushions. Ladies & Gent's Toilet Requisites, Fancy Goods & Christmas Novelties. We Guarantee Satisfaction. Paper torn in two places. Box 625.Printed by F.H. Sparkman, Arcade, Bendigobusiness, retail, advertising -
 Melbourne Legacy
Photograph - Photo, Anzac Day London 1974, 1974
... Embankment Gardens, Charing Cross, London in 1974 from a Comradeship... Embankment Gardens, Charing Cross, London in 1974 from a Comradeship ...A photo of a wreath laying ceremony on Anzac day in Thames Embankment Gardens, Charing Cross, London in 1974 from a Comradeship album. The label identifies Legatee Rex Hall. The handwritten inscription on the back says: "In Thames Embankment Gardens, out___ by members of the Corps 1920. Placing the wreath on Anzac Day 1974. From Left - Tyrone, grandson of Pat Hanna, Mrs Dorothy Roberts, Jessie Pat's widow, Friedl, Pat's granddaughter, ___ ___ Pattie, Pat's daughter. The Imperial Camel Corps fought in every battle in Sinai and Palestine and had 1600 battle casualties of which about 300 names are engraved here. The Corps was composed of 50% Australian, New Zealand troops and 50% British-English, Scottish, Welsh and Indians." The Comradeship committee gathered photos of events and compiled them in a Comradeship photo album for Legatees to look through. This photo and several others (see 01029 - 01032) of Anzac services in London are part of a photo album of Comradeship activities (from 1930 to 1977) see items 01027 to 01036. The Comradeship photo album was put together by the Comradeship committee and records events that Legatees did and places they lived or visited. Some appear to be trips to visit other Legatees living overseas and social occasions held in different places. It shows the bond that Legatees have with each other.Black and white photo of Anzac Day in London in 1974.Label pasted on the front: Anzac Day London 1974. L/Rex Hall and Camel Corps memorial / Third from left - Jessie Hand and Tyrone and Friedl. On the back handwritten description and stamped in grey ink 'J.A.Ballard photography / London'anzac day, comradeship -
 Bendigo Historical Society Inc.
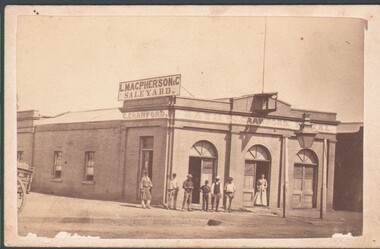
Photograph - WES HARRY COLLECTION: SANDHURST PHOTOS, 1850's, 1879
... in Sandhurst. (a) L. Macpherson's horse bazaar, Charing Cross, 1850's.... Macpherson's horse bazaar, Charing Cross, 1850's, (b) Southern Cross ...Group of four sepia toned photographs of businesses in Sandhurst. (a) L. Macpherson's horse bazaar, Charing Cross, 1850's, (b) Southern Cross Hotel, R. Hansen, Saddler, Macpherson's saleyards. Photographed by Chevalier, Pall Mall, Sandhurst © W. Anderson and son, Commercial House, Mitchell Street Sandhurst, 1879, (d) C. Crawford, Bath Hotel (meals 1/- , beds 1/-) Circa 1850's. For information on Lewis Macpherson, Charles Crawford, Christian Hansen, Charles Hansen, Charles Rohrs, Robert Sawers, Jane Sawers, Richard Baker Anderson of Kenilworth, Mitchell St, William Webb Anderson, Stella Anderson, Richard E. Anderson, Albert Henry Anderson - See Research field for further information.Chevalier, Pall Mall, Sandhurstbuildings, commercial, various, l. macpherson and co. saleyards, c. crawford bath hotel, w. anderson and son, mitchell st, southern cross hotel, r. hansen saddler. hansen & rohrs. christian hansen. charles hansen. louis macpherson.. lewis macpherson. charles crawford. jane sawers. robert sawers. anderson, richard baker. w. anderson and sons. -
 Bendigo Historical Society Inc.
Document - CONNELLY, TATCHELL, DUNLOP COLLECTION: LEGAL PAPERS, 1919 1920
... (Manager - Farmers & Citizens Trustees Company Bgo Ltd. Charing... Trustees Company Bgo Ltd. Charing Cross Bendigo) re costs Wm ...Document. Various legal papers. 1 - 1919 - Hands E W (Butcher Bendigo) re costs Morrison. 2 - 1919 - Horsfield Taylor deceased estate. Re costs Mrs Horsfield. 3 - 1920 - Hocking James (Frankston) re costs. Federal Land Tax & Sunda Singh. 4 - 1919 - Howe J B (Bridgewater) re costs Land Tax. 5 - 1919 - Grabasch Mrs J O (Pier Millan) re costs Reed Bros. 6 - 1919 - 1920 - Grylls, Mrs E P (Bendigo) re costs Will. 7 - 1920 - Coy F C T (Manager - Farmers & Citizens Trustees Company Bgo Ltd. Charing Cross Bendigo) re costs Wm Simpson Estate.cottage, miners, connelly, tatchell & dunlop, hands e w, morrison, horsfield taylor, horsfield mrs, hocking james, sunda singh, howe j b, grabasch mrs j o, reed bros, grylls mrs e p, coy f c t, farmers & citizens trustees company bgo ltd, simpson wm -
 Bendigo Historical Society Inc.
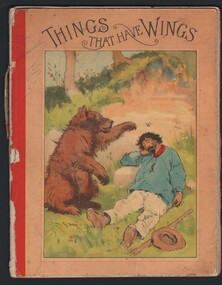
Book - THINGS THAT HAVE WINGS
... by William Clowes and Sons Limited, Stamford Street and Charing Cross... Limited, Stamford Street and Charing Cross, London. Published ...Book. Things That Have Wings. Child's book titled 'Things That Have Wings'. Part of The Little Lamb Series of Books. Printed by William Clowes and Sons Limited, Stamford Street and Charing Cross, London. Published by The Religious Tract Society, 56 Paternoster Row and 65 St Paul's Churchyard, London. Book has a lithograph on inside title page of foliage and insects drawn by T Sulman. Book contains stories on varying winged animals and insects and contains six lithograph drawings by varying artists. Pages 29 and 30 are missing. Book is a buff colour with a red torn spine binding. Front cover has a coloured picture of a bear swatting a fly away from a sleeping man. Stories contain a religious tone. To Jessie from Florrie (in pencil on inside front cover.)book, story, things that have wings, childrens book -
 Bendigo Historical Society Inc.
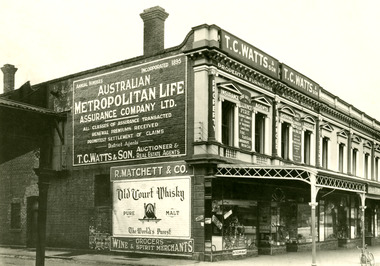
Photograph - MATCHETT'S CORNER
... end of City Club Hotel. Block of buildings at Charing Cross.... Block of buildings at Charing Cross. Demolished - replaced ...John Matchett was born in Corbrackey, Ireland in 1828. His Wholesale and Family Grocers started in 1857. It was on the Corner of Hargreaves and Edward Streets, Bendigo. It was known as the BELFAST STORES, HARGREAVES-STREET WEST SANDHURST. After his death in1903, Robert Matchett carried on the Grocery and Produce Business.Black and white photograph on grey board. Row of brick 2 storey shops with verandas over footpath. Windows on second story have columns each side and curved and painted pediments over. On back of photograph is written: Matchett's Corner at Bath Lane end of City Club Hotel. Block of buildings at Charing Cross. Demolished - replaced by Fountain Plaza block. In image, many advertisements. On F BR 'Frank A Jeffrey Photo - Bendigo'. Circular stamp 'Royal Historical Society of Victoria - Bendigo Branch'. In image 'TC Watts and Son' , 'Property and Furniture Auction Rooms', Australian - Metropolitan Life Assurance Company Ltd', R Matchett and Co - Grocers - Wine and Spirit Merchants', 'Old Court Whisky'. Pin hole in each corner, brown stain (spilled liquid) on image.Frank A Jeffreybendigo matchetts, john mattchett -
 Bendigo Historical Society Inc.
Document - CLARA BUTT AND KENNERLEY RUMFORD, 1913
... & Hargreaves St., Bendigo. Cockings Teething Pilules, Chemist, Charing... Pilules, Chemist, Charing Cross, Bendigo. The Café Savoy Pall Mall ...Clara Butt and Kennerley Rumford, Australian Tour 1913. Princess Theatre, Bendigo, Tuesday Evening, August 12th, 1913. Program on page 8 (pages not numbered). Program has many advertisments; Prescott & Dawe Ophalmic Opticians, corner of Mitchell & Hargreaves St., Bendigo. Cockings Teething Pilules, Chemist, Charing Cross, Bendigo. The Café Savoy Pall Mall, The Athens Café, Vienna Café, Pall Mall and City Market, Hargreaves St., Bendigo. Favaloro Bros., others are from Melbourne and Ballarat. Also an advertisment for J & N Tait's coming engagements or Mr Harry Lauder, the CelebratedScotch ComedianPublished by W H Pickering & Co., 343 Collins St. Printed by Page & Bird Pty Ltd., Melbourne. Cover light card, dark cream. Pages paper, cream. Blue ink used throughtout.Published by W H Pickering & Co., 343 Collins St. Printed by Page & Bird Pty Ltd., Melbournetheatre, opera, clara butt and kennerley rumford, clara rumford & kennerley rumford, australian tour 1913. princess theatre, bendigo, august 12th, 1913. program has many bendigo advertisments along with ballarat and melbourne advetisments and advertisment for j & n tait's engagements or mr harry lauder, scotch comedian -
 Ballarat Tramway Museum
Newspaper, The Courier Ballarat, "Cabinet stops tram move", 9/06/1953 12:00:00 AM
... Charing Cross and Golden Square from July 6. Quotes the Acting... tram operations between Charing Cross and Golden Square from ...Yields information about the considerations of State Cabinet of a proposal by the SEC to close a Bendigo tram line and thoughts to move the tramways from the SEC to MMTB Management.Newspaper clipping from the Ballarat Courier - 9/6/1953, titled "Cabinet stops tram move" reporting that state cabinet had vetoed the SEC's proposal to cease tram operations between Charing Cross and Golden Square from July 6. Quotes the Acting Premier Mr. Garvin. Follows a mass meeting of tramway employees the previous Sunday. Item notes that the Govt was planning to re-organise the SEC and the trams are likely to come under the control of the MMTB, or the Transport Board. See Reg Item 5651 for a follow up Courier Editorial on this matter. On rear of cutting is an item about trains services in Melbourne being restored following the Jolimont dispute and that the MMTB were to run more peak period trams. Contained originally within Reg Item 5623 at the front of this note book. For items see btm5623 loose items list.pdf.has date "9-6-53" in ink on right hand side at top.mmtb, sec, bendigo, golden square -
 Bendigo Historical Society Inc.
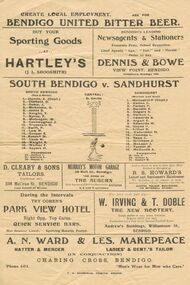
Document - RANDALL COLLECTION: BENDIGO FOOTBALL LEAGUE SPONSORS, 1926
... & Les. Makepeace, Ladies & Gents Tailor(In Conjunction) Charing... & Les. Makepeace, Ladies & Gents Tailor(In Conjunction) Charing ...Document, Bendigo Football League , Sponsors.Hartley's Sporting Goods (J.L.Shoosmith); Dennis & Bowe View Point, Bendigo, Newsagents & Stationers;D. Cleary & Sons, Tailors, 358 McCrea St, Bendigo; Murray's Motor Garage, 58 Bull St, Bendigo; R.S.Howard's Ladies & Gentlemen's Hairdresser, 114 Mitchell St, Bendigo;Park View Hotel Right Opp. Top Gates; W. Irving & T.Doble , The New Bootery, Andrew's Buildings Williamson St., Bendigo; A.N.Ward & Les. Makepeace, Ladies & Gents Tailor(In Conjunction) Charing Cross, Bendigo;South Bendigo V. Sandhurst,game; 6 O'Clock Lager - Ginger Tonik;Webster's Williamson Street, Bendigo; Suttons, Pall Mall, Bendigo; Brasier & Co, Railway Station, Bendigo, Heavy Machinery & Houses Removed; ''Dug Out'' Thomas & Newell, Complete Home Furnishers, Opp. Savings Bank; Capital Theatre, Book at Suttons or Ring 696.F.H.Sparkman, Printer, Arcade.document, names of bendigo pioneers -
 Bendigo Historical Society Inc.
Document - DOCUMENTS RELATING TO: THE BENDIGO AND DISTRICT TOURIST ASSOCIATION, July 7th, 1970
... . Theatre, façade of Charing Cross, a flying-fox from Nell Gwynne..., façade of Charing Cross, a flying-fox from Nell Gwynne ...Various documents relating to the Bendigo and District Tourist Association. Includes Minutes of five meetings of the Board (1970/1971); Notice of AGM 1969; Annual Report 1971; Articles of Association (as amended 14/9/1971); single page headed ''Development of Nell Gwynne and Victoria Hill Sites'' - extensive plans for a 'tourist site with museum, cemetery, chapple (sic), rotunda. Theatre, façade of Charing Cross, a flying-fox from Nell Gwynne to Victoria Hill (no date); Mining Sub-Committee Report and Recommendation (Tourist Development Committee) 1967 re Resolution that ''Quartz Hill'' be developed as a mining tourist attraction (details provided ($75.000 est.); Draft Proposals for Brochure (authored by Miles Lewis, Carlton) - brochure to promote the idea of a museum and tourist development at the Nell Gwynne site; letter to Bendigo businesses re seeking funds for tourist development - Daryl McClure, Hon Sec June 1970.;bendigo, tourism, bendigo and district tourist association -
 Bendigo Historical Society Inc.
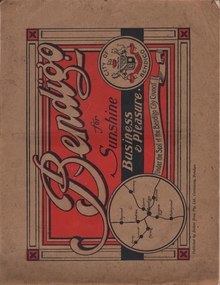
Book - BENDIGO FOR SUNSHINE BUSINESS AND PLEASURE
... , The Bendigo Advertiser, Charing Cross, Hartley Bros, Cohn Bros..., Bucknell & Jeffrey, The Bendigo Advertiser, Charing Cross, Hartley ...Bendigo for Sunshine Business and Pleasure, under the seal of the Bendigo City Council. Published by Bolton Bros Pty Ltd, Centreway, Bendigo. The book has 56 pages of early Bendigo photos, depicting various tourist attraction, buildings,shops, industries. Some of the photes: Herbert Keck&Sons, Commercial House, Tomlins-Simmie&co. Flour Millers,The Beehive, W. Cowling, The School of Mines, Chemists of Bendigo, Bolton Bros, Prescott and Dawe, Churches of Bendigo, W.J. Lenten, Myer,Favaloro, Electric Light- Poer and Tramway, Bartlett Bros, Baker&Woods, William Wallace, Public Buildings, Lake Weeroona, Bendigo Business College, Leggo's of Bendigo, Rosalind Park, Stillwell, Bendigo Pottery, Warren's Emporium, Randall's, Chatfield, Frank Monaghan, Rickards Bros, Cocking's Bargain Centre, Whitelock & Carter, Bucknell & Jeffrey, The Bendigo Advertiser, Charing Cross, Hartley Bros, Cohn Bros, Bendigo Art Gallery, J.B. Wilson.bendigo, history, photographic history -
Clunes Museum
document
... Charing Cross London 1882) .5 PLAN OF GOLD MINING CO'S. CLUNES... by Alfred G. Lock F.R.G.S published by E. & F. N. Spon 16 Charing ...INFORMATION ABOUT A STAMP SHOE FROM A CORNISH STYLE SQUARE-HEAD STAMP BATTERY POSSIBLY USED BY PORT PHILLIP MINE, CLUNES, FROM MATTHEW CHURCHWARD, SENIOR CURATOR, ENGINEERING & TRANSPORT, MUSEUM OF VICTORIA LETTER DATED 15 OCTOBER, 1997. THE GOLDFIELDS AND MINERAL DISTRICTS OF VICTORIA. GOLD ITS OCCURRENCE AND EXTRACTION, PLAN OF GOLD MINING COMPANIESINFORMATION RECEIVED REGARDING THE PORT PHILLIP MINE; Including .1 COPY OF ARTICLE 12TH MAY, 1858 FROM "THE ARGUS." MELBOURNE. .2 LETTER FROM "SCIENCEWORKS" TO MR. ALAN KEEBLE DATED 15/10/1997 (3 Pages) .3 SECTION OF MERCURY, TROUGHS, STAKES & STAMPS (Extract taken from publication, The Gold Fields, Mineral Districts of Victoria, by R. Brough Smyth F.G.S, published by Queensberry Hill Press 1979) .4 GOLD. ITS OCCURRENCE AND EXTRACTION (Extract taken from publication, Gold: Its Occurrence and Extraction by Alfred G. Lock F.R.G.S published by E. & F. N. Spon 16 Charing Cross London 1882) .5 PLAN OF GOLD MINING CO'S. CLUNES (Extract taken from Dicker's Mining Record 26/3/1867, page 173. https://trove.nla.gov.au/work/32734386?q&versionId=39944948) local history, mining, company exploration -
 Ballarat Tramway Museum
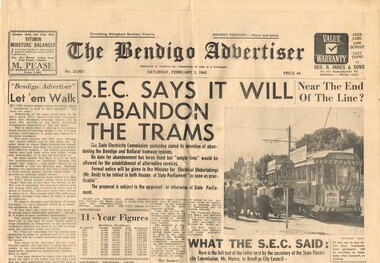
Newspaper, Bendigo Advertiser, "SEC Says it will abandon the trams" "Near the end of the Line?" "Let 'em Walk", "What the SEC Said", "Lost City Without Trams", 3/02/1962 12:00:00 AM
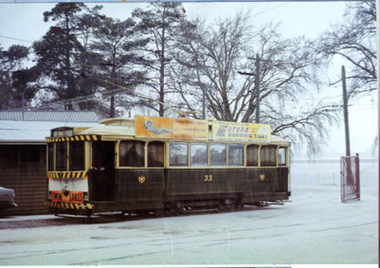
... en route to Eaglehawk at Charing Cross and further article... at Charing Cross and further article reporting on comments from four ...Yields information about the 1962 proposal of the SEC to closure the Bendigo tramway system and notes the impact on the city, with references to Ballarat and Geelong.Newspaper - The Bendigo Advertiser, Saturday 3/2/1962, 14 broad sheet pages, with the main headline ""SEC Says it will abandon the trams" about the notice given in Parliament the previous day by the Minister for Electrical Undertakings Mr. Reid following notice by the SEC. Includes the text of a letter to the City of Bendigo, by the Secretary of the SEC, Mr. D. H. Munro. Has an editorial titled "Let 'em Walk", a photo of the No. 2 en route to Eaglehawk at Charing Cross and further article reporting on comments from four civic leaders "Lost City Without Trams". Quotes two local MLA's - L. W. Galvin, C.P. Stoneham, Cr. W. Mathrick of Eaglehawk and the K.H. Gordon,Chamber of Commerce. Notes impact on the city, Ballarat and Geelong bus system. See Reg Item 6950 for the Ballarat The Courier Report. Full copy of the newspaper collected for style and adverts - has a Briquette advert on page 14.sec, closure, bendigo, parliament, eaglehawk, geelong, ballarat -
 Bendigo Historical Society Inc.
Photograph - DAWN SMITH COLLECTION: PHOTOS OF BENDIGO, c1929
... in Bendigo's "Charing Cross", the intersection of View Street and Pall... and monuments. The fountain is located in Bendigo's "Charing Cross ...Black & White Photograph Alexandra Fountain, Bendigo Souvenir Tourism Set Rose Collection Series c1929. Alexandra Fountain is regarded as one of Bendigo, Victoria, Australia's most prominent landmarks and monuments. The fountain is located in Bendigo's "Charing Cross", the intersection of View Street and Pall Mall. Haring Cross effectively stands at the centre of the city and is one of Bendigo's busiest and most prominent intersections. The fountain stands opposite to the main entrance of Rosalind Park. Alexandra Fountain was funded from the proceeds of the Bendigo Juvenile Industrial Exhibition (1879), a £500 gift from George Lansell and a further £700 from the Sandhurst City Council (now the City of Greater Bendigo). The fountain was designed by W. C. Vahland,] a local architect responsible for some of the cities most prominent buildings.The fountain was named in honour of Alexandra, Princess of Wales and the grand opening (5 July 1881) was attended by her sons Prince Albert and Prince George.bendigo, tourism, alexandra fountain bendigo -
 Ballarat Tramway Museum
Document - Calendar, Topmill Pty Ltd, "Australian Trams 1999 Calendar", 1998
... , 23 and two single truckers at Charing Cross 1970. Used... and 1299i4 - trams 28, 2, 23 and two single truckers at Charing Cross ...24 Page full colour calendar featuring Australian Trams, published by Top mill Pty Ltd. Cover (1299i5) features Sydney trams outside Central station in Eddy Ave. Other cities represented - Brisbane, Sydney, Adelaide, Perth, Fremantle, Bendigo, Ballarat, Sydney light rail, Hobart and Melbourne. Photos by Hugh Ballment, Dale Budd, Robert Merchant, Arthur Perry and the Sydney Tramway Museum. Priced at $9.95, and has "Parkholme Newsagency and Toys" sticker over bar code section, giving the same price. Distributed by Gordon and Gotch. Ballarat trams - 1299i1 - 33 at depot during hail storm on 20/8/1971 and 1299i2 - BTM trams 14 and 26 at Carlton St. during BTM operations 1970's or early 1980's. Used for month of June. Bendigo trams - 1299i3 - No. 4 at Eaglehawk terminus - 1/2/1971 and 1299i4 - trams 28, 2, 23 and two single truckers at Charing Cross 1970. Used for month of May.tramways, trams, australian trams, ballarat, bendigo, museums -
 Bendigo Historical Society Inc.
Document - MCCOLL, RANKIN AND STANISTREET COLLECTION: INDENTURE, GOLD MINING LEASE 11081 CROWN AND HERBERT JACKSON LEED OF BENDIGO, 21st September, 1940
... No Liability of Charing Cross Bendigo is now the proprietor... No Liability of Charing Cross Bendigo is now the proprietor ...6-page document plus map, dated 21st September 1940, between the Crown and Herbert Jackson Leed, for the land shown on the accompanying map 'indicated by yellow colour' Depths indicated on lease document. On map: Mining District of Bendigo, County of Bendigo, Parish of Sandhurst. No. 11081. Net Area 24 acres, 3 roods, 3 perches. Signed by Herbert Leed and ?Walsh, Warden Clerk, Bendigo. Map shows lease holding 11081 coloured yellow. Other leases: no's. 9882 11081, 11034, 11080. Streets: Fletcher Street, and Belle Vue Road. Gullies: Derwenters Mistake Bully and Pig Face Gully on lease 11081. Quarry Hill Recreation Reserve marked and some residential allotments. Water race indicated on map. On back of document: ; Deborah United Gold Mining Company No Liability of Charing Cross Bendigo is now the proprietor of the within described estate by transfer registered on 21st November 1940 and numbered 1795202.bendigo, mining, deborah united gold mine, herbert jackson leed, deborah united gold mining. major general sir winston joseph dugan -
Bendigo Historical Society Inc.
Document - ROSALIND PARK, STATE SERVICE ORCHESTRA, 14 October, 1951
... , Charring Cross, Bendigo. Open- Mon to Sat, 8.30am to 9.30pm. Sun... Supply, Charring Cross, Bendigo. Open- Mon to Sat, 8.30am ...The Centenary Committee in conjunction with the National Theatre Movement present State Service Orchestra. Conductor: Dr. Schildberger. Rosalind Park, Sunday, October 14th 2.45pm, 1951. Program 1/-. Dorothy Deegan, H Fisher, Beryl Jones, Ernest Marzaus, Robert Simmons, Michael Walker, Orchestra. Official Opening of Three-Arts Festival by His Worship the Mayor (Cr. G A Pethard). Accompanist Dr H Schildberger. Flautist Eugene Aumann. Program for Three Arts Festival, Oct. 14-20. Sunday, 3pm State Service Orchestra Rosalind Park. Monday-Ballet and Song: Melbourne Ballet Guild and Mr E Michelson. Tuesday-Drama: Bendigo Branch: The Linden Tree. Wednesday-Orchestral, Bendigo Orchestra Society. Thursday-Vocal and Instrumental Concert. Friday-Shakespeare Festival (in conjunction with Bendigo Shakespearian Society). Saturday- Drama: Swan Hill Branch: Within These Walls. Bookings at Allans. Advertisement on rear cover: Marshall's Fruit Supply, Charring Cross, Bendigo. Open- Mon to Sat, 8.30am to 9.30pm. Sun 9am to 6pm.Cambridge Press, Bendigoprogram, theatre, state service orchestra, the centenary committee in conjunction with the national theatre movement present state service orchestra. conductor: dr. schildberger. rosalind park, october 14th 2.45pm, 1951. dorothy deegan, h fisher, beryl jones, ernest marzaus, robert simmons, michael walker, orchestra. official opening of three-arts festival by his worship the mayor (cr. g a pethard). accompanist dr h schildberger. flautist eugene aumann. melbourne ballet guild and mr e michelson. drama: bendigo branch: the linden tree. orchestral, bendigo orchestra society. vocal and instrumental concert. shakespeare festival (in conjunction with bendigo shakespearian society). drama: swan hill branch: within these walls. bookings at allans. marshall's fruit supply, bendigo. open 7 days a week -
 Ballarat Tramway Museum
Slide - 35mm slide/s set of 7, Noel Simons, 1972
... - No. 6 in Mitchell Street bound for Charing Cross. Tram has... hand side. 1212.2 - No. 6 in Mitchell Street bound for Charing ...Set of 7 transparencies undated on PAKON mounts - appear to be early 1970's. 1212.1 - No. 18 about to enter the Long Gully loop with ESSO service station on the right hand side. 1212.2 - No. 6 in Mitchell Street bound for Charing Cross. Tram has destination of "Rly Station". Has buildings on the east side of Mitchell St. in the background. 1212.3 - No. 7 (North Bendigo) and 29 (Golden Square) crossing. Actual location? 1212.4 - "No 6 showing 'SPECIAL' at Eaglehawk terminus. Has the Foodland store and Fruit shop in the background. 1212.5 - No. 19 at Eaglehawk terminus, on the extension to the normal Eaglehawk terminus. Tram has showing 'Eaglehawk'. Tram has two SEC roof ads. 1212.6 - No. 25 and another Bogie car at Quarry Hill terminus on last day. 1212.7 - No. 18 and 29 at Quarry Hill terminus. No.. 18 showing 'Quarry Hill' - has two SEC roof ads 'Electric Cooking - Matchless' and 'Everything's fine in my all electric kitchen' and No. 29 has a briquettes roof ad.Information typed onto a white label stuck on the slide. 1212.1 - "No. 18 at Long Gully" 1212.2 - "No. 6 in Mitchell Street." 1212.3 - "7 and 29 Lake View Hotel" 1212.4 - "No. 6 at Eaglehawk" 1212.5 - "No. 19 at Eaglehawk Term." 1212.6 - "Last cars Quarry Hill." 1212.7 - "18 & 29 Quarry Hill"tramways, trams, bendigo, long gully, mitchell st., eaglehawk, quarry hill, last tram, tram 6, tram 7, tram 18, tram 19, tram 25, tram 29 -
 Ballarat Tramway Museum
Slide - 35mm slide/s - set of 5, 1970's
... , south of Charing Cross - some surface damage around the top..., south of Charing Cross - some surface damage around the top ...Series of five 35mm slides in a yellow colour "Peter Fox Collins St. Melbourne" cardboard mounts, of view of Bendigo trams. Each slide along the top edge has the details while the bottom edge, has a number in the details area. 2599.1 - No. 9420, No. 24 at Quarry Hill - photo at dusk, poor quality, has surface damage all over slide. 2599.2 - No. 9421, ditto 2599.3 - No. 10132, No. 19 in Bendigo Trust operation colours at intersection of McCrae St & Nolan St, some surface damage around the top and bottom edges. Has Gillies Pies roof advertisement. Tram has destination of North Bendigo. 2599.4 - No. 10133, No. 25, High St, south of Charing Cross - some surface damage around the top and bottom edges. Tram has roof advertisements for "Gas" and "Myers". Has destination of Joss House 2599.5 - No. 10134, No. 19, Pall Mall, some slight surface damage. Tram has destination of Golden Square and has a roof advertisement for Sandhurst Milk and one other company. In blue ink on each slide; number as above in bottom edge. 2599.1 and .2 - "No. 24 Quarry Hill" 2599.3 & .5 - "No. 19 Nth Bendigo" 2599.4 - "No. 25 Nth Bendigo"tramways, trams, bendigo, pall mall, bendigo trust, nolan st, tram 24, tram 19, tram 25 -
 Ballarat Tramway Museum
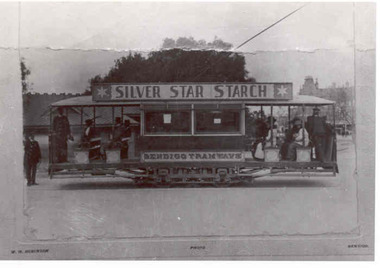
Photograph - Black & White Photograph/s - set of 4, WHO. Robinson, c1905 of original
... photograph of a ESCo Bendigo tramcar at Charing Cross, Bendigo, c1905... at Charing Cross, Bendigo, c1905. Original photograph has been ...1890.1 - Black and white copy photograph of a damaged photograph of a ESCo Bendigo tramcar at Charing Cross, Bendigo, c1905. Original photograph has been damaged - mounted onto a sheet of card, with "WHO. Robinson - Photo - Bendigo" printed onto the sheet. Tram photographed side on, has not been fitted with windscreens. has a "Silver Star Starch" roof advertisement and has "Bendigo Tramways" painted onto the side of the tramcar. In the background of the photograph are buildings in Gardens area that front View St. Also the Shamrock hotel can be seen in the distance. 1890.1 - copy of same photograph but with a better reproduction and repair of the print. 1890.3 - Electronic copy of same photograph donated by Ron Hann on a CD of photographs given to him at the time of his visit in January 1963 by the Manager. Refer to email held with item 3841. Added 28/2/2010. No actual print, held on digital file only - see image 1890i3. See Reg Item 4568 for the CD. 1890.4 - Black and White print contained within the Wal Jack Bendigo and Geelong Album, see Reg Item 5003 for more details. Added 2/7/2013. On rear of 1890.2 - "Bendigo" in ink in top right hand corner and in pencil "(Similar truck to original Ballarat car No. 18"trams, tramways, bendigo, esco, view st, silver star starch -
 Ballarat Tramway Museum
Album - Photo Album, Keith Kings, Jul. 1970
... at Charing Cross 21 1921 Photo of Bendigo Birneys 28 and 29... terminus. 20 1920 Photo of Bendigo 18 at Charing Cross 21 1921 ...Album comprises heavy cardboard covers with brown Rexene covers, with inside papers of heavy dark grey photo album paper, 36 leaves of dark grey photo paper and two brass interscrews within black grommets. See Condition Details re damage to back cover. Album contains 32 photos - personal prints of Keith Kings. Title page has been hand written to Les Denmead, dated 6/7/1970, thanking Mr. Denmead for his assistance over the years. Photos divided into the three SEC Provincial Tramway cities, each with a typed name proceeding the set of photos. Two further photos of Geelong were at the rear of the album, but were not in position when catalogued. One of these photos may be Reg. Item 1874 - photo of Geelong scrubber tram. Each of the photographs have been separately registered, as shown in the table below. Scanned images made of front and back of the photos. Back has Keith Kings ID number, description, notes and date of photo. Conservation Notes prepared - within the cataloguing sheet - see related documents. Folio Reg. Notes Item No. 1 Handwritten note to Mr. L. J. Denmead from Keith Kings. 2 Title sheet – “BALLARAT” 3 1903 Small photo of SEC Monogram from Geelong No. 1 1904 Photo of SEC plaques etc at Wendouree office 4 1905 Photo of front of Wendouree Parade depot – 1957 - with trams 40 and 25 in photo. 5 1906 Photo of Ballarat 23 at depot 6 1907 Photo of Ballarat 29 in depot. 7 1908 Photo of Ballarat 17 in Wendouree Parade 8 1909 Photo of Ballarat 21 at depot. 9 1910 Photo of Ballarat 15 and 31 in Sturt St. 10 1911 Photo of Ballarat No. 40 Sturt St. 11 1912 Photo of Ballarat No. 38 – Wendouree Parade 12 1913 Photo of Scrubber car in depot. 13 Title sheet – “BENDIGO” 14 1914 Photo of Bendigo depot 15 1915 Photo of Bendigo No. 17, 1949. 16 1916 Photo of Bendigo 22 and 4 at Eaglehawk. 17 1917 Photo of Bendigo 12 at Golden Square. 18 1918 Photo of Bendigo 13 and 26 at Eaglehawk terminus. 19 1919 Photo of Bendigo 17 (bogie) at Quarry Hill terminus. 20 1920 Photo of Bendigo 18 at Charing Cross 21 1921 Photo of Bendigo Birneys 28 and 29 at Charing Cross 22 1922 Photo of original sprinkler and track cleaning car in Bendigo depot 23 1923 Photo of Bendigo 2nd track cleaning car 24. 1924 Photo of trams at Manchester Loop, 1958. 25. Title sheet – “GEELONG” 26 1925 Photo of Geelong 19 in front of the depot. 27 1926 Photo of Geelong depot 28 1927 Photo of Geelong No. 3 at East terminus 29 1928 Photo of Geelong No. 23 outside depot. 30 1929 Photo of Geelong No. 16 at Eastern Park terminus. 31 1930 Photo of Geelong No. 28 at depot 32 1931 Photo of Geelong Birney No. 14 at Eastern Park terminus. 33 1932 Photo of Geelong No. 32 at Moorabool St. 34 1933 Photo of Geelong No. 37 outside depot 35 1934 Photo of Geelong No. 39 at West terminus 36. No photo – marks of four corners remained. 37 – back cover No photo – marks of four corners remained. Photos not to be taken out of the album unless for photographic copying. Use image files. Photo Album - The Commercial Photo Album - No. 1 - 36 leaves. See hand written note from Keith Kings to Mr. L. J. Denmead. Dated 6/7/70.trams, tramways, ballarat, bendigo, geelong, photo album -
 Ballarat Tramway Museum
Slide - 35mm slide/s - set of 10, Eldon Hogan, mid 1960's to early 1970's
... roof advertisements. .7 - Three trams, Pall Mall, Charing.... .7 - Three trams, Pall Mall, Charing Cross, with the Beehive ...Set of 10 Agfa Plastic mounted slides - from the Eldon Hogan collection - possibly on an ARE Bendigo tours - mid 1960's (black destination rolls) and late 1960's or early 1970's. Scanned on the Canon scanner at the depot 15/12/1971 at the time of the installation of the scanner. .1 - No. 24 in bound along High St Bendigo with the discovery of gold monument in the foreground, Golden Sq route. .2 - ditto .3 - No. 26 outbound at the above location. .4 - No. 24 at the corner of Short St and High St, with the Technical college building? in the background. .5 - No. 26 at ditto, outbound for Golden Square. .6 - No. 24, High St Bendigo, with the Cathedral in the background. Tram has two Johnnie Walker Whiskey roof advertisements. .7 - Three trams, Pall Mall, Charing Cross, with the Beehive building in the background. Trams have SEC roof advertisement. .8 - ditto with Coca Cola ad on the Beehive building, turning around. .9 - No. 29 and a bogie tram at the Golden Square terminus with Billy Rodda's Golden Square Hotel in the background. Just past the tram is a large truck carrying boxes. .10 - Nos, 18, a bogie tram, 21 and 29 at the Quarry Hill terminus. tramways, trams, bendigo, tram 18, tram 24, tram 26, tram 21, tram 29 -
 Dandenong/Cranbourne RSL Sub Branch
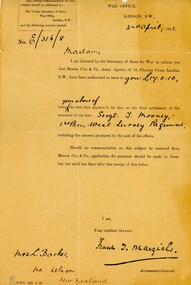
Document - English document, Unknown
... you that Messrs. Cox & Co., Army Agents, of 16, Charing Cross..., of 16, Charing Cross, London, SW., have been authorized to issue ...Historical due to date shown on the form. Possibly Sgt Mooney served in the Boer War.Document signed by the Accountant-General, War Office London 1901 in regards to a legacy for 17 pounds and 10 pence. F. 6-Form 45. War Office, London, SW., 3rd April 1901. Madam, I am directed by the Secretary of State for War to inform you that Messrs. Cox & Co., Army Agents, of 16, Charing Cross, London, SW., have been authorized to issue to you 17 pounds and 10 pence, being you share of the sum that appears to be due on the final settlement of the accounts of the late Sergt. J. Mooney, Ist Bn, West Surrey Regiment, including the amount produced by the sale of his effects. Should no communication on this subject be received from Messrs. Cox & Co., application for payment should be made to them, but not until ten days after the receipt of this letter. I am, Your obedient Servant, Frank T. Marzials, Accountant-General. Form is addressed to Mrs L. Barker, New Zealand -
 Ballarat Tramway Museum
Photograph - Digital image Set of 20
... - No. 28 and 5 at Eaglehawk terminus .2 - No. 28 leaving Charing... - No. 28 leaving Charing Cross and travelling into View St ...Set of 20 digital images of Bendigo Tramways, 1972 at or before closure while on a tram tour by Stuart Lodington. .1 - No. 28 and 5 at Eaglehawk terminus .2 - No. 28 leaving Charing Cross and travelling into View St with Armstrong Type Service building in background and Firestone Advertisements. .3 - No. 29 with Eaglehawk Town Hall and Post Office in background. .4 - No. 26 and 29 at start of double track, High St Eaglehawk .5 - No. 29 leaving Eaglehawk with shops in the background, Foodland, J. Bests .6 - No. 29 and 23 crossing Manchester Loop with Manchester Arms Hotel in the background and an old poppet head. .7 - No. 29 at ditto with poppet head in the background. .8 - No. 28 and two other trams at the Quarry Hill terminus. .9 - No. 29 in High St Bendigo with the Cathedral and Golden Gate Hotel in the background. .10 - No. 3 with destination Eaglehawk, in bound Carpenter St? .11 - No. 29 following a single trucker through a loop or the end of the double track near the depot. .12 - No. 23?, at Eaglehawk terminus, with Eaglehawk Town Hall in the background. .13 - Birney tram crossing the bridge at the Depot entrance - No. 29 .14 - No. 29 on the Eaglehawk line? .15 - as for .13 .16 - No. 29 entering the depot. .17 - No. 23, inbound from Eaglehawk, at Jobs Gully Loop with the railway overbridge in the background. .18 - No. 28 and two other trams (see also Reg Item 4982) for the same tram tour at Myrtle St. Loop. .19 - No. 21 with North Bendigo on the destination approaching the Golden Square terminus. .20 - No. 7 at Golden Square terminustrams, tramways, bendigo, eaglehawk, quarry hill, golden square, depot, tram 5, tram 29, tram 28, tram 26, tram 23, tram 7, tram 21 -
 Bendigo Historical Society Inc.
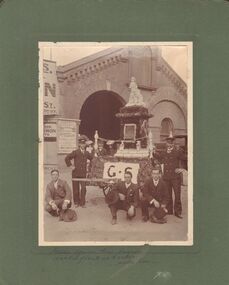
Photograph - W. G. DAHL PHOTO SERIES
... in Charring Cross in front of the now demolished Horse Bazaar once.... The float stands in Charring Cross in front of the now demolished ...Photograph captioned 'Golden Square Fire Brigade Dahlia Float at Easter Fair', is one of nine sepia mounted photographs pertaining to early 20th century Bendigo donated to BHS by the Essendon Op Shop. Uncle Son caption and tick possibly relates to W G Dahl. Float mounted upon a hand drawn fire brigade hose & reel cart has two uniformed Fire-men standing beside the cart, along with three kneeling men wearing ties, vests and suits. Float covered in dahlia flowers has sign reading 'Erected by the Committee of the Victorian Gold Jubilee Exhibition Melb 1901-2 in Commemoration of the Discovery of Gold in Bendigo'. Moulded images in white featuring a kneeling boy panning for gold beside a standing young girl in long dress are prominently displayed upon the top portion of the flower covered float. The float stands in Charring Cross in front of the now demolished Horse Bazaar once located between the Lyric Theatre and the City Family Hotel. Ornate brickwork of the building follows the roof-line either side of embossed 'Established 1853'. Two matching arches are featured on front of building. Horse Bazar is embossed in large capital letters above main entrance arch, with Nicholls & Hill above the other. Embossed letters below read succeeded to L Macpherson & Co & F Hill. A small arched window within walled arch matches entrance arch. A notice board mounted on building front reads, Office of the Australian Alliance Assurance Company , Fire Life Guaranteed. Sandhurst agents ,L Macpherson Sternberg & Son.bendigo, fire brigade, golden square