Showing 730 items
matching bendigo 21
-
 Ballarat Tramway Museum
Slide - 35mm slide/s - set of 32, Noel Simons, 25/02/1971 12:00:00 AM
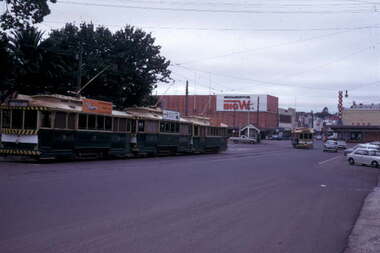
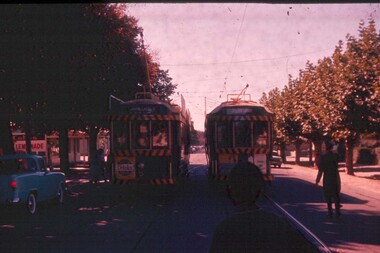
Set of 31 transparencies taken on 25/2/1972 on Kodak mounts. 1201.1 - Bendigo No. 26 in Bond St. just after leaving Long Gully en route for Quarry Hill. Has Norris Supermarket in background. Has two SEC roof ads. 1201.2 - No. 26 climbing View St. from Charing Cross en route to Eaglehawk. Has ANZ bank and AMOCO service station in background. 1201.3 - as for 1201.3, but after tram has passed photographer. Has buildings west of Mackenzie St. in photograph. 1201.4 - Tram stop and centre of the road pole with two "CARS STOP BY REQUEST" signs mounted on pole at the corner of Mackenzie St. 1201.5 - same position as for 1201.3, but with No. 5 descending the street. 1201.6 - same position as for 1201.2, but with No. 5 descending the street. Photo taken after tram has passed photographer. 1201.7 - No. 7 in Nolan St. from across the park at Lake Weeroona. 1201.8 - No. 7 entering McCrae St from Nolan St. - distant view. Note "TRAM "sign on left hand side under tree and overhead in McCrae St. from former track that once was in this street. 1201.9 - No. 7 in High St. with Cathedral in background. Tram en route to North Bendigo. Note scaffolding around Cathedral main spire area. 1201.10 - No. 7 crossing Bendigo Creek bridge in High St. near Golden Square. Has a Caltex Service station in the background. 1201.11 - No. 7 at Golden Square terminus with Sunburst Fruit Juices and a Peters Ice cream delivery vans alongside. 1201.12 - as for 1201.11 but photo taken from behind tram, with the end of the rails in the photograph. 1201.13 - No. 7 and 21 in Pall Mall at Charing Cross with No. 5 in the background. Taken some distance away from the location. 1201.14 - No. 7 at Golden Square terminus, taken a short distance from the tram terminus. Shows Milk Bar on right hand side and the hotel on the left hand side. Taken from the south side of the roadway. 1201.15 - as from 1201.14 but taken from the north side of the roadway. 1201.16 - No 5 waiting at California Gully loop. Distant photo showing surrounds 1201.17 - No. 5 en route for Quarry Hill crossing No. 26 at California Gully. 1201.18 - No. 26 at Eaglehawk terminus with Eaglehawk Town Hall and Post Office in background. 1201.19 - No. 21 arriving at Charing Cross en route to North Bendigo. Has Alexandra Fountain in the background, ANZ bank RACV building, and other buildings on the north side of Pall Mall or Nolan St. 1201.20 - No. 26 en route for Quarry Hill at Charing Cross, with crew standing by front door. Has Colonial Mutual life building, Armstrong Tyre Service (Firestone) and a sign for Cohns Drinks in the background. 1201.21 - as for 1201.20 but with No. 5 en route to Eaglehawk now in photograph. 1201.22 - No. 26 at Quarry Hill terminus. 1201.23 - No. 26 at Quarry Hill terminus, view of front portion of tram only from a gate at the Bendigo cemetery. 1201.24 - Track at the end of the Quarry Hill line showing the point blades of the former "Y" terminus and the overhead for this. 1201.25 - No. 2 at the Quarry Hill terminus, looking along the former Trackwork. 1201.26 - as for 1201.25 1201.27 - number not used. 1201.28 - Golden Square terminus from some distance from the actual terminus, showing the Warning sign "TRAM" for motorists from the south. No. 7 at the terminus. 1201.29 - No. 7 passing through the Golden Square shopping centre. Numerous cars and pedestrians. Tram en route for North Bendigo. 1201.30 - No. 7 in High St. Golden Square, en route for North Bendigo. Photo taken after tram has passed photographer. 1201.31 - No. 7 in High St. just past Wattle St. with the Cathedral in the background. Tram has two SEC roof ads good side on photo, 'Everything's fine in my all electric kitchen' and 'Electrical cooking - clean, quick, economical'. 1201.32 - No. 7 in High St. nearing Wattle St. Has Cathedral in the background. Photo taken after tram has passed photographer.Information written on in black ink and date stamped on purple ink. 1201.1 - "No. 26 in Bond St just after leaving Long Gully" 1201.2 - "No. 26 climbing View St. from Charing Cross" 1201.3 - "No. 26 ascending View St. from Charing Cross (At Mackenzie St.)" 1201.4 - "View St. & Mackenzie St." 1201.5 - "No. 5 in View St. near Mackenzie St." 1201.6 - "No. 5 in View St. nearing Charing Cross." 1201.7 - "No. 7 in Nolan St. seen from Lake Weeroona Park." 1201.8 - "No. 7 entering McRae St. from Nolan St. Note "TRAM" warning sign on left. 1201.9 - "No. 7 in High St. passing Short St." 1201.10 - "No. 7 crossing Bendigo Creek bridge in High St. near Golden Square." 1201.11 - "No. 7 at Golden Square terminus" 1201.12 - "No. 7 at Golden Square terminus" 1201.13 - "No 7, 21 and 5 at Charing Cross" 1201.14 - "No. 7 at Golden Square terminus" 1201.15 - "No. 7 at Golden Square terminus" 1201.16 - "No 5 waiting at California Gully loop." 1201.17 - "Nos. 5 and 26 crossing at California Gully loop" 1201.18 - "No. 26 at Eaglehawk terminus" 1201.19 - "No. 21 arriving at Charing Cross from Golden Square" 1201.20 - "No. 26 at Charing Cross" 1201.21 - "Nos. 5 and 26 at Charing Cross." 1201.22 - "No. 26 at Quarry Hill terminus" 1201.23 - "No. 26 at Quarry Hill terminus seen through the gates of the Bendigo Cemetery." 1201.24 - "Quarry Hill terminus showing remains for former double track layout abandoned before 1964." 1201.25 - "No. 2 at Quarry Hill terminus" 1201.26 - "No. 2 at Quarry Hill terminus" 1201.28 - "The Southern approach to Golden Square with No. 7 standing at the terminus, "TRAM" warning sign on the left. 1201.29 - "No. 7 passing through Golden Square Shopping Centre" 1201.30 - "No. 7 in High St. Golden Square" 1201.31 - "No. 7 in High St. passing Wattle St." 1201.32 - "No. 7 in High St. nearing Wattle St."tramways, trams, bendigo, bond st., view st., nolan st., high st., eaglehawk, california gully, charing cross, quarry hill, trackwork, tram 2, tram 5, tram 7, tram 21, tram 26 -
 Ballarat Tramway Museum
Slide - 35mm slide/s - set of 8, Noel Simons, 25/02/1972 12:00:00 AM
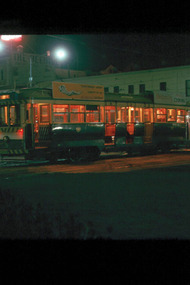
Set of 8 transparencies taken on 25/02/72 on Kodak mounts. 1202.1 - Night photo of Bendigo 5 at Charing Cross, waiting to depart to Quarry Hill. Tram has two SEC roof ads. Has Ezywalkin and the Beehive buildings in the background. 1202.2 - as for 1202.1 1202.3 - as for 1202.1 but further back and 7 and 21 waiting for their runs as well in Pall Mall. 1202.4 - 5 and 2 at Charing Cross, night photo, looking along Mitchell St. with Fountain Plaza on right of photo and Ezywalkin store. 1202.5 - No. 2 at Charing cross, bound for Eaglehawk. Tram has two SEC ads. 1202.6 - No. 26 at Quarry Hill terminus with the cemetery in the background. Tram has two SEC roof ads. 1202.7 - No. 26 in Mitchell St. bound for Eaglehawk, at Wills St. with the Hopetoun Hotel in the background. 1202.8 - as for 1202.6Information written on in blue ink and date stamped on purple ink. 1202.1 - "No. 5 at Charing Cross" 1202.2 - "No 5. at Charing Cross" 1202.3 - "Nos. 7, 21 and 5 at Charing Cross" 1202.4 - "Nos. 5 and 2 at Charing Cross" 1202.5 - "No. 2 at Charing Cross" 1202.6 - "No. 26 at Quarry Hill" 1202.7 - "No. 26 in Mitchell St. opposite Wills St." 1202.8 - "No. 26 at Quarry Hill" tramways, trams, bendigo, night photo, charing cross, quarry hill, mitchell st., tram 2, tram 5, tram 7, tram 21, tram 26 -
 Ballarat Tramway Museum
Slide - 35mm slide/s - set of 25, Noel Simons, 26/02/1972 12:00:00 AM
Set of 25 transparencies taken on 26/2/1972 on Kodak mounts. 1204.1 - Bendigo No. 5 - just arrived at Manchester Loop near Havilah Road, Long Gully. Photo taken after tram has passed photographer. 1204.2 - No. 26 in Backhaus St. Long Gully passing William St, en route to Quarry Hill. Photo taken after tram has passed photographer. 1204.3 - No. 5 climbing the High St. Hill Eaglehawk, heading for Quarry Hill with the buildings on the West side of High St. in the background, including the Eaglehawk Town Hall. 1204.4 - as for 1204.3, but tram close up. 1204.5 - as for 1204.3, but after tram has passed photographer. 1204.6 - No. 5 at intersection of Mt Korong Road Ironbark and Calder Highway, with the AMPOL service 'station in the background. Photo taken after tram has passed photographer. 1204.7 - No. 26 en route to Quarry Hill shortly after leaving Needle Loop, passing William St., Long Gully. 1204.8 - No. 5 at California Gully Loop, picking up a passenger, with the shops at Long Gully in the background. Photo taken after tram has passed photographer. 1204.9 - No. 5 in Long Gully, en route to Quarry Hill. Photo taken after tram has passed photographer. 1204.10 - No. 2 at Eaglehawk terminus with the Eaglehawk Town Hall and Post Office in the background. Tram has two SEC roof ads. 1204.11 - No. 2 at Eaglehawk terminus, close up. 1204.12 - as for 1204.11, but through the park gates. 1204.13 - as for 1204.11, but with tram stop shelters in the foreground and buildings on the West side of High St in the background. 1204.14 - No. 2 in Mt. Korong Rd, midway between California Gully Loop and Needle Loop. Photo taken after tram has passed photographer. 1204.15 - No. 5 in Long Gully, en route to Quarry Hill. 1204.16 - as for 1204.15, but with trams departed loop. Has an ESSO service station in the background. 1204.17 - No. 26 leaves Charing Cross up View St.. Photo taken after tram has passed photographer. Has Armstrong Tyre Service, Cohns Drinks ad on a building and the T&G building in the background. Also Firestone ads on the tyre service building. 1204.18 - No. 5 waits at Charing Cross with the Alexandra Fountain in the background. Tram has two SEC roof ads, 'Everything s fine in my all electric kitchen' and 'Electricity Best for Cooking'. Has RACV, Colonial Mutual Life buildings in the background and the planting areas around Charing Cross gardens in the foreground. 1204.19 - No. 21 en route to North Bendigo arrives at Charing Cross, with passengers waiting to board. No. 5 in the background. In the background is the Fountain Gate Plaza building and the City Family Hotel. 1204.20 - as for 1204.19, but with No. 7 en route to Golden Square. 1204.21 - as for 1204.19, but closer up. 1204.22 - as for 1204.18 1204.23 - No. 25 in Nolan St. near the crossing of Bendigo Creek, running a special tram tour. 1204.24 - No. 25 on a special charter, in Weeroona Ave. at Cnr of Caledonia St. passing the Gas works. 1204.25 - Nos. 25 (showing Golden Square), 7 and 26 at Charing Cross. Has fountain in the background.Information written on in blue ink and date stamped on purple ink. 1204.1 - "No. 5 at Manchester Loop, near Havilah Rd. Long Gully." 1204.2 - "No. 26 in Backhaus St. Long Gully passing William St." 1204.3 - "No. 5 in High St. Eaglehawk." 1204.4 - "No. 5 in High St. Eaglehawk." 1204.5 - "No. 5 in High St. Eaglehawk." 1204.6 - "No. 5 in Mt. Korong Rd., Ironbark, passing Calder Highway Junctn." 1204.7 - "No. 26 shortly after leaving Needle Loop, passing William St., Long Gully. No. 5 cresting hill in distance." 1204.8 - "No. 5 at California Gully Loop." 1204.9 - "No. 5 in Long Gully" 1204.10 - "No. 2 at Eaglehawk terminus." 1204.11 - "No. 2 at Eaglehawk terminus." 1204.12 - "No. 2 at Eaglehawk terminus." 1204.13 - "No. 2 at Eaglehawk terminus." 1204.14 - "No. 2 in Mt. Korong Rd, midway between California Gully Loop and Needle Loop. 1204.15 - "Nos. 2 and 26 crossing at Long Gully." 1204.16 - "No. 26 leaves Long Gully loop for Eaglehawk as No. 2 pulls out of the far end towards Bendigo" 1204.17 - "No. 26 beginning the climb up View St. from Charing Cross." 1204.18 - "No. 5 at Charing Cross." 1204.19 - "No 21 arrives at Charing Cross from Golden Square while No. 5 awaits departure time for Eaglehawk." 1204.20 - "Nos. 7, 21, and 2 (behind which is No. 5) at Charing Cross." 1204.21 - "Nos. 7, 21, and 2 at Charing Cross." 1204.22 - "No. 5 at Charing Cross." 1204.23 - "No. 25 in Nolan St. near Bendigo creek crossing" 1204.24 - "No. 25 in Weeroona Ave. at cnr of Caledonia St." 1204.25 - "Nos. 25, 7, 26 and 2 (behind 26) at Charing Cross."tramways, trams, bendigo, eaglehawk, long gully, california gully, charing cross, north bendigo, tram 2, tram 5, tram 7, tram 21, tram 25, tram 26 -
 Ballarat Tramway Museum
Slide - 35mm slide/s - set of 23, Noel Simons, 26/02/1972 12:00:00 AM
... . No. 21 bound for North Bendigo. 1205.3 - as for 1205.3.... No. 21 bound for North Bendigo. 1205.3 - as for 1205.3 ...Set of 23 transparencies taken on 26/2/1972 on Kodak mounts. 1205.1 - Bendigo No. 25 on a special tour at Fire Station Loop, en route to Golden Square. 1205.2 - No. 21 and 25 crossing at Fire Station Loop, note photographers on the ground. No. 21 bound for North Bendigo. 1205.3 - as for 1205.3, but with trams departing loop and fire station in the background. 1205.4 - No. 25 at Golden Square Hotel with 'Rodda's Golden Square Hotel' in the background. Tram on a special tour, but showing destination of North Bendigo. 1205.5 - as for 1205.4 - but showing special. Has the end of the track in the photograph. 1205.6 - Nos. 7 and 25 (on a special tour) crossing at Myrtle St. Loop. 1205.7 - No. 7 leaving Myrtle St. loop with the mine poppet head in the background. Photo taken after tram has passed photographer. (Print made of this slide 10/2001 for use in the Gold Gold Gold exhibition of 10/2001 - See Reg. item 1979. 1205.8 - No. 25 entering depot. Tram showing 'special'. Tennis court on right has players. Photo taken after tram has passed photographer. 1205.9 - No. 24 (showing 'special') and No. 20 (showing 'Long Gully') at Bendigo Depot. 1205.10 - No. 24 on a special charter, leaving Bendigo depot. Tram has two 'Johnnie Walker' roof ads. 1205.11 - Bendigo depot with 29, 25 and a bogie car inside the depot doors. 1205.12 - As for 1205.11, but with 28 and 29. 1205.13 - No. 24 standing at front entrance of Bendigo depot with No. 20 in the background. 1205.14 - No. 24 running out into McCrae St showing special, with conductor on front step. 1205.15 - No. 24 in Caledonia St. at corner of Thunder St with the Gasworks in the background. 1205.16 - No. 5 en route for Quarry Hill at Charing cross with No. 26 (en route for Eaglehawk) about to arrive. Has former crossover at this location in the foreground. Has the Ezywalkin building in the background. 1205.17 - No. 5 and 26 at Charing Cross, with the Alexandra Fountain in the foreground and the Beehive and Ezywalkin buildings in the background. No.26 has two SEC roof ads. 1205.18 - Charing Cross looking along Pall Mall with trams 7 and 21 and 26 in the picture. 1205.19 - Charing Cross, with 21 departing for Golden Square and No. 5 heading for Quarry Hill. Has the Ezywalkin and the Beehive buildings in the background. 1205.20 - as for 1205.19, but a few moments later. Adjacent pole has a "NO ROAD" letter in reflectors vertically. 1205.21 - Charing Cross with Nos. 25, 21, 26 and 7, looking south from Pall Mall end. 1205.22 - No. 24 crossing Mitchell St. en route for Golden Square, showing 'special' with the Beehive and Ezywalkin buildings in the background. 1205.23 - Charing Cross with Nos. 24, 21 and 7 in the photo and Fountain Plaza in the background. Print of 1205.7 - stored in box D1.Information written on in blue ink and date stamped on purple ink. 1205.1 - "No. 25 at Fire Station Loop High Street, Golden Square." 1205.2 - "Nos. 25 and 21 crossing at Fire Station Loop, near Golden Square." 1205.3 - "Nos. 25 and 21 crossing at Fire Station Loop, near Golden Square." 1205.4 - "No. 25 at Golden Square terminus." 1205.5 - "No. 25 at Golden Square terminus." 1205.6 - "Nos. 7 and 25 crossing at Myrtle St. Loop." 1205.7 - "No. 7 leaving Myrtle St. Loop." 1205.8 - "No 25, entering Bendigo Depot." 1205.9 - "Nos. 20 and 24 at Bendigo Depot." 1205.10 - "No. 24 at Bendigo Depot." 1205.11 - "Nos. 25 and 29 at Bendigo Depot." 1205.12 - "Birney cars 29 and 28 at Bendigo Depot." 1205.13 - "No. 24 (with 20 beyond) at Bendigo Depot." 1205.14 - "No. 24 entering McCrae St. from Arnold St." 1204.15 - "No. 24 in Caledonia St. at cnr of Thunder St." 1204.16 - "No. 5 waits at Charing Cross as No. 26 arrives from Quarry Hill. Note remains of crossover abandoned on relocation in 1965." 1204.17 - "Nos. 5 and 26 at Charing Cross." 1204.18 - "Nos. 26, 7 and 21 at Charing Cross (No. 5 just visible behind No. 26)." 1204.19 - "No. 21 leaves Charing Cross for Golden Square as No. 5 starts off for Quarry Hill." 1204.20 - "No. 21 swings onto the single track Golden Square line as No. 5 heads into Mitchell St. towards Quarry Hill." 1204.21 - "Nos. 25, 21 and 26 watch No. 7 arrive at Charing Cross from Golden Square." 1204.22 - "No. 24 at Charing Cross crossing Mitchell St." 1204.23 - "Nos. 24, 21 and 7 at Charing Cross."tramways, trams, bendigo, golden square, myrtle st., fire station, depot, charing cross, tram 5, tram 7, tram 20, tram 21, tram 24, tram 25, tram 28, tram 29 -
 Ballarat Tramway Museum
Slide - 35mm slide/s - set of 12, Noel Simons, 28 Feb. 1972
... of the tram. 1207. 8 - No. 21 in High St. Bendigo with the Cathedral... - No. 21 in High St. Bendigo with the Cathedral in the background ...Set of 12 transparencies taken on 28/2/1972 on Kodak mounts. 1207.1 - Bendigo 26 and 2 at Charing Cross. 26 en route for Eaglehawk, 2 for Quarry Hill. Has the Colonial Mutual Life, Armstrong Tyre Service, and Australian Mutual Provident Society buildings and a Cohns Drinks ad. in the background. 1207.2 - as for 1207.1 but with Alexandra fountain in the foreground. 1207.3 - No. 2 in Mitchell St. heading for Quarry Hill. Photo taken after tram has passed photographer. Has buildings on either side of Mitchell St. in the background, including the Plaza Theatre. 1207.4 - No. 6 en route for Golden Square departing Charing Cross. Has the RACV and ANZ bank in the background. 1207.5 - No. 2 crossing Pall Mall to enter Charing Cross ex Quarry Hill, with the Fountain Plaza in the background. 1207.6 - No. 6 arriving Charing Cross ex Golden Square with No. 21 alongside. No. 21 has the SEC ad. 'Everything's fine in my all electric kitchen.' Has the City Family Hotel and the Fountain Plaza shopping centre in the background. 1207.7 - No. 5 at Charing Cross en route for Quarry Hill with No. 2 behind. No. 2 has two SEC roof ads, 'Everything s fine in my all electric kitchen' and 'Electricity best for cooking'. RACV building in the background. Tram crews are discussing the day in the front of the tram. 1207. 8 - No. 21 in High St. Bendigo with the Cathedral in the background. No. 21 has two SEC roof ads, 'Everything's fine in my all electric kitchen' and 'Electricity best for cooking'. 1207.9 - No. 6 in High St. Bendigo with the Cathedral in the background. 1207.10 - No. 6 in High St. Bendigo, just past Wattle St. Photo taken after the tram has passed the photographer from within the Highway Car Sales yard. 1207.11 - No. 26 bound for Eaglehawk at the end of the double track in View St., note signal contactors, tram stop and section signs mounted on pole. 1207.12 - No. 26 turning from View St. into Barnard St.Information written on in blue ink and date stamped on purple ink. 1207. 1- "Nos. 26 and 2 at Charing Cross." 1207.2 - "Nos. 26 and 2 at Charing Cross." 1207.3 - "No. 2 in Mitchell St. just after leaving Charing Cross." 1207.4 - "No.6 leaving Charing Cross for Golden Square." 1207.5 - "No. 2 arriving at Charing Cross from Quarry Hill." 1207.6 - "No. 21 waits at Charing Cross as No. 6 arrives from Golden Square." 1207.7 - "No 5 at Charing Cross with No. 2 lurking behind." 1207.8 - "No. 21 in High St. at cnr of Wattle St." 1207.9 - "No. 6 in High St. at cnr of Wattle St." 1207.10 - "No. 6 in High St. between Wattle and Vine Sts." 1207.11 - "No. 26 at end of double track in View St. near Barnard. St. 1207.12 - "No. 26 seen at dusk turning from View St. into Barnard St."tramways, trams, bendigo, charing cross, high st, view st., tram 2, tram 5, tram 6, tram 21, tram 26 -
 Ballarat Tramway Museum
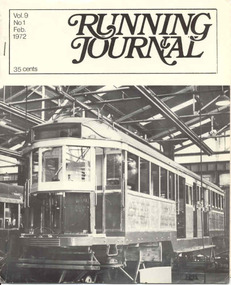
Magazine, Tramway Museum Society of Victoria (TMSV), "Running Journal Vol 9, No. 1, Feb. 1972", Feb. 1972
Demonstrates aspects of publication of material in an enthusiast based magazine for a Melbourne based organisation, with a detailed article on the overhaul of trams at Preston workshops for Melbourne.Feb. 1972 issue of "Running Journal", consisting of formally printed cover on glossy paper which has been folded, containing seven wax stencil cut, duplicated sheets, pages 3 to 16. Published by the Tramway Museum Society of Victoria. Sheets have been stapled into the folded covers. See condition notes also. Cover has W2 277 undergoing a "O2" overhaul at Preston workshops Page 2 - photos of 928, 733 and 921 undergoing various overhaul stages Pages 3 to 9 - article by Norm Cross on MMTB tramcar overhauls at Preston Workshops Page 9 - News from Ballarat (BTPS - foundations for new shed) Page 10 - 11 - Tramway Quiz Page 12 - 14 - TMSV Museum news (muses) Page 15 - Answers to quiz Page 16 - Back issues of Running Journal Page 17 - Photos of 980 and Museum activities Page 18 (back cover) - 18 in Sturt St., July 1970, Ballarat 18 - in Vickers St. Sebastopol shed, trams 31, 30 and 32 stored at the SEC Ballarat North Power station grounds awaiting transport, in October 1971 and MMTB 469 arriving as the last Footscray tram. Loose sheet - duplicated, advertising, Last Mail Covers - Bendigo Tramways, prior to closure on 16/4/1972. Second copy ex ARHS 9/2003 added 21/09/2006. 3rd copy added 28/10/2007, ex Graeme Breydon Collection.Has Graeme Breydon address stamp on front cover.trams, tramways, tmsv, running journal, ballarat, overhauls, preston, mmtb -
 Ballarat Tramway Museum
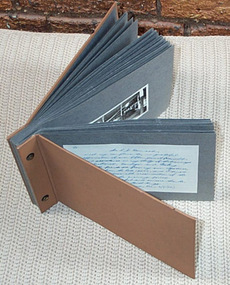
Album - Photo Album, Keith Kings, Jul. 1970
... at Charing Cross 21 1921 Photo of Bendigo Birneys 28 and 29... terminus. 20 1920 Photo of Bendigo 18 at Charing Cross 21 1921 ...Album comprises heavy cardboard covers with brown Rexene covers, with inside papers of heavy dark grey photo album paper, 36 leaves of dark grey photo paper and two brass interscrews within black grommets. See Condition Details re damage to back cover. Album contains 32 photos - personal prints of Keith Kings. Title page has been hand written to Les Denmead, dated 6/7/1970, thanking Mr. Denmead for his assistance over the years. Photos divided into the three SEC Provincial Tramway cities, each with a typed name proceeding the set of photos. Two further photos of Geelong were at the rear of the album, but were not in position when catalogued. One of these photos may be Reg. Item 1874 - photo of Geelong scrubber tram. Each of the photographs have been separately registered, as shown in the table below. Scanned images made of front and back of the photos. Back has Keith Kings ID number, description, notes and date of photo. Conservation Notes prepared - within the cataloguing sheet - see related documents. Folio Reg. Notes Item No. 1 Handwritten note to Mr. L. J. Denmead from Keith Kings. 2 Title sheet – “BALLARAT” 3 1903 Small photo of SEC Monogram from Geelong No. 1 1904 Photo of SEC plaques etc at Wendouree office 4 1905 Photo of front of Wendouree Parade depot – 1957 - with trams 40 and 25 in photo. 5 1906 Photo of Ballarat 23 at depot 6 1907 Photo of Ballarat 29 in depot. 7 1908 Photo of Ballarat 17 in Wendouree Parade 8 1909 Photo of Ballarat 21 at depot. 9 1910 Photo of Ballarat 15 and 31 in Sturt St. 10 1911 Photo of Ballarat No. 40 Sturt St. 11 1912 Photo of Ballarat No. 38 – Wendouree Parade 12 1913 Photo of Scrubber car in depot. 13 Title sheet – “BENDIGO” 14 1914 Photo of Bendigo depot 15 1915 Photo of Bendigo No. 17, 1949. 16 1916 Photo of Bendigo 22 and 4 at Eaglehawk. 17 1917 Photo of Bendigo 12 at Golden Square. 18 1918 Photo of Bendigo 13 and 26 at Eaglehawk terminus. 19 1919 Photo of Bendigo 17 (bogie) at Quarry Hill terminus. 20 1920 Photo of Bendigo 18 at Charing Cross 21 1921 Photo of Bendigo Birneys 28 and 29 at Charing Cross 22 1922 Photo of original sprinkler and track cleaning car in Bendigo depot 23 1923 Photo of Bendigo 2nd track cleaning car 24. 1924 Photo of trams at Manchester Loop, 1958. 25. Title sheet – “GEELONG” 26 1925 Photo of Geelong 19 in front of the depot. 27 1926 Photo of Geelong depot 28 1927 Photo of Geelong No. 3 at East terminus 29 1928 Photo of Geelong No. 23 outside depot. 30 1929 Photo of Geelong No. 16 at Eastern Park terminus. 31 1930 Photo of Geelong No. 28 at depot 32 1931 Photo of Geelong Birney No. 14 at Eastern Park terminus. 33 1932 Photo of Geelong No. 32 at Moorabool St. 34 1933 Photo of Geelong No. 37 outside depot 35 1934 Photo of Geelong No. 39 at West terminus 36. No photo – marks of four corners remained. 37 – back cover No photo – marks of four corners remained. Photos not to be taken out of the album unless for photographic copying. Use image files. Photo Album - The Commercial Photo Album - No. 1 - 36 leaves. See hand written note from Keith Kings to Mr. L. J. Denmead. Dated 6/7/70.trams, tramways, ballarat, bendigo, geelong, photo album -
 Ballarat Tramway Museum
Photograph - Black & White Photograph/s, Keith Kings, 7/03/1958 12:00:00 AM
Black and White photograph contained with Reg. Item 1902 - Photo Album from Keith Kings to Les Denmead 1970. Photograph of SEC Bendigo - Manchester Loop on the Eaglehawk route, with trams 21, 2 and 23 to the city with No. 20 and 17 waiting in the loop to proceed to Eaglehawk. Part of the Bendigo Easter Fair day? Large group of people waiting to board tram in the background. A number of motor vehicles in the photo. Photo taken Easter Monday, 7/3/1958. On rear of photo is stamped "ll317A and 28.5.70", possibly indicating print manufacture dates. Keith Kings No. A(e)(12) Scanning: i - image file, p - presentation file, b - back of photograph.Stamp in top left hand corner and handwritten number with "K.S. Kings No. A(e)(12) Copyright reserved". In blue ink "Bendigo / The second track cleaning car / Depot / Easter Monday 7/3/54".trams, tramways, bendigo, easter fair, manchester loop, eaglehawk, tram 21, tram 2, tram 23, tram 20, tram 17 -
 Ballarat Tramway Museum
Photograph - Black & White Photograph/s - set of 2, Keith Kings, 21/08/1955 12:00:00 AM
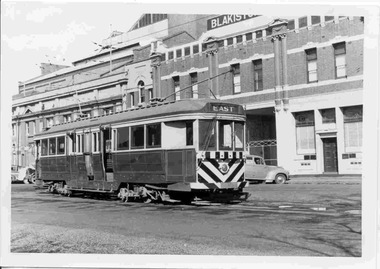
.1 - Black and White photograph contained with Reg. Item 1902 - Photo Album from Keith Kings to Les Denmead 1970. Photograph of SEC Geelong, 37, fitted with dash canopy lighting and tiger stripes outside the depot, 21/8/1955. Tram has destination of "East". Name of "Blakistons" on building in background. Photo on back has number "l 012A and 14.5.70" in black ink, possibly indicating date of making print. Keith Kings No. P(d)(5) .2 - Black and White print contained within the Wal Jack Bendigo and Geelong Album, see Reg Item 5003 for more details. Details as above..1 - Stamp in top left hand corner and handwritten number with "K.S. Kings No. P(d)(5) Copyright reserved". In blue ink "Geelong / No. 37 / As fitted with dash lighting / Outside depot / 21/8/55". .2 - Stamp as above. In blue ink "Geelong No. 37 Zebra painted ends and canopy. Only ex P&MTT bogie thus. (All ex HTT bogies thus) 21/8/55". trams, tramways, geelong, depot, blakistons, tram 37 -
 Ballarat Tramway Museum
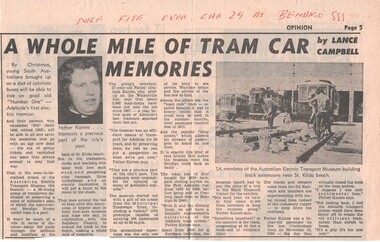
Newspaper, The Advertiser, "A whole mile of tram car memories" - Adelaide tramway history & opening of AETM Track, 26/10/1972 12:00:00 AM
Newspaper Clipping from the Adelaide Advertiser dated 25/10/1972 in the Opinion section, written by Lance Campbell, of Father Graham Kaines providing a potted history of Adelaide's trams, the opening of the AETM's first section of tramway track and Fr. Graham's interest since a 14 year old in trams. Includes a photograph of three workers (unknown), trams No. 1, 282 (?) and Ballarat 21 on depot fan. Page 5 of newspaper. See also Other Information for personal note from cataloguer.In red biro on top of page "Nice Fite over car 29 at Bendigo 881"trams, tramways, aetm, tramway museums, adelaide, father graham kaines -
 Ballarat Tramway Museum
Photograph - Black & White Photograph/s set of 19, Mar. 1972
... ". 981.1 - Tram 21 at North Bendigo terminus, with level crossing... Bendigo Golden Square Quarry Hill tram 2 tram 21 tram 7 tram 24 ...Set of 19 black and white prints, all 89mm square of Bendigo trams, date machine printed on print is "Mar 1972". 981.1 - Tram 21 at North Bendigo terminus, with level crossing in background. Has destination "Golden Square" and two SEC roof ads. 981.2 - tram 2? at Eaglehawk, with destination "Depot", two SEC roof ads and "Leo A. Hughes Photographer" on side of building in background. 981.3 - tram 2? at Eaglehawk, side on view. 981.4 - tram 26 at Quarry Hill terminus looking back into city. 981.5 - tram 7 en route to North Bendigo at the site of the Bridge St. loop. Has a Peters Ice Cream truck and Sandhurst Fruit Juices truck on right side of photograph. 981.6 - tram 2 at Quarry Hill terminus. 981.7 - tram 2? at one of the loops on the Eaglehawk line, inbound? 981.8 - bogie tram at Charing Cross with fountain in background. Side on view looking south. 981.9 -trams 7 and 21 on Golden Square/North Bendigo line with bogie tram in background, at Charing Cross. Same as item 972. 981.10 - bogie tram at Charing Cross - has buildings in south west corner in background, including Colonial Mutual Life and an advertisement for the Herald newspaper. 981.11 - trams 25, 7 and two other trams at Charing Cross. 981.12 - trams 2 and 26 and three others at Charing Cross. 981.13 - tram 25 at Golden Square terminus, with Rodda's Golden Square Hotel in the background. Tram showing destination of "Nth Bendigo" 981.14 - tram 24, showing "Special" on depot access track. Has two Johnnie Walker roof ads on side. 981.15 - as above, but tram on bridge outside depot. 981.16 - trams 25 and 28 at depot 981.17 - tram 24 showing "Special" on depot access track with a single truck car in background. 981.18 - trams 2 and 26 at Charing Cross. Has advertisements for "Armstrong Tyre Service" and "Cohn's drinks" on buildings in background. 981.19 - Bendigo 2 at location?, about to enter a loop or double track section. Has hotel in background. On rear of each photo in the top left hand corner is a print number 1 to 19 in ink and location notes, generally "Bendigo"trams, tramways, charing cross, bendigo, golden square, quarry hill, tram 2, tram 21, tram 7, tram 24, tram 26 -
 Ballarat Tramway Museum
Document - Form/s, Ballarat Tramway Preservation Society (BTPS), BTPS Sales sheet, mid 1970's
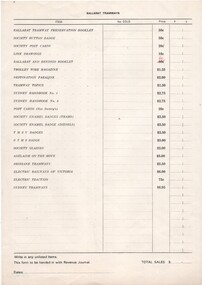
1027.1 - A4 size sheet printed as a sales listing record sheet for the BTPS mid 1970's. Use to record sales of various items and to facilitate the calculation of the total sales at the end of the day or period. Gives Item, No. Sold, Price and $, c. Lists 21 different items, including enamel badges, glasses etc. 1027.2 - as for 1027.1 - except price of "Ballarat and Bendigo Book" changed from 50c to 60c in red biro.trams, tramways, sales sheets, btps, sales, accounting -
 Ballarat Tramway Museum
Memorabilia - Exhibition Material, Warren Doubleday, "gold!, Gold!, GOLD! and Trams", 29/01/2003 12:00:00 AM
Two photos and thirty captions or label cards used in the Museum's exhibition entitled "gold!, Gold!, GOLD! and Trams". Printed on a colour laser jet, 200 gsm card, unless noted otherwise. Most cards have two Velcro dots on rear, except larger ones which may have three or four. .1 151 x 210 Opening Tram Leonora Tramways - supplied by the Perth Electric Tramway Society .2 210 x 292 Kalgoorlie Electric Tramways Limited trams No. 19 and 13 - ex PETS .3 210 x 297 Gold and Tramways of Ballarat - text card.. .4 210 x 297 text card - 2nd card. .5 130 x 210 Acknowledgements card. .6 - .8 97 x 297 - "GOLD!" on each card, with a heavier font each time. .9 172 x 297 "and trams" .10 136 x 297 "Painted to Celebrate" .11 383 x 80 "At first horses" .12 62 x 472 "Then came Electric" - Two pieces of card joined together, stored folded. .13 65 x 557 "and other Golden Cities" - Two pieces of card joined together, stored folded. .14 68 x 550 "For the City of Ballarat" - Two pieces of card joined together, stored folded. .15 47 x 385 "To Ballarat East as well" .16 45 x 90 "Main St" / "Photo Wal Jack 1963 btm362" .17 46 x 194 "Main and Victoria Sts" / "Photo Ron Fluck 1950 btm870" .18 69 x 126 "1964 Sebastopol" / "Photo Tramway Museum Society of Victoria" .19 66 x 99 "1951 Ballarat / Photo Keith Kings btm1378" .20 45 x 102 "Bendigo N.J. Simons Collection btm 1205.7" .21 68 x 106 "2001 Ballarat / Photo Warren Doubleday" .22 43 x 157 "To Sebastopol / From E.D. Jenkins book, Sebastopol Victoria 1864-1964 btm1090" .23 43 x 158 "From the City / Charles Rudd photograph, State Library of Victoria btm 1113i" .24 43 x 271 "Electric Power for Industry / BTM Collection btm 698i" .25 47 x 160 "To the Gardens / From Geo Rose stereo pair. Donated by Bacchus Marsh Blacksmith Cottage and Forge btm1257" .26 41 x 96 "Leonora / Courtesy Perth Electric Tramway Society" .27 45 x 117 "Bridge St / Postcard from Norm DePomeroy collection btm 841" .28 46 x 169 "Transport for all / Postcard from Norm DePomeroy collection btm837" .29 44 x 89 "Main St / Photo Ron Fluck 1962 btm867" .30 41 x 117 "Kalgoorlie / Courtesy Perth Electric Tramway Society" .31 46 x 150 "1905 Opening / BTM Collection btm482" .32 52 x 404 "Ballarat Trams are Ballarat History"trams, tramways, btm, exhibitions, gold!, gold!, gold! and trams, gold tram -
Ballarat Tramway Museum
document - Correspondence, Electric Supply Co. of Vic (ESCo), Jul. 1927
Set of two letters and a newspaper cutting between Mr. P. J. Pringle of ESCo Ballarat and Mr. D. Murdoch, General Manager of the TB Melbourne regarding the controversy with the SEC regarding the possible takeover by the SEC of the Ballarat and Bendigo power supplies and the trams. 1973.1 - Letter from ESCo to TB dated 19/7/1927 and received by TB 21/7/1927 forwarding some cuttings regarding the matter (see Reg. Item 1973.3 and 1974.). On ESCo letterhead. 1972.2 - Carbon copy of letter from TB to ESCo, on pink paper dated 21/7/1927 regarding the matter. 1972.3 - Newspaper clipping from The Courier, 13/6/1927 titled "Future Electricity Supplies / Yallourn or the Company? / Ballarat and Bendigo Confer" Contains a statement from Mr. P. Pringle and reports on the conference held between Ballarat and Bendigo Councillors in Ballarat on previous Saturday afternoon. On top of the pink sheet written in pencil is the file number "22/1/2" and on the newspaper clipping, 1972.3 "Courier 13/6/27".tram, trams, sec, esco, mmtb, takeover, power supply -
 Ballarat Tramway Museum
Slide - 35mm slide/s - set of 4, Peter Moses, Jan. 1969
... trams / Charing Cross" and in red ink "21" .3 - "Bendigo... - "Bendigo three trams / Charing Cross" and in red ink "21" .3 ...Set of four colour slides taken at Charing Cross Bendigo, Jan. 1969. .1 - Trams 30 and 28 travelling to North Bendigo and Golden Square respectively. Has the Beehive building in the background, along with W.M.I. Jones Chemist, Evelyn Amor shop, Dewars Whiskey rooftop advertisement. 28 has a SEC Briquettes roof advertisement. .2 - As above but with the front or bogie tram in the photo. Also has A. G. Treloar Optician's shop. Kodak cardboard mount slide, taken by Peter Moses, Jan. 1969. .3 - Close up photo of Birney No. 30, with 28 in the background. .4 - No. 28 leaving for Golden Square with the Plaza building, the Cenotaph, and the City Family Hotel in the background. Kodak cardboard mount slide, taken by Peter Moses, Jan. 1969.On the rear of all the slides "P. Moses" in black ink .1 - "Bendigo Charing Cross" and in red ink "19" .2 - "Bendigo three trams / Charing Cross" and in red ink "21" .3 - "Bendigo" and in red ink "23" .4 - "Bendigo Charing Cross" and in red ink "14". tramways, trams, bendigo, tram 28, tram 30 -
 Ballarat Tramway Museum
Slide - 35mm slide/s - set of 5, Peter Moses, Jan. 1969
Set of five colour slides taken the SEC Bendigo depot, Jan. 1969. .1 - inside depot, show two bogies and one Birney on one road and the pit arrangements. .2 - ditto, slightly different exposure .3 - trams 21, 24 and 5 at the front of the depot .4 - Scrubber tram by the depot extension. .5 - Looking across the depot yard with the scrubber in the foreground and depot in the background. Kodak cardboard mount slide, taken by Peter Moses, Jan. 1969. On the rear of all the slides "P. Moses" in black ink .1 - "Jan 1969 Bendigo / Depot" in blue ink and on the opposite side of the slide in red ink “28” .2 - "Jan 1969 Bendigo / Depot" in blue ink and on the opposite side of the slide in red ink “27” .3 - "Jan 1969 Bendigo / Tram Depot" in blue ink and on the opposite side of the slide in red ink “29” .4 - In red ink "31" .5 - "Jan 1969 Bendigo / Depot" in blue ink and on the opposite side of the slide in red ink “30”. tramways, trams, bendigo, depot, scrubber tram, tram 21, tram 24, tram 5 -
 Ballarat Tramway Museum
Slide - 35mm slide/s, Peter Moses, Jan. 1969
Photo of three single truckers, 31, 32, 21 parked in City Loop, with another single trucker, 26 or 28 entering Sturt St. 31 and 21 have SEC "Everything's under control in my all-electric kitchen", 32 - Wilkinson Sword?. In the background are Woolworths Big W store and Dickins supermarket. Kodak cardboard mount slide, taken by Peter Moses assumed Jan. 1969, dated only "Jan", but date lines up with Bendigo slides and type of numbering. Could be 1970.On the rear of the slide in black ink "P. Moses" along bottom right hand corner in black ink.tramways, trams, city loop, sturt st, grenville st, tram 31, tram 32, tram 21 -
 Ballarat Tramway Museum
Document - Photocopy, M. Sayers, "Lighting Effects in the Victoria Gardens, Bendigo", 2000?
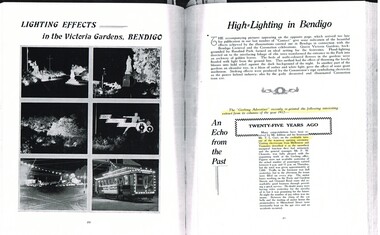
... . Yields information about tram 21 as the Bendigo Coronation tram ...Article titled "Lighting Effects in the Victoria Gardens, Bendigo", "High = Lighting in Bendigo", "An Echo from the Past". The article has photos of celebratory flood lighting in Bendigo, Victoria Gardens during 1937, for the Bendigo Carnival and Coronation Celebrations. Festivities were held in Victoria Gardens. Notes the Coronation tram car, illuminated and decorated. Has a photo of No. 21 outside the depot. Reprint of an extract from the Geelong Advertiser in 1912, 25 years ago of the opening of the Geelong tramways, passenger numbers and celebrations of the event. Record revised 3/4/2019 to add digital images with those from Andrew Cook CD. See item 9099 for the image of tram 21. Page 35 - records the relocation of Mr. A N Mercer who was involved in the reconstruction of Ballarat and Bendigo Tramways has transferred to the Flinders St Drawing Office. Each item had a thin strip of paper attached by staple to the top left hand corner, giving the Vol. No. details.Yields information about tram 21 as the Bendigo Coronation tram in Photocopy of an article in the State Electricity Commission of Victoria Magazine, Contact, Vol 2, No. 2, Aug. 1937. One A3 sheet.trams, tramways, sec, geelong, decorated trams, bendigo, opening, coronation -
 Ballarat Tramway Museum
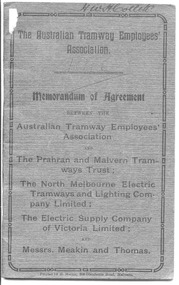
Book, Australian Tramway Employees Association (ATEA), "Memorandum of Agreement - ATEA with PMTT, NMETL, ESCo & Meakin & Thomas", 1913
Four separate agreements, one for each organisation. All details wages and conditions of work and disputes, grievances, and discipline, leave etc. Pages 1 - 10 - agreement with the PMTT - dated 14/1/1913, applied from 1/10/1912 to 1/6/1916. Signed for PMTT by Alex Cameron Chairman; Thomas King Member; and Thomas King Secretary and for Union by Lionel L. Hill President and A. C. Warton General Secretary. Pages 12 - 20 - ditto with NMELTL - dated 14/1/1913, applied from 1/1/1913 to 30/6/1916. Signed for NMETL by L. Voight, A.D. Murdoch and for Union by A. C. Warton General Secretary. Pages 21 - 32 - ditto with ESCo - dated 14/1/1913, applied from 1/12/1912 to 30/6/1916, includes rosters for Ballarat and Bendigo. Signed by William J Home for P. J. Pringle for ESCo and for Union by Lionel L. Hill President and A. C. Warton General Secretary. Pages 33 - 42 - ditto with Messrs Meakin and Thomas, Lessees of the Northcote Cable Tramways. Dated 14/1/1913, applied from 1/12/1912 to 30/6/1916. Signed by F.W. Meakin and Lena Thomas in front of Louis Waxman Solicitor and A. C. Warton, General Secretary. Yields information about the industrial agreements with Tramway operators in Victoria, except for MTOCo.Forty-Four page booklet, off-white paper, saddle-stapled, with additional dark grey colour paper cover titled "The Australian Tramway Employees' Association with the The Prahran & Malvern Tramways Trust / The North Melbourne Electric Tramways and Lighting Company Limited/ The Electric Supply Company of Victoria Limited and Messrs. Meakin and Thomas". Two copies held. "Ballarat Tramway Preservation Society Catalogue No. 213" in ink on top of first page, inside cover on both copies. Copy 1 - has name of "H.W.H.Collett" and "1913" on front cover, and pencil or red pencil notes against various rules in the ESCo section. Copy 2 - some minor pencil marks.trams, tramways, bendigo, ballarat, atea, unions, agreements, esco, nmetl, pmtt, northcote cable trams, meakin & thomas -
 Ballarat Tramway Museum
Newspaper, Transport Regulation Board, "Ballarat & Bendigo Bus Services", 1970
Newspaper cutting that advertises applications for the provision of bus services in Bendigo and Ballarat to replace the urban tramway systems.Newspaper clipping from the Tenders/Holidays Section of a Melbourne Newspaper, Dec 1970, possibly the Melbourne Sun or The Age, advertising for applications for replacement bus services to the trams in Ballarat and Bendigo. Issued by the Transport Regulation Board. Notes that detailed plan of bus services available from the Board's Offices, cnr of Lygon and Princes Sts Carlton and a closing date of 21 Jan. 1971. Signed by B. P. Kay as Secretary. closure, bus services, ballarat, bendigo, transport regulation board -
 Ballarat Tramway Museum
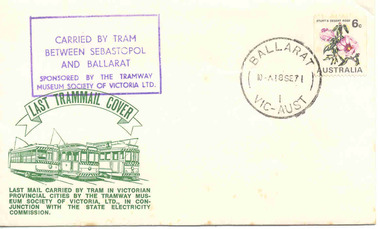
Document - Letter and Envelope, Tramway Museum Society of Victoria (TMSV), "Last Trammail Cover", 9/1/971
Demonstrates arrangements made by the TMSV to record the closure of the SEC Ballarat system in 1971 and has a strong association with some of the donor's activities at the time.Last Tram Mail Cachet - Ballarat 1971. 2942.1 - Envelope - preprinted in dark green ink - titled "Last Trammail Cover" - with a purple stamp in top left hand corner - "Carried by Tram between Sebastopol and Ballarat / Sponsored by the Tramway Museum Society of Victoria Ltd.", in top right hand corner - 6c Australia stamp, featuring Sturt's Desert Rose and a Post Office Cancellation stamp "Ballarat 18 Sep. 71". Envelope made by Tudor Presseal. 2942.2 - Preprinted card - green ink titled "Last Trammail Cover", headed by TMSV's name, address and details of the TMSV, with the names of the Organisers John Fitzsimons and Bob Prentice along the lower edge. Purchased through eBay - envelope and eBay emails within worksheet. 2942.3 - as for 2942.1, addressed to Mr. N. Gower / Flat 5 - 12 Errard St / Ballarat 3350. 2942.4 - as for 2942.2 - no damage to card and with words "Neville / Best Wishes / Bob Prentice" on rear in red ink. 2942.3 and .4 added 21/03/2006. Hand written note by Neville stored with worksheet. 2942.5 - added 11/10/2007 - envelope that has not been used. See Reg Item 5957 for the Bendigo version.2942.1 - On rear of envelope "$12" in pencil, 2942.4 - Words "Neville / Best Wishes / Bob Prentice" on rear in red ink.trams, tramways, tmsv, last tram, post office, postage stamps, last tram mail -
 Ballarat Tramway Museum
Slide - 35mm slide/s, Travis Jeffrey, c1962
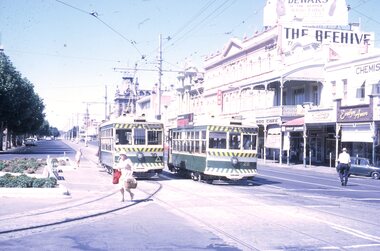
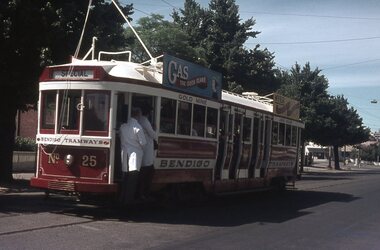
Agfa plastic mount (blue base, white cover) with a photo of Bendigo No. 5 and No. 24 crossing at Myrtle St. loop. No. 5 has destination of Charing Cross and a Cohns Drinks Advertisement on front panel. No. 24 has destination of Golden Square. On the front dash panel is advertisement for Huttons Hams and a Streets Ice-cream advertisement. Note the empty roof advertisement panel on No. 24 - refer to Reg. Item 2632, which shows the tram at Golden Square."BES 21" in penciltramways, trams, bendigo, golden square, myrtle st, tram 5, tram 24 -
 Ballarat Tramway Museum
Document - Letter/s, Melbourne and Metropolitan Tramways Board (MMTB), 16/03/1934 12:00:00 AM
Yields information about the setting the height of overhead in Melbourne.Memo from T. Strickland, Chief Engineer, MMTB to GM, ESCo, Bendigo, dated 16/3/1934 regarding the height of overhead in Melbourne. Received 21/3/1934 and acknowledged 20/3/1934. Sheet has a watermark.trams, tramways, overhead, trolley wire, esco -
 Ballarat Tramway Museum
Document - Letter/s, State Electricity Commission of Victoria (SECV), "Tramways By-Law No. 1 ", Sep. 1949
Yields information about the distribution of the SEC tramway by-laws to workers and alterations to them in 1949 in a temporary format.Correspondence concerning the alterations to By-Law No. 1, in Sept. 1949. .1 - covering letter forwarding the typed amendments to the Manager Ballarat, dated 21/9/1949. Has a date stamp of 23/9/1949.. type on Quarto paper with SEC letter head. .2 - 6 pages - foolscap - carbon copy of the alterations to the By Law, re special trams, fares in Ballarat, Bendigo and Geelong and transfer checks. Dated under seal of the SEC 18/8/1949. trams, tramways, by laws, sec -
 Ballarat Tramway Museum
Photograph - Digital image Set of 20
... ) for the same tram tour at Myrtle St. Loop. .19 - No. 21 with North... St. Loop. .19 - No. 21 with North Bendigo on the destination ...Set of 20 digital images of Bendigo Tramways, 1972 at or before closure while on a tram tour by Stuart Lodington. .1 - No. 28 and 5 at Eaglehawk terminus .2 - No. 28 leaving Charing Cross and travelling into View St with Armstrong Type Service building in background and Firestone Advertisements. .3 - No. 29 with Eaglehawk Town Hall and Post Office in background. .4 - No. 26 and 29 at start of double track, High St Eaglehawk .5 - No. 29 leaving Eaglehawk with shops in the background, Foodland, J. Bests .6 - No. 29 and 23 crossing Manchester Loop with Manchester Arms Hotel in the background and an old poppet head. .7 - No. 29 at ditto with poppet head in the background. .8 - No. 28 and two other trams at the Quarry Hill terminus. .9 - No. 29 in High St Bendigo with the Cathedral and Golden Gate Hotel in the background. .10 - No. 3 with destination Eaglehawk, in bound Carpenter St? .11 - No. 29 following a single trucker through a loop or the end of the double track near the depot. .12 - No. 23?, at Eaglehawk terminus, with Eaglehawk Town Hall in the background. .13 - Birney tram crossing the bridge at the Depot entrance - No. 29 .14 - No. 29 on the Eaglehawk line? .15 - as for .13 .16 - No. 29 entering the depot. .17 - No. 23, inbound from Eaglehawk, at Jobs Gully Loop with the railway overbridge in the background. .18 - No. 28 and two other trams (see also Reg Item 4982) for the same tram tour at Myrtle St. Loop. .19 - No. 21 with North Bendigo on the destination approaching the Golden Square terminus. .20 - No. 7 at Golden Square terminustrams, tramways, bendigo, eaglehawk, quarry hill, golden square, depot, tram 5, tram 29, tram 28, tram 26, tram 23, tram 7, tram 21 -
 Ballarat Tramway Museum
Photograph - Digital image Set of 20, 1971-72
Set of 22 digital images of Bendigo Tramways, 1972 at or before closure while on a tram tour by Stuart Lodington. .1 - No. 7 arriving at North Bendigo .2 - No. 5 departing Charing Cross along View St, with a Firestone tyres in the background. .3 - front view of a tram in View St with a blurred background image. .4 - No. 24 showing Eaglehawk destination .5 - No 26 and 3 in View St, with the Armstrong Tyre Service building in the background and signs for T&G and Cohn's Drinks. .6 - ditto .7 - No. 3 arriving at Charing Cross from Eaglehawk in View St, with a Quarry Hill destination. .8 - No. 3 and 18 at Charing Cross. .9 - No. 24 on the Quarry Hill line. .10 - No 26 in View St, with the Armstrong Tyre Service building in the background and signs for T&G and Cohn's Drinks. .11 - ditto, with fountain in view, Colonial Mutual building and a newsagent with a Herald sign on the building. .12 - No. 7 at North Bendigo terminus .13 - ditto with pole being reversed. .14 - No. 18 at Quarry Hill terminus with Northern Terrazzo sign in the background. .15 - No. 24 at Quarry Hill terminus .16 - No. 18 arriving at Charring Cross, with Fountain Plaza and Bendigo Pharmacy in the background. .17 - No. 3 and 18 at Charing Cross. .18 - No. 7 at North Bendigo terminus with pole being placed on the overhead. .19 - No. 26 in View St inbound, with Sandhurst Trustees sign in the background. .20 - No. 6 leaving Charing Cross in Pall Mall with Myer and other buildings in the background. .21 - No. 7 at North Bendigo .22 - Single trucker with two roof Advertisements crossing View St with fountain in view, Colonial Mutual building and a newsagent with a Herald sign on the building.trams, tramways, bendigo, eaglehawk, quarry hill, north bendigo, charing cross, view st, tram 7, tram 5, tram 24, tram 26, tram 5, tram 3, tram 18, tram 6 -
 Ballarat Tramway Museum
Photograph - Digital image Set of 20, 9/12/1972 12:00:00 AM
... Set of 21 digital images of Bendigo Tramways, at the re... 30 tram 19 Set of 21 digital images of Bendigo Tramways ...Set of 21 digital images of Bendigo Tramways, at the re-opening of the Bendigo tramways by the Bendigo Trust on 9/12/1972by Stuart Lodington. All trams in the first Bendigo Trust colours. .1 - No. 25 with Gas and Myer roof advertisements .2 - No. 30 with 3BO roof advert and a BP service station in the background. .3 - SEC single trucker at the Mine with a large "Tram Tours" sign on the front of the tram .4 - ditto .5 - No. 19 with a large group of passengers, Bendigo Motor Co and Sandhurst roof advertisements .6 - No. 30 in McCrae St .7 - view of opening march with band .8 - No. 19 in opening parade .9 - Opening Parade in High St with cathedral in the background .10 - No. 30 in Nolan St crossing bridge .11 - ditto .12 - No. 25 at the mine .13 - No. 30 leaving the mine .14 - No. 30 ditto with BCTV roof advert. .15 - Charing Cross with cenotaph, The Beehive building and Ezywalkin shoes and Coca Cola adverts .16 - No. 19 southbound in High St with City Centre Motel building in the background. .17 - No. 30 returning from North Bendigo .18 - No 25 in High St after leaving Gold Mine .19 - No. 30 at the Mine .20 - No. 30 in Nolan St .21 - No. 30 with 3BO roof advert and a BP service station in the background.trams, tramways, bendigo, north bendigo, charing cross, bendigo trust, central deborah, tram 25, tram 30, tram 19 -
 Ballarat Tramway Museum
Photograph - Black & White Photograph/s, c1942
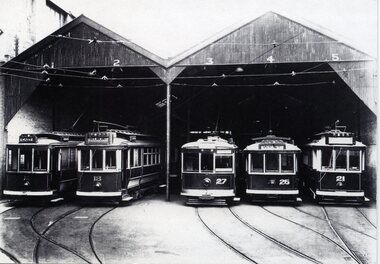
Yields information about the appearance of Bendigo Birney trams mid 1950's.Black and white photograph, printed onto card (inkjet printer?) of the Geelong depot with five trams parked - Nos. 2, 13, 27, 26 and 21 in the front. Roads marked 1 to 5. c1942"28 / Geelong publicity view taken about 1929 (crossed out), 1936 (crossed out) 1942? with WFS Collection in bottom left hand corner and "William Scott" address label in bottom right hand corner.trams, tramways, geelong, depot, tram 2, tram 13, tram 27, tram 26, tram 21 -
 Ballarat Tramway Museum
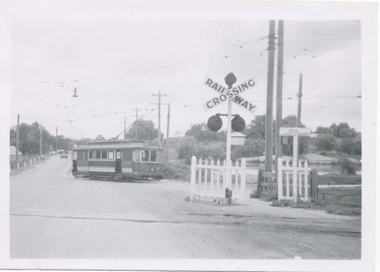
Photograph - Black & White Photograph/s, Wal Jack, 10/04/1950 12:00:00 AM
... On rear in ink "No. 21 at North Bendigo, Thunder St, level... Bendigo Thunder St Level Crossings tram 21 On rear in ink "No. 21 ...Black and White print contained within the Wal Jack Bendigo and Geelong Album, see Reg Item 5003 for more details. Photo of No. 21 departing from the North Bendigo terminus, 10-4-1950, turning in to Thunder St. Has the level crossing flashing lights in the foreground. i1 - scan of print in the album i2 - rear of image i3 - scan of negative at 3200dpi added 6/6/2020. On rear in ink "No. 21 at North Bendigo, Thunder St, level crossing 10-4-50" and in bottom right hand corner "W. Jack".trams, tramways, bendigo, north bendigo, thunder st, level crossings, tram 21 -
 Ballarat Tramway Museum
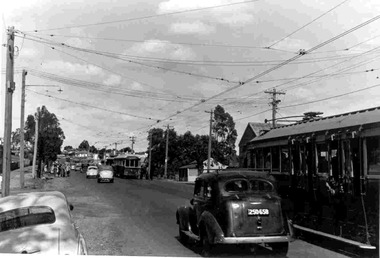
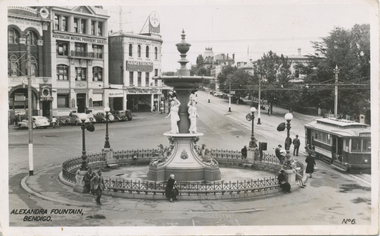
Postcard, Valentine & Sons Publishing Co, Valentines Series Postcard, No 6 of the Alexandra Fountain, Bendigo
Black and White postcard contained within the Wal Jack Bendigo and Geelong Album, see Reg Item 5003 for more details. Valentines Series Postcard, No 6 of the Alexandra Fountain, Bendigo. Charing Cross. Has a single trucker in the photo with the destination of Eaglehawk. In the back ground is the Australian Mutual Provident Society Building, Colonial Mutual Life building and Armstrong tyre service building. On rear of card is Valentine's name with space for written notes and stamps. Has a handwritten message to Wal Jack from Roy Field of Sydney, dated 21-6-1949 and 1d and 1/2 stamps. trams, tramways, bendigo, charing cross, alexandra fountain, tram 22