Showing 536 items
matching give way
-
 Flagstaff Hill Maritime Museum and Village
Leisure object - Snuff, c. 1895 - 1953
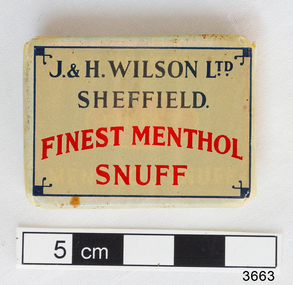
This dry tobacco variety of snuff is a finely ground, flavoured tobacco intended to be sniffed into the nose (not further into the sinuses or throat). It can vary in grind, blend and moistness. Snuff sniffing has been popular, particularly amongst the aristocracy, since the 1600’s and into the 1900’s and is becoming popular again as an alternative to smoking. It delivers a ‘hit’ of nicotine with lingering flavours that last for 15 to 20 minutes. It can be used by pinching a small amount from the container with thumb and forefinger then holding the pinched fingers to each nostril and giving a quick short sniff to transfer the snuff into the nostril. Another way is to sniff it from the ‘anatomical snuff box’, the depression on the back of the hand between base of thumb and forefinger. The user can also purchase a specially crafted snuff box or a bullet shaped nasal dispenser. A useful accessory to have on hand is a handkerchief, as the process of inhaling snuff can cause sneezing and increased nasal discharge. Snuff will keep in its sealed packet for up to 2 years, and for up to 6 months once the packet is opened and kept in a cool dark place. The snuff in our collection branded “J. & H. Wilson Ltd” dates between May 1895, when Joseph and Henry Wilson became a Limited company (they were originally part of the Wilsons & Co. company and were cousins of the proprietors), and 1953, when they sold their business. This snuff belonged to Dr. Angus as part of his personal effects. It was donated to Flagstaff Hill Maritime Village by the family of Doctor William Roy Angus, Surgeon and Oculist. It is part of the “W.R. Angus Collection” that includes historical medical equipment, surgical instruments and material once belonging to Dr Edward Ryan and Dr Thomas Francis Ryan, (both of Nhill, Victoria) as well as Dr Angus’ own belongings. The Collection’s history spans the medical practices of the two Doctors Ryan, from 1885-1926 plus that of Dr Angus, up until 1969. ABOUT THE “W.R.ANGUS COLLECTION” Doctor William Roy Angus M.B., B.S., Adel., 1923, F.R.C.S. Edin.,1928 (also known as Dr Roy Angus) was born in Murrumbeena, Victoria in 1901 and lived until 1970. He qualified as a doctor in 1923 at University of Adelaide, was Resident Medical Officer at the Royal Adelaide Hospital in 1924 and for a period was house surgeon to Sir (then Mr.) Henry Simpson Newland. Dr Angus was briefly an Assistant to Dr Riddell of Kapunda, then commenced private practice at Curramulka, Yorke Peninsula, SA, where he was physician, surgeon and chemist. In 1926, he was appointed as new Medical Assistant to Dr Thomas Francis Ryan (T.F. Ryan, or Tom), in Nhill, Victoria, where his experiences included radiology and pharmacy. In 1927 he was Acting House Surgeon in Dr Tom Ryan’s absence. Dr Angus had become engaged to Gladys Forsyth and they decided he would take time to further his studies overseas in the UK in 1927. He studied at London University College Hospital and at Edinburgh Royal Infirmary and in 1928, was awarded FRCS (Fellow from the Royal College of Surgeons), Edinburgh. He worked his passage back to Australia as a Ship’s Surgeon on the on the Australian Commonwealth Line’s T.S.S. Largs Bay. Dr Angus married Gladys in 1929, in Ballarat. (They went on to have one son (Graham 1932, born in SA) and two daughters (Helen (died 12/07/1996) and Berenice (Berry), both born at Mira, Nhill ) Dr Angus was a ‘flying doctor’ for the A.I.M. (Australian Inland Ministry) Aerial Medical Service in 1928 . The organisation began in South Australia through the Presbyterian Church in that year, with its first station being in the remote town of Oodnadatta, where Dr Angus was stationed. He was locum tenens there on North-South Railway at 21 Mile Camp. He took up this ‘flying doctor’ position in response to a call from Dr John Flynn; the organisation was later known as the Flying Doctor Service, then the Royal Flying Doctor Service. A lot of his work during this time involved dental surgery also. Between 1928-1932 he was surgeon at the Curramulka Hospital, Yorke Peninsula, South Australia. In 1933 Dr Angus returned to Nhill where he’d previously worked as Medical Assistant and purchased a share of the Nelson Street practice and Mira hospital from Dr Les Middleton one of the Middleton Brothers, the current owners of what was once Dr Tom Ryan’s practice. Dr L Middleton was House Surgeon to the Nhill Hospital 1926-1933, when he resigned. [Dr Tom Ryan’s practice had originally belonged to his older brother Dr Edward Ryan, who came to Nhill in 1885. Dr Edward saw patients at his rooms, firstly in Victoria Street and in 1886 in Nelson Street, until 1901. The Nelson Street practice also had a 2 bed ward, called Mira Private Hospital ). Dr Edward Ryan was House Surgeon at the Nhill Hospital 1884-1902 . He also had occasions where he successfully performed veterinary surgery for the local farmers too. Dr Tom Ryan then purchased the practice from his brother in 1901. Both Dr Edward and Dr Tom Ryan work as surgeons included eye surgery. Dr Tom Ryan performed many of his operations in the Mira private hospital on his premises. He too was House Surgeon at the Nhill Hospital 1902-1926. Dr Tom Ryan had one of the only two pieces of radiology equipment in Victoria during his practicing years – The Royal Melbourne Hospital had the other one. Over the years Dr Tom Ryan gradually set up what was effectively a training school for country general-practitioner-surgeons. Each patient was carefully examined, including using the X-ray machine, and any surgery was discussed and planned with Dr Ryan’s assistants several days in advance. Dr Angus gained experience in using the X-ray machine there during his time as assistant to Dr Ryan. Dr Tom Ryan moved from Nhill in 1926. He became a Fellow of the Royal Australasian College of Surgeons in 1927, soon after its formation, a rare accolade for a doctor outside any of the major cities. He remained a bachelor and died suddenly on 7th Dec 1955, aged 91, at his home in Ararat. Scholarships and prizes are still awarded to medical students in the honour of Dr T.F. Ryan and his father, Dr Michael Ryan, and brother, John Patrick Ryan. ] When Dr Angus bought into the Nelson Street premises in Nhill he was also appointed as the Nhill Hospital’s Honorary House Surgeon 1933-1938. His practitioner’s plate from his Nhill surgery states “HOURS Daily, except Tuesdays, Fridays and Saturday afternoons, 9-10am, 2-4pm, 7-8pm. Sundays by appointment”. This plate is now mounted on the doorway to the Port Medical Office at Flagstaff Hill Maritime Village, Warrnambool. Dr Edward Ryan and Dr Tom Ryan had an extensive collection of historical medical equipment and materials spanning 1884-1926 and when Dr Angus took up practice in their old premises he obtained this collection, a large part of which is now on display at the Port Medical Office at Flagstaff Hill Maritime Village in Warrnambool. During his time in Nhill Dr Angus was involved in the merging of the Mira Hospital and Nhill Public Hospital into one public hospital and the property titles passed on to Nhill Hospital in 1939. In 1939 Dr Angus and his family moved to Warrnambool where he purchased “Birchwood,” the 1852 home and medical practice of Dr John Hunter Henderson, at 214 Koroit Street. (This property was sold in1965 to the State Government and is now the site of the Warrnambool Police Station. ). The Angus family was able to afford gardeners, cooks and maids; their home was a popular place for visiting dignitaries to stay whilst visiting Warrnambool. Dr Angus had his own silk worm farm at home in a Mulberry tree. His young daughter used his centrifuge for spinning the silk. Dr Angus was appointed on a part-time basis as Port Medical Officer (Health Officer) in Warrnambool and held this position until the 1940’s when the government no longer required the service of a Port Medical Officer in Warrnambool; he was thus Warrnambool’s last serving Port Medical Officer. (The duties of a Port Medical Officer were outlined by the Colonial Secretary on 21st June, 1839 under the terms of the Quarantine Act. Masters of immigrant ships arriving in port reported incidents of diseases, illness and death and the Port Medical Officer made a decision on whether the ship required Quarantine and for how long, in this way preventing contagious illness from spreading from new immigrants to the residents already in the colony.) Dr Angus was a member of the Australian Medical Association, for 35 years and surgeon at the Warrnambool Base Hospital 1939-1942, He served as a Surgeon Captain during WWII 1941-45, in Ballarat, Victoria, and in Bonegilla, N.S.W., completing his service just before the end of the war due to suffering from a heart attack. During his convalescence he carved an intricate and ‘most artistic’ chess set from the material that dentures were made from. He then studied ophthalmology at the Royal Melbourne Eye and Ear Hospital and created cosmetically superior artificial eyes by pioneering using the intrascleral cartilage. Angus received accolades from the Ophthalmological Society of Australasia for this work. He returned to Warrnambool to commence practice as an ophthalmologist, pioneering in artificial eye improvements. He was Honorary Consultant Ophthalmologist to Warrnambool Base Hospital for 31 years. He made monthly visits to Portland as a visiting surgeon, to perform eye surgery. He represented the Victorian South-West subdivision of the Australian Medical Association as its secretary between 1949 and 1956 and as chairman from 1956 to 1958. In 1968 Dr Angus was elected member of Spain’s Barraquer Institute of Barcelona after his research work in Intrasclearal cartilage grafting, becoming one of the few Australian ophthalmologists to receive this honour, and in the following year presented his final paper on Living Intrasclearal Cartilage Implants at the Inaugural Meeting of the Australian College of Ophthalmologists in Melbourne In his personal life Dr Angus was a Presbyterian and treated Sunday as a Sabbath, a day of rest. He would visit 3 or 4 country patients on a Sunday, taking his children along ‘for the ride’ and to visit with him. Sunday evenings he would play the pianola and sing Scottish songs to his family. One of Dr Angus’ patients was Margaret MacKenzie, author of a book on local shipwrecks that she’d seen as an eye witness from the late 1880’s in Peterborough, Victoria. In the early 1950’s Dr Angus, painted a picture of a shipwreck for the cover jacket of Margaret’s book, Shipwrecks and More Shipwrecks. She was blind in later life and her daughter wrote the actual book for her. Dr Angus and his wife Gladys were very involved in Warrnambool’s society with a strong interest in civic affairs. Their interests included organisations such as Red Cross, Rostrum, Warrnambool and District Historical Society (founding members), Wine and Food Society, Steering Committee for Tertiary Education in Warrnambool, Local National Trust, Good Neighbour Council, Housing Commission Advisory Board, United Services Institute, Legion of Ex-Servicemen, Olympic Pool Committee, Food for Britain Organisation, Warrnambool Hospital, Anti-Cancer Council, Boys’ Club, Charitable Council, National Fitness Council and Air Raid Precautions Group. He was also a member of the Steam Preservation Society and derived much pleasure from a steam traction engine on his farm. He had an interest in people and the community He and his wife Gladys were both involved in the creation of Flagstaff Hill, including the layout of the gardens. After his death (28th March 1970) his family requested his practitioner’s plate, medical instruments and some personal belongings be displayed in the Port Medical Office surgery at Flagstaff Hill Maritime Village, and be called the “W. R. Angus Collection”. The W.R. Angus Collection is significant for still being located at the site it is connected with, Doctor Angus being the last Port Medical Officer in Warrnambool. The collection of medical instruments and other equipment is culturally significant, being an historical example of medicine from late 19th to mid-20th century. Dr Angus assisted Dr Tom Ryan, a pioneer in the use of X-rays and in ocular surgery. Snuff, in cardboard box sealed with a paper wrapper, part of the W.R. Angus Collection. Red and blue printing on white wrapper reads with details of the manufacturer. c. 1895-1953These details read “J. & H. WILSON LTD. / SHEFFIELD./ FINEST MENTHOL / SNUFF“ and “CELEBRATED FOR DELICATE FLAVOUR / AND / PUNGENCY” and “WE GUARANTEE / THIS SNUFF / TO BE OF / OUR FINEST / QUALITY … J & H W LTD “flagstaff hill, warrnambool, shipwrecked coast, flagstaff hill maritime museum, maritime museum, shipwreck coast, flagstaff hill maritime village, great ocean road, dr w r angus, snuff, hot dry toast, j. & h. w ltd., j & h wilson ltd., joseph & henry wilson ltd., tobacco sniffing, personal effects -
 Flagstaff Hill Maritime Museum and Village
Tool - Fuller, Grooving iron, 19th and early-20th centuries
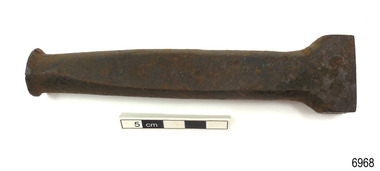
This hand groover is sometimes called a seamer, grooving iron, punch or fuller. It would have been used by a metal smith, such as a blacksmith, tinsmith or sheet metal worker. It is used to join two edges of metal. The smith overlaps the edges of the metal, then places the tool on top and beats it with a hammer on the top, forcing the metal into the tool's groove, which joins the metal. The device would be moved along the edges to complete the seam. The same tool could give a decorative finish to an artisan's work.This handmade tool was made for the particular purpose of joining sheets of metal together. The metal formed in this way could be used for water tanks, boilers and other similar items. It is an example of the equipment made and used in the trades of a metalsmith and blacksmith in the 19th and early 20th centuries.Tool: a fuller, used to form a groove in heated iron. It is also referred to as a groover, seamer or fuller punch. Hand tool with round handle, flat round top and indented rectangular base. Base has grooves on long edges. flagstaff hill maritime museum, maritime museum, shipwreck coast, great ocean road, blacksmith tool, vintage tool, sheet metal fabrication, groover, seamer, hand tool, tinsmth, metalsmith, seaming tool, sheet metal worker, manual tool, smith's tool, fuller, grooving iron, punch -
 Surrey Hills Historical Society Collection
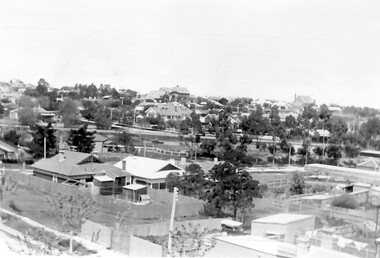
Photograph, Surrey Hills looking south-east from the steeple of Holy Trinity Church, 1921
The property in the foreground is 'Edgeware' at 171 Union Road, a house built by the Zeplin family. It became the home / residence of Dr Percy Liddle and later Dr James Landells Blakie. By the time this photo was taken Dr Blakie had moved across the road to 174 Union Road. In the background behind the 2 houses in the foreground is the Surrey Hills Stationmaster's house, sitting behind a picket fence. The Alan Holt register gives a build date of c1915 for this house, which fits stylistically. The first stationmaster was probably Michael Ginnane, who stayed in the area after he retired, moving to 1 Russell Street. This property was listed as 8 Bedford Avenue, the only house on the south side of the road. It was demolished in c1972 to make way for widening of the rail track with a third line. The photographer Norman Carter took many photos of Surrey Hills and Mont Albert from the 1920s, in particular of events and activities associated with the Church of England.Black and white photo taken from the steeple of Holy Trinity Church looking across housing towards the railway line and Albany / Windsor Crescents and on towards Canterbury Road. Surrey Hills Primary School and St Stephens Presbyterian Church feature prominently on the horizon. The stationmaster's cottage is centre left adjacent to a large conifer-like tree, with a white fence delineating the railway yards.On back of original: "6-11-21" and in a different hand in biro: "from tower of Holy Trinity Church"albany crescent, windsor crescent, st stephens presbyterian church, surrey hills primary school, railways, stationmasters' houses, bedford avenue, norman carter, edgeware, dr percy liddle, dr james blakie -
 Wodonga & District Historical Society Inc
Photograph - Wodonga Hotel, now Elgin's
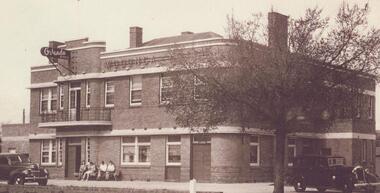
The Wodonga Hotel was constructed in 1940 at a cost of £10,000. It is now called Elgins Hotel. It was established after the transfer of the licence from the Halfway Hotel. This was the result of a lengthy hearing before the Licensing Board over two days in December 1939, There was some opposition from established guest house keepers and hotelkeepers. G. A. Adams, owner of the Carriers’ Arms Hotel was refused a hearing as he was not a resident, so Rachael Spence his manageress objected on the ground that it would do her hotel a lot of harm. Mr Luke Murphy represented the applicants, Irene Weatherall and Lena Pickering. He stated that the new structure would be of brick, cement and iron and contain 22 rooms. The site was near the municipal sale yard and near the railway station, and, he pointed out the trucking industry, which he believed to be larger than any other in Victoria, outside of Melbourne. The hearing was told of the bad state of the Half Way Hotel, having been there for almost 100 years. Luke Murphy was quoted as saying “If Hovell were here he could give evidence on that.” The lack of accommodation and quality accommodation at Wodonga hotels was frequently heard of. Costa’s Wine Café had very excellent accommodation for but only five or six people. The lessee of the-tea rooms at the municipal saleyards, also gave evidence. Mrs Lowden said that on sale day she served up to 130 dinners in addition to 10 or 20 breakfasts, and almost continuous light lunches. She did not think a hotel would provide a needed facility for patrons of the saleyards. In April 1940 the application was granted on the condition that premises were erected within 42 weeks. The hotel was used for soldier accommodation during World War II and experienced a boom period when Wodonga saleyards were located across the road. Irene House behind the pub also was constructed in the 1970s when Albury-Wodonga had been identified as a National Growth Centre by the Whitlam Labor government. After running the hotel for 5 generations, the Weatherall Family sold the business in 2021.These images represent an early business in Wodonga . 2 photos of the Wodonga Hotel and 1 newspaper advertisementwodonga businesses, a. e. costa, wodonga pioneers, early wodonga businesses, wodonga businesses high street -
 St Kilda Historical Society
Card - Seasonal card, A Merry Xmas and a Happy New Year to You, 20th century
A card encouraging customers to give a gift at Christmas to the boy who delivers or sells them their daily newspapers. Undated but perhaps early 20th century.Pink coloured card with greeting, verse and image of Santa Claus printed in blue. Stamped on the back.Printed on front: 'A Merry Xmas and a Happy New Year to You. Once a Year this Christmas comes - But I come round each day; I bring you all the news there is, in a most respectful way. A Christmas Gift just once a Year Would make me mighty glad; Although I'm only young you know - But an Honest Paper Lad. Stamped on rear: 'Cards, Books and Stationery. You will get satisfaction from McArthur's Agency St Kilda. Latest books & periodicals by every mail.'st kilda businesses, 20th century, st kilda - history, mcarthur's agency -
 Warrnambool and District Historical Society Inc.
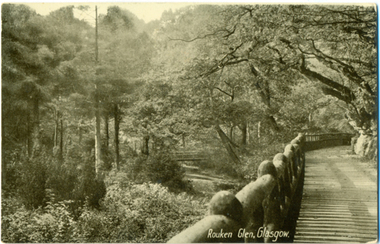
Postcard - Rouken Glen, Glasgow, 1914-1918
This is Item 11 of 27 items in the Daisy Vickers collection of World War One memorabilia. These items were sent or given to Daisy Ogier (nee Vickers) during World War One by Corporal Arthur Anderson who enlisted from Warrnambool in 1915 at the age of 21. He served in Egypt and France and returned to Australia in 1919. Daisy Ogier (1907-1987) was a student and then a teacher at Warrnambool Technical School with her early teaching years there from 1925 to 1936 and in 1949. She became the head mistress from 1950 to 1963 and in 1968. She officially retired in 1976. Daisy Vickers was one of the best loved and dedicated teachers that the school ever had. She married the Reverend Fred Ogier and continued her association with the school after her husband's deathThis card is interesting because of its association with World war One and two local people daisy Vickers and Arthur AndersonThis is a photograph of the Scottish country side with a bridge and a walk way. There is ink handwriting on the back. Glasgow 22nd March 18 Dear Daisy You will see by the card that I am away from the war for a few days in amongst civilization & having a good rest. Glasgow is a lovely city & the people are very good to us boys from Australia. They try their best to give us a good time. I hope you received my letter I wrote to you. Love from Ikedaisy vickers, arthur anderson, world war one, world war one postcards -
 Warrnambool and District Historical Society Inc.
Booklet - Booklet Collection: City of Warrnambool Tourist Guides, Collett, Bain and Gaspar, Warrnambool
This is a collection of sixteen tourist guides dating from the mid 1970's to 2013. These contain listings of businesses, accommodation, eateries and events in Warrnambool and district. They also include maps of Warrnambool and surrounds, advertising and photographs of various attractions. While mainly covering Warrnambool a small number of the guides cover the South West Region. These directories have mainly been published by the Warrnambool City Council and are a selection of the types of information provided to visitors at the Tourist information centre during this time period.These tourist guides give snapshots of the City of Warrnambool for the years covered and will be useful for research.[.1] An 8 page paper booklet with black printing and a black & white photo of the pond at the Botanical Gardens on the front cover. [.2] two photocopied A4 black and white pages from the book "On the Trail" K Winser 1956 (Main Roads of Australia) [.3] A trifold colour brochure with a stylised map of the coast on the yellow and blue front cover. The inside has stylised colour drawings on Warrnambool attractions. The rear cover has coloured photographs of bush, Liebig Street and Fletcher Jones gardens [.4] A trifold black and white brochure with a black line drawing of a whale on the front cover. [.5] A trifold white card with mauve printing. The front cover has a line drawing of the former Timor Street post office and a map of businesses and landmarks in Timor Street. The reverse side contains a brief history of Warrnambool. [.6] A 98 page stapled booklet with a foreword by Vanda Savill. There are 4 pages of coloured photographs. The remainder are black and white photographs. The front cover is purple with white writing in the lower third. There is an outline of the coast and five colour photographs of district attractions. The inside middle page has a map of the Western wonderland region. The content covers towns in this area. Content relating to Warrnambool is in the last six pages. [.7] Twelve loose photocopied black and white pages. The front cover has the Warrnambool Premier Town 1988-1991 logo and a photo of a Southern Right Whale and calf. The bottom right hand corner has a Standard Warrnambool logo. [.8] 44 page booklet printed with blue ink. The staples have been removed. The glossy front cover has blue printing with a coloured photo of Flagstaff Hill Maritime Village pond. The centre pages has a fold out map of the City of Warrnambool. The rear cover has photos of The Twelve Apostles and Hopkins Falls. [.9] 4 loose photocopied pages with Warrnambool Library and Corangamite Regional Library Service Warrnambool City Library black ink stamps. The front page line drawing illustrations of Warrnambool attractions [.10] A single sheet of glossy white paper folded in half to make four pages. The front page has a Warrnambool premier town logo 1979-1982 and blue printing and a visitor survey. [.11] A conference pack of light card folded to make a pocket containing three brochures, a shipwreck coast tourist directory and a Australian Heritage Parks Association conference program dated 24 to 27 May 1992. The front cover of the pack has green writing over a stylised upward arrow. There is a City of Warrnambool logo in the top right hand corner and two film strips diagonally across the cover containing photographs of Warrnambool. The rear cover has a coloured Warrnambool Premier Town logo. [.12] A 63 page stapled booklet with coloured photographs of Warrnambool. The front cover has black writing on white background. There is a coloured photograph of Flagstaff Hill in the middle of the cover and a Warrnambool City and Visit Victoria logos on the lower edge. The middle pages has a coloured of the city of Warrnambool with an inset map of Allansford. [.13] A single large sheet of white paper folded in ten to make a brochure. The front cover has black printing. The rear cover has a purple ink stamp for the City of Warrnambool Tourist Information Centre. When folded out the reverse side has a green, grey and white map of the South West Region of Victoria. [.14] A 48 page colour booklet on glossy paper. The front cover has white writing on a blue background and includes photographs of the Twelve Apostles, the Promenade walk, Flagstaff Hill and a southern right whale's tail. The rear cover has photographs of The Twelve apostles, a passenger train from Melbourne passing the Lake Pertobe playground, and a rural scene. There is white writing and a white Warrnambool City logo on a blue background. The centre pages have a stylised green and blue map of the city of Warrnambool. [.15] A 48 page colour booklet on glossy paper. The front cover has white writing over colour photographs of two people at a lookout, Flagstaff Hill, three southern right whales and a child at the Lake Pertobe playground. The lower edge has blue upper case writing on a white background. The rear cover has a colour photograph of the Twelve Apostles. The lower white border on the rear covers has a a blue and green City of Warrnambool logo and blue writing. The centre pages have a stylised green and blue map of the city of Warrnambool. [.16] A 64 page colour booklet on glossy paper. The front cover has black writing on a black background and there is a photograph of a southern right whale's tail. The lower edge has the Warrnambool City and Visit Vitoria Logos. The centre pages have maps of Warrnambool and surrounds. [.1] This week in Warrnambool Vol 2 No. 5 Thurs 1st Feb. For the time of your life [.2] Warrnambool Way [.3] Warrnambool The Holiday Host on the South West Coast with compliments City of Warrnambool and Warrnambool Chamber of Commerce [.4] MMI Insurance presents Whales Giants of the Deep Whale Watcher's Logbook Warrnambool [.5] Warrnambool History began in Timor Street [.6] Western Wonderland Tourist Association [.7] A Premier Arrow Tour of Warrnambool Victoria's Premier Town Australia's Southern Right Whale Nursery [.8] Warrnambool The Heart of Victoria's Great Southwest Visitor's Handbook [.9] What to see in Warrnambool Victoria's Premier City 1979-1982 [.10] Win a Free Holiday & $200 Cash in Victoria's Premier Town [.11] Advancing Warrnambool together! [.12] Great Ocean Road Warrnambool Official Visitor Guide [.13] Tourist guide to the South West Region Victoria All it needs is you [.14] Warrnambool visitor guide 2005 the great ocean rod experience attractions accommodation entertainment dining [.15] Warrnambool Visitor Guide 2006 the great ocean road experience Attractions Accommodation Entertainment Dining [.16] Official Visitors' Guide Warrnambool Victoria Australia Discover the Great Ocean Road warrnambool, warrnambool tourist guides -
 Flagstaff Hill Maritime Museum and Village
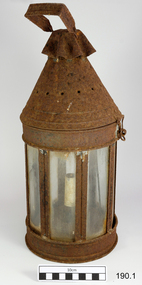
Functional object - Lamp, After 1950
The lamp has been manufactured for decorative used, representing lamps of the late 19th and early 20th century used for lighting.The lamp is an example of a 19th century ships lamp. It is currently not associated with a historical event, person or place at this time and is being used to augment Flagstaff's village display.Metal lamp with circular base, 8-sided glass section and conical lid topped by a frilled metal cone and handle made from a strip of metal bent into a 'u' shape and attached so that it can swing back and forth..Cone hinges to side to give access to candle, which is seated in a short ring in the centre of the base. There is a ring of air holes around the circumference of the cone, about half way up the height of it. A shard of glass missing from one of the glass panels and the metal parts are corroded.flagstaff hill, warrnambool, shipwrecked coast, flagstaff hill maritime museum, maritime museum, shipwreck coast, flagstaff hill maritime village, great ocean road, lighting, candle lamp, domestic lighting, ship lamp -
 Wodonga & District Historical Society Inc
Album - Ringer's River by Des Martin - Plate 33 - Escaping the Police
The bodies of mother and son are driven side by side to burial while the shops shut down and all Overton turns out for the funeral. Ellen's elder son Con O'Hara, and Sean O'Day ride as outriders to the hearses. Sgt. Baker and his men arrive at the church, the Sgt. approaches Con, declares that no police action will be taken before the town re-opens, and asks if he can provide an escort for the cortege. The funeral over O'Day tarries till after the shops have opened and Sgt. Baker sets a trap for him on the bridge over the Murray. Cornering him on the bridge he says it will give him great pleasure to personally escort him all the way to the police station. "All the way Sergeant?" asks O'Day. "Then come on!" With which he jumps his horse over the rail of the bridge. D.J. Martin on Pampas Air.The album and images are significant because they document literature written by a prominent member of the Wodonga community. The presentation of this precis was supported by several significant district families and individuals.Ringer's River Album Coloured photo Plate 33des martin, many a mile, ringer's river, northeast victoria stories -
 Royal Australian and New Zealand College of Obstetricians & Gynaecologists (RANZCOG)
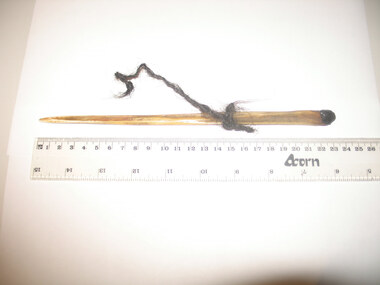
Central Australian 'pointing bone', c1920?
Pointing bones were ritualistically used by sorcerers for magic. The 'magic' and 'sorcery' from 'pointing the bone' can involve the ritual removal of organs from the body, done when a person is asleep, and then put back into the person unknowingly. In this way a person can be 'sung' but will be unaware of it. This pointing bone was originally given to Sir Wilfred Fish, FRCS, who was a Kings Surgeon and had been giving lectures in Sydney in the 1920s on his specialty, maxillofacial surgery. His daughter, Mrs Vivian Greaves, gave this item to Sir Keith Drayton some years later. Pointing bone, from Central Australia. The object is a carved macropod fibula. At one end there is a blob of resin and an attachment of human hair in a string. At the other end, the bone has been sharpened to a point. -
 Vision Australia
Administrative record - Text, The Association for the Blind, Blind Members' Council annual reports and annual general meeting minutes 21/8/1981 to 19/9/1997, 1981-1997
These meetings were held at the Kooyong office and the minutes include Present, Chair, Apologies, Minutes, Matter arising from minutes, Correspondence, Life governors, Election of members, Nominations, Reports from Regional Blind Members groups. Some highlights are: 30/6/1990 under the capable leadership of Mrs Elsie Germon the schools programme has been re-convened. Regular visits are being made to primary schools. Speakers are accompanied by sighted guides. 9/8/1991 Executive Director, Mr John Cook reported merger of the Braille & Talking Book Library with AFB. First radio appeal for 3RPH raising over $30,000, opening of the new Baringa Day Centre at Shepparton. 30/6/1996 the annual report highlighted the Centenary of AFB it was noted that self-help has always been the major emphasis underpinning the work of the Blind Member's Council. The Tilly Aston Fund raised over $1/2 million for the new National Information Centre. The peer support work and monitoring of services, ensures that we give back something to AFB, for the support we receive. BMC representatives made 70 visits across the State. The Council registered the Tilly Aston Rhododendron as a lasting way of acknowledging the work of our founder. 19/9/1997 The Chairman welcomed those present to the second combined meeting of the AFB and the Tilly Aston Customer Council. The Council welcomed the change in Articles and Memorandum of the Association and the formation of the Tilly Aston Customer Council which allowed all customer of the Association automatic membership and input to the monitoring of services. Minute book of Blind Members Council annual reports and general meetingsassociation for the blind, blind members council -
 Ballarat Tramway Museum
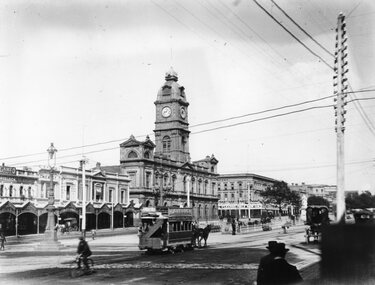
Photograph - Black & White Photograph/s, Horse Tram Sturt St, c1890
Photograph of a horse tram (possibly No. 7), with a Havelock Tobacco advertisement, travelling westbound in Sturt St. on the north side with the City of Ballaarat Town Hall (clock showing 905). Traffic in Sturt St was two-way on either side of the median strip which at the time did not extend fully between Lydiard St and Armstrong St. The photograph includes the gas street lamp in the middle of the Sturt and Lydiard Streets intersection and a telephone/telegraph pole on the right side. Several horse-drawn cabs in the photograph, along with some men. In the background are shops for Cameo Cigarettes, Tea Merchants, C Ekans? Chemist, J T Marsh Hatter, the Town Hall and Snows department store promoting a clearing sale. The photo has been taken from the Post Office Steps, c1890. State Library Multimedia Source Catalogue does not give the name of the photographer and the date of the photo. Acknowledgement of the source of the photograph is required.Yields information about Sturt St and horse trams c1890 and the use of the street in the early morning.Black and white print from the State Library of Victoria.On rear in pencil in bottom left hand corner "Copy of H92 320/106" and in centre along bottom edge "Reproduction Rights Reserved - Copied by State Library of Victoria".trams, tramways, sturt st, lydiard st. north, horse trams, ballarat town hall, two way traffic, tram 7 -
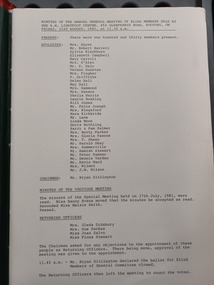
 Ballarat Tramway Museum
Administrative record - Memorandum, State Electricity Commission of Victoria (SECV), "Notice to Tramway Employees - Retrenchment Dates", 21/06/1971 12:00:00 AM
Yields information about the planning for the closure of the tramway system in Ballarat by the SEC and the way the retrenchment of staff would be arranged., Yields information about the planning for the closure of the tramway system in Ballarat by the SEC and the way the retrenchment of staff would be arranged.Duplicated quarto sized memorandum titled "Notice to Tramway Employees - Retrenchment Dates", dated 21 June 1971, giving advice of the possible change over dates and likely termination dates for Workshops personnel, Track cleaner, track gang and depot staff. Has "Tram Depot" typed in top left hand corner.trams, tramways, closure, ballarat, sec, depot -
 Melbourne Tram Museum
Document - St Kilda - Brighton, Victorian Railways (VR), "Rules and Regulations", June 1907
Provides the Rules and Regulations for the St Kilda - Brighton Electric Street Railway, dated June 1907. The railway opened on 5/5/1906 and to Brighton on 22/12/1906. the latter largely as a single track. Has the name F E Bradford on the front cover. Gives rules for crossing cable tram lines, those for drivers, speeds, conductors, accidents, bell signals, signals on overhead line, regulations for working by staff and ticket, pilot working, rules for workers on the permanent way, and additional rules such as collecting money from passengers for breaking windows.Yields information about the "Rules and Regulations" - St Kilda Brighton - Electric Street Railway Book - cloth cover red covers, 20 pages, centre stapled.Has initials "PwR" and "Secretary" in ink on the first page.trams, tramways, cable trams, trackwork, yokes -
 Bendigo Historical Society Inc.
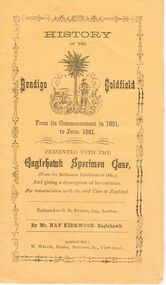
Document - BENDIGO GOLDFIELD - HISTORY OF, FOR MELBOURNE EXHIBITION 1880
Yellow covered booklet 'History of the Bendigo Goldfield from its commencement in 1851 to June 1881' Presented with the Eaglehawk Specimen Case and giving a description of its contents, for transmission with the said case to England. Dedicated to G.D. Peters, Esq, London, by Mr. Hay Kirkwood, Eaglehawk. Inside first page ( un-numbered) 'The Bendigo Goldfield Compiled by Messrs Hay Kirkwood and Wm. Welch. The Rise and Progress. At the latter end of 1851, a few enterprising pioneers, with Captain Harrison, now police magistrate of Castlemaine, made their way from Forest Creek ( Castlemaine ) 30 miles distant, to a place on the Bendigo Creek, now called Golden Square, then a squatter's run, where rich auriferous ground was met with. The new soon spread far and near, and the world was soon startled with the intelligence that another very extensive goldfield had been discovered, the importance of which may be gathered from the fact that in the month of June, in the following year, six months after the first sod was raised, 80,000 ounces of pure native gold was taken by Melbourne.Printer: W. Welch, View Streetbendigo, mining, melbourne exhibition 1880 -
 Bendigo Historical Society Inc.
Book - LODGE COLLECTION: THE TEMPLE BUILDERS BY ALEX H.STONE
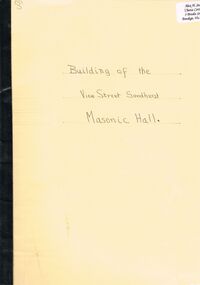
Bound book the Temple Builders compiled by Alex H. Stone, 10th May 1988. this book refers to the people responsible for the erection of the Masonic Temple in View Street Bendigo. The book also makes reference to the way of life and how news was circulated in a time before newspapers. This book also gives an understanding of how the group was first formed. Other material refers to the laying of the foundation stone on 24/6/1873. Centenary Souvenir of the laying of the Foundation Stone of the Masonic Hall, View Street, Bendigo on 24th June 1873. Photo of the laying of the foundation stone. Architects of the project were Vahland and Getzschmann.Alex H. Stoneclubs, social, bendigo masonic lodge -
 Bendigo Historical Society Inc.
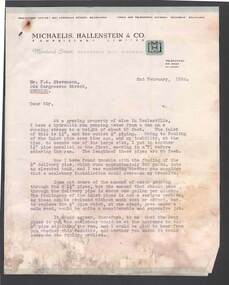
Document - BILL ASHMAN COLLECTION: CORRESPONDENCE
Letter, dated 2 February, 1954, from Roy Michaelis to Mr. F. A. Stevenson. Letter typed on paper with printed letterhead. In the letter the writer mentions that he has a pipe line which has fouled up and he was inquiring if a scalebuoy would improve the problem. The second letter ( a carbon copy), dated 10/2/54, is to Mr Roy Michaelis from (name obscured). He mentions that he has thought about it but he can't see any way to help at the moment. He also says that the scalebuoy needs a steady flow of water which the hydraulic ram does not give. He also refers to some other work he has done elsewhere.sciences, instruments - general, scalebuoy, bill ashman collection - correspondence, michaelis hallenstein & co pty ltd, f a stevenson, roy michaelis -
 Bendigo Historical Society Inc.
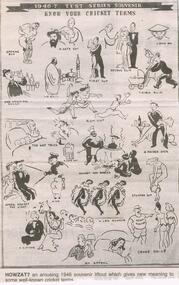
Newspaper - JENNY FOLEY COLLECTION: HOWZAT?
Bendigo Advertiser '' The way we were'' from 2002. Howzat?: an amusing 1946 souvenir lift out which gives new meaning to some well-known cricket terms. The clip is in a folder.newspaper, bendigo advertiser, the way we were -
 Bendigo Historical Society Inc.
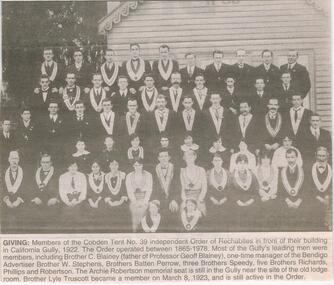
Newspaper - JENNY FOLEY COLLECTION: GIVING
Bendigo Advertiser ''The way we were'' from 2003. Giving: members of the Cobden tent No. 39 independent Order of Rechabites in front of their building in California Gully, 1922. the order operated between 1865-1978. Most of the Gully's leading men were members, including Brother C. Blainey (father of professor Geoff Blainey), one time manager of the Bendigo Advertiser, Brother W. Stephens, Brother Batten Perrow, three brothers Speedy, five Brothers Richards, Phillips and Robertson. The Archie Robertson memorial seat is still in the Gully near the site of the old lodge room. Brother Lyle Truscott became a member on March 8, 1923 and is still active in the Order. The clip is in a folder.newspaper, bendigo advertiser, the way we were -
 Bendigo Historical Society Inc.
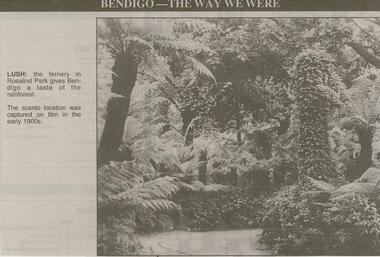
Newspaper - JENNY FOLEY COLLECTION: LUSH
Bendigo Advertiser ''The way we were'' from 2000. Lush: the fernery in Rosalind Park gives Bendigo a taste of the rainforest. The scenic location was captured on film in the early 1900s. The clip is in a folder.newspaper, bendigo advertiser, the way we were -
 Bendigo Historical Society Inc.
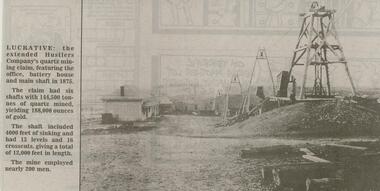
Newspaper - JENNY FOLEY COLLECTION: LUCRATIVE
Bendigo Advertiser ''The way we were'' from 2000. Lucrative: the extended Hustlers Company's quartz mining claim, featuring the office, battery house and main shaft in 1875. The claim had six shafts with 144,500 tonnes of quartz mined, yielding 188,000 ounces of gold. The shaft included 4,000 feet of sinking and 16 crosscuts, giving a total of 12,000 feet in length. The mine employed nearly 200 men. The clip is in a folder.newspaper, bendigo advertiser, the way we were -
 Bendigo Historical Society Inc.
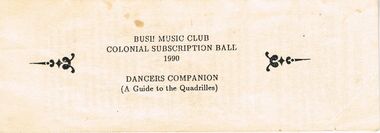
Document - PETER ELLIS COLLECTION: BUSH MUSIC CLUB COLONIAL BALL, 1990
Small off white coloured booklet Bush Music Club Inc. Colonial Subscription Ball 1990 Dancers Companion (A guide to the Quadrilles) The Quadrille Figure 1 (Le Pantelon) (2x32) 8 Top couples R and L through. (without giving hands). 8 Set & turn Partners 8 Top ladies chain. 4 Top couples promenade across set. 4 Half R and L to place. 32 Side couples repeat Figure 2 (Le 'Ete) (4x24) 4 Top couples advance & retire. 4 Cross over (without changing places with partner). 8 Repeat back to place. 8 Set & turn partners. 24 Sides repeat. 48 Top and Sides repeat. Figure 3 (La Poule) (4x32) 4 Lady 1, Man 2 adv, tough RH, retire to opposite place. 4 Lady 1, Man 2 adv, join LH give RH to partner 4 Line of 4 balance fwd & back twice. 4 Men lead partners to opp. Place. 4 Lady 1, Man 2 adv. & ret. 4 Lady 1, Man 2 adv, honour & ret. 4 Top couples, advance & retire. 4 Half R & L to place. 32 Repeat with Lady 2, Man !. 32 Repeat with Lady 3, Man 4. 32 Repeat with Lady 4, Man 3. The Quadrille Figure 4. (La Pastourelle) (4x32) 4 1st couple advance & retire. 4 1st couple adv, lady join 2nd couple. 4 Line of 3 adv. & ret, 1st man retire. 4 Line of 3 adv. Ladies cross to 1st man. 4 Line of 3 adv. & ret, 2nd man retire. 4 Re-advance, form circle with 2nd man. 4 Circle L half way round. 4 Half R & L to place. 32 Repeat with 2nd couple leading. 32 Repeat with 3rd couple leading. 32 Repeat with 4th couple leading. Figure 5 (La Finale) (4 x 32 + 8) 4 All advance & retire. 4 Turn partners. 4 Ladies adv, curtsey & retire. 4 Men advance, bow & retire. 8 All set & turn corners. 8 Promenade with corner. (men to original place with corner) 96 Repeat 3 times to return to partner. 4 All advance & retire. Turn Partners. Notes: 1 Couples numbered 2 Set & turn is a 'balance' set and open hand turn. The Prince Imperial's Quadrille Figure 1. (4x24) 4 Top couples visit right, honour sides. 4 Top men retire with partner & side lady to opposite place, (ladies facing each other). 8 Ladies grand chain to places 8 All set and turn partners 24 Top couples repeat back to place. 48 Repeat with side couples. Figure 2 (4 x 24) 4 1st Lady, 2nd man adv & turn in centre finish facing 2nd lady. 2 2nd lady pass through to 1st man. 2 Both couples turn out to place. 4 top couples advance & retire. 4 Ladies chain back to place. (Nariel) 8 Chasse-croise. (4 steps past partner RH turn corner 4 steps back, LH turn with partner.) 24 Repeat wth 2nd lady, 1st man leading 24 Repeat wth 3rd lady, 4th man leading 24 Repeat wth 4th lady, 3rd man leading. Figure 3 (4x32) 4 1st lady to centre, curtsey to partner. (RH in RH, ACW turn in to centre) 4 2nd lady to centre, curtsey to partner. 4 3rd lady to centre, curtsey to partner.4 4th lady to centre, curtsey to partner. 8 ladies join hands, circle R, small steps after circle R, Men join circle, (giving RH to partner). 4 Balance for 4 (step lift x 4) 4 Turn partners to place, bow & curtsey. 32 Repeat, Lady 2, 1, 4 & 3 to centre 32 Repeat Lady 3, 4, 2 & 1 to centre 32 Repeat, Lady 4, 3, 1 & 2 to centre The Prince Imperial's Quadrille Figure 4 (4x32) 4 Top couples advance & retire. 4 Top couples adv, ladies move to R, as men retire to place. 8 Line of 3 adv & ret twice. 4 Single men adv, bow and retire. 4 Re-advance and turn to face partner. 4 Circle L half way round (with partner & side couple). 4 Half R & L to place. 32 Repeat with side couples leading. 32 Repeat with top couples leading (men moving to left as ladies retire) 32 Repeat with Side couple leading. (Men moving to left as ladies retire) Figure 5 (4x32 +32) 16 Ladies to the right, (RH turn with corner man then continue round to the right turning each man) 4 1st Lady, 2nd man advance & retire 4 re-advance & turn RH (finish facing partners) 8 set & turn partners (finishing in place) 32 Repeat with 2nd Lady, 1st man leading 32 repeat with 3rd lady, 4th man leading 32 Repeat with 4th Lady, 3rd man leading 16 Ladies to the right again. 4 Men turn partners to centre. 4 All bow and curtsey. 8 Promenade set ( hall) Note: Set & turn is a 'balance' set and open hand turn. The Parisienne Quadrille Figure 1 (1x32) 8 Couples R and L through. (without giving hands) 8 set & turn partners 8 Ladies chain. 4 Couples promenade across set. 4 Half R and L to place. Figure 2 (2x24) 4 Couples advance & retire. 4 Cross over (without changing places with partners) 8 Repeat back to place. 8 Set & turn partners. 24 Repeat. Figure 3 (2x32) 4 Lady 1, Man 2 adv, touch RH, retire to opposite place. 4 Lady 1, Man 2 adv, join LH, give RH to partner. 4 Line of 4 balance fwd & back twice 4 Men lead partners to opp. Place 4 Lady 1, Man 2 adv & retire 4 Lady 1, Man 2 adv, honour & ret. 4 Couples, advance & retire. 4 Half R & L to place. 32 Repeat with Lady 2, Man 1. The Parisienne Quadrille Figure 4. (2x32) 4 1st couple advance & retire. 4 1st couple adv, lady join 2nd couple. 4 Line of 3 adv. & ret, 1st man retire. 4 Line of 3 adv. Ladies cross to 1st man. 4 Line of 3 adv. & ret, 2nd man retire. 4 Re-advance, form circle with 2nd man. 4 Circle L half way round. 4 Half R & L to place. 32 Repeat with 2nd couple leading. Figure 5 (2x32) 4 Couples advance & retire 4 Cross over 8 Repeat back to place. 8 Ladies chain across & back.8 Set & turn partners. 32 Repeat Notes: 1 This 'quadrille' is similar to the first set (1st 4 figures) and is danced as two couple sets. 2 Set & turn is a 'balance' set and open hand turn. The Lancers Quadrille Figure 1 (4x24) 4 1st lady, 2nd man advance & retire, 4 Adv, turn two hands, return to place. 4 1st couple lead through across set 4 2nd couple lead through back 8 all set & turn corners. 24 Repeat, 2nd lady, 1st man leading 24 Repeat 3rd lady, 4th man leading 24 Repeat, 4th lady, 3rd man leading Figure 2 (4x24) 4 1st couple advance & retire. 2 1st lady adv to centre, turn to face partner 2 1st couple honour each other. 8 1st couple set and turn then sides form top & bottom lines 4 Lines advance & retire, 4 Advance and turn partners to place. 24 Repeat with 2nd couple leading 24 Repeat with 3rd couple leading 24 Repeat with 4th couple leading Figure 3. (2x32) 4 Ladies advance, curtsey & retire. 4 Men adv, bow, turn by left, bow to partners, then join RH in centre, (ladies RH on partners left elbow). 8 Promenade round set to place. 4 Ladies adv, curtsey & retire again. 4 Men adv, bow, turn by right, bow to partners, join LH in centre, right arm behind partner. 8 Promenade round to set in place. 32 Repeat. The Lancers Quadrille. Figure 4. (4x24) 8 Top couples visit R then L 4 Right Hands around with LH couple 4 then left hands around. 8 Circle left with that couple. 24 Repeat with side couples leading. 24 repeat, top couples visit L then R. 24 Repeat, side couples visit L then R. Figure 5. (4x48 +24) 8 All grand chain 1/2 way round and honour partners. 8 Continue grand chain to place and honour partners. 8 1st couple visit, return to place, facing out with sides in behind. 2 Change places with partner, 2 All rock fwd and back 2 change places again 2 All rock fwd and back 8 Cast out reform in lines 4 Lines advance & retire 4 Advance & turn partners to place 48 Repeat with 2nd couple leading 48 Repeat with 3rd couple leading 48 Repeat with 4th couple leading. 8 Grand chain 1/2 way round and honour partners. 8 continue grand chain to place and honour partners 8 swing partners (R arm round partner, LH in air) Note: All figures walked. Set & Turn is a 'balance' set and open two hand turn. The Caledonians Quadrille Figure 1. (2x32) 4 Top couples R.H. across, move CW (Ladies hands joined over Mens). 4 then L.H. across, move ACW. 8 Set & swing Partners 8 Top ladies chain. 4 Top couples promenade across set. 4 Half R and L to place. 32 Side couples repeat. Figure 2. (4x24) 8 1st Man advance & retire twice. 8 Set & swing corners. 8 Promenade with corners (to men's position.) 24 2nd man repeat. 48 3rd and 4th man repeat. Figure 3. (4x32) 4 Lady 1, Man 2 advance & retire. 4 Re-advance, 2 hand turn to place. 8 1st & 2nd couples lead through and back. (1st lead through across, 2nd back) 8 Set & swing corners. 4 All advance & retire. 4 Swing partners. 32 Repeat with Lady 2, Man 1. 32 Repeat with Lady 3, Man 4. 32 Repeat with Lady 4, Man 3. The Caledonians Quadrille Figure 4. (4x24) 2 Lady 1, Man 2 advance and stop. 2 Lady 2, Man 1 advance and stop. 4 Turn partners back to place. 2 All ladies to the right 4 steps. 2 All men to the left 4 steps. 2 All ladies to the right 4 steps. 2 All men to the left 4 steps. 4 Promenade to place. 4 Swing partners. 24 Repeat with Lady 2, Man 1 leading. 24 Repeat with Lady 3, Man 4 leading. 24 Repeat with Lady 4, Man 3 leading. Figure 5. (4x48 + 16) 8 1st couple visit. 4 Ladies advance, curtsey & retire. 4 Men advance, bow & retire. 8 All set & swing partners. 8 Grand chain 1/2 way round and honour partners. 4 Promenade to place 4 and swing partners. 8 Chasse-croise, (4 steps past partner, RH to corner balance fwd & back, then 4 steps back, LH to partner balance fwd & back). 48 Repeat with 2nd couple leading. 48 Repeat with 3rd couple leading. 48 Repeat with 4th couple leading. 8 All promenade set. 8 Swing partners. Note: Set & swing is 'normal' set and cross hand swing. The Royal Irish Quadrille Figure 1. (2x32) 8 Top couples to Right, R & L through 8 Set & swing Partners. 8 Ladies chain. 4 Couples promenade across (to the other couples position). 4 Half R & L to place. 32 Repeat with tops to the left. Figure 2. (4x24) 4 Top couples to Right, adv & ret. 4 Cross over (without changing places with partner). 8 Repeat back to place. 8 Set & swing partners. 24 Repeat with top couples to the Left. 48 Tops repeat with Right and Left sides. Figure 3. (4x32) 4 Lady 1,2 and Man on Right, advance, touch RH, retire to opposite place. 4 Advance again, join LH, give RH to partner. 4 Line of 4 balance fwd & back twice. 4 Men Lead partners to opp. Place. 4 Lady 1,2 and opp. Man adv & ret. 4 Advance, honour & retire. 4 Couples, advance & retire. 4 Half R & L to place. 32 Repeat with Ladies 3,4 leading. 64 Repeat with Tops facing left. The Royal Irish Quadrille Figure 4. (4x32) 4 Top couples to Right, adv & ret. 4 Re-adv, Top Ladies join opp. Couple. 4 Line of 3 adv & ret. Top men retire. 4 Line of 3 adv, ladies join other man. 4 Line of 3 adv & ret, Side men retire. 4 Re-advance, form circle with opp. Man. 4 Circle L half way round. 4 Half R & L to place. 32 Repeat with Side ladies leading. 64 Repeat with Top couples facing left. Figure 5. (4 x 32 + 8) 4 All advance & retire. 4 Swing partners. 4 Ladies advance, curtsey & retire. 4 Men advance, bow & retire. 8 All set & swing corners. 8 Promenade with corner. (Men to original place with corner). 96 Repeat 3 times to return to partner. 4 All advance & retire. 4 Swing partners. Notes: 1. This is The Quadrille danced diagonally, with Top couples dancing first with the side couple on their right, then the left. Ie. 1-3 and 2-4 then 1-4 and 2-3. 2. Set & swing is 'normal' set and irish swing.The Eightsome Reel Numbering: Clockwise 1-2-3-4 Part A (40 Bars) 4 All join hands, circle left 4 All circle right. 4 Grand Cross, Ladies join RH. 4 Grand Cross, Men join LH. 8 Set & turn Partners 16 Grand chain right round set. Part B ( 8x48 bars) 1st Lady advance to centre, Others join hands in circle. 8 Circle left and right 4 Set once and turn partner 1st Lady sets to partner then open hand turn once with partner. 4 Set once and turn opposite 1st Lady sets to opposite man, then open hand turn once. 8 Reel of 3, 1st Lady, partner and opposite man 1st Lady remains in centre. 8 Circle left and right again 4 Set once and turn side man 1st lady and man on right. 4 Set once and turn other side man 1st lady and man on left. 8 Reel of 3, 1st lady, and two side men. 48 2nd lady repeat. 96 3rd and 4th ladies repeat. 192 Men repeat same movement. The Eightsome Reel Part C (40 Bars) 8 All circle left and right. 4 Grand cross - Ladies join RH. 4 Grand Cross - Men join LH. 8 All set and turn partners. 16 Grand Chain round set. Note: Set is 'normal' set. Turn is open hand turn. NOTES 1. The Quadrille 2. The Prince Imperials 3. The Parisienne Quadrille 4. The Lancers Quadrille 5. The Caledonians Quadrille 6. The Royal Irish Quadrille 7. The Eightsome Reelperson, individual, peter ellis oam -
 Bendigo Historical Society Inc.
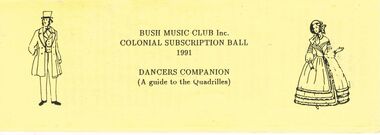
Document - PETER ELLIS COLLECTION: BUSH MUSIC CLUB COLONIAL BALL, 1991
Small yellow booklet outline of a man on left of title and woman on right. Bush Music Club Inc. Colonial Subscription Ball 1991 Dancers Companion (A guide to the Quadrilles) The Quadrille Figure 1 (Le Pantelon) (2x32) 8 Top couples R and L through. (without giving hands). 8 Set & turn Partners 8 Top ladies chain. 4 Top couples promenade across set. 4 Half R and L to place. 32 Side couples repeat Figure 2 (Le 'Ete) (4x24) 4 Top couples advance & retire. 4 Cross over (without changing places with partner). 8 Repeat back to place. 8 Set & turn partners. 24 Sides repeat. 48 Top and Sides repeat. Figure 3 (La Poule) (4x32) 4 Lady 1, Man 2 adv, tough RH, retire to opposite place. 4 Lady 1, Man 2 adv, join LH give RH to partner 4 Line of 4 balance fwd & back twice. 4 Men lead partners to opp. Place. 4 Lady 1, Man 2 adv. & ret. 4 Lady 1, Man 2 adv, honour & ret. 4 Top couples, advance & retire. 4 Half R & L to place. 32 Repeat with Lady 2, Man !. 32 Repeat with Lady 3, Man 4. 32 Repeat with Lady 4, Man 3. The Quadrille Figure 4. (La Pastourelle) (4x32) 4 1st couple advance & retire. 4 1st couple adv, lady join 2nd couple. 4 Line of 3 adv. & ret, 1st man retire. 4 Line of 3 adv. Ladies cross to 1st man. 4 Line of 3 adv. & ret, 2nd man retire. 4 Re-advance, form circle with 2nd man. 4 Circle L half way round. 4 Half R & L to place. 32 Repeat with 2nd couple leading. 32 Repeat with 3rd couple leading. 32 Repeat with 4th couple leading. Figure 5 (La Finale) (4 x 32 + 8) 4 All advance & retire. 4 Turn partners. 4 Ladies adv, curtsey & retire. 4 Men advance, bow & retire. 8 All set & turn corners. 8 Promenade with corner. (men to original place with corner) 96 Repeat 3 times to return to partner. 4 All advance & retire. Turn Partners. Notes: 1 Couples numbered 1 4 2 3 2 Set & turn is a 'balance' set and open hand turn. The Lancers Quadrille Figure 1 (4x24) 4 1st lady, 2nd man advance & retire, 4 Adv, turn two hands, return to place. 4 1st couple lead through across set 4 2nd couple lead through back 8 all set & turn corners. 24 Repeat, 2nd lady, 1st man leading 24 Repeat 3rd lady, 4th man leading 24 Repeat, 4th lady, 3rd man leading Figure 2 (4x24) 4 1st couple advance & retire. 2 1st lady adv to centre, turn to face partner 2 1st couple honour each other. 8 1st couple set and turn then sides form top & bottom lines 4 Lines advance & retire, 4 Advance and turn partners to place. 24 Repeat with 2nd couple leading 24 Repeat with 3rd couple leading 24 Repeat with 4th couple leading Figure 3. (2x32) 4 Ladies advance, curtsey & retire. 4 Men adv, bow, turn by left, bow to partners, then join RH in centre, (ladies RH on partners left elbow). 8 Promenade round set to place. 4 Ladies adv, curtsey & retire again. 4 Men adv, bow, turn by right, bow to partners, join LH in centre, right arm behind partner. 8 Promenade round to set in place. 32 Repeat. The Lancers Quadrille. Figure 4. (4x24) 8 Top couples visit R then L 4 Right Hands around with LH couple 4 then left hands around. 8 Circle left with that couple. 24 Repeat with side couples leading. 24 repeat, top couples visit L then R. 24 Repeat, side couples visit L then R. Figure 5. (4x48 +24) 8 All grand chain 1/2 way round and honour partners. 8 Continue grand chain to place and honour partners. 8 1st couple visit, return to place, facing out with sides in behind. 2 Change places with partner, 2 All rock fwd and back 2 change places again 2 All rock fwd and back 8 Cast out reform in lines 4 Lines advance & retire 4 Advance & turn partners to place 48 Repeat with 2nd couple leading 48 Repeat with 3rd couple leading 48 Repeat with 4th couple leading. 8 Grand chain 1/2 way round and honour partners. 8 continue grand chain to place and honour partners 8 swing partners (R arm round partner, LH in air) Note: All figures walked. Set & Turn is a 'balance' set and open two hand turn. The Prince Imperial's Quadrille Figure 1. (4x24) 4 Top couples visit right, honour sides. 4 Top men retire with partner & side lady to opposite place, (ladies facing each other). 8 Ladies grand chain to places 8 All set and turn partners 24 Top couples repeat back to place. 48 Repeat with side couples. Figure 2 (4 x 24) 4 1st Lady, 2nd man adv & turn in centre finish facing 2nd lady. 2 2nd lady pass through to 1st man. 2 Both couples turn out to place. 4 top couples advance & retire. 4 Ladies chain back to place. (Nariel) 8 Chasse-croise. (4 steps past partner RH turn corner 4 steps back, LH turn with partner.) 24 Repeat with 2nd lady, 1st man leading 24 Repeat with 3rd lady, 4th man leading 24 Repeat wth 4th lady, 3rd man leading. Figure 3 (4x32) 4 1st lady to centre, curtsey to partner. (RH in RH, ACW turn in to centre) 4 2nd lady to centre, curtsey to partner. 4 3rd lady to centre, curtsey to partner.4 4th lady to centre, curtsey to partner. 8 ladies join hands, circle R, small steps after circle R, Men join circle, (giving RH to partner). 4 Balance for 4 (step lift x 4) 4 Turn partners to place, bow & curtsey. 32 Repeat, Lady 2, 1, 4 & 3 to centre 32 Repeat Lady 3, 4, 2 & 1 to centre 32 Repeat, Lady 4, 3, 1 & 2 to centre The Prince Imperial's Quadrille Figure 4 (4x32) 4 Top couples advance & retire. 4 Top couples adv, ladies move to R, as men retire to place. 8 Line of 3 adv & ret twice. 4 Single men adv, bow and retire. 4 Re-advance and turn to face partner. 4 Circle L half way round (with partner & side couple). 4 Half R & L to place. 32 Repeat with side couples leading. 32 Repeat with top couples leading (men moving to left as ladies retire) 32 Repeat with Side couple leading. (Men moving to left as ladies retire) Figure 5 (4x32 +32) 16 Ladies to the right, (RH turn with corner man then continue round to the right turning each man) 4 1st Lady, 2nd man advance & retire 4 re-advance & turn RH (finish facing partners) 8 set & turn partners (finishing in place) 32 Repeat with 2nd Lady, 1st man leading 32 repeat with 3rd lady, 4th man leading 32 Repeat with 4th Lady, 3rd man leading 16 Ladies to the right again. 4 Men turn partners to centre. 4 All bow and curtsey. 8 Promenade set ( hall) Note: Set & turn is a 'balance' set and open hand turn. The Parisienne Quadrille Figure 1 (1x32) 8 Couples R and L through. (without giving hands) 8 set & turn partners 8 Ladies chain. 4 Couples promenade across set. 4 Half R and L to place. Figure 2 (2x24) 4 Couples advance & retire. 4 Cross over (without changing places with partners) 8 Repeat back to place. 8 Set & turn partners. 24 Repeat. Figure 3 (2x32) 4 Lady 1, Man 2 adv, touch RH, retire to opposite place. 4 Lady 1, Man 2 adv, join LH, give RH to partner. 4 Line of 4 balance fwd & back twice 4 Men lead partners to opp. Place 4 Lady 1, Man 2 adv & retire 4 Lady 1, Man 2 adv, honour & ret. 4 Couples, advance & retire. 4 Half R & L to place. 32 Repeat with Lady 2, Man 1. The Parisienne Quadrille Figure 4. (2x32) 4 1st couple advance & retire. 4 1st couple adv, lady join 2nd couple. 4 Line of 3 adv. & ret, 1st man retire. 4 Line of 3 adv. Ladies cross to 1st man. 4 Line of 3 adv. & ret, 2nd man retire. 4 Re-advance, form circle with 2nd man. 4 Circle L half way round. 4 Half R & L to place. 32 Repeat with 2nd couple leading. Figure 5 (2x32) 4 Couples advance & retire 4 Cross over 8 Repeat back to place. 8 Ladies chain across & back.8 Set & turn partners. 32 Repeat Notes: 1 This 'quadrille' is similar to the first set (1st 4 figures) and is danced as two couple sets. 2 Set & turn is a 'balance' set and open hand turn. Wellington Waltz 8 Honour Partner, honour corner 8 Circle L 7 steps, then tap, tap 8 Circle R 7 steps, then tap, tap 4 Top couples, 2 side-steps to centre and back with lady turning under man's left arm. 4 Waltz across to opposite side 8 Side couples repeat. 8 Top ladies chain across. (pause in centre, turn twice with opp. Man) 8 Side ladies chain across. 8 Grand Chain half way round set. 8 Waltz to man's place. 64 Repeat with side couples leading. Waltz Cotillon 8 Honour Partner, honour corner 16 1st couple waltz the set. 8 Top ladies cross over.8 Side ladies cross over. 8 Top men cross over. 8 Side men cross over. 16 All waltz back to place. Form top & bottom lines, 8 Adv. & ret, cross over. 8 Adv. & ret, cross back. 16 Waltz chain to meet partner. 16 All waltz back to place. Form top & bottom lines, 8 Adv. & ret, cross over. 8 Adv. & ret, cross back. 16 Waltz chain to meet partner. 16 All waltz back to place. 112 Repeat with 2nd couple leading. 112 Repeat with 3rd couple leading. Side lines adv. & ret. 112 Repeat with 4th couple leading. Side lines adv. & ret. Galopade Quadrille 8 Honour Partner, honour corner 8 All galop round set. (Galop half way round set, on opp. Side change places with partner, continue galop to place.) 8 Top couples R & L through. 8 Side couples R & L through. 8 All set & swing partners. 8 All galop round set. 8 Top ladies chain. 8 Side ladies chain. 8 All set & swing partners. 8 All galop round set. 8 1st couple lead through, 2nd on return 8 3rd couple lead through, 4th on return 8 All set & swing partners. 8 All galop round set. 4 1st lady & 2nd man adv. & ret. 4 2nd lady & 1st man adv. & ret. 4 3rd lady & 4th man adv. & ret. 4 4th lady & 3rd man adv. & ret. 8 All set & swing partners. 8 All galop round set. 4 Ladies advance & retire. 4 Men advance & retire. 8 Double ladies chain. 8 All set & swing partners. 8 All galop round set. 8 Top couples waltz the set 8 Side couples waltz the set 8 All set & swing partners. 32 Waltz the hall. The Caledonians Quadrille Figure 1. (2x32) 4 Top couples R.H. across, move CW (Ladies hands joined over Mens). 4 then L.H. across, move ACW. 8 Set & swing Partners 8 Top ladies chain. 4 Top couples promenade across set. 4 Half R and L to place. 32 Side couples repeat. Figure 2. (4x24) 8 1st Man advance & retire twice. 8 Set & swing corners. 8 Promenade with corners (to men's position.) 24 2nd man repeat. 48 3rd and 4th man repeat. Figure 3. (4x32) 4 Lady 1, Man 2 advance & retire. 4 Re-advance, 2 hand turn to place. 8 1st & 2nd couples lead through and back. (1st lead through across, 2nd back) 8 Set & swing corners. 4 All advance & retire. 4 Swing partners. 32 Repeat wth Lady 2, Man 1. 32 Repeat with Lady 3, Man 4. 32 Repeat with Lady 4, Man 3. The Caledonians Quadrille Figure 4. (4x24) 2 Lady 1, Man 2 advance and stop. 2 Lady 2, Man 1 advance and stop. 4 Turn partners back to place. 2 All ladies to the right 4 steps. 2 All men to the left 4 steps. 2 All ladies to the right 4 steps. 2 All men to the left 4 steps. 4 Promenade to place. 4 Swing partners. 24 Repeat wth Lady 2, Man 1 leading. 24 Repeat wth Lady 3, Man 4 leading. 24 Repeat wth Lady 4, Man 3 leading. Figure 5. (4x48 + 16) 8 1st couple visit. 4 Ladies advance, curtsey & retire. 4 Men advance, bow & retire. 8 All set & swing partners. 8 Grand chain 1/2 way round and honour partners. 4 Promenade to place 4 and swing partners. 8 Chasse-croise, (4 steps past partner, RH to corner balance fwd & back, then 4 steps back, LH to partner balance fwd & back). 48 Repeat with 2nd couple leading. 48 Repeat wth 3rd couple leading. 48 Repeat wth 4th couple leading. 8 All promenade set. 8 Swing partners. Note: Set & swing is 'normal' set and cross hand swing. The Lancers Quadrille (BMC version) Figure 1. (4x32) 8 1st Lady, 2nd man advance & swing in centre (with ballroom hold). 4 Partners move 1/2 way across, Centres keep swinging. 4 Promenade partner to opp. Place. 8 1st couple lead through to place. 8 All swing corners. 32 Repeat with 2nd lady, 1st man. 32 Repeat with 3rd lady, 4th man. 32 Repeat with 4th lady, 3rd man. Figure 2. (4x32) 8 1st couple lead up (to 2nd) & retire. 8 1st couple swing in place Form top & bottom lines. 8 Lines adv & retire twice. 8 Swing partners. 32 Repeat with 2nd couple leading. 32 Repeat with 3rd couple leading. (Forming side lines instead) 32 Repeat with 4th couple leading. (Forming side lines instead) Figure 3. (2x32) 4 Introduction - Ladies to the centre and men form a circle around them. 8 Men circle left. 8 Men circle right. Men form a grand cross (LH) Right arm behind partners. 16 Promenade round set. Ladies return to the centre. 32 Repeat - Circle L & R, & Grand Cross. The Lancers Quadrille (BMC version) Figure 4. (2x48) 8 Top couples visit. 4 Tops RH star. 4 then LH star. 8 Tops basket Left. 8 Tops basket Right. 8 Tops circle Left. Tops circle Right. 48 Repeat with side couples leading. Figure 5. ((4x 16+32) + 24) 8 All grand chain 1/2 way round and honour partners. 8 Promenade with partners to place. 8 1st couple lead up, turn and lead out with side falling in behind. 8 Cast out, reform top & bottom lines. 4 Lines advance & retire. 4 Advance & swing partners to place. 8 Swing partners in place. 48 Repeat with 2nd couple leading. 48 Repeat with 3rd couple leading (forming side lines) 48 Repeat with 4th couple leading. (forming side lines) 8 All grand chain 1/2 way round and honour partners. 8 Promenade with partners to place. 8 Swing partners in place. Note: Normal swing here is with hands crossed. 1. The Quadrille 2.The Lancers Quadrille 3. The Prince Imperials 4. The Parisienne Quadrille 5. The Wellington Waltz 6. The Waltz Cotillon 7. The Galopade Quadrille 8. The Caledonians Quadrille 9. The Lancers Quadrille (BMC)person, individual, peter ellis oam -
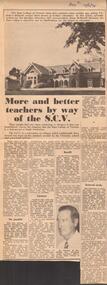 Bendigo Historical Society Inc.
Document - Digital, LA TROBE UNIVERSITY BENDIGO COLLECTION: MORE AND BETTER TEACHERS BY WAY OF THE S.C.V
A Bendigo 'Advertiser' newspaper article titled 'More and better teachers by way of the S.C.V.' The SCV Vice President Doug McDonnell gives a written report to the Bendigo 'Advertiser' outlining the State College's objectives and the impact of the colleges on the future of education in Victoria. There is a photo of "Invergowrie'', the central office of the S.C.V. 19/06/68bendigo, education, state college of victoria, la trobe university bendigo collection, collection, education, tertiary education, state college of victoria, bendigo, mr. douglas m. dcdonell, ''invergowrie, '' place, house, houses, buildings, bendigo teachers' college -
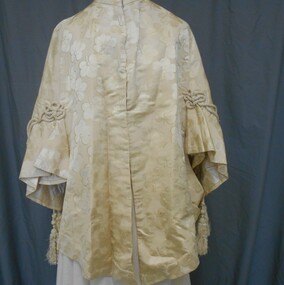 Bendigo Historical Society Inc.
Clothing - CREAM SILK EVENING CAPE (RELATED TO 11400.842)
Cream silk, woven in a jacquard style, featuring a floral design. Fully lined with cream silk satin. A 4cm deep, stand-up mandarin style collar. Eight metal hook and eyes fasten the front in a concealed way. Heavy cording, finished with pearl trimmed tassels,a double inverted pleat, 22cm long at the centre back hemline. Three darts at shoulders giving a 'sleeve-like' shape. Lower edges of which are elaborately corded. A 12cm'slit' at the lower edge seam with the front panel gives more flexibilty to the wearer. Tassel head and decorative 1.5cm ''ball'' are woven in a ''turks head'' style. A 2.5cm wide silk ribbon, attached at centre back, and possibly tied around the waist.A card with the cape is hand written - ''For Historical Soc.if wanted, From M.Bush's Collection. Could have been from Mrs. Mueller's. Gift from Mrs. E.G.JARRETT''costume, female, cream silk evening cape -
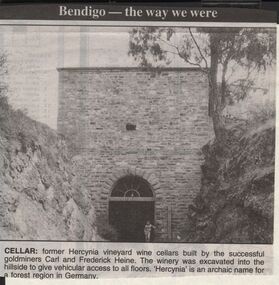 Bendigo Historical Society Inc.
Newspaper - JENNY FOLEY COLLECTION: CELLAR
Bendigo Advertiser "The way we were" from 1999. Cellar: former Hercynia vineyard wine cellars built by the successful goldminers Carl and Frederick Heine. The winery was excavated into the hillside to give vehicular access to all floors. 'Hercynia' is an archaic name for a forest region in Germany.newspaper, bendigo advertiser, the way we were