Showing 1937 items matching "tram signs"
-
 Ballarat Tramway Museum
Photograph - Black & White Photograph/s - set of 4, Richard Gilbert, c1975
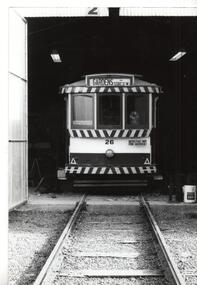
Series of four Black and white photographs of tram 26 on No. 2 road at the BTPS Depot, undergoing replacement of the broken frame on the Brill 21E truck. The tramcar record sheets note that the car was lifted 15-3-1975 and lower 27-7-1975 and tested on the same day. Seems to have re-entered service on 28/9/1975. .1 - on the front of the road, with a "Defective Not for Service" sign. .2 - car on jacks being either lifted or lowered. .3 - tramcar body lifted showing the word to replace the side frame underway, has the good and broken side frame in the view. .4 - tram being either lifted or lowered - with Rolf Jinks in the view. trams, tramways, btps, depot, brill trucks, maintenance, tram 26 -
 Ballarat Tramway Museum
Photograph - Black & White Photograph/s, Richard Gilbert, c August 1971
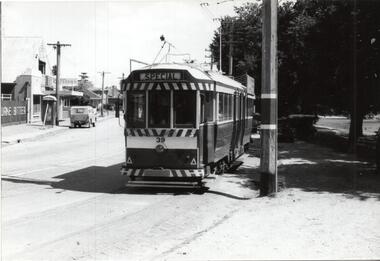
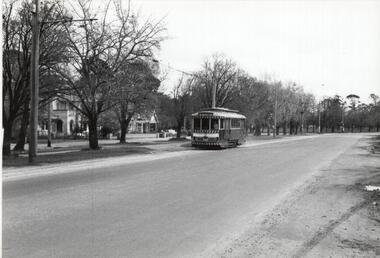
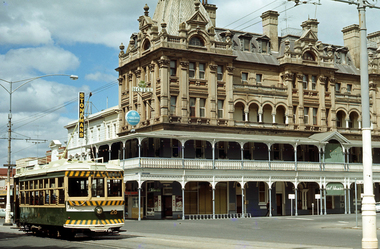
Yields information about the View Point line and its use mid 1971. Black and white photograph of tram 39, running a special on the View Point line (?) Wendouree Parade, c August 1971. This line saw little use in the period prior to closure. In the background is a shop - Danube Caterers, a Victoria Bitter sign, Lake Wendouree and a telephone box. trams, tramways, lake view, lake wendouree, wendouree parade, tram 39 -
 Ballarat Tramway Museum
Photograph - Black & White Photograph/s - set of 2, Richard Gilbert, c August 1971
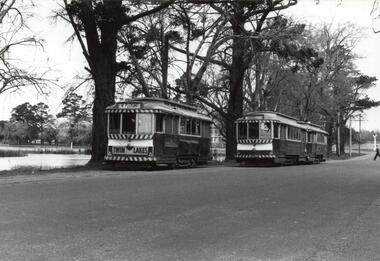
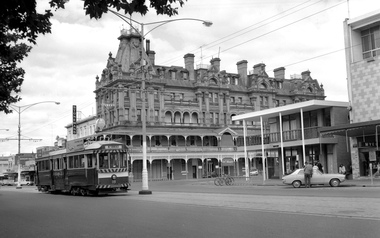
... (with a Twin Lakes sign, Mt Pleasant) crossing tram 21 (Gardens via... - tram 11 (with a Twin Lakes sign, Mt Pleasant) crossing tram 21 ...Yields information about the use of the Carlton St crossing loop prior to the closure of the tramway. Series of 2 Black and white photographs of trams using the Carlton St, Wendouree Parade crossing loop. .1 - tram 11 (with a Twin Lakes sign, Mt Pleasant) crossing tram 21 (Gardens via Sturt St West) and another single trucker. Has the signal and the Olympics Monument in the background. .2 - tram 27 and a bogie tram crossing. Tram 27 has the destination of Victoria St and a Twin Lakes sign. trams, tramways, carlton st, wendouree parade, tram 27, tram 11, tram 21 -
 Ballarat Tramway Museum
Photograph - Black & White Photograph/s - set of 2, Richard Gilbert, c August 1971
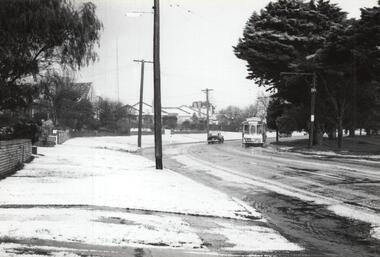
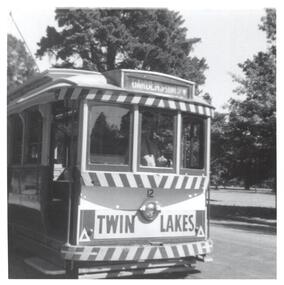
Yields information about the appearance of Wendouree Parade, after a hail storm the day before the closure of the Victoria St line. Series of 2 Black and white photographs of tram operations following a heavy hail storm on Friday afternoon 21/8/1971. .1 - single trucker with a Twin Lakes sign westbound in Wendouree Parade, rounding the Haddon St curve. .2 - trams 12 and 21 parked on the SEC depot fan.trams, tramways, haddon st, wendouree parade, depot, tram 12, tram 21 -
 Ballarat Tramway Museum
Photograph - Black & White Photograph/s - set of 4, Richard Gilbert, c August 1971
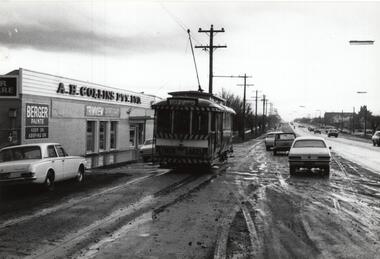
Yields information about the appearance of the Sebastopol line shortly before the closure of the first of the Ballarat tram lines. Series of 4 Black and white photographs of tram operations on the Sebastopol line, during August 1971. .1 - Tram 12, with the destination of Grey St and a twin lakes sign, pass the A H Collins hardware store, with adverts for Berger Paints and Trimview windows. shows the nature of Albert St after rain. .2 - Trams 27 (Sebastopol with a Twin Lakes sign) crossing 32 at the Grey St loop. .3 - Tram 12, showing Depot via Drummond North southbound in Albert St Sebastopol. .4 - Tram 26 at the Sebastopol terminus showing City Oval as its next destination. This may not be correct.trams, tramways, sebastopol, albert st, grey st, tram 12, tram 27, tram 26, tram 32 -
 Ballarat Tramway Museum
Photograph - Black & White Photograph/s, Richard Gilbert, Aug. 1971
Yields information about Sturt St east end appearance. Black and white photograph of No 31? in Sturt St, after leaving Grenville St, to the Gardens. Has a Twin Lakes sign. Has Edments Hartley, Gear Chemist, Thomas Jewellery, Union Hotel and Dickins Food store in the background. trams, tramways, sturt st, grenville st, tram 31? -
 Ballarat Tramway Museum
Photograph - Black & White Photograph/s - set of 2, Richard Gilbert, c August 1971
Yields information about tramway operations in Sturt St west. Series of 2 Black and white photographs of trams using the Hospital corner curves. .1 - No. 12 east bound in Sturt St West with the destination of Mt Pleasant. Has a Twin Lakes sign. Near the intersection with Russell or Morrison Streets at the Victoria Park loop. .2 - West bound (NO. 11?) about to enter the Victoria Park Loop trams, tramways, sturt st west, russell st, victoria park, tram 12, tram 11? -
 Ballarat Tramway Museum
Negative, Wal Jack, late 1930's
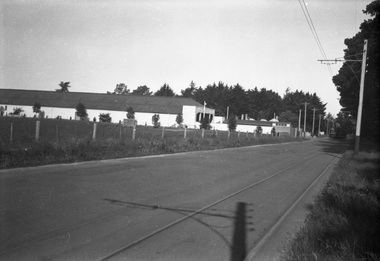
Yields information about Ballarat 's tram depot building from Wendouree Parade and a possible land sale.Negative and Digital image of the Wal Jack Ballarat Negative file of the depot as seen from Wendouree Parade from near the intersection with Forest St. Has a single trucker turning into the depot. There appears to be a sign on the land, possibly advertising it for sale. Shows the buildings after the new front has been put on. Late 1930's. trams, tramways, depot, wendouree parade, sale of land -
 Ballarat Tramway Museum
Photograph - B&W print of donated negative - set of 5, Graham Parry, 1971
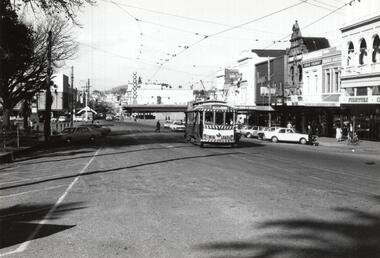
Yields information about the City Loop and tram operations in Sturt St, 1971Set of five black and white prints and associated negatives of trams in Ballarat during 1971 prior to closure of the system by Graham Parry. All images from the scanned negative. .1 - No. 43 and possibly 31 in the City Loop. Has various buildings in the background. .2 - No. 34 at the Sturt and Lydiard Sts tram stop. Has the National Mutual Building in the background, which has a CML (Colonial Mutual Life) sign on it. .3 - No.35 at the north side tram stop. Has a Briquettes roof advert. Tram has the destination of Lydiard St North. .4 - View looking from the top of the hill at the City Loop with 43 and other cars in the loop. Has the Dickens Food Store and Patersons in the view along with other buildings. .5 - as for .4, but from the south side footpath with trams 43, 31, 26 and another in the loop. All have SEC roof adverts.tramways, trams, sturt st, city loop, lydiard st nth, tram 43, tram 31, tram 34, tram 35, tram 26 -
 Ballarat Tramway Museum
Photograph - Digital image, John Ward, 22/03/1970 12:00:00 AM
Digital image of Bendigo tram 7 outward bound to Golden Square at corner of High and Laurel St Bendigo, with the United Kingdom Hotel in the background with a Carlton Draught sign. Photo by John Ward 22 March 1970. Slide title "00755 220370 SEC single truck tram 7 in High St at Robert St Golden Square Bendigo Vic"trams, tramways, bendigo, high st, golden square, tram 7 -
 Ballarat Tramway Museum
Photograph - Digital image, John Ward, 1/01/1972 12:00:00 AM
Digital image of Bendigo 28, with a Lake Weeroona destination, at the corner will Williamson St with the Shamrock Hotel in the background. Has signs for Carlton Draught beer. A Stonemasons signs is next door. Photo by John Ward 1 January 1972 Slide title "00890 010172 SEC Birney tram 28 Pall Mall at Williamson St outside Shamrock Hotel Bendigo Vic"trams, tramways, bendigo, pall mall, lake weeroona, tram 28 -
 Ballarat Tramway Museum
Photograph - Digital image, John Ward, 1/01/1972 12:00:00 AM
Digital image of the Bendigo 18 to North Bendigo in Pall Mall at Williamson St with the Shamrock Hotel and the ANZ Bank in the background. Has signs for Stonemasons and Myers in the photo. Photo by John Ward 01-01-1972 Slide title "04759 010172 7208-H SECV bogie tram 18 Pall Mall at Williamson St Bendigo Vic"trams, tramways, bendigo, pall mall, north bendigo, tram 18 -
 Ballarat Tramway Museum
Photograph - Black & White Photograph/s, Andrew Howlett, c1971
Yields information about the appearance of the Lydiard St North terminus.Black and White photograph print of tram 27 at the Lydiard St North terminus, looking towards the Cemetery. Tram has the destination of Sebastopol and has a Twin Lakes sign.trams, tramways, lydiard st north, cemetery, tram 27 -
 Ballarat Tramway Museum
Photograph - Black & White Photograph/s - set of 2, Andrew Howlett, c1971
Yields information about the appearance of No. 12 in Wendouree Parade c1971.Series of two Black and White photograph prints of the Ballarat Horse Tram No. 12 near Gardens loop Wendouree Parade, c1971. Tram has a Twin Lakes sign. trams, tramways, wendouree parade, tram 12 -
 Ballarat Tramway Museum
Negative, Wal Jack, 1948
Yields information about bogie tram 34 and its possible first day in service as that tram rather than its Melbourne number 137.Negative and Digital image of the Wal Jack Ballarat Negative file of bogie tram No. 34 at the corner of Sturt and Lydiard St with the destination of View Point and an auxiliary board "Regatta". Wal Jack notes Reg Item 7584 gives the date of first use of 34 on Regatta traffic as / /1948 In the background is the Commonwealth Bank, the National Mutual building, Berry Anderson Printers, Wilson's Tailors and Mercers, a sign for Penfolds Wines and Roy ? Endear and a Chemist shop. Chemist sign as adverts for Kodak film Ipana toothpaste. On the side of the chemist shop is an advert for the Plaza theatre "The 13th Hour" - which was a film in the USA early 1947. trams, tramways, sturt st, view point, events, tram 34 -
 Ballarat Tramway Museum
Legal record, State Electricity Commission of Victoria (SECV), "Agreement between the SEC, City of Ballaarat and Borough of Sebastopol" re tramways, 1929
The SEC made this agreement with respect to the operation of tramways in Ballarat and Sebastopol in 1929, though the SEC did not formally take over operation until 1934.Yields information about the 1929 agreement between the SEC, The City of Ballaarat and the Borough of Sebastopol about the operation of tramways in Ballarat.Original copy and photocopy of an SEC made 17/11/1929 of the "Agreement between the SEC, City of Ballaarat and Borough of Sebastopol" re tramways at the time of the operation transfer of the tramways from ESCo to the SEC. Five pages, foolscap, white paper stapled in top left hand corner. Outlines the conditions of operations, track maintenance, tramcars, responsibilities, buildings, bus services. On pages 13 and 14 has the names of the parties who signed the agreement, including John Monash. Agreement dated 17/11/1929. See Reg Item 4941 for another version, carbon copy of a closely typed version. tram, trams, agreements, sec, city of ballaarat, borough of sebastopol, esco -
 Ballarat Tramway Museum
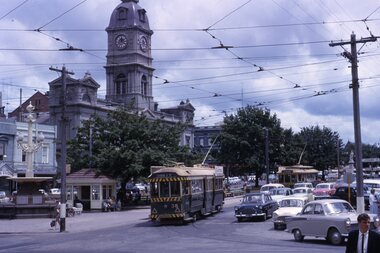
Slide - 35mm slide/s, Robert Thomson, 21/04/1962 12:00:00 AM
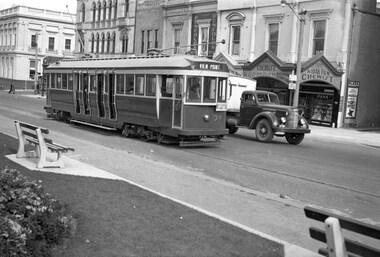
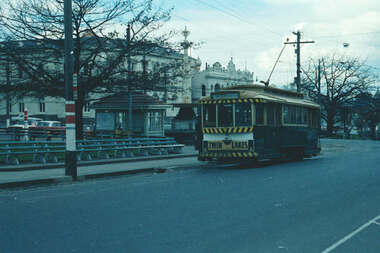
Yields information about Ballarat's trams during 1964 and the Victoria St terminus and an AETA Convention tour.Kodachrome cardboard mount, colour slide of trams 18 and 37 at the Victoria St terminus, during the AETA Convention tour of 21-4-1962. Tram, 18 has adverts for The Age, Lancashire's store at 94-98 Bridge St and a Whites Florist and No. 37 and SEC Electric Cooking advert and the AETA tour sign."AETA Convention 21-4-62" in ink.tramways, trams, victoria st, aeta, aeta tour, tram 18, tram 37 -
 Ballarat Tramway Museum
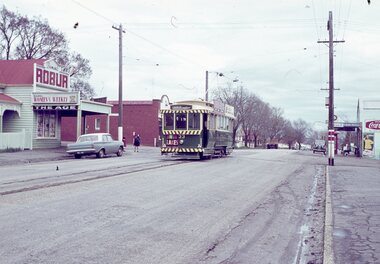
Slide - 35mm slide/s, Robert Thomson, c1964
Yields information about Ballarat's trams during 1964c, the Mt Pleasant terminus.AGFA blue / white plastic mount, colour slide of No. 33 at the Mt Pleasant terminus, c1964. In the background are the shops advertising Robur Tea, Women's Weekly, The Age, and coca Cola. The tram has a Twin Lakes sign. image i2 - cleaned up by PCW - 22-9-2022tramways, trams, mt pleasant, barkly st, tram 33 -
 Ballarat Tramway Museum
Photograph - Colour Photograph/s, Austin Brehaut, Mar. 1999
... that still have signs of the former tram stops. An accompanying note... have signs of the former tram stops. An accompanying note ...Set of 23 photographs taken by Austin Brehaut during March and April 1999 of power poles along the former tram routes that still have signs of the former tram stops. An accompanying note (scanned) written by Austin Brehaut is reproduced below in Other Information - see related documents. 1096.1 - Sturt St at Doveton St., south (down) side. .2 - Drummond St. Sth (east side) outside St. Patrick's School between Dana and Eyre St. .3 - Drummond St. Sth, cnr Urquhart St. (east side) .4 - Drummond St. Sth, cnr South St. (east side) .5 - Drummond St. Sth, cnr Sebastopol St. (east side) .6 - Drummond St. Sth, cnr Latrobe St. (east side) .7 - Drummond St. Sth, cnr Darling St. .8 - Sturt St. cnr Ripon St. (North East side) .9 - Ripon St. Nth, cnr Sussex St. .10 - Ripon St. Nth, cnr Mair St. (South West Corner) .11 - Ripon St. Nth, cnr Mair St. (North East Corner) .12 - Macarthur St. cnr Burbank St. (up side) .13 - Lydiard St. Nth, cnr Clarendon St. (east side) .14 - Lydiard St. Nth, cnr Howard St. (west side) .15 - Lydiard St. Nth, cnr Gregory St. (west side) .16 - Lydiard St. Nth, cnr Howitt St. (west side) .17 - Lydiard St. Nth, near Walker St., (east side) .18 - Lydiard St. Nth, cnr Landsborough St. (east side) .19 - Barkly St. cnr Main Road (up side) .20 - Barkly St. near Haymes Cres (down side) .21 - Barkly St., near Young St. (down side) .22 - Barkly St, Cameron St (up side) .23 - Barkly St., at Cobden St. terminus (west side) .1 - April 99, .2 > .10, 9/3/99, .11 > .18 - March 1999, .19 > .23 - April 1999. See also Reg. Item 768.1 > 768.6 for another group of tram stop photos in Drummond St. in 1997. On Fujifilm paper.On rear of each photo in blue ink is location at date at the top of the photo and in the bottom right hand corner - initials "APB"tram stops, power poles, barkly st., lydiard st. nth, ripon st., sturt st., drummond st. sth -
 Ballarat Tramway Museum
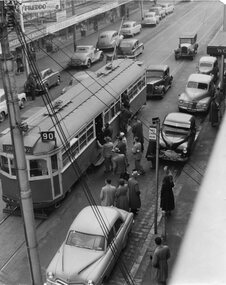
Photograph - Black & White Photograph/s, c1956
Black and white photograph of W6 994 in Smith St. Collingwood/Fitzroy, in bound on route 90 to City - Spencer St., picking up passengers at a tram stop. Pole obscuring front of tram. Tram has destination "City Spencer St" and run number "P44" Tram appears to be fairly crowded already. Photo taken c1956 with a number of motor cars in the street including some Holdens. In the background are a number of shop fronts, with signs for "Singer Sewing Machines", "Freddo frogs", "Peters Ice Cream", Davies Hardware, John Cornish. On the side of the photograph is the first part of a Woolworths store front. The address of the John Cornish, Mercer, was 205 Smith St. Fitzroy and Woolworths were at 182 -184 Smith St. Collingwood. See 1968 Sands and McDougal Director of Victoria for Smith St. details.trams, tramways, mmtb, smith st., w6 class, bourke st., tram w6 994 -
 Ballarat Tramway Museum
Slide - 35mm slide/s - set of 14, Noel Simons, 23/11/1962 12:00:00 AM
Set of 14 Kodachrome transparencies taken on 23/11/1962. 1162.1 - tram 38 turning into Lydiard St. North from Sturt St. with tram 20 in background. Many motor vehicles in photo. 1162.2 - as above, but a minute of so later. Has Mutual Life building in background as well as Town Hall. 1162.3 - No. 40 entering Albert St. from Skipton St. outbound to Sebastopol. 1162.4 - No. 40 near start of side of the road running in Albert St. heading to Sebastopol. 1162.5 - No. 40 at the City terminus, on the South side of Sturt St. Has Town Hall and other buildings along the south side of Sturt St. in the background. 1162.6 - No. 40 at Sebastopol terminus - shows arrangement of the signs at the terminus. 1162.7 - No. 40 and No. 38 crossing at loop between Sayle and Grey St. No. 40 inbound. 1162.8 - No. 40 turning from Drummond St. South to Sturt St. at Hospital Corner with Southern Cross Hotel in background. 1162.9 - No. 18 in Wendouree Parade near Forest St. heading east with destination of "Victoria St." 1162.10 - Nos 41 and 39 at Depot Junction. Both trams have SEC ads. 1162.11 - No. 39 turning into the depot from Wendouree Parade - showing destination of "Gardens via Drummond Nth" 1162.12- No. 17 at Lydiard St. North terminus, showing destination of "Grey St. Sebas". Has a Twin Lakes sign 1162.13 - ditto, but with trolley pole turned around. Has SEC Briquettes roof ad and Whitehorse whiskey ad on rear dash panel. 1162.14 - No. 40 outbound to Sebastopol crossing Albert St. 1162.1 -"Nos. 38 and 20 in Sturt St. Ballarat at corner of Lydiard St." 1162.2 - "No. 38 turns into Lydiard St. as No. 20 waits at stop in Sturt St. Ballarat" 1162.3 - "No. 40 entering Albert St. from Skipton St. Redan on Sebastopol route." 1162.4 - "No 40 at beginning of reserved track on Sebastopol route, Albert St. Redan." 1162.5 - "No. 40 in Sturt St. Ballarat near cnr. of Armstrong St." 1162.6 - "No. 40 at Sebastopol terminus" 1162.7 - "No. 38 and 40 crossing at Sayle St. Loop on Albert St. reserved track, Sebastopol route" 1162.8 - "No. 40 turning into Sturt St. from Drummond St." 1162.9 - "No. 18 in Wendouree Pde. Ballarat near tramway depot" 1162.10 - "No. 41 and 39 outside Ballarat tramway depot, Lake Wendouree in background" 1162.11 - "No. 39 entering tramway depot from Wendouree Parade, Ballarat" 1162.12 - "No 17 at Lydiard St. North terminus, Ballarat North" 1162.13 - "No 17 at Lydiard St. North terminus, Ballarat North" 1162.14 - "No. 40 crossing Albert St. Sebastopol as reserved track switches from left to right of road" All have date stamp of "23 Nov. 1962" in purple ink. All black ink unless otherwise noted.tramways, trams, ballarat, albert st., sturt st., sebastopol, grey st., hospital corner, wendouree parade, depot junction, lydiard st. north, tram 17, tram 18, tram 20, tram 38, tram 39, tram 40, tram 41 -
 Ballarat Tramway Museum
Certificate, Ballarat and District Model Railway Club, Jun. 1998
"Certificate of Appreciation" issued by the Ballarat and District Model Railway Club for the BTM's participation in the Model Railway Spectacular held during the Queens Birthday Weekend June 1998. Printed by laser printer onto an A4 size off white preprinted paper, with the clubs logo. Signed in blue ink by Club President (Ian Mitaxa) and Secretary (Peter Roberts).tramways, trams, model tramways, btm, displays -
 Ballarat Tramway Museum
Slide - 35mm slide/s - set of 17, Noel Simons, 20/11/1962 12:00:00 AM
Set of 17 transparencies taken on 20/11/1962 on Kodak mounts. 1187.1 - Bendigo No. 2 at the Quarry Hill terminus, showing destination of Quarry Hill. Has Cohns Drinks and Streets Ice Cream ads on dash panel, a SEC 'electric cooking' roof ad and another roof ad. Shows the Y terminus at this location, but tram standing just before it. Overhead in position. 1187.2 - as above, but closer up. 1187.3 - as above, but from the north side, showing cemetery in the background. 1187.4 - Bendigo No.3 at Eaglehawk terminus. Tram showing destination of Quarry Hill. Has the various buildings at Eaglehawk in the background including the Foodland store. Has Streets Ice cream and White Horse Whiskey ads on the dash panel. 1187.5 - Bendigo No. 18 at Garden Gully crossing loop, in bound, with destination of Eaglehawk. Passengers waiting for an Eaglehawk tram at the stop. Has a white horse whiskey ad on dash panel and SEC roof ads. Conductor standing in doorway looking out. 1187.6 - Bendigo No. 7 inbound in Nolan St. at cnr of McCrae St. showing destination of Golden Square. Has Streets Ice cream ad on dash panel and a Castrol Roof ad. 1187.7 - Bendigo No. 19 at the North Bendigo terminus with railway level crossing in background. Tram has a Cohns Drinks ad and an SEC 'Electric Cooking' roof ad. 1187.8 - Bendigo No. 2 at the Quarry Hill terminus, looking back into Bendigo, showing destination of Eaglehawk. 1187.9 - Bendigo No. 21 in McCrae St, near Nolan St outbound for North Bendigo. Photo taken after tram has passed photographer. 1187.10 - Bendigo Nos. 4 and 26 at Charing Cross in View St. with fountain alongside and the Beehive, Ezywalkin Buildings in the background. No. 26 has a Sandhurst Milk and SEC 'Electric Cooking' roof ad. 1187.11 - close up of 22E maximum traction truck and folded footstep. 1187.12 - Bendigo No. 19 at Charing Cross terminus, after tram has passed photographer, showing destination of North Bendigo, with the Beehive building in the background and passengers boarding tram. 1187.13 - Bendigo No. 11, turning from View St. into Pall Mall, showing Special with the conductor holding point bar. Has the Beehive and Ezywalkin Buildings in the background. 1187.14 - No. 7 at Charing Cross terminus, in Pall Mall, bound for Golden Square. Has the Beehive and Ezywalkin buildings in the background and passengers waiting at the tram stop. 1187.15 - No. 18 at the Charing Cross terminus, bound for Eaglehawk. Has the Beehive and Ezywalkin buildings in the background and passengers waiting at the tram stop. Also has the 'Safety Zone' sign in the photograph. 1187.16 - No. 2 at Quarry Hill terminus, night or dusk photo. Tram showing destination of Depot. 1187.17 - No. 26 at Charing Cross, night photo. Tram has destination of Quarry Hill, but is on the line for Eaglehawk. Photo looks along Mitchell St. Also shows Safety Zone sign. Information written on in black ink and date stamped on purple ink. 1187.1 - "No. 2 at Quarry Hill terminus Bendigo" 1187.2 - "No. 2 at Quarry Hill terminus Bendigo" 1187.3 - "No. 2 at Quarry Hill terminus Bendigo" 1187.4 - "No. 3 at Eaglehawk terminus" 1187.5 - "No. 18 in Mt Korong Road, Long Gully at cnr of Havilah Road (Eaglehawk Route)" 1187.6 - "No. 7 in Nolan St. Bendigo, at Cnr of McCrae St., near lake Weeroona, (North Bendigo Route)' 1187.7 - "No. 19 at North Bendigo terminus" 1187.8 - "No. 2 at Quarry Hill terminus" 1187.9 - "No. 21 in McCrae St. Bendigo, near Nolan St. (North Bendigo Route) 1187.10 - "4 and 26 at Alexandra Fountain, Charing Cross Bendigo" 1187.11 - "Truck of Bogie Car, Bendigo Tramways" 1187.12 - "No. 19 in Pall Mall at Charing Cross, Bendigo" 1187.13 - "Birney car No. 11 entering Pall Mall from View St. at Charing Cross Bendigo" 1187.14 - "No. 7 in Pall Mall at Charing Cross, Bendigo" 1187.15 - "No. 18 at Alexandra Fountain, Charing Cross, Bendigo" 1187.16 - "No. 2 at Quarry Hill terminus, Bendigo" 1187.17 - "No. 26 at Alexandra Fountain, Charing Cross, Bendigo" tramways, trams, bendigo, quarry hill, eaglehawk, north bendigo, maximum traction, night photo, tram 2, tram 3, tram 4, tram 7, tram 11, tram 18, tram 19, tram 21, tram 26 -
 Ballarat Tramway Museum
Slide - 35mm slide/s, Noel Simons, 21/11/1962 12:00:00 AM
Set of 6 transparencies taken on 21/11/1962 on Kodak mounts. 1189.1 - Bendigo No.11 at Quarry Hill terminus. Photo taken looking in along the route. Tram has destination of North Bendigo. 1189.2 - No. 21 in Pall Mall bound for North Bendigo. Tram has roof ads for Mamouney's furniture and SEC. In the background are the National Bank building, Dad and Dave's Cafe and the Beehive Buildings and the London Pharmacy. 1189.3 - No. 2 in Mitchell St, just after crossing over railway bridge. Photo taken after tram has passed photographer. Has what appears to be an SEC road works crew in the background. Has destination of Quarry Hill. 1189.4 - No. 17 climbing Mitchell St. on the start of the single track section, just before crossing the railway bridge. Has destination of Quarry Hill and the large Maples building sign in the background. 1189.5 - as for 1189.4 but after tram has passed photographer. Has an Ilford film roof ad and an SEC roof ad. Railway bridge in the background. 1189.6 - No. 21 at Charing Cross with passengers boarding. Tram has destination of North Bendigo and roof ads for SEC 'Electric Cooking' and Sandhurst Milk. In background are the buildings on the south side of High St. Also has a SEC worker in white overalls sweeping the track.Information written on in black ink and date stamped on purple ink. 1189.1 - "Birney car No. 11 in High St. Bendigo at Golden Square terminus" 1189.2 - "No. 21 in Pall Mall Bendigo near Charing Cross" 1189.3 - "No. 2 in Mitchell St. Bendigo, just after crossing bridge over railway line (Quarry Hill route)" 1189.4 - "No. 17 in Mitchell St. Bendigo, climbing the hill the bridge over the railway line. (Quarry Hill route)" 1189.5 - "No. 17 in Mitchell St., Bendigo approaching bridge over Railway line (Quarry Hill route)" 1189.6 - "No. 21 at Charing Cross, Bendigo"tramways, trams, bendigo, golden square, pall mall, mitchell st., quarry hill, tram 2, tram 11, tram 17, tram 21 -
 Ballarat Tramway Museum
Slide - 35mm slide/s - set of 4, Noel Simons, Apr. 1967
Set of 2 slides made from the Association of Railway Enthusiast Provincial Tramways film strip, possibly during April 1967. 1192.1 and 1192.3 mounted in Kodak Ready Mounts. The others in plain white mounts. Slides dated Dec. 1968. 1192.1 - No. 21 out bound to Golden Square in High St., between Wattle and Vine Streets. Photo taken after tram has passed photographer. Has a sign for "Reid's Furnituorium" in the background. 1192.2 - Bendigo No. 28 dressed up as Myers Christmas tram, passing the Post Office and Courts in Pall Mall. 1192.3 - Bendigo No. 23 at Needle Loop en route to Eaglehawk. Tram has two SEC roof ads, one "Electric Cooking" and the other "Everything fine in my all electric kitchen". 1192.4 - Bendigo scrubber parked at the end of the main depot lead, alongside the depot office buildings.Details in blue ink, date hand stamped in purple ink. 1192.1 - "No. 21 heads along High St for Golden Square between Wattle and Vine Streets." 1192.2 - "Birney No. 28 in Christmas Garb, traverses Pall Mall en route to North Bendigo". 1192.3 - "No. 23 at Needle Loop on its run to Eaglehawk". 1192.4 - "Scrubber car at Bendigo Depot".tramways, trams, north bendigo, bendigo, bridge st loop, depot, tram 21, tram 23, tram 28, tram scrubber -
 Ballarat Tramway Museum
Slide - 35mm slide/s - set of 24, Noel Simons, 20/05/1971 12:00:00 AM
Set of 24 transparencies taken on 20/5/1971 on Kodak mounts. 1195.1 - Bendigo 19 arriving at Charing Cross en route to North Bendigo with Fountain Plaza and the City Family Hotel in the background. No. 19 has two roof ads for the SEC. -'Electricity better for cooking' and 'Everything's under control in my all electric kitchen' 1195.2 - as above, but standing at the Charing cross stop, with the Beehive Stores and other buildings along the east side of Pall Mall in the background. 1195.3 - No 21 ex Golden Square crossing View St. trackwork in front of No. 25 waiting to depart for Quarry Hill. No.21 has two roof ads (as for No.19 in 1195.1) and No.25 has one SEC roof ad and another. Ezywalkin sign in the background, and Fountain Plaza. 1195.4 - as for 1195.3, but after 21 has arrived and 25 left for Quarry Hill. Has Ezywalkin store and the Beehive store in the background. 1195.5 - No. 5 at the Eaglehawk terminus. Photo taken with a cannon in foreground looking along High St. Eaglehawk. Has shops on the west side of High St. in the background. 1195.6 - No. 5 at the Eaglehawk terminus, close up of the rear of the tram - note tow bar arrangement. Has destination of Quarry Hill. 1195.7-Nos.25 and 5 crossing at the Thorpe St. Loop, California Gully. No. 25 bound for Eaglehawk (has SEC Briquette and electric cooking roof ads) and 5 en route for Quarry Hill with a SEC and Cinzano roof ad. 1195.8 - as for 1195.7, but after trams have passed each other. Has Borough Auto Service building in the background. 1195.9 - No. 5 in Mt Korong Road, towards Bamard Street, photo taken after tram has passed photographer. 1195.10 - No. 30 at the Golden Square terminus with the Milk Bar on the right hand side of the photograph. 1195.11 - No. 30 inbound at Fire Station Loop, High St. Golden Square. Has old fire station in the background. Passengers are boarding the tramcar. 1195.12 - No. 30 in High St, bound for North Bendigo between Vine and Wattle Streets. 1195.13 - No. 5 bound for Eaglehawk waits at Iron Bark Gully Loop, at Hayes St. 1195.14 - No. 5 and No. 2 crossing at Iron Bark Gully Loop. 1195.15 - No. 5 bound for Eaglehawk leaving the Manchester Loop, Long gully. 1195.16 - No. 5 passing William Street, Long Gully en route to Eaglehawk. 1195.17 - No. 5 just before the California Gully Crossing Loop. 1195.18 - Nos. 5 and 26 crossing at California Gully crossing Loop. No. 5 heading to Eaglehawk, 26, Quarry Hill. 1195.19 - No. 5 in High St. Eaglehawk with Bob Moyle's Victoria Hotel and the TAB in the background. 1195.20 - No. 5 in High St. Eaglehawk approaching the terminus. Photo taken after the tram has passed the photographer. Has Foodland store and J. Best Fruit supply in the background, along with Eaglehawk Town Hall. 1195.21 - No. 5 at the Eaglehawk terminus, photo taken along seldom used track along High St. 1195.22 - as for 1195.22 - but at the very end of the track. 1195.23 - No. 5 en route for Quarry Hill climbs High St. Eaglehawk with the Victoria Hotel and Eaglehawk Town Hall in the background. 1195.24 - No. 5 and 25 crossing at Jobs Gully Loop. Note 25 has a black on white destination roll, while No. 5 has a white on black destination roll. Information written on in black ink and date stamped on purple ink. 1195.1 - "No. 19 arrives at Charing Cross Bendigo from Golden Square" 1195.2 - "No. 19 about to leave Charing Cross for North Bendigo" 1195.3 - "No. 25 awaiting departure for Quarry Hill, watches No. 21 arrive at Charring Cross from Golden Square" 1195.4 - "No. 21 on North Bendigo service and No. 25 on Quarry Hill run await departure at Charing Cross" 1195.5 - "No. 5 at Eaglehawk terminus" 1195.6 - "No. 5 at Eaglehawk terminus" 1195.7 - "Nos. 5 and 25 crossing at Thorpe St. Loop, California". 1195.8 - "Nos. 25 and 5 crossing Thorpe St. Loop, California Gully". 1195.9 - "No. 5 descending Mt Korong Rd. towards Bamard St." 1195.10 - "Birney car No. 30 at Golden Square terminus" 1195.11 - "Birney car No. 30 in High Street near Thistle Street (Fire Station Loop)" 1195.12 - "No. 30 in High St. between vine and Wattle Streets" 1195.13 - "No. 25 at Hayes Street Loop Iron Bark". 1195.14 - "Nos. 2 and 5 crossing at Hayes Street Loop Iron Bark" 1195.15 - "No. 5 at Manchester Loop opposite Havilah Road, Long Gully" 1195.16 - "No. 5 passing William Street, Long Gully". 1195.17 - "No. 5 at California Gully" 1195,18 - "Nos. 26 and 5 at Thorpe St. Loop, California Gully". 1195.19 - "No. 5 in High St. Eaglehawk". 1195.20 - "No. 5 approaching Eaglehawk terminus" 1195.21 - "No. 5 at Eaglehawk terminus" 1195.22 - "No. 5 at Eaglehawk terminus" 1195.23 - "No. 5 in High St. Eaglehawk" tramways, trams, bendigo, charing cross, eaglehawk, california gully, golden square, iron bark gully, jobs gully, tram 2, tram 5, tram 19, tram 21, tram 25, tram 26, tram 30 -
 Ballarat Tramway Museum
Newsletter, Ballarat Tramway Preservation Society (BTPS), Notice to BTPS members about a Social Meeting t, Jan. 1972
1239.1 - Notice to BTPS members about a Social Meeting to be held at St. Cuthbert's Church Hall, Sturt St. West on 27 Jan. 1972. Notes an inspection of the proposed track to Wendouree Parade and work commenced on the depot foundations. Signed by Hal Cain, President. Printed on pink paper using Stencil process. 1239.2 - Appeal form or notice to members, seeking funds to cover the cost of acquisition of tram No. 33, ($750) and transport ($450) from Hamilton. Gives notes on history of 33 in Hamilton. Donations to be sent to the Treasurer, Mrs. Dean in Box Hill. Gives date of return of tram 33 to Ballarat as 28 April 1977. Printed on yellow paper with duplicator process.1239.2 has "Nancy's" in top right hand corner in blue ink.museums btps, appeals, hamilton, social meetings -
 Ballarat Tramway Museum
Photograph - Black & White Photograph/s, David Endacott, 14/08/1971 12:00:00 AM
Black and white photograph and negative of the timetable board and CARS STOP HERE" sign on the pole at the Sebastopol terminus, with the Royal Hotel and Fosters Lager sign in the background. See item No. 29 for the sign itself. Assumed photo taken 14 August 1971. Duplicate print (1268A) by John Phillips 12/1999. Large copy print added 5/2001. Original neg scanned at hi res and updated 11/5/2020.trams, tramways, sebastopol, royal hotel, signs -
 Ballarat Tramway Museum
Photograph - Colour Photograph/s, David Endacott, 1971
Colour print of Ballarat No. 17 in-bound to the City in Sturt St. West, about to pass a school crossing. Tram has destination of Mt Pleasant and a Twin Lakes sign on the front canopy. Shows the Sturt St. West layout, with houses in the background. Taken in 1971, possibly August 1971 as trees have lost their leaves. On Kodak paper. Original film image scanned at 3200dpi 12/5/2020.On rear in blue ink "Sturt St. West" and in top left hand corner "1971".sturt st. west, mt pleasant, tram 17 -
 Ballarat Tramway Museum
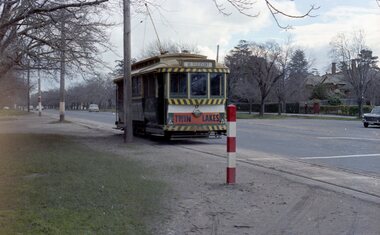
Photograph - Colour Negative, Colour Print, David Endacott, 1971
Colour positive (negative) of SEC tram No. 11 at the City terminus. Tram has destination of "Gardens via Sturt St. West" and a Twin Lakes advertising board on the front dash panel. Has fountain and tramway waiting shed in the background as well as the Ballarat Post Office. Tram stop pole and attached signs in front of the tramcar. A colour laser image of this negative made on 10/1/2000 using a Canon Laser printer has been placed on file at 01-01-57. Original film image scanned at 3200dpi 12/5/2020.ballarat, lydiard st. nth, city terminus, sturt st., tram 11