Showing 576 items
matching filed station
-
 Eltham District Historical Society Inc
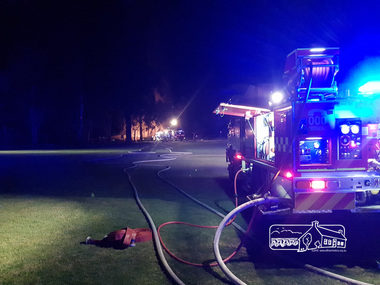
Photograph, Anthony Owen, Arson fire in early hours of the morning destroys the Adventure Playground at Eltham North, 16 December 2017
... Eltham Fire Station Eltham CFA Digital file Arson fire in early ...A community group project steered by Bambi McLean led to the construction of the Eltham North Adventure Playground which opened off Wattletree Road in 1995. The structure was mainly wooden and included an undercover element with slides and areas to climb. It was destroyed by fire in the early hours of 16 December 2017. These phtoos were taken at approx. 2am on the morning of 16 December 2017 by 2nd Lieutenant Anthony Owen of Eltham Fire Station. A new adventure playground was built in 2018.Digital fileeltham north, north eltham adventure playground, arson, wattletree road, fire engine, eltham fire brigade, eltham fire station, eltham cfa -
 Eltham District Historical Society Inc
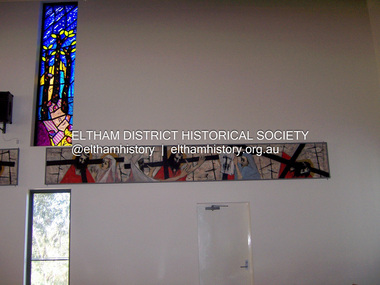
Photograph - Digital Photograph, Marguerite Marshall, Stations of the Cross, Clifton Pugh (1961); Our Lady Help of Christian's Church, Henry Street, Eltham, 11 October 2006
... digital image file Stations of the Cross, Clifton Pugh (1961); Our ...Stations of the Cross by Clifton Pugh is a contempooray art piece in four sections making up 11 stations of the cross. It was commissioned by the Catholic parish in Eltham (Our Lady Help of Christians) in 1961 Published: Nillumbik Now and Then / Marguerite Marshall 2008; photographs Alan King with Marguerite Marshall.; p81 Art is an important means of nurturing faith at Our Lady Help of Christians Church, Henry Street, Eltham. The Stations of the Cross by Clifton Pugh and The Crucifix with the Ascending Jesus by sculptor Charles Rocco are two of the fine works that enhance the parishioners’ worship. These two inspiring works of art were added in 2001 – long after Roman Catholics began worshipping in Eltham around 1864. This beautiful worship centre was built following hardship and change – for parishioners have endured their church being destroyed by fire and have built four churches since they first worshipped together. Before 1864, according to local legend, a visiting priest administered sacraments in the parlour of former convict-turned-respected citizen Thomas Sweeney at Sweeneys Lane, Eltham.1 The first church was blessed in September, 1865, by the Archbishop of Melbourne, Dr Goold. It stood on an acre (0.4ha) of land in Little Eltham as that area was known then, near the present Fordhams and Main Roads and was part of the Heidelberg Church Parish. In 1912 the church was relocated to a new building on the present primary school site at 1 Henry Street. This was closer to the town centre, which had moved from Little Eltham after the railway line was extended to Eltham in 1902.2 In 1958 the church split from the Sacred Heart parish, Diamond Creek, to become a parish in its own right, with Father Tom Curran as inaugural priest. Not long after in 1961, a fire destroyed the church and huge working bees under the prominent Catholic builders, the Sibbel brothers, rebuilt and extended it, using the original altar from the first church. It was then that builder and parishioner Herman Sibbel asked his friend, artist Clifton Pugh, to paint the Stations of the Cross for the church. But the priest, Father Curran, neither approved of Pugh’s bohemian reputation nor liked the paintings, so they were hung in the corridor of Our Lady’s Primary School instead. The parishioners almost sold the paintings in 1989 to pay for major school renovations. However the paintings remained there for about 40 years, until 2001, when the church was extensively renovated by Father Barry Caldwell. Another change awaited the church, as it outgrew its building, later to be used as the school hall. So, in 1976, the present church was built across the road. Three beautiful stained-glass windows depicting the Passion, Death, Resurrection and the presence of Christ’s Spirit, link these with the church’s experiences. The first depicts a bushfire in Eltham, referring to their church damaged by fire. Another represents the Resurrection of Christ with new growth on a blackened stump and the Holy Spirit is represented by the Southern Cross. A window depicting Our Lady Help of Christians by parishioner Bill Peperkamp, was donated by parishioners to commemorate the Silver Jubilee of Father Desmond G Jenkins’ ordination to the priesthood on July 27, 1977. This, with the statue of Mary, creates a Marian shrine. In the 14 Stations of the Cross painted on four masonite panels Pugh captures the pathos of the suffering Christ and his disciples.3 The figures are stylised, except intriguingly, that of Pontias Pilate, who looks like Clifton Pugh. Charles Rocco’s sculpture is an extraordinary Jesus figure being raised from the Cross. The delicate stainless steel mesh of the figure creates a sense of the power of God over death. The organ, built in 1868 by George Fincham and Sons, was first installed in the All Saints’ Anglican Church, East St Kilda, then in the St Andrews Church, Clifton Hill. It was rebuilt into a modern instrument with a donation from parishioner Jim Murray, in memory of his wife Gwendolene Mary.4 Church members created their own work of art in front of the entrance, by painting designs and messages on 700 tiles. This work indicates the strong church family and faith expressed in art, that awaits the worshipper inside.This collection of almost 130 photos about places and people within the Shire of Nillumbik, an urban and rural municipality in Melbourne's north, contributes to an understanding of the history of the Shire. Published in 2008 immediately prior to the Black Saturday bushfires of February 7, 2009, it documents sites that were impacted, and in some cases destroyed by the fires. It includes photographs taken especially for the publication, creating a unique time capsule representing the Shire in the early 21st century. It remains the most recent comprehenesive publication devoted to the Shire's history connecting local residents to the past. nillumbik now and then (marshall-king) collection, art, clifton pugh, stations of the cross, our lady help of christans, installation -
 Vision Australia
Audio - Sound recording, Time Capsule - RPH broadcast on 13 September 2005, 13/09/2005
On November 25, 2005, a time capsule was buried at Vision Australia's head office in Kooyong. As part of the contents, a recording of programs broadcast on the day Vision Australia was launched (13 September 2005) was stored on a flash card.1 CD with 2 sound files3rph radio station, time capsule -
 Melbourne Tram Museum
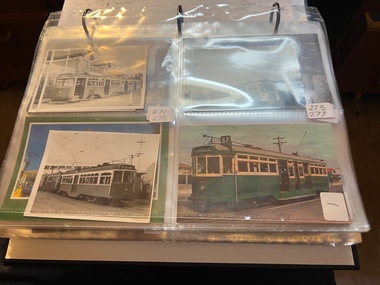
Album - Charles Craig - part 1 of 2, 1950s to 1970s
Photo - see pdf file for further information. Number Brief Description CC1 S178 at Elsternwick level crossing track works CC2 Building East Preston Depot 1955 CC3 Camberwell depot – post WW2 – lots of trams and a black cat CC4 W2 584 and SW6 958 northbound – Chapel St and Brighton Road CC5 W2 357 – southbound, Chapel St Brighton Road CC6 Pascoe Vale Road, Raceday working – note the signal CC7 The Preston Workshops - The Argus, post WW2, 223, 647 et al CC8 923 or is it 922 being built at Preston – The Argus photo - CC8A 832 being positioned onto trucks at Preston after an overhaul – Argus Photo – see also CC306 CC9 Footscray depot` CC10 W5 797 in St Kilda Road during track works – 1950s CC11 W2 457 at Kew Post Office CC12 Wellington Parade – W2 432, 492 and 337 – special event CC13 Swan St line up of trams – football? Or other special event – Sinclair’s bus on the right side. CC14 W2 630 being washed at a depot – The Argus photo CC15 Royal Park line at Flemington Road – W2 355 and W5 786 CC16 Nicholson St track construction from a tram cab CC17 T181 on tour at Gordon St CC18 T181 on Maribyrnong Bridge CC19 Ditto at River St just off bridge CC20 As for CC18 CC21 At Raleigh Rd CC22 T181 at Footscray depot CC23 Track construction, Nicholson, just north of Gertrude CC24 Commissioning overhead Bourke St tram 988 CC25 Queens Parade – 997 and 994 CC26 Swapping trolley wheel to skid – commissioning CC27 Track construction in Gertrude St CC28 985 in Queens Parade running special CC29 997 in Queens Parade CC30 1033 at North Fitzroy – AETA Special CC31 Bourke St at Elizabeth St – has passengers on board CC32 W6 985, 996 Queens Parade, Mk 3 bus 333 CC33 As above CC34 Showing construction at Nicholson & Gertrude – Bourke St CC35 W2 223 on Burnley temporary bridge – VR track expansion CC36 W5 823 – ditto CC37 Tram on old bridge prior to removal CC38 W2 433 on temporary bridge with new bridge beams and old track CC39 Looking down showing temporary single track – Swan St CC40 Tait train passing under tram bridge CC41 SW6 on single line – off loading CC42 W2 547 at City Road Junction CC43 City Road Jtn – 1969 – 596 and 771 CC44 City Road Jtn – 1969 – 596 and 771 (same as CC45 438 in Flinders St CC46 355 somewhere CC47 552 somewhere CC47A 364 at Preston Workshops? CC48 W2 334 on Traverser – Preston Workshops CC49 Wellington pade – large line up of trams, c1950 925, and 611 CC50 W2 493 Franklin st – advertising for Savings Certificates CC51 Possibly 551 with advertising for fund raising for Blind institute CC52 249 at Hawthorn – Riversdale Junction – with a Tally Ho and Village Fair Aux. board CC53 MMTB Postcard of 511 CC54 Wattle Park terminus with Single line warning sign CC55 Wattle Park Duplication CC56 36 at Domain Junction – 833 CC57 36 at Domain Junction CC58 36 at Domain Junction with 810 and 833 CC59 36 in Swanston by Flinders St Station CC60 36 in Spencer St at A’Beckett CC61 36 crossing Collins St CC62 36 crossing Collins St CC63 36 northbound in St Kilda Road with Shrine in background CC64 36 northbound in Swanston St at Flinders St CC65 Postcard – Ballarat 36 in Domain Road CC66 Postcard - Stampshow – Hawthorn Horse tram CC67 Postcard - Stampshow – Peace cable tram CC68 Postcard - 1041 and cable car set 1 at Preston CC69 Postcard - Colins & Elizabeth – greetings from old Melbourne CC70 Postcard - Cable car set at Preston CC71 Postcard - Twentyman’s cable cars CC72 Postcard - Nu-color-vue – horse tram 256 CC73 Cable car set – Market & Flinders CC74 Cable trams at Twentymans’ in their shed CC75 Cable tram track at Bourke & Spencer prior to removal CC76 Cable tram bogie at Preston Workshops – used as a dolly CC77 Cable trams at Twentymans’ CC78 Postcard - Valentines – Bourke looking west from Swanston CC79 Postcard - Rose 3938 – Bourke at Swanston – the Leviathan building CC80 Postcard - Valentines – Elizabeth St looking south from Collins – No. 19 CC81 Postcard - Rose P4765 – Bourke St Melbourne CC82 Postcard - Rose 4090 – cable tram passing Parliament house CC83 Postcard - Valentines – GPO Elizabeth St CC84 Interior of cable trailer with clothing on a set CC85 Elizabeth St looking north CC86 Cigarette card - Collins St No. 41- WD HO Wills CC87 Postcard - Rialto building with cable set CC88 Postcard - Valentines - Swanston at Flinders looking north CC89 CC90 Q 150 Hanna St – dated on rear CC91 176 turning – photo ex Alan Jungworth CC92 161 on Princes Bridge – minimum fare 4d sign and Inspector CC93 459 at Point Ormond CC94 158 at Gordon St – side on view CC95 X 217 in Swanston St CC96 X 217 in Swanston St with an East Brighton destination CC97 T177 CC98 T177 Peel St – no destination roll – being transferred? CC99 X1 462 in Glenhuntly Road to Point Ormond CC100 X1 462 in Glenhuntly Road to Elsternwick Rly Station CC101 X1 462 in Glenhuntly Road to Point Ormond CC102 Q 150 Hanna St CC103 190 at Camberwell Depot CC104 T182 at Footscray CC105 X1 466 and W2 at Footscray CC106 190 at Camberwell Depot CC107 X1 467 Barkly St Footscray CC108 X2 679 turning into William St from La Trobe St CC109 X2 677 Glenhuntly Road with Point Ormond Destination CC110 Postcard T180 CC111 Postcard format – X1 467 on a truck – see also CC178 CC112 Postcard format – X1 467 at Wantirna South CC113 Q200 and SW6 896 at Thornbury – has labels on rear CC114 T177, Ballarat Road – has labels on rear CC115 T178 at Point Ormond CC116 Postcard X1 465 and 466 CC117 Postcard – X2 676 CC118 Postcard – TMSV X2 217 CC119 810 on temporary bridging – 24-12-67 CC120 W2 575 – Queens Parade junction in, still temporary bridging, substation under construction CC121 Forming Queens Parade Junction base slab CC122 W2 596 prior to tramway works – all tracks still in position CC123 It’s a mass of reinforcing – bridging being formed CC124 Looking north with substation being built CC125 Looking east with some rather tight curves, Wellington St still in use CC126 SW6 958 ex Wellington St with all tracks and signal box and buildings. CC127 Victoria Pde at Gisborne looking east – at least 4 cars CC128 SW6 893? With dash canopy lights and SW6 862 and a man with a newspaper CC129 SW6 894 on the S curves, with tram in Wellington St CC130 Similar photo CC131 W2 564 turning into Wellington St – the concrete tracks are not that old CC132 W2 552 running out of Wellington St CC133 W5 732 from Fitzroy St into St Kilda Road with next iteration in position – very wonky CC134 W5 764 turning into Fitzroy St CC135 SW6 947 turning from Wellington St CC136 W2 586 running out of High St CC137 W2 500 turning into Wellington St CC138 W2 543 in Wellington St inbound CC139 L103 with St Kilda Junction destination, and a tower truck on right CC140 Workmen – new track in Queensway in use CC141 Ditto CC142 L103 in Queensway, and another car in bound CC143 Looking east along Wellington St which has been taken out of use. Also a MMTB Roller CC144 W5 824 and a W2 and all types of wobbly temporary track CC145 W2 354 to High St CC146 Sw6 947 on the S bends CC147 W2 500 looking north – tram on the S bends CC148 SW6 896 leaving the S bend CC149 W2 357 and a MMTB City bus with trees/gardens on the side CC150 W5 817 Elliot Ave – see also CC302 CC151 W2 552 – note the large trolley bridge CC152 W2 550 at depot or workshops CC153 1B truck CC154 SW2 432 CC155 W2 155 at Glenhuntly CC156 SW6 937 on AETA tour? CC157 X2 677 on Footscray service – Ballarat Rd? CC158 W2 641 – High St Kew? CC159 SW6 847 – Power St Hawthorn CC160 Simpson St – big line up CC161 W2 546 truck No. 1? CC162 W2s at Glenhuntly depot CC163 No. 15 truck under 899 CC164 206 and other junk at Preston Workshops CC165 W in Swanston St Melbourne – Rose series card CC166 Y1 613 Batman Ave?? or William St at Collins CC167 Tram plans CC168 X 217 Swanston St – see also 95 and 96 CC169 217 in Swanston St – same as 95 CC169A 192 in St Kilda Road at Princes bridge CC170 192 in St Kilda Road at Princes bridge CC171 Bendigo 3 arriving Malvern depot – being unloaded CC172 Ditto CC173 T180 at a depot CC174 X1 463 wheel set CC175 C30 – dog car side view – close up CC176 C30 dog car CC177 206 and 30 at Preston Workshops CC178 X1 467 on a truck – see CC111 also CC179 42 CC180 42 at a depot, no destination box CC181 W2 556 1A type truck CC182 Flinders St Station – Rose Series CC183 W7 1035 Spring – Nicholson St CC184 W7 1022 MMTB Post Card CC185 Adelaide 178 – has on rear – R. Lilburn 4/82 CC186 Adelaide 175 – has on rear – R. Lilburn 4/82 CC187 Y1 610 on AETA tour CC188 Y1 610 on AETA tour with large group – Point Ormond CC189 AETA display – has GH55-32 in pencil on rear CC190 AETA display – has GH55-29 in pencil on rear CC191 Y1 610 on AETA tour with large group – Point Ormond CC192 VR 53 at Footscray CC193 VR cars 40 and 34 at Elwood wash dock CC194 W7 1024 as the 1970 Christmas tram CC195 Geelong – loading a set of 22E trucks CC196 Geelong 10 and 23 running an AETA special CC197 Geelong – AETA special CC198 Geelong 7 at Junction CC199 Geelong 10, in the city CC200 Geelong 33 with Belmont destination CC201 Geelong 15 Eastern Park destination 29-3-1948 CC202 Geelong 23 at Railway Station – 29-3-1948 CC203 Geelong 23 at Railway Station – 29-3-1948 CC204 Geelong – loading a bogie tram CC205 Geelong – loading a bogie tram CC206 Geelong 40 – loaded on truck CC207 Geelong 40 – on jacks CC208 Geelong 40 on jacks – 19 behind CC209 Geelong 38 with two workers on either side CC210 – 214 Australian Historic Tramways stamp folder and set CC215 Bendigo 17 at depot – has dup JBS on rear CC216 Bendigo 20, 29 bogie and straight sill car at Charing Cross CC217 Bendigo one man bogie Pall Mall CC218 Bendigo – Bogie 23, other cars and welding truck at depot CC219 Bendigo 7 with Quarry Hill destination CC220 Bendigo 21 with Lake Weerona destination CC221 ESCo 18 Ballarat CC222 Ballarat bogie 22 on AETA special CC223 Ditto CC224 Ballarat 34 at Stones Corner – R Lilburn CC225 Ballarat 15 in Bridge St – R Lilburn CC226 Ballarat 40 at Gardens – R Lilburn CC227 Ballarat 37 running out of depot – R Lilburn CC228 Postcard – Valentines – Sturt St with loaded horse tram trailer CC229 AETA Geelong tram tour ticket – 29-3-1948 CC230 Postcard – Geelong – Valentine 2114 – T&G building CC231 Postcard – PMTT ! – High St Malvern CC232 Postcard – Empire – Glenferrie Road, Malvern at Wattletree Rd CC233 Postcard Y469, MMTB CC234 Postcard Z2 Spring St CC235 Postcard – Z1 MMTB CC236 Postcard – Stamp Show W1 431 CC237 Postcard – Stamp show B2005 CC238 Postcard – Stamp show W6 982 CC239 Postcard – Valentines 1264 – Johnstone Park with tram in distance CC240 Postcard – Rose 10711 – Swanston and Lonsdale – Hospital and W232 CC241 Postcard – Rose 4827 – Fitzroy St St Kilda W2 362 and 548 CC242 Postcard – Valentines – 939 – St Kilda War Memorial, W and a R? CC243 Postcard – Valentines – 572 – St Kilda War Memorial, W 413 and 140? CC244 Postcard – Valentines – 938 – Uper and Lower Esplanade – L 104 CC245 Postcard – St Kilda Rd at Princes Bridge Y1 and W CC246 Postcard – Biscay BG82 – W5 814 - CC247 Postcard – Biscay 796112 – Bourke St looking west CC248 Postcard – Biscay 796109 – Bourke St looking east CC249 Postcard – Biscay 2AUS58 – Z5 Bourke St CC250 Postcard – Biscay BG 249 – Swanston St CC251 Postcard – National View – St Kilda Rd – shrine and Prince Henrys W2 405 CC252 Postcard – Nu color vue – 11 ML 156 – St Kilda Rd CC253 Postcard – Nu color vue – 11 ML 153 – Swanston St CC254 Postcard – Nu Color vue – Collins St 442 CC255 Postcard – Pitt card – Adelaide – H 364 at Victoria St CC256 Postcard – SPER L/P 154 CC257 Postcard – BTMS – 550 CC258 Postcard – SPER – Brisbane 295 CC259 Adelaide 131 at Burnside – has R Lilburn on card, c1911 CC260 Adelaide 194 CC261 Adelaide 235, with two crew, The News photo CC262 Rockhampton, outside post office – has source of photo details CC263 Sydney – 2086 and 2062 arriving Circular Quay CC264 Sydney – P class – Pitt St? CC265 Sydney – 1610 at Circular Quay CC266 Brisbane 99 and 468 CC267 Sydney with bridge behind CC268 Steam tram Paramatta Park – 103 CC269 Sydney – Museum Station =- Elizabeth St CC270 Sydney – weed burner 137S at a loop Demonstrates the work of Charles Craig in photography and collection of prints.Assembled album in a black presentation folder of 270 photographs from the Charles Craig Collection - 86 sleeves - part 1 of 2. All photographs have been scanned and placed on the Museum's G drive. A list of all photographs with details where possible has been compiled. Victorian Provincial, Launceston, Hobart and Sydney tram photos have been transferred to other Museums, image files retained.melbourne, tramways, tramcars, trams, charles craig, st kilda junction, trackworks -
 Melbourne Tram Museum
Album - Charles Craig - part 2 of 2, 1950s to 1970s
Photo - see pdf file for further information. Number Brief Description CC271 Y1 610 and another at Camberwell depot CC272 Ditto CC273 Y1 613 at Batman Ave CC274 Y1 611 Peel St North Melbourne CC275 Y 469 Camberwell depot CC276 Ditto CC277 Postcard – L104 – MMTB CC278 L103, Hawthorn Road CC279 L103, Hawthorn Road CC280 L103 Dandenong Road CC281 L103 and w5 847 Dandenong Road CC282 L104 on Preston Workshops traverser CC283 Flinders St station with Ws CC284 Flinders St looking south along St Kilda Road to Shrine CC285 Postcard – Nu Color vue – Flinders St CC286 Postcard – Valentines – Flinders St No. 13 CC287 Postcard – Rose Series – 13595 – has been trimmed CC288 Postcard – Rose Series – 10660 – Princes Bridge and Flinders St yard CC289 Postcard – Rose but has been trimmed of Flinders St CC290 Postcard – same as CC285 CC291 SW6 914 and another car in Swanston St by Flinders St CC292 SW6 903 and bus 436 with Flinders St Station in background CC293 W5 776 at Flinders St Station CC294 W2 596 at Flinders St Station CC295 L101 and W2 Swanston St by Ian Brady CC296 Postcard - Biscay BG 250 – A 281 - CC297 W5 779 Maribyrnong River CC298 SW5 787 Queensbridge St CC299A Duplicate copy CC299 Ditto CC300 W5 812 St Kilda Junction CC301 W5 721 Carnegie? - CC302 W5 817 Elliot Ave – see also CC150 CC303 CW5 682 CC304 CW5 682 Dandenong Road CC305 SW6 855 Power St Hawthorn CC306 Argus photo same as CC8A CC307 Freight car 19 leaving South Melbourne depot CC308 Freight car 19 at South Melbourne depot CC309 Cleaner 7 CC310 W2 295 and 8 at South Melbourne Depot CC311 Cleaners 5, 8 and 7 and S or T at South Melbourne depot CC312 Freight car 17 with crew member CC313 Cleaners 5, 8 and 7 along with a tower truck and another road motor CC314 Wheel Transport car 16 at Preston CC315 Cleaner 7 CC316 Cleaner 6 Brunswick Depot R Hudson and Bob Prentice CC317 SW6 867 in Swanston at Flinders CC318 SW6 850 at Chapel and Brighton Road CC319 SW6 914 at Batman Ave CC320 SW6 963 and W5 826 in Collins St near Spencer St CC321 Sw6 923 RAAF tram CC322 Same image at 318, but better has initials T McC (Tom McCaw) CC323 Sw6 963 In Collins at Spencer St CC324 SW6 947 in Collins at Spencer St CC325 Ditto with crew CC326 SW6 850 at Preston Workshop – Argus photo CC327 SW5 843 at Swan and church, severely derailed – Herald photo CC328 SW6 886 in Victoria Parade near La Trobe CC329 SW6 948 turning from Union St into Maribyrnong Road – single curve CC330 W5 731 CC331 SW5 on a 4D – Herald WT photo CC332 Sw6 867 Swanston St with driver carrying handles etc CC333 SW6 954 – Truganini Cres CC334 SW6 915 illuminated for Christmas, the CDA father Xmas special CC335 SW6 850 on route 77 side on view CC336 Sydney R class 1845 on trailer in a busy road CC337 Sydney R class 1845 on trailer CC338 Ditto CC339 Ditto – on trailer turning from a local street CC340 MMTB Emergency van CC341 Ditto CC342 Welding truck – Hopkins and Leeds CC343 Welding truck – Hopkins and Leeds CC344 Welding truck in Hopkins St Footscray CC345 Negative – Hobart tram 103 CC346 Launceston tram CC347 Trackwork – East Kew CC348 Trackwork and a W2 East Kews CC349 SW6 892 and trackwork – East Kew CC350 W4 670 – FRONT ON CC351 W3 654 – Brunswick Depot CC352 W3 666 – St Kilda Road and High St Demonstrates the work of Charles Craig in photography and collection of prints.Assembled album in a black presentation folder of 80 photographs from the Charles Craig Collection - 31 sleeves - part 2 of 2. All photographs have been scanned and placed on the Museum's G drive. A list of all photographs with details where possible has been compiled. Victorian Provincial, Launceston, Hobart and Sydney tram photos have been transferred to other Museums, image files retained.melbourne, tramways, tramcars, trams, charles craig -
 Melbourne Tram Museum
Album - Ron Wilson 46 Photographs -1987 to 1999
Photo - see pdf file for further information. Number Brief Description RWC1 SW6 897 in MTA livery on Rt 5 in Swanston St outside Flinders St Station RWC2 WS6 965 as an advertising car for Next Flight on Rt 15 in Swanston St outside Flinders St Station RWC3 W1 427 on tourist Service in Swanston St at the city shunt. Photo taken from the signal box RWC4 SW5 814 as an advertising car for the RVIB in Park St near St Kilda Rd RWC5 PMTT foundation stone for Kew Depot RWC6 SW5 682 as an arts car in Coldblo Rd in Malvern Depot RWC7 SW5 724 as an arts car on Rt 6 in St Kilda Rd at Domain Rd RWC8 SW6 866 on Rt 6 and a Z 107 in MTA livery in Swanston St outside Flinders St Station RWC9 W5 821 with 2 doors in MTA livery in Victoria Prd at Brunswick St RWC10 782 at Bylands RWC11 SW5 847 in MTA livery turns into Preston Workshops during track repairs RWC12 Scrubber 10W in St Kilda Rd outside the arts centre RWC13 W5 685 on the fan of South Melb Depot RWC14 SW6 880 on Rt 8 in St Kilda Rd outside Flinders St Station RWC15 W6 997 on Rt 15 in St Kilda Rd outside Flinders St Station RWC16 W6 971 in Victoria Prd crossing Nicholson St RWC17 SW5 846 on Rt 6 in Swanston St at Flinders St RWC18 SW6 852 on Rt 72 in Swanston St at Flinders St RWC19 Z 217 on Rt 22 as an advertising car for Qantas in Swanston St outside Flinders St Station RWC20 Z 230 on Rt 1 in Swanston St at Little Lonsdale St RWC21 W7 1011 on Rt 8 as an advertising car for St George Bank in St Kilda Rd outside the Arts Centre RWC22 Z 220 as an advertising car foe Telstra in Swanston St at Flinders Lane RWC23 SW6 854 on RT passes 946 in Swanston St outside Flinders St Station RWC24 Z 56 in MTA livery in Swanston St outside Flinders St Station RWC25 SW6 930 in MTA Livery at the end of the siding in the South Melb per way depot RWC26 SW6 954 on Rt 69 at the St Kilda Terminus RWC27 SW6 948 on a semi-trailer in Preston Workshops RWC28 Z 159 in MTA Livery in Elizabeth St at Victoria St RWC29 B2 2003 on Rt 59 in Elizabeth St at Victoria St RWC30 A1 235 at the Batman Ave Terminus RWC31 Z 191 at the Batman Ave Terminus RWC32 SW6 998 on Rt 15 in MTA livery in Swanston St at Collins St RWC33 SW6 925 on Rt 8 in MTA livery in Swanston St at Collins St RWC34 SW6 993 on Rt 67 in MTA livery in Swanston St at Collins St RWC35 SW5 846 on Rt 6 in MTA livery in Swanston St at Collins St RWC36 W2 643 at Bylands RWC37 A1 233 at the Batman Ave Terminus RWC38 SW6 883 on Rt 64 in MTA livery in Swanston St at Collins St RWC39 SW6 939 in MTA Livery running in to South Melb Depot in Swanston St at Collins St RWC40 SW5 844 in M&MTB on Rt 72 in Swanston St at Collins St RWC41 W7 1024 advertising Buy Australian on Rt 5 in Swanston St at Collins ST RWC42 W7 1007 on RT 64 in M&MTB livery in Swanston St at Collins St RWC43 SW6 880 in MTA livery on Rt 69 at the St Kilda Terminus RWC44 SW6 884 on Rt 16 waits as Z 169 shunts in ST Kilda Rd outside the Arts Centre RWC45 SW5 in M&MTB livery on Rt 8 in ST Kilda Rd outside the Arts Centre RWC46 Z 133 in MTA Livery on Rt 50 in Elizabeth St at the Terminus Demonstrates the work of Ron Wilson in photography and collection of prints. Assembled album in a black presentation folder of 46 photographs from the Ron Wilson Collection - 12 A4 sleeves. All photographs have been scanned and placed on the Museum's G drive. A list of all photographs with details has been compiled. melbourne, tramways, trams, flinders st, mta, advertising trams -
 Melbourne Tram Museum
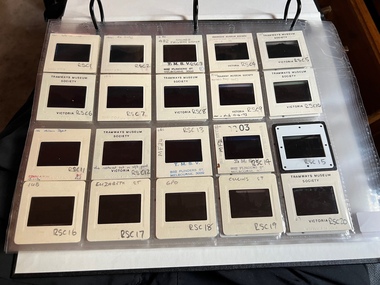
Album - Ron Scholten Slide Collection, Ron Scholten
Photo - see pdf file for further information. Number Brief Description RSC1 PCC 1041 at the gates of Preston Workshops on a test run without it’s trolley retriever RSC2 PCC 1041 in Glenhuntly Road on Route 67 en route to Carnegie crossing the Railway Gates at Glenhuntly Station RSC3 W2 482 stored at Malvern Depot with Olympic Park on the Destination RSC4 Cable Car Set 64 in Swanston St outside Princess Bridge Station in Bound with open top Double Deck Bus, Trak Motors ? Departing from Flinders St Station RSC5 W3 669 in St George Rd at Sumner St en route to Preston Workshops for scrapping RSC6 Cable Car in Lygon St en route to Carlton RSC7 PCC 1041 turning from St Georges Rd into Miller St to enter Preston Workshops RSC8 Flinders St Station with cable cars RSC9 PCC 1041 in strife on it’s maiden day in service. Trams on route 88 delayed in Queens Parade Clifton Hill RSC10 Flinders St at William St with Cable Cars RSC11 L 104 on the fan of the new shed at Malvern Depot on a TMSV tour RSC12 Cable Set 1 after it’s restoration at Preston Workshops on the fan near the front gate RSC13 X1 466 at a suburban terminus of the Footscray System RSC14 X2 680 at Point Ormond Terminus RSC15 An ex Launceston Tram at the outside terminus of the Penny Royal Complex Tramway in Launceston RSC16 Q 148 at Preston Workshops awaiting disposal RSC17 Elizabeth St with Cable Cars RSC18 Elizabeth and Bourke St corner outside the GPO with cable cars RSC19 Collins St with Cable Cars RSC20 A photo taken from the observation deck of the ICI building showing a view of Parliament house with a w class tram in Nicholson St RSC21 Auburn Horse car with a posed photo of all the tramwaymen employed RSC22 Cheltenham Double Deck Horsecar with a full load of passengers RSC23 City of Northcote cable trailer 3 at a terminus RSC24 City of Northcote Cable cars passing in High St Northcote RSC25 St Kilda Rd at Princes Bridge with Cable Cars RSC26 Flinders St with Cable Cars RSC27 Cable Cars RSC28 Bourke St looking towards Elizabeth St from Queen St RSC29 Cable cars in Bourke St at Elizabeth St looking East RSC30 Cable cars in Elizabeth St at the terminus at Flinders St RSC31 Cable cars in Bourke St at Swanston St looking west RSC32 Cable cars in Swanston St at Flinders St looking North RSC33 Cable cars in Collins St near Russell St RSC34 Cable cars in Elizabeth St at Bourke St RSC35 Cable cars in Collins St at Elizabeth St RSC36 Cable Cars in Swanston St at Flinders St RSC37 Cable cars in Collins St RSC38 Cable Cars RSC39 Cable cars in St Kilda Rd near Princes Bridge RSC40 Cable cars in Collins St East of Swanston St RSC41 Cable cars in Spring St outside Parliament house RSC42 K 92 in M&MTB Chocolate and cream livery but with a P&MTT Destination box on Route 14 RSC43 Thornbury depot viewed from Miller St and St Georges rd. Two W2 class cars are laying over between the peaks RSC44 Z3 201 in Met Livery passes D1 3510 in new M Tram livery. A Staff member in uniform stands in the doorway. Dandenong Rd RSC45 D1 3530 advertising Heinekin Super Golf on Route 55 in Royal Park RSC46 D1 3504 in M Tram livery on the reserved track in Matthews Ave near Essendon Airport showing Route 81 Travancore . I suspect it is a private enthusiasts charter due to the Malvern W class run number in the rear windscreen RSC47 D1 3504 on Route 64 in Dandenong Rd in M Tram Livery RSC48 D1 3504 in M Tram Livery at Airport West Terminus RSC49 D1 3504 in M Tram Livery in Union Rd outside the Showgrounds RSC50 D1 3504 at West Maribyrnong Terminus in M Tram Livery RSC51 D1 3503 in M Tram Livery in Malvern Depot RSC52 SW6 960 and VR 53 in Harbour Esplanade for the NMEL&T Co Centenary RSC53 Hawthorn Tramways Trust 32 in Harbour Esplanade for the NMEL&T Co Centenary RSC54 VR 53 & B 2042 in Harbour Esplanade for the NMEL&T Co Centenary RSC55 VR 53 & C 3016 in Harbour Esplanade for the NMEL&T Co Centenary RSC56 NMEL&T Co 13 usually V214 in Harbour Esplanade for the NMEL&T Co Centenary RSC57 NMEL&T Co 13 usually V214 at Preston Workshops for the NMEL&T Co Centenary RSC58 Hawthorn Tramways Trust Lettering on HTT 32 in Harbour Esplanade for the NMEL&T Co Centenary RSC59 Hawthorn Tramways Trust 32 in Harbour Esplanade for the NMEL&T Co Centenary RSC60 Hawthorn Tramways Trust 32in Harbour Esplanade for the NMEL&T Co Centenary RSC61 Hawthorn Tramways Trust 32 in Harbour Esplanade for the NMEL&T Co Centenary RSC62 NMEL&T Co 13 usually V214 at Preston Workshops for the NMEL&T Co Centenary RSC63 W2 516 and another on route 59 wait to shunt at Essendon Airdrome Terminus as W2 571 on route 49 departs. This was the last day of operation. RSC64 Australia’s First Electric Tram at Box Hill with Tramwaymen including H J Hilton who is in the centre RSC65 W2 484 en route to St Kilda Junction and another wait for passengers after a race meeting at Caulfield Racecourse RSC66 X1 463 on the Footscray system en route to Russell St RSC67 Geelong 35 on Chilwell Route, Formerly HTT 13, M&MTB 119, then Bendigo 1 and Ballarat 37 RSC68 P&MTT 4 on Opening Day of the system in Glenferrie Rd RSC69 Bendigo 6 in McCrae St near the Depot end route to North Bendigo RSC70 P&MTT 4 in Glenferrie on opening day of the System RSC71 Scrubber 3 stripped and awaiting scrapping at Preston Workshops RSC72 Scrubber 4 at South Melbourne Depot RSC73 Q 191 & 139 at Preston Workshops awaiting scrapping RSC74 Rail Grinder 3 at Preston Workshops as purchased from Sydney RSC75 Y 469 waits to shunt at Wattle Park Terminus as Y1 613 departs on driver training duties RSC76 VR 53 on the outside roads at Essendon Depot RSC77 W5 796 with three doors and square windows running out of Brunswick Depot in Cameron St, with a supplementary destination board showing “City via Swanston St” RSC78 W2 258 on the wheel grinder road at Brunswick depot RSC79 X2 676 on a TMSV tour, W5 817 & 836 & VR 53 on the open roads at Essendon Depot RSC80 PCC 1041 on test, passes W71035 in High St Preston RSC81 D1 class production number 7 as delivered on test in Matthews Ave RSC82 W2 383 on route 5 turning from the reserved track in Dandenong Rd into St Kilda Rd at St Kilda Junction RSC83 Z3 204 as advertising tram for Vodaphone Grand Prix running into Malvern Depot new shed RSC84 Z1 4 on test in St Georges Rd RSC85 PCC 1041 on Route 96 in Burke St near Exhibition St RSC86 Z1 3 without numbers on test turning from Miller St in St Georges Rd RSC87 Track components stored in Coldblo Rd at Malvern Depot with Z class cars adjacent RSC88 D1 3501 in M Tram Livery on Route 55 in Peel St at Franklin St RSC89 C 3001 in Yarra Trams Livery Porto 018 & D13502 in M Tram Livery on Display in Harbourside Esplanade RSC90 D1 class tram production number 7, in as delivered condition on test in Matthews Ave RSC91 D1 3503 inside Malvern Depot RSC92 SW6 955 and W6 974 in St Kilda at City Rd at Dusk RSC93 Freight Car 19 at Preston Workshops in green Livery RSC94 Rail Grinder 3 in green Livery at South Melb Per Way Yard RSC95 A SW6 class car on route 50 shunting at Elizabeth St Terminus at night, taken from Flinders St Station RSC96 W2 588 & 435 in St Kilda Rd at Batman Ave RSC97 Y1 613 in service at Wattle Park Terminus RSC98 W2 588 in Wellington Parade en-route to the City with a Grand Final Load of passengers followed closely by 384 RSC99 W2 558 on a MCG Footy Special entering the Simpson St sidings RSC100 W3 657 & an L Class in the new shed at Malvern Depot RSC101 Y1 613 in St Kilda Rd on an enthusiasts tour in St Kilda Rd south of St Kilda jun RSC102 Y1 613 on an enthusiasts tour in Clarendon St with the two extra tracks on the Viaduct under construction RSC103 W6 976 on the fan of the new shed at Malvern Depot RSC104 W7 1024 as an advertising car for Bank of NSW at the route 1 terminus at South Melb Beach RSC105 PCC 980 on route 96 in Nicholson St near North Fitzroy Depot RSC106 SW6 890 with dash canopy lighting in Market St on the opening day of William St Services RSC107 W2 444 with big numbers heads a line of footy specials in Simpson St Sidings RSC108 Cable Cars in Elizabeth St RSC109 NMEL&T co 2 with a trailer outside the power station in Mount Alexander Rd RSC110 Alf Twentyman’s cable car set in his Northcote backyard RSC111 Cable Cars in Queens Parade Clifton Hill RSC112 Cable cars in Collins St outside the Townhall RSC113 PCC 1041 at Carnegie terminus RSC114 Cable cars in Elizabeth St RSC115 Cable cars in Collins St near Swanston St RSC116 HTT 19 turns from Riversdale Rd into Camberwell Rd at Camberwell Junction RSC117 W1 419 official builders photo of first car of the class RSC118 Cable car with a full load of passengers RSC119 W1 422 illuminated for the visit of T.R.H. The Duke and Duchess of York RSC120 PCC 1041 in strife on it’s maiden day in service. Trams on route 88 delayed in Queens Parade Clifton Hill RSC121 Bendigo birney in Finn St near North Bendigo terminus RSC122 SW6 in St Kilda Rd at Domain Rd at night RSC123 All 3 of Alf Twentyman’s cable cars in his Northcote backyard RSC124 Cable trailer 256 being unloaded into the shed at Bylands RSC125 Cable grip car 1 being removed from the Melbourne Museum RSC126 Alf Twentyman's cable cars in his Northcote Backyard RSC127 Alf Twentyman's cable cars in his Northcote Backyard RSC128 Alf Twentyman's cable cars in his Northcote Backyard RSC129 Alf Twentyman's cable cars in his Northcote Backyard RSC130 W class car in Swanston St at Collins St RSC131 Y1 469, L & W3 on the run out of Glenhuntly Depot on a tour RSC132 W7 1024 as an advertising tram for Bank of NSW at Clifton Hill RSC133 W2 496 on a footy special in Simpson St Sidings RSC134 W2 as originally converted to a test car at Preston Workshops RSC135 W3 667 in Brunswick Depot with Ellen Butland at the controls RSC136 W3 669 on it’s final run at Victoria Prd & Brunswick St RSC137 W2 571 in Wellington Prd at Clarendon St with a Footy Final load of Passengers RSC138 Y1 613 shunts at Spencer St Terminus as X217 waits on Australia Day Pageant RSC139 PCC 1041 on Rt 96 in Burke St outside the Southern Cross Hotel RSC140 890 with accident damage on the outside roads at Preston Workshops c1978 RSC141 535 on Rt 4 at the old St Kilda Jun c1967 RSC142 1041 on Rt 88 turns from Bourke St into Spring St 1973 RSC143 102 on a tour at Albert Park Beach Terminus Feb 1972 RSC144 833, 835 & 834 in the shed at Malvern Depot c1976 RSC145 281 in Wellington Parade on a football very crowded special c1974 RSC146 464 Ballarat Rd 1960 RSC147 181 Explosives Fty - at Footscray Station - July 1960 RSC148 181 Williamstown Road 1960 RSC149 Cable car set at Alf Twentyman’s c1970 RSC150 X 217 at Malvern Depot c1970 RSC151 X1 465 and T181 Footscray Football ground in Barkly St. c1960 RSC152 Scrubber 5 at South Melbourne depot c1960 RSC153 X1 465 Footscray to Russell St, c1960 RSC154 X1 467 Leeds St Footscray 1960 RSC155 PMTT 4 Glenferrie Road, 1910 RSC156 S 164 at Malvern Depot c1970 RSC157 T178 Footscray c1960 RSC158 Cleaner No. 7 at South Melbourne depot c1960 RSC159 Two Y classes at Princes Bridge / Batman Ave mid 1950s RSC160 Swanston St – Nu color vue slide – M142 Demonstrates the work of Ron Scholten in photography, collection and/or production of duplicate slidesAssembled album in a black presentation folder of 160 colour slides, 8 slide sleeves, collected or produced by Ron Scholten. Many are TMSV or Windsor Publications slides. All photographs have been scanned and placed on the Museum's G drive. A list of all photographs with details has been compiled. melbourne, tramways, trams, cable trams -
 Melbourne Tram Museum
Album - David Frost Slide Collection, David Frost
Photo - see pdf file for further information. Number Brief Description date DFC1 A general view from the former railway platform at Port Melb Station looking towards Station Pier on opening day 20-12-1987 DFC2 A2 285 in the Tramway Platform at Port Melbourne Station on opening Day 20-12-1987 DFC3 A2 285 in the Tramway Platform at Port Melbourne Station on opening Day 20-12-1987 DFC4 A2 285 in the Tramway Platform at Port Melbourne Station on opening Day 20-12-1987 DFC5 A2 273 at St Kilda Tramway Station on opening day 22-11-1987 DFC6 A2 273 turning from Fitzroy St into St Kilda Tramway Station on opening day 22-11-1987 DFC7 B1 2001 at St Kilda Tramway Station turning into Fitzroy St on opening day 22-11-1987 DFC8 B1 2002 enters St Kilda Tramway Station on opening day 22-11-1987 DFC9 An A2 approaches St Kilda Tramway Station on opening day 22-11-1987 DFC10 Concreting the connecting curve from Fitroy St into St Kilda Station c July 1987 DFC11 An MTA AEC MKVI bus in Grey St St Kilda at Dalgety St with Tramway works in the background c July 1987 DFC12 Grey St St Kilda at Dalgety St with Tramway works in the background in Fitzroy St c July 1987 DFC13 Concreting the connecting curve from Fitroy St into St Kilda Station c July 1987 DFC14 Restaurant Tram 442 in Fitzroy St at Grey St Passing MTA bus 59 outside St Kilda Station c1986 DFC15 Former VR tram stop sign painted on a pole at Glenhuntly Rd & Broadway DFC16 Former VR Elwood Tram Depot under demolition 1996 DFC17 Former VR Elwood Tram Depot under demolition 1996 DFC18 Former VR Elwood Tram Depot under demolition 1996 DFC19 Former VR Elwood Tram Depot under demolition 1996 DFC20 Former VR Elwood Tram Depot under demolition 1996 DFC21 Former VR Elwood Tram Depot under demolition 1996 DFC22 Former VR Elwood Tram Depot under demolition 1996 DFC23 Former VR Elwood Tram Depot under demolition 1996 DFC24 MTS Tower waggon in use at the former VR Elwood Tram Depot under demolition 1996 DFC25 A Sign advertising the sale of the Former VR Elwood Tram Depot – 10/8/1996 1996 DFC26 Former VR Elwood Tram Depot under demolition 1996 DFC27 Interior of a shed at the former VR Elwood Tram Depot under demolition 1996 DFC28 Former VR Elwood Tram Depot under demolition 1996 DFC29 Former VR Elwood Tram Depot under demolition 1996 DFC30 Former VR Elwood Tram Depot under demolition 1996 DFC31 VR 20, former breakdown car in Bob Prentice’s Back Yard Jan 1974 DFC32 VR 20 on a low loader en route to Bob Prentice’s for preservation 1959 DFC33 VR 20 as the breakdown car on the St Kilda Electric Street Railway c1955 DFC34 VR 39 waits in St Kilda St as breakdown car 20 enters Elwood Depot c1955 DFC35 VR 54 and 50 in the rear yard of Elwood Depot c1958 DFC36 VR 50 in the rear yard of Elwood Depot c1958 DFC37 VR 50 in the rear yard of Elwood Depot c1958 DFC38 VR 28 in St Kilda St outside Elwood depot after the line had been cut back to this point c1958 DFC39 VR 29 in St Kilda St outside Elwood depot after the line had been cut back to this point c1958 DFC40 VR 35 passes 28 on the St Kilda Electric Street Railway c1955 DFC41 VR 39 on the St Kilda Electric Street Railway c1955 DFC42 Y1 613 on a tour c1970 DFC43 VR 54 in St Kilda St outside Elwood Depot c1955 DFC44 VR 28 at Brighton Beach Terminus c1955 DFC45 VR 33 being washed in the wash bay at the rear of Elwood Depot c1955 DFC46 VR 20 breakdown car running into Elwood Depot c1955 DFC47 VR 3 in the rear yard at Elwood Depot c1955 DFC48 VR 51 on an AETA Tour running out of Elwood Depot c1958 DFC49 VR 28 on the St Kilda Electric Street Railway c1955 DFC50 VR 28 with crew in St Kilda St outside Elwood depot after the line had been cut back to this point 1959 DFC51 VR 52 in Grey St near Fitzroy St c1958 DFC52 VR 51 on a AETA Tour passes 33 in Grey St near Fitzroy St c1958 DFC53 VR 29 in Grey St near Fitzroy St c1958 DFC54 VR51 on an AETA Tour shunts as 52 waits on the St Kilda Electric Street Railway c1958 DFC55 VR 51 on the Black Rock Electric Street Railway c1955 DFC56 VR 28 in St Kilda St outside Elwood depot after the line had been cut back to this point c1958 DFC57 Combined Rail-Tram Tickets of the Black Rock Electric Street Railway Feb 1975 DFC58 Combined Rail-Tram Tickets of the St Kilda Electric Street Railway Feb 1975 DFC59 Electric Street Railway & Motor Coach Paper Tear off Tickets Feb 1975 DFC60 VR 52 & 53 on Rt 82 pass in Cordite Ave near Wests Rd Sept 1975 DFC61 Z 68 & 52 in East Preston Depot in M&MTB Livery c1977 DFC62 Copy photo of VR 18 in Elwood Depot c1910 DFC63 VR 51 as a one man car at Black Rock Terminus c1955 DFC64 VR 53 on Rt 82 in Droop St Footscray Jan 1974 DFC65 B2 2027 on Rt 96 in South Melb Station c1988 DFC66 VR 20 as preserved in Bob Prentice’s backyard High St Prahran Jan 1974 DFC67 VR 700 on Rt 82 in Droop St Footsray c1978 DFC68 VR 28 as the last car from ST Kilda Station 28-2-1959 DFC69 VR 700 at the Rt 82 Moonee Ponds Terminus c1978 DFC70 VR 52 waiting time at the Rt 82 Footscray Terminus, the driver intently stares at the bundy clock as the Braid and the Connie gossip Jul 1972 DFC71 VR 54 shunting outside Elwood Depot to return to St Kilda Station 1959 DFC72 SW6 969 in MTA Livery blocking the entrance to South Melb Depot presumably during the scratch ticket dispute Jan 1990 DFC73 VR 52 & 53 on Rt 82 pass in Droop St Footscray Sept 1975 DFC74 VR 700 after withdrawl in the Newport Railway museum in the process of a repaint c1985 DFC75 VR 700 after withdrawl in the Newport Railway museum in the process of a repaint c1985 DFC76 VR 700 on Rt 82 in Droop St Footsray at The Cresent c1978 DFC77 VR 700 on Rt 82 in Droop St Footsray c1978 DFC78 Former VR tram depot in use as an MTA Bus depot c1990 DFC79 VR 52 waiting time at the Rt 82 Footscray Terminus Jul 1972 DFC80 VR 52 waiting time at the Rt 82 Footscray Terminus with Connie changing the pole Jul 1972 DFC81 VR 52 at the Rt 82 Moonee Ponds Terminus with the crew chatting 7-12-1974 DFC82 VR 52 on Rt 82 on the reserved track in Raleigh Rd Ascot Vale Jan 1974 DFC83 VR 53 on Rt 82 in Leeds St Footscray about to turn into Hopkins St April 1976 DFC84 VR 53 on Rt 82 in Droop St Footsray Jan 1974 DFC85 VR 700 on Rt 82 in Droop St Footsray at Hopkins St c1978 DFC86 Z 52 in MTA livery on Rt 19 in Elizabeth St near Bourke St c1985 DFC87 VR 52 at the Rt 82 Moonee Ponds Terminus Jul 1972 DFC88 VR 53 at the Rt 82 Footscray Terminus Jan 1974 DFC89 VR 52 freshly outshopped from the workshops and W7 1011 at the Bourke St Terminus with 52 on display for the 1968 railway exhibition 1968 DFC90 Painting of W class 369 in Chocolate & Cream c1930 DFC91 Charing Cross, Bendigo at night c1965 DFC92 Ballarat ? c1965 DFC93 Bendigo 18 on an AETA tour in McCrae St near Tramway Ave c1965 DFC94 View from the roof of a tram in the body shop at Preston Workshops 1977 DFC95 View from the roof of a tram in the body shop at Preston Workshops 1977 DFC96 View from the roof of a tram in the body shop at Preston Workshops showing the panto on 546 1977 DFC97 Interior view of Carlton Control Centre showing desk and wall panel c1968 DFC98 W2 493 on Rt 55 in Kingsway outside South Melb Depot Aug 1973 DFC99 W2 496 in Sturt St at Kingsway on Rt 1 Jul 1973 DFC100 Z class truck c1975 DFC101 Z3 116 in Bourke St at King St as new c1979 DFC102 Bob Prentice on tour c1968 DFC103 SW6 900 as an advertising tram for Newsday at night 1969 DFC104 597 Jul 1973 DFC105 W2 480 on Rt 3 passing under the railway bridge at Caulfield Oct 1972 DFC106 Interior view of Carlton Control Centre showing desk c1968 DFC107 SW6 856 on Rt 77 at night Jul 1973 DFC108 W2 496 in Sturt St at Kingsway on Rt 1 Jul 1973 DFC109 PCC 980 on a tour at South Melb Depot c1968 DFC110 SW6 856 on Rt 77 at night Jul 1973 DFC111 View from the roof of a tram in the body shop at Preston Workshops showing the panto on 546 1977 DFC112 Dandenong Rd from Chapel St Nov 1968 DFC113 A Z class car turns from Gertrude into Nicholson St c1990 DFC114 SW6 900 as an advertising tram for Newsday at night 1969 DFC115 Port Melbourne Station showing Centennial bridge and station building prior to closure. 10-1987 DFC116 Port Melbourne station with train prior to closure, looking south 10-1987 Demonstrates the work of David Frost in photography and or collecting slides.Assembled album in a black presentation folder of 116 colour slides, 6 slide sleeves, collected or photographed by David Frost. Many are TMSV or Windsor Publications slides. All photographs have been scanned and placed on the Museum's G drive. A list of all photographs with details has been compiled. melbourne, tramways, trams, vr trams, elwood, st kilda light rail, port melbourne, opening, elwood depot, buses -
 Melbourne Tram Museum
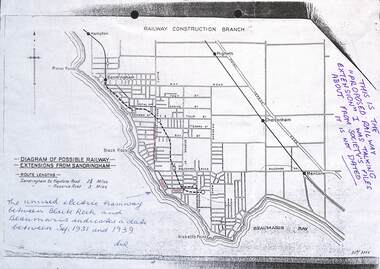
Drawing, "Possible railway extensions from Sandringham"
Drawing, photocopied from the Sandringham and District Historical Society's files showing possible route and station locations of an extension from the Sandringham station. Prepared by the Railway Construction Branch of the Victorian Railways. Shows the tram lines. Possibly late 1930s.Yields information about a possible extension of the Sandringham railway line to Beaumaris.Drawing - photocopied with hand written notes - A4 sheetExtensive notes in ink.trams, railways, sandringham, beaumaris, new railways, railway construction branch -
 Linton and District Historical Society Inc
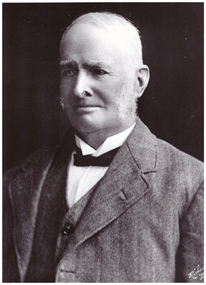
Photograph, Cr. John Clarke
There are three copies of this photograph, the first was formerly in a frame and was in the possession of the Shire of Grenville until it was donated to LDHS. (Frame is in room 01 at Resource Centre. It is understood photograph was removed from frame with a view to having it restored.) The second copy of the photograph is mounted photograph 233 and the third is a copy held in the Clarke family file. John Clarke was the owner of Emu Hill station. (See photograph of Emu Hill homestead, Registration number 2013-01). Between 1872 and 1917 he was also a Shire of Grenville councillor, and served as Shire President in 1878, 1889, 1898, 1906 and 1912. John's wife was Mary Jane Newcomen, daughter of William (W.W.R.) Newcomen and Matilda (Egan).Black and white photograph of John Clarke, showing a man with sideburns, wearing a suit with waistcoat, shirt with high collar, and bow tie.On back of mount of original photo: "J. CLARKE". On mounted photo: "Mr John Clarke".john clarke, emu hill pastoral station, shire presidents -
 Eltham District Historical Society Inc
Audio - Audio Recording, Irene Kearsey - Snr Constable Arthur Eggleston Dungey at home in Eltham, 14 Feb. 2024
EDHS Newsletter No. 274 February 2024 Our EDHS member Irene Kearsey is forever searching, researching and at times discovering hidden historical gems. One such discovery is finding details about the life and career of “Senior Constable Dungey – Eltham’s third policeman” and what he and his wife had in the Eltham police house; now our Local History Centre at 728 Main Road, Eltham. At our meeting on Wednesday 14th February 2024, Irene with talk about the career of Arthur Eggleston Dungey leading him to Eltham and then describe what was in the house. We now know how he and wife Louisa furnished the house in 1890, down to the number of teaspoons. If you had ancestors in 19th century Victoria, Irene has a suggestion for your research that might reveal such details1:02:35 duration Digital MP3 file; 21.4MBaudio recording, eltham district historical society, meeting, society meeting, eltham, guest speaker, eltham police station, irene kearsey, snr constable arthur eggleston dungey, eltham police residence -
 Eltham District Historical Society Inc
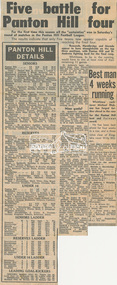
Newspaper clipping, Five battle for Panton Hill four and Panton Hill Details, Diamond Valley News, c.1970, 1970c
Panton Hill Football League match results On reverse of clipping another story "Petrol Warriors" about Eric Giggins and John Sternbergs who acquired a petrol station in Montmorency and initiated a petrol price warDigital file only - scanned by EDHS from item on loaneric giggins, john sternbergs, lew howard collection, match details, montmorency service station, panton hill football league, petrol price war, research football club -
 Sunbury Family History and Heritage Society Inc.
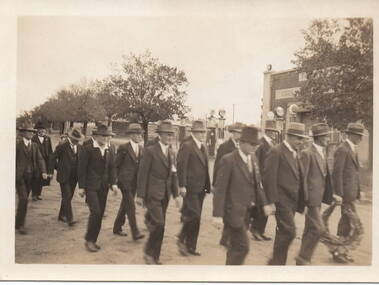
Photograph, Anzac March, C1930s
The group of men in the photograph were marching in file along Brook Street and were making their way to the War Memorial in Stawell Street. They were approaching the intersection of Brook, O'Shanassy and Stawell Streets, known locally as the 5 ways. A non-digital sepia photograph with a cream border of men dressed in suits and hats marching in file along a tree-lined street. One man holds a wreath to place on a memorial. A service station with petrol pump are to the RHS of the photograph.The words 'Kodak Print' and S579 are stamped on the back of the photograph.war memorials, anzac day, brook street, stawell street, o'shanassy street, marches -
Vision Australia
Audio - Sound recording, Christmas at 1179, 2004-2011
Interviews with volunteers and staff at 3RPH about their roles and how they spend Christmastime. 1 CD with 1 sound filevision australia, 3rph radio station, stella glorie, amanda fehim -
 Ballarat Tramway Museum
Negative, Wal Jack, Geelong No. 1 leaving crossing loop in Aphrasia St, 23-6-1949
Geelong No. 1 leaves the crossing loop in Aphrasia St before turning into Pakington St. The tram has the destination of Station. See item 9051 for a print that identifies the date as 23-6-1949 and gives other details. Yields information about Geelong No. 1 and Aphrasia StNegative and Digital images of the Wal Jack Geelong Negative filestrams, tramways, geelong, newtown, aphasia st, tram 1 -
 Ballarat Tramway Museum
Negative, Wal Jack, Geelong 21 and 22 crossing at the Albert St loop in Pakington St, 23/6/1949
Geelong 21 and 22 crossing at the Albert St loop, the second loop in Pakington St. Tram 21 has the destination of Station, and 22 the destination of West. See item 9053 for details of the location and date - 23-6-1949. Refer to "Twenty five years ago, the Closure of the Geelong Tramways", by Ken McCarthy, April 1981 issue of Trolley Wire page 10 for routing information. Yields information about tram operations in Pakington St.Negative and Digital images of the Wal Jack Geelong Negative file.trams, tramways, geelong, pakington st, west, station, tram 21 tram 22 -
 Ballarat Tramway Museum
Negative - Geelong 9 at the Geelong Railway Station, Wal Jack, 17-11-1953
Geelong 9 at the Geelong Railway Station. Has the station canopy in the background. See item 9054 for a print, dated 17-11-1953.Yields information about Geelong 9 and the railway station. Negative and Digital images of the Wal Jack Ballarat Negative file.trams, tramways, geelong, railway, tram 9 -
Vision Australia
Audio - Sound recording, 20th Anniversary messages to VAR Mildura, 1998
In March 1998 Mildura residents received their first broadcast from RPH radio. These messages from VA CEO Ron Hooton, former RPH manager Stephen Jolley and former production program coordinator Roberta Ashby congratulating the station on their 20th anniversary.1 CD with 3 sound files3mph radio station, ron hooton, stephen jolley, roberta ashby -
 Melbourne Tram Museum
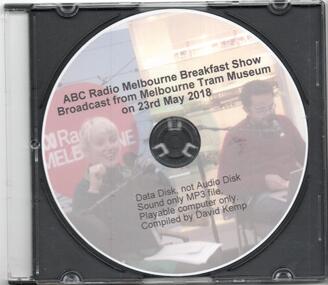
Photograph - Compact Diskette with CD, David Kemp, "ABC Radio Melbourne Breakfast Show Broadcast from Melbourne Tram Museum on 23rd May 2018", 23/05/2018 12:00:00 AM
Compact Diskette with CD Audio file within a black plastic case with a clear cover. CD titled "ABC Radio Melbourne Breakfast Show Broadcast from Melbourne Tram Museum on 23rd May 2018". Features the ABC Melbourne 774 breakfast show presenters Sami Shah and Jacinta Parsons, along with Kevin Tierney, Adam Chandler, Roberto D'Andrea, Malcolm Just, Colin Tyrus (former ABC Radio newsreader and now does the stop announcements for Yarra Trams) and "The Singing Connies" See Reg item 2839 for associated photographs.trams, tramways, abc radio news, melbourne tram museum, conductors, hawthorn depot, radio stations, music -
 Melbourne Tram Museum
Album - Photo Album, Michael Schrader, "Tram Pix ex Slides", 1960's
Manilla file folder, Railways of Australia Committee with a blue tape on the left hand side, preprinted file containing six sets of photograph sleeves with a sheet of white paper between, marked "Tram Pix ex Slides". Clipped into the folder with brass foldback clips. Sheet 1 front: MMTB Christmas Tram - 16W - Swanston St - 1963 T181 at Footscray Depot c1960 Brisbane Dreadnought 178 Sheet 1 rear VR 6 on an AETA Tour Brighton line Brisbane 358 and baby dreadnought and a group of 4 people Ballarat 35 and three other trams in City Loop - pre 1960 Sheet 2 front Ballarat 30 in bound in Albert St Sebastopol pre 1960 Bendigo 12 leaving depot, pre 1960 Bendigo 26 at Eaglehawk pre 1960 Sheet 2 rear Bendigo 29 pre 1960 Bendigo 28 with a group of enthusiasts standing in front - mid to late 1960's Sydney - coupled set of crossbench cars at a beach terminus Sheet 3 front Sydney - with Mark Foys in background Sydney - 2057 Sydney - trams being scrapped c1960 Sheet 3 rear Sydney - trams being burnt VR 30 at St Kilda Station Sheet 4 front VR36 and 6 on the Brighton line VR53 at St Kilda Station Sheet 4 rear VR 51 at Sandringham VR 51 on Sandringham Black Rock line VR 50 at Black Rock terminus Sheet 5 - not used Sheet 6 - front - photograph of a steam tram locomotive???trams, tramways, swanston st, myer, christmas trams, footscray depot, brisbane, st kilda brighton, ballarat, bendigo, sydney, scrapped trams, st kilda railway station, sandringham, black rock, tram 16w, tram 181, tram 178, tram 6, tram 358, tram 35, tram 30, tram 12, tram 26, tram 29, tram 28, tram 2057, tram 30, tram 36, tram 53, tram 51, tram 50 -
 Melbourne Tram Museum
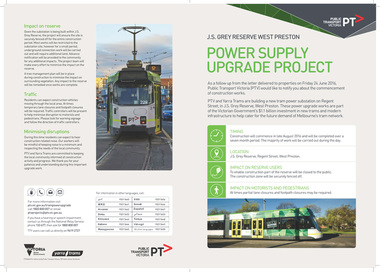
Pamphlet, Yarra Trams, "Power supply upgrade project - J. S. Grey Reserve West Preston", Jul. 2016
Digital image of a folded A4 pamphlet titled "Power supply upgrade project - J. S. Grey Reserve West Preston", about the construction of a new sub-station on the reserve, gives construction dates, impact, site plan, elevation plan, reason or need for the sub-station for tram power upgrades. Dated July 2016. A4 print made for files.trams, tramways, substation, power supply, yarra trams, west preston -
 Melbourne Tram Museum
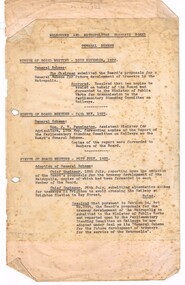
Document - Report, Melbourne & Metropolitan Tramways Board (MMTB), "Melbourne and Metropolitan Tramways Board General Scheme", c1923
Personal Papers titled "Melbourne and Metropolitan Tramways Board General Scheme": File comprises of: 1. Typed document noting the MMTB Minute of the Board meetings of 30/11/1922, 24/5/1923 and 26/7/1923 approving the General Scheme be forwarded to the Minister and the Parliamentary Standing Committee and changes to resolve crossing the Railway at Brighton Station. 2 - Printed document - 1923 - Report - 8 pages - The Parliamentary Standing Committee on Railways - General Scheme for Tramways for Metropolis - printed 24/7/1923. Has stapled to the document a pink cover sheet. Gives details of the committee, the committee report, comments on the Board's financial position, the debate between tramways or railways, recommendations and views of the Railways Commissioners. Attached to the report is the MMTB 30 page duplicated document giving the Board's proposals. See Reg Item 2089 for actual drawings referred to. See Reg Item 2098 and 3374 for another copy of this document and the map.Both documents have been stamped "Perway File"trams, tramways, mmtb, general scheme, tramways, development, parliament, brighton, railways, finances -
 Melbourne Tram Museum
Photograph - Negative and Black & White Photograph/s, early 1950's
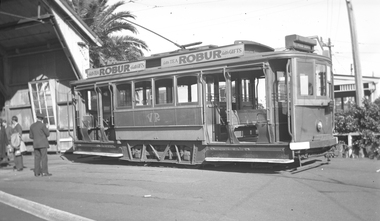
Negative (120) and contact print of VR tram No. 7 at the Elwood depot. See also Reg Item 3623 for another photo showing the tram. .1 - View of the tram and the depot building. Appears to have an AETA special tram tour board on the front. (2 prints held) .2 - End on photograph of the tram showing the white bumpers and steps, taken at St Kilda Station Side on photo, showing the strengthening steel work applied to this four wheel tram. Has two Robur Tea advertisements. Tram possibly preparing for a tour given the number of men standing on the side. Hi Res image filed in the dbtext/hawthtramcoll/Large Images/htd3624i`Large.jpg and htd3624i2Large.Envelope containing negative and photo typed "Tram VR Elwood Spread the load." .1 - On the rear of the print "VR Tram - Elwood Depot 5'3" gauge". .2 - 'VR Tram St Kilda Station Extension 5'3" gauge".trams, tramways, victorian railways, vr, elwood depot, aeta, st kilda railway station, tram 7 -
 Melbourne Tram Museum
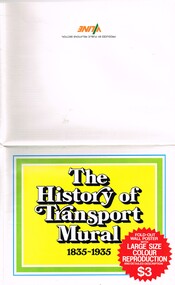
Pamphlet, V/Line, "The History of the Transport Mural - 1835-1935", undated
Pamphlet - large 8 fold pamphlet, full colour, titled "The History of the Transport Mural - 1835-1935" - providing a detailed description of the Mural, its parts, making, painting, detailing its preparation by Harold Freedman, timing, his work and other details. Prepared by VLine, priced $3, c2000? Understood that Keith provided details for the mural. Imaged over 8 jpg files.trams, tramways, spencer st, mural, southern cross station -
 Melbourne Tram Museum
Slide - Set of 6, Keith Caldwell, March 1967?
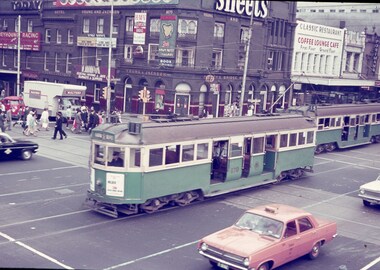
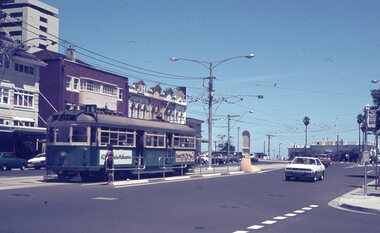
Set of six Agfa colour blue white plastic mount slides, photo by Keith Caldwell of trams passing the intersection of Flinders and Swanston St. Slides undated - c1967/68, possibly 3/68, aligns with similar scene and time on Reg Item 4315 .1 - W4 670 crossing Flinders St with both the driver and conductor in the view. Has destination of Hanna St. .2 - L102 crossing route 61 to South Caulfield Junction. Has adverts for Tolley's Brandy and a fast courier. In the background is SW6 940 (University 2A) and W2 389? (East Malvern, route 4D) .3 - W3 668 to South Melbourne Beach, route 1 .4 - W3 669, route 1 to South Melbourne Beach, has advert for White Crow sauce. .5 - W2 627, North Balwyn with other trams at the Swanston St stop, including a SW6 on route 64 .6 - a long line up of up to 9 trams northbound at the Swanston St stop outside Flinders St Station, led by SW6 917 (University, route 64) with adverts Suptuned, Sony and "take my advice" featuring an owl. Following is another SW6, 913? with adverts for Tiger Paw, also a route 64. In the background is the Flinders St station awing with a Craven Filer cigarette advert.. Photos have Young and Jackson, the Classic Restaurant Coffee lounge bar in the view, Coles,.1 - "BXBU" and on .3, .1 also has W4" in ink.trams, tramways, flinders st, swanston st, w4 class, w3 class, l class, sw6 class, w2 class, hanna st, south caulfield, university, route 2a, route 4d, east malvern, st kilda beach, route 1, route 64, north balwyn, tram 670, tram 102, tram 668, tram 669, tram 627, tram 913 -
 Melbourne Tram Museum
Album - Robert Thomson Slide Collection, "9.9.1988 to 16.9.1988"
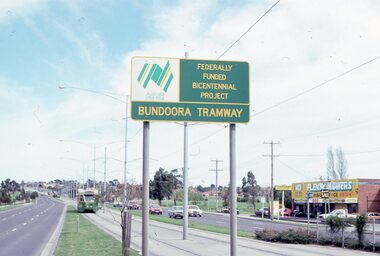
Photo - see pdf file for further information. Number Brief Description RT055 Bundoora Extension - RT056 Bundoora Extension - tram 261 - "Special" route 00 RT057 Bundoora Extension - tram 86 - "Bundoora" route 86 RT058 St Kilda - Esplanade - Carlisle RT059 Relay - Danks St RT060 "City Brunswick St" - route 12 RT061 tram 1003 - "City Brunswick St"- route 12 RT062 track work on route 12 RT063 tram 774 - "City Brunswick St"- route 12 RT064 track work RT065 light rail - tram 2005 - "Depot" RT066 light rail - tram 273 - "Port Melbourne" - route 111 RT067 St Kilda Light Rail Station -tram 291- "St Kilkda Beach - route 06 RT068 St Kilda Rd - tram 830 - "City" - route 6 RT069 StKildaRd-tram928-"??"-route05 RT070 St Kilda - tram 272 - "East Brunswick" - route 96 RT071 Elizabeth St Terminus - tram 80 - "Ascot Vale" - route 9 RT072 West Coburg Reserved Track - tram 78 - "Domain & St Kilda Rds" - route 56 RT073 West Coburg Terminus - tram 66 - "Domain & St Kilda Rds" - route 56 RT074 West Coburg Terminus - tram 87 - "Domain & St Kilda Rds" - route 56 RT075 Batman Ave Terminus - tram 118 - "Wattle Park" - route 70 RT076 Collins St Terminus - tram 1022 - "West Preston" - route 11 RT077 North Balwyn Terminus - tram 255 - "City - Lonsdale St" - route 48 RT078 Kew Cotham Rd Terminus - tram 865 - "St Kilda Beach via Balaclava Rd" - route 69 RT079 St Kilda esplanade - Carlisle - tram 946 - "Kew Cotham Rd" - route 69 - tram 295 - "East Brunswick" - route 96 RT080 West Preston Terminus - tram 943 - "St Kilda Beach" - route 10 RT081 Mont Albert Terminus - tram 250 - "Mont Albert" - route 42 RT082 Carnegie Single Line - tram 998 - "City" - route 67 RT083 Carnegie Single Line - tram 736 - "Carnegie" - route 67 RT084 Carnegie terminus - tram 736 - "City" - route 67 RT085 East Brighton Terminus - tram 914 - "City" - route 64 RT086 St Kilda Jct - tram 998 - "East Malvern Darling Rd" - route 3 & tram 969 - "City" route 3 RT087 Bourke St Spencer St - tram 271 - "St Kilda Beach" - route 96 RT088 Preston Railway Overbridge - "Northcote via St Georges Rd" - route 9 RT089 Victoria Parade - tram 906 - "Mont Albert" - route 42 & tram 252 - "City" - route 42 RT090 Victoria Parade - tram 1025 - "City Spencer St" - route 31Demonstrates the work of Robert Thomson in photography, collection and/or production of slidesAssembled album in a black presentation folder of 36 colour slides, collected or produced by Robert Thomson. All photographs have been scanned and placed on the Museum's G drive. A list of all photographs with details has been compiled. melbourne, tramways, trams, track construction -
 Melbourne Tram Museum
Album - Robert Thomson Slide Collection, "January 1980 Box 2 - COTMA 1982"
Photo - see pdf file for further information. Number Brief Description RT315 Fitzroy St St Kilda 27-1-80 - tram 900 - "City" - route 16 RT316 Mont Albert Terminus 27-1-80 - tram 937 - "City" - route 42 RT317 Footscray Terminus 26-1-80 - tram 700 - route 82? RT318 Hawthorn Depot 27-1-80 - tram V214 & tram 56 - "Wattle Park - Elgar Rd" - route 70 RT319 Hawthorn Depot 27-1-80 - tram V214 RT320 Swan St Burnley 27-1-80 - tram V214 RT321 Batman Avenue 27-1-80 - tram V214 RT322 Sth Melbourne Beach Terminus 27-1-80 - tram 757 - "East Coburg Moreland" - route 1 RT323 Mitcham Station 24-1-80 - bus 794 -"Doncaster Jun" - route 281 RT324 COTMA 1982 Sth Melb Depot RT325 COTMA 1982 Sth Melb Depot - tram 8W - "Special" RT326 COTMA 1982 Sth Melb Depot - tram 587 RT327 COTMA 1982 Sth Melb Depot - tram 587 RT328 COTMA 1982 Sth Melb Depot - Tramways Emergency Truck RT329 COTMA 1982 Sth Melb Depot - track stockpile RT330 COTMA 1982 Sth Melb Depot - emergency trucks and lifts RT331 1982 West Coburg Dawson St Relay - tram 764 - "Domain Rd" - route 56 RT332 1982 Hawthorn Depot - tram 610 - "Special" & tram 469 - "Special" RT333 1982 Preston Workshops - tram 201 RT334 1982 Preston Workshops - tram 202 and tram 46 - note this car repainted into the Z3 Deep Yellow livery. RT335 1982 Victoria Pde - tram 729 -"Mont Albert" - route 42 Demonstrates the work of Robert Thomson in photography, collection and/or production of slidesAssembled album in a black presentation folder of 21 colour slides, collected or produced by Robert Thomson. A list of all photographs with details has been compiled. melbourne, tramways, trams, z3 class, z1 class, v class, w5 class, w2 class, y1 class, y class, south melbourne depot, vr class, tram 700, tram 214, tram 900, route 16, sw6 class, fitzroy st, mont albert, route 42, tram 937, footscray, hawthorn depot, z1, tram 46, route 70, swan st, batman avenue, south melbourne beach, tram 757, mitcham station, aec, mkv1 class, bus 794, route 281, tram 8w, tram 587, tram 56, international, route 56, tram 764, dawson st, tram 610, tram 469, preston workshops, tram 201, tram 202, tram 729, victoria parade -
 Melbourne Tram Museum
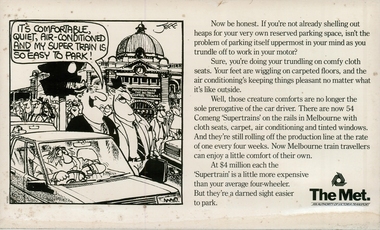
Poster, The Met, "Its comfortable, quiet, air-conditioned and my 'super train' is easy to park", mid 1980's
Advertising Poster for use in Tramcars printed on heavy cardboard advertising public transport and in particular the then New Comeng "Supertrains" and avoiding car parking's by using The Met Features a cartoon by Jeff with Flinders St Station and cars not moving in traffic. Has The Met logo. Has the caption "Its comfortable, quiet, air-conditioned and my 'super train' is easy to park" Image file is a small version of the large pdf file, on file as hte5566i.pdftrams, tramways, posters, flinders st, advertisements, cartoons, the met, comeng, car parks -
 Melbourne Tram Museum
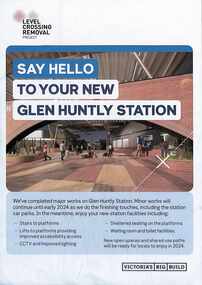
Pamphlet, Level Crossing removal authority, "Sey hello to your new Glen Huntly Station", July 2023
The former tramway/railway level crossing at this station was removed during 2023 by lowering the railway line in a trench. The roadway opened on 15 July 2023 (Press Release from the State Government - see media file), and https://tdu.to/m/288561/re-glen-huntly?insearch=1 for a report and photo by Brian Weedon of the new tram stop. The new station opened on 31/7/2023.Yields information about the new Glen Huntly station and the level crossing removal.A5 full colour pamphlet titled "Sey hello to your nrew Glen Huntly Station"railways, tramways, glen huntly road, level crossing -
 Melbourne Tram Museum
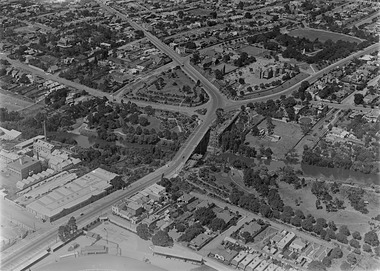
Photograph - Digital Image, Kevin O'Reilly, series of three images of the Hawthorn Bridge over the Yarra, c1930, c1930's
Image from CD (Compact Diskette for use in computers) - see Reg Item 135. A series of three images of the Hawthorn Bridge over the Yarra, c1930, during the era with problems with the bridge. See separate article for more details. Richmond 6, Richmond, Richmond 3 on the CD as original files. .1 - Looking from the south west, at the Hawthorn bridge with the temporary wooden bridge being constructed on the south side. Has the cable tram depot in the photo and part of the Burnley racing course. Temporary track on the north side of the steel bridge and crossings can be seen. .2 - Looking along Bridge Road to the east with Hawthorn Bridge in the middle of the photograph. Shows the industrial and residential areas, Hawthorn Railway Station and part of the Burnley Race course, the cable tram depot building. W class tram in Church St Hawthorn and W class tram crossing the bridge on the north side temporary track. Note the cable tram used as a shelter on the north east corner of the bridge. .3 - Looking south along River St towards Bridge Road, with the Yarra River and Hawthorn Bridge on the left side of the photograph. Shows the industry in the area at the time, wool and skin Merchants, north side of the cable depot, housing and the outlook to the river!trams, tramways, hawthorn, yarra river, burnley, richmond, hawthorn bridge