Showing 1098 items matching "lights"
-
 Melbourne Tram Museum
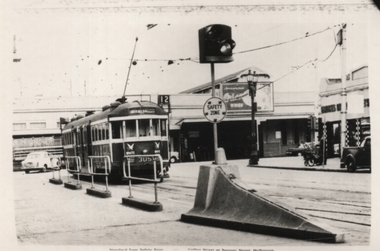
Photograph - Safety Zone prow & W2 305, Melbourne & Metropolitan Tramways Board (MMTB), 1961
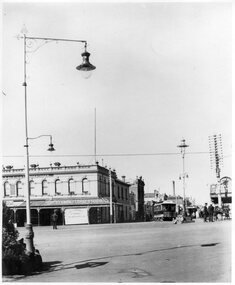
Photo, an Official MMTB photograph, shows a safety zone concrete prow with a set of flashing lights at the intersection of Collins and Spencer Sts. In the view is W2 305 (Route 12, South Melbourne Beach). The tram has large experimental roof ventilators and two White Wings Tomato sauce adverts on the end panels. In the background are the Victorian Railways Spencer St buildings. Photo used in the 1961 MMTB Annual Report.Yields information about Safety zones and W2 305.Black and White photograph on plain paper.In ink on rear "Collins & Spencer"tramways, collins st., spencer st, safety zone, w2 class, tram 305 -
 Melbourne Tram Museum
Photograph - Crew assists uncounscious pregnant woman, mid 1970s
Photograph is of two Essendon Depot crew members standing by a tram driver's door. The photo caption is "?? Driver ? Hadara and conductor Harry Nikolaou on the tram that unloaded 90 passengers to take an unconscious pregnant woman on an express trip to hospital." Photo is mid 1970's based on the conductor's uniform and the tram being fitted with markers lights taken at Flinders and Elizabeth St with Fliinders St station in the background. Source unknown.Yields information about a mid 1970s event where a tram was used for emergency transport.Black and white photograph print including a typed caption at the top.Has in red ink on rear "Misc Trams Victoria" and a source stamp which is unreadable.tramcars, tramways, mmtb, uniforms, medical, emergencies, essendon depot -
 Melbourne Tram Museum
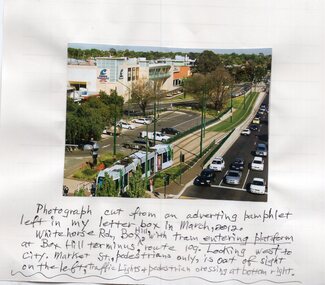
Photograph - Illustration, Keith Kings, Mar. 2012
Illustration of the Box Hill tram terminus from a real estate magazine March 2012 - showing a C class tram arriving at the terminus with many motor vehicles alongside and glued to a sheet of paper. Route 109In ink below "Photograph cut from an advertising pamphlet left in my letter box in March 2012. Whitehorse Rd Box Hill with tram entering platform at Box Hill terminus, route 109. Looking west to city. Market St, pedestrians only is out of sight on the left. Traffic lights and pedestrian crossing at bottom right."trams, tramways, box hill, route 109, c class -
 Melbourne Tram Museum
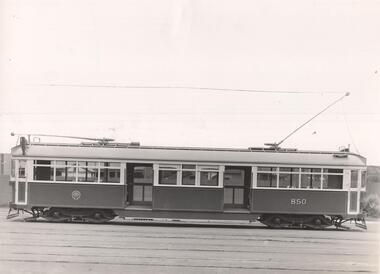
Photograph - Tram 850 Sutcliffe Photo, Sutcliffe Pty Ltd, 1939
Photograph of SW6 850, at South Melbourne depot, side on view. Made by Sutcliffe of 94 Elizabeth St Melbourne for the MMTB. See also Reg Items 674 and 3426 for other photos, probably taken at the same time.Yields information about SW6 850 when new in 1939.Photograph, Black and White, two copies held.In ink on the rear: Copy 1 - M&MTB SA 948, SW6 850, South Melbourne Depot 1939" Copy 2 - M&MTB SW6 850, Note: Roller bearing in lieu of axle boxes brasses, tail lights . ?Hanna St Depot, March 1939" Has Keith Kings stamp "SA 225".trams, tramways, sw6 class, tram 850 -
 Ballarat Tramway Museum
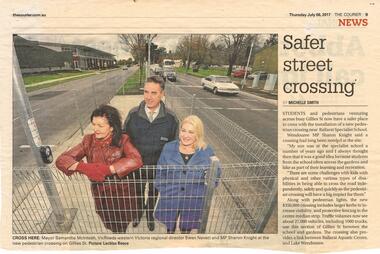
Newspaper, The Courier Ballarat, "Safer Street Crossing", 6/07/2017 12:00:00 AM
Newspaper clipping from The Courier, 6/7/2017 titled "Safer Street Crossing" about the installation of a set of traffic lights at the rear of the Museum Depot. Photo looking north along Gillies St. Included in the photo is Samantha McIntosh, VicRoads Ewen Nevett and MP Sharon Knight. Tram depot in the background. Note the traffic light installation resulted (a bit of accident and good talking by Neville Britton) of a crossing into the depot. Was not included in the drawings.gillies st, traffic lights, ballarat specialist school -
 Ballarat Tramway Museum
Slide - 35mm slide/s, Travis Jeffrey, 1961
Agfa plastic mount (blue base, white cover) with a photo of No. 34 Wendouree Parade, near Carlton St, Sturt St side of loop, showing Sturt St. West early 1961. Tram is in the process of being fitted with dash canopy lights and tiger strips. Slide rescanned at 3200 dpi 24-10-2020, jpg replaced, tiff file retained. This file was scanned in 2003 and may show colour changes."BAS 13" in penciltramways, trams, wendouree parade, carlton st, tram 34 -
 Ballarat Tramway Museum
Photograph - Black & White Photograph/s, 1955 or 1956
Black and white photograph of three Geelong bogie trams at the intersection of Moorabool and Ryrie Streets. Tram No. 33 in Moorabool St. has the destination of Belmont, while the adjacent tram has the destination of North. The third tram is eastbound in Ryrie St. Note Safety zone signs, the bar traffic lights. See also Reg. item 2799 for a subsequent photograph. In the background is the Bank of New South Wales building. Two copies held.tramways, trams, geelong, moorabool st, ryrie st, traffic lights, safety zone, tram 33 -
 Ballarat Tramway Museum
Slide - 35mm slide/s, Wal Jack, 23/01/1961 12:00:00 AM
Photo of No. 17 in Wendouree Parade (east side of Lake) showing 'View Point'. Looking across lake foreshore, at rear of tram. Tram not yet fitted with dash canopy lights, but small white stripe has been painted as has the tiger stripes on the bumper and the roof of the tram. Has ads for 'The Age' and 'Bourne Liquid Plastics'. Car number positioned under headlight. Slide going red, Taken on 23-1-61.'SEC Ballarat, No. 17 Wendouree Parade, View Point Line, 23-1-61' in blue ink and 'W.Jack' in purple ink stamp.tramways, trams, view point, wendouree parade, dash canopy lights, tram 17 -
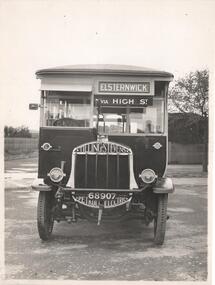 Melbourne Tram Museum
Photograph - Set of 2 Black & White Photograph/s, Sutcliffe Pty Ltd, late 1920's
Set of two Photographs, Black and White, of the MMTB bus 7 - Tilling Stevens, petrol electric bus. .1 - Front on view showing the radiator, head lights and other details including the crank handle - shows the destination of Elsternwick via High St. Registration Number 68907. .2 - Side on view of the bus showing the lettering, logo, doorways and destination. Photos Print and photograph by Sutcliffe of Cromwell buildings 366a Bourke St. Melbourne.In ink on the rear: .1 - "M&MTB Tilling Stevens, Petrol Electric Bus No. 7, late 1920's. .2 - as above plus "33 seats" KSK print numbers SA951 and SA952.trams, tramways, mmtb, buses, elsternwick, tilling stevens, tram 7 -
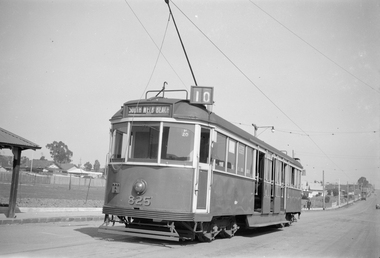 Melbourne Tram Museum
Negative - Set of 2, Ellis Collection, c1940
Set of two Negatives (120) of W5 825 at the West Preston Terminus, Gilbert Road, before Regent St. c1940. Note the "T" shaped lights on the tram - these were a red reflector - see page 104 of Destination City 5. Tram has the destination of South Melbourne Beach, route 10 and has a run number of P20 showing. Hi Res image filed in the dbtext/hawthtramcoll/Large Images/htd3606i1 and i2Large.jpgtrams, tramways, west preston, gilbert rd, w5 class, gilbert rd, route 10, tram 825 -
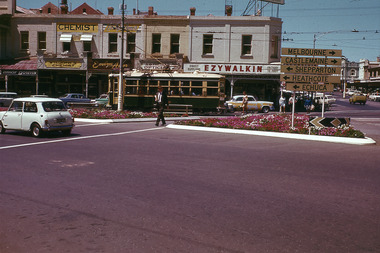 Bendigo Historical Society Inc.
Slide - Mouat Crawford Collection: Farming Life in the Wimmera, c1960s
BHS CollectionBendigo Charing Cross, corner Pall Mall and Mitchell Streets. Includes a tram, pedestrians and vehicles. Sign board directing traffic to Melbourne, Castlemaine, Shepparton, Heathcote, and Echuca. Stores in background include Ezywalkin Shoe store, A G Trelgar Optical, Evelyn Amor, W and T Jones Chemist, E G Amor Gowns. No traffic lights, tram line still going up Mitchell Street. Used as a teaching aid.ILFORDbendigo, charing cross, tram, pall mall, mouat crawford collection -
 Mission to Seafarers Victoria
Letter - Correspondence, Julius Kokx, Letter to Lillie from Julius Kokx, 4 October 1926
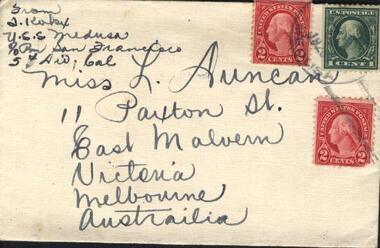
Lillie Duncan was a member of the Ladies' Harbour Lights Guild, the women's auxiliary group of the Mission to Seafarers organisation. The LHLG was formed in 1902 and organised social events for visiting seafarers and were directly responsible for much of the fundraising for the construction of the facility at 717 Flinders Street. As a member of the Guild, Lillie was expected to entertain and support visiting seafarers, although within a strict set of rules. This letter, along with a number of others, was sent to Lillie from abroad.This letter, along with a number of others sent to Lillie Duncan by visiting seafarers, underscore the social conventions of the time and the work of the Mission to Seafarers in provide comfort and support to visiting seafarers. The letters speak of the many events and activities undertaken at the Mission and provide a snapshot of the era.Letter addressed to Miss L. Duncan, 11 Paxton St, East Malvern, Melbourne, Australia from J. Kokx, U.S.S. Medusa, c/o Pm San Francisco, 5th Div Cal consisting of two parts. Part 0074.1 Envelope Part 0074.2 Letter Both the envelope and the letter are creamy yellow in colour with black curly writing on one side of the envelope and both sides of the letter. The letter begins with "Dear Lillie, I received your letter..." and concludes with "Bundles of love, Julius Kokx, x Little Melbourne girl x"The envelope is torn across the top and part of the flap for access to its contents. It has two 2 cent red stamps with the text "United States Postage" and "Washington" on it, and one green 1 cent stamp with the text "U.S. Postage 1 cent 1"correspondence, handwriting, postage stamps, julius kokx, lillie duncan, lhlg, uss medusa, san francisco, california -
 Mission to Seafarers Victoria
Letter - Correspondence, Letter to Lillie from Alex, July 1926
Lillie Duncan was a member of the Ladies' Harbour Lights Guild, the women's auxiliary group of the Mission to Seafarers organisation. The LHLG was formed in 1902 and organised social events for visiting seafarers and were directly responsible for much of the fundraising for the construction of the facility at 717 Flinders Street. As a member of the Guild, Lillie was expected to entertain and support visiting seafarers, although within a strict set of rules. This letter, along with a number of others, was sent to Lillie from abroad.This letter, along with a number of others sent to Lillie Duncan by visiting seafarers, underscore the social conventions of the time and the work of the Mission to Seafarers in provide comfort and support to visiting seafarers. The letters speak of the many events and activities undertaken at the Mission and provide a snapshot of the era.Letter addressed to Miss L. Duncan, 11 Paxton St, East Malvern, Melbourne, Australia from Alex (no return address on the back or in the letter). It is in two parts. Part 0099.1 Envelope Part 0099.2 Letter Both the envelope and the letter are creamy yellow in colour with black curly writing on one side of the envelope and both sides of the letter. The letter begins with "Dearest Lily,I know you will forgive..." and concludes with "ever yours, Alex".There is a round ink stamp on the top middle of the envelope with the text "Cristobal, Jul 28 1130 AM 1926 Canal Zone". There is also an ink stamp in seven wavy lines covering the small blue 5 cents stamp. This stamp has the text "United States Postage, Roosevelt" on it.lhlg, alex, lillie duncan, panama, canal -
 Melbourne Tram Museum
Photograph - Black and White - St Kilda Junction c1900 looking along Wellington Street
The photograph shows St Kilda Junction c1900, looking towards Wellington Street from the centre of the junction. A Windsor (Chapel Street to Ackland Street) cable tram is turning the corner while another is approaching. There is a cable tram uniformed person (with his hands on his hips) watching the tram - possible an Inspector. In the view is: AA Sleight Undertaker, Miss Nichols St Kilda Floral Studio, street lights, and a number of pedestrians standing on the roadways.Yields information about cable trams and St Kilda Junction.Photograph - Black and White - St Kilda Junction c1900 looking along Wellington Streettramways, trams, cable trams, st kilda junction, inspectors -
 Melbourne Tram Museum
Photograph - W2 class 511 with refreshed livery, c1970s
Photograph of W2 class tram 511 in suburban street displaying destination "City route 11". The tram is fitted with side lights installed in the early 1970s and appears to be freshly painted in green and cream livery. A man stands in the driver's cab hands on controls and the off-side weather blinds are down, but no passengers or conductor appear to be in the tram. The incorrect destination and lack of run number and passengers suggest the tram is being moved by workshop staff.Yields information about W2 class tram in 1970s. Black and white photograph with nothing on rearw2 class, tram number 511, city route 11, side lights, livery, workshop staff -
 Shepparton RSL Sub Branch
Case, Vinyl Record, Hits of the War Years, 1985
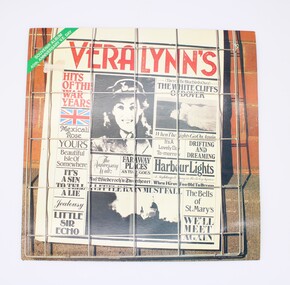
Vera Lynn was a popular artist during the Second World War, known for her wholesome and romantic songs. This record was released on the 40th anniversary of the end of the Second World War and contains twenty songs that were popular during the period, especially with serving troops. Vera Lynn was supposedly fondly referred to as the "Forces' Sweetheart." The record contains the following songs: SIDE ONE 1. (There'll be Bluebirds over) The White Cliffs of Dover 2. Harbour Lights 3. As Time Goes By 4. Beautiful Isle of Somewhere 5. Auf Wiederseh'n Sweetheart 6. Faraway Places 7. Little Sir Echo 8. Mexican Rose 9. A Nightingale Sang In Berkeley Square 10. Jealousy SIDE TWO 1. It's a Lovely Day To-morrow 2. The Bells of St. Mary's 3. A Little Rain Must Fall 4. The Anniversary Waltz 5. Yours 6. When I Grow Too Old To Dream 7. It's A Sin to Tell A Lie 8. When The Lights Go On Again 9. Drifting And Dreaming 10. We'll Meet AgainThough not rare, as a mass produced product, this record is representative of the music that was well-known during the 1940s both on the home front and by serving troops. Its release as an anniversary edition speaks to the enduring memory of the period and for some community members who lived through the Second World War, has strong social significance and ability to recall memories of the wartime period. Glossy square-shaped card sleeve printed in colour with combination of text and black and white photographs arranged as though a newspaper page. From top left corner: green stripe, red album title, union jack, photograph of a young servicewoman, photograph of the Cliffs of Dover, photograph of St Mary's and various song titles in various serif fonts. Newspaper-style page set behind metal square fencing upon brick fence, simulating a newspaper being sold. Reverse features pastel-toned photograph of Vera Lynn, with smaller collage-style image of the newspaper-style text on front, below which are song titles for Side One and Side Two in a numbered list. vera lynn, music, wartime, second world war, world war ii, world war 2, musicians, anniversary -
 Shepparton RSL Sub Branch
Vinyl Record, Hits of the War Years, 1985
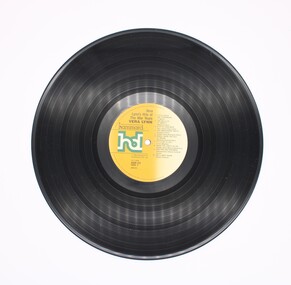
Vera Lynn was a popular artist during the Second World War, known for her wholesome and romantic songs. This record was released on the 40th anniversary of the end of the Second World War and contains twenty songs that were popular during the period, especially with serving troops. Vera Lynn was supposedly fondly referred to as the "Forces' Sweetheart." The record contains the following songs: SIDE ONE 1. (There'll be Bluebirds over) The White Cliffs of Dover 2. Harbour Lights 3. As Time Goes By 4. Beautiful Isle of Somewhere 5. Auf Wiederseh'n Sweetheart 6. Faraway Places 7. Little Sir Echo 8. Mexican Rose 9. A Nightingale Sang In Berkeley Square 10. Jealousy SIDE TWO 1. It's a Lovely Day To-morrow 2. The Bells of St. Mary's 3. A Little Rain Must Fall 4. The Anniversary Waltz 5. Yours 6. When I Grow Too Old To Dream 7. It's A Sin to Tell A Lie 8. When The Lights Go On Again 9. Drifting And Dreaming 10. We'll Meet AgainThough not rare, as a mass produced product, this record is representative of the music that was well-known during the 1940s both on the home front and by serving troops. Its release as an anniversary edition speaks to the enduring memory of the period and for some community members who lived through the Second World War, has strong social significance and ability to recall memories of the wartime period. Flat disc, black in colour, with an inscribed, modulated spiral groove across diameter. Centre has adhesive paper label bearing information about the songs on each side and artist/copyright information. Label is Mustard yellow to white in ombre fade effect. Centre of disk has round hole through which the disk is attached to a machine. Disc contained within plastic sleeve, fused on three sides.vera lynn, music, wartime, second world war, world war ii, world war 2, musicians, anniversary, phonograph, vinyl record, gramophone record -
 Flagstaff Hill Maritime Museum and Village
Tool - Sash Window Template, Late 19th to first quarter of the 20th century
A window sash is a type of moveable window frame that can slide, usually vertically. Unlike a window frame built into the wall, a sash allows glass window panes to slide up and down. The sashes fit inside a track that runs along another window frame attached to the house. Lead weights traditionally counterbalanced sashes, but today they are counterbalanced by springs. The traditional sash window is double-hung; this means it has two sashes that can both slide along a vertical track. However, some sash windows have a single moveable sash, and sashes may slide horizontally. A sash usually contains panels of glass, called lights. The lights are traditionally held together by a grid of bars. The sash window was developed in 17th century England and allowed for greater airflow. The sash window has had a significant impact on western architecture, used in nearly every style of English domestic architecture since the late 17th century. The subject item is a template used by the carpenter to mark or scribe the vertical track in which to window will slide up and down.An item used when sash windows were made by hand from the 17th to the early 20th century. The template allowed the carpenter to mark accurately a channel that was then planed and the Mitre to join the bars.Wooden Ovalo sash template with two screws each side. It has slot along length and has 45 degree bevelled edge each end.Noneflagstaff hill, warrnambool, shipwrecked-coast, flagstaff-hill, flagstaff-hill-maritime-museum, maritime-museum, shipwreck-coast, flagstaff-hill-maritime-village, wooden ovalo sash template, ovalo sash template, template, sash template, sash templet, window sash, tool -
 Ballarat Heritage Services
Photograph - Digital photograph, Brenda & Jack Ford, Eureka Diorama entrance, 14/12/1993
The signage that detailed the events surrounding the Eureka Stockade diaroma was affixed to the hut wall beside the entrance to the interior diorama. In the first photograph, you can see the dark, bare timber colour of the slab wood that held the signage plus (on the left side) one of the numerous holes in the slab walls. This made the display very cold and draughty in its interior. Once inside, you were confronted with an earthen, gravel and leafy floor, which became muddy, after rain, as it was on the day this photograph was taken. The diorama was held in a glass and cement display case. with no lights on. It was dark inside the hut so the diorama was not easy to see unless you inserted a coin into a metal pay-box. Then lights would turn on and a recording of shouting and gunfire (representing the battle noise) would play. The Photographer remembers the whole experience to be short and underwhelming. Once outside the diorama’s slab hut, you could walk across to a partial representation of the stockade’s fortifications, complete with two wagon wheels. This space was also graveled to distinguish it from the rest of the green-lawn park. digital photographeureka stockade, diorama, jack ford, brenda ford, eureka stockade memorial -
 Ballarat Heritage Services
Photograph - Digital photograph, Brenda & Jack Ford, Eureka Diorama exit, 14/12/1993
The signage that detailed the events surrounding the Eureka Stockade diaroma was affixed to the hut wall beside the entrance to the interior diorama. In the first photograph, you can see the dark, bare timber colour of the slab wood that held the signage plus (on the left side) one of the numerous holes in the slab walls. This made the display very cold and draughty in its interior. Once inside, you were confronted with an earthen, gravel and leafy floor, which became muddy, after rain, as it was on the day this photograph was taken. The diorama was held in a glass and cement display case. with no lights on. It was dark inside the hut so the diorama was not easy to see unless you inserted a coin into a metal pay-box. Then lights would turn on and a recording of shouting and gunfire (representing the battle noise) would play. The Photographer remembers the whole experience to be short and underwhelming. Once outside the diorama’s slab hut, you could walk across to a partial representation of the stockade’s fortifications, complete with two wagon wheels. This space was also graveled to distinguish it from the rest of the green-lawn park.digital photographeureka, diorama, 1993, jack ford, brenda ford, eureka monument, memorial -
 Mission to Seafarers Victoria
Booklet - Booklet, Recipes, The Rogue Academy, Food for Conversation-The Rogue Academy, 2017
From the Rogue Academy website: Over the last 100 years, volunteering has been the mainstay of the Mission To Seafarers. We were invited to create an artwork for the MTS centennial celebration, which was held in September 2107 In highlighting the essential nature of volunteering to the organisation, we further explored the richness and vitality of the MTS volunteer community by gathering information about the volunteer. We initiated conversations that sought individual stories, their role within the organisation and heir feelings, opinions and ideas about the generous act of giving time. This information was being used to create further artworks in the leadup to the September that highlight the impact and importance of your role at the Mission and the changes in these roles after the introduction of shipping containers. Food for Conversation recipe booklets which show old recipes that may have been served by the famous Ladies Harbour Lights Guild at their many functions, sea shanty evenings and volunteer BBQs accompanied the main even – a diiner at the exhibiion.The Rogue Academy is a social and participatory agency run by artists Amanda Shone and Fiona Lee that is working with the Mission’s volunteers to rethink the capacity of volunteering as a form of social engagement and unpaid labour in the 21st century. For Opening Night, they will host a casual dinner for Mission volunteers and their families, offering a hearty meal that would be the envy of the Ladies of the Harbour Lights Guild. As seats become available seafarers and members of the public will be invited to join in the conversation, and adding to the atmosphere will be three seafaring knotters.PerformanceSmall blue booklet with the Flying Angel logo in cover.mission to seafarers, 2017, 100th anniversary, sounding histories, the rogue academy, food for conversation, lhlg, ladies harbour lights guild, recipes, centenary, flinders street, cameron bishop, anne wilson, maree clarke, artworks, deakin university, fiona lee, amanda shone, dinner, volunteers, michael needham, catherine bell, bishop and reis, michael graeve, anne scott wilson, performance, installation, community, cultural events -
 Orbost & District Historical Society
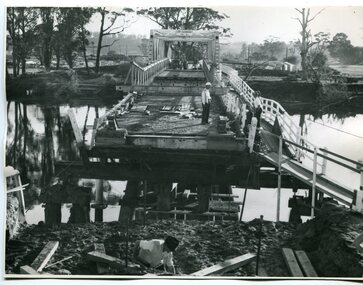
black and white photographs, February 17 1971
After the damage from the February 1971 floods at Orbost when the abutment to the Snowy River road bridge was washed away a Bailey bridge, portable, pre-fabricated, truss bridge, was put into place to ensure town access, the C.R.B. rebuilt the approach to the bridge driving new piles and constructing the Bailey bridge. They worked late into the night under flood lights to ensure the link from the Orbost township to the Princes Freeway would be open to traffic as soon as possible.These photographs are pictorial records of a significant event in the history of Orbost.Three black / white photographs of a Bailey bridge being erected across a river. 3245.1 and 3245.2 are the same. bailey-bridge orbost-snowy-river-bridge bridge-orbost -
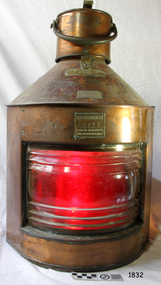 Flagstaff Hill Maritime Museum and Village
Functional object - Navigation Lamp, W. T George and Co. Ltd, ca 1941
William Thomas George was born in Birmingham in 1884 and was a tin plate worker. He and his wife Ellene had a son Leslie Thomas George. The firm W T George & Co was formed sometime later. In 1939 his firm produced ship lamps. The Patent Number GB546575 on the lamp's plate was assigned to Leslie Thomas George in 1941 for improvements in, or relating to, ships' lanterns. From that time the patent number was affixed to their namufactured Meteorite lights. The ship navigation lamp is important as an example of the evolution of marine safety technology. Countries began passing laws and regulations in the 1830s that required ships to show navigation lights at night or in poor weather. From the late 1840s colours were standardised; red for portside of the vessel and green for starboard, a white masthead light, and a white light at anchor. By 1914 the International Convention for the Safety of Life at Sea was formed and continues, with decisions and notifications on improvements and changes.. Lamp; Portside ship's lamp is rounded in the front with two flat sides coming to a point at the rear. Glass has circular ridging. Metal handle with lid and clasp. The reflector has red colouring. Inscribed on fixed plates on the front, with maker's details and Patent number. This Meteorite lantern was made by W T George and Co Ltd, of Birmingham. "Port" "W T George and Co Ltd" "Sherlock Street Birmingham" "Meteorite 68990 Patented No 546575 and others pending"warrnambool, shipwreck coast, flagstaff hill, flagstaff hill maritime museum, flagstaff hill maritime village, portside ships lamp, portside, port lamp, ship's lamp, marine lamp, navigation lamp, w t george & co, coloured lens, red lens, ship fitting, marine technology, navigation light, signal lamp, leslie thomas george, gb546575, patent gb546575, meteorite, lantern, lamp, light -
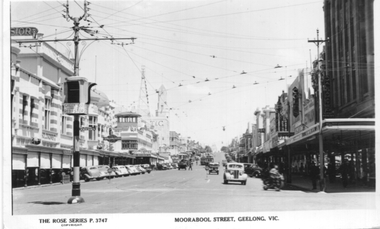 Ballarat Tramway Museum
Postcard, Rose Stereograph Co, "Moorabool Street Geelong Vic", 1949
Postcard produced by the Rose Stereograph Co. No P 3747, showing the scene at the corner of Moorabool and Ryrie Sts Geelong. Has a tram in the far distance turning out of Malop Street along with many motor cars of the late 1940s. In the view are Bright and Hitchcocks, the T&G building, Bank of NSW, Coles, and the Amalgamated store. Also in the view is one of the Bar neon-type traffic lights that Geelong installed. The rear of the postcard notes that it is a real photograph. Yields information about the view of Moorabool St at Ryrie St.Black and white Postcard divided back, unused. On top right hand rear is "1949"tramways, trams, geelong, moorabool st, ryrie st -
 Ballarat Tramway Museum
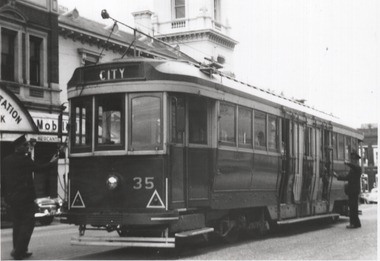
Photograph - Tram 35 Lydiard St Nth reversing, late 1950s
The photograph shows SEC Ballarat tram No. 35 reversing at the Lydiard St North x-over opposite the Post Office. The driver is preparing to lift the trolley pole, while the conductor is standing alongside the tram. The tram has the destination of City and has been fitted with tail lights and large reflective triangles - from 1956 to 1960. In the background are the Post Office and the Ballarat Mining Exchange building fitted with Mobil gas petrol bowsers. Photographer and date unknown.Yields information about tram 35 reversing at the Lydiard St Nth crossover opposite the Post Office - late 1950s.Black and white print on plain papertramcars, tram 35, lydiard st nth, city, mining exchange, post office -
 Ballarat Tramway Museum
Administrative record, State Electricity Commission of Victoria (SECV), "Some notes pertaining to tramway conference, Ballarat", 4/1954
Set of notes prepared before the 1954 conference by the Ballarat office. Notes actions on the 1952 and 1953 conferences, rail profile survey, bitumen paving, painting of tram, blinds, removal of sun blinds, lights fitted to trams, brake blocks - hardness and allowable wear, side bearing clearances, castings, track and depot workshop hours, costs, trolley wheels, lubrication products used, alterations to Maximum traction tramcars, and failure of pony wheel axles.Yields information and demonstrates SECV meeting notes prepared prior to a joint meeting.Four foolscap sheets - carbon copy.secv, ballarat, trams, tramways, minutes, sec, tramcar equipment, maintenance, trackwork, trolley wheels, motors, maximum traction, employees -
 Melbourne Tram Museum
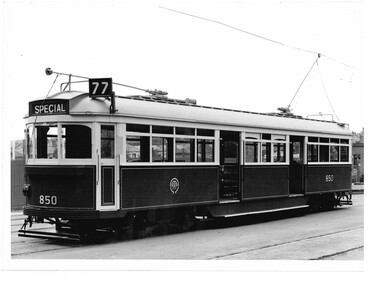
Photograph - Set of 3 Black & White Photograph/s, Sutcliffe Pty Ltd, 1939
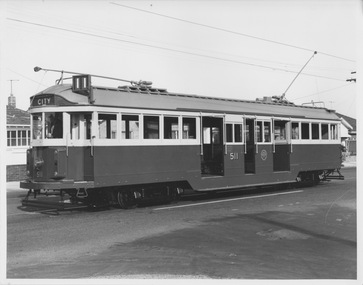
Black and white photograph of the first of SW6 class tramcars, No. 850 at South Melbourne Depot following its construction showing the tail light and the dash canopy lighting. The photograph does not have the sign "This is your car use it" as shown on the other official photograph of this tram - see page 41 of the 5th Edition of Destination City. Tram shows route 77 with the destination of Special. Photograph by Sutcliffe Pty Ltd, Illustrative Photographers of 94 Elizabeth St Melbourne. .1 - as above - from the Keith Kings collection - added 4/4/2019. .2 - as above but with the sign "This is your car use it" - added 4/4/2019. See Reg Item 3558 for another print within an album.Stamped on rear in red, with the photo number in black "Sutcliffe Pty Ltd, / Illustrative Photographers / No. 3 / 94 Elizabeth St Melbourne / CENT 1500 - 2601" (Their Melbourne central exchange phone number) .1 - Has the photographers stamp, along with Keith's details in ink on the rear "M&MTB S-A947 / SW6 - 850 / South Melbourne Depot 1939 / Note: Tail-lights & Dash Canopy Lighting, Roller Bearing Axle Boxes". Date stamp 12 Jan. 1948. .2 - Has the photographers stamp, along with Keith's details in ink on the rear "M&MTB S-A946 / SW6 - 850 / South Melbourne Depot 1939 / Note: Tail-lights & Dash Canopy Lighting, Dash Advert, Roller Bearing Axle Boxes". Date stamp 12 Jan. 1948.trams, tramways, mmtb, sw6 class, new trams, south melbourne depot, route 77, tram 850 -
Tatura Irrigation & Wartime Camps Museum
Model - hut, ablution block, 1940
Made by Internee at Camp 3a. Lother Streker.Wood & Cardboard Model of a shed from Camp 3 painted silver. A wood, matchstick, paper ablution block model from Camp 3. The frame is wood, the covering is made from matchsticks laid on paper and covered with paper and painted silver. The roof is done the same. The shed is divided into a hand wash room, 2 bathrooms, mixed shower rooms, wood heater room, another hand wash room and a laundry. There are lights, baths, showers, etc.tatura, handcrafts, model -
 Ballarat Tramway Museum
Photograph - Colour Photograph/s, B. Groves?, 7/12/1962 12:00:00 AM
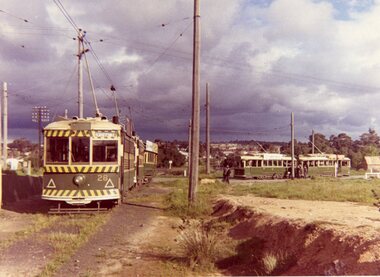
Colour print of five SECV Bendigo trams at the North Bendigo tram terminus during a 1962 tour. Tram 28 (Birney), another Birney and then three single truckers at the terminus. All have their poles turned to return to the City. Photo shows the nature of the location of the terminus; open paddocks. All trams have been fitted with dash canopy lights. Taken on AGFA paper. On rear is a stamped date "- 7.12.62", looks like a machine imprint.On rear "Tram Tour Bendigo / Mr. B. Groves / 333 Pascoe Vale Road / Essendon W5 / Vict." In top right hand corner is the number "1175" In the stamp appears " 110B / Photo / The? / -7.12.62"birney, bendigo, north bendigo, tram 28 -
 Ballarat Tramway Museum
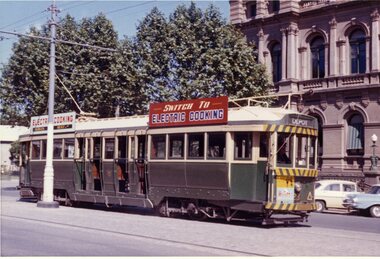
Photograph - Colour Photograph/s, 23/11/1962 12:00:00 AM
Colour print of Bendigo SECV Bendigo tram 23 outside the Bendigo Post Office in Pall Mall. On Kodacolor paper with a Kodak red ink stamp on rear. Tram has dash canopy lights, but no large white strip under the drivers windows. Photo dated 23.11.62. Tram showing destination of "Depot". Tram has "Hutton's" ham or bacon ad on front dash panel, with to SEC roof ads "Electric Cooking" and "Switch to Electric Cooking".On rear top left hand corner "17 / 22.11.62" in very wavy handwriting, typical of an aged person.bendigo post office, bendigo, pall mall., tram 26