Showing 856 items
matching hawthorn bridge
-
 Kew Historical Society Inc
Photograph - Farewell to 'Our Lady of Fatima'. Xavier College 22/4/51
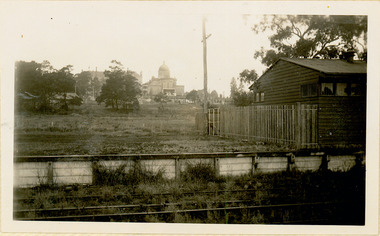
The Kew railway was opened in 1887, and diverged from the main (Box Hill–Lilydale) line about half-way between Hawthorn and Glenferrie. From the point of divergence the line was slightly less than one mile long, and it had only one intermediate station — Barker. There were four road over-bridges and two level crossings, including one over the busy Barkers Road. The line supported a passenger and goods service, and was electrified in December 1922, at the same time as the main line to Box Hill. There were a number of peak hour services which ran from Flinders Street station (Melbourne) to Kew, but in 1938 all but one of these were diverted to the Ashburton line, where traffic was growing. This had an adverse effect on Kew traffic, as passengers from Kew needed to cross over a footbridge at Hawthorn to change trains, and the main line trains were usually already crowded by the time they reached Hawthorn. At about the same time the off-peak trains were replaced by road buses. In 1952 all passenger trains were withdrawn, but the road bus service continued for many years. Goods trains were finally withdrawn in 1957, and the railway was dismantled in 1958-59. (Source: Frank Stamford, 'The Hawthorn - Kew Railway')Small black and white snapshot of a train leaving Kew Station with the Xavier Chapel on the hill in the background, hence the ironic title provided by the photographer. The photograph, one of 12, is part of a larger album of newspaper clippings, timetables, tickets and photos relating to the Kew Railway Line, taken and compiled by Lachlan Richardson, while a resident of Kew. The album dates from the 1950s. The album is part of a larger subject file on the Kew Line, compiled over time by members of the Kew Historical Society."Farewell to 'Our Lady of Fatima'. Xavier College 22/4/51"kew railway line, transport -- railways -- kew (vic.), kew branch line, xavier college, kew railway station -
 Kew Historical Society Inc
Photograph - Kew Branch Line: Looking along cutting towards Barker Station 22/4/51
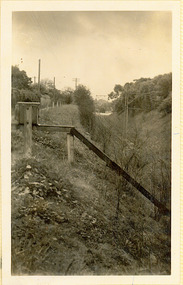
The Kew railway was opened in 1887, and diverged from the main (Box Hill–Lilydale) line about half-way between Hawthorn and Glenferrie. From the point of divergence the line was slightly less than one mile long, and it had only one intermediate station — Barker. There were four road over-bridges and two level crossings, including one over the busy Barkers Road. The line supported a passenger and goods service, and was electrified in December 1922, at the same time as the main line to Box Hill. There were a number of peak hour services which ran from Flinders Street station (Melbourne) to Kew, but in 1938 all but one of these were diverted to the Ashburton line, where traffic was growing. This had an adverse effect on Kew traffic, as passengers from Kew needed to cross over a footbridge at Hawthorn to change trains, and the main line trains were usually already crowded by the time they reached Hawthorn. At about the same time the off-peak trains were replaced by road buses. In 1952 all passenger trains were withdrawn, but the road bus service continued for many years. Goods trains were finally withdrawn in 1957, and the railway was dismantled in 1958-59. (Source: Frank Stamford, 'The Hawthorn - Kew Railway')Small black and white snapshot looking along cutting towards Barker Station 22/4/51. The photograph, one of 12, is part of a larger album of newspaper clippings, timetables, tickets and photos relating to the Kew Railway Line, taken and compiled by Lachlan Richardson, while a resident of Kew. The album dates from the 1950s. The album is part of a larger subject file on the Kew Line, compiled over time by members of the Kew Historical Society."Looking along cutting towards Barker Station 22/4/51"kew railway line, transport -- railways -- kew (vic.), barker railway station, kew branch line -
 Kew Historical Society Inc
Photograph - The last train at Kew Station, August 1952
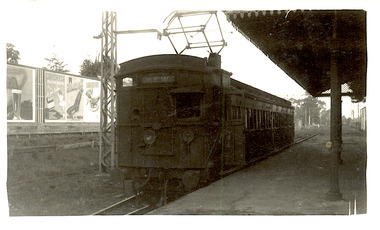
The Kew railway was opened in 1887, and diverged from the main (Box Hill–Lilydale) line about half-way between Hawthorn and Glenferrie. From the point of divergence the line was slightly less than one mile long, and it had only one intermediate station — Barker. There were four road over-bridges and two level crossings, including one over the busy Barkers Road. The line supported a passenger and goods service, and was electrified in December 1922, at the same time as the main line to Box Hill. There were a number of peak hour services which ran from Flinders Street station (Melbourne) to Kew, but in 1938 all but one of these were diverted to the Ashburton line, where traffic was growing. This had an adverse effect on Kew traffic, as passengers from Kew needed to cross over a footbridge at Hawthorn to change trains, and the main line trains were usually already crowded by the time they reached Hawthorn. At about the same time the off-peak trains were replaced by road buses. In 1952 all passenger trains were withdrawn, but the road bus service continued for many years. Goods trains were finally withdrawn in 1957, and the railway was dismantled in 1958-59. (Source: Frank Stamford, 'The Hawthorn - Kew Railway')Small black and white snapshot of the last passenger train at Kew Railway Station in 1952. The photograph, one of 12, is part of a larger album of newspaper clippings, timetables, tickets and photos relating to the Kew Railway Line, taken and compiled by Lachlan Richardson, while a resident of Kew. The album dates from the 1950s. The album is part of a larger subject file on the Kew Line, compiled over time by members of the Kew Historical Society."The last train at Kew Station, August 1952"kew railway line, transport -- railways -- kew (vic.), kew branch line, kew railway station -
 Kew Historical Society Inc
Photograph - Kew Branch Line: Weeds at Kew Station 14/51
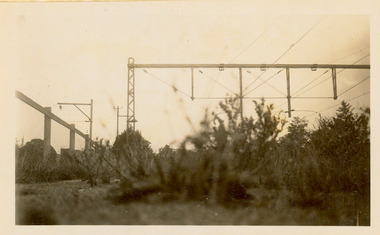
The Kew railway was opened in 1887, and diverged from the main (Box Hill–Lilydale) line about half-way between Hawthorn and Glenferrie. From the point of divergence the line was slightly less than one mile long, and it had only one intermediate station — Barker. There were four road over-bridges and two level crossings, including one over the busy Barkers Road. The line supported a passenger and goods service, and was electrified in December 1922, at the same time as the main line to Box Hill. There were a number of peak hour services which ran from Flinders Street station (Melbourne) to Kew, but in 1938 all but one of these were diverted to the Ashburton line, where traffic was growing. This had an adverse effect on Kew traffic, as passengers from Kew needed to cross over a footbridge at Hawthorn to change trains, and the main line trains were usually already crowded by the time they reached Hawthorn. At about the same time the off-peak trains were replaced by road buses. In 1952 all passenger trains were withdrawn, but the road bus service continued for many years. Goods trains were finally withdrawn in 1957, and the railway was dismantled in 1958-59. (Source: Frank Stamford, 'The Hawthorn - Kew Railway')Small black and white snapshot of how the Kew Branch Line was allowed to run down. The photograph, one of 12, is part of a larger album of newspaper clippings, timetables, tickets and photos relating to the Kew Railway Line, taken and compiled by Lachlan Richardson, while a resident of Kew. The album dates from the 1950s. The album is part of a larger subject file on the Kew Line, compiled over time by members of the Kew Historical Society.kew railway line, transport -- railways -- kew (vic.), barker railway station, kew branch line -
 Kew Historical Society Inc
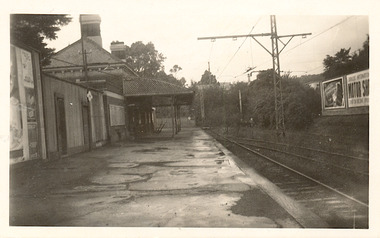
Photograph - Kew Railway Station, May 1950
The Kew railway was opened in 1887, and diverged from the main (Box Hill–Lilydale) line about half-way between Hawthorn and Glenferrie. From the point of divergence the line was slightly less than one mile long, and it had only one intermediate station — Barker. There were four road over-bridges and two level crossings, including one over the busy Barkers Road. The line supported a passenger and goods service, and was electrified in December 1922, at the same time as the main line to Box Hill. There were a number of peak hour services which ran from Flinders Street station (Melbourne) to Kew, but in 1938 all but one of these were diverted to the Ashburton line, where traffic was growing. This had an adverse effect on Kew traffic, as passengers from Kew needed to cross over a footbridge at Hawthorn to change trains, and the main line trains were usually already crowded by the time they reached Hawthorn. At about the same time the off-peak trains were replaced by road buses. In 1952 all passenger trains were withdrawn, but the road bus service continued for many years. Goods trains were finally withdrawn in 1957, and the railway was dismantled in 1958-59. (Source: Frank Stamford, 'The Hawthorn - Kew Railway')Small black and white snapshot of Kew Railway Station inMay 1950. The photograph, one of 12, is part of a larger album of newspaper clippings, timetables, tickets and photos relating to the Kew Railway Line, taken and compiled by Lachlan Richardson, while a resident of Kew. The album dates from the 1950s. The album is part of a larger subject file on the Kew Line, compiled over time by members of the Kew Historical Society."Kew Railway Station, May 1950"kew railway line, transport -- railways -- kew (vic.), kew branch line, kew railway station -
 Kew Historical Society Inc
Photograph - Kew Railway Station, 1951
The Kew railway was opened in 1887, and diverged from the main (Box Hill–Lilydale) line about half-way between Hawthorn and Glenferrie. From the point of divergence the line was slightly less than one mile long, and it had only one intermediate station — Barker. There were four road over-bridges and two level crossings, including one over the busy Barkers Road. The line supported a passenger and goods service, and was electrified in December 1922, at the same time as the main line to Box Hill. There were a number of peak hour services which ran from Flinders Street station (Melbourne) to Kew, but in 1938 all but one of these were diverted to the Ashburton line, where traffic was growing. This had an adverse effect on Kew traffic, as passengers from Kew needed to cross over a footbridge at Hawthorn to change trains, and the main line trains were usually already crowded by the time they reached Hawthorn. At about the same time the off-peak trains were replaced by road buses. In 1952 all passenger trains were withdrawn, but the road bus service continued for many years. Goods trains were finally withdrawn in 1957, and the railway was dismantled in 1958-59. (Source: Frank Stamford, 'The Hawthorn - Kew Railway')Small black and white snapshot of Kew Railway Station in 1950. The photograph, one of 12, is part of a larger album of newspaper clippings, timetables, tickets and photos relating to the Kew Railway Line, taken and compiled by Lachlan Richardson, while a resident of Kew. The album dates from the 1950s. The album is part of a larger subject file on the Kew Line, compiled over time by members of the Kew Historical Society."Kew Station / 14/51 / 22/4/51 F5"kew railway line, transport -- railways -- kew (vic.), kew branch line, kew railway station -
 Kew Historical Society Inc
Photograph - Railway level crossing in Glenferrie Road, Glenferrie, E.J. Dower, c.1912
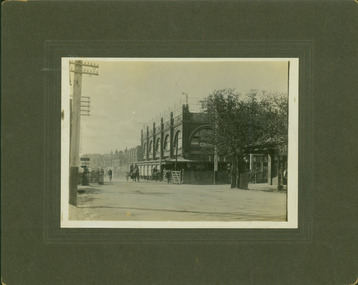
One of a series of photographs, taken by Edgar James Dower in the second decade of the twentieth century. Born and raised in Olinda, his family later moved to Surrey Hills. He worked as an adult as a clerk in the city office of the Metropolitan Gas Company, and in his role as a 'collector', he was able to photograph scenes including the construction of tramlines and associated buildings in Kew, Hawthorn, Camberwell and Surrey Hills. Later he established a real estate agency with his brother - the E.J. Dower Real Estate Agency, Dandenong Office.The image is an historically significant record of the development of transport infrastructure which was used to connect Victorians in the first two decades of the twentieth century. This development resulted from increases in population and the consequent extension of Melbourne's suburbs. The photographs, both individually and collectively, richly detail the labour of workers and the tools and machinery used to create and extend Melbourne's public transport network in the years preceding and during World War 1.Digital copy of an original mounted photograph showing Glenferrie Road Hawthorn, looking north towards the old railway level crossing that existed before the line was elevated on a bridge over Glenferrie Road. "The Don Store" at right is immediately behind the old railway level crossing. The tree and shops at left before the crossing were to be removed / demolished as part of the realignment of the train tracks.Annotated verso: "1914 [deleted]/1913 / Glenferrie Road showing railway gates / Taken just before the commencement of the regrading of railway line to Camberwell".theme --- travelling by tram, theme -- connecting victorians by transport and communications, glenferrie road -- hawthorn (vic.), railways -- hawthorn, the don store -- hawthorn (vic.) -
 Kew Historical Society Inc
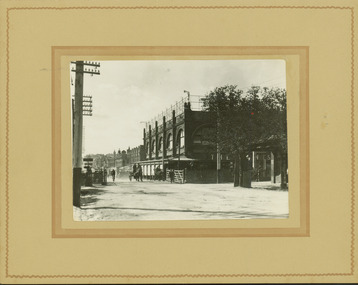
Photograph - Railway level crossing in Glenferrie Road, Glenferrie, E.J. Dower, 1912
One of a series of photographs, taken by Edgar James Dower in the second decade of the twentieth century. Born and raised in Olinda, his family later moved to Surrey Hills. He worked as an adult as a clerk in the city office of the Metropolitan Gas Company, and in his role as a 'collector', he was able to photograph scenes including the construction of tramlines and associated buildings in Kew, Hawthorn, Camberwell and Surrey Hills. Later he established a real estate agency with his brother - the E.J. Dower Real Estate Agency, Dandenong Office.The image is an historically significant record of the development of transport infrastructure which was used to connect Victorians in the first two decades of the twentieth century. This development resulted from increases in population and the consequent extension of Melbourne's suburbs. The photographs, both individually and collectively, richly detail the labour of workers and the tools and machinery used to create and extend Melbourne's public transport network in the years preceding and during World War 1.Digital copy of an original mounted photograph showing Glenferrie Road Hawthorn, looking north towards the old railway level crossing that existed before the line was elevated on a bridge over Glenferrie Road. "The Don Store" at right is immediately behind the old railway level crossing. The tree and shops at left before the crossing were to be removed / demolished as part of the realignment of the train tracks.Annotated verso: "Glenferrie Road, Glenferrie, showing railway gates and Walker's Store / Taken prior to the construction of electric tramline and the regrading of Camberwell Railway Line / Taken by E.J. Dower about 1912".theme --- travelling by tram, theme -- connecting victorians by transport and communications, glenferrie road -- hawthorn (vic.), railways -- hawthorn, the don store -- hawthorn (vic.) -
 Kew Historical Society Inc
Photograph, Opening Ceremony Victoria Street Bridge: Laying of memorial stone by John Adam Esq. Mayor of Richmond, 1884
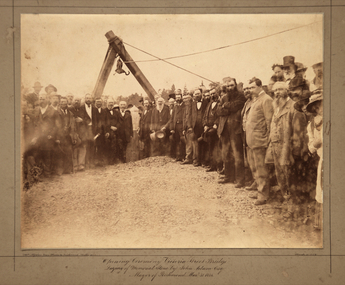
A formal group photograph of the grand opening of the Victoria Street Bridge on March 31 1884. The Argus was to report that: ‘The ceremony of laying the memorial stone of the Victoria-bridge, which connects Kew and Hawthorn with Richmond and Collingwood, was performed yesterday afternoon by the mayor of Richmond (Mr John Adam) in the presence of a large assemblage. Among the gentlemen present at yesterday’s proceedings were the mayor of Collingwood (Mr. M. Dwyer), the Mayor of Melbourne (Councillor C. Smith, M.L. A.) the mayor of Kew (Mr. Barnard), Mr. J. A. B. Koch and Mr. W. W. Shelley (ex mayors of Richmond), Mr. Joseph Bosisto, M.L.A., the Hon. L. L. Smith, Councillor De Mole (ex mayor of Kew), Mr. Jas. Lancashire and Mr. Winter (ex mayors of Ricmond), Mr. Walker (ex mayors of Collingwood), Mr. Johnson (engineer), Mr. C. Rowan, C.E. (engineer of the bridge alterations) and the town clerks of Richmond, Collingwood and Kew.’ Following the opening ceremony ‘… a ponderous steam roller was driven over the structure, with a view to test, or rather to demonstrate its stability … Most of the gentlemen present walked over the bridge, after which they were grouped by a photographer, with the memorial stone as a central feature, and several views of the scene were taken’.An original, rare silver albumen mounted and titled photograph of an important event in 19th century Melbourne.Original photograph mounted on display card of the opening of the Victoria Street Bridge. The original photograph is very faded and has been enhanced to improve the image's viewability.On the reverse of the card is an indecipherable stamp and an inscription identifying the photographers. "T. W. & C. A. McAlpine Bros, Photographers &., Campbell Parade East Richmond Melbourne March 31.1884victoria street bridge, john adam, m. dwyer, c. smith, barnard, j.a.b. koch, w.w. shelley, bridge, kew, collingwood, l.l. smith, joseph bosisto -
 Kew Historical Society Inc
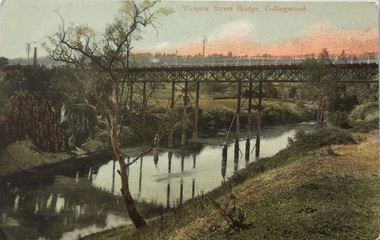
Postcard, Victoria Street Bridge, Collingwood, 1905-1913
... and Abbotsford with Kew and Hawthorn. Victoria Street Bridge, Collingwood ...Victoria Bridge is a riveted and welded steel Warren truss bridge over the Yarra River completed in 1884 to a design by Fraser & Chase following a controversial design competition held in 1880. Funds for the bridge's construction were provided by the councils of Collingwood, Hawthorn, Kew and Richmond. The contract was awarded to Mr P. Platt. Charles Rowand was officially appointed Supervising Engineer in 1883. The winning design was based on the theoretical work of William Charles Kernot (1845-1909) who campaigned for economy in public works design and the application of scientific principles in engineering. ... The bridge was widened in 1890 by the addition of a third line of truss on new piers on the up stream side to carry horse trams. Work commenced in 1914 to convert the horse tramway to an electric tramway by the Prahran & Malvern Tramways Trust, part of the Trust's extension of its tramway into the eastern suburbs between 1913-18. In 1915 the bridge was further strengthened to accommodate the extra weight of electric trams and widened by the addition of two six feet cantilever footpaths. During this period the Prahran & Malvern Tramways Trust erected two ornamental gantries over the roadway to support overhead wires for the electric tramway. Further widening and reconditioning of the bridge took place in 1933, including the addition of four new welded trusses, two intermediate and two on the outside. The latter were supported on new cantilevered truss cross beams attached to the top of the piers. (Source: Heritage Victoria)Early and rare postcard of the Victoria Street Bridge linking Victoria Street and Barkers Road.Polychrome postcard of the Victoria Street Bridge which links Richmond and Abbotsford with Kew and Hawthorn.View from Harrison Cres embankment / former Xavier College boatshed on site of tree in foreground. / Chimney left corner - Wool Scoring Mils in Victoria St. / On horizon - Studley Villa, Studley House circa 1880s, Studley Hall / Chinese gardens to be seen behind three set of columns / M.J. Slatterypostcards -- yarra river, postcards -- bridges. -- greater melbourne (vic.), victoria street bridge -
 Kew Historical Society Inc
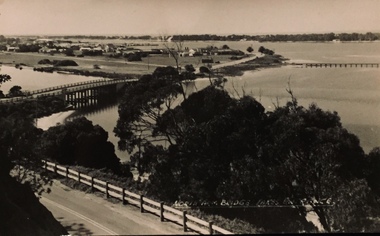
Photograph - North Arm Bridge, Lakes Entrance, Henry Beater Christian, 1920s
Henry Christian (c.1809-91) was one of the first settlers in Kew. He arrived in Victoria with his wife Agnes and son Orlando in 1855 on the Gypsy Queen. He established a rope-making business in Bulleen Road by 1858 but was declared insolvent two years later. In his final years, he was celebrated as one of the oldest living settlers of the district. His son, Orlando Henry Beater Christian (c.1853-1930) became a member of the Hawthorn Band and a foundation member of the Willsmere Swimming Club. Orlando and his wife Elizabeth had four children: Henry Beater (1886-1962), Ada Susannah May (1888-1962), Orlando Julius (1891-1917) and Lilian Adelaide ( -1956). Ada was to marry into the Washfold family. An item from an outstanding and diverse photographic collection, assembled by members of the Christian and Washfold families of Kew, comprising professional and amateur photography, depicting individuals, natural and settled environments and the interactions between these worlds. Photograph of Lake Arm Bridge at Lakes Entrance.Sent to Mavis and the boys [detailed text]landscape photography, lakes entrance (vic.), christian-washfold collection -
 Kew Historical Society Inc
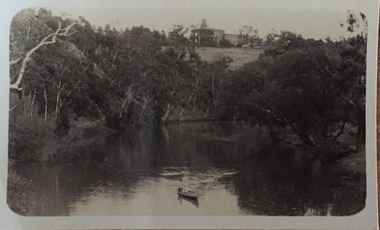
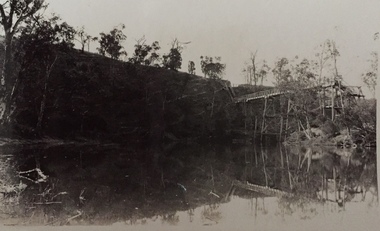
Photograph - Zig-zag Bridge on the Yarra River at Kew, Henry Beater Christian, 1920-28
Henry Christian (c.1809-91), the grandfather of the photographer, was one of the first settlers in Kew. He arrived in Victoria with his wife Agnes and son Orlando in 1855 on the Gypsy Queen. He established a rope-making business in Bulleen Road by 1858 but was declared insolvent two years later. In his final years, he was celebrated as one of the oldest living settlers of the district. His son, Orlando Henry Beater Christian (c.1853-1930) became a member of the Hawthorn Band and a foundation member of the Willsmere Swimming Club. Orlando and his wife Elizabeth had four children of which Henry Beater Christian (1886-1962) was the eldest.Small black and white photograph of the Yarra River at Studley Park. In the middle ground, a man is paddling a canoe upstream. On the horizon, the tower and buildings of Raheen in Studley Park Road can be seen.henry christian (1886-1962), landscape photography, kew canoe club history — — photographs, yarra river -- studley park -- kew (vic.), christian-washfold collection -
 Kew Historical Society Inc
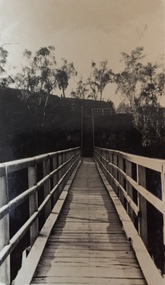
Photograph - Walkway, Zig-zag Bridge on the Yarra River at Kew, Henry Beater Christian, 1920-28
Henry Christian (c.1809-91), the grandfather of the photographer, was one of the first settlers in Kew. He arrived in Victoria with his wife Agnes and son Orlando in 1855 on the Gypsy Queen. He established a rope-making business in Bulleen Road by 1858 but was declared insolvent two years later. In his final years, he was celebrated as one of the oldest living settlers of the district. His son, Orlando Henry Beater Christian (c.1853-1930) became a member of the Hawthorn Band and a foundation member of the Willsmere Swimming Club. Orlando and his wife Elizabeth had four children of which Henry Beater Christian (1886-1962) was the eldest.Small black and white photograph of the walkway of the Zig-zag Bridge over the Yarra River at Studley Park.henry christian (1886-1962), landscape photography, yarra river -- studley park -- kew (vic.), zig-zag bridge -- yarra river -- kew (vic.), christian-washfold collection -
 Kew Historical Society Inc
Photograph - Zig-zag Bridge on the Yarra River at Kew, Henry Beater Christian, 1920-28
Henry Christian (c.1809-91), the grandfather of the photographer, was one of the first settlers in Kew. He arrived in Victoria with his wife Agnes and son Orlando in 1855 on the Gypsy Queen. He established a rope-making business in Bulleen Road by 1858 but was declared insolvent two years later. In his final years, he was celebrated as one of the oldest living settlers of the district. His son, Orlando Henry Beater Christian (c.1853-1930) became a member of the Hawthorn Band and a foundation member of the Willsmere Swimming Club. Orlando and his wife Elizabeth had four children of which Henry Beater Christian (1886-1962) was the eldest.Small black and white photograph of the Zig-zag Bridge over the Yarra River at Studley Park.henry christian (1886-1962), landscape photography, yarra river -- studley park -- kew (vic.), zig-zag bridge -- yarra river -- kew (vic.), christian-washfold collection -
 Kew Historical Society Inc
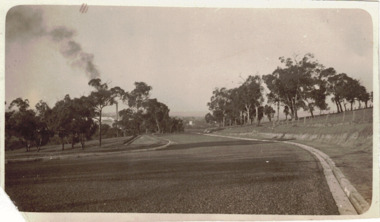
Photograph - The Boulevard at Kew, 1937
The Yarra Scenic Boulevard stretching from Hawthorn to the Chandler Highway was completed as a major project between 1933 and 1936 during a period of significant unemployment. Key dates in the construction this section the road include: 1933 when Kew Council supported the construction of the road from Studley Park to the Kew Asylum; and 1936 when the road from the Johnston Street Bridge to the Chandler Highway was opened. The inscription on the reverse of the photo 'Boulevard Fairfield' is misleading as there is no section of the Boulevard in Fairfield. A more likely interpretation is that it is a photograph of the Kew section of the Yarra Boulevard with the factories of Fairfield in the distance.Rare early photograph of the Yarra Boulevard, taken one year after the opening of the road. The photograph is an important historical record of the results of 'Susso' labor in the creation of major works in Melbourne by the Victorian Government. Original, black and white positive print of the Boulevard at Kew in 1937. Key aspects to note about the photograph is that the road is bituminised; that the gutters are concreted; that the kerb is constructed of concrete blocks; and that there is an unmade footpath on what appears to be the right hand side of the road. The landscape is sparsely treed, and those trees that remain are presumably remnant vegetation. At the right, the land is fenced. The land at the left falls away sharply to the river below. On the horizon, at left, there is an industrial complex including a tall chimney that is burning fuel creating smoke. "Boulevard Fairfield" great depression, susso projects, roads -- kew (vic.), yarra boulevard, yarra valley -
 The 5th/6th Battalion Royal Victoria Regiment Historical Collection
Plaque - 4th Brigade Plaque
4th BDE plaque, unknown the year madeunusual design of the plaque4th Bridge plaque, with the purple background material5/6 rvr, 5/6 rvr bhq, plaque, 4th bde -
 The 5th/6th Battalion Royal Victoria Regiment Historical Collection
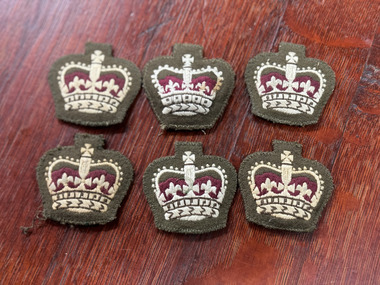
Uniform - Warrant Officer Crown, Warrant Officer Crown with green thread
British Army Household Bridge WO Warrant Officer SD Rank x 6 -
 Wodonga & District Historical Society Inc
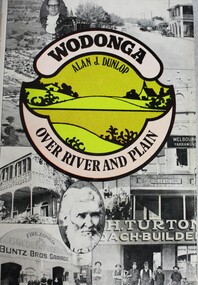
Book - Wodonga Over River and Plain, Alan J. Dunlop, 1976
A great local history of the Wodonga area. Starts with discussion of the Aboriginal inhabitants of the region and early contacts with European explorers and settlers. Explains the establishing of a customs post with its twin city Albury on the other side of the Murray River. The town grew subsequent to the opening of the first bridge across the Murray in 1860. Originally named Wodonga, its name was changed to Belvoir then later back to Wodonga.non-fictionA great local history of the Wodonga area. Starts with discussion of the Aboriginal inhabitants of the region and early contacts with European explorers and settlers. Explains the establishing of a customs post with its twin city Albury on the other side of the Murray River. The town grew subsequent to the opening of the first bridge across the Murray in 1860. Originally named Wodonga, its name was changed to Belvoir then later back to Wodonga.victoria. wodonga, settlers wodonga, indigenous australians wodonga -
 Victorian Railway History Library
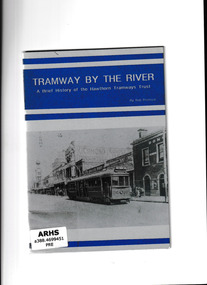
Booklet, Tramway Publications, Tramway by the river : a brief history of the Hawthorn Tramways Trust, 1993
... The Hawthorn Tramways Trust was established in 1914, and merged ...The Hawthorn Tramways Trust was established in 1914, and merged with the Melbourne and Metropolitan Tramways Board in 1920. The Hawthorn line operated via Bridge Road, Richmond. Horse drawn trams were withdrawn in 1916 prior to the introduction of cable trams. The booklet provides technical details about this line, as well as photographs.Ill, maps, p.17.non-fictionThe Hawthorn Tramways Trust was established in 1914, and merged with the Melbourne and Metropolitan Tramways Board in 1920. The Hawthorn line operated via Bridge Road, Richmond. Horse drawn trams were withdrawn in 1916 prior to the introduction of cable trams. The booklet provides technical details about this line, as well as photographs.tramways - melbourne, trams - melbourne - history -
 Flagstaff Hill Maritime Museum and Village
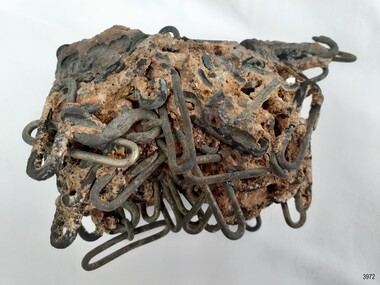
Functional object - "S" Hook Buckle, Ca. 1855
The "S" hook buckles were grouped together under the sea as part of the cargo of the vessel Schomberg. "S" hook buckles are used for fastening two ends of fabric together such as harness belts, trouser belts and similar items. The buckles were recovered in October 1980 by the Flagstaff Hill Sub-Aqua Group, Peter Ronald, Barry Lowther and Jeff Bell. ABOUT THE SCHOMBERG (October 6 to December 27, 1855)- When the ship Schomberg was launched in 1855, she was considered the most perfect clipper ship ever to be built. James Baine’s Black Ball Line had commissioned her for their fleet of passenger liners. The Aberdeen builders designed her to sail faster than the clippers designed the three-masted wooden clipper ship to be fast. The timber used for the diagonal planking was British oak with layers of Scottish larch. This luxury emigrant vessel was designed for superior comfort. She had ventilation ducts to provide air to the lower decks and a dining saloon, smoking room, library and bathrooms for the first-class passengers. The master for Schomberg’s maiden voyage was Captain ‘Bully’ Forbes. He drunkenly predicted at her launch that he would make the journey between Liverpool and Melbourne in 60 days. Schomberg departed Liverpool on 6 October 1855 with 430 passengers and 3000 tons of cargo including iron rails and equipment intended the build the Geelong Railway and a bridge over the Yarra from Melbourne to Hawthorn. The poor winds slowed Schomberg’s sail across the equator. She was 78 days out of Liverpool when she ran aground on a sand spit near Peterborough, Victoria, on 27 December; the sand spit and currents were not marked on Forbes’s map. The ship’s Chief Officer spotted the coastal steamer SS Queen at dawn and sent a signal. The master of the SS Queen approached the stranded vessel and all of Schomberg’s passengers safely disembarked. In 1975, 120 years after the Schomberg was wrecked, divers from Flagstaff Hill found an ornate communion set at the wreck site along with many other artefacts. In 1978 a diamond ring was discovered under the concretion in the lid of the communion set, which is currently on display. Former Director of Flagstaff Hill, Peter Ronald, had salvaged most of the artefacts from the wreck. This group of "S" hook buckles and conglomeration of buckles is significant as an example of an item in common use in the mid-19th century and the items carried on ship as cargo. The Schomberg collection as a whole is of historical and archaeological significance at a State level. Flagstaff Hill’s collection of artefacts from the Schomberg is also significant for its association with the Victorian Heritage Registered shipwreck (VHR S 612). The collection is of prime significance because of the relationship between the objects salvaged, as together they help us to interpret the story of the Schomberg. The collection as a whole is historically significant for representing aspects of Victoria's maritime history and its potential to interpret social and historical themes. "S" hook buckles; oval silver alloy buckles contained within a conglomeration of materials from the sea. The group was recovered from the wreck of the Schomberg.flagstaff hill, warrnambool, flagstaff hill maritime museum, maritime museum, shipwreck coast, flagstaff hill maritime village, great ocean road, shipwreck artefact, schomberg, horse harness fitting, harness hardware, "s" hook buckle, "s" hook buckles, conglomeration of buckles, belt buckle, fastener, quick release fastener, flagstaff hill sub-aqua group, peter ronald, barry lowther, jeff bell -
 Melbourne Tram Museum
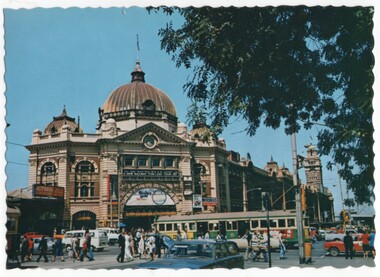
Postcard - Nu-color-Vue - Flinders St Station, Nucolorvue Publishing, Bustling Flinders St Station, Early 1970's
One of a series of postcards produced by Nu-color-vue. Shows W2 327 in Swanston St crossing Flinders St. The station building has the area above the clocks promoting Flinders Gate, a future project that occupied the former Princes Bridge station site. As well adverts for Mitchells Brushes, the Arts Centre fund raising, a five day east coast tour and Astoria Rent-a-carYields information about the appearance of Flinders Station building in the early 1970's and shows a busy or bustling intersection prior to the construction of the City Rail Loop.Postcard - Nu-color-Vue - Flinders St Station early 1970's - serrated edges of Flinders and Swanston St. ML 138swantson st, flinders st, w2 class, tram 327, nucolorvue, postcard, souvenir, trams, tramways -
 Melbourne Tram Museum
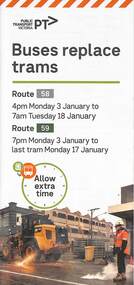
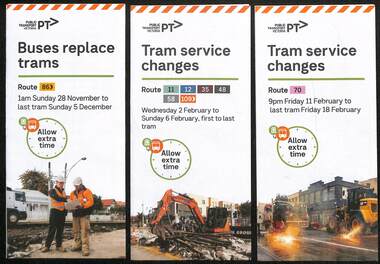
Pamphlet, Yarra Trams, Buses Replace Trams - Routes 58, 59, 86 and 96, 2022
.1 - pamphlet provided at tram stops giving details of the works and bus services for routes 58 and 59 .2 - Project document describing the work and dates - downloaded from the Yarra Trams website after buses were used to replace route 58 from the Royal Children's Hospital rather than from Royal Park Station as originally planned. .3 - as for .1 - for the upgrading of the Merri Creek Bridge - route 86 - see also Reg Item 6066 .4 - as for .1 - for the installation of superstops in Nicholson St between Elgin St and Holden St - route 96Shows the methods that Yarra Trams customers are advised of changes due to track replacement works..1 - Pamphlet - DL, four fold printed on off white paper titled - Buses Replace Trams - Route 58 and Route 59 - Jan 2022 .2 - Project sheet - 3 A4 sheets, titled "Renewal works: Essendon Depot and Mt Alexander Road - 3.1 to 18.1.2022. .3 - Pamphlet - DL 3 fold, Buses Replace Trams, route 86, November 2021 - Merrit Creek Bridge works .4 - Pamphlet - DL - 4 fold, Buses Replace Trams, route 96, January 2020 - Nicholson St works for tram super stops.mt alexander road, tram works, track work, route 58, route 59, yarra trams, ptv, essendon tram depot, route 86, route 96, nicholson st, merri creek, bridges, carlton, super stops, trams, tramways, northcote -
 Melbourne Tram Museum
Pamphlet, Yarra Trams, Tram Service Changes, 2022
.1 - pamphlet provided at tram stops giving details of the works and bus services for 86 - Merri Creek Bridge works .2 - ditto - for provision of a super stop in William St at Collins St including replacement bus services on route 58 .3 - as for .1 - track reconstruction in Swan St between Stanley St and Stawell St Richmond or BurnleyShows the methods that Yarra Trams customers are advised of changes due to track replacement works..1 - Pamphlet - DL, three fold DL - Buses replace trams - route 86 - 28/11/2021 to 5 December 2021 - Route 86 .2 - Pamphlet - DL, four fold DL - Tram Service changes 2/2/2022 to 6/2/2022 - Routes 11, 12, 35, 48, 58 and 109 .3 - Pamphlet - DL, four fold DL - Tram Service changes - 11/2022 to 18/2/2022 - Route 70tram works, track work, route 58, yarra trams, ptv, route 86, merri creek, bridges, super stops, trams, tramways, richmond, burnley, route 70, collins st, william st -
 Melbourne Tram Museum
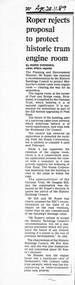
Newspaper - Photocopy, The Age Newspaper, Roper rejects proposal to protect historic tram engine room, 28-11-1989
Provides a report from The Age, 28-11-1989 written by Ingrid Swendsen, about the rejection by the Planning and Environment Minister , Tom Roper to protect the former cable tram winding or Engine house on the corner of Bridge and Punt Roads Richmond, despite the recommendation of the Historic Buildings Council to add it to the register. The building was later demolished by the Roads Corporation to widen the intersection. The Tramways have a small sub-station on the site. Quotes Douglas Hill of the National Trust and Roz Hansen of the Historic Buildings Council. Provides a report on the rejection of a recommendation to protect a historic building.Photocopy of a newspaper clipping from The Age 28-11-1989 - Roper rejects proposal to protect historic tram engine roomtrams, tramways, cable trams, engine house, winding house, punt road, bridge road, demolition, richmond, historic buildings council -
 Melbourne Tram Museum
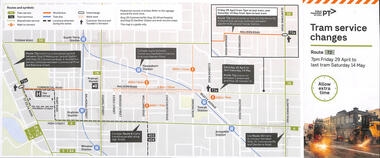
Pamphlet, Public Transport Victoria (PTV), Tram Service Changes, 2022
Pamphlet provided at tram stops giving details of the works and bus services for: .1 - route 72 track reconstruction between Chapel St and Orrong Road, in Malvern Road including the Orrong Road over rail line bridge - 29-4-2022 to 14-5-2022 .2 - All Collins and William St routes for the installation of a super stop in William St at Collins St - - 2-2-2022 to 6-2-2022Shows the methods that Yarra Trams and Public Transport Victoria customers are advised of changes due to track replacement works..1 - Pamphlet - DL, five fold DL - Tram service changes - route 72 - 29-4-2022 to 14-5-2022 .2 - Pamphlet - DL, four fold DL - changes in Collins and William Streets - 2-2-2022 to 6-2-2022tram works, track work, yarra trams, ptv, bridges, trams, tramways, route 72, malvern road, orrong road, super stops, collins st, william st -
 Melbourne Tram Museum
Slide - Black and white reproduction photograph - K class tram 92, mid 1920s
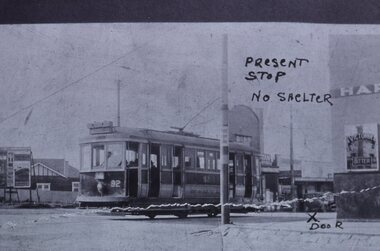
Photograph - of a K class four-wheel or single truck tram on a PMTT route 14 (STRATHALBYN ST (Kew) - VICTORIA BRIDGE) tram service, at Harp Road and High St. The reference gives the tram based at Kew Depot in 1928. The tram was originally a Prahran and Malvern Tramways Trust tram, though, by the time of this photograph, it has been re-lettered for the MMTB, which took over the PMTT in 1920. The photograph has been marked up for a submission possibly to either Council or the MMTB for a waiting room or shelter at this location. The wall of the Harp of Erin Hotel and a Victoria Bitter sign can be seen on the right-hand side. The original photo appears to have been torn. Original photo mid to late 1920's.Yields information about the K class tram of the MMTB and methods of seeking a tram stop shelter and High Street and Harp Road intersection.Kodachrome cardboard duplicate slide - Black and white reproduction photograph - K class tram 92 - at Harp Road Kew "MP17" in penciltrams, tramways, kew, harp road, route 14, k class tram, tram 92, harp of erin, victoria bitter, high st, strathalbyn st -
 Melbourne Tram Museum
Pamphlet - Tram works on Swan St, Yarra Trams, Tram Service Changes, 2022
.1 - pamphlet provided at tram stops giving details of the works for 70 .2 - ditto - for Tram Network Upgrade - Swan St and Wallen Road Bridge, Richmond .3 - as for .1 - track reconstruction in Swan St between Stanley St and Stawell St Richmond or BurnleyShows the methods that Yarra Trams customers are advised of changes due to track replacement works. .1>.2 - Pamphlet - DL, four fold DL - Tram Service changes - 11/2022 to 18/2/2022 - Route 70 .3>.4 - Pamphlet - DL, four fold DL - Tram Network Upgrade - Swan St and Wallen Road Bridge, Richmond .5 - Newspaper clipping - Tram works on Swan Sttram works, track work, yarra trams, ptv, bridges, trams, tramways, richmond, burnley, route 70, wallen road bridge -
 Melbourne Tram Museum
Photograph - Black and White - St Kilda Road near City Road
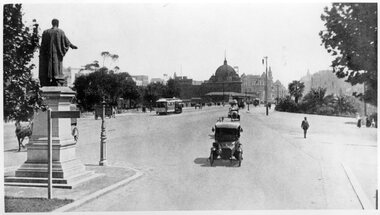
Photo 1 - looking north from the point where St Kilda Road widened after crossing Princes Bridge. Has the Edmund Fitzgibbon monument on the left. One cable tram set is making its way into the City. Has Flinders St Station in the background, along with a number of motor cars and one horse drawn vehicle behind the monument and another behind a sign. In the far distance is an advertisement for The Herald newspaper. Photo 1910c Photo 2 - looking south from near the end of the bridge, with seven cable cars in the view, along with motors cars and two horse drawn vehicles. Government House can be seen on the left horizon.Yields information about St Kilda Road c1910.Set of two black and white photographs of" .1 - St Kilda Road near City Road looking north - with Edmund FitzGibbon monument .2 - looking southtramways, trams, cable cars, flinders street station, st kilda road, princes bridge, monuments, edmund fitzgibbon -
 Melbourne Tram Museum
Photograph - Photo card Melbourne album sheets 1920c
Part of an album of photo cards - cigarette card size - that depicted Melbourne and other country towns c1920. Sheet 1 - Melbourne - Elizabeth St, Collins St, Spring St, St Kilda Rd, Swanston St, Princes Bridge and Exhibition buildings. Sheet 2 - Healesville, Lorne, Brighton, Albury, Bendigo, Woori Yallock and Queenscliff - three cards have been removed prior to acquisition. Sheet 3 - Queen Victoria Gardens, Alexandra Avenue, Exhibition Gardens, St Kilda Road, Botanic Gardens - three cards have been removed prior to acquisition.Set of three album sheets containing up to 9 small printed photos on each sheet of Melbourne and some country towns.melbourne, victoria, tramways, gardens -
 Melbourne Tram Museum
Photograph - Unloading a bridge beam ex Kelly & Lewis, Victorian Railways (VR), 1929
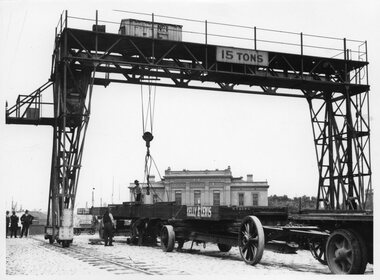
Photo shows a large bridge beam being unloaded at the Flinders St / Spencer St yard by an overhead crane. The beam is marked "Kelly and Lewis". Kelly & Lewis in the 1920s were making bridge beams for the Victorian Railways at their Springvale workshops. Though this photo does not appear in the PROV railway photograph collection, possibly one of the beams for the Spencer St - Clarendon St bridge that was built in 1929 . There are a number of photos of similar bridge beams for the Spencer St bridge constructed in 1929 by the Victorian Railways in the State Library. See reference for one of these.Yields information about the bridge beams possibly for the Spencer St bridge.Photograph - Unloading a bridge beam ex Kelly & LewisIn ink of rear of prints "Photo Victorian Railways"spencer st bridge, victorian railways, kelly & lewis, bridges, bridge beams