Showing 174 items matching " cable grip"
-
 Melbourne Tram Museum
Negative, Ellis Collection, c1940?
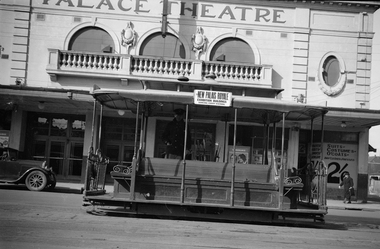
... Negative (120) of a cable grip car outside the Palace... Negative (120) of a cable grip car outside the Palace Theatre 790 ...Negative (120) of a cable grip car outside the Palace Theatre 790 Nicholson St Fitzroy. Tram has a side advertisement for the New Palais Royale, at the Exhibition buildings for dancing every evening. The Theatre was opened in 1920 and demolished in 1959 - now a car wash. See http://cinematreasures.org/theaters/52757 accessed 28/5/2019. A low resolution A4 laminated was received with the negatives. Hi Res image filed in the dbtext/hawthtramcoll/Large Images/htd3590large.jpgtrams, tramways, cable trams, nicholson st, fitzroy, theatres -
 Ballarat Tramway Museum
Photograph - Ballarat - Grip car or dummy 593 at BTPS depot, Ian Stanley, 11-10-1987
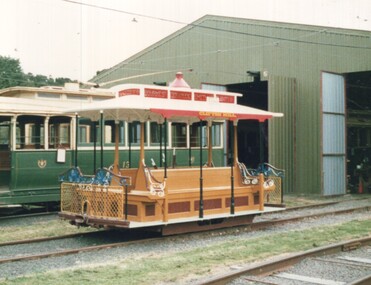
... and motorisation of former Melbourne cable tram grip car or dummy 593... reconstruction and motorisation of former Melbourne cable tram grip car ...Photos shows Newton Williams reconstruction and motorisation of former Melbourne cable tram grip car or dummy 593 at Ballarat during a demonstration visit. See reference for full details of the reconstruction and visit. Tram 18 is in the background. Photo taken at the time of the BTPS's AGM.Yields information about BTPS Operations and work in 1987Colour print of grip car or dummy 593 at BTPS Depot Has details of the location and dates on rear along with photographers number.ballarat, tramways, tramcars, btps, tram 593, grip car, cable trams, tram 18 -
 Melbourne Tram Museum
Photograph - Black & White Photograph/s, c1910
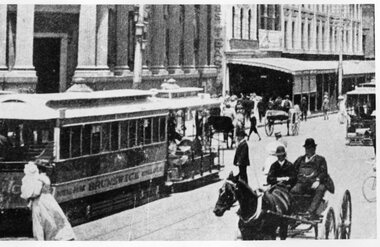
... Black and white copy print of a bogie cable trailer... Trams tramways Cable Trams Bogie Cable Trailers Elizabeth St ...Black and white copy print of a bogie cable trailer and grip car tram in Elizabeth St, c1900 along with a horse drawn vehicle alongside. At corner with Collins St.On rear in ink "Melbourne, Bogie cable trailer in Elizabeth St City. Probably about." Has a Keith Kings Collection stamp.trams, tramways, cable trams, bogie cable trailers, elizabeth st, collins st -
 Melbourne Tram Museum
Newspaper, The Age, "Clang clang goes the trolley right into a glass case", 24/01/1974 12:00:00 AM
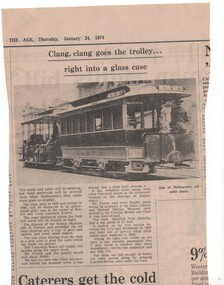
... the Science Museum) cable car - grip and trailer into a glass case...) cable car - grip and trailer into a glass case on the corner ...Newspaper clipping from The Age, Thursday January 24, 1974 titled "Clang clang goes the trolley right into a glass case", about the positioning of the Museum of Victoria (at the time the Science Museum) cable car - grip and trailer into a glass case on the corner of Russell and Little Lonsdale St. Has a photo of a Nicholson St cable car. Notes the MMTB repair work.trams, tramways, mmtb, cable trams, museums, exhibitions -
 Melbourne Tram Museum
Photograph - Newspaper, Herald Sun, "The Steam roller won", 11/4/1923
... On rear in ink "M&MTB Damaged cable tram grip car, result... car and lifting the grip out of position. tramways trams cable ...Photo shows a damaged grip car with bent staunchions and the grip mechanism being lifted with a block and tackle by a uniformed tramway man. The actual cutting notes that a lady's leg was injured in the incident.Yields information about damage to a grip car and lifting the grip out of position.Black and white print notes on the rear.On rear in ink "M&MTB Damaged cable tram grip car, result of an accident with a steam roller in Victoria St North Richmond, on 10/4/1923. Copy ex 'Sun' 11/4/23 in C Craig Collection. (15/7/71) and K S KIngs stamp with number '95-21'. "tramways, trams, cable trams, accidents, victoria st -
 Melbourne Tram Museum
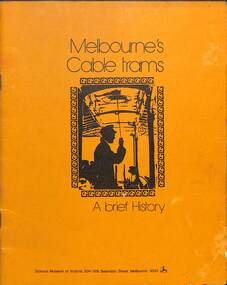
Book, Science Museum, "Melbourne's Cable Trams - A brief history", 1975
... of the engine houses, the cable, the grip mechanism, the ticket bell... houses, the cable, the grip mechanism, the ticket bell punch ...Book produced by the Science Museum provides a brief history of the cable tram system, with photos. Includes details of the engine houses, the cable, the grip mechanism, the ticket bell punch, and why "Mind the Curve". Has a list of acknowledgments. Published shortly after or at the time of the launch of the tram in the enclosure in Russell St. The additional sheet with the book provides details for each route of route, the location of the city terminus, suburban terminus, running time, night light, route length, first and last car for each day of the week. Not known who compiled the sheet.Demonstrates the work of the Science Museum - now Scienceworks.Book - 16 pages + card cover +postcard of cable tram set No. 1 at the Science Museum 1975. Inside the book is a ruled sheet of paper with details of the cable tram routes, handmade with ink.tramways, cable trams, science museum, melbourne -
 Melbourne Tram Museum
Negative, Ellis Collection, 1940
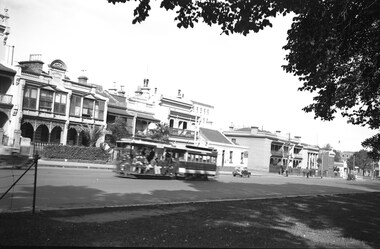
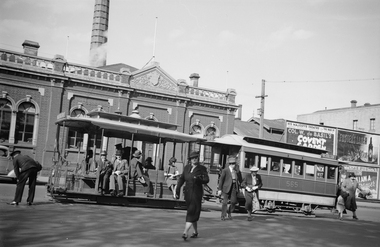
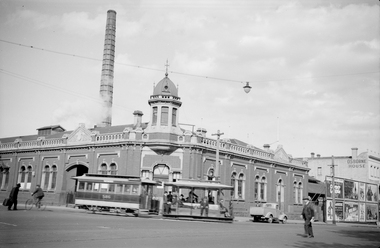
... Negative (120) of a cable tram grip car and saloon car... (120) of a cable tram grip car and saloon car northbound ...Negative (120) of a cable tram grip car and saloon car northbound in Nicholson St between Victoria Parade and Gertrude St. Has the Salisbury Place (34 Nicholson St) block in the view. Photo 1940 based on the date that other photos were taken in the area - See Reg Item 3593. Hi Res image filed in the dbtext/hawthtramcoll/Large Images/htd3593large.jpgtrams, tramways, cable trams, nicholson st, cable trams -
 Melbourne Tram Museum
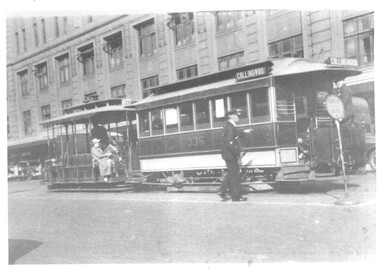
Photograph - Cable tram 336 Lonsdale St, E Bowes, c1938
... Photograph shows cable trailer 336 and grip car in Lonsdale...Photograph shows cable trailer 336 and grip car in Lonsdale ...Photograph shows cable trailer 336 and grip car in Lonsdale St with the Myer building in the background. The trailer has the destination of Collingwood. The conductor is preparing to board the rear of the cable trailer. Note the safety zone sign.Yields information about the Collingwood cable tram services and the Lonsdale St services.Black and white photograph with notes on rear.In ink "13" and "K McC"tramcars, tramways, cable trams, lonsdale st, collingwood, tramm 336 -
 Melbourne Tram Museum
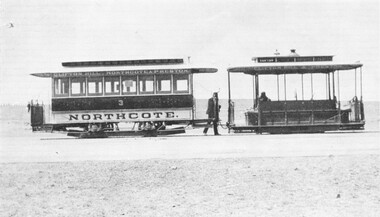
Photograph, Northcote cable tram 3
... The photograph shows a Northcote cable tram set - grip car... The photograph shows a Northcote cable tram set - grip car and trailer ...The photograph shows a Northcote cable tram set - grip car and trailer No. 3. The trailer is lettered - Clifton Hill - Northcote & Preston. The background has been whited out though possibly a conductor and the gripman can be seen. For the story of the Northcote line, see the Museum's article - Northcote: the on again, off again cable tramway in the references.Yields information about the Northcote cable trams before they were merged with the MMTB.Photograph, black and white, plain papertrams, tramways, cable tram, northcote, clifton hill, tram 3 -
 Melbourne Tram Museum
Negative, Wal Jack, 19/01/1941 12:00:00 AM
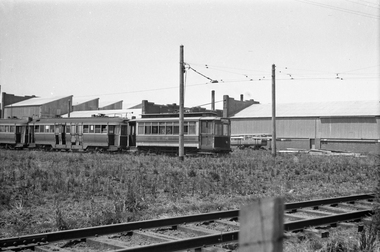
... the number of the second car is number 125. Note the two cable.... Note the two cable grip cars and the bus body in the background ...Black and white negative by Wal Jack of U206 and a C Class or N class stored at Preston Workshops. Based on image the number of the second car is number 125. Note the two cable grip cars and the bus body in the background. Rod Atkins advised 11/10/2020: "The bus body is one of the four James Motors of South Melbourne body's first fitted to the group of 12 Thornycroft "J" chassis in 1924-1925 numbered 13 to 24. Then in 1929 they were all transferred to the ADC chassis but four were retained in late thirties to early forties for possible further use. The four bodies were then fitted to the new International K6 chassis in 1943. The vehicle numbers were 19 to 308 16 to 309 24 to 311 and 18 to 312. They were finally disposed of in 1949." Photo 19-1-1941, based on other similar photo dates.trams, tramways, preston workshops, u class, c class, n class, grip tram, buses, tram 206, tram 125 -
 Melbourne Tram Museum
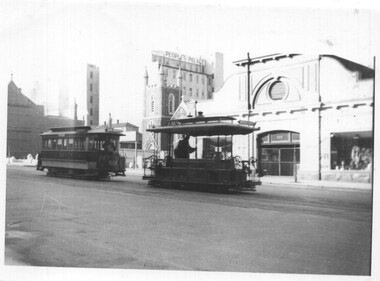
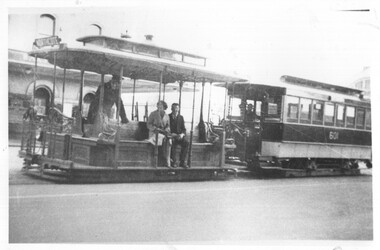
Photograph - Shunting cable trams at Bourke St terminus, C Roy G Field, 1937
... Photograph shows cable trailer 601 and grip car shunting...Photograph shows cable trailer 601 and grip car shunting ...Photograph shows cable trailer 601 and grip car shunting at the Bourke St terminus. The trams have the destination of Northcote. In the background is the Peoples Palace and Hudsons Stores and St Augustines Church. Photo by C Roy Field, 1937.Yields information about the Bourke St terminus in 1937.Black and white photograph with notes on rear.In ink "16" and "K McC"tramcars, tramways, cable trams, bourke st, tram 601 -
 Melbourne Tram Museum
Negative, Ellis Collection, 1940
... Negative (120) of a cable tram grip car and saloon car 558...) of a cable tram grip car and saloon car 558 outside the Nicholson St ...Negative (120) of a cable tram grip car and saloon car 558 outside the Nicholson St Winding house tram stop, with another cable tram departing, saloon car 528, towards the city. In the background is Osborne House and shop selling The Age, and the Herald. Hi Res image filed in the dbtext/hawthtramcoll/Large Images/htd3594large.jpg. A low resolution A4 laminated was received with the negatives. Based on a billboard date in Reg Item 3593, the year is 1940.trams, tramways, cable trams, nicholson st, winding houses, conductors, passengers, tram stops, tram 558, tram 528 -
 Melbourne Tram Museum
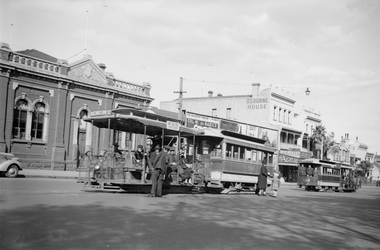
Photograph - Awaiting departure from Bourke St - cable trailer 601, c1939
... Photograph shows cable trailer 601 and grip car...Photograph shows cable trailer 601 and grip car ...Photograph shows cable trailer 601 and grip car at the Bourke St terminus. The trams have the destination of Northcote. In the background is part of the MTOCo Head Office. Photo from the CB Thomas Collectioin, c1939. Trailer 601 was the last built cable trailer; built by the MMTB in 1923.Yields information about the Bourke St terminus in 1939.Black and white photograph with notes on rear.In ink "17" and "K McC"tramcars, tramways, cable trams, bourke st, tram 601 -
 Melbourne Tram Museum
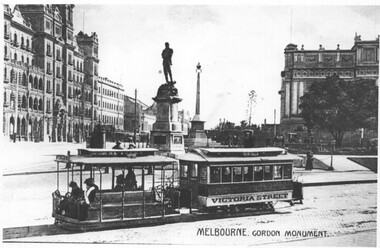
Photograph - Cable tram 78 - Gordon Monument
... Photograph shows cable trailer 78 and grip car in Macarthur...Photograph shows cable trailer 78 and grip car in Macarthur ...Photograph shows cable trailer 78 and grip car in Macarthur St Melbourne about to cross Spring St. The tram is lettered for Victoria St line. In the background is the General Gordon Monument (see reference), the Windsor Hotel and the Victorian Parliament buildings. See items 6184 and 8083 for other photos with the monument.Yields information about cable trams and the Gordon Monument.Black and white photograph with notes on rear.In ink "12" and "K McC"tramcars, tramways, cable trams, spring st, macarthur st, tram 78 -
 Melbourne Tram Museum
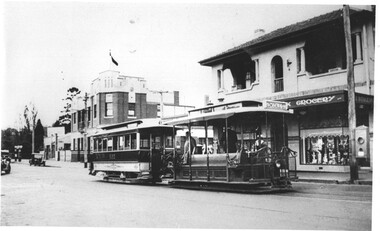
Photograph - Cable tram 520 Collingwood terminus, c1939
... Photograph shows cable trailer 520 and grip car...Photograph shows cable trailer 520 and grip car ...Photograph shows cable trailer 520 and grip car at the Johnston St terminus of the Collingwood line. The grip car has a destination box showing Lonsdale St. In the background is a service station, a hotel and a grocery shop. On the pole in front of the tram is a Cincinnati-type Bundy clock. From the C B Thomas Collection.Yields information about the Collingwood cable tram services and the Lonsdale St services.Black and white photograph with notes on rear.In ink "14" and "K McC"tramcars, tramways, cable trams, lonsdale st, collingwood, tram 520 -
 Melbourne Tram Museum
Photograph - Negative and Black & White Photograph/s, Ellis Collection, 1940
... Negative (120) of a cable tram grip car and saloon car 584... Houses tram 584 Negative (120) of a cable tram grip car ...Negative (120) of a cable tram grip car and saloon car 584 turning from Gertrude St Fitzroy into Nicholson St. In the background is the cable tram winding house and a large bill board advertising - see Reg Item 5600 for more details. Hi Res image filed in the dbtext/hawthtramcoll/Large Images/htd3600large.jpg 6" x 4" print held as well - image which has a narrower view. Mark on the front of the print near the top right hand corner. Based on a billboard date in Reg Item 3593, the year is 1940.trams, tramways, cable trams, gertrude st, nicholson st, winding houses, tram 584 -
 Melbourne Tram Museum
Document - Report, Miles Pierce, "Cable Trams in Melbourne - a Major Nineteenth Century Engineering Achievement", Apr. 2017
... , maps, the cable, the grip, the Trams themselves, Northcote Line... Trams tramways Cable Trams MTO Co Construction Grip Tram Engine ...Research report - Manuscript - 22 pages titled "Cable Trams in Melbourne - a Major Nineteenth Century Engineering Achievement", written by Miles Pierce of Engineers Australia Heritage. Gives the overseas background of cable trams, the personnel, the company, (Melbourne Tramway and Omnibus Company, construction, Engine Houses, maps, the cable, the grip, the Trams themselves, Northcote Line, Operation and demise, remaining cable tram heritage. Has acknowledgements and references. Includes photographs and diagrams. Received by e-mail 9/7/2017. The Museum assisted with the report. Was scheduled to be presented at the Engineering Conference in Mildura Oct. 2017.trams, tramways, cable trams, mto co, construction, grip tram, engine houses, northcote cable tram -
 Melbourne Tram Museum
Negative, Ellis Collection, Cable Tram - Nicholson St at Gertrude St, 1940
... Negative (120) of a cable tram grip car and saloon car 565... Street cable so the gripmen can line it up with grip and the grip ...Negative (120) of a cable tram grip car and saloon car 565 outside the Nicholson St Winding house tram stop, with several passengers walking from the tram, the conductor attending to the "dolly" for the Gertrude Street cable so the gripmen can line it up with grip and the grip man looking down. In the image are adverts for Col. W. de Basil's Covent Garden show at Her Majesty's Theatre, Fosters Lager, Hoyts De Luxe Bourke St a Richard Greene film. See Also Reg Item 3600 for the full bill board. Based on the date for the Covent Garden show commencing Thursday March 14, the year is 1940. trams, tramways, cable trams, nicholson st, winding houses, conductors, passengers, tram stops, tram 565 -
 Melbourne Tram Museum
Photograph - Negative and Black & White Photograph/s, Ellis Collection, 1940
... Negative (120) of a cable tram grip car and saloon car 586... Houses tram 586 Negative (120) of a cable tram grip car ...Negative (120) of a cable tram grip car and saloon car 586 turning from Nicholson St into Gertrude St Fitzroy. In the background is the cable tram winding house and a large bill board advertising: r Col. W. de Basil's Covent Garden show at Her Majesty's Theatre, Fosters Lager, Hoyts De Luxe Bourke St a Richard Greene film - Where I am a Stranger, Victoria Bitter and Saunders Malt Extract. Hi Res image filed in the dbtext/hawthtramcoll/Large Images/htd3600large.jpg 6" x 4" print held as well - image which has a narrower view. Based on a billboard date in Reg Item 3593, the year is 1940.trams, tramways, cable trams, gertrude st, nicholson st, winding houses, tram 586 -
 Ballarat Tramway Museum
Photograph - Illustration/s, Melbourne cable tram No. 1
... set, grip car and cable trailer No. 1 possibly photographed... reproduction of a Melbourne tramways cable car set, grip car and cable ...Photographic reproduction of a Melbourne tramways cable car set, grip car and cable trailer No. 1 possibly photographed in Nicholson St. Carlton by the Exhibition gardens. Destination of grip car is "Spencer St." On rear of trailer has a "Nicholson St." board. Has three people seated on grip car, along grip man and conductor on front platform of trailer. Would appear to be posed photograph. The numeral one is not fully central and may have been modified on the print. Printed on glossy paper.On rear in blue ink "C161"trams, tramways, cable trams, melbourne, nicholson st. -
 Melbourne Tram Museum
Photograph - Digital Image, Kevin O'Reilly, "Kew Burke Rd' looking at the East Kew Tram terminus, c1925
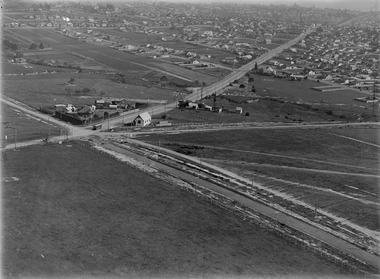
... . It is finished in the late MMTB chocolate and cream livery. A cable.... It is finished in the late MMTB chocolate and cream livery. A cable ...Image from CD (Compact Diskette for use in computers) - see Reg Item 135. Image titled "Kew Burke Rd' on CD, of looking at the East Kew Tram terminus with the city skyline in the background, c1925. Photo published in the Bellcord No. 16, Oct. 2012. From the article with the photograph; The terminus was located at the intersection of High St, Burke, Kilby and Doncaster Roads. We are at the outer edges of Melbourne’s suburbia at the time, unlike the current tram terminus of today. Burke Road, north of Doncaster Road is clearly under construction in preparation for the new river crossing. The vacant block of land in the foreground will remain so for another ten years or so. In 1960 the new Dickens Supermarket was built on this site and the intersection became known locally as Dickens Corner. The narrow track on the left hand side of the photo is Doncaster Road. The tram at the terminus is a straight-sill single trucker of one of the G, K, Q or R classes. It is finished in the late MMTB chocolate and cream livery. A cable grip car body has been placed as a tram shelter at the terminus. The church was subsequently relocated to Francis Street Yarraville where it still stands today as a private residence. Behind the large hedge on the south side of High Street is Smith’s Dairy. Part of this land would be sold to the MMTB for a planned new tram depot Behind the large hedge on the south side of High Street is Smith’s Dairy. Part of this land would be sold to the MMTB for a planned new tram depot but by the early 1960s it was transferred to the Education Department for construction of the Kew High School. The last portion of the dairy closed in the 1970s.trams, tramways, kew, burke rd, east kew, doncaster rd -
 Melbourne Tram Museum
Photograph - Black and White - demolishing cable tram track Smith St and Queens Parade 1954/55
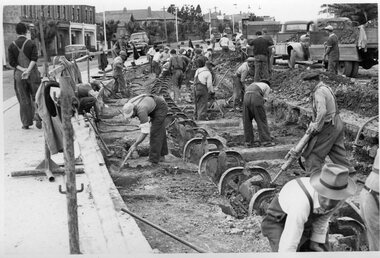
... were required to drop the cable from the grip prior... the layout of the cables and the large sheave pit that the cable ...The photograph shows the demolition or removal of the cable tram track at the intersection of Smith St Gertrude St. Fitzroy. The workmen are excavating the former cable tram track The inbound cable tram track remains in position. The 1955 Annual Report notes that work commenced following the completion of the Queen's visit in March 1954 and that all work was done by day-labour. The track was opened to service in late June 1955. The second image is from a Melbourne and Metropolitan Board of Works plan (part) No. 1217 - Collingwood for the intersection, obtained for reference from the State Library of Victoria Collection of MMBW Plans. It shows the layout of the cables and the large sheave pit that the cable itself passed around. The trams were required to drop the cable from the grip prior to the entry to the curve and then coast around. Photographer is possibly Keith Kings.Yields information about the extent of work need to convert the former Northcote Cable tram route to Electric trams, the people and the methods used to undertake the work.Photograph - Black and White of the demolition of the cable tram track at the corner of Queens Parade - Smith St Clifton Hill.trams, tramways, cable trams, workmen, mmtb, demolition, track work, conversion, smith street, queens parade, clifton hill -
 Melbourne Tram Museum
Audio - AV Presentation, Robert Green, "The Melbourne cable tramways - 1885 - 1940", 5/2008
... cable tram systems, the grip, George Duncan, F B Clapp..., the grip, George Duncan, F B Clapp, the tramcars, cables ...Presentation by Robert Green to the Engineering Heritage Victoria, 22 May 2008 comprising a Powerpoint slides with the actual audio of the presentation. Gives the background to the establishment of the Melbourne cable tram system, its construction, operation, power or engine houses, and its replacement by electric trams or buses. Includes images of remnants of the former system in Abbotsford St North Melbourne, horse omnibuses, other cable tram systems, the grip, George Duncan, F B Clapp, the tramcars, cables or the rope, engine houses, St Kilda and passengers changing at Victoria St from electric to cable tram Demonstrates the work of Robert Green's research work into cable tram history and research and yields information about the history and development of Melbourne's cable tram network, the largest single operator network in the world.Digital Audio Visual Presentation of a lecture by Robert Green 2008 cable trams, melbourne, mtoco, trackwork, engine houses, tramcars, george duncan, f b clapp, horse buses, abbotsford st -
 Melbourne Tram Museum
Photograph - Black & White Photograph/s, Original photo c 1923
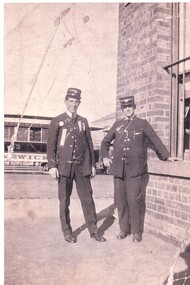
... John McMahon in cable tram uniform with tickets pinned to his... Trams tramways Cable Trams MMTB Conductors Brunswick Haymarket ...Photograph, copy print of an old photograph of conductor John McMahon in cable tram uniform with tickets pinned to his jacket along with other items alongside another cable tram crewman (grip man or another conductor - has large pins on his uniform and has the same bag over his shoulder) with a Brunswick depot / route cable tram set in the background. Advised by the donor that the photograph was taken c1923 at the Haymarket - thought to actually be at the Brunswick depot - the iron bars of revenue office. Printed AGFA photo Sensatis paper.trams, tramways, cable trams, mmtb, conductors, brunswick, haymarket, uniforms -
 Melbourne Tram Museum
Photograph - Set of 3 Black & White Photograph/s, Keith Kings, 11/11/1985 12:00:00 AM
... . .2 - display of cable car 299 and grip car at the city square.... .2 - display of cable car 299 and grip car at the city square ...Set of three Photographs, Black and White, Photo of: .1 - Minister for Transport Tom Roper unveiling a plaque at the City Sq, 11/11/1985? celebrating the centenary of 100 years of Melbourne tramways. See image i1 and i2 for close up of the plaque. .2 - display of cable car 299 and grip car at the city square along with a pseudo railcar. .3 - group of four cars on display in Swanston St with Y469 on the rear.trams, tramways, 100 years of trams, tmsv, swanston st, y class, tram 469 -
 Melbourne Tram Museum
Document - Folder, William Pollock, "The Melbourne Cable Tramway System", c1940
... – htd4715i29.jpg 25 – Cable Grip – htd4715i30.jpg 26 – Crown Pulley... – Cable Grip – htd4715i30.jpg 26 – Crown Pulley – two sheets ...Folder - heavy red covers with two screw sets containing a photocopy of a report by William Pollock, prepared after the closure of the cable tram system titled ""The Melbourne Cable Tramway System". Image numbers listed: Folder – htd4715i1 Inside of folder – htd4715i2.jpg Report –Photocopy of a 14 foolscap sheets, paper titled “The Melbourne Cable Tramway System” by William Pollock, describing the system in detail, listing 26 appendices. Has notes on each Power Station, including a table of opening, closing, power produced and cables, fuel, permanent way (track), cables, underground gear, tunnels, flooding and the grip. Image – htd4714i3.pdf Appendix 1 – Handwritten table “Cost the Melbourne Tramway System” – photocopied special size sheet folded. See image htd4715i4.jpg 2 – Drawing – Typical Power House layout - image htd4715i5.jpg 3 – Drawing – Head of Cable Driver – htd4715i6.jpg 4 – Drawing – Rope Drive – htd4715i7.jpg 5 – Photocopy of a Fuel and Water test sheet for the Esplanade Power House – two sheets – 14/5/1918 – htd4715i8.jpg and htd4715i9.jpg 6 – Section of Cable Tram track – htd4715i10.jpg 7 – Tar Burner used by MTOC 1893 – 1900 - htd4715i11.jpg 8 – Yoke Bracket for line drums – A1 Pulley – htd4715i12.jpg 9 – Tunnel Yoke – htd4715i13.jpg 10 – Elevating Wheel or Pulley with shield plate – htd4715i14.jpg 11 – Curve Pulleys, curve drum and rubbing bar – 2 sheets – htd4715i15.jpg and htd4715i16.jpg 12 – Curve or Conical drum – htd4715i17.jpg 13 – Cable Separating pulley or cone line drum – htd4715i18.jpg 14 – Yoke Pulley or General Pulley – htd4715i19.jpg 15 – Yoke Bracket for Drums – htd4715i20.jpg 16 – Automatic Switch Gear – htd4715i21.jpg 17 – Hand operated switch gear – htd4715i22.jpg 18 – Hand pickup – htd4715i23.jpg 19 & 20 – Photo of bunched strands and damaged cable – htd4715i24 21 – Diagram of Rope – Clarendon St Rope No. 41 – htd4715i25.jpg 22 – Strand Alarm – htd4715i26.jpg 23 – Rope History – two sheets – htd4715i27 and htd4715i28.jpg 24 – Rope Splice – htd4715i29.jpg 25 – Cable Grip – htd4715i30.jpg 26 – Crown Pulley – two sheets – htd4715i30 and htd4715i31trams, tramways, drawings, tramcars, cable trams, trackwork, mto co, reports -
 Melbourne Tram Museum
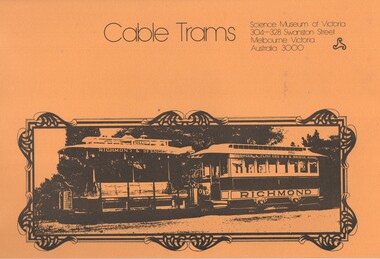
Book, Science Museum of Victoria, "Cable Trams", Apr. 1975
... , cable, bell punches, grips, crews and "mind the curve". .2... (power), the trams, cable, bell punches, grips, crews and "mind ....1 - Book - 4 pages, (brown paper) + card covers (brown printed matching brown on one side) - side stapled, titled "Cable Trams", published by the Science Museum of Victoria, Swanston St, at the time of the launch of the No. 1 cable tram set in the glazed display case 1/5/1975. Gives a description of cable tramways, a map, summary history, winding houses (power), the trams, cable, bell punches, grips, crews and "mind the curve". .2 - Program for the launch event and a list of speakers - Judge R. J. Leckie, F. R. Kirby, R. J Hamer and R. H. Fowler of the Museum. Also contains a pamphlet for the Science Museum of Victoria. Two copies held.trams, tramways, cable trams, science museum, displays -
 Melbourne Tram Museum
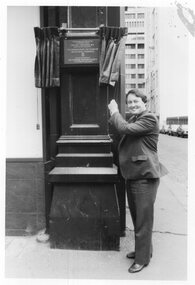
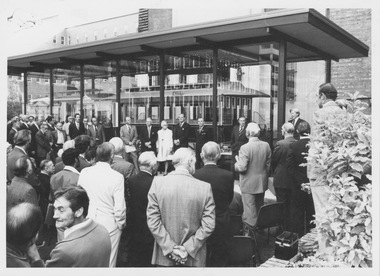
Photograph - Set of 4 prints of Cable Car set No. 1 being installed in Russell St display 1975, K S Kings, April and May 1975
... " "Melbourne. Cable Tram Grip Car No.1 is unloaded after overhaul..." "Melbourne. Cable Tram Grip Car No.1 is unloaded after overhaul ...Photographs show the installation process and official unveiling of Cable Tram set No.1, the first cable tram set to operate in Melbourne from 1885. It marked the 90th anniversary since its appearance on the cable network. This set was preserved by Alf Twentyman for many decades.Yields information about the provenance of Melbourne's first cable tram Black and white prints with notes on the rear.On rear in ink or pencil: "Melbourne. Official unveiling of Cable Tram set No. 1 at the Science Museum 1/5/75, Thurs, 3.30pm, Russell St, Cnr Lt Lonsdale St, City" "Melbourne. Undergear being fitted to Cable Trailer No.1 at the Science Museum, before it joins Grip Car No.1 in the glass display case. Russell St, at Cnr Lt Lonsdale St, Melbourne. Not the temporary track. Sunday 20/4/75. (Stamp): K S Kings 140-10. Copyright reserved" "Melbourne. Cable Tram Grip Car No.1 is unloaded after overhaul at Preston W/S at the Science Museum, Russell St, at Cnr Lt Lonsdale St, City. Sunday 20/4/75. (Stamp): K S Kings 140-8. Copyright reserved" "Cable Car No.1 being moved into display case, Russell St, Melbourne, 9am Sunday 20 April 1975. (Stamp): Graeme S Breydon, 204 Carlisle St, Balaclava. 3183 B48-22" tramways, trams, cable trams, cable tram set no.1, science museum, russell st, alf twentyman -
 Melbourne Tram Museum
Album - Ron Scholten Slide Collection, Ron Scholten
... at Bylands RSC125 Cable grip car 1 being removed from the Melbourne... at Bylands RSC125 Cable grip car 1 being removed from the Melbourne ...Photo - see pdf file for further information. Number Brief Description RSC1 PCC 1041 at the gates of Preston Workshops on a test run without it’s trolley retriever RSC2 PCC 1041 in Glenhuntly Road on Route 67 en route to Carnegie crossing the Railway Gates at Glenhuntly Station RSC3 W2 482 stored at Malvern Depot with Olympic Park on the Destination RSC4 Cable Car Set 64 in Swanston St outside Princess Bridge Station in Bound with open top Double Deck Bus, Trak Motors ? Departing from Flinders St Station RSC5 W3 669 in St George Rd at Sumner St en route to Preston Workshops for scrapping RSC6 Cable Car in Lygon St en route to Carlton RSC7 PCC 1041 turning from St Georges Rd into Miller St to enter Preston Workshops RSC8 Flinders St Station with cable cars RSC9 PCC 1041 in strife on it’s maiden day in service. Trams on route 88 delayed in Queens Parade Clifton Hill RSC10 Flinders St at William St with Cable Cars RSC11 L 104 on the fan of the new shed at Malvern Depot on a TMSV tour RSC12 Cable Set 1 after it’s restoration at Preston Workshops on the fan near the front gate RSC13 X1 466 at a suburban terminus of the Footscray System RSC14 X2 680 at Point Ormond Terminus RSC15 An ex Launceston Tram at the outside terminus of the Penny Royal Complex Tramway in Launceston RSC16 Q 148 at Preston Workshops awaiting disposal RSC17 Elizabeth St with Cable Cars RSC18 Elizabeth and Bourke St corner outside the GPO with cable cars RSC19 Collins St with Cable Cars RSC20 A photo taken from the observation deck of the ICI building showing a view of Parliament house with a w class tram in Nicholson St RSC21 Auburn Horse car with a posed photo of all the tramwaymen employed RSC22 Cheltenham Double Deck Horsecar with a full load of passengers RSC23 City of Northcote cable trailer 3 at a terminus RSC24 City of Northcote Cable cars passing in High St Northcote RSC25 St Kilda Rd at Princes Bridge with Cable Cars RSC26 Flinders St with Cable Cars RSC27 Cable Cars RSC28 Bourke St looking towards Elizabeth St from Queen St RSC29 Cable cars in Bourke St at Elizabeth St looking East RSC30 Cable cars in Elizabeth St at the terminus at Flinders St RSC31 Cable cars in Bourke St at Swanston St looking west RSC32 Cable cars in Swanston St at Flinders St looking North RSC33 Cable cars in Collins St near Russell St RSC34 Cable cars in Elizabeth St at Bourke St RSC35 Cable cars in Collins St at Elizabeth St RSC36 Cable Cars in Swanston St at Flinders St RSC37 Cable cars in Collins St RSC38 Cable Cars RSC39 Cable cars in St Kilda Rd near Princes Bridge RSC40 Cable cars in Collins St East of Swanston St RSC41 Cable cars in Spring St outside Parliament house RSC42 K 92 in M&MTB Chocolate and cream livery but with a P&MTT Destination box on Route 14 RSC43 Thornbury depot viewed from Miller St and St Georges rd. Two W2 class cars are laying over between the peaks RSC44 Z3 201 in Met Livery passes D1 3510 in new M Tram livery. A Staff member in uniform stands in the doorway. Dandenong Rd RSC45 D1 3530 advertising Heinekin Super Golf on Route 55 in Royal Park RSC46 D1 3504 in M Tram livery on the reserved track in Matthews Ave near Essendon Airport showing Route 81 Travancore . I suspect it is a private enthusiasts charter due to the Malvern W class run number in the rear windscreen RSC47 D1 3504 on Route 64 in Dandenong Rd in M Tram Livery RSC48 D1 3504 in M Tram Livery at Airport West Terminus RSC49 D1 3504 in M Tram Livery in Union Rd outside the Showgrounds RSC50 D1 3504 at West Maribyrnong Terminus in M Tram Livery RSC51 D1 3503 in M Tram Livery in Malvern Depot RSC52 SW6 960 and VR 53 in Harbour Esplanade for the NMEL&T Co Centenary RSC53 Hawthorn Tramways Trust 32 in Harbour Esplanade for the NMEL&T Co Centenary RSC54 VR 53 & B 2042 in Harbour Esplanade for the NMEL&T Co Centenary RSC55 VR 53 & C 3016 in Harbour Esplanade for the NMEL&T Co Centenary RSC56 NMEL&T Co 13 usually V214 in Harbour Esplanade for the NMEL&T Co Centenary RSC57 NMEL&T Co 13 usually V214 at Preston Workshops for the NMEL&T Co Centenary RSC58 Hawthorn Tramways Trust Lettering on HTT 32 in Harbour Esplanade for the NMEL&T Co Centenary RSC59 Hawthorn Tramways Trust 32 in Harbour Esplanade for the NMEL&T Co Centenary RSC60 Hawthorn Tramways Trust 32in Harbour Esplanade for the NMEL&T Co Centenary RSC61 Hawthorn Tramways Trust 32 in Harbour Esplanade for the NMEL&T Co Centenary RSC62 NMEL&T Co 13 usually V214 at Preston Workshops for the NMEL&T Co Centenary RSC63 W2 516 and another on route 59 wait to shunt at Essendon Airdrome Terminus as W2 571 on route 49 departs. This was the last day of operation. RSC64 Australia’s First Electric Tram at Box Hill with Tramwaymen including H J Hilton who is in the centre RSC65 W2 484 en route to St Kilda Junction and another wait for passengers after a race meeting at Caulfield Racecourse RSC66 X1 463 on the Footscray system en route to Russell St RSC67 Geelong 35 on Chilwell Route, Formerly HTT 13, M&MTB 119, then Bendigo 1 and Ballarat 37 RSC68 P&MTT 4 on Opening Day of the system in Glenferrie Rd RSC69 Bendigo 6 in McCrae St near the Depot end route to North Bendigo RSC70 P&MTT 4 in Glenferrie on opening day of the System RSC71 Scrubber 3 stripped and awaiting scrapping at Preston Workshops RSC72 Scrubber 4 at South Melbourne Depot RSC73 Q 191 & 139 at Preston Workshops awaiting scrapping RSC74 Rail Grinder 3 at Preston Workshops as purchased from Sydney RSC75 Y 469 waits to shunt at Wattle Park Terminus as Y1 613 departs on driver training duties RSC76 VR 53 on the outside roads at Essendon Depot RSC77 W5 796 with three doors and square windows running out of Brunswick Depot in Cameron St, with a supplementary destination board showing “City via Swanston St” RSC78 W2 258 on the wheel grinder road at Brunswick depot RSC79 X2 676 on a TMSV tour, W5 817 & 836 & VR 53 on the open roads at Essendon Depot RSC80 PCC 1041 on test, passes W71035 in High St Preston RSC81 D1 class production number 7 as delivered on test in Matthews Ave RSC82 W2 383 on route 5 turning from the reserved track in Dandenong Rd into St Kilda Rd at St Kilda Junction RSC83 Z3 204 as advertising tram for Vodaphone Grand Prix running into Malvern Depot new shed RSC84 Z1 4 on test in St Georges Rd RSC85 PCC 1041 on Route 96 in Burke St near Exhibition St RSC86 Z1 3 without numbers on test turning from Miller St in St Georges Rd RSC87 Track components stored in Coldblo Rd at Malvern Depot with Z class cars adjacent RSC88 D1 3501 in M Tram Livery on Route 55 in Peel St at Franklin St RSC89 C 3001 in Yarra Trams Livery Porto 018 & D13502 in M Tram Livery on Display in Harbourside Esplanade RSC90 D1 class tram production number 7, in as delivered condition on test in Matthews Ave RSC91 D1 3503 inside Malvern Depot RSC92 SW6 955 and W6 974 in St Kilda at City Rd at Dusk RSC93 Freight Car 19 at Preston Workshops in green Livery RSC94 Rail Grinder 3 in green Livery at South Melb Per Way Yard RSC95 A SW6 class car on route 50 shunting at Elizabeth St Terminus at night, taken from Flinders St Station RSC96 W2 588 & 435 in St Kilda Rd at Batman Ave RSC97 Y1 613 in service at Wattle Park Terminus RSC98 W2 588 in Wellington Parade en-route to the City with a Grand Final Load of passengers followed closely by 384 RSC99 W2 558 on a MCG Footy Special entering the Simpson St sidings RSC100 W3 657 & an L Class in the new shed at Malvern Depot RSC101 Y1 613 in St Kilda Rd on an enthusiasts tour in St Kilda Rd south of St Kilda jun RSC102 Y1 613 on an enthusiasts tour in Clarendon St with the two extra tracks on the Viaduct under construction RSC103 W6 976 on the fan of the new shed at Malvern Depot RSC104 W7 1024 as an advertising car for Bank of NSW at the route 1 terminus at South Melb Beach RSC105 PCC 980 on route 96 in Nicholson St near North Fitzroy Depot RSC106 SW6 890 with dash canopy lighting in Market St on the opening day of William St Services RSC107 W2 444 with big numbers heads a line of footy specials in Simpson St Sidings RSC108 Cable Cars in Elizabeth St RSC109 NMEL&T co 2 with a trailer outside the power station in Mount Alexander Rd RSC110 Alf Twentyman’s cable car set in his Northcote backyard RSC111 Cable Cars in Queens Parade Clifton Hill RSC112 Cable cars in Collins St outside the Townhall RSC113 PCC 1041 at Carnegie terminus RSC114 Cable cars in Elizabeth St RSC115 Cable cars in Collins St near Swanston St RSC116 HTT 19 turns from Riversdale Rd into Camberwell Rd at Camberwell Junction RSC117 W1 419 official builders photo of first car of the class RSC118 Cable car with a full load of passengers RSC119 W1 422 illuminated for the visit of T.R.H. The Duke and Duchess of York RSC120 PCC 1041 in strife on it’s maiden day in service. Trams on route 88 delayed in Queens Parade Clifton Hill RSC121 Bendigo birney in Finn St near North Bendigo terminus RSC122 SW6 in St Kilda Rd at Domain Rd at night RSC123 All 3 of Alf Twentyman’s cable cars in his Northcote backyard RSC124 Cable trailer 256 being unloaded into the shed at Bylands RSC125 Cable grip car 1 being removed from the Melbourne Museum RSC126 Alf Twentyman's cable cars in his Northcote Backyard RSC127 Alf Twentyman's cable cars in his Northcote Backyard RSC128 Alf Twentyman's cable cars in his Northcote Backyard RSC129 Alf Twentyman's cable cars in his Northcote Backyard RSC130 W class car in Swanston St at Collins St RSC131 Y1 469, L & W3 on the run out of Glenhuntly Depot on a tour RSC132 W7 1024 as an advertising tram for Bank of NSW at Clifton Hill RSC133 W2 496 on a footy special in Simpson St Sidings RSC134 W2 as originally converted to a test car at Preston Workshops RSC135 W3 667 in Brunswick Depot with Ellen Butland at the controls RSC136 W3 669 on it’s final run at Victoria Prd & Brunswick St RSC137 W2 571 in Wellington Prd at Clarendon St with a Footy Final load of Passengers RSC138 Y1 613 shunts at Spencer St Terminus as X217 waits on Australia Day Pageant RSC139 PCC 1041 on Rt 96 in Burke St outside the Southern Cross Hotel RSC140 890 with accident damage on the outside roads at Preston Workshops c1978 RSC141 535 on Rt 4 at the old St Kilda Jun c1967 RSC142 1041 on Rt 88 turns from Bourke St into Spring St 1973 RSC143 102 on a tour at Albert Park Beach Terminus Feb 1972 RSC144 833, 835 & 834 in the shed at Malvern Depot c1976 RSC145 281 in Wellington Parade on a football very crowded special c1974 RSC146 464 Ballarat Rd 1960 RSC147 181 Explosives Fty - at Footscray Station - July 1960 RSC148 181 Williamstown Road 1960 RSC149 Cable car set at Alf Twentyman’s c1970 RSC150 X 217 at Malvern Depot c1970 RSC151 X1 465 and T181 Footscray Football ground in Barkly St. c1960 RSC152 Scrubber 5 at South Melbourne depot c1960 RSC153 X1 465 Footscray to Russell St, c1960 RSC154 X1 467 Leeds St Footscray 1960 RSC155 PMTT 4 Glenferrie Road, 1910 RSC156 S 164 at Malvern Depot c1970 RSC157 T178 Footscray c1960 RSC158 Cleaner No. 7 at South Melbourne depot c1960 RSC159 Two Y classes at Princes Bridge / Batman Ave mid 1950s RSC160 Swanston St – Nu color vue slide – M142 Demonstrates the work of Ron Scholten in photography, collection and/or production of duplicate slidesAssembled album in a black presentation folder of 160 colour slides, 8 slide sleeves, collected or produced by Ron Scholten. Many are TMSV or Windsor Publications slides. All photographs have been scanned and placed on the Museum's G drive. A list of all photographs with details has been compiled. melbourne, tramways, trams, cable trams -
 Flagstaff Hill Maritime Museum and Village
Equipment - Sand peg set, Mid-19th to mid-20th Century
This set of Victorian era wooden sand pegs was part of the equipment used by the Rocket Rescue Crew when attending a shipwreck. The broad pegs were designed to give a strong grip on soft sand and soil. The pegs could be used with the sand anchor as well as to give a stronger hold on the tripod holding the hawser. The same design is still available today and is used by the Army and by campers. The rocket rescue crews used a sand anchor at a beach rescue site to weigh down the rescue apparatus. The crew would connect the shackle to the other cable on the anchor and to the loose steel cable to form a triangle with the cable lengths. They would then bury the anchor in about a 0.75-meter trench, keeping the free end of the cable above the surface. This end of the cable was then connected to a block that was attached to the heavy hawser line. The block and a crotch pole were used to keep the hawser line high and taught as the survivors were hauled to shore on a line or in a breeches buoy. Saving lives in Warrnambool – The coastline of South West Victoria is the site of over 600 shipwrecks and many lost lives; even in Warrnambool’s Lady Bay there were around 16 known shipwrecks between 1850 and 1905, with eight lives lost. In 1859 the first Government-built lifeboat arrived at Warrnambool Harbour and a shed was soon built to house it. In 1858 the provision of rocket and mortar apparatus was approved for lifeboat stations in Victoria, and in 1864 a rocket house was built to safely store the rocket rescue equipment. In 1878 the buildings were moved to the Breakwater area, and in 1910 the new Lifeboat Warrnambool arrived with its ‘self-righting’ design. For almost a hundred years the lifeboat and rocket crews, mostly local volunteers, trained regularly to maintain their rescue skills. They were summoned when needed by alarms, gunshots, ringing bells and foghorns. Some became local heroes but all served an important role. By the end of the 1950s, the lifeboat and rescue equipment had become obsolete. Rocket Rescue Method - The Government of Victoria adopted lifesaving methods based on Her Majesty’s Coast Guard in Great Britain. It authorised the first line-throwing rescue system in 1858. Captain Manby’s mortar powered a projectile connected to a rope, invented in 1808. The equipment was updated to John Dennett’s 8-foot shaft and rocket method that had a longer range of about 250 yards. From the 1860s the breeches buoy apparatus was in use. The apparatus was suspended on a hawser line and manually pulled to and from the distressed vessel carrying passengers and items. In the early 1870s Colonel Boxer’s rocket rescue method became the standard in Victoria. His two-stage rockets, charged by a gunpowder composition, could fire the line up to 500-600 yards, although 1000 yards range was possible. Boxer’s rocket carried the light line, which was faked, or coiled, in a particular way between pegs in a faking box to prevent twists and tangles when fired. The angle of firing the rocket to the vessel in distress was measured by a quadrant-type instrument on the side of the rocket machine. Decades later, in about 1920, Schermuly invented the line-throwing pistol that used a small cartridge to fire the rocket. The British Board of Trade published instructions for both the beach rescue crew and ship’s crew. It involved setting up the rocket launcher on shore at a particular angle measured by the quadrant, inserting a rocket that had a lightweight line threaded through its shaft, and then firing it across the stranded vessel, the line issuing freely from the faking board. A tally board was then sent out to the ship with instructions in four languages. The ship’s crew would haul on the line to bring out the heavier, continuous whip line, then secure the attached whip block to the mast or other sturdy part of the ship. The rescue crew on shore then hauled out a stronger hawser line, which the ship’s crew fixed above the whip block. The hawser was then tightened using the block on the shore end of the whip. The breeches buoy and endless whip are then attached to the traveller block on the hawser, allowing the shore crew to haul the breeches buoy to and from the vessel, rescuing the stranded crew one at a time. This set of sand pegs would have been used with sand anchor that is part of the rocket rescue equipment . It is significant for its connection with local history, maritime history and marine technology. Lifesaving has been an important part of the services performed from Warrnambool's very early days, supported by State and Local Government, and based on the methods and experience of Great Britain. Hundreds of shipwrecks along the coast are evidence of the rough weather and rugged coastline. Ordinary citizens, the Harbour employees, and the volunteer boat and rescue crew, saved lives in adverse circumstances. Some were recognised as heroes, others went unrecognised. In Lady Bay, Warrnambool, there were around 16 known shipwrecks between 1850 and 1905. Many lives were saved but tragically, eight lives were lost.Peg or spike; set of twelve wooden pegs, painted red. Pages have a long, thick square shank with bevelled side edges, flat top with broad hook on one side of the top and a point at the other end. A small hole goes from one side to the other side near the centre of the shank, on the face without the hook. flagstaff hill maritime museum & village, flagstaff hill, maritime museum, maritime village, warrnambool, great ocean road, shipwreck, life-saving, lifesaving, rescue crew, rescue, rocket rescue, maritime accidents, shipwreck victim, rocket crew, beach rescue, line rescue, rescue equipment, rocket firing equipment, rocket rescue equipment, rocket apparatus, beach apparatus, breeches buoy, rocket house, rocket equipment, rocket launcher, rocket line, marine technology, beach rescue set, traveller, block, running block, pulley, hawser, faked line, lady bay, warrnambool harbour, port of warrnambool, volunteer lifesavers, volunteer crew, breakwater, rocket rescue method, rocket rescue apparatus, shore to ship, rocket apparatus rescue, stranded vessel, whip line, endless whip, harbour board, sand anchor, rocket set, anchor backer, beach anchor, backer, steel cable, wire cable, sand peg, wooden tent peg, army peg, military peg