Showing 397 items
matching george medal
-
 Running Rabbits Military Museum operated by the Upwey Belgrave RSL Sub Branch
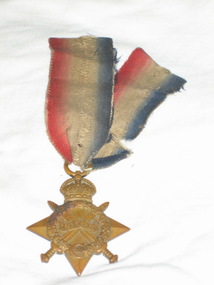
Medals, Medals of L/Cpl George William Steele
... /Cpl George William Steele Medals ...Wounded7/5/1915 Gallipoli Died of Wounds at sea in transit to hospital The 1914 Star This bronze medal award was authorized by King George V in April 1917 for those who had served in France or Belgium between 5th August 1914 to midnight on 22nd November 1914 inclusive. The reverse is plain with the recipient's service number, rank, name and unit impressed on it. It should be remembered that recipients of this medal were responsible for assisting the French to hold back the German army while new recruits could be trained and equipped. Collectively, they fully deserve a great deal of honour for their part in the first sixteen weeks of the Great War. There were approximately 378,000 1914 Stars issued. The British War Medal, 1914-18 The silver or bronze medal was awarded to officers and men of the British and Imperial Forces who either entered a theatre of war or entered service overseas between 5th August 1914 and 11th November 1918 inclusive Approximately 6.5 million British War Medals were issued. Approximately 6.4 million of these were the silver versions of this medal. The recipient's service number, rank, name and unit was impressed on the rim. SN 1053 14Btn AIF -
 Running Rabbits Military Museum operated by the Upwey Belgrave RSL Sub Branch
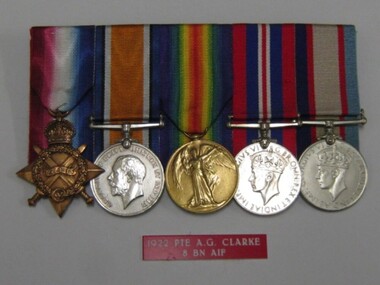
Medals, Medals of PTE Arthur Ernest Clarke
WW1 Served in Gallipoli & France WW2 Militia The 1914 Star This bronze medal award was authorized by King George V in April 1917 for those who had served in France or Belgium between 5th August 1914 to midnight on 22nd November 1914 inclusive. The reverse is plain with the recipient's service number, rank, name and unit impressed on it. It should be remembered that recipients of this medal were responsible for assisting the French to hold back the German army while new recruits could be trained and equipped. Collectively, they fully deserve a great deal of honour for their part in the first sixteen weeks of the Great War. There were approximately 378,000 1914 Stars issued. The British War Medal, 1914-18 The silver or bronze medal was awarded to officers and men of the British and Imperial Forces who either entered a theatre of war or entered service overseas between 5th August 1914 and 11th November 1918 inclusive Approximately 6.5 million British War Medals were issued. Approximately 6.4 million of these were the silver versions of this medal. The recipient's service number, rank, name and unit was impressed on the rim. The Allied Victory Medal Approximately 5.7 million victory medals were issued. The recipient's service number, rank, name and unit was impressed on the rim. The 1939-45 Star Awarded for service as follows: • Army - awarded for six months service in an operational command during the period 3 September 1939 to 2 September 1945. The War Medal 1939-45 Awarded to members who served full-time in operational or non-operational service between 3 September 1939 and 2 September 1945. Clarke SN 1703 8 Btn AIF -
 Running Rabbits Military Museum operated by the Upwey Belgrave RSL Sub Branch
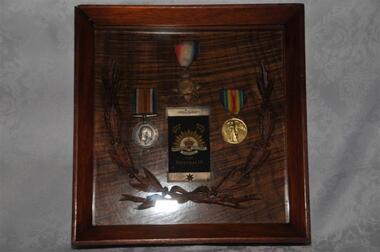
Framed Medals
Framed 1914/15 Star, British War Medal, Victory Medal, Embroidered "for Australia" cloth & Metal Scroll, Death Brooch. L/Cpl Chester George Mather 22 Btn KIAmedals, ww1, army -
 Federation University Historical Collection
Book - Book - Scrapbook, Ballarat Institute of Advanced Education: Scrapbook of newspaper cutting, Book 7; May 1972 to August 1972
Newspaper cuttings relating to Ballarat Institute of Advanced Education. These are from various newspapers and include The Age, Ballarat Courier, The Australian, The Herald. The cuttings cover the period from 1 May 1972 to 16 August 1972. Book with orange cover, front. Spiral bound.ballarat institute of advanced education, biae, employment advertisements, application for enrolment, outline of courses, technical teachers on strike, biae students-pick and shovel, award winner from mt isa, first h e arblaster award to brian nash, alan weston wins state award - joinery, ballarat paper for conference in u s a, publicity campaign by biae, george cross for r w richards, teachers' award attacked, professor white - cornell university, the college graduate, allowance cuts hit students, multi-purpose colleges considered, academic board for smb, cuts in college budgets, gas scholarships, darryl jeffries, noel shillito, federal government cuts to colleges, sturt mansions, julie selmon-architecture student, graeme mcgregor-construction student, teacher colleges get freedom, fourth uni in geelong, ballarat to put case for university, students head nuclear protest, studying their likely careers, gaol gates are safety hazard, medal presented by the queen, r richards, alp education committee at smb, biae campus divided longer than expected, mayor puts ballarat's claim for university, geology seminar, rainbow high school visit smb, awards for 80 new craftsmen, smb ball -
Federation University Historical Collection
Book - Book - Scrapbook, Ballarat College of Advanced Education: Scrapbook of newspaper cutting, Book 14; November 1983 to June 1984
Newspaper cuttings relating to Ballarat College of Advanced Education. These are from various newspapers and include The Age, Ballarat Courier, The Australian, The Herald. The cuttings cover the period from 1 November 1983 to 20 June 1984. . Book with beige cover, front. Spiral bound.employment advertisements, application for enrolment, outline of courses, peter pilven - potter, h r hughan award, how to get organised, organising personal files, 400 million years old, plants fossils at bcae, new pottery kiln, fund for grand piano, bcae phys ed aims, neville bunning at 81, living on a limited income, visiting engineers from india and fiji, industrial safety course, dennis else, student accommodation, closure of hostels, anne kilminster - northern territory, mining education group visits ballarat, lecturer's book out soon, garry kinnane, sandy blythe - paraplegic, phys ed teacher, ballarat's mature-age mafia, lyn bowers, heather howard, pam bignell, sue nichols, death of tom turner, principal of teachers' college 1950-1970, lynette snibson medal winner, new bcae graduates, kiran mazumdar visits from india, neil trezise at bcae, tertiary staff changes to save millions, wayne herbertson, toni shephard, western mining award to chris elliot, roped in for triple egg beater, heated pool debate, nurses will go to college, from base to bcae, paul rainbow awarded associateship, exhibited at the lighthouse, sculptor ken palmer, chifley bust, graduates finding good jobs, sir george paton, steve moneghetti hopes to run again -
Federation University Historical Collection
Book - Book - Scrapbook, Ballarat College of Advanced Education: Scrapbook of newspaper cutting, Book 17; February 1986 to June 1986
Newspaper cuttings relating to Ballarat College of Advanced Education. These are from various newspapers and include The Age, Ballarat Courier, The Australian, The Herald. The cuttings cover the period from 15 February 1986 to 28 June 1986. Mention of the Solutions Data Bank developed within the VIOSH program conducted at Ballarat College of Advanced Education. . Book with beige cover, front. Spiral bound.employment advertisements, application for enrolment, outline of courses, ballarat college of advanced education, bcae, dr ray watson psychologist, moneghetti for world events, musical cultural exchange, annie begonia queen, "cool burn" may save animals, wombat state forest, trainees at queen elizabeth centre, course will benefit sport, council president to national organisation, dr don watts, engineering study awards, ricky calvert, barry walker, indian brewer returns, n c mohan ram, metallurgy medal to ian mckee, political desert images, geoff bonney, jack coman, garry kinnane lecturer, biography of george johnston, mayor crebbins graduates, education for the nation, degrees for dad and daughter, paul hotchin a busy man, robert morrow mining engineer, the flab kids, speech problems rife, brett sinclair wins $1000, roderick ramsay top geology student, pro david klein revisits, merit for geologist, filipino academic at bcae, method to assess skills, student nurses meet patients, schools compete for environment awards, students set to join vsu, victorian student union, first for local sculpture students, adrian thomas, head of perfoming arts, key role in inventions, head questions government plans, saga of survival on the ice, dick richards, dr jim thyer physics lecturer, old u s defence 'secret', safety solutions data bank, dennis else -
 Ballarat Clarendon College
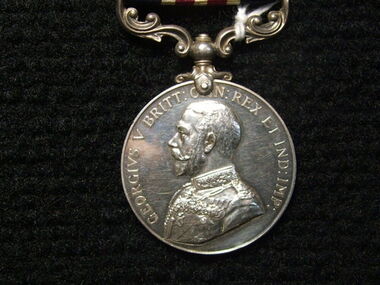
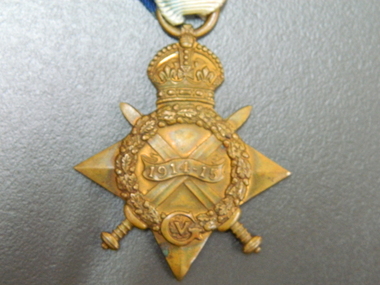
Medal, The 1914-15 Star, 12/1918
The 1914–15 Star was authorised in 1918 and was awarded for service in specified theatres of war between 5 August 1914 and 31 December 1915. A recipient of the 1914 Star could not also be awarded the 1914–15 Star. The medal is accompanied by its original box. The Holgate medals were the first war medals held by BCC archives. They have historical and social significance for the College.The 1914-15 Star is a four pointed star of bright bronze, ensigned with a crown. The obverse has crossed gladius, overlaid with an oak wreath that is ensigned with the cypher of King George V. A scroll bearing the legend 1914-15 is centrally placed across the crossed blades. The 1914-15 Star ribbon has the red white and blue colours of the Empire, in shaded and watered stripes. The medal is accompanied by its original box.Engraved on a scroll in the centre of the medal front: '1914-15' The oak wreath is ensigned with the cypher of King George V. The back of the medal is engraved: '3193 / Pte E. S. HOLGATE / 6/F AMB. A.I.F. The box lid is inscribed: 'AMC/13 / 3193 / Pte. E. S. Holgate / 6/F.Amb,A.I.F. / 9350/Decd.'world war one, medal, 1914, the 1914 15 star, w w 1, private e s holgate, holgate, a i f, australian imperial force, holgate medal -
 Ballarat Clarendon College
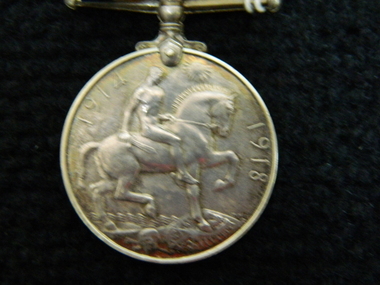
Medal, British War Medal, 1918
The British War Medal 1914-20 was iInstituted by King George V in 1919 to mark the end of World War I and record the service given. The qualification period was later extended to cover post-war mine clearance and service in Russia during 1919 and 1920. The British War Medal was awarded for service in a theatre of war between 5 August 1914 and 11 November 1918. Those eligible included members of women's organisations; persons on the staffs of military hospitals and members of recognised organisations who handled sick and wounded; and members of other duly recognised or other authorised organisations as specified in medal regulations. The qualification period was later extended to cover post-war mine clearance and service in Russia during 1919 and 1920. Lieut E. S. Holgate was mentioned in despatches for Gallantry in the Field 24/25 April 1918. He was killed in action at Villers-Bretonneux, 27 April, 1918. The British War Medal completes a trio of medals awarded to Lieut. E. S. Holgate, including the 1914-15 Star and the Victory Medal. The Holgate medals were the first war medals held by BCC archives. They have historical and social significance for the College.The British War Medal is round and made of cupro-nickel. It features the effigy of George V on the obverse. The reverse has an image of St George on horseback trampling underfoot the eagle shield of the Central Powers, and a skull and cross-bones, the emblems of death. Above this is the risen sun of victory. The British War Medal has a wide central watered stripe of orange, flanked by two narrow white stripes, which are in turn flanked by two black pin-stripes, further flanked by two outer stripes of purple. The colours have no particular significance. Impressed around edge are the recipient's details. Inscribed around outer edge of obverse: 'GEORGEIVS V BRITT. OMN:REX ET IND:IMP:' Impressed around edge of medal: 'LIEUT.E.S.HOLGATE. A.I.F.' Inscribed on the reverse '1914 1918'medal, 1918, world war 1, british war medal, w w 1, holgate, a i f, australian imperial force, holgate e s, holgate medal -
 Ballarat Clarendon College
Medal, Military Medal GV, Instituted 25th March 1916
Instituted in 1914, the Military Cross (MC) was issued for gallantry in presence of the enemy to warrant and junior officers of the Army who were ineligible (on account of their rank) for the Distinguished Service Order. During the First World War, it was also available to equivalent ranks in the Royal Naval Division and Royal Marines and it later became available to equivalent ranks in the RAF for acts of gallantry on land. The equivalent award for the other ranks for gallantry on land in presence of the enemy was the Military Medal (MM) which had been instituted in 1916 and, similarly to the MC, later became available to RAF other ranks serving on the ground. This medal was awared to Pte H. S Holgate for bravery in the field in 1917. Pte Holgate was killed in action at Zonnebeke 11 October 1917. Historical and social significance for schoolSilver medal with a swivelling suspension. features King George the V, uncrowned, in Field Marshal's uniform on the obverse. The medal reverse depicts the crowned royal cypher over the words "FOR BRAVERY IN THE FIELD" all within a laurel wreath. Impressed around edge are the recipient's details. The ribbon has a central stripe of thin red and white lines flanked by equally sized stripes of navy. Inscribed around obverse: 'GEORGIVS V BRITT: O[M]N: REX ET IND: IMP:' Inscribed in centre of reverse below royal insignia : 'FOR/BRAVERY/IN THE/FIELD' Impressed around OUTER edge of medal: '4303 PTE H. S. HOLGATE. 8/COY AUST. M.G.C.' Notation on original box A./Cpl H.S.Holgate 29Bn AIF 51531/Decd. 43031917, medals, military medal, world war i, w w 1, holgate, private h s holgate, zonnebeke, holgate medal -
 Bendigo Military Museum
Memorabilia - MONTAGE, FRAMED MEMORABILIA, Post 2000
Robert George Lunn VX76842 enlisted on 27.2.1942 age 35 years, 5.3 1942 transfer to Engineer Training Echuca, 12.4.1942 transfer to 2nd Field Sqd, 27.6.1942 transfer to No 4 Bomb Disposal Coy, 3.9.1942 transfer to No 2 Bomb Disposal Coy, 18.2.1943 transfer to Engineer Training Centre RAE, 18.8.1943 transfer to 5th Aust Advance Reinforcements Depot Townsville, 11.11.1943 embark for Pt Moresby, 19.11.1943 taken on strength 2/9th Field Coy, 4.6.1944 embark from Lae to Brisbane, 11.8.1944 hospital with Malaria28.8.1944 rejoin unit, 20.9.1944 hospital (unclear), 27.9.1944 rejoin unit, 23.5.1945 embark for Morotai, 7.8.1945 promoted to Cpl, 12.8.1945 fly from Balikpapan to Aust to attend a Junior leaders school Aust Army, 22.8.1945 arrive Vic and attend school, 29.8.1945 attend RAE Training Centre NSW, 31.10.1945 Move to Vic for discharge, 7.11.1945 discharged from the 2nd AIF.Wood framed item with photo, ID tags, medals x 4, RAS badge, RSL badge, all items are set in panels within the frame, panel with text at bottom. Medals. 1. 1939 - 45 Star. 2. Pacific Star. 3. British War medal 1939 - 45. 4. Australian Service Medal 1939 - 45."VX76842 Lance Corporal Robert George Lunn, 2/9 Australian Field Company Australian Imperial Force, 27 February 1942 - 7 November 1945"framed, memorabilia, ww2, medals, lunn -
 Bendigo Military Museum
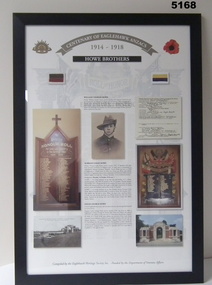
Memorabilia - CENTENARY of EAGLEHAWK ANZACS, FRAMED, Eaglehawk Heritage Society, HOWE BROTHERS, c2014
PRIVATE WILLIAM CHARLES HOWE, No 873, 14th Battalion, RTA 10/5/1916. PRIVATE NORMAN LESLIE HOWE, No 5107, 7th Battalion, died from wounds 5/10/1917 in Belgium. SERGEANT LESLIE GEORGE HOWE (same surname but not a brother) No. 2709, 7th Battalion, Awarded Distinguished Conduct Medal. RTA. Memorabilia - framed story of two brothers, soldiers in colour using memorabilia of the soldiers and their lives. Printed on paper. Frame - black extruded plastic, glass front, cardboard backing."HOWE BROTHERS"framed item, anzacs, eaglehawk -
 Bendigo Military Museum
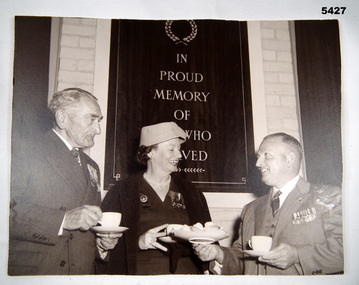
Photograph - PHOTOGRAPH, RSL, Pre 2000
Photo in the collection re John Eric Wiles VX16067, refer Cat No 5410P for his service details. Vivian Bullwinkle (The survivor of the Banks Island massacre WW2)B & W photograph on card backing showing three people, two men and one women, all 3 are wearing medals, on rear a label has been typed and stuck on.On rear, “ Sir George Knox, Vivian Bullwinkle, Jack Wiles President Mitcham RSL”photographs, mitcham rsl, wiles -
 Bendigo Military Museum
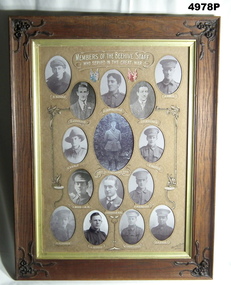
Honour Board - BEEHIVE STORE HONOUR BOARD WW1, Bee Hive Staff, Photographic Honour Roll Members of the Beehive Emporium Staff who served in the Great War WW1, c1918-1925
This honour roll was found in poor condition in a district antique shop. It was fully restored by an enthusiastic local lady, It was presented to the Soldiers Memorial Military Museum on 20 April 2022. The Museum is now known as the Bendigo Military Museum. The Beehive was a major store in Pall Mall Bendigo, the Main Street through the centre of the City. Names on the roll. Top row, E. Buddle, Edgar Peter No 4450 14th reinforcements 6th BN. R Jenkins, Reginald Claude No 4526 14th reinforcements 6th BN. H Crowalladar. Spelt wrong, actually Thomas Henry Cadwallader No 4160 13th Reinforcements 7th BN KIA 18.8.1916. J. A. Williams, John Arnold No 9797 16th reinforcements 2nd Fld Amb. J. Holl, James Thomas No 2432 5th reinforcements 60th BN. 2nd row, N. Veale, (Veal) Norman Joseph No 2070 5th reinforcements 14th BN Major Robert Oswald Henderson D.S.O, 38th BN HQ, KIA 29.9.1918. Rank at death Lt Colonel. P, Buddle, Thomas Percy No 3359 9th Reinforcements 58th BN KIA 27.4.1918. 3rd row. C. Wood MM, Charles No 2453 5th Reinforcements 24th BN, MM 20.9.1917, Bar to MM 14.6.1918. T. Henderson MM, Thomas Richard, 15th Reinforcements 5th BN (2nd Lt). Awarded MM after joining the Canadian Army. F. Marriot, Frederick No 1897 13th Reinforcements 4th LH Regt, MM 2.11.1917 4th row. N Meagher, Norman Bernard No 43 38th BN HQ. G.Speedy, George Thomas No 21718 General reinforcements Army medical Corp 1917. W. Trebilcock, William Edward No 55239 5th General Reinforcements (Vic) 1918. C. P. Fisk, Charles Reginald No 55371 6th General Reinforcements (Vic) 1918. "MM" Military Medal "DSO" Distinguished Service Order The frame is a flat faced hardwood timber, varnished. Each corner has a decorative scroll work of leaves and flowers. They are dark brown colour. There is a gold rim around the inside of the picture frame. Inside are 15 oval openings, in which are black and white portraits of WW1 soldiers. The writing and captions are in white paint. Each name has a decorative loop around it. There are two sets of National flags painted near the top. Red and blue tints.ww1, honour roll, beehive -
 Bendigo Military Museum
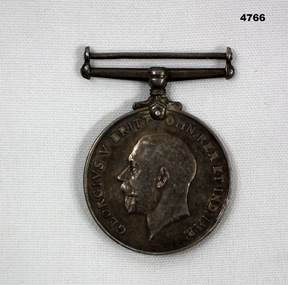
Award - MEDAL, Post 1945
George James Rush No 14312 enlisted in the RAAF on 10.7.1940, discharged 14.7.1947 with the rank of Sgt in No 2 Aircraft DepotBritish War medal with ribbon not mounted“G.J Rush 14312 RAAF”medals, awards, british -
 Bendigo Military Museum
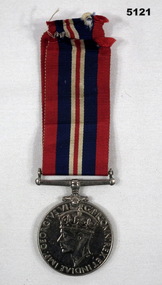
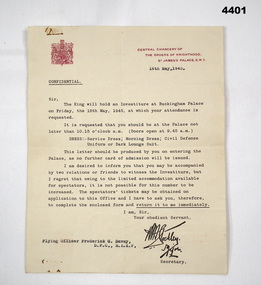
Document - INVESTITURE INVITATION, Central Chancery of the Orders of Knighthood, St James' Palace, 16th May, 1945
The invitation was sent to F.G. Davey requesting his attendance at Buckingham Palace where he was to be presented with the DFC by King George VI. Part of F.G. Davey Collection. See catalogue no. 3536P for his service record.Confidential document in black type under the letterhead of the Central Chancery of the Orders of Knighthood, St James' Palace SW1. Letterhead including a crest is printed in red. Signature of the sender is a printed replica of a handwritten version. Document is printed on cream coloured cartridge paper.distinguished flying cross, medals, f.g.davey -
 Bendigo Military Museum
Award - MEDAL, Post 1918
George Henry BRUMBY No 1790 enlisted 14.3.1916 in 2nd reinforcements 39th Bn aged 22 years 11 months, embarked for England 16.8.1916, embark for France 23.11.1916, hospital Mumps 2.12.1916, rejoin Unit 25.12.1916, hospital Influenza 23.3.1918, rejoin Unit 19.4.1918, embark for Aust 1.5.1919, discharged from the AIF 20.7.1919.British War medal 1914 - 19 single on own with no ribbon, stamped on rim edge.Stamped on, “1790 Pte G.H Brumby 39th Bn A.I.F”medals, awards, british war medal -
 Bendigo Military Museum
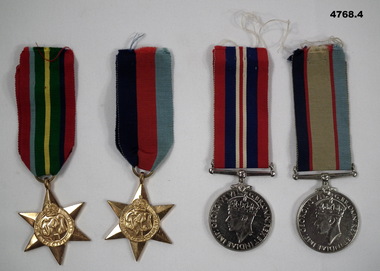
Award - MEDAL SET, Post 1945
Stanley George BRUMBYY Regt No’s V236330 & VX140658. Enlisted initially in the CMF 22.7.1942 to 2.4.1943, transfer to AIF 3.4.1943 age 18 years, embark for Lae N.Guinea 20.12.1943 with 2/12 Aust Field Regt, disembark Aust 7.3.1944, hospital twice with Malaria from 10.5.1944 to 8.10.1944, embark for Morotai with 2/8th Field Regt 6.5.1945, embark for British North Borneo 19.6.1945, disembark Brisbane 24.2.1946, discharged from the 2nd AIF 7.10.1946. Item relates to Cat No 4766.Medals individual with ribbons all engraved. 1. Pacific Star. 2. 1939 - 45 Star. 3. British War medal 1939 - 45. 4. Australian Service medal 1939 - 45Engraved/stamped on all, “VX140658 S.G.BRUMBYmedals, awards ww2 -
 Ballarat Clarendon College
Medallion, Dux of Junior School 1923
Medallion awarded to Robert McIntyre Buchanan, Dux of Ballarat College Junior School 1923. Robert (25/07/1909 - 1/11/1998), son of Mr R McI Buchanan Town Hall Hotel, Brother of Jack and George; entered Ballarat College 14/2/1922. Socially significantLocket-style medal with chain ring at top, gold on silver shield with ornate wreath around sides and bottom. Inscribed on front: R B / 1923 Inscribed on back: R M Buchanan / DUX / JNR SCHOOL / BALLARAT / COLLEGE Stamped on back: STG. SILVERrobert-mcintyre-buchanan, dux, ballarat-college-junior-school -
 Ballarat Clarendon College
Albert Telfer White (1918) collection
Significant items relating to Albert Telfer White who entered Ballarat College April 1912 and left December 1918. Albert was born 29 June 1897 at his home 'Ashford Vale" farm, Cuthbert's Road, Cardigan. Albert, a second generation Australian, was the fourth son and sixth of eleven children born to dairy farmer John White and his wife Elizabeth, nee Douglas. Albert attended Bunker's Hill State School prior to enrolling at Ballarat College. After College he obtained employment with the engineering firm Ronaldson and Tippett in Ballarat. Following his eighteenth birthday Albert enlisted in the AIF in Ballarat with the rank of Private, No 2012. He embarked for the Middle East with 23rd Battalion on 26 August 1915 and was 'taken on strength at the Gallipoli Peninsular 25 October 1915". On 10 January 1916 Albert was posted to Alexandria, Egypt and during this time he was able to meet with his aunt Rose Douglas, an Australian Army Nursing Sister. This was a great comfort to his family. Albert was sent to France 19 March 1916 and transferred to the 22nd Battalion. He was mentioned in dispatches for 'good and gallant conduct' 5 August (1917?). Albert was hospitalised 30 March 1918, rejoined 22nd Battalion 3 June 1918, wounded in action 3 October 1918 but died of wounds at Rouen 10 October 1918. news of his death was received by his family n Australia just prior to the armistice. Albert Telfer White's sacrifice is commemorated at Ballarat College, Avenue of Honour Ballarat (Tree 1214), Ballarat Shire Honour Avenue Learmonth (Tree 163) and the Australian War Memorial Canberra. (These notes provided by family November 2016)Collections of items including: Bayonet, Carl Eickhorn, Solingen, (29.A.159 engraved on handle) Trench shovel The ANZAC book 1916 (flyleaf inscribed: No 2012 / Pte A T White / H Quarters / 22nd Battalion / 6th Inf Brigade / France) Gallipoli medal with documentation First World War Mothers’ and Widows’ Badge Next of Kin Memorial Plaque (Death Penny) and accompanying letter from King George V Imperial War Graves Commission documentation and photograph Australia Graves Services In Memory card and photograph Documentation relating to Australian War Memorial Roll of Honour, Learmonth Memorial Wall, Ballarat and Learmonth Avenues of Honours Documentation from the Australian Army Records office Documentation relating to Military Medal, 1914/15 Star, British War Medal and Victory Medal (whereabouts unknown, November 2016) Portraiture of Albert Telfer White as a child, as a young adult (civilian dress), in full kit (A I E F formal), and at camp 1915 Portraiture of sisters Cis, Addie, Bessie, Evelyn (with personal inscriptions) Four postcards (one with letter from Albert ‘at sea’ to his mother - undated) Death notice (unreferenced newspaper clipping) Biographical and family relationship details Photocopy of The White Family 1906 showing (standing) Adeline, Leslie, Harold (father), Muriel (mother), William; (seated) Albert, John (Grandfather), Elizabeth, Allan, Elizabeth (Grandmother), Evelyn (baby) and Benjamin The ANZAC book 1916 (flyleaf inscribed: No 2012 / Pte A T White / H Quarters / 22nd Battalion / 6th Inf Brigade / France) Gallipoli medal: engraved on reverse: A T WHITE Embossed lettering on death penny: ALBERT TELFER WHITE Handwritten on reverse of portraits: Lovingly yours / Cis / 21/11/17; your / loving sister / Addie; your loving / sister / Evelyn; Yours lovingly / Bessie Handwritten on back of postcard of ship H M A T 'Anchisis' 14.3.16: Dear Mother, I am sending you a card / of the boat we are on. Our deck is right / on the back. I have marked it with an X. / We are not allowed to put the date on or / where we are. I am sitting on the deck now / holding the card in my hand so it is hard / to write. We are together yet haven't been / separated Bill, Matt and myself. Haven't / had anything to do. I will write a couple / of letters now. Albert Handwritten on back of postcard photograph of Albert at camp: 30th September 1915 / Dear Mother / There is a studio at the / camp so Matt and I got our Photos / taken yesterday morning, & got them/ this morning. I am sending / Ciss one of Matt.albert-telfer-white, ballarat college, world-war-one, avenue-of-honour -
 Ballarat Clarendon College
Medal, 1914-15 Star
The 1914–15 Star was authorised in 1918 and was awarded for service in specified theatres of war between 5 August 1914 and 31 December 1915. A recipient of the 1914 Star could not also be awarded the 1914–15 Star. Albert was born 29 June 1897 at his home 'Ashford Vale" farm, Cuthbert's Road, Cardigan. Albert, a second generation Australian, was the fourth son and sixth of eleven children born to dairy farmer John White and his wife Elizabeth, nee Douglas. Albert attended Bunker's Hill State School prior to enrolling at Ballarat College. After College he obtained employment with the engineering firm Ronaldson and Tippett in Ballarat. Following his eighteenth birthday Albert enlisted in the AIF in Ballarat with the rank of Private, No 2012. He embarked for the Middle East with 23rd Battalion on 26 August 1915 and was 'taken on strength at the Gallipoli Peninsular 25 October 1915". On 10 January 1916 Albert was posted to Alexandria, Egypt and during this time he was able to meet with his aunt Rose Douglas, an Australian Army Nursing Sister. This was a great comfort to his family. Albert was sent to France 19 March 1916 and transferred to the 22nd Battalion. He was mentioned in dispatches for 'good and gallant conduct' 5 August (1917?). Albert was hospitalised 30 March 1918, rejoined 22nd Battalion 3 June 1918, wounded in action 3 October 1918 but died of wounds at Rouen 10 October 1918. news of his death was received by his family in Australia just prior to the armistice. Albert Telfer White's sacrifice is commemorated at Ballarat College, Avenue of Honour Ballarat (Tree 1214), Ballarat Shire Honour Avenue Learmonth (Tree 163) and the Australian War Memorial Canberra. (These notes provided by family November 2016)Part of a greater A T White CollectionThe 1914-15 Star is a four pointed star of bright bronze, ensigned with a crown. The obverse has crossed gladius, overlaid with an oak wreath that is ensigned with the cypher of King George V. A scroll bearing the legend 1914-15 is centrally placed across the crossed blades. The 1914-15 Star ribbon has the red white and blue colours of the Empire, in shaded and watered stripes.Engraved on a scroll in the centre of the medal front: '1914-15' The oak wreath is ensigned with the cypher of King George V. The back of the medal is engraved: 2012 / Pte A T White / 23/BN. A.I.F. albert-telfer-white, medal, world war one, 1914-15 star -
 Lara RSL Sub Branch
Medal - Bombardier G.S.Hunt 57473, 1914
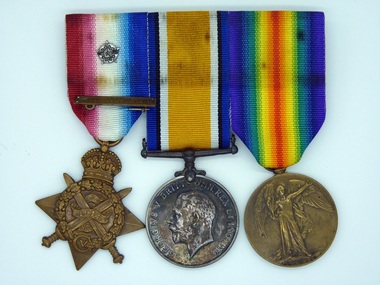
World War 1 Australian Bombardier with the Royal Field Artillery189 A brass gift box with an embossed hinging lid which was presented to WW1 sailors and soldiers for Christmas 1914. The gift was at the initiative of HRH The Princess Victoria Alexandra Alice Mary the daughter of the then King George V and Queen Mary. 189.1 Small card with paper insert 189.2 Three medals with coloured ribbons, one medal has a small metal badge attached. Items belonging to Bombardier G.S.Hunt, 57473 in the Royal Field Artillery, WW1.The lid is embossed with the bust of HRH Princess Mary in a wreath with the letter "M" to either side and the following words "IMPERIUM BRITANNICUM" and "CHRISTMAS 1914" and has the country names "FRANCE", "BELGIUM", "JAPAN", "RUSSIA", MONTENEGRO" and "SERVIA". 189.1 Front of card a crown with M underneath with 1915 under that. Inside Wreath with sword through it and the words With best wishes for a victorious new year from The Princess Mary and friends at home. 189.2 WW1 Campaign Medals / ribbons 1914-15 Star, British War Medal and Victory Medal.brass, hunt, g.s hunt, christmas, 1914, princess mary, bombadier, ww1, world war 1, army, royal field artillery, 1914 star, british war medal, victory medal -
 Lara RSL Sub Branch
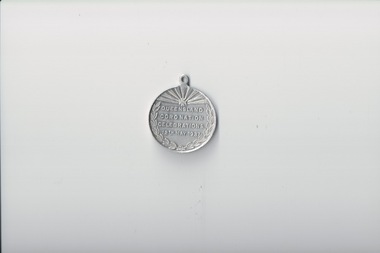
Coronation Medal, 1937
... of coronation of George V1 medal commemoration George V1 Queensland ...Celebration of coronation of George V1QLD Coronation Celebrations Medal 12th May 1937On the front is relief of King George V1 and Queen Elizabeth, the other has sheath around the edge with a gathered bands with a Maltese Cross in the centre. The inscription Queensland Coronation Celebrations 12th May 1937medal, commemoration, george v1, queensland -
 Bendigo Military Museum
Award - MEDAL, GREEK CAMPAIGN, 1947 - 1983
The Greek Commemorative War Medal was instituted by Royal Decree on 19.8.1947. It was awarded for service from the outbreak of war in Greece 1940 to the fall of Crete in 1941. It was also awarded to allied foreign troops who saw service as per the areas covered on the reverse of the medal. This medal was awarded to Alan Kenneth NAISMITH DCM, VX4838, 2/7th Bn. Refer Cat No 1421 for his service details.The medal itself is gilded bronze. The front of the medal in the centre is a relief of King George II of Greece. Around the outside is a laurel wreath joined at the top by a crown. The ribbon is attached by a ring suspender.The ribbon has a centre light blue stripe with a dark blue stripe each side. on the edges of the ribbon is a thin light blue stripe. The rear of the ribbon has a pin clasp The rear of the medal has a thin raised edge on the outside of the medal. The inscription in the centre is raised. The wording is in Greek except for the date. The inscription reads. 1940 - 41, Epirus, Albania, Macedonia, Thrace, Crete.commemorative war medal greek, 1940 - 41, medals -
 Bendigo Military Museum
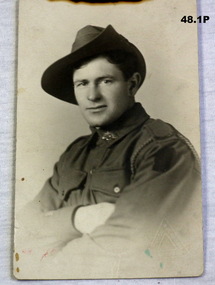
Photograph - PHOTOGRAPHS, c. 1914 - 1919
.1) 21.1.19 Yours sincerely Sgt. J.S. HOWLETT. 48.1 Pc Copy re 48.1P. .2) Single soldier, unknown. .3) Harry FOWLER, George ALLEN, Unknown. .4) Jack HOWLETT 2nd from left - group of 6 soldiers. Jack HOWLETT No. 2676, 59th Batt. AIF Refer 41 medals. .1) - .4) 4 sepia tone photos re J.S HOWLETT and mates in uniform. .1) Has a copy on display.photography, serving soldiers, portraits, military history -
 Bendigo Military Museum
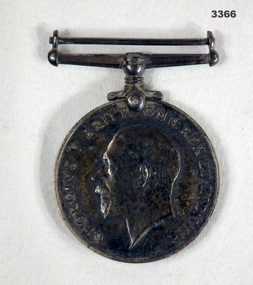
Award - MEDAL
British War Medal, dark metal, round with bar at top. King George V on front.On front in latin around outside: GEORGEIVS V BRITT OMN REX ET IND: IMP On back: 1914 - 1918 Around edge: 23179 PTE A HOLLENS, ESSEX Rmedals, military, history -
 Bendigo Military Museum
Administrative record - COMPENDIUM WW1 - WW2, 4) A H Pettifer, Government Printer et al, 2) 14.2.1946; .3) 1.3.1919; .4) 30.11.1954 .5) 24.11.19? - WWI; .6) 31.10.1917; .7) 12.6.1917; .8) Page 1: 20.12.1915, Page 2: 10.12.1915, Page 6: 19.1915; .9) 10.9.1918; .10) 18.4.1919; .11) c.2.3.19?; .12) 18.9.1920; .14) post WWI; .15) 24.4.1920; .17) 18.4.1942; .18) 19.6.1943; .19) 18.3.1947; .20) 1944; .21) 1944; .23) 22.10.1941; .26) 13.9.1944; .27) 1.1944; .30) 7.3.1950; .31) 31.7.1944; .32) 16.4.1942; .33) 13.6.1946; .34) 6.5.1946; .36) a) & b) 3.11.1947; .37) 24.10.1951; .38) 24.9.1957; .39) 9.10.1957; .40) 19.2.1958; .41) 26.2.1958; .42) 1.3.1958; .43) & .44) 7.3.1958; .45) 25.2.1958; .46) 3.1.1948; .47) 26.2.1948; .48) 22.4.1958; .49) 24.2.1958; .50) 12.3.1958; .51) 6.1958; .52) c.Mar/Apr 1958; .53) 5.4.1958; .54) c.end WWII; .55) a.b. 13.6.1967; .56) 26.5.1967; .57) 18.2.1954
Herbert Trangmar Allan, refer 2755.4 for his extensive service history and wards. .2) Details gifting of a pair of Japanese binoculars to Col H T ALLAN by Pacific Island Regiment. .3) Certificate issued by Winston Churchill, Secretary of State for War (The War of 1914-1918), awarded to Capt H T ALLAN MC. .4) Herbert Trangman ALLAN born 5.1.1895 at Woolwich, NSW. Middle name misspelled, should be Trangmar not Trangman. .6) Congratulating H T ALLAN on receiving the Military Cross award for leading 2 companies which had lost officers during action on Passchendaele Ridge on 9.10.1917. .7) Describes life behind the lines whilst H T ALLAN's battalion has been resting for a month. Daily life consisted of training drills, sport & entertainment. Writer takes time to describe the countryside & weather. .8) Relate to H T ALLAN's military exam results & his promotion to 2nd Lieutenant in 1915. .9) To Herbert Allan's father, Mr P Allan detailing the citation for awarding of the Military Cross to Herbert ALLAN. Original citation appeared in the London Gazette,5.4.1918. .10) Form addressed to Capt H ALLAN MC, 17th Battalion stating his period of enlistment in the 1st AIF was to expire 26.5.1919. .11) Letter from Lord BIRDWOOD (General) to Herbert ALLAN in response to a letter received 19.11.19?. General BIRDWOOD expresses his opinions on difficulties the allied troops face in their fight against the Japanese. .12) Letter to Capt H T ALLAN advising of MID oak leaves sent to him. Details guidelines for attaching oak leaves to both the larger Victory Medal & the small service dress medal. .13) Form details H T ALLAN's WWII Army No, Rank, Unit & Decorations & Medals held. The form has not been signed & dated. .14) Details service record of Lt Col H T ALLAN NX12229. Includes military service from 1912 - 1944, schools & courses attended, decorations, promotions & overseas service. .16) Form issued to H T ALLAN on 15.12.1939 granting permission to leave New Guinea for Australia & return within a period of 12 months. Issued by Customs Office in Salamaua. Lists H T ALLAN's age as 44, height 5' 10" & occupation. .17) Letter from Major General MORSHEAD GOC, AIF (ME) to Major H T ALLAN, OBE, MC congratulating him on being awarded the OBE for outstanding service at Tobruch. .18) Letter from Major General MORSHEAD to Major H T ALLAN, OBE, MC replying to ALLAN's letter of 15.6.1943. MORSHEAD is congratulating ALLAN on his appointment to New Guinea Force, also acknowledges his excellent service record. .19) Letter acknowledges H T ALLAN's resignation from the Office of Production Member of the Australian New Guinea Production Control Board, effective from 28.8.1946. .20) Major General WINDEYER commanded the 20th Brigade from 1942-1946. .22) Card sent from the CO of the 3rd Australian Anti-Tank Regiment. .23) Menu for Farewell Dinner held in the Officer's Mess of the 20th Infantry Brigade, Tobruch on 22.10.1941. .24) Menu & Toast list for Farewell Dinner to Brigadier J J MURRAY DSO MC VD. Attended by H T ALLAN & held in the Officers Mess, 2/17 Australian Infantry Battalion on 22.12.1941. .25) Invitation to Col H T ALLAN by Lady Gowrie (wife of Governor General Baron Gowrie) to attend a Luncheon at Government House, Canberra, ACT. .26) Letter to Major (T/Lt Col) H T ALLAN from Major W A JENNER advising him of his secondment to 2/17 Australian Infantry Battalion & appointment to command 5 Aust Base Sub Area. .27) Application for Africa Star with Eighth Army Clasp signed by H T ALLAN & approved by Lt Colonel of 2/17 Australian Infantry Battalion. H T ALLAN held the rank of Major (substantive) at the time of qualification, 1.3.1942 - 11.1942. He held the rank of Lt Colonel at the time of application in 2.1944. .28) Detailing changes in command & promotions including that of Lt Col H T ALLAN, dated 1.4.19? .29) For Lt Col H T ALLAN detailing movements required by First Australian Army command. .30) Acknowledgement & confirmation of Col H T ALLAN's application for campaign awards for WWII. .31) Letter addressed to Lt Col H T ALLAN from Lt Gen Stanley Sauige requesting information on New Britain for a forthcoming visit. .32) Certificate was presented to H T ALLAN on 16.4.1942 when he was awarded an OBE by King George VI. .33) Document details H T ALLAN's relinguishing of Command of the HQ of Pacific Islands Regiment. ALLAN also relinguished the rank of temporary Colonel & was transferred to the Reserve of Officers with rank of substantive Lt Colonel. .35) Official letter to Colonel H T ALLAN from Joseph Francis, Minister for the Army. The letter acknowledges Col ALLAN's long & distinguished career during both peace & wartime. .36) a) & b) From H T ALLAN (assumed) to Prime Minister J B CHIFFLEY referring to the production of copra in New Guinea, the actions of the Commonwealth Bank in relation to planters & the collaboration of New Guinea natives with the Japanese. Assumed to be a copy of original. .37) Letter to H T ALLAN indicating he had been placed on the Retired List with the rank of Honorary Colonel. .38) Letter invites H T ALLAN to officially open the State Conference in Lae in late March or early April 1958. Invitation was extended due to H T ALLAN for distinguished service in PNG. .39) Letter to H T ALLAN thanking him for accepting the invitation to open the Papua & New Guinea State Conference in late March or early April 1958. .40) Letter from H T ALLAN to Lt Gen Sir Henry WELLS, Chief of the General Staff, Victoria Barracks, Melbourne. ALLAN requests permission to wear his uniform for official engagements during his upcoming visit to New Guinea. ALLAN also offers advice on how to deal with native troops including serving time with them, learning their language & studying their customs. He suggests that this would help quell & dissent & revolt. .41) Reply from Major General DALY to HT ALLAN thanking him for his offer to spend time with the CO of the Pacific Island Regiment to address concerns with that unit. This meeting would coincide with ALLAN's upcoming visit to PNG. .42) HT ALLAN's reply to Major General T J DALY's letter of 26.2.1958. ALLAN requests an opportunity to discuss PIR issues with Major General DALY prior to his visit to PNG. .43) Major General T J DALY's reply to HT ALLAN's request for a meeting to discuss ongoing issues with the Pacific Island Regiment. .44) Letter from HT ALLAN to Brigadier D M CLELAND notifying him that he will be staying in Port Moresby on his way to the RSS&AILA Congress in Lae. .45) Lieutenant Colonel MCGUINN writes to invite Colonel ALLAN to visit the PIR during his visit to New Guinea at the end of March of the beginning of April 1959. .46) Letter of appreciation to H T ALLAN thanking him for his efforts in presenting the case for the Territory of New Guinea during the post WWII transition period. .47) Letter to H T ALLAN from New Guinea Citizens Association, Lae Branch, thanking him for his service on behalf of the people of the Territory of New Guinea. The association offered to send ALLAN a suitable present in recognition of his service. .48) Major General T J DALY's reply to HT ALLAN's suggestions for handling disquiet amongst the native troops in the Pacific Island Regiment. .49) Reply from Lieutenant General WELLS to H T ALLAN granting him permission to wear his uniform on his forthcoming visit to New Guinea. WELLS also notes that he has passed other requests made by ALLAN to Major General DALY. .50) Copy of H T ALLAN's reply to Lieutenant General WELL's letter of 24.2.1958 [.49)]. .51) A written account of Colonel H T Blue ALLAN's visit to New Guinea in 3.1958. Article appeared on p.65 & 67 of the 6.1958 edition of Pacific Islands Monthly. .52) Newspaper account of Colonel H T Blue ALLAN's opening of the Rabaul Branch of the Native Ex Servicemen's Association. Colonel ALLAN spoke of the involvement of the Pacific Islands Regiment during WWII. .53) The Rabaul Times account of Colonel H T Blue ALLAN's opening of the Rabaul Branch of Native Ex Servicemen's Club. Featured on p1, concluded p3. .54) Biographical account of Colonel H T ALLAN's service in WWI & WWII. In addition an account of his success in New Guinea between the wars is included. .55) a.b. Biography of Colonel H T ALLAN written by R W Robson who was the founder of the Pacific Islands Monthly. Article was written following ALLAN's death on 23.5.1967 aged 72. This item is a pre publication copy of Robson's article which appeared in the Pacific Islands Monthly. .56) Text of a valedictory given at the funeral of Colonel Herbert Trangmar ALLAN OBE, MC, ED, NX12229 held 26.5.1967 following his death on 23.5.1967. The speech summarized his life in both wars & civilian life. 57) Invitation issued to Colonel H T & Mrs ALLAN to attend a Garden Party at Government House on 18.2.1954. At this function Colonel H T & Mrs ALLAN were to be presented to her Majesty Queen Elizabeth II.Herbert T ALLAN Collection. The contents are all of various size, the Album is the size documented. .1) Large teal green album containing 16 plastic pockets each with white card insert. Various documents & photos contained in each pocket. .2) Typed letter, black type on cream paper. .3) Certificate mounted on fawn card backed with dark brown veneer. Presented to Capt H T ALLAN MC for being mentioned in despatches on 7.11.1917. .4) New South Wales Birth Certificate extract, printed on pink paper with watermark. .5) Telegram on tissue paper to a sheet of cream paper. Pin located top L corner. Requests the attendance of Lt Herbert ALLAN, Russell Hotel, Russell Square. .6) Typed letter mounted on grey cardboard. .7) 2 page letter on foolscap paper, secured by pin top L corner. Written from France by Herbert (Bert) ALLAN & addressed to his father. .8) 11 pages secured with a clip top L corner. 1st document typed, 2nd handwritten, remainder printed. Relate to H T ALLAN's military exam results. .9) Typed letter from Department of Defence Base Records Office to P ALLAN. .10) Document, printed form to inform the recipient that their period of enlistment in the 1st AIF had expired. .11) 4 page handwritten letter on 2 sheets of paper. 1st page has a printed letterhead. .12) BR Form No 20. Typed formal letter from AIF Base Records Office to accompany Mentioned in Despatches oak leaves sent to the recipient. .13) Form AAFA36 used for recommending the awarding of an Efficiency Decoration. Form details service record & details of a serving soldier. .14) 1 large / 1 small page, numbered, detailing the service record of Lt Col H T ALLAN. Black type on cream paper. 2 pages are loose but evidence of attachment visible. .15) Bachelor of Arts Degree Certificate (testamur) granted by the University of Sydney, awarded to Herbert Trangmar ALLAN. Printed on cream parchment. .16) Proforma document issued by the Territory of New Guinea permitting leave & return to the Territory. Printed 2 sides, black type on cream paper. .17) Letter on Australian Imperial Force letterhead from Major General MORSHEAD to Major H T ALLAN. .18 Letter on HQ2 Aust Corps letterhead from Major General MORSHEAD to Major H T ALLAN. .19) Typed letter on External Territories letterhead from J R Halligan to H T ALLAN. .20) Cream Christmas card folded in 2, sent to H T ALLAN. On front in black lettering is HQ 20th Australian Infantry Brigade below black Rising Sun emblem. Inside in black lettering is With Best Wishes for Christmas and New Year. Christmas 1944. .21) Cream card folded in 2. Front illustration depicts a devil figure riding a platypus & carrying a pennant with 2/13 on it. The devil is depicted attacking a German & Japanese soldier. Below the devil is a boomerang with Greetings Xmas 1944 printed on it. Illustration is in green & black. Inside on LHS is a message from 2/13 Battalion. On RHS is a list of 2/13 battle honours from 1940-1943. On back in black print is 1944-1945 New Guinea Australia. .22) Cream Christmas card folded in 2. Front illustration in brown with word Greetings in green. RHS inside printing in green & brown letters. Artillery badge on back in brown. .23) Cream card folded in 2. Typed menu on cream paper attached inside. Front cover illustrated with 20th Infantry Brigade colour patch & a rat over a scroll with words - So What? .24) Cream card folded in 2. On front black printing accompanied by 2/17 Battalion colour patch that is black over green diamond shape. Inside a list of Toasts & Dinner Menu printed in black. Back page for autographs. .25) Cream invitation card. Black cursive script printing below gold crown on front. .26) Typed letter on cream paper. .27) Typed foolscap application form to claim the Africa Star. .28) & .29) Message form filled with typed orders. .30) Typed letter acknowledging an application for campaign medals & listing eligible awards. .31) Typed letter on bond paper. .32) Certificate on cream parchment. Black print in cursive script. Text details the awarding of an OBE to the recipient. .33) Typed text on Australian Military Forces letterhead. Cream paper. .34) Typed text. Temporary note for H T ALLAN's discharge from AMF. .35) Typed letter on Commonwealth of Australia, Minister for the Army letterhead. .36) a) & b) 2 page letter in black type on cream paper. Pages are loose, letter unsigned. .37) 1 page typed letter on Australian Military Forces letterhead. .38) & .39) 1 page typed letter on Return Sailors, Soldiers & Airmen's Imperial League of Australia, Papua & New Guinea Branch letterhead. .40) 1 page typed letter, unsigned. .41) Single sided typed letter on Australian Military Forces letterhead on cream paper. .42) 1 page typed letter, unsigned on cream paper. .43) Single sided typed letter on Australian Military Forces, Northern Command, Victoria Barracks, Brisbane letterhead on cream paper. .44) Single sided typed letter on cream paper. .45) 2 page typed letter on folded cream paper bearing the letterhead of the Pacific Islands Regiment. .46) 1 page typed letter on cream, lined paper. .47) 1 page typed letter on cream paper. .48) 1 page typed letter on Australian Military Forces, Northern Command Headquarters, Victoria Barracks, Brisbane letterhead on cream paper. .49) 1 page typed letter on Chief of General Staff, Australian Military Forces, Army Headquarters, Victoria Barracks, Melbourne letterhead on cream paper. .50) 1 page copy of an unsigned letter on cream paper. .51) Magazine article: Building a New Nation in New Guinea : Some advice from Colonel Blue ALLAN. Black & white article with a 2nd small section stapled to the main page. Large page features a black & white captioned photo of a group listening to a uniformed Officer deliver a speech. Also features advertising front & back. .52) Newspaper article: Official Opening of Native Ex Servicemen's Club. Black & white typed newspaper article featuring a captioned black & white photo of a uniformed Australian Officer & a group of New Guinea Ex Servicemen. .53) a. b. c. Newspaper article: Master Blue Came Back to the Islands: 4000 Attend Club Opening. 3 Section article cut from a newspaper. One part is the banner of the newspaper with date published. Other sections contain the text of the article. The larger section features a black & white photo of an Australian Army Officer in uniform. .54) Newspaper article, untitled. Black & white typed newspaper article with black & white caricature of an Australian Army Officer featured. .55) a. b. Magazine article: The Story of a Big Man who Loved Soldiering. 2 page black & white typed article with sub headings. .56) Text of a Speech. 2 page typed text written for a valedictory given at a funeral. Pages connected with a staple in the top L corner. .57) Printed, cream card invitation to a Garden Party for the recipient to meet Queen Elizabeth II & The Duke of Edinburgh. Text is in cursive script under the Coat of Arms of Her Majesty. .2) Signature ? Capt S C PIR. .4) Date of issue typed: 30.11.1954 Name of recipient: Herbert Trangman Allan Stamped: T Wells, Registrar General NSW .5) Handwritten: To Lt Herbert Allan, Russell Hotel, Russell Square. Typed: Buckingham Palace OHS. Your attendance is required at Buckingham Palace on Wednesday next the Twentyeighth inst (28.11.19?) at ten o'clock am service dress please telegraph acknowledgement Lord Chamberlain London. Stamped: Central District 24 NO 19. .6) Signed in pencil: W Birdwood. In pencil on back: 15 x 12. .8) p1: Handwritten signature. Copy dated 29.12.1915. p2 Handwritten in ink: P Allan Esq, Mount Hunter Hill. Military Examination. Copy dated 29.12.1915. Handwritten in pencil: Results: H T Allan. Tactics - Distinction 92% HE Barff p3 Underlined in ink: 38th Infantry Herbert Trangmar Allan to be 2nd Lieutenant (provisionally). Dated 16 June 1914. p5 Handwritten: Total 139. Lieut Allan tied with 15 others for 20 place. p7, 9, 10 & 11underlined in ink: H T Allan. p8 Underlined in ink: Allan HT. .9) & .10) Signature in black ink. .12) Handwritten signature in black ink: On back handwritten signature in black ink: Clive Wilkinson, Buddong, Robinson St, Chatswood. Also ? Rd, Cremorne Pt. .13) Handwritten in black ink: Details of HT Allan's Commission Service from 16.6.1914 - 18.2.1946. .15) Handwritten signature of the University Chancellor, Dean of Faculty of Arts & Registrar. Handwritten name of recipient. Seal of the University of Sydney imprinted bottom LHS. .16) Handwritten in black ink: Details of recipient. Stamped in red ink: New Guinea Customs. Stamped in blue ink: H M Customs, Cooktown, dated 17.12.1939. Handwritten on reverse: Signature. Stamped on reverse in red ink: New Guinea Customs, dated 15.12.1939. .17) & .18) Handwritten signature: Major General Morshead. .19) Handwritten signature in black ink: J R Halligan. .20) Handwritten inside in blue ink: Lt Col Allan. Good wishes from your many friends here. Signed by Major General Windeyer. .21) Inside LHS handwritten in blue ink: Lt Col Allan & an indecipherable signature. .22) Inside RHS handwritten: To Major (Blue) Allan OBE MC from Lt Col? .23) On front handwritten in blue ink: H T Allan?. Inside in black ink & pencil are 19 signatures. .24) On front: 3 signatures in black ink & pencil. On back: 36 signatures in black & blue ink & pencil. .25) On back handwritten in black ink: Colonel H T Allan OBE MC, with 3 ink lines below name. .26) Handwritten in blue/black ink: Signature. Handwritten in blue pencil top R corner: A32/3477. Handwritten in black ink bottom L corner: Cond (?) 15/9A. Handwritten in black ink: Signature. .27) Stamped top R corner: 2/17 Bn Received 9.2.1944. Signature in black ink: H T Allan. Signature in black ink: ? Lt Col 2/17 Aust Inf Bn 10.2.1944 Page bottom in pencil: Blue will keep 1 1/4 for you? .30) Handwritten: Details of eligible medals. Handwritten signature: J C K Miller Capt 7.3.50. Handwritten bottom L corner: Col H T Allan Bottom R corner: OBE, MC, 1914-19, Victory, ED, MID 1914-18, MID 1939-45 On back: Steak & Kidney Morris ) Clark ) Vowood ) 10/- 70215 Maughan ) Allan ) .31) Top of page: Imprinted Coat of Arms Top LHS in black ink: TOP SECRET AND PERSONAL Handwritten signature: Stanley Sauige .32) Embossed top L corner: Seal of the Most Excellent Order of the British Empire. Handwritten: Mary R. .32) Signed: Queen Mary, mother of George VI. .33) Handwritten signature. .34) Handwritten in blue ink: HERBERT TRANGMAR ALLAN 6 MAY 46 Handwritten signature. .35) Handwritten signature in blue ink: Joseph Francis, Minister for the Army. .37) Handwritten signature. .38) & .39) Handwritten signature: J W Knight. .41), .43) & .45) Handwritten signature in blue ink. .46) & .47) Handwritten signature in black ink: Henry G Eckhoff. .48) Handwritten signature in blue ink: With best wishes Yours sincerely T J Daly. .49) Handwritten signature in black ink: Yours sincerely H Wells. .57) Handwritten in black ink: Colonel & Mrs H T Allan.certificates, records, awards, administrative, compendium -
 Bendigo Military Museum
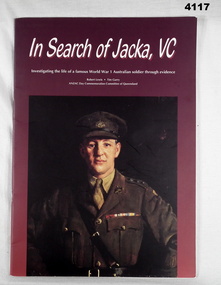
Book - MILITARY BOOK, ANZAC Day Commemoration Committee QLD, In Search of Jacka, VC, 2002
In search 0f JACKA VC. Investigating the life of famous WW1. Australian Soldier through evidence, a biography for education.Book, soft cover cardboard, white print on dark red back ground, front has copy of an Oil painting of “Captain Albert Jacka” by George Coates, back cover colour illustration enlist poster depicting Lieut Jacka VC, 24 pages, plain white, illustrated in B & W photographs, maps and medals.albert jacka vc, investigating albert jacka -
 Bendigo Military Museum
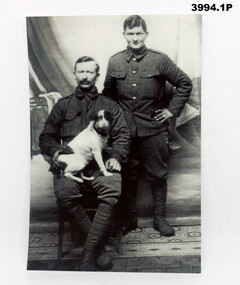
Memorabilia - PHOTOGRAPHS
"Leslie Pyers" MM No 2134 38th Bn AIF. Refer Cat No 3993P for his service details. "George Pyers" No 2188 enlisted on 25.4.1916 age 18 years in the 3rd Reinforcements to the 38th Bn AIF, embarked for England 17.11.1916, embark for France 20.12.1916, hospital 22.4.1917, rejoin unit 55.5.1917, WIA Gas shell 8.6.1917, rejoin unit 28.8.1917, WIA 2nd occasion 29.11.1917 GSW to left arm and Right leg, he does not return to France, hospital 9.11.1918 with Influenza, RTA 12.12.1918, discharged from the AIF 11.3 1919..1) Photo, B & W of Leslie Pyers standing with his brother George seated with a dog on his lap, both in uniform, no headwear. .2) Photo, B & W portrait of Leslie Pyers showing his “Military Medal” ribbon on uniform. 38th battalion, photography, leslie pyers, george pyers -
 Bendigo Military Museum
Memorabilia - KINGS MESSAGE, Post WW1
This letter from the King is one of four items sent to NOK of all soldiers who died in the Commonwealth in the Great War. This letter is re Pte W.Williams No 1442 2nd Bn AIF. Refer Cat No 4342P for his service details in WW1 also 1859P medals, photo.Cream coloured paper letter with red and black print. At the top is a embossed red Buckingham Palace coat of Arms, under in black print a message from the King with signature copy.Signed, “George R.I.”memorabilia, letters, ww1 -
 Bendigo Military Museum
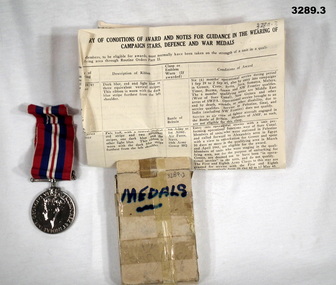
Award - MEDAL & BOX, Post 1945
Item relates to S W Ross VX78589, refer 3147 for his service details..1) War Medal 1939 - 1945. One side has head of George VI, the reverse shows a triumphant lion holding a bird headed monster to the ground. .2) Plain cardboard box to suit. .3) Sheet of paper summarising conditions of award & guidance for wearing..1) Inscription on Medal: VX78589 S W ROSS. .2) Written in blue ink on box: Medals. .3) Handwritten in ink on sheet of paper: Returned from Active Service badge. Total Awards = One VX78589 S W ROSS. Note: 2 numbers shown. Original 12277, then later with a different pen 12274. 12274 is the correct No on the RAS badge.medals, military, containers