Showing 946 items
matching angles
-
 Kiewa Valley Historical Society
Iron - Kerosene
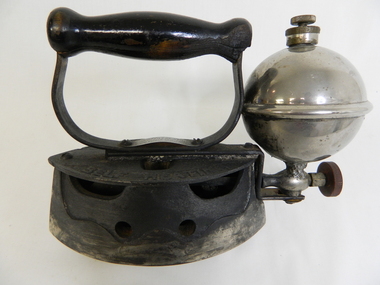
Kerosene irons were used c1930 - 1950 especially where electricity wasn't available. Shelite was another fuel that could be used instead of kerosene. The advantage of the kerosene iron was that it didn't require a stove to be lit (especially in summer) to heat the iron and it didn't require electricity.Residents in the Kiewa Valley used kerosene irons.This black iron is made of cast iron with a steel base and a black wooden handle. This Comfort iron has a ball shaped container with a screw-on lid to hold the fuel (kerosene or Shelite). At the bottom of this ball is a pipe going down then meeting another pipe at right angles to it leading into the iron. At the pipe junction there is a handle on a screw to limit the amount of fuel. The Kerosene would flow through this pipe. There is a filler plug air stem on top. This is a self-heating iron.Comfort iron / Self Heating Comfort Iron MFD by / National Stamping and Electric Works / made in U.S.A. Chicago iron, domestic, laundry, pressing clothes, household, kerosene, shelite -
 Warrnambool and District Historical Society Inc.
Woodwork, Wood plane, Early 20th century
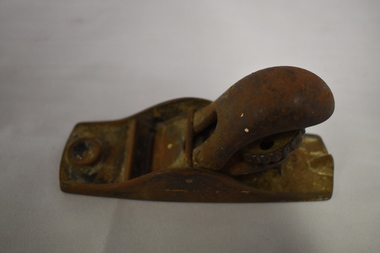
This hand tool would have been used either in the home for making small items of furniture or small building projects or it could have been used by a tradesman working on small jobs in the building industry – window sills, doors, cupboards etc. Planes are still used today to whittle down wood. This tool has no known local provenance but it is a good example of hand tools of the past and will be useful for display. This is a metal plane used for shaving wood. It has a rectangular base curved at the ends and the end of a steel blade is visible near one end of the base. The handle is dome-shaped and attached to the handle by a screw is a ridged metal wheel that rests on the blade which has been inserted on an angle. This wheel can be turned to adjust the blade, keep it in place or remove it for replacement. The plane is much rusted (it may have been painted black) and no manufacturer’s marks are visiblhousehold tools, wood plane -
 Phillip Island and District Historical Society Inc.
Photographs, 1940's
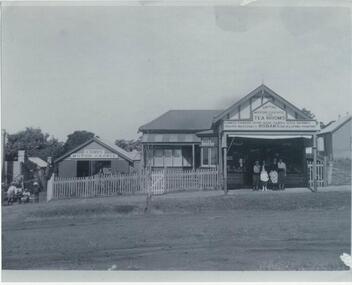
Store located in Thompson Avenue, Cowes where the Commonwealth Bank was located and now a Furniture Shop. On right hand side heading down the hill. Owned by Smith family (Jessie and husband). Purchased by Bernie & Nell Mulholland. Still there in the 1950's.348-01: Black & White photograph of the Cowes Motor Garage at left and Smiths Motor Garage and Tea Rooms on the right. Three children in the gateway in front of the Motor Garage and four people in front of the Tea Rooms. On the front of the Tea Rooms is printed " confectionery, home made cakes, iced drinks, photo materials and Kodak's developing printing". 348-02: Black & White photograph of the same store and garage taken at a different angle. No people in the photograph.smith motor garage & tea rooms, cowes motor garage, smith family, allan smith -
 Bendigo Historical Society Inc.
Document - MALONE COLLECTION: GREETING CARDS
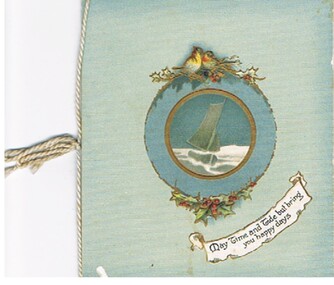
Pale blue card, darker at the edges. Dark blue circular picture frame edged in gold. Inner edge wider. In the frame is a picture of a sailing boat. At the top of the frame is some holly and two little birds. At the bottom is some more holly. On an angle in the bottom right corner is a white banner, edged in gold. It has: May Time and Tide but bring you happy days' printed in black on it. Card and insert held together with pale blue cord.Raphael Tuck & Sonsperson, greeting cards, malone collection, malone collection, greeting cards -
 Bendigo Historical Society Inc.
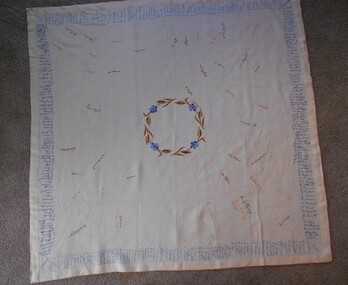
Textile - TABLECLOTH WITH EMBROIDERED NAMES
Textiles. Machine made rectangular cream coloured linen tablecloth. 3.5cm turned over hem with decorative stitching around top of hem. 2.5cm diameter machine embroidered wreath in centre of blue flowers and brown and yellow leaves. 326 names (blue) hand embroidered around the edge at right angles to the hem and 44 names scattered in central area. (several colours)., tag in one corner ''SEMCO''. Old box 75,yellow label 183.textiles, domestic, tablecloth with embroidered names -
 Bendigo Historical Society Inc.
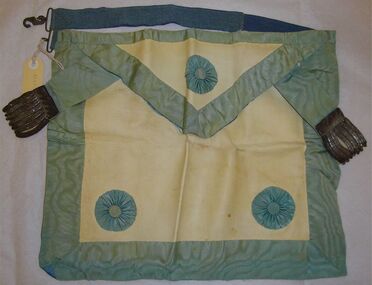
Textile - MASONIC APRON - CARL MUELLER
White leather Masonic Apron with pale blue ribbon border and a blue rosette in each corner. White leather flap at the top with blue border and a pale blue rosette. On each side of the flap is a ribbon with 7 metal spring like pieces coming from a number of small pieces on an angle. The back is line with blue silk. An elastic apron string with a metal hook in the shape of two entwined serpents? .The hook hooks into a catch on the other side.organization, club / society, masonic apron, masonic apron, carl mueller -
 Royal Australian and New Zealand College of Obstetricians & Gynaecologists (RANZCOG)
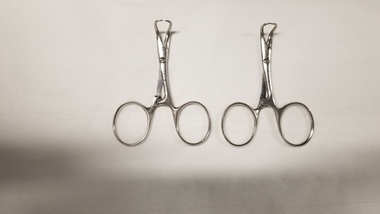
Tool - Towel clips used by Dr Michael Kloss
These items were part of a collection of instruments used by Dr Michael Kloss in his medical practice. Dr Kloss subsequently donated this collection to the College.Two small metal towel clips. The clips resemble small sets of scissors, with a ratchet adjacent to the handle to lock them at particular apertures. The end of each arm of the scissors bends upwards 90 degrees, then towards the centre of the clip at another 90 degree angle. Each arms tapers to a sharp point, with the ends of the points facing and adjacent to each other. Both clips are engraved with the word 'Kloss'. Inner aspect of each clip is engraved with the word 'GERMANY'.'Kloss' 'GERMANY'obstetrics -
 Anglesea and District Historical Society
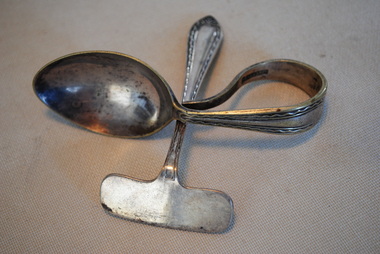
Toddler's Spoon and Pusher Cutlery, G & E Rodd
Silver spoon with easy-to-grasp handle with a loop. Silver pusher with a flat piece at right angles to the handle - to be held in left hand. It is used to push food onto the spoon. Rodd were established by George Rodd in 1919. Early name of company was G & E Rodd. Their markings had trade name Apex. When it became a public company in 1945 the marking was changed to Rodd. The business continued until 1985 - merged with Grosvenor and later Mytton.Spoon: APEX EPNS A1 Pusher: RODD EPNS A1.toddler's cutlery -
 Kilmore Historical Society
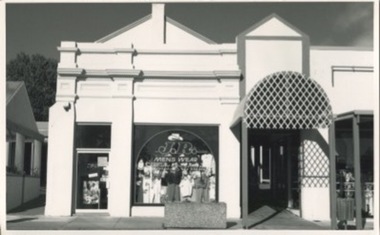
Photograph, 13 Sydney Street
Was the site of J. Quinn Bakery and Breakells Bakery and shop20cm x 12.5 black and white photograph of the shop at 13 Sydney Street which at the time of the photograph was J.R. Mens Wear. Light coloured recently renovated building, some of the older trim remains and restored, corrugated steel awning which leads down the arcade, concrete planter box out the front of the shop. Was the location of J. Quinn Bakery and Breakells Bakery and shop. 2 picture available in the item offering slightly different angles.Written on the back: Photo 1: 1024 Photo 2: 1025baker, bakery, bakers and bakeries, shopfront, mens fashion -
 Wodonga & District Historical Society Inc
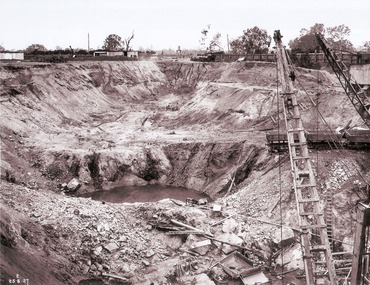
Album - Hume Reservoir Australia Album - View of South Wing Wall Foundations from Top of Tail Tower Pillar, August 1927
This set of photos is from a leather bound album bearing the inscription "HUME RESERVOIR AUSTRALIA" plus 'The Rt. Hon. L. C. M. S. Amery, P. C., M .P.' all inscribed in gold. It was presented to The Rt. Hon. L. C. M. S. Amery, P. C., M. P, Secretary of State for Dominion Affairs on the occasion of his visit to the Hume Reservoir on 2nd November 1927. This album is of local and national significance as it documents the planning and development of the Hume Reservoir up to 1927. It was the largest water reservoir in the British Empire. The album records the pioneering engineering work that went into its construction.DEPARTMENT OF PUBLIC WORKS, N.S.W. RIVER MURRAY WATERS SCHEME. HUME RESERVOIR. 30. View from Top of Tail Tower Pillar - South Wing Wall Foundations. This photograph was taken at right angles to the preceding one, (WHS 00723) ooking downstream along the cut for the South Wing Wall foundation. The granite is at a greater depth here than elsewhere and the cut will be twice as deep before the foundations are cleared. New South Wales. August 1927.hume reservoir australia, river murray waters scheme, hume reservoir construction -
 Melbourne Tram Museum
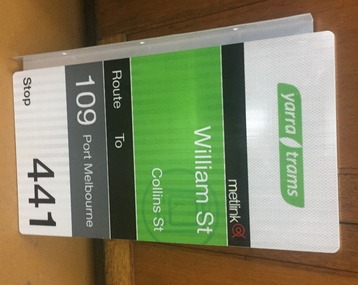
Sign, Yarra Trams, Metlink, Tram Stop Sign, c2005
Tram Stop Sign - folded anodized aluminium, overlain both sides with a reflectorised backing plastic material which has been bonded to the to sign, printed with tram stop information, with Metlink and Yarra Tram logos. Has three holes in the small angled side, enabling it to be fixed to a structure at the tram stop or a pole. Tram stop - model or a sample sign for a tram stop sign in Collins at the corner of William St for Route 109, stops 47 and 441trams, tramways, tram stops, metlink, signs, route 109, collins st -
 Melbourne Tram Museum
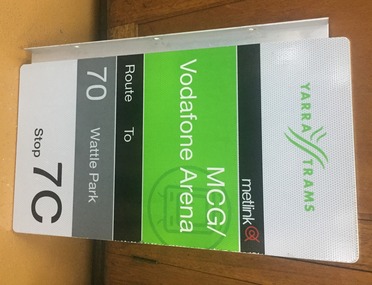
Sign, Yarra Trams, Metlink, Tram Stop Sign, c2005
Tram Stop Sign - folded anodized aluminium, overlain both sides with a reflectorised backing plastic material which has been bonded to the to sign, printed with tram stop information, with Metlink and Yarra Tram logos. Has three holes in the small angled side, enabling it to be fixed to a structure at the tram stop or a pole. Tram stop - model or a sample sign for a tram stop sign for the MCG/Vodaphone Arena, route 70, stop 7C on both sides.trams, tramways, tram stops, metlink, signs, route 70, sports, mcg, vodaphone arena -
 Melbourne Tram Museum
Sign, Yarra Trams, Metlink, Tram stop sign, c2005
Tram Stop Sign - folded anodized aluminium, overlain both sides with a reflectorised backing plastic material which has been bonded to the to sign, printed with tram stop information, with Metlink and Yarra Tram logos. Has three holes in the small angled side, enabling it to be fixed to a structure at the tram stop or a pole. Tram stop - model or a sample sign for a tram stop sign for the MCG/Vodaphone Arena, route 70, stop 7C on both sides.trams, tramways, tram stops, metlink, signs, route 70, sports, mcg, vodaphone arena -
 Warrnambool and District Historical Society Inc.
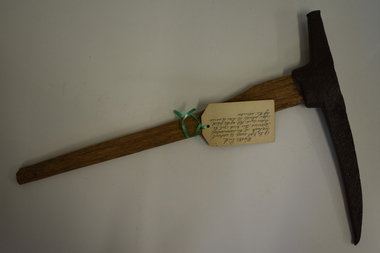
Tools, Miner's Pick, Early 20th century
This miner’s pick was of the type used to extract limestone at the Warrnambool limestone quarries, mainly for buildings and walls. This pick cut the sides and the top of the block and then it was levered off with a crowbar at an angle of about 30° to 40°. These blocks were then reduced to the required size using cross cut saws. There were about 12 limestone quarries operating in Warrnambool in the 19th century and limestone was extensively quarried for about 85 years to the 1930s when quarrying ceased. Today there has been a small revival in the Warrnambool area in the use of limestone blocks for building. Warrnambool also once had several bluestone quarries on the outskirts of the town. This miner’s pick has a wooden handle with rounded sides tapering to a wider end. The wood is weather-worn and split in places, especially at the top end. The pick is metal with a curved shape that tapers to a point at one end. The metal near the other end has a cavity into which is inserted the wider end of the wooden handle. limestone quarries in warrnambool, quarrying in warrnambool, warrnambool history -
 Warrnambool and District Historical Society Inc.
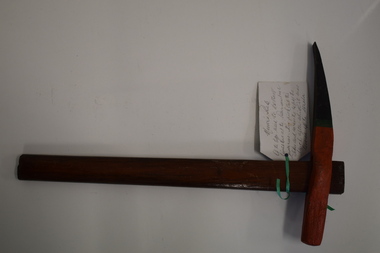
Tool, Miner's Pick
This miner’s pick was of the type used to extract limestone at the Warrnambool limestone quarries, mainly for buildings and walls. This pick cut the sides and across the top of the block and then the block was levered off the strata using a crowbar at an angle of 30° or 40°. These blocks were then reduced to the required size using cross-cut saws. There were about 12 limestone quarries operating in Warrnambool in the 19th century and limestone was extensively quarried for about 85 years to the 1930s when the quarrying ceased. Today there has been a small revival in the use of limestone blocks for building. Warrnambool also once had several bluestone quarries on the outskirts of the town. This miner’s pick is of considerable interest as an example of the type used in quarrying limestone in Warrnambool . Quarrying was once an important industry in Warrnambool. This miner’s pick has a short wooden handle with a metal stud inserted at the bottom end. The handle is rounded on the sides and tapers slightly from the top to the bottom. The metal pick has a curved shape with one blunt end and one sharp end. It has a cavity in the end nearest the blunt end and the wooden handle slots into this. The pick is painted black, green and orange, perhaps for display purposes. A handwritten information tag is attached to the handle. quarrying in warrnambool, limestone quarries in warrnambool -
 Mission to Seafarers Victoria
Photograph - Photograph serie, Digital copies, Louise Hearman, 1988
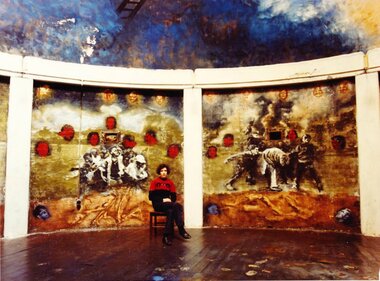
Artist Louise Hearman visited the Mission on the 15th of September 2011 and brought photographs in colour of her artwork painted in 1987/88 in the Norla Dome. She shared some background information about how she created the artwork: Louise arranged with O'Brien Glass to have the glass panes donated to replace the steel plates once covering the skylight. She painted the entire ceiling of the Dome precariously balancing on scaffolding. The walls were made as canvas panels and then put in place. She angled some of them to create openings so when you entered the Dome you were totally encased in her work.Louise Hearman is a Melbourne born artist and Archibald Prize winner. Hearman first came to public notice in 1987/88 when she spent a year painting the mural in the Norla Dome. The premises of the Mission also served as her studio at that time.Series of 7 colour photographs scannedlouise hearman, exhibitions, cultural events, norla dome, 1988, cottage, flinders street, melbourne, elephant room -
 City of Moorabbin Historical Society (Operating the Box Cottage Museum)
Tools, Coping saw, c1900
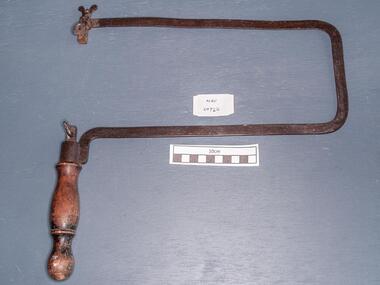
A coping saw is a type of hand saw used to cut intricate external shapes and interior cutouts in woodworking or carpentry. It is widely used to cut mouldings to create coped rather than miter joints. It is occasionally used to create fretwork though it is not able to match a fretsaw in intricacy of cut, particularly in thin materials. Coping saw blades are always thicker and much coarser cutting than typical fretsaw blades. A coping saw consists of a thin, hardened steel blade, stretched between the ends of a square, c-shaped, springy-iron frame to which a handle is attached. The blade is easily removed from the frame so that the blade can be passed through a drilled hole in the middle of a piece of wood. The frame is then re-attached to the blade and the cut starts from the middle of the piece. Long cuts perpendicular to the edge of the material are possible but the shallow depth of the frame rather limits how far from the edge one may cut. The much deeper frame of the fretsaw is more useful for cutting well away from the edge but conversely cannot manage the thicker materials commonly cut by the coping saws. The coping saw blade is installed with the teeth pointing towards the handle. Unlike a hacksaw, which has the teeth pointed away from the handle, the coping saw cuts on the pull stroke. The coping saw blade is removable by partially unscrewing the handle. The blade is prevented from rotating by means of the short, steady bar provided where the blade is attached. Loosening the handle also allows the blade to be rotated relative to the frame as desired. Carefully aligning the finger steady bars at the top and bottom of the blade ensures that the thin blade is straight and not twisted along its length. Re-tightening the handle tensions the blade and locks it at the desired angle relative to the frame. The short steady bar nearest the handle is held securely between finger and thumb while the handle is tightened to ensure the blade remains at the desired angle. Unlike the fretsaw the coping saw blade has holding pins which lock securely into the angled slots of the rotatable blade holders. Gentle curves are achieved by slowly turning the whole frame by means of the handle while continuing to cut steadily. A coping saw with wooden handle but no bladetools, saws, steel , clamps, metalwork, woodwork, carpentry, early settlers, pioneers, market gardeners, moorabbin, bentleigh, cheltenham, fretsaw, coping saw, bowsaw, blacksmiths, -
 Flagstaff Hill Maritime Museum and Village
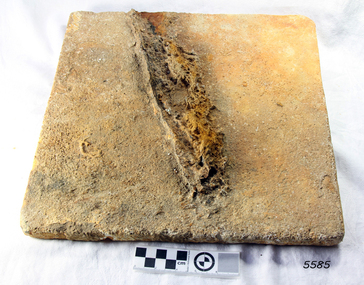
Marble Tile, circa 1878
The artefact is a white marble tile raised from the wreck of the LOCH ARD (1878). The cargo manifest of the sunken vessel has the entry “Marble £400”. This is placed directly following the entry “Glass (604 cases)”. This conjunction suggests the marble tile was originally part of a consignment intended for use in a ‘high end’ residential or public building project in the gold and wool rich Colony of Victoria. Traditionally, white or cream marble was imported into Britain from the Mediterranean region of Europe, where beds of sedimentary limestone (calcium and magnesium carbonate) had been buried over a long geological period of time. Deep in the earth’s crust, it had been subjected to immense pressures and high temperatures, sufficient to completely re-crystallise the original deposits. Marble beds began as layers of sediment at the bottom of ancient tropical seas, forming from the skeletal remains of calcareous fossils, shell, and coral fragments. The metamorphic process of prolonged compression and heating recrystallised this skeletal material, destroying all signs of the original sedimentary fabric. The resulting ‘true’ marbles of, for example, White Carrara (Tuscany, Italy), Verdi (green) Antico (Thessaly, Greece), and Rouge (red) Languadoc (Carcassone, France), were highly prized in classical decoration (sculpture and friezes) and architecture (temples and arches). Marble was found in nineteenth century Australia, but in small, uneconomic deposits, not suitable for commercial quarrying. The comparative expense of imported marble restricted its use in colonial buildings to carved fireplaces and mantel pieces, or outdoor ornaments such as fountains, statuary and grave stones. If Carrara marble floor tiles were used, they were used sparingly, as an arresting feature in entrance halls for instance. However, most prominent private and public construction used timber flooring, waxed or ‘jappaned’, with carpet runners and rugs (for example the Austin’s Barwon Park Mansion, 1871), or laid tessellated and ceramic tiles of baked clay infused with colour (for example the Chirnside’s Werribee Park Mansion, 1878). HISTORY OF THE LOCH ARD The LOCH ARD belonged to the famous Loch Line which sailed many ships from England to Australia. Built in Glasgow by Barclay, Curdle and Co. in 1873, the LOCH ARD was a three-masted square rigged iron sailing ship. The ship measured 262ft 7" (79.87m) in length, 38ft (11.58m) in width, 23ft (7m) in depth and had a gross tonnage of 1693 tons. The LOCH ARD's main mast measured a massive 150ft (45.7m) in height. LOCH ARD made three trips to Australia and one trip to Calcutta before its final voyage. LOCH ARD left England on March 2, 1878, under the command of Captain Gibbs, a newly married, 29 year old. She was bound for Melbourne with a crew of 37, plus 17 passengers and a load of cargo. The general cargo reflected the affluence of Melbourne at the time. On board were straw hats, umbrella, perfumes, clay pipes, pianos, clocks, confectionary, linen and candles, as well as a heavier load of railway irons, cement, lead and copper. There were items included that intended for display in the Melbourne International Exhibition in 1880. The voyage to Port Phillip was long but uneventful. At 3am on June 1, 1878, Captain Gibbs was expecting to see land and the passengers were becoming excited as they prepared to view their new homeland in the early morning. But LOCH ARD was running into a fog which greatly reduced visibility. Captain Gibbs was becoming anxious as there was no sign of land or the Cape Otway lighthouse. At 4am the fog lifted. A man aloft announced that he could see breakers. The sheer cliffs of Victoria's west coast came into view, and Captain Gibbs realised that the ship was much closer to them than expected. He ordered as much sail to be set as time would permit and then attempted to steer the vessel out to sea. On coming head on into the wind, the ship lost momentum, the sails fell limp and LOCH ARD's bow swung back. Gibbs then ordered the anchors to be released in an attempt to hold its position. The anchors sank some 50 fathoms - but did not hold. By this time LOCH ARD was among the breakers and the tall cliffs of Mutton Bird Island rose behind the ship. Just half a mile from the coast, the ship's bow was suddenly pulled around by the anchor. The captain tried to tack out to sea, but the ship struck a reef at the base of Mutton Bird Island, near Port Campbell. Waves broke over the ship and the top deck was loosened from the hull. The masts and rigging came crashing down knocking passengers and crew overboard. When a lifeboat was finally launched, it crashed into the side of LOCH ARD and capsized. Tom Pearce, who had launched the boat, managed to cling to its overturned hull and shelter beneath it. He drifted out to sea and then on the flood tide came into what is now known as LOCH ARD Gorge. He swam to shore, bruised and dazed, and found a cave in which to shelter. Some of the crew stayed below deck to shelter from the falling rigging but drowned when the ship slipped off the reef into deeper water. Eva Carmichael had raced onto deck to find out what was happening only to be confronted by towering cliffs looming above the stricken ship. In all the chaos, Captain Gibbs grabbed Eva and said, "If you are saved Eva, let my dear wife know that I died like a sailor". That was the last Eva Carmichael saw of the captain. She was swept off the ship by a huge wave. Eva saw Tom Pearce on a small rocky beach and yelled to attract his attention. He dived in and swam to the exhausted woman and dragged her to shore. He took her to the cave and broke open case of brandy which had washed up on the beach. He opened a bottle to revive the unconscious woman. A few hours later Tom scaled a cliff in search of help. He followed hoof prints and came by chance upon two men from nearby Glenample Station three and a half miles away. In a state of exhaustion, he told the men of the tragedy. Tom returned to the gorge while the two men rode back to the station to get help. By the time they reached LOCH ARD Gorge, it was cold and dark. The two shipwreck survivors were taken to Glenample Station to recover. Eva stayed at the station for six weeks before returning to Ireland, this time by steamship. In Melbourne, Tom Pearce received a hero's welcome. He was presented with the first gold medal of the Royal Humane Society of Victoria and a £1000 cheque from the Victorian Government. Concerts were performed to honour the young man's bravery and to raise money for those who lost family in the LOCH ARD disaster. Of the 54 crew members and passengers on board, only two survived: the apprentice, Tom Pearce and the young woman passenger, Eva Carmichael, who lost all of her family in the tragedy. Ten days after the LOCH ARD tragedy, salvage rights to the wreck were sold at auction for £2,120. Cargo valued at £3,000 was salvaged and placed on the beach, but most washed back into the sea when another storm developed. The wreck of LOCH ARD still lies at the base of Mutton Bird Island. Much of the cargo has now been salvaged and some was washed up into what is now known as LOCH ARD Gorge. Cargo and artefacts have also been illegally salvaged over many years before protective legislation was introduced. One of the most unlikely pieces of cargo to have survived the shipwreck was a Minton porcelain peacock - one of only nine in the world. The peacock was destined for the Melbourne International Exhibition in 1880. It had been well packed, which gave it adequate protection during the violent storm. Today, the Minton peacock can be seen at the Flagstaff Hill Maritime Museum in Warrnambool. From Australia's most dramatic shipwreck it has now become Australia's most valuable shipwreck artefact and is one of very few 'objects' on the Victorian State Heritage Register. HISTORY OF THE LOCH ARD The LOCH ARD belonged to the famous Loch Line which sailed many ships from England to Australia. Built in Glasgow by Barclay, Curdle and Co. in 1873, the LOCH ARD was a three-masted square rigged iron sailing ship. The ship measured 262ft 7" (79.87m) in length, 38ft (11.58m) in width, 23ft (7m) in depth and had a gross tonnage of 1693 tons. The LOCH ARD's main mast measured a massive 150ft (45.7m) in height. LOCH ARD made three trips to Australia and one trip to Calcutta before its final voyage. LOCH ARD left England on March 2, 1878, under the command of Captain Gibbs, a newly married, 29 year old. She was bound for Melbourne with a crew of 37, plus 17 passengers and a load of cargo. The general cargo reflected the affluence of Melbourne at the time. On board were straw hats, umbrella, perfumes, clay pipes, pianos, clocks, confectionary, linen and candles, as well as a heavier load of railway irons, cement, lead and copper. There were items included that intended for display in the Melbourne International Exhibition in 1880. The voyage to Port Phillip was long but uneventful. At 3am on June 1, 1878, Captain Gibbs was expecting to see land and the passengers were becoming excited as they prepared to view their new homeland in the early morning. But LOCH ARD was running into a fog which greatly reduced visibility. Captain Gibbs was becoming anxious as there was no sign of land or the Cape Otway lighthouse. At 4am the fog lifted. A man aloft announced that he could see breakers. The sheer cliffs of Victoria's west coast came into view, and Captain Gibbs realised that the ship was much closer to them than expected. He ordered as much sail to be set as time would permit and then attempted to steer the vessel out to sea. On coming head on into the wind, the ship lost momentum, the sails fell limp and LOCH ARD's bow swung back. Gibbs then ordered the anchors to be released in an attempt to hold its position. The anchors sank some 50 fathoms - but did not hold. By this time LOCH ARD was among the breakers and the tall cliffs of Mutton Bird Island rose behind the ship. Just half a mile from the coast, the ship's bow was suddenly pulled around by the anchor. The captain tried to tack out to sea, but the ship struck a reef at the base of Mutton Bird Island, near Port Campbell. Waves broke over the ship and the top deck was loosened from the hull. The masts and rigging came crashing down knocking passengers and crew overboard. When a lifeboat was finally launched, it crashed into the side of LOCH ARD and capsized. Tom Pearce, who had launched the boat, managed to cling to its overturned hull and shelter beneath it. He drifted out to sea and then on the flood tide came into what is now known as LOCH ARD Gorge. He swam to shore, bruised and dazed, and found a cave in which to shelter. Some of the crew stayed below deck to shelter from the falling rigging but drowned when the ship slipped off the reef into deeper water. Eva Carmichael had raced onto deck to find out what was happening only to be confronted by towering cliffs looming above the stricken ship. In all the chaos, Captain Gibbs grabbed Eva and said, "If you are saved Eva, let my dear wife know that I died like a sailor". That was the last Eva Carmichael saw of the captain. She was swept off the ship by a huge wave. Eva saw Tom Pearce on a small rocky beach and yelled to attract his attention. He dived in and swam to the exhausted woman and dragged her to shore. He took her to the cave and broke open case of brandy which had washed up on the beach. He opened a bottle to revive the unconscious woman. A few hours later Tom scaled a cliff in search of help. He followed hoof prints and came by chance upon two men from nearby Glenample Station three and a half miles away. In a state of exhaustion, he told the men of the tragedy. Tom returned to the gorge while the two men rode back to the station to get help. By the time they reached LOCH ARD Gorge, it was cold and dark. The two shipwreck survivors were taken to Glenample Station to recover. Eva stayed at the station for six weeks before returning to Ireland, this time by steamship. In Melbourne, Tom Pearce received a hero's welcome. He was presented with the first gold medal of the Royal Humane Society of Victoria and a £1000 cheque from the Victorian Government. Concerts were performed to honour the young man's bravery and to raise money for those who lost family in the LOCH ARD disaster. Of the 54 crew members and passengers on board, only two survived: the apprentice, Tom Pearce and the young woman passenger, Eva Carmichael, who lost all of her family in the tragedy. Ten days after the LOCH ARD tragedy, salvage rights to the wreck were sold at auction for £2,120. Cargo valued at £3,000 was salvaged and placed on the beach, but most washed back into the sea when another storm developed. The wreck of LOCH ARD still lies at the base of Mutton Bird Island. Much of the cargo has now been salvaged and some was washed up into what is now known as LOCH ARD Gorge. Cargo and artefacts have also been illegally salvaged over many years before protective legislation was introduced. One of the most unlikely pieces of cargo to have survived the shipwreck was a Minton porcelain peacock - one of only nine in the world. The peacock was destined for the Melbourne International Exhibition in 1880. It had been well packed, which gave it adequate protection during the violent storm. Today, the Minton peacock can be seen at the Flagstaff Hill Maritime Museum in Warrnambool. From Australia's most dramatic shipwreck it has now become Australia's most valuable shipwreck artefact and is one of very few 'objects' on the Victorian State Heritage Register. The wreck of the LOCH ARD is of State significance — Victorian Heritage Register S417 Flagstaff Hill’s collection of artefacts from LOCH ARD is significant for being one of the largest collections of artefacts from this shipwreck in Victoria. It is significant for its association with the shipwreck, which is on the Victorian Heritage Register (VHR S417). The collection is significant because of the relationship between the objects, as together they have a high potential to interpret the story of the LOCH ARD. The LOCH ARD collection is archaeologically significant as the remains of a large international passenger and cargo ship. The LOCH ARD collection is historically significant for representing aspects of Victoria’s shipping history and its potential to interpret sub-theme 1.5 of Victoria’s Framework of Historical Themes (living with natural processes). The collection is also historically significant for its association with the LOCH ARD, which was one of the worst and best known shipwrecks in Victoria’s history. A square marble tile retrieved from the wreck of the LOCH ARD. Most of its surface is covered by a thin layer of limestone and marine growth encrustation that is stained rust-red. There is a piece of corroded iron encrusted at an oblique angle on the tile’s rear face. The tile is ‘rough-worked’, cut to shape and size, but not smoothed or polished. There is a companion tile in similar condition in the Flagstaff Hill collection. From visual observation of the original surface (at low magnification) the tile appears to be of white Carrara-type marble.flagstaff hill, warrnambool, shipwrecked coast, flagstaff hill maritime museum, maritime museum, shipwreck coast, flagstaff hill maritime village, great ocean road, loch line, loch ard, captain gibbs, eva carmichael, tom pearce, glenample station, mutton bird island, loch ard gorge, white marble, marble tile, carrara marble, colonial architecture, victorian building materials -
 Bendigo Military Museum
Photograph - PHOTOGRAPH, BCOF, c 1944 - 1956
These relate to the WW2 and Post War service of VX112283 "Keith Charles Buckley" - Major1. Photo of an Australian Major of RA Sigs - in BCOF signing a document. Beside him is an Australian soldier and an Asian Gentleman. Behind them are cups and saucers. On the table is a round stamp or blotter. The Major is wearing Campaign medals. 2. Photo of the same conference from a different angle. 2 Australians, 5 Asian gentlemen. The Major and the mature Asian Gentleman are signing documents. The Australians are in winter dress. The civilians are in suits with ties, The table is a large square one with turned wooden legs.photos, ww2, signing of documents -
 Orbost & District Historical Society
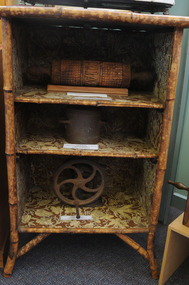
Shelves, early to first half 20th century
This item is an example the skill and craftmanship of early settler families who of necessity were self-reliant.Bamboo shelves (3 shelves + top) with brown vinyl padded top. Insides are wallpapered with an embossed paper of cream flowers on dark brown background. Wooden sides are covered with same wallpaper which has been painted over tan . There seems to have been a door originally attached as there are two hinges, top and bottom, on right hand side. There are 4 legs angled outwards with stays - all made of bamboo. Back and shelves appear to be slatted timber. Sometimes called a "whatnot".furniture-shelves-handmade -
 Bendigo Historical Society Inc.
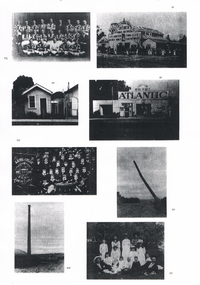
Document - LONG GULLY HISTORY GROUP COLLECTION: COPIES OF PHOTOS
Page with photocopies of photos on it. 'Aq' is a football team. 'Ar' is a store which sells china, glass, oil, seeds and produce. People are gathered in front of the shop. 'As' is a weatherboard house. 'At' is a service station which sells Atlantic fuel and run by Herb Pearce. 'Au' is a photo of the Long Gully Junior Band. 'Av' is a large chimney which has a bend in it and is leaning at about a 45 degree angle. 'Aw' is a photo of a tall chimney and 'ax' is a group of people with the women in long dresses.bendigo, history, long gully history group, the long gully history group - copies of photos, herb pearce, atlantic, long gully junior band -
 Bendigo Historical Society Inc.
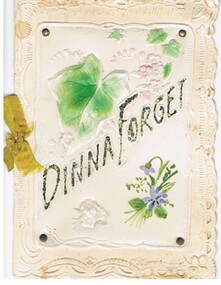
Document - MALONE COLLECTION: GREETING CARDS
Document. Greeting Cards. White card with shaped, embossed edges with some cutouts. On the front is a shaped embossed piece of celluloid held on with a bifurcated pin in each corner. It has a large green leaf near the top with some smaller green leaves and pink flowers. Dinna Forget is embossed on an angle across the centre and has had glitter on it. At the bottom is more pink flowers and a bunch of blue flowers. It has a light olive coloured ribbon tied in a bow on the left.person, greeting cards, malone collection, malone collection, greeting cards -
 Bendigo Historical Society Inc.
Document - BILL ASHMAN COLLECTION: CORRESPONDENCE
Two pages of typed notes titled - Electrically Welded Single Strand Barb Wire. The notes mention the advantages of the single strand electrically welded barb wire over the ordinary twisted barb wire of two strands. Advantages include less weight in the fence and for freight, less stretching, barbs are at fight angles to the wire and rust does not attack the welded barb wire as it is not bent which can cause the galvanising to crack. The welding helps to keep the rust out.sciences, instruments - general, scalebuoy, bill ashman collection - correspondence, electrically welded single strand barb wire, university of melbourne -
 Bendigo Historical Society Inc.
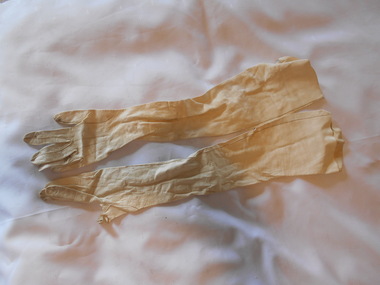
Clothing - MAGGIE BARBER COLLECTION: CREAM ELBOW LENGTH KID LEATHER GLOVES WITH FLAT PEARL BUTTON AT WRIST, 1890-1900's
Clothing. Elbow length, fine cream coloured kid leather gloves. Top edge is curved and is not hemmed. A plackett at the wrist is finely bound in the leather, and is 11.5 cm long. It fastens with three tiny 8 mm diameter pearl shell buttons, and bound button holes. The gloves are machine stitched, and it would appear that the long full-length side seam has been placed side by side, and then 'overlocked'. Three rows of angled stitching fans out over the back of the hand.costume accessories, female, kid leather gloves -
 Ballarat Tramway Museum
Slide - 35mm slide/s, Wal Jack, 26/12/1960 12:00:00 AM
Photo of tram No. 38 in Sturt St. at Lydiard St. in transition of having dash canopy lighting fitted. Tiger stripes on bumper bars, and white stripe under windscreen. Has large reflective tri-angles. Has Castrol Ad on roof of tram. In background is old Commonwealth bank building, Mutual Life Association building. On tram stop pole is section sign, 'Cars stop here' sign and it is painted as a compulsory stop. Taken 26-12-1960.SEC Ballarat No. 38 in Sturt St. 26-12-60' in blue ink and 'W.Jack' stamped in purple inktramways, trams, sturt st., dash canopy lights, tram stops, tram 38 -
 Bacchus Marsh & District Historical Society
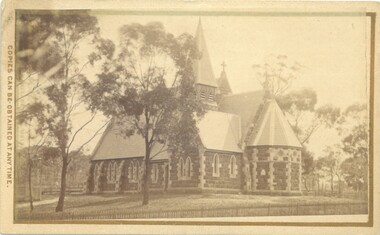
Photograph, Holy Trinity Church Bacchus Marsh 1883
The Holy Trinity Anglican Church in this location was first opened in 1877. An earlier nearby prefabricated Church building known as the 'Iron Church' had served as the Anglican place of worship in Bacchus Marsh from around 1855 until 1877. The 1877 sandstone Church with a slate roof was intended as a permanent structure for Anglican worship in Bacchus Marsh and still stands in 2024 and continues to function as an Anglican Church. The building was designed by Frederick Wyatt and is described as early English Gothic in style. It was opened on 5 June 1877 by Bishop Moorhouse of Melbourne. The sandstone was acquired from Grant's quarry at Maddingley.Small sepia unframed photograph on card with gold border framing photograph. Housed in the Jeremeas Family Album, which contains photographs of Bacchus Marsh and District in 1883 by Stevenson and McNicoll. The photograph depicts the recently constructed Anglican Holy Trinity Church in Gisborne Road, Bacchus Marsh. The view of the building is from Gisborne Road looking west. From this angle the rear and southern side of the building can be seen. A picket fence along the entrance to the Church grounds can be seen in the foreground.On the front: Stevenson & McNicoll. Photo. 108 Elizabeth St. Melbourne. COPIES CAN BE OBTAINED AT ANY TIME. On the back: LIGHT & TRUTH inscribed on a banner surmounted by a representation of the rising sun. Copies of this Portrait can be had at any time by sending the Name and Post Office Money Order or Stamps for the amount of order to STEVENSON & McNICOLL LATE BENSON & STEVENSON, Photographers. 108 Elizabeth Street, MELBOURNE churches bacchus marsh, holy trinity anglican church bacchus marsh, holy trinity church of england bacchus marsh, stevenson and mcnicoll 1883 photographs of bacchus marsh and district -
 Warrnambool and District Historical Society Inc.
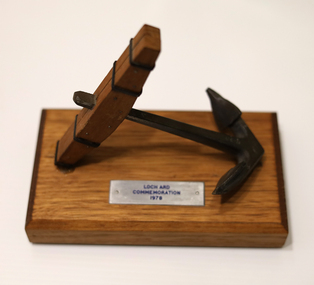
Souvenir - Loch Ard Commemoration Souvenir, 1978
This object has been made in 1978 to commemorate the 100th anniversary of the sinking of the ship 'Loch Ard'. This ship was wrecked on Mutton Bird Island near Port Campbell, Victoria in June 1878 with the loss of 52 lives and with two survivors. The story of the two survivors, passenger Eva Carmichael and seaman Tom Pearce has become part of the local folklore and has been retold in poetry, stage and T.V. drama and prose works. and is the subject of one of the night laser shows at Flagstaff Hill Maritime Museum in Warrnambool. Port Campbell Information Centre and Flagstaff Hill Maritime Museum also house many significant shipwreck items from the 'Loch Ard' including the nationally-important Loch Ard Minton Peacock. One of the commemorative events that took place in 1978 was the raising of the anchor from the wreck and its display at Port Campbell. This anchor item was probably made at the time and given to one of those connected to the recovery of the anchor. This souvenir is of interest as an object made to commemorate the most significant shipwreck in Western VictoriaThis is a souvenir of a shipwreck. It has a rectangular-shaped wooden base with a wooden piece with one curved edge standing upright at a slight angle on the top of the base. The wooden piece has four metal strips and has a metal anchor slotted into it so that the anchor is raised from the base. The wooden piece and the end of the anchor are glued to the base. The base has a silver-coloured metal name piece. The wooden sections have been slightly varnished. On the bottom of the base there are four rubber pads at each corner. Loch Ard Commemoration 1978loch ard wreck, loch ard commemoration 1978, flagstaff hill maritime museum, port campbell information centre, tom pearce & eva carmichael -
 Whitehorse Historical Society Inc.
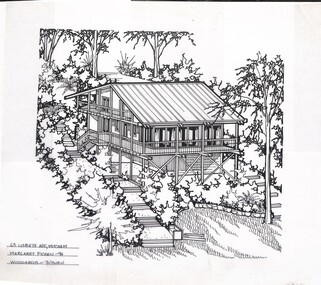
Artwork, other - Ink Line Drawing, Margaret Picken, 63 Lisbeth Ave., Mitcham, 1994
A property illustration by Margaret Picken Commissioned by a real estate agency for the purpose of advertising 63 Lisbeth Ave., Mitcham. This property has be listed as having sold for $325,000 in 2002. Made by using Rotring ‘Rapidigraph’ drafting pens with Rotring ink on Rapidigraph polyester drafting film, double matte. Trained as a cartographic draftsman within the mining industry, Margaret Picken is an artist who worked producing property illustrations for real estate agencies in eastern suburbs of Victoria from 1983-2005. Retiring from the industry as technological changes favored coloured photography over illustrations, and commissioning companies over sole contractors.This artwork is of Historical Significance as a record of local domestic architecture.A black ink line drawing on drafters film by Maragret Picken, of an angled view from above of a elevated bush block, with three story timber stilt house situated into the hill. In the lower right corner is the bottom of the hill, and a front lawn with a edged garden bed behind. While on either side of the house are steps leading up the hill to the back of the block. The house has steps leading up to a partial wrap around verandah There are two hole punch holes along the top edge63 Lisbeth Ave., Mitcham Margaret Picken - 94 Woodards -whitehorse historical society, schwerkolt cottage, housing, architecture, margaret picken, house, garden, real estate, mitcham -
 Flagstaff Hill Maritime Museum and Village
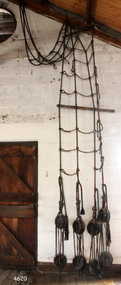
Equipment - Rigging
The shrouds or fore-rigging are a part of the standing rigging on a sailing ship. They are used in pairs on each side of a ship to help hold the masts in place and to aid the sailors who climb the rigging. They are part of the basic framework for the sails. Larger vessels may have two or three pairs, and some ships may have upper and lower shrouds. The upper shrouds would be fixed to a protruding structure on the top of the masts so that they hung from the right angle. The ropework skills of the sailmaker would be used to create the shrouds, choosing fibres with properties suitable for the job at hand and creating the triangular shape carefully. Deadeyes and ropes were then used to attach the shrouds to the ship's structure.This shroud is an example of a part of the standing rigging of a sailing ship. Shrouds were used in pairs on larger sailing vessels to help hold the masts in place and give access to adjustable rigging such as sails.Fore Rigging or Shrouds, made from rope fibres. This shroud includes the upper and lower wooden deadeyes. They are part of a ship's rigging. flagstaff hill, warrnambool, maritime museum, maritime village, great ocean road, shipwreck coast, shroud, fore-rigging, ropework, sailing ship rigging, standing rigging, natural fibres, sailmakers, handmade, deadeye, knot making -
 Flagstaff Hill Maritime Museum and Village
Equipment - Rigging
The shrouds or fore-rigging are a part of the standing rigging on a sailing ship. They are used in pairs on each side of a ship to help hold the masts in place and to aid the sailors who climb the rigging. They are part of the basic framework for the sails. Larger vessels may have two or three pairs, and some ships may have upper and lower shrouds. The upper shrouds would be fixed to a protruding structure on the top of the masts so that they hung from the right angle. The ropework skills of the sailmaker would be used to create the shrouds, choosing fibres with properties suitable for the job at hand and creating the triangular shape carefully. Deadeyes and ropes were then used to attach the shrouds to the ship's structure.This shroud is an example of a part of the standing rigging of a sailing ship. Shrouds were used in pairs on larger sailing vessels to help hold the masts in place and give access to adjustable rigging such as sails.Fore Rigging or Shrouds, made from rope fibres. This shroud includes the upper and lower wooden deadeyes. They are part of a ship's rigging.flagstaff hill, warrnambool, maritime museum, maritime village, great ocean road, shipwreck coast, shroud, fore-rigging, ropework, knot making, sailing ship rigging, standing rigging, natural fibres, sailmakers, handmade, deadeye