Showing 1533 items matching "ballarat north gardens"
-
 Ballarat Tramway Museum
Slide - 35mm slide/s, Travis Jeffrey, c1962
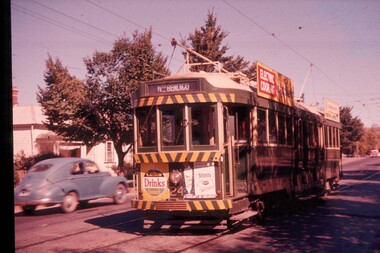
Agfa plastic mount (blue base, white cover) with a photo of Bendigo No. 24 in the crossing loop at Myrtle St. loop. Tram has destination of North Bendigo. On the front dash panel is advertisement for Cohns Soft drinks and Streets Ice Cream. Roof advertisements for SEC, Electric Cooking and another one."BES 23" in penciltramways, trams, bendigo, golden square, myrtle st, tram 24 -
 Ballarat Tramway Museum
Slide - 35mm slide/s, Travis Jeffrey, c1962
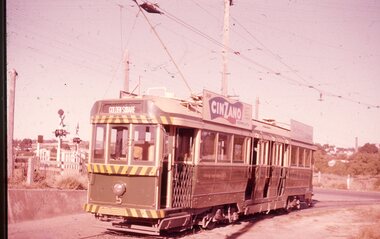
Agfa plastic mount (blue base, white cover) with a photo of Bendigo No. 5 in the crossing loop at Myrtle St. loop. No. 5 has a Cinzano roof advertisements and one other. Tram has destination of North Bendigo. Photo taken c1962."BES 25" in penciltramways, trams, bendigo, golden square, myrtle st, tram 5 -
 Ballarat Tramway Museum
Slide - 35mm slide/s, Travis Jeffrey, c1962
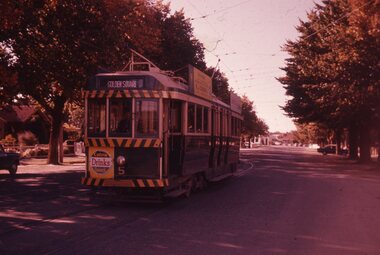
Agfa plastic mount (blue base, white cover) with a photo of Bendigo 5 at North Bendigo terminus. Tram has the destination of Golden Square. Photo has the level crossing in the background. Tram has a "Cinzano" and another roof advertisement. Photo taken c1962."BES 30" in penciltramways, trams, bendigo, north bendigo, tram 5 -
 Ballarat Tramway Museum
Slide - 35mm slide/s, Travis Jeffrey, c1962
Agfa plastic mount (blue base, white cover) with a photo of Bendigo 5 passing through the Bridge St Loop. Tram has the destination of Golden Square, a Cohns Soft drink ad on the dash panel and a "R.J. Conroy" roof advertisement. Photo taken c1962."BES 31" in penciltramways, trams, bendigo, north bendigo, bridge st, tram 5 -
 Ballarat Tramway Museum
Slide - 35mm slide/s - set of 3, Travis Jeffrey, late 1960's or early 1970's
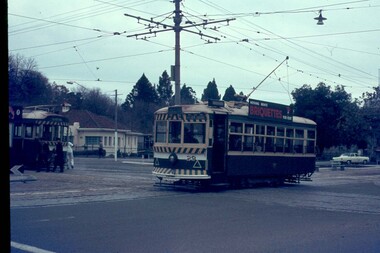
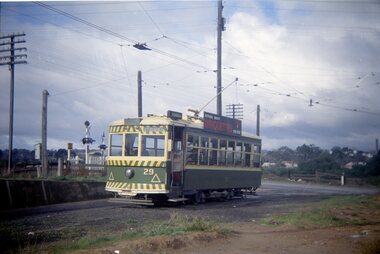
Series of three Agfa plastic mount (blue base, white cover) of photos of Bendigo No. 29 on the Golden Square - North Bendigo route. Photo taken late 1960's early 1970's from the window of another tram. The tram has a SEC Briquettes roof advertisement fitted. 2655.1 - No. 29 leaving Charing Cross for Golden Square with 26 in the background. 2655.2 - No. 29 north bound in Pall Mall with Stonemasons Supermarket and the Stoneman's Shamrock Hotel in the background. 2655.3 - No. 29 leaving a Myrtle St loop, in High St?, with Hardies Fibrolite Pipes yard in the background."BES 49", "50", "51" in pencil.tramways, trams, bendigo, golden square, pall mall, charing cross, high st, tram 29 -
 Ballarat Tramway Museum
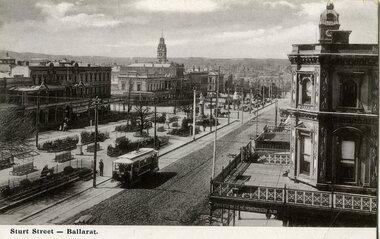
Postcard, WTP, "Sturt Street, Ballarat", 1905?
Photo appears to be taken soon after the opening of the electric trams, as the tramway is well paved compared to the rest of the street which shows vehicle tracks etc. For similar images see Reg. items 834, 838, 2151 and 8998. Note the roof of a small horse-drawn vehicle crossing in the center foreground of the photograph - this vehicle is shown in detail in other images. Shows buildings along the north side of Sturt St. and the building at the SE corner of Doveton St. ESCo tram has a destination board on the front dash of the tram.Yields information about Sturt St soon after the opening of the Ballarat Electric tramwayPrinted black and white postcard of an ESCo tram near the intersection of Doveton St. and Sturt St. travelling west along the south side of Sturt Street. Could be a reproduction postcard - very high gloss finish of photograph. Titled "Sturt Street, Ballarat" in the bottom left-hand corner printed on a white strip at the bottom of the postcard. On rear of photograph are printed letters "W.T.P." - possibly publisher, in the stamp area "Printed in Germany". Card has been marked for areas for the correspondence and address. In bottom right hand corner "$8-" in pencil.trams, tramways, ballarat, doveton st, sturt st, esco -
 Ballarat Tramway Museum
Slide - 35mm slide/s, c1955
Agfachrome Professional plastic mount (blue base, white cover) reproduction slide of a colour slide of Geelong No. 2 at North terminus. Tram has the destination of Belmont. Photo taken mid 1950's. "G 3" and "1 -3" in pencil.tramways, trams, geelong, north, tram 2 -
 Ballarat Tramway Museum
Photograph - Black & White Photograph/s, John Phillips, c1971
Black and white photograph of SEC No. 30 west bound in Wendouree Parade near Dowling St with Lake Wendouree in the background. Has boat sheds in the background. No. 30 has the destination of "Gardens via Drummond North" and SEC roof advertisement "Everything's fine in my all electric kitchen". Photo taken by John Phillips c1971. Three copies held Fourth copy added 8/11/2005 - to box D2.tramways, trams, wendouree parade, dowling st, lake wendouree, tram 30 -
 Ballarat Tramway Museum
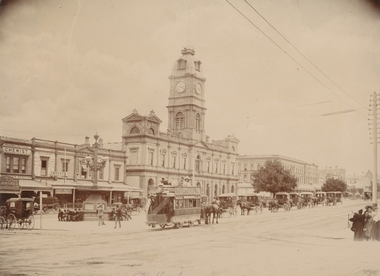
Photograph - Block Mounted Photograph, Black, 1897
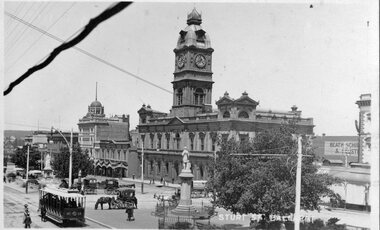
Block mounted photograph of Ballarat Horse Tram No. 16, westbound, on the North side of Sturt St at the intersection of Lydiard St. with the Ballarat Town Hall in the background. Has 10 horse drawn cabs parked along the median strip in the photograph as well. Shows the buildings along the south side of Sturt St. On the side of the tramcar are the roof advertisement for Havelock Tobacco and on the stair, advertisement for Bonanza's store. See image btm2726p for higher resolution scan and 2726i1 for close up scene of the tram car. Photograph mounted onto heavy pre-printed cardboard with detail corners and lining. Has stamp in bottom left hand corner "Black, Photo" and along bottom edge of photo "Ballarat". Reg. Item 767 dates the photograph as 1897.trams, tramways, horse trams, horse cabs, sturt st, town hall, tram 16 -
 Ballarat Tramway Museum
Negative, Travis Jeffrey, 17/06/1962 12:00:00 AM
Colour Negative No. N395, of Bendigo Birney No. 29 at North Bendigo terminus. Trolley pole yet to be turned. Has railway level crossing lights in the background. Tram has a Briquettes roof advertisement. Photo possibly 17/6/1962. Colour laser printed copy of image stored in box 73. Image scanned at hi res 27/5/2020 and image updated.In red pen on folder that contained negative, "NR70B" and "17 Jun 62". trams, tramways, bendigo, north bendigo, tram 29 -
 Ballarat Tramway Museum
Negative, Travis Jeffrey, 17/06/1962 12:00:00 AM
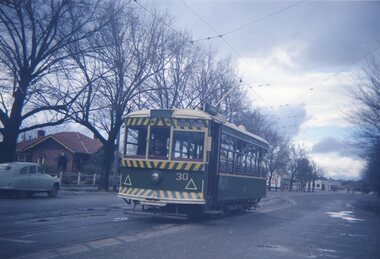
Colour Negative No. N396, of Bendigo Birney No. 30 on the North Bendigo line at the Bridge St. loop. Tram has the destination of Golden Square. Photo possibly 17/6/1962. Colour laser printed copy of image stored in box 73. Image scanned at hi res 27/5/2020 and image updated.In red pen on folder that contained negative, "NR69B" and "17 Jun 62". trams, tramways, bendigo, bridge st, north bendigo, tram 30 -
 Ballarat Tramway Museum
Negative, Travis Jeffrey, 5/08/1962 12:00:00 AM
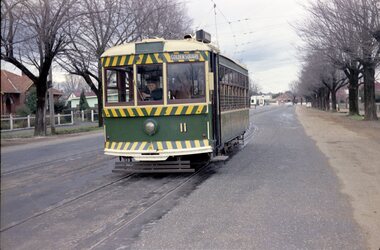
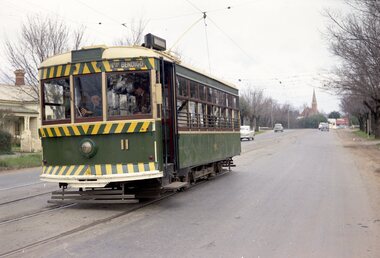
Colour Negative No. N407, of the Bendigo No 11 on the North Bendigo line at the Bridge St. loop. Tram has the destination of Golden Square. Photo taken possibly on 5/8/1962. Colour laser printed copy of image stored in box 73. Original negative hires scan and image updated 28/5/2020.In red pen on folder that contained negative, "NR95B" and "5 Aug 62". trams, tramways, bendigo, north bendigo, bridge st, tram 11 -
 Ballarat Tramway Museum
Negative, Travis Jeffrey, 5/08/1962 12:00:00 AM
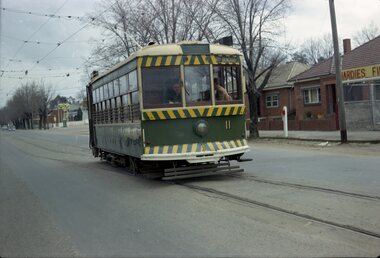
Colour Negative No. N408, of the Bendigo No 11 leaving Myrtle St loop in High St? with Hardies Fibrolite Pipes yard in the background. Tram has the destination of North Bendigo. See also Reg. item 2655.3 for a similar image. Photo taken possibly on 5/8/1962. Colour laser printed copy of image stored in box 73. Original negative hires scan and image updated 28/5/2020.In red pen on folder that contained negative, "NR94B" and "5 Aug 62". trams, tramways, bendigo, north bendigo, high st, myrtle st, tram 11 -
 Ballarat Tramway Museum
Negative, Travis Jeffrey, 5/08/1962 12:00:00 AM
Colour Negative No. N409, of the Bendigo No 11 leaving the Fire Station loop in High St, inbound. Tram has the destination of North Bendigo. Photo taken possibly on 5/8/1962. Colour laser printed copy of image stored in box 73. Original negative hires scan and image updated 28/5/2020.In red pen on folder that contained negative, "NR93B" and "5 Aug 62". On bottom of folder, "SEC Bendigo Colour" - handwritten at time of sorting by WAD. trams, tramways, bendigo, high st, fire station loop, tram 11 -
 Ballarat Tramway Museum
Negative, Travis Jeffrey, 5/08/1962 12:00:00 AM
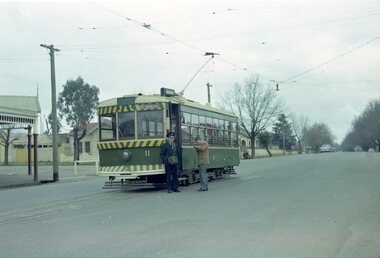
Colour Negative No. N411, of the Bendigo No 11 at Quarry Hill terminus, with the conductor standing by the front door of the tram and a passenger appearing to get some money out of a wallet. Tram has the destination of North Bendigo. Photo taken possibly on 5/8/1962. Colour laser printed copy of image stored in box 73.In red pen on folder that contained negative, "NR90B" and "5 Aug 62". trams, tramways, bendigo, quarry hill, crews, tram 11 -
 Ballarat Tramway Museum
Postcard, Kodak, ESCo crossbench tram No. 19
Printed black and white photographic postcard of Ballarat ESCo crossbench tram No. 19 at the intersection of Armstrong and Sturt St. travelling east along the north side of Sturt Street. Photo appears to be taken in the early days of tram operation - small destination box. Has the Ballarat Town Hall, the National Mutual Life building, Snows and other buildings on the south side of Sturt. St. Has a number of horse drawn vehicles in the image as well. Titled "Sturt Street, Ballarat" in bottom right hand corner". On rear of postcard, printed is the words "Post Card", areas for "Correspondence" and "Address Only" and in stamp area in a square "Kodak Australia" twice. Handwritten on the card is "With Best Wishes for a Happy New Year to all Rostella / W. Lovett". Images .1 - shows postcard, .2 - close up, of No. 19, note Inspector along side tram, the stance of the motorman/driver, and conductor on the rear platform of the tram. Appears to have a destination of "Gardens ?" .3 - rear of postcard Handwritten letter on card.trams, tramways, esco, sturt st, postcards, armstrong st -
 Ballarat Tramway Museum
Slide - 35mm slide/s, Eldon Hogan, Oct. 1966
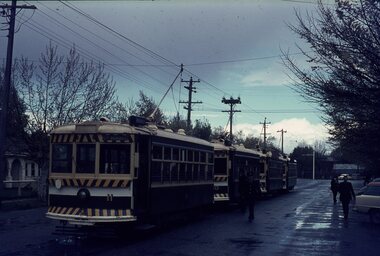
Colour slide of four Birney Trams on the North Bendigo line, Oct. 1966, SPER Tour, lead by tram No. 11, followed by No. 30. People alongside the tram on a wet day. Photographer Eldon Hogan, AGFA Slide, blue plastic with white plastic on reverse.In ink "SPER Bendigo Oct. '66"tramways, trams, sper, bendigo, birney, tram 11, tram 30 -
 Ballarat Tramway Museum
Slide - 35mm slide/s, Eldon Hogan, mid 1970's
Colour slide of Birney tram No. 30 at the North Bendigo Terminus in Bendigo Trust colours, mid 1970's and a SEC Bogie tram behind. Possibly on an ARE tour. Photographer Eldon Hogan, AGFA Slide, blue plastic with white plastic on reverse.tramways, trams, sper, bendigo, birney, north bendigo, tram 30 -
 Ballarat Tramway Museum
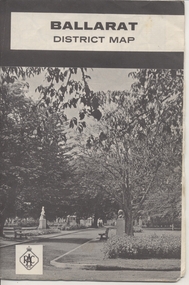
Map, Royal Automobile Club of Victoria, "Ballarat District Map - RACV", c1966
Yields information about the extent of Ballarat in the early to mid 1960's shows the tram lines and other rail lines in the district.Printed street map titled "Ballarat District Map", published by the RACV, showing the central part of Ballarat, Ballarat Outlets, streets, principal attractions, Ballarat and district maps and information, and a list of sporting and entertainment facilities. Has the tram lines shown dotted, does not run out to Sebastopol or the Lydiard St North terminus. Each map in the bottom left hand corner has the numbers "1166", possibly indicating the date.trams, tramways, map, ballarat, racv, railways -
 Ballarat Tramway Museum
Film - Movie Film & Box, Kodak, 1960 to 1971
Yields information in movie film format of Ballarat trams in 1960 through to 1971, how the system operated and was used by people, including special trams., Yields information in movie film format of Ballarat trams in 1960 through to 1971, how the system operated and was used by people, including special trams.Movie film - 8mm, approx. 15 mins, without leader strip on a plastic reel, within a clear plastic case - Standard 8, titled "Ballarat Trams". See Reg Item 4957 for DVD and Mini DVD. Has been transferred to DVD - see Reg item 4957 Made by Arthur Hill. Also transferred to DVD by Rod Cook Oct. 2015, via Roger Greenwood for use in his DVD, "The City of Ballarat Trams, Gardens & Gold" of 2016. See Reg Item 6883. In Arthur's letter - on file - Made between 1960 and August 1971. Synopsis: based on time. Between 1960 and 1968 0:00 Trams Ahead sign before the Victoria St terminus with 20 at terminus 0.14 - No. 20 leaving Victoria St terminus and being followed along Victoria St by car and then passengers jointing the tram at a tram stop. 00.40 - No. 12 (c1960) in bound along Lydiard St North and arriving in the Gregory St loop. 00.56 - No. 12 and 14 crossing at Gregory St. 01.20 - No. 33 and a bogie car crossing at depot loop. 01.31 - No. 18 travelling along Wendouree Parade with the Lake in the background. 01.42 - No 41 at depot junction and running into the depot No. 2 road with a short sequence of a tramway signal. 02.17 - SEC Sign at the depot gate, shot of 41 in No. 2 road, with the lights other way around, Caution beware of trams sign and a red signal. 02.31- Timetable sign at Gardens Loop 02.36 - No. 30 arriving at Loop and view of a signal with no lights showing. 02.48 - Destination roll being changed through a number of destinations. 03.26 - No. 20 arriving at Carlton St loop with the Olympic monument in the background and the red signal light going out. 03.31 - a lady standing at the front of No. 20, with an ice cream in hand, and No. 17 arriving at the Carlton St loop with a short sped up sequence and No. 20 departing from the loop, followed by No. 17 leaving the loop, heading into the city. 03.41 - No. 13 inbound from Sebastopol crossing Albert St and heading into the city. 04.12 - view of signal and contactor, the light going green and the tram passing underneath. 04.24 - No. 12 at the Sebastopol terminus and departing. 04.51 - No. 12 crossing Albert St Sebastopol. 05.16 - Following No. 12 along Albert St, with Borough Offices in background initially. 05.28 - No. 12 arriving at the Grey St loop with No. 14 arriving at the loop from the city and both trams departing. March 1971 05.58 - No. 30 being followed along Barkly St, Mt Pleasant and the pole being turned at the terminus 06.32 - No. 30 picking up a lady passenger. 06.38 - view from the front of a tram, with the drivers hand and a cigarette, view from the back of the tram, along the Mt Pleasant route and running through the loop and then turning into Main St - has the Ballarat (East) fire station in one sequence, and finally running along Main St. 07.35 - view from tram, with car turning into Bridge St. and then running into Sturt St passed the Parking Loop, and along Sturt St. 08.32 - Points at Drummond St North being changed, doors changed over and the tram running along Drummond St. North, through the Mill St loop and into Macarthur St and in Wendouree Parade, with the Lake Wendouree in view and crossing No. 12 at the Depot Loop, with crews chatting, past the depot, a lady passenger getting off the tram near Forest St., and arriving at Gardens Loop with the same lady passenger who got on in Barkly St, getting off the tram. 11.09 - view of No. 30 at Gardens Loop, departing the loop. August 1971 11.30 - R761 crossing Melton (Exford Wier) on the special train to Ballarat and then the bridge between Ballan and Gordon Stations. 12.16 - View from the front of a tram, following No. 26 along Lydiard St North, crossing at Gregory St and returning to the City. 12.39 - No. 14 and one other tram running along Albert St to Sebastopol, crossing No. 21 at Grey St and then to Sebastopol terminus, crossing Albert St and return and running along Albert St. 13.36 - No. 26, 39 crossing 13 at Gardens Loop. 14.00 - view looking across Lake Wendouree. 14.07 - 26 arriving at Victoria St, running part of Destination roll, passengers getting off with hotel in the background, trolley pole being turned and then with 39 following tram along Victoria St, crossing at the King St Loop. 15.07 - view of a trolley pole tracking through the overhead at curve 15.10 - end. Written labels giving title information on reel.trams, tramways, ballarat, sebastopol, lydiard st north, victoria st, mt pleasant, lake wendouree, depot, tram 12, tram 13, tram 14, tram 17, tram 18, tram 21, tram 26, tram 33, tram 39, tram 41 -
 Ballarat Tramway Museum
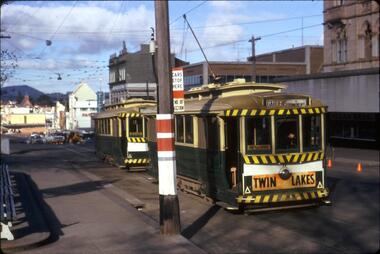
Photograph - Digital image Set of 11, Stuart Loddington, 10 images of Ballarat trams prior to closure, 1971
Yields information about Ballarat Tramways and trams prior to the closure of the tramway system.Set of 11 digital images, comprising 1 donation text image and 10 images of Ballarat trams prior to closure, scanned from original slides by Stuart Lodington, 1971 prior to closure of the system. .1 - Donation text slide. .2 - No. 26 southbound in Lydiard St North, with the Ballarat Railway Station level crossing gates in the background. .3 - No. 27 and 30 crossing at Bell St Loop, Skipton St. (see also btm4976i4) .4 - No. 17 Wendouree Parade, near Gardens Loop .5 - Single truck tram at Victoria St terminus, taken from the west side of the Buninyong Rail line bridge, with CRB Roadwork sign, Eureka Caravan Park and Meagher Hotel in the background, possibly No. 11, see entry for .10 .6 - No. 12 and 30 crossing at the Urquhart St Loop, Drummond St South. .7 - No. 12 westbound in Sturt St, with Grenville St in the background. .8 - No. 17 at Gardens Loop with the Trolley pole being reversed. .9 - No. 30, Lydiard St North with Reid's Palace building in the background. .10 - No. 11 passing over the Buninyong rail line bridge, with Gardens via Sturt St West and a Twin Lakes sign. Has a number of children alongside the driver. .11 - No. 21 heading northbound in Wendouree Parade, Gardens, just to the north of the now BTM depot junction.trams, tramways, ballarat, level crossings, buninyong railway, lydiard st north, bell st, victoria st, wendouree parade, gardens, drummond st, sturt st, tram 26, tram 27, tram 30, tram 17, tram 12, tram 21, tram 11 -
 Ballarat Tramway Museum
Photograph - Digital image Set of 10, 1971
Yields information about Ballarat Tramways and trams prior to the closure of the tramway system.Set of 10 digital images of Ballarat trams prior to closure, scanned from original slides by Stuart Lodington, 1971 prior to closure of the system. .1 - No. 27 at Lydiard St North terminus with passengers alighting/boarding and an enthusiast about to turn the pole. .2 - No. 27 and No. 30 Skipton St at the Bell St Loop. .3 - No. 13 at the Mt Pleasant terminus, showing destination of Gardens via Drummond St North. .4 - Crews of No. 31 (Conductor and Driver) reversing pole of No. 31 at the depot. .5 - No. 11 inbound on Victoria St. .6 - Night view of a tram at a terminus. .7 - Scrubber on 0 road at the depot .8 - No. 14 at Gardens Loop with another tram behind and the driver standing in the front of the tram. .9 - No. 13 (Mt Pleasant) inbound in Sturt St with 14 behind. .10 - No. 26 northbound to Lydiard St north, about to cross Albert St Sebastopol with the SSW shop in the background. trams, tramways, sebastopol, lydiard st nth, skipton st, bell st, mt pleasant, victoria st, depot, albert st, tram 27, tram 30, tram 13, tram 11, scrubber, tram 14, tram 26 -
 Ballarat Tramway Museum
Photograph - Digital image Set of 7, 1971
Yields information about Ballarat Tramways and trams prior to the closure of the tramway system.Set of 7 digital images of Ballarat trams prior to closure, scanned from original slides by Stuart Lodington, 1971 prior to closure of the system. .1 - No. 26 and 27 inbound Sturt St West at Parker St loop, both trams showing CITY. .2 - No. 43 and 14 crossing at Parker St Loop. .3 - No. 39 turning in bound from Hamilton Ave into Sturt St West. Tram showing destination of Mt Pleasant. .4 - No. 39 inbound in Hamilton Ave. .5 - No. 14 (Gardens via Sturt St W), and No. 13 (Special) at Gardens Loop .6 - No. 26, crossing Albert St Sebastopol, northbound, going to Lydiard St North .7 - Crew of No. 43 standing in front of the tram at Gardens Looptrams, tramways, sturt st west, parker st loop, hamilton ave, albert st, crews -
 Ballarat Tramway Museum
Photograph - Digital image Set of 20, Dec. 1970
Set of 20 digital images of Bendigo Tramways December 1970 by Stuart Lodington. .1 - Bendigo track gang renewing a joint, McCrae St, with welding truck alongside and Birney No. 29. .2 - No. 5 at Quarry Hill terminus? .3 - No. 24 at the depot .4 - No. 2 on the Quarry Hill line .5 - No. 5 approaching the Eaglehawk terminus .6 - No. 29? at the Golden Square Terminus with Bill Rodda's Golden Square hotel in the background. .7 - No. 3 inbound on the Quarry Hill line. .8 - trams crossing on the Eaglehawk line, through the window of one tram. .9 - side on view of a B23D controller in a bogie tram .10 - No. 5 at the Eaglehawk terminus .11 - No. 21 at No. 21 crossing on the Golden Square line. No. 29 showing special, No.21 - North Bendigo, Fire Station Loop? .12 - No. 29 and another tram - near work site? .13 - interior view from Birney looking at the front of another tram parked behind. .14 - No. 29, No. 6 crossing at .15 - No. 6, showing special at Charing Cross. .16 - No. 5 and another tram at North Bendigo on a Special .17 - No. 28 at Charing Cross .18 - No. 5 on Special at a Loop on the Eaglehawk line .19 - No. 28, and two other trams at the Myrtle St Loop .20 - No. 18 showing Quarry Hill and two other trams on View St.trams, tramways, bendigo, trackwork, mccrae st, depot, quarry hill, eaglehawk, golden square, controllers, north bendigo, view st, tram 29, tram 5, tram 24, tram 2, tram 3, tram 6, tram 28, tram 18 -
 Ballarat Tramway Museum
Photograph - Digital image Set of 20, 1971-72
Set of 20 digital images of Bendigo Tramways, 1972 at or before closure while on a tram tour by Stuart Lodington. .1 - No. 29 at the North Bendigo terminus .2 - No. 29 just past the Bendigo end of the double track in High St Eaglehawk, with a BP dealer in the background. .3 - Night photo of No. 18 at a terminus, showing "Eaglehawk" .4 - ditto .5 - Night photo of No. 24 at Eaglehawk with Leo A Hughes Photographer in the background. The Tram has "Johnnie Walker whiskey" roof adverts. .6 - No. 29 outbound in Thunder St with a train passing over the bridge in the background. .7 - view from the front window of a tram on the Eaglehawk line with a large "display event float" in the foreground and tram approaching a crossing loop. .8 - No. 29 at North Bendigo .9 - view of High St Eaglehawk looking east from the terminus, showing the track and centre poles. .10 - No. 29 outbound on the North Bendigo line turning from either Nolan St or Caledonia St, running a special. .11 - No. 7 departing North Bendigo for Golden Square. .12 - No. 3 and 18 at Charing Cross. No. 3 has two SEC roof Advertisements .13 - No. 7 at North Bendigo with the trolley pole being reversed. .14 - No. 24 at Quarry Hill with Northern Terrazzo in the background with the driver alongside .15 - No. 7 and No.6 at Charing Cross with the Beehive buildings in the background. .16 - No. 7 at North Bendigo terminus .17 - ditto .18 - No. 24 at Quarry Hill with Northern Terrazzo in the background with the conductor alongside. .19 - ditto .20 - No. 26 and other bogie tram in View St near Charing Cross with the Armstrong Tyre Service building and signs for Cohn's Drinks and T&G in the view.trams, tramways, bendigo, eaglehawk, quarry hill, golden square, depot, north bendigo, charing cross, tram 29, tram 18, tram 24, tram 3, tram 7, tram 6, tram 26 -
 Ballarat Tramway Museum
Photograph - Digital image Set of 20, 1971-72
Set of 22 digital images of Bendigo Tramways, 1972 at or before closure while on a tram tour by Stuart Lodington. .1 - No. 7 arriving at North Bendigo .2 - No. 5 departing Charing Cross along View St, with a Firestone tyres in the background. .3 - front view of a tram in View St with a blurred background image. .4 - No. 24 showing Eaglehawk destination .5 - No 26 and 3 in View St, with the Armstrong Tyre Service building in the background and signs for T&G and Cohn's Drinks. .6 - ditto .7 - No. 3 arriving at Charing Cross from Eaglehawk in View St, with a Quarry Hill destination. .8 - No. 3 and 18 at Charing Cross. .9 - No. 24 on the Quarry Hill line. .10 - No 26 in View St, with the Armstrong Tyre Service building in the background and signs for T&G and Cohn's Drinks. .11 - ditto, with fountain in view, Colonial Mutual building and a newsagent with a Herald sign on the building. .12 - No. 7 at North Bendigo terminus .13 - ditto with pole being reversed. .14 - No. 18 at Quarry Hill terminus with Northern Terrazzo sign in the background. .15 - No. 24 at Quarry Hill terminus .16 - No. 18 arriving at Charring Cross, with Fountain Plaza and Bendigo Pharmacy in the background. .17 - No. 3 and 18 at Charing Cross. .18 - No. 7 at North Bendigo terminus with pole being placed on the overhead. .19 - No. 26 in View St inbound, with Sandhurst Trustees sign in the background. .20 - No. 6 leaving Charing Cross in Pall Mall with Myer and other buildings in the background. .21 - No. 7 at North Bendigo .22 - Single trucker with two roof Advertisements crossing View St with fountain in view, Colonial Mutual building and a newsagent with a Herald sign on the building.trams, tramways, bendigo, eaglehawk, quarry hill, north bendigo, charing cross, view st, tram 7, tram 5, tram 24, tram 26, tram 5, tram 3, tram 18, tram 6 -
 Ballarat Tramway Museum
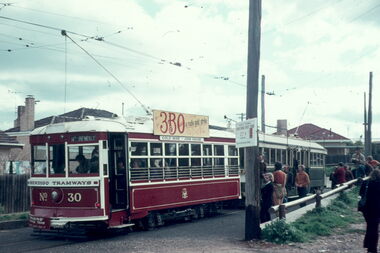
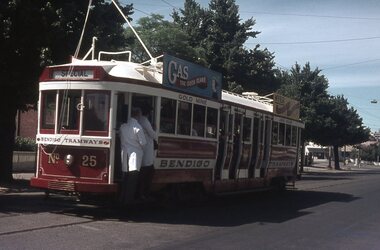
Photograph - Digital image Set of 20, 9/12/1972 12:00:00 AM
Set of 21 digital images of Bendigo Tramways, at the re-opening of the Bendigo tramways by the Bendigo Trust on 9/12/1972by Stuart Lodington. All trams in the first Bendigo Trust colours. .1 - No. 25 with Gas and Myer roof advertisements .2 - No. 30 with 3BO roof advert and a BP service station in the background. .3 - SEC single trucker at the Mine with a large "Tram Tours" sign on the front of the tram .4 - ditto .5 - No. 19 with a large group of passengers, Bendigo Motor Co and Sandhurst roof advertisements .6 - No. 30 in McCrae St .7 - view of opening march with band .8 - No. 19 in opening parade .9 - Opening Parade in High St with cathedral in the background .10 - No. 30 in Nolan St crossing bridge .11 - ditto .12 - No. 25 at the mine .13 - No. 30 leaving the mine .14 - No. 30 ditto with BCTV roof advert. .15 - Charing Cross with cenotaph, The Beehive building and Ezywalkin shoes and Coca Cola adverts .16 - No. 19 southbound in High St with City Centre Motel building in the background. .17 - No. 30 returning from North Bendigo .18 - No 25 in High St after leaving Gold Mine .19 - No. 30 at the Mine .20 - No. 30 in Nolan St .21 - No. 30 with 3BO roof advert and a BP service station in the background.trams, tramways, bendigo, north bendigo, charing cross, bendigo trust, central deborah, tram 25, tram 30, tram 19 -
 Ballarat Tramway Museum
Photograph - Digital image, 7/08/1971 12:00:00 AM
Yields information about the SEC Ballarat trams in the months before the closure of the SEC Tramway system. Yields information about the streetscape. Digital images, scanned from slides by Graeme Cleak, scanning by Peter Winspur 9/2011. Slide FR27 - No. 41, No. 11 and a another single trucker at the Tramway centre stop, Sturt and Lydiard Sts. No. 22 bound for Gardens via Drummond North and has a Twin Lakes sign on the front. In the background are the buildings of Sturt St on the south side. Taken 7-8-1971. trams, tramways, sturt st, lydiard st, tram 11 -
 Ballarat Tramway Museum
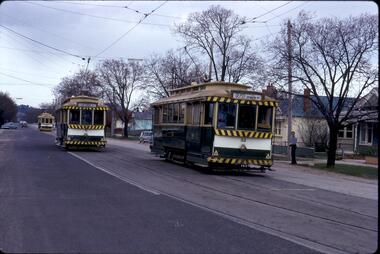
Photograph - Digital image Set of 8, 21/08/1971 12:00:00 AM
Yields information about the SEC Ballarat trams in the months before the closure of the SEC Tramway system. Yields information about the streetscape. Set of 8 Digital images, scanned from slides by Graeme Cleak, scanning by Peter Winspur 9/2011. .1 - Slide FS14 - No. 31 and 32 crossing at the High St Loop in Macarthur St. Tram 31 has the destination of Victoria St. Geoff Dean and his mini on the right hand side of the photograph. Another depot bound single trucker in the photograph, .2 - Slide FS3 - 31 outbound in Victoria St, with St Alipius church in the background. .3 - Slide FS5 - No. 31, and four other trams, some running special at Sturt and Lydiard Sts during the ARHS tour of that day. Has the ANZ Bank and SEC offices in the background. .4 - Slide FS9 - Nos. 39, 26 and two other trams in Lydiard St for the ARHS tour with Reid's Palace, Macleod & Co and J.J. Collier buildings in the background along with other buildings in Lydiard St North. Taken from the Provincial Hotel. .5 - Slide FS11 - No. 26 northbound showing Special running through the level crossing at Ballarat with the Kennedy Murray General Carrier in the background. Taken from the Provincial Hotel. .6 - Slide FS13 - No. 32 turning from Sturt St into Drummond Street North showing Depot via Drummond North, with the Southern Cross Hotel, Rimmington Bros and J.A, Malpass(?) buildings in the background. .7 - Slide FR35 - night shot of No. 17 (with Twin Lakes sign) and No. 32 in Nos 3 and 4 roads at the depot. .8 - Slide FR34 - night shot of the front of the depot - as above and No. 43 on "0" road. All photos 21-8-1971 trams, tramways, railway station, macarthur st, victoria st, sturt st, lydiard st north, level crossings, depot, tram 31, tram 32, tram 39, tram 26, tram 17, tram 43 -
 Ballarat Tramway Museum
Photograph - Digital image, c1971
Yields information about Ballarat streetscape and its trams in the closing days of the SEC tramway system.Digital image from a black and white print of tram 42 southbound in Lydiard St North, for Sebastopol. Tram has an "Everything is under control in my all electric kitchen" In the background is the streetscape on the east side of Lydiard St Nth, including the Colonists Hotel, Davidsons shop and the Art Gallery. Photo by Marc Dahlstrom c1971. On rear is the Marc Dahlstrom stamp.trams, tramways, lydiard st north, tram 42