Showing 3302 items
matching year 1
-
 Ballarat Clarendon College
Coulter Cup
As an incentive to improve school work and develop student leadership, from 1927 former Clarendon PLC student Nellie Sutherland (Coulter) donated a silver cup each year. The cup soon became a prestigious award. It was awarded to the girl holding the leading place in 'work, sport and above all moral character'. The cups were awarded annually until to 1951. Mrs Sutherland made these gifts partly to remember her school days under Mrs Kennedy and because the school in Mair Street was built on the site of her former home. But the main reason was in memory of her two brothers Jason and Les killed during World War 1. In 2001 the Junior School Parent Group funded the ongoing award for a Year 6 student. The award criteria in 2001 were 'general excellence in academic achievement, respect for and from others, a positive role model, involvement and initiative'. This Coulter Cup was awarded in 1946 to Barbara Walter.Small silver double-handed cup with ornate edge to cup lip and engraving on faceEngraved on face of cup: CPLC crest / THE COULTER CUP / 1946barbara walter, coulter cup -
 Bendigo Military Museum
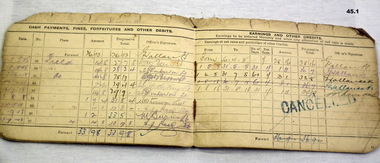
Booklet - BOOKLETS PAY AND RECORDS, C 1915 - 1919
... Howlett . Year of birth 1895. .1) Soldier's Pay Book, AIF. .2 ...WWI Service & Pay Books for John Stanley HOWLETT No. 2676 AIF 59th Battalion. Refer 41 medals, 48.4P photos..1) Soldier's Pay Book, AIF. .2) Soldier's Pay Book, for use on active service. .3) Record of Service Book..1) Pay Book NR 59072 for John Stanley Howlett No 2676 AIF 59th Batt. .2) Active Service Pay Book 59072 59th Batt. 2675 Pte John Stanley Howlett. Attested Aug 15th, 1916. .3) Record of Service Book issued to John Stanley Howlett . Year of birth 1895.documents, military records, military history -
 Bendigo Military Museum
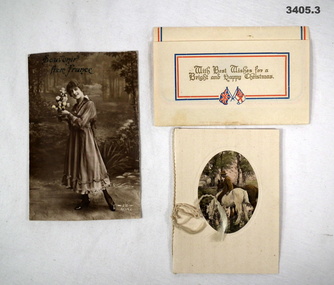
Card - CARDS WW1, c.1915 - 1918
N Graham No 551, refer Cat No 266 for his service details..1) Brown post card of lady holding flowers. .2) Cream greeting card with red & blue border with gold coloured Rising Sun. .3) Cream greeting card with coloured illustration of a man on a horse..1) Printing: "Souvenir from France" Handwriting: "To Maude form N Graham" .2) Printing: "Wish Best Wishes for a Bright & Happy Christmas" Handwriting: "To all at Minmindie with best Xmas wishes" .3) Handwriting: "To Maude with sincere good wishes for a Merry Christmas and a Bright & Happy New Year From her old teacher N Graham"cards, letters, 38th -
 Bendigo Military Museum
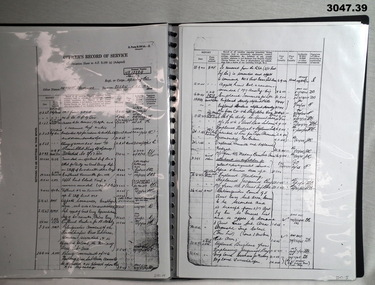
Administrative record - FOLDER AND RECORDS
For historical information refer to notes attached to Cat No 2755.4 See attached sheets for the remainder of pages.Black plastic folder, ring binding with 20 clear plastic sleeves. .1) Photocopy of cover for personnel documents for Herbert Trangmar ALLAN, MC, NX12229, N60005, Captain 2nd Garrison Battalion. A4 page size. .2) Photocopy of WWII attestation form dated 2.5.1940 for NX12229, Herbert Trangmar ALLAN. .3) Photocopy of Medical Exam Section. .4) Photocopy of Medical Exam Section with black & white ID photo. .5) Enlarged photocopy of ID photos of Herbert Trangmar ALLAN. .6) Photocopy of Mobilization attestation form dated 6.10.39 for Herbert Trangmar ALLAN. .7) Photocopy of Termination of Officer's Appointment dated 2.4.1946 for Herbert Trangmar ALLAN, OBE, NX12229. .8) Photocopy of Officers Record of Service for Herbert Trangmar ALLAN. Address at time was Wali, New Guinea .9) Photocopy of Officers Record of Suc for Herbert Trangmar ALLAN OBE MC ED NX12229. Address at time was Wali, New Guinea. First entry: 16.6.1914. Last entry: 1.11.1945. .10) Photocopy of Officers Record of Service, dated 29.8.1950. For NX12229 Herbert Trangmar ALLAN MC OBE ED. Last address Watsons Bay NSW. .11) Photocopy of Determination of Demobilization Priority for NX12229 Herbert Trangmar ALLAN. Dated 5.10.1945. .12) Photocopy of sheet showing service early WWII for Herbert Trangmar ALLAN. .13) Photocopy of sheet showing early WWII service of N60005, Herbert Trangmar ALLAN. .14) Photocopy of Officer's Record of Service sheet for Herbert Trangmar ALLAN OBE MC NX12229. First entry: 17/2/1943. Last entry: 24.8.1944. .15) Photocopy of Record of Service sheet. First entry: 28.9.1944. Last entry: 25.5.1945. .16) Photocopy of Officer's Record of Service for Herbert Trangmar ALLAN OBE MC NX12229. First entry: 1.6.1945. Last entry: 14.3.1946. .17) Photocopy of Record of Service sheet. Mentions MID in SWPA & rank changes. First entry: 21.3.1946. Last entry: 30.9.1950. .18) Photocopy of Officer's Record of Service sheet for NX12229 Herbert Trangmar ALLAN 2nd Garrison Battalion. First entry: 6.9.1944. Last entry: 7.5.1946 .19) Photocopy of Recommendation for an OBE for NX12229 Herbert Trangmar ALLAN MC Major. Tobruk period April / October 1941. .20) Photocopy of a sheet showing medals & awards for N60005 NX12229 Herbert Trangmar ALLAN OBE MC ED MID. .21) Photocopy of a letter to Deputy Commissioner - Repatriation on AIF letterhead. Re: Captain ALLAN H T 17 Battalion. .22) Photocopy of an AIF letterhead Canberra dated 1.5.1950. To Secretary HQ Repat Commission. Re: Capt ALLAN H T 17 Battalion. .23) Photocopy of a sheet showing telephone note re awards, dated 2.7.1955. Re: ALLAN H T. Address Mullaway, Woolgoolga, NSW. .24) Photocopy of ranks & dates for ALLAN H T NX12229. DOB 5.1.1895. Served in 14-18 Yes. First entry: 16.6.1914. Last entry: 29.1.1944. .25) Photocopy of ranks & dates for above. First entry: 13.2.1942. Last entry: 1.4.1945. .26) Photocopy of ranks & dates for ALLAN H T NX12229. DOB 5.1.1895. OBE MC. First entry: 23.7.1945. Last entry: 15.8.1951. .27) Photocopy of a note showing Colonel H T ALLAN, address Mullaway, Woolgoolga, NSW. Written on a note pad with British Aluminium stamped on it. .28) Typed sheet showing a brief (biography) story of the life of Herbert Trangmar ALLAN (Blue). .29) Colour top view photo on A4 paper showing a huge pair of Japanese binoculars mounted on a tripod. .30) Colour R side view photo on A4 paper of Japanese binoculars. .31) Colour rear view photo of huge Japanese binoculars. .32) Colour front view photo on A4 paper of huge Japanese binoculars mounted on a tripod. .33) Colour L side view photo of huge Japanese binoculars. .34) Colour photo of tripod with timber legs & brace to suit binoculars above. .35) Black & white photo of a manufacturers plate featuring Japanese writing & numbers. .36) Colour photo on A4 paper showing manufacturers plate on rear of support brace on the tripod head. .37) Copy of WM Collection photo number 058101 showing an Australian soldier looking into the binoculars, Finschafen New Guinea .38) Menu card. TobrukDay Dinner 2/17th Sgts Mess. Dated Wed 19.11.1941. .39) Christmas card with red ribbon in its fold. Shows a signpost Syria - Australia - & a Rising Sun, a kangaroo with smoke & fire, a laughing kookaburra on a sign post. Stamp. HQ 20 Aust Inf Bde AIF. .38) On rear: Two autographs. .39) Inside: “Best wishes for year 1942-1943 from Brig W (T) V Windeyer and staff”recorrds, certificcats, folders -
 Bendigo Military Museum
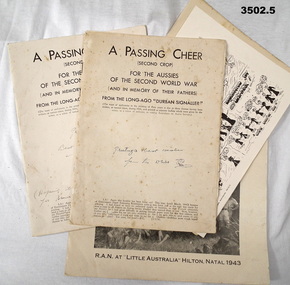
Book - BOOKS WW2, Pseudonym - Durban Signaller, A Passing Cheer, C.WW2
... in ink on front cover of .1) & .2): “Greetings & Best Wishes from ....1) & .2) 2 copies of a paper covered book for the Aussies of the 2nd World War containing songs & poems. .3) Loose leaf cartoon from .2) .4) & .5) Identical loose leaf additions of song words & illustration of RAN at Little Australia Hilton Natal 1943. Handwritten in ink on front cover of .1) & .2): “Greetings & Best Wishes from the writer EC” “Greetings & Best Wishes for Xmas & New Year 1944 from “ECbooks - music / song / poetry, military history -
 Bendigo Military Museum
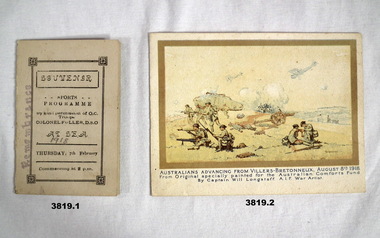
Card - CARDS WW1, 1918
.1) This troop ship was the HMAS A18 Wiltshire which embarked from Sydney on 2.2.1928. This was ascertained by deciphering one of the hand written signatures who was in the 8th Reinforcements 39th Batt AIF..1) Card, folding, Souvenir Sports programme at sea Thursday 7th February 1918 at 2pm. Inside has events & is hand signed by many men. Rear has details of the planning committee. .2) Card folding, from Australian Comforts Fund Xmas & New Year 1918-19. Card shows 2 paintings & 2 images of weapons captured by Australians..2) “Greetings from Will”cards, souvenir, hmas, comforts fund -
 Bendigo Military Museum
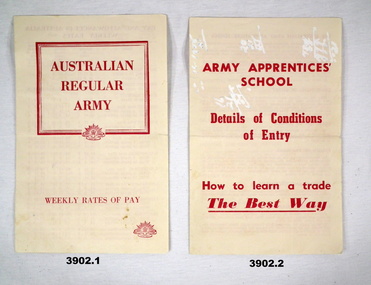
Pamphlet - PAMPHLETS, ARMY APPRENTICE, c.1960 - 1963
1.) Pamphlet, folding, printed in red showing rates of weekly pay in pounds / shillings / pence, from a Band Boy through to a Warrant Officer Class 1. .2) Pamphlet, folding, printed in red detailing 4 year Army Apprenticeships, conditions, rations, training, pay, medical, dental,amenities, sport..1) Printed in red on front: “AUSTRALIAN REGULAR ARMY, WEEKLY RATES OF PAY” Bottom R: “Rising Sun badge” .2) Printed in red on front: “ARMY APPRENTICES' SCHOOL” “Details of Conditions of Entry. How to learn a trade The Best Way”pamphlets, army apprenticeship, rates, conditions -
 Bendigo Military Museum
Literary work - ADVERTISING LEAFLETS, 9) 5.8.1944. .10) 23.6.1945
This collection of leaflets were enclosed in various Volumes of the First to the Sixth years of the war in pictures. Refer Cat No 4184.6.1)- .2) Leaflet, Life and times of Winston Churchill, folded, exterior orange colour, B & W print, interior white with black & orange print with white photo. .3) .4) Leaflet, The Sun News Pictorial, folded, white paper with black print. .5) - .6) Leaflet, The first year, the second year of the war in pictures, .5) cream colour, .6) green colour both B & W print. .7) - .8) Envelopes, paper, beige colour stamped “Inscriptions”. .9 - .10) War map Section. Page of a newspaper, folded, beige colour black print. .7) & .8) Hand written on both slightly different, “Reg RUNCIMAN Rutherford St Swanhill”, .8) has “8 JL 42”leaflets, advertising -
 Bendigo Military Museum
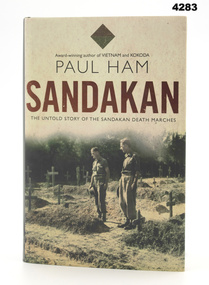
Book - BOOK, WW2, SANDAKAN : The Untold Story Of The Sandakan Death Marches, Published 2012
“This is the story of the three-year ordeal of the Sandakan prisoners of war. After the fall of Singapore in February 1942. Their journey became known as the Sandakan Death Marches.”Book with dust cover. 1) Cover, hard cover, cardboard with pale green paper-cover, red and black print on spine, end papers dark red colour. 2) Dust cover, paper, red and black print on front and spine, background beige on front, grey grey colour on spine. Illustrated front and spine sepia toned photograph of two soldiers in uniform standing in a graveyard. Colour photograph on back of the “Sandakan Memorial Gates” with garden view behind. 656 pages, cut, plain, off white, illustrated black and white photographs and maps.book, wwii, sandakan, prisoners of war -
 Bendigo Military Museum
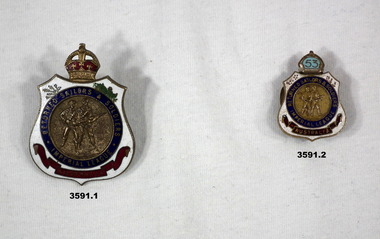
Badge - BADGES RSL, 1) pre WW2
Items in collection re Sgt James Clarence WATT. Refer Cat No 3554.2 for his service records..1) Returned sailors & soldiers Imperial League metal badge with crown at top, white background, 2 gold figures in centre. 2 Attachment rings on back. .2) Returned sailors & soldiers Imperial League metal badge, a crown bearing 53 ( member year 1953) inside it at top, white background, 2 gold figures in centre. Attachment clip on back..1) Printed on red marking at bottom on front: “AUSTRALIA”, “Stamped: 80413” .2) Printed on red marking at bottom on front: “AUSTRALIA”, Stamped on back attachment clip: “A2920 2”rsl, membership, badges -
 Bendigo Military Museum
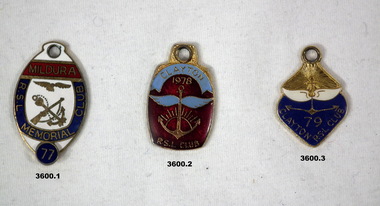
Badge - BADGES, RSL MEMBERSHIP, post 1945
Badges were in a group of items possibly related to Cat No 3596..1) Badge, metal, association, red / white / blue. Centre has rifle, anchor & wings, No 77 member 1977. .2) Badge, metal, association, red / blue, centre has wings, anchor & Rising Sun, 1978 denoting membership. .3) Badge, metal, association, gold / blue / white, centre has anchor, wings, Rising Sun version, 79 meaning member that year. Badges are different sizes..1) Front: “MILDURA RSL MEMORIAL CLUB 77” Back: “442” .2) Front: “CLAYTON 1978 RSL CLUB” Back: “927” .3) Front: “CLAYTON RSL CLUB 79” Back: “Not transferable”badges, rsl, membership -
 Bendigo Military Museum
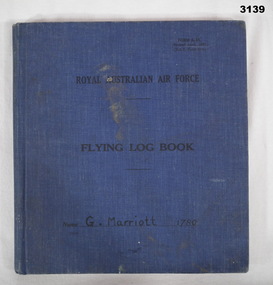
Book - BOOK, RAAF, RAAF, RAAF Flying Log Book, 4.1937
Blue buckram hard cover with black printing. Inside a large quantity of mostly empty ruled pages with columns eg year, aircraft, number, pilot, hours flown. Handwritten front cover: “G MARRIOTT 1780” Entered inside: 1st entry: “Sep 14 1938; Aircraft: Demon AI-38; Hours: 15” Last entry: “Mar 1 1939; Aircraft: Anson L9161; Kalgoorlie to Pearce, WA, Hours: 2.45”log books, raaf -
Federation University Historical Collection
Document - Document - Design, E J Barker: Ballarat College of Advanced Education: Final Year Project Report; "Internal Combustion Engine Driven Heat Pump", 1984
Mechanical Engineering Department Ballarat C.A.E. Final Year Report submitted by John Barker, 1984. The Report was "Internal Combustion Engine Driven Heat Pump". His supervisor was L E Taylor. The location of the experimental rig was in the Thermodynamics Laboratory at Ballarat Council of Advanced Education. This project involved the design, construction and limited testing of an Internal Combustion Engine Driven Heat Pump, utilising full waste heat recovery, for the purpose of heating mains supply water. John is the son of Jack Barker, foundation director of Ballarat College of Advanced Education.75 page report - typed with photos and diagrams. 38 pages - Appendix 1-8engineering, vice principal, foundation director, ballarat college of advanced education, bcae, mount helen campus, engineering drawing, design, manufacture, heat engines, internal combustion engine, report, supervisor, l e taylor, john barker, internal combustion engine driven heat pump, heat recovery, thermodynamics laboratory -
Federation University Historical Collection
Photograph - Art Student, University of Ballarat Student study, c2005, c2005
Federation University Australia was established on 1 January 2014. Formerly known as the University of Ballarat, its enabling legislation was the University of Ballarat Amendment (Federation University Australia) Act 2013. Although formally created as a University in 1994, the University of Ballarat has a lineage back to 1870 with the establishment of the School of Mines Ballarat, making it the third institution of higher learning to be established in Australia and the first to be established in regional Australia. On 1 January 1994, Ballarat University College became the University of Ballarat and in 1998 the University merged with three TAFE Institutes to become a dual sector institution with multiple campuses. On 1 January 2014, the University of Ballarat amalgamated with the Monash University Gippsland Campus to form Federation University Australia. The Gippsland Campus also had a long lineage dating back to 1928 with the establishment of the Yallourn Technical School which became a predecessor institution to the Gippsland College of Advanced Education formed in 1968. In 1990, it was renamed the Monash University College and in 1993 became the Gippsland Campus of Monash University. In 2016, Federation University Australia announced plans to take possession, over a two-year period, of Monash’s Berwick Campus in the south-east corridor of Melbourne. Federation University Australia, or FedUni, is headquartered in Ballarat and offers programs in Higher Education and Vocational Education and Training to regional Victoria and beyond. The University’s commitment to educational and social equity, teaching excellence, research distinction, environmental sustainability and regional capacity building has enabled it to develop in a way that draws on its proud heritage to inform its future. Its regional character sets a framework for the University’s priorities but does not constrain it from serving wider community interests, nationally and internationally. The name Federation University Australia was chosen to convey the scope and capacity of an expanded regional university with a federated network of campuses.Colour photograph of students on the grass outside the Union Building on Mt Helen Campus.federation university, mount helen campus, students, alumni, art, painter -
 Federation University Historical Collection
Photograph - Photograph - Colour, Social Distancing Signs during the Covid-19 Pandemic, 2020, 06/04/2020
On 12 January, the World Health Organization (WHO) confirmed that a novel coronavirus was the cause of a respiratory illness in a cluster of people in Wuhan City, Hubei Province, China, who had initially come to the attention of the WHO on 31 December 2019. On 3 March, the Reserve Bank of Australia became the first central bank to cut interest rates in response to the outbreak. Official interest rates were cut by 0.25% (25 base points) to a record low of 0.5%. On 12 March, the Federal Government announced a A$17.6 billion stimulus package, the first since the 2008 GFC. he package consists of multiple parts, a one-off A$750 payment to around 6.5 million welfare recipients as early as 31 March 2020, small business assistance with 700,000 grants up to $25,000 and a 50% wage subsidy for 120,000 apprenticies or trainees for up to 9 months, 1 billion to support economically impacted sectors, regions and communities, and $700 million to increase tax write off and $3.2 billion to support short-term small and medium-sized business investment. On 16 March, Premier Dan Andrews and Minister for Health Jenny Mikakos declared a state of emergency for Victoria for at least four weeks. On 19 March, the Reserve Bank again cut interest rates by a further 0.25% to 0.25%, the lowest in Australian history. On 22 March, the government announced a second stimulus package of A$66bn, increasing the amount of total financial package offered to A$89bn. This included several new measures like doubling income support for individuals on Jobseeker's allowance, granting A$100,000 to small and medium-sized businesses and A$715 million to Australian airports and airlines. It also allowed individuals affected by the outbreak to access up to A$10,000 of their superannuation during 2019–2020 and also being able to take an additional same amount for the next year. on the same day Victorian Premier Daniel Andrews announced on 22 March that the state will bring the school holiday forwards to 24 March from 27 March. On 30 March, the Australian Federal Government announced a $130 billion "JobKeeper" wage subsidy program offering to pay employers up to $1500 a fortnight per full-time, part-time or casual employee that has worked for that business for over a year. For a business to be eligible, they must have lost 30% of turnover after 1 March of annual revenue up to and including $1 billion. For businesses with a revenue of over $1 billion, turnover must have decreased by 50%. Businesses are then required by law to pay the subsidy to their staff, in lieu of their usual wages. This response came after the enormous job losses seen just a week prior when an estimated 1 million Australians lost their jobs. This massive loss in jobs caused the myGov website to crash and lines out of Centrelink offices to run hundreds of metres long.The program was backdated to 1 March, to aim at reemploying the many people who had just lost their jobs in the weeks before. Businesses would receive the JobKeeper subsidy for six months. Victoria's "Second Wave" from Ballarat Courier, 05 August 2020 Wednesday, August 5: 725 cases, 15 deaths. A record figure reached yet again. Tuesday, August 4: 439 cases, 11 deaths. New fines introduced for COVID-infected people who aren't home. Monday, August 3: 429 cases, 13 deaths. Premier details mass industry shutdowns in Melbourne. Sunday, August 2: 671 cases, seven deaths as harsh new statewide lockdowns are announced Saturday, August 1: 397 new cases, three deaths Friday, July 31: 627 new cases, eight deaths. Premier says one in four Covid cases not home when checked. Thursday July 30: 723 cases, 13 deaths. Just when it was looking promising, alarming new record set. Wednesday July 29: 295 new cases, nine deaths as new cases drop below 300 for first time in nine days Tuesday July 28: 380 new cases, six deaths as aged care outbreaks continue to climb Monday July 27: 532 new cases as daily cases hits 500 for first time, six deaths Sunday July 26: 459 new cases as double-digit death toll is recorded for first time with 10 deaths Saturday July 25: 357 new cases, five new deaths Friday July 24: 300 cases, six deaths, ADF role expanded to help with contact tracing. Thursday July 23 - 403 cases, five deaths, worst day for fatalities in any state, masks now mandatory Wednesday July 22 - 484 cases, two deaths Tuesday July 21 - 374 cases, three deaths Monday July 20 - 275 cases, one death Sunday July 19 - 363 cases, three deaths, notice that masks will become mandatory in lockdown areas Saturday July 18 - 217 cases, three deaths, final Melbourne public housing tower released from hard lockdown Friday July 17 - 428 cases, three deaths Thursday July 16 - 317 cases, two deaths Wednesday July 15 - 238 cases, one death Tuesday July 14 - 270 cases, two deaths Monday July 13 - 177 cases Sunday July 12 - 273 cases, one death Saturday July 11 - 216 cases, one death Friday July 10 - 288 cases, a national daily record at the time Thursday July 9 - 165 cases, eight of nine Melbourne public housing towers released from hard lockdown Wednesday July 8 - 134 cases, new stage-three restrictions announced for metropolitan Melbourne and Mitchell Shire Tuesday July 7 - 191 cases Monday July 6 - 127 cases, two deaths, NSW border closed Sunday July 5 - 74 cases Saturday July 4 - 108 cases, immediate hard lockdown of nine Melbourne public housing towers Friday July 3 - 66 cases Thursday July 2 - 77 cases Wednesday July 1 - 73 casesColour photographs of social distancing signs during the Covid-19 Pandemic, on Chemist Warehouse in Sebastopol. On 06 April 2020 a maximum of 75 people were allowed in the chemist at one time, and those with syptoms of Covid-19 (fever, cough, shortness of breath) were asked to not enter without phone contact. Upon entering customers were directed to use hand sanitizer, and 1.5 metre markings were placed on the floor to enable legal social distancing.covid-19, corona virus, pandemic, chemist's warehouse, sebastopol, social distancing -
 Federation University Historical Collection
Photograph - Photograph - Colour, E.J. Barker Library Social Distancing During the Covid19 Pandemic, 2020, 06/04/2020
On 12 January, the World Health Organization (WHO) confirmed that a novel coronavirus was the cause of a respiratory illness in a cluster of people in Wuhan City, Hubei Province, China, who had initially come to the attention of the WHO on 31 December 2019. On 3 March, the Reserve Bank of Australia became the first central bank to cut interest rates in response to the outbreak. Official interest rates were cut by 0.25% (25 base points) to a record low of 0.5%. On 12 March, the Federal Government announced a A$17.6 billion stimulus package, the first since the 2008 GFC. he package consists of multiple parts, a one-off A$750 payment to around 6.5 million welfare recipients as early as 31 March 2020, small business assistance with 700,000 grants up to $25,000 and a 50% wage subsidy for 120,000 apprenticies or trainees for up to 9 months, 1 billion to support economically impacted sectors, regions and communities, and $700 million to increase tax write off and $3.2 billion to support short-term small and medium-sized business investment. On 16 March, Premier Dan Andrews and Minister for Health Jenny Mikakos declared a state of emergency for Victoria for at least four weeks. On 19 March, the Reserve Bank again cut interest rates by a further 0.25% to 0.25%, the lowest in Australian history. On 22 March, the government announced a second stimulus package of A$66bn, increasing the amount of total financial package offered to A$89bn. This included several new measures like doubling income support for individuals on Jobseeker's allowance, granting A$100,000 to small and medium-sized businesses and A$715 million to Australian airports and airlines. It also allowed individuals affected by the outbreak to access up to A$10,000 of their superannuation during 2019–2020 and also being able to take an additional same amount for the next year. on the same day Victorian Premier Daniel Andrews announced on 22 March that the state will bring the school holiday forwards to 24 March from 27 March. On 30 March, the Australian Federal Government announced a $130 billion "JobKeeper" wage subsidy program offering to pay employers up to $1500 a fortnight per full-time, part-time or casual employee that has worked for that business for over a year. For a business to be eligible, they must have lost 30% of turnover after 1 March of annual revenue up to and including $1 billion. For businesses with a revenue of over $1 billion, turnover must have decreased by 50%. Businesses are then required by law to pay the subsidy to their staff, in lieu of their usual wages. This response came after the enormous job losses seen just a week prior when an estimated 1 million Australians lost their jobs. This massive loss in jobs caused the myGov website to crash and lines out of Centrelink offices to run hundreds of metres long.The program was backdated to 1 March, to aim at reemploying the many people who had just lost their jobs in the weeks before. Businesses would receive the JobKeeper subsidy for six months.Colour photographs of furniture placed for social distancing in the Federation University E.J Barker Library during the Covid-19 Pandemic. The next day the library was closed all except staff.covid-19, corona virus, pandemic, library, e.j. barker library, mt helen library -
 Federation University Historical Collection
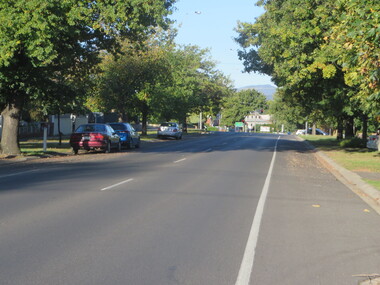
Photograph, Dana Street, Ballarat During Covid-19 State of Emergency, 13/04/2020
On 12 January, the World Health Organization (WHO) confirmed that a novel coronavirus was the cause of a respiratory illness in a cluster of people in Wuhan City, Hubei Province, China, who had initially come to the attention of the WHO on 31 December 2019. On 3 March, the Reserve Bank of Australia became the first central bank to cut interest rates in response to the outbreak. Official interest rates were cut by 0.25% (25 base points) to a record low of 0.5%. On 12 March, the Federal Government announced a A$17.6 billion stimulus package, the first since the 2008 GFC. he package consists of multiple parts, a one-off A$750 payment to around 6.5 million welfare recipients as early as 31 March 2020, small business assistance with 700,000 grants up to $25,000 and a 50% wage subsidy for 120,000 apprenticies or trainees for up to 9 months, 1 billion to support economically impacted sectors, regions and communities, and $700 million to increase tax write off and $3.2 billion to support short-term small and medium-sized business investment. On 16 March, Premier Dan Andrews and Minister for Health Jenny Mikakos declared a state of emergency for Victoria for at least four weeks. On 19 March, the Reserve Bank again cut interest rates by a further 0.25% to 0.25%, the lowest in Australian history. On 22 March, the government announced a second stimulus package of A$66bn, increasing the amount of total financial package offered to A$89bn. This included several new measures like doubling income support for individuals on Jobseeker's allowance, granting A$100,000 to small and medium-sized businesses and A$715 million to Australian airports and airlines. It also allowed individuals affected by the outbreak to access up to A$10,000 of their superannuation during 2019–2020 and also being able to take an additional same amount for the next year. on the same day Victorian Premier Daniel Andrews announced on 22 March that the state will bring the school holiday forwards to 24 March from 27 March. On 30 March, the Australian Federal Government announced a $130 billion "JobKeeper" wage subsidy program offering to pay employers up to $1500 a fortnight per full-time, part-time or casual employee that has worked for that business for over a year. For a business to be eligible, they must have lost 30% of turnover after 1 March of annual revenue up to and including $1 billion. For businesses with a revenue of over $1 billion, turnover must have decreased by 50%. Businesses are then required by law to pay the subsidy to their staff, in lieu of their usual wages. This response came after the enormous job losses seen just a week prior when an estimated 1 million Australians lost their jobs. This massive loss in jobs caused the myGov website to crash and lines out of Centrelink offices to run hundreds of metres long.The program was backdated to 1 March, to aim at reemploying the many people who had just lost their jobs in the weeks before. Businesses would receive the JobKeeper subsidy for six months. * On 12 April 2020 Victorian Premier Daniel Andrews Extended the State of Emergency until midnight on May 11. On this day the world has 1,604,900 cases of coronavirus, with 95,738 deaths. America has 468,887 cases of covid19, with 1,900 Americans dying in the last 24 hours. The UK has 65,077 cases. 881 people died in the last 24 hours. Australia has 6,292 cases. 58 people have died to date.Colour photographs of Ballarat's usually very busy Dana Street during Covid-19 Social Isoliation. The photographs were taken at 4.00pm. dana street, ballarat, covid19, corona virus, pandemic, state of emergency -
 Federation University Historical Collection
Photograph - Photograph - Colour, Eyre Street, Ballarat During Covid-19 State of Emergency, 13/04/2020
On 12 January, the World Health Organization (WHO) confirmed that a novel coronavirus was the cause of a respiratory illness in a cluster of people in Wuhan City, Hubei Province, China, who had initially come to the attention of the WHO on 31 December 2019. On 3 March, the Reserve Bank of Australia became the first central bank to cut interest rates in response to the outbreak. Official interest rates were cut by 0.25% (25 base points) to a record low of 0.5%. On 12 March, the Federal Government announced a A$17.6 billion stimulus package, the first since the 2008 GFC. he package consists of multiple parts, a one-off A$750 payment to around 6.5 million welfare recipients as early as 31 March 2020, small business assistance with 700,000 grants up to $25,000 and a 50% wage subsidy for 120,000 apprenticies or trainees for up to 9 months, 1 billion to support economically impacted sectors, regions and communities, and $700 million to increase tax write off and $3.2 billion to support short-term small and medium-sized business investment. On 16 March, Premier Dan Andrews and Minister for Health Jenny Mikakos declared a state of emergency for Victoria for at least four weeks. On 19 March, the Reserve Bank again cut interest rates by a further 0.25% to 0.25%, the lowest in Australian history. On 22 March, the government announced a second stimulus package of A$66bn, increasing the amount of total financial package offered to A$89bn. This included several new measures like doubling income support for individuals on Jobseeker's allowance, granting A$100,000 to small and medium-sized businesses and A$715 million to Australian airports and airlines. It also allowed individuals affected by the outbreak to access up to A$10,000 of their superannuation during 2019–2020 and also being able to take an additional same amount for the next year. on the same day Victorian Premier Daniel Andrews announced on 22 March that the state will bring the school holiday forwards to 24 March from 27 March. On 30 March, the Australian Federal Government announced a $130 billion "JobKeeper" wage subsidy program offering to pay employers up to $1500 a fortnight per full-time, part-time or casual employee that has worked for that business for over a year. For a business to be eligible, they must have lost 30% of turnover after 1 March of annual revenue up to and including $1 billion. For businesses with a revenue of over $1 billion, turnover must have decreased by 50%. Businesses are then required by law to pay the subsidy to their staff, in lieu of their usual wages. This response came after the enormous job losses seen just a week prior when an estimated 1 million Australians lost their jobs. This massive loss in jobs caused the myGov website to crash and lines out of Centrelink offices to run hundreds of metres long.The program was backdated to 1 March, to aim at reemploying the many people who had just lost their jobs in the weeks before. Businesses would receive the JobKeeper subsidy for six months. * On 12 April 2020 Victorian Premier Daniel Andrews Extended the State of Emergency until midnight on May 11. On this day the world has 1,604,900 cases of coronavirus, with 95,738 deaths. America has 468,887 cases of covid19, with 1,900 Americans dying in the last 24 hours. The UK has 65,077 cases. 881 people died in the last 24 hours. Australia has 6,292 cases. 58 people have died to date.Colour photographs of Ballarat's usually very busy Eyre Street during Covid-19 Social Isoliation. The photographs were taken at 4.00pm. ballarat, covid19, corona virus, pandemic, state of emergency, eyre street -
Federation University Historical Collection
Document, Ballarat School of Mines - List of Student involved in military encampment
... Military Museum: * Originally 12 – 14 year olds went to Junior... Museum: * Originally 12 – 14 year olds went to Junior Cadets ...According to Neil Leckie, Manager of the Ballarat Ranger Military Museum: * Originally 12 – 14 year olds went to Junior Cadets attached to their school. * From age 14 – 17 they were Senior Cadets attached to the local militia unit. * After 1 July of the year a Cadet turned 18, the Cadet left the Senior Cadets and became a member of the Citizen Military Force. * In October 1918 the AIF, Militia and Cadets were renamed to give some connection to the AIF battalion raised in the area. Ballarat saw: 8th Australian Infantry Regiment comprising: * 8th Battalion AIF renamed 1st Battalion 8th Australian Infantry Regiment * 70th Infantry Militia renamed 2nd Battalion 8th Australian Infantry Regiment * 70th Infantry Cadets renamed 3rd B, 8th Australian Infantry. 39th Australian Infantry Regiment comprising: * 39th Battalion AIF renamed 1st Battalion 39th Australian Regiment * 71st Infantry Militia renamed 2nd Bn, 39th Australian Infantry Regiment * 71st Infantry Cadets renamed 3rd Bn, 39th Australian Infantry Regiment Prior to the reorganisation in 1918 the 18th Brigade was the 70th, 71st and 73rd Infantry. It is thought that the 18th Brigade Cadet units in 1920 were those that came from the old: * 69th Infantry (Geelong/Queenscliff) * 70th Infantry (Ballarat/Colac) * 71st Infantry (Ballarat West) * 72nd Infantry Warrnambool) * 73rd Infantry (NW Vic) The next name change came in 1921! School of Mines Ballarat is a predecessor of Federation University.Ballarat School of Mines - List of Student involved in military encampment ballarat school of mines, students, military encampment, j.a greensfield, roderick dunn, w.o. knott, j.l. daniel, c.h. hill, j.g. bato, e.t. raine, a.g.m. elliott, t.k. jebb, roy eva, lieutenent bastian, private wightman, 70th infantry, 71st infantry, 30th aamc, r.o. buchanan, e.l. fidge, r.c. valentine, h.c. smith, j.m. turnbull, w.l. carroll, e.w. siemering, j.m. wesley, k.whittle, a.t bernaloo, j.b sutcliffe, 18th aamc, e, e.n.t. henry, f.j. jellet, a.p. dorman, private tonkin, private somerville, t.h. robinson, s.k. mciver, 18th asc, w.g. walker, r.m. fleming, g.s. richards, j.f. maughan, c.w. schroder, r. jenkyns, l. vernon, 19th light horse, allan bernaldo -
Federation University Historical Collection
Document - Document - Letter, Ballarat Junior Technical School: Letter from Mr R Richards, Principal of Ballarat School of Mines and Industries, re Brian Canny, 1958
... year course. ballarat junior technical school head master l ...Notification from Principal of Ballarat School of Mines and Industries, to the Head Master of Ballarat Junior Technical School, that Brian Canny has enrolled at SMB. Enrolled in Civil Engineering - four year course.1 cream coloured page, typedballarat junior technical school, head master, l garner, r richards, principal, smb, ballarat school of mines and industries, brian canny, enrolled in civil engineering, four year course -
Federation University Historical Collection
Document - Document - Letter, Ballarat Junior Technical School: Letter from Mr Garner to Head Master re Kevin Maxwell Onn, 1958
Letter from Mr Garner to the Head Master of school Kevin Maxwell Onn if transferring to before the end of the year. Lists subjects he has been studying while at Ballarat Junior Technical School for Form I JTS - English, Social Studies, Mathematics, Science, Solid Geometry, Modelling, Free Drawing, Woodwork, Sheetmetal Work and Music.1 cream coloured page, typedballarat junior technical school, head master, l garner, kevin maxwell onn, transferring, english, social studies, mathematics, science, solid geometry, modelling, free drawing, woodwork, sheetmetal, music -
Federation University Historical Collection
Document - Document - Letter, Ballarat Junior Technical School: Correspondence related to the enrolment of student,1952
Letter from Mrs McDonald requesting her son be enrolled at BJTS for the following year. Understands date has passed for enrolments. Knows there are a number of students from Meredith wishing to come. Would it be possible for the Bus to come to Meredith. Already goes to Elaine, four miles away. Mr Garner explains it is too late to enrol. School is full. Suggests he does Grade VII and then make application before October 1953. Ballarat High School Principal arranges bus travel..1: Lined writing paper - blue ink .2: Cream page, typed.1: Signature of Mrs Les McDonald ballarat junior technical school, head master, l garner, mrs l mcdonald, son, enrol at bjts, meredith, grade vii, ballarat high school, principal, october 31 -
Federation University Historical Collection
Document - Document - Letter, Ballarat Junior Technical School: School correspondence with Messer & Opie Ptd Ltd, re scholarships, 1956
Letters relate to the awarding of the scholarship provided by Messer and Opie Pty Ltd. School informed them of the winner of the 1955 scholarship was Barry Paterson. He has gone to the School of Mines and started a four year course in Electrical Engineering. School also thanks them for the money for the following year's scholarship. .1 and .3: Yellow pages, typed .2: Light orange, typedLetterhead for Messer & Opie Signature of secretary, B McCoyballarat junior technical school, head master, l garner, barry paterson, messer & opie, scholarship, intermediate technical certificate, diploma entrance level, school of mines, electrical engineering -
Federation University Historical Collection
Document - Document - Letter, Ballarat Junior Technical School: Letter to Dr Ursula Hoff, National Galley of Victoria, 1952
Letter to Dr Ursula Hoff, Keeper of Prints at the National Gallery of Victoria. School returning circular and wish to have six prints for the year. Four from previous year returned.Cream pages, typed .1: Signature of D Gibbensballarat junior technical school, head master, l garner, keeper of prints, national gallery of victoria, dr ursula hoff, prints for loan -
Federation University Historical Collection
Poster, Victorian Department of Health and Human Services, A number of Covid-19 Posters Produced by the Victorian Departent of Health and Human Services, 2021, 11/06/2021
On 12 January, the World Health Organization (WHO) confirmed that a novel coronavirus was the cause of a respiratory illness in a cluster of people in Wuhan City, Hubei Province, China, who had initially come to the attention of the WHO on 31 December 2019. On 3 March, the Reserve Bank of Australia became the first central bank to cut interest rates in response to the outbreak. Official interest rates were cut by 0.25% (25 base points) to a record low of 0.5%. On 12 March, the Federal Government announced a A$17.6 billion stimulus package, the first since the 2008 GFC. he package consists of multiple parts, a one-off A$750 payment to around 6.5 million welfare recipients as early as 31 March 2020, small business assistance with 700,000 grants up to $25,000 and a 50% wage subsidy for 120,000 apprenticies or trainees for up to 9 months, 1 billion to support economically impacted sectors, regions and communities, and $700 million to increase tax write off and $3.2 billion to support short-term small and medium-sized business investment. On 16 March, Premier Dan Andrews and Minister for Health Jenny Mikakos declared a state of emergency for Victoria for at least four weeks. On 19 March, the Reserve Bank again cut interest rates by a further 0.25% to 0.25%, the lowest in Australian history. On 22 March, the government announced a second stimulus package of A$66bn, increasing the amount of total financial package offered to A$89bn. This included several new measures like doubling income support for individuals on Jobseeker's allowance, granting A$100,000 to small and medium-sized businesses and A$715 million to Australian airports and airlines. It also allowed individuals affected by the outbreak to access up to A$10,000 of their superannuation during 2019–2020 and also being able to take an additional same amount for the next year. on the same day Victorian Premier Daniel Andrews announced on 22 March that the state will bring the school holiday forwards to 24 March from 27 March. On 30 March, the Australian Federal Government announced a $130 billion "JobKeeper" wage subsidy program offering to pay employers up to $1500 a fortnight per full-time, part-time or casual employee that has worked for that business for over a year. For a business to be eligible, they must have lost 30% of turnover after 1 March of annual revenue up to and including $1 billion. For businesses with a revenue of over $1 billion, turnover must have decreased by 50%. Businesses are then required by law to pay the subsidy to their staff, in lieu of their usual wages. This response came after the enormous job losses seen just a week prior when an estimated 1 million Australians lost their jobs. This massive loss in jobs caused the myGov website to crash and lines out of Centrelink offices to run hundreds of metres long.The program was backdated to 1 March, to aim at reemploying the many people who had just lost their jobs in the weeks before. Businesses would receive the JobKeeper subsidy for six months. Victoria's "Second Wave" from Ballarat Courier, 05 August 2020 Wednesday, August 5: 725 cases, 15 deaths. A record figure reached yet again. Tuesday, August 4: 439 cases, 11 deaths. New fines introduced for COVID-infected people who aren't home. Monday, August 3: 429 cases, 13 deaths. Premier details mass industry shutdowns in Melbourne. Sunday, August 2: 671 cases, seven deaths as harsh new statewide lockdowns are announced Saturday, August 1: 397 new cases, three deaths Friday, July 31: 627 new cases, eight deaths. Premier says one in four Covid cases not home when checked. Thursday July 30: 723 cases, 13 deaths. Just when it was looking promising, alarming new record set. Wednesday July 29: 295 new cases, nine deaths as new cases drop below 300 for first time in nine days Tuesday July 28: 380 new cases, six deaths as aged care outbreaks continue to climb Monday July 27: 532 new cases as daily cases hits 500 for first time, six deaths Sunday July 26: 459 new cases as double-digit death toll is recorded for first time with 10 deaths Saturday July 25: 357 new cases, five new deaths Friday July 24: 300 cases, six deaths, ADF role expanded to help with contact tracing. Thursday July 23 - 403 cases, five deaths, worst day for fatalities in any state, masks now mandatory Wednesday July 22 - 484 cases, two deaths Tuesday July 21 - 374 cases, three deaths Monday July 20 - 275 cases, one death Sunday July 19 - 363 cases, three deaths, notice that masks will become mandatory in lockdown areas Saturday July 18 - 217 cases, three deaths, final Melbourne public housing tower released from hard lockdown Friday July 17 - 428 cases, three deaths Thursday July 16 - 317 cases, two deaths Wednesday July 15 - 238 cases, one death Tuesday July 14 - 270 cases, two deaths Monday July 13 - 177 cases Sunday July 12 - 273 cases, one death Saturday July 11 - 216 cases, one death Friday July 10 - 288 cases, a national daily record at the time Thursday July 9 - 165 cases, eight of nine Melbourne public housing towers released from hard lockdown Wednesday July 8 - 134 cases, new stage-three restrictions announced for metropolitan Melbourne and Mitchell Shire Tuesday July 7 - 191 cases Monday July 6 - 127 cases, two deaths, NSW border closed Sunday July 5 - 74 cases Saturday July 4 - 108 cases, immediate hard lockdown of nine Melbourne public housing towers Friday July 3 - 66 cases Thursday July 2 - 77 cases Wednesday July 1 - 73 casesColour posters advising on safety measures for Victorian during the 2020-2021 Covid-19 Pandemic. The posters were made available by the Department of Health and Human Services and have been saved as PDFs, and printed off onot A4 paper.covid-19, corona virus, pandemic, posters, department of health and human services -
 Federation University Historical Collection
Photograph, Ballarat School of Mines Associates Board 1951-1957, c1984
In the early 1880s the Ballarat School of Mines Council introduced a three year course of training under the professors to qualify students in the following professions: 1. Mining Engineering 2. Metallurgy 3. Geology 4. Electricity [45] Each of these courses had an additional, but optional, fourth year of study. The prescribed subjects of study for an Associateship was set out in the Calendar of the Ballarat School of Mines in each year. Any student who passed the prescribed examinations in any of the above courses was issued with a Certificate of Competency, and conferred with the distinction of Associate. By the 1890s the professorial staff had drawn up a curriculum leading to an Associateship of the Ballarat School of Mines. The first two years work was to be common to all courses, but in the third and subsequent years the student wold be devoted to a specialised branch of study. The Associateship was to be conferred in one of another of the following Courses: Agriculture, Civil Engineering, Electrical Engineering, [Geology], Metallurgy and Mining Engineering. All were three year courses except for Agriculture which was two years. Each course was conducted in accordance with a prescribed curriculum and syllabus. During the 1910s there was an expectation that candidates for the Associate course should have attained the age of sixteen, and have received preparatory training equivalent to University Matriculation at least in the subjects of Elementary Mathematics, English Grammar and Composition, or have passed through Junior Technical School. In 1960 an new procedure for admission to graduate status as Associates was introduced to the Ballarat School of Mines where Associateship would be conferred at a public ceremony. After 01 July 1976 graduates of Ballarat College of Advanced Education and Ballarat College of Advanced Education were admitted in major studies relating to mining for Australian accreditation and overseas purposes. Ballarat School of Mines Associates could ascribe ASMB after their name.Black and white photograph of Associatedsof the Ballarat School of Mines from 1951-1957.Associates of the Ballarat School of Mines :Lists names 1989-1964ballarat school of mines, smb campus, electrical engineering 1958, brian w. schreenan civil engineering 1958, clifford j. restarick metallurgy 1958, john t h. clelland metallurgy 1958, donald c. stevens mining engineering 1958, john g. wolfe civil engineering 1959, james e. mcneil electrical engineering 1959, patrick h. nally civil engineering 1959, graham j. willey metallurgy 1959, stanley p. kisler civil engineering 1959, donald j. overall electrical engineering 1959, brian j. mclennan civil engineering 1959, philip j. davis art 1959, bruce v. mcdougall mining engineering 1959, lancelot j. matthews mechanical engineering 1959, alan w. wilson mechanical engineering 1959, alan w. wilson electrical engineering 1959, george a r. lewis art 1959, noel e. meagher electrical engineering 1960, john l. collier mining engineering 1960, john l. collier civil engineering 1960, frank andrewartha mechanical engineering 1960, norman leckie art 1960, lansell j. groat civil engineering 1960, boon thiam lu mining engineering 1960, oswyn n. hails civil engineering 1960, john a. watts applied chemistry 1960, thomas b. gallagher civil engineering 1960, brian a. bellingham civil engineering 1961, alan c leviston applied chemistry 1961, walter j wynd civil engineering 1961, francis d benjamin civil engineering 1961, leonard e fox mechanical engineering 1961, yan kai chung applied chemistry 1961, george d mcgrath mechanical engineering 1961, john r sawyer mechanical engineering 1961, ronald horgan applied chemistry 1961, douglas j vendy civil engineering 1961, john a barnes electrical engineering 1961, brian w smith metallurgy 1961, william r carlyon metallurgy 1961, chris p livitsanos metallurgy 1961, lawrence g trevan civil engineering 1961, richard g dunlop mechanical engineering 1961, ronald m ingleton mechanical engineering 1961, peter m robinson mechanical engineering 1961, david j jelbart mechanical engineering 1961, john g hollway mechanical engineering 1961, george m hetherington civil engineering 1961, david w brown mechanical engineering 1961, john r gowan civil engineering 1961, geoffrey a christian civil engineering 1961, arthur c burrow mechanical engineering 1961, john n mcarthur applied chemistry 1961, graeme r bromley mechanical engineering 1961, william davison civil engineering 1961, ben a johnson electrical engineering 1961, ben a johnson civil engineering 1961, allan j tinney civil engineering 1961, thomas h j coad applied chemistry 1961, brian h duthie civil engineering 1961, basil c bautovich mechanical engineering 1961, reece pullen electrical engineering 1961, john d carmichael electrical engineering 1961, william j spencer civil engineering 1961, neil a brogden civil engineering 1961, michael villani civil engineering 1961, ralph j hepburn mechanical engineering 1961, peter w linaker mechanical engineering 1961, peter j matthews mechanical engineering 1961, edgar mca bartrop mining engineering 1961, donald j stewart, brian schreenan -
Federation University Historical Collection
Document, John Barker, Internal Combustion Engine Driven Heat Pump, 1983
John C. Barker, the son of E.J. Barker , studied Mechanical Engineering at the Ballarat College of Advanced Education, and completed his final year in 1983..1 - Internal Combustion Engine Driven Heat Pump project report .2 - Final Year Engineering Degree Projects 1983 (Full catalogue) .3) Four-figue mathematical tables.On .3 "John C. Barker Ballarat College" in handwriting on the front cover.john c. barker, engineering, heat pump, combustion engine -
Federation University Historical Collection
Document, Federation University Coronavirus - Advice for staff and students, 17/05/2021
On 12 January, the World Health Organization (WHO) confirmed that a novel coronavirus was the cause of a respiratory illness in a cluster of people in Wuhan City, Hubei Province, China, who had initially come to the attention of the WHO on 31 December 2019. On 3 March, the Reserve Bank of Australia became the first central bank to cut interest rates in response to the outbreak. Official interest rates were cut by 0.25% (25 base points) to a record low of 0.5%. On 12 March, the Federal Government announced a A$17.6 billion stimulus package, the first since the 2008 GFC. he package consists of multiple parts, a one-off A$750 payment to around 6.5 million welfare recipients as early as 31 March 2020, small business assistance with 700,000 grants up to $25,000 and a 50% wage subsidy for 120,000 apprenticies or trainees for up to 9 months, 1 billion to support economically impacted sectors, regions and communities, and $700 million to increase tax write off and $3.2 billion to support short-term small and medium-sized business investment. On 16 March, Premier Dan Andrews and Minister for Health Jenny Mikakos declared a state of emergency for Victoria for at least four weeks. On 19 March, the Reserve Bank again cut interest rates by a further 0.25% to 0.25%, the lowest in Australian history. On 22 March, the government announced a second stimulus package of A$66bn, increasing the amount of total financial package offered to A$89bn. This included several new measures like doubling income support for individuals on Jobseeker's allowance, granting A$100,000 to small and medium-sized businesses and A$715 million to Australian airports and airlines. It also allowed individuals affected by the outbreak to access up to A$10,000 of their superannuation during 2019–2020 and also being able to take an additional same amount for the next year. on the same day Victorian Premier Daniel Andrews announced on 22 March that the state will bring the school holiday forwards to 24 March from 27 March. On 30 March, the Australian Federal Government announced a $130 billion "JobKeeper" wage subsidy program offering to pay employers up to $1500 a fortnight per full-time, part-time or casual employee that has worked for that business for over a year. For a business to be eligible, they must have lost 30% of turnover after 1 March of annual revenue up to and including $1 billion. For businesses with a revenue of over $1 billion, turnover must have decreased by 50%. Businesses are then required by law to pay the subsidy to their staff, in lieu of their usual wages. This response came after the enormous job losses seen just a week prior when an estimated 1 million Australians lost their jobs. This massive loss in jobs caused the myGov website to crash and lines out of Centrelink offices to run hundreds of metres long.The program was backdated to 1 March, to aim at reemploying the many people who had just lost their jobs in the weeks before. Businesses would receive the JobKeeper subsidy for six months. On 2 April, the number of cases in Victoria exceeded 1,000, including over 100 healthcare workers. On 5 April, New South Wales Police launched a criminal investigation into whether the operator of Ruby Princess, Carnival Australia, broke the Biosecurity Act 2015 (Cwth) and New South Wales state laws, by deliberately concealing COVID-19 cases. On 6 April, the Department of Health revealed that 2,432 people recovered from the infection as the federal government started reporting recovery statistics. This is more than a third from the official number reported so far, Deputy Chief Medical Officer Professor Paul Kelly stating, "I think it is important. Firstly it really reinforces that message, which is a true one, that most people who get this disease do recover”. The day before, at 3pm, it was announced that 2,315 of the 5,687 confirmed coronavirus cases had recovered. May 2020 - An outbreak in Victoria at a meatworks that was later revealed to be Cedar Meats was announced on 02 May with eight cases. By 8 May, the cluster of cases linked to Cedar Meats in Victoria was 71, consisting of at least 57 workers and 13 close contacts, including a nurse, aged care worker and high school student. The number had increased to 75 by 9 May, 88 by 13 May, and 90 by 14 May. On 9 May, two Victorian cases were announced to be related to McDonald's Fawkner. By 18 May, this had increased to 12 cases, and on that day it was revealed that a delivery driver had tested positive, prompting the closing for cleaning of 12 more McDonald's locations: Melton East, Laverton North, Yallambie, Taylors Lakes, Campbellfield, Sunbury, Hoppers Crossing, Riverdale Village, Sandown, Calder Highway Northbound/Outbound, Calder Highway Southbound/Inbound, and BP Rockbank Service Centre Outbound. On 15 May, South Australia became the second jurisdiction, after the ACT, to be free of any active cases, however on 26 May, a woman returning from overseas who was granted exemption into South Australia from her hotel quarantine in Victoria tested positive for COVID-19. This was the first new case in 19 days for the state.[101] On 4 June, it was announced that the woman had recovered and the state was free of any active cases once again.[102] On 17 May, Victoria announced two further business sites had been shut down due to a suspected case at each. Domino's Pizza in Fairfield has been shut for two weeks, and mattress manufacturer The Comfort Group in Deer Park was closed from Friday 15 May to at least Wednesday 20 May. On 6 June, both New South Wales and Victoria reported no new cases for the previous 24 hours, with only Queensland and Western Australia reporting one new case each, the lowest national total since February. Western Australia also announced two old cases. However, the new case in Queensland was linked to the Rydges on Swanston cluster in Melbourne when a man who travelled from Melbourne to Brisbane on Virgin flight VA313 on 1 June tested positive.Printout of a webspage designed to guide staff and students through the COVID-19 pandemic. covid-19, corona virus, pandemic, federation university australia, covidsafe plan, response -
Federation University Historical Collection
Document, Federation University CovidSafe Plan, 17/05/2021
On 12 January, the World Health Organization (WHO) confirmed that a novel coronavirus was the cause of a respiratory illness in a cluster of people in Wuhan City, Hubei Province, China, who had initially come to the attention of the WHO on 31 December 2019. On 3 March, the Reserve Bank of Australia became the first central bank to cut interest rates in response to the outbreak. Official interest rates were cut by 0.25% (25 base points) to a record low of 0.5%. On 12 March, the Federal Government announced a A$17.6 billion stimulus package, the first since the 2008 GFC. he package consists of multiple parts, a one-off A$750 payment to around 6.5 million welfare recipients as early as 31 March 2020, small business assistance with 700,000 grants up to $25,000 and a 50% wage subsidy for 120,000 apprenticies or trainees for up to 9 months, 1 billion to support economically impacted sectors, regions and communities, and $700 million to increase tax write off and $3.2 billion to support short-term small and medium-sized business investment. On 16 March, Premier Dan Andrews and Minister for Health Jenny Mikakos declared a state of emergency for Victoria for at least four weeks. On 19 March, the Reserve Bank again cut interest rates by a further 0.25% to 0.25%, the lowest in Australian history. On 22 March, the government announced a second stimulus package of A$66bn, increasing the amount of total financial package offered to A$89bn. This included several new measures like doubling income support for individuals on Jobseeker's allowance, granting A$100,000 to small and medium-sized businesses and A$715 million to Australian airports and airlines. It also allowed individuals affected by the outbreak to access up to A$10,000 of their superannuation during 2019–2020 and also being able to take an additional same amount for the next year. on the same day Victorian Premier Daniel Andrews announced on 22 March that the state will bring the school holiday forwards to 24 March from 27 March. On 30 March, the Australian Federal Government announced a $130 billion "JobKeeper" wage subsidy program offering to pay employers up to $1500 a fortnight per full-time, part-time or casual employee that has worked for that business for over a year. For a business to be eligible, they must have lost 30% of turnover after 1 March of annual revenue up to and including $1 billion. For businesses with a revenue of over $1 billion, turnover must have decreased by 50%. Businesses are then required by law to pay the subsidy to their staff, in lieu of their usual wages. This response came after the enormous job losses seen just a week prior when an estimated 1 million Australians lost their jobs. This massive loss in jobs caused the myGov website to crash and lines out of Centrelink offices to run hundreds of metres long.The program was backdated to 1 March, to aim at reemploying the many people who had just lost their jobs in the weeks before. Businesses would receive the JobKeeper subsidy for six months. On 2 April, the number of cases in Victoria exceeded 1,000, including over 100 healthcare workers. On 5 April, New South Wales Police launched a criminal investigation into whether the operator of Ruby Princess, Carnival Australia, broke the Biosecurity Act 2015 (Cwth) and New South Wales state laws, by deliberately concealing COVID-19 cases. On 6 April, the Department of Health revealed that 2,432 people recovered from the infection as the federal government started reporting recovery statistics. This is more than a third from the official number reported so far, Deputy Chief Medical Officer Professor Paul Kelly stating, "I think it is important. Firstly it really reinforces that message, which is a true one, that most people who get this disease do recover”. The day before, at 3pm, it was announced that 2,315 of the 5,687 confirmed coronavirus cases had recovered. May 2020 - An outbreak in Victoria at a meatworks that was later revealed to be Cedar Meats was announced on 02 May with eight cases. By 8 May, the cluster of cases linked to Cedar Meats in Victoria was 71, consisting of at least 57 workers and 13 close contacts, including a nurse, aged care worker and high school student. The number had increased to 75 by 9 May, 88 by 13 May, and 90 by 14 May. On 9 May, two Victorian cases were announced to be related to McDonald's Fawkner. By 18 May, this had increased to 12 cases, and on that day it was revealed that a delivery driver had tested positive, prompting the closing for cleaning of 12 more McDonald's locations: Melton East, Laverton North, Yallambie, Taylors Lakes, Campbellfield, Sunbury, Hoppers Crossing, Riverdale Village, Sandown, Calder Highway Northbound/Outbound, Calder Highway Southbound/Inbound, and BP Rockbank Service Centre Outbound. On 15 May, South Australia became the second jurisdiction, after the ACT, to be free of any active cases, however on 26 May, a woman returning from overseas who was granted exemption into South Australia from her hotel quarantine in Victoria tested positive for COVID-19. This was the first new case in 19 days for the state.[101] On 4 June, it was announced that the woman had recovered and the state was free of any active cases once again.[102] On 17 May, Victoria announced two further business sites had been shut down due to a suspected case at each. Domino's Pizza in Fairfield has been shut for two weeks, and mattress manufacturer The Comfort Group in Deer Park was closed from Friday 15 May to at least Wednesday 20 May. On 6 June, both New South Wales and Victoria reported no new cases for the previous 24 hours, with only Queensland and Western Australia reporting one new case each, the lowest national total since February. Western Australia also announced two old cases. However, the new case in Queensland was linked to the Rydges on Swanston cluster in Melbourne when a man who travelled from Melbourne to Brisbane on Virgin flight VA313 on 1 June tested positive.Printout of a webpage designed to guide staff and students through the COVID-19 pandemic. covid-19, corona virus, pandemic, federation university australia, covidsafe plan, response -
Federation University Historical Collection
Document, Federation University Coronavirus Updates, 2020-2021, 17/05/2021
On 12 January, the World Health Organization (WHO) confirmed that a novel coronavirus was the cause of a respiratory illness in a cluster of people in Wuhan City, Hubei Province, China, who had initially come to the attention of the WHO on 31 December 2019. On 3 March, the Reserve Bank of Australia became the first central bank to cut interest rates in response to the outbreak. Official interest rates were cut by 0.25% (25 base points) to a record low of 0.5%. On 12 March, the Federal Government announced a A$17.6 billion stimulus package, the first since the 2008 GFC. he package consists of multiple parts, a one-off A$750 payment to around 6.5 million welfare recipients as early as 31 March 2020, small business assistance with 700,000 grants up to $25,000 and a 50% wage subsidy for 120,000 apprenticies or trainees for up to 9 months, 1 billion to support economically impacted sectors, regions and communities, and $700 million to increase tax write off and $3.2 billion to support short-term small and medium-sized business investment. On 16 March, Premier Dan Andrews and Minister for Health Jenny Mikakos declared a state of emergency for Victoria for at least four weeks. On 19 March, the Reserve Bank again cut interest rates by a further 0.25% to 0.25%, the lowest in Australian history. On 22 March, the government announced a second stimulus package of A$66bn, increasing the amount of total financial package offered to A$89bn. This included several new measures like doubling income support for individuals on Jobseeker's allowance, granting A$100,000 to small and medium-sized businesses and A$715 million to Australian airports and airlines. It also allowed individuals affected by the outbreak to access up to A$10,000 of their superannuation during 2019–2020 and also being able to take an additional same amount for the next year. on the same day Victorian Premier Daniel Andrews announced on 22 March that the state will bring the school holiday forwards to 24 March from 27 March. On 30 March, the Australian Federal Government announced a $130 billion "JobKeeper" wage subsidy program offering to pay employers up to $1500 a fortnight per full-time, part-time or casual employee that has worked for that business for over a year. For a business to be eligible, they must have lost 30% of turnover after 1 March of annual revenue up to and including $1 billion. For businesses with a revenue of over $1 billion, turnover must have decreased by 50%. Businesses are then required by law to pay the subsidy to their staff, in lieu of their usual wages. This response came after the enormous job losses seen just a week prior when an estimated 1 million Australians lost their jobs. This massive loss in jobs caused the myGov website to crash and lines out of Centrelink offices to run hundreds of metres long.The program was backdated to 1 March, to aim at reemploying the many people who had just lost their jobs in the weeks before. Businesses would receive the JobKeeper subsidy for six months. On 2 April, the number of cases in Victoria exceeded 1,000, including over 100 healthcare workers. On 5 April, New South Wales Police launched a criminal investigation into whether the operator of Ruby Princess, Carnival Australia, broke the Biosecurity Act 2015 (Cwth) and New South Wales state laws, by deliberately concealing COVID-19 cases. On 6 April, the Department of Health revealed that 2,432 people recovered from the infection as the federal government started reporting recovery statistics. This is more than a third from the official number reported so far, Deputy Chief Medical Officer Professor Paul Kelly stating, "I think it is important. Firstly it really reinforces that message, which is a true one, that most people who get this disease do recover”. The day before, at 3pm, it was announced that 2,315 of the 5,687 confirmed coronavirus cases had recovered. May 2020 - An outbreak in Victoria at a meatworks that was later revealed to be Cedar Meats was announced on 02 May with eight cases. By 8 May, the cluster of cases linked to Cedar Meats in Victoria was 71, consisting of at least 57 workers and 13 close contacts, including a nurse, aged care worker and high school student. The number had increased to 75 by 9 May, 88 by 13 May, and 90 by 14 May. On 9 May, two Victorian cases were announced to be related to McDonald's Fawkner. By 18 May, this had increased to 12 cases, and on that day it was revealed that a delivery driver had tested positive, prompting the closing for cleaning of 12 more McDonald's locations: Melton East, Laverton North, Yallambie, Taylors Lakes, Campbellfield, Sunbury, Hoppers Crossing, Riverdale Village, Sandown, Calder Highway Northbound/Outbound, Calder Highway Southbound/Inbound, and BP Rockbank Service Centre Outbound. On 15 May, South Australia became the second jurisdiction, after the ACT, to be free of any active cases, however on 26 May, a woman returning from overseas who was granted exemption into South Australia from her hotel quarantine in Victoria tested positive for COVID-19. This was the first new case in 19 days for the state.[101] On 4 June, it was announced that the woman had recovered and the state was free of any active cases once again.[102] On 17 May, Victoria announced two further business sites had been shut down due to a suspected case at each. Domino's Pizza in Fairfield has been shut for two weeks, and mattress manufacturer The Comfort Group in Deer Park was closed from Friday 15 May to at least Wednesday 20 May. On 6 June, both New South Wales and Victoria reported no new cases for the previous 24 hours, with only Queensland and Western Australia reporting one new case each, the lowest national total since February. Western Australia also announced two old cases. However, the new case in Queensland was linked to the Rydges on Swanston cluster in Melbourne when a man who travelled from Melbourne to Brisbane on Virgin flight VA313 on 1 June tested positive.Printout of a number of regular Coronavirus updates that were distributed during the Covid-19 Pandemic. covid-19, corona virus, pandemic, federation university australia, covidsafe plan, response, face masks, blended workfore, lock down, office capacity, gatherings, physical distancing, social distancing, cotact tracing, exams, safe start on campus, transition to campus, employee assistance program