Showing 690 items matching "railway crossing"
-
 Melbourne Tram Museum
Negative, Wal Jack, 24/07/1944 12:00:00 AM
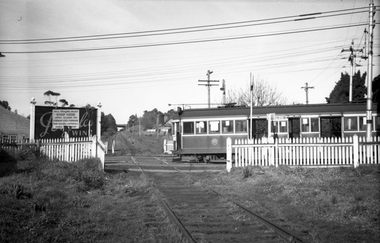
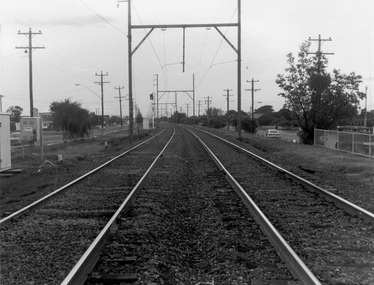
... in Whitehorse Road, crossing the outer circle railway. The tram has... Trams tramways Balwyn Whitehorse Road Level Crossings Outer ...Black and white negative, by Wal Jack, of W2 365 in Whitehorse Road, crossing the outer circle railway. The tram has the destination of Balwyn. Note the sign on the level crossing requiring all trains to stop before proceeding. In the background is a Penfolds Wine billboard. Photo dated 24-7-1944 in the Wal Jack album along with details of the location and the tramcar.trams, tramways, balwyn, whitehorse road, level crossings, outer circle railway, w2 class, tram 365 -
 Melbourne Tram Museum
Negative, Wal Jack collection, c1930
Black and white negative from Wal Jack collection of the W2 557, East Preston, route 9, Photo c1930. crossing "The Hump" over the Epping (Whittlesea) railway line alongside Preston Workshops. Photo may not be by Wal Jack as a size that he did not use.trams, tramways, w2 class, the hump, east preston, route 9, tram 557 -
 Melbourne Tram Museum
Administrative record - Report, Tramway Board, Tramway Board - Special Work, 1916
Report prepared by the Tramway Board, the intermediate body between the Melbourne Tramway and Omnibus Co. (MTOC) and the Melbourne and Metropolitan Tramways Board (MMTB), examining the status of the special work (points and crossings), curves, depot entry tracks and other worn tracks for wear. This report looks at the northern half of the cable system. Prepared May 1916 with a second inspection during July 1916. Provides detailed layout drawings of each junction, crossings with other cable lines, railway tracks, curves, depot entry, and locations where cable pick up points were - a "wiggle" in the track. Yields information about the examination of the cable tram special work prior to the end of the MTOCo franchise.Digital image - scan of the 1916 Report by the Tramway Board - approx 200 pages within a heavy cardboard folder secured with two interscrews or Chicago screws. Typed quarto sheets interleaved with foolscap drawings of each location. Folder by Sands & McDougall - dated 24/7/1917 No. D6350. tramways, trams, cable trams, tramway board, mtoco, track repairs, trackwork, points, level crossings -
 Melbourne Tram Museum
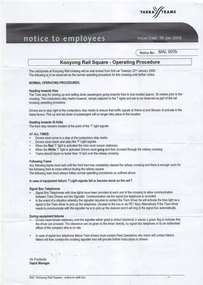
Document - Notice to Employees, Yarra Trams, "Kooyong Rail Square - Operating Procedure", Jan 2008
Document provides information on the operation of the rail square (also known as a tram square, railway Square) at the Kooyong Glenferrie Road level crossing. Provides a site plan, signal information and operational procedures including when items fail. Dated 16/1/2008.Demonstrates an instruction into the operation of the Kooyong rail squareSingle A4 sheet, printed double sided, with a coloured site plan.trams, tramway square, rail square, railway square, glenferrie road, kooyong level crossing, operations, instructions -
 Melbourne Tram Museum
Photograph - Cable trams and stall vendors Princes Bridge, 1908
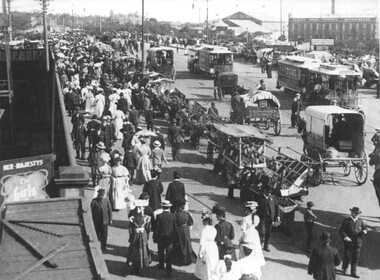
... In ink "Princes bridge area, crossing over railway lines... In ink "Princes bridge area, crossing over railway lines 1908 ...Black and white photograph of Princes Bridge looking south with produce vendor's carts and many people on both sides of the bridge, generally walking south. In the view are several horse-drawn vehicles, cable trams, one of which is bound for Queensberry St from Toorak. In the view is a poster for Le Girls at Her Majestys Theatre, Worth's Olympic Theatre, and Varley Bros Printer and Bookbinders building. Not known how the photo was dated to 1908. Photo possibly from a postcard.Yields information about Princes Bridge 1908.Black and white print with notes on the rear.In ink "Princes bridge area, crossing over railway lines 1908, City Bound tram - Toorak - Queensberry St route"tramways, tramcars, collins st, victoria bridge, cable trams -
 Melbourne Tram Museum
Document - St Kilda - Brighton, Victorian Railways (VR), "Rules and Regulations", June 1907
Provides the Rules and Regulations for the St Kilda - Brighton Electric Street Railway, dated June 1907. The railway opened on 5/5/1906 and to Brighton on 22/12/1906. the latter largely as a single track. Has the name F E Bradford on the front cover. Gives rules for crossing cable tram lines, those for drivers, speeds, conductors, accidents, bell signals, signals on overhead line, regulations for working by staff and ticket, pilot working, rules for workers on the permanent way, and additional rules such as collecting money from passengers for breaking windows. See Reg Item 3508 for a "Supplement to the Book of Instructions re the working of the St Kilda and Brighton Electric Street Railway, dated 1/1/1915", item 2840 for the 1926/27 version and 7580 for a 1911 version.Yields information about the "Rules and Regulations" - St Kilda Brighton - Electric Street Railway Book - cloth cover red covers, 20 pages, centre stapled.Has initials "PwR" and "Secretary" in ink on the first page.trams, tramways, cable trams, trackwork, vr, victorian railways, st kilda - brighton, rules, employees, safeworking -
 Melbourne Tram Museum
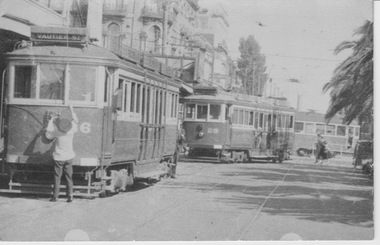
Photograph, Broken Axle tram 65, 1923
The photograph shows the failure of a tramcar axle after being hit by a train (the Deepdene Dasher) at the Deepdene level crossing in 1923 - see pages 6 to 8 of the reference for details of the event and who was to blame. Yields information about the damage to a tramcar axle after a collision with the Deepdene Dasher in 1923.Photograph, black and white, with notes on the rear.On rear in pencil "Car 65 run into by train at Deepdene, axle Hadfield centre" tramways, axles, deepdene, accidents, collisions, tram 65, mmtb, trams, railways -
 Melbourne Tram Museum
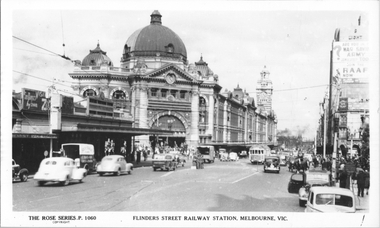
Postcard, Rose Stereograph Co, "Flinders St Railway station Melbourne", c1940
Rose Series postcard No. P 1060, titled "Flinders St Railway station Melbourne," shows a W2 with white war time paint on the bumper bar crossing Swanston Street (Route 28?) with many cars and one horse-drawn cart in the view. On the est bound safety zone stop are several men in military uniforms. Note the eastbound safety zone stop on the east side of Swanston Street. Yields information about the intersection of Flinders and Swanston Sts.Postcard - printed real photograph with Rose Stereograph Co. name on the rear.Has been used as a part letter to Ken Magor.trams, tramways, w2 class, flinders st station, flinders st, swanston st, safety zones, world war ii, princes bridge station -
 Melbourne Tram Museum
Photograph - Set of two Colour Prints, Melbourne & Metropolitan Tramways Board (MMTB), c1973
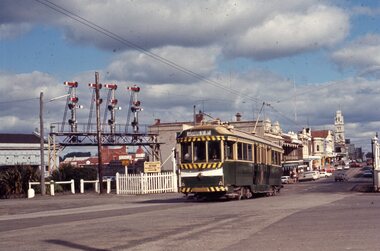
... Colour photograph of tram 1041 crossing under the railway... Colour photograph of tram 1041 crossing under the railway ...Colour photograph of tram 1041 crossing under the railway at Royal Park, with a Hitachi silver train passing overhead, front car appears to be 8M. Photograph Official VR / MMTB, c1973, when both vehicles relatively new. Train has destination of Gowrie and 1041, route 55, West Coburg. .1 - 3/4 view of tram with just one carriage of the train in the view. .2 - ditto, but with the whole train in the view.trams, tramways, mmtb, vr, hitachi silver train, 1041, tram 1041 -
 Melbourne Tram Museum
Photograph - Digital Image, Kevin O'Reilly, series of three images of the Hawthorn Bridge over the Yarra, c1930, c1930's
Image from CD (Compact Diskette for use in computers) - see Reg Item 135. A series of three images of the Hawthorn Bridge over the Yarra, c1930, during the era with problems with the bridge. See separate article for more details. Richmond 6, Richmond, Richmond 3 on the CD as original files. .1 - Looking from the south west, at the Hawthorn bridge with the temporary wooden bridge being constructed on the south side. Has the cable tram depot in the photo and part of the Burnley racing course. Temporary track on the north side of the steel bridge and crossings can be seen. .2 - Looking along Bridge Road to the east with Hawthorn Bridge in the middle of the photograph. Shows the industrial and residential areas, Hawthorn Railway Station and part of the Burnley Race course, the cable tram depot building. W class tram in Church St Hawthorn and W class tram crossing the bridge on the north side temporary track. Note the cable tram used as a shelter on the north east corner of the bridge. .3 - Looking south along River St towards Bridge Road, with the Yarra River and Hawthorn Bridge on the left side of the photograph. Shows the industry in the area at the time, wool and skin Merchants, north side of the cable depot, housing and the outlook to the river!trams, tramways, hawthorn, yarra river, burnley, richmond, hawthorn bridge -
 Melbourne Tram Museum
Photograph - Digital Image, Kevin O'Reilly, Sandringham" looking south over the Sandringham Railway station, mid 1920's
Image from CD (Compact Diskette for use in computers) - see Reg Item 135. Image titled "Sandringham" on CD, of looking south over the Sandringham Railway station, shows the interlocked gates at the level crossing, Sandringham tram depot, shopping centre, Tait train in the platform and the beach front. Mid 1920's?trams, tramways, sandringham, vr trams -
 St Kilda Historical Society
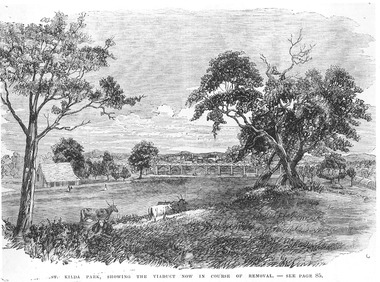
Photograph - Photograph of artwork, St Kilda Park, showing the viaduct now in course of removal, 25/06/1867
St Kilda Park, now Albert Park Reserve, showing cows, eucalyptus trees, oval and a railway viaduct in background. The viaduct was part of the Windsor to St Kilda loop line which operated between 1857 and 1867. The loop line ran from the St Kilda railway station on a combination of wooden viaducts and earth embankments fifteen feet high, crossing over St Kilda and Punt Roads by way of bridges and then gradually decreasing to a level crossing at Union Street and then on to Windsor station. Black and white photograph of a lithograph published in a book (unidentified)ST KILDA PARK, SHOWING THE VIADUCT NOW IN COURSE OF REMOVAL - SEE PAGE 85st kilda railway station, albert park, windsor to st kilda rail loop -
 Melbourne Tram Museum
Photograph - VR tram 34 departing St Kilda Station
Photograph taken from a second floor building shows bogie car VR tram 34 crossing Fitzroy St and M&MTB tracks after departing St Kilda Railway Station. All saloon windows are open, all sunshades raised and passengers aboard. A summers day with two male pedestrians and two motor vehicles in foreground. Yields information of Railways tramcar 34 and St Kilda Railway Station Black and white photograph with note on rear.Indistinct blue stamp and 'Summer 1959'victorian railways, vr tram 34, st kilda railway station, fitzroy st, m&mtb -
 Stawell Historical Society Inc
Photograph, Glenorchy Bridge on the Wimmera River 1866
Glenorchy Bridge Wimmera River. Part of a collection of Photographs by Mr. O.G. Armstrong as commissioned by the Shire of Stawell for the Inter-colonial and Paris Exhibition in Melbourne in 1866. Prior to the construction of this bridge in 1860, there existed two forwards across the Wimmer River at Glenorchy. One was 2 miles on the Stawell side of Glenorchy and 500 metres from the present railway bridge. It was well made, stone floor and can be seen today. The second was located 800 metres downstream of the town and was known as Stuart’s Crossing. These Fords were popular crossing spots for Bullock Drays which were delayed for days during floods before the bridge was built. The original Bridge was built near the site of the present ‘old’ bridge. stawell -
 Melbourne Tram Museum
Photograph - Tram 65 after collision with the Deepdene Dasher, Bill Simpson, 1923
The photograph shows J class tram No. 65 at the Kew Depot after a collision with the Deepdene Dasher hauled by locomotive F187 at the Whitehorse Road level crossing. The tram became Ballarat SECV No. 11. Shows the extent of damage to the side of the tram. See item 7654 for a photo of the damaged axle. Yields information about the damage to a tramcar after a collision with the Deepdene Dasher in 1923.Photograph - Black and White - the original one with notes on rear."1924 Deepdene Rly Crossing Whitehorse Rd" in ink.mmtb, tramways, kew depot, accidents, tram 65, railways, deepdene -
 Greensborough Historical Society
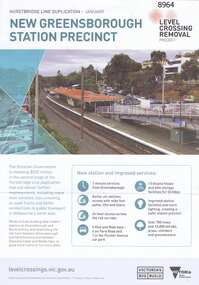
Newsletter, Victorian Government, New Greensborough Station Precinct, January 2024
Update on the new Greensborough Station Precinct; part of the Level crossing Removal Project and Victoria's Big Build.Four page newsletter colour illustrationsgreensborough railway station, hurstbridge rail line, railways -
 Sunbury Family History and Heritage Society Inc.
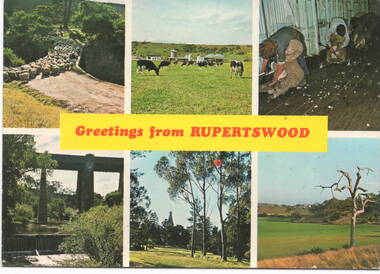
Postcard, Murfett Publishers, 'Rupertswood', C1970s
The post card waas assembled by Salesian College, which is in Rupertswood Mansion. The six images are sites within the Rupertswood Estate and are as follows: Clockwise from L-R- Sheep at the Bridge crossing at Jacksons Creek, Friesan Stud sale, Shearing sheep, Jackson Creek flats, Rupertswood Mansion, Railway bridge spanning Jacksons Creek. Initially Salesian College started as an agricultural school training boys in farm skills. It is now a co-educational secondary college.A postcard with six non-digital photographs of sites within the Rupertswood Estate. Information about each site and the manufacturer's details are on the back of the card.Across the centre of the postcard: GREETINGS FROM RUPERTSWOODrupertswood mansion, salesian college, railway viaduct, jacksons creek, sheep shearing, friesan cattle, sunbury -
 Stawell Historical Society Inc
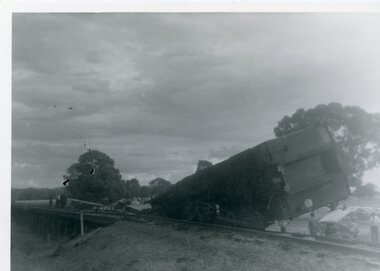
Photograph, Train Derailment near Glenorchy February 1971-- 6 Photos, 1971
Series of six photographs of Train derailment near Glenorchy February 1971. These Photographs are copies o=from negatives held by the society - Made possible by grant 1991. These photographs taken of a train accident. The Afternoon Passenger Train - at the level crossing on the Warracknabeal - Stawell Road. There are 2 crossings on the road - This crossing is near the Wimmera River Rail Bridge. The cause of the accident - was a collision between a loaded Gravel truck and the passenger train. The Driver of the Truck was killed. 1231-2 B/w Photo of Train Smash near Glenorchy. This photo was donated from the estate of Mr Boothey in 2010, and is almost identical to one in 1231. This Photo is in album 4. B/W Photos of a Train Smash - 1231 The deisel Engine completely derailed off the rail line. 1231-1 showing the derailed rolling stock from another angle. Many onlookers. 1231-2 The Boogie is completely off the carriage 3 Photogrpahsstawell railways transport, glenochy -
 Ballarat Tramway Museum
Photograph - Black & White Photograph/s - set of 32, Eldon Hogan, 4/06/1965 12:00:00 AM
Yields information about a 1924 Jelbart Engine manufacturing display in Sturt St and the street scene and peoples clothing at the time.Set of 32 black and white photographs of an Association of Railway Enthusiasts tour to Bendigo and trams 4/7/1965. The photos are not necessarily in photographic order. .1 - 30 on the Eaglehawk terminal track, beyond the normal terminus. .2 - 30 & 29 High St Eaglehawk. .3 - ditto with a poppet head in the background. .4 - 30 at one of the crossing loops .5 - 30 at Eaglehawk terminus extension .6 - ditto. .7 - ditto .8 - cleaning out the track .9 - showing the location of the track at Eaglehawk terminus and its extension .10 - cleaning out track .11 - a portable shed adjacent to the track .12 - A view of the two Birneys travelling in the empty country. .13 - ditto .14 - 19 and 18 at Golden Square .15 - Bendigo tram depot - creek crossing .16 - Scrubber at the depot .17 - 28 and 19 at the North Bendigo terminus .18 - 18 and 30 on the Golden Sq line .19 - 28 and 19 at the North Bendigo terminus .20 - ditto. .21 - 28 and 19 near the depot entry. .22 - 28 and 30 Pall Mall .23 - 28 at North Bendigo .24 - 17 and 19 and 6 at Quarry Hill .25 - 28 and 30 Mitchell St .26 - 19, 6 and 21 Quarry Hill .27 - 19 and 6 Quarry Hill .28 - 28 and 6 at the depot entry .29 - ditto .30 - 18 and 30, Golden Sq line .31 - 25 at depot .32 - 6 and 19 Charing Cross. Photographer Eldon Hogan. Printed on Kodak Paper .33 - roll of negatives of some of the above photos - stored in box 83 as well. trams, tramways, are, bendigo, eaglehawk, quarry hill, golden square, north bendigo, tram 30, tram 29, tram 28, tram 6, tram 19, tram 25, tram 17, tram 18 -
 Narre Warren and District Family History Group
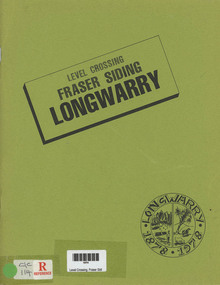
Book, Level Crossing Fraser Siding Longwarry - 1878-1978, 1978
History book for Centenary celebrations - 1878-1978non-fictionHistory book for Centenary celebrations - 1878-1978early settlement and businesses -
 Melbourne Tram Museum
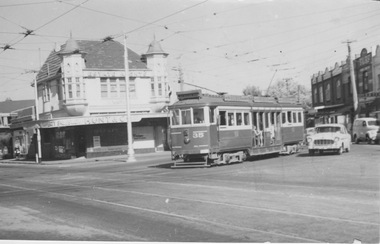
Photograph - VR tram 36, 29 at St Kilda Station, 12 January 1954
The photograph shows VR tram 36 at St Kilda Railway Station with the driver in summer jacket raising the rear trolley pole. The tram displays destination Vautier St, an intermediate terminus about three kms from the station. VR tram 29 is also arriving at the terminus with weather blinds and saloon sunshades raised to shunt over tram 36. Its destination sign is indistinct but appears to be Middle Brighton or Brighton Beach. This movement of multiple shunting was common in the afternoon peak. Up to three trams would depart simultaneously following the arrival of a busy electric train from the city. The first tram would travel limited express to Brighton Beach; the second tram also ran limited express to the intermediate terminus at Middle Brighton; the last tram stopped all stops to Vaitier St, then return to repeat the same run. Also in the photograph is a M&MTB W2 tram in Fitzroy St crossing the VR tracks bound for its Acland St, St Kilda Beach terminus.Yields information about St Kilda Railway Station VR 36, Vr 29, and tram operationsSepia photograph with note on the rear.In ink on the rear " 36,29, &a W2 at M&MTB/VR crossing St Kilda Stn 12-1-54 1035"vr tram, st kilda railway station, weather blinds, middle brighton, tram 36, tram 29, brighton beach, vautier st, limited express, intermediate terminus, m&mtb, w2, fitzroy st, acland st -
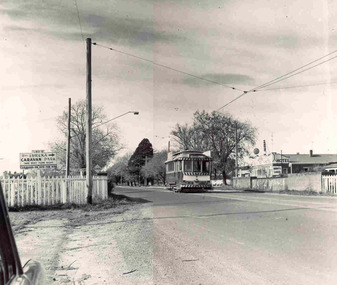
 Melbourne Tram Museum
Photograph - VR tram 35 at Ormond Rd and Glen Huntly Rd, 28 February 1959
Photograph shows VR bogie car 35 northbound crossing M&MTB Ormond line on final day of operations before closure.Yields information of Railways tramcar on final day of operationsBlack and white photograph with stamp and notes on rear ARHS Vic Division L G Poole Collection stamp, black biro writing 'At Glenhuntly Rd Crossing 28/2/1959victorian railways, vr tram 35, closure, glen huntly rd, ormond rd -
 Melbourne Tram Museum
Magazine, Yarra Trams, "The Wire", 5/2011 to 1/2015
... Crossings Railway squares Myki Metlink Tickets Route 96 Rules St ...0 - No 9 - 1/4/2011 - Rhinos on skateboards, Did you know, Spencer St works, .1 - No. 11 of 3/5/2011 with the revised Yarra trams logo, traffic priority, work over Easter in Spencer St at Bourke and Collins St, Good Friday appeal, safety, passenger feedback and future works. .2 - No. 13 - 31/5/2011 - new uniform, cleaning, CEPR, trackwork - Fitzroy St, Northcote, Rhino, Carlton Control. .3 - No. 14 - 15/6/2011 - Haymarket Roundabout, accessibility, maintenance, CSE. 3a - No. 16 - 19/7/2011 - Managers on the move, Trevor Jones, Yarra's vision, Richard Ch'ng and Rhino update. .4 - No. 17 - 2/8/2011 - High St Westgarth trackwork, Swanston St, IMF CEO visit .5 - No. 18 - 16/8/2011 - Performance benchmarks met, Preston Workshops, repairs to 3018, tram signal priority. .6 - No . 19 - 30/8/2011 - New E class trams, routes "a" or "d", TramTracker in shelters, police, fare evasion .7 - No. 20 - 15/9/2011 - Football trams, Superstops, Bridge Road, Rhinos. .8 - No. 21 - 27/9/2011 - CEO's journey to work, accessibility, increased patronage, E class. .8a - No. 22 - 11/10/2011 - Minister Mulder visit, E class, Customer experience, Elizabeth Kerdelhue Corporate Affairs Director, flood indicator in Wellington Parade, Keolis - Orleans and PTV coming your way. .9 - No. 23 - 25/10/2011 - forthcoming royal visit, opening for Footscray Road extension, Rhinos, Stockholm .10 - No. 24 - 8/11/2011- Royal visit, photos, Z3 158, route 86 works in High St. (see htd5043i21 for a image from an unknown newspaper of the actual event - features Z3 158.) .11 - No. 25 - 22/11/2011 - new staff guide, Gold Coast tram line, Macarthur St, overhead, fund raising, route numbering update. .12 - No. 26 - 6/12/2011 - Swanston St Superstops, Newmarket bridge strikes, rhinos. .13 - No. 27 - 20/12/2011 - Christmas carnival, Lenny Bates, portable crossover, uniforms. .14 - No. 28 - 17/1/2012 - Passing of Len Bates, Myki, Gardiner railway station. 14a - No. 29 - 31/1/2012 - Southbank depot, patronage, myki, think like a passenger, fatigue management, .15 - No. 30 - 15/2/2012 - visit of Keolis, SNCF people, list of Executive leadership team with photos, Swanston St works, Myki introduction. .16 - No. 31 - 29/2/2012 - patronage up, tram postage stamps, Myki, rhinos. .17 - No. 32 - 14/3/2012 - St Kilda Rd trackwork, fund raising, Southbank Depot extensions, Myki, driving conditions, grand prix. .18 - No. 33 - 30/3/2012 - introduction of the PTV, end of MetLink and Transport Ticketing Authority, changes in management structure, trackwork, Gold Coast tramway and Keolis. .19 - No. 34 - Dr Jake - Royal children's Hospital super stop, route 96 - Premium line. .20 - No. 35, 2/5/2012 - Revision of Rules, trackwork in St Kilda Road and Elizabeth St, Myki, safety - Zero Harm. .21 - No. 69 - 25/9/2013 - Passengers paying their way, E class update, Mal Ashworth retires, progress report, feedback, new chime on trams. .22 - No. 70 - 9/10/2013 - Art comes alive, tram 925, driver simulator at Preston Workshops, E class project, 90th Glen Huntly. .23 - No. 83 - 23/4/2014 - Screen time for trams, new PIDs on B class, assistance animals, Operations Centre, Preston Workshops, Electrical log sheets to SLV. .24 - No. 89 - 23/7/2014 - punctuality, refresh of network map (fold-out map), women drivers. .25 - No. 97 - 19/11/2014 - Revitalising route 96, Keolis news, free tram zone, guide dogs. .26 - No. 99 - 17/12/2014 - Accessibility week, new uniform top for CSE's, free tram zone, world trade centre stop upgrade, heat stress, Art tram 158. .27 - No. 100 - 14/1/2015 - Route 96 complete, New Years eve free travel, fare compliance, patronage down, .28 - No. 12 - 16/5/2011 - Gold coast tramway, performance dashboard, tramworks and the rhino .29 - No. 16 - 19/7/2011 - Depot managers, tevor jones, record patronage, vision, rhino .30 - No. 17 - 2/8/2011 - High St Westgarth works, Duncan Smith, David Clarke Training, Swanston St works, and Preston Workshops . .32 - No. 39 - 28/6.2012 - maintenance, Emmanual Sorin, transformation, fare evasion, and Combino in Potsdam. .33 - No. 105 - 25/3/2015 - Grand Prix, Elgin and Lygon upgrade, Camberwell Junction, PTV hub, overhead. .34 - No. 78 - 12/2/2014 - January heatwave, Australian Open, Mark Wild of PTV, and Curt Skinner - voice in Channel 10 series Get Ace .35 - No. 81 - 26/3/2014 - drug and alcohol testing, zero harm, Victoria Bridge works, Keolis, relations with Toronto, Collins St safety and incident on a route 57 tram. .36 - No. 109 - 20/5/2015 - Goodbye Z class, Hello E class, Kew Depot centenary, drug & alcohol reminder, passenger satisfaction, Anzac day, B class life extension. .37 - No. 110 - 3/6/2015 - 3rd W class tram back grom Bendigo, employer of the year, CSE's go digital, Camberwell depot, Queensbridge tram and bus stop and Tram Hub preview. .38 - No. 115 - Feb. 2016 - 12 page centre stapled - New Year's eve services, spike the rhino is back, Burke Road level crossing removed, more E class, safe network in 2106, tennis, customers happy, New Preston depot, Farewell to Clement, Z class 40 years on network.Demonstrates Yarra trams staff newsletters.Set of 33 Yarra Trams internal newsletter "The Wire", All A4, printed in full colour. All four pages unless noted otherwise, full colour, performance snapshot on front cover.trams, tramways, yarra trams, traffic control, trackwork, spencer st, fund raising, operations, rhinos, carlton control, high st, haymarket, preston workshops, e class, route numbers, bridge road, wellington parade, ptv, royal visit, footscray road, new tramway, gold coast, macarthur st, swanston st, superstops, newmarket, gardiner, burke road, level crossings, railway squares, myki, metlink, tickets, route 96, rules, st kilda road, elizabeth st, tram 158, tram 925, glen huntly depot, simulator, b class, opeations centre, art trams, patronage, kew depot, new preston, queensbridge, w class, bendigo -
 Chelsea & District Historical Society Inc
Photograph - Frankston Railway Line, Chelsea, 1993
... platform stopping station, on a single railway line to Frankston ...Chelsea station opened on 4 February 1907 as a single platform stopping station, on a single railway line to Frankston, which was laid in 1882. The double line was introduced in December 1910, and the station expanded to two platforms. In 1922 the railway line was electrified. Black and white photos of Frankston Railway Line, taken at Chelsea looking north from Argyle Street Crossing. chelsea, electric train, frankston railway line -
 Ballarat Tramway Museum
Photograph - Ballarat tram 31, Victoria St, Buninyong Railway bridge, John Phillips, 1968
Photo of Ballarat No. 31, just after leaving Victoria St. terminus, late 1960's or early 1970s crossing over the Eureka siding railway bridge. Taken by John Phillips. Tram has destination of Gardens via Sturt St. West, Twin Lakes advertisement on the front. In the background is Meagher's Hotel with Abbots Lager and Victoria Bitter sign. On the bridge is graffiti "Smash US Imperialism". On the Ballarat side of the bridge is a sign directing travellers to the "Eureka Caravan Park". Yields information about the vicinity of the Victoria St terminus and the bridge over the Buninyong Railway line.Black and White photograph mounted on heavy cardboard backing. Has 6 Velcro dots on the rear and marks where mounting devices have been removed on the rear. Note: image scanned in two runs through a scanner, resulting in the shading in the image file. .1 - Second copy with 4 black Velcro squares and 4 dots on rear - wider view on the right-hand side with an additional pole - not scanned.trams, tramways, victoria st, eureka, twin lakes, tram 31 -
 Ballarat Tramway Museum
Photograph - Ballarat tram 31, Victoria St, Buninyong Railway bridge, John Phillips, 1968
... . crossing the Buninyong railway overbridge. Meaghers Hotel.... crossing the Buninyong railway overbridge. Meaghers Hotel ...Black and white photo of No. 31, inbound from Victoria St. crossing the Buninyong railway overbridge. Meaghers Hotel in the background and an ad for Eureka Caravan Park. No cars on the road. 'Smash Imperialism' graffiti on bridge beam. Tram fitted with lights, a small number over the headlight, and a long Twin Lakes sign under the headlight. See item 2015 for another print.Yields information about the vicinity of the Victoria St terminus and the bridge over the Buninyong Railway line.Black and white photograph - laminated.trams, tramways, ballarat, victoria st -
 Stawell Historical Society Inc
Photograph, Train Photographs
-1 K Class Seaby Street Crossing c.1960 -2 Melbourne bound X Class passing B Box Stawell 1985 -3 Arial View of picnic train Heatherlie Quarry 1929 -4 Stawell circa 1993 N Class Loco with N set passenger carriages. From left Kevin Neville, train conductor, Craig Pitcher & Trevor Skurrie -5 Horsham bound Goods train Glenorchy J Class -6 West bound goods train 1980's Great Western T Class -7 N Class Steam Hauling Short Goods Train Stawell -8 N Class from Grant St Bridge same as -7Eight Colour photographs of trainsrailways -
 Ballarat Tramway Museum
Slide - Ballarat trams - Railway station & Lydiard St - set of 3, Ron Hood, 9/1971
... , northbound crossing the level crossing in Lydiard St with the signal ...Set of three colour photographs by Ron Hood in early Sept. 1971 of trams on the Lydiard St Nth line: 1 - tram 40, northbound crossing the level crossing in Lydiard St with the signal gantry in the view. 2 - tram 34, southbound ditto and the railway station building in the background. 3 - tram 35, northbound from the balcony of the Provincial Hotel with Reids Coffee palace, Macleod & Co, JJ Coller and 3BA buildings in the background.Yields information about tram operations at the Ballarat level crossing in Lydiard St Nth shortly before closure of the route.Set of 3 Colour slides in plain white cardboard mounts.In ink "Railway Station, Ballarat Sept. 1971" and slide numbers 21, 22, 23tramways, trams, tram 40, tram 34, tram 35, lydiard st north, level crossing, signals -
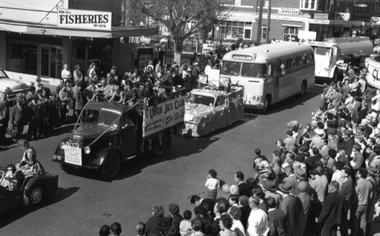 Box Hill Historical Society
Photograph - Street Parade, c.1962
... and celebrations Station Street Bank Street Railways Railway crossings B&w ...B&w photounion jack club, chamber of commerce, clubs and associations, box hill music centre, box hill fisheries, model dairy, ventura bus lines, ellingworth's estate agency, festivals and celebrations, station street, bank street, railways, railway crossings -
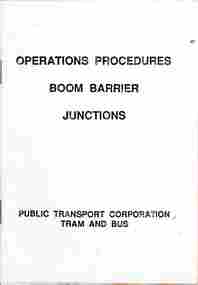 Melbourne Tram Museum
Document, The Met, "Operations Procedures Boom Barrier Junctions", 10/1991
... Melbourne line following a fatal accident at a level crossing... following a fatal accident at a level crossing. (The original ...Document published at the time of fitting boom barriers to Ingles St and Bridge St on the Port Melbourne light rail line. Gives description of operation, driving procedures, fault conditions, and restart procedure after a fault. Don Storey's history notes - Boom gates were re-installed on the Port Melbourne line following a fatal accident at a level crossing. (The original railway boom gates were removed when the line was converted to 'light rail') - 31/10/1991Yields information about the boom barriers on the Port Melbourne light rail line.Document - 8 page booklet centre stapled printed on white paper.tramways, tramcars, port melbourne, bridge st, ingles st, boom barriers, lrv