Showing 1824 items matching "electric trams"
-
 Ballarat Tramway Museum
Photograph - ESCo tram 14 at depot, State Electricity Commission of Victoria (SECV), c1935
... tram No. 14 in the depot, c1935. Original photograph taken by the SECV and a typed caption added "Original Brill Truck Type Rolling Stock (1935), Ballarat Electric Tramways. ...tram No. 14 in the depot, c1935. Original photograph taken by the SECV and a typed caption added "Original Brill Truck Type Rolling Stock (1935), Ballarat Electric Tramways. ...Photograph of ESCo tram No. 14 in the depot, c1935. Original photograph taken by the SECV and a typed caption added "Original Brill Truck Type Rolling Stock (1935), Ballarat Electric Tramways. Blinds on No. 14 have been rolled down. Shows step arrangements and condition of tramcar paintwork. Copy 2 - print made from negative N201. Record revised 22/04/2000 Copy 3 - from display boards 5/2000 when replaced by a laminated photocopy of the photograph - see image i2. Copy 4 - mounted onto black cardboard backing (blue back cardboard) - Record revised 15/8/2004. See Reg Item 3001 for original print of this photograph. Scan from negative held see image i1 - added 15/5/2020. Image i3 from print supplied by Bob Prentice to Keith Kings for the 1971 book, Ballarat Tramways Yields information about the condition and appearance of an ESCo tram c1935.Black and white photograph, copy print.trams, tramways, esco, secv, tramcars, ballarat , tram 14 (esco), tram 14 -
Ballarat Tramway Museum
Photograph - Black & White Photograph/s, Dave Macartney, Early 1970's
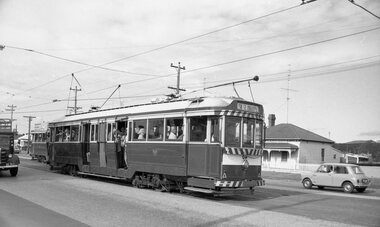
... Tram has two SEC Roof advertisements - "Electricity Best for Cooking" and "Everything's under control in my all electric kitchen". ...Tram has two SEC Roof advertisements - "Electricity Best for Cooking" and "Everything's under control in my all electric kitchen". ...Yields information about the area known as Hospital corner or Hospital junction and the appearance of the trams prior to closure.Black and white photograph of SEC No. 28 turning from Sturt St into Drummond St. South, at Hospital Corner with Destination of Sebastopol. Tram has two SEC Roof advertisements - "Electricity Best for Cooking" and "Everything's under control in my all electric kitchen". Has also Rimmington Bros. shop in the background and other shops on the south side of Sturt. St. Colour photocopy, laminated, of this photograph on display 5/2000 at 02-02-06 1413.1 - as for above, but slightly wider view both sides. Shows the Town Hall and part of the hotel."DJM" on back of print in pencil.trams, tramways, hospital corner, sturt st, junction, tram 28 -
 Ballarat Tramway Museum
Slide - Bendigo trams - Charing Cross - set of 5, Warren Doubleday, 12/3/1970
... Set of five slides of Bendigo trams taken at Charing Cross - Pall Mall, View St and Mitchell St, taken by Warren Doubleday on 27/3/1970 1 - Tram 21 arriving with the Centotaph, City Family Hotel, and Fountain Plaza in the background. 2 - Tram 24 arriving. 3 - Briney 28 departing, with the Easter Fair headboard and other locations that could be visited by tram 4 - Tram 5 departing with a Cinzano and Electric cooking roof adverts 5 - General view of four trams - 21, 28 bogie cars 4 and 24 with The Beehive building in the background....Ballarat Tramway Museum South Gardens Reserve Wendouree Parade Ballarat Ballarat goldfields Set of five slides of Bendigo trams taken at Charing Cross - Pall Mall, View St and Mitchell St, taken by Warren Doubleday on 27/3/1970 1 - Tram 21 arriving with the Centotaph, City Family Hotel, and Fountain Plaza in the background. 2 - Tram 24 arriving. 3 - Briney 28 departing, with the Easter Fair headboard and other locations that could be visited by tram 4 - Tram 5 departing with a Cinzano and Electric cooking roof adverts 5 - General view of four trams - 21, 28 bogie cars 4 and 24 with The Beehive building in the background. ...Set of five slides of Bendigo trams taken at Charing Cross - Pall Mall, View St and Mitchell St, taken by Warren Doubleday on 27/3/1970 1 - Tram 21 arriving with the Centotaph, City Family Hotel, and Fountain Plaza in the background. 2 - Tram 24 arriving. 3 - Briney 28 departing, with the Easter Fair headboard and other locations that could be visited by tram 4 - Tram 5 departing with a Cinzano and Electric cooking roof adverts 5 - General view of four trams - 21, 28 bogie cars 4 and 24 with The Beehive building in the background.Yields information about the operation of trams at Bendigo's Charing Cross.Colour Slide - Anscochrome GAF plastic mounts - set of 5Have the photographer's slide number written on them.bendigo, charing cross, tram 21, tram 24, tram 28, tram 5, tram 4 -
Ballarat Tramway Museum
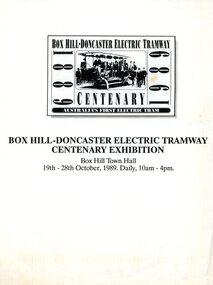
Memorabilia - Memorabilia - Collection of items, Box Hill-Doncaster Electric Tramway Centenary Exhibition
... Trams. These items include newspaper cuttings, pamphlets, reports, timetables, fares prices plus special items relating to events. Items from Melbourne and regional Victoria, interstate - Adelaide and Sydney, plus overseas, make up this collection. Date: 19th - 28th October, 1989. Daily, 10am - 4pm White bag labelled - Box Hill - Doncaster Electric ...Ron Bridger was an avid collector of items related to transport, predominately Trams. These items include newspaper cuttings, pamphlets, reports, timetables, fares prices plus special items relating to events. Items from Melbourne and regional Victoria, interstate - Adelaide and Sydney, plus overseas, make up this collection. White bag labelled - Box Hill - Doncaster Electric Tramway - Centenary. Numerous items relating to exhibition collected and placed in paper bag. Date: 19th - 28th October, 1989. Daily, 10am - 4pm -
 Ballarat Tramway Museum
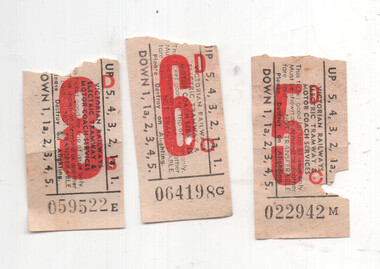
Ephemera - Set of 3 Victorian Railways tram and bus tickets, Victorian Railways (VR), mid 1950s
... electric tramways and motor coach service tickets collected by Hugh Ballment. All black on offwhite paper with price printed in red. 1 - 5d - 022942M 2 - 6d - 064198G 3 - 8d - 059522E Issued mid to late 1950s for use on the St Kilda - Brighton and Sandringham - Black Rock lines prior to closure when both trams and motor buses were used....electric tramways and motor coach service tickets collected by Hugh Ballment. All black on offwhite paper with price printed in red. 1 - 5d - 022942M 2 - 6d - 064198G 3 - 8d - 059522E Issued mid to late 1950s for use on the St Kilda - Brighton and Sandringham - Black Rock lines prior to closure when both trams and motor buses were used. ...Set of 3 pre-decimal VR electric tramways and motor coach service tickets collected by Hugh Ballment. All black on offwhite paper with price printed in red. 1 - 5d - 022942M 2 - 6d - 064198G 3 - 8d - 059522E Issued mid to late 1950s for use on the St Kilda - Brighton and Sandringham - Black Rock lines prior to closure when both trams and motor buses were used.Yields information about the tickets in use during the mid 1950s on the Victorian Railways operated services.Ephemera - set of 3 used paper flimsy Victorian Railways paper tickets with plain backs.tramways, tickets, fares, vr, victorian railways -
 Ballarat Tramway Museum
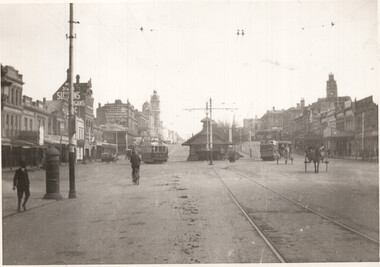
Photograph - Sturt St and Grenville St terminus, c1915
... electric line and before the removal of the shelter in 1923. There is possibly one motor cars in the photograph outside Suttons. The Mechanics Institute is advertising its Library, ladies rooms and fees. Yields information about the intersection of Sturt/Bridge and Grenville Sts, ESCo trams ...Photograph taken from the corner of Sturt, Bridge and Grenville Sts Ballarat looking west. Shows an ESCo Sebastopol type tramcar on the left and a 1905 built type on the right. In the middle is the waiting shelter / office. Photograph shows the track into Bridge St. Has a number of horse drawn vehicles in the photograph. Possibly c1915 after the opening of the Sebastopol electric line and before the removal of the shelter in 1923. There is possibly one motor cars in the photograph outside Suttons. The Mechanics Institute is advertising its Library, ladies rooms and fees.Yields information about the intersection of Sturt/Bridge and Grenville Sts, ESCo trams, and the shelter.Black and white photograph with a plain back.sturt st, grenville st, shelter, esco, tramways, tramcars -
 Ballarat Tramway Museum
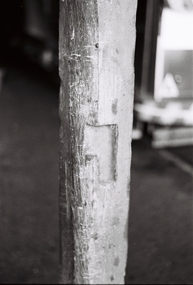
Negative - Notch in wooden column at depot indicating a former horse stall, Robert Green, 30/12/1968
... Yields information about the prior use of the electric tram depot as a horse tram depot. Tramways horst trams depot stables 35mm negative in a film strip Negative Notch in wooden column at depot indicating a former horse stall Robert Green ...Photo shows a notch in a wooden column at the depot, indicating a former horse stall, photographed on 30/12/1968 by Robert Green. The depot was originally built by the Ballaarat Tramway Co to house the horse drawn tramcars and the horses from 1887 to 1905. Yields information about the prior use of the electric tram depot as a horse tram depot.35mm negative in a film striptramways, horst trams, depot, stables -
 Ballarat Tramway Museum
Negative - SECV Ballarat operations - set of 6, Robert Green, 31/12/1968
... Set of 6 photographs by Robert Green 31/12/1968, showing the tramcar operations of the SECV system on that day: 1 -Tram 12 In Wendouree Parade nearing Carlton St 2 -Trams 18,12 Crossing at Carlton St loop with the conductor changing trams. 3 -Trams 18, 12 Crossing at Carlton St Loop. 4 -Tram 38 showing the front of the tram with a shop in the background advertising The Age newspaper 5 -Trams 38, 43 Crossing at the Seymour St loop 6 -Tram 41 Inbound at the Grey St Loop. Tram has an electric cooking roof advert. ...Ballarat Tramway Museum South Gardens Reserve Wendouree Parade Ballarat Ballarat goldfields Set of 6 photographs by Robert Green 31/12/1968, showing the tramcar operations of the SECV system on that day: 1 -Tram 12 In Wendouree Parade nearing Carlton St 2 -Trams 18,12 Crossing at Carlton St loop with the conductor changing trams. 3 -Trams 18, 12 Crossing at Carlton St Loop. 4 -Tram 38 showing the front of the tram with a shop in the background advertising The Age newspaper 5 -Trams 38, 43 Crossing at the Seymour St loop 6 -Tram 41 Inbound at the Grey St Loop. Tram has an electric cooking roof advert. Yields information about the SECV Ballarat tram operations on 31/12/1968. ...Set of 6 photographs by Robert Green 31/12/1968, showing the tramcar operations of the SECV system on that day: 1 -Tram 12 In Wendouree Parade nearing Carlton St 2 -Trams 18,12 Crossing at Carlton St loop with the conductor changing trams. 3 -Trams 18, 12 Crossing at Carlton St Loop. 4 -Tram 38 showing the front of the tram with a shop in the background advertising The Age newspaper 5 -Trams 38, 43 Crossing at the Seymour St loop 6 -Tram 41 Inbound at the Grey St Loop. Tram has an electric cooking roof advert. Yields information about the SECV Ballarat tram operations on 31/12/1968.35mm negative in a film strip - set of 6tramways, sturt st, wendouree parade, lydiard st north, carlton st loop, tram 12, tram 18, tram 38, seymoure st loop, grey st loop, tram 41 -
 Ballarat Tramway Museum
Negative - SECV Ballarat operations the last day - set of 9, Robert Green, 19/9/1971
... Set of 9 photographs by Robert Green 19/9/1971, showing the tramcar operations of the SECV system on the last day of SECV Operations in Ballarat. 1 -Trams 40, 42 crossing at the Bell St loop. 2 -Tram 40 Sturt St, side on view at Dawson St with St Patricks Cathedral in the background. Tram has a Eureka Tiles and an Electric cooking roof adverts 3 -Tram 40 ditto with Prestige Homes, Franklin Chemist, H P Stevens Furriers, Boronia Florist, 4 -Trams 34, 35 at Dawson St with the Golden City Hotel in the background. 5 -Tram 35 at ditto 6 -Tram 42 in Sturt St with St Andrews Kirk in the background 7 -Tram 42 ditto from the Golden City Hotel 8 -Tram 42 Sturt St with the Franklin Chemist, H P Stevens Furrier, 34in the background' 9 -Tram 39 Sturt St with a light load with the Queen Alexandria bandstand and Bongiornos store in the background. ...Ballarat Tramway Museum South Gardens Reserve Wendouree Parade Ballarat Ballarat goldfields Set of 9 photographs by Robert Green 19/9/1971, showing the tramcar operations of the SECV system on the last day of SECV Operations in Ballarat. 1 -Trams 40, 42 crossing at the Bell St loop. 2 -Tram 40 Sturt St, side on view at Dawson St with St Patricks Cathedral in the background. Tram has a Eureka Tiles and an Electric cooking roof adverts 3 -Tram 40 ditto with Prestige Homes, Franklin Chemist, H P Stevens Furriers, Boronia Florist, 4 -Trams 34, 35 at Dawson St with the Golden City Hotel in the background. 5 -Tram 35 at ditto 6 -Tram 42 in Sturt St with St Andrews Kirk in the background 7 -Tram 42 ditto from the Golden City Hotel 8 -Tram 42 Sturt St with the Franklin Chemist, H P Stevens Furrier, 34in the background' 9 -Tram 39 Sturt St with a light load with the Queen Alexandria bandstand and Bongiornos store in the background. ...Set of 9 photographs by Robert Green 19/9/1971, showing the tramcar operations of the SECV system on the last day of SECV Operations in Ballarat. 1 -Trams 40, 42 crossing at the Bell St loop. 2 -Tram 40 Sturt St, side on view at Dawson St with St Patricks Cathedral in the background. Tram has a Eureka Tiles and an Electric cooking roof adverts 3 -Tram 40 ditto with Prestige Homes, Franklin Chemist, H P Stevens Furriers, Boronia Florist, 4 -Trams 34, 35 at Dawson St with the Golden City Hotel in the background. 5 -Tram 35 at ditto 6 -Tram 42 in Sturt St with St Andrews Kirk in the background 7 -Tram 42 ditto from the Golden City Hotel 8 -Tram 42 Sturt St with the Franklin Chemist, H P Stevens Furrier, 34in the background' 9 -Tram 39 Sturt St with a light load with the Queen Alexandria bandstand and Bongiornos store in the background. Yields information about the SECV Ballarat tramways last day of operations on 19/9/1971.35mm negative in a film strip - set of 9tramways, last day, closure, tram 42, sturt st, tram 34, lydiard st, tram 40, bell st loop, tram 35, tram 39 -
 Ballarat Tramway Museum
Slide - SECV Ballarat 28 and 13 - Wendouree Parade, Robert Green, 1/1969
... Tram 13 (Mt Pleasant) has a roof advert for ANA Medical and Hospital Benefits, and No. 28 (Victoria St), two electric cooking roof adverts....Tram 13 (Mt Pleasant) has a roof advert for ANA Medical and Hospital Benefits, and No. 28 (Victoria St), two electric cooking roof adverts. ...Set of two colour slides of Ballarat trams 28 and 13 crossing possibly at Depot Loop, January 1969. Tram 13 (Mt Pleasant) has a roof advert for ANA Medical and Hospital Benefits, and No. 28 (Victoria St), two electric cooking roof adverts.Yields information about trams 13 and 28 in Wendouree Parade during January 1969, Set of two Kodak colour slides, cardboard mounts.tramways, tram 13, tram 28, wendouree parade -
 Ballarat Tramway Museum
Slide - SECV Ballarat 34 and 37, Lydiard St North, Robert Green, 1/1969
... Set of three colour slides of Ballarat trams 34 and 37 in Lydiard St Nth, January 1969. Tram 37 has an electric cooking roof advert....Ballarat Tramway Museum South Gardens Reserve Wendouree Parade Ballarat Ballarat goldfields Set of three colour slides of Ballarat trams 34 and 37 in Lydiard St Nth, January 1969. Tram 37 has an electric cooking roof advert. Yields information about trams 37 and 34 in Lydiard St North during January 1969. ...Set of three colour slides of Ballarat trams 34 and 37 in Lydiard St Nth, January 1969. Tram 37 has an electric cooking roof advert.Yields information about trams 37 and 34 in Lydiard St North during January 1969.Set of three Kodak colour slides, cardboard mounts.tramways, lydiard st nth, tram 37, tram 34 -
 Ballarat Tramway Museum
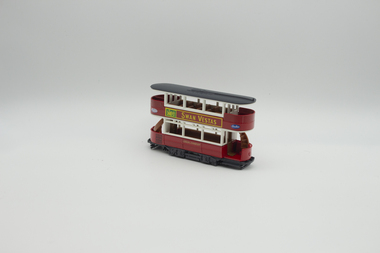
Model - Matchbox, Matchbox International Limited, "Y-15 Preston Tramcar", 1986
... Notes that over 3000 similar trams were provided to nearly 50 operators by Dick Kerr, later the United Electric Car Company of Preston. ...Notes that over 3000 similar trams were provided to nearly 50 operators by Dick Kerr, later the United Electric Car Company of Preston. ...Model of typical UK double deck, four-wheel tram made by Matchbox models. Notes that over 3000 similar trams were provided to nearly 50 operators by Dick Kerr, later the United Electric Car Company of Preston. Painted in the colours and livery of London Transport. Demonstrates of a model of a Preston UK built double decker tram in London Transport colours. This type of tram was a very popular body in the UK.Model of Preston (UK) double deck tram type Y15 - diecast, painted in a card board box by Matchbox with details of the tram on the rear.models, tramcars, dick kerr, uk trams, london transport, matchbox models -
 Ballarat Tramway Museum
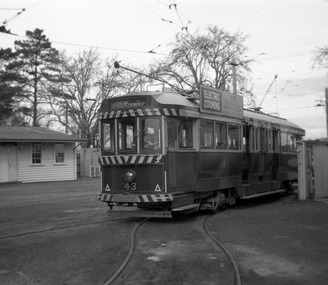
Photograph - Digital Image, Peter Knife, SEC 43 squeezing into Road 0 at Ballarat Depot, 14/8/1965
... Digital image of SEC 43 squeezing or turning into Road 0 at Ballarat Depot. Tram has an electric cooking roof advert. Photo by Peter Knife 14 Aug 1965. ...Ballarat Tramway Museum South Gardens Reserve Wendouree Parade Ballarat Ballarat goldfields Digital image of SEC 43 squeezing or turning into Road 0 at Ballarat Depot. Tram has an electric cooking roof advert. Photo by Peter Knife 14 Aug 1965. ...Digital image of SEC 43 squeezing or turning into Road 0 at Ballarat Depot. Tram has an electric cooking roof advert. Photo by Peter Knife 14 Aug 1965. This track "0 Road" was built to accommodate bogie cars in the mid-1950s, a set of very sharp reverse curves. Yields information about Ballarat's trams in August 1965.Digital image of a black and white negativetramways, tramcars, ballarat, tram 43, sec depot, 0 road -
 Ballarat Tramway Museum
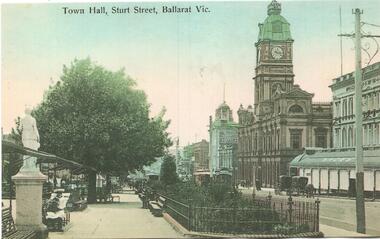
Postcard - copy, "Town Hall Sturt Street Ballarat Vic", c2000
... Yields information about the appearance of Sturt St following the introduction of electric trams in 1905 and has a strong association with the work of Sovereign Hill and Rose Stereograph Co. ...Postcard of Sturt St looking East from about Doveton St with Shoppee Square, Snows store and the Town Hall in the view. Card reproduced for Sovereign Hill Gold Mining Township by Rose Stereograph Co. of Glen Waverley c2000. Divided back type with caption, production and the Rose Co. symbol on the rear.Yields information about the appearance of Sturt St following the introduction of electric trams in 1905 and has a strong association with the work of Sovereign Hill and Rose Stereograph Co.Postcard reproduction - full colour - Rose Stereograph Co.trams, tramways, sturt st, ballarat, esco, rose postcards, town hall, shoppee's square, snows -
 Ballarat Tramway Museum
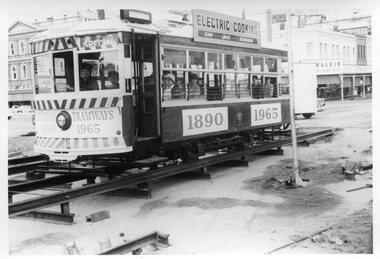
Photograph, Tramway Museum Society of Victoria (TMSV), Bendigo Birney 28 - bridgework, 1965
... Photo shows Bendigo 28 decorated for the 75th anniversary of Bendigo trams (1890 to 1965) crossing temporary track at Charing Cross during the reconstruction of the Bendigo Creek bridge during early 1965 - see Electric Traction Vol. 20, No. 6, June 1965. ...Ballarat Tramway Museum South Gardens Reserve Wendouree Parade Ballarat Ballarat goldfields Photo shows Bendigo 28 decorated for the 75th anniversary of Bendigo trams (1890 to 1965) crossing temporary track at Charing Cross during the reconstruction of the Bendigo Creek bridge during early 1965 - see Electric Traction Vol. 20, No. 6, June 1965. ...Photo shows Bendigo 28 decorated for the 75th anniversary of Bendigo trams (1890 to 1965) crossing temporary track at Charing Cross during the reconstruction of the Bendigo Creek bridge during early 1965 - see Electric Traction Vol. 20, No. 6, June 1965. The front cover has a photo by H R Clark of the decorated car. The photo shows the method of supporting the rails during the work prior to completion of concreting. Yields inforamation about bridge reconstruction in Bendigo and their 75th anniversary.Black and white photograph printTMSV Shop stamptrams, tramways, bendigo, birney, tram 28, bridgeworks, charing cross, 75th anniversary -
 Ballarat Tramway Museum
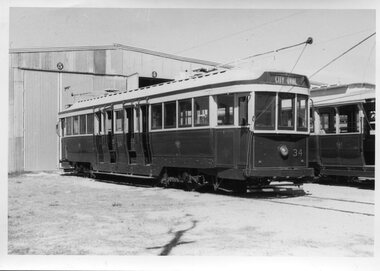
Photograph, Tramway Museum Society of Victoria (TMSV), Ballarat 34 at St Kilda Tramway Museum, 1972c
... Photo shows Ballarat 34 at the Australian Electric Traction Museum (AETM) at St Kilda Adelaide. Standing in front of the AETM's depot, showing the destination of City Oval. Behind the tram...Ballarat Tramway Museum South Gardens Reserve Wendouree Parade Ballarat Ballarat goldfields Photo shows Ballarat 34 at the Australian Electric Traction Museum (AETM) at St Kilda Adelaide. Standing in front of the AETM's depot, showing the destination of City Oval. Behind the tram ...Photo shows Ballarat 34 at the Australian Electric Traction Museum (AETM) at St Kilda Adelaide. Standing in front of the AETM's depot, showing the destination of City Oval. Behind the tram is Ballarat 21. Yields information about Ballarat 34 soon after its arrival in Adelaide and removal of the dash canopy lighting.Black and white photograph printTMSV Shop stamptrams, tramways, tram 34, aetm, st kilda tramway museum, adelaide -
 Ballarat Tramway Museum
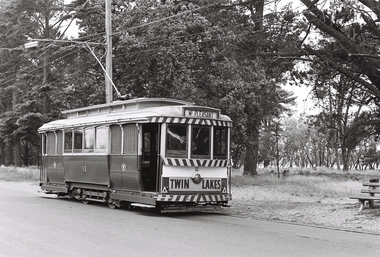
Photograph - Illustration, WTP, "Sturt Street, Ballarat", c1905
... tram has a destination sign hung from the driver's dash canopy. On the left is the Snows Department store and a pole with telegraph/telephone wires and insulators. The Thomas Moore Statue is adjacent to the tramcar. The median plantation was known as Shoppees Square. See item 8419 for a postcard and 3795 for a copy photograph. Photo by WTP & Co. Yields information about Sturt St soon after the opening of the Ballarat Electric ...The photo shows an ESCo tram soon after commencement of trams in 1905, at the corner of Armstrong and Sturt Streets, Ballarat. The tram has a destination sign hung from the driver's dash canopy. On the left is the Snows Department store and a pole with telegraph/telephone wires and insulators. The Thomas Moore Statue is adjacent to the tramcar. The median plantation was known as Shoppees Square. See item 8419 for a postcard and 3795 for a copy photograph. Photo by WTP & Co.Yields information about Sturt St soon after the opening of the Ballarat Electric tramwayPrinted photograph on a sheet of plain paper.tramways, trams, sturt st, esco, armstrong st, wtp -
 Ballarat Tramway Museum
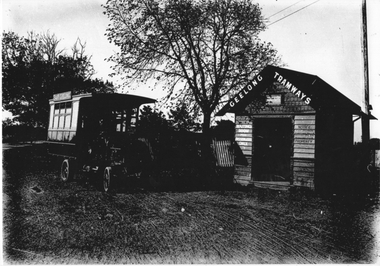
Photograph - Geelong MESCo Bus East Geelong, c1920
... Electric Supply Co. (MESCo), bus at the East Geelong terminus. MESCo operated the Geelong tram system from 1912 and opened the tram line to this location "East Geelong" in 1923. ...Electric Supply Co. (MESCo), bus at the East Geelong terminus. MESCo operated the Geelong tram system from 1912 and opened the tram line to this location "East Geelong" in 1923. ...The photo shows the Melbourne Electric Supply Co. (MESCo), bus at the East Geelong terminus. MESCo operated the Geelong tram system from 1912 and opened the tram line to this location "East Geelong" in 1923. The terminus was at the Geelong Cemetery, with a wooden waiting room shelter with signage about the building being used for passengers only and prohibiting the posting of bills. The buses ran from the railway station and Moorabool St wharf from 1912 until they were replaced by trams in 1923. The bus is also seen in item 4315. Yields information about the operation of a bus by MESCo in Geelong.Black and white photograph - plain back.geelong, tramways, mesco, buses, east geelong, shelters -
 Ballarat Tramway Museum
Postcard - Sturt Street looking east, Rose Stereograph Co, c1907
... Yields information about the appearance of Sturt St following the introduction of electric trams in 1905 and has a strong association with the work of Rose Stereograph Co. tramways trams Sturt St postcards Dawson St ESCo See image 2 for details of the handwritten note on the rear. ...The photo postcard is a black and white version of a Rose Stereographic Co postcard - see item 7379, of Sturt St looking East from about Dawson St with the shops on the southern side and the Town Hall in the view. Has an ESCo tram in the bottom right-hand corner. Yields information about the appearance of Sturt St following the introduction of electric trams in 1905 and has a strong association with the work of Rose Stereograph Co.Postcard with a handwritten letter on rear. Dated 4/4/07See image 2 for details of the handwritten note on the rear. tramways, trams, sturt st, postcards, dawson st, esco -
 Ballarat Tramway Museum
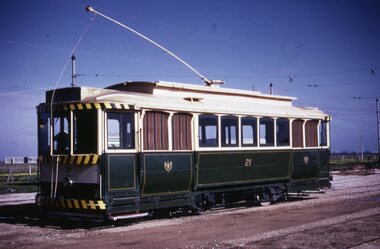
Slide, EX SEC tram 21 - Adelaide Tramway Museum, c1972
... Colour duplicate slide of EX SEC Ballarat tram 21 - Adelaide Tramway Museum, operated by the Australian Electric Traction Museum at St Kilda Adelaide in the SEC livery. ...Ballarat Tramway Museum South Gardens Reserve Wendouree Parade Ballarat Ballarat goldfields Colour duplicate slide of EX SEC Ballarat tram 21 - Adelaide Tramway Museum, operated by the Australian Electric Traction Museum at St Kilda Adelaide in the SEC livery. ...Colour duplicate slide of EX SEC Ballarat tram 21 - Adelaide Tramway Museum, operated by the Australian Electric Traction Museum at St Kilda Adelaide in the SEC livery. Photo taken at the AETM Depot. Slide by the Tramway Museum Society of Victoria, probably 1972. Yields information about Ballarat tram 21 which was donated to the AETM following closure of the SEC system.Colour Kodak duplicate slide - white cardboard mountaetm, tram 21, tramcars, tramway museums -
 Ballarat Tramway Museum
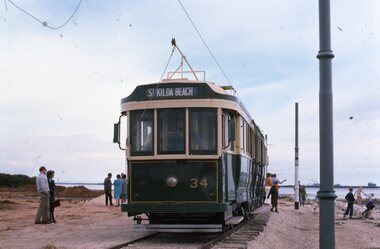
Slide, EX SEC tram 34 - Adelaide Tramway Museum, c1972
... Colour duplicate slide of EX SEC Ballarat tram 34 - Adelaide Tramway Museum, operated by the Australian Electric Traction Museum at St Kilda Adelaide. ...Ballarat Tramway Museum South Gardens Reserve Wendouree Parade Ballarat Ballarat goldfields Colour duplicate slide of EX SEC Ballarat tram 34 - Adelaide Tramway Museum, operated by the Australian Electric Traction Museum at St Kilda Adelaide. ...Colour duplicate slide of EX SEC Ballarat tram 34 - Adelaide Tramway Museum, operated by the Australian Electric Traction Museum at St Kilda Adelaide. Tram is in the SEC livery with the dash canopy lighting and tiger stripe panels removed. Photo taken at the the then St Kilda Beach terminus. Slide by the Tramway Museum Society of Victoria, probably 1972. Yields information about Ballarat tram 34 which was donated to the AETM following closure of the SEC system.Colour Kodak duplicate slide - white cardboard mountaetm, tramcars, tramway museums, tram 34, st kilda beach -
 Ballarat Tramway Museum
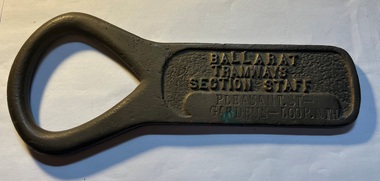
Functional object - Section Staff, Electric Supply Co. of Vic (ESCo), "Pleasant St Gardens - Loop Nth"
... electric signals. Yields Information about the operation of Ballarat's trams and safeworking procedures. tramcars tramways staff safeworking tramway staffs sec esco Cast brass item with a flat part recessed section with the words "BALLARAT TRAMWAYS SECTION STAFF" cast into the surface and a flat section underneath, flush with the outside edges in which the words "PLEASANT ST - GARDENS LOOP NTH. " stamped in. ...Used as a means of authorising a tramcar to have sole use of the track between the named points to avoid head-on collisions. Safeworking object - known as a section staff. Not known when made, but in use, until the introduction of the electric signalling in the mid 1930's by the SEC. See also Reg Items 934 and 988 for details of use and other examples are at 1851, 52 and 53, 2473 and 4444 to 4448 , 4996 and 4497 and Reg item 934 and 988 for articles on the safeworking systems.Demonstrates aspects of Safeworking on the Ballarat Tramway system used to c1936 when replaced by electric signals. Yields Information about the operation of Ballarat's trams and safeworking procedures.Cast brass item with a flat part recessed section with the words "BALLARAT TRAMWAYS SECTION STAFF" cast into the surface and a flat section underneath, flush with the outside edges in which the words "PLEASANT ST - GARDENS LOOP NTH. " stamped in. Has an open rounded end which forms a handle or a point where it could be hung on a peg.tramcars, tramways, staff, safeworking, tramway staffs, sec, esco -
 Ballarat Tramway Museum
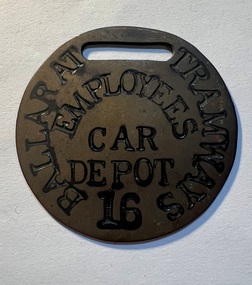
Badge - ESCo employee pass, Electric Supply Co. of Vic (ESCo)
... trams. tramcars tramways esco depot employees pass badges Handmade metal badge from brass sheet about 54 in diameter with a slot (long oval shape) about 23 long x 5 deep through which a leather strap could be fitted through. Stamped in capital letters on the badge are "BALLARAT TRAMWAYS" on the outside, "EMPLOYEES CAR DEPOT", in the centre of the badge, with the word "Employees" in a semi-circle. Near the bottom of the badge is the number "16". The letters have been filled with black paint. Badge ESCo employee pass Electric ...Used by ESCo to enable identification of depot employees when travelling on their trams. Date made and when used unknown. See also 1798 for another example.Demonstrates a employee's free pass for travelling on Ballarat's trams.Handmade metal badge from brass sheet about 54 in diameter with a slot (long oval shape) about 23 long x 5 deep through which a leather strap could be fitted through. Stamped in capital letters on the badge are "BALLARAT TRAMWAYS" on the outside, "EMPLOYEES CAR DEPOT", in the centre of the badge, with the word "Employees" in a semi-circle. Near the bottom of the badge is the number "16". The letters have been filled with black paint.tramcars, tramways, esco, depot, employees pass, badges -
 Ballarat Tramway Museum
Postcard - ESCo, Electric Supply Co. of Vic (ESCo), "Souvenir tram ticket - Railway Picnic", c1905
... Printed postcard/ticket for the 16/9/1905 Railway Picnic by the Electric Supply Co of Victoria promoting Bendigo Tramways. Has three views of ESCo's depot and power station and one of a tram. ...Ballarat Tramway Museum South Gardens Reserve Wendouree Parade Ballarat Ballarat goldfields Printed postcard/ticket for the 16/9/1905 Railway Picnic by the Electric Supply Co of Victoria promoting Bendigo Tramways. Has three views of ESCo's depot and power station and one of a tram. ...Printed postcard/ticket for the 16/9/1905 Railway Picnic by the Electric Supply Co of Victoria promoting Bendigo Tramways. Has three views of ESCo's depot and power station and one of a tram. Ticket priced at 6d. On the rear is an advertisement for Henderson & Goodisson's Beehive drapery, furniture, and Carpets. The letter has been sent to Mr Lewis Morgan of Pitfield Plains Vic, noting the trams. In the top right-hand corner is "B Deakin Engineer and Manager", following an English practice of providing details of the Manager;s name.Demonstrates an ESCo printed ticket for a specific event of 1905.Postcard - ticket - divided back used number 6188Hand written message written on the rear - see image 2tramways, trams, bendigo, esco, ticket, railway picnic -
 Ballarat Tramway Museum
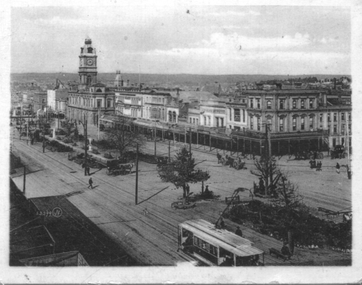
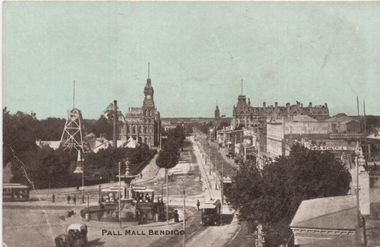
Postcard, E W Cole Book Arcade, "Pall Mall Bendigo", c1905
... Given the tram track colour, the photo was taken possibly soon after the opening the electric tramways in Bendigo in 1903. ...Given the tram track colour, the photo was taken possibly soon after the opening the electric tramways in Bendigo in 1903. ...Printed postcard with a coloured image looking from the City Family Hotel over Charring Crossing and looking along Pall Mall. There are four tramcars in the view. Given the tram track colour, the photo was taken possibly soon after the opening the electric tramways in Bendigo in 1903. In the view is a gold mine poppet head, the Town Hall and the various buildings along Pall Mall. Published by E W Cole Book Arcade, part of their 48 views Cole's Sunny Australia Series.Demonstrates a Bendigo postcard featuring Charing Cross and Pall Mall.Postcard colour - divided back - unusedtramways, trams, bendigo, alexandra fountain, charing cross, esco, pall mall -
 Ballarat Tramway Museum
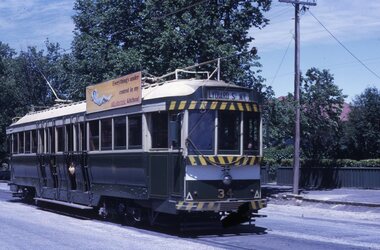
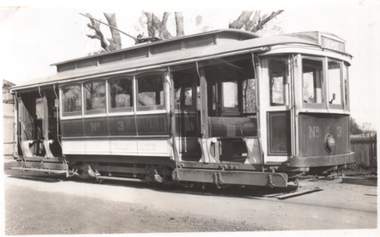
Photograph - ESCo Bendigo tram 3, 1930s
... Yields information about Bendigo tram 3 during the mid 1930s. tramways trams Bendigo tram 3 AETA tram 8 In ink on rear "No. 3 - Electric Supply Co of Victoria (Prior to 1934 when SEC acquired the undertaking), and Ken Magor stamp. ...Photograph of Bendigo Tram No 3 at the tram depot, with the destination of Depot. Tram in the ESCo Red and Cream colour scheme with the tram number on the side of the vehicle. The tram commenced life with the Hawthorn Tramway Trust as their No. 8. Became No. 114 when the MMTB took over, sold to the SEC in 1931 and became Bendigo No. 3. It was donated to the AETA in 1956 and subsequently rebuilt as HTT 8. The tram is on display at the Melbourne Tram Museum Hawthorn. See reference for further details. One of a series of 7 photos (items 9108 to 9114) possibly taken at the time of the SEC takeover in 1934 to illustrate the type of tram that was being used at Bendigo. Possibly an SEC report photo. Based on the book Destination Eaglehawk, most likely from the Basil Miller collection.Yields information about Bendigo tram 3 during the mid 1930s.Photograph, black and white with notes on rear.In ink on rear "No. 3 - Electric Supply Co of Victoria (Prior to 1934 when SEC acquired the undertaking), and Ken Magor stamp.tramways, trams, bendigo, tram 3, aeta, tram 8 -
 Ballarat Tramway Museum
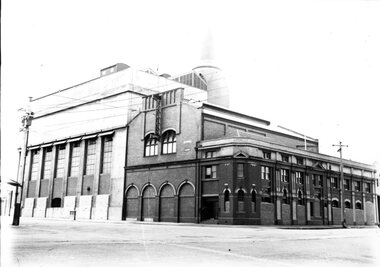
Photograph - Geelong power station, Melbourne Electric Supply Co. (MESCo), c1926
... trams entered the depot from the street not yet built. Date between 1924 and 1928 (based on photograph of Pengelly tramcar arriving and recently received, secondhand Melbourne tramcar). The ground floor offices facing Corio Tce. appear to be boarded up. Yields information about the Geelong Power station c1926 tramways Geelong MESCo power station Plate number 1-8 in ink on back of photo. Black and white print on paper. Photograph Geelong power station Melbourne Electric ...Photograph shows Geelong power station after completion. Power house building on the SW corner of Corio Tce. and Yarra Sts, Geelong, with new furnace room on the left, turret removed from the corner of the building, a third floor added on the Corio Tce. side but offices and concreted company name above where the trams entered the depot from the street not yet built. Date between 1924 and 1928 (based on photograph of Pengelly tramcar arriving and recently received, secondhand Melbourne tramcar). The ground floor offices facing Corio Tce. appear to be boarded up.Yields information about the Geelong Power station c1926Black and white print on paper.Plate number 1-8 in ink on back of photo.tramways, geelong, mesco, power station -
 Ballarat Tramway Museum
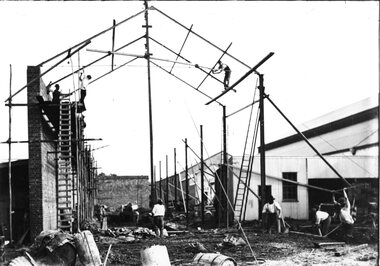
Photograph - Geelong tram depot construction, Melbourne Electric Supply Co. (MESCo), c1926
... Photograph Geelong tram depot construction Melbourne Electric Supply Co. (MESCo) ...Photograph shows Geelong tram depot under construction. (Later 1 road). Corio Tce. (Renamed Brougham St.), 1911Yields information about the Geelong Tram depot c1926Black and white print on paper.Plate number 2-1 in ink on back of photographtramways, geelong, mesco, power station -
 Ballarat Tramway Museum
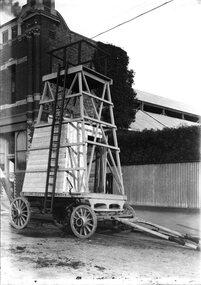
Photograph - Geelong Tramway Tower Trailer, Melbourne Electric Supply Co. (MESCo), c1926
... tram depot. Smoke from the power station chimney is in the top left of the photo. The trailer was used for tramway overhead, shown in action in photos 9272 and 9273. Early 1910s. Yields information about the Geelong MESCo tower trailer c1926 tramways Geelong MESCo power station Plate number 2-2 in ink on back of photograph Black and white print on paper. Photograph Geelong Tramway Tower Trailer Melbourne Electric ...The MESCo's tower trailer, photographed in Corio Tce. The building in the background is Blakiston's, immediately west of the tram depot. Smoke from the power station chimney is in the top left of the photo. The trailer was used for tramway overhead, shown in action in photos 9272 and 9273. Early 1910s.Yields information about the Geelong MESCo tower trailer c1926Black and white print on paper.Plate number 2-2 in ink on back of photographtramways, geelong, mesco, power station