Showing 1979 items matching "signal"
-
 The Beechworth Burke Museum
Photograph, 1944
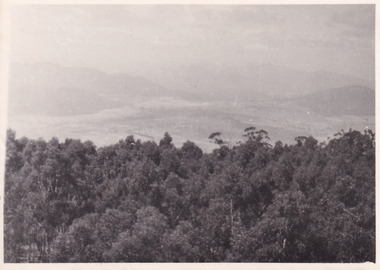
Taken in 1944, the photograph depicts the view from Mt. Stanley. A secret experimental micro-wave radio station was established and tested at this site by the Army Signal Detachment Unit during World War II. It was part of an experimental Ultra High Frequency (UHF) link between Melbourne and Sydney. At the time, it was highly classified. It intended to enquire into the hitherto unexplored transmission of micro-waves; that is, a radio signal which could only be transmitted by line of sight, and thus required hill-top to hill-top location.The photograph is historically significant as it pertains to World War II; the largest global conflict in history. This significance is enhanced by Australia's prominent involvement in campaigns across the Pacific, particularly on land in New Guinea and across the Huon Peninsula. It was also the first time that the Australian mainland came under direct attack by the Axis, with Japanese forces targeting north-west Australia and Sydney Harbour. These battles became Australia's largest and most complex offensives during the war. The record is also historically significant as it relates to the Royal Australian Corps of Signals, or "RA Sigs". This significance is strengthened by Australia's unique distinction of having the first established signal unit under the British Empire. This unit provides electronic warfare. They enable commanders to implement highly dynamic battle control against opposing forces by using a number of methods including radio, fibre optic, micro-wave, information systems and satellite links. The record has strong research potential. This is due to the ongoing scholarly and public interest in war, military history, the ANZAC legend, and the continuing existence of the RA Sigs. The historic context of this record can provide insight into Australia's history, military, technological innovation and advancements, as well as national economic, defence and foreign policies after 1945.Black and white rectangular photograph printed on matte photographic paper.Reverse: BMM5095.4 / 32 /military album, army album, wwii, world war ii, mt stanley, beechworth, victoria, melbourne, sydney, royal australian corps of signals, army signal detachment unit, military, war -
 Bendigo Military Museum
Literary work - BOOK, Jan Andrews, The WW1 Service of William F.P. Andrews
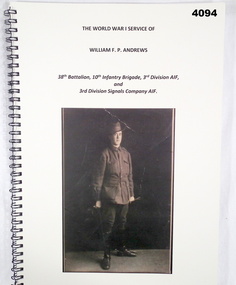
The World War 1 service of William.F.P.Andrews 38th Batt, 3rd Div AIF and 3rd Div Signals Company AIF. He enlisted on 27.3.1916, No 57, age 19 years 6 months in the 38th Batt HQ, embark for England 20.6.1916, embark for France 22.11.1916, hospital 16.12.1916 with Bronchitis, rejoin unit 23.12.1916, transfer to 3rd Div Signals 25.4.1917, hospital 11.1.1918 with Influenza, rejoin unit 23.1.1918, hospital 20.5.1918 with Impetigo/Dermatitis, rejoin unit 12.7.1918, discharged from the AIF 12.12.1919.Book, spiral bound with black metal, cover cardboard black print and illustrated in sepia tone of a soldier in uniform, rear cover has a postcard photo, 101 pages, plain white paper, illustrated B & W and colour, diagrams, maps and photo of medals.books, 38th batt aif, world war 1 service -
 Melbourne Tram Museum
Document - Notice cable trams, Melbourne & Metropolitan Tramways Board (MMTB), "Traffic Signalling", 1921
Notices to cable tram employees and signalmen about the operation of the intersection of Collins and Swanston Street c1921. Details how Police would signal for the number of trams to cross in either direction and how the signalman would operate the signals and the cable depression lever for Collins St cable cars. The Rules for signalmen dated 1/7/1921 and signed by J G Roberts, Manager Cable system for the MMTB. This intersection was one of the busiest in Melbourne running four separate routes in Collins St and the busy St Kilda Road route.Yields information about the cable tram operation of Swanston and Collins St and signalmen.Two foolscap photocopied sheets, stapled in top left hand corner.tramways, cable trams, swanston st, collins st, signalmen, police -
 Melbourne Tram Museum
Ephemera - Greetings card - Swanston St at Collins St - cable trams, Jack Cranston, c1905
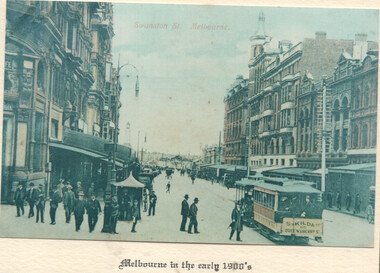
Greetings card with a photo of Swanston St looking south from Collins St. On the left side of the photo is a cable tram signal shelter with a signal man at the levers. A St Kilda tram is southbound. Image prior to the construction of Flinders St station building. The Water Tower clock is visible at Princes Bridge Station - see reference. It was moved from Elizabeth St to Princes Bridge in 1902. The card was produced Jack Cranston and published for Glencon Insurance Assessors. See item 8448 for images of the card itself.Yields information about cable trams in Swanston St and a cable tram signalmen c1905.Greetings card with a colour photograph, printed on stippled paper.tramcars, tramways, cable trams, mtoco, swanston st, signalmen -
 Bendigo Military Museum
Award - TROPHY, SIGNALLING, c.1926
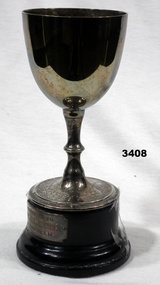
Metal trophy cup on dark wooden base. Inscription on the cup & small metal plaque attached to the base.On cup: "WON BY 38TH BATT TEAM, SIGNALING, SEYMOUR 1926, CAPT W L TRESSIDDER, SGT R BEATTIE, PTE D STILLWELL, B SILKE, R CLARKE" On base: "PRESENTED TO CAPT W L TRESSIDDER BY THE TEAM"trophy, award, signalling 38th -
 Ringwood and District Historical Society
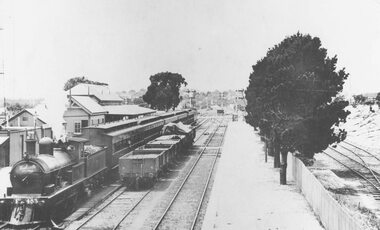
Photograph, Ringwood railway station looking east circa 1920's
Undated photograph of Ringwood railway station precinct, however some indication of date has been determined by a railway enthusiast- see inscriptionNo inscription but accompanying typed information reads, "From a postcard..... It doesn't show the footbridge and so it was taken before 13/12/1920. And the signal with the six arms on it is seen in the background and therefore it must have been taken after October, 1912". -
 Moorabbin Air Museum
Manual (Item) - Westland Wirlwind - Pilot'S Notes
Description: 300 pages. Published by Honeywell International. Published 31/7/2000. Engine Manual for Allied Signal Engines 286.1 (72-03, 72-04) Level of Importance: World. -
 Melbourne Tram Museum
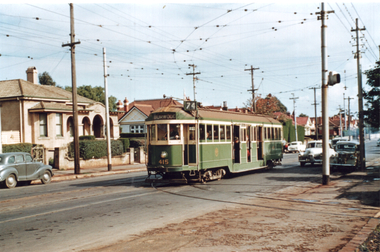
Photograph - Tram 415 - Riversdale Road, Travis Jeffrey, mid 1950s
Colour print showing W2 class tram No. 414 (Burwood Route 74), at the junction in Riversdale Road for Camberwell Depot. Note the signal light on the pole on the right hand side of the photograph.Yields information about tram 415 and the junction with the Camberwell Depot tracks.Colour print on Fujichrome paper.trams, tramways, tram 415, riversdale road, cambewell depot -
Frankston RSL Sub Branch
Document, Certificate of Discharge
Certificate of Discharge issued to Noel Louis Blundell by the 9th Australian Division Signals, Australian Military Forces. Dated 27th November, 1943. Certificate number 11495. N L Blundell served as a GP1 Wireless Mechanic, he enlisted on the 18th June, 1940 and was on Active Service in Australia for 309 days and Overseas for 689 days. -
 Montmorency–Eltham RSL Sub Branch
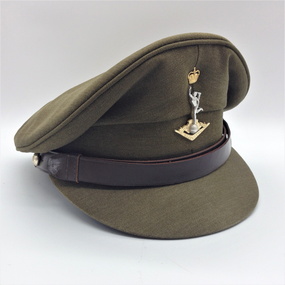
Cap, Peaked, Royal Australian Signals, 1988, 1988
Standard issue peaked cap for 1988.Peaked khaki cloth cap with brown 18mm leather chin strap with two 13mm AMF gilt buttons (crown and map only). Khaki cloth covered peak. Royal Aust. Signals cap badge. Brown leather sweat band. Plastic covered, grey cloth liner with black stamped manufacturer's, etc. details. Australian Government Clothing Factory and logo Size /|\ 56 VIC 1988 (Note - no personal markings) headgear, cap -
 Bendigo Historical Society Inc.
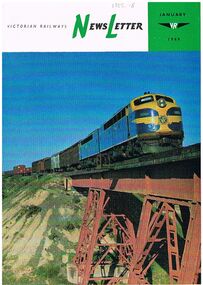
Magazine - BADHAM COLLECTION: VICTORIAN RAILWAYS NEWSLETTER JANUARY 1969
Victorian Railways Newsletter January 1969. Newsletter printed in glossy paper with colour photos on front. The contents include photos of Melbourne's West Tower signal box also a related article, Powelltown in 1919, horse train on Sanderson's line at turn of the century. Printed at the Victorian railways printing works Laurens St North Melbourne.magazine, government, victorian railways -
 Ballarat Tramway Museum
Photograph - Digital image, c1971
Yields information about Ballarat streetscape and its trams in the closing days of the SEC tramway system.Digital image from a black and white print of tram 11 outbound in Lydiard St North, crossing the railway level crossing. Has the Reid's Palace building and the railway station and signal gantry in the background. The tram has a "Bliss Bombs" (Make Bliss not Love) roof advertisement and a Twin Lakes sign. Photo by Marc Dahlstrom c1971. On rear is the Marc Dahlstrom stamp.trams, tramways, lydiard st, railway station, level crossings, tram 11 -
 Lakes Entrance Historical Society
Photograph - Western Harbour, Bulmer H D, 1940c
Black and white photograph of the western harbour. It shows a variety of vessels, including auxilliary yachts and motor launches. In the background, part of the New Works area on the south shore includes Signal Flagstaff, Harbour Engineers House and Pilots House. In foreground part of rock groyne built originally to control sand buildup. Lakes Entrance VictoriaThe Boat Haventownship, waterfront, boats and boating -
 Melbourne Tram Museum
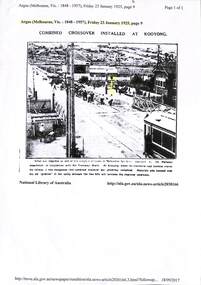
Newspaper, The Argus, "Combined Crossover installed at Kooyong", 23/01/1925 12:00:00 AM
Photocopy of an article from The Argus, 23/1/1925, page 9 extracted through Trove, titled "Combined Crossover installed at Kooyong" with a photograph of the level crossing, replacement of track leading up to the Tramway or Railway Square. The disc signal for trams has been highlighted in yellow. Item made by Robert Green 18/9/2017trams, tramways, victorian railways, glenferrie road, level crossings, tramway square, trackwork -
 Melbourne Tram Museum
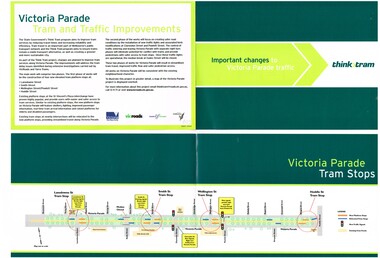
Pamphlet, VicRoads, "Important changes to Victoria Parade Traffic", c2010
Pamphlet - bifold - printed on gloss paper, full colour, titled "Important changes to Victoria Parade Traffic", details changes to tram stops and traffic signals in Victoria Parade as part of the Think Tram project. Item not dated - c2010. Has VicRoads, City of Melbourne, Yarra Trams and State Govt logos. Two copies held.trams, tramways, yarra trams, victoria parade, superstops, tram stops -
 Bendigo Historical Society Inc.
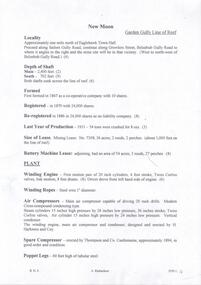
Document - NEW MOON MINE - NOTES ON THE NEW MOON MINE
Four typed copies of notes on the New Moon Mine on the Garden Gully Line of Reef. Notes include locality, depth of shaft, last year of production, size of lease, plant, Telephone and electric signalling, early history, gold obtained, prominence, gold production and dividends. Hand drawn locality map included. Albert Richardson Collection.cottage, miners, new moon mine, notes on the new moon mine, h harkness & coy, thompson & co, telephone & electric signalling, 'robin hood' ground, bendigo amalgamated goldfields co, special edition australian mining standard 1/6/1899, mines dept booklet 'bendigo goldfields' 1936, mines dept annual and quarterly reports, annals of bendigo mining section 1907 = 1931, a richardson, souvenir 'declaration of 200th dividend' issued by directors of new moon co 1/12/1906, mines dept bulletin 47 'structure of bendigo goldfields' h herman 1923 -
 Bendigo Historical Society Inc.
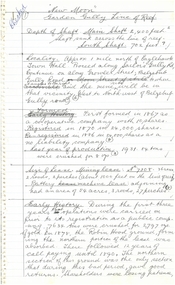
Document - NEW MOON MINE - NOTES ON THE NEW MOON MINE
Handwritten notes on the New Moon Mine on the Garden Gully Line of Reef. Notes include depth of Shaft, locality, Formation & Registration, Last year of production 1931, Size of lease, Early History, Plant, Poppet Legs, Telephone & Electric Signalling, Gold Obtained, Prominence, Total Gold Production and Dividends. ( duplicate of record 3559.1)document, gold, new moon mine, notes on the new moon mine, garden gully line of reef, prospector's vote, h harkness & coy, thompson & co of castlemaine, bendigo amalgamated goldfields coy, mines dept special edition australian mining standard 1/6/1899, mines dept annual and quarterly reports, a richardson -
 Orbost & District Historical Society
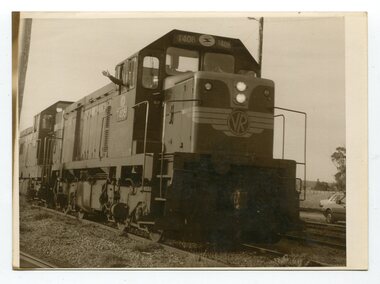
black and white photographs, August 21 1987
These photographs are of the final train to leave Orbost railway Station on August 21 1987 signalling the closure of the line. 3105.12 shows Locomotive T408 and on the side is written "LAST TRAIN EX ORBOST 24.8.87". These photographs are associated with the history of the Orbost-Bairnsdale railway line and therefore reflects the role that the rail line played in the social and economic history of Orbost. The closure of the line was a significant event in Orbost's history.Fifteen black / white photographs of the last train to leave Orbost Railway station.3105.1 - on back - "Last Train leaving Orbost Railway Station on Friday August 21. 1987. SRM August 26 1987 Last train from Orbost, Friday last saw the end of an era when the last freight train to pull out of Orbost Station at about 4.co pm. A symbolic wave from engineer, Bill Buckley, was the only ceremony to mark the passing of rail transport for East Gippsland." 3105.2 - on back - " Last train prepares to leave from Orbost on August 21, 1987." 3105.3 - on back - " The Orbost railhead following the departure of the last train on Friday August 21, 1987. Shows spectators who farewelled the last train." 3105.4 - on back - "From Grandview, Newmerella, shows the last train from Orbost crossing the timber Trestle (sic) viaduct across the Snowy River flats on Friday August 21, 1987" 3105.5 - on back - " A pair of Series 3 "T" Class Diesel Electric locomotives which were used to haul the final train from the Orbost Rail Head on Friday, August 21, 1987. Goods shed on right" 3105.6 - on back - " VFTY Timber Wagons at the Orbost Railway Station. 30 of these large wagons were built for the timber traffic between Orbost and Melbourne. Part of last train to leave Orbost on August 1, 1987." 3105.7 - on back - "The Fordson powered Rail Tractor which was used during shunting at the Orbost railway station, hooked up behind the second locomotive for its final journal from Orbost on Friday August 21, 1987." 3105.8 - on back - "Two Series 3 "T" Class Locomotives (Diesel Electric) were used to haul the final train from Orbost - T408 and T347, T408 was the leading locomotive. Orbost Goods Shed is on the left. Last train left on Friday August 27, 1987." 3105.9 - on back - " 3 "T" Class Diesel Electric locomotives often used in pairs to haul the timber trains out of Orbost. This locomotive was used to lead (haul) the final train from Orbost on Friday August 21, 1987" 3105.10 - on back - "The Gantry at the Orbost Railway Yards - capacity 10 tons. The last wagons before being hooked up to the locos for their last trip out of Orbost on Friday August 21, 1987" 3105.11 - on back - " Station Masters Office and Goods Shed at Orbost Railway Station. The two Series 3 "T" Class Diesel Electric locomotives waiting to haul the final train from Orbost on Friday 21 1987" otrbost-bairnsdale-railway east-gippsland-railway orbosr-railway-closure -
 Bendigo Military Museum
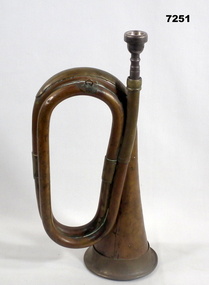
Instrument - BUGLE
The Australian Army bugle is a brass musical instrument used primarily for Military Purposes including signaling, commands, ceremonies and other official functions. They are no longer used in battle but still used as part of tradition.Brown/gold coloured bugle. Small hook at top so as to be able to attach it. Mouthpiece comes loose and inserted into the air pipe. Bugle is in the form of a mouthpiece inserted into a simple hollow tube of metal that circles twice before coming out to form into a widening tunnel.Mouthpiece has "Vincent Back Corp - 2 3/4c" engraved.brass bugle, musical instrument -
 Ballarat Tramway Museum
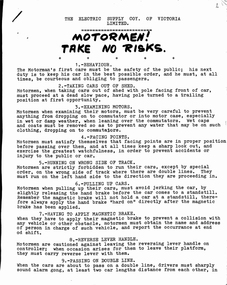
Document - Instruction, B. Prentice, Motormen! Take No Risks", Jun. 1947
Yields information about the instructions issued to Motormen in Ballarat by the Electric Supply Co. for driving and operating tramcars.Instruction - 6 quarto sheets stapled in top left hand corner - retyped from an original Electric Supply Co. of Victoria (ESCo) document with a black hand written heading Motormen! Take No Risks", detailing motormen's behaviours, operations, braking, tram car lights, steps, ticketing, recruit motormen, shunting, speed, trolley wheels, changing cars, trailers, controllers, testing magnetic brakes, switches, timetables, fares, tram stops, section staffs, holidays, uniforms, breakdowns, smoking, lost property, headways, gong signals, conductors, whistle signals, instructions to recruit motormen. 7th page - details motors and how to get your car ready for service and how to apply power. (see btm8096i1.pdf) page 8 missing. trams, tramways, esco, training, instructions, motormen, operations -
 The Beechworth Burke Museum
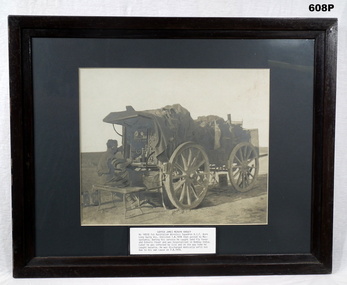
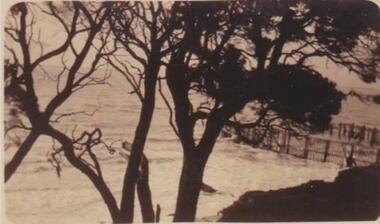
Photograph, 1944
Taken in 1944, the photograph depicts an Australian Army vehicle with a trailer driving through bushland in Victoria. A secret experimental micro-wave radio station was established and tested in Stanley, Victoria by the Army Signal Detachment Unit during World War II. It was part of an experimental Ultra High Frequency (UHF) link between Melbourne and Sydney. At the time, it was highly classified. It intended to enquire into the hitherto unexplored transmission of micro-waves; that is, a radio signal which could only be transmitted by line of sight, and thus required hill-top to hill-top location.The photograph is historically significant as it pertains to World War II; the largest global conflict in history. This significance is enhanced by Australia's prominent involvement in campaigns across the Pacific, particularly on land in New Guinea and across the Huon Peninsula. It was also the first time that the Australian mainland came under direct attack by the Axis, with Japanese forces targeting north-west Australia and Sydney Harbour. These battles became Australia's largest and most complex offensives during the war. The record is also historically significant as it relates to the Royal Australian Corps of Signals, or "RA Sigs". This significance is strengthened by Australia's unique distinction of having the first established signal unit under the British Empire. This unit provides electronic warfare. They enable commanders to implement highly dynamic battle control against opposing forces by using a number of methods including radio, fibre optic, micro-wave, information systems and satellite links.Black and white rectangular photograph printed on matte photographic paper.Reverse: BMM5095.9 / Our outfit (fully mobile) / on the move / 32 /military album, army album, wwii, world war ii, army signal detachment unit, royal australian corps of signals, ra sigs, australian army, army truck, beechworth, stanley, victoria, melbourne, sydney -
 Bendigo Military Museum
Photograph - PHOTOGRAPH, FRAMED, C. 1917 - 18
JAMES MERVYN HARVEY (telegraphist by trade) No 14510 enlisted in the AIF on 1.16.1916 in Australian Wireless Sqd reinforcement 3 aged 21 years 8 months. Embarked for Basra (Iraq) via Bombay 25.7.1916. It appears he was invalided to India on 12.11.1916, does not state why. He joined the Wireless Signal Service Depot in Rawalpindi India on 2.12.1917. Embarked from Bombay to Basra 27.2.1918 as part of 1st Aust & NZ Wireless Signal Sqd and joined the unit near Baghdad on 6.4.1918. Discharged from the AIF on 7.8.1919 as medically unfit.Framed, black & white photo of SAPPER JAMES MERVYN HARVEY No 14510 1st Australian Wireless Squadron AIF. He is operating a morse key mounted on the rear of a specially equipped GS wagon that is unhitched from its horses. The hatless soldier is seated on a folding bench seat & is wearing headphones. Numerous articles of personal kit are draped over the wagon. Bottom centre: Is a bio of SAPPER JAMES MERVYN HARVEY No 14510 1st Australian Wireless Squadron AIF.wireless sqd aif, ww1 -
 Puffing Billy Railway
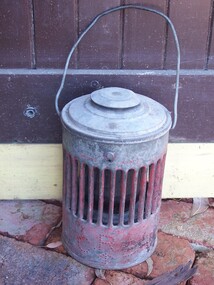
Warning Lamp, Appletons Patent Railway, circa 1900
Appletons Patent Railway Warning Lamp with Sherwood Style burner Used by Gangers during track work at night Appletons was an early pioneer of railway lamp signal lamp Alfred Edward Appleton invented and patented the Spinner Railway signal lamp in England in 1897. Appleton lamps were patented and manufactured by Alfred Edward Appleton at a factory in Sherwood during the early 1920's to late 50's and widely used throughout Queensland Railways. Alfred Edward Appleton's father was a railway pointsman and porter on the Great Western Railway in Tewkesbury England Historic - Early Hand signalling Lantern Appletons Patent Railway Warning Lamp made of tin & metal and glassAppletons Patentpuffing billy, appleton warning lamp, lamp -
 Phillip Island and District Historical Society Inc.
Photograph, Cowes Sea Baths, Phillip Island
The Sea Baths at Cowes were built about 1893. They were erected by the Shire Council and administered by that body. Mixed bathing was not allowed. A Red flag at certain hours gave the "all clear" signal for ladies.Looking down on Sea Baths through foreshore treelocal history, photographs, sea baths, cowes, sepia photograph, mary karney -
 National Vietnam Veterans Museum (NVVM)
Memorabilia - Poodle radio
The poodle was purchased at the PX store in Vietnam by a soldier returning home as a present for his girlfriend (later to become his wife). Andrew Clyne, Service no: 3799091, served in 110 Signal Squadron, Vietnam, in 1971.Two-toned blue synthetic toy poodle with a gold collar and chain around its neck. It has two brown glass eyes, a black plastic nose and red felt tongue. A metal zipper under belly conceals the mechanism of a transistor radio.Transister Japan/ Novelty/ Vol/ Tuner/ Made in Japan on tag attached to hind leg. Red NOVELTY printed on control. toy poodle, japan, transistor radio, clyne, 110 signals, andrew clyne -
 Flagstaff Hill Maritime Museum and Village
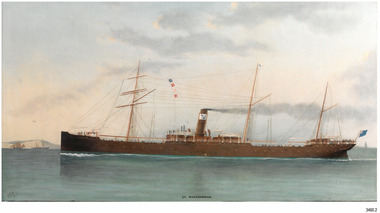
Photograph - Vessel, Sail and Steam Ship, S.S. Warrnambool
This photograph and a matching earlier photograph are the images of a painting of the British steamship SS Warrnambool at Dover Strait in the English Channel. The photographs were donated by the painting’s owner, who acquired the 30” x 56” (76 x 142.5 cm) oil on canvas painting in 1998. Both photographs were accompanied by a letter, one written in 2001, and the other in 2003. The letters confirm that the artist of the painting was Charles Keith Miller, signed with the initials “CKM” and dated “1893”. The painting shown in the photographs was a gift to the Town Council of Warrnambool, presented to Warrnambool folks in Melbourne on December 1, 1892, by the Captain of William Lund’s ship SS Warrnambool. The painting was given by Lund in appreciation of the Ladies of Warrnambool who had presented the ship with a ‘house’ flag bearing the Blue Anchor Line’s symbol of a diagonal blue anchor on a white background; the ladies had made the decision to present the flag only a month earlier. A few days later, December 6th, the SS Warrnambool was on its homeward journey to Britain, sailing via Adelaide. It anchored for a short time off the Port of Warrnambool. A boat was launched from Lady Bay to take a group of friends to the ship with a delivery of gifts. After cheers were roused for both the ship and the Captain, the ship continued on its way. The photograph shows the gifted white flag with a diagonal blue anchor flying from the masthead. The same symbol is painted on the ship’s black funnel. The signal flags on the foremast display ‘M’ ‘R’ ‘V’ ‘B’. These letters are most likely the ship’s call number ‘MRVB’. Although the painting was given as a gift in December 1892, it is post-dated “1893”. Perhaps the painting was given earlier than anticipated; or the date added later, but whatever the reason, the provenance of the painting was confirmed at auctions of this painting and other works by the same artist. CHARLES KEITH MILLER 1836-1907:- Captain Charles Miller left his home in Scotland at the age of 15 years for a life at sea. He earned his Master’s Certificate ten years later. After being the captain of sailing ships he moved over to the steamships because they were faster. In 1866 he married and settled in Glasgow. Over the following eleven years he and his wife had five children, then sadly his wife passed away. Captain Miller returned to the sea for a while but in 1888 he gave up his sea life to spend his time as a marine artist. His understanding of seafaring life and vessels, combined with his artistic skills, gave him the ability to produce fine art and several galleries and museums have collections of his sought-after works. S.S. WARRNAMBOOL 1892-1925:- The steamship SS Warrnambool was built in 1892 by the Sunderland Ship Building Company for the Lund Line of London, founded by William Lund in 1869. It efficiently carried both passengers and cargo across the world to Australia, under the command of her master Captain Joshua Edward Iibery, who had many years of experience with the Blue Anchor Line. The company, referred to as the Blue Anchor Line or BAL, owned a fleet of both sail and steamships. The funnels of all of the steamships were painted black, with a white band around the top bearing a diagonal blue anchor and chain. The company’s house flag was also white with a diagonal blue anchor. The SS Warrnambool carried passengers and cargo in a ‘no frills’ service to and from Europe around the Cape of Good Hope, stopping at some ports in between. The ship was involved in bringing home returned solders in 1895. At one time it carried a doctor from Victoria, Australia, to assist at the war front in South Africa. The ship had a very good reputation for its cargo arriving ‘almost always in excellent condition.’ Exported goods from Australia included iron safes, flour, wool, apples, frozen rabbits, butter, cheese, pork, cattle, poultry and sheep. One remarkable delivery contained Ostriches for Queen Victoria and they survived the journey well. The SS Warrnambool was sold in 1900 to the British and South American Steam Navigation Co. Ltd of Liverpool and was renamed ‘Harmodius’. The company was managed by R.P. Houston & Company of London and its Houston Line funnels were red with a black top. The Harmodius was sold in 1919 to K.S.S. Co. Ltd, managed by Kaye Son & Co. Ltd. of Liverpool, and was renamed ‘Kut’. The line had black funnels with a white ‘K’ in a diamond or between white stripes. In 1926 it was purchased by T.W. Ward Ltd. and broken up. NOTE- other vessels named “Warrnambool” Two other vessels carried the name “Warrnambool” (1)- HMAS Warrnambool J202 (1941-1947), a Bathurst Class corvette vessel owned by the Royal Australian Navy, destroyed by a mine. The photograph is significant for its association with the painting "SS Warrnambool" by well-known early 20th century marine artist Charles Keith Miller, whose paintings are well valued. The painting and the photograph of it are namesakes of Warrnambool and are connected through the gifts exchanged between the ship company owner, the City of Warrnambool and the Ladies of Warrnambool; the House Flag and the painting by C K Miller. The image is a good likeness to original photographs of the late-19th to early-20th century steam and sale vessel. Coloured photograph of a painting, the steamship S.S. Warrnambool. The three-masted ship has lowered sails. It is in calm water, land on one side, and other vessels in the water. The ship has four raised signal flags, a house flag and a blue ensign. The funnel also bears the house flags symbol. Smoke emits from the funnel. Figures are visible onboard. There is a signature and a title on the lower edge of the photograph. (Artist of the painting in the photograph was Charles Keith Miller)House flag symbol, [diagonal blue anchor on white background] Text "CKM" and "1893" Text "S. S. WARRNAMBOOL."flagstaff hill, warrnambool, photograph, steam ship warrnambool, flagstaff hill maritime village, shipwreck coast, ss warrnambool, captain, charles keith miller, ckm, 1893, william lund, warrnambool town council, blue anchor line, lund line, ladies of warrnambool, house flag, diagonal blue anchor, captain miller, sunderland ship building company, migrant ship, 1892 ship, home flag, bal, australian export, s.s.warrnambool, dover strait, english chanel, port of warrnambool, lady bay, mrvb, captain charles miller, captain joshua edward iibery, ostriches, queen victoria, british and south american steam navigation co., harmodius, r.p. houston & company, houston line, k.s.s. co. ltd, kaye son & co. ltd, kut, t.w. ward ltd -
 Ringwood RSL Sub-Branch
Badges
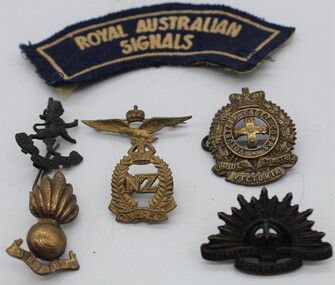
1. Cloth badge Royal Australian Signals Corp 2. Hat badge Victorian Volunteer Cadets c 1900 3. Collar badge Victorian Scottish Reg 4. Rising Sun lapel badge 5. New Zealand Forces lapel badge 6. Artillery lapel badge 7. Air Force sweetheart badge possibly Dutch -
 Ballarat Tramway Museum
Slide - 35mm slide/s, Keith Caldwell, 12/03/1962 12:00:00 AM
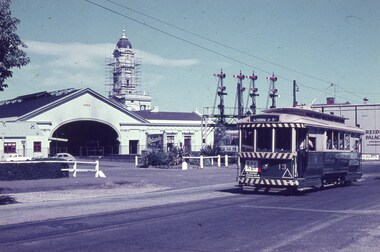
Yields information about the nature of tram services and trams in Lydiard St North and the Railway Station.Agfa colour slide, white cardboard mount, photo by Keith Caldwell on 12/3/1962 of: Tram 13 northbound in Lydiard St North, with the railway station and Reid's Coffee Palace in the background. The station clock tower has scaffolding around it. An Orlando wine advertisement is visible on the platform along with signal gantry. The Tram has an Age advertisement.In ink "Ballarat 12.3.62"tramways, trams, railway station, lydiard st north, tram 13 -
 Ballarat Tramway Museum
Slide - 35mm slide/s, Mark Plummer, Dec. 1968
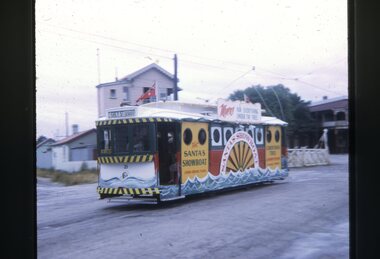
Photo of Ballarat tram No. 21, dressed as the Myers Santa Showboat tram, southbound in Lydiard St North during December 1968. Has the railway level crossing, Ballarat B signal box and the Victoria Guest house in the background. Tram has "Grey St." as the destination. Kodak cardboard mount slide, taken Mark Plummer, December 1968.tramways, trams, lydiard st north, railway crossing, myers santa tram, decorated trams, tram 21 -
 Ballarat Tramway Museum
Photograph - Colour Photograph/s, John Stormont, 3/03/1968 12:00:00 AM
Demonstrates an aspect of Ballarat where trams crossed the railway level crossing in Lydiard St Nth.Colour photograph of SEC No. 11 crossing the railway level crossing Ballarat southbound in Lydiard St Nth. Shows the railway station building, the signal gantry and crossing gates. No. 11 has destination of Sebastopol, a Twin Lakes advertisement on the rear and a roof advertisement for SEC Briquettes. Photo taken 3-3-1968. On Kodak Paper. Photo by John Stormont.On rear, written on a label in ink "Car 11crossing tracks at Ballarat Station, 3 March 1968" and on the photo "John Stormont"level crossings, railway station, lydiard st nth, tram 11