Showing 1483 items matching "terminus"
-
 Ballarat Tramway Museum
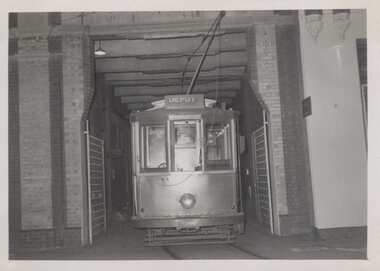
Photograph - Black & White Photograph/s - set of 4, Keith Kings, 8/01/1956 12:00:00 AM
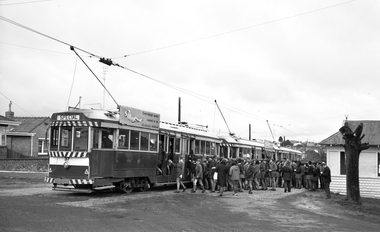
Black and White print contained within the Wal Jack Bendigo and Geelong Album, see Reg Item 5003 for more details. Set of four black and white photographs from Keith Kings of the staged closures of the Geelong tramways. Note some of these photographs are very similar to those of Geoff Grant - See Reg Item 476i8. Also see Reg item 4398 and 4399 for same images of Keith Kings collected by Bill Scott. .1 - No. 1 - last tram ex Chilwell back at Depot - Sun 8/1/56 - KSK Photo Q(x)(8). .2 - Scene for the last tram in Ryrie St, Sun 26/3/56, many people in photograph, with tram in background, has destination of Belmont. KSK Photo T(g)(7) .3 - ditto, for 31 and 38 as the third and second "last" trams, back at Ryrie St, Sun 26/3/56 - KSK Photo T(g)(6) .4 - Nos. 31 and 38 as the last trams at Belmont terminus, Sun 26/3/1956 - KSK Photo T(g)(4)On the rear in ink and with the Keith Kings Copyright stamp: .1 - "Geelong - 1 - last tram ex Chilwell back at Depot - Sun 8/1/56" - Q(x)(8) .2 - "Geelong - 4 - last tram back at Ryrie St, Sun 26/3/56" - T(g)(7) .3 - "Geelong - 31 & 38 - as third and second "last" trams, back at Ryrie St, Sun 26/3/56" - T(g)(6) .4 - "Geelong - 31 and 38 as last trams at Belmont terminus, Sun 26/3/1956" - T(g)(4)trams, tramways, geelong, closure, chilwell, ryrie st, belmont, last tram, tram 1, tram 4, tram 31, tram 38 -
 Ballarat Tramway Museum
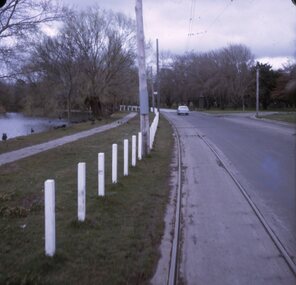
Slide - 27 mm sq slide/s - set of 9 - Victoria St and crews, Lilian Butler, Aug. 1971
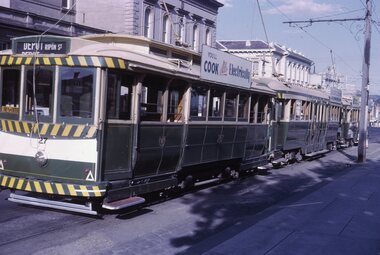
Yields information about the streetscapes of Ballarat on the Gardens to Victoria St route and in particular buildings and people that crewed the trams.Set of nine Colour 27 x 27 mm slide in a Kodachrome cardboard mount. .1 - R. Williams (Motorman) and Danny Powell (badge 30) standing in front of a tram at Victoria St. The tram has the destination of Gardens via Sturt St West. .2 - view of No. 113 Victoria St - now Ardenlee B&B. .3 - Sunshine Biscuit Factory .4 - Mack's Hotel .5 - Stones Corner - intersection of Victoria and Mt Pleasant routes .6 - Crossing Grenville St .7 - No. 30 at the City terminus, Lydiard St with Racey's and the SEC office in the background. .8 - as for .5, but looking east with the Caltex service station in the background. .9 - No. 30 at the Victoria St terminus. Slide mount date August 1971. Photo from the collection of Lilian Butler.ballarat, tramways, trams, victoria st, bridge st, stones corner, tram 30 -
 Ballarat Tramway Museum
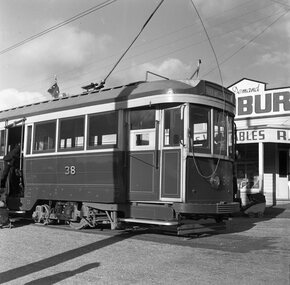
Photograph - B&W print of donated negative, John Webster, 11/4/1953
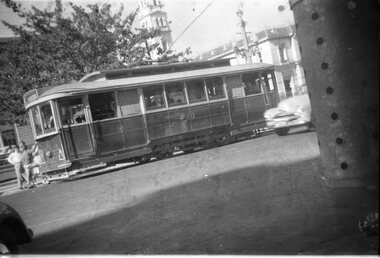
Yields information about Ballarat No. 38 in the early 1950's and demonstrates the loading of prams onto tramsBlack and white digital print from scan of a donated negative showing the rear end of No. 38 at the Mt Pleasant terminus. Has the Mt Pleasant Terminus Milk bar in the background with the Robur Tea sign, Barkly St. On the left hand edge of the photo has a crewman leaning forward to lift a pram into the tram and behind the tram can be seen another pram. Black and White print made from scan of negative. Original Negative stored with Negatives. Image rescanned from copy neg and updated 31/5/2020. See On this basis, the envelope and marking matches that of Reg Item 4158, photo of No. 40, by John Webster and assumed taken on the same day as Item 4157, 4158, 4168, 4178 - 11/4/1953. Contained within Envelope No. 30.On left hand side of the negative in ink is "CR 13".tramways, trams, mt pleasant, barkly st, prams, tram 38 -
 Ballarat Tramway Museum
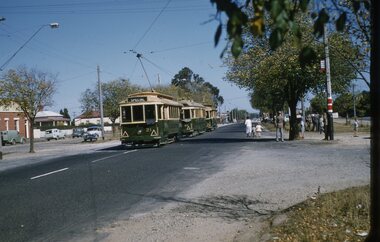
Slide - 35mm slide/s, Ben Parle, 5/04/1958 12:00:00 AM
Kodachrome Transparency - 35mm slide - cardboard mount, with one side with red border and words "Kodachrome Transparency / Processed by Kodak" top and bottom. Photo taken by Ben Parle 5/4/1958. Has slide No. "16" stamped in red in top corner. Photo of the No. 41 and 21 at the Victoria St terminus, with another single truck tram behind. No. 21 has destination of Special. Both trams are carrying the AETA special car auxiliary signs. Passengers are walking across to the service car - note the level of traffic on the main highway to Melbourne. Group of AETA travellers standing on the right hand side of the photo. Meagher's Hotel can be seen on the left hand side. Note the tram stop signage at the terminus. For high resolution scan see btm2849h.tif"Victoria St line" "5-4-58"tramways, trams, victoria st, aeta, tram 21, tram 41 -
 Ballarat Tramway Museum
Photograph - Digital image Set of 7, Tony Smith, 19/09/1971 12:00:00 AM
Yields information about Ballarat Tramways and trams prior to the closure of the tramway system.Set of 7 digital images of Ballarat trams prior to closure, scanned from original slides by Tony Smith, 1971 prior to closure of the system. This set of slides appears to be the last day of operations - 19/9/1971 .1 - 34 at the Sebastopol terminus - shows the trolley pole guide in the overhead. .2 - 34 and another bogie tram at Sebastopol with the driver and conductor posing with a family. Also note the bus stop sign on the pole by the front tram. .3 - 35 at the Sebastopol terminus .4 - 39 southbound in Drummond St south at the Bell St loop .5 - 39 passing roadworks in Bell St. .6 - 37 parked in city Loop showing Special .7 - front end of an ex HTT bogie tram in Sturt St, with Gear Chemist and Edments Hartleys store in the background.trams, tramways, sebastopol, trolley wire, albert st, drummond st, bell st, closure, tram 34, tram 35, tram 39 -
 Kew Historical Society Inc
Plan - Subdivision Plan, Erin Heights Estate, East kew, 1917
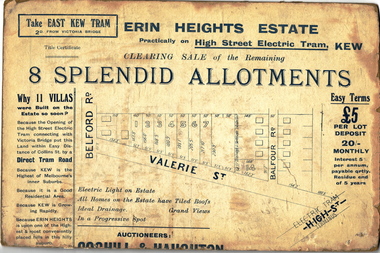
Pru Sanderson, in her groundbreaking ‘City of Kew Urban Conservation Study : Volume 2 - Development History’ (1988), summarised the periods of urban development and subdivisions of land in Kew. The periods that she identified included 1845-1880, 1880-1893, 1893-1921, 1921-1933, 1933-1943, and Post-War Development. These periods were selected as they represented periods of rapid growth or decline in urban development. An obvious starting point for Sanderson’s groupings involved population growth and the associated economic cycles. These cycles also highlighted urban expansion onto land that was predominantly rural, although in other cases it represented the decline and breakup of large estates. A number of the plans in the Kew Historical Society’s collection can also be found in other collections, such as those of the State Library of Victoria and the Boroondara Library Service. A number are however unique to the collection.The Kew Historical Society collection includes almost 100 subdivision plans pertaining to suburbs of the City of Melbourne. Most of these are of Kew, Kew East or Studley Park, although a smaller number are plans of Camberwell, Deepdene, Balwyn and Hawthorn. It is believed that the majority of the plans were gifted to the Society by persons connected with the real estate firm - J. R. Mathers and McMillan, 136 Cotham Road, Kew. The Plans in the collection are rarely in pristine form, being working plans on which the agent would write notes and record lots sold and the prices of these. The subdivision plans are historically significant examples of the growth of urban Melbourne from the beginning of the 20th Century up until the 1980s. A number of the plans are double-sided and often include a photograph on the reverse. A number of the latter are by noted photographers such as J.E. Barnes.The Erin Heights Estate in Kew included just seven lots in in Valerie Street. These were all that remained of this wartime subdivision, the other 11 allotments on Balfour and Belford Roads having already been sold. Balfour Road was to be only a temporary name as the street is currently called Windella Avenue. Now, the parkland opposite the subdivision is the reserve created from the route of the Outer Circle Railway. This Railway reached Kew East in 1925, but had been planned as far back as 1873. The development focuses on the benefits of living in Kew: being at the highest of Kew’s ‘suburbs’; being a good residential area; its rapid growth; and the proximity of the Kew East tram in High Street. In 1917, the electric tramline only extended to a terminus at the Harp of Erin hotel. The terminus is clearly represented on the plan.subdivision plans - east kew, erin heights estate -
 Melbourne Tram Museum
Photograph - Set of 3 Black & White Photograph/s, 1960's
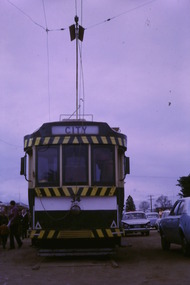
A series of three Black and white photographs of tram T class 182 at the Williamstown Road terminus of the Footscray tram system, c1960. Tram photograph in Somerville Road. All showing the return destination of Russell St. .1 - Shows the shops in the background. Trolley pole reversed and appears the driver is about to enter the cab of the tram. Has the run number F6. Has a Caltex, Ampol, Kix and Caravan park sign in the background. .2 - 182 at the terminus with trolley pole reversed and under the wheel locating guard. Has Run No. F5 in the rear cabin window. .3 - ditto, but before trolley pole reversed with passengers leaving the car and one lady waiting to board. Printed on Fujichrome paper. Not known who took the photograph or when it was printed. Two copies of .1 held.Stamped in black ink on back "TMSV Sales"trams, tramways, footscray, williamstown rd, somerville rd, tram 182, t class, mmtb -
 Melbourne Tram Museum
Photograph - Set of 3 Black & White Photograph/s, c1920
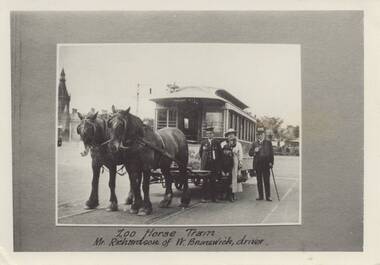
Set of three black and white photographs of the Melbourne Zoo Horse tram. .1 - view of tram with horses, a conductor, and a well dressed family in front of the tram. Photo taken at the Sydney road terminus. Has the note under the photo "Zoo Horse Tram Mr Richardson of W. Brunswick, driver." .2 - Side of view of the horse tram - No. 42 with "Royal Park" on the side. .3 - View of the zoo terminus, from the rear of the tram with "Zoological Gardens" on the rear dash panel of the tram. The conductor appears to be applying the hand brake. Note the signage on the right side of the photo. Photos c1900 to 1910. 2nd copy of .2 and .3 added from the Keith Kings collection - 14-8-2021 - see also Reg Item 5993 for another copy.On the rear of .3 -"M. G. R? collection" On rear of 2nd copy of .2 is the MMTB Stamp.trams, tramways, horse trams, royal park, zoo tram, tram 42 -
 Ballarat Tramway Museum
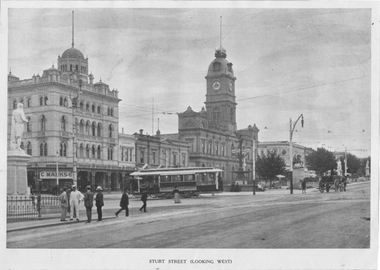
Photograph - Illustration, "Sturt Street (looking west), c1907
Illustration titled - "Sturt Street (looking west) with an ESCo tram turning from Sturt St into Lydiard St North from the Grenville St terminus. The tram has the destination box above the driver, c1907. A horse-drawn cart is in the view along with the Town Hall, the National Mutual building with the Jeweller's sign C Marks visible. On the left hand side is the Robbie Burns statue.Yields information about Sturt St and the associated buildings and ESCo operations.Illustration cut from a magazine or publicationballarat, illustrations, sturt st, esco, lydiard st, ballarat town hall, statues -
 Ballarat Tramway Museum
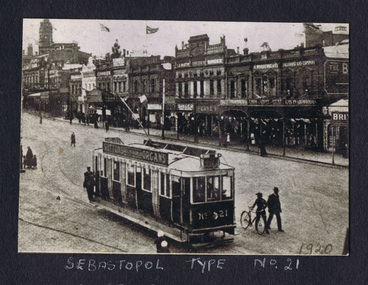
Photograph - Digital image - ESCo 21 Grenville St, 1920
Photo of ESCo Sebastopol type No. 21 in Sturt St arriving at the Grenville St city terminus. Has a "Suttons for Organs" roof advertisement. Wal's album noted "Sebastopol type No. 21, Sturt St 1920." Has "1920" written on the photograph in the bottom right hand corner. See also Reg item 178 for another version of this image and 9465 for a glass plate negative.Yields information the appearance of the Sebastopol type tram when they were in service, c1920 and the north side of Sturt St streetscape.Digital image from the Wal Jack Ballarat Album.trams, tramways, sebastopol type, sturt st, grenville st, suttons, esco, tram 21 -
 Melbourne Tram Museum
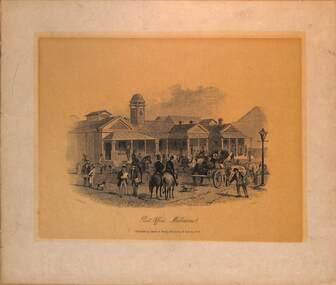
Drawing - early Melbourne CBD scenes, Sands & Kenny Melbourne & Sydney, 1856
Set of three prints of Melbourne street scenes published by Sands & Kenny in 1856 1 - Post Office 2 - Princes Bridge and city terminus of M&HB Railway Melbourne (Melbourne and Hobsons Bay Railway) 3 - Collins Street looking east from Wesleyan Chapel Melbourne (near Queens St) Shows typical horse-drawn transport, railway and pedestrians of the era.Yields infomaition about Melbourne in 1856.Set of three prints or lithographs of drawings of early Melbourne scenes on paper.melbourne, horses, horse drawn vehicles, collins st, post office, princes bridge, railways, m&hbr -
 Melbourne Tram Museum
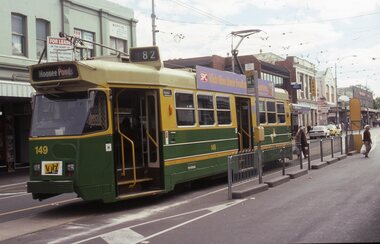
slide - Colour - Melbourne Trams, David Verrier, April 1999
1 - Z3 149 at Footscray terminus in Leeds St., route 82. Tram has adverts for 101.1 FM Radio station, and SPC Fruit preservers and a PTC logo 2 - Z3 149 and B2 2112 at Moonee Ponds Junction (Route 82 Footscray) Tram 2112 (Airport West, Route 59) is an all advertising scheme for Nokia phones. Shows the then terminal arrangements.Yields information about the Route 82 terminals.Set of two white with black back plastic colour slides stamped April 99trams, tramways, footscray, moonee ponds junction, route 82, route 59, nokia, z3 class, b2 class, tram 2112, tram 149 -
 Ballarat Tramway Museum
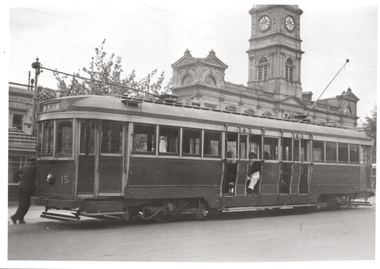
Photograph - Ballarat tram 15, City, late 1940s
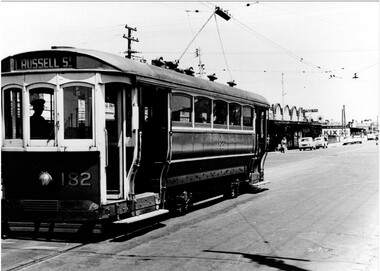
Photograph shows Ballarat bogie tram No. 15 at the City terminus (Sturt and Lydiard Sts), c1948. Has a destination of Mt Pleasant with a crewman leaning on the front of the tram. In the background is the Town Hall. The tram was originally Hawthorn Tramways Trust No. 26, then MMTB 132 and sold to the SEC in 1945 becoming tram 15. It was later renumbered to No. 36 during 1953. Photographer unknown. Two copies held.Yields information about tram 15 late 1940s and the Town Hall.Black and white print - plain back.tramcars, city, sturt st, tram 15, town hall -
 Melbourne Tram Museum
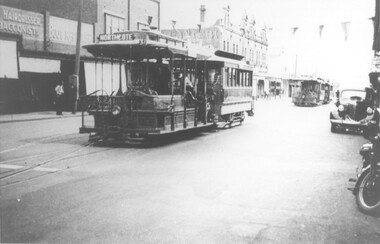
Photograph - Cable tram - Northcote terminus, 1930s
Photo of a cable tram set that has arrived at the Northcote line terminus in High St, prior to shunting. Another two cable sets are in the background. The gripman and conductor can be seen to be preparing to shunt the tram. The photo caption says the trailer is No. 235. A Bundy clock can been seen on the pavement on the left side of the photograph. A hairdresser and tobacconist shop are in the view. Photographer and date unknown.Yields information about Northcote cable tram terminus in High St at Dundas St.Black and white print with a hand written note on rear.In pencil "Car 235 at Dundas St"trams, tramways, northcote, high st, cable trams, tram 235, bundy clock -
 Melbourne Tram Museum
Postcard, Rose Stereograph Co, "Looking over Princes Bridge & The Yarra, Melbourne", c1941
Rose Series postcard No. P 201, titled "Looking over Princes Bridge & The Yarra, Melbourne" with a view including Princes Bridge Railway Station, Batman Ave. tram terminus with two trams, The Yarra River, the bridge, and the entrance to Flinders St station. The south west curve track from Swanston Street into Flinders Street is visible along with various Safety Zones at the tram stop.Yields information about St Kilda Road, Princes Bridge c1941Postcard - printed real photograph with Rose Stereograph Co. name on the rear. Two copies held.tramways, flinders st station, st kilda road, princes bridge station, princes bridge, yarra river, flinders st, trams -
 Ballarat Tramway Museum
Photograph - Digital image Set of 20, 1971-72
Set of 20 digital images of Bendigo Tramways, 1972 at or before closure while on a tram tour by Stuart Lodington. .1 - No. 29 at the North Bendigo terminus .2 - No. 29 just past the Bendigo end of the double track in High St Eaglehawk, with a BP dealer in the background. .3 - Night photo of No. 18 at a terminus, showing "Eaglehawk" .4 - ditto .5 - Night photo of No. 24 at Eaglehawk with Leo A Hughes Photographer in the background. The Tram has "Johnnie Walker whiskey" roof adverts. .6 - No. 29 outbound in Thunder St with a train passing over the bridge in the background. .7 - view from the front window of a tram on the Eaglehawk line with a large "display event float" in the foreground and tram approaching a crossing loop. .8 - No. 29 at North Bendigo .9 - view of High St Eaglehawk looking east from the terminus, showing the track and centre poles. .10 - No. 29 outbound on the North Bendigo line turning from either Nolan St or Caledonia St, running a special. .11 - No. 7 departing North Bendigo for Golden Square. .12 - No. 3 and 18 at Charing Cross. No. 3 has two SEC roof Advertisements .13 - No. 7 at North Bendigo with the trolley pole being reversed. .14 - No. 24 at Quarry Hill with Northern Terrazzo in the background with the driver alongside .15 - No. 7 and No.6 at Charing Cross with the Beehive buildings in the background. .16 - No. 7 at North Bendigo terminus .17 - ditto .18 - No. 24 at Quarry Hill with Northern Terrazzo in the background with the conductor alongside. .19 - ditto .20 - No. 26 and other bogie tram in View St near Charing Cross with the Armstrong Tyre Service building and signs for Cohn's Drinks and T&G in the view.trams, tramways, bendigo, eaglehawk, quarry hill, golden square, depot, north bendigo, charing cross, tram 29, tram 18, tram 24, tram 3, tram 7, tram 6, tram 26 -
 Ballarat Tramway Museum
Photograph - Digital image Set of 20, 1971-72
Set of 22 digital images of Bendigo Tramways, 1972 at or before closure while on a tram tour by Stuart Lodington. .1 - No. 7 arriving at North Bendigo .2 - No. 5 departing Charing Cross along View St, with a Firestone tyres in the background. .3 - front view of a tram in View St with a blurred background image. .4 - No. 24 showing Eaglehawk destination .5 - No 26 and 3 in View St, with the Armstrong Tyre Service building in the background and signs for T&G and Cohn's Drinks. .6 - ditto .7 - No. 3 arriving at Charing Cross from Eaglehawk in View St, with a Quarry Hill destination. .8 - No. 3 and 18 at Charing Cross. .9 - No. 24 on the Quarry Hill line. .10 - No 26 in View St, with the Armstrong Tyre Service building in the background and signs for T&G and Cohn's Drinks. .11 - ditto, with fountain in view, Colonial Mutual building and a newsagent with a Herald sign on the building. .12 - No. 7 at North Bendigo terminus .13 - ditto with pole being reversed. .14 - No. 18 at Quarry Hill terminus with Northern Terrazzo sign in the background. .15 - No. 24 at Quarry Hill terminus .16 - No. 18 arriving at Charring Cross, with Fountain Plaza and Bendigo Pharmacy in the background. .17 - No. 3 and 18 at Charing Cross. .18 - No. 7 at North Bendigo terminus with pole being placed on the overhead. .19 - No. 26 in View St inbound, with Sandhurst Trustees sign in the background. .20 - No. 6 leaving Charing Cross in Pall Mall with Myer and other buildings in the background. .21 - No. 7 at North Bendigo .22 - Single trucker with two roof Advertisements crossing View St with fountain in view, Colonial Mutual building and a newsagent with a Herald sign on the building.trams, tramways, bendigo, eaglehawk, quarry hill, north bendigo, charing cross, view st, tram 7, tram 5, tram 24, tram 26, tram 5, tram 3, tram 18, tram 6 -
 Ballarat Tramway Museum
Photograph - Digital image Set of 10, Tony Smith, 1971
Yields information about Ballarat Tramways and trams prior to the closure of the tramway system.Set of 10 digital images of Ballarat trams prior to closure, scanned from original slides by Tony Smith, 1971 prior to closure of the system. .1 - 37 at the Lydiard St North terminus, with the shelter in the background. .2 - 33 at the Mount Pleasant terminus, has the corner store with a "The Sun" advertisement and the general store on the right side of the road in the background. Has signs for Streets Ice Cream and Coca Cola. Also has the tram stop signs - painted pole and enamel sign. .3 -33 arriving at the Mt Pleasant terminus with the conductor stepping off the back step, a lady walking across to the tram. Tram has a Twin Lakes sign. .4 - 11 at Victoria St terminus, with conductor turning the pole. Tram has a Twin Lakes sign. IN the background is the rail bridge over the Eureka line and a shelter. .5 - 11 in bound from Victoria St, shows the bleakness of the street at the time. Tram has Twin Lakes and a SEC Briquettes signs. .6 - 12 outbound to Mt Pleasant in Main St and the corner with Humffray St. Tram has a Twin Lakes sign. .7 - 11 in bound from Victoria St, in Bridge St, with junction in background. Tram has Twin Lakes and a SEC Briquettes signs. In the background are Rodda's, C.W. Pennant wall papers and Gill and O'Keffe footwear stores. .8 - 21 in Wendouree Parade, in bound to Victoria St, with the Lake in the background, near Macarthur St. .9 - 21 ditto, nearing the Macarthur St junction. Has the shelter and tram stop signage for View Point in the background. .10 - 34 sitting on the depot fan, 2 road, ready to run out. Has Mt Pleasant as the destination.trams, tramways, lydiard st north, mount pleasant terminus, victoria st, main st, bridge st, wendouree parade, macarthur st, view point, depot, tram 37, tram 33, tram 11, tram 12, tram 21, tram 34 -
 Bendigo Historical Society Inc.
Document - BASIL MILLER COLLECTION: TRAMS - 'RUNNING JOURNAL'
Journal of the Tramway Museum Society of Victoria. Ltd. Volume 5, No.3. 30 Cents. December 1968 - January 1969. 16 pages. At front cover picture (right) shows Ballarat Single Truck tram no. 21 is the Myer Father prepared for the road prior to departing the depot at 8.24 am. Saturday 16th November 1968, for Victoria Street terminus.person, individual, basil miller -
 Ballarat Tramway Museum
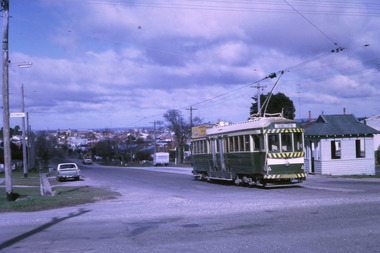
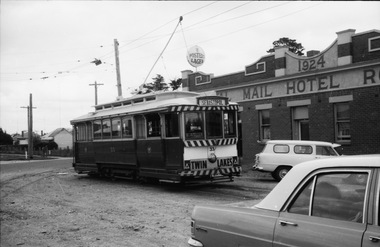
Photograph - Digital image Set of 2, Graham Parry, 1971
Yields information about the Sebastopol terminus and tram operations in 1971.Digital image of photograph of trams in Ballarat during 1971 prior to closure of the system by Graham Parry. All images from the scanned negative. .1 - tram 33 arriving at the Sebastopol terminus with the Royal Mail Hotel in the background. There is a Fosters Lager sign. and a number of parked cars. The tram has a Twin Lakes sign. .2 - ditto with the driver turning the poletrams, tramways, sebastopol, trolley poles, tram 33 -
 Ballarat Tramway Museum
Photograph - Digital image Set of 2, Jim Seletto, Mar. 1971
Yields information about the operation of trams at night in Ballarat and the appearance of the City tram stop.Set of two Digital images of trams at the city terminus, by Jim Seletto, March 1971. 1 - Tram 32 - showing Mt Pleasant. Has a Wilkinson Sword Roof Adverts. In the background is the SEC office, illuminated and a sign for a shop with "Blast Off" .2 - Trams 31 and 32. Both photos have the short tram stop section pole in the view. trams, tramways, sturt st, city, sec street furniture, tram stops, sec showroom sturt st, tram 31, tram 32 -
 Ballarat Tramway Museum
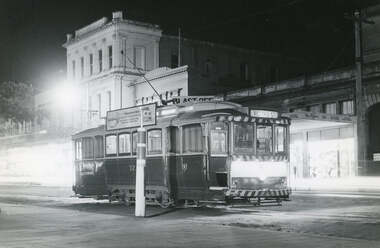
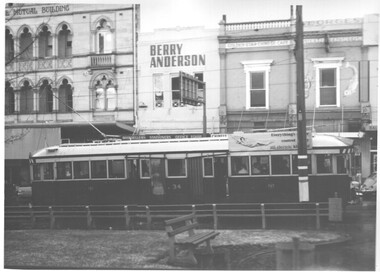
Photograph - Black & White Photograph/s, Charles Craig, early 1970's
Yields information about the use of the use of the City terminus during the last days of the SEC operated system.Black and White photograph of No. 34 at the City Terminus, Sturt St, south side - tram has an SEC Roof Advert re electric cooking. In the background is the National Mutual Building, Berry Anderson stationary shop, Golden Start Chinese Cafe and the Georges Oyster bar and fish shop. Photo by Charles Craig possibly early 1970's. trams, tramways, sturt st, city, tram 34 -
 Ballarat Tramway Museum
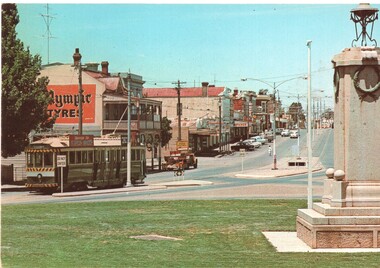
Postcard, Nu-color-vue or Nucolorvue Productions, "Eagle Hawk Victoria" "Eaglehawk, Victoria", mid 1960's?
Postcard - colour photograph of High St Eaglehawk, with No.3 at the Eaglehawk tram terminus. Has The Cenotaph on the right hand side. Nu-colour-vue postcard, EH1. Divided back, printed in Australia. Has the various stamp values required for postage in Australia, New Zealand, UK and the USA in the stamp section. Has a kangaroo logo in the centre bottom or the rear. trams, tramways, bendigo, postcards, eaglehawk, high st -
 Ballarat Tramway Museum
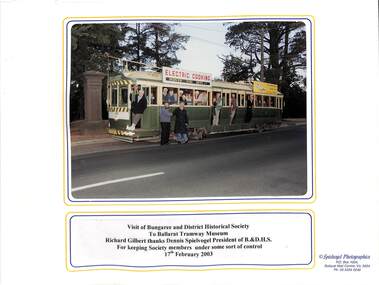
Photograph - Colour Photograph/s - mounted, 17/02/2003 12:00:00 AM
Colour photograph, mounted in a white card board folder with a title block. Title - "Visit of the Bungaree and District Historical Society to the Ballarat Tramway Museum". Group photo of the tour group looking out the windows of No. 40 at the Carlton St terminus. Taken 17/2/2003. Has Richard Gilbert and Dennis Spielvogel in front of the tram. Produced by Spielvogel Photographic.trams, tramways, btm, tram tours, carlton st, bungaree historical society -
 Ballarat Tramway Museum
Photograph - Digital image, John Ward, 18/08/1971 12:00:00 AM
Yields information about the use of trams for school tours prior to closure of the Ballarat system.Digital image of trams 37, 41 and 40 loading school children at the Lydiard St North on a tour prior to the closure of the tramway. Photo by John Ward 18 August 1971. Slide title "04678 180871 7169-G SECV bogie trams 37, 41 & 40 with school children terminus Lydiard St North Ballarat Vic"trams, tramways, schools, tours, special trams, lydiard st north, tram 37, tram 41, tram 40 -
 Ballarat Tramway Museum
Photograph - Black & White Photograph/s, Geoff Grant, 7/04/1956 12:00:00 AM
Black and white photograph of Melbourne trams 1033 (on an Australian Electric Traction Association tour) and tram 957 at the Bourke St. terminus, dated 7/04/1956. 1033 showing SPECIAL, has AETA sign and poster on rear bumper bar. Tram 957 showing destination of "Northcote - Dundas St." route "90". Tramway buildings in background.On rear stamped in bottom rh corner "Geoff Grant / 7 Apr 1956 / Victoria"trams, tramways, melbourne, bourke st, aeta, tours, tram 1033, 957 -
 Ballarat Tramway Museum
Photograph - Black & White Photograph/s, late 1960's
Black and white photograph of SEC No. 11 at the Mt Pleasant terminus, with the Conductor swinging the pole and school children boarding the tram. Destination showing "Gardens via Drummond Nth". Tram has a "Twin Lakes" sign on the front dash panel and a SEC Briquettes advertisement. Colour photocopy, laminated, of this photograph on display 5/2000 at 02-02-06trams, tramways, mt pleasant, trolley poles, twin lakes, tram 11 -
 Ballarat Tramway Museum
Slide - 35mm slide/s, Peter Moses, Jan. 1966
Photo of SEC Ballarat Tram No. 40, 35 and 27 at the City terminus in Sturt St. at Lydiard St. Tram 27 has destination of "Depot via Ripon St." and roof advertisements SEC "You'll cook better electrically". In the background are the Post Office and the ANZ bank buildings. Kodak cardboard mount slide, taken by Peter Moses January 1966.On back of both slides in blue ink "Jan. 1966, Sturt St. No. 35, 27" and in bottom right hand corner "P. Moses".tramways, trams, city terminus, sturt st, tram 40, tram 35, tram 27 -
 Ballarat Tramway Museum
Negative - Black and white print from negative, Travis Jeffrey, 12/12/1958 12:00:00 AM
Negative No. N374 and black and white print made by a laser printer (stored in folder) of Ballarat No. 20 at the City Terminus, intersection of Sturt and Lydiard Streets with the Ballarat Post Office in the background. Taken from the south side of the street - unusual view. Date 12/12/1958. hi res scan made and image updated 23/5/2020.Paper folder that contained the negative had "NR2A" in red ink, "BA1" in pencil, date stamp of "29 Dec 1958" on front, and date stamps "26 Sep 1962" on rear, top and bottom.trams, tramways, city terminus, sturt st, tram 20 -
 Ballarat Tramway Museum
Slide - 35mm slide/s, Travis Jeffrey, c1962
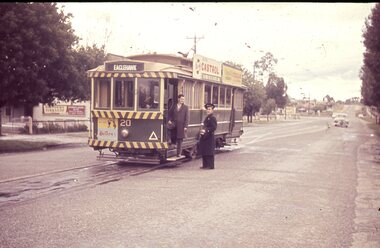
Agfa plastic mount (blue base, white cover) with a photo of Bendigo 20 at the Quarry Hill terminus. Tram has the destination of Eaglehawk and has a Castrol Oil, and another company roof advertisements, with Huttons Ham advertisement on the dash panel. Conductor and another person (enthusiast) outside the tram, driver changing ends on the inside. In the background is the premises for "Northern Terrazzo"."BES 15" in penciltramways, trams, bendigo, quarry hill, tram 20