Showing 998 items matching "railway signs"
-
 Ballarat Tramway Museum
Slide - 35mm slide/s - set of 6, Campbell Duncan, 19/09/1971 12:00:00 AM
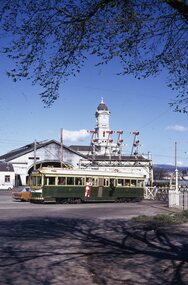
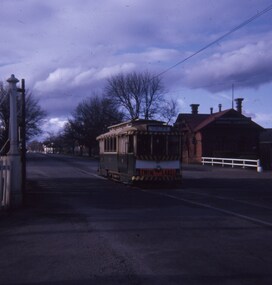
Yields information about the operations of the Ballarat Tramway system on the last day of SEC tramway operations in Ballarat.Set of 6 Kodak - Kodachrome slides - cardboard mounts - all taken on 19/9/1971, last day of operations prior to closure of the SEC operated tramway. .1 - Tram 40, waits at the level crossing gates - the gates are being opened. In the background is the station building and the signal gantry. Tram has the destination of Sebastopol. .2 - No. 42, with destination of Lydiard St north, northbound in Lydiard St, with railway station buildings and VRI in the background. .3 - No. 35 on inbound, Lydiard St North. .4 - No. 35, on inbound service, leaving Skipton St loop with another bogie in the background. .5 - No. 39 on inbound service, Albert St Sebastopol with the Sebastopol boundary sign and Binks Ford in the background. Tram has an everything under control in my all electric kitchen roof advert. .6 - No. 42, with destination of Sebastopol, Albert St Sebastopol.In ink on slide: .1 - Sun 19 Sept 71 - up Lydiard St Nth waits for gates to be opened after fast goods. .2 - Sun 19 Sept 1971, down Lydiard St Nth near VRI. .3 - Sun 19 Sept 1971, Up Lydiard St Nth .4 - Sun 19 Sept 1971, Up Sebastopol (supplementary service) has just crossed down in Skipton St near Drummond St. .5 - Sun 19 Sept 1971, Up Sebas at Ballarat / Sebastopol boundary. .6 - Sun 19 Sept 1971, c5.30pm down Sebas in Sebas shire.tramways, trams, lydiard st nth, railway station, level crossings, skipton st, albert st, sebastopol, closure, last day, tram 40, tram 42, tram 35, tram 39 -
 Ballarat Tramway Museum
Sign, Victorian Railways (VR), VR Tramways, 1920's
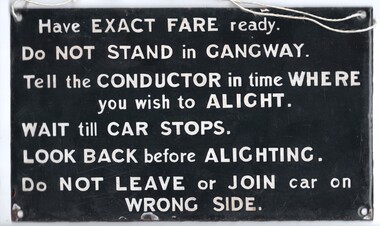
... Passengers VR Victorian Railways Fares Conductors Sign - enamelled ...Sign - enamelled on a metal plate with screw holes in each corner - white letters on black background - fitted to a Victorian Railways Tramcar - regarding having exact fare ready, not standing in gangway, alighting and do not leave or join on the wrong side. Advised by Tony Smith of MTPS 5/8/2016 a sign from a VR tramcar. Has a number of them. String through top two corners was fitted to the donated item.trams, tramways, signs, passengers, vr, victorian railways, fares, conductors -
 Ballarat Tramway Museum
Slide - 35mm slide/s - set of 6, Dave Simpson, late 1960's early 1970's
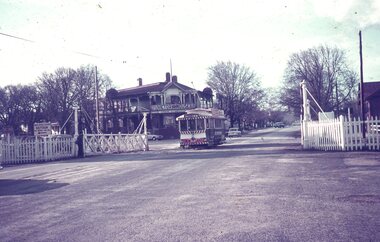
Yields information about Railway Level crossing in Lydiard St North and some of the trains that used it.Set of six 35mm slides - Hanimex light grey white plastic mounts or AGFA dark blue / white plastic mounts of trams and trains crossing the level crossing at Lydiard St North Ballarat. .1 - tram 33 with destination of Lydiard St North, just after crossing the rail tracks - has a Twin Lakes sign with Victoria House in the background. .2 - tram 40 with destination of Lydiard St North, waiting at the level crossing with S303 entering the station. .3 - ditto, but with S304 in the photograph under the signal gantry. .4 - tram 17 crossing the crossing with the signal box and Victoria House in the background. .5 - ditto - tram has a Twin Lakes signs and a "Make Bliss No Love" roof advert for Bliss Bombs. .6 - ditto - with the S. F. Motors Pty Ltd Mercedes Benz dealership in the background.tramways, trams, railway station, lydiard st north, level crossings, victorian railways, tram 33, tram 40, tram 17 -
 Ballarat Tramway Museum
Postcard, Ron Scholten, SEC Ballarat tram 17
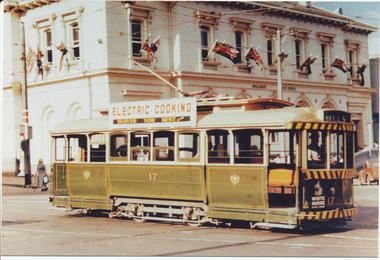
Yields information about the use of Special trams and the Ballarat railway station level crossing.Colour photograph, printed on a postcard back format of SEC Ballarat tram 17 crossing Sturt St from Lydiard St north with the Ballarat Post Office in the background. Doors have been changed over for the Sturt St central median strip. Note the lady with the walking stick behind the tram and the tram stop sign. Tram has an SEC Electric Cooking advertisement and the destination of Bell St.trams, tramways, lydiard st north, sturt st, post office, tram 26 -
 Ballarat Tramway Museum
Photograph - Black & White Photograph/s, Australian Railway Historical Society (ARHS), 27/02/1954 12:00:00 AM
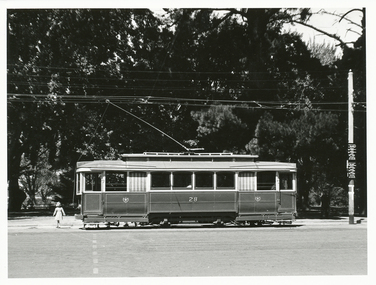
Yields information about the appearance of SEC tram No. 28 at Gardens loop mid 1950's.Black and white photograph of Ballarat tram No. 28 at the Gardens Loop - 27-2-1954. Has a little girl walking at the rear of the tram. In the background are the timetable signs on the tram stop pole. The tram is travelling south.On rear in ink "ARHS Photo, Botanical Gardens, Ballarat, 27-2-1954."trams, tramways, wendouree parade, gardens, gardens loop, tram 28 -
 Ballarat Tramway Museum
Slide - 35mm slide/s - set of 20, Eldon Hogan, 22/05/1971 12:00:00 AM
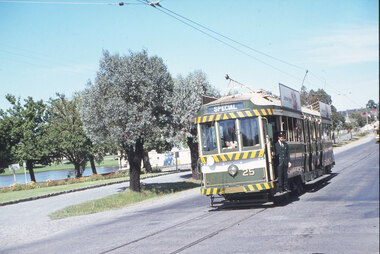
Set of 20 35mm Agfa colour blue and white plastic mount slide - featuring photos taken during an Association of Railway Enthusiasts Tour by Eldon Hogan. Folder had the date "22/5/1971" on it. Scanned on the Canon scanner at the depot 15/12/2005 at the time of the installation of the scanner. .1 - No. 25 in Nolan St with Lake Weeroona in the background. .2 - Three Birneys at the Depot junction, 30 and 29 with Conoles Hotel, McCrae St in the background. .3 - No. 5 in front of the Shamrock Hotel, Pall Mall .4 - No. 29 in front of the Shamrock Hotel with Stonemasons sign in the background. .5 - No. 18 ditto .6 - No. 30 and another Birney at the Quarry Hill terminus .7 - No. 24 southbound High St at the Violet St intersection with a "Mine Open" sign in the foreground and the Cathedral in the background. .8 - No. 19 at the Golden Square terminus, with the Golden Square Hotel in the background. .9 - No. 29 - side on view, North Bendigo line? Thunder St? .10 - No. 30 crossing the railway overbridge, inbound from Eaglehawk with a number of photographers in the foreground. .11 - No. 29? ditto .12 - No. 5 outbound - side on view, Thunder St, North Bendigo line? .13 - No. 29 and 30 at the intersection of High St and Brazier St with Church or School hall in the background. .14 - ditto .15 - ditto .16 - No. 25 and the two Birneys at the Eaglehawk terminus. .17 - No. 29 and two other trams at ditto .18 - No. 30 and 19 adjacent to the Lake View Hotel, McCrae St .19 - No. 5 and 25 crossing on the Eaglehawk Line, Ironbark? .20 - No. 29 at Quarry Hilltramways, trams, bendigo, lake weeroona, pall mall, golden square, eaglehawk, quarry hill, tram 25, tram 30, tram 29, tram 5, tram 18, tram 19, tram 24, tram 25 -
 Otway Districts Historical Society
Book, Ken Jenkins, Over the Otways, nd
Early pioneers arrived long before the railways, their battles with the environment, and getting supplies in and out of the Otways.Over the Otways. G.A. Facey. 1st ed. Anglesea (Vic); G.A. Facey; nd. ii, 26 p.; illus. Soft cover.(1) Signed by author. (2) "To Dad From allie" (3) "Belongs G. Bellchambers Beech Forest"otway ranges; g.a. facey; reminiscences;, otway ranges; g.a. facey; reminiscences; -
 Otway Districts Historical Society
Photograph, Ray Jude, Beech Forest showing the delta crossover, 1959, 21 November 1959
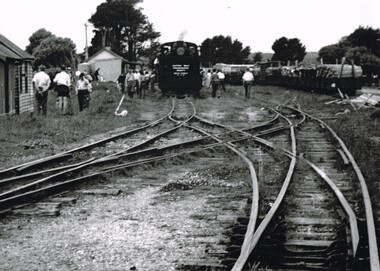
On 21 November 1959 yet another special train was run, this time on a G41 engine showing the sign "Puffing Billy Preservation Society, Beech Forest, 25-11-59", with eight NBH excursion carriages and a guard's van. The train stopped at Beech Forest where people removed themselves and wandered around the station. Mixed goods wagons loaded with wood and louvred van rest in the background. Note the delta or 'scissors' crossover between lines in the centre of the picture.B/W. Beech Forest Railway Station with a G41 locomotive, showing the sign "Puffing Billy Preservation Society, Beech Forest, 25-11-59" on track number one, mixed goods trucks on track number three, passengers throughout, and the delta or scissors crossover line, at 21 November 1959.beech forest; railways; -
 Otway Districts Historical Society
Photograph, Ray Jude, Beech Forest: engine leaving balloon loop, 1959, 21 November 1959
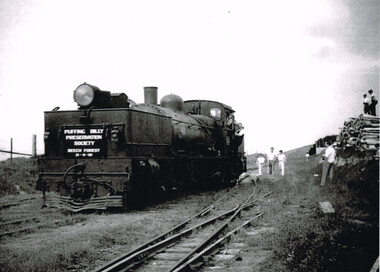
B/W. Engine G41, showing the sign "Puffing Billy Preservation Society, Beech Forest, 21-11-59", leaves the balloon loop at Beech Forest Railway Station, with guard and child hanging from the engine. A number of people are in the area, particularly two on top of a stack of timber. beech forest; railways; -
 Otway Districts Historical Society
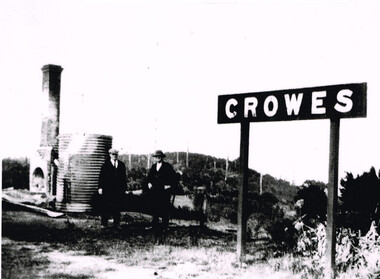
Photograph, Brucker, Crowes after the 1919 fires, 1919
The 1919 bushfire was the worst the area suffered. The fire struck on Saturday afternoon on the 15th February. It destroyed the station at Lavers Hill and Crowes, departmental residences at Lavers Hill and Weeaproinah, the overhead bridges at Beech Forest and Wimba, and damaged the track at various points along the line so that two locomotives became temporarily marooned at Beech Forest.. By the following Tuesday a daily fire relief train had begun operation. By the following Sunday a special train loaded with army tents travelled through to Lavers Hill and deposited most of its consignment there because little remained of this sizeable settlement. An outsider would have had difficulty in picking the place. The letters of the Lavers Hill station nameboard had been burnt although the metal letters survived, and one of the local wags had rearranged them to read "LIARS HELL". By the 1920s water trains were being used to help fight fires, a simple NQR open wagon loaded with the standard 1500 litre square iron water tank.B/W. Crowes station sign, the remains of a chimney, galvanised iron sheet and a water tank, and two men gazing at the camera. Note in the background the clear felling of the timber.crowes; lavers hill; beech forest; weeaproinah; wimba; railways; bushfire; -
 Otway Districts Historical Society
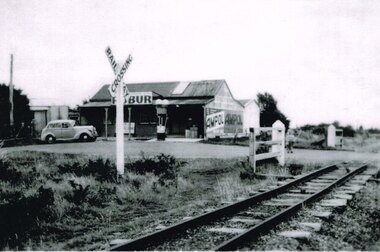
Photograph, Laver's Hill General Store, c.1945, c.1945
Lavers Hill General Store, or more usually, Hampshire's Store, was owned initially for two years by Hampshire and Hutley, and then for 17 years by Mr and Mrs P. Hampshire (senior) who serviced the area including during the Depression. On their retirement their son, Percy, went into partnership with Leo Brauer for four years, and then ran it with his wife, Nea, for a further eight years until the store burnt down. The Store was a placed where the community congregated. It was a place where people met or waited for the train or the Cream Bus or the Mail Bus. Inside it was a place where you could buy groceries, fruit and vegetables, footwear, petrol, and so on. It was a place where children could buy a big stick of licorice for a halfpenny or 3d. worth of broken biscuits. Blackwood Gully Tea Rooms now stands in its place. B/W. Laver's Hill General Store, c.1945, with petrol bowser and sedan outside, and the level crossing to the right and the level crossing sign midfield.lavers hill; general store; railways; petrol bowser; hampshire; hutley; leo brauer; -
 Otway Districts Historical Society
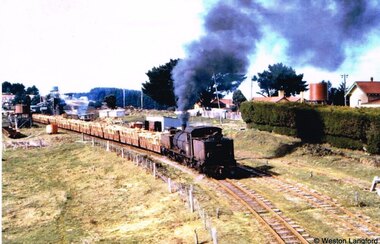
Photograph, Langford, Weston, Beech Forest: Goods trail departing for Colac, 1961, 9 August 1961
The Garratts were approaching 35 years of age and needed constant repairs to keep them in service, the other rolling stock was between 45 and 60 years old, the track was generally in poor condition, and the amount of traffic offering was only a faction of that carried previously and came from one station, Beech Forest. A further sign of decay was in the transfer of goods between the gauges. Where eight or nine men had worked full-time transferring between gauges only one man was seen by 1960, with several other men hired on the basis of '$2 a truck', assuming they could be found. In 1961 VR announced its intention to close the line which it did on 30 June 1962. Colour. On 9 August 1961 a G42 locomotive and goods train departing for Colac with the coal stage on the left, the saw mill and Gangers Shed on the right, and houses in the right background.. beech forest; railways; -
 Bendigo Historical Society Inc.
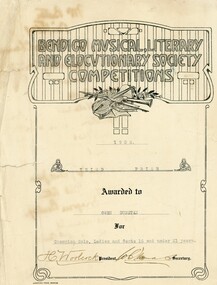
Certificate - Bendigo Musical, Literacy and Elocutionary Society, 1932
The Bendigo Competitions Society Inc. was originally started by a group of local traders – The Chamber of Commerce – a group of businessmen. 2024 marks the 98th Bendigo Competitions Society Annual Bendigo Eisteddfod. Gwenllian Maude Dunstan Born: Long Gully, 8 August 1911, daughter of Thomas Dunstan and Maude Jane James Married: 1939, William James Rowe Gwenllian Rowe died Bendigo, 18 March 2002 William James Rowe Born: Long Gully, 1912, son of William James Rowe and Hilda May Goldsworthy Railway employee. William Rowe died Bendigo 24 June 1985. Both are buried at Bendigo Cemetery; Quick Lawn, Section 1, Row 1. (No photograph available) Bendigo Musical, Literacy and Elocutionary Society Competitions Certificate 1932. Third prize awarded to Gwen Dunstan for Champion Solo, Ladies and Gents 16 and under 21. Signed by the President H. Woolcock and the Secretary. The rear side of the certificate has handwritten notes. Six Bendigo Musical, Literary and Elocutionary Competition Awards Judge’s Award Sheets for 1923, 1925, 1926, 1930, 1931 and 1932. Letter to Miss Dunstan notifying her that she had been included in the Annual Masonic Ball Debutante set in 1931. The chaperone for this event was Mrs G V Lansell. history, bendigo, bendigo competitions -
 Ballarat Tramway Museum
Slide - 27 mm sq slide/s, Andrew Howlett, Tram No. 27, southbound crossing the Lydiard St level crossing, Sep. 1968
Yields information about the Lydiard St Nth Level crossing.Colour slide, Kodak white cardboard mount, developed September 1968 of No. 27, southbound crossing the Lydiard St level crossing with a destination of Sebastopol. The tram has a Twin Lakes sign. the Kennedy Murrays General Carrier building in the background."Railway Xing Lydiard St Nth" in red ink.ballarat, tramways, trams, lydiard st nth, level crossings, railway station, tram 27 -
 Ballarat Tramway Museum
Sign - Manufacturers plate - GE 247 tram motors, Australian General Electric
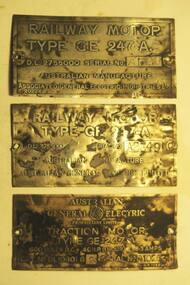
Set of three manufacturer's serial plates from GE 247-A motors used in tramcars. Manufactured in Australia under licence from General Electric of the USA. Known as "railway motors" in the USA. Used extensively in Australian tramway systems. The company changed its name a number of times. 1 - Associated General Electric Industries - Serial Number A1307 2 - Australian General Electric Limited - A2349 3 - Australian General Electric Pty Ltd - A10253 - has the GE logo.Yields information about the Australian Company who made tramway motors in SydneySet of three metal (brass or steel) manufacturers plates for GE 247-A motorsge 247 motors, tramways, trams, motors, general electric, australian made -
 Ballarat Tramway Museum
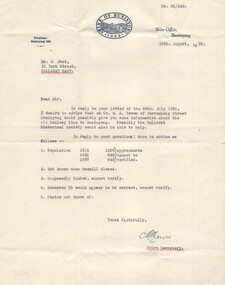
Letter - Shire of Buninyong to Wal Jack, Shire of Buninyong, 18-8-1958
Wal Jack often prepared letters to bodies asking for historical details as part of his research and writing of articles. This letter responds to historical questions about the former Buninyong railway line and other shire details such as the population of the Shire. Signed by the Shire Secretary.Demonstrates a letter from the Shire of Buninyong.Letter - type on pre-printed letterhead, quarto sheet with a Westerlec Air dried watermark.letter, wal jack, buninyong, railway lines -
 Ballarat Tramway Museum
Slide - 35mm slide/s, early 1960's
Bendigo Charing Cross, looking east towards railway station, with SEC No. 7 about to depart for Eaglehawk. A Birney tram in background heading for Quarry Hill. Photo shows 'Ezywalkin' and 'Fountain Plaza' buildings, has large white with black lettering road signs on left. On centre pole in front of tram is smaller road direction signs (yellow with black letters) for Echuca, Heathcote and Melbourne. Tram has dash canopy lights, early 1960's.niltramways, trams, bendigo, charing cross, quarry hill, eaglehawk, tram 7 -
 Buninyong & District Historical Society
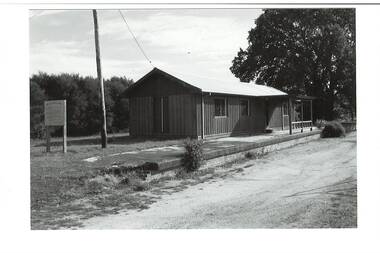
Photograph - B/W photograph, Mr C J Brooks, Buninyong Railway Station platform, (built 1889), 9 April 1994
Remains of Buninyong Railway Station platform, line closed 1947Only remains of Railway stationB/W photo remains Buninyong Railway Station platform, (built 1889) sign on left, power pole and Tennis Club shed, elm tree behind right.buninyong, bunny, railway, platform -
 Kew Historical Society Inc
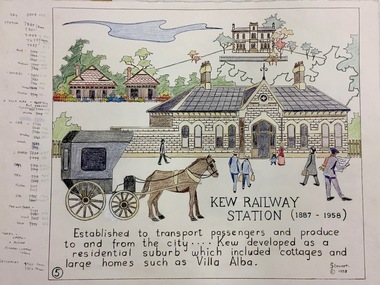
Work on paper, Joy Stewart, 5. Kew Railway Station (1887-1958), 1988
Kew Tapestry The eight panels depict the history of Kew. This was a 1988 Australian Bi-Centennial Project carried out under the auspices of City of Kew Council and the Kew Historical Society Incorporated. Nearly 600 citizens including many children participated in the production by adding a few or more stitches. A book records their names and the panels upon which they worked. Artist: Joy Stewart Co-ordinator: Dorothy BenyeiSydney Joy (Joy) Stewart was born in Melbourne 1925. She studied at Swinburne Technical College Art School from 1941-1945, then the National Gallery Art School 1946-1948. Her career included employment positions as a display artist, designer/painter, gallery assistant, and art teacher. Joy relocated to Cairns in 1981. Solo exhibitions in Melbourne and Cairns, including 'Done By Me' at Cairns Regional Gallery in 1999. Group exhibitions at Cairns Regional Gallery, 'The Fish John West Regrets, 1993' and 'Facets of Life' 1994. Joy Stewart died in Cairns in 2018.5. Kew Railway Station (1887-1958). A Handcoloured cartoon created by the artist Joy Stewart as a template for the fifth of a series of embroidered panels depicting the history of Kew. Wool colour codes at left. Inscription: "KEW RAILWAY STATION (1887-1958). Established to transport passengers and produce too and from the city ... Kew developed as a residential suburb which included cottages an dlarge homes such as Villa Alba". Signed by the artist "(c) JStewart, 1988"bicentennial project (kew), joy stewart -
 Kew Historical Society Inc
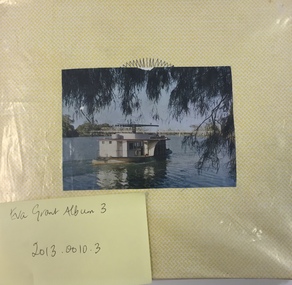
Album - Photographs of heritage sites in Victoria, Eva Grant, 1964-66
Eva Grant was a member of the Kew Historical Society. Three albums in the collection were created by her, this one, the third created between 1964 and 1966. They were donated to the Society by her daughter in 2010. Each of the albums includes photographs and newspaper cuttings collected on her travels to historic places in South East Australia in the 1950s and 1960s. Particular structures photographed in this album include: Barnawatha (Vic.) - The Hermitage | Beveridge (Vic.) - Stone cottage where Ned Kelly was born. | Brighton - St Andrew’s Church graveyard. | Chiltern (Vic.) - lake view [missing] | Cowes (Vic.) - ‘Broadwater’ [originally home of Henty-Wilson family], demolished 1965; Bell of the Speke wreck; Edward’s tree. | Euroa (Vic.) - Habbies Howe | Fairfield (Vic.) - Dight’s Falls; John Dight. | Fernshawe (Vic.) - Queen Mary tree. | Jolimont (Vic.) - Old railway tunnel linking the first Government House (1964); Sign identifying location of first Government House. | Kew (Vic.) - Cairn at Dight’s Falls; Canoe tree, Bowyer Avenue. | Kyneton - De Grave’s Flour Mill - “C”. | Maldon (Vic.) - Chinese oven; Macarthur’s House; Maldon’s oldest resident; Chinese graves x 2; [Beehive Chimney]. | Marysville (Vic.) - Centenary cairn | Mitcham (Vic.), Mud brick house x 2, Deep Creek Road. | Melbourne (Vic.) - St Paul’s Cathedral [renovation] (1964); Wreckers at Damman’s Corner, cnr Bourke and Collins Streets (1964); Princess Gate project x 2 (1964); Colonial Storekeeper’s building on cnr King and Bourke Streets (1966); Early observatory 1861-3; the Honey Memorial. | Mt Oberon (Vic.) - [obsolete] radio telephone dish. | Seymour (Vic.) - Habres (sic) House x 3.| Swan Hill (Vic.) - Major Mitchell’s Cairn (12/1964); Headstone of Andrew Beverage AM (12/1964). | Templestowe (Vic.) - Finn’s Hotel. | Thornton (Vic.) - Eildon Station. | Werribee (Vic.) - Chirnside Memorial [Presbyterian] Church; gaslight beside church | Location unknown, but possibly Swan Hill - Brick house; Wooden bullock dray. | Location unknown - Headstone of John Furlonge 1835.Important record of significant heritage properties in Victoria, many of which have since been demolished.30 page spirex bound drawing book including photographs and newspaper articles of historic buildings in Victoria. The front cover has a picture of a steam boat. The cover is encased in plastic. A number items in the album are annotated with written commentary by Eva Grant who compiled the album. Annotations and transcriptions by Eva Grant on most imageseva grant, photograph albums, heritage places - victoria -
 Sunbury Family History and Heritage Society Inc.
Photograph, 25
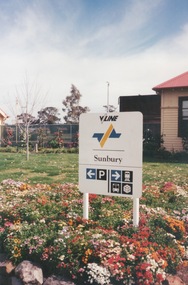
A coloured photograph of a V Line sign set in a flowerbed at Sunbury Railway Station. -
 Sunbury Family History and Heritage Society Inc.
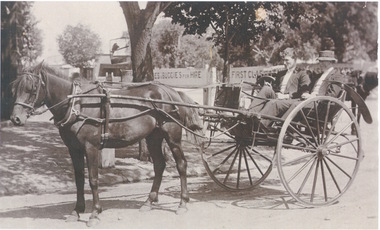
Photograph, c1900s
The two men in the curricle were in Brook Street outside Sunbury Railway Station.Before the advent of motor transport and buses, passengers from the train were taken by horse drawn vehicles to their destinations. An area was set aside at the station where the horses and vehicles waited for trains to arrive.A sepia photograph of two men seated in a stationary horse -drawn curricle beside a plantation area. There are two signs advertising horses and buggies for hire and some buildings are visible in the distance.curricles, brook street, sunbury, sunbury railway station -
 Surrey Hills Historical Society Collection
Photograph, Arthur Lyons of 55 Sunbury Crescent, Surrey Hills
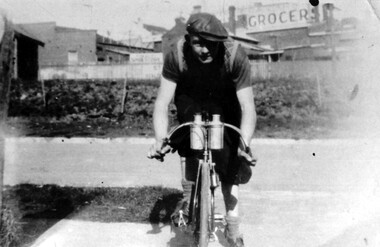
Taken outside the Lyons' home in Sunbury Crescent with Union Road shops in the background. It shows the brick substation which stood by the railway gates. The paling fences are along Stirling Crescent, across the railway line. Arthur was the only son of Frederick Adolphus Lyons (1891-1980) who was born in Surrey Hills, son of Thomas and Catherine Lyons. He married Elizabeth Ruby Hall in 1918. They lived at 55 Sunbury Crescent. The Lyons’ home was called ‘Knopshambury’ - this was probably a misspelling of Knockshanbally in Co Kilkenny, the birth place of Fred’s father, Thomas Edmund Josias Lyons (1846-1915). Arthur Lyons was born in Surrey Hills on 12 Jun 1920. He became a motor mechanic / welder and lived at 55 Sunbury Crescent. This is one of a series of photos donated by Arthur Lyons. The donation was made while he was in hospital. He died shortly afterwards (23 Sep 1990). Donation was finalised by a neighbour, Mrs Florence Ann Armitstead, wife of Glen Victor Armitstead. Glen was a local hairdresser. They moved to 11 Sunbury Crescent after their marriage in 1939. Arthur had no relatives to distribute the material to.A black and white photograph of a man, with his bicycle. In the background is the railway line and buildings one of which has a sign advertising a grocer.sunbury crescent, surrey hills, stirling crescent, railway line, grocers, (mr) arthur lyons, (mr) arthur frederick lyons, cyclist -
 Surrey Hills Historical Society Collection
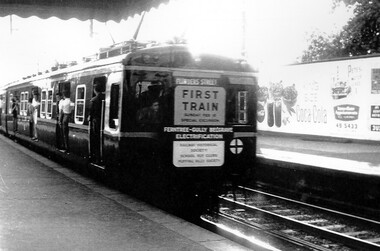
Photograph, Leaving Surrey Hills - the rear of first electric surburban train to Belgrave, 1962, 18/02/1962
This was a special run for rail enthusiasts and marked the official opening of the first train from Ferntree Gully to Belgrave after the line from Upper Ferntree Gully was converted to broad gauge and electrified.A black and white photograph of the rear of a train with passengers alighting at Surrey Hills station. Signage on the rear indicates that the train was a special excursion marking the electrification of the rail from Ferntree Gully to Belgrave.A sign at the rear of the train states: "First train / Sunday February 18 / Special Excursion / Ferntree Gully Belgrave / Electrification"surrey hills, transport, trains, railways, rail electrification, special rail excursions, official opening -
 National Wool Museum
Photograph - Geelong Victoria, 1889
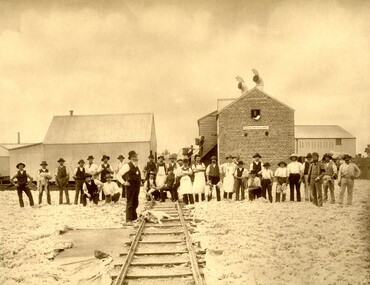
Image was donated by Mr. Peter JM Bell of West Yorkshire, UK in 2009. Mr. Bell worked for Robert Jowitt & Sons between 1999 and 2006 when the company ceased operations. Mr. Bell discovered this photo and decided to donate it to the National Wool Museum. Jowitt & Sons was established in 1775 and became a limited company in 1919. They were wool merchants and had buying branches in Australia - Fremantle, Melbourne, Sydney and Adelaide.Photo of approximately 30 men standing on and perpendicular to a railway track. Behind the group are four buildings, two on the left, two on the right. A dog is resting on the railway track. The ground has been covered in wool and a sign on the right-hand building reads 'ROBERT JOWITT & SONS".Wording: Geelong- Victoria/ 1889;Method: printed;Location: bottom centrewool, railway, dog, jowitt & sons -
 Surrey Hills Historical Society Collection
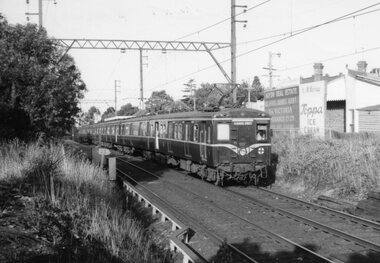
Unknown - Digital photo, George L Coop, Harris train at Mont Albert railway station c 1964, c1964
The train is headed towards Surrey Hills station. In the background are the Hamilton Street shops with advertising posters on their rear walls. The donor George Lister Coop was about 27 years of age when he took this photo. It is one of a small series of photos donated by him that relate to Mont Albert and Surrey Hills stations. He has always had an interest in railways and there are other examples of his documentation of railway history in other collections contributing to this database. A black & white photo of a Harris train destined for Flinders Street that has passed through Mont Albert station, which can just be seen in the background. Behind the train on the rear walls of buildings are advertising for Haydn Real Estate and K&M Murray selling Toppa Ice Cream.advertising signs, george l coop, mont albert station, trains, haydn real estate, toppa ice cream, k & m murray, hamilton street shops -
 Vision Australia
Photograph (item) - Image, Help required for Carols by Candlelight
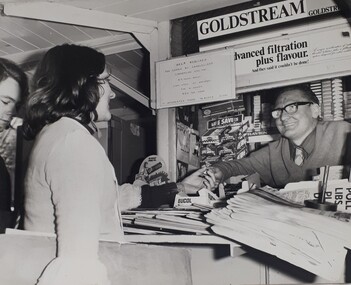
Carols by Candlelight required the assistance of the general public around Melbourne to sell programs and other items, assist ticket sales and other activities. Various avenues were used to call for this assistance, including the circulation of Help Wanted signs at newsagent kiosks at metropolitan railway stations. In this image, a woman buys something from a newsagent kiosk, whilst another person waits behind her. The newsagent smiles from behind his stack of papers, beside a Life Savers rack and in front of cigarette towers behind him. Above him is an advertisement for Goldstream tobacco. The sign attached slightly over the tobacco advertisement reads: Help Required for Carols by Candlelight commencing 27th Nov. 5 1/4 hours daily. 6 day week inc. Saturday. For 4 weeks. 80 cents per hour. If interested phone Mr Burke 511381.carols by candlelight, royal victorian institute for the blind -
 Parks Victoria - Mount Buffalo Chalet
Clock
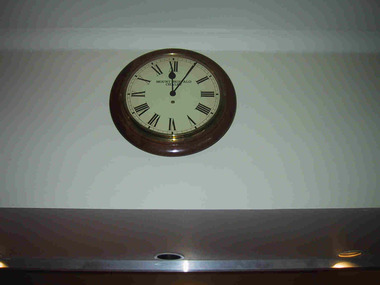
Appears to be an original piece from Mt Buffalo Chalet. Purpose made for the Chalet as inscribe d with Mount Buffalo Chalet to Clock face most likely in Victorian Railways era, post 1924.. "Interestingly, the photograph indicates that a big round clock was mounted on the fenestration just behind and above the cabinet (fig 36). Reminiscent of railway clocks, it was perhaps introduced by the Victorian Railways after 1924. it resembles the clock that was subsequently mounted on the wall above the Chalet reception desk, and more recently stored away for safety with other movable items in the Chalet. Closer comparison however seems to indicate that the two clocks have different wooden frames and probably differ in diameter." "A number of specific items, which have been useful in the day to day operations of the chalet, remain in the building, with each complementing the other to provide context, meaning and character to their setting. items such as the hall porter bell, the many signs providing information to guests, the wall clock, barometer and dinner bell point to the Chalet being a well-run social institution with a pleasant environment for rest, recreation and congenial company." (Pg 81, Historica, MBCC)Large circular clock with "Mount Buffalo Chalet" printed in black on face. Clock has Roman numerals in black with two black hands against a white face. Wooden , circular frame. "Mount Buffalo Chalet" -
 Parks Victoria - Mount Buffalo Chalet
Bell
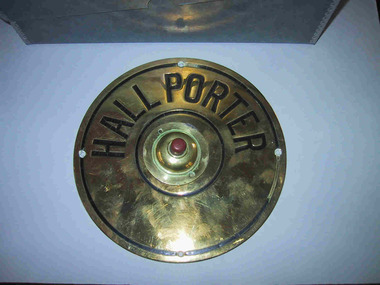
Was attached to a wall near reception but was removed to storage in approx.. 2000 - 2002. The bell has strong associations with the Victorian Railways Era reflecting the service and ethos of Railways with its uniformed Porters welcoming and on duty as Night Porter and day for all guests needs. (Especially lost keys) assistance with luggage, room service and co-ordinating transit and transport with Railways buses and services. A personal recollection is of Joseph the Night Porter welcoming and assisting when as a family with four sleeping children we would arrive after midnight to the Chalet where rooms would be ready, beds turned down and all unpacking of the car supervised by Joseph. (J. Skeggs) "A number of specific items, which have been useful in the day to day operations of the Chalet, remain in the building with each complementing the other to provide context ,meaning and character to their setting. Items such as the hall porter bell, the many signs providing information to the guests, the wall clock, barometer and dinner bell point to the Chalet being a well-run social institution with a pleasant environment for rest, recreation and congenial company." (Pg 81 Historica, MBCC) Listed in Draft Inventory of Significant Collection items A.3 Fixtures and Fitttings. (Pg 165. Historica MBCC)Circular brass disc with inner (separate ) maroon button mounted in raised circular disc. Hall Porter is embossed with black colouring around half of outer, larger disc."HALL PORTER" -
 Wodonga & District Historical Society Inc
Photograph - Fred Rochow Railways Collection - Driver George Judge, 1974
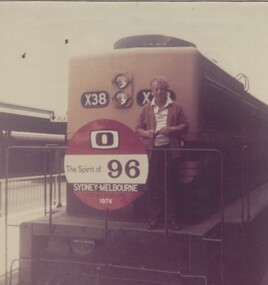
The Fred Rochow Railways Collection incorporates photos related to the operation of the Wodonga Railway Station including different types of trains and railways staff C. 1930 – 1990. It was donated to the Wodonga Historical Society by Fred Rochow, a railwayman who spent many years based in Wodonga. He joined the Victorian Railways on 17th June l947 and retired in 1988. For some time, he was a member of the Australian Federated Union of Locomotive Enginemen and served a term as a member of the Trades Hall Council. He had an extensive knowledge of the struggles that took place to achieve better conditions for railway workers. Fred worked for many years as a fireman and then worked his way up the ranks to driver, experiencing many changes from the days of steam locomotives through to diesel trains, locomotives and even the modern XPT train. He worked throughout Victoria at different stages of his career, with his final working years focused on the northeast of Victoria and the Albury to Melbourne line. After his retirement, Fred continued to share his love of steam miniature trains with the community.This collection has local and statewide significance as it captures images of trains, locomotives and personnel who operated the railway services in Wodonga and throughout Northeast Victoria. The railways played a critical role in opening up Victoria and connecting Australia for trade, business, social communication and transport.Driver George Judge standing on front of Locomotive X38 special train "Spirit of 96" The X class are a class of mainline diesel locomotives built by Clyde Engineering Victorian Railways between 1966 and 1976. X 38 was part of the second order. It entered service on Friday, 8th May 1970. X 37 and X 38 were built as replacements for the two S Class locomotives lost in the fatal Southern Aurora crash at Violet Town in 1969. It was later sold to Pacific National and rebuilt as XR550. "Spirit of 96" was a passenger train specially designed for cast and crew of the Australian 0-10 Network series “Number 96”. It was used to travel from Sydney to Melbourne for the annual TV Week Logie Awards. It was a silver, multi-carriage train with the Commissioner's carriage hooked up at the rear for VIPs. The 16 and a half-hour overnight journey, left from the centre of Sydney at 4.30 pm with a farewell party, complete with red carpet and jazz band in attendance. It featured whistle stop visits at country sidings and stations. Thousands of people turned out to see their favourite stars, before it arrived at Spencer Street station. The rail service of the time was keen to promote its overnight tourism packages, and for the journey the train was christened as the "Spirit of 96”. On front of locomotive "X38" On red black and white sign attached to the front rail of the locomotive "O/The Spirit of 96/Sydney-Melbourne/1974"railways wodonga, fred rochow, wodonga railwaymen, x class diesel locomotive, george judge, spirit of 96