Showing 933 items
matching tram 26
-
 Ballarat Tramway Museum
Photograph - Colour Photograph/s - set of 10, Carolyn Dean, 1/03/1995 12:00:00 AM
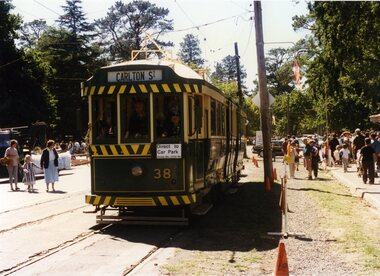
... tram 26..., northbound, Gardens Loop .2 - tram 26 ditto .3 - Richard Gilbert...Begonia Festival BTM Wendouree Parade Staff tram 26 tram 27 ...Set of ten colour photographs of the 1995 Begonia Festival taken by Carolyn Dean - on Kodak paper. 2004.1 - tram 38, northbound, Gardens Loop .2 - tram 26 ditto .3 - Richard Gilbert and Darren Hutchesson standing by 661 .4 - No. 26 running out - Depot Junction .5 - Peter Winspur cleaning sides of No. 26 .6 - Richard Gilbert (as Inspector) and Greg Rogers and friends at Depot junction .7 - John Phillips, Paul Mong, Alastair Reither and Clayton Giles standing in front of No. 13 .8 - No. 33 running out across Wendouree Parade, with 27 and 26 in background. .9 - Len Millar, Roy Sheedy, Travis Jeffrey standing in front of No. 26 .10 - Gavin Young walking across Wendouree Parade at Gardens Loop.On rear of all photos "March 95 C. Dean"begonia festival, btm, wendouree parade, staff, tram 26, tram 27, tram 33, tram 38, tram 13, tram 661 -
 Ballarat Tramway Museum
Photograph - Colour Photograph/s, 23/11/1962 12:00:00 AM
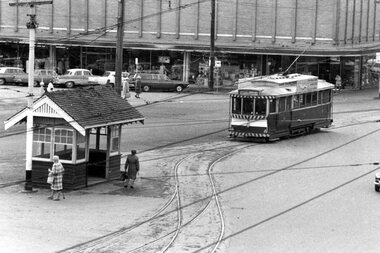
... tram 26...Colour postcard size print of SEC Bendigo trams 26... Cross tram 26 On rear top left hand corner "21.11.62" in very ...Colour postcard size print of SEC Bendigo trams 26 and a single trucker at Charing Cross with Mitchell St. in the background. Photo dated 21.11.1962. Printed on AGFA paper. Both trams fitted with dash canopy lighting, but no large white strip under the driver's windows. 26 showing destination of "Eaglehawk" with two SEC ads and another ad on the front dash panel. Single trucker has a Castrol ad on the roof. In the background are various buildings along the east side of Pall Mall and along Mitchell St. Pole by the front of 26 has directional signs "Melbourne" and "Heathcote / Echuca". On rear top left hand corner "21.11.62" in very wavy handwriting typical of an aged person.bendigo, pall mall, charing cross, tram 26 -
 Ballarat Tramway Museum
Photograph - Black & White Photograph/s, late 1940's or 1950's
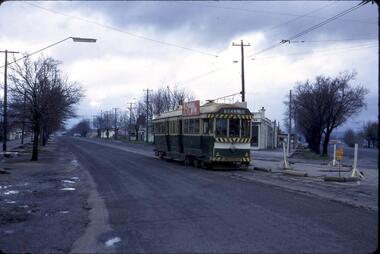
... tram 26...Black and white photograph of Ballarat tram No. 26 crossing... the appearance of tram No. 26 crossing the railway level crossing ...Yields information about the appearance of tram No. 26 crossing the railway level crossing in Lydiard St Nth and the railway features at this location.Black and white photograph of Ballarat tram No. 26 crossing the Railway level crossing in Lydiard St Nth. The tram has the destination of Grey St Sebastopol. In the background is the railway level crossing gates, the goods shed and the signal gantry. Two copies held.On rear in ink (Lloyd's hand writing) - "Ballarat, Lydiard St railway crossing, 27-2-1954, ARHS neg."trams, tramways, lydiard st nth, railway crossing, grey st, tram 26 -
 Ballarat Tramway Museum
Slide - 35mm slide/s, Keith Kings, 20/10/1962 12:00:00 AM
... tram 26...Bendigo trams, 18, 26, 29, 11 in Bridge St. Loop, with 5... Bendigo Bridge St Loop ARHS tram 18 tram 26 tram 29 tram 11 tram 5 ...Bendigo trams, 18, 26, 29, 11 in Bridge St. Loop, with 5 in Nolan St waiting for a Bendigo tram? on 20-10-1962 as part of an ARHS tour to Bendigo. Note white convoy marker on front tram, Tram 18 showing 'RLY Station' destination. Tram 18 has 'Kohn Drinks' ad on front panel. Photo by Keith Kings.Stamped 'K.S.KIngs etc', and in blue ink 'K(k)(384), 1/250, f5.6, 20/10/62, ARHS, Convoy 'A' 5,11,29,26,18 on Bridge St.. Loop, Bendigo'tramways, trams, bendigo, north bendigo, bridge st loop, arhs, tram 18, tram 26, tram 29, tram 11, tram 5 -
 Ballarat Tramway Museum
Photograph - Black & White Photograph/s - set of 4, Richard Gilbert, c1975
... tram 26...Series of four Black and white photographs of tram 26... Brill Trucks Maintenance tram 26 Series of four Black and white ...Series of four Black and white photographs of tram 26 on No. 2 road at the BTPS Depot, undergoing replacement of the broken frame on the Brill 21E truck. The tramcar record sheets note that the car was lifted 15-3-1975 and lower 27-7-1975 and tested on the same day. Seems to have re-entered service on 28/9/1975. .1 - on the front of the road, with a "Defective Not for Service" sign. .2 - car on jacks being either lifted or lowered. .3 - tramcar body lifted showing the word to replace the side frame underway, has the good and broken side frame in the view. .4 - tram being either lifted or lowered - with Rolf Jinks in the view. trams, tramways, btps, depot, brill trucks, maintenance, tram 26 -
 Ballarat Tramway Museum
Slide - 35mm slide/s, Mark Plummer, Dec. 1968
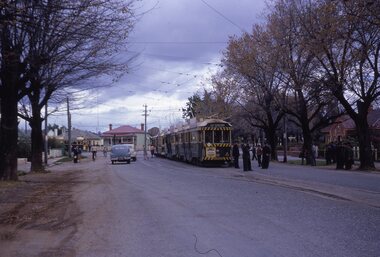
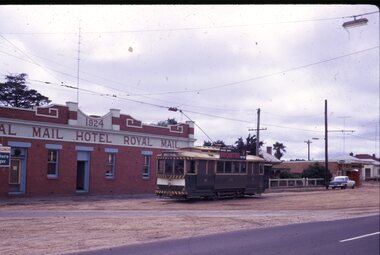
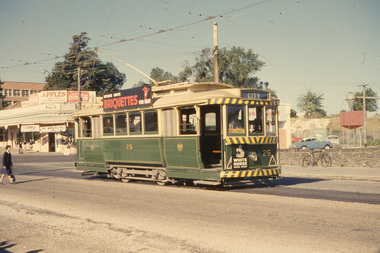
... tram 26...Photo of Ballarat tram No. 26 at the Sebastopol terminus... Royal Mail Hotel tram 26 Photo of Ballarat tram No. 26 ...Photo of Ballarat tram No. 26 at the Sebastopol terminus with the Royal Mail Hotel in the background. Tram waiting for departure, has a briquette roof advertisement. A Fosters Lager ad board on hotel. Note PMG phone box by Milk Bar. Kodak cardboard mount slide, taken Mark Plummer, December 1968.tramways, trams, sebastopol, royal mail hotel, tram 26 -
 Ballarat Tramway Museum
Photograph - Digital image Set of 5, George Coop, 1968 - 1970
... tram 26... and a Twin Lakes sign. .5 - Tram 26, at corner of Sturt and Camp.... Trams tramways Sturt St tram 11 tram 31 tram 13 tram 33 tram 26 ...Yields information about the tram operations at or near the Titanic Bandstand in Sturt St.Five (5) Digital images taken by George Coop during the period 1968 - 1970, of SEC trams in Sturt St, between Lydiard and Grenville Streets on the north side of Sturt St. .1 - Tram 11, descending the hill by the Titanic bandstand with the Post Office in the background. Trams has a Twin Lakes advert, Bliss Bombs and the destination of Mt Pleasant. .2 - Tram 31 ditto, except destination of Victoria St. .3 - Tram 13 with bandstand in the view - for Mt Pleasant. .4 - Tram 33, with a lady and man carrying a box descending the footpath. Tram has the destination of Victoria St and a Twin Lakes sign. .5 - Tram 26, at corner of Sturt and Camp Streets, with the Owen Williams store in the background. trams, tramways, sturt st, tram 11, tram 31, tram 13, tram 33, tram 26 -
 Ballarat Tramway Museum
Photograph - Black & White Photograph/s, Dave Macartney, 1971
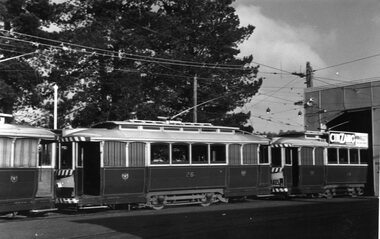
... tram 26.... Second tram is 26, third (partly in depot) - 14. Trams have drop... Ballarat tram 26 tram 14 On rear in pencil "DJM" Black and white ...Black and white photograph of three SEC single truckers on No. 1 road at the SEC Wendouree Parade depot during 1971. Second tram is 26, third (partly in depot) - 14. Trams have drop end blinds down. Tram 14 has a Cinzano spirits advertisement on the roof and a Twin Lakes ad on the front of the tram. Photo by Dave Macartney. Photocopy made 4/1999 for display purposes. Small copy added 10/10/2019. Image updated.On rear in pencil "DJM"trams, tramways, sec depot, ballarat, tram 26, tram 14 -
 Ballarat Tramway Museum
Photograph - Black & White Photograph/s, Richard Gilbert, c1970
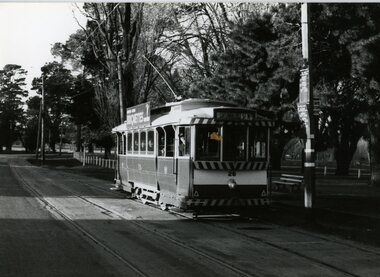
... tram 26...Black and white photograph of Ballarat tram No. 26 sitting... Wendouree Parade tram 26 Black and white photograph of Ballarat tram ...Black and white photograph of Ballarat tram No. 26 sitting in Gardens Loop in Wendouree Parade. Taken c1970. No. 26 has a Briquettes SEC roof advertisement and destination of Drummond St. North. On the adjacent power pole are the timetable boards that were at the loop and an enamel tram stop sign. Photo taken by Richard Gilbert. On Kodak Paper.trams, tramways, gardens loop, wendouree parade, tram 26 -
 Ballarat Tramway Museum
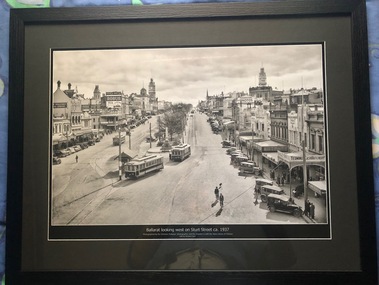
Photograph - Black & White copy, Victorian Railways, "Ballarat, looking west on Sturt St ca 1937"
... tram 26... in kerbs, many pedestrians and trams 20, 26 and 16.... west. Tram No. 26 has the destination of Mt Pleasant, No. 20 ...Original photograph by Victorian Railways, with the original image held by the State Library of Victoria. Edited by Richard Conn. Purchased and framed by the Museum. For a similar photo see Reg Item 8329 .Provides information about the appearance of Sturt St from Grenville St looking west. Tram No. 26 has the destination of Mt Pleasant, No. 20 Sturt St West and No. 16 is travellng to the Gardens. Has in the view buildings of Ballaarat Gas Co, the Ballaarat Mechanics Institute with advertisements for Robur Tea and Davies Bread, Thornton for photos, Terminus Cash Butchery, Carlyon's Hotel, 8 hour monument and Malvern Star cycles. Framed, black & White copy photograph view A2 size, titled "Ballarat, looking west on Sturt St ca 1937". Original image by the Victorian Railways, c1937. Looking from the top of a building in Grenville St. towards the West. Has a number of parked vehicles in kerbs, many pedestrians and trams 20, 26 and 16.ballarat, vr photos, sturt st, robur tea, thornton, ballarat gas co, vacuum oil co, tram 20, tram 16, tram 26, davies bread, shelters, tramways -
 Ballarat Tramway Museum
Slide - 35mm slide/s, Wal Jack, 23/03/1962 12:00:00 AM
... tram 26...Ballarat Tram No. 26, in Barkly St, near Main St... Barkly St tram 26 'SEC Ballarat, No. 26 in Barkly St. near Main ...Ballarat Tram No. 26, in Barkly St, near Main St. - 23.3.1962. Tram has dash canopy lighting, but small white strip. Has large briquettes roof ad and White Horse scotch whiskey ad on front. In back is vacant block and land and corner store. Young lady walking across the road to catch the tram.'SEC Ballarat, No. 26 in Barkly St. near Main St., Ballarat East, 23/3/62' in blue ink.tramways, trams, ballarat, barkly st, tram 26 -
 Melbourne Tram Museum
Negative, Wal Jack, 12/03/1946 12:00:00 AM
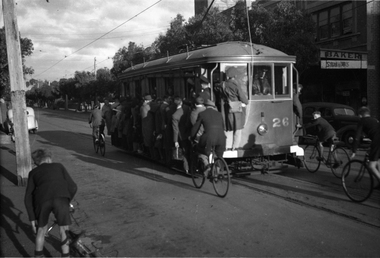
... tram 26...Black and white negative, of Victorian Railways tram 26... tram 26 Black and white negative, of Victorian Railways tram 26 ...Black and white negative, of Victorian Railways tram 26 in Bay Road near depot junction - extremely overload with hangers on, footboards used and a young cyclist hanging onto the rear of the tram. Wal's album print "VR Sandringham - Black Rock Tramways - No. 26 "Toastrack" in Bay Road near depot junction - Black Rock Bound (5.55pm) 12-3-46" along with Wal Jack stamp and T555 Note the white bumper bars. A uniformed tramway man? and conductor are observing. In the background is the Roxy Theatre and the spire of the All Souls Anglican Church. (The church spire has since been rebuilt).Also in the background is the Salvation Army Hall, Barker Upholster and two buses. Photo in the Wal Jack Victorian Railways Album.trams, tramways, victorian railways, vr trams, bay road, sandringham, tram 26 -
 Ballarat Tramway Museum
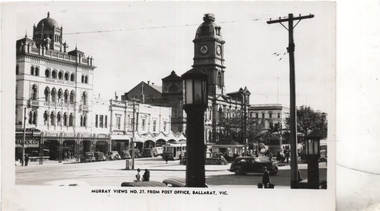
Postcard, Murray Views, "Murray Views No. 27 from Post Office Ballarat Vic", 1948
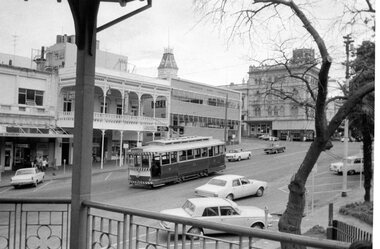
... tram 26... in a note to Ken Magor of Newcastle notes the trams (No. 26... the trams (No. 26 and a bogie), tram services, the ESCo fuse box ...Photo shows the view looking southwest from the Post Office towards the Town Hall. Two trams are in the view including the National Mutual building, the Town Hall, and Myer. Wal Jack in a note to Ken Magor of Newcastle notes the trams (No. 26 and a bogie), tram services, the ESCo fuse box, the tram waiting shelter, and that the location is known as "City Tram Centre". Wal has dated the photo as 1948. Note: There are two Murray Views No. 27 - see item 7360 as well.Yields information about Sturt and Lydiard St view and tram services.Postcard black and white, plain back, with a handwritten note on rear.See image 2 for details of the handwritten note by Wal Jack on the rear. tramways, trams, sturt st, lydiard st, tram 26, tramway centre -
 Ballarat Tramway Museum
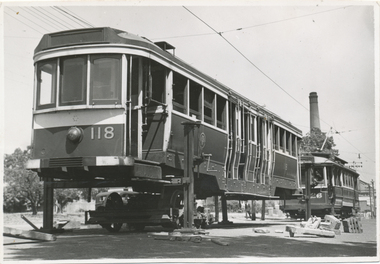
Photograph - Black & White Photograph/s, 14/01/1947 12:00:00 AM
... tram 26... removed. Tram No. 26 is behind with a destination of Newtown... 26 tram 31 Black and White print contained within the Wal ...Black and White print contained within the Wal Jack Bendigo and Geelong Album, see Reg Item 5003 for more details. Photo of MMTB Maximum Traction Car No. 118 being unloaded in Corio Terrace 14 Jan 1947. Tramcar became No. 31. Tram is on jacks, with one set of bogies under the tram. Has a number of wood blocks lying alongside. Tram 118 has the wartime white stripes on the tram. No destination box, windows lowered and trolley poles removed. Tram No. 26 is behind with a destination of Newtown. No details on photographer. trams, tramways, geelong, unloading, bogie trams, corio terrace, transporting trams, tram 118, tram 26, tram 31 -
 Ballarat Tramway Museum
Photograph - Digital image Set of 5, George Coop, 1968 - 1970
... tram 26... and Jury shop. .5 - Tram 26, in Bridge St, with the points... and Jury shop. .5 - Tram 26, in Bridge St, with the points ...Yields information about the tram operations at the intersection of Bridge and Grenville St and Sturt St.Five (5) Digital images taken by George Coop during the period 1968 - 1970, of SEC trams in the Grenville St area. .1 - Tram 31 crossing Grenville St to pick up passengers in Sturt St - the shelter in the foreground and the Woolworth's Big W store in the background. .2 - Tram 17 picking up a passenger at the Shelter, with the Dickins store in the background. Tram has a "Make Bliss not Love" roof advert and has a destination of Gardens via Sturt St West. .3 - Tram 13 - as for .1 .4 - ditto with 12 in the City Loop - in the background are the Magnet Bakery, Begonia City Butch and Gilbert and Jury shop. .5 - Tram 26, in Bridge St, with the points at Grenville St in the foreground. Tram has the destination of Gardens via Sturt St West. In the background are the shops for Faull's shoes and Suttons HMV. trams, tramways, grenville st, shelters, bridge st, sturt st, city loop, passengers, tram 31, tram 17, tram 13, tram 12, tram 26 -
 Ballarat Tramway Museum
Photograph - Black & White Photograph/s, The Courier Ballarat, 24??/12/1987
... tram 26.... Tram No. 26 on 3 road. Horse tram on No. 4 road. Note... No. 1 BTPS Reconstruction Tramcars Tram 1 tram 26 On rear ...Black and white photograph of Garry Wood 'working' on the body framework of Horse Tram No. 1, on No. 4 road, 2?/12/1987. Posed by the Ballarat Courier newspaper, and published on 26/12/1987, the day of the 100th anniversary of the tramway opening. Tram No. 26 on 3 road. Horse tram on No. 4 road. Note original part of depot yet to receive its green cladding.On rear, are cropping marks, "courier 26/12/1987", and written on label "Photo page 65, bottom, reduce to 5 1/2" x 3 1/2" and 84%".trams, tramways, horse tram no. 1, btps, reconstruction, tramcars , tram 1, tram 26 -
 Ballarat Tramway Museum
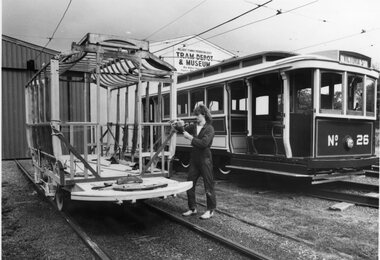
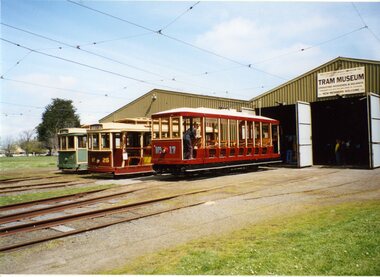
Photograph - Colour Photograph/s set of four, Carolyn Dean, 8/11/1997 12:00:00 AM
... tram and No. 26. 764.4 - Tram No. 26 with Travis Jeffrey... No. 592, Tower Truck, Horse tram and No. 26. 764.4 - Tram No. 26 ...Group of four colour postcard size photographs taken on 8/11/1997 of the visit of the Vintage Car Club to Ballarat. 764.1 - Horse tram No. 1 and rear of ex MMTB Mark III bus, No. 592 on depot area. 764.2 - as for 764.1 764.3 - from access road in front of shed, showing bus No. 592, Tower Truck, Horse tram and No. 26. 764.4 - Tram No. 26 with Travis Jeffrey and John Phillips.On rear of each photo in ink "8.11.97"btm, vintage car club, tram depot, mark iii bus no. 592, tram 1, 26 -
 Ballarat Tramway Museum
Photograph - "Maroon Day" - BTM, Benjamin Boehle-Mitchell, 19/1/2025
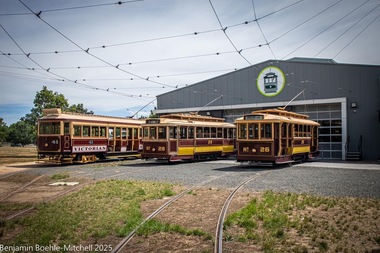
... tram 26... and 26 on the depot fan 2 - Trams 41 and 28 at Depot Junction... and 26 on the depot fan 2 - Trams 41 and 28 at Depot Junction ...Digital image of a "Maroon Day" 19/1/2025 1 - Trams 41, 28 and 26 on the depot fan 2 - Trams 41 and 28 at Depot Junction. Photos by Benjamin Boehle-Mitchell. Yields information about the BTM Operations Jan. 2025Digital image of 2 colour photographstramcars, btm, tram 41, tram 28, tram 26 -
 Ballarat Tramway Museum
Photograph - Digital image set of 6, 27/06/1971 12:00:00 AM
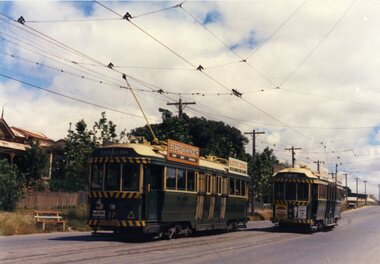
... tram 26..., "Make Bliss, Not Love". .4 - slide FQ22 - Trams 26 and 41... Grenville St tram 41 tram 26 tram 27 tram 37 Set of six Digital ...Yields information about the SEC Ballarat trams in the months before the closure of the SEC Tramway system. Yields information about the streetscape.Set of six Digital images, scanned from slides by Graeme Cleak, scanning by Peter Winspur 9/2011. .1 - Slide FQ16 - No. 41, outbound at the south end of Drummond St south about to turn into Skipton St, with the destination of Bell St. .2 - slide FQ18 - No. 41, outbound to Sebastopol terminus, Albert St, just before the terminus itself. .3 - slide FQ21 - No. 41, inbound Albert St Sebastopol with the Sebastopol Town Hall in the background. Tram has a "Bliss Bombs" roof advertisement on the side, "Make Bliss, Not Love". .4 - slide FQ22 - Trams 26 and 41, crossing at Grey St Sebastopol Loop. No. 41 has destination of Grey St. .5 - slide FQ27 - Trams 27 and 37, crossing at the Hamilton Ave loop, No. 41 inbound - with destination of Victoria St at the Hamilton Ave loop with the "Stonehenge" fence house in the background. Sturt St West. .6 - slide FS29 - No. 37 at Grenville St, Sturt St intersection with Bridge St in the background. Tram has the destination of View Point and is entering the loop itself. The destination was no longer in use at the time of the photograph and would indicate that the destination has been arranged. In the background is the Woolworths Big W store and the Dickins Food Store. All photos taken on 27/6/1971. trams, tramways, drummond st sth, sebastopol, grey st, albert st, sturt st west, grenville st, tram 41, tram 26, tram 27, tram 37 -
 Ballarat Tramway Museum
Photograph - Black & White Photograph/s - set of 3, Richard Gilbert, Nov. 1998
... tram 26... - Photo of crew in front of tram 26 with caption on the rear... Ride Signs tram 26 All have captions written on back in blue ...Set of three black and white photographs of activities around the tramway during November 1998 sent to the Editor of Trolley Wire - used in the February 1999 issue of Trolley Wire. All photos by Richard Gilbert. Photos taken early November 1998. 1145.1 - photo of the old fare signs with caption on the rear "Retirement at last for the Museum's original tram ride signs, in service for over twenty years, and looking like it. With the fare rise to $2 / $1 new signs were introduced." 1145.2 - Photo of crew in front of tram 26 with caption on the rear "On Springfest Day in early November, Motorman O'Neil and Conductor Giles on car 26, ready for the onslaught." - photo taken 1/11/1998. 1145.3 - photo equipment on trolley being moved around with caption on the rear - "The motor cases of car 33 are currently residing on the trolley for cleaning. Here they are being relocated to the bottom of 3 road by Al and Dave, with assistance from our youngest and keenest worker, Danny Edwards." All have captions written on back in blue ink (as noted in description) and "Richard Gilbert" in bottom right hand corner, and cropping marks in blue ink on rear.trams, tramways, trolley wire, springfest, btm, volunteers, tram ride signs, tram 26 -
 Ballarat Tramway Museum
Photograph - Digital image Set of 10, George Coop, 1968 - 1970
... tram 26... and Pleasant Streets. .1 - Tram 26 climbing the Sturt St hill... tram 26 tram 40 tram 30 tram 39 tram 18 tram 31 tram 41 tram 13 ...Yields information about the tram operations and the landscape views of the Sturt St median strip.Ten (10) Digital images taken by George Coop during the period 1968 - 1970, of SEC trams in Sturt St, between the City and Pleasant Streets. .1 - Tram 26 climbing the Sturt St hill to Lydiard St, with the Cook's Private Hotel, the Commonwealth Bank and the National Mutual Life building in the background. Photo taken from the Titanic Bandstand. .2 - Tram 40 Sturt St, enough to Lydiard St North just before Raglan St. Has a lady passenger by the tram stop. .3 - Tram 30 - Sturt St north side, near Armstrong St, - has a blue framing line around the photograph. .4 - Tram 39, Sturt St, near Doveton St, shows the rotunda in the median strip. .5 - Tram 18, with median step in view. .6 - Tram 31, with two Johnnie Walker whiskey roof adverts, outside the National Mutual Life building with the Alan Bros Jewellers and Golden Star Chinese Cafe in the view. .7 - Tram 31, Sturt St south side with Town Hall and the Golden City Hotel in the view. Tram has destination of Gardens via Drummond North. .8 - Tram 41 - ditto - going to Sebastopol. .9 - Tram 13, south side, Gardens via Sturt West, about , near Ripon St, with the Ampol service station in the background and about to pick up a lady passenger .10 - Tram 17, near Doveton St. Has a Twin Lakes sign and a Wilkinson Sword Razor Bladese roof advert. trams, tramways, sturt st, raglan st, passengers, doveton st, tram 26, tram 40, tram 30, tram 39, tram 18, tram 31, tram 41, tram 13, tram 17 -
 Ballarat Tramway Museum
Photograph - Colour Photograph/s, William. F. Scott, 26/12/1987 12:00:00 AM
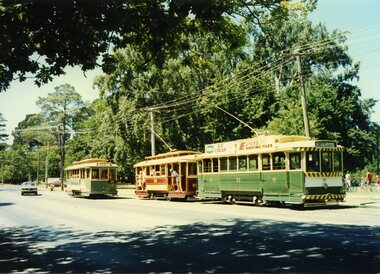
... tram 26...Colour photograph of three trams, 27, 33 and 26 at Gardens.... Trams tramways Wendouree Parade Gardens Loop tram 26 tram 27 ...Yields information about the appearance and the use of trams by the BTM in Wendouree Parade, in varying livery's and used in a framed photograph in the BTM depot.Colour photograph of three trams, 27, 33 and 26 at Gardens Loop, Wendouree Parade, photograph by William F Scott, 26.12.1987, celebrating 100 years of tramways in Ballarat. Printed on AGFA paper. Photo used in Ballarat Tramway Museum book - "Ballarat's Heritage Tramway" and in Reg item 2007 - framed photograph in the Meal room. On rear in ink "Ballarat Try Museum 26.12.1987 / William F Scott photo.trams, tramways, wendouree parade, gardens loop, tram 26, tram 27, tram 33 -
 Ballarat Tramway Museum
Photograph - Colour Photograph/s, 23/11/1962 12:00:00 AM
... tram 26...967.1 - Colour postcard size print of SEC Bendigo trams 4.... North Bendigo tram 4 tram 17 tram 26 tram 19 On rear top left ...967.1 - Colour postcard size print of SEC Bendigo trams 4 and 17 at a crossing Loop on the Eaglehawk line. Photo dated 21.11.1962. Printed on AGFA paper. Both trams fitted with dash canopy lighting, but no large white strip under the driver's windows. 17 showing destination of "Eaglehawk", has two SEC ads on the side re Electric Cook and a White Horse whiskey ad on front panel. Tram 4 showing destination of "Quarry Hill", has two ad panels on roof and two ads on front panel including one Cohn's' Drinks. 967.2 - Colour postcard size print of SEC Bendigo tram 26 in Mitchell St. crossing Hargreaves St. heading for Charing Cross. Photo dated 21.11.1962. Printed on AGFA paper. Trams fitted with dash canopy lighting, but no large white strip under the driver's windows. Has two roof ads and one ad on rear drivers panel. In background of photo are the buildings along Mitchell St. looking down along Mitchell St and into View St. Has Plaza theatre sign in photo above tram. On right hand side, is a van marked "Carrier M. Slattery". Tram has destination of "Quarry Hill" in rear box. 967.3 - Colour postcard size print of SEC Bendigo tram 19 on the North Bendigo line. Photo dated 21.11.1962. Printed on AGFA paper. Trams fitted with dash canopy lighting, but no large white strip under the driver's windows. Has destination "Nth Bendigo" and SEC roof ads and drivers panel ad for Briquettes.On rear top left hand corner "21.11.62" in very wavy handwriting typical of an aged person.bendigo, eaglehawk, mitchell st., north bendigo, tram 4, tram 17, tram 26, tram 19 -
 Ballarat Tramway Museum
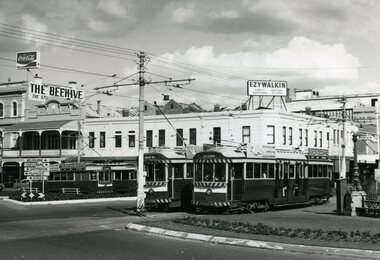
Photograph - Black & White Photograph/s, Andrew Ward, 15/01/1972 12:00:00 AM
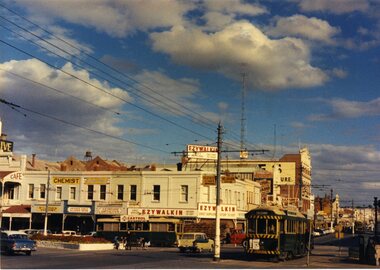
... tram 26... building and Ezywalkin stores. Trams 7, 5 and 26 in the photograph... Mall tram 7 tram 5 tram 26 On rear in ink "Sat 15.1.72 ...Yields information about the appearance of Bendigo electric trams at the time of opening, how passengers could be seated, staff, paint schemes, decorations, and truck arrangements.Black and White photograph of four trams at Charing Cross, taken from the south east corner, looking towards the Beehive building and Ezywalkin stores. Trams 7, 5 and 26 in the photograph. Photo by Andrew Ward 15.1.1972.On rear in ink "Sat 15.1.72" / "single truck car 7 and bogie cars 5 & 26" in the top left hand corner and in a mix of ink and pencil "Bendigo Trust / Andrew C. Ward, Bendigo Vic 3550".trams, tramways, bendigo, charing cross, pall mall, tram 7, tram 5, tram 26 -
 Bendigo Historical Society Inc.
Photograph - HARRY BIGGS COLLECTION: EAGLEHAWK TRAM
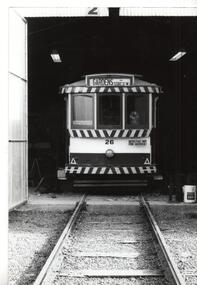
... Tram no. 26... of Eaglehawk sign on it. The tram is no. 26. Two photos both the same... Tram Tram no. 26 Photograph. Harry Biggs Collection. 3 black ...Photograph. Harry Biggs Collection. 3 black & white photos of workmen moving a tram. The tram has a Borough of Eaglehawk sign on it. The tram is no. 26. Two photos both the same of a crane lifting objects, towards the back is the crane operator standing in the truck operating the crane. Five men are standing in the foreground. The third photo is of a tram bogie that is at the site of the moving of tram no 26.organization, public utility, transport, harry biggs collection, eaglehawk tram, tram no. 26 -
 Ballarat Tramway Museum
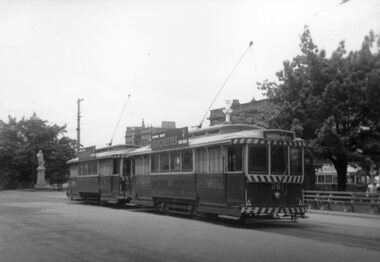
Photograph - Black & White Photograph/s, Bob Lilburn, c1961
... tram 26... (No. 26 being the rear tram nearest to the photographer...trams tramways Sturt St. City Terminus tram 26 Black ...Black and white photograph of two single truck trams (No. 26 being the rear tram nearest to the photographer) at the City terminus in Sturt St. at the intersection with Lydiard St. Robert Burns statue in the background. Both trams in the intermediate scheme of lights but no large white strip under the dash canopy lights. This places the photog as being taken during the early 1961's onwards. Both trams have Briquettes roof advertisements. A bogie tram is on the other side of the road. No. 26 showing "Gardens via Sturt St. W". Two copies held.trams, tramways, sturt st., city terminus, tram 26 -
 Ballarat Tramway Museum
Photograph - Black & White Photograph/s set of 19, Mar. 1972
... tram 26... - tram 26 at Quarry Hill terminus looking back into city. 981.5... tram 26 On rear of each photo in the top left hand corner ...Set of 19 black and white prints, all 89mm square of Bendigo trams, date machine printed on print is "Mar 1972". 981.1 - Tram 21 at North Bendigo terminus, with level crossing in background. Has destination "Golden Square" and two SEC roof ads. 981.2 - tram 2? at Eaglehawk, with destination "Depot", two SEC roof ads and "Leo A. Hughes Photographer" on side of building in background. 981.3 - tram 2? at Eaglehawk, side on view. 981.4 - tram 26 at Quarry Hill terminus looking back into city. 981.5 - tram 7 en route to North Bendigo at the site of the Bridge St. loop. Has a Peters Ice Cream truck and Sandhurst Fruit Juices truck on right side of photograph. 981.6 - tram 2 at Quarry Hill terminus. 981.7 - tram 2? at one of the loops on the Eaglehawk line, inbound? 981.8 - bogie tram at Charing Cross with fountain in background. Side on view looking south. 981.9 -trams 7 and 21 on Golden Square/North Bendigo line with bogie tram in background, at Charing Cross. Same as item 972. 981.10 - bogie tram at Charing Cross - has buildings in south west corner in background, including Colonial Mutual Life and an advertisement for the Herald newspaper. 981.11 - trams 25, 7 and two other trams at Charing Cross. 981.12 - trams 2 and 26 and three others at Charing Cross. 981.13 - tram 25 at Golden Square terminus, with Rodda's Golden Square Hotel in the background. Tram showing destination of "Nth Bendigo" 981.14 - tram 24, showing "Special" on depot access track. Has two Johnnie Walker roof ads on side. 981.15 - as above, but tram on bridge outside depot. 981.16 - trams 25 and 28 at depot 981.17 - tram 24 showing "Special" on depot access track with a single truck car in background. 981.18 - trams 2 and 26 at Charing Cross. Has advertisements for "Armstrong Tyre Service" and "Cohn's drinks" on buildings in background. 981.19 - Bendigo 2 at location?, about to enter a loop or double track section. Has hotel in background. On rear of each photo in the top left hand corner is a print number 1 to 19 in ink and location notes, generally "Bendigo"trams, tramways, charing cross, bendigo, golden square, quarry hill, tram 2, tram 21, tram 7, tram 24, tram 26 -
 Ballarat Tramway Museum
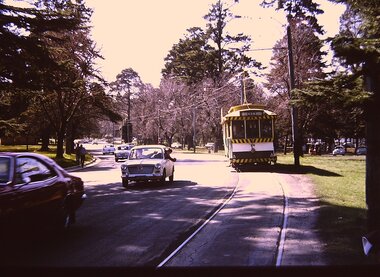
Photograph - Digital image Set of 4, Chris Phillips, c1971
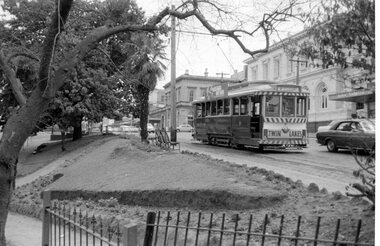
... tram 26... the Trams" meeting. .1 - No. 26 descending the hill from Carlton... tram 27 tram 26 tram 43 Set of four digital images of trams ...Yields information about the use of trams in the Gardens area prior to closure.Set of four digital images of trams in the Gardens area by Chris Phillips c1971. Possibly on the day of the "Save the Trams" meeting. .1 - No. 26 descending the hill from Carlton St. Has the destination of City. .2 - Nos. 39 and 26 at Gardens Loop with a group of photographers on the right hand side. .3 - No. 27 with destination of City, just after leaving the Carlton St stop. .4 - No. 43 at Gardens Loop.trams, tramways, wendouree parade, gardens, carlton st, gardens loop, tram 39, tram 27, tram 26, tram 43 -
 Ballarat Tramway Museum
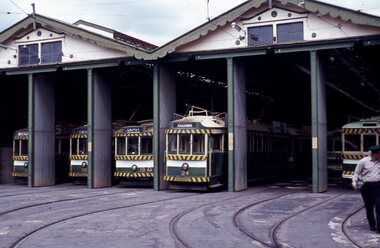
Slide - 35mm slide/s - set of 11, Eldon Hogan, mid 1960's to early 1970's
... tram 26... Eaglehawk Depot Charing Cross Golden Square tram 26 tram 19 tram 24 ...Set of 11 Agfa Plastic mounted slides - from the Eldon Hogan collection - possibly on an ARE Bendigo tours - mid 1960's (black destination rolls) and late 1960's or early 1970's. Scanned on the Canon scanner at the depot 15/12/1971 at the time of the installation of the scanner. .1 - front of depot -26, 19, 24, 29 and 28 amongst those present. .2 - ditto .3 - 24 departing depot .4 - 26 at Eaglehawk .5 - No. 5 turning from Pall Mall into Mitchell St with town hall in background. .6 - No. 5 using crossover in Mitchell St - with Maples, CBA Bank, Astor, Homecrafts, Roger David shops or signs in the background. .7 - ditto .8 - bogie car at Charing Cross with the Fountain Plaza shopping centre in the background. .9 - Charing Cross, with the fountain in the foreground, The Beehive and three trams in the view. .10 - No. 24 outbound, Golden Square line crossing the bridge over the creek, adjacent to the discovery of Gold Monument. .11 - ditto. tramways, trams, bendigo, eaglehawk, depot, charing cross, golden square, tram 26, tram 19, tram 24, tram 29, tram 28, tram 26, tram 5 -
 Ballarat Tramway Museum
Photograph - Colour Photograph/s - set o f8, Carolyn Dean, 25.09.2005
... tram 26... Parade. .1 - Trams 27, 26 and Bendigo 17 in front of the depot... tram 26 On rear of all photos "25.9.05" and " Photo Carolyn ...Set of eight colour photographs of the operation of 100th anniversary of electric trams in Ballarat, 25/09/05 in Wendouree Parade. .1 - Trams 27, 26 and Bendigo 17 in front of the depot. .2 - 17 at St. Aidans Drive .3 - ditto with Graeme Cleak and Len Miller standing in front .4 - 17 and horse tram at loop. .5 - Horse tram 1 at St Aidans .6 - Horse tram 1 arriving gardens Loop .7 - 17 at St Aidans Drive with Graeme Cleak and Darren Hutchesson .8 - Horse tram arriving Gardens Loop with Sam Boon learning the brakes.On rear of all photos "25.9.05" and " Photo Carolyn Dean"horse tram, bendigo 17, 100 years of electric trams, wendouree parade, tram 1, tram 17, tram 27, tram 26