Showing 244 items
matching route signs
-
 Ballarat Tramway Museum
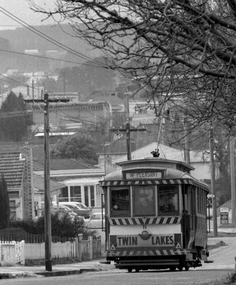
Photograph - Digital image, Peter Bruce, "No. 11 Mt Pleasant", 1970s
Yields information about the Mt Pleasant route and Barkly St.Digital image, black and white, of No. 11 in Barkly St, out bound to Mt Pleasant. Tram has a Twin Lakes sign. Photo taken by Peter Bruce 1970's and 1971, prior to the closure of the Ballarat tramway system. Peter's Title of image: "No. 11 Mt Pleasant" trams, tramways, barkly st, mt pleasant, tram 11 -
 Ballarat Tramway Museum
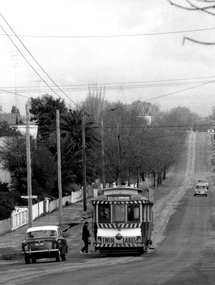
Photograph - Digital image, Peter Bruce, "No. 11 Setting down.", 1970s
Yields information about the Mt Pleasant route and Barkly St.Digital image, black and white, of No. 11 in Barkly St, out bound to Mt Pleasant setting down passengers. Tram has a Twin Lakes sign. Mini Minor motor car in the front of the tramcar. Photo taken by Peter Bruce 1970's and 1971, prior to the closure of the Ballarat tramway system. Peter's Title of image: "No. 11 Setting down."trams, tramways, barkly st, mt pleasant, tram 11 -
 Ballarat Tramway Museum
Photograph - Digital image, 1970s
Yields information about the Mt Pleasant route and Main St.Digital image, black and white, of No. 11 in Main St Ballarat, running out to Mt Pleasant. Tram has a Twin Lakes sign. Robson Glaziers shop in the background. Photo taken by Peter Bruce 1970's and 1971, prior to the closure of the Ballarat tramway system. Peter's Title of image: "No. 11 turns out of Barkly St" (not correct location)trams, tramways, mt pleasant, main st, tram 11 -
 Ballarat Tramway Museum
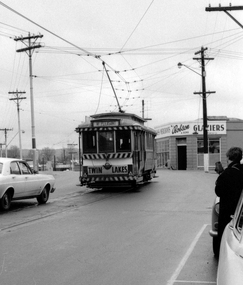
Photograph - Digital image, 1970s
Yields information about the Mt Pleasant route and Barkly St.Digital image, black and white, of No. 30 in bound along Barkly St, Mt Pleasant. Tram has a Twin Lakes sign and destination of Gardens via Drummond Nth. Tram picking up passenger at rear door, while a Vanguard motor car waits. Photo taken by Peter Bruce 1970's and 1971, prior to the closure of the Ballarat tramway system. Peter's Title of image: "No. 31 and Vanguard"trams, tramways, barkly st, mt pleasant, tram 31 -
 Ballarat Tramway Museum
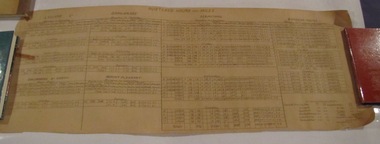
Document - Roster, Electric Supply Co. of Vic (ESCo), "Rostered hours and Miles", 1910's?
Yields information about the details the rosters for crews during the ESCo era and how the tram service operated. Further work on the sign on / off times and knowledge of timetables could determine the date.Single large rolled sheets which has been hand written detailing the Rostered Hours and Miles for crews during the ESCo era. Gives details for the Lydiard St, Drummond St North, Orphanage, Mount Please, Sebastopol and Gardens routes for Monday to Thursday, Fridays, Saturdays and Sundays rosters listing run number, sign on/off, rostered hours, total, number of trips, rostered miles, garden miles total miles and average speed. In the bottom right hand corner is a list of distances for the Gardens routes. Possible 1910's given Reg Item 4738, which can in the same set of donations. trams, tramways, ballarat, rosters, employees, shifts, timetables, esco -
 Ballarat Tramway Museum
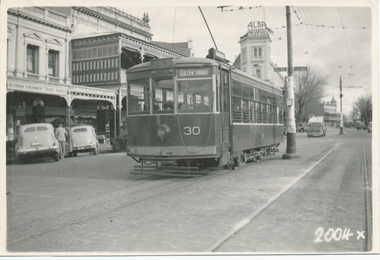
Photograph - Black & White Photograph/s, Jun. 1949
Black and White print contained within the Wal Jack Bendigo and Geelong Album, see Reg Item 5003 for more details. Photo of Bendigo Birney No. 30 in High St Bendigo at the end of the double track line en route to Golden Square. Wal's album notes date the photo as June 1949. In the background is the Victorian Government Tourist Bureau and an advertising sign for "Alba Motor Spirit" Has the number "2004X" written in white ink on the negative. Printed on Ilford paper. On rear in pencil "468"trams, tramways, bendigo, birney, high st, tram 30 -
 Ballarat Tramway Museum
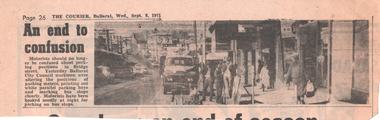
Newspaper, The Courier Ballarat, "An end to confusion", 8/9/1971
Newspaper item with photograph of Council workers changing car parking signs in Bridge St following the closure of the two tram routes using the streets. Notes the confusion over parking in bus stop zones.Yields information about the closure of the SEC operated tram system and changed car parking.Newspaper cutting from The Courier 8/9/1971.tramways, closure, ballarat, bridge st, car parking, bus stops -
 Ballarat Tramway Museum
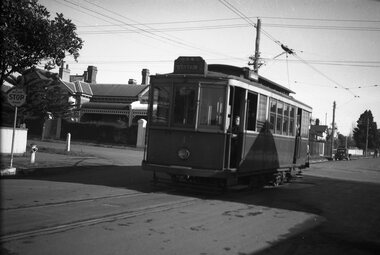
Negative, Wal Jack, early 1950's
Negative and Digital images of the Wal Jack Geelong Negative file of Geelong No. 1 at the Newton terminus, corner of Aphasia St and Shannon Ave. The house in the background remains in position. The tram has the destination of Station. Note the sign on the left hand side "Major STOP Road". Early !950's. prior to the 1/12/1952 route reorganisation, when Newtown Trams went to Eastern Park. trams, tramways, geelong, newtown, aphasia st, tram 1 -
 Ballarat Tramway Museum
Photograph - Black and White W4 671 St Kilda Road, Charles Craig
Photograph shows Ballarat Tramway Museum tram W4 671 (St Kilda Beach, route 15) in St Kilda Road at High Street during the late 1950s or early 1960s It has a "Mr Motorist keep my tracks clear" sign on the rear. A number of sun shades have been lifted.Yields information about W4 class trams.Photograph - Black and White W4 671 St Kilda Roadtramways, trams, w4 class, tram 671, st kilda road -
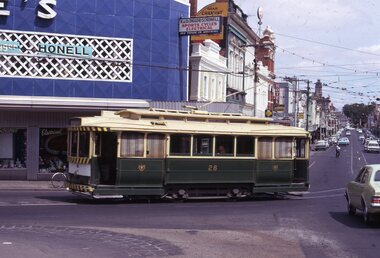 Ballarat Tramway Museum
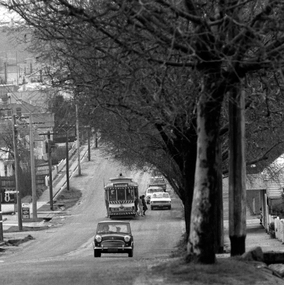
Slide - Tram 28 Stones Corner, Richard Jones, Mar. 1970
Image shows Ballarat 28 at Stones corner en route to Mt Pleasant in Main St. The weather blinds, fully drawn are showing their age. In the background is Stones Corner store, a sign board K&O (Digger) Schonell Sports Cycles and Electrical and Gear Chemist.Yields information about Stones Corner and tram 28.Digital image of a Kodachrome slideballarat, trams, tramways, tram 28, main st, stones corner -
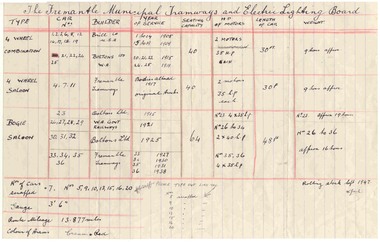 Ballarat Tramway Museum
Document - List, Wal Jack, Fremantle Rolling stock list - 1947, 1947
List of Fremantle Municipal Tramways and Electric Lighting Board tramcars - handwritten and signed W.Jack. Dated 1947 - showing type, car numbers, builder, year of service, seating capacity, HP of motors, length and weight. Also shows car scrapped, gauge, route mileage and colours. See also Reg items 152 and 5628 for other lists.fremantle, mtt, perth -
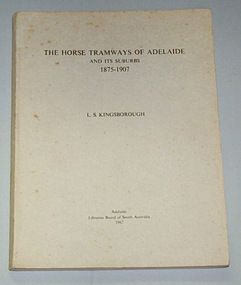 Ballarat Tramway Museum
Book, L.S. Kingsborough Glen Osmond S.A, "The Horse Tramways of Adelaide and Its Suburbs 1875-1907", 1967
A brief history of each tramway company that operated in Adelaide and suburbs, along with photographs of horse trams, 'Carette', Juliens Patent Experimental Electric Tram, conductor and fare equipment. Appendix I included rules for drivers and conductor with Adelaide and Suburban Tramway Company Limited. Appendix II (a), (b) and (c), outline drawings of various types of cars. Appendix III, destination signs and lights. Appendix IV, Adelaide and Suburbs Horse Tram routes in 1908.trams, tramways, horse trams, adelaide -
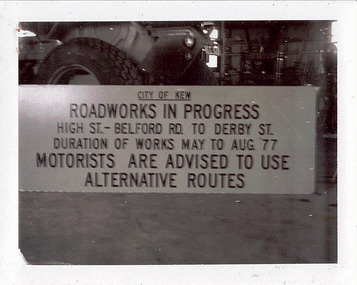 Kew Historical Society Inc
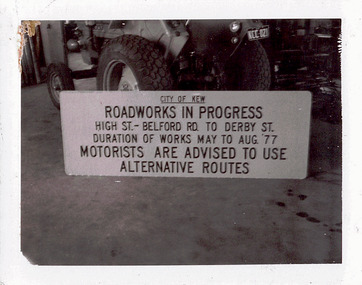
Photograph - City of Kew 'Roadworks in Progress' sign, 1969-80
One of a series of photographs donated by the City Engineer of the former City of Kew, showing road works. The photos variably include council workers, signage and equipment.One of a series of photographs of core local government services as practised by the City of Kew. The photographs are an accurate record of street works of the period. Original black and white photographic positive of a sign advertising roadworks in the City of Kew. The photograph was probably taken in what was then the Kew Council Depot on the corner of High and Disraeli Streets. The sign reads: "City of Kew / Roadworks in Progress / High Street - Belford Road to Derby St. / Duration of works May to Aug 77 / Motorists are advised to use alternative route". city of kew, local government -- city of kew, road works, street works, kew city depot -
 Kew Historical Society Inc
Photograph - City of Kew 'Roadworks in Progress' sign, 1969-80
One of a series of photographs donated by the City Engineer of the former City of Kew, relating to road works. The photos variably include council workers, signage and equipment.One of a series of photographs of core local government services as practised by the City of Kew. The photographs are an accurate record of street works of the period. Original black and white photographic positive of a sign advertising roadworks in the City of Kew. The photograph was probably taken in what was then the Kew Council Depot on the corner of High and Disraeli Streets. The sign reads: "City of Kew / Roadworks in Progress / High Street - Belford Road to Derby St. / Duration of works May to Aug 77 / Motorists are advised to use alternative route".city of kew, local government -- city of kew, road works, street works, kew city depot -
 University of Melbourne, Burnley Campus Archives
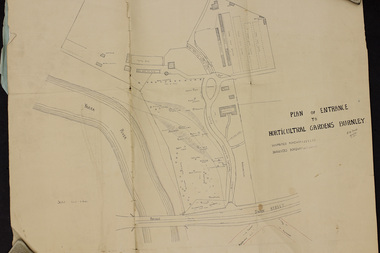
Plan, Plan of Entrance to Horticultural Gardens Burnley, 1932
Copy of plan photographed at the Public Records Office Victoria. (1) Hand drawn plan signed by A.W. Jessep 8/12/32 with 'Suspected Roadway' and ' Suggested Roadway'. Scale 1 inch - 1 chain. Trees on East side named. (2) Memorandum to The Agricultural Superintendent dated 08.12.1932 'Re Proposed Boulevard Along the River Yarra' from the Principal A.W. Jessep. Plan had been to put road through the Lagoon Paddock and he suggested the route outside the Burnley College grounds.prov, burnley gardens, a.w. jessep -
 Melbourne Tram Museum
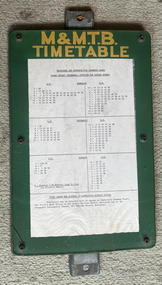
Functional object - Timetable Board, Melbourne & Metropolitan Tramways Board (MMTB), Camberwell Junction - Batman Ave, 1970s
Timetable board for Camberwell Junction Batman Ave route 70, detailing times that services were scheduled to depart the Junction. Probably used until replaced by The Met style signs in the mid-1980s.Demonstrates a timetable board style used by the MMTB in the 1970s and early 1980s.Board made up to display tramway timetables for attachment to a post comprising heavy galvanised steel backing sheet with two small channels either end, spot welded to the steel back, front painted in green with the letters "M&M.T.B" in yellow paint, perspex sheet at the front, secured by 6 Allen screws with nuts on rear, containing a typed timetable sheet - for Camberwell Junction for Batman Ave timetable - undated. tramways, map, batman ave, camberwell junction, route 70, timetable -
 Ballarat Tramway Museum
Photograph - Geelong vintage bus
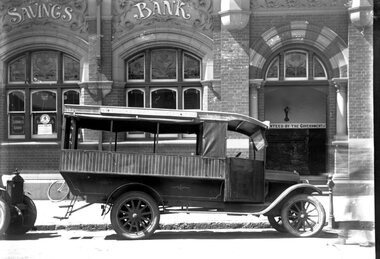
Private bus parked outside the former lavishly signed State Savings Bank in Moorabool St on the SE corner with Corio St. The bus provided a direct route to West Geelong (Church St and possibly to the stockyards west of Pakington St, via Clarence and Elizabeth Sts. The tram route via Aberdeen St would have taken considerably longer. 1920s.Black and white print on paper.GSR710/20/1/14 and 20-14 written on the reverse in pencil. The No. 2 inside a circle written on the reverse in ink.geelong private bus, geelong state savings bank -
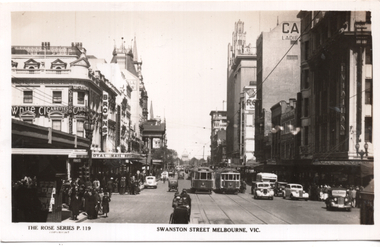 Melbourne Tram Museum
Postcard, Rose Stereograph Co, "Swanston Street Melbourne", c1950
Rose Series postcard No. P 119, titled "Swanston Street Melbourne", looking south from just to the north of Bourke Street. Has trams W5 class No. 803 (Route 8 - Toorak) and W2 class 277 (route 2A City). There is a bus on the right hand side of the photograph. Also In the photo are the Royal Mail Hotel advertising Black and White Cigarettes, Fosters Larger. Carlton Ale, the Leviathan building, the Town Hall and a sign for Browns.Yields information about Swanston St. at the intersection with Bourke St. C1938.Postcard - printed real photograph with Rose Stereograph Co. name on the rear. Unused.Has the tram numbers in pencil on the rear of the card.trams, tramways, w2 class, swanston st, w5 class, tram 803, tram 277 -
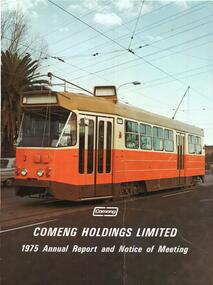 Melbourne Tram Museum
Document - Illustration/s, Letter/s, Commonwealth Engineering - Comeng, "Comeng Holdings Limited 1975 Annual Report and Notice of Meeting", Nov. 1975
.1 - Illustration of Z3 3 on the front cover of "Comeng Holdings Limited 1975 Annual Report and Notice of Meeting" with the Comeng Logo. Tram appears not to have been fitted with its route number and destination equipment. .2 - Letter on stippled paper, Comeng letterhead, with raised printing and watermarked "Z Mattpost" addressed to the donor supplying copies of the cover to him. Dated 19/11/1975. Signed by G. McArley Secretary.trams, tramways, z class, comeng, letterhead, annual reports, tram 3 -
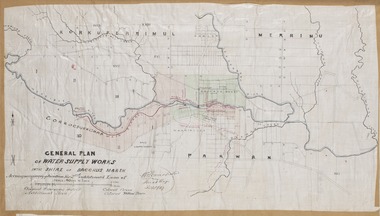 Bacchus Marsh & District Historical Society
Map, General Plan for Water Supply Works, Shire of Bacchus Marsh 1887
Debate about water supply and its planning and development took place in the Bacchus Marsh region from the 1850s through into the twentieth century. This plan was part of documentation to support an application for an additional loan of money from the Ministry of Water Supply to the Bacchus Marsh Shire Water Supply Trust. The plan includes the route of a proposed water channel in the Parwan area, and other features of water supply infrastructure such as the location of standpipes and gates are also shown on the plan.A single page paper map showing a general plan for the supply of water in the Bacchus Marsh area.The plan shows the route of the 'Main Channel' near the Werribee River and a proposed route for a Parwan Channel. The location of 'Dryden's House' near the Werribee River is also shown and the locations of land held by T. (Tom) Oliver and the Racecourse Reserve in Maddingley. Scale 40 chains to 1 inch. The plan is signed by Bacchus Marsh Shire Engineer, W.E. Standfield. The map is pasted into a bound volume containing 76 maps or plans in total. High resolution digital image stored on BMDHS computer network. General Plan of Water Supply Works in the Shire of Bacchus Marsh. Accompanying application for 2nd additional Loan. Original Waterworks district. Additional area. W.E. Standfield, 30/8/87.water supply, water supply maps, water supply bacchus marsh, irrigation, bacchus marsh victoria maps -
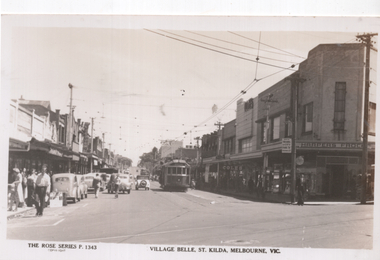 Melbourne Tram Museum
Postcard, Rose Stereograph Co, "Village Belle, St Kilda, Melbourne Vic", early 1950s
Rose Series postcard No. P 1343, titled "Village Belle, St Kilda, Melbourne Vic" showing W2 568 (Moreland Route 15) at the St Kilda Beach terminus in Ackland St. Another W2 is further behind. A uniformed tramway employee is walking across the road, underneath a MMTB sign advising of Trams to the City and a Fare of 5d and child fares of 2d. In the background is the Coles store and Harpers Frocks. In the foreground are tram tracks for the Victorian Railways St. Kilda to Brighton Beach line in Buckly Street.Yields information about Ackland St, St Kilda early 1950s.Postcard - printed real photograph with Rose Stereograph Co. name on the rear.trams, tramways, village belle, ackland st, route 15, st kilda, w2 class, tram 568 -
 Melbourne Tram Museum
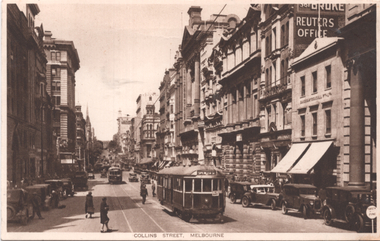
Postcard, "Collins Street Melbourne", c1929
Photo looking east in Collins St from Elizabeth St with W2 class tram 284 (Spencer St) and another W2 in the distance. The tram is yet to be fitted with a route number box. The tram was the first to be converted from a W class to a W2 class (8/1928) and was fitted with route number boxes in April 1930. In the background is the Sands McDougal city office and a sign advertising Reuter's Office.Yields information about Collins St c1929.Postcard - printed, unused, with Ken Magor stamp on the rear.trams, tramways, w2 class, tram 284, collins st -
 Melbourne Tram Museum
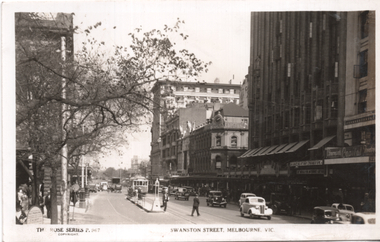
Postcard, Rose Stereograph Co, "Swanston Street Melbourne", late 1940s
Rose Series postcard No. P 967 titled "Swanston Street Melbourne", looking south from Little Collins St. One W2 class tram is running a Route 7D is in the view. Note the Tram Safety Zone with the lamp on the top. In the background are the Town Hall on the left, the Manchester Unity building, and advertising for Capstan cigarettes and a sign for the Capital Theatre.Yields information about Swanston St. at the intersection with Little Collins St.Postcard - printed real photograph with Rose Stereograph Co. name on the rear. Unused.Has "1949" in pencil on the rear.trams, tramways, w2 class, swanston st, route 7d -
 Melbourne Tram Museum
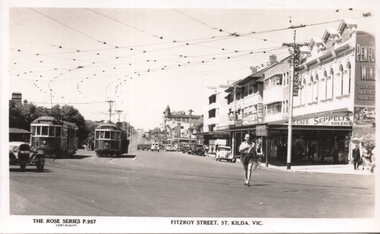
Postcard, Rose Stereograph Co, "Fitzroy Street St Kilda Vic", late 1930s
Rose Series postcard No. P 957 titled "Fitzroy Street St Kilda Vic" showing two W2 class tramcars at the intersection of Fitzroy Street and The Esplanade St Kilda. Tram W2 class No. 407 (route 15) is inbound while W2 274 (route 67) is outbound. In the view is the Hong Kong cafe sign together with advertisements for Seppelts and Penfolds wines.Yields information about Fitzroy St, St Kilda late 1930s.Postcard - printed real photograph with Rose Stereograph Co. name on the rear and remnants of blue card on the rear.trams, tramways, fitzroy st, st kilda, the esplanade, w2 class, tram 402, tram 274, route 67, route 15 -
 Melbourne Tram Museum
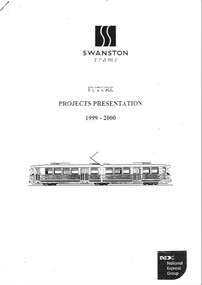
Document - Report, Swanston Trams, "Swanston Trams future projects presentation 1999 - 2000", Oct, 1999
Report - photocopied 27 x A4 sheets, stapled in the top left hand corner titled "Swanston Trams future projects presentation 1999 - 2000" looking for submissions from consultants to undertake a number of projects - signed by Russell Nathan, 6/10/1999. Projects included - (see image i3) - ticket machines at various locations, a city sights tram service, all night tram service, deviation of route 82, Park St link, tram maintenance facilities, consolidation of depots, tram stop improvements and traffic management initiatives.trams, tramways, swanston trams, national express, proposals, route 82 -
 Melbourne Tram Museum
Photograph - Framed Photographs, Malvern Framing Gallery, c1990
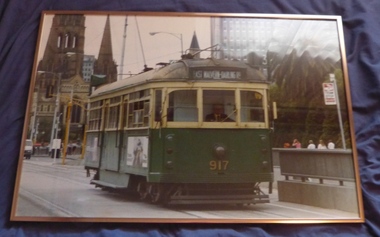
Framed photograph Malvern Driver Ron Scholten's driving W6 917 on a route, East Malvern Darling Road, route 3, in St Kilda Road, c1990. Has St Patricks Cathedral and the Gas and Fuel towers in the background. Has a tram stop sign on the right hand side of the photograph. The tram has two advertisements on the side. Photograph by David Featherston. Received with a broken sheet of glass.On rear in pencil "Photo David Featherston"trams, tramways, swanston st, st kilda rd, tram stops, tram 917 -
 Melbourne Tram Museum
Photograph - Last cable tram in Bourke St, 26/10/1940
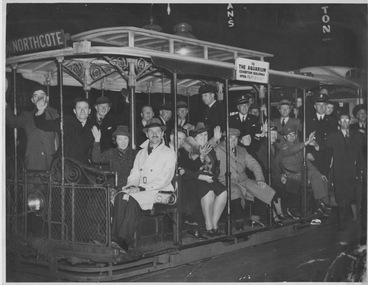
This photograph shows crowded cable dummy at night with "Northcote' destination and "The Aquarium Exhibition Building' sign on the side of roof. See item 1655 for other photographs.Yields information about closure of cable tram network. Black and white photograph with pencil note on rear. 2730 last cable tram to run on Bourke St cable routetram, cable tram, last tram, bourke st cable tram -
 Ballarat Tramway Museum
Negative - Tram 40 - Mercer St, city end, early 1956
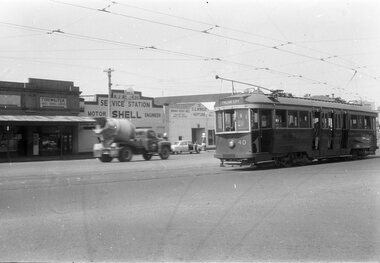
Photo shows Geelong tram 40 Mercer St, city end. The tram has the destination of North. In the background is a typewriter shop, R J Reynolds? Shell service station and S G Winkler Service station with a Neptune sign. The driver has his hand on the air brake and the controller with the front driver's window open. One of a set of photos was taken between 15/2/1956 and 3/3/1956 when services operated only between Belmont and North before the final closure of the Belmont route on 25/31956 and that bogie tram 31 is not shown on the board, having gone to Ballarat on 15/2/1956 - see item 5554. See item 8213 for an article on the Geelong system by Keith Kings. Yields information about the Geelong operations toward the closure of the tram system.Black and white Negative - 120 sizetramways, geelong, tram 40, north, mercer st -
 Melbourne Tram Museum
Photograph - Four colour slides - Wattle Park Single Line, Warren Doubleday, 1-8-1970
Set of four photographs taken at the time of the conversion of the Wattle Park route, in Riversdale Road from single line to double track between Warragul Road and the terminus, alongside Wattle Park itself. Yields information on the single line operation of the Wattle Park line prior the conversion to double track operation.Set of four colour Anscochrome slides, of single line operations on the Wattle Park line. .1 - W5 722 on Wattle Park single line, Sat. p.m. .2 - W2 388 meets W2 344 on Wattle park loop - shows the commencement of roadworks. .3 - SW5 853 from the park .4 - W5 738 at Warragul Road - shows the gates to Wattle park and the Caltex Service Station sign.Has photographers slide numbers on each slide.wattle park, route 70, riversdale rd, w2 class, w5 class, sw5 class, trackwork, tram 722, tram 388, tram 853, tram 738, trams, tramways -
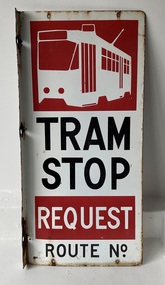 Melbourne Tram Museum
Sign - "Tram Stop Request"
Indicated or provided a location to tram drivers and passengers of a tram stop that trams had to be hailed or be requested to stop or to alight. Has the outline of a Z class tram. Introduced after Z class trams started to be used. A small sign providing details of the route number could be placed on the bottom edge. The 1977-78 MMTB Annual report has a photo of one of these then-new signs.Demonstrates the form of tram stop that the MMTB used in Melbourne that trams had to be signaled to stop at. Style introduced following following the use of Z class trams. Sign - Tram Stop - "Tram Stop Request" - formed from a formed steel sheet with a short angle leg, with holes along the top and bottom edges and on the angled side. Painted with a white background and red detailing.tram stop, signs, mmtb, trams, tramways