Showing 1860 items matching " poles"
-
 Ballarat Tramway Museum
Photograph - Digital image, c1971
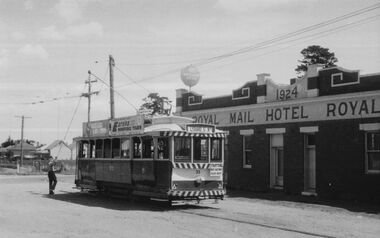
Yields information about Ballarat streetscape and its trams in the closing days of the SEC tramway system.Digital image from a black and white print of tram 33 being reversed at Sebastopol, the driver is reversing the pole. The tram has a Eureka Roofing Tiles and "Bliss Bombs" (Make Bliss not Love) roof advertisement and a "Trotting at Brae Raceway" auxiliary board. In the background is the Sebastopol Royal Mail Hotel, Albert St. Photo by Marc Dahlstrom c1971.On rear is the Marc Dahlstrom stamp.trams, tramways, albert st, sebastopol, tram 33 -
 Ballarat Tramway Museum
Photograph - Colour Print, Lilian Butler, 20/09/1971 12:00:00 AM
Yields information about the disposal of tramcars from the SEC Ballarat system to the TMSV following closure.Colour print of Ballarat tramcar 17, being prepared for loading at the SEC Ballarat depot with poles supporting the overhead and a person (Mr Ward?) standing on the roof of the tramcar. Photo taken 20/9/1971. Item was placed in an envelope marked "Mr. G Ward" - retained with photograph in storage folder. Photo printed on Kodak Paper. Photograph by Lilian Butler?in ink on rear "Tram Depot - Wendouree Parade, Ballarat Monday 20th September 1971. With my compliments Lilian Butlertrams, tramways, tmsv, tram disposal, sec, depot, loading trams, tram 17 -
 Ballarat Tramway Museum
Photograph - Black & White Photograph/s - set of 3, Ron Hann, 26/12/1959 12:00:00 AM
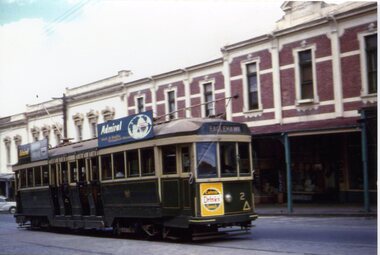
Yields information about the principal intersection following the opening of electric trams, with an electric tram in photo and prior to a parade.Colour prints on laser print paper - of Bendigo 2 climbing the hill in View St Bendigo, 26/12/1959 enroute to Eaglehawk. Show streetscape, centre poles and buildings. The tram has a Cohn's drink ad on the front panel and two roof advertisements for Admiral Televisions and the destination of Eaglehawk. Printed on Fujifilm, Fujicolor Crystal Archive for Frontier"Has labels "References T3116, T3117 and T3118 Photo by Ron Hann" and another label "Bendigo 26.12.59" on rear.trams, tramways, view st, bendigo, tram 2 -
 Bendigo Historical Society Inc.
Slide - DIGGERS & MINING. THE DIGGINGS THE DIGGERS, c1853
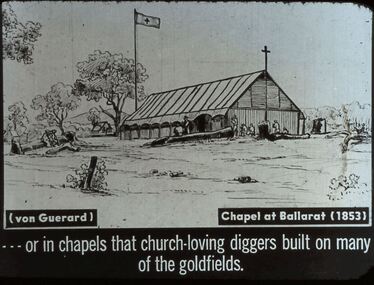
Diggers & Mining. The Diggings The Diggers. Slide: or in chapels that church-loving diggers built on many of the goldfields. (von Guerard) Chapel at Ballarat (1853). The church of wooden structure with a wooden cross on one end of the gable roof and a flag pole at the other end of the building flying a flag with a cross. Markings: 73 994.LIF:4. Used as a teaching aid.hanimounteducation, tertiary, goldfields -
 Ballarat Tramway Museum
Sign - Tram Stop Information, State Electricity Commission of Victoria (SECV), Stop Information
Sheet metal signs mounted onto 2 metal brackets top and bottom by rivets. Mounted on wood pole so it faced outwards at right angles. On both faces in black paint on white background is "Trams Leave here for Gardens, View Point, Sebastopol." Believed to be located at the intersection of Sturt St and Drummond St. on the south side before junction.trams, tramways, ballarat, secv, street furniture, tram stops, route signs -
 Ballarat Tramway Museum
Slide - 35mm slide/s, Wal Jack, 23/03/1962 12:00:00 AM
Photo of No. 18 turning from MacArthur St. into Drummond St. north, taken from north west corner. Side on view of 18. Tram fitted with dash canopy lighting and SEC ad on roof. Adjacent to photographer is a compulsory tram stop painted on a pole with a white painted over section below it. Photo taken on 23-3-1962.'SEC Ballarat, No. 18 in Macarthur St., turning into Drummond St. 23-3-62' in blue inktramways, trams, macarthur st., drummond st., tram 18 -
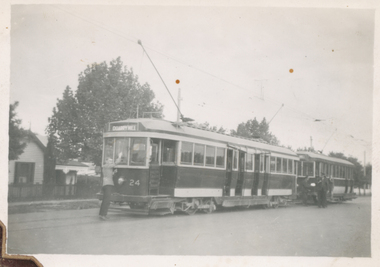 Ballarat Tramway Museum
Photograph - Black & White Photograph/s, Peter Duckett, 1946
Black and White print contained within the Wal Jack Bendigo and Geelong Album, see Reg Item 5003 for more details. Photograph of No. 24 at the Quarry Hill terminus, with No. 22 behind. Poles are being reversed. Tram has the destination of Quarry Hill. Photo by Peter Duckett, 1946. See Keith Kings "Bendigo Tramways" for the tram number. In pencil on rear "SEC Bendigo No. 24, ex M&MTB 138" and "Peter Duckett" in bottom right hand corner.trams, tramways, bendigo, bogie trams, quarry hill, tram 138, tram 24 -
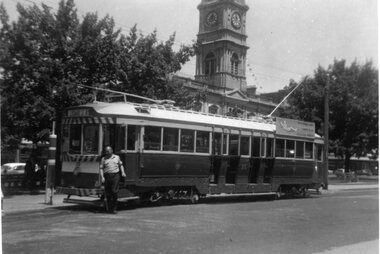 Ballarat Tramway Museum
Photograph - Black & White Photograph/s, Bob Lilburn, c1970
Black and white photograph of Ballarat No. 35 at the City terminus, with the short tram stop pole at the front of the tram c1970. Has the tram driver standing by the front door, with sleeves rolled up. Tram has destination of "Lydiard St. North" and a SEC roof ad, "Everything's under control in my all electric kitchen." Town Hall building in the background.trams, tramways, sturt st., city terminus, tram stops, tram 35 -
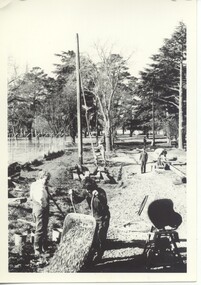 Ballarat Tramway Museum
Photograph - Black & White Photograph/s - set of 2, post June 1973
Yields information about the construction of the track and depot fan c 1972.Black and white photographs of the construction of the access track and depot fan at the new BTPS depot, involving he carting of gravel etc in wheel barrows. The poles have been positioned and the track extended over the level crossing indicating 1973, prior to the installation of one road. See - 1972 - 73 Annual Report page 3 for a list of dates.trams, tramways, depot, btps, construction -
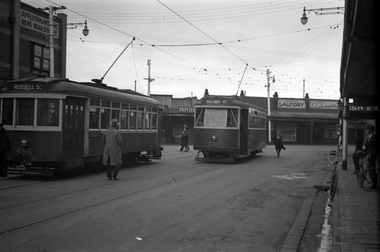 Melbourne Tram Museum
Negative, Wal Jack, 25/05/1941 12:00:00 AM
Black and white negative, by Wal Jack, of X1 466 (Russell St) and X2 677 (Ballarat Road) at the Footscray Railway Station stop in Leeds St. In the background is R S Smith Printer, Marx's Laundry, note the clock on a pole on the right side of the photo, Photo dated 25-5-1941 in the Wal Jack album along with details of the location.trams, tramways, leeds st, footscray, russell st, ballarat road, x1 class, x2 class, tram 466, tram 677 -
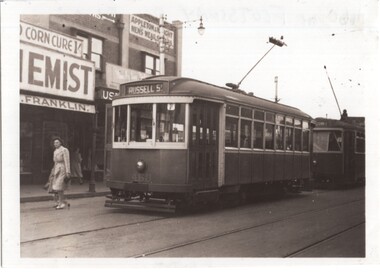 Melbourne Tram Museum
Photograph - Black and White photograph, Bob Lilburn, mid 1950's?
Black and white photograph of X1 460 (Russell St) at the Footscray Railway station with an X2 class car behind. Note the metal pan in the overhead to assist to set the trolley pole at night. In the background is a chemist? Franklin advertising a Corn Cure 1/- and Appleton & Wright Men's Wear Store. Photo possibly mid 1950's and by Bob Lilburn.On rear in ink "460 at Footscray Rly Station"trams, tramways, x1 class, footscray, russell st, overhead, tram 460, leeds st, x2 class, mmtb -
 Stawell Historical Society Inc
Photograph, Stawell Post Office Cnr Wimmera and Main Streets 1975
Stawell Post Office on corner of Wimmera and Main Streets. Erected 1875. Phone box and car at right of photo. Directional sign on the left side of the building. The Fruit Vegs building on the right side has replaced the Akins building on the right side in an earlier photo.Black & white photograph of a two storey building built in 1875. Out the front of the building is a signpost, bench seat, phone box and car in the foreground. A flag pole protrudes from one of the windows on the top storey. On the right side of the photo is a Fruit Vegs sign on the awning of the building next door. A directional sign post is on the left side of the building stawell -
 Bendigo Historical Society Inc.
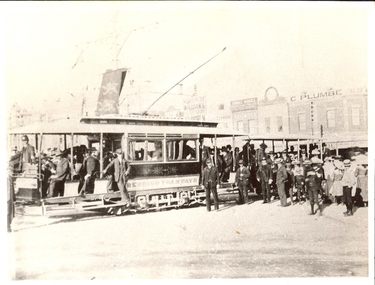
Photograph - BASIL MILLER COLLECTION: TRAM - CHARING CROSS
BHS CollectionBlack and white copy. Photo taken of electric tram at Charing Cross Terminus. Many Pall Mall businesses visible in background. C 1903 ? Large crowd to left of photo near Tram. The banner on light pole behind tram has two rampant lions. Tram is open doorways at both ends, Bendigo Tramways printed on side.cottage, miners -
 Eltham District Historical Society Inc
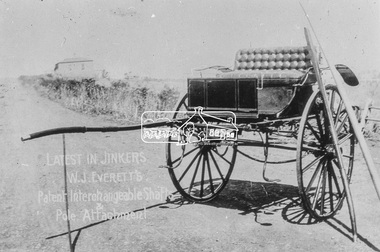
Photograph, Albert Jones, Latest in Jinkers; W.J. Everett's Patent Interchangeable Shafts Pole Attachment
Photo Spark/Jones Collection (Albert Jones photographer) reproduced on p172 of The Diamond Valley Story by Dianne H. Edwards, Shire of Diamond Valley 1979. "Blacksmith W. Everett devised metal fittings that enabled a jinker's shafts to be quickly replaced by a centre pole to harness a pair of horses. This vehicle won him a prize at the Royal Agricultural Show early in the century."Black and white copy of photo printed on glossy photographic paper 30.5 x 40.5 cm (12 x 16 inch); image size approx. 18.5 x 28 cmdiamond valley story, horse drawn carriage, jinker, w.j. everett -
 Phillip Island and District Historical Society Inc.
Photograph, Thompson Ave, Cowes Phillip Island, 1920
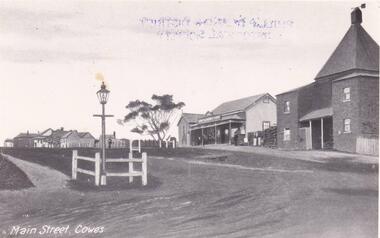
View looking up Thompson Avenue from The Esplanade. The Chicory Kiln built in 1870, a two storey brick building is adjoined by West's General Store, built in 1869 to cater for the needs of the Settlers. A large Gum Tree and finally houses follow on from these two buildings. In the foreground and to the left, is a small three sided fence and a gracious Gas Lamp on long pole.Cowes looking up Thompson Ave to Chapel Street. 1905Main Street Coweslocal history, photographs, streetscape, cowes, black & white photograph, mary robb -
 National Wool Museum
Photograph
Depicts Booyoolee Shed, which was built in 1856 and demolished in 1989. View from east side of shed. A modern version of a "stobie" pole can be seen, which was used to carry 240 volt power to shed to drive the overhead, enabling the old combustion engine to be dispensed with. Taken by John Bailey in South Australia at the request of Gael Shannon (former NWM employee). -
 Melbourne Tram Museum
Photograph - Z2.101 at Preston Workshops, Michael McLeod, c. 1990
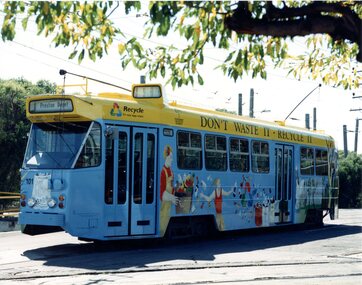
The photograph shows Z2 No. 101 (with "Preston Depot" indicated on the route banner and the route number box blank) at Preston Workshops. The tram is in an all-over advertising livery with a PSA on recycling by the Environment Protection Authority, with the slogan "DON'T WASTE IT - RECYCLE IT" printed across the length of the tram above the windows. The tram also had trolley poles installed. Photo by Michael McLeod.Shows a now-withdrawn tram with obsolete equipment (i.e., trolley poles) and livery that contains a PSA in the past.Colour Photograph - Z2.101 at Preston Workshopstrams, tramways, z2 class, public transport, tram 101, decorated trams, preston workshops -
 Melbourne Tram Museum
Photograph - Z1.16 at Preston Workshops, Michael McLeod, c. 1990
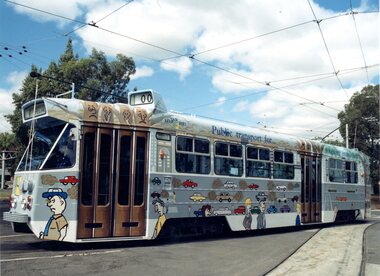
Photograph shows Z1 No. 16 (with "Special" indicated on the route banner and "00" on the route number box) at Preston Workshops. The tram is in a livery with a PSA on public transport, with the slogan "Public transport for… a healthy environment" on behalf of the Public Transport Corporation (PTC) printed across the length of the tram above the windows. The tram also had trolley poles installed. Photo by Michael McLeod.Shows a now-withdrawn tram with obsolete equipment (i.e., trolley poles) and livery that contained a PSA in the past.Colour Photograph - Z1.16 at Preston Workshopstrams, tramways, z1 class, public transport, tram 16, all over advertising -
 Linton and District Historical Society Inc
Photograph, Taylors Super Snaps Ballarat, Sussex Street, Linton
Photograph taken from high vantage point further along Sussex Street. Visible east side: Edinburgh Bakery, Preston's shop, Wishart's blacksmiths. Church of England vicarage in the distance. Visible west side: roofs of Morgan's and Sandow's stores. The photograph is undated but thought to have been taken in the 1940s, as there are electricity poles in the street. (Electricity came to Linton in 1939).Very small photograph of Sussex Stret, Linton, view to south-east.sussex street linton -
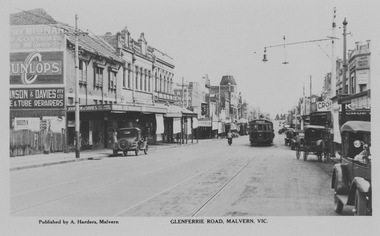 Melbourne Tram Museum
Photograph - M&MTB W class 255 in Glenferrie Rd, Malvern, Rose Stereograph Co, 1920s
The photograph shows Melbourne and Metropolitan Tramways Board W class tram 255 in Glenferrie Rd showing destination Victoria Bridge. The tramcar is in the mid ground and Glenferrie Rd is lined with retail shop verandahs on the ground floor and ornate second floor residences or workshops. Span poles hold the tramway overhead and several early motor cars are seen along the roadway.Yields information about Glenferries Rd and M&MTBBlack and white photograph with writing on the rear.Printed Post Card by Rose Stereograph, Armadale with ink stamp reading "K J Magor No." glenferrie rd, melbourne and metropolitan tramways board, w class, tram 255, victoria bridge, span poles, retail shop verandahs -
 Melbourne Tram Museum
Photograph - PMTT tram 26 Glenferrie Rd, Malvern, Rose Stereograph Co, 1910s
The photograph shows Prahran and Malvern Tramways Trust tram 26 in Glenferrie Rd on route 1, possibly just south of the tram depot. The tramcar is in the mid ground and Glenferrie Rd is lined with retail shop verandahs on the ground floor and ornate second floor residences or workshops. Central poles hold the tramway overhead and several horse drawn carts are seen along the roadway.Yields information about Glenferries Rd and PMTTBlack and white photograph with writing on the rear.Printed Post Card by Rose Stereograph, Armadale with ink stamp reading "K J Magor No." prahran and malvern tramways trust, glenferrie rd, tram depot, central poles, route 1, horse drawn carts -
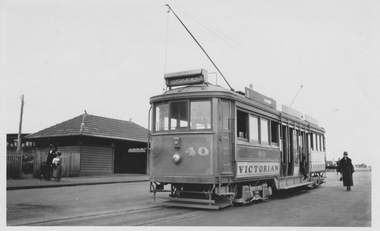 Melbourne Tram Museum
Photograph - VR tram 40 at Brighton Beach terminus, A G Renwick, January 1924
The photograph shows VR tram 40 just arrived at Brighton Beach terminus. Both trolley poles are still raised and the destination still shows Brighton Beach, awaiting the crew to make the changes. Some saloon windows are open with a male passenger boarding and a female passenger in long coat approaching the tram. In the mid ground to the left a large passenger shelter can be seen. Yields information about VR 40 and Brighton Beach terminusBlack and white photograph with note on the rear.In ink on the rear "139Y VR Electric Tram No.40 at Brighton Beach Jan 1924. Photo by A G Renwick 503""vr trams, brighton beach terminus, saloon windows, tram 40, trolley poles -
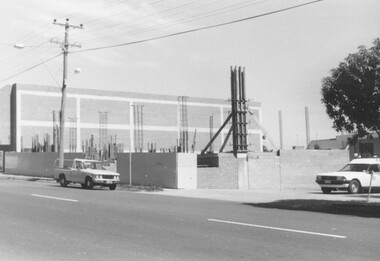 Ringwood and District Historical Society
Photograph, Building Construction: 27-29 Ringwood St, Ringwood. 1982 (2 views)
Written on back of photograph SS0245a: , "Framing the columns under the first floor of 27-29 Ringwood Street. Social Security buildings in background. Shows Waltons 'Blimp' in sky right of power pole. It was tethered over their store on highway. 25/3/82". On back of SS0245b: "Preparing the foundations of 27-29 Ringwood St. 25/3/82" -
 Parks Victoria - Wilsons Promontory Lightstation
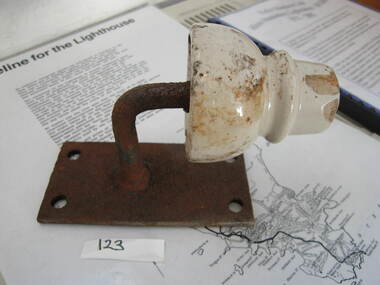
insulator & metal support
The ceramic insulators were used by the PMG to insulate telephone lines connecting to the lightstation accommodation. The installation of a single galvanised wire telegraph line in 1873 provided the lightstation with a vital link to the outside world via Morse code. In 1875, the Australasian Sketcher reported on the new facility, writing that ‘the lighthouse on the extreme point of the promontory is connected with Melbourne by a line of telegraph, and as a large number of vessels pass in sight of the lighthouse, useful information is gained respecting their movements’.The system was immobilised in 1885 when a thunderstorm caused some of the poles to explode and connection wires to fuse and turn into molten metal. During WWII the lighthouse line was upgraded to four copper wires, and in 1971 a radio link replaced the line. The lines required constant maintenance. Some poles remain along the length of the promontory’s Telegraph Track as reminders of this former communication link. Insulators can also be found in the collections at Cape Schanck; Cape Otway and Gabo Island. Comprises a white ceramic insulator attached to a rectangular metal plate. -
 Ballarat Tramway Museum
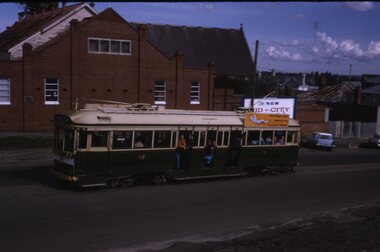
Slide - Set of 7, Warren Doubleday, Ballarat - last Saturday of full operations, 21/8/1971
Photos taken on the last Saturday of full operations by the SECV in Ballarat prior to the first closure of the Victoria St line on 22/8/1971. 1 - Tram 42 climbing Victoria St with a sign for the site of the "New Mid - City Motel" behind. 2 - Tram 13 in Victoria St from the Anglican church tower with Black Hill in the background. 3 - Barkly and Main St from the Anglican church tower with an outbound tram the Ampol Service station in the view. 4 - Tram 39 in Wendouree Parade near depot with swans in the background. 5 - Ballarat 26 Wendouree Parade Olympic monument with the tram crossing from the side of the road into the middle of the road for Hamilton Ave. 6 - Trams 21 and 27 crossing at the Skipton St loop. 7 - Tram 27 and others on the ARHS tour at Sebastopol with the conductor unhooking the trolley pole rope before turning the pole. Yields information about the last full Saturday of SEC Tramway operations in Ballarat and has a strong association with the archivist. Set of 7 Kodachrome colour slides - cardboard mountsHave the photographer's slide numbers written on them.trams, tramways, closure, tram 26, tram 27, tram 13, tram 17, wendouree parade, victoria st, barkly st, tram 39, olympics, sebastopol, skipton st loop, tram 42, tram 21 -
 Ballarat Tramway Museum
Photograph - Digital image Set of 10, 1971
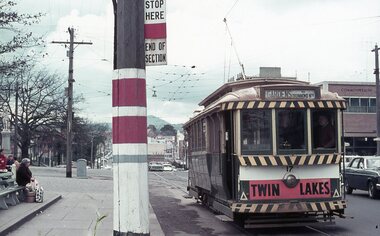
Yields information about Ballarat Tramways and trams prior to the closure of the tramway system.Set of 10 digital images of Ballarat trams prior to closure, scanned from original slides by Stuart Lodington, 1971 prior to closure of the system. .1 - No. 17 at the City Centre, Sturt St, south side, with Gardens via Sturt St on destination roll. Can see the ESCo switch box in the back and the stop and section sign on the adjacent pole. .2 - No. 26 at Sebastopol terminus alongside the Royal Mail Hotel. The tram has yet to turn the pole or the destination roll. Note the Bus Stop sign on the pole, just prior to closure. .3 - ditto .4 - No. 27 and 30 crossing in Skipton St at the Bell St loop (see also btm4975i3) .5 - No. 32, Gardens, about to enter the Carlton St loop, with Lake Wendouree in background, Wendouree Parade. .6 - No. 32 at Depot junction, good photo of depot trackwork entry area. .7 - No. 21, Wendouree Parade, Gardens area, north bound, showing Gardens via Sturt. .8 - No. 12, inbound on Sturt St west at a tram stop. Has destination of Mt. Pleasant. .9 - No. 27 at Lydiard St north terminus with the shelter in the background. .10 - No. 21 at Gardens Loop, tram has destination of Mt. Pleasant. Crews sitting in the saloon.trams, tramways, ballarat, sturt st, sebastopol, drummond st sth, wendouree parade, carlton st, depot, depot junction, trackwork, gardens, sturt st west, crews, tram 17, tram 26, tram 27, tram 32, tram 21, tram 12 -
 Flagstaff Hill Maritime Museum and Village
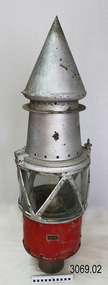
Functional object - Marine Navigation Light, Early 20th century
Breakwater navigation lights are placed at the end of the breakwaters to warn incoming vessels of the end of the structure, as a marine safety measure. The subject item was such a light believed to have been placed at the end of Warrnambool's breakwater around 1915 when it was extended. The light had remained in place for many years until it was probably removed when the structure was undergoing rock armouring repairs to the end of the breakwater in 1975. The light had been placed in a council storage shed probably from the time when the structure was undergoing these repairs in 1975. In 2014 the light was removed from the storage shed and donated to Flagstaff Hill museum. History: Warrnambool breakwater plans were drawn up by 1874 and approval was given for preliminary construction work to start but when the money ran out, the works stopped. With a number of quick changes of government the “Warrnambool” breakwater project was kicked from one Victorian state government to another. Then finally in 1879, the eminent British harbour engineer Sir John Coode was asked to design a breakwater. His first design was for a 1800 feet long structure but that was scaled back to 900 feet and construction finally began in 1884. This structure was attributed in causing major siltation of Lady bay, as a consequence the breakwater was again extended in 1915. In 1975, the rock armouring at the end of the breakwater was added but by 1979 another impact study was calling for the breakwater to be removed altogether. The Heritage Council Victoria, regard the Warrnambool breakwater is of historical significance to the state as one of the most important maritime engineering projects that was undertaken in Victoria during the late nineteenth century. The light is also as part of this structure regarded as a significant item of historical interest.Marker light or navigation light. Round light stand with conical top piece (2 separate pieces). Metal base painted red, clear glass middle section enclosed by metal frame, metal cone shaped top section painted silver. Electrical wiring can be seen inside centre section. Pole that light would have been on to elevate it is missing.Has metal plate screwed onto side of base engraved "23". flagstaff hill, warrnambool, shipreck coast, flagstaff hill maritime museum, maritime museum, great ocean road, warrnambool breakwater, marker light, naviagtion light, breakwater navigation light -
 Bendigo Military Museum
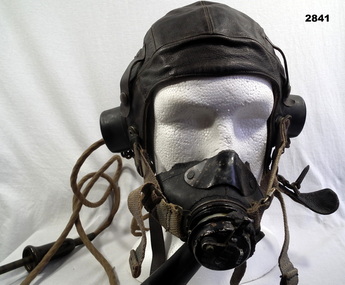
Headwear - HELMET, FLYING WW2, British Air Ministry, c.1940
WWII British pattern flying helmet, leather. Sewn in ear phones, wiring is cotton covered. Large bakelite four pole plug, mouthpiece is rubber. Exhaust valve & rubber tube at bottom. Built in microphone has an external on/off switch, wiring broken away. Straps are cotton webbing. Helmet has five small leather straps around the crown.On headphones: "R ALLAN"uniforms airforce, trades-leatherworking, passchendaele barracks trust, helmet flying -
 Glenelg Shire Council Cultural Collection
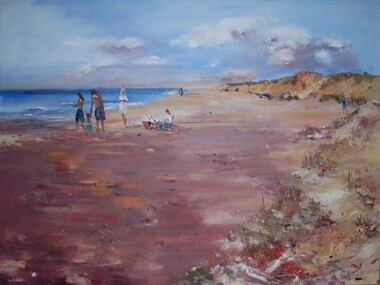
Painting, Julie Kent, Beach Scene, n.d
Hung in CEO's Office 5/9/2003Scene depicting a beach. On the right are sand dunes with grass covering them. On the left is the ocean. The beach runs from foreground left to the upper centre of image, diminishing in size. In centre left of image three standing adult figures and one child stand to the left of a seated figure wearing a red hat. A fishing pole is braced in the sand beside the figure's chair.Front: J Kent (blue paint, lower right) Back: (unknown) -
 Bendigo Historical Society Inc.
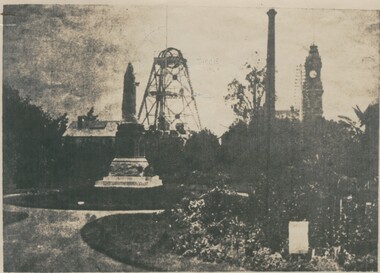
Photograph - QUEEN'S RESERVE
black and white photogrpah 'Queen's Reserve' showing statue of Queen Victoria, poppet legs of Hustlers Royal Reserve No 2 City Mine, chimney, post office tower. Early telephone wires on pole. On front 'Queen's Reserve' In biro ' Hustler's Royal Reserve No. s 2 ( city ) mine. On back RHSV, Bendigo Branch. Previous reg. no. Mng 12place, landscape view, queen's reserve, bendigo