Showing 25830 items matching " m>tram"
-
 Melbourne Tram Museum
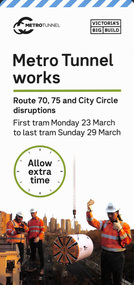
Pamphlet, Public Transport Victoria (PTV), Metro Tunnel works, Mar. 2020
Set of two pamphlets issued by Yarra trams for tramways works during 2020 1 - hanging strip type notice for Metro Tunnel works - cut to fit around a strap hanger bar for Flinders St work - route 70, 75 and City Circle tram service changes for work in Flinders St, between Monday 23 March and Sunday 29 March 2020. 2 - hanging strip type notice for Plenty Rd works on route 86 - cut to fit around a strap hanger bar - 2 copies held. From Saturday 21 March to Sunday 29 March. 3 - hanging strip type notice for safe travel on buses due to corona virus. Was found on Route 70 tram. Have Yarra Trams PTV and Vic Govt. logos along with printing dates.trams, tramways, yarra trams, ptv, trackwork, route 70, route 75, route 86, city circle, metro tunnel -
 Melbourne Tram Museum
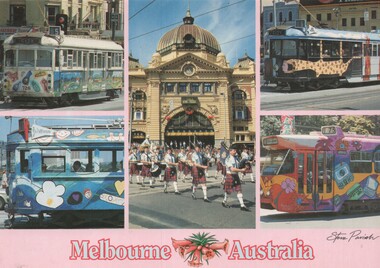
Postcard, Steve Parish Paddington Qld, five panels featuring Transporting Art trams:, late 1980's
Colour postcard, five panels featuring Transporting Art trams: 1 - SW5 726 route 5, by Mental as Anything 2 - Flinders St station with a pipe band marching. 3 - SW5 723 - Bob & Lorraine Jenyns (See also Reg Item 5210) 4 - SW5 829 - The Peace Tram by Megan Evans and Eve Glenn. It was painted in 1986, and overpainted in 1991 by a new work by Lin Onus. 5 - Z 10? - not part of the Transporting Art Project - tram was allocated to Camberwell for some time and is showing route 75. .3 and .4 advised by Russell Jones 16/9/2020. Back has space for name and address, stamp and a message and details of the postcard. Produced by Steve Parish Postcards. Card No. PC323 and a historical note regarding trams on the back. Has "Melbourne Australia" along the bottom edge.trams, tramways, flinders st station, sw5 class, transporting art, tram 723, tram 726, tram 829, tram 10? -
 Melbourne Tram Museum
Newspaper, The Age, The Sun, The Herald, The Pubic transport Mess - "Rail loop may turn cash tide, Jan. 1980
Set of four newspaper clippings regarding the Transport Pageant including photos of the events. .1 - The Age, 29-1-1980 - The Pubic transport Mess - "Rail loop may turn cash tide" with a graph of train and tram passengers per year, loss of passengers. Includes a photo of the TMSV horse tram and Ballarat 40 with a note that it had broken down. Written by Gerry Carman as Transport Reporter. .2 - The Sun, 29-1-1980 - "A tram link to history" featuring a photo of Alison Mercer patting the TMSV horse tram horse - Blossom. .3 - The Herald 28-1-1980 - "Remember when" with a photo of people enjoying a model Puffing Billy locomotive and Ethel Smith patting Blossom. .4 - The Sun 21-1-1980 - detailing the event programme - see also Reg Item 5573.trams, tramways, australia day, mmtb, melbourne, tramcars, pageant, melbourne pageant, public transport, passengers, tmsv, btps -
 Melbourne Tram Museum
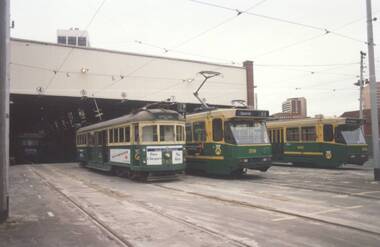
Photograph - Set of 11 Colour Print/s, Bill Davis, mid 1980's to 1990
Set of 11 colour prints of Melbourne trams and locations during the mid 1980's to 1990, Photos not well focused. .1 - trams 782, 259 and 2002 out the front of South Melbourne Depot .2 - 979 and 888 at ditto .3 - 888 .4 - 975 and two other W's at Preston Depot .5 - 2001 - Burwood Road on a Special, near Hawthorn Bridge. .6 - ditto .7 - 968, Kingsway, South Melbourne near Sturt St .8 - 861 ditto .9 - 881 outbound St Kilda Road .10 - 900 and W2 442 (Restaurant tram 1) at Acland St terminus. .11 - 913, inbound Glenhuntly Road, on the east side of Glenhuntly Station. Features advertisements on trams for: Triple FM Radio, Bank of Melbourne, Space Deamons Printed on Kodak, Fujichrome or Konica paper.trams, tramways, ptc, south melbourne depot, preston depot, burwood rd, kingsway, st kilda rd, acland st, glenhuntly rd, tram 782, tram 259, tram 2002, tram 2001, tram 979, tram 888, tram 975, tram 968, tram 861, tram 881, tram 900, tram 442, tram 913 -
 Ballarat Tramway Museum
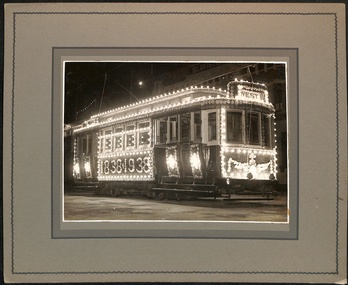
Photograph - Geelong No. 23 decorated for the Centenary, E. Bonney, 1938
Mounted photograph of Geelong No. 23 decorated for the Centenary of the establishment of Geelong in 1938, photographed at night in Corio Terrace, decorated with festooned lighting and other "baubles" and items. On the sides, the letters "1838.1938". Tram has the destination of West. Shows the lighting on the tram in detail and able to see the waxed flowers and other greenery. See also items 5863 and 5865 for other photographs and 8886 for a daytime photograph.Yields information about tram 23 decorated for the Centenary of the town's establishment.Block mounted photograph onto grey card with printed edges, Print stamped on rear - Photo by E. Bonney of 11 Shannon Ave Newtown Geelong, representing the "Sun News Pictorial" and "Melbourne Herald". celebrations, illuminated trams, tram 23, decorated trams, geelong, centenary -
 Ballarat Tramway Museum
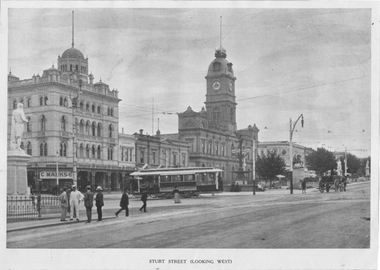
Photograph - Illustration, "Sturt Street (looking west), c1907
Illustration titled - "Sturt Street (looking west) with an ESCo tram turning from Sturt St into Lydiard St North from the Grenville St terminus. The tram has the destination box above the driver, c1907. A horse-drawn cart is in the view along with the Town Hall, the National Mutual building with the Jeweller's sign C Marks visible. On the left hand side is the Robbie Burns statue.Yields information about Sturt St and the associated buildings and ESCo operations.Illustration cut from a magazine or publicationballarat, illustrations, sturt st, esco, lydiard st, ballarat town hall, statues -
 Ballarat Tramway Museum
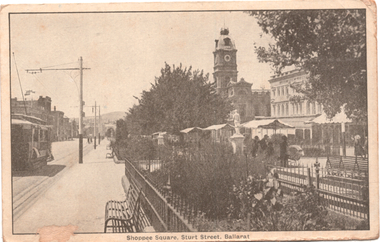
Postcard, R.E.M Series Melbourne, "Shoppee Square Sturt Street Ballarat", c1915
Photograph - looking east along Sturt Street between Doveton and Armstrong Streets, shows an ESCo tram eastbound. On the right is the Shoppee Square "market" place with awnings open. Wal Jack's note: "Part of the old type trams on the "up" track or north side of Sturt St from Doveton St. Date about 1914-16 period. Iron railings have long disappeared"Yields information about the streetscape of Sturt St and Lydiard Streets c1915.Postcard black and white, divided back, used, REM SeriesSee image 2 for Wal Jack's notes on the image. tramways, trams, esco, sturt st, shoppee's square -
 Ballarat Tramway Museum
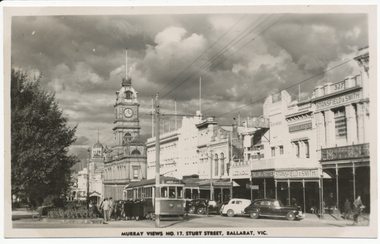
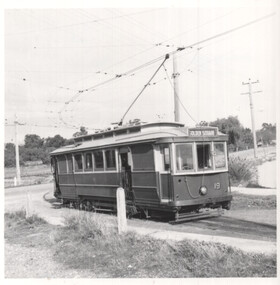
Photograph - Digital image, Murray Views, Murray Views No. 17 Sturt St Ballarat, 1948
Digital image from the Wal Jack Ballarat Album of No. 15 at the intersection of Sturt and Doveton St with passengers boarding the tram. Tram has the destination of Gardens via Sturt St West, Murray Views No. 17 Postcard. Has Town Hall, Myer, Hoskins Stores?, Block Arcade, F. Gallagher and Stansfield and Smith buildings in the view. See image i2 for rear of photograph.Yields information about the early use of Ballarat's bogie trams and Sturt St through the medium of a postcard. Digital image of a postcard from an album compiled by Wal Jack, loaned to the Museum. Copy added 28-12-2021 - most likely a reproduction of the original as it does not have a postcard back. Printed on rear - Real Photograph Produced in Australia by Murray Views, Gympie Q" and places for stamp, dividing line and word "postcard" on rear of copy - "Ballarat No. 15 (later ) in Sturt St, eastwards from Cnr" and Keith Kings stamp.trams, tramways, doveton st, bogie trams, lydiard st, tram 15 -
 Ballarat Tramway Museum
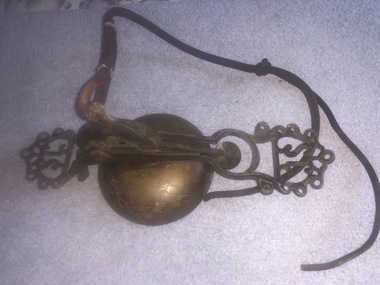
Functional object - Tramcar Conductors (Signal) Bell
Recovered by the donor, with approval of the Depot Foreman, from the wreckage in the SEC Ballarat yard from the demolished Tram No. 20 that was involved in a collision on 16/9/1970. One of the support members, near the bell striker has been broken through and the area where it was secured to the roof of the tram at the same end has been bent. This may be the result of the accident. JS - John Stephenson of New York?Demonstrates a conductors communication bell made by or for use on Melbourne tramcars. A reminder of SEC Tram No. 20 which was involved in a major accident in Victoria St on 16/9/1970Brass Conductor Signal or Communication Bell, consisting of cast frame, bell, striker, bell pull part, one nut to secure the bell to the frame and a screwed bolt for the bell pull part. Has a section of leather bell cord and a leather bell cord hanging piece. Has the initials "JS" cast in both ends that were used to secure the bell to the roof. Has two metal clips used to secure the leather bell cord into position.conductor, bell, trams, ballarat, tram 20, accidents, tramways -
 Ballarat Tramway Museum
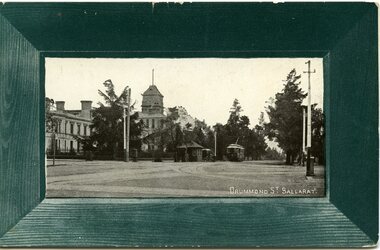
Postcard, Commonwealth of Australia, Drummond St Ballarat, 1909
The photograph is marked "Drummond St. Ballarat" In the background is the Ballarat hospital, with a cab stand/shelter shed with two horse-drawn cabs at either end. Large trees in Drummond St. - conifers. Also shows other tram track and poles at the time of the photograph being taken. The ESCo tram is not fitted with windscreens. The second copy has an undated letter on the rear. with a handwritten note "1911 period"Yields information about the Ballarat Hospital c1909.Black and white postcard with a green (17mm wide) border acting as a frame to the postcard picture. The picture measures 49mm High x 97mm wide. Has a Victorian One Penny stamp with a "168" cancellation stamp and two cancellation stamps, one Ballarat 7/7/09 and the other with a large "5" in the middle.. The card has been published by the Commonwealth of Australia with a coat of Arms. In the bottom left hand corner is a symbol "HB" within an artists paint palette.Short message from "Nell" to her sister Jean Hall of Blackwood.esco, horse cabs, trams, tramways, ballarat, hospital corner, drummond st. -
 Ballarat Tramway Museum
photograph - Set of 4 Black & White - Bendigo tramways, Peter Duckett, late 1940s
Set of four photographs of Bendigo trams and infrastructure photographed by Peter Duckett, early 1950 1 - Bendigo 19 at North Bendigo terminus - tram has destination of Golden Square 2 - Birney No. 30 leaving the depot for North Bendigo 3 - Depot entrance from Arnold St (now Tramway Ave) across Hargraves St 4- North Bendigo terminus overhead wiringYields information about Bendigo trams early 1950sSet of four black and white photographs by Peter Duckett.Details the image on the rear of the print in ink.bendigo, tramcars, bendigo tramways, overhead, double trolley wire, terminals, quarry hill, charing cross, tram 19, tram 30 -
 Ballarat Tramway Museum
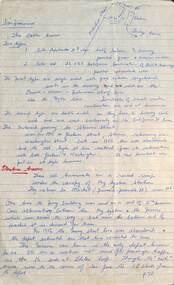
Letter - from Alwyn Marshall Toolamba to Wal Jack re San Francisco, Alwyn Marshall, late 1950s
Wal Jack had an extensive range of correspondents throughout Australia and the world who often provided him with detailed drawings and notes on various tramway systems. This letter details over two pages Alwyn's notes on San Francisco trams - cable, electric and the Twin Peaks tunnel. Notes changes to the cable tram system in the mid 1950s. There may have been additional sheets.Demonstrates some of the correspondence that Wal Jack received from around the world.Handwritten letter one ruled foolscap sheet, written on both sides - undated. letters, wal jack, railways, tramways, alwyn marshall, san francisco, cable trams -
 Melbourne Tram Museum
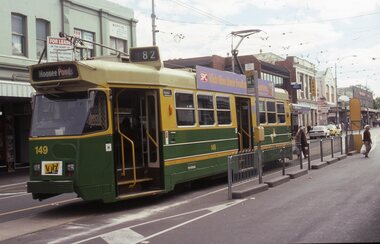
slide - Colour - Melbourne Trams, David Verrier, April 1999
1 - Z3 149 at Footscray terminus in Leeds St., route 82. Tram has adverts for 101.1 FM Radio station, and SPC Fruit preservers and a PTC logo 2 - Z3 149 and B2 2112 at Moonee Ponds Junction (Route 82 Footscray) Tram 2112 (Airport West, Route 59) is an all advertising scheme for Nokia phones. Shows the then terminal arrangements.Yields information about the Route 82 terminals.Set of two white with black back plastic colour slides stamped April 99trams, tramways, footscray, moonee ponds junction, route 82, route 59, nokia, z3 class, b2 class, tram 2112, tram 149 -
 Ballarat Tramway Museum
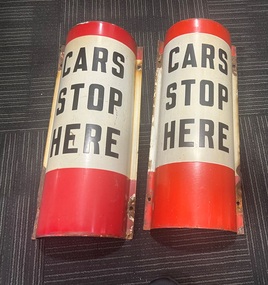
Sign, Melbourne and Metropolitan Tramways Board (MMTB), "CARS STOP HERE"
Sign - red band top and larger or deeper bottom red band, with words "CARS STOP Here" in black paint on a white background. Has a black back. Used to indicate a compulsory tram stop, that is, trams had to stop every time before they passed it. Possibly ex Melbourne as Ballarat did not use steel poles. The design allowed them to be placed back to back.Yields information about Tramway stops signs and their layout.Semi-circular enamel sign on heavy metal sheet with mounting holes on the side returns.trams, tramways, street furniture, tram stops, mmtb -
 Melbourne Tram Museum
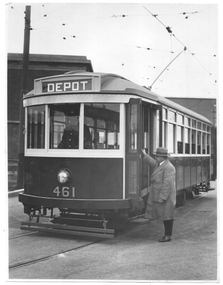
Photograph - X1 461- set of 3, C J Frazer, 1926
Photographs show X1 461 when new and men boarding or leaving the tramcar to illustrate the step height. The photos show a driver in position and the MMTB 2B Truck. The tram has the destination of depot. The tram entered service early Sept. 1926. Photographed at Hanna St South Melbourne depot. Note also the Driver's uniform of the day. See item 7401 for an internal photograph.Yields information about the X1 class tramcar when new.Set of tthree Black and White photographsOn the rear has the stamp of G J Fraser of 154 Little Collins Street Melbourne.tramcars, x1 class, tram 461, new tramcars, mmtb, hanna st depot, south melbourne, unifoms, trams -
 Melbourne Tram Museum
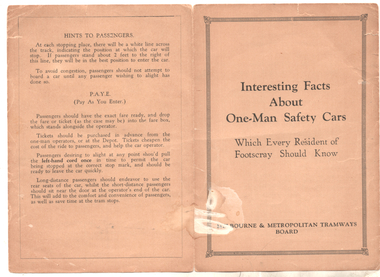
Pamphlet, Melbourne & Metropolitan Tramways Board (MMTB), "Interesting Facts about One-Man Safety Cars", 1926
Pamphlet details the features of the X1 class trams that were introduced onto the Footscray system during late 1926. Details the construction of the tram, seating, safety features, fares, fare boxes, pay as you enter (PAYE), and provide hints for passenger behaviour. See items 7519 and 7530 for the introduction to Russell St and Williamstown Road respectively also using the Pay as You Leave system,. Yields information about the attributes of the X1 class tram at the time of their introduction in 1926.Pamphlet - one sheet folded printed on light brown paper.tramways, trams, mmtb, x1 class, fare box, footscray -
 Melbourne Tram Museum
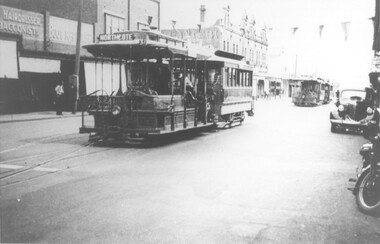
Photograph - Cable tram - Northcote terminus, 1930s
Photo of a cable tram set that has arrived at the Northcote line terminus in High St, prior to shunting. Another two cable sets are in the background. The gripman and conductor can be seen to be preparing to shunt the tram. The photo caption says the trailer is No. 235. A Bundy clock can been seen on the pavement on the left side of the photograph. A hairdresser and tobacconist shop are in the view. Photographer and date unknown.Yields information about Northcote cable tram terminus in High St at Dundas St.Black and white print with a hand written note on rear.In pencil "Car 235 at Dundas St"trams, tramways, northcote, high st, cable trams, tram 235, bundy clock -
 Melbourne Tram Museum
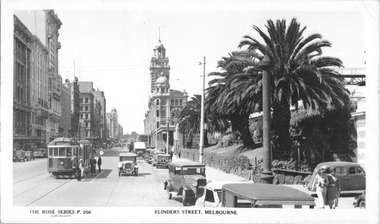
Postcard, Rose Stereograph Co, "Flinders St Melbourne", late 1930s
Rose Series postcard No. P 206, titled "Flinders St Melbourne" with W2 class tram 412 (Spencer St, route 40) westbound in Flinders St with Flinders Street Railway Station in the background. A group of ladies has alighted from the tram at the Safety Zone near Queen St. Note the "Do not park here" sign placed behind the pole on the right side of the photograph.Yields information about Flinders St late 1930sPostcard - printed real photograph with Rose Stereograph Co. name on the rear. Two copies held.tramways, w2 class, flinders st, tram 412, safety zone, trams, route 40 -
 Melbourne Tram Museum
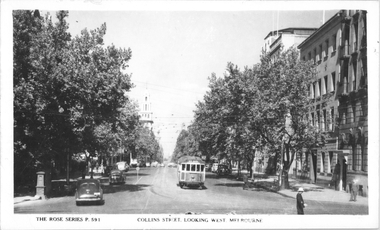
Postcard, Rose Stereograph Co, "Collins Street looking west, Melbourne", late 1930s
Rose Series postcard No. P 591, titled "Collins Street looking west, Melbourne" with W2 class tram No. 637 (Kew Depot, route 47) eastbound at Spring Street, about to turn into Macarthur Street. There is a policeman on point duty and a man walking across to the tram. On the left-hand side is a safety zone post. On the bottom left hand of the photo is a letter box or receiving pillar.Yields information about Collins St late 1930s.Postcard - printed real photograph with Rose Stereograph Co. name on the rear.tramways, trams, w2 class, tram 627, collins st, route 47, spring st -
 Melbourne Tram Museum
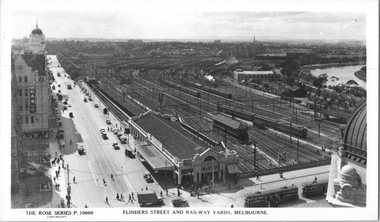
Postcard, Rose Stereograph Co, "Flinders Street and Railway Yards, Melbourne", 1930s
Rose Series postcard No. P 10660, titled "Flinders Street and Railway Yards, Melbourne" showing Princes Bridge Station buildings, the extensive railway yards of the time, signal boxes, Batman Ave, and the Yarra River. There are two trams visible in Flinders Street and another two trams, W2 class, in Swanston Street - both of these seem to have wind deflectors rather than doors on the 'on-side"Yields information about Princes Bridge and the associated railway yards during the 1930s.Postcard - printed real photograph with Rose Stereograph Co. name on the rear.tramways, trams, flinders st station, yarra river, flinders st, princes bridge station, railways, swanston st, w2 class -
 Melbourne Tram Museum
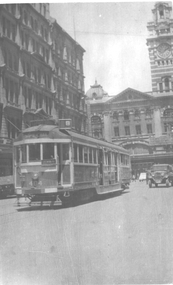
Photograph - Tram 404 leaving Elizabeth St terminus, c1942
Black and white photograph showing W2 class No. 404 with the destination of "Special" and the route Number "B", leaving the Elizabeth St terminal. The tram has white strip under the cabin front and an auxiliary board, that cannot be read but could be via Flemington Road. Special B indicated that the tram was going to go the Ordinance Factory - see item 3019. The Flinders St Station building is in the background.Yields information about tram 404 and the use of the war time destinations for the Ordinance Factory - c1942Black and White photograph with a plain back.trams, tramways, w2 class, tram 404, elizabeth st -
 Melbourne Tram Museum
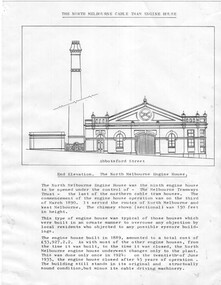
Drawing - North Melbourne Engine House, Jack Cranston
Drawing shows the North Melbourne cable tram engine house in Abbotsford St at Queensberry St, North Melbourne. Shows the elevation to Abbotsford St and the plan of the engine house showing the cable or rope layout and its function. Has notes on the engine house itself and costs etc. It operated from March 1890 to June 1935. Compiled by Jack Cranston for his book on cable trams.Yields information about the North Melbourne Engine house.Set of two printed quarto sheets.tramways, cable trams, engine houses, north melbourne, abbotsford st., queensberry st -
 Melbourne Tram Museum
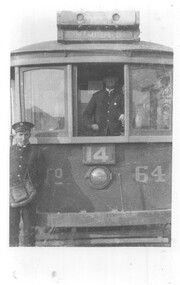
Photograph - "Tram 64, Kew Depot", Bill Simpson, c1922
Photograph shows the driver and conductor standing in the front of J class tram 64 at Kew Depot, mid 1920s. The tram has a destination of Victoria Bdg and route number 14. Shows the MMTB uniform of the period with out jacket lapel badges, though the Motorman does have a small one on his jacket collar. Photograph included in item 8295, "My Uncle Bill".Yields information about the style of MMTB Uniforms in 1922 and tram 64.Photograph - Black and White - with location note on the rear and negative.In ink, "Kew Depot"mmtb, tramways, crews, uniforms, tram 64, j class, kew depot -
 Melbourne Tram Museum
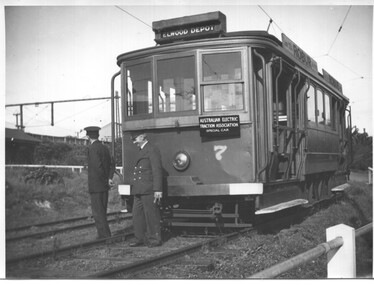
Photograph - VR Tram 7 St Kilda Station, 16-8-1947
Photo of VR tram 7 at St Kilda Railway station in the yard while on a AETA tour, 16-8-1947. Has the destination Elwood Depot. Two crewmen and standing by the front of the tram, which has the war time markings on the bumper bar and footsteps. The driver has his controls in his hand. Dated from the Victorian Rail Tours database - see reference. Yields information about VR tram No. 7 at St Kilda station.Black and white photograph with a stamp on the rear.Has the Ken Magor stamp and number "734" written in.tramcars, tramways, vr, st kilda railway station, tram 7, aeta tours -
 Ballarat Tramway Museum
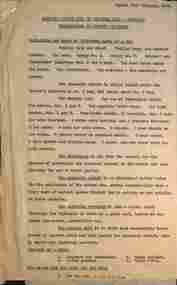
Document, Electric Supply Co of Vic. (ESCo), "Instructions to Recruit Motormen", 1936
Single or front sheet of a set of notes titled "Instructions to Recruit Motormen", with a note that it was copied 10/2/1936 - has the heading of Electric Supply Co. of Vic. The document gives a description of the equipment fitted to a tram and its purpose. Most likely prepared for early ESCo tramcars, prior to the arrival of trams ex Melbourne. Only the first sheet of a multipage document has survived.Yields information and demonstrates ESCo information provided to motormen as part of their training.Single foolscap sheet, typed carbon copy.ballarat, trams, tramways, motormen, training, esco, equipment. -
 Melbourne Tram Museum
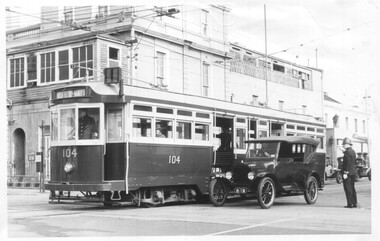
Photograph - L class Smith & Gertrude Sts filming, Melbourne & Metropolitan Tramways Board (MMTB), c1950
Set of two photographs of L class trams 104 and 106 during the filming of a movie or TV series in Gertrude St crossing Smith St. One photo has a horse-drawn cart passing a tram, while the other has a motor car of the 1920s passing. Both have a policeman on duty at the intersection. In the background is the building on the southwest corner of the intersection. Possibly during the 1970s.Yields information about the use of L class trams for filming in Fitzroy area.Set of two Black and white photographs.trams, tramways, gertrude st, smith st, l class, tram 104, tram 106 -
 Melbourne Tram Museum
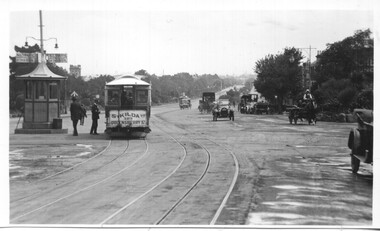
Postcard - St Kilda Junction - cable tram 123, 1910s
Photo of St Kilda Road, from the junction looking north with tram 123 standing opposite the signal box. The tram is sign written for "St Kilda to Queensberry St. The signal box has signs advising that "All traffic keep to the left of this box". A uniformed employee is standing between the box and the tramcar. There are several motor cars in view, along with one horse-drawn cart.Yields information about St Kilda Junction, and cable tram operations.Black and White Photograph postcard format, divided back with note on rear.In pencil on the rear "St Kilda Rd from the junction"tramways, trams, cable tram, st kilda, st kilda road, st kilda junction, signal box, tram 123 -
 Ballarat Tramway Museum
Slide - Lydiard St North - trams 42 & 38 - Set of 2, Ron Hood, 12/1970
Set of two colour photographs by Ron Hood December 1970: 1 - Tram 42 northbound in Lydiard St North with the Railway station and the signal gantry in the view along with a Holden motor car alongside. 2 - Tram 38 north bound in Lydiard St North with Craigs Hotel, the National Mutual building, ANZ bank, ES&A bank building and the Bank of NSW in the view.Yields information about trams 42 and 38 in Lydiard St North during Dec. 1970.Colour slides in hanimount cardboard mounts.Numbered 20 & 21 in ink.tramways, trams, lydiard st nth, tram 42, railway station, tram 38 -
 Federation University Historical Collection
Document - Document - Letter, Ballarat Junior Technical School: Letter from Mr Garner, Head Master, to Mr John, Ballarat
Letter from Mr L Garner, Head Master, to Mr John of M B John Ltd, Ballarat. Letter conveys thanks for allowing fourth form boys to visit the foundry works. visit was interesting and informative.. Yellow paper typedballarat junior technical school, l garnar, junior technical certificate, head master, mr john, m b john ltd, foundry, fourth form visit -
Phillip Island and District Historical Society Inc.
Photograph, 21/11/1969
Part of a collection presented and donated by Mrs Helen Jansson. Official Opening of second Phillip Island Bridge to San Remo. Built 1968/69 and opened by Hon M. V. Porter, MLA, 21/11/1969.Seated crowds each side of road. Approach to Bridge - children at right. No margins on Photo.local history, photography, photographs, slides, film, civil engineering, bridges, phillip island bridge opening 1969, black & white photograph, mrs helen jansson, second phillip island bridge 1969