Showing 1979 items matching "signal"
-
 Wodonga & District Historical Society Inc
Certificate - Australian Railways Union, Victorian Branch, Past Officers Certificate, Wodonga Sub-Branch, 1926
The Wodonga line and train station opened in November 1873 when the section of the line from Wangaratta was completed. The expansion of the railways to the northeast of Victoria occurred after the Victorian Government took over the railways in 1867 and the trains serviced large towns such as Seymour, Wangaratta and Wodonga, as well as smaller towns along the way. The north- east train line to Wodonga remained a significant factor in the development of Wodonga as a rural city in the 20th century. The Past Officers Certificate has local significance as it was presented to Wodonga resident, Lachlan McEachern, who was President of the Wodonga Sub-Branch of the Victorian Branch of the Australian Railways Union, and there are other items that belonged to Mr Eachern in the collection of the Wodonga Historical Society. It also has wider significance as an example of a Past Officers certificate dated to the 1920s, as other examples in the collection of Museums Victoria are later and are dated to the 1930s, 1940s and 1950s. Dark brown wooden frame with a lighter brown wood and gold inner border on a Past Officers Certificate from the Victorian Branch of the Australian Railways Union, presented to L. McEachern in 1926, in recognition of services rendered as President of the Wodonga Sub-Branch. The certificate is a colour lithograph with black and white photolithograph images and a red embossed seal. The inscription on the certificate is surrounded by two Corinthian columns and a background illustration of a signal gantry at Flinders St Station. The signatures of the State President and State Secretary are faded. At the bottom of the certificate, there are black and white images of a suburban electric passenger train, "Unity Hall" which is the building where the Australian Railway Union offices were located and a steam train."AUSTRALIAN RAILWAYS UNION" "A.R.U" "AUSTRALIAN RAILWAYS / UNION / VICTORIAN BRANCH" "Presented to / L.McEachern / In Recognition / of Services Rendered / As President / of the Wodonga Sub-Branch /Year 1926" "State President / State Secretary"australian railways union, a.r.u., a.r. u. victorian branch, wodonga sub-branch, victorian railways, v.r., past officers certificate, flinders st station, railway unions, trade unions -
 Melbourne Tram Museum
Slide - Set of 3, Keith Caldwell, 11/3/1960
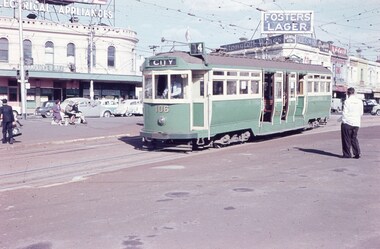
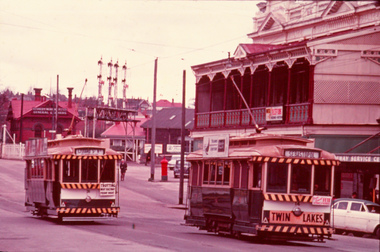
Set of 3 Agfa Colour slide, cardboard mount, by Keith Caldwell of 11 March 1960 of trams at St Kilda Junction. .1 - L 106 arriving at the junction from Wellington St. Tram has the destination of City, route 4. Signals for the trams can been seen on a pole on the left hand side of the photo. .2 - SW6 - as for .1 .3 - W3 668 ditto, from Fitzroy St, showing Moreland, route 15. Has an advert for 3AW. In the background in all photos are adverts for Speedie electrical appliances, Fosters Lager, Stonefell wines, Gilbeys Gin, Penfolds, Stockdale's Bread, Hamburger Max Snack bar, Ardath, Brooks Books.All hand stamped "11 Mar '60"; .1 "L" in ink and .3 "W3" in ink written on.trams, tramways, st kilda junction, signal box, l class, w3 class, tram 106, tram 926, tram 668, sw6 class, wellington st, mmtb, route 4, route 64, route 15 -
 RMIT Design Archives
Diazotypes, Robin Boyd's Sketch for combined project 60-64 Clarendon St + corner site, 1968
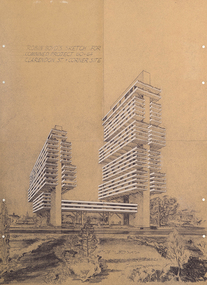
Robin Boyd’s unbuilt scheme for two residential towers for Carnich Pty Ltd in East Melbourne is one of his most striking late projects – remarkable for its daring scale, its indebtedness to the megastructural polemics of Paul Rudolph and Japanese Metabolism, and its prescience – a high-rise apartment building now sits on the same site. The drawing is spectacular: trays of space are held aloft on angled concrete props that branch off trunk-like vertical slabs. With balconies and spandrels highlighted in white, the scheme’s dynamism echoes El Lissitzky’s mad Wolkenbugel (‘Skyhooks’) while also signalling a tragic last hurrah before Boyd’s 1971 death. Philip GoadIncludes sketch of two structures and surrounding flora.Inscribed upper left of recto, "ROBIN BOYD'S SKETCH FOR / COMBINED PROJECT 60-64 / CLARENDON ST. + CORNER SITE"architecture, mid-century modern, emigre, rmit design archives -
 Ballarat Tramway Museum
Photograph - Removal of tramway overhead wire, Bridge & Main Sts, The Courier Ballarat, 27/10/1971
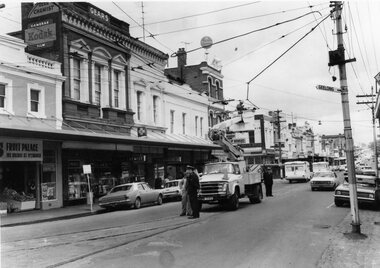
Photograph taken by The Courier - photo taken 27/10/1971, published 28/10/1971 of the Removal of tramway overhead wire, Bridge & Main Sts corner. shows an SEC bucket truck with a workman removing the signalling cabling, with a policeman at either end of the truck providing traffic control. Shows the track in the street and the overhead junction. In the background is Gears Chemist, a fruit shop (Fruit Palace), Bank of New South Wales, and a Kodak advertisement on the chemist building. Collected by Alan Bradley from the Ballarat Courier early 1980's. See Excel file "Record of Ballarat Courier Photos SEC era" (Archive Documents) for source of details.Yields information about removal, dismantling of the Ballarat tramway system overhead following closure of the system in Bridge St. Also shows the streetscape.Black and White copy photograph of a newspaper photograph.tramways, trams, closure, overhead, main st, bridge st -
 Parks Victoria - Gabo Island Lightstation
Light & object
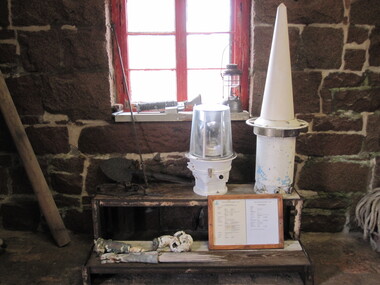
Further information on the unidentified object has not been available during preparation of this report, but it may be a buoy light, or perhaps even a solar powered rotating light made by Pharos Marine, New Zealand. Portable beacon lights were made with a plastic lens and an aluminium base and it is known that one of these was installed in the Gabo Island Lighthouse in February 1992. It was replaced in May 2006 and the lights are now no longer used within the AMSA network. The unidentified item, which can be described as a white painted conical object, appears to be associated with signalling, but more information is needed to confirm this. These items of equipment are presumed to relate to core lightstation functions and look to be in good condition. They have at least second level significance for their probable provenance and association with the theme of visual signalling and the use of navigation equipment for maintaining safe routes for shipping.Beacon and unidentified object (GILS 0095) The portable beacon is a small rotating light containing a lens and prism. The other item can be described as a white painted conical object. -
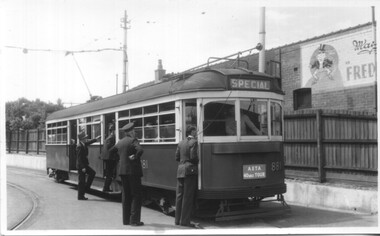 Melbourne Tram Museum
Photograph - Set of 5 Black & White - First AETA tour, 15-2-1947
Set of five photographs of the first Australian Electric Traction Association (AETA) tram tour of Melbourne on 15/2/1947. See page 8 of the March 1947 issue of "Tram Tracks" for details of the tour and the MMTB Crew. 1 - SW6 881 about to leave Glen Huntly Depot 2 - Crossing Balaclava Junction 3 - Crossing the Kooyong railway level crossing in Glenferrie Road - has the railway signal box and gates in view. 4 - Turning into Riversdale Road from Glenferrie Road with the Stotts Business College building in the background. 5 - Just to the east of Yarra River Bridge in Swan Street with the Burnley Gardens on the right.Yields information about the first AETA tram tour in 1947Set of 5 Black and white photograph on paper. Two copies of each held.Each one of the set has a photographers file stamp on the rear, but no details filled in.trams, tramways, aeta, tram tours, tram 881, sw6 class, glen huntly, kooyong level crossing, glenferrie road, riversdale road, burnley, hawthorn, balaclava junction, glen huntly depot, hawthorn road, swan st -
 Melbourne Tram Museum
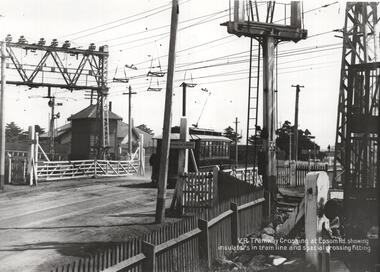
Photograph - NMETL tram 4 Epsom Road level crossing, Victorian Railways, c1919
Photo of the Level Crossing in Epsom Road, Flemington or Ascot Vale showing the overhead arrangement and structures either side of the road to provide power to either the trams or the trains. The small signal box is in the view as well as the interlocked gates. A NMETL saloon tram, No. 4, is crossing the railway lines. Photo late 1919 or 1920. Has the words "VR Tramway Crossing at Epsom Rd showing insulators in tram line and special crossing fitting." The level crossing was electrified on 18-8-1919 and abolished mid 1925 when the underpass was built. See Weekly Notice Extracts 1894-1994, published 1996. See item 8667 for a similar photo with tram 184.Yields information about the Epsom Road level crossing and tram 4.Photograph, Black and White, with notes on the rear.In ink on the rear: "Melbourne - North Melbourne Electric Tramway and Lighting Co. Ltd - No. 4 in Epsom Road on level crossing to Showrooms and Flemington Racecourse. About 1919-1920." Has KSK stamp and Number LWR-4 and CEE 12 in to right-hand corner.trams, tramways, level crossings, nmetl, epsom rd, showgrounds, ascot vale, tram 4 -
 Ballarat Tramway Museum
Slide - 35mm slide/s, Max Michell, No. 14 southbound in Lydiard St North, Sep. 1971
Yields information the operation of trams prior to the closure of the SEC system near the Railway Station. Has a strong association with the work of the Association of Railway Enthusiasts.AGFA blue and white plastic mount, 35mm slide, from the Association of Railway Enthusiast's film strip titled "Provincial Tramway Film Strip" of No. 14 southbound in Lydiard St North with a Twin Lakes and an auxiliary board advertising a Fete. No. 31 is northbound to Lydiard St North with an auxiliary board "Trotting Bray Raceway Friday Night". Photo taken Sept. 1971. In the background is the railway level crossing signal gantry and Reid's Coffee Palace. Note the letter box at the railway station yard. The film strip notes (Reg. Item 2560), provided the following caption details: "No. 31 and 14 cross at the end of the double track outside the Ballarat Coffee Palance - Oct. '68" Photo Max Michell Slide No. 7 Various notations by John as to the slide number and the trams in pencil and ink.tramways, trams, are, film strip, level crossings, lydiard st north, bray raceway, tram 31, tram 14 -
 Melbourne Tram Museum
Photograph - Set of 4 Black & White Photograph/s, Keith Kings, about 6/1977
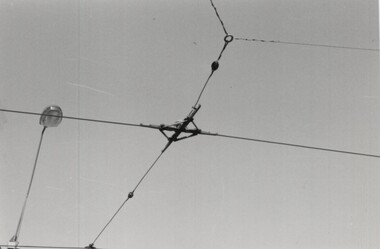
Set of 4 black and white photographs of MMTB trialling overhead fittings for pantographs on the West Preston line. .1 - dummy fitting of where two overhead trolley wires cross each other at 90 degrees .2 - cross frog and signal contactor .3 - Section insulators with pantograph pan depression bars .4 - ears fitted to a curve section with a short dropping sections. Handwritten note (filed with photos) giving photo numbers, location and that sent to ET. Not dated as such. Electric Traction magazine issues for June and August 1977 - see image i5 an it advises of the pantograph trials and changes made. W2 546 had been fitted during May 1977 with a pantograph and a closed circuit camera.trams, tramways, mmtb, west preston, overhead, electrical engineering, electric traction, pantographs -
 Warrnambool and District Historical Society Inc.
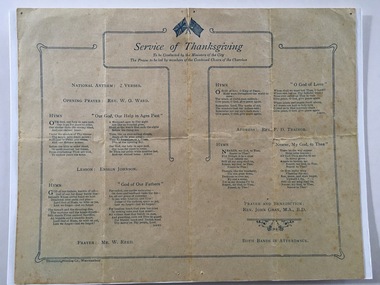
Document, Service of Thanksgiving, 1918
This is a programme of the Warrnambool City Council Civic & Thanksgiving Official Service on November 1918. The service was held in the Warrnambool Botanic Gardens, conducted by the Ministers of the Churches in Warrnambool and led by the combined choirs of the churches. It was a public occasion held to offer thanksgiving for the end of World War One in November 1918. One of the hymns sung had the opening lines: ‘O God of Love, O King of Peace/Make wars throughout the world to cease’. The service was attended by the Mayor of Warrnambool and the City Councillors and Council employees. World War One was a signal event in the history of Warrnanmbool (as it was for all places in Australia) with so many young men volunteering for active service and so many dying overseas.This programme is of great interest as it records an important occasion in Warrnambool – the end of World War One and the official service of thanksgiving that commemorated this happening. This is a programme for the Warrnambool City Council Civic & Thanksgiving Official Service in November 1918. It is a sheet of buff-coloured paper folded in two to make four pages. There is blue printed material on three of the pages. The front page has the City of Warrnambool crest printed in blue with blue edging on the page and some ornamental patterns. The inside pages has a blue sketch of the flags of Australia and Britain. The programme is faded and creased and a little blotched.warrnambool city council, history of warrnambool, world war one -
 Flagstaff Hill Maritime Museum and Village
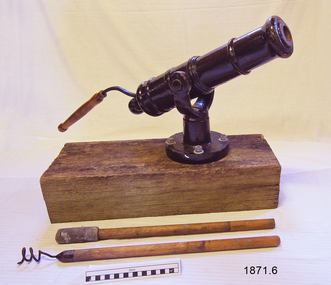
Weapon - Cannon, mid to late 19th century
The history of the Thunderchild gun is not known. It was presumably manufactured in Torquay in the second half of the 19th century. Such guns were often attached to a ship’s rail through the holes in the swivel base, as in the base of this gun. The guns fired grapeshot and were originally used on ships to repel boarders. They were also used to launch whaling harpoons and were sometimes employed for signalling. The relatively late date makes the latter application most likely. This Thunderchild gun is complete with ramrod and wad remover. It is in good working order and easily assembled. It is used locally for special ceremonies and for Whaleboat Races as a starting gun. (Guns and Cannon, South Wester Victoria, May 2008, ref W/F/03) The small bore cannon is part of a collection of nineteenth century Flagstaff Hill Guns and Cannon, which is classified as being a high level of significance, on State, National and World The nineteenth century artillery pieces are a very rare and representative collection of artillery of this era. The artillery pieces, individually and as a collection, are highly significant for historical, scientific and aesthetic reasons at the state, national and world levels. The artillery pieces are excellent examples of nineteenth century artillery designed for the shore defence of western Victoria in the mid to late 1800s. The collection demonstrates the system of nineteenth century Imperial Defence implemented by Britain and of the recycling of obsolete technology to the colonies by Britain. The collection represents the methods of artillery technology, its advancement and its modifications in order to remain active. It also illustrates the transference of defence technology from Britain to Australia and demonstrates the level of reliance Australia had on British defence equipment. The artillery pieces form prominent elements in their landscapes and, together with the batteries and sites in which they are located, create a strong visual link to the region’s defence history. Importantly the artillery pieces, individually and as a collection, represent a very rare and intact group of nineteenth century artillery. Very few examples of nineteenth century artillery have survived worldwide, the largest collections being sited in Canada. The collection is a rare collection of artillery which demonstrates the advancements made in artillery technology during the nineteenth century, and is one of the largest collections of nineteenth century artillery in Australia. Further, the collection is extremely intact, with most pieces retaining original carriages and many located within their original emplacement. This collection of artillery, with their carriages and in their locations, are of exceptional national significance as they represent the largest intact collection of artillery within a single defensive network, outside of major colonial ports. The collection of nineteenth century carriages and slides are in themselves an extremely rare and important collection, however their significance is enhanced by their placements within batteries and with guns. (Conservation Management Plan for Victorian Guns and Cannon, South Western Victoria, May 2008) Cannon; small 1pdr cast iron, smooth bore muzzle loading swivel gun, painted glass black. 19th century cannon has polished wood handle, two detachable metal stirrups and metal swivel base with cuff, attached to block of wood by four bolts. Accessories are a wood tamper and wood ramrod. Name on gun is Thunder-Child, Torquay, Vic. There are Maker’s Marks on the gun and base, and a number on the cannon.. Marks; Barrel "Thunder/ Child". Base cuff " THUNDER / -CHILD / TORQUAY / VIC ", Trunnion "2825/H"flagstaff hill, warrnambool, shipwrecked coast, flagstaff hill maritime museum, maritime museum, shipwreck coast, flagstaff hill maritime village, great ocean road, cannon, torquay, thunder child cannon, thunderchild cannon, signal cannon, muzzle loading cannon, ordinance, munitions -
 Whitehorse Historical Society Inc.
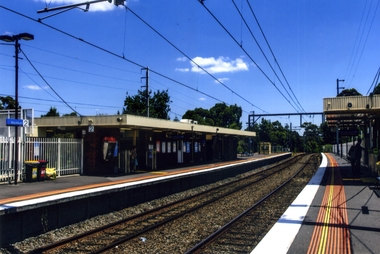
Photograph, Blackburn Railway Station, 2012
In 1882 the railway from Melbourne to Camberwell was extended to Lilydale, Blackburn Station was then known as Blackburn Greek Station and was opened on 2 December 1882. At this time the Lilydale line had only a single track. On 12 August 1889 Blackburn was designated as a 'crossing station' as it had 2 platforms. In 1891 a second line was added between Box Hill and Ringwood stations. Service termination at Blackburn began in the late 1890's due to the large number of passengers visiting the Blackburn Lake Sanctuary. The Lilydale line was electrified to Ringwood in January 1923. Automatic signalling reached Blackburn in 19568. Boom gates replaced hand gates in 1970. in 1980, the goods siding was removed and the old station was demolished.Coloured photograph of the south side of the Blackburn Station. People using this platform are headed towards the city - 2012blackburn railway station -
 Kiewa Valley Historical Society
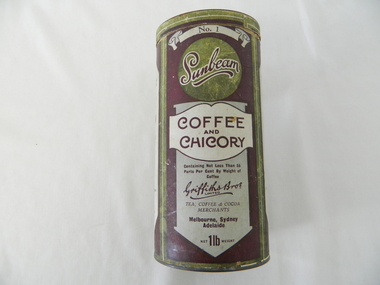
Container Tin Cylindrical
This item was produced by a Melbourne Tea, Coffee and Cocoa Merchant importers(1898-1960). It was a time when local production of, coffee had yet not begun. Imports from India and the Asian region had dominance in the market place. The blending of coffee with chicory was a cheaper method of providing a flavour enriched drink which was marketed as "containing not less than 55 parts per cent by weight of coffee" The coffee weighed heavier than the chicory. This was a time before strict accurate consumer information/content became mandatory and legally enforceable.This empty container of "Sunbeam" Coffee and Chicory finely ground "instant - just add boiling water" beverage was the start of the "fast" breakfast drink. The use of grinding the coffee beans and percolation to obtain the final drink was at the start of the rural sector's decreasing the time for casual drinking. The once casual countryside psyche was now (mid to late 1900's) becoming more "on the go".This cylindrical container (coffee and chicory) is constructed from pressed cardboard with both ends enclosed by tin(pressed) lid and bottom. The outside wrapping is promotional and descriptive in the colours of purple background and information label areas with purple lettering on a white and silver background. The cylinder is made from 2 mm pressed cardboard.Main label " No.1" underneath "Sunbeam" underneath "COFFEE and CHICORY" UNDERNEATH "Containing Not Less than %% Parts Per Cent By Weight of Coffee" underneath in Hand Writing" Griffiths Bros Limited", below this "TEA ,COFFEE & COCOA MERCHANTS" Below this" Mellbourne, Sydney, Adelaide" and lastly "net 1lb weight". Alternate side "The Following Well Known Economical & Flavoury Teas" underneath this "Packed Specially For The Trade" underneath "SUNBEAM & VICTORY SIGNAL COCOA" and in smaller print "Absolutely Pure, Made in Australia" underneath Equal To The Best Imported"breakfast containers, food storage, instant coffee, speed breakfasts, domestic -
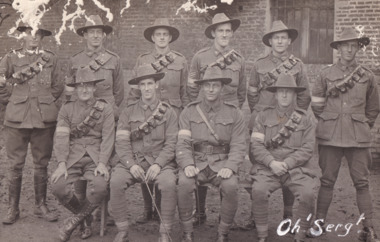 The Beechworth Burke Museum
Postcard, 1918
It is believed that the photograph on the obverse side of the postcard was taken in 1918. Depicted are ten Australian male soldiers. Their names are transcribed in pencil on the reverse side of the postcard. Each soldier is dressed in a formal military uniform. It is believed that these soldiers were part of The Australian Imperial Force during World War I. This can be inferred by the chevron rank insignia visible on the uniforms of nine of ten men. The placement of this insignia on the sleeves of their right arms suggests that they were either Warrant Officers or Non-Commissioned Officers (NCO). Specifically, the number of chevron stripes - here, nine men have three - are believed to signify a Corporal rank. The men pictured on this postcard are also wearing 'Rising Sun' collar badges on their coats. Australia, unlike most other Commonwealth countries, did not adopt metal regimental badges during the First World War. All units were issued with the Australian Army General Service Badge, better known as the 'Rising Sun’ badge. This insignia is almost always identified with the Australian Imperial Force. Another characteristic of the Australian Imperial Force uniform are the rectangular colour patches worn by all men on this postcard. In March 1915, a new scheme of unit identification was devised to replace the wearing of unit titles. This consisted of cloth colour patches on the upper arms of a soldier’s tunic. The black and white nature of the record means that we cannot establish which battalion these soldiers were part of. However, one of the handwritten signatures on the reverse side of the postcard reads "W.A. Griggs". This was the signature of Sergeant William Archibald Griggs. Further research shows that Griggs was part of the 5th Australian Division Signals Company. Therefore, it is believed these soldiers were part of the ANZAC Signal Companies. The main role of the Signal Companies during World War I was the laying and maintenance of telephone cables and switchboards, used to connect various units in their area. Furthermore, the man standing in the back row, third from the left side, has an Overseas Service chevron patch on his coat. In January 1918, the Australian Imperial Force approved the wearing of the overseas service chevrons which had been adopted by the British Army. These were embroidered or woven inverted chevrons worn above the cuff on the right arm. Due to a shortage of supply, some men had chevrons privately made. For each year of war service, a blue chevron was awarded, and those men who had embarked in 1914 received a red chevron to indicate that year’s service; however, the black and white nature of the postcard makes it difficult to determine what colours are on this man's patch.The record is historically significant due to its connection to World War I. This conflict is integral to Australian culture as it was the single greatest loss of life and the greatest repatriation of casualties in the country's history. Australia’s involvement in the First World War began when the Australian government established the Australian Imperial Force (AIF) in August 1914. Immediately, men were recruited to serve the British Empire in the Middle East and on the Western Front. The first significant Australian action of the war was the Australian Naval and Military Expeditionary Force’s (ANMEF) landing on Rabaul on 11 September 1914. The ANMEF took possession of German New Guinea at Toma on 17 September 1914 and of the neighbouring islands of the Bismarck Archipelago in October 1914. On 25 April 1915, members of the AIF landed on Gallipoli in Turkey with troops from New Zealand, Britain, and France. This specific event holds very strong significance within Australian history. The record has strong research potential. This is due to the ongoing public and scholarly interest in war, history, and especially the ANZAC legend, which is commemorated annually on 25 April, known as ANZAC Day.Black and white rectangular postcard printed on paper.Obverse: Oh 'Serg!' / Reverse: CARTE POSTALE / 6537 / Correspondance / Adresse / w.a. Grigg / J. Fain / Ruckling / R.J Farrar / (?) / Clarke / L (?) / GFFisher / R. M. Forrest / With Compliments / Sgt's Mess / November 1918 /military album, army, aif, uniform, military, wwi, world war i, rising sun badge, william archibald griggs, anzac, signal companies, postcard, patches, chevron -
 8th/13th Victorian Mounted Rifles Regimental Collection
Photograph
Robin Ellison was a signals Sergeant on HQ and Mick butler was an AFV crewman.Cambrai Day is celebrated annually by Armoured Corps regiments of the British Commonwealth. It marks the anniversary of the Battle of Cambrai in November 1917 when a force of more than 400 British Mark IV Tanks broke the defences of the German Hindenburg Line, It was the first large-scale, effective use of tanks in warfare. Cambrai turned from a battle of great success to failure, but it heralded a new type of warfare and changed the nature of the battlefield forever.The gathering at Buna Barracks Albury, Beersheba Barracks Wangaratta, Bapaume Barracks Benalla and Salamaua Barracks Cobram on 30 November 1986 was the inaugural meeting of the 8th/13th Victorian Mounted Rifles Regimental Association.Colour photograph of Sergeant Robin Ellison and lance Corporal Mick Butler taken at Buna Barracks Albury at a Cambrai Day gathering of former members of 8/13 Victorian Mounted Rifles, 30 November 1986. -
 Melbourne Legacy
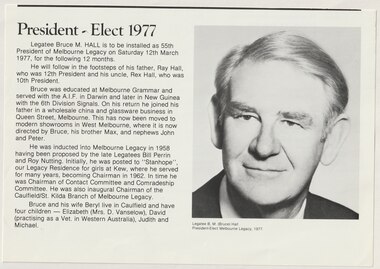
Document - Article, Legatee Bruce Hall, President 1977
A cutting from from a Melbourne Legacy President's report showing a photo of Legatee Bruce M Hall (President of Melbourne Legacy in 1977). It was collected to be a record of a photo of past presidents. Legatee Bruce Hall was the son of Legatee Ray Hall (president in 1931) and nephew of Legatee Rex Hall (president in 1933). In World War 2 Legatee Bruce Hall served with the AIF in Darwin and New Guinea with the 6th Division Signals. He joined Legacy in 1958 on the nomination of Legatees Bill Perrin and Roy Nutting. The article was part of an album of past presidents from 1965 to 1989. The folder included biographical details and obituaries, eulogies and death notices of prominent Legatees. The items have been catalogued separately.A record of Legatee Bruce Hall a past president of Legacy. The information was collected to record the lives of prominent legatees in a folder.Article with a black and white photo of Legatee Bruce M Hall - President 1977.past presidents, bruce hall -
 Ballarat Tramway Museum
Slide - 35mm slide/s - set 16, John Theodore, 15/10/1978 12:00:00 AM
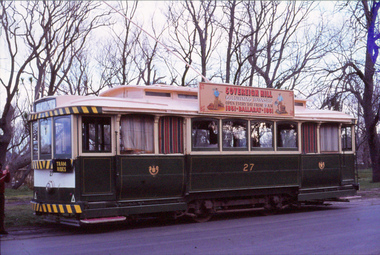
Yields information about the official opening by the BTPS of its operations in Wendouree Parade at the time of the 1978 AGM and the building extensions.Set of 16 AGFA blue and white plastic mount 35mm slides of the 1978 AGM at the depot and tram operations in Wendouree Parade - 15/10/1978 (September 1978 Fares Please!) .1 - 27 at St Aidans Drive .2 - ditto with a Sovereign Hill roof Advert .3 - ditto .4 - ditto at Carlton St .5 - ditto .6 - 27 arriving Depot Junction - note the signal lamp .7 - ditto .8 - looking up the access track .9 - Building extension works underway 10 - ditto showing the pits .11 - showing the stockpile of gravel .12 - 1978 AGM in progress - note the landscaping .13 - ditto .14 - 27 on the 3 road extension .15 - 40 and 27 at the depot fan .16 - depot fan and 27. Various notations by John as to the slide number and the trams in pencil and ink.tramways, trams, btps, wendouree parade, meetings, depot, buildings, tram 40, tram 27 -
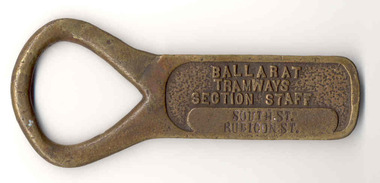 Ballarat Tramway Museum
Functional Object - Section Staff, Electric Supply Co. of Vic (ESCo), "South St. Rubicon St."
Demonstrates aspects of Safeworking on the Ballarat Tramway system from 1960 to c1936 when replaced by electric signs. Yields Information about the operation of Ballarat's trams and safeworking procedures.Cast brass item with a flat part recessed section with the words "BALLARAT TRAMWAYS SECTION STAFF" cast into the surface and a flat section underneath, flush with the outside edges in which the words "SOUTH ST. RUBICON ST." stamped in. Has an open rounded end which forms a handle or a point where it could be hung on a peg. Used a means of authorising a tramcar to have sole use of the track between the named points to avoid head on collisions. Safeworking object - known as a section staff. Not known when made, but in use until the introduction of the electric signalling in the mid 1930's by the SEC. See also Reg Items 934 and 988 for details of use and other examples are at 1851, to 53, 2473 and 4444 to 4448, , 4996 and 4497 and Reg item 934 and 988 for articles on the safeworking systems.trams, tramways, staff, safeworking, tramway staffs, sec, signals -
 Ballarat Tramway Museum
Document - Photocopy, Signalling Record Society of Victoria, "Safeworking Operations of the Ballarat Electric Tramway System", May. 1988
Copy of an article by Neville Gower, published in "Somersault", the magazine of the Signalling Record Society of Victoria, May 1988. Describes location of loops in horse drawn era compared to those of the ESCo area 1905 to 1934, with reference to changes made to ESCo Loops by SECV upon rehabilitation of the system, based upon changes on BTM's collection of staffs. Published in p54, 55, 56 and 60 of Somersault, May 1988. Copy supplied by Graeme Reynolds, printed with a dot matrix printer. Page 56 and cover page supplied by Warren Doubleday (2/1999). Was a follow up article or item by Peter Barry in the July 1988 issue and an article on Bendigo during 1989. (Information provided by David Langley editor at the time - 1/1999). See also item 988.p1 - 54 has been enhanced in black ink.trams, tramways, signals, crossing loop, esco, tramway staffs -
 Ballarat Tramway Museum
Slide - 35mm slide/s - set of 2, Peter Moses, Jan. 1969
2059.1 - Photo of SEC Ballarat No.41 passing through the railway gates at Ballarat Railway Station, Lydiard St. North, with the destination of "Sebastopol". Tram has a SEC "Everything's under control in my all electric kitchen". Reid's Coffee Palace is the background. Photo shows the Ballarat Railway station clock tower, part of the train shed and the signals on the station side of the gates and another bogie tram waiting at the end of the double track in Lydiard St. for No. 41 to pass. 2059.2 - ditto, but with the two trams passing each other. The Provincial Hotel is also in the photograph. Kodak cardboard mount slide, taken by Peter Moses assumed Jan. 1969, dated only "Jan", but date lines up with Bendigo slides and type of numbering. Could be 1970.On the rear of the slides in black ink "P. Moses" along bottom left hand corner in black ink.tramways, trams, railway crossing, lydiard st, railway station, reid's coffee palace, provincial hotel, tram 41 -
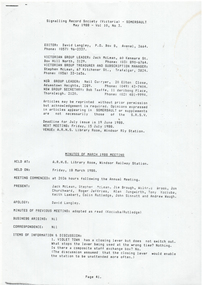
 Ballarat Tramway Museum
Functional Object - Section Staff, Electric Supply Co. of Vic (ESCo), "Carlton St to Haddon St Loop"
Demonstrates aspects of Safeworking on the Ballarat Tramway system from 1960 to c1936 when replaced by electric signs. Yields Information about the operation of Ballarat's trams and safeworking procedures.Cast brass item with a flat part recessed section with the words "BALLARAT TRAMWAYS SECTION STAFF" cast into the surface and a flat section underneath, flush with the outside edges in which the words "CARLTON ST HADDON ST LOOP " stamped in. Has an open rounded end which forms a handle or a point where it could be hung on a peg. Used as a means of authorising a tramcar to have sole use of the track between the named points to avoid head on collisions. Safeworking object - known as a section staff. Not known when made, but in use until the introduction of the electric signalling in the mid 1930's by the SEC. See also Reg Items 934 and 988 for details of use and other examples are at 1851, to 53, 2473 and 4444 to 4448, 4996 and 4497 and Reg item 934 and 988 for articles on the safeworking systems.trams, tramways, staff, safeworking, tramway staffs, sec, signals -
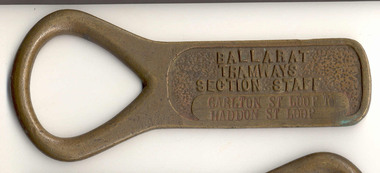
 Ballarat Tramway Museum
Functional Object - Section Staff, Electric Supply Co. of Vic (ESCo), "Pleasant St to Carlton St Loop"
Demonstrates aspects of Safeworking on the Ballarat Tramway system from 1960 to c1936 when replaced by electric signs. Yields Information about the operation of Ballarat's trams and safeworking procedures.Cast brass item with a flat part recessed section with the words "BALLARAT TRAMWAYS SECTION STAFF" cast into the surface and a flat section underneath, flush with the outside edges in which the words "PLEASANT ST TO CARLTON ST LOOP " stamped in. Has an open rounded end which forms a handle or a point where it could be hung on a peg. Used as a means of authorising a tramcar to have sole use of the track between the named points to avoid head on collisions. Safeworking object - known as a section staff. Not known when made, but in use until the introduction of the electric signalling in the mid 1930's by the SEC. See also Reg Items 934 and 988 for details of use and other examples are at 1851, to 53, 2473 and 4444 to 4448, , 4996 and 4497 and Reg item 934 and 988 for articles on the safeworking systems.trams, tramways, staff, safeworking, tramway staffs, sec, signals -
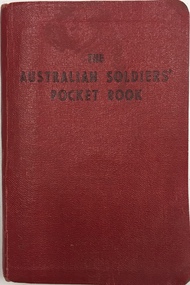 Kew Historical Society Inc
Book, Brown, Prior, Anderson Pty Ltd, The Australian Soldiers' Pocket Book : Containing useful information for Australian soldiers, 1940
Booklet produced in 1940 for members of the 2nd AIF by the Australian Comforts Fund Victorian Division. The 128-page pocket-sized book could be carried everywhere and provided Australian soldiers with a wide range of useful information about the requirements of war service and many other important details such as: The Laws and Customs of War - including Geneva Convention guidelines, notes on spies and insignia of rank; Things a Soldier should Know - including over 60 points; Signaling - including flags, morse code, shipboard bell times and time zone; Decorations Awarded to Australians in the Great War; Arabic and Japanese words; First Aid for gas injuries etc.; Australian Historical Events, facts and figures etc.; and Conduct Overseas - including expectations of behaviour when representing Australia. non-fictionaustralian comforts fund (victoria), second world war 1939-1945, hugh george ferguson -
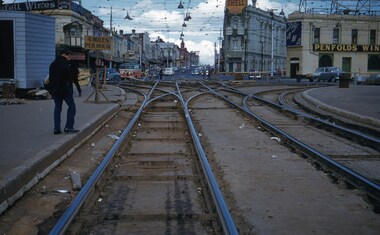 Melbourne Tram Museum
Slide - Set of 2, Keith Kings, 17/10/1959 12:00:00 AM
Set of two Colour slides, Kodak, white cardboard mount of track laying and reconstruction at St Kilda Junction during Oct. 1959. .1 - St Kilda Junction during reconstruction looking south with the junction arrangements shown. Has in the background, the Signal box, the junction hotel and the Corner Hotel, all with adverts for Penfold Wines, Fly ANA, Shell, Sepletts wins and Gilbeys Gin. Shows the vertical curves and the nature of the trackwork at this location. Photo 17/10/1959. .2 - ditto, but further back, with track welding, overhead work, tower wagon and a welding truck. In the background in addition to .1 are signs for Fosters Lager and Goodyear tyres. Dated 18/10/1959. Slide Number K(l)(293) and K(i)(293).Extensive handwriting on rear in ink and that it was photographed at 1/125 f4 and 1/125 f5.6trams, tramways, st kilda junction, overhead, tower wagon, welding truck, signal box, trackwork -
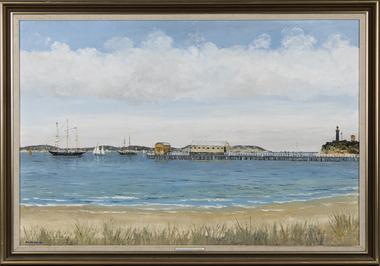 Queenscliffe Maritime Museum
Painting - Oil Painting, Dacre Smyth, 1. 'Queenscliffe' in open shed. 2. 1988 Tall Ships at Queenscliff; Leeuwin, Asgard
Tall Ships at Queenscliff; 'The sail training barquentine "Leeuwin" from West Australia and the Republic of Ireland brigantine "Asgard II" at anchor off Queenscliff prior to the "Arrival Convoy" in Melbourne of a number of the Tall Ships, all bound eventually for Sydney via Hobart for Australia's 1988 bicentenary. The Queenscliff pier with the old lifeboat shed and the Blacklight (Queenscliffe's High Light) alongside the old signal tower are also depicted. Port Phillip Heads in the disctance. By Dacre Smyth 29 Dec 1987.A barquentine or schooner barque is a sailing vessel with three or more masts; with a square rigged foremast and fore-and-aft rigged main, mizzen and any other masts. A brigantine is a two-masted sailing vessel with a fully square-rigged foremast and at least two sails on the main mast: a square topsail and a gaff sail mainsail (behind the mast). The main mast is the second and taller of the two masts.Oil painting in frame of the Leeuwin and Asgard tall ships in Queenscliff 1988.On front: Tall Ships at Queenscliff (LEEUWIN and ASGARD). Hand written on back: Tall Ships at Queenscliff; 'The sail training barquentine "Leeuwin" from West Australia and the Republic of Ireland brigantine "Asgard II" at anchor off Queenscliff prior to the "Arrival Convoy" in Melbourne of a number of the Tall Ships, all bound eventually for Sydney via Hobart for Australia's 1988 bicentenary. The Queenscliff pier with the old lifeboat shed and the Blacklight (Queenscliffe's High Light) alongside the old signal tower are also depicted. Port Phillip Heads in the disctance. By Dacre Smyth 29 Dec 1987'.leeuwin, barquentine, queenscliff, dacre smyth, brigantine -
 Ringwood and District Historical Society
Photograph, Ringwood railway station precinct. Post number 35 in view from the foot bridge. The signalman is giving the staff to the driver of a dog box suburban train, from Bayswater
Black and White PhotographAccompanying sheet reads, " 'Post 35' shows the scene from the foot bridge. The signalman is giving the staff to the driver of a dog box suburban train, from Bayswater because there is a train probably on arrival Croydon on the Croydon line. The right hand arm of the bracket is off for Bayswater. Post 35 at that time was a prefab structure which replaced the signal posts knocked down on 22/6/1945. The red brick building bottom right corner is the relay room which included devices which would probably have prevented the June 1945 accident". -
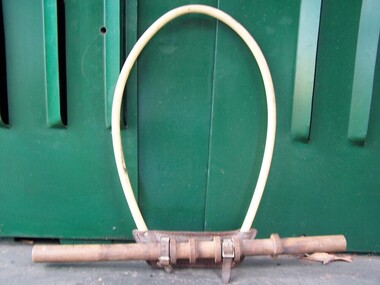 Puffing Billy Railway
hoop, Staff exchanger
Staff exchanger hoop - Leather Bakelite and wooden prop staff. The hoop held the 'Staff’ giving authority for a locomotive or rail vehicle permission to travel over a specified section of track. The display shows the hand held type used from person to person. Hand held staffs were exchanged at low speeds or stationary. Automatic staff exchangers were also in use when a vehicle was not required to travel at low speed to exchange the staffs and were used by express trains. To exchange the 'Staff’ from the platform or signal box to the locomotive driver, the hoop was held up in the air by the person, and collected by the Drivers arm. The reverse occurred when the staff was being given by the Driver. Both exchanges may occur where one section of line ends and another commences.Historic - Railways - Staff exchanger hoop - used for person to person exchanging.Staff exchanger hoop made of Leather Bakelite and wooden prop staffpuffing billy, staff exchanger hoop -
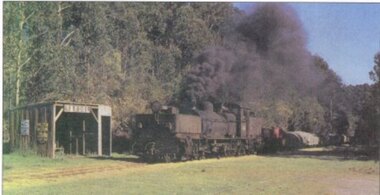 Otway Districts Historical Society
Photograph, R. Preston, Banool: Locomotive G42 and goods, c.1960, c.1960
This original station on the Colac-Beech Forest line was first known as "Moorbanool" after the local parish, and then shortened to "Banool" on 1 November 1904. At first facilities consisted of a passenger shelter, a loop siding for 11 trucks, plus a residence for the ganger of the track gang based there. By 1912 with the extension of the line to Crowes increased train services on the line required a crossing station in this section of the track, and therefore Banool became a staff and ticket station with a crossing loop and home signals. However, this only lasted for two years and was abolished as an economy measure in 1916. Loading figures show that in most years the outwards tonnage at Banool was less than 150 tonnes. The station was reduced to a passenger shelter and goods loop only by 1929, and by the time of closure in 1962 most trains were steaming through.Colour. Locomotive G42 and its NQR goods wagons, loaded and unloaded, steaming past Banool station passenger shelter. 143mm x 274mm print.banool; moorbanool; railways; locomotive g42; -
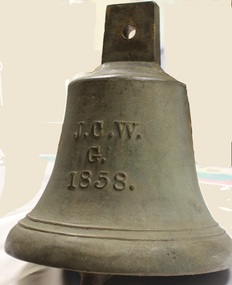 Wodonga & District Historical Society Inc
Functional object - Gordon Family Orchard Bell
The Gordons were architects and were associated with many buildings still standing in Albury and Wodonga, St Patrick's Church and the de Kerilleau Homestead among them. They established Vermont Orchard on 74 acres to the south of the Wodonga settlement. Here they grew fruit and nuts for the domestic and export market. The enterprising family also set about transforming some of the land by clearing it, creating streets and making general improvements. It was the biggest subdivision in Wodonga at the time. The 234 allotments in the Wodonga Estate were put up for sale by auction in May 1890. A total of 200 people were said to have attended. Gordon, William, Charles and Vermont streets in Wodonga are named after the family. This bell was used at the Vermont orchard to signal the beginning and end of the working day, as well as lunch breaks.The Gordon Family orchard bell is made of cast iron. It includes the inscription "J. C. W../G./1858." This is thought to represent the initials of John Gordon and sons Walter Joseph and Charles Goodwin Sylvester Gordon. There is some conjecture about this due to the date "1858". John was born in London, England in 1823 and died in 1880. Walter is generally accepted to have been born in 1857 and died 1903. In one family tree Charles is recorded as being born on 28 January 1858 but his birth was registered in 1860. The mystery of the date is therefore not fully resolved.On one side of the bell "J. C. W../G./1858."gordon family wodonga, gordon and gordon architects, vermont wodonga -
 City of Greater Bendigo - Civic Collection
Souvenir, International Commonwealth Games Committee, Melbourne Commonwealth Games Queens Baton relay, 2006
The Queen's Baton Relay has been the traditional curtain-raiser to the Commonwealth Games since 1958. It symbolises the gathering of people from across the Commonwealth. On 14 March 2005 Her Majesty placed a message in the baton at Buckingham Palace, signalling the start of a journey of almost 180,000 kilometres. The baton's journey to the opening ceremony took exactly one year and one day, arriving at the Melbourne Cricket Ground during the opening ceremony of the Melbourne 2006 Commonwealth Games on 15 March 2006. It was the first baton relay to visit all 71 nations of the Commonwealth. Athletes and non-athletes alike shared the privilege of carrying the baton. In Bendigo two sites were chosen for events. Bendigo Stadium: Basketball and Wellsford Rifle Range: Full Bore Shooting.Baton in display box. Reproduction of actual object. Front panel has 36 inserts, base is narrower than top. Queens message button near top which unlike the original is not removable. Top is gold coloured, back is dark green. Box is black with black inner liner.Top of box: Melbourne 2006 Commonwealth Games / Queen's Baton Relaycommonwealth games 2006, city of greater bendigo tourism, city of greater bendigo sport