Showing 1743 items matching " concrete"
-
 Royal District Nursing Service (now known as Bolton Clarke)
Photograph - Photograph, black and white, c.1960
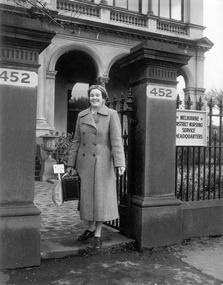
Sister Beryl Hawker is a District Nurse working for the Melbourne District Nursing Service (MDNS) and is leaving their Headquarters at 452 St. Kilda Road, Melbourne to give nursing care to a patient in their home situated in a Melbourne suburb. She is wearing the MDNS winter uniform grey wool coat over her grey cotton dress with white collar. A red Maltese cross is attached to the centre of her grey wool beret. Her nursing case contains an apron, hand towel, thermometer, instruments, dressings and lotions.The Trained nurses of the Melbourne District Nursing Society (MDNS), later known as Royal District Nursing Service (RDNS), visited patients in their home and gave best practice care in many fields of nursing and to people of many cultures throughout its 130 years of expansion. Initial visits not only assessed the specific nursing situation but the situation as a whole. Their patients ranged in age from babes, children, adults to the elderly and referrals were taken from Hospitals, General Practitioners and allied Health facilities. Some of the care provided was: – Post-Natal care given to mother and babe, Wound Care following various types of surgery, accidents, burns, cancer, leg ulcers etc. Supervising and teaching Diabetic Care, including teaching and supervising people with Diabetes to administer their own Insulin, and administering Insulin to those unable to give their own injections. Administering other injections and setting up weekly medication boxes. The Sisters performed Catheterizations on adults suffering from conditions such as Quadriplegia, Paraplegia, Multiple Sclerosis (MS), Motor Neurone Disease (MND) and Guillan-Barre Syndrome, and when required at school on children for e.g. those with Spina Bifida. The Sisters visited those requiring Cystic Fibrosis support and care; those requiring Haemo-Oncology care, including visiting children at school; those requiring Home Enteral Feeding care, and those requiring IV therapy at home and home Dialysis. Palliative Care was given including pain relief with the use of syringe drivers, personal care as needed, and advice and support to both patient and family. RDNS provided Stoma management to those needing Urostomy, Ileostomy and Colostomy care and those requiring Continence care. HIV/AIDS nursing care was provided; visits to Homeless Persons were made. Personal care was given to patients ranging in age and with varying mobility problems, such as those with MS, MND, Guillan-Barre Syndrome, Quadriplegia, Paraplegia, Acquired Brain Injury, following a Cerebrovascular Accident (Stroke), those with severe Arthritis and those with a form of Dementia. When necessary the elderly were assisted with personal care and advice given on safety factors with the use of hand rails, bath or shower seats, and hand showers. Rehabilitation with an aim towards independence remained at the forefront of the Sister’s minds and when possible using aids and instruction on safe techniques enabled the person to become fully independent. All care included giving advice and support to the patient and their Carers. The Sisters liaised with the persons Doctor, Hospital and allied Health personal when necessary.Sister Beryl Hawker, who has short dark hair, is smiling as she is leaving Melbourne District Nursing Service (MDNS) Headquarters. She is wearing the MDNS uniform of an ankle length double breasted grey wool coat and wool beret with a central Maltese cross. Part of the MDNS insignia is seen at the top of her left sleeve. In her right hand she is carrying a rectangular nursing case and a light colour soft material bag. She is standing in front of the open metal spike gate between the two square grey concrete pillars of the gateway; the black numbers '452' are written on a white background on the top section of each pillar. A spiked metal fence is attached and running to the right of the right pillar; attached to this and close to the pillar, is a white plaque with black capital letters reading: 'Melbourne District Nursing Service Headquarters'. In the background is a paved path leading to part of a building with part of three arches seen and above this some concrete balustrade. A large pedestal concrete flower urn sits next to the partially seen steps leading up to the building. Some low bushes are seen behind the fence and in front of the building.59134-11melbourne district nursing service, mdns, mdns uniform, mdns headquarters, sister beryl hawker, royal district nursing service, rdns -
 Southern Sherbrooke Historical Society Inc.
Photograph - Terry Smith at the building site of the caretaker's house, Belgrave Reservoir, c.1940s
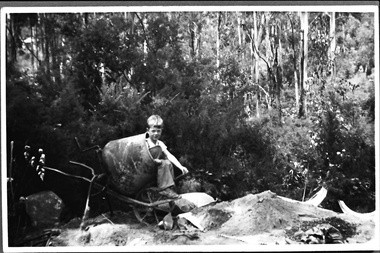
Black and white photo of Terry Smith, Pam Harris's younger brother, aged about 6 or 7, during the building of a septic tank for the caretaker's house at Belgrave Lake Park. Terry is sitting in a concrete mixer. On the ground are bags of concrete. A pile of sand is on a tarpaulin. Behind Terry there are shrubs and small trees and behind them are tall trees on a steep hillside. The Belgrave Reservoir is at the bottom of the slope. A house can be seen in the distance, possibly the house visible in B0399. Terry and Pam's father, Oscar Smith, built the caretaker's house, selling it in 1960 for £1250. The photo probably dates to the 1940s and is part of a collection of family photos donated by Pam Harris, Shire of Sherbrooke President, 1982-1983 & 1987-1988. -
 Ballarat Tramway Museum
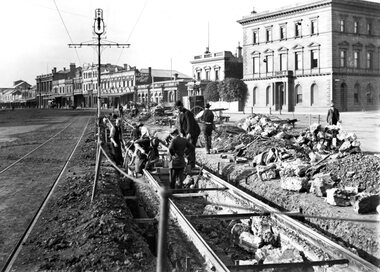
Negative, Geoff Grant, 26/05/1954 12:00:00 AM
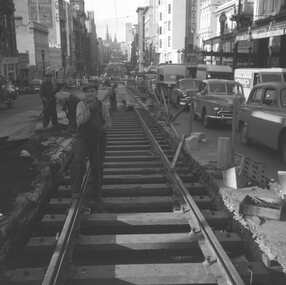
Negatives No. 279 and colour print made by colour laser printer (stored in folder ) of the construction of the west bound track in Bourke St near Queen St. The eastbound track at this location has been completed. Photo shows the nature of construction, sleepers on a concrete foundation and then concrete in. Envelope containing the slide not dated, but assumed to be 26/5/1954 as for Reg. Item 1559. Photo by Geoff Grant. Hi res scan of negative and image updated 19/5/2020. Four prints or copies of the photograph, 101mm square, added 1/6/03. Photo used in the Melbourne Immigration Museum's "Trammies" Exhibition Feb to May 2003. Prints made by the Immigration Museum for use in the making of the display panels.trams, tramways, melbourne, bourke st, construction, queen st -
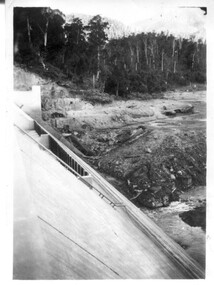
 Wodonga & District Historical Society Inc
Album - Hume Reservoir Australia Album - Section of completed coffer dam, January 1927
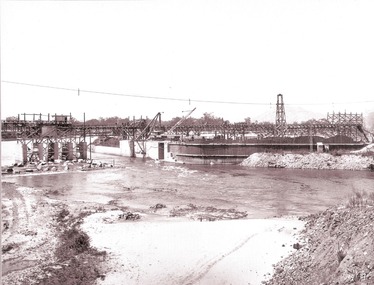
This set of photos is from a leather bound album bearing the inscription "HUME RESERVOIR AUSTRALIA" plus 'The Rt. Hon. L. C. M. S. Amery, P. C., M .P.' all inscribed in gold. It was presented to The Rt. Hon. L. C. M. S. Amery, P. C., M. P, Secretary of State for Dominion Affairs on the occasion of his visit to the Hume Reservoir on 2nd November 1927. This album is of local and national significance as it documents the planning and development of the Hume Reservoir up to 1927. It was the largest water reservoir in the British Empire. The album records the pioneering engineering work that went into its construction.DEPARTMENT OF PUBLIC WORKS, N.S.W. RIVER MURRAY WATERS SCHEME. HUME RESERVOIR. 20. Section of completed coffer dam with river diverted over the concrete foundations of dam that were placed during the first stage of operations. New South Wales. January 1927. Cofferdams are temporary structures used where construction is being carried out in areas submerged in water. They are most commonly used to facilitate the construction or repair of dams, piers and bridges. To divert the river, a Coffer Dam was built across the old bed above and below the Dam site and tying into the end of the concrete wall built inside the levee bank. This completely surrounded the remainder of the site of the Dam and south wing wall, including an area of 12½ acres. hume reservoir australia, river murray waters scheme, hume reservoir construction -
 Eltham District Historical Society Inc
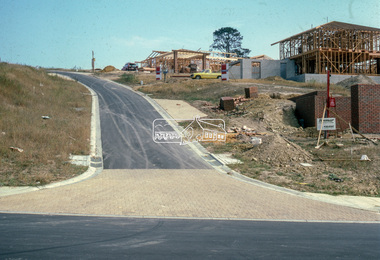
Slide - Photograph, Road infrastucture, new housing development, most likely Templestowe, c.Mar. 1985
Eltham Shire Council officers would benchmark road infrastructure in surrounding local government areas. In this case, the street is most likely a private street scheme in a new housing development in what is present-day Manningham City Council. Areas of interest in the phioto are the roll over concrete kerbs, brick paving at road entrace and drainage.35mm colour positive transparency (1 of 15) Mount - Kodak Kodachrome Cardinfrastructure, roads, city of manningham, footpaths and gutters, housing estates, unidentified, templestowe -
 Federation University Historical Collection
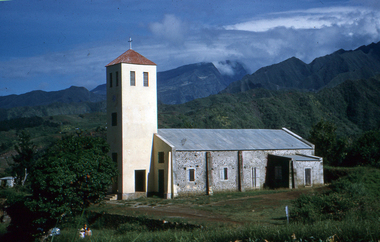
Slide, Eglise du Bras de Pontho (Church of the Holy Angels of Bras de Pontho), c1970
A small wooden chapel was built on this site but was destroyed by a cyclone in 1948. It was immediately replaced by the present church, which has simple architecture and interior ornaments. The concrete building is a large rectangle to which is added a square tower supporting a small bell tower. From the church site you can view the Bras de la Plaine valley Photograph of a church Handwritten "Eglise du Bras de Pontho" Stamped "R. Ueberschlag"eglise du bras de pontho, church of the holy angels of bras de pontho, church, bras de la plaine valley -
 Federation University Historical Collection
Booklet, Ballarat School of Mines Student's Magazine, Third Term, 1907, 1907
Table of contents: Editorial, Our helpful servants, Tuberculosis, Retimbering main hauling shaft, Ferro concrete, Notes on incandescent lamps, Sporting notes, Hints on prospecting, Geometrical boarding, Abstract from chemical journals, Past students, Gain in power and economy by condensing operations, News and notes, Correspondence, Balance sheet, Editorial notices.Gray coloured booklet of 24 pages. ballarat school of mines, students' magazine, james t. mitchell, sherb. h. sheppard, a. d. gilchrist, j. h. chambers, w. h. shoebridge, w. b. maine, j. h. osborne, e. mclachlan, harold r. emsley, francis herring, w. geldard, c. c. ross, h. j. whittington, a. c. morrison, e. w. heighway, h. brook, w. kingston, francis greene, w. e. figgis, h. hoylton, w. r. thomas, basil sawyer, c. w. nash, a. crittenden, s. h. shephard, j. blayne, t. lennon, h. f. owen, j. sutherland, h. nevett, r. c. stewart, a. smith, c. whyte, m. j. dobie, r. d. nevett, rupert king,, j. m. currie, w. b. blythe, f. a. marriott, f. brinsden, l. d. cameron, john sutherland, f. a. moss, g. c. klug, c. m. harris, n. stuckey, w. white, gerald young, karl moore, r. e. avery, mel. gray, j. milbin, horace giles, w. brokenshire, a. s. coyte, a. a. booth, r. g. todd, g. sides, j. grieve, jack wallace, sydney burdekin, arthur nevett, w. h. callister -
 Ballarat Tramway Museum
Photograph - Geelong Tramway relaying stringer constructed track
Relaying stringer constructed track in Mercer St., just west of the Gheringhap St. intersection opposite Johnstone Park, looking east towards Malop Street. The southern track has subsided and the original concrete stringers dug out, with them lying beside the track. According to the local papers, wider stringers are to be used. August 1914.Black and white print on paper.GSR710/25/1/5, 25-5, and the no. 3 inside a circle, written in pencil on the reverse. The letter A, and the no. 1 in a circle are written in ink on the reverse.geelong tramway relaying tracks, geelong streetscape c. 1914 -
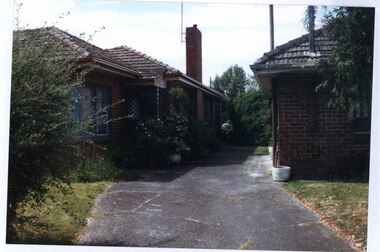 Glen Eira Historical Society
Photograph, Dalny Road, 5-5A, Murrumbeena, 2001
Originally labelled "Beauville Estate, Established 1936, Still Thriving 65 years on, 10th March 2001", the Beauville Estate Album contains colour photographs of houses in the Estate. They were taken around the time of the Beauville Estate’s 65th Heritage Celebration held on 10/03/2001 and donated to the Caulfield Historical Society shortly afterwards. Photographer unknown. City of Glen Eira’s Heritage Management Plan Vol 2 p79 (this is p84 of the pdf version) – HO12 Beauville Estate and environs, Murrumbeena: The Beauville Historic Area is important at the State level as the first large housing estate undertaken by the AV Jennings Construction Co, later Jennings Group Limited, Victoria’s largest home builder. It is important also as a very early estate development incorporating a range of features other than houses and including made roads, shops and recreation facilities. In this respect it was the forerunner of the comprehensively planned housing estate of the post war era. The estate is distinguished by its aesthetic values, as is the earlier and comparable Hillcrest Estate, which are formed by a combination of restrained diversity in house styles, with the exception of no. 30 in the emerging International style, and by a landscaped garden environment. Colour photograph of the concrete driveway between two unpainted variegated brown brick houses. Features for both include tiled roofs while the left one has a tall brick chimney and small porch while the right one shows part of a striped awning. There is a bush in the foreground with other plants beside the left house. murrumbeena, houses, architectural styles, 1930's, inter war style, a.v. jennings, av jennings, jennings, brick houses, beauville estate, dalny road, sir albert victor jennings, a v jennings construction co, beauville estate heritage area, glen eira city council, architectural features, jennings group limited, land subdivision, beauville historic area, chimneys, drives, porches, striped awnings -
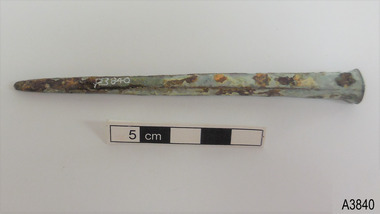 Flagstaff Hill Maritime Museum and Village
Functional object - Nail
This historic bronze nail dates back to 1790s to 1890s. Nails such as this one were used for ship building, as deck fasteners and many other uses. This nail was made at a time when the shanks of nails were usually machine cut but the heads were hand formed by blacksmiths. The nail was recovered from a shipwreck along the coast of Victoria in around 1968 and is part of the John Chance Collection. The nail is significant historically as an example of hardware used when building wooden ships in the early to mid-19th century. The nail is historically significant as an example of the work and trade of blacksmith. The nail is also significant as it was recovered by John Chance, a diver in Victoria’s coastal waters in the late 1960s to early 1970s. Items that come from several wrecks have since been donated to the Flagstaff Hill Maritime Village’s museum collection by his family, illustrating this item’s level of historical value.Nail; bronze, deck nail. Rounded rectangular head, rectangular shank cross-section, tip flattened to a rounded wedge shape. The surface is pitted and rough and has blue-grey, green and orange concretion and degradation on the nail's surface. Recovered from an unspecified shipwreck along the coast of Victoria. Part of the John Chance Collection. flagstaff hill, warrnambool, flagstaff hill maritime museum, maritime museum, shipwreck coast, flagstaff hill maritime village, great ocean road, john chance, fastener, nail, square nail, machine cut mail, blacksmith, historic nail, bronze nail, hand forged, coastal shipwreck, victorian shipwreck -
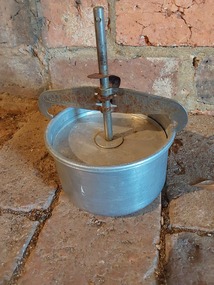 Mont De Lancey
Functional object - Food Press, Whittingslowe Product, Unknown
This vintage food press may have been used for pressed tongue and other foods. A small vintage round clip on lidded aluminium food press possibly used for pressed tongue. The clip has the manufacturer's name on it with the Patent No. The clip on the lid has a strong thick steel bar threaded through it which is screwed tight to press the food within. It has a very heavy round concrete weight inside.FOOD PRESS WHITTINGSLOWE Product PAT APPN Number 187.....745kitchen equipment, kitchenware, food press, meat press -
 Melbourne Tram Museum
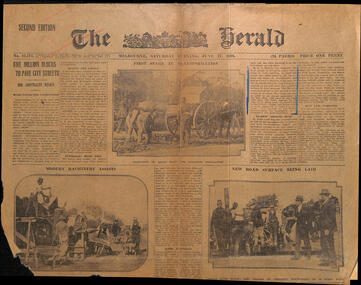
Newspaper, The Herald, "Five Million blocks to pave city streets - Big contracts begin", 17/06/1916 12:00:00 AM
Newspaper clipping, from The Herald, 17/6/1916, 2nd Edition - titled "Five Million blocks to pave city streets - Big contracts begin" about the repaving of St Kilda Road with wood blocks . has three photos of the work, using concrete foundations. Notes the future electric trams in the last paragraph.trams, tramways, cable trams, track, wood blocks, st kilda rd -
 Glen Eira Historical Society
Photograph, Beauville Avenue, 8, Murrumbeena, 2001
Originally labelled "Beauville Estate, Established 1936, Still Thriving 65 years on, 10th March 2001", the Beauville Estate Album contains colour photographs of houses in the Estate. They were taken around the time of the Beauville Estate’s 65th Heritage Celebration held on 10/03/2001 and donated to the Caulfield Historical Society shortly afterwards. Photographer Bev Baxter. See also 2104A-10.City of Glen Eira’s Heritage Management Plan Vol 2 p79 (this is p84 of the pdf version) – HO12 Beauville Estate and environs, Murrumbeena: The Beauville Historic Area is important at the State level as the first large housing estate undertaken by the AV Jennings Construction Co, later Jennings Group Limited, Victoria’s largest home builder. It is important also as a very early estate development incorporating a range of features other than houses and including made roads, shops and recreation facilities. In this respect it was the forerunner of the comprehensively planned housing estate of the post war era. The estate is distinguished by its aesthetic values, as is the earlier and comparable Hillcrest Estate, which are formed by a combination of restrained diversity in house styles, with the exception of no. 30 in the emerging International style, and by a landscaped garden environment. Colour photograph of white rendered house with unpainted brick features. Other features include a square enclosed porch with two decorative arched entrances with steps, tiled roof, green and yellow striped awning, the word "eight" written on the front of the house, concrete paths and driveway and a low unpainted brick fence beside the driveway.murrumbeena, houses, beauville avenue, architectural styles, 1930's, inter war style, a.v. jennings, av jennings, jennings, brick houses, beauville estate, porches, arches, sir albert victor jennings, rendered houses, a v jennings construction co, beauville estate heritage area, glen eira city council, architectural features, jennings group limited, land subdivision, gardens, beauville historic area, chimneys, brick fences, striped awnings -
 Kiewa Valley Historical Society
12 small black and white photgraphs of Junction Dam and surrounding area, Photo No. 1 c1940, all others c 1948
Junction Dam is a reinforced slab and buttress type construction and was commenced in February, 1940 by Lewis Construction Company. Stiff leg derricks were erected at appropriate locations at the site of the dam and used for the disposal of excavated material and the placing of concrete. A rock crushing and screening plant was established at a site a short distance upstream from the dam site and concrete was supplied from a central mixing plant placed close to the upstream toe of the structure. The SEC took over the construction in April 1942 and the dam wall was completed in March, 1944. Bogong township was commenced in early 1940 with the construction of a workmen's camp housing 96 men, (known as Junction camp). Construction of housing for families commenced shortly after. Forty houses, plus office, workshops, stores and laboratory accommodation were completed over the next 5 years,Of historical significance as a pictorial record of Junction Dam, Lake Guy and Bogong Village, as the photos were taken only 4 years after completion and one photo taken on completion of the dam wall but before the lake was filled with water.12 small black and white photographs of Junction Dam, Bogong Village and surrounding area.Photo 1 - On the back upper edge in pen 'Junction Dam'. Then '12' in pencil, circular stamp, printed in centre 'Print by Willson White Albury'. Photo 2 - On the back upper edge in pen 'Junction Dam October 1948'. Stamp as no. 1 photo. Stamp '998L' lower centre. Photo 3 - on the back upper edge in pen 'Junction Dam October 1948'. Circular stamp with 'Kodak Print' . Lower centre back is stamped 'velox' and '998L'. Photo 4 - upper back, in ink - 'Junction Dam Spion Kopje in background. October 1948'. Stamps as photo no. 4. Photo 5 - upper back, in ink - 'Lake Guy (orange filter) October 1948'. Centre back, in pencil '29' and circular stamp with words 'Print by Willson White Albury'. Photo 6 - upper back edge 'Junction, Bogong from Radio Receiving Shack Dec. 1948'. In pencil '14'. Photo 7 - On back of photo 'View of Mountains from Little Arthur Fire Track October 1948'. Two circular stamps with 'Kodak Print', another two stamps - 'Velox' and '998L'. Photo 8 - On back in ink 'Loone's Store Bogong with Spion Kopje in background. October 1948'. Lower down, stamps 'Velox' and '998L'. Part of circular stamp with one word 'Kodak'. Photo 9 - on back in ink 'Junction Camp, Bogong Village & Lake Guy from Little Arthur Fire Track. October 1948'. Stamped across writing '998L'. Lower down stamped 'Velox' and circular stamp with words 'Kodak Print'. Photo 10 - on back in ink 'Junction Camp & Bogong Village Lake Guy in Foreground. October 1948'. Stamps as photo 9. Photo 11 - on back in ink 'Junction Camp & Bogong Village, Lake Guy in Foreground. October 1948'. Lower stamp '998L'. Photo 12 - 'Junction of Rocky & Pretty Rivers with tennis courts in foreground October 1948' . Circular stamp with words, 'Print by Willson White Albury'. Number '29' written pencil.junction dam; bogong village; kiewa hydro electric scheme; lake guy -
Queenscliffe Maritime Museum
Domestic object - China crockery recovered from wreck of Light of the age
Subsequent to the wrecking of the Light of the Age marine concretions and corrosion products formed a cement capping over the cargo, stabilising and protecting it. The site of the Light of the Age was found by divers in late 1960s, and soon became a popular diving site. Huge amounts of intact crockery were removed from the wreck by boatloads of divers, including distinctive brown glazed teapots with legs (one diving author named it 'the Teapot Wreck' (Denmead, 1973: 78-82), 'Greek Key' patterned transferware, Cooper & Wood Portobello black glass three piece bottles, and sauce, preserve and condiment bottles often with contents (gooseberries, raspberries, olives) and seals intact. Larger items including a signal cannon and an anchor were removed from the site, while divers seeking souvenirs commonly used cold chisels to chip objects free of the concretion 'cap' which had stabilised and protected the remaining cargo for so long. In 1982 this situation was drastically changed when someone used explosives to further break concretions. However the charge was too powerful resulting in the site's complete destruction and the remaining items to become scattered and broken. Abraded and worn ceramic objects washed up on the beach are invariably collected by beachgoers, including fragments of crockery, figurines and animal figures used for 19th century household decoration and toys. The Light of the Age is archaeologically significant as the wreck of an international immigrant ship with an inward bound cargo. It is historically significant for its association with both the Black Ball and White Star Lines which carried thousands of immigrants to Australia. Built in 1855 and lost on 16 January 1868 now lies at Point Lonsdale Beach, half a mile west from Point Lonsdale, Port Phillip Heads.01- 1 shallow bowl, 02- 1 sweet bowl, 03- 1 willow pattern service dish, 04- 2 ladle cups [no handles], 05 06- 2 egg cups, 07- 2 bread and butter plates, 08- 1 condiment bowl lidWedgwood deep saucer; Pearl stone china, Ribbon, Wedgewood Willow Pattern service dish, Staffordshire Stone China, Fenton, No10shipwrecks, salvage, crockery, light of the age, clippers -
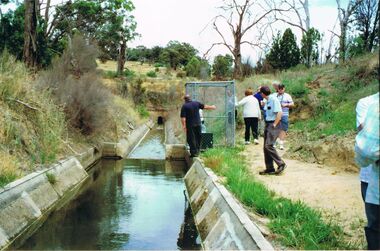 Bendigo Historical Society Inc.
Photograph - COLIBAN CHANNEL
Colour photo. Image shows channel to Castlemaine and tunnel, just after leaving Coiliban main Channel. 'Tracking the Coliban Main Channel' Bendigo Historical Society Inc., excursion 5th. December, 2009, organised by Phil Wilkin, member. John Kelly and Ray Smith in image., others unknown. Concrete lined channel, with tunnel in background.cottage, miners, coliban, channel, castlemaine, tunnel -
 Bendigo Historical Society Inc.
Photograph - T C WATTS & SON COLLECTION: MERCY STREET, BENDIGO, 1930
BHS CollectionBlack and white photograph mounted on rectangular brown board. House, weatherboard, tile roof, 2 chimneys, woven crinkled wire fence, 4 gates, leadlight windows, weatherboard garage RH side of house, washing on line at back, porch with brick balustrade and concrete pillars. On back of photoboard ' King's, Mercy Street Street £1000'.Frank A. Jeffree, Bendigoplace, building, residential, stamped on back in rectangle ''t.c. watts and son/auctioneer/estate agents/253 mitchell street/bendigo'', stamped on back in circle ''royal historical society of victoria, bendigo branch'', handwritten on back ''kings/mercy street/1000pounds'' -
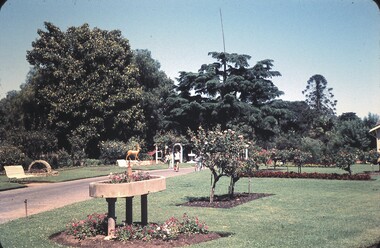 Bendigo Historical Society Inc.
Slide - BENDIGO VIEWS, Dec 1960
Slide. Bendigo Views. Trees, roses and flower beds in the Botanical Gardens. In the forground is a large concrete flower container sitting on three pillars. Behind this further back is a statue of a deer. To the left of the deer is another flower container in the shape of a large basket. Some people are walking on the path. Bendigo Botanical and Zooalogical Gardens in Napier Street, Whitehillsslide, bendigo, bendigo views, bendigo views -
 Nillumbik Shire Council
Sculpture: Michael WILSON (b.1943 Hastings, Victoria), Cicada, 1997
Michael Wilson learnt the craft of Goldsmithing after seeing well known sculptor and silversmith Matcham Skipper working in his studio at Montsalvat in and around 1970. This work is a gift to the Eltham Community in recognition of his twenty five years of developing his goldsmith skills and operating his business within the Shire. Wilson officially opened his commercial premises in 1985. Michael Wilson is a local jewellery maker. His work is influenced directly by the environment in which he lives. This sculpture is representative of his distinctive style of work as a nationally and an internationally recognised Designer and Goldsmith. Made of steel and powdercoated in aluminium with a concrete base. Decorative elements such as the ring encasing the cicada and the cicada's wings are guilded with 24ct gold leaf. The steel rod is burgundy in colour with the cicada painted a dark olive green to represent the 'Green Grocer' variety common in Eltham. The colours used in this sculpture match the surrounding Elm and Ash trees in the landscape. N/Apublic art, cicada, wilson, gold, green grocer, jewellery -
 Wodonga & District Historical Society Inc
Photograph - Fred Rochow Railways Collection - Railway Bridge over the Hume Weir at Sandy Creek
The Fred Rochow Railways Collection incorporates photos related to the operation of the Wodonga Railway Station including different types of trains and railways staff C. 1930 – 1990. It was donated to the Wodonga Historical Society by Fred Rochow, a railwayman who spent many years based in Wodonga. He joined the Victorian Railways on 17th June l947 and retired in 1988. For some time, he was a member of the Australian Federated Union of Locomotive Enginemen and served a term as a member of the Trades Hall Council. He had an extensive knowledge of the struggles that took place to achieve better conditions for railway workers. Fred worked for many years as a fireman and then worked his way up the ranks to driver, experiencing many changes from the days of steam locomotives through to diesel trains, locomotives and even the modern XPT train. He worked throughout Victoria at different stages of his career, with his final working years focused on the northeast of Victoria and the Albury to Melbourne line. After his retirement, Fred continued to share his love of steam miniature trains with the community. This collection has local and statewide significance as it captures images of trains, locomotives and personnel who operated the railway services in Wodonga and throughout Northeast Victoria. The railways played a critical role in opening up Victoria and connecting Australia for trade, business, social communication and transport.The bridge at Sandy Creek, near Tallangatta in Victoria. The construction of the bridge was necessitated by the extension of the Hume Weir. Due to the higher water line railway lines and roads had to be relocated. The bridge was built on 45 sets of concrete pillars, each set 42 feet apart. The line to Tallangatta was closed in 1981 and the bridge deck was removed in 1987.railways wodonga, fred rochow, high country rail trail, sandy creek bridge -
 Bendigo Historical Society Inc.
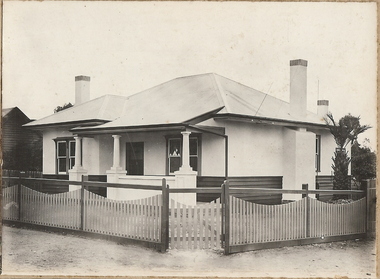
Photograph - T C WATTS & S0N COLLECTION: 9 BANNISTER STREET, BENDIGO, 1930
BHS CollectionBlack and white photograph mounted on rectangular brown board. House, cement plaster over lathes, verandah with concrete form pillars. Scalloped picket fence, 3 chimneys. On back of photo: ' Cnr. Bannister and Norfolk St., £700 .' Sold' 2012 photo of house attached to record showing current address as 9 Bannister Street, Bendigo.Frank A. Jeffree, Bendigobendigo, business, t.c. watts & son, 9 bannister street bendigo -
 Melbourne Tram Museum
Slide, Keith Kings, 10/10/1968 12:00:00 AM
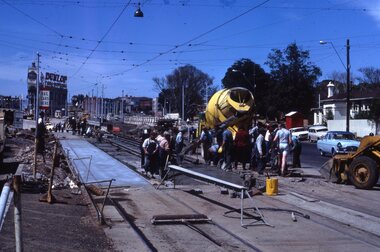
35mm Kodak white cardboard colour slide by Keith Kings of 10/10/1968 of the concreting of the track to connect St Kilda Road into the junction further to the south and Wellington St replacement - Queensway. Note the temporary tram stop. Note the overhead trucks in the distance. The Junction Hotel in the far distance. See Keith's slide notes.Keith Kings stamp and number "41-30" and exposure details. In ink "St Kilda Jtn Bypass works - temporary junction in St Kilda Rd, south of new junction, replaced by new track, 1050am Sunday.trams, tramways, st kilda junction, fitzroy st, st kilda rd, trackwork, high st, tram stops -
 Glen Eira Historical Society
Photograph, Beauville Avenue, 4, Murrumbeena, 2001
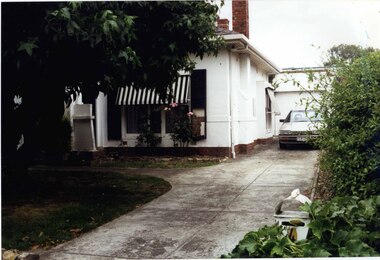
Originally labelled "Beauville Estate, Established 1936, Still Thriving 65 years on, 10th March 2001", the Beauville Estate Album contains colour photographs of houses in the Estate. They were taken around the time of the Beauville Estate’s 65th Heritage Celebration held on 10/03/2001 and donated to the Caulfield Historical Society shortly afterwards. Photographer Bev Baxter. City of Glen Eira’s Heritage Management Plan Vol 2 p79 (this is p84 of the pdf version) – HO12 Beauville Estate and environs, Murrumbeena: The Beauville Historic Area is important at the State level as the first large housing estate undertaken by the AV Jennings Construction Co, later Jennings Group Limited, Victoria’s largest home builder. It is important also as a very early estate development incorporating a range of features other than houses and including made roads, shops and recreation facilities. In this respect it was the forerunner of the comprehensively planned housing estate of the post war era. The estate is distinguished by its aesthetic values, as is the earlier and comparable Hillcrest Estate, which are formed by a combination of restrained diversity in house styles, with the exception of no. 30 in the emerging International style, and by a landscaped garden environment. Colour photograph of a white rendered house with a few rows of unpainted bricks at ground level. Other features include black and white awnings, a concrete driveway leading to a garage with a car in front and 2 unpainted chimneys. A metal mail box has the number 4 painted on it in the foreground of the garden. The garden includes a large tree at the front. murrumbeena, houses, beauville avenue, architectural styles, 1930's, inter war style, a.v. jennings, av jennings, jennings, brick houses, beauville estate, porches, sir albert victor jennings, a v jennings construction co, beauville estate heritage area, glen eira city council, architectural features, jennings group limited, land subdivision, gardens, beauville historic area, garages (private), brick chimneys, rendered houses, drives, striped awnings -
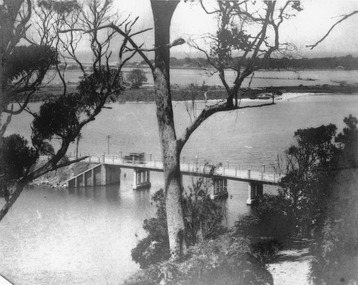 Lakes Entrance Historical Society
Photograph - North Arm bridge Lakes Entrance Victoria, 1920c
Other photographs in album of this area dated 1928Black and white photograph of the North Arm Bridge, taken from Kalimna Heights looking towards the Entrance and Bullock Island. Bridge has no side rails, appears to be chain and wire between concrete posts. Sedan car passing over the bridge. The walking track to Kalimna Heights visible right foreground. Lakes Entrance Victoriabridges, waterways, transport -
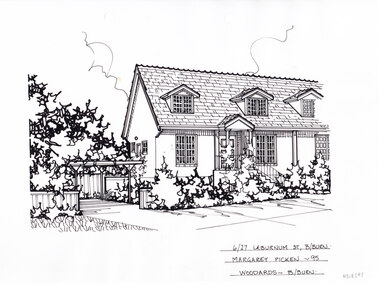 Whitehorse Historical Society Inc.
Artwork, other - Ink Line Drawing, Margaret Picken, 6/27 Laburnum St., Blackburn, 1995
A property illustration by Margaret Picken Commissioned by a real estate agency for the purpose of advertising 6/27 Laburnum St., Blackburn This property is listed as having sold in for $170,500 in 1996 Made by using Rotring ‘Rapidigraph’ drafting pens with Rotring ink on Rapidigraph polyester drafting film, double matte. Trained as a cartographic draftsman within the mining industry, Margaret Picken is an artist who worked producing property illustrations for real estate agencies in eastern suburbs of Victoria from 1983-2005. Retiring from the industry as technological changes favored coloured photography over illustrations, and commissioning companies over sole contractors.This artwork is of Historical Significance as a record of local domestic architecture.A black ink line drawing on drafters film by Margaret Picken, of a single story brick house muntin windows, there are three dormer windows. At front of the house is a concrete staircase leading to the portico front door. To the left is a driveway leading to a separate timber carport. There are two hole punch holes just below centre of the upper edge6/27 Laburnum St., B/Burn Margarget Picken - 95 Woodards - B/Burnwhitehorse historical society, schwerkolt cottage, housing, architecture, margaret picken, house, garden, real estate, blackburn -
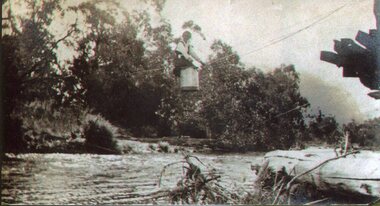 Kiewa Valley Historical Society
Photo - Tawonga Bridge.( Set of 2 photos)
Photo 1 - Rene Roper (Postmistress) crossing swollen Kiewa River on a milk can flying fox at Tawonga, during high winter waters Photo 2 - First Tawonga bridge was built in 1884- destroyed by floods in 1916. New bridge constructed 1923 and destroyed in 1953. Present concrete bridge constructed in 1986 and named Ryders BridgeBridge construction over Kiewa River at TawongaCopies of two original black and white photos. Photo 1 - Flying fox at site of Tawonga Bridge over the Kiewa River Photo 2 - Timber pile bridge over the Kiewa River at Tawongatawonga bridge, kiewa valley -
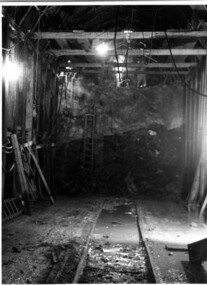 Kiewa Valley Historical Society
Photograph Tailrace tunnel Arch Drive, Tunnel face at Tailrace showing Arch Drive, between 1943 and 1952
This photo was taking during construction of the tailrace tunnel between West Kiewa Power Station and Mt. Beauty. Much of the area was unstable and timber supports were erected prior to concreting. The tunnel was commenced in 1941 and completed in 1952. It brings water from the power station into the open tailrace at Mt. Beauty and then into the regulating pondage before discharge into the Kiewa River.Shows method of construction for supporting walls and ceiling of tunnel with timber, size of tunnel (note worker on upper level), and conditions in the work place during construction in the 1940's/50's - note the timber ladder to gain access to the upper level.Black and white photographHand written on back of photograph "Tunnel face at Tailrace showing Arch Drive".tailrace, power station, water, construction -
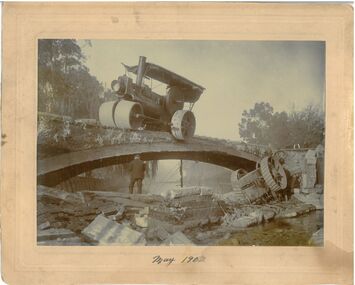 Bendigo Historical Society Inc.
Photograph - Monier Bridge Collapse, May, 1902
In 1867 Frenchman, Joseph Monier patented reinforced concrete horticultural troughs. In 1873 this process was extended to iron reinforced bridges with the first bridge built in 1875. In Australia, Sir John Monash of Monash and Anderson company, originally built 8 Monier bridges in Bendigo all single arch except Weeroona Ave., which was a double arch. Six of these remain.Black and white photograph. Steam rollers appears to have collapsed from a Monier bridge with men investigating amidst the rubble with one steam roller remaining on the bridge, and another resting in a creek underneath. Photograph by W. H. Robinson. Photograph mounted on cream-coloured card.Written on the front in black ink 'May 1902.'monier bridges, bendigo creek, accidents -
 Kyneton RSL Sub Branch
Mt Macedon War Memorial Cross tile, Original completed in 1933, additions made 1941 and restoration 1995
The original idea to create a monument was conceived by William Cameron. The monument was first constructed of cement block tiles and was a memorial to all those who served in WW1. Later gates were added to the precinct in memory of those who served in WW2. Restoration of the Memorial took place in 1995, with the original tiles being replaced by replaced by re-inforced concrete. Mt Macedon Memorial Cross is a significant War Memorial in the district. ANZAC Day dawn service is held at the Mt Macedon Cross, it is an impressive setting.Glazed precast cement block coloured to resemble sandstone, mounted on wooden stand. Centre front is a metal plate inscribed : Mt Macedon War Memorial Cross.On the back of the stand is a printed description of the construction history of the Mt Macedon Memorial Cross. No 77, on white sticker ( previous cataloguing number) memorial -
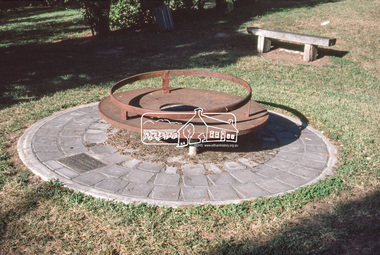 Eltham District Historical Society Inc
Slide - Photograph, Monument with time capsule, Eltham Community Centre, Main Road, Eltham, c.Mar. 1989
The monument with time capsule was established by the Shire of Eltham Historical Society to commemorate Victoria’s 150th anniversary and mark the former location of the Eltham Town Centre, which existed along this section of Main Road, then known as Maria Street. The unveiling was conducted 10 November 1985 by Cr. Mary Grant (Shire President). The monument was constructed with a concrete base and the main feature is an old tyring plate or disc. The Time Capsule Ceremony involved lowering the sealed time capsule into place, bolting down its container lid and then concreting over the lid. The capsule contains items relating to present day (1985) Eltham and its people including a video film made by Joh Ebeli and also details of families and organizations who have contributed to construction of the monument. It is to be opened in the year 2035. The Society received an excellent response from local people, firms and organizations by way of assistance with this project. Graham Beyer, who originated the project, arranged many of the donations. He and his firm, Package Handling Equipment, donated the time capsule itself and carried out fabrication of sections of the monument. The design of the monument was adapted by Graham Beyer from drawings by Joh Ebeli. Charmac Industries donated the container for the time capsule and a cast gun metal name plate for the monument. BMG Concrete donated concrete for the base which was constructed by Caridi Construction Company. Northbourne Garden Supplies donated materials for the paving around the monument. Robert Becker from Eltham Apex directed construction of the paving by Society members. Terry Hutchinson donated the use of his crane to lift the tyring disc into place. Financial contributions were also made by the Eltham Chamber of Commerce and the Rotary Club of Eltham. In 1987 in commemoration of the Society’s 20th Anniversary, Joh Ebeli suggested the commissioning of a plaque to be added which explains the functions of the various items used in the Society’s Victorian 150th Anniversary Monument and this was unveiled by its designer, Joh Ebeli, on October 10, 1987.35mm colour positive transparency (1 of 28) Mount - Kodak KodachromeProcess Date MAR 89Meltham, eltham community centre, monument, time capsule