Showing 17972 items matching "shows"
-
 Melbourne Tram Museum
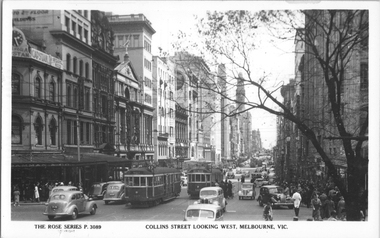
Postcard, Rose Stereograph Co, "Collins Street, looking west, Melbourne", late 1940s
Rose Series postcard No. P 3089 titled "Collins Street, looking west, Melbourne" looking west from Swanston Street with W2 class trams 397 (City, route 47) and 569 (West Preston route 10) in the view. In the background are a further four trams. Alongside 569 is the Safety Zone for the eastbound tram stop. The photo shows a busy traffic and pedestrian scene.Yields information Collins St late 1940s.Postcard - printed real photograph with Rose Stereograph Co. name on the rear.tramways, trams, collins st, w2 class, tram 397, tram 569, route 47, route 10 -
 Melbourne Tram Museum
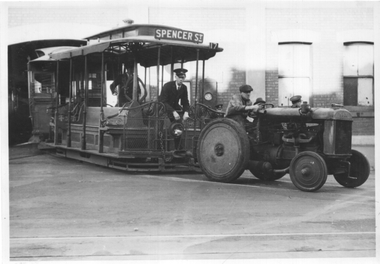
Photograph - Cable tram being towed out of North Fitzroy depot, The Age, late 1930s
The photograph shows a cable tram set being towed out of a car depot or car house by a tractor, North Fitzroy Nicholson St depot. The grip is in the raised position, with the gripman's hands on the brake levers. The conductor is waiting to pull the pin that secures the tow bar. The tram has the destination of Spencer St. Photo late 1930s or 1940. Note the Bundy clock on the depot wall.Yields information about towing a cable tram out of a car house probably shortly before closure of the cable tram system in 1940.Black and White photograph - printed on plain paper.On the rear has the Copyright stamp of The Age and pencil number "KM-M-007", Ken Magor stamp, "tram being towed out of depot" and number 4838.cable trams, tractor, towing cable tram, car house, north fitzroy depot -
 Melbourne Tram Museum
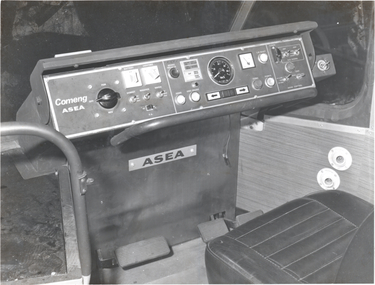
Photograph - Z class tram ASEA controller - set of 3, Melbourne & Metropolitan Tramways Board (MMTB), 1975
Photographs show the ASEA built control equipment of a Z class tram. 1 - Drivers control stand showing the foot pedals and switches with the ASEA and Comeng names on the panel. 2 - the driver's controller with the cover removed showing the various parts and linkages - photographed at the factory. 3 - Tramiac control cabinet with a technician showing one of the components or cards - see item 6140 for more details.Provides information and detail about the Z class driver's control equipment.Set of three black and white photographsHas MMTB stamp and stamp of R T Grigg of NZ. on rear.trams, tramways, new trams, comeng, z class, asea, controllers, mmtb -
 Melbourne Tram Museum
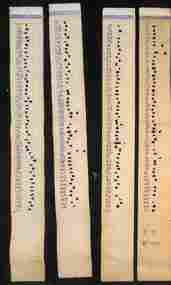
Administrative record - Essendon Depot - ticket punch marks, Melbourne & Metropolitan Tramways Board (MMTB), 1973
The strips show the mark or hole shape for each ticket punch at Essendon Depot. The set of four sheets, for punches numbered 1 to 200 are dated 8/12/73. The second set, for punches numbered 1 to 225 have the same matching punch shapes as the first set but are undated. The second set could possibly be an earlier set when there were more conductors at Essendon. Demonstrates a record of each ticket punch mark or shape against the ticket punch number.Set of 9 card strips, which have been punched for each numbered ticket punch at Eassendon Depot.Set 1 of 4 has "As at 8/12/73" on the base of the first sheet and the first four have been stamped "Essendon" on the top of each sheet.tramways, mmtb, tickets, conductors, outfits, ticket punches, essendon depot -
 Melbourne Tram Museum
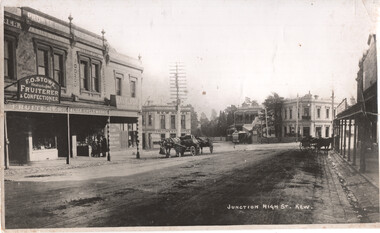
Photograph - Kew Junction looking South West - horse tram, c1900
Photograph, from a postcard titled "Junction High St Kew." shows a horse tram at Kew Junction in Church St about to turn into High St. Buildings in the view are F O Stowe Fruiter Confectioner, Alice cycle works, a tobacconist advertising Havelock tobacco sign, and Collins Kew Hotel. There are three horse-drawn carts, one with a horse eating from a chaff bag.Yields information about Kew Junction c1900.Black and white photograph with notes on the rear.Has on the rear in pencil "Horse tram in Barker Road Kew" and number "185"tramways, horse trams, kew junction, high st kew, church st -
 Melbourne Tram Museum
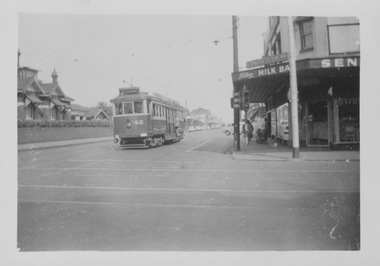
Photograph - VR tram 42 at Carlisle St, 1950s
The photograph shows VR tram 42 in Barkly St at the Carlisle St intersection displaying destination St Kilda Rly. A male passenger is boarding. In the foreground the M&MTB Carlisle St tracks can be seen, a corner milk bar shop and traffic lights showing green for Barkly St traffic. In the mid ground what looks like a Holden car is turning into a driveway.Yields information about VR tram 42, Barkly St and Carlisle St intersectionBlack and white photograph with no notes on the rear.vr tram, tram 42, barkly st, carlisle st, st kilda rly, milk bar, traffic lights, holden car -
 Melbourne Tram Museum
Photograph - VR single truck closed cross bench tram
Photograph shows a side view of a single truck closed cross-bench tram with trolley pole raised and depot workman in driver cabin. No tram number is visible. A coupling device appears to be a feature at one end. Behind the tram are trees and perhaps gardens. Contrary to the note attached to the rear of the photograph, this class of tram was manufactured in South Australia in 1913 by Pengelly and Company for the Victorian Railways.Yields information about VR closed cross bench trams Black and white photograph with typed description on rearTyped description reads: 'One society member has preserved this toast-rack or cross-bench tram in his backyard. It was built by the Victorian Railways in 1913 for their St Kilda-Brighton tramway and was purchased after the closure of the line in 1959.'victorian railways, closed cross bench, pengelley and company -
 Melbourne Tram Museum
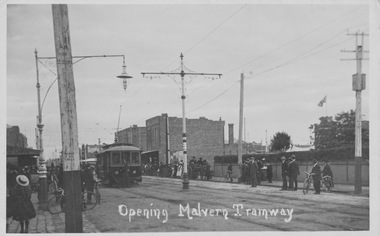
Photograph - Prahran and Malvern Tramways Trust tram 6 on Opening Day, 1910
The photograph shows Prahran and Malvern Tramways Trust tram 6 after using a crossover on Glenferrie Rd or High St, Malvern. The driver raises the trolley pole and is watched by a large crowd of spectators along both footpaths, many with bicycles. Central poles hold the tramway overhead and one carries a Hail Cars Here sign. The photograph bears a handwritten title "Opening Malvern Tramway".Yields information about Glenferries Rd, High St and PMTTSepia photograph with no writing on the rear.glenferrie rd, high st, central poles, crossover, prahran and malvern tramways trust, tram 6, hail cars here -
 Ithacan Historical Society
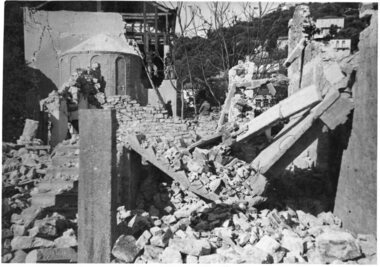
Photograph, Ithaca earthquake, 1953
In 1953 massive earthquakes occurred on Ithaca causing widespread damage across the island. The disaster left some parts of the island uninhabitable and caused a lot of people to relocate to other villages. It also brought about another diaspora from Ithaca and many of the survivors of the disaster were reunited with family members in Melbourne. This image shows the damage done to Saint John's Church in the village of Kioni on Ithaca.A black and white photograph showing the extent of damage done as a result of a massive earthquake. -
 Falls Creek Historical Society
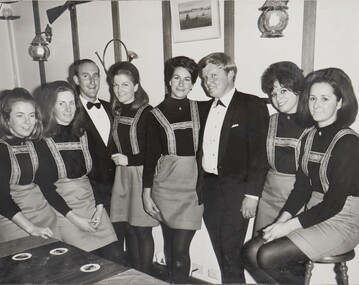
Photograph - Koki Lodge Staff - opening weekend 1967
This item is from the private collection of George Shirling of Red Onion, Falls Creek. It shows some of the staff employed at Koki Lodge in 1967. An explanation of "Australia's First Alpine Art Show" to be held at Koki is also included. The Art Show exhibited a collection of Australian painters including John Glover (1826), Louis Buvelot (1886) Hans Heyson (1902), Grace Cossington-Smith (1918), and William Dobell, Norman Lindsay, Donald Friend, Sali Herman, Sidney Nolan, John Olson, Charles Blackman, Arthur Boyd, and Pro Hart. George Shirling arrived in Falls Creek in 1962. He engaged Phil Nowell to build the original Koki Alpine Lodge which opened in 1965 with 14 beds. George operated the lodge with Michael “Baldy” Blackwell as manager. He also graduated in sport psychology in 1981 and was invited to become team psychologist for the Australian Winter Olympic team which went to Albertville, France, in 1992. He later owned the Red Onion Chalet. George credited the success of Koki to “Baldy” Blackwell. “Baldy” and Phil Nowell started the Trackers Mountain Lodge in partnership during the 1980s. In 1971 George sold Koki Lodge to Sigi Doerr. In 2024 the renamed Koki Alpine resort remains a highly popular destination in Falls Creek. George Shirling passed away on 27th February 2023. He had remained actively involved in Falls Creek and was generous with his time and knowledge, always an amazing supporter of The Falls Creek Museum and Falls Creek Village.This item is significant because shows early activities at Koko Lodge and Australia's First Alpine Art Show.A black and white photograph of George Shirling with staff at Koki Lodge 1967. The photo is accompanied with a sign explaining special activities held at Koki and tariffs for the winter season of 1967.On sign: ITEM No 50 Staff at Koki Alpine Lodge Queens Birthday Opening weekend, June 1967 (Includes, Nolene Mewton, Baldy Blackwell, Coonie, George Shirling and Pam Blackwell.george shirling, falls creek, australia's first alpine art show -
 Bendigo Historical Society Inc.
Photograph - HILDA HILL COLLECTION: BLACK AND WHITE PHOTOS, 1919-1924
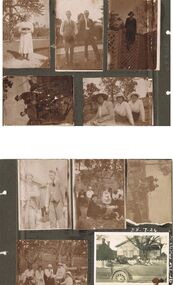
Black & White Photographs Series of 10 depicting life for the Hill Family in 1919, young lady standing near large tree wearing a white dress with black waist sash and dark stockings rear background shows the gable roof and 4 chimneys all behind a large hedge, Durvol December 14 1919 In garden setting man on left wearing grey trousers and what appears to be a bag attached via a string to his waist, grey waistcoat white shirt and dark tie, other gentleman is wearing a dark suit white shirt and dark tie,background shows a hedge and tops of trees, a gable roofed building looms above hedge to centre right, Durvol December 14 1919. Dark photo shows a young lady sitting at the top of a trellis fence, she is wearing dark clothing, her blouse has a white collar, hat with bow above her right shoulder, background shows the tops of two trees, Durvol August 1919. 1 man dressed in dark suit and hat, one boy sitting on the seat, both boys are wearing dark clothing and the boy standing is also wearing long dark socks and boots, the large two wheeled carriage, to the right is a gable roofed shed and top right background a large tree branch, Durvol August 3 1919. 3 ladies seated on the ground first lady on left wears a large brimmed hat with light coloured clothing, other 2 ladies are wearing white blouses and dark skirts each with a light coloured hats. 3 men 2 facing the camera and the other facing to the rear, the front 2 are wearing grey trousers and waistcoats man on right has dark tie and smoking a pipe, man facing the rear wears a hat and grey suit, gable roof of a building is in the background November 29 1919. Group of men and women enjoying a picnic two of the men are seated and both wear dark hats and dark suits with white shirts and dark ties, all of the ladies are wearing hats white blouses, one a light coloured skirt and other 2 dark skirts, bush setting with hill in background, Hibernian Picnic 1919. Four wheeled carriage drawn by one dark horse, the two passengers are dressed in dark suits and hats, a whip is mounted in the front foot well, right background is a standing lady dressed in a white blouse and dark skirt, also tree in left background, 25 July 1924. Group of ladies seated two wearing light coloured hats and all wearing white blouses four are in dark skirts, background is wooded area right background is a post and rail fence, Hibernian Picnic 1919. Old vehicle with five passengers, two ladies in the front one driving and a man and two more ladies in the rear seat, all are wearing dark clothing, gabled roof house in background with white picket fence, left background shows another gable roofed building two chimneys dark appearance.Hilda Hill Personal Collectionaustralia, history, post war life -
 Bendigo Military Museum
Photograph - PORTRAIT IN A PATRIOTIC FRAME, 1914-1918
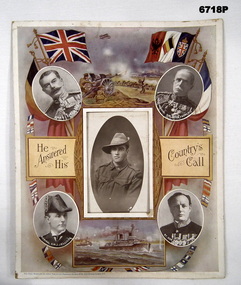
Passchendaele Barracks TrustPicture - This is a black and white "chest up" portrait of an Australian soldier. He is in uniform wearing a slouch hat, Rising sun badges are on his collar. The photo is oval shaped. Mount - This is a cardboard sheet. It has a rectangular hole in the centre. On top LHS is the Union flag, RHS has places of various allies. The top shows a small primitive bi-plane. Top Centre is an 18 Pdr Cannon firing. Photos of Kitchener, French, Jellicoe and Churchill are in each corner. A ship is at the bottom centre. The photo has detached from the frame.passchendaele barracks trust, ww1, soldier portrait -
 Ballarat Clarendon College
Medal, Victory Medal 1914-19, 01/09/1919
The Victory Medal (also called the Allied Victory Medal) is a campaign medal - of which the basic design and ribbon was adopted by Belgium, Brazil, Cuba, Czechoslovakia, France, Greece, Italy, Japan, Portugal, Romania, Siam, Union of South Africa and the USA. The medal was issued to all those who received the 1914 Star or the 1914-15 Star, and to most of those who were awarded the British War Medal - it was never awarded singly. These three medals were sometimes irreverently referred to as Pip, Squeak and Wilfred.The Holgate medals were the first war medals held by BCC archives. They have historical and social significance for the College.The Victory Medal is a 36mm diameter circular copper medal, lacquered in bronze. The obverse shows the winged, full-length, full-front, figure of Victory, with her left arm extended and holding a palm branch in her right hand. The reverse has the words ‘THE GREAT / WAR FOR / CIVILISATION / 1914-1919' in four lines, all surrounded by a laurel wreath. The 39mm wide ribbon has a ‘two rainbow' design, with the violet from each rainbow on the outside edges moving through to a central red stripe where both rainbows meet.The reverse has the words ‘THE GREAT / WAR FOR / CIVILISATION / 1914-1919' in four linesworld war one, ballarat college, victory medal, w w 1, e s holgate, allied victory medal -
Ballarat Clarendon College
Medal, Victory Medal 1914-1919
The Victory Medal (also called the Allied Victory Medal) is a campaign medal - of which the basic design and ribbon was adopted by Belgium, Brazil, Cuba, Czechoslovakia, France, Greece, Italy, Japan, Portugal, Romania, Siam, Union of South Africa and the USA. This medal was never awarded singly. It ia accompanied by the ribbon of the British War Medal but this medal is not held in the School archiveThe medal is of historical and social significance for the College. The Holgate medals were the first WW1 medals held by the school archive.The Victory Medal is a 36mm diameter circular copper medal, lacquered in bronze. The obverse shows the winged, full-length, full-front, figure of Victory, with her left arm extended and holding a palm branch in her right hand. The reverse has the words ‘THE GREAT / WAR FOR / CIVILISATION / 1914-1919' in four lines, all surrounded by a laurel wreath. The 39mm wide ribbon has a ‘two rainbow' design, with the violet from each rainbow on the outside edges moving through to a central red stripe where both rainbows meet. The reverse has the words ‘THE GREAT / WAR FOR / CIVILISATION / 1914-1919' in four lines Inscribed around outer edge of medal: '4303 A-CPL. H. S. HOLGATE 29 BN A.I.F.'world war one, ballarat college, victory medal, w w 1, allied victory medal, h s holgate -
 Bendigo Military Museum
Banner - BANNER, HMAS BENDIGO, RAN
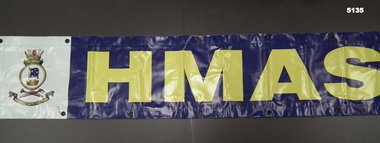
Gangway banner from the Fremantle class Patrol boat HMAS Bendigo (11) P211. Decommissioned at Cairns on 9 September 2006. Two banners presented to Training Ship Bendigo staff - one for RSL Museum and one for Training Ship.This is a heavy duty vinyl banner used on the ships gangway. Background colour is blue with the words HMAS BENDIGO printed in yellow paint along the banner. At each end of the banner is the crest of HMAS BENDIGO. The crest shows a rope circle and in the centre is the top of a battlement with the flag of the Southern Cross. Above the rope circle is a stylised crown with parts of a sailing ship on the crown. Under the rope circle are a stone axe, a nulla nulla and a boomerang. Under the weapons on a banner are the words in English "Advance with Purpose". The banner has numerous brass eyelets around the borders.ran, hmas bendigo -
 Seaworks Maritime Museum
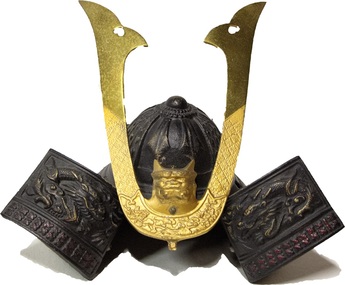
Ornamental Samurai helmet, c. 1950
A minature, ornamental Samurai helmet made of cast iron and brass, gifted to the Port of Melbourne Authority. The helmet has wing-like projections on the front, known as Fukigaeshi, and a prominent gold plated crest, mounted on the front centre. Red and gold embellishments can also be seen around the bottom edge of the piece and on the dragons adorning the Fukigaeshi. There are six small holes around the centre of the helmet. Research shows that there may have originally been decorative fabric and tassels embellishing the piece which would have been threaded through these holes and then looped around the crest.ornament, samurai, japan -
 Kiewa Valley Historical Society
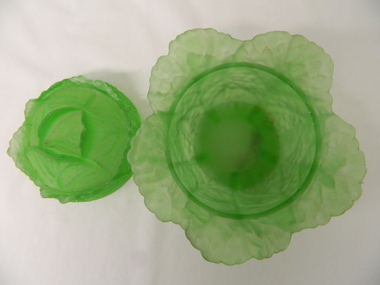
Bowl Covered, circa mid to late 1900's
This covered glass bowl with lid was made in a period when there was a strict discipline in the use a various dishes and accompaniments with respect to the type of crockery used. This was in the English style, especially in well to do rural family estates. This period was part of the early 1900's, when large rural acreage was family owned and the economical return to rural produce was very high. It was a time when the Australian economy "rode on the back of sheep"This item has relative significance to the Kiewa Valley as part of the rural and mining(gold) era when the strong return from local gold mining and grazing was demonstrated by the "landed gentry" and significant household cutlery, crockery, etiquette and old English mores, influenced by "Mother Britain"This green opalescent covered bowl is similar to the French PV cabbage form. When the lid is on the bowl appears as a small cabage with three sets of half peeled leaves. There are five outer leaves, next row are five inner leaves and finally three core leaves. The main bowl has a lip encircling the inside of the bowl for the lid to rest upon with closed. The glass has been pressed to show the leaves with their web like stalks. The inside area of the bowl and lid are smooth. This is to allow the mashed up contents to be easily scraped into a serving ladle.Barely visible "VALLERYSTHAL"glass bowls, kitchen crockery, serving etiquette, meal presentation -
 Warrnambool and District Historical Society Inc.
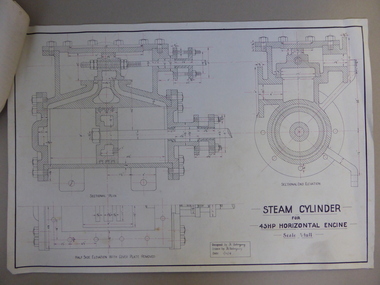
Document, Steam Cylinder Horizontal Engin, 1919
This drawing was produced by Ron Uebergang in 1919 at the Warrnambool Technical School. Members of the Uebergang families have been in the Warrnambool/Allansford area since the early 1850s. Ronald Uebergang (1903-1971) was born in Warrnambool, the son of Ernest Uebergang and Mary Watson. He lived at the family property, Hopkins Hill, and went to Allansford State School and Warrnambool Technical School. He was mechanically-minded, fond of music and dancing and a keen photographer. He married Myra Hall and they ran a dairy farm at Hopkins Hill and later went in for grazing beef cattle. Warrnambool Technical School was established in 1913, firstly at a Timor Street site and later at Caramut Road. Today it is called Brauer College. This drawing is of considerable interest as it was produced by Ron Uebergang. Members of the Uebergang families have been prominent in the Warrnambool/Allansford area since the early days of the district’s establishment. It is also important as a good example of the type of work produced by students from Warrnambool Technical School in its early years. This is a1919 drawing of a Steam Cylinder for a 45 HP Horizontal Engine. The drawing is half the full size of the cylinder. The drawing is on a white card with the sketches done in black and red ink. The card has a heavy black margin around the edges drawn in black ink. The drawing shows a Sectional Plan and a Half Side Elevation with the Cover Plate Removed. The card has the signature of Ron Uebergang. Attached by a metal clip to the card are four pages of measurements and plans of the steam cylinder. These are in black and red ink. Three of these pages have become partly detached. ‘Designed by R. Uebergang’ ‘Drawn by R. Uebergang’ ‘Date 1/12/19’ ronald uebergang, warrnambool technical school, history of allansford, history of warrnambool -
 Orbost & District Historical Society
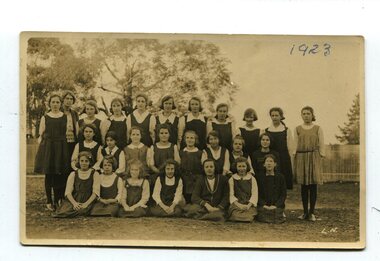
black and white photographs, 1923
3160.1 - front row right - Bet Gilbert P. Richardson. 3160.4 - back - Alice Hammill; Marion Nixon; Bel Kerr; ?; Annie Malcolm; E Gall front - Marion Gilbert; Pen Gilbert; Elsie Pardew; Jean Frewin 1923 These photographs are of students of Orbost Elementary High School. . During 1910-11 the first approaches were made to the Department for the establishment of a HES in Orbost and this became a reality in 1912. Orbost HES supplied post-primary education in the district until a high school was built in 1948. Orbost High School / Orbost Secondary College has played a significant part in the education of senior students in the Orbost district . It is the sole senior educational institution. These photographs are representative of its history.They are also associated with sport in Orbost in the first half of the 20th century.Four black / white photographs. 3160.1 is of three rows of young girls in uniforms - possibly sports uniforms. In the back row standing second left is an older woman - a teacher. 3160.2 is of two rows of girls in uniforms. Each girl in the front row is holding a hockey stick. A small square has been cut out - the head of the girl in the middle of front row. 3160.3 and 3160.4 show two rows of girls - the front row sitting and the back standing. There is a trophy on the ground middle front. all photographs have been taken outside.3160.3 - on back - Pen 6 Mary 4 Marion Gilberts 4 14 @ 5/- day sport-orbost recreation-hockey orbost-elementary-high -
 Federation University Historical Collection
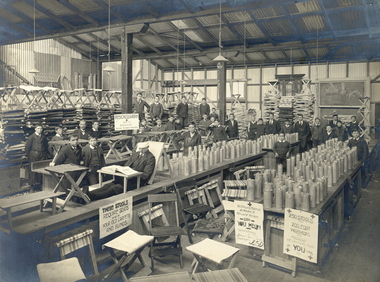
Photograph, Richards & Co, Ballarat Junior Technical School War Effort, 1915, 1915
The Ballarat Junior Technical School was established in 1913, and was a division of the Ballarat School of Mines. According to 'The Australasian' of 31 July 1915 sixty students of the Ballarat Junior Technical School made all the items depicted in the photograph.Black and white photograph mounted onto a brown card showing the interior of the Ballarat School of Mines Carpentry Building. It shows the war efforts of Sloyd students at the Ballarat Junior Technical School. Numerous foot stools, foot warmers, tables and seats were made by student to send to the front during World War One. Teacher Albert Steane stands on the left (2nd to the left of the Red Cross sign). From the second timber support beam V. Maddison stands 4th to the right and F.N. Ling 6th to the right of the beam. ballarat school of mines, ballarat junior technical school, world war one, world war 1, world war, red cross, albert steane, v. maddison, fn king, war effort, home front, trade, steane, sloyd -
 Flagstaff Hill Maritime Museum and Village
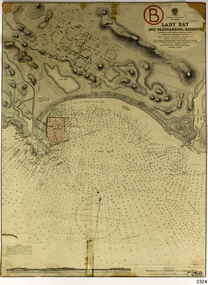
Document - Navigation Chart, Admiralty Office, Lady Bay and Warrnambool Harbour, 1893
This navigation cart of Lady Bay and Warrnambool Harbour was originally surveyed in 1870 but this version includes the update for magnetic variation in 1893. Since the printing of the chart several annotations have been added. These include an additional stamp dated 15-8-1910, a handwritten comment across the top of the page dated August 1910, and another handwritten comment regarding the ‘Proposed Extension of Dock’ dated 19-2-1925, plus connected drawings, notes and figures. The 1925 proposal on this chart may have been a reaction to the Royal Commission of 1923, when the damaged stonework on the seaward side of the Warrnambool Breakwater, caused by the action of the sea, was the subject of enquiry. A conference between the Public Works, Water Commission and the Harbour Trust concluded that it would less costly to make repairs to prevent further damage rather than replaced the damage portion of the wall. A contract was raised in late 1924 to deposit rubble on the damaged side of the breakwater to minimise the Southern Ocean’s destructive action and work had started by August 1925. The Breakwater construction had begun in 1874 and was completed in 1890. The Victorian Government had commissioned Sir John Coode, a British harbour engineer, to present a plan to complete the Warrnambool Breakwater but his original plan was too expensive. He prepared a revised plan for a shorter structure. The construction proved to be too short to protect adequately from the weather and didn't allow enough depth for larger vessels to come into port. The decreasing trade was further affected by siltation in the bay due to the breakwater, and the completion of the railway line. The situation of the harbour became a real problem by 1910 and required continuous dredging. In 1914 the Breakwater was extended but proved to be a failure because the work began to subside and by 1920 about two thirds of the harbour was silted up. Alterations made in the 1920's increased the silting problem and by the 1940's the harbour was no longer used. More alterations were made in the 1950's and 1960's. This chart is significant for its strong connection to the maritime history of Warrnambool Harbour and Lady Bay and the Warrnambool Breakwater. The Warrnambool Breakwater is registered as a place of significance on the Victorian Heritage Database (VHR H2024). The Warrnambool Breakwater is one of the most important late 19th century maritime engineering projects in Victoria and significant in the development of Victorian coastal shipping. It is also significant for its connection with British harbour engineer, Sir John Coode. The chart is a historical record of structures existing in 1893; the Warrnambool Jetties, Warrnambool Breakwater in Lady Bay, the leading lights (lighthouses), streets, roads, bridges and many buildings. It also shows the lay of the land and seabed. Navigation Chart: Lady Bay and Warrnambool Harbour, Australia - South Coast - Victoria. Surveyed by Nav. Lieut. H.J. Stanley, R.N., 1870. Updated for Magnetic Variation, 1893. The rectangular chart is printed on heavy cream paper. Stamps are shaped rectangular, oval and round. Around the Breakwater and Jetty area are handwritten notes, dotted and joined lines, numbers and signatures, and shading of red and green. The chart shows the surrounds of Warrnambool Harbour, Lady Bay, the Breakwater and Jetty, roads, bridges and the streets in Warrnambool. It has sounding details, and angles of line from the leading lights.Stamp, rectangular, including "AUG 1910" Stamp, double oval " - - - -CHART" Stamp, hand drawn, red circle, with "B" inside Hand written note "22-8-1910 - - - - - of surveying C. Ca - - - request of 15-8-10 [initials] " Notes and lines in red pen, including a grid of sounding numbers: "1300" "1050" "1200" "Possible Extension of Dock" "19-2-25" "Dock Dredged to 20 Ft" Notes and lines in blue pen "Extension of Dock to accommodate vessels drawing 20 Feet" and "Light not visible south of this line" Red dots (4) with yellow highlight at both leading lights, breakwater and jettyflagstaff hill, warrnambool, flagstaff hill maritime museum & village, maritime museum, maritime village, shipwreck coast, map, chart, navigation chart, plan, lady bay, warrnambool harbour, port of warrnambool, breakwater, jetty, pier, dock extension, proposed extension, vhr h2024, 1870, 1893, 1910, 1925, warrnambool town late 1800s, warrnambool streets late 1800s royal commission, 1923, public works, water commission, harbour trust, victorian harbours, sir jon coode -
 Bendigo Historical Society Inc.
Photograph - HANRO COLLECTION: PHOTO OF HANRO KNITTING MILLS
Photo of Hanro Knitting Mills: On Cream card with 6cm border is a photo of the Hanro Knitting Mills building in Hargreaves Street Bendigo. Of brick construction with doors either end. Four steps lead up to the doors and 10 windows along the front facing Hargreaves Street. A path with open gutters of blue stone block runs along the front of the building. Out from the path are three established trees on the nature strip. The view in the photo also shows part of the right hand side of the building. On the top written in black ink is *MP386*. Box 116ABartlett Bros., Bendigohanro, clothing, hanro knitting mill building, hanro knitting mill building. hargreaves street. -
 Bendigo Historical Society Inc.
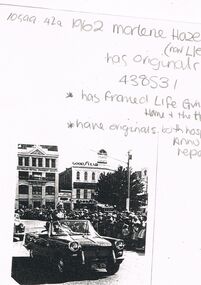
Photograph - BENDIGO EASTER FAIR COLLECTION: MARLENE HAZELDENE, 1958 POPULAR GIRLS
Photocopies of photos. On front written in pencil 1962 Marlene Hazeldene (now Llewellyn) has originals, has framed life governorship Home and Hospital, have originals both hospitals annual reports. Image on front shows Triumph sports car with women sitting up high on seat, in Easter Parade. Presumably Marlene Hazeldene. On back, photo of 4 women, one man. Women dressed formally in suits, dresses and hats. One woman has Mary Keating written on sash. Man in suit. In pencil '1958'. And Bendigo Advertiser.bendigo, bendigo easter fair, 1958, 1962 popular girls -
 Bendigo Historical Society Inc.
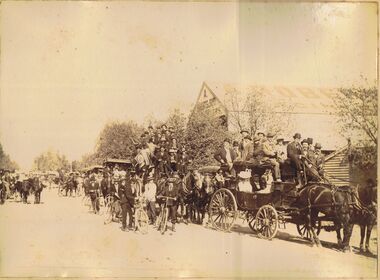
Photograph - HORSE AND CART PROCESSION
Sepia image mounted on board: image shows large procession of horse drawn vehicles, line of jinkers, carriages, etc. disappears into background, with bicycle riders alongside. Men are mostly wearing three piece suits, hats, and women wearing long dresses, seated in carriage. Procession is lined up outside buildings. Timber buildings with iron roof. Written on sign ' Roberts & Sons. Indistinct, behind trees' Roberts & Sons operated a foundry in Wills Street, Bendigo. Roberts & Sons, picnic, 1896. (Source: Bendigo Trust Collection)'Robevent, recreation, picnic, bendigo, procession, roberts & sons, foundry, wills street. -
 Bendigo Historical Society Inc.
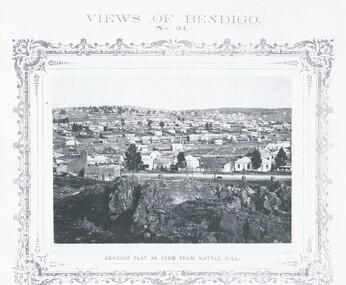
Photograph - VIEWS OF BENDIGO, BENDIGO FLAT AS SEEN FROM WATTLE HILL, 1875 Copy ,1970
Sepia photograph on cream board. Shows Bendigo Flat houses from Wattle Hill. Inscription: Above, 'Views of Bendigo No.34'. Below, 'Bendigo Flat as seen from Wattle Hill'. 'N.J.Caire Photo, Sandhurst'. Bottom, 'Casey & Wenborn Print Forbes & Holmes, Agents', 'This Flat twenty years since, was a busy seen with it's thousands of Diggers, breaking the native soil in search of Gold. The canvas tents then used have long since giving place to more solid and comfortable domiciles constructed of wood and bricks. Nicholas CaireN.J.Caireplace, bendigo, bendigo flat, see, 'views of bendigo' by n.j.caire, prev. ref.: 'mp154' -
 Bendigo Historical Society Inc.
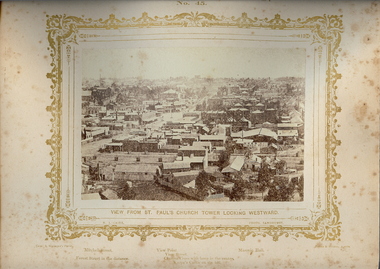
Photograph - VIEWS OF BENDIGO: LOOKING WEST FROM ST. PAUL'S CHURCH, 1875 copy,1970
Sepia photo on cream board. Shows westwards view over Bendigo from St. Pauls church tower. Inscription: Above image, 'Views of Bendigo|No.45.'. Below, 'View from St. Paul's church tower looking Westward.', 'N.J.Caire Photo, Sandhurst'. Bottom, 'Casey & Wenborn's Print Forbes & Holmes, Agents',' Mitchell Street, Forest Street in the distance',' View Point, View Street, Charing Cross with lamp in the centre. Knipe's Castle on the hill'. On Back, RHSV stamp, Bendigo Branch '1959|70' Nicholas CaireN.J.Caireplace, bendigo, view west from st.pauls church, see: 'views of bendigo' by n.j.caire -
 Bendigo Historical Society Inc.
Photograph - VIEWS OF BENDIGO: NEAR BIG HILL RANGES, 1875, copy,1970
Sepia photo on cream board, copy of original. Shows scene near Big Hill from Mr. Buick's residence. Inscription: Above image, 'Views of Bendigo|No.47.'. Below, 'Scene near Big Hill ranges, taken from Mr. Buick's Residence.','N.J.Caire Photo, Sandhurst'. Bottom, 'Casey & Wenborn's Print Forbes & Holmes, Agents',' Mount Alexander in the distance. Mr.Moffit's Sheep Station, Ravenswood, |can be seen this side of Mt. Alexander.'. On Back, 'RHSV stamp, Bendigo Branch '1959|70'. (Two copies) Nicholas CaireN.J.Cairecottage, miners, see: 'views of bendigo' by n.j.caire -
 Bendigo Historical Society Inc.
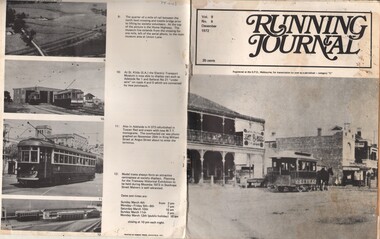
Document - BASIL MILLER COLLECTION: TRAMS - 'RUNNING JOURNAL', December 1972
Journal of the Tramway Museum Society of Victoria. Ltd. Volume 9, No. 6. December 1972, 35 cents, thirteen pages. Cover photo (right) shows Sydney Road Coburg looking south from Bell Street with horse tram bound for the Brunswick cable tram terminus at Moreland Road. The horse tram was established by the Northern Tramway Company in 1889. Purchased by the Coburg Council in 1911 they operated until 1916 when replaced by the electric trams of the Melbourne Brunswick and Coburg Tramway Trust. History of document: Part of 'Basil Miller Tramways Collection'.document -
 Bendigo Historical Society Inc.
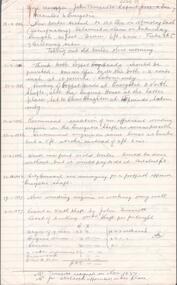
Document - ALBERT RICHARDSON COLLECTION: HERCULES AND ENERGETIC
a. Five page handwritten document titled 'Mine Manager John Truscott's Report Hercules and Energetic' Other reports included from Mine Managers on the Hercules and Energetic Mines are: J. Woolcock's report 4.3.1895, F. Youlden 1898 and J. Roberts 1911. b. One page hand drawn plan of titled ' Hercules transverse plotted by A.E. R., .D., A.A., page 23, 24.3.37. Hercules Long, by A.E.K. , W.R.N 24.3.37. Plans show measurements of tramway, height of poppet head, position of ore bins and other buildings on mine site.Albert Richardsonbendigo, mining, hercules and energetic mine -
 Bendigo Historical Society Inc.
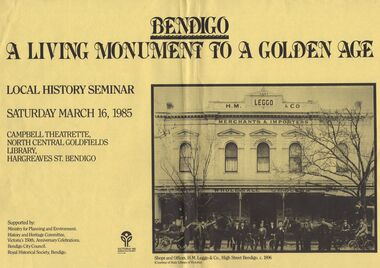
Document - DOCUMENT - FLYER FOR LOCAL HISTORY SEMINAR, 1985, BENDIGO
Bright yellow flyer of local history seminar, Saturday March 16, 1985 titled Bendigo - A Living Monument to a Golden Age, held at the Campbell Theatrette, North Central Goldfields Library, Hargreaves St. Bendigo. Has a copy of photo of Shops and Offices, H. M. Leggo & Co., High Street Bendigo. C. 1896. The photo shows a number of men outside H. M. Leggo & Co. Merchants & Importers, Wholesale Grocers. There are two horse drawn vehicles with two horses in each and some of the men have bicycles.bendigo, history, city history, flyer for local history seminar bendigo, north central goldfields library, ministry for planning and environment, history and heritage committee, victoria's 150th. anniversary celebrations, bendigo citycouncil, royal historical society bendigo, h m leggo & co, state library of victoria