Showing 2600 items
matching tram 4
-
 Ballarat Tramway Museum
Photograph - Digital image Set of 20, 1971-72
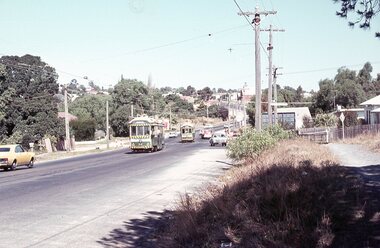
Set of 20 digital images of Bendigo Tramways, 1972 at or before closure while on a tram tour by Stuart Lodington. .1 - No. 7 at Golden Square terminus .2 - ditto .3 - No. 26 in bound on the Eaglehawk line with a crossing loop behind. .4 - Birney crossing the bridge by the tram depot. .5 - No. 29 running a special on the Eaglehawk line with a HBA billboard in the background. .6 - No. 29 with a driver walking in front of the tram at the above location. .7 - No. 29 on the Eaglehawk line .8 - ditto waiting for a tram at Manchester Loop with poppet head in the background. .9 - No. 29 on the Eaglehawk line .10 - Eaglehawk Town Hall at night. .11 - No. 7 at the depot junction in McCrae St, with Golden Square destination. .12 - No. 29 with the Camp Hotel Eaglehawk in the background. Also a Newsagent with The Sun, The Bendigo Advertiser and The Age signs on the building, High St .13 - No. 29 Mt Korong Rd, with the railway overbridge in the background. .14 - interior photo of Birney tram roof .15 - interior view of controls of Birney at Eaglehawk .16 - No. 29 outbound at the Depot Junction McCrae St. .17 - No. 18 at the Eaglehawk terminus .18 - close up view of No. 29 front. .19 - No. 29 in Nolan St, crossing the bridge, outbound. .20 - No. 18 at the Eaglehawk terminus with the Eaglehawk Town Hall, Post Office in the background. Has a circus banner on the side.trams, tramways, bendigo, eaglehawk, quarry hill, golden square, depot, mccrae st, nolan st, tram 7, tram 26, tram 29, tram 18 -
 Ballarat Tramway Museum
Photograph - Digital image Set of 20, 1971-72
Set of 20 digital images of Bendigo Tramways, 1972 at or before closure while on a tram tour by Stuart Lodington. .1 - No. 29 at the North Bendigo terminus .2 - No. 29 just past the Bendigo end of the double track in High St Eaglehawk, with a BP dealer in the background. .3 - Night photo of No. 18 at a terminus, showing "Eaglehawk" .4 - ditto .5 - Night photo of No. 24 at Eaglehawk with Leo A Hughes Photographer in the background. The Tram has "Johnnie Walker whiskey" roof adverts. .6 - No. 29 outbound in Thunder St with a train passing over the bridge in the background. .7 - view from the front window of a tram on the Eaglehawk line with a large "display event float" in the foreground and tram approaching a crossing loop. .8 - No. 29 at North Bendigo .9 - view of High St Eaglehawk looking east from the terminus, showing the track and centre poles. .10 - No. 29 outbound on the North Bendigo line turning from either Nolan St or Caledonia St, running a special. .11 - No. 7 departing North Bendigo for Golden Square. .12 - No. 3 and 18 at Charing Cross. No. 3 has two SEC roof Advertisements .13 - No. 7 at North Bendigo with the trolley pole being reversed. .14 - No. 24 at Quarry Hill with Northern Terrazzo in the background with the driver alongside .15 - No. 7 and No.6 at Charing Cross with the Beehive buildings in the background. .16 - No. 7 at North Bendigo terminus .17 - ditto .18 - No. 24 at Quarry Hill with Northern Terrazzo in the background with the conductor alongside. .19 - ditto .20 - No. 26 and other bogie tram in View St near Charing Cross with the Armstrong Tyre Service building and signs for Cohn's Drinks and T&G in the view.trams, tramways, bendigo, eaglehawk, quarry hill, golden square, depot, north bendigo, charing cross, tram 29, tram 18, tram 24, tram 3, tram 7, tram 6, tram 26 -
 Ballarat Tramway Museum
Photograph - Digital image Set of 20, 1971-72
Set of 22 digital images of Bendigo Tramways, 1972 at or before closure while on a tram tour by Stuart Lodington. .1 - No. 7 arriving at North Bendigo .2 - No. 5 departing Charing Cross along View St, with a Firestone tyres in the background. .3 - front view of a tram in View St with a blurred background image. .4 - No. 24 showing Eaglehawk destination .5 - No 26 and 3 in View St, with the Armstrong Tyre Service building in the background and signs for T&G and Cohn's Drinks. .6 - ditto .7 - No. 3 arriving at Charing Cross from Eaglehawk in View St, with a Quarry Hill destination. .8 - No. 3 and 18 at Charing Cross. .9 - No. 24 on the Quarry Hill line. .10 - No 26 in View St, with the Armstrong Tyre Service building in the background and signs for T&G and Cohn's Drinks. .11 - ditto, with fountain in view, Colonial Mutual building and a newsagent with a Herald sign on the building. .12 - No. 7 at North Bendigo terminus .13 - ditto with pole being reversed. .14 - No. 18 at Quarry Hill terminus with Northern Terrazzo sign in the background. .15 - No. 24 at Quarry Hill terminus .16 - No. 18 arriving at Charring Cross, with Fountain Plaza and Bendigo Pharmacy in the background. .17 - No. 3 and 18 at Charing Cross. .18 - No. 7 at North Bendigo terminus with pole being placed on the overhead. .19 - No. 26 in View St inbound, with Sandhurst Trustees sign in the background. .20 - No. 6 leaving Charing Cross in Pall Mall with Myer and other buildings in the background. .21 - No. 7 at North Bendigo .22 - Single trucker with two roof Advertisements crossing View St with fountain in view, Colonial Mutual building and a newsagent with a Herald sign on the building.trams, tramways, bendigo, eaglehawk, quarry hill, north bendigo, charing cross, view st, tram 7, tram 5, tram 24, tram 26, tram 5, tram 3, tram 18, tram 6 -
 Ballarat Tramway Museum
Photograph - Digital image Set of 20, 16/04/1972 12:00:00 AM
Set of 22 digital images of Bendigo Tramways, of the last running day of the Eaglehawk to Quarry Hill line 16 April 1972, .1 - No. 3 and 24 crossing at Long Gully .2 - No. 3 turning at the Cricket ground, Barnard and View Sts, inbound to the City and Quarry Hill .3 - No. 3 in bound to the City and Quarry Hill, Long Gully area .4 - No. 18 inbound to the City and Quarry Hill crossing the railway bridge from Eaglehawk. .5 - Manchester Loop .6 - No. 18 inbound to the City and Quarry Hill crossing the railway bridge from Eaglehawk. .7 - No. 18 about to enter Jobs Gully Loop .8 - No. 3 about to turn at the Cricket ground, Barnard and View Sts inbound to the City and Quarry Hill .9 - No. 3 turning at the Cricket ground, Barnard and View Sts, inbound to the City and Quarry Hill .10 - No. 18 at Eaglehawk terminus with the Mechanics Institute in the background. .11 - No. 3 in bound, Ironbark area. .12 - No. 3 at Long Gully Loop .13 - No. 3 outbound to Eaglehawk. .14 - No. 18 at Eaglehawk with German circus banner on tram .15 - No. 18 on the Eaglehawk line at Jobs Gully Loop .16 - No. 24 outbound to Eaglehawk at Taylor St .17 - No. 18 inbound to the City and Quarry Hill crossing the railway bridge from Eaglehawk. .18 - No. 3 at Manchester Loop .19 - No. 18 at Eaglehawk terminus .20 - No. 18 at Eaglehawk with German circus banner on tram .21 - bogie tram at Long Gully Loop. .22 - No. 24 outbound to Eaglehawk at Taylor Sttrams, tramways, bendigo, eaglehawk, long gully, jobs gully, manchester loop, tram 24, tram 18, tram 3 -
 Ballarat Tramway Museum
Photograph - Digital image Set of 4, 8/05/2011 12:00:00 AM
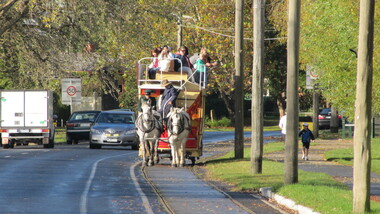
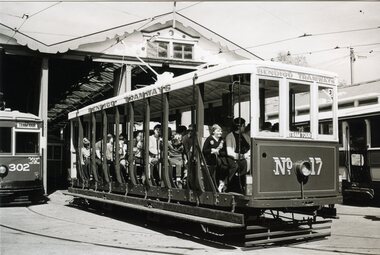
Yields information about the operation of the horse tram by the BTM during the Ballarat Heritage Weekend 2011Set of four digital images of the Horse tram No 1 operation in Wendouree Parade on Mother's Day, 8/5/2011, Photos by Warren Doubleday. .1 - Southbound .2 - in some light rain, with no one on the upper decks. .3 - through the parklands .4 - details of the horse owners caravan / float, Horse Drawn Cab Co.trams, tramways, horse tram, btm, wendouree parade, heritage, tram 1 -
 Ballarat Tramway Museum
Photograph - Colour Print/s - set of 4, Earl Ewers, 28/05/2011 12:00:00 AM
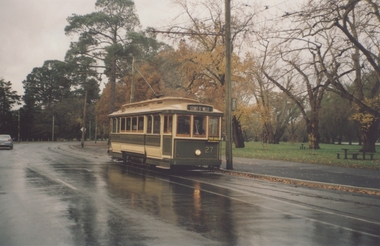
Yields information about the BTM's 40th anniversary celebrations, and some of the people involved.Set of four colour prints of trams in Wendouree Parade during the 40th anniversary celebrations. Taken by Earl Ewers, printed on Fujichrome paper. Taken 28/5/2011 .1 - No. 27 as service tram, entering Gardens Loop. .2 - No. 33 at the Crossing Loop, with Sovereign Caravans and Eureka Roofing Tiles roof adverts. .3 - ditto at Carlton St. .4 - ditto at St Aidans DriveOn rear in blue pen .1 - No. 27 as service car, Wendouree Parade Ballarat 28 May 2011 .2 - No. 33 on a "special", Wendouree Parade Ballarat 28 May 2011 .3 - No. 33 at Carlton St terminus, Ballarat Gardens 28 May 2011 .4 - No. 33 Lake Wendouree, Mt Warrenheip, Black Swans, Ballarat Gardens 28 May 2011.trams, tramways, 40th anniversary, lake wendouree, wendouree parade, gardens loop, tram 27, tram 33 -
 Ballarat Tramway Museum
Photograph - Colour Print/s - set of 7, Earl Ewers, 28/05/2011 12:00:00 AM
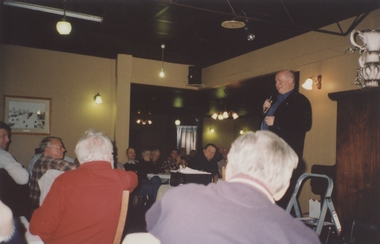
Yields information about the BTM's 40th anniversary celebrations, and some of the people involved.Set of seven colour prints of speakers during the 40th anniversary celebrations dinner at the Brewery Tap Hotel, Warrenheip. Taken by Earl Ewers, printed on Fujichrome paper. Taken 28/5/2011. .1 - Richard Gilbert speaking .2 - Paul Nicholson .3 - Neil Lardner, Richard Gilbert and Greg Rogers .4 - Neil Lardner, Richard Gilbert, Stephen Butler and Greg Rogers .5 - Alan Bradley .6 - Bill Kingsley .7 - Ballarat Bertie beer advert at hotel.On rear in blue pen .1 - Richard Gilbert speaking at 40th Anniversary Dinner, Warrenheip Hotel 28 May 2011. .2 - Paul Nicholson speaking at 40th Anniversary Dinner, Warrenheip Hotel 28 May 2011. .3 - Neil Lardner, Richard Gilbert, Greg Rodgers 40th Anniversary Dinner, Warrenheip Hotel 28 May 2011. .4 -L. to R. Neil Lardner, Richard Gilbert, Stephen Butler Greg Rodgers 40th Anniversary Dinner, Warrenheip Hotel 28 May 2011. .5 - Alan Bradley speaking at 40th Anniversary Dinner, Warrenheip Hotel 28 May 2011. .6 - Bill Kingsley speaking at 40th Anniversary Dinner, Warrenheip Hotel 28 May 2011. .7 -"Ballarat Bertie" adverts, Warrenheip Hotel 28 May 2011.trams, tramways, 40th anniversary, btm -
 Ballarat Tramway Museum
Photograph - Colour Print/s - set of 8, Earl Ewers, 29/05/2011 12:00:00 AM
Yields information about the BTM's 40th anniversary celebrations, and some of the people involved.Set of eight colour prints of the display area and new panels on show for the first time. Taken by Earl Ewers, printed on Fujichrome paper. Taken 29/5/2011. .1 - Display area from the office .2 - Boards and panels on display alongside 3 road .3 - No. 39 and shed. .4 - New panels alongside wall./ .5 - Gavin Young at sales desk .6 - Panel - 1950's to 1960's .7 - Yanks Conductresses and pranksters .8 - End of the Line On rear in blue pen .1 - Interior Museum Section BTM 29 May 2011 .2 - Interior Ballarat Tram Museum 29 May 2011 .3 - Interior Ballarat Tram Museum 29 May 2011 .4 - Wall mountings ready to be put on museum wall 29 May 2011 .5 - "Counting the badges" Gavin Young hard at it 29 May 2011 Ballarat Tram Depottrams, tramways, 40th anniversary, btm, displays, depot, tram 39, tram 1, tram 40 -
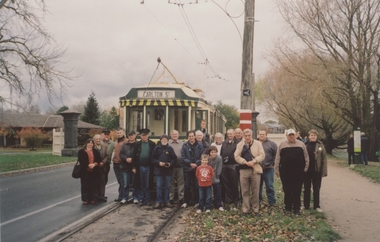 Ballarat Tramway Museum
Photograph - Colour Print/s - set of 4, Earl Ewers, 29/05/2011 12:00:00 AM
Yields information about the BTM's 40th anniversary celebrations, and some of the people involved.Set of three colour prints of the members and friends standing in front of No. 40 at St Aidans, Sunday morning BBQ and one print of people boarding the tram, with Richard Gilbert talking to John Frost. Taken by Earl Ewers or others, printed on Fujichrome paper. Taken 29/5/2011.trams, tramways, 40th anniversary, btm, depot, wendouree parade, tram 40 -
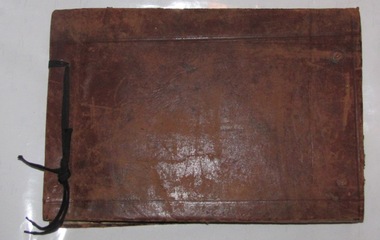 Ballarat Tramway Museum
Album - Photo Album, Wal Jack, Adelaide, 1950's
These notes are based on a report prepared for the Board re the donation of materials collected by Wal Jack and donated to the BTM in 2011. The following notes are general across the collection unless written for a specific Ballarat item. Has proven association with Wal Jack and tramway developments within Australasia until 1964 and given their extent particular significance. Features South Australian trams. Brown leather covers, over heavy board, tied together with a black shoe lace, light grey paper inside covers holding some 63 sheets of card on which photos have been mounted using photo corners of various types, captions in blue or black ink. Has some 392 black and white photographs including some postcards. Has photos of various locations and lines within Adelaide, includes works trams, buses, trolley buses, arranged by tramcar class in some places. Includes horse trams at Goolwa and Victor Harbor, Port Adelaide steam tram. Album Scanned Dec. 2019 prior to forward 7 packets of negatives to the collection of the AETM via John Radcliffe. Refer to dbtext\Archive Document files\Reg Item 5009. Each page scanned as a hi res (1200 dpi) jpg file using the Fujitsu Scan Snap Scanner SV600. Advised 3/4/2020, that the negs will be held by the National Railway Museum. All photos scanned 12/2022. See Related documents regarding the negatives -trams, tramways, adelaide, victor harbor, tramcars, wal jack -
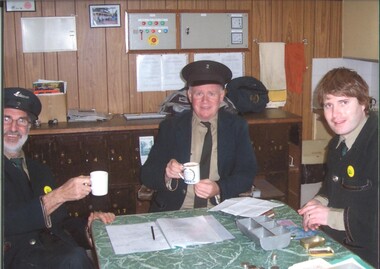 Ballarat Tramway Museum
Photograph - Colour Photograph/s, Richard Gilbert, 20/04/1980 12:00:00 AM
Yields information about three BTM workers enjoying a break in the depot.Mounted colour print, digital printed, onto a foam backing of Neville Hesketh, Richard Gilbert and Ryan Vanderzweep in the depot 20/4/2008. Print made 9/2009 for exhibition purposes and laminated.trams, tramways, btm, depot, tram crews -
 Ballarat Tramway Museum
Photograph - Colour Photograph/s, Richard Gilbert, c2004
Yields information about the reconstruction of the body of ESCo 12.Mounted colour print, digital printed, onto a foam backing of Alastair Reither, Garry Wood, Richard Gilbert pushing No. 12 back into the depot on 4 road c2004. Print made 9/2009 for exhibition purposes and laminated.trams, tramways, btm, depot, tram 12 -
 Ballarat Tramway Museum
Photograph - Digital image set of 6, 27/06/1971 12:00:00 AM
... , "Make Bliss, Not Love". .4 - slide FQ22 - Trams 26 and 41... Grenville St tram 41 tram 26 tram 27 tram 37 Set of six Digital ...Yields information about the SEC Ballarat trams in the months before the closure of the SEC Tramway system. Yields information about the streetscape.Set of six Digital images, scanned from slides by Graeme Cleak, scanning by Peter Winspur 9/2011. .1 - Slide FQ16 - No. 41, outbound at the south end of Drummond St south about to turn into Skipton St, with the destination of Bell St. .2 - slide FQ18 - No. 41, outbound to Sebastopol terminus, Albert St, just before the terminus itself. .3 - slide FQ21 - No. 41, inbound Albert St Sebastopol with the Sebastopol Town Hall in the background. Tram has a "Bliss Bombs" roof advertisement on the side, "Make Bliss, Not Love". .4 - slide FQ22 - Trams 26 and 41, crossing at Grey St Sebastopol Loop. No. 41 has destination of Grey St. .5 - slide FQ27 - Trams 27 and 37, crossing at the Hamilton Ave loop, No. 41 inbound - with destination of Victoria St at the Hamilton Ave loop with the "Stonehenge" fence house in the background. Sturt St West. .6 - slide FS29 - No. 37 at Grenville St, Sturt St intersection with Bridge St in the background. Tram has the destination of View Point and is entering the loop itself. The destination was no longer in use at the time of the photograph and would indicate that the destination has been arranged. In the background is the Woolworths Big W store and the Dickins Food Store. All photos taken on 27/6/1971. trams, tramways, drummond st sth, sebastopol, grey st, albert st, sturt st west, grenville st, tram 41, tram 26, tram 27, tram 37 -
 Ballarat Tramway Museum
Photograph - Digital image Set of 8, 21/08/1971 12:00:00 AM
Yields information about the SEC Ballarat trams in the months before the closure of the SEC Tramway system. Yields information about the streetscape. Set of 8 Digital images, scanned from slides by Graeme Cleak, scanning by Peter Winspur 9/2011. .1 - Slide FS14 - No. 31 and 32 crossing at the High St Loop in Macarthur St. Tram 31 has the destination of Victoria St. Geoff Dean and his mini on the right hand side of the photograph. Another depot bound single trucker in the photograph, .2 - Slide FS3 - 31 outbound in Victoria St, with St Alipius church in the background. .3 - Slide FS5 - No. 31, and four other trams, some running special at Sturt and Lydiard Sts during the ARHS tour of that day. Has the ANZ Bank and SEC offices in the background. .4 - Slide FS9 - Nos. 39, 26 and two other trams in Lydiard St for the ARHS tour with Reid's Palace, Macleod & Co and J.J. Collier buildings in the background along with other buildings in Lydiard St North. Taken from the Provincial Hotel. .5 - Slide FS11 - No. 26 northbound showing Special running through the level crossing at Ballarat with the Kennedy Murray General Carrier in the background. Taken from the Provincial Hotel. .6 - Slide FS13 - No. 32 turning from Sturt St into Drummond Street North showing Depot via Drummond North, with the Southern Cross Hotel, Rimmington Bros and J.A, Malpass(?) buildings in the background. .7 - Slide FR35 - night shot of No. 17 (with Twin Lakes sign) and No. 32 in Nos 3 and 4 roads at the depot. .8 - Slide FR34 - night shot of the front of the depot - as above and No. 43 on "0" road. All photos 21-8-1971 trams, tramways, railway station, macarthur st, victoria st, sturt st, lydiard st north, level crossings, depot, tram 31, tram 32, tram 39, tram 26, tram 17, tram 43 -
 Ballarat Tramway Museum
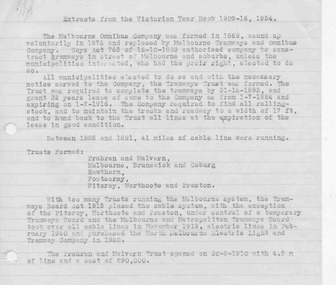
Document - Research Notes, Extracts from the Victorian Year Book 1909-16 and 1954, c1960?
Yields information about Melbourne tramway trusts, track mileage, tramway Acts and Melbourne trams sold to the SEC.Set of four typed or handwritten research notes on line quarto paper. Not known who prepared them. .1 - Extracts from the Victorian Year Book 1909-16 and 1954 - notes on the trust, cable tram company, cable tram trust, electric tramway trusts. .2 Tramway Mileage (track) for Victoria except VR trams - from the year books, MMTB and SEC, 1901-09, 1913-14, 1950-54, SEC 1955-1960. .3 Tramway Acts - handwritten - 1910 to 1922 .4 - List of MMTB Cars sold to SEC, and others - handwritten trams, tramways, sec, mmtb, tramcars, track -
 Ballarat Tramway Museum
Document - Photocopies, Royal South Street Society, Royal South Street Society Guide, 2008
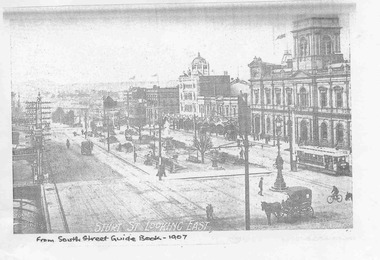
Has a strong association with the work of the Royal South Street Society, who published a handbook/guide or manual for their competitions. Used a photograph published at about the same time.Set of 15 photocopies of pages from the Royal South Street Society Guide showing trams in Sturt St Ballarat. .1 - Sturt St Looking East - with an ESCo tram outside the town hall and other horse drawn vehicles - 1907 .2 - Sturt St Looking West - same image as in Reg item 2688 - 1907 .3 - Sturt St Looking East - with many vehicles and people - 1910 and the "Chef" kitch range stove advertisement sold by Middleton and Morris of Sturt St. .4 - Sturt and Lydiard St, with a tram turning from Sturt into Lydiard St, 1910 with the post office in the background - 1910 and an advertisement for Woderine medicine sold by Jas. A. Gear, herbalist. .5 - Sturt St looking West - tram turning from Sturt into Lydiard St, taken from near post office corner - 1911 and a advertisement for Williams the Shoeman. .6 - Sturt St. West - with an ESC0o tram outbound - the only vehicle - 1913. .7 - same photo as .3, with a Monster Military Carnival Advertisement for Nov. 8th - 1913 .8 - Sturt and Lydiard St from next to post office, looking west with two trams, one horse trailer and many people - a busy scene - 1914 .9 - Sebastopol tram No. 21 at Grenville St - 1928 - with the Ballarat Gas Company Show rooms in the background, the Sturt St shelter. The tram has a Suttons Organs roof advertisement. .10 - View of Sturt Street, showing City Hall Buildings, with an ESCo Sebastopol type tramcar crossing the street, taken from the post office stops. - 1928 - Advertisements for G. Ludbrook Furnishing Undertaker (Motor Service and Horse drawn vehicles) and R. Young Grocer. .11 - Sturt St looking West, looking west, with a Sebastopol type tram at Grenville St and the big shelter removed. Has many buildings and many people in the background - 1928. .12 - same photo as for .10 and Clarendon Presbyterian Ladies Collection, Ballarat photograph - 1929. .13 - Advertisement for Ballarat Tramways - cars for Coliseum, fare box, route numbers and route colour scheme - 1929. .14 - as for above, no date, but opposite is the is an item for the Mouth Organ Band Contest, "A" Grade - c1933, notes the Coburg Tramway Athletic Club Harmonica Band and the Malvern Tramways Harmonica band amongst the contestants. .15 - same as .9, with a advertisement for the Melbourne Coffee Palace - Bourke St. Photocopies made by Neville Hasket for the BTM 10/2008. See also Reg item 675 for alternative source details.Handwritten note on photocopiestrams, tramways, ballarat, sturt st., royal south street society, lydiard st, town hall, post office, esco -
 Ballarat Tramway Museum
Photograph - Black & White Photograph/s, William. F. Scott, 3/04/1983 12:00:00 AM
Yields information about the appearance of Bendigo Birney trams at the time of the opening of the tram services and Eaglehawk Town Hall.Black and white photograph, of Toastrack, Bendigo 17, with passengers outside the Bendigo Depot, photo by William F Scott 3/4/1983."22" in pencil in top left hand corner, and along bottom edge in ink "Bendigo Trust, car on tour 3/4/1983, William F. Scott photo".trams, tramways, bendigo, depot, tram 17 -
 Ballarat Tramway Museum
Photograph - Black & White Photograph/s - set of 4, 1890
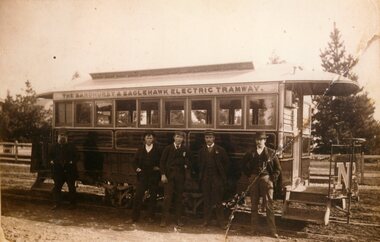
Demonstrates part of the evolution of Ballarat's trams when they were drawn from cable trailers of North Sydney for use as the central section of ESCo's Ballarat trams.4373 - Black and White sepia coloured reproduction (copy by scanning and reprinting) of a image of "The Sandhurst & Eaglehawk Electric Tramway" battery tram, with five men (two in uniform) standing alongside. Cans see the letters "No." Note the unpaved streets. Company operated the battery tram during 1890. 4373.1 - Black and white print - copied by Harris House of Photography - 3 prints and 1 negative - N526 - with tear in image removed. 4373.2 - Negative only - N524 - no people but with one of the battery doors only - negative only - see image. Envelope and other paperwork with the 4373.1 and 4373.2 - with the worksheet file. 3 - Black and White copy print contained within the Wal Jack Bendigo and Geelong Album, see Reg Item 5003 for more details. Added 1/7/2013 .0 In pencil "Basil W Miller Collection" .3 - "PWD" in bottom right hand corner in ink.trams, tramways, bendigo, battery trams, eaglehawk -
 Ballarat Tramway Museum
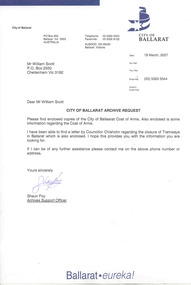
Document - Letter/s, City of Ballarat, 19/03/2007 12:00:00 AM
Yields information about the City of Ballaarat's Coat of Arms and colours.Set of four documents - City of Ballarat civic crests/ coat of arms / emblems 4371.1 - Letter dated 19/3/2007, from the City of Ballarat, signed by Shaun Foy, Archives Support Officer to William F Scott, giving permission to use the City civic crests in his forthcoming book. .2 - City of Ballaarat Crest - full colour version. .3 - City of Ballaarat Crest - black and white version .4 - Colour sheet - explaining the layout of the "Arms of Ballaarat" Letter also notes Mayor's report at the time of closure - see Reg Items 653 and 1829 for these items.trams, tramways, crests, coat of arms, city of ballaarat, city of ballarat -
 Ballarat Tramway Museum
Postcard - Folder set, William. F. Scott, Doveton St. and Sturt St, c2000
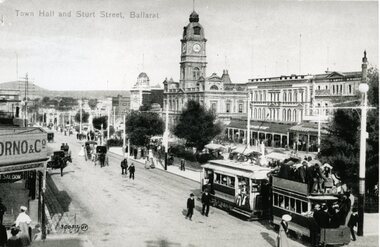
Demonstrates aspects of Ballarat tramway operation with horse tram trailers, - copy of a postcard photograph.B&W print of an ESCo tram just past the intersection of travelling east along the north side of Sturt. Steet towing a heavily laden horse tram as a trailer. Photo appears to be taken soon after opening of the electric trams, as the tram does not have any destination box above the driver. Possibly summer 1905/1906. Numerous people in the street, some horse drawn vehicles in the photograph. Shows buildings along the south side of Sturt St. and part of the verandah of the building at the NE corner of Doveton St. Horse Trailer No. 4 In top of image are the words "Town Hall and Sturt Street, Ballarat" Two copies Larger version than normal, obtained by Bill Scott for publication. For a list and description of the same base image see Archives file - "Notes on ESCo Tram towing a heavily loaded trailer" See Reg Item 4370i1 for a colour postcard.On rear of copy 1, "WFS Collection" in ink and on rear of Copy2 - "William F Scott" address label and "WF Scott collection" in ink.trams, tramways, esco, horse trams, postcards, doveton st, sturt st, tram 8, tram 2 -
 Ballarat Tramway Museum
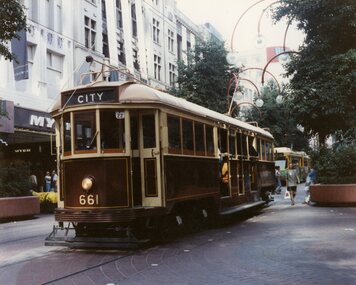
Photograph - Black & White Photograph/s - set of 3, William. F. Scott, 1989
Yields information about the appearance of Geelong's trams and the railway station area and the conversion to a one-man tram.Set of three colour photographs of BTPS owned W3 661 operating in Bourke St Melbourne. Presumed taken at the same time as the front cover of the annual report, 1988-1989 - 29/4/1989. Has Myer building in the background. .2 - ditto - crossing an articulated tram. .3 - westbound in Bourke Street with the Priceline Centrepoint building in the background and Medicare office. Printed on Kodak paper.In pencil on the rear "William F Scott".trams, tramways, btps, bourke st, yapper tours, tram 661 -
 Ballarat Tramway Museum
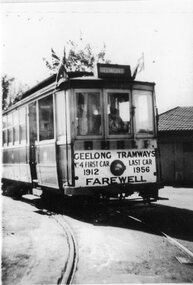
Photograph - Colour Photograph/s, 8/01/1956 12:00:00 AM
Yields information - Photo printed from a slide of Geelong No. 4 decorated for the last tram in Geelong.Colour print from a Agfachrome Professional plastic mount reproduction slide of a colour slide of Geelong No. 18 at East terminus on the last day of the first closures, 8.1.1956 Shows a young boy walking away from the tram and the driver closing the door. Tram has the destination of East. See also Reg Item 2676 for a the original slide of this photograph. Two copies held.On rear in ink on both copies: "Geelong Trmys SEC 4a) (crossed out) East terminus on last day of first closures 8.1.1956 - Ballarat Try Museum"trams, tramways, geelong, east, last tram, closure, tram 18 -
 Ballarat Tramway Museum
Photograph - Black & White Photograph/s - set of 2, 1915
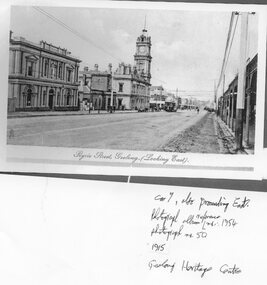
... the appearance of the official last Geelong tram, No. 4, prior to its use ...Yields information about the appearance of the official last Geelong tram, No. 4, prior to its use that evening.4403.1 - Black and white (sepia coloured) reproduction of a photograph from an album photo from the Geelong Heritage Centre collection of the Post office, in Ryrie St Geelong, looking east, with tram 7 proceeding east, from Album No. 1954, photograph No. 50, 1915. 4403 - as above, but photos Nos. 48 and ?, also showing the Post Office, prior to the construction of the tramway and another view of the Post Office. Printed on Hewlett Packard paper.4303.1 - in ink on the front "Car 7, also proceeding East. Photograph album reference Nos. 1954, photograph No. 50, / 1915 / Geelong Heritage Centre" 4303.2 - "Geelong Heritage Centre / Photograph album ref no. 1954/50 1915" trams, tramways, geelong, ryrie st, tram 7 -
 Ballarat Tramway Museum
Photograph - Black & White Photograph/s, Keith Kings, 23/03/1956 12:00:00 AM
... Black and white reproduction photograph of Geelong No. 4... the first tram was decorated and operated. trams tramways Geelong ...Yields information about the opening of the tramway line across the Barwon river and the way the first tram was decorated and operated.Black and white reproduction photograph of Geelong No. 4, outside the Geelong tram depot, on the last day of service, 25.3.1956. With photograph was a sheet of paper, with a note written in Bob Lilburn's handwriting, "2PM outside about to enter Depot after Kings Photographed it, run out on his request? !! yeah. Sun 25.3.56, last day. Car broken up by the above incumbent!!!!" Photo assumed to be Keith Kings, from the Geelong Heritage Centre.In ink on rear "Geelong Heritage Centre" trams, tramways, geelong, last tram -
 Ballarat Tramway Museum
Photograph - Black & White Photograph/s, Wal Jack, 21/04/1962 12:00:00 AM
... Jack, 21/4/1962. Two copies. Tram has advertisements.... Photographed by Wal Jack, 21/4/1962. Two copies. Tram has ...Yields information about Ballarat Trams and streetscapes early 1960's and the details of the Victoria St terminus while running specials for the AETA.Black and white print of Ballarat 18 and 37, at the Lydiard St gates, while B79 crosses the street. Photographed by Wal Jack, 21/4/1962. Two copies. Tram has advertisements for "The Age". Tram is showing Special and has a number of people photographing the scene - AETA tour. Photo print courtesy of Port Dock Railway Museum, now the National Railway Museum. See worksheet 4311 for letter and details of prints sent to Bill Scott, 19/10/2001. Any photo credit to mention NRM Collection.On rear of copy 1" "73)" and "SEC Ballarat / 18 & 37 / Lydiard St North / 21/4/62 2091 / Wal Jack" trams, tramways, lydiard st, railway crossing, aeta, tram 18, tram 37 -
 Ballarat Tramway Museum
Photograph - Black & White Photograph/s, Wal Jack, 21/04/1962 12:00:00 AM
... , at the Victoria Street terminus, photographed by Wal Jack, 21/4/1962... Ballarat Trams and streetscapes late 1950's on the Mt Pleasant ...Yields information about Ballarat Trams and streetscapes late 1950's on the Mt Pleasant route and advertising of the period.Black and white print of Ballarat 18 and 37, at the Victoria Street terminus, photographed by Wal Jack, 21/4/1962. Two copies. Tram has advertisements for "The Age", Whites Florists, Lancashire's. Both trams are showing "Special" and have the AETA tour boards on the front of the tram. Photo print courtesy of Port Dock Railway Museum, now the National Railway Museum. See worksheet 4311 for letter and details of prints sent to Bill Scott, 19/10/2001. Any photo credit to mention NRM Collection.On rear of copy 1 "SEC Ballarat / 18 & 37 / Victoria / 21/4/62 2092 / Wal Jack" Copy 2 "DAC" in ink, bottom right hand corner.trams, tramways, victoria st, terminus, tram 18, tram 37 -
 Ballarat Tramway Museum
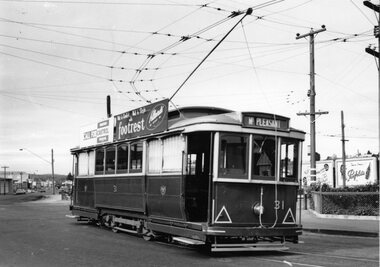
Photograph - Black & White Photograph/s, Doug Colquhoun, 26/04/1960 12:00:00 AM
Yields information about Ballarat Trams and streetscapes and Wendouree Parade during the early 1960's.Black and white print of Ballarat of No. 31 enroute to Mount Pleasant, turning from Main St into Barkly St. Tram has the destination of Mt Pleasant. Two copies. Photo taken Doug Colquhoun 26/4/1960. Has roof advertisements for Castrol Oils and Footrest of Sturt St furnishings. In the background is a Penfolds sign. Photo print courtesy of Port Dock Railway Museum, now the National Railway Museum. See worksheet 4311 for letter and details of prints sent to Bill Scott, 19/10/2001. Any photo credit to mention NRM Collection.On rear of copy 1"SEC Ballarat / 31 / Bridge St / 26/4/60 2101 / D. A. Colquhoun" Copy 2 "DAC" in ink, bottom right hand corner.trams, tramways, mt pleasant, main st, barkly st, tram 31 -
 Ballarat Tramway Museum
Photograph - Black & White Photograph/s, Doug Colquhoun, 27/04/1954 12:00:00 AM
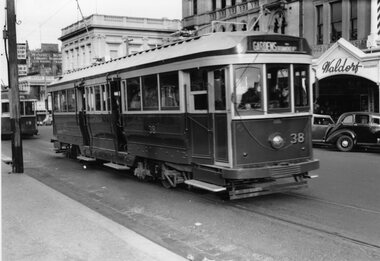
Yields information about Ballarat Trams and streetscapes, the scrubber tram and the Bell Street loop, early 1960's.Black and white print of Ballarat of No. 38 in Sturt St, just to the west of Lydiard St with No. 19 in the background. Tram has the destination of Gardens via Drummond North, No. 19, Sebastopol. IN the background is the Waldorf shop premises, tram stop signs. Photo by Doug Colquhoun 27/4/1954. Two copies. Photo print courtesy of Port Dock Railway Museum, now the National Railway Museum. See worksheet 4311 for letter and details of prints sent to Bill Scott, 19/10/2001. Any photo credit to mention NRM Collection.On rear of copy 1"SEC Ballarat / 38 / Sturt St / 27/4/54 2118 / D A Colquhoun " Copy 2 "DAC" in ink, bottom right hand corner.trams, tramways, sturt st, city, tram 38, tram 19 -
 Ballarat Tramway Museum
Photograph - Black & White Photograph/s, Doug Colquhoun, 25/04/1960 12:00:00 AM
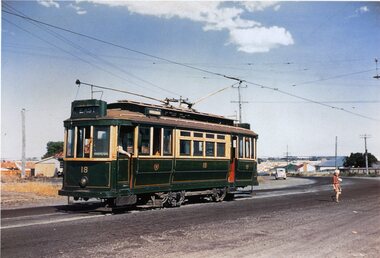
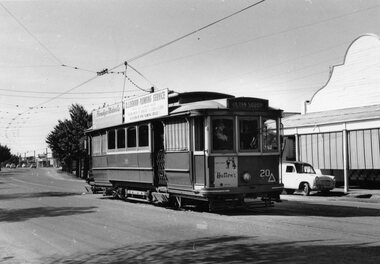
... Square. Photo by Doug Colquhoun 25/4/1960. Two copies... of Geelong's trams. trams tramways Bendigo Golden Square tram 20 ...Yields information about one of Geelong's trams.Black and white print of Bendigo No. 20, enroute to Golden Square. Photo by Doug Colquhoun 25/4/1960. Two copies. Trams has a front dash advertisement for Hutton's hams and roof advertisements for D. J. Osborn Plumbing Service and Bendigo Motor Co. Photo print courtesy of Port Dock Railway Museum, now the National Railway Museum. See worksheet 4311 for letter and details of prints sent to Bill Scott, 19/10/2001. Any photo credit to mention NRM Collection.On rear of copy 1"SEC Bendigo / 20 / Golden Square / 25/5/60 2121 / D A Colquhoun " Copy 2 "DAC" in ink, bottom right hand corner.trams, tramways, bendigo, golden square, tram 20 -
 Ballarat Tramway Museum
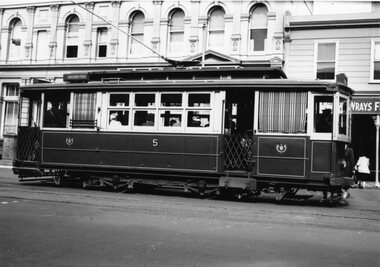
Photograph - Black & White Photograph/s, Doug Colquhoun, 15/04/1955 12:00:00 AM
Yields information about Ballarat's trams in the early 1960's and the street scape at the Ballarat Railway station and level crossing.Black and white print of Geelong No. 5 - side view, Ryrie St, 15/4/1955, by Doug Colquhoun. Two copies. Photo print courtesy of Port Dock Railway Museum, now the National Railway Museum. See worksheet 4311 for letter and details of prints sent to Bill Scott, 19/10/2001. Any photo credit to mention NRM Collection.On rear of copy 1 "SEC Geelong / 5 / Ryrie St / 15/4/55 2141 / D A Colquhoun " Copy 2 "Ryrie St? going E / D. Colquhoun" in ink, bottom right hand corner.trams, tramways, geelong, ryrie st, tram 5