Showing 216 items matching "centre poles"
-
 Bendigo Historical Society Inc.
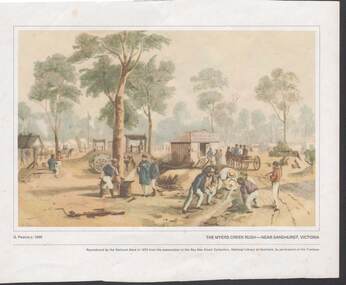
Painting - CAROL HOLSWORTH COLLECTION: 1970 NATIONAL BANK PAINTING 'THE MYERS CREEK RUSH' - NEAR SANDHURST
1970 National Bank painting reproduction The Myers Creek Rush - Near Sandhurst , Victoria Below the picture title the words - Reproduced by the National Bank in 1970 from the watercolour in the Rex Nan Kivell Collection , National Library of Australia , by permission of the Trustees .A hut in the foreground has a sign Tuck & Sons Branch Store. Centre left appears to be a National Colonial flag on a high flag pole .There are a number of buildings throughout the scene , horses and carts , mine windlasses .A Blacksmith in the foreground is talking to two men .Six men are examining the results of gold panningpainting, watercolour, gold diggers -
 Royal Australian and New Zealand College of Obstetricians & Gynaecologists (RANZCOG)
Portable operating table used by Sir Victor Bonney, Allen & Hanburys, England, c. 1900
This operating table belonged to the famous gynaecological surgeon Dr Victor Bonney and was given to Dr Frank Forster in 1953 by his widow Mrs Annie Bonnie, a distant relative of Forster's. Dr Victor Bonney (1872 - 1953) followed his father into medicine and trained at St Bartholomew's and the Middlesex Hospitals. Writing his obituary in 1953, FW Roques said of Bonney that he "'made three great gifts to surgery. First, he was the pioneer of myomectomy; second, with Berkeley, he extended and perfected Wertheim's operation for carcinoma of the cervix; and third, he devised a fine surgical technique emulated by so many of his pupils. To theatre sisters, labour-ward sisters and young house-surgeons he will always be remembered as the discoverer of 'Bonney's Blue' [antiseptic solution].'" Bonney's utilitarian, portable operating table has a round, worn scrubbed patch showing traces of his famous blue solution.This portable operating table was owned and used by pioneering gynaecological surgeon Sir Victor Bonney in London, U.K. c 1900. Dr Bonney employed two theatre sisters and had two sets of instruments and portable operating tables. This made it possible for Dr Bonney to 'complete three or more operations a day by rotating staff and equipment with a chauffeur driven Lanchester or Rolls Royce', delivering them from one house to the next. The donor of the operating table, the late Dr Frank Forster, was a distant relative of Sir Victor Bonney's widow, Annie Appleyard, formerly of Tasmania. When he visited her in the UK after Bonney's death, she offered the operating table to Dr Forster for the RANZCOG Museum. It was still in a canvas bag in the boot of one of Bonney's cars. Sir Victor Bonney was the pioneer of myomectomy, the surgical procedure for removing uterine fibroids. In collaboration with Berkeley, he extended and perfected Wertheim's operation for carcinoma of the cervix. Bonney was an influential teacher, developing and promoting conservatism of surgical technique (minimal intervention) that has had a lasting influence in modern surgical practice. To theatre-sisters, labour-ward sisters and young house-surgeons he will always be remembered as the discoverer of Bonney's Blue an antiseptic that was characteristically blue.Portable, laminated operating table. Plywood rectangular table with two laminated plywood extensions, a head board, and a foot board. At the foot board are insets of canvas straps to support a patient's ankles. Two detachable stirrup poles, each with a canvas strap attached, fit into two holes at the lower end of the table. The table is supported by two timber trellis cross braces with metal bars, and supported at the centre by a metal rod that allows the table to pivot up and down. Two metal arcs with a locking mechanism fix the table at the desired elevation, allowing a Trendelenburg tilt ( a 45 degree tilt, with the patient's head downwards.) The operating table is demountable for transportation and re-assembly.obstetric delivery -
 National Vietnam Veterans Museum (NVVM)
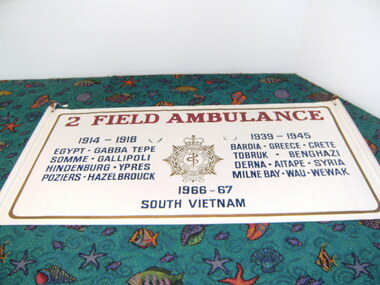
Banner, 2nd Field Ambulance
2nd Field Ambulance (Fd Amb) is a highly mobile unit whose role was the rapid collection of the sick and wounded. The white plastic banner held by two wooden poles has red writing on top with large print "2 FIELD AMBULANCE". A gold crest is in centre depicting a crown atop an insignia "Australian Army Medical Corps" with a snake wrapped around a pole. In blue print 1914 - 1918 with several countries listed below and 1939 - 1945 with several countries listed below. Bottom of the banner in blue writing 1966 -67 SOUTH VIETNAM.2nd Field Ambulancebanner, 2 field ambulance -
 National Vietnam Veterans Museum (NVVM)
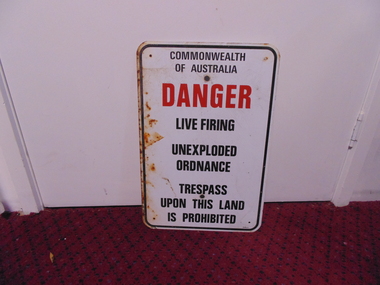
Sign - Sign, Danger
A white rectangular metal sign with rounded corners and a black line border. It has holes drilled in four corners. plus two larger central holes for fixing it to wall or pole and is rusted on the left side. Centre justified warning message reads: Commonwealth Of Australia (in black)/ DANGER (in red) /Live Firing/ Unexploded/Ordnance/ Trespass/ Upon This Land/ Is Prohibited. Centre justified message reads: Commonwealth Of Australia (in black)/ DANGER (in red) /Live Firing/ Unexploded/Ordnance/ Trespass/ Upon This Land/ Is Prohibited. sign, commonwealth of australia, danger, warning -
 Tatura Irrigation & Wartime Camps Museum
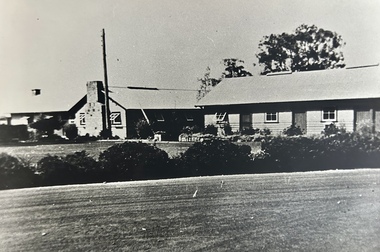
Photograph, Cluster of Huts, 1940's
Black and white photograph of a cluster of 3 huts. Would be administration. Large well established gardens dominant eucalyptus centre rear - Australian flag on tall flag pole.camp administration huts -
 Tatura Irrigation & Wartime Camps Museum
Photograph
Black and white photograph of administration staff quarters. Road in front bordered by bushes. Centre hut of 3 large stone chimney and electric power pole.camp 13 -
 City of Ballarat
Artwork, other - Public Artwork, Anton Hassall, Eureka Circle by Anton Hassall
The Eureka Circle was commissioned by the City of Ballarat to mark the 150th anniversary of the Eureka Rebellion.The artwork is of historic and aesthetic significance to the people of Ballaratcorten steel artwork with flag pole and Eureka flag at centre -
 Ruyton Girls' School
Functional object - Girl Guides Flag Pole Finial, c.1920s
Used by a Girl Guides' group based at Ruyton Girls'School. Ruyton formed a Girl Guide Company in mid-1922, which continued, with a brief hiatus in 1924, until c.1945.Brass finial for a flag pole in the form of a trefoil. The trefoil has a five pointed star pierced into centre lobe and the alphabet character G impressed into each other lobe. (G G representing Girl Guides). The brass of the trefoil has a short cylindrical section which attaches to a flag pole.G Gruyton girls' school, kew, girl guides, flags, school, 1920s, 1930s, 1940s -
 Hume City Civic Collection
Photograph, Mid 1990's
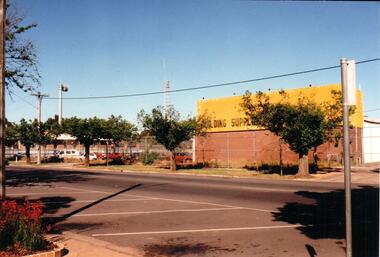
The building suppliers and the Sunbury CFA were sited at the northern end of Evans Street and in the past were away from the main shopping centre. As Sunbury expanded and Sunbury Shopping Square was built on the opposite side of Evans Street, the building suppliers closed down and the CFA depot was moved out of the town centre to two other locations to avoid traffic conjestion.A coloured photograph of the east side of Evans Street showing the building suppliers yard and the Sunbury CFA station and towers. The road in the foreground has been marked out for angle parking. There is a metal pole on the extreme RHS of the photograph.building suppliers, shopping centres, sunbury country fire authority (cfa), evans street, george evans collection -
 National Wool Museum
Bobbin Holder
... pole attached at centre of the base and narrowing at the top.... pole attached at centre of the base and narrowing at the top ...A wooden bobbin holder associated with the "Beehive" manual sock knitting machineA wooden bobbin holder, circular base with a hollow round pole attached at centre of the base and narrowing at the top.knitting textile machinery machine knitting, hosiery, knitting, textile machinery, machine knitting -
 Yarrawonga and Mulwala Pioneer Museum
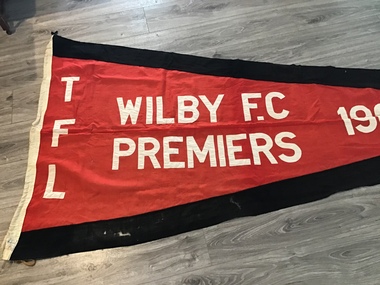
Article - Tungamah Football League Premiership Flag, Wilby Football Club Premiers 1967, 1967
The Tungamah Football League was formed in 1953 and dissolved in the late 1960's. This was the only premiership won by the Wilby FC and was played against Congupna Road at Mulwala on 28th September 1967. Wilby lost to Mulwala in the 1968 Grand Final.Red and black cloth triangular pennant shape. Bound on short side and threaded with rope for hanging from a pole. Red base colour with black edges. White letters stitched in the centreT.F.L. Wilby F. C Premiers 1967 -
 Whitehorse Historical Society Inc.
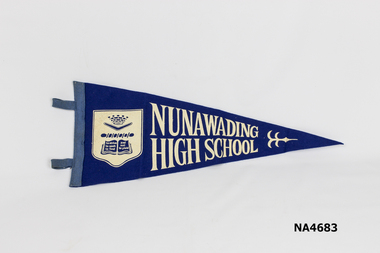
Banner - School Pennant, 1960s
Donated by Robin Goucher who was a student at Nunawading High SchoolSchool Pennant. Blue Felt 43cm x 17cm. Printed white shield 8cm x 9cm with Nunawading High School down the centre of pennant. Two grey felt loops for holding display on pole.Nunawading High Schooltrophies & awards, education -
 City of Ballarat Libraries
Glass Slide, Ballarat Post Office
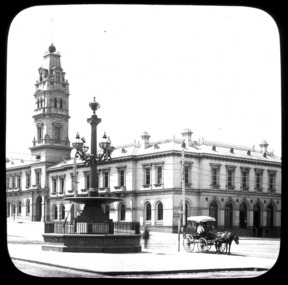
It is believed the ball on the tower flag pole was raised and lowered to indicate when mail had been sorted and was ready.Previously unknown image of Ballarat. The set and its subjects indicate these images were produced to promote Ballarat and were perhaps aimed at tourists.Ballarat Post Office, ne corner Sturt and Lydiard Streets, image not dated but tower erected 1885. In foreground Burke and Wills memorial fountain, erected 1867.horse and cart, fountain, telegraph pole -
 City of Ballarat Libraries
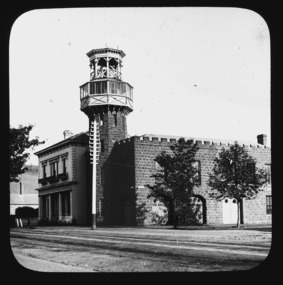
Glass Slide, Ballarat City Fire Station
This image shows the elaborate lookout tower which has since had the cantilevered section removed. The face stonework has since been covered with cement render. The residence next door is believed to have been built for Dr. R. Pinnock, in 1877.Previously unknown image of Ballarat. The set and its subjects indicate these images were produced to promote Ballarat and were perhaps aimed at tourists.Ballarat City Fire Station, nw corner Sturt and Raglan Streets, erected 1860. telegraph pole -
 City of Ballarat Libraries
Photograph, Cannon Ballarat Centenary Celebrations 1938
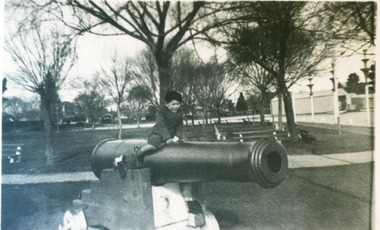
Ian Wilson astride the cannon during the Cannon Centenary Celebrations at View Point, Lake Wendouree in 1938. Lollipop tiered light poles lit up red, green and yellow lights.garden, celebrations, cannon, view point, lake wendouree, centenary, ian wilson -
 City of Ballarat Libraries
Card Box Photographs, Mining Exchange, Ballarat 1899
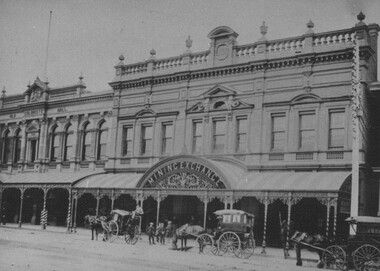
Horse Drawn Cabs parked outside of the Mining Exchange, Lydiard Street North. The striped veranda, iron frieze and barbers pole can be seen. Another feature in this photograph is The Old Colonist's Hall. mining exchange, ballarat, lydiard street north, old colonist's hall, horse drawn cab, building, commercial -
 Whitehorse Historical Society Inc.
Photograph, Aubrey Street Mitcham, 4/02/1966 12:00:00 AM
... and a telephone pole in the centre of photograph.... and a telephone pole in the centre of photograph. Aubrey Street Mitcham ...Black & white photograph of a trench dug in preparation for laying gas pipes in Aubrey Street Mitcham. Two cars to the left and a telephone pole in the centre of photograph.aubrey street mitcham, streets, gas company -
 Ballarat Heritage Services
Photograph - Colour, Clare Gervasoni, Facade of the Former Sebastopol Town Hall During Building Works, 2018, 12/03/2018
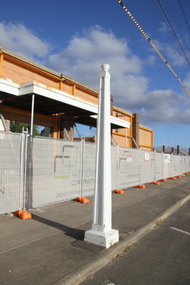
The old Sebastopol Town Hall was erected in 1868 and opened on 19 March, 1869. The newer Town Hall was rebuilt in the 1950s and opened on 20 December 1960. The building was demolished except for the facade to build a new library in Sebastopol. The $2.8 million redeveloped Sebastopol Library Community Hub opend its doors to the community on Wednesday 2 January, 2019. This major redevelopment has transformed the City of Ballarat’s Library and Maternal and Child Health services into a vibrant modern community hub, Photographs of the facade of the former Sebastopol Town Hall, and the remains fo the old Sebastopol Town Hall revealed during renovations in 2018. The two white poles, donated by former mayors are also depicted. The two white poles at the front of the biulding include a plaque "Presented by the mayor Cr F.W. Miller, 1934"sebastopol, sebastopol town hall, sebastopol civic centre, sebastopol community centre, f.w. miller -
 Mt Dandenong & District Historical Society Inc.
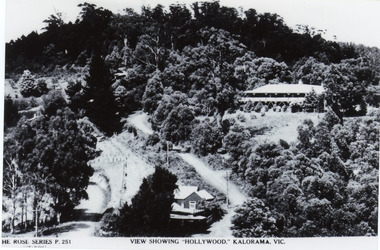
Photograph, View Showing 'Hollywood' Kalorama, Vic
Copy of Rose Series postcard #251 showing 'Mountjoy' named as 'Hollywood'. Mount Dandenong and Ridge Roads are visible at the FiveWays intersection along with the TeaRoom/Post Office. c1940Black and white photograph of a bushed setting with a building centre front and another, larger building up hill on RHS. Two unmade roads are visible with fences and telephone/power poles.The ROSE SERIES P. 251 VIEW SHOWING "HOLLYWOOD". KALORAMA, VIC.rose series, fiveways, guest house, mt dandenong road, ridge road, post office, hollywood, tea rooms, mountjoy -
 Ballarat Tramway Museum
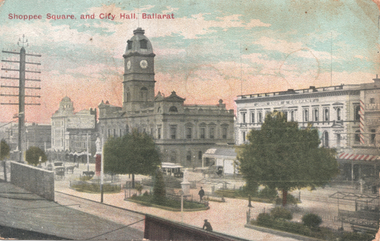
Postcard, "Shoppee Square and City Hall, Ballarat", c1909
Photo looks over Shoppee Square (Central median area) in Sturt St between Armstrong and Doveton Streets, with the Town Hall and John Snow & Company (Snows) building in the view, along with the national mutual building. An ESCo tram is westbound on the south side of Sturt St. Note the telegraph pole on the left side of the photo. One the rear is a birthday message to a person in Hamilton Newcastle. It is dated 29/11/1909.Yields information about Sturt St Ballarat and Shoppee's square.Postcard colour, Divided back. No publisher's name on rear though has a publisher mark in the top centre - a six pointed star with a central motif.See image 2 for letter.tramways, trams, esco, sturt st, shoppee's square -
 Ballarat Tramway Museum
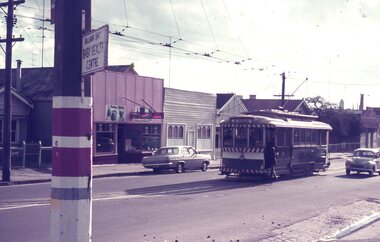
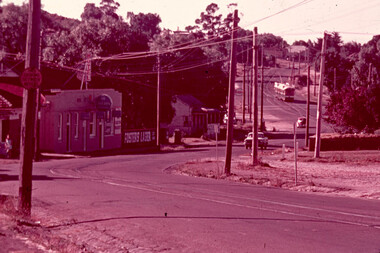
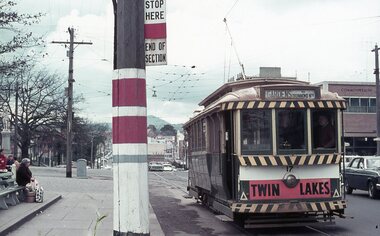
Slide - 35mm slide/s, Dave Simpson, late 1960's early 1970's
Yields information about Main Road, just before the intersection with Barkly St.One 35mm slide Anscochrome white plastic mounts of No. 13 with the destination of Mt Pleasant in Main Road, just before the intersection with Barkly St. with "Fish and Chips" shop in the background. Has a Tarax advert on the shop. (This shop was subsequently rebuilt with a car park next door, but is (27-8-16) now closed. In the foreground is a painted tram stop on a pole with a direction sign for the Ballarat East Baby Health Centre.tramways, trams, main road, mt pleasant, tram 13 -
 Ballarat Tramway Museum
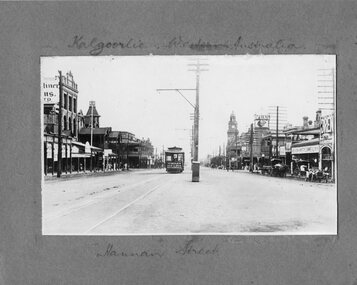
Photograph - Leaf from a photo album, 1920s
... Street with buildings on either side of photograph. Has poles... of photograph. Has poles down the centre of the street to support ...Leaf from a photo album containing 2 black and white photographs pasted onto sheet of brown/grey cardboard with two punch holes at one end. Photos taken early 1920's? Photo 1 - "Kalgoorlie Western Australia" in pencil on top of photo, and "Hannan Street" on bottom. Photo shows a tram traveling along Hannan Street with buildings on either side of photograph. Has poles down the centre of the street to support the bracket arms for the tramway and other power lines. Tram has "Nestles Milk" advertisement on dash panel. Photo 2 - "Breakneck Gorge Hepburn" in pencil at base of photograph.trams, tramways, hepburn springs, kalgoorlie, hannan st -
 Ballarat Tramway Museum
Photograph - Black & White Photograph/s - set of 2, 1905
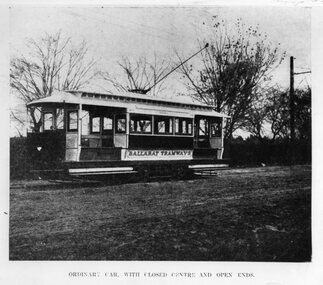
B&W photograph of the one of the ESCo California Combination tramcars at the time of the opening of the service, photographed most likely in Wendouree Parade, near the dept. Shows bracket arm in background, trolley pole and head. Also shows the nature of the road surface at the time, c1905. The print for this photograph made from a copy negative of page 454 of the Australasian, August 19, 1905 in 1993. Print includes caption "ORDINARY CAR, WITH CLOSED CENTRE AND OPEN ENDS" See Reg. Item No. 763. Photo has been mounted onto a styrene card with card sides and Velcro strips on the top edge for display purposes. Mounted Oct. 1993 for the CHHA Exhibition, theme "Made in Australia". 762.1 - added 6/12/2004. Same print with details of source written on the rear. ARHS Vic. Div. Photo Number 771/23, ex Latrobe Library. Not as good as print as above. Cropped at base - does not have caption. See Alan Bradley, draft Chapter 3 of the history of Ballarat Tramwaystrams, tramways, esco, tramcars, ballarat -
 Ballarat Tramway Museum
Photograph - Black & White Photograph/s, R.G. Vanselow, 30/08/1968 12:00:00 AM
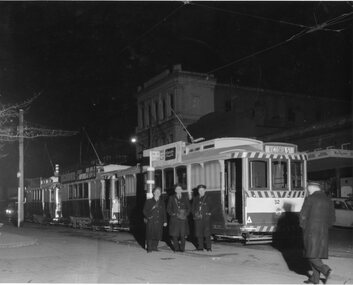
Black and white photograph of SEC No. 32 and two other single truckers at the City Centre in Sturt St, on the north side. Photographed by R.G. Vanselow at 11.05pm on 30/8/1968. The three crew members (drivers) are standing by the tram stop pole while an Inspector walks towards them. Photo has the SEC building in the background. Tram 32 has a Wilkinson Sword razor blade roof ad. The 2nd tram has a roof ad for Myers Pixietown. Tram 32 showing destination of "Victoria St." Colour photocopy, laminated, of this photograph on display 5/2000 at 02-02-06 1380 Copy 2 - made by enlarging photo to an approx. A4 print by colour photocopying and laminated for display purposes. Made July 2000 for the Trams at Night exhibition in the depot. Made by W.Doubleday. Has four Velcro dots on rear. Overall size 210H x 272W. Stored in same box at rear of large photos area in an A4 plastic folder.On rear in pencil "Approx. 11.05pm, Fri 30 August 1968 / City Centre, Sturt St, / Ballarat" and in bottom right hand corner, in ink "With Compliments / R.G." and stamped in black ink "Vanselow".trams, tramways, city centre, sturt st, night photo, tram 32 -
 Ballarat Tramway Museum
Magazine, Jack Richardson, "Tram Tracks - The Electric Traction Monthly", Feb. 1949 to August 1949
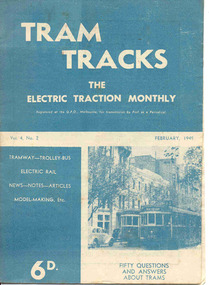
2467.1 - Vol. 4 No. 2, February 1949 of "Tram Tracks - The Electric Traction Monthly" of the Australian Electric Traction Association. Magazine consists of 16 printed pages with a 12 page supplement titled "Fifty Questions and Answers about trams in Australia". Has a single staple on the saddle. Incorporated within the magazine are articles or editorials on Tramways and Tramway Experts (Sydney and bus replacement), Interurban to St Kilda (conversion of VR St. Kilda line). General news items on Brisbane, Geelong, Launceston closure, Hobart, Bourke St routes, Perth, Adelaide, NSW, Christchurch, Overseas tramways and railways. Also has letters to the Editor, plans of a Birney tram for model makers and AETA Notes. Issue has advertisements for the Model Dockyard, ARLHS, The Hobby Shop, Barnes Tennis Centre, Fleet, Christie Model Railway Equipment of Sydney, Meadmore Model Engineering, Austral Bronze, Wattle Park, Traction Publications and Robilt "O" gauge locomotives. 2467.2 - Vol 4, No. 5 - May 1949 - 20 pages - red cover, 4th year, article by Peter Duckett with photos of Board members, "PCC Trucks here", MMTB advert for staff, news from Sydney, Newcastle, Melbourne (applications for new Chairman to replace Mr. Bell), Bendigo, Perth, Christchurch, Wellington, Wanganui, Bourke St construction work (photo of poles), Brisbane tramway history, map of CBD Melbourne, Melbourne and Sydney suburban railways, AETA News. 2467.3 - Vol 4, No. 6 - June 1949 - 16 pages - green pages, tramways and private cats, news from Sydney, Newcastle, Melbourne, Launceston, Hobart, article "Scrap Sydney Tams by 1960 - Newcastle this years say London experts", buses tackle football crowds (Sydney), Fremantle (Wal Jack letter), and Melbourne and Sydney suburban railways, AETA News. 2467.4 - Vol 4, No. 7 - July 1949 - 16 pages - tramways and the public, news from Sydney, Newcastle, Melbourne, appointment of R. Risson as new chairman, Perth, Adelaide, Launceston, tramcar solenoid brakes, National City Lines USA, and Melbourne and Sydney suburban railways, AETA News. 2467.5 - Vol 4, No. 8 - August 1949 - 8 pages - tramways and politics, photo of new points for Latrobe and William Sts, East Hills Line by C. C. Singleton, general tramway news, and advertisement for Robilt model railways. .2 to .4 added 15-2-2016 from the collection of Ian Stanley. .5 added 24-3-18 - from consolidation of Melbourne Tram Museum and BTM collections)trams, tramways, electric traction, aeta, australian tramways, mmtb, pcc, closure, sydney, newcastle, brisbane -
 Ballarat Tramway Museum
Film - Movie Film & Box, Kodak, 1960
Yields information in movie film format of Ballarat trams in 1960, how the system operated and was used by people., Yields information in movie film format of Ballarat trams in 1960, how the system operated and was used by people.Movie film - 8mm, approx. 30mins, with leader strip on a plastic reel, within a black and white plastic box, titled "Ballarat No. 1. 1960". Has been transferred to DVD - see Reg item 4100 as Segment No. 2. Made by Ben Parle. Also transferred to DVD by Rod Cook Oct. 2015, via Roger Greenwood for use in his DVD, "The City of Ballarat Trams, Gardens & Gold" of 2016. See Reg Item 6883. Synopsis: based on time. 0:00 View of typed introduction, noting that this is a pictorial record of Ballarat. 0:10 Title “The Tramways of Ballarat 1960, Part 1” 0:16 13, showing “View Point” at Stones Corner, Bridge St, east end, with trolley pole being turned, while another single trucker heads out towards Mt Pleasant. 0:25 13 leaving Stones Corner, short approach and then longer trailing shot of the tram going towards the City in Bridge St. 0:44 View out of front of tram in Bridge St heading towards the City, with cars in the photo, then passing through city Loop, no trams in the loop and running up to Lydiard St Nth and crossing the road. 1:22 Running up Sturt St from Armstrong St, passes over Dawson St X-over and up to the next intersection, Lyons St. 1:54 Title “The View Point Line” 1:59 19 inbound, in Ripon St, from crossing Mair St, towards camera and then passing away and turning into Sturt St. 2:49 View of a “Warning Oncoming Trams” sign 2:52 19 in Ripon St, going to View Point, crossing Webster St towards camera, then going away through the disconnected Victoria Ave loop, pass the “Warning Oncoming Trams” sign. Note very windy scene with people running across roads. 3:17 19 in Wendouree Parade, in bound, though showing destination View Point, going away from the camera, past the View Point Hotel. 3:39 19 coming towards camera near Excerpt or Devon St and then going away towards the terminus. 4:04 19 at the terminus, stationary, with a single trucker 3?, passing from Macarthur St into Wendouree Parade, behind 19. 4:20 33 coming towards camera in Wendouree Parade from St Aidans Drive, stopping to pick up passenger at Forest St and then going away towards the City, photographed from near the depot, on a wet and windy day. 4:54 35 in Wendouree Parade, coming towards the Camera from St Aidans Drive and then going away with the Gardens Loop area in the background. Tram stops at stop to let a passenger off. 5:28 21 leaving Gardens Loop for the City via the Depot, green light in signal can be seen. 5:43 28?, closely followed by 26 turn from Drummond St South into Sturt St. 6:18 Scene opens with shot of “Sebastopol” destination on a bogie tram. 6:21 Title “The Sebastopol Line” 6:24 21 turning from Sturt St into Drummond St Sth with destination of Bell St and then going away from the camera. 6:55 38 in Drummond St Sth, coming towards the camera and then passing the camera with Sturt St just in the view. 7:10 21, showing Gregory St, in Drummond St Sth, approaching and then going away, entering the Urquhart St Loop, 7:39 34 in Drummond St Sth (location check required (Latrobe?)), approaches camera, picks up passengers and the goes away. 8:09 39 at ? Street, turns from Drummond St Sth into Skipton St, after picking up and setting down passengers, bound for Sebastopol 8:55 35 inbound in Skipton St passes through the Bell Street Loop, and then goes away from the camera. 9:33 42 outbound in Skipton St, approaches the camera, passes and then crosses over the half the road into Albert St. 10:00 39 inbound in Albert St – location? 10:31 34 outbound for Sebastopol, approaches camera and just starts to pass by. 10:36 34 in Grey St crossing loop, crosses 42 inbound. 10:59 39 outbound in Albert St, with shopping centre in bound, approaches camera, passes and then crosses over Albert St. Mid morning scene. 11:39 39 inbound, Albert St south, approaches camera and then passes and the crosses over Albert St. 12:16 41 outbound in Albert St passes the camera, and pulls into the terminus with the conductor getting out on the back bumper to pull the pole down as the tram stops and a passenger walks into the Royal Hotel. 12:39 Title “The Lydiard Street North Line” 12:44 Filmed from the Hotel balcony, 21 inbound in Lydiard St Nth passes over Mair St, stops while 33 passes in the other direction. 13:18 With the red light showing on the Seymour St loop signal, 33 inbound for Sebastopol stops and picks up many passengers, passes the camera and runs past the VRI building in the background and through the loop. Possibly filmed on a Sunday given the ladies dresses and quieter streets. 14:01 30 outbound, passes the camera and stops at Macarthur St. Filmed alongside the brick wall of the cutting. 14:28 30 inbound arrives, passes through the Gregory St loop and then proceeds past the camera, making a stop to pick up passengers. 15:14 28 in Lydiard St Nth – location?, approaches and goes away from the camera, north of Gregory St. 15:34 28 ditto location? 15:53 21 arrives at the terminus with passengers getting on and off. 16:11 View of the a vertical positioned “End of Section” sign on a pole at the terminus and then lifting the camera to see the timetable board and the stop sign. 16:33 31 in Bridge St passing Morseheads and then turning into Sturt St, stops at the Grenville St stop, while another single trucker comes down to the stop from the City. 16:58 31 outbound in Bridge St, with destination of Victoria St. 17:14 Title “The Victoria Street Line” 17:18 31 outbound to Victoria St from Stones Corner. Starts with an overhead shot, shows clock at the Caltex service station,. 17:37 31 inbound approaching Bakery Hill and then descending to the junction after it passes camera. 18:09 25 climbing outbound in Victoria St, passing the camera, to then pass through the King St loop. 18:47 25 inbound in Victoria St, passing the camera, then pass through the King St loop, with St Alypius Church in the background. 19:36 14 approaching the rail bridge in Victoria St and stopping at the 2nd last stop to left of passengers. 20:01 14 leaving the terminus and approaching the camera and the a short sequence going away, to the next stop to pick up quite a few passengers. 20:14 “Trams Stop Here” sign, metal wrap around on a steel pole. 20:16 Title “The Mount Pleasant Line” 20:21 11 inbound in Main St, with a passenger leaping off the tramcar and another getting off just before the junction. 20:45 11 passes the junction and then proceeds away from the camera in Bridge St. 21:04 30 outbound in Main St, then turns into Barkly St, a bus (Eclipse Motors) passes in Main St just before the sequence ends. 21:31 30 inbound near Steinfield St. (exact location?) 21:49 25 approaches the camera, then proceeds away and passes through the Grant St. loop. 22:29 25 inbound, windy day, between Grant and Cobden, (exact location?), with a horse drawn bread van in the view and the breadman walking behind the tram as it passes. 23:02 11 outbound in Barkly St, (exact location?) 23:37 11 inbound in Barkly St (exact location?) 23:44 Mt Pleasant terminus signage 23:50 30 approaches the terminus and then stops with the conductor alighting turning the pole, passengers getting on and off and the driver appearing at the other end. 24:32 Title “The Gardens Via Sturt St. West Line” 24:35 21 outbound in Sturt St near Raglan St, approaches and passes the Camera. 25:09 12, showing City Oval, approaches and passes the camera, outbound near Windermere St. 25:33 13 showing View Point, goes away from the camera – location? 25:44 12 comes from St. West, inbound passes the camera and then stop as the next stop next Talbot St? 26:21 Short sequence of a “Warning Oncoming Trams” sign 26:28 42 inbound in Sturt St West, just before Ripon St, view coming towards camera and then going away to cross Ripon St. 27:10 34 passes through the Parker St loop 27:25 35 or 39 inbound past the college in Sturt St West 28:04 41 outbound at the Russell St curve, passes away from the camera. 28:11 35? inbound passes away from the camera through the Victoria Park or Morrison St loop, swinging out into the roadway. 28:29 View of timetable sign at Hamilton Ave. 28:37 35 turning from Sturt St West into Hamilton Ave, can see the conductor changing over the barrier rails. 29:11 42 inbound, crosses another bogie tram (35?) at Carlton St loop then passes the camera and goes past the Olympic rings monument. 29:42 12 approaches the Carlton St gates. 30:07 12 outbound, crosses a bogie tram in the loop with both trams then leaving the loop. 30:20 Title “End of Part One” Written labels giving title information on outside of box.trams, tramways, ballarat, sebastopol, lydiard st north, victoria st, mt pleasant, sturt st west -
 Ballarat Tramway Museum
Postcard, Charing Cross Bendigo, 1906
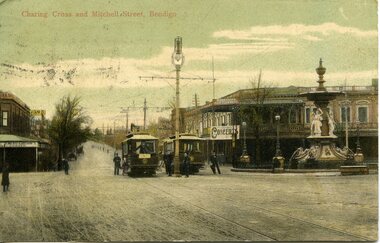
Yields information about postcard printing, Bendigo Charing Cross in 1906 and a person who appears to have collected cards.Printed colour postcard of Charing Cross Bendigo with two trams in the view and crew men standing in front of the trams with buildings, the fountain in the background. Looks along Mitchell St. Title of the postcard is "Charing Cross and Mitchell St, Bendigo". Has in view, R. Curtains City Club Hotel with a "Concerts" sing on it and on the other corner, a building with the name "Gibsons Corner". Note the direction of the trolley poles on the trams, the wrong way around for the direction of the street. On rear of postcard is a message address to Miss Jani Baskin, San Antonio, Texas USA, post marked ex Bendigo 28.9.1906 and Seattle WA, Oct. 2? 1906, with a Victorian stamp and a two Cent (due to postage underpaid) US stamp. Centre divided postcard with spaces marked for correspondence and address. On the left hand edge is "Printed in Germany" trams, tramways, bendigo, mitchell st, charing cross, tram 14, tram 40 -
 Ballarat Tramway Museum
Slide - 35mm slide/s, Graham Evans, Apr. 1972
White cardboard mount, 35mm slide, from the Association of Railway Enthusiast's film strip titled "Provincial Tramway Film Strip" of a Bogie car at Long Gully Loop, in the far distance, with a Hotel and the ESSO service station in between. Has Fosters Lager and Carlton signs on hotel. Note sign on the closet pole - "No standing between Notices". The film strip notes (Reg. Item 2560), provided the following caption details: "Meandering roadway and centre road track were a feature of the long "EAGLEHAWK" line. Here an inbound car negotiates the Long Gully Loop. - April '72 (Graham Evans)" See image btm2593p.tif for high level scan of image. Stamped on base of slide "11803" and written in ink on top edge "Eaglehawk line"tramways, trams, are, film strip, long gully, eaglehawk -
 Ballarat Tramway Museum
Photograph - Digital image Set of 10, 1971
Yields information about Ballarat Tramways and trams prior to the closure of the tramway system.Set of 10 digital images of Ballarat trams prior to closure, scanned from original slides by Stuart Lodington, 1971 prior to closure of the system. .1 - No. 17 at the City Centre, Sturt St, south side, with Gardens via Sturt St on destination roll. Can see the ESCo switch box in the back and the stop and section sign on the adjacent pole. .2 - No. 26 at Sebastopol terminus alongside the Royal Mail Hotel. The tram has yet to turn the pole or the destination roll. Note the Bus Stop sign on the pole, just prior to closure. .3 - ditto .4 - No. 27 and 30 crossing in Skipton St at the Bell St loop (see also btm4975i3) .5 - No. 32, Gardens, about to enter the Carlton St loop, with Lake Wendouree in background, Wendouree Parade. .6 - No. 32 at Depot junction, good photo of depot trackwork entry area. .7 - No. 21, Wendouree Parade, Gardens area, north bound, showing Gardens via Sturt. .8 - No. 12, inbound on Sturt St west at a tram stop. Has destination of Mt. Pleasant. .9 - No. 27 at Lydiard St north terminus with the shelter in the background. .10 - No. 21 at Gardens Loop, tram has destination of Mt. Pleasant. Crews sitting in the saloon.trams, tramways, ballarat, sturt st, sebastopol, drummond st sth, wendouree parade, carlton st, depot, depot junction, trackwork, gardens, sturt st west, crews, tram 17, tram 26, tram 27, tram 32, tram 21, tram 12 -
 Ballarat Tramway Museum
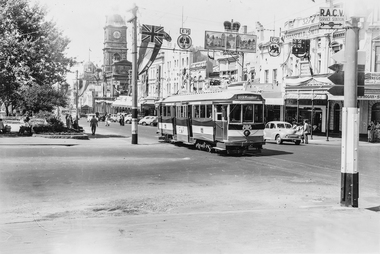
Photograph - Digital image, Wal Jack, 8/03/1954 12:00:00 AM
Yields information about the Ballarat's bogie trams, in particular No. 38 that was decorated for the Royal visit in 1954.Digital image from the Wal Jack Ballarat Album of Ballarat 38 decorated for the Queens visit to Ballarat, passing under the royal route in Sturt St and the corner of Doveton St, 8-3-1954, Wal Jack photo. Note directional sign on pole showing an arrow to a RACV Service Centre. See image i2 for rear of photograph. See image i3 for hi res scan of print. See image i4 for hi res scan of negative See image i5 for cleaned up image - PCW - 22-9-2022On rear in ink "SEC Ballarat No. 38 decorated for Queen's visit, passing under street decorations Sturt St from Doveton St 8-3-54". In top right hand corner is Wal Jack stamp with negative number "T170" written in.trams, tramways, royal visit, decorated trams, sturt st, doveton st, tram 38