Showing 167 items matching "pall mall fountain"
-
 Ballarat Tramway Museum
Photograph - Colour Photograph/s, 1960's
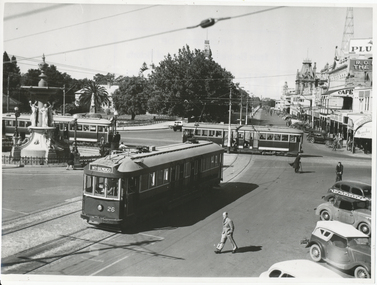
Colour postcard size print of an SEC Bendigo trams 7 and 21 at Charing Cross. Printed on AGFA paper. Photo taken during last years of Bendigo. Trams have dash canopy lighting and large white strip under the driver's windows. Tram 21 showing "North Bendigo" and 7 showing "Golden Square" destinations. Photo has Cenotaph, fountain and buildings on the south east corner of Mitchell St and Pall Mall in background.bendigo, pall mall, charing cross, tram 7, tram 21 -
 Ballarat Tramway Museum
Photograph - Colour Photograph/s, 1960's
Colour postcard size print of an SEC Bendigo trams 7 and 21 at Charing Cross with two bogie trams by fountain. Printed on AGFA paper. Photo taken during last years of Bendigo. Trams have dash canopy lighting and large white strip under the driver's windows. Tram 21 showing "North Bendigo" and 7 showing "Golden Square" destinations. Taken at same time as 971. Photo has Cenotaph, fountain and buildings on the south side Charing Cross in the background, including ANZ bank and RACV office.bendigo, pall mall, charing cross, tram 7, tram 21 -
 Ballarat Tramway Museum
Photograph - Black & White Photograph/s, early 1960's
Black and White print of an aerial view of Bendigo SECV Bendigo tram 18 at Charing Cross terminus for the Eaglehawk route with another bogie tram and two single truck trams in the background. Trams have dash canopy lights, but no large white strip under the drivers windows. Photo not dated but appears to be at during early 1960's. Tram 18 has White Horse Whiskey ad on front dash panel, SEC Roof ads. Numbers of other trams cannot be determined. All trams have roof ads, including SEC ads and a CASTROL ad. Good view of the fountain and buildings on the north east corner. Has Ezywalkin store, City Club Hotel and other buildings. Shows traffic arrangements for cars to do a right turn from Pall Mall into Mitchell St. On a building in Mitchell St. is an advertisement for "ASTOR Radio"trams, tramways, charing cross, bendigo, mitchell st, aerial views, tram 18 -
 Ballarat Tramway Museum
Photograph - Black & White Photograph/s, John Buckland, 23/12/1946 12:00:00 AM
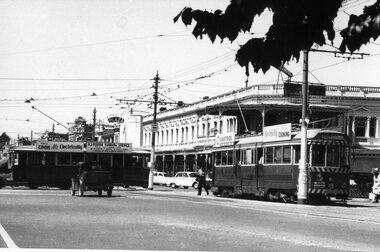
Black and white photograph of Bendigo track cleaner/sprinkler and ESCo No. 9 at the Pall Mall tram stop just to the south of the Fountain at Charing Cross. ESCo 9 has been modified (See Kings Bendigo Tramways p54). Sprinkler car has trolley pole facing Golden Square, as has No. 9. Pole by the trams have signs "ALL CARS STOP HERE" and a "NO ROAD" sign. Photo taken 23/12/1946. 676.1 - Black and White print contained within the Wal Jack Bendigo and Geelong Album, see Reg Item 5003 for more details. Added 2/7/2013. See The Bendigo Tramways, K.S.Kings On rear typed is "SECV Bendigo Tramways Car 9 and Track Grinder at Charing Cross 23/12/1946" and stamped in but rh corner "Photograph by John Buckland" trams, tramways, bendigo, esco, work trams, tram sprinkler, scrubber, tram 9 -
 Ballarat Tramway Museum
Slide - 35mm slide/s - set of 13, Peter Moses, 1974
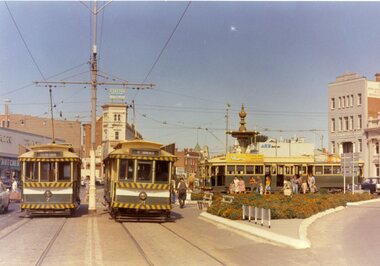
Set of 13 colour slides, 7 on Kodak cardboard mounts and 6 on Agfa colour plastic mounts. .1 - Bendigo Trust, Birney trams 28 and 30 at Central Deborah Mine terminus. No. 30 has a 3BO Roof advertisement. .2 - ditto .3 - ditto with the Central Deborah mine and buildings in the background. .4 - No. 30 inbound in High St. with Sacred Heart Cathedral in the background (spire under construction) .5 - Nos. 30 and 28 crossing at Charing Cross with the Fountain Plaza building and the fountain in the background. .6 - No. 28 north bound in Pall Mall, after leaving Charing Cross with the Shamrock Hotel in the background. .7 - Photo showing track and centre poles in View St. looking west - no overhead. Has AMOCO service station near McKenzie St. .8 - No. 28 taken from cab of No. 30, in McCrae St, at end of double track. .9 - No. 28 turning from McCrae St. into Nolan St. .10 - No. 28 in Nolan St. with Lake Weeroona rowing sheds in the background. .11 - No. 19 in now Tramway Ave (then Arnold St.) running into depot .12 - No. 19 outside Bendigo depot .13 - ditto Slides taken by Peter Moses, during the winter of 1974 (no leaves on the trees).On the rear of all the slides "P. Moses" in black ink. .1 - "1974 Bendigo Central Deborah Mine" in blue ink and in red ink “16”. .2 - "1974 Bendigo two Birney cars / Central Deborah Mine" in blue ink and in red ink “18”. .3 - "1974 Bendigo trams at Central Deborah Mine" in blue ink and in red ink “17”. .4 - "1974 Bendigo High St / tram near Sacred Hearth Cathedral" in blue ink and in red ink “15”. .5 - "1974 Bendigo two Birney cars / Charing Cross" in blue ink and in red ink “20”. .6 - "1974 Bendigo No. 28 Pall Mall" in blue ink and in red ink “8”. .7 - "1974 Bendigo / Old Tramline View St." in black ink and in red ink “5”. .8 - "1974 Bendigo, McRae St. (Pall Mall)" and in red ink "9". .9 - "1974 Bendigo, Lake Weeroona, / tram " and in red ink "10". .10 - "1974 Bendigo, Lake Weeroona" and in red ink “11”. .11 - "1974 Bendigo / Outside depot" and in red ink “24”. .12 - "1974 Bendigo / Outside depot" and in red ink “25”. .13 - "1974 Bendigo / Depot" and in red ink “26”.tramways, trams, bendigo, central deborah, bendigo trust, sacred hearth cathedral, north bendigo, depot, tram 19, tram 28, tram 30 -
 Ballarat Tramway Museum
Photograph - Black & White Photograph/s, Ian Barkla, c1960
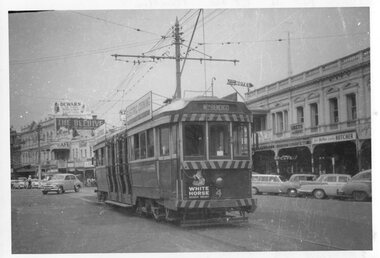
Black and white photograph of Bendigo, northbound about to arrive at the Fountain. Photo taken after tram has passed the photographer. Tram has destination of "Nth Bendigo" Undated, tram has been fitted with dash canopy lights but not the enlarged white strip under the driver's cab windows. Has buildings on the east side of Pall Mall in background with many cars of the era - early 60's. Tram has "White Horse" whisky ad on rear drivers dash panel and two SEC roof ads.On rear in black biro "Bendigo No. 4 at the Fountain / (was last Geelong tram 25-3-56) / Ex Geelong 33, Ex 120 MMTB"trams, tramways, bendigo, pall mall, tram 4 -
 Ballarat Tramway Museum
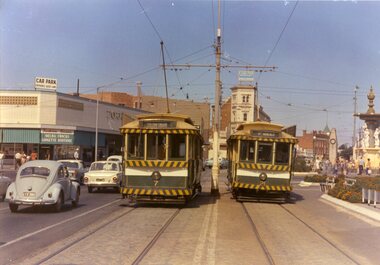
Photograph - Black & White Photograph/s, Ian Barkla, 30/08/1969 12:00:00 AM
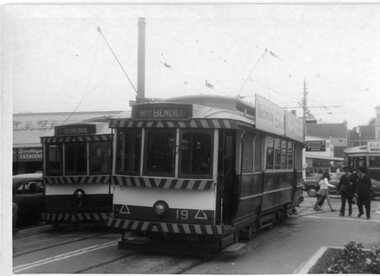
Black and white photograph of Bendigo 7 and 19 at Charing Cross, with the end of a Bogie tram in the background. Bendigo 19 has destination of "Nth Bendigo", 7 of "Golden Square". Both trams have the large white strip under the dash canopy lighting. In background is a driver and conductor walking towards 19. Tram 19 has two large SEC roof ads. Taken 30-8-1969. On Kodak paper.On rear in black biro "Bendigo 19 at the Fountain, 30-8-69 / Ex 185 MMTB"trams, tramways, bendigo, pall mall, charing cross , tram 19, 7 -
 Ballarat Tramway Museum
Photograph - Black & White Photograph/s, Ian Barkla, c1960
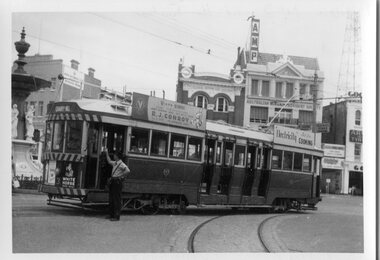
Black and white photograph of Bendigo 3 at Charing Cross, with the Fountain in left hand edge of photograph. Photo shows the curve from View St. into Pall Mall. Tram has "White Horse" whiskey ad and another ad on the drivers dash panel, an SEC roof ad on the rear of the tram and R.J.Conroy's Victa Mowers roof ad on the front of the tram. Conductor in a short sleeved shirt, is standing at front of tram talking to the driver. AMP and CML buildings in background. Tram has been fitted with dash canopy lighting, but not the enlarged white strip. Not dated.On rear in black biro "Bendigo No. 3 at the Fountain ' Ex Geelong 32, Ex 122 MMTB".trams, tramways, bendigo, charing cross , tram 3 -
 Ballarat Tramway Museum
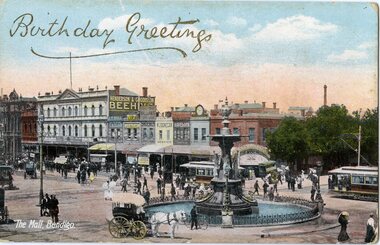
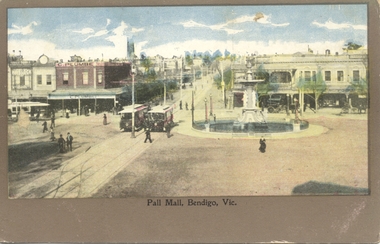
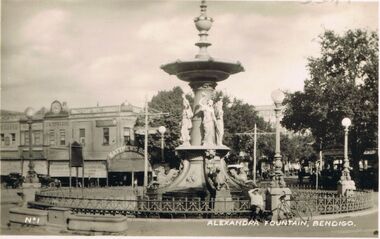
Postcard, The Mall Bendigo, Charing Cross, c1904
Yields information about Pall Mall Bendigo and demonstrates British printed colour photo postcards with a decorative hand painted message.Colour postcard of The Mall Bendigo, Charing Cross or Pall Mall with two trams in view, the fountain and building on the north east corner, including Henderson and Goodson's Beehive store, , J. T. Hill Tailor, Wertheims, Williams Showman, J. Donegan Dentist, Havelock Tobacco and on corner J. Koch supply store. Has many people by buildings, with well dressed ladies - and event day? Also horse and cars. On the top left hand corner in gold ink are words "Birthday Greetings" handwritten on card. In white ink in bottom left hand corner is title "The Mall, Bendigo". Rear is words "Post Card", divided back type, place for stamp included prices and "Printed in Britain" Card has not been used. trams, tramways, postcards, bendigo, pall mall, charing cross -
 Ballarat Tramway Museum
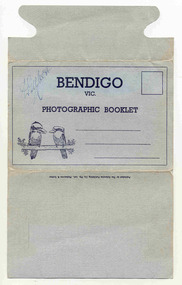
Postcard - Folder set, Valentine & Sons Publishing Co, "Bendigo Photographic Booklet", 1940's
Set of 9 black and white views of Bendigo printed on a folded strip, glued within a light grey colour light weight cardboard folder, titled "Bendigo Photographic Booklet". Booklet printed with an address area with title and kookaburras. Produced by The Valentine Publishing Co. Pty Ltd Melbourne & Sydney The rear has a slit on the rear cover that allowed the folder to be secured. Pictures are: 1. Mitchell St 2. The Lookout Tower 3. Conservatory Gardens 4. Shamrock Hotel 5. The Lake, Upper Reserve 6. The Pall Mall 7. Civic Buildings 8. Soldiers Memorial Hall and Post Office 9. Alexandria Fountain, Bendigo with a single trucker, M class type tram, prior to alterations, but in SEC colour scheme of the mid 1930's Made during 1940, with photographs of the 1930's as well given motor cars in the photo. Has "D. Gilbert" in ink on cover.trams, tramways, bendigo, pall mall, charing cross, mitchell st -
 Ballarat Tramway Museum
Photograph - Digital image Set of 20, 1971-72
Set of 22 digital images of Bendigo Tramways, 1972 at or before closure while on a tram tour by Stuart Lodington. .1 - No. 7 arriving at North Bendigo .2 - No. 5 departing Charing Cross along View St, with a Firestone tyres in the background. .3 - front view of a tram in View St with a blurred background image. .4 - No. 24 showing Eaglehawk destination .5 - No 26 and 3 in View St, with the Armstrong Tyre Service building in the background and signs for T&G and Cohn's Drinks. .6 - ditto .7 - No. 3 arriving at Charing Cross from Eaglehawk in View St, with a Quarry Hill destination. .8 - No. 3 and 18 at Charing Cross. .9 - No. 24 on the Quarry Hill line. .10 - No 26 in View St, with the Armstrong Tyre Service building in the background and signs for T&G and Cohn's Drinks. .11 - ditto, with fountain in view, Colonial Mutual building and a newsagent with a Herald sign on the building. .12 - No. 7 at North Bendigo terminus .13 - ditto with pole being reversed. .14 - No. 18 at Quarry Hill terminus with Northern Terrazzo sign in the background. .15 - No. 24 at Quarry Hill terminus .16 - No. 18 arriving at Charring Cross, with Fountain Plaza and Bendigo Pharmacy in the background. .17 - No. 3 and 18 at Charing Cross. .18 - No. 7 at North Bendigo terminus with pole being placed on the overhead. .19 - No. 26 in View St inbound, with Sandhurst Trustees sign in the background. .20 - No. 6 leaving Charing Cross in Pall Mall with Myer and other buildings in the background. .21 - No. 7 at North Bendigo .22 - Single trucker with two roof Advertisements crossing View St with fountain in view, Colonial Mutual building and a newsagent with a Herald sign on the building.trams, tramways, bendigo, eaglehawk, quarry hill, north bendigo, charing cross, view st, tram 7, tram 5, tram 24, tram 26, tram 5, tram 3, tram 18, tram 6 -
 Ballarat Tramway Museum
Postcard, Rose Stereograph Co, Charing Cross, Bendigo, mid 1900's
Demonstrates aspects of the development of the Bendigo tramways by ESCo prior to undertaking the Ballarat system. Yields information about Charing Cross soon after the electric tramway was opened.Black and White postcard, early 1900's view of Charing Cross, Bendigo looking towards the north, Pall Mall. Has three tram cars in the view, the fountain, centre poles, horse drawn cabs and vehicles, a poppet head and building on the east side of the Pall Mall. Divided back postcard with areas for message, address, and the stamp. Has "67)" in the top left hand corner of the back of the card, a circled "13" crossed out, "early 1900's" in ink. In the top right hand corner "$8" in pencil. On the front of the card has "67)" in the top left hand corner in ink.trams, tramways, bendigo, pall mall, charing cross, tram 4 -
 Ballarat Tramway Museum
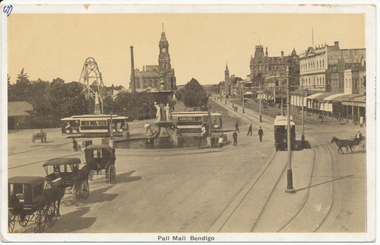
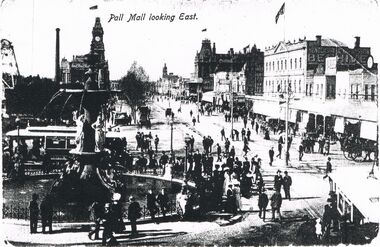
Postcard, Pall Mall Bendigo, early 1900's
Postcard, coloured, Pall Mall Bendigo, looking east towards the Railway Station. Has three trams in the view, along with the fountain. Has C. Plumbe store on the north east corner of the intersection. Title "Pall Mall, Bendigo Vic." Note the small space for a message under the image. On rear, undivided back, with "Post card", "Address to be written on this side" and position for stamp. In the top left hand corner, has "Ian Barkla's" hand stamp. Ian Barkla stamptrams, tramways, bendigo, pall mall -
 Ballarat Tramway Museum
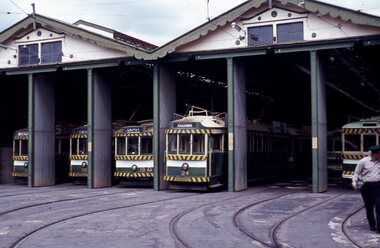
Slide - 35mm slide/s - set of 11, Eldon Hogan, mid 1960's to early 1970's
Set of 11 Agfa Plastic mounted slides - from the Eldon Hogan collection - possibly on an ARE Bendigo tours - mid 1960's (black destination rolls) and late 1960's or early 1970's. Scanned on the Canon scanner at the depot 15/12/1971 at the time of the installation of the scanner. .1 - front of depot -26, 19, 24, 29 and 28 amongst those present. .2 - ditto .3 - 24 departing depot .4 - 26 at Eaglehawk .5 - No. 5 turning from Pall Mall into Mitchell St with town hall in background. .6 - No. 5 using crossover in Mitchell St - with Maples, CBA Bank, Astor, Homecrafts, Roger David shops or signs in the background. .7 - ditto .8 - bogie car at Charing Cross with the Fountain Plaza shopping centre in the background. .9 - Charing Cross, with the fountain in the foreground, The Beehive and three trams in the view. .10 - No. 24 outbound, Golden Square line crossing the bridge over the creek, adjacent to the discovery of Gold Monument. .11 - ditto. tramways, trams, bendigo, eaglehawk, depot, charing cross, golden square, tram 26, tram 19, tram 24, tram 29, tram 28, tram 26, tram 5 -
 Ballarat Tramway Museum
Photograph - Black & White Photograph/s, State Electricity Commission of Victoria (SECV), late 1940's
... the doorway. In the background is the fountain, the Gardens and Pall..., the Gardens and Pall Mall. SEC Publicity Photo, see Inscriptions ...Black and White print contained within the Wal Jack Bendigo and Geelong Album, see Reg Item 5003 for more details. Photo of the Charing Cross with three bogie trams at the intersection, SEC publicity photo c1950. Two of the bogies crossing on the Eaglehawk - Quarry Hill line have white or cream strips on the lower edge of the body. No 26 has the destination of North Bendigo, though it is on Golden Square line with the driver standing just inside the doorway. In the background is the fountain, the Gardens and Pall Mall. SEC Publicity Photo, see Inscriptions for notes re photo. On the rear is the SEC Publicity Photo stamp, with negative number 21.1 written in, "Yallourn" in pencil and a typed piece of paper taped to the rear of the photo noting the Provincial tramways owned by the SEC, but that it is loss making.trams, tramways, bendigo, charing cross, secv, pall mall, tram 26 -
 Ballarat Tramway Museum
Photograph - Black & White Photograph/s, The Bendigonian, Sep. 2005
Black and White copy print contained within the Wal Jack Bendigo and Geelong Album, see Reg Item 5003 for more details. Photo of the Pall Mall with the Town Hall and Post Office buildings in the background, a mine poppet head. Features an electric tram towing an ex Ballarat double deck horse tram trailer. Has the Bendigo Supply Stores in the right hand side of the photo. Would appear to be a special event given the number of people in the photograph. Copied by Keith Kings from The Bendigonian 19/9/1905. On rear in ink " SA777, Bendigo, Electric tram towing an ex Ballarat old horse tram. Fountain. Copied ex "The Bendigonian 19/9/1905."trams, tramways, bendigo, charing cross, horse trams, pall mall -
 Bendigo Historical Society Inc.
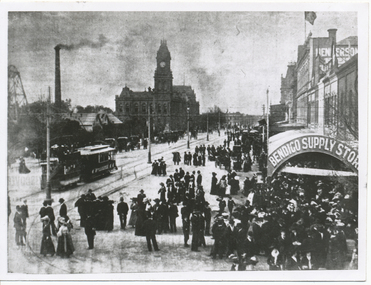
Photograph - DILLON-SHALLARD COLLECTION: PHOTO OF PALL MALL LOOKING EAST
... the fountain, two trams can be seen, one on Pall Mall the other in View.... In the foreground the fountain, two trams can be seen, one on Pall Mall ...Photo of Pall Mall looking East. In the foreground the fountain, two trams can be seen, one on Pall Mall the other in View Street. A lot of people can be seen around the fountain and all along Pall Mallphotograph, streetscape, bendigo -
 Bendigo Historical Society Inc.
Book - BENDIGO: VICTORIA'S GOLDEN CITY
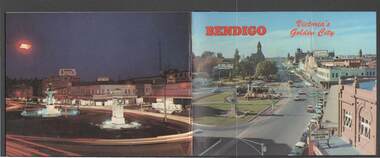
Coloured booklet of various scenes and buildings in and around Bendigo, titled Bendigo Victoria's Golden City. The front cover has a scene of Charing Cross looking towards Pall Mall. Inside the front cover is a very brief history and some Historical Buildings are mentioned. They are: Fortuna, Shamrock Hotel, Gold Mines Hotel, City Hall, Post Office, Law Courts, the Home for the Aged, Sacred Heart Cathedral, St. Paul's, Specimen Cottage, Log Lock-up and the Chinese Joss House. The coloured pictures inside are: The Central Deborah Gold Mine, Fortuna, Miner's Cottage, The Gold Mines Hotel, Victoria Hill, Bendigo Law Courts, Eaglehawk Log Lock-up, Look-out Tower Rosalind Park, Alexandra Fountain - Charing Cross, Conservatory Gardens with Law Courts in background, Inside the Conservatory, Bendigo Home & Hospital for the Aged - Victoria's 'White House', Sacred Heart Cathedral, Chinese Joss House, Chinese Joss House - Interior of the Main Temple, Bendigo Pottery - Potter at work, Bendigo Municipal Offices, Bendigo Institute of Technology at Flora Hill, Mt. Alvernia Hospital, Cobb & Co Coach, R Class Locomotive, Bendigo Tramcar, Lake Weeroona and Lake Eppalock Pumping Station. Some more attractions are mentioned inside the back cover. On the back cover is the Cenotaph - the only scale replica of the Whitehall Cenotaph - and Alexandra Fountain by night.Nucolorvue Productions Pty Ltdbendigo, tourism, photographs of bendigo icons, bendigo - victoria's golden city, fortuna, shamrock hotel, gold mines hotel, city hall, post office, law courts, home for the aged, victoria's 'white house', sacred heart cathedral, st paul's, specimen cottage, log lock-up, chinese joss house, charing cross, cenotaph, alexandra fountain, centra deborah gold mine, army cartographic unit, miner's cottage, harvey town, victoria hill, look-out tower rosalind park, conservatory gardens, conservatory, bendigo pottery, bendigo municipal offices, bendigo institute of technology, mt alvernia hospital, cobb & co coach, r class locomotive, bendigo railway station, bendigo tramcar, lake weeroona, lake eppalock pumping station, art gallery, historical museum eaglehawk, melville's caves, whitehall cenotaph, nucolorvue productins pty ltd, national library of australia -
 Bendigo Historical Society Inc.
Photograph - Bendigo circa 1930-1940, 19/09/2017
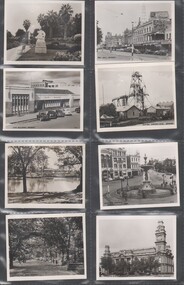
8548a Eight photographs of Bendigo circa 1930-1940, provided with printed envelope, photos cover: Pall Mall, Central Deborah Gold Mine, Alexandra Fountain, Bendigo City Hall, Rosiland Park, the City Baths, Civic Building, and the Conservatory Gardens. 8548b envelope for eight photos of Bendigo circa 1930-1940. each photograph is named.photographs of central bendigo landmarks, b&w photos -
 Bendigo Historical Society Inc.
Photograph - LESLIE JOHN BAGUST COLLECTION: ALEXANDRA FOUNTAIN, 1940
Leslie John Bagust Collection. Black & White Photograph of Alexandra Fountain Bendigo in 1940. Image taken on the corner of Pall Mall and Mitchell Street looking north. Matthew Bros. Department store on the corner. Tram Line running all the way up Mitchell Street.bendigo, tourism, bendigo alexandra fountain -
 Bendigo Historical Society Inc.
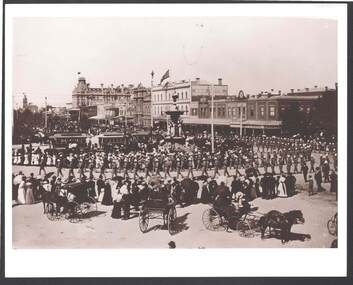
Photograph - JOHN JONES COLLECTION: PROCESSION AT THE FOUNTAIN
Photograph taken at Alexandra Fountain, Charing Cross. Photo shows a crowd of people watching a procession of soldiers? Which have come along Pall Mall and are turning up View Street. Some trams are in the picture. Three horse drawn vehicles are in the foreground. One building has Henderson & Doolsson ?? Furniture & Drapery painted on the side. The soldiers are marching with reversed arms indicating a Mourning event .place, bendigo, charing cross, john jones collection - procession at the fountain, alexandra fountain, henderson & doolisson -
 Bendigo Historical Society Inc.
Photograph - LESLIE JOHN BAGUST COLLECTION: VALENTINE BENDIGO POSTCARDS, 1940
Leslie John Bagust Collection. Black & White Photograph 1940 Alexandra Fountain Bendigo and surrounding streetscape. Matthews Brothers Haberdashery on the corner of Mitchell Street and Pall Mall. Beside The Matthew Bros. store J.B. Edwards tendered his trade as Jeweller and Watchmaker and T. Sayer furnished the local undertaker with hearses, horses and plumage. Just visible over the tops of the trees in Mitchell Street is the Morley Johnson building the former Toyworld. At the bottom of the photo on the front left in white is the notation No.1, and towards the right front bottom corner is the notation Alexandra Fountain, Bendigo.Valentine Publishing Co. Pty Ltd. Melbournebendigo, tourism, alexandra fountain bendigo -
 Bendigo Historical Society Inc.
Photograph - DAWN SMITH COLLECTION: PHOTOS OF BENDIGO, c1929
Black & White Photograph Alexandra Fountain, Bendigo Souvenir Tourism Set Rose Collection Series c1929. Alexandra Fountain is regarded as one of Bendigo, Victoria, Australia's most prominent landmarks and monuments. The fountain is located in Bendigo's "Charing Cross", the intersection of View Street and Pall Mall. Haring Cross effectively stands at the centre of the city and is one of Bendigo's busiest and most prominent intersections. The fountain stands opposite to the main entrance of Rosalind Park. Alexandra Fountain was funded from the proceeds of the Bendigo Juvenile Industrial Exhibition (1879), a £500 gift from George Lansell and a further £700 from the Sandhurst City Council (now the City of Greater Bendigo). The fountain was designed by W. C. Vahland,] a local architect responsible for some of the cities most prominent buildings.The fountain was named in honour of Alexandra, Princess of Wales and the grand opening (5 July 1881) was attended by her sons Prince Albert and Prince George.bendigo, tourism, alexandra fountain bendigo -
 Bendigo Historical Society Inc.
Photograph - DAWN SMITH COLLECTION: PHOTOS OF BENDIGO, c1929
Dawn Smith Collection. Black & White Photograph Mitchell Street Bendigo, C. 1929. The No. 16 Single Bogey Electric Tram sitting beside Matthews Bros.. At the corner of Pall Mall and Mitchell Street Pedestrians in the street and sitting outside by Alexandra Fountain. A café on the corner ? Lucas Café where the future Bendigo Bank would stand offers afternoon teas & suppers specialising in ices and soda fountain drinks. The second power pole has a sign on it the right hand side pointing up past the café, with the words Golden Square on it.bendigo, streetscape, pall mall and mitchell street corne -
 Bendigo Historical Society Inc.
Photograph - Charing Cross and Pall Mall
View of Charing Cross and Pall Mall Bendigo, featuring the Alexandra fountain still under construction. The fountain was jointly funded by the Bendigo Juvenile Industrial Exhibition in 1879, a 500 pound donation by George Lansell and a 700 pound grant from the Sandhurst City Council. The fountain was designed by William Vahland and was opened 5/7/1881. The fountain is 28 feet tall and sits in a 2 feet deep pond that is 50 feet in diameter. It was built with 22 tons of Harcourt granite, cast iron and painted stone.8531 A4 B&W photograph of Charing Cross and Pall Mall, Bendigo, in the late 1800s (prior to automobiles); taken from the City Family Hotel. Photograph shows work underway on the Alexandra Fountain at Charing Cross. Photo shows three trams, pedestrians and some horse drawn vehicles. Pall mall shows Post Office, Shamrock hotel and TAFE towers.charing cross, post office -
 Bendigo Historical Society Inc.
Memorabilia - Alexandra Fountain Souvenir Plate
Alexandra Fountain is a fountain in the Australian city of Bendigo, Victoria. It is regarded as one of the city's most prominent landmarks and monuments The fountain is located in Bendigo's Charing Cross area at the intersection of View Street and Pall Mall. Charing Cross effectively stands at the centre of the city and is one of Bendigo's busiest and most prominent intersections. The fountain stands opposite the main entrance of Rosalind Park. Alexandra Fountain was funded from the proceeds of the Bendigo Juvenile Industrial Exhibition (1879), a £500 gift from George Lansell and a further £700 from the Sandhurst City Council (now the City of Greater Bendigo). The fountain was designed by William Vahland (1828–1915), a local architect responsible for some of the city's most prominent buildings. The fountain was named in honour of Alexandra, Princess of Wales. Its grand opening on 5 July 1881 was attended by her sons Prince Albert and Prince George.White shallow bowl with transfer of Alexandra Fountain in centreMade in Japanalexandra fountain, bendigo landmarks -
 Bendigo Historical Society Inc.
Postcard - POSTCARD. HUSTLERW ROYAL RESERVE, 1885
Postcard. Alexander Fountain in foreground. Hustlers Royal Reserve. No.2. Bendigo Post Office, Left back ground. Beehive bjuilding on right. locality Pall Mall Bendigo. -
 Ballarat Tramway Museum
Slide - 35mm slide/s, Wal Jack, 12/04/1959 12:00:00 AM
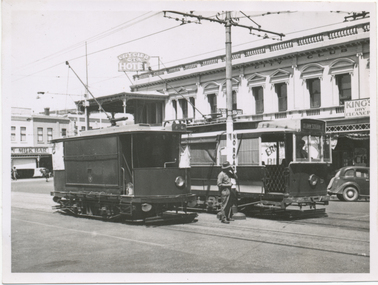
Bendigo No. 29 at Charing Cross, waiting. Tram heading north along the double track section, with Beehive buildings etc in background. Tram has passengers on it. A crew member is walking near the car, no coat, but has a cap on. Large 'Mobilgas' sign on the Beehive building. Photo taken on 12-4-1959. Has numerous cars in background and shows centre of road poles. Photo is over exposed. Tram has large white triangles on front panelsBendigo No. 29, from Fountain, 12-4-59' and 'W.Jack Photo' in blue ink.tramways, trams, bendigo, birney, charing cross, pall mall, tram 29 -
 Bendigo Historical Society Inc.
Photograph - BASIL MILLER COLLECTION: CHARING CROSS BENDIGO, early 1900's
BHS CollectionBlack and white photo - copy? View of Alexandra Fountain/Charing Cross, looking northward down Pall Mall. Two trams - one left hand side, one bottom right. Groups of people standing /sitting around Fountain. Horse and carts visible on street scape. Poppet head and mine chimney of Hustlers Park mine on left hand side alongside Bendigo Creek. basil miller, bendigo, charing cross, alexandra fountain, bendigo tramways -
 Ballarat Tramway Museum
Album - Postcards & Photographs - Vic Solomons and others - Australian Tramways, Vic Solomons, 2023
Contains 184 images of postcards and photographs collected primarily by Vic Solomons of Sydney, with others from the collection of Wal Jack and Warren Doubleday. Covers almost all of Australia's tramway systems. 1 Post Card Hay St Perth Looking East No 3 Unknown Perth 2 Post Card Cars 30 & 90 both on Route 19 pass in Barrack St looking South Perth WA 1935.02.18 Perth 3 Post Card Hay St Looking East Perth WA Unknown Perth 4 Post Card William St Perth WA Unknown Perth 5 Post Card Perth from Shaftsbury Hotel Unknown Perth 6 Post Card Hay St Perth WA Looking East Unknown Perth 7 Post Card Barrack St Perth Unknown Perth 8 Post Card Murray Views No 3 High St Showing Town Hall Fremantle WA Unknown Fremantle 9 Post Card High St Fremantle WA Unknown Fremantle 10 Post Card View of Bolder City Golden Mile in the Background (Section No 1) 1908.08.20 Kalgoolie 11 Post Card Hannan St Kalgoolie 1900.08.19 Kalgoolie 12 Post Card Hannan St Kalgoolie WA (No 2) Unknown Kalgoolie 13 Post Card Intersection Hannan & Maritana Sts Kalgoolie WA Unknown Kalgoolie 14 Post Card Hannan St Kalgoolie Unknown Kalgoolie 15 Post Card Lane Street Bolder City Unknown Kalgoolie 16 Post Card Hobart Double Deck Tram Unknown Hobart 17 Post Card Macquarie St Hobart Unknown Hobart 18 Photo Liverpool Street Hobart Unknown Hobart 19 Photo Hobart 21 Unknown Hobart 20 Photo Hobart 14 in Elizabeth St Hobart Unknown Hobart 21 Post Card Macquarie St Hobart Unknown Hobart 22 Post Card Macquarie St Hobart Tas Unknown Hobart 23 Photo Double Decker Tram 3 at G.P.O. Hobart Tas No 31 Unknown Hobart 24 Post Card Double Decker Tram 19 Hobart Tas A B Series No 24 Unknown Hobart 25 Photo Hobart Municipal Tramways Tas No 95 Unknown Hobart 26 Post Card Elizabeth St Hobart Unknown Hobart 27 Post Card Elizabeth St Hobart Unknown Hobart 28 Post Card Elizabeth St Hobart Unknown Hobart 29 Post Card Elizabeth St Hobart Tas Unknown Hobart 30 Post Card HMT 21 with crew at Beach Road Terminus Unknown Hobart 31 Post Card HMT 9 & another with crew at Beach Road Terminus. Front cover photo of Destination GPO 1921.01.00 Hobart 32 Post Card Cascade Road and Mount Wellington Hobart Unknown Hobart 33 Post Card Elizabeth St Hobart Unknown Hobart 34 Post Card Elizabeth St Hobart Unknown Hobart 35 Post Card Elizabeth St Hobart 1915.04.07 Hobart 36 Post Card Macquarie St Hobart Tas Unknown Hobart 37 Post Card Macquarie St showing Post Office Hobart 1908.03.12 Hobart 38 Post Card Hobart Municipal Tramways 21 Unknown Hobart 39 Post Card Elizabeth St Hobart Tas Unknown Hobart 40 Post Card Liverpool Street Hobart Unknown Hobart 41 Post Card Electric Tram Launceston Tas 446 W J Little Photo 1919.02.08 Launbceston 42 Post Card Launceston Tram no 3 1911.08.30 Launbceston 43 Post Card Launceston Tram no 3 passes tram No 1 Unknown Launbceston 44 Post Card Tram 6 at Trevallyn a popular suburb Launceston Tasmania Unknown Launbceston 45 Post Card Tram 7 at Trevallyn Road Terminus Launceston Tasmania Unknown Launbceston 46 Post Card Tram 4 in Brisbane St Launceston Unknown Launbceston 47 Post Card Tram 9 in Brisbane St Launceston Tasmania Unknown Launbceston 48 Post Card Camerom Street Launceston Tasmania Unknown Launbceston 49 Post Card Murray Views No 15 Jetty Road Glenelg Terminus 1962-02-08 Adelaide 50 Post Card Bay Tram at Jetty Road Terminus Glenelg SA Unknown Adelaide 51 Post Card Tram 3 in King William Street Adelaide S Aust Unknown Adelaide 52 Post Card Valentine Series No 3065 The Old Horse Tram Victor Harbour Unknown Victor Harbour 53 Post Card Bourke Street Melbourne with Cable Car Looking East 1904.04.25 Melbourne 54 Post Card Opening of New Electric Tramway Elsternwick 1913-11-13 Melbourne 55 Post Card Cable trams in Clarendon St Sth Melb Unknown Melbourne 56 Post Card Pall Mall from Charing Cross Bendigo Unknown Bendigo 57 Post Card Tram 4 & 7 pass at The Fountain and Mitchell Street Bendigo Vic Rose Series P 3198 Unknown Bendigo 58 Post Card M&MTB 133 at Charing Cross bound for Eaglehawk Bendigo Vic Murray Views No 45 Unknown Bendigo 59 Post Card Pall Mall Bendigo Vic Unknown Bendigo 60 Post Card Charing Cross & Mitchell St Bendigo Trams passing 1919.00.00 Bendigo 61 Post Card Pall Mall Looking East Unknown Bendigo 62 Post Card Electric Trams and City Hotel Bendigo Vic Unknown Bendigo 63 Post Card Moorabool Street Geelong V 23 Unknown Geelong 64 Post Card Murray Views No 3 Moorabool Street Geelong Vic Unknown Geelong 65 Post Card The Rose Series P 2487 Ryrie Street Geelong Vic Unknown Geelong 66 Post Card Southern Cross Series 2696 Ryrie Stret Geelong Vic Unknown Geelong 67 Post Card The Rose Series P 1490 Ryrie Street Geelong Vic 1920-03-04 Geelong 68 Post Card Valentine Series No 1568 Lower Sturt Street Ballarat Unknown Ballarat 69 Post Card Rose Series P 1710 Sturt Street Ballarat Victoria Unknown Ballarat 70 Post Card Sturt Street Ballarat Victoria Unknown Ballarat 71 Post Card Horse Tram In Sturt Street Ballarat 1905.11.10 Ballarat 72 Post Card Sturt Street Ballarat Looking North-West Unknown Ballarat 73 Post Card Shoppes Square Sturt Street Ballarat Looking North Unknown Ballarat 74 Post Card Junction Sturt and Lydiard Streets Ballarat 1909-09-01 Ballarat 75 Post Card The Electric Supply Co Souvenir Tram Ticket No 3085of the opening of Electric System August 18 1905 1905.08.18 Ballarat 76 Post Card Sturt Street Ballarat Victoria 1907.11.25 Ballarat 77 Post Card Off to the Gardens Electric Tram Ballarat Unknown Ballarat 78 Post Card Sturt Street Ballarat 1907.04.16 Ballarat 79 Post Card Sturt Street Ballarat Looking East Electric tram with Double Deck Trailer 1911.04.17 Ballarat 80 Post Card Sturt Street Ballarat Looking East Unknown Ballarat 81 Post Card Sturt Street Ballarat Looking West 1911.03.01 Ballarat 82 Post Card Town Hall and Sturt Street Ballarat Unknown Ballarat 83 Post Card Lydiard Street Ballarat 1906.11.23 Ballarat 84 Post Card Looking North along Adelaide Street from George Street Brisbane Sidues Series No 764 Unknown Brisbane 85 Post Card Looking South along Queen Street from the Creek Street Intersection Brisbane Qld Sirues Series No 1379 Unknown Brisbane 86 Post Card George Street from near Supreme Court Brisbane Unknown Brisbane 87 Post Card Queen and Eagle Streets Brisbane 1907.07.04 Brisbane 88 Post Card Queen Street showing His Majesty’s Theatre Brisbane Unknown Brisbane 89 Post Card Queen Street Treasury Building 1908.01.20 Brisbane 90 Post Card G P O and Queen Street Brisbane Unknown Brisbane 91 Post Card Queen Street Brisbane Looking from Wharf Street Unknown Brisbane 92 Post Card Customs House Brisbane 1905.02.16 Brisbane 93 Post Card Queen St Brisbane 1905.09.16 Brisbane 94 Post Card Queen St Brisbane 1907.11.19 Brisbane 95 Post Card Treasury Buildings Brisbane Unknown Brisbane 96 Post Card Queen and Eagle Streets Brisbane Unknown Brisbane 97 Post Card The Valley Corner Brisbane Unknown Brisbane 98 Post Card Brisbane Queen Street opposite General Post Office Unknown Brisbane 99 Post Card North Quay and Milton Beach Brisbane Q Unknown Brisbane 100 Post Card Victoria Bridge Brisbane South Side 1907.08.14 Brisbane 101 Post Card Victoria Bridge Brisbane Unknown Brisbane 102 Post Card Breakfast Creek Bridge Brisbane Q Unknown Brisbane 103 Post Card Melbourne Street Station South Brisbane Queensland Unknown Brisbane 104 Post Card General Post Office Queen Street Brisbane 1955.09.23 Brisbane 105 Post Card Customs House Brisbane 1904.11.04 Brisbane 106 Post Card Queen St Brisbane 1919.11.00 Brisbane 107 Post Card Queen St Brisbane Sidues Series No 627 Unknown Brisbane 108 Post Card Creek Street Brisbane Queensland Unknown Brisbane 109 Post Card Customs House and Garden Reach Brisbane Queensland 1910.00.08 Brisbane 110 Post Card Queen and Creek Streets Brisbane 1909.06.07 Brisbane 111 Post Card Queensland National Bank andd Queen Street Brisbane Queensland Unknown Brisbane 112 Post Card Queen Street and Treasury Buildings Brisbane 0000.09.07 Brisbane 113 Post Card Queen Street showing “Courier” Buildings Brisbane Unknown Brisbane 114 Post Card Intersection George & Roma Streets Brisbane Q 1916.05.11 Brisbane 115 Post Card Adelaide Street Brisbane Q Unknown Brisbane 116 Post Card G P O Queen Street Brisbane Q Unknown Brisbane 117 Post Card Treasury Building Brisbane 1906.03-20 Brisbane 118 Post Card Queen and Eagle Streets Brisbane 1907.02.01 Brisbane 119 Post Card Queen St Brisbane Unknown Brisbane 120 Post Card Queen St Brisbane Q Unknown Brisbane 121 Post Card Victoria Bridge Brisbane 1906.07.30 Brisbane 122 Post Card An Unusual View showing Head of Queen Street Victoria Bridge & South SideSuburbs Brisbane Q Unknown Brisbane 123 Post Card Petries Bight Brisbane Q Unknown Brisbane 124 Post Card South End Victoria Bridge Brisbane Q Unknown Brisbane 125 Post Card Customs House Brisbane Unknown Brisbane 126 Post Card Photo of toastrack car circa 1910 Unknown Brisbane 127 Post Card Treasury Buildings Brisbane Unknown Brisbane 128 Post Card East Street Rockhampton with Steam Tram & trailer Unknown Rockhampton 129 Post Card Post Office Rockhampton with steam tram Unknown Rockhampton 130 Post Card East Street Rockhampton with Steam Trams Rose Series P 7154 Unknown Rockhampton 131 Post Card William Street Rockhampton Rose Series P 7156 Unknown Rockhampton 132 Post Card Central East Street Rockhampton Q with Steam Trams Unknown Rockhampton 133 Photo Sturt St Ballarat Unknown Ballarat 134 Photo Bridge Street Ballarat Unknown Ballarat 135 Post Card George St Sydney Unknown Sydney 136 Post Card Elizabeth St Sydney Unknown Sydney 137 Post Card Railway Square Unknown Sydney 138 Post Card Sydney Harbor Bridge - pending receipt 139 Post Card Kings Cross - Mowbray Series with description on rear from C Roy G Field Unknown Sydney 140 Post Card Kings Cross - Mowbray Series with description on rear from C Roy G Field Unknown Sydney 141 Post Card Central Railway Station Sydney - Rose Series P6033 1954-01-26 Sydney 142 Post card William Street Darlinghurst looking towards City - Rose Series P6602 unknown Sydney 143 Post Card Circular Quay Sydney - Rose Series P6680 Unknown Sydney 144 Post Card View at Manly NSW - Rose Series B1003 Unknown Sydney 145 Post Card Hunter St Newcastle NSW - Rose Series P7843 Unknown Newcastle 146 Post Card Bank Corner Newcastle NSW - Mowbray Series No. 155 Unknown Newcastle 147 Post Card Hunter St Newcastle NSW Unknown Newcastle 148 Post Card Criterion Hotel Hunter St Newcastle NSW Unknown Newcastle 149 Photo Horse tram at Newtown Station 1894 to 1898 - PTC photo c1894 Newtown 150 Photo Steam tram motor No 3 at Railway Square 1879 1879 Sydney 151 Photo Railway steam tram c1900 with a horse drawn double deck bus c1900 Sydney 152 Photo Steam motor 5A and doubled deck bus Unknown Sydney 153 Photo Steam motor 53A with detail notes on rear 1922 Sydney 154 Photo Cable tram set at Milsons Point ferry terminal c1900 Sydney 155 Photo Early Sydney electric car - Ocean St - Rose Bay Unknown Sydney 156 Photo George St looking souoth c1905 c1905 Sydney 157 Photo Tram 165 at Circular Quay Unknown Sydney 158 Photo Tramcar ferry or transporter at The Spit Unknown Sydney 159 Photo tram 882 George St at Marti Place, 1937 1937 Sydney 160 Photo Tram 826 Railway Sq area Unknown Sydney 161 Photo Railway Sq in background, Broadway with double decker bus and toastrack car late 1930s Sydney 162 Photo Coupled St Pitt St? - photo Ben Parle Feb. 1950 Sydney 163 Photo Electric tram No. 2 - North Sydney with side trolley pole running Unknown Sydney 164 Photo George St - Horden's Corner Unknown Sydney 165 Photo George St at Martin Place c1920 Sydney 166 Photo Castlereagh St Sydney c1928 c1928 Sydney 167 Photo Railway Sqare c1920 c1920 Sydney 168 Photo Darling St Countereweight Unknown Sydney 169 Photo Trolley bus depot Unknown Sydney 170 Photo Trolley bus No. 14 Unknown Sydney 171 Photo Newcastle Railway Station with steam tram - Wharf Road?? Unknown Newcastle 172 Photo High St West Maitland - steam tram Unknown Maitland 173 Photo High St West Maitland - steam tram Unknown Maitland 174 Post Card Argent St near tram terminal Broken Hill NSW c1900 Broken Hill 175 postcard Argent St looking south Broken Hill - with Ken Magor's notes on rear Unknown Broken Hill 176 Photo Toronto - steam tram 61A Unknown Toronto 177 Photo 124A trial run 1911? Sutherland - Cronulla line 1911 Sutherland 178 Photo 103A at a tram stop Unknown Sydney 179 Photo Cable tram set at Crows Nest terminus grip car 12, trailer 22 Unknown Sydney 180 Photo Cable tram Queens Square Sydney 1903 Sydney 181 Photo cars 2078 and 2077 Chatswood late 1950s Sydney 182 Photo car 1877 Balmain area late 1950s Sydney 183 Photo Trolley bus - Rockdale destination Late 1950s Sydney 184 Photo Broken Hill steam tram - motor 18A North Tram Unknown Broken Hill 185 Photo Millars Point Sydney NSW - ferry/tram interchange, unknown Sydney All items imaged including the rear or back where there was writing of information. All files stored on the Museum's Photo Collections directory. Demonstrates through the medium of many images, Australian tramway systems and Ballarat's place in them.Album - heavy card covers, plastic lined with postcard or 6x4 photo sleeves.australia, tramways, postcards, photographs, steam trams, horse trams, cable trams, trolley buses