Showing 441 items matching "sec buildings"
-
 Ballarat Tramway Museum
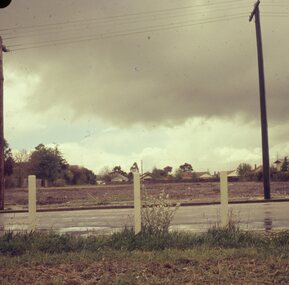
Slide - 27 mm sq slide/s - set of 4, Lilian Butler, SEC Wendouree Parade depot site, Jul. 1973
Yields information about some of the SEC Wendouree Parade depot after it had been demolished.Set of four Colour 27 x 27 mm slides in plain white cardboard mounts of four views of the SEC Wendouree Parade depot site with the buildings demolished and the site cleared. The second slide shows the Trackwork still in position in the roadway and the last the view from Gregory St. Slide not dated - building demolition works commenced July 1972. Photo from the collection of Lilian Butler.ballarat, tramways, trams, sec depot, demolition, depot, wendouree parade -
 Ballarat Tramway Museum
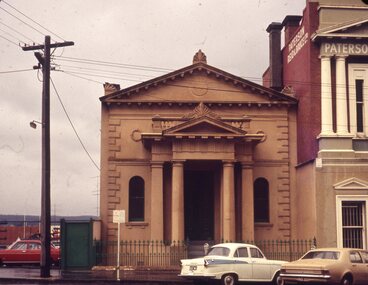
Slide - 27 mm sq slide/s, Lilian Butler, SEC owned hall known as Electra Hall in Camp St Ballarat, c1971/1972
... the appearance of the SEC owned building in Camp St, known as Electra ...Yields information about the appearance of the SEC owned building in Camp St, known as Electra Hall.Hanimex colour slide - white cardboard mount of the SEC owned hall known as Electra Hall in Camp St Ballarat c1971. Photo from the collection of Lilian Butler. See Reg Item 6550 for a March 2016 image of the building.ballarat, tramways, trams, sec, electra hall -
 Ballarat Tramway Museum
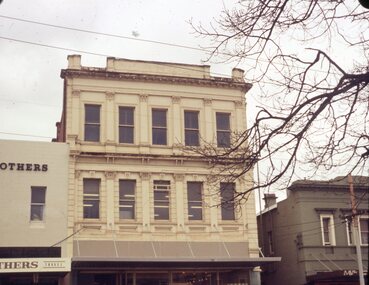
Slide - 27 mm sq slide/s, Lilian Butler, SEC owned offices in Sturt St near Lydiard St, c1971/1972
... the appearance of the SEC owned building in Sturt St which was used ...Yields information about the appearance of the SEC owned building in Sturt St which was used as offices and the SEC crews meal room.Hanimex colour slide - white cardboard mount of the SEC-owned offices in Sturt St near Lydiard St - used for tram crew mess room, local commercial offices and showrooms - photo c1971. Photo from the collection of Lilian Butler. ballarat, tramways, trams, sec, sturt st, crews -
 Ballarat Tramway Museum
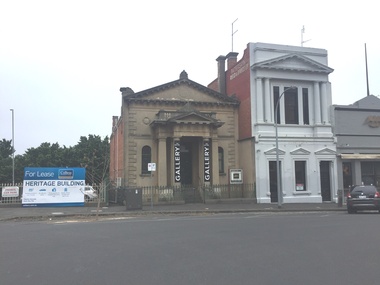
Photograph - Digital image, Warren Doubleday, Former SEC owned hall known as Electra Hall in Camp St Ballarat, Mar. 2016
Digital Image of the former SEC owned hall known as Electra Hall in Camp St Ballarat March 2016. Shows the building for Lease and being used for a Gallery space. See Reg Item 6548 for a c1971 image.trams, tramways, secv, electra hall -
 Ballarat Tramway Museum
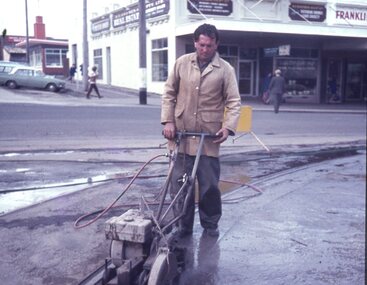
Slide - 27 mm sq slide/s - set of 7 - track removal, Lilian Butler, c1971 to 1972
Series of 7 photos showing track removal following the closure of the Ballarat Tram system.Yields information about the removal of the tram tracks in the city area.Set of 7 colour slides - 1 x Agfa blue and white plastic slide mount, 4 Hanimex cardboard mounts and 2 Kodachrome cardboard mounts of track removal works in Ballarat, c1971 to 1972 .1 - Saw cutting the road pavement at the Dawson St Crossover. .2 - Rolling the crushed rock pavement in Sturt St after track removal - near Doveton St. .3 - Track repairs or starting to remove the railway crossing at Lydiard St North - has an SEC truck in the background and the Kennedy Murray Pty Ltd General Carriers building in the background. .4 - commencing work on the Dawson St Crossover removal with St Patrick's Cathedral in the background. .5 - as for .2 .6 - L. G. Pearce excavating track near Dawson St. .7 - ditto Photo from the collection of Lilian Butler. ballarat, tramways, trams, track removal, dawson st, trackwork, sturt st, level crossings, lydiard st north -
 Ballarat Tramway Museum
Photograph - Digital image Set of 8, George Coop, 1968 - 1970
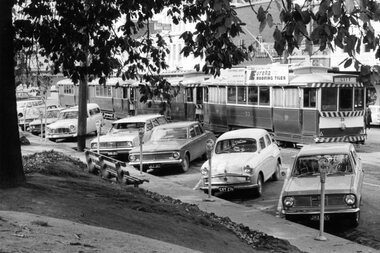
Yields information about the City Loop area and its operation. Eight (8) Digital images taken by George Coop during the period 1968 - 1970, of trams at the City Loop. .1 - 33, 17 and two other single truckers parked in the loop with motor vehicles and parking meters. No. 33 has an Eureka Roofing Tile Advert. .2 - 28? passing two track workers cleaning the west end points with a bogie car and three single truckers in the loop. In the background are Patersons and Dickins Food Store. .3 - No. 12 parked at the east end of the loop, hard up against the tram in front. Shows the Section Insulator. .4 - As for .1, front on photo with the destination of City and a "Pay as You Enter". The Dickins sign can be seen. .5 - as for .2, No. 35 leads the queue. Has the Woolworths Big W store in the background. .6 - view from the rear (12, 30, 17) with No. 33 being driven out of the loop. .7 - View from the rear, 33 has moved out of view. Has the T&G (Temperance and General) building in the view. .8 - No. 31 moves over the points at the west end of the loop. The tram has the Destination of Gardens via Drummond North, a Twin Lakes advert and a SEC Electric Cooking Advert.trams, tramways, city loop, sturt st, trackwork, overhead, tram 33, tram 17, tram 26, tram 12, tram 35, tram 31 -
 Ballarat Tramway Museum
Photograph - Digital image Set of 6, George Coop, 1968 - 1970
Yields information about the tram operations at or near the Ballarat Railway Station.Six (6) Digital images taken by George Coop during the period 1968 - 1970, of SEC trams in Lydiard St North near or at the Railway station/ .1 - Tram 28 northbound with the station building and signal gantry in the background. No. 28 has a White Florist roof advert. .2 - Tram 32 southbound - taken from the signal box, has the gate wheel in the foreground. .3 - Tram 27 south bound, with destination of Sebastopol, with the station building, signal gantry and Reid's Coffee Palace in the background. No. 27 has a Twin Lakes sign and a Bliss Bombs roof advert. .4 - Tram 32, northbound, crossing the railway tracks, taken from the signal box has the railway station goods shed, building and signal gantry in the background. The tram has a Wilkinson Sword Razor blades roof advert. .5 - Tram 28, southbound from signal box. See image .1 for details. .6 - Tram 27, southbound in Lydiard St north with Bliss Bombs advert and destination of Sebastopol. Has the goods yard in the background. Taken through the verandah of Victoria House. trams, tramways, level crossings, railway station, lydiard st north, signals, tram 28, tram 32, tram 27 -
 Ballarat Tramway Museum
Photograph - Digital image Set of 10, George Coop, 1968 - 1970
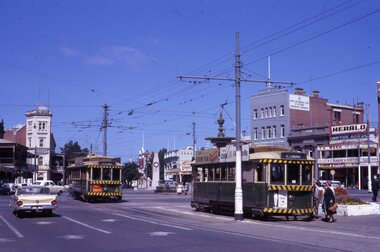
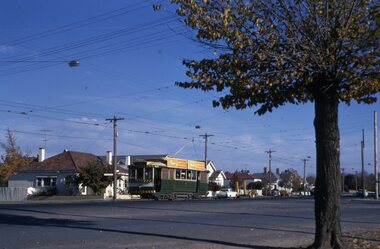
Yields information about the tram operations and the landscape views of the Sturt St median strip.Ten (10) Digital images taken by George Coop during the period 1968 - 1970, of SEC trams in Sturt St, between the City and Pleasant Streets. .1 - Tram 26 climbing the Sturt St hill to Lydiard St, with the Cook's Private Hotel, the Commonwealth Bank and the National Mutual Life building in the background. Photo taken from the Titanic Bandstand. .2 - Tram 40 Sturt St, enough to Lydiard St North just before Raglan St. Has a lady passenger by the tram stop. .3 - Tram 30 - Sturt St north side, near Armstrong St, - has a blue framing line around the photograph. .4 - Tram 39, Sturt St, near Doveton St, shows the rotunda in the median strip. .5 - Tram 18, with median step in view. .6 - Tram 31, with two Johnnie Walker whiskey roof adverts, outside the National Mutual Life building with the Alan Bros Jewellers and Golden Star Chinese Cafe in the view. .7 - Tram 31, Sturt St south side with Town Hall and the Golden City Hotel in the view. Tram has destination of Gardens via Drummond North. .8 - Tram 41 - ditto - going to Sebastopol. .9 - Tram 13, south side, Gardens via Sturt West, about , near Ripon St, with the Ampol service station in the background and about to pick up a lady passenger .10 - Tram 17, near Doveton St. Has a Twin Lakes sign and a Wilkinson Sword Razor Bladese roof advert. trams, tramways, sturt st, raglan st, passengers, doveton st, tram 26, tram 40, tram 30, tram 39, tram 18, tram 31, tram 41, tram 13, tram 17 -
 Ballarat Tramway Museum
Photograph - Black & White Photograph/s set of 2, Charles Craig, c1955
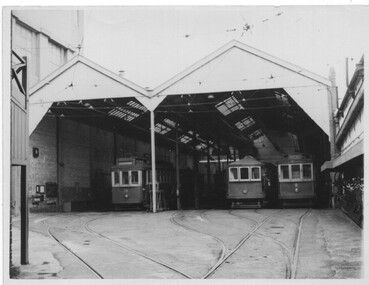
Set of two photographs of trams at the SEC Geelong Depot, mid 1950's. .1 - 19, scrubber and 9 with the depot buildings in the view - two copies of the print - slightly differently framed. .2 - bogie ( fitted with zebra stripes and dash canopy lights), 4, 16, 19, 38 (left to right) Destination Eaglehawk notes that No. 4 was the only single trucker fitted with zebra stripes and dash canopy lighting - see pages 42 and 44 during 1955 trams, tramways, geelong, depot, tram 19, tram 9, scrubber, tram 4, tram 16, tram 19, tram 38 -
 Ballarat Tramway Museum
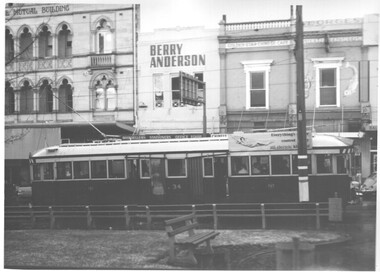
Photograph - Black & White Photograph/s, Charles Craig, early 1970's
Yields information about the use of the use of the City terminus during the last days of the SEC operated system.Black and White photograph of No. 34 at the City Terminus, Sturt St, south side - tram has an SEC Roof Advert re electric cooking. In the background is the National Mutual Building, Berry Anderson stationary shop, Golden Start Chinese Cafe and the Georges Oyster bar and fish shop. Photo by Charles Craig possibly early 1970's. trams, tramways, sturt st, city, tram 34 -
 Ballarat Tramway Museum
Photograph - Black & White Photograph/s set of 2, Charles Craig, 1971
Yields information about the intersection of Sturt St and Drummond St and its use by trams in the period before the closure of the SEC system.Set of two Black and White photographs of trams near the intersection of Sturt St and Drummond St North, Hospital Corner. .1 - No. 41, another bogie and a single trucker travel along Sturt St south, the last tram has a destination of Special. .2 - Photo looking at the median strip with a tram on either side. Single trucker with a Twin Lakes sign inbound and another single truck outbound. Shows the position of the shelter and the ESCo switch box. Has a Marshal battery advert on a building in the background. Photo by Charles Craig - during 1971. trams, tramways, sturt st, hospital corner, drummond st, tram 41 -
 Ballarat Tramway Museum
Photograph - Black & White Photograph/s, Charles Craig, 1971
Yields information about Stones Corner, associated building and its use by trams in the period before the closure of the SEC system. Black and White photograph of tram of No. 11 at Stones Corner turning from Bridge St into Main Road. Tram showing Special, has a Twin Lakes sign and a Briquettes roof advert. In the background is H. Whitefield, the State Savings Bank of Victoria, a directional sign for C. W. Pennant wall paper Rodda and the ANZ bank? Photo by Charles Craig - during 1971. trams, tramways, bridge st, stones corner, main road, tram 11 -
 Ballarat Tramway Museum
Photograph - Digital image, W. J. Llewelyn, late 1971
Yields information about the removal of the overhead in Lydiard St North, following the closure of the SEC operated tram system in Sept. 1971Set of two colour digital images taken by W. J. Llewelyn of the removal and cutting up of the overhead and cutting the copper trolley wire in Lydiard St North - Oct. 1971? Shows the method and equipment used. Has a van marked "Arch Smallgoods" in Lydiard St North. Shows the Mair St traffic light, and Railway Hotel on the corner. In the background is the George Hotel, St Paul's Technical College, and Union Fidelity Trustee Company buildings in the background. Warren Doubleday remembers being there at the time, but can't find a photograph of it and date.trams, tramways, lydiard st, closure, secv, overhead, demolition -
 Ballarat Tramway Museum
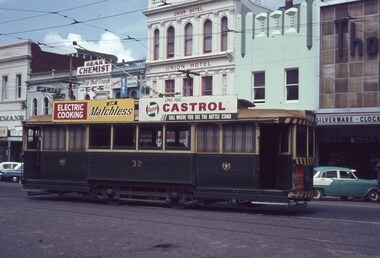
Slide - 35mm slide/s, David Verrier, 6/10/1964 12:00:00 AM
Yields information about the appearance of the tram 33 and the lower end of Sturt St in 1964.Agfa colour slide, white blue plastic mount. Photograph by David Verrier of tram 32 in the east end of Sturt St, near Grenville St. Tram has roof advertisements for SEC Matchless Cooking and Castrol Oil. In the background are Gear Chemist, the Union Hotel and part of the Thomas Edmonds buildings. Photo taken 6/10/1964.On back of slide in pencil "Tues 6/10/64 Ballarat No. 32 in Sturt St from Victoria St" tramways, trams, sturt st, tram 33 -
 Ballarat Tramway Museum
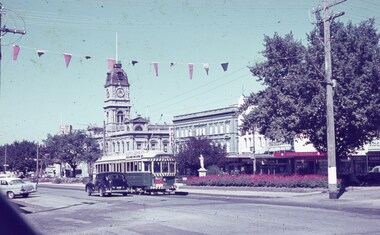
Slide - 35mm slide/s, Keith Caldwell, 1963
Yields information about tram 35 and Sturt St near Armstrong St.Agfa colour slide, white cardboard mount, photo by Keith Caldwell during 1963 of: Tram 35 in Sturt St at Armstrong St, with the destination of Mt Pleasant. Tram has a Dancing at Civic Hall, SEC Electric Cooking. In the background is the Town Hall and the Myer building. The decoration on the street would indicate that the photo was taken on either the 12/3 or 16/3 during the Begonia Festival. tramways, trams, sturt st, armstrong st, town hall, tram 35 -
 Ballarat Tramway Museum
Photograph - B&W print of donated negative - set of 5, Graham Parry, 1971
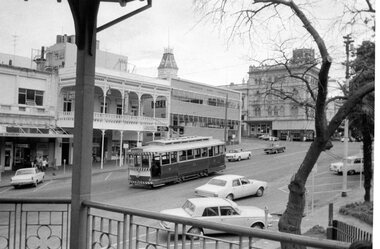
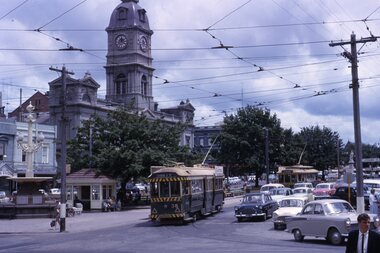
Yields information about the City Loop and tram operations in Sturt St, 1971Set of five black and white prints and associated negatives of trams in Ballarat during 1971 prior to closure of the system by Graham Parry. All images from the scanned negative. .1 - No. 43 and possibly 31 in the City Loop. Has various buildings in the background. .2 - No. 34 at the Sturt and Lydiard Sts tram stop. Has the National Mutual Building in the background, which has a CML (Colonial Mutual Life) sign on it. .3 - No.35 at the north side tram stop. Has a Briquettes roof advert. Tram has the destination of Lydiard St North. .4 - View looking from the top of the hill at the City Loop with 43 and other cars in the loop. Has the Dickens Food Store and Patersons in the view along with other buildings. .5 - as for .4, but from the south side footpath with trams 43, 31, 26 and another in the loop. All have SEC roof adverts.tramways, trams, sturt st, city loop, lydiard st nth, tram 43, tram 31, tram 34, tram 35, tram 26 -
 Ballarat Tramway Museum
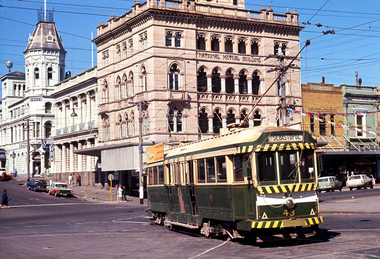
Photograph - Digital image, John Ward, 28/02/1969 12:00:00 AM
Yields information about the appearance of the intersection of Sturt and Lydiard St North during 1969.Digital image of tram 43 turning from Lydiard St North into Sturt St with the National Mutual Building and Craigs Hotel n the background. Tram has destination of Sebastopol. Photo by John Ward 28 Feb. 1969. Slide title "01114 280269 SEC bogie tram 43 Lydiard St North to Sturt St Ballarat Vic"trams, tramways, sturt st, lydiard st north, tram 43 -
 Ballarat Tramway Museum
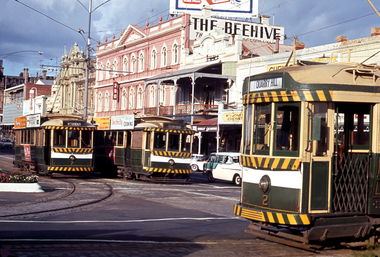
Photograph - Digital image, John Ward, 22/03/1970 12:00:00 AM
Digital image of three Bendigo trams at Charing Cross. Trams 7 (North Bendigo), 21 (Golden Square) and 2 (Quarry Hill). Has the Beehive building in the background, along with sings for 3BO, Myer, Amor gowns and Wm I Jones Chemist. The trams have some SEC Roof adverts. Photo by John Ward 22 March 1970. Slide title "00757 220370 SEC single truck trams 7 & 21 Pall Mall bogie tram 2 Mitchell St Charing Cross Bendigo Vic"trams, tramways, bendigo, charing cross, pall mall, mitchell st, tram 7, tram 21, tram 2 -
 Ballarat Tramway Museum
Legal record, State Electricity Commission of Victoria (SECV), "Agreement between the SEC, City of Ballaarat and Borough of Sebastopol" re tramways, 1929
The SEC made this agreement with respect to the operation of tramways in Ballarat and Sebastopol in 1929, though the SEC did not formally take over operation until 1934.Yields information about the 1929 agreement between the SEC, The City of Ballaarat and the Borough of Sebastopol about the operation of tramways in Ballarat.Original copy and photocopy of an SEC made 17/11/1929 of the "Agreement between the SEC, City of Ballaarat and Borough of Sebastopol" re tramways at the time of the operation transfer of the tramways from ESCo to the SEC. Five pages, foolscap, white paper stapled in top left hand corner. Outlines the conditions of operations, track maintenance, tramcars, responsibilities, buildings, bus services. On pages 13 and 14 has the names of the parties who signed the agreement, including John Monash. Agreement dated 17/11/1929. See Reg Item 4941 for another version, carbon copy of a closely typed version. tram, trams, agreements, sec, city of ballaarat, borough of sebastopol, esco -
 Ballarat Tramway Museum
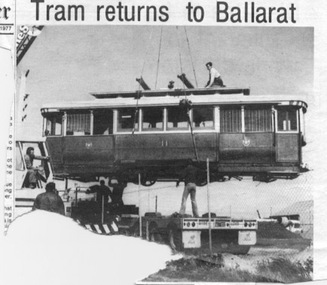
Newspaper, The Courier Ballarat, "Tram returns to Ballarat", "Sebastopol home for tram", 11/08/1977 12:00:00 AM
Newspaper cuttings from The Courier, Ballarat, August 11 1977 with photos of SEC tram No. 11 returning to Ballarat from Sebastopol. 1112.1 - from the page with the Editorial, has a photo (large portion from the bottom left hand corner missing of the rear of the crane) being unloaded at Sebastopol for storage with a column of text detailing the story of the tram and the BTPS plans. Also refers to another photo on page 15. 1112.2 - from page 15 of the Courier, with Jack Chadwick standing on the front step of the tram, outside the entry to the Smythes Road, Sebastopol storage building. Has an inset item on the story. See Reg Item 3827 for a print of the actual photograph.1112.2 - in central right hand side in brackets in blue ink (page(15) and on rear top edge "11/Aug. 1977." in blue ink.trams, tramways, btps, sebastopol, 11, daylesford, tramcar acquisition -
 Ballarat Tramway Museum
Slide - 35mm slide/s - set of 14, Noel Simons, 23/11/1962 12:00:00 AM
Set of 14 Kodachrome transparencies taken on 23/11/1962. 1162.1 - tram 38 turning into Lydiard St. North from Sturt St. with tram 20 in background. Many motor vehicles in photo. 1162.2 - as above, but a minute of so later. Has Mutual Life building in background as well as Town Hall. 1162.3 - No. 40 entering Albert St. from Skipton St. outbound to Sebastopol. 1162.4 - No. 40 near start of side of the road running in Albert St. heading to Sebastopol. 1162.5 - No. 40 at the City terminus, on the South side of Sturt St. Has Town Hall and other buildings along the south side of Sturt St. in the background. 1162.6 - No. 40 at Sebastopol terminus - shows arrangement of the signs at the terminus. 1162.7 - No. 40 and No. 38 crossing at loop between Sayle and Grey St. No. 40 inbound. 1162.8 - No. 40 turning from Drummond St. South to Sturt St. at Hospital Corner with Southern Cross Hotel in background. 1162.9 - No. 18 in Wendouree Parade near Forest St. heading east with destination of "Victoria St." 1162.10 - Nos 41 and 39 at Depot Junction. Both trams have SEC ads. 1162.11 - No. 39 turning into the depot from Wendouree Parade - showing destination of "Gardens via Drummond Nth" 1162.12- No. 17 at Lydiard St. North terminus, showing destination of "Grey St. Sebas". Has a Twin Lakes sign 1162.13 - ditto, but with trolley pole turned around. Has SEC Briquettes roof ad and Whitehorse whiskey ad on rear dash panel. 1162.14 - No. 40 outbound to Sebastopol crossing Albert St. 1162.1 -"Nos. 38 and 20 in Sturt St. Ballarat at corner of Lydiard St." 1162.2 - "No. 38 turns into Lydiard St. as No. 20 waits at stop in Sturt St. Ballarat" 1162.3 - "No. 40 entering Albert St. from Skipton St. Redan on Sebastopol route." 1162.4 - "No 40 at beginning of reserved track on Sebastopol route, Albert St. Redan." 1162.5 - "No. 40 in Sturt St. Ballarat near cnr. of Armstrong St." 1162.6 - "No. 40 at Sebastopol terminus" 1162.7 - "No. 38 and 40 crossing at Sayle St. Loop on Albert St. reserved track, Sebastopol route" 1162.8 - "No. 40 turning into Sturt St. from Drummond St." 1162.9 - "No. 18 in Wendouree Pde. Ballarat near tramway depot" 1162.10 - "No. 41 and 39 outside Ballarat tramway depot, Lake Wendouree in background" 1162.11 - "No. 39 entering tramway depot from Wendouree Parade, Ballarat" 1162.12 - "No 17 at Lydiard St. North terminus, Ballarat North" 1162.13 - "No 17 at Lydiard St. North terminus, Ballarat North" 1162.14 - "No. 40 crossing Albert St. Sebastopol as reserved track switches from left to right of road" All have date stamp of "23 Nov. 1962" in purple ink. All black ink unless otherwise noted.tramways, trams, ballarat, albert st., sturt st., sebastopol, grey st., hospital corner, wendouree parade, depot junction, lydiard st. north, tram 17, tram 18, tram 20, tram 38, tram 39, tram 40, tram 41 -
 Ballarat Tramway Museum
Slide - 35mm slide/s - set of 5, Noel Simons, 19/11/1962 12:00:00 AM
Set of 5 transparencies taken on 19/11/1962 on Kodak mounts. 1186.1 - Bendigo 21 bound for Golden Square at Charing Cross with The Beehive buildings and shops in Pall Mall in the background. Trams has an ad for Cohns drinks on front bumper, SEC Best for Cooking roof ad. and Mamouney's furniture roof ad. Two women passengers boarding. 1186.2 - Bendigo 26 crossing Pall Mall from Mitchell St. bound for Eaglehawk with "Ezywalkin" shop in background. Tram has an SEC 'Electric Cooking' roof ad and a 'Streets Ice cream' ad on front dash. 1186.3 - Bendigo 7 arriving at the Charing Cross stop, bound for North Bendigo. Has a Huttons dash panel ad, a Castrol roof ad. Buildings as for 1186.1. Passengers waiting at the stop. 1186.4 - Bendigo 19 leaving Charing Cross for Golden Square with City Club Hotel alongside and other buildings as for 1186.1 in the background. Tram has Briquettes ad on front dash and SEC 'Electric Cooking' roof ad. 1186.5 - Bendigo 21in High St. at corner of Short St. heading for Charing Cross. Destination half way between Depot and Railway Station. Tram has ads for Cohns Drinks on dash panel, SEC 'Cook with Electricity' and a Sandhurst Milk roof ads.Information written on in black ink and date stamped in purple ink. 1186.1 - "No. 21 in Pall Mall at Charing Cross, Bendigo" 1186.2 - "No. 26 arriving at Alexandra Fountain, Charing Cross, Bendigo" 1186.3 - "No. 7 in Pall Mall at Charing Cross, Bendigo" 1186.4 - "No. 19 in High St., Bendigo, leaving Charing Cross for Golden Square" 1186.5 - "No. 21 in High St. Bendigo, at corner of Short St." tramways, trams, bendigo, charing cross, pall mall, high st., tram 7, tram 19, tram 21, tram 26 -
 Ballarat Tramway Museum
Slide - 35mm slide/s - set of 17, Noel Simons, 20/11/1962 12:00:00 AM
Set of 17 transparencies taken on 20/11/1962 on Kodak mounts. 1187.1 - Bendigo No. 2 at the Quarry Hill terminus, showing destination of Quarry Hill. Has Cohns Drinks and Streets Ice Cream ads on dash panel, a SEC 'electric cooking' roof ad and another roof ad. Shows the Y terminus at this location, but tram standing just before it. Overhead in position. 1187.2 - as above, but closer up. 1187.3 - as above, but from the north side, showing cemetery in the background. 1187.4 - Bendigo No.3 at Eaglehawk terminus. Tram showing destination of Quarry Hill. Has the various buildings at Eaglehawk in the background including the Foodland store. Has Streets Ice cream and White Horse Whiskey ads on the dash panel. 1187.5 - Bendigo No. 18 at Garden Gully crossing loop, in bound, with destination of Eaglehawk. Passengers waiting for an Eaglehawk tram at the stop. Has a white horse whiskey ad on dash panel and SEC roof ads. Conductor standing in doorway looking out. 1187.6 - Bendigo No. 7 inbound in Nolan St. at cnr of McCrae St. showing destination of Golden Square. Has Streets Ice cream ad on dash panel and a Castrol Roof ad. 1187.7 - Bendigo No. 19 at the North Bendigo terminus with railway level crossing in background. Tram has a Cohns Drinks ad and an SEC 'Electric Cooking' roof ad. 1187.8 - Bendigo No. 2 at the Quarry Hill terminus, looking back into Bendigo, showing destination of Eaglehawk. 1187.9 - Bendigo No. 21 in McCrae St, near Nolan St outbound for North Bendigo. Photo taken after tram has passed photographer. 1187.10 - Bendigo Nos. 4 and 26 at Charing Cross in View St. with fountain alongside and the Beehive, Ezywalkin Buildings in the background. No. 26 has a Sandhurst Milk and SEC 'Electric Cooking' roof ad. 1187.11 - close up of 22E maximum traction truck and folded footstep. 1187.12 - Bendigo No. 19 at Charing Cross terminus, after tram has passed photographer, showing destination of North Bendigo, with the Beehive building in the background and passengers boarding tram. 1187.13 - Bendigo No. 11, turning from View St. into Pall Mall, showing Special with the conductor holding point bar. Has the Beehive and Ezywalkin Buildings in the background. 1187.14 - No. 7 at Charing Cross terminus, in Pall Mall, bound for Golden Square. Has the Beehive and Ezywalkin buildings in the background and passengers waiting at the tram stop. 1187.15 - No. 18 at the Charing Cross terminus, bound for Eaglehawk. Has the Beehive and Ezywalkin buildings in the background and passengers waiting at the tram stop. Also has the 'Safety Zone' sign in the photograph. 1187.16 - No. 2 at Quarry Hill terminus, night or dusk photo. Tram showing destination of Depot. 1187.17 - No. 26 at Charing Cross, night photo. Tram has destination of Quarry Hill, but is on the line for Eaglehawk. Photo looks along Mitchell St. Also shows Safety Zone sign. Information written on in black ink and date stamped on purple ink. 1187.1 - "No. 2 at Quarry Hill terminus Bendigo" 1187.2 - "No. 2 at Quarry Hill terminus Bendigo" 1187.3 - "No. 2 at Quarry Hill terminus Bendigo" 1187.4 - "No. 3 at Eaglehawk terminus" 1187.5 - "No. 18 in Mt Korong Road, Long Gully at cnr of Havilah Road (Eaglehawk Route)" 1187.6 - "No. 7 in Nolan St. Bendigo, at Cnr of McCrae St., near lake Weeroona, (North Bendigo Route)' 1187.7 - "No. 19 at North Bendigo terminus" 1187.8 - "No. 2 at Quarry Hill terminus" 1187.9 - "No. 21 in McCrae St. Bendigo, near Nolan St. (North Bendigo Route) 1187.10 - "4 and 26 at Alexandra Fountain, Charing Cross Bendigo" 1187.11 - "Truck of Bogie Car, Bendigo Tramways" 1187.12 - "No. 19 in Pall Mall at Charing Cross, Bendigo" 1187.13 - "Birney car No. 11 entering Pall Mall from View St. at Charing Cross Bendigo" 1187.14 - "No. 7 in Pall Mall at Charing Cross, Bendigo" 1187.15 - "No. 18 at Alexandra Fountain, Charing Cross, Bendigo" 1187.16 - "No. 2 at Quarry Hill terminus, Bendigo" 1187.17 - "No. 26 at Alexandra Fountain, Charing Cross, Bendigo" tramways, trams, bendigo, quarry hill, eaglehawk, north bendigo, maximum traction, night photo, tram 2, tram 3, tram 4, tram 7, tram 11, tram 18, tram 19, tram 21, tram 26 -
 Ballarat Tramway Museum
Slide - 35mm slide/s, Noel Simons, 21/11/1962 12:00:00 AM
Set of 17 transparencies taken on 21/11/1962 on Kodak mounts. 1188.1 - Bendigo No. 11 at Depot Junction McCrae and Arnold St. with driver/conductor changing points. 1188.2 - Bendigo No. 4 at Charing Cross, side on photo, with City Club Hotel and Alexandra Fountain in the background. Tram has Castrol and SEC 'Electric Cooking' ads. 1188.3 - Bendigo No. 4 climbing View St. after tram has passed photographer. Tram has Streets Ice Cream and Cohns Soft Drinks ad on rear dash panel. In the background are the buildings in View St., including the Princess Theatre. Tram has destination of Eaglehawk. 1188.4 - Trams 2 and 4 crossing at the California Gully or Thorpe St Loop. 1188.5 - Bendigo 4 in Mt Korong Road. Tram inbound with destination of Quarry Hill, just leaving Garden Gully Loop. 1188.6 - Bendigo 4 and 17 crossing at the Hayes St. or Iron Bark Gully Loop. No. 17 bound for Eaglehawk, No. 4, Quarry Hill. 17 has two SEC roof ads and a white horse whiskey ad. 1188.7 - No. 17 bound for Eaglehawk, soon after leaving California Gully. Has large mullock heap in background. 1188.8 - Bendigo 2 and 17 crossing at the Thorpe St. or California Gully Loop. Has butchers shop in background. 1188.9 - Bendigo 17 at the Eaglehawk terminus. Has destination of Quarry Hill. In background is the hotel and shops at the terminus, showing ads for "Melbourne Bitter". Tram has two SEC 'Electric Cooking' ads. Driver and conductor about to assist two lady passengers with a pram and baby. 1188.10 - No. 17 at Eaglehawk terminus, awaiting departure. Has Eaglehawk Town Hall and Post Office in background. Tram has a Whitehorse Whiskey ad on the front dash panel. 1188.11 - No. 3 in High St. Eaglehawk, with destination of Eaglehawk. Has the shops on the south side of High St. in the background, including the Eaglehawk fish shop. Tram has two roof ads, one an SEC roof ad, and Cohns Drinks and Streets Ice cream ads on front dash panel. 1188.12 - as above, but after tram has passed photographer. Note the centre of the road poles. 1188.13 - No. 2 outbound for Eaglehawk at the intersection of Mt. Korong Road and the Calder Highway. Photo taken after the tram has passed the photographer. Has an Ampol service station in the background. 1188.14 - No. 11 leaving the Bendigo depot, crossing the bridge, with the Scrubber car in the background. 1188.15 - No. 21 at the North Bendigo terminus. Tram has destination of Golden Square and Cohns drink ad on front dash and two roof ads on side. 1188.16 - No. 11 on Golden Square route, in High St. at intersection with Old High St. 1188.17 - No. 11 at the Golden Square terminus, conductor turning the pole. Hotel on the left side of the photo. Note the road works barrier and red flag behind the tram. Slide has an end of roll mark on the right hand side of the image.Information written on in black ink and date stamped on purple ink. 1188.1 - "Birney car No. 11 in McCrae St. at Cnr of Arnold about to run into depot, Bendigo" 1188.2 - "No. 4 at Alexandra Fountain, Charing Cross Bendigo" 1188.3 - "No. 4 climbing the View St. Hill from Charing Cross, Bendigo (Eaglehawk Route)" 1188.4 - "No. 4 and 2 at Thorpe St. Loop, California Gully" 1188.5 - "No. 4 in Mt Korong Rd., Long Gully, Near Havilah Rd. (Bendigo) (Eaglehawk Route)" 1188.6 - "Nos. 17 and 4 crossing on Hayes St. Loop, Ironbark, Bendigo" 1188.7 - "No. 17 soon after leaving California Gully (Eaglehawk Route)" 1188.8 - "No.2 and 17 crossing on Thorpe St. Loop, California Gully (Eaglehawk Route)" 1188.9 - "No. 17 at Eaglehawk terminus" 1188.10 - "No. 17 at Eaglehawk terminus" 1188.11 - "No. 3 in High St. Eaglehawk" 1188.12 - "No. 3 nearing Eaglehawk terminus" 1188.13 - "No. 2 in Mt. Korong Rd., Ironbark. Calder highway on left (Eaglehawk route) 1188.14 - "Birney car No. 11 leaving Bendigo depot. Scrubber car at rear" 1188.15 - "No. 21 at North Bendigo Terminus" 1188.16 - "Birney car No. 11 in High St. Bendigo at intersection with Old High Street (Golden Square Route)" 1188.17 - "Birney Car No. 11 at Golden Square terminus, High St., Bendigo". tramways, trams, bendigo, depot junction, charing cross, view st., eaglehawk, north bendigo, golden square, tram 2, tram 3, tram 4, tram 11, tram 17, tram 21, tram scrubber -
 Ballarat Tramway Museum
Slide - 35mm slide/s, Noel Simons, 21/11/1962 12:00:00 AM
Set of 6 transparencies taken on 21/11/1962 on Kodak mounts. 1189.1 - Bendigo No.11 at Quarry Hill terminus. Photo taken looking in along the route. Tram has destination of North Bendigo. 1189.2 - No. 21 in Pall Mall bound for North Bendigo. Tram has roof ads for Mamouney's furniture and SEC. In the background are the National Bank building, Dad and Dave's Cafe and the Beehive Buildings and the London Pharmacy. 1189.3 - No. 2 in Mitchell St, just after crossing over railway bridge. Photo taken after tram has passed photographer. Has what appears to be an SEC road works crew in the background. Has destination of Quarry Hill. 1189.4 - No. 17 climbing Mitchell St. on the start of the single track section, just before crossing the railway bridge. Has destination of Quarry Hill and the large Maples building sign in the background. 1189.5 - as for 1189.4 but after tram has passed photographer. Has an Ilford film roof ad and an SEC roof ad. Railway bridge in the background. 1189.6 - No. 21 at Charing Cross with passengers boarding. Tram has destination of North Bendigo and roof ads for SEC 'Electric Cooking' and Sandhurst Milk. In background are the buildings on the south side of High St. Also has a SEC worker in white overalls sweeping the track.Information written on in black ink and date stamped on purple ink. 1189.1 - "Birney car No. 11 in High St. Bendigo at Golden Square terminus" 1189.2 - "No. 21 in Pall Mall Bendigo near Charing Cross" 1189.3 - "No. 2 in Mitchell St. Bendigo, just after crossing bridge over railway line (Quarry Hill route)" 1189.4 - "No. 17 in Mitchell St. Bendigo, climbing the hill the bridge over the railway line. (Quarry Hill route)" 1189.5 - "No. 17 in Mitchell St., Bendigo approaching bridge over Railway line (Quarry Hill route)" 1189.6 - "No. 21 at Charing Cross, Bendigo"tramways, trams, bendigo, golden square, pall mall, mitchell st., quarry hill, tram 2, tram 11, tram 17, tram 21 -
 Ballarat Tramway Museum
Slide - 35mm slide/s - set of 3, Noel Simons, 22/11/1962 12:00:00 AM
Set of 3 transparencies taken on 22/11/1962 on Kodak mounts. 1190.1 - No. 7 (bound for North Bendigo) at the Charing Cross stop with No. 19 just left for Quarry Hill. Has the buildings on the south side of High St. in the background, including RACV building. No. 7 has front dash panel ad for Streets ice cream, and roof ads for Ilford Film and an SEC "Cook with Electricity". Passengers are boarding the tram. 1190.2 - Bendigo No. 2 at Charing Cross with fountain in the background and other buildings on the south side of High St. Tram has two SEC roof ads - good side on view - "Electric Cooking - Matchless" and "Switch to Electric Cooking". 1190.3 - Nos. 19, 2 and 7 at Charing cross with a Austin ? motor car. Has buildings on the south side of High St. in the background, along with SEC and Ilford film roof ads.Information written on in black ink and date stamped on purple ink. 1190.1 - "Nos. 19 and 7 at Alexandra Fountain, Charing Cross, Bendigo" 1190.2 - "No. 2 at Alexandra Fountain, Charing Cross, Bendigo" 1190.3 - "Nos. 19, 2 and 7 at Alexandra Fountain, Charing Cross, Bendigo" tramways, trams, bendigo, charing cross, alexandra fountain, tram 2, tram 7, tram 19 -
 Ballarat Tramway Museum
Slide - 35mm slide/s - set of 4, Noel Simons, Apr. 1967
Set of 2 slides made from the Association of Railway Enthusiast Provincial Tramways film strip, possibly during April 1967. 1192.1 and 1192.3 mounted in Kodak Ready Mounts. The others in plain white mounts. Slides dated Dec. 1968. 1192.1 - No. 21 out bound to Golden Square in High St., between Wattle and Vine Streets. Photo taken after tram has passed photographer. Has a sign for "Reid's Furnituorium" in the background. 1192.2 - Bendigo No. 28 dressed up as Myers Christmas tram, passing the Post Office and Courts in Pall Mall. 1192.3 - Bendigo No. 23 at Needle Loop en route to Eaglehawk. Tram has two SEC roof ads, one "Electric Cooking" and the other "Everything fine in my all electric kitchen". 1192.4 - Bendigo scrubber parked at the end of the main depot lead, alongside the depot office buildings.Details in blue ink, date hand stamped in purple ink. 1192.1 - "No. 21 heads along High St for Golden Square between Wattle and Vine Streets." 1192.2 - "Birney No. 28 in Christmas Garb, traverses Pall Mall en route to North Bendigo". 1192.3 - "No. 23 at Needle Loop on its run to Eaglehawk". 1192.4 - "Scrubber car at Bendigo Depot".tramways, trams, north bendigo, bendigo, bridge st loop, depot, tram 21, tram 23, tram 28, tram scrubber -
 Ballarat Tramway Museum
Slide - 35mm slide/s - set of 24, Noel Simons, 20/05/1971 12:00:00 AM
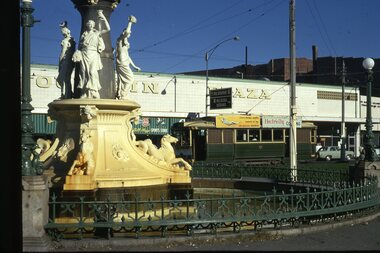
Set of 24 transparencies taken on 20/5/1971 on Kodak mounts. 1195.1 - Bendigo 19 arriving at Charing Cross en route to North Bendigo with Fountain Plaza and the City Family Hotel in the background. No. 19 has two roof ads for the SEC. -'Electricity better for cooking' and 'Everything's under control in my all electric kitchen' 1195.2 - as above, but standing at the Charing cross stop, with the Beehive Stores and other buildings along the east side of Pall Mall in the background. 1195.3 - No 21 ex Golden Square crossing View St. trackwork in front of No. 25 waiting to depart for Quarry Hill. No.21 has two roof ads (as for No.19 in 1195.1) and No.25 has one SEC roof ad and another. Ezywalkin sign in the background, and Fountain Plaza. 1195.4 - as for 1195.3, but after 21 has arrived and 25 left for Quarry Hill. Has Ezywalkin store and the Beehive store in the background. 1195.5 - No. 5 at the Eaglehawk terminus. Photo taken with a cannon in foreground looking along High St. Eaglehawk. Has shops on the west side of High St. in the background. 1195.6 - No. 5 at the Eaglehawk terminus, close up of the rear of the tram - note tow bar arrangement. Has destination of Quarry Hill. 1195.7-Nos.25 and 5 crossing at the Thorpe St. Loop, California Gully. No. 25 bound for Eaglehawk (has SEC Briquette and electric cooking roof ads) and 5 en route for Quarry Hill with a SEC and Cinzano roof ad. 1195.8 - as for 1195.7, but after trams have passed each other. Has Borough Auto Service building in the background. 1195.9 - No. 5 in Mt Korong Road, towards Bamard Street, photo taken after tram has passed photographer. 1195.10 - No. 30 at the Golden Square terminus with the Milk Bar on the right hand side of the photograph. 1195.11 - No. 30 inbound at Fire Station Loop, High St. Golden Square. Has old fire station in the background. Passengers are boarding the tramcar. 1195.12 - No. 30 in High St, bound for North Bendigo between Vine and Wattle Streets. 1195.13 - No. 5 bound for Eaglehawk waits at Iron Bark Gully Loop, at Hayes St. 1195.14 - No. 5 and No. 2 crossing at Iron Bark Gully Loop. 1195.15 - No. 5 bound for Eaglehawk leaving the Manchester Loop, Long gully. 1195.16 - No. 5 passing William Street, Long Gully en route to Eaglehawk. 1195.17 - No. 5 just before the California Gully Crossing Loop. 1195.18 - Nos. 5 and 26 crossing at California Gully crossing Loop. No. 5 heading to Eaglehawk, 26, Quarry Hill. 1195.19 - No. 5 in High St. Eaglehawk with Bob Moyle's Victoria Hotel and the TAB in the background. 1195.20 - No. 5 in High St. Eaglehawk approaching the terminus. Photo taken after the tram has passed the photographer. Has Foodland store and J. Best Fruit supply in the background, along with Eaglehawk Town Hall. 1195.21 - No. 5 at the Eaglehawk terminus, photo taken along seldom used track along High St. 1195.22 - as for 1195.22 - but at the very end of the track. 1195.23 - No. 5 en route for Quarry Hill climbs High St. Eaglehawk with the Victoria Hotel and Eaglehawk Town Hall in the background. 1195.24 - No. 5 and 25 crossing at Jobs Gully Loop. Note 25 has a black on white destination roll, while No. 5 has a white on black destination roll. Information written on in black ink and date stamped on purple ink. 1195.1 - "No. 19 arrives at Charing Cross Bendigo from Golden Square" 1195.2 - "No. 19 about to leave Charing Cross for North Bendigo" 1195.3 - "No. 25 awaiting departure for Quarry Hill, watches No. 21 arrive at Charring Cross from Golden Square" 1195.4 - "No. 21 on North Bendigo service and No. 25 on Quarry Hill run await departure at Charing Cross" 1195.5 - "No. 5 at Eaglehawk terminus" 1195.6 - "No. 5 at Eaglehawk terminus" 1195.7 - "Nos. 5 and 25 crossing at Thorpe St. Loop, California". 1195.8 - "Nos. 25 and 5 crossing Thorpe St. Loop, California Gully". 1195.9 - "No. 5 descending Mt Korong Rd. towards Bamard St." 1195.10 - "Birney car No. 30 at Golden Square terminus" 1195.11 - "Birney car No. 30 in High Street near Thistle Street (Fire Station Loop)" 1195.12 - "No. 30 in High St. between vine and Wattle Streets" 1195.13 - "No. 25 at Hayes Street Loop Iron Bark". 1195.14 - "Nos. 2 and 5 crossing at Hayes Street Loop Iron Bark" 1195.15 - "No. 5 at Manchester Loop opposite Havilah Road, Long Gully" 1195.16 - "No. 5 passing William Street, Long Gully". 1195.17 - "No. 5 at California Gully" 1195,18 - "Nos. 26 and 5 at Thorpe St. Loop, California Gully". 1195.19 - "No. 5 in High St. Eaglehawk". 1195.20 - "No. 5 approaching Eaglehawk terminus" 1195.21 - "No. 5 at Eaglehawk terminus" 1195.22 - "No. 5 at Eaglehawk terminus" 1195.23 - "No. 5 in High St. Eaglehawk" tramways, trams, bendigo, charing cross, eaglehawk, california gully, golden square, iron bark gully, jobs gully, tram 2, tram 5, tram 19, tram 21, tram 25, tram 26, tram 30 -
 Ballarat Tramway Museum
Slide - 35mm slide/s - set of 2, Noel Simons, 20/05/1971 12:00:00 AM
... in the foreground. In the background is the Fountain Plaza building. Tram.... In the background is the Fountain Plaza building. Tram has 2 SEC roof ads ...Set of 2 slides mounted in Kodak Ready Mounts. Slides dated 20 May 1971. 1196.1 - Bendigo No. 21 arriving at Charing Cross from Golden Square with the Alexandria Fountain in the foreground. In the background is the Fountain Plaza building. Tram has 2 SEC roof ads. 1196.2 - No. 30 at Charing Cross from North Bendigo. On a pole in front of the tram are two signs "All cars stop here" in white printing on a red background and "Cars Stop by Request" in white lettering on a black background.1196.1 - "No. 21 passing Alexandra Fountain on arrival at Charing Cross from Golden Square" 1196.2 - "No. 30 at Charing Cross"tramways, trams, charing cross, bendigo, alexandra fountain, tram stops, tram 21, tram 30 -
 Ballarat Tramway Museum
Slide - 35mm slide/s - set of 4, Noel Simons, 24/05/1971 12:00:00 AM
Set of 4 transparencies taken on 24/5/1971 on Kodak mounts. 1199.1 - No. 21 in High St. at junction with old High St., near Fire Station Loop. Tram has two SEC roof ads. 1199.2 - No. 21 in High St. between Shamrock and Thistle Sts. Photo taken after the tram has passed the photographer. 1199.3 - Photo of a green box containing timetables for the four Bendigo routes. Located at Charing Cross. 1199.4 - Bendigo No. 23 en route to Eaglehawk at Charing Cross, with two SEC roof ads 'Everything's fine in my all electric kitchen' and "Switch to electric cooking'. Has the Ezywalkin building and the Beehive building in the background. Information written on in black ink and date stamped on purple ink. 1199.1 - "No. 21 in High St. at junction with old High St., near Fire Station Loop." 1199.2 - "No. 21 in High St. between Shamrock and Thistle Sts." 1199.3 - "Bendigo Tramways timetable at Alexandra Fountain Charing Cross." 1199.4 - "No. 23 at Alexandra Fountain Charing Cross, Bendigo." tramways, trams, bendigo, timetables, charing cross, high st., tram 21, tram 23