Showing 666 items matching "table cover"
-
 Warrnambool and District Historical Society Inc.
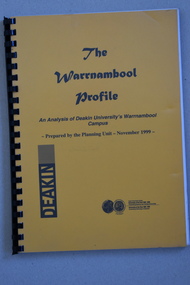
Booklet Lettering Book, Deakin University Planning Unit, The Warrnambool Profile – An Analysis of Deakin University’s Warrnambool Campus, 1999
This booklet was prepared in 1999 by the Planning Unit of Deakin University. It gives current data on the campus and projections and suggestions for the future. The Warrnambool Campus of Deakin University was established in 1990 after a merger with the Warrnambool Institute of Advanced Education which was already on the site that the university still occupies. This is Sherwood Park, a 94 hectare site on the Princes Highway, five kilometres from Warrnambool.This booklet is of some interest as it contains information on the Warrnambool Campus of Deakin University ten years after it was first established. This is a soft cover booklet of 179 pages. It has an orange front cover and a black back cover with black printing and a plastic over-sheet. The booklet has printed information, tables and graphs. It has black plastic spiral binding. deakin university, warrnambool campus -
 Warrnambool and District Historical Society Inc.
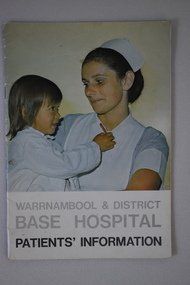
Booklet, Warrnambool & District Base Hospital Patients' information, C1970
This booklet outlines procedures and rules which pertain to the Warrnambool base Hospital. It covers such items as services, admissions, meals, visitors, blood donors, charges, and complaints. A small booklet with social and historical interest to the district.16 page booklet with image of a nurse with a child in her arms on the front cover and text in grey and black on a white background.Back cover has a photograph a woman in a wheelchair with four hospital staff. below is a red cross in a circle with Warrnambool and district Base Hospital around it.It has a map of the site and a table of contents outlining aspects of procedures arpund the hospital.Photography : Roger Lee. Printed by Philprint Warrnambool.warrnambool base hospital, warrnambool, warrnambool and district base hospital -
 Marysville & District Historical Society
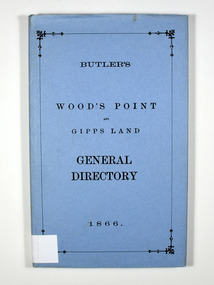
Book, Butler's Wood's Point and Gipps Land General Directory 1866, 1985
A directory of the local businesses, road guides and table of distances in the Wood's Point, Jamieson, Omeo and Bairnsdale areasHardback. Blue dust cover. Title in black on the front cover.Stamp of the Marysville & District / Historical Society Inc / P.O. Box 22 / Marysville 3779directory, wood's point, gippsland, victoria, history, jamieson, bairnsdale, omeo, road guide, table of distances, advertisements -
 Bendigo Military Museum
Book - BOOK & LETTERS
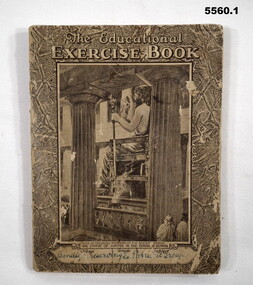
Copy of receipts for donations made by Bendigo Preserving Company Patriotic Group to various charity groups in support of WW2 war effort. Includes 3 letters to Company thanking for donation.1. Small lined exercise book, Black & white cover with 36 sheets (72 pages). Last 24 pages blank and other pages have receipts stuck into books of donations for money raised to various organisations. 2. Typed thank you letter from Salvation Army. 3. Handwritten thank you letter from Red Cross. 4. Handwritten thank you letter from Red Cross.1. On front cover "The Educational Exercise Book" and picture of the statue of Jupiter in the Temple at Olympia. On back, conversion tables for weights and measures. 2. Salvo Letterhead and Thank You note. 3. Red Cross Letterhead and handwritten note. 4. Red Cross Letterhead and handwritten note.fundraising, receipts, ww2 -
 Bendigo Military Museum
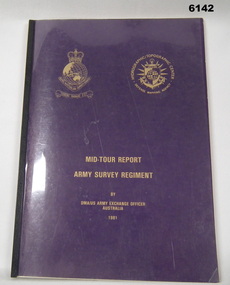
Administrative record - American - Australian Officer Exchange - Mid Tour Report ASR 1981, Major D Bowen US Army Corps of Engineers, Major David Bowen US Army Corps of Engineers, 07.1981
American - Australian Officer Exchange - Mid Tour Report ASR 1981, Major D Bowen US Army Corps of Engineers. A two-year exchange program existed between the Australian Survey Corps and the US Army Corps of Engineers. This is a report by the US Exchange Officer in 1981 half way through the exchange tour.Clear film plastic covers front and back, Light Purple cardboard covers. Contains Cover Letter to American Embassy, Canberra ACT. Page 2 is Information page with references. Table of Contents page. Actual Report is pages numbered 1-19. Booklet "Lansells Fortuna (green cover edition) pages 1-16, only some pages are numbered. Army Survey Regiment Organisation Chart, "Map Production Story"- 8 pages, Bowen to Gram No1- WestPoint to Australia 2 pages, Enclosure 9 - Use Addresses (USA). Armed Forces of Australia - Badges of Rank, Enclosure 5 - Recommended Changes 2 pages, Enclosure 6 - Technical Services R&D Tasks, Married Quarter Floor Plan.royal australian survey corps, rasvy, fortuna, army survey regiment, army svy regt, asr -
 Bendigo Military Museum
Manual - The Plane Table - Its Use in Surveying, McGraw Publishing Company, New York, USA, 1908
The plane table instrument was a simple but very effective early method of producing maps. Some very early editions were produced by the Australian Survey Corps after its formation in 1915 using this method. This manual details how to use the "Plane Table" for Surveying purposes.Hard Cloth covered Covers front and back, paper pages. title page has rubber stamp impressions (see below). Contents page, symbols page, pages 1-47 and index page.Adhesive label on front "46.10 and 12411", "1504" in purple also on front cover, Numbers inside front cover - "Acc. No. 000076" and crossed out. "scm - B0 - 86-72" written underneath. stamps- Australian Intelligence Corps, Headquarters library No 150 (difficult to read) on first page and stamped "CANCELLED" , Stamp School of Military Survey Library Call No 526 - 9825 LOV. Another stamp on title page - Department of Defence Library 46.10 and 12411. Second stamp 2/D. M.O.S. 2012 with CANCELLED. royal australian survey corps, rasvy, army survey regiment, army svy regt, asr, fortuna -
 Bendigo Military Museum
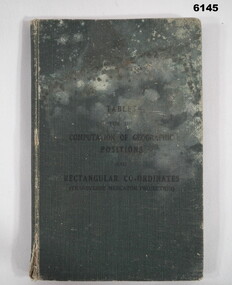
Manual - Mathematical Tables for the Computation of Geographic positions and Rectangular Coordinates, 1942
Numerous mathematical tables for the computation of Geographical Positions and rectangular coordinatesHard covered Book, cloth covered, A5 in size, 169 pages, Title Page, contents Page, 5 x blank pages at front, 15 x blank pages at rear."? Slattery" , "Sgt RC Andrews. School Tac? Adm. Seymour" all crossed out, on 1st page inside cover. "Please Return to: Survey Directorate AHQ Victoria Barracks Melbourne" Front and rear pages.royal australian survey corps, rasvy, fortuna, army survey regiment, army svy regt, asr -
 Bendigo Military Museum
Book - Sun Observations for Azimuth - Astronomical Fixations Woomera 1951, 28.05.1951 to 02.08.1952
Field Survey control position fixing observations for the Woomera Rocket Range, South Australia. Sun Astronomical observations by Sergeant NRJ Hillier later Colonel and Director of Military Survey-Army, and Sergeant DR Ridge later Lieutenant Colonel and Commanding Officer of the Army Survey Regiment.Hard covered book, handwritten pages, map sketches, extra laminated table of figuresHandwritten observation tables and notes. Handwritten notes on front and back coversroyal australian survey corps, rasvy, fortuna, army survey regiment, army svy regt, asr -
 Bendigo Military Museum
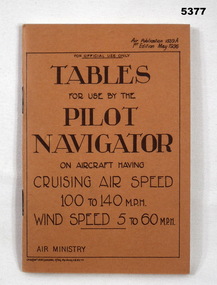
Booklet - BOOKLET, AVIATION, Air Ministry, 1936
Refer to the service of LAC's Lance & Percy Coates.Small booklet, brown cover. Bound with two staples. Front printing is in black ink. It has a large quantity of charts and tables. The first 6 pages inform the user how to use the tables.aircraft, booklet -
 Bendigo Military Museum
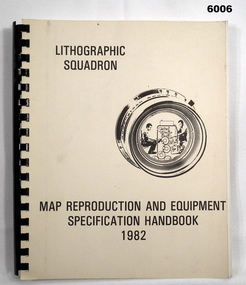
Manual - Map Reproduction and Equipment Specification Handbook, 1982
This handbook provided comprehensive technical information principally to the lithographic technician and to other Royal Australian Survey Corps technical trades. Part 1 comprised technical descriptions and photos of lithographic equipment used in military map production. Part 2 provided various tables such as printing sizes conversion tables. Part 3 provided technical guidance on the stipples and screens utilised in the map reproduction process. Part 4 detailed the Pantone Matching System printing colours for map and chart products. Part 5 was a Glossary of Lithographic Technical Terms.Army Survey Regiment Manual/handbook with a manilla cover comprising approximately 100 pages. The pages in the document are in black and white paper providing technical information and photograph identifying lithographic equipment and other information to lithographic technicians. Printed on standard paper bound by a by a black plastic spiral spline.royal australian survey corps, rasvy, fortuna, army svy regt, asr, army survey regiment -
 Bendigo Military Museum
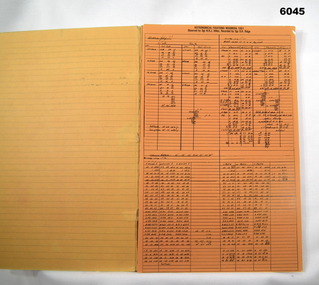
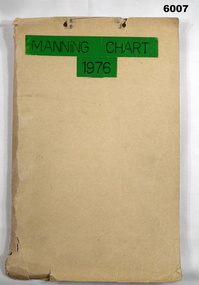
Document - Army Survey Regiment Manning Chart 1976, 1976
This document contains detailed photocopies of reports of Army Survey Regiment’s staff manning from December 1975 to August 1976. Each monthly report provided to Directorate of Survey covered the allocation of staff to Regimental Headquarters and its four sub units comprising Headquarters, Air Survey (Topographic), Cartographic and Lithographic Squadrons. Each Squadron’s troop or section structure was represented by a wire diagram with soldiers and/or civilians names assigned to rank based established positions. A detailed table at the end of each report sumarised Army Survey Regiment’s posted strength by employment category and rank.Manilla cardboard folder containing 83 photocopied pages of staff posted to the Army Survey Regiment. Pages are fixed to the folder by a metal fastener. The title of the folder is written in black ink on a green tape background.royal australian survey corps, rasvy, army survey regiment, army svy regt, asr, fortuna -
 Bendigo Military Museum
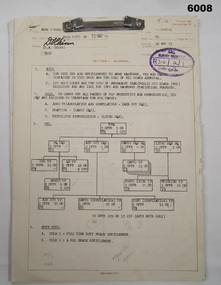
Document - Army Survey Regiment Army and Civilian Establishment Authorisation, 23 05 1975
This document was a directive from Army Headquarters authorising the allocation of Army and Civilian positions to the Army Survey Regiment. It provided an organisational wire diagram summarising the overall numbers of Officer, Civilian and Other Ranks to RHQ, and Headquarters, Air Survey, Cartographic and Lithographic Squadrons. Staff allocations to RHQ and each of the four squadron's troop and/or sections were identified in a table format, by hierarchy of rank and employment categories.This document comprises 7 pages of information in black and white with diagrams and tables detailing the allocation of staff to the unit. Pages are fixed by a metal fastener. There is no cover.royal australian survey corps, rasvy, fortuna, army survey regiment, army svy regt, asr -
 Bendigo Military Museum
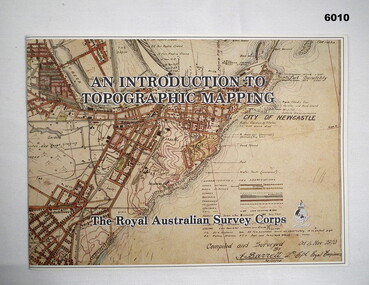
Pamphlet - An Introduction to Topographic Mapping, C 1991
This pamphlet was published by the Army Survey Regiment as an overview of the Royal Australian Survey Corps (RASvy), its role and unit structure circa 1991, prior to RASvy’s disbandment in 1996. The pamphlet comprehensively detailed the eight steps of topographic map production: Establish Survey Control, Aerial Photography, Aerotriangulation, Stereoplotting, Field Verification, Cartography, Printing and Storage/Map Distribution. Leading technologies used by RA Svy in 1991 included GPS control surveys, 5 colour printing on the Speedmaster offset press and bulk map packaging using the Map Handling Station (with guillotine). Digital map production was operating on the AUTOMAP 2 system, before the “Newheart” system upgrade two years later. Printed on the pamphlet cover was a portion of the plane tabled “four inches to a mile” map of Newcastle. This was compiled and surveyed in 1910 by LCPL A. Barrett, a member of the RAE Detachment, as part of the first major topographic mapping effort of Australia.This is a Royal Australian Survey Corp pamphlet with a historical map printed in colour on cardboard on both sides of the cover. There are 16 pages printed in colour on gloss paper, with photos, diagrams and descriptions. The pamphlet is bounded by two staples on its spine. Each of the 17 images were scanned at 300 dpi in JPEG (.jpg) format and stored on the attached 16 Gb USB memory stick. The images have been converted into MPEG-4 (.mp4) video format, 4Mb in size and runs for 2:16 minutes and is also stored on the memory stick.royal australian survey corps, rasvy, fortuna, army survey regiment, army svy regt, asr -
 Bendigo Military Museum
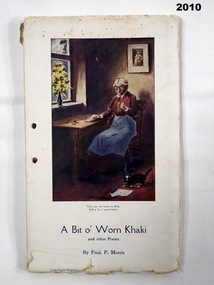
Book - BOOK OF POEMS, MORRIS Fred. P, " A Bit o' Worn Khaki and other poems", 3rd Edition - 6th Thousand
Poems dedicated to the Mothers of AustraliaSoft cover book. Soft cover: Lightweight cardboard with blue print on front. Front cover, illustrated in colour, copy of painting depicting a woman seated at a table, 52 pages, uncut, plain, off white paper. Illustrated black and white drawings.books, ww1, poetry -
 Lara RSL Sub Branch
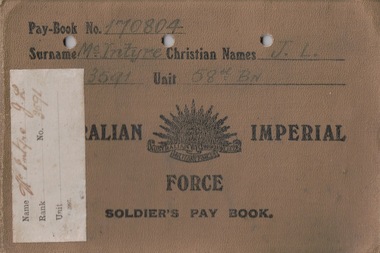
Personal Records, Paybook, J.L.McIntyre
These paybooks were carried by John Lachlan McIntyre while on active service during the First World War. The books cover the period November 1915 to July 1919. Every soldier carried a paybook, and made an entry each time they were paid. Paybooks enable researchers to track the dates and places that a soldier served. These paybooks are associated with JL McIntyre, a founding member of Lara RSL. The books are highly personal objects carried with him every day, and would have formed a key element of his wartime experience. They are also significant as research materials, allowing researchers to track McIntyre's war experience. 2 Small khaki paybooks. One is landscape with a rising sun badge and text on the front. The other is portrait with a cloth cover and text. Each book has tables inside tracking dates and locations of payments made to JL McIntyre while on service. Book 1: Pay Book No. 170804 Surname McIntyre Christian Names J.L. 3591 Unit 58th Bn Australian Imperial Force Soldier's Pay Book. Book 2: JL McIntyre Soldier's Pay Book, For Use On Active Service 3591paybook, military, army, wwi, world war one, first world war, mcintyre, rsl, lara -
 Lara RSL Sub Branch
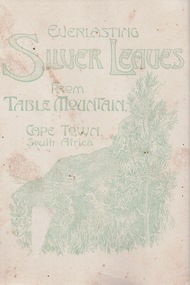
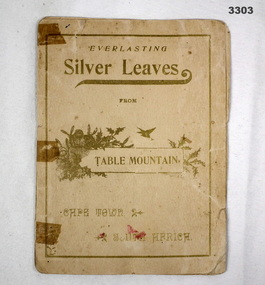
Picture Postcard Booklet, Cape Town South Africa
This card is part of the McIntyre collection from three sons, J.L. McIntyre (founding member of Lara RSL Sub Branch WW1; J. W. McIntyre WW1 and T.G. McIntyre WW2. Jim McIntyre picked this card up while on leave in Cape Town, South AfricaA card sent home to family from WW1 Anzac serving in the AIFOn cover (see image) is written Everlasting Silver Leaves from Table Mountain Cape Town South Africa On second page (see image) is a photo of Strand Street, Cape Town On third page (see image) are three leaves with a picture of flowers, a hand and sign 'Remember Me' On back page (see image) is writing - Cape Town 12/1/17 To Florrie From Jim silver leaves, table mountain, cape town, south africa, ww1, world war 1, australian army, aif, mcintyre, strand street -
 Bendigo Military Museum
Card - CARD, BOER WAR, Pre 1900
Post card Boer War sent from South Africa by Otto J LUCKWALL, 5th Vic Mounted Rifles to his sister. Otto was from Bendigo. The card has pressed leaves & photo inside. Fawn cardboard two page folded card with gold lettering on front. Sepia photo inside front cover of camp scene with soldier standing on guard with rifle. trenches in foreground, Three pressed leaves inside. Back cover with red, white & blue bow joining the leaves at their stems.Printed on cover: “Everlasting Silver Leaves From Table Mountain Cape Town South Africa” On L leaf: “Loving Greetings” On R leaf: “To my dear sister” cards, boer war, silver leaves -
 Bendigo Military Museum
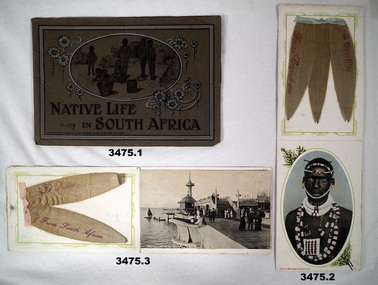
Booklet - BOOKLETS SOUTH AFRICA WW1, c.1915
Items collected by Bert HEWSTON on the way to England WW1, refer Cat No 2759.2 for his service history. Part of the HEWSTON collection re WW1 & WW2.3 x Souvenir booklets from South Africa. .1) Dark grey/brown cover with illustration of native children within an oval shape. Contains colour prints of native people & places. 15 pages. .2) A coloured reproduction of a Zulu in marriage costume. Cream card cover with pale brown printing. Contains 3 x dried silver leaves fromTable Mountain fused to the inside back cover. .3) Photo post card of Promenade Pier, Cape Town which has 2 x dried silver leaves from Table Mountain fused to the inside the back cover..1) Printed: “Native life in South Africa” .2) Printed: “Zulu in marriage costume SA” .3) Printed: “From South Africa”documents - booklets, military history - souvenirs, africa -
 Bendigo Military Museum
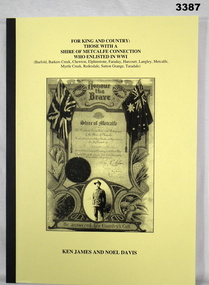
Book - BOOK WW1, For King & Country. Those with a Shire of Metcalfe Connection who Enlisted in WWI, 2009
Soft light cardboard cover. Yellow background, black print on font. Black buckram spine. Black & white photo of a certificate - Honour the Brave for the Shire of Metcalfe. 281 pages, cut, plain, white. Illustrated in black & white, photos, certificates, maps, lettersHandwritten in black ink on Table of Contents along with "RSL Stamp" "Peter C Ball" (Signed off the donation) book, shire of metcalf -
 Bendigo Military Museum
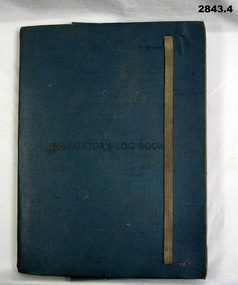
Administrative record - FOLDER, 2) & .3) Geographical Section, General Staff, No 4080 War Office 1941 et al, Navigator's Log Book, 2) & .3) 1941
.1) Navigator's Log Book, hard cover, blue colour buckram with dark blue paint on front cover. Back end paper includes a pocket for maps & has a Conversion Table & Nautical Miles, Statute Miles, Kilometres, tables in black print on beige paper included. Stiff card divider. .2) Map folded, black printing on beige paper. Gibraltar Scale 1:1,000,000 at 56 degrees N. .3) Map folded, black printing on beige paper. Algeria Scale 1:1,000,000 at 56 degrees N. .4) Pencil grey lead, timber colour. Stamped into pencil: HB Commonwealth of Australia..1) Hand written in black ink on front end paper: Wreck at Cape Juby. In pencil: S2 / MZ / W2 / 1Z . 35N .2) Hand written in blue pencil: Atlantic. Blue & red ink & lead pencil notations over map. .3) Hand written in blue pencil: Mediterranean. Blue & red ink numerous notations over map.documents - maps/records, military history, passchendaele barracks trust -
 Federation University Historical Collection
Document, John Barker, Internal Combustion Engine Driven Heat Pump, 1983
John C. Barker, the son of E.J. Barker , studied Mechanical Engineering at the Ballarat College of Advanced Education, and completed his final year in 1983..1 - Internal Combustion Engine Driven Heat Pump project report .2 - Final Year Engineering Degree Projects 1983 (Full catalogue) .3) Four-figue mathematical tables.On .3 "John C. Barker Ballarat College" in handwriting on the front cover.john c. barker, engineering, heat pump, combustion engine -
 Federation University Historical Collection
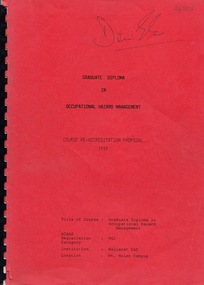
Document - Document - Booklet, VIOSH: Ballarat College of Advanced Education; Graduate Diploma in Occupational Hazard Management; Re-Accreditation Proposal, 1985
... Spiral bound booklet with red paper cover. Includes a Table... Spiral bound booklet with red paper cover. Includes a Table ...Victorian Institute of Occupational Safety and Health (VIOSH) Australia is the Asia-Pacific centre for teaching and research in occupational health and safety (OHS) and is known as one of Australia's leaders on the field. VIOSH has a global reputation for its innovative approach within the field of OHS management. VIOSH had its first intake of students in 1979. At that time the Institution was known as the Ballarat College of Advanced Education. In 1990 it became known as Ballarat University College, then in 1994 as University of Ballarat. It was 2014 that it became Federation University. VIOSH Australia students are safety managers, senior advisors and experienced OHS professionals. They come from all over Australia and industry. Students are taught active research and enquiry; rather than textbook learning and a one-size fits all approach. VIOSH accepts people into the Graduate Diploma of Occupational Hazard Management who have no undergraduate degree - on the basis of extensive work experience and knowledge. Booklet contains a detailed outline of the course for the Re-Accreditation Proposal in 1985. Extra information was requested and this was provided in a supplementary booklet in April 1986.Spiral bound booklet with red paper cover. Includes a Table of Contents. Re-accreditation proposal covers 104 pages with two Appendices. Separate section included with further information as requested.viosh, victorian institute of occupational safety and health, ballarat college of advanced education, occupational hazard management, course re-accreditation proposal, supplementary information -
 Federation University Historical Collection
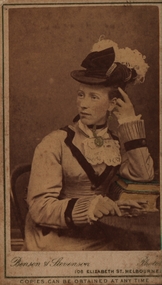
Photograph - Sepia photograph, Benson & Stevenson, Emma Eliza Jane Phillips, c1860's
Emma was one of the first white children born in the Barrabool Hills (Geelong) to parents Richard and Elizabeth Phillips. Emma Eliza Jane Phillips was one of the first white children born in the Barrabool Hills (South Geelong) in the Port of New South Wales on 25/04/1844 and died at "Gracedale" Yendon 12/10/1925, age 81. Emma was the daughter of Richard Price Phillips and Elizabeth Anne Goodenough. Richard, originally a coach plater, was the licensee of "The Thistle Inn", a small hotel on the corner of Corio and Yarra Streets. Elizabeth appears to have had a dressmakers shop around the corner in Yarra Street. Emma married Thomas Watson in Ballarat in 18--? Thomas William Watson was born in Harston, Cambridge, England on10/11/1838 and died at "Gracedale", Yendon, Victoria, Australia 27/04/1920, age 81. He came to Australia seeking gold but instead of finding a fortune he worked for the Victorian Railways. After living in Sebastapol and Ballarat North they settled on a small farm at Yendon named "Gracedale" They were married in Ballarat at Saint Paul's Church of England in Ballarat East. Emma sang in the choir and was a member of the Ballarat Philharmonic Society. They first lived in Sebastapol, then Crompton Street, Ballarat North before building a house at Yendon. Thomas and Emma had 10 children, five boys and five girls, also rearing 3 grandchildren. Thomas and some of his sons ( including John Richard) helped to cut the original steps at Lal Lal to the bottom of the Lal Lal Falls.Photograph of a woman seated at a table with one elbow resting on books. Her jewllery has been hand painted in gold and the top book cover in green. C1860Front: Benson & Stevenson 108 Elizabeth Street Melbourne Copies can be obtained at any time Verso: Emma Eliza Jane (Phillips) Watson; 1844-1925; 81yrs; Died "Gracedale" Yendon, Vic; Born - South Geelong/Barrabool Hills; Dad's (John Richard Watson) motheremma eliza jane phillips, emma eliza jane watson, barrabool hills, yendon, thomas watson, richard price phillips, elizabeth goodenough, lal lal falls -
4th/19th Prince of Wales's Light Horse Regiment Unit History Room
Book, Melanie Oppenheimer, The Power of Humanity 100 Years of Australian Red Cross 1914-2014, 2014
Hard covered book with photos, illustrations, tables and referencesNational Library of Australia 9780732294854 -
 Flagstaff Hill Maritime Museum and Village
Book, A Classical Dictionary
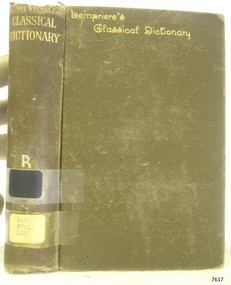
This item is from the ‘Pattison Collection’, a collection of books and records that was originally owned by the Warrnambool Mechanics’ Institute, which was founded in Warrnambool in 1853. By 1886 the Warrnambool Mechanics’ Institute (WMI) had grown to have a Library, Museum and Fine Arts Gallery, with a collection of “… choice productions of art, and valuable specimens in almost every branch and many wonderful national curiosities are now to be seen there, including historic relics of the town and district.” It later included a School of Design. Although it was very well patronised, the lack of financial support led the WMI in 1911 to ask the City Council to take it over. In 1935 Ralph Pattison was appointed as City Librarian to establish and organise the Warrnambool Library as it was then called. When the WMI building was pulled down in 1963 a new civic building was erected on the site and the new Warrnambool Library, on behalf of the City Council, took over all the holdings of the WMI. At this time some of the items were separated and identified as the ‘Pattison Collection’, named after Ralph Pattison. Eventually the components of the WMI were distributed from the Warrnambool Library to various places, including the Art Gallery, Historical Society and Flagstaff Hill. Later some were even distributed to other regional branches of Corangamite Regional Library and passed to and fro. It is difficult now to trace just where all of the items have ended up. The books at Flagstaff Hill Maritime Village generally display stamps and markings from Pattison as well as a variety of other institutions including the Mechanics’ Institute itself. RALPH ERIC PATTISON Ralph Eric Pattison was born in Rockhampton, Queensland, in 1891. He married Maude Swan from Warrnambool in 1920 and they set up home in Warrnambool. In 1935 Pattison accepted a position as City Librarian for the Warrnambool City Council. His huge challenge was to make a functional library within two rooms of the Mechanics’ Institute. He tirelessly cleaned, cleared and sorted a disarrayed collection of old books, jars of preserved specimens and other items reserved for exhibition in the city’s museum. He developed and updated the library with a wide variety of books for all tastes, including reference books for students; a difficult task to fulfil during the years following the Depression. He converted all of the lower area of the building into a library, reference room and reading room for members and the public. The books were sorted and stored using a cataloguing and card index system that he had developed himself. He also prepared the upper floor of the building and established the Art Gallery and later the Museum, a place to exhibit the many old relics that had been stored for years for this purpose. One of the treasures he found was a beautiful ancient clock, which he repaired, restored and enjoyed using in his office during the years of his service there. Ralph Pattison was described as “a meticulous gentleman whose punctuality, floorless courtesy and distinctive neat dress were hallmarks of his character, and ‘his’ clock controlled his daily routine, and his opening and closing of the library’s large heavy doors to the minute.” Pattison took leave during 1942 to 1945 to serve in the Royal Australian Navy, Volunteer Reserve as Lieutenant. A few years later he converted one of the Museum’s rooms into a Children’s Library, stocking it with suitable books for the younger generation. This was an instant success. In the 1950’s he had the honour of being appointed to the Victorian Library Board and received more inspiration from the monthly conferences in Melbourne. He was sadly retired in 1959 after over 23 years of service, due to the fact that he had gone over the working age of council officers. However he continued to take a very keen interest in the continual development of the Library until his death in 1969. The Pattison Collection, along with other items at Flagstaff Hill Maritime Village, was originally part of the Warrnambool Mechanics' Institute’s collection. The Warrnambool Mechanics’ Institute Collection is primarily significant in its totality, rather than for the individual objects it contains. Its contents are highly representative of the development of Mechanics' Institute libraries across Australia, particularly Victoria. A diversity of publications and themes has been amassed, and these provide clues to our understanding of the nature of and changes in the reading habits of Victorians from the 1850s to the middle of the 20th century. The collection also highlights the Warrnambool community’s commitment to the Mechanics’ Institute, reading, literacy and learning in the regions, and proves that access to knowledge was not impeded by distance. These items help to provide a more complete picture of our community’s ideals and aspirations. The Warrnambool Mechanics Institute book collection has historical and social significance for its strong association with the Mechanics Institute movement and the important role it played in the intellectual, cultural and social development of people throughout the latter part of the nineteenth century and the early twentieth century. The collection of books is a rare example of an early lending library and its significance is enhanced by the survival of an original collection of many volumes. The Warrnambool Mechanics' Institute’s publication collection is of both local and state significance. A Classical Dictionary Containing a copious amount of all the Proper Names mentioned in ancient Authors; with value of coins, weights, and measures used among the Greeks and Romans and Chronological Table Author: J Lempriere Publisher: George Routledge & Sons Fly page has hand written date of March 1907 Label on spine cover with typed text PAT 870.3 LEM Pastedown front endpaper has sticker from Warrnambool Mechanics Institute and Free Library Front loose endpaper has a stamp from Corangamite Regional Library Service Front loose endpaper has a sticker from Corangamite Regional Library Servicewarrnambool, shipwrecked-coast, flagstaff-hill, flagstaff-hill-maritime-museum, maritime-museum, shipwreck-coast, flagstaff-hill-maritime-village, shipwrecked-artefact, book, pattison collection, warrnambool library, warrnambool mechanics’ institute, ralph eric pattison, corangamite regional library service, warrnambool city librarian, mechanics’ institute library, victorian library board, warrnambool books and records, warrnambool children’s library, great ocean road, a classical dictionary, j lempriere -
 Flagstaff Hill Maritime Museum and Village
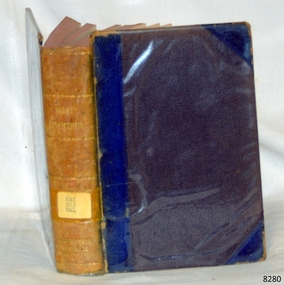
Book, Morte Darthur
This book was part of a large group of books referred to as the Pattison Collection, which belonged to the Warrnambool Public Library, part of the Warrnambool Mechanics’ Institute. About RALPH ERIC PATTISON and the ‘PATTISON COLLECTION’ The ‘Pattison Collection’ is a collection of books and records that was originally owned by the Warrnambool Mechanics’ Institute, founded in Warrnambool in 1853. By 1886 the Warrnambool Mechanics’ Institute (WMI) had grown to have a Library, Museum and Fine Arts Gallery, with a collection of “… choice productions of art and valuable specimens in almost every branch and many wonderful national curiosities are now to be seen there, including historic relics of the town and district.” It later included a School of Design. Although it was very well patronised, the WMI was led to ask the City Council to take it over in 1911 due to lack of financial support. In 1935 Ralph Pattison was appointed as City Librarian to establish and organise the Warrnambool Public Library as it was then called. Ralph Eric Pattison was born in Rockhampton, Queensland, in 1891. He married Maude Swan from Warrnambool in 1920 and they set up home in Warrnambool. In 1935 when Pattison accepted the position as City Librarian for the Warrnambool City Council his huge challenge was to make a functional library within two rooms of the Mechanics’ Institute. He tirelessly cleaned, cleared and sorted a disarrayed collection of old books, jars of preserved specimens and other items reserved for exhibition in the city’s museum. He developed and updated the library with a wide variety of books for all tastes, including reference books for students; a difficult task to fulfil during the years following the Depression. He converted all of the lower areas of the building into a library, reference room and reading room for members and the public. The books were sorted and stored using a cataloguing and card index system that he had developed himself. He also prepared the upper floor of the building and established the Art Gallery and later the Museum, a place to exhibit the many old relics that had been stored for years for this purpose. One of the treasures he found was a beautiful ancient clock, which he repaired, restored and enjoyed using in his office during the years of his service there. Ralph Pattison was described as “a meticulous gentleman whose punctuality, floorless courtesy and distinctive neat dress were hallmarks of his character, and ‘his’ clock controlled his daily routine and his opening and closing of the library’s large heavy doors to the minute.” Pattison took leave from 1942 to 1945 to serve in the Royal Australian Navy, Volunteer Reserve as Lieutenant. A few years later he converted one of the Museum’s rooms into a Children’s Library, stocking it with suitable books for the younger generation. This was an instant success. In the 1950’s he had the honour of being appointed to the Victorian Library Board and received more inspiration from the monthly conferences in Melbourne. He was sadly retired in 1959 after over 23 years of service, due to the fact that he had gone over the working age of council officers. However, he continued to take a very keen interest in the continual development of the Library until his death in 1969. THE NEW WARRNAMBOOL LIBRARY When the WMI building was pulled down in 1963 a new civic building was erected on the site and the new Warrnambool Library, on behalf of the City Council, took over all the holdings of the WMI. At this time some of the items were separated and identified as the ‘Pattison Collection’, named after Pattison. Eventually, the components of the WMI were distributed from the Warrnambool Library to various places, including the Art Gallery, Historical Society and Flagstaff Hill. Later some were even distributed to other regional branches of Corangamite Regional Library and passed to and fro. It is difficult now to trace just where all of the items have ended up. The books at Flagstaff Hill Maritime Village generally display stamps and markings from Pattison as well as a variety of other institutions including the Mechanics’ Institute itself. WARRNAMBOOL MECHANICS’ INSTITUTE Warrnambool's Mechanics' Institute (or Institution as it was sometimes called) was one of the earliest in Victoria. On 17th October 1853, a meeting was held where it was resolved to request the Lieutenant Governor of the Colony to grant land for the erection of a Mechanics' Institutes building. A committee was formed at the meeting and Richard Osburne chaired the first meeting of this committee. The land on the North West corner of Banyan and Merri Streets was granted but there were no funds to erect the building. The Formal Rights of the Warrnambool Mechanics' Institute's encompassed its aims and these were officially adopted in1859; "This Institution has for its object the diffusion of literary, scientific, and other useful knowledge amongst its members, excluding all controversial subjects, religious or political. These objects are sought to be obtained by means of a circulating library, a reading room, the establishment of classes, debates, and the occasional delivery of lectures on natural and experimental philosophy, mechanics, astronomy, chemistry, natural history, literature, and the useful and ornamental arts, particularly those which have a more immediate reference to the colony." The Warrnambool Mechanics' Institute opened its first reading room in November 1884 in the National School building at the corner of Banyan and Timor Streets. The Institute was funded by member subscription, payable on a quarterly, half-yearly or yearly basis. Samuel Hannaford, the Manager of the Warrnambool Bank of Australasia, was the first Honorary Secretary of the Mechanics' Institutes, and an early President and Vice-President. He also gave several of the early lectures in the Reading Room. Another early Secretary, Librarian and lecturer was Marmaduke Fisher, the teacher at the National School. Lecture topics included The Poets and Poetry of Ireland', 'The Birth and Development of the Earth', 'The Vertebrae - with Remarks on the pleasures resulting from the study of Natural History' and 'Architecture'. In 1856 the Reading Room was moved to James Hider's shop in Timor Street, and by 1864 it was located in the bookshop of Davies and Read. In the 1860s the Mechanics' Institute struggled as membership waned but in 1866, after a series of fundraising efforts, the committee was able to purchase land in Liebig Street, on a site then called Market Square, between the weighbridge and the fire station. A Mechanics' Institute building was opened at this site in August 1871. The following year four more rooms were added to the main Reading Room and in 1873 the Artisan School of Design was incorporated into the Institute. The same year Joseph Archibald established a Museum; however, it deteriorated when he was transferred to Bendigo in 1877. In 1880, with Archibald's return to Warrnambool, the Museum was re-established, and in 1885 a new building was built at the back of the Institute to accommodate the re-created School of Design, the Art Gallery and the Museum. In 1887 the Museum section was moved to the former courthouse in Timor Street (for some time the walls of the building formed part of the TAFE cafeteria but all is now demolished)). In 1911 the Museum was transferred back to the original building and the management of the Mechanics' Institute was handed over to the Warrnambool City Council. The Museum and Art Gallery became one and housed many fine works of art, and the Library continued to grow. The building was well patronised, with records showing that at the beginning of the 20th century there were between 500 and 800 visitors. During World War One the monthly figures were in the thousands, with 3,400 people visiting in January 1915. The Museum was a much - loved Institution in Warrnambool until the contents of the Museum and Art Gallery were removed to make room for the Warrnambool City Council Engineers' Department. The contents were stored but many of the items were scattered or lost. When the original building was demolished the site became occupied by the Civic Centre, which included the new City Library. (The library was temporarily located in the old Palais building in Koroit Street.) In the process of reorganisation the Collection was distributed amongst the community groups: -The new City Library took some of the historical books and some important documents, historic photographs and newspapers. -The Art Gallery kept the 19th Century art collection and some of the artefacts from the museum. -The Historical Society has some items -The State Museum has some items -Some items were destroyed -Flagstaff Hill Maritime Village has old newspapers, Government Gazettes, most of the Mechanics' Institute Library, ledgers and documents connected to the Mechanics' Institute Library, some framed and unframed artworks and some photographs. The Warrnambool Mechanics' Institute Library book collection is deemed to be of great importance because it is one of the few collections in an almost intact state, and many of the books are now very rare and of great value. The Pattison Collection, along with other items at Flagstaff Hill Maritime Village, was originally part of the Warrnambool Mechanics' Institute’s collection. The Warrnambool Mechanics’ Institute Collection is primarily significant in its totality, rather than for the individual objects it contains. Its contents are highly representative of the development of Mechanics' Institute libraries across Australia, particularly Victoria. A diversity of publications and themes has been amassed, and these provide clues to our understanding of the nature of and changes in the reading habits of Victorians from the 1850s to the middle of the 20th century. The collection also highlights the Warrnambool community’s commitment to the Mechanics’ Institute, reading, literacy and learning in the regions, and proves that access to knowledge was not impeded by distance. These items help to provide a more complete picture of our community’s ideals and aspirations. The Warrnambool Mechanics Institute book collection has historical and social significance for its strong association with the Mechanics Institute movement and the important role it played in the intellectual, cultural and social development of people throughout the latter part of the nineteenth century and the early twentieth century. The collection of books is a rare example of an early lending library and its significance is enhanced by the survival of an original collection of many volumes. The Warrnambool Mechanics' Institute’s publication collection is of both local and state significance. Morte Darthur Author: Thomas Malory Publisher: Macmillan & Co Date: 1868 Further Information: From the Flypaper - Sir Thomas Malory's Book of King Arthur and of his Noble Knights of the Round Table The label on the spine cover with typed text PAT 823 MAL Pastedown front endpaper has a sticker from Warrnambool Mechanics Institute and Free Library Front loose endpaper has a sticker from Corangamite Regional Library Service Front loose endpaper has a stamp from Corangamite Regional Library Service flagstaff hill, warrnambool, shipwrecked coast, flagstaff hill maritime museum, maritime museum, shipwreck coast, flagstaff hill maritime village, great ocean road, book, pattison collection, warrnambool library, warrnambool mechanics’ institute, ralph eric pattison, corangamite regional library service, warrnambool city librarian, mechanics’ institute library, victorian library board, warrnambool books and records, warrnambool children’s library, thomas malory, morte darthur -
 Flagstaff Hill Maritime Museum and Village
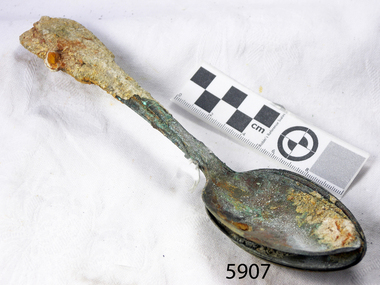
Domestic object - Spoon, circa 1878
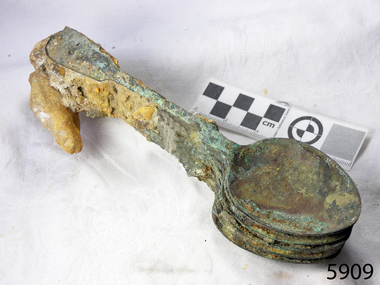
These table spoons are from the wreck of the LOCH ARD, a Loch Line ship of 1,693 tons which sailed from Gravesend, London, on 2 March 1878 with 17 passengers and a crew of 36 under Captain George Gibbs. “The intention was to discharge cargo in Melbourne, before returning to London via the Horn with wool and wheat”. Instead, on 1 June 1878, after 90 days at sea, she struck the sandstone cliffs of Mutton Bird Island on the south west coast of Victoria, and sank with the loss of 52 lives and all her cargo. The manifest of the LOCH ARD listed an array of manufactured goods and bulk metals being exported to the Colony of Victoria, with a declared value of £53,700. (202 bills of lading show an actual invoice value of £68, 456, with insurance underwriting to £30,000 of all cargo). Included in the manifest is the item of “Tin hardware & cutlery £7,530”. These table spoons are some of 482 similar items of electro-plated cutlery from the LOCH ARD site, comprising spoons and forks of various sizes but all sharing the same general shape or design and metallic composition. 49 of these pieces display a legible makers’ mark — the initials “W” and “P” placed within a raised diamond outline, which is in turn contained within a sunken crown shape — identifying the manufacturer as William Page & Co of Birmingham. An electroplater’s makers’ marks, unlike sterling silver hallmarks, are not consistent identifiers of quality or date and place of manufacture. A similar line of five impressions was usually made to impress the consumer with an implication of industry standards, but what each one actually signified was not regulated and so they varied according to the whim of the individual foundry. In this case, the maker’s marks are often obscured by sedimentary accretion or removed by corrosion after a century of submersion in the ocean. However sufficient detail has survived to indicate that these samples of electro-plated cutlery probably originated from the same consignment in the LOCH ARD’s cargo. The generally common range of marks are drawn from 255 tea spoons, 125 dessert spoons, and 99 table forks. These marks are clearly visible in 66 instances, while the same sequence of general outlines, or depression shapes, is discernible in another 166 examples. Suggested trade names for William Page & Co’s particular blend of brass plating are ‘roman silver’ or ‘silverite’. This copper alloy polishes to a lustrous gold when new, discolouring to a murky grey with greenish hue when neglected. HISTORY OF THE LOCH ARD The LOCH ARD belonged to the famous Loch Line which sailed many ships from England to Australia. Built in Glasgow by Barclay, Curdle and Co. in 1873, the LOCH ARD was a three-masted square rigged iron sailing ship. The ship measured 262ft 7" (79.87m) in length, 38ft (11.58m) in width, 23ft (7m) in depth and had a gross tonnage of 1693 tons. The LOCH ARD's main mast measured a massive 150ft (45.7m) in height. LOCH ARD made three trips to Australia and one trip to Calcutta before its final voyage. LOCH ARD left England on March 2, 1878, under the command of Captain Gibbs, a newly married, 29 year old. She was bound for Melbourne with a crew of 37, plus 17 passengers and a load of cargo. The general cargo reflected the affluence of Melbourne at the time. On board were straw hats, umbrella, perfumes, clay pipes, pianos, clocks, confectionary, linen and candles, as well as a heavier load of railway irons, cement, lead and copper. There were items included that intended for display in the Melbourne International Exhibition in 1880. The voyage to Port Phillip was long but uneventful. At 3am on June 1, 1878, Captain Gibbs was expecting to see land and the passengers were becoming excited as they prepared to view their new homeland in the early morning. But LOCH ARD was running into a fog which greatly reduced visibility. Captain Gibbs was becoming anxious as there was no sign of land or the Cape Otway lighthouse. At 4am the fog lifted. A man aloft announced that he could see breakers. The sheer cliffs of Victoria's west coast came into view, and Captain Gibbs realised that the ship was much closer to them than expected. He ordered as much sail to be set as time would permit and then attempted to steer the vessel out to sea. On coming head on into the wind, the ship lost momentum, the sails fell limp and LOCH ARD's bow swung back. Gibbs then ordered the anchors to be released in an attempt to hold its position. The anchors sank some 50 fathoms - but did not hold. By this time LOCH ARD was among the breakers and the tall cliffs of Mutton Bird Island rose behind the ship. Just half a mile from the coast, the ship's bow was suddenly pulled around by the anchor. The captain tried to tack out to sea, but the ship struck a reef at the base of Mutton Bird Island, near Port Campbell. Waves broke over the ship and the top deck was loosened from the hull. The masts and rigging came crashing down knocking passengers and crew overboard. When a lifeboat was finally launched, it crashed into the side of LOCH ARD and capsized. Tom Pearce, who had launched the boat, managed to cling to its overturned hull and shelter beneath it. He drifted out to sea and then on the flood tide came into what is now known as LOCH ARD Gorge. He swam to shore, bruised and dazed, and found a cave in which to shelter. Some of the crew stayed below deck to shelter from the falling rigging but drowned when the ship slipped off the reef into deeper water. Eva Carmichael had raced onto deck to find out what was happening only to be confronted by towering cliffs looming above the stricken ship. In all the chaos, Captain Gibbs grabbed Eva and said, "If you are saved Eva, let my dear wife know that I died like a sailor". That was the last Eva Carmichael saw of the captain. She was swept off the ship by a huge wave. Eva saw Tom Pearce on a small rocky beach and yelled to attract his attention. He dived in and swam to the exhausted woman and dragged her to shore. He took her to the cave and broke open case of brandy which had washed up on the beach. He opened a bottle to revive the unconscious woman. A few hours later Tom scaled a cliff in search of help. He followed hoof prints and came by chance upon two men from nearby Glenample Station three and a half miles away. In a state of exhaustion, he told the men of the tragedy. Tom returned to the gorge while the two men rode back to the station to get help. By the time they reached LOCH ARD Gorge, it was cold and dark. The two shipwreck survivors were taken to Glenample Station to recover. Eva stayed at the station for six weeks before returning to Ireland, this time by steamship. In Melbourne, Tom Pearce received a hero's welcome. He was presented with the first gold medal of the Royal Humane Society of Victoria and a £1000 cheque from the Victorian Government. Concerts were performed to honour the young man's bravery and to raise money for those who lost family in the LOCH ARD disaster. Of the 54 crew members and passengers on board, only two survived: the apprentice, Tom Pearce and the young woman passenger, Eva Carmichael, who lost all of her family in the tragedy. Ten days after the LOCH ARD tragedy, salvage rights to the wreck were sold at auction for £2,120. Cargo valued at £3,000 was salvaged and placed on the beach, but most washed back into the sea when another storm developed. The wreck of LOCH ARD still lies at the base of Mutton Bird Island. Much of the cargo has now been salvaged and some was washed up into what is now known as LOCH ARD Gorge. Cargo and artefacts have also been illegally salvaged over many years before protective legislation was introduced. One of the most unlikely pieces of cargo to have survived the shipwreck was a Minton porcelain peacock - one of only seven in the world. The peacock was destined for the Melbourne International Exhibition in 1880. It had been well packed, which gave it adequate protection during the violent storm. Today, the Minton peacock can be seen at the Flagstaff Hill Maritime Museum in Warrnambool. From Australia's most dramatic shipwreck it has now become Australia's shipwreck artefact and is one of very few 'objects' on the Victorian State Heritage Register most valuable. The LOCH ARD shipwreck is of State significance – Victorian Heritage Register S 417. Flagstaff Hill’s collection of artefacts from LOCH ARD is significant for being one of the largest collections of artefacts from this shipwreck in Victoria. It is significant for its association with the shipwreck, which is on the Victorian Heritage Register (VHR S417). The collection is significant because of the relationship between the objects, as together they have a high potential to interpret the story of the LOCH ARD. The LOCH ARD collection is archaeologically significant as the remains of a large international passenger and cargo ship. The LOCH ARD collection is historically significant for representing aspects of Victoria’s shipping history and its potential to interpret sub-theme 1.5 of Victoria’s Framework of Historical Themes (living with natural processes). The collection is also historically significant for its association with the LOCH ARD, which was one of the worst and best known shipwrecks in Victoria’s history. Unrestored table spoons from the wreck of the LOCH ARD. The spoon design has a flattened fiddle-back handle, with a thin stem or shank, flared collar, and a shallow rounded bowl. The spoons metallic composition is a thin layer of brass alloy which has partially corroded back to a nickel-silver base metal. Some verdigris. Spoons are covered in concretion mainly on top of handles where they are joined. Bowls are separate. 4 spoons in group.flagstaff hill maritime museum, maritime museum, shipwreck coast, great ocean road, loch line, loch ard, mutton bird island, loch ard gorge, electroplated cutlery, loch ard shipwreck, william page and co, birmingham brass plating, table spoons -
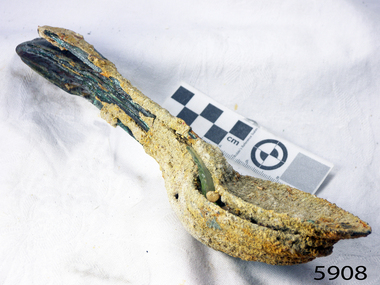 Flagstaff Hill Maritime Museum and Village
Domestic object - Spoon, circa 1878
These table spoons are from the wreck of the LOCH ARD, a Loch Line ship of 1,693 tons which sailed from Gravesend, London, on 2 March 1878 with 17 passengers and a crew of 36 under Captain George Gibbs. “The intention was to discharge cargo in Melbourne, before returning to London via the Horn with wool and wheat”. Instead, on 1 June 1878, after 90 days at sea, she struck the sandstone cliffs of Mutton Bird Island on the south west coast of Victoria, and sank with the loss of 52 lives and all her cargo. The manifest of the LOCH ARD listed an array of manufactured goods and bulk metals being exported to the Colony of Victoria, with a declared value of £53,700. (202 bills of lading show an actual invoice value of £68, 456, with insurance underwriting to £30,000 of all cargo). Included in the manifest is the item of “Tin hardware & cutlery £7,530”. These table spoons are some of 482 similar items of electro-plated cutlery from the LOCH ARD site, comprising spoons and forks of various sizes but all sharing the same general shape or design and metallic composition. 49 of these pieces display a legible makers’ mark — the initials “W” and “P” placed within a raised diamond outline, which is in turn contained within a sunken crown shape — identifying the manufacturer as William Page & Co of Birmingham. An electroplater’s makers’ marks, unlike sterling silver hallmarks, are not consistent identifiers of quality or date and place of manufacture. A similar line of five impressions was usually made to impress the consumer with an implication of industry standards, but what each one actually signified was not regulated and so they varied according to the whim of the individual foundry. In this case, the maker’s marks are often obscured by sedimentary accretion or removed by corrosion after a century of submersion in the ocean. However sufficient detail has survived to indicate that these samples of electro-plated cutlery probably originated from the same consignment in the LOCH ARD’s cargo. The generally common range of marks are drawn from 255 tea spoons, 125 dessert spoons, and 99 table forks. These marks are clearly visible in 66 instances, while the same sequence of general outlines, or depression shapes, is discernible in another 166 examples. Suggested trade names for William Page & Co’s particular blend of brass plating are ‘roman silver’ or ‘silverite’. This copper alloy polishes to a lustrous gold when new, discolouring to a murky grey with greenish hue when neglected. HISTORY OF THE LOCH ARD The LOCH ARD belonged to the famous Loch Line which sailed many ships from England to Australia. Built in Glasgow by Barclay, Curdle and Co. in 1873, the LOCH ARD was a three-masted square rigged iron sailing ship. The ship measured 262ft 7" (79.87m) in length, 38ft (11.58m) in width, 23ft (7m) in depth and had a gross tonnage of 1693 tons. The LOCH ARD's main mast measured a massive 150ft (45.7m) in height. LOCH ARD made three trips to Australia and one trip to Calcutta before its final voyage. LOCH ARD left England on March 2, 1878, under the command of Captain Gibbs, a newly married, 29 year old. She was bound for Melbourne with a crew of 37, plus 17 passengers and a load of cargo. The general cargo reflected the affluence of Melbourne at the time. On board were straw hats, umbrella, perfumes, clay pipes, pianos, clocks, confectionary, linen and candles, as well as a heavier load of railway irons, cement, lead and copper. There were items included that intended for display in the Melbourne International Exhibition in 1880. The voyage to Port Phillip was long but uneventful. At 3am on June 1, 1878, Captain Gibbs was expecting to see land and the passengers were becoming excited as they prepared to view their new homeland in the early morning. But LOCH ARD was running into a fog which greatly reduced visibility. Captain Gibbs was becoming anxious as there was no sign of land or the Cape Otway lighthouse. At 4am the fog lifted. A man aloft announced that he could see breakers. The sheer cliffs of Victoria's west coast came into view, and Captain Gibbs realised that the ship was much closer to them than expected. He ordered as much sail to be set as time would permit and then attempted to steer the vessel out to sea. On coming head on into the wind, the ship lost momentum, the sails fell limp and LOCH ARD's bow swung back. Gibbs then ordered the anchors to be released in an attempt to hold its position. The anchors sank some 50 fathoms - but did not hold. By this time LOCH ARD was among the breakers and the tall cliffs of Mutton Bird Island rose behind the ship. Just half a mile from the coast, the ship's bow was suddenly pulled around by the anchor. The captain tried to tack out to sea, but the ship struck a reef at the base of Mutton Bird Island, near Port Campbell. Waves broke over the ship and the top deck was loosened from the hull. The masts and rigging came crashing down knocking passengers and crew overboard. When a lifeboat was finally launched, it crashed into the side of LOCH ARD and capsized. Tom Pearce, who had launched the boat, managed to cling to its overturned hull and shelter beneath it. He drifted out to sea and then on the flood tide came into what is now known as LOCH ARD Gorge. He swam to shore, bruised and dazed, and found a cave in which to shelter. Some of the crew stayed below deck to shelter from the falling rigging but drowned when the ship slipped off the reef into deeper water. Eva Carmichael had raced onto deck to find out what was happening only to be confronted by towering cliffs looming above the stricken ship. In all the chaos, Captain Gibbs grabbed Eva and said, "If you are saved Eva, let my dear wife know that I died like a sailor". That was the last Eva Carmichael saw of the captain. She was swept off the ship by a huge wave. Eva saw Tom Pearce on a small rocky beach and yelled to attract his attention. He dived in and swam to the exhausted woman and dragged her to shore. He took her to the cave and broke open case of brandy which had washed up on the beach. He opened a bottle to revive the unconscious woman. A few hours later Tom scaled a cliff in search of help. He followed hoof prints and came by chance upon two men from nearby Glenample Station three and a half miles away. In a state of exhaustion, he told the men of the tragedy. Tom returned to the gorge while the two men rode back to the station to get help. By the time they reached LOCH ARD Gorge, it was cold and dark. The two shipwreck survivors were taken to Glenample Station to recover. Eva stayed at the station for six weeks before returning to Ireland, this time by steamship. In Melbourne, Tom Pearce received a hero's welcome. He was presented with the first gold medal of the Royal Humane Society of Victoria and a £1000 cheque from the Victorian Government. Concerts were performed to honour the young man's bravery and to raise money for those who lost family in the LOCH ARD disaster. Of the 54 crew members and passengers on board, only two survived: the apprentice, Tom Pearce and the young woman passenger, Eva Carmichael, who lost all of her family in the tragedy. Ten days after the LOCH ARD tragedy, salvage rights to the wreck were sold at auction for £2,120. Cargo valued at £3,000 was salvaged and placed on the beach, but most washed back into the sea when another storm developed. The wreck of LOCH ARD still lies at the base of Mutton Bird Island. Much of the cargo has now been salvaged and some was washed up into what is now known as LOCH ARD Gorge. Cargo and artefacts have also been illegally salvaged over many years before protective legislation was introduced. One of the most unlikely pieces of cargo to have survived the shipwreck was a Minton porcelain peacock - one of only seven in the world. The peacock was destined for the Melbourne International Exhibition in 1880. It had been well packed, which gave it adequate protection during the violent storm. Today, the Minton peacock can be seen at the Flagstaff Hill Maritime Museum in Warrnambool. From Australia's most dramatic shipwreck it has now become Australia's shipwreck artefact and is one of very few 'objects' on the Victorian State Heritage Register most valuable. The LOCH ARD shipwreck is of State significance – Victorian Heritage Register S 417. Flagstaff Hill’s collection of artefacts from LOCH ARD is significant for being one of the largest collections of artefacts from this shipwreck in Victoria. It is significant for its association with the shipwreck, which is on the Victorian Heritage Register (VHR S417). The collection is significant because of the relationship between the objects, as together they have a high potential to interpret the story of the LOCH ARD. The LOCH ARD collection is archaeologically significant as the remains of a large international passenger and cargo ship. The LOCH ARD collection is historically significant for representing aspects of Victoria’s shipping history and its potential to interpret sub-theme 1.5 of Victoria’s Framework of Historical Themes (living with natural processes). The collection is also historically significant for its association with the LOCH ARD, which was one of the worst and best known shipwrecks in Victoria’s history. Unrestored table spoons from the wreck of the LOCH ARD. The spoon design has a flattened fiddle-back handle, with a thin stem or shank, flared collar, and a shallow rounded bowl. The spoons metallic composition is a thin layer of brass alloy which has partially corroded back to a nickel-silver base metal. Some verdigris. Spoons are covered in concretion, mainly on bowls where they are joined. A piece of glass is embedded in the concretion. 6 spoons in group.flagstaff hill maritime museum, shipwreck coast, great ocean road, loch line, loch ard, mutton bird island, loch ard gorge, electroplated cutlery, loch ard shipwreck, william page and co, birmingham brass plating, spoon, spoons -
 Flagstaff Hill Maritime Museum and Village
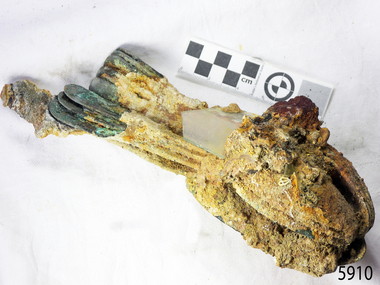
Domestic object - Spoon, circa 1878
These table spoons are from the wreck of the LOCH ARD, a Loch Line ship of 1,693 tons which sailed from Gravesend, London, on 2 March 1878 with 17 passengers and a crew of 36 under Captain George Gibbs. “The intention was to discharge cargo in Melbourne, before returning to London via the Horn with wool and wheat”. Instead, on 1 June 1878, after 90 days at sea, she struck the sandstone cliffs of Mutton Bird Island on the south west coast of Victoria, and sank with the loss of 52 lives and all her cargo. The manifest of the LOCH ARD listed an array of manufactured goods and bulk metals being exported to the Colony of Victoria, with a declared value of £53,700. (202 bills of lading show an actual invoice value of £68, 456, with insurance underwriting to £30,000 of all cargo). Included in the manifest is the item of “Tin hardware & cutlery £7,530”. These table spoons are some of 482 similar items of electro-plated cutlery from the LOCH ARD site, comprising spoons and forks of various sizes but all sharing the same general shape or design and metallic composition. 49 of these pieces display a legible makers’ mark — the initials “W” and “P” placed within a raised diamond outline, which is in turn contained within a sunken crown shape — identifying the manufacturer as William Page & Co of Birmingham. An electroplater’s makers’ marks, unlike sterling silver hallmarks, are not consistent identifiers of quality or date and place of manufacture. A similar line of five impressions was usually made to impress the consumer with an implication of industry standards, but what each one actually signified was not regulated and so they varied according to the whim of the individual foundry. In this case, the maker’s marks are often obscured by sedimentary accretion or removed by corrosion after a century of submersion in the ocean. However sufficient detail has survived to indicate that these samples of electro-plated cutlery probably originated from the same consignment in the LOCH ARD’s cargo. The generally common range of marks are drawn from 255 tea spoons, 125 dessert spoons, and 99 table forks. These marks are clearly visible in 66 instances, while the same sequence of general outlines, or depression shapes, is discernible in another 166 examples. Suggested trade names for William Page & Co’s particular blend of brass plating are ‘roman silver’ or ‘silverite’. This copper alloy polishes to a lustrous gold when new, discolouring to a murky grey with greenish hue when neglected. HISTORY OF THE LOCH ARD The LOCH ARD belonged to the famous Loch Line which sailed many ships from England to Australia. Built in Glasgow by Barclay, Curdle and Co. in 1873, the LOCH ARD was a three-masted square rigged iron sailing ship. The ship measured 262ft 7" (79.87m) in length, 38ft (11.58m) in width, 23ft (7m) in depth and had a gross tonnage of 1693 tons. The LOCH ARD's main mast measured a massive 150ft (45.7m) in height. LOCH ARD made three trips to Australia and one trip to Calcutta before its final voyage. LOCH ARD left England on March 2, 1878, under the command of Captain Gibbs, a newly married, 29 year old. She was bound for Melbourne with a crew of 37, plus 17 passengers and a load of cargo. The general cargo reflected the affluence of Melbourne at the time. On board were straw hats, umbrella, perfumes, clay pipes, pianos, clocks, confectionary, linen and candles, as well as a heavier load of railway irons, cement, lead and copper. There were items included that intended for display in the Melbourne International Exhibition in 1880. The voyage to Port Phillip was long but uneventful. At 3am on June 1, 1878, Captain Gibbs was expecting to see land and the passengers were becoming excited as they prepared to view their new homeland in the early morning. But LOCH ARD was running into a fog which greatly reduced visibility. Captain Gibbs was becoming anxious as there was no sign of land or the Cape Otway lighthouse. At 4am the fog lifted. A man aloft announced that he could see breakers. The sheer cliffs of Victoria's west coast came into view, and Captain Gibbs realised that the ship was much closer to them than expected. He ordered as much sail to be set as time would permit and then attempted to steer the vessel out to sea. On coming head on into the wind, the ship lost momentum, the sails fell limp and LOCH ARD's bow swung back. Gibbs then ordered the anchors to be released in an attempt to hold its position. The anchors sank some 50 fathoms - but did not hold. By this time LOCH ARD was among the breakers and the tall cliffs of Mutton Bird Island rose behind the ship. Just half a mile from the coast, the ship's bow was suddenly pulled around by the anchor. The captain tried to tack out to sea, but the ship struck a reef at the base of Mutton Bird Island, near Port Campbell. Waves broke over the ship and the top deck was loosened from the hull. The masts and rigging came crashing down knocking passengers and crew overboard. When a lifeboat was finally launched, it crashed into the side of LOCH ARD and capsized. Tom Pearce, who had launched the boat, managed to cling to its overturned hull and shelter beneath it. He drifted out to sea and then on the flood tide came into what is now known as LOCH ARD Gorge. He swam to shore, bruised and dazed, and found a cave in which to shelter. Some of the crew stayed below deck to shelter from the falling rigging but drowned when the ship slipped off the reef into deeper water. Eva Carmichael had raced onto deck to find out what was happening only to be confronted by towering cliffs looming above the stricken ship. In all the chaos, Captain Gibbs grabbed Eva and said, "If you are saved Eva, let my dear wife know that I died like a sailor". That was the last Eva Carmichael saw of the captain. She was swept off the ship by a huge wave. Eva saw Tom Pearce on a small rocky beach and yelled to attract his attention. He dived in and swam to the exhausted woman and dragged her to shore. He took her to the cave and broke open case of brandy which had washed up on the beach. He opened a bottle to revive the unconscious woman. A few hours later Tom scaled a cliff in search of help. He followed hoof prints and came by chance upon two men from nearby Glenample Station three and a half miles away. In a state of exhaustion, he told the men of the tragedy. Tom returned to the gorge while the two men rode back to the station to get help. By the time they reached LOCH ARD Gorge, it was cold and dark. The two shipwreck survivors were taken to Glenample Station to recover. Eva stayed at the station for six weeks before returning to Ireland, this time by steamship. In Melbourne, Tom Pearce received a hero's welcome. He was presented with the first gold medal of the Royal Humane Society of Victoria and a £1000 cheque from the Victorian Government. Concerts were performed to honour the young man's bravery and to raise money for those who lost family in the LOCH ARD disaster. Of the 54 crew members and passengers on board, only two survived: the apprentice, Tom Pearce and the young woman passenger, Eva Carmichael, who lost all of her family in the tragedy. Ten days after the LOCH ARD tragedy, salvage rights to the wreck were sold at auction for £2,120. Cargo valued at £3,000 was salvaged and placed on the beach, but most washed back into the sea when another storm developed. The wreck of LOCH ARD still lies at the base of Mutton Bird Island. Much of the cargo has now been salvaged and some was washed up into what is now known as LOCH ARD Gorge. Cargo and artefacts have also been illegally salvaged over many years before protective legislation was introduced. One of the most unlikely pieces of cargo to have survived the shipwreck was a Minton porcelain peacock - one of only seven in the world. The peacock was destined for the Melbourne International Exhibition in 1880. It had been well packed, which gave it adequate protection during the violent storm. Today, the Minton peacock can be seen at the Flagstaff Hill Maritime Museum in Warrnambool. From Australia's most dramatic shipwreck it has now become Australia's shipwreck artefact and is one of very few 'objects' on the Victorian State Heritage Register most valuable. The LOCH ARD shipwreck is of State significance – Victorian Heritage Register S 417. Flagstaff Hill’s collection of artefacts from LOCH ARD is significant for being one of the largest collections of artefacts from this shipwreck in Victoria. It is significant for its association with the shipwreck, which is on the Victorian Heritage Register (VHR S417). The collection is significant because of the relationship between the objects, as together they have a high potential to interpret the story of the LOCH ARD. The LOCH ARD collection is archaeologically significant as the remains of a large international passenger and cargo ship. The LOCH ARD collection is historically significant for representing aspects of Victoria’s shipping history and its potential to interpret sub-theme 1.5 of Victoria’s Framework of Historical Themes (living with natural processes). The collection is also historically significant for its association with the LOCH ARD, which was one of the worst and best known shipwrecks in Victoria’s history. Unrestored table spoons from the wreck of the LOCH ARD. The spoon design has a flattened fiddle-back handle, with a thin stem or shank, flared collar, and a shallow rounded bowl. The spoons metallic composition is a thin layer of brass alloy which has partially corroded back to a nickel-silver base metal. Some verdigris. Spoons are covered in large amount of concretion. A piece of rock is embedded in the concretion. 6 spoons in group.flagstaff hill maritime museum, shipwreck coast, great ocean road, loch line, loch ard, mutton bird island, loch ard gorge, electroplated cutlery, loch ard shipwreck, william page and co, birmingham brass plating, table spoons -
 Flagstaff Hill Maritime Museum and Village
Domestic object - Spoon, circa 1878
These table spoons are from the wreck of the LOCH ARD, a Loch Line ship of 1,693 tons which sailed from Gravesend, London, on 2 March 1878 with 17 passengers and a crew of 36 under Captain George Gibbs. “The intention was to discharge cargo in Melbourne, before returning to London via the Horn with wool and wheat”. Instead, on 1 June 1878, after 90 days at sea, she struck the sandstone cliffs of Mutton Bird Island on the south west coast of Victoria, and sank with the loss of 52 lives and all her cargo. The manifest of the LOCH ARD listed an array of manufactured goods and bulk metals being exported to the Colony of Victoria, with a declared value of £53,700. (202 bills of lading show an actual invoice value of £68, 456, with insurance underwriting to £30,000 of all cargo). Included in the manifest is the item of “Tin hardware & cutlery £7,530”. These table spoons are some of 482 similar items of electro-plated cutlery from the LOCH ARD site, comprising spoons and forks of various sizes but all sharing the same general shape or design and metallic composition. 49 of these pieces display a legible makers’ mark — the initials “W” and “P” placed within a raised diamond outline, which is in turn contained within a sunken crown shape — identifying the manufacturer as William Page & Co of Birmingham. An electroplater’s makers’ marks, unlike sterling silver hallmarks, are not consistent identifiers of quality or date and place of manufacture. A similar line of five impressions was usually made to impress the consumer with an implication of industry standards, but what each one actually signified was not regulated and so they varied according to the whim of the individual foundry. In this case, the maker’s marks are often obscured by sedimentary accretion or removed by corrosion after a century of submersion in the ocean. However sufficient detail has survived to indicate that these samples of electro-plated cutlery probably originated from the same consignment in the LOCH ARD’s cargo. The generally common range of marks are drawn from 255 tea spoons, 125 dessert spoons, and 99 table forks. These marks are clearly visible in 66 instances, while the same sequence of general outlines, or depression shapes, is discernible in another 166 examples. Suggested trade names for William Page & Co’s particular blend of brass plating are ‘roman silver’ or ‘silverite’. This copper alloy polishes to a lustrous gold when new, discolouring to a murky grey with greenish hue when neglected. HISTORY OF THE LOCH ARD The LOCH ARD belonged to the famous Loch Line which sailed many ships from England to Australia. Built in Glasgow by Barclay, Curdle and Co. in 1873, the LOCH ARD was a three-masted square rigged iron sailing ship. The ship measured 262ft 7" (79.87m) in length, 38ft (11.58m) in width, 23ft (7m) in depth and had a gross tonnage of 1693 tons. The LOCH ARD's main mast measured a massive 150ft (45.7m) in height. LOCH ARD made three trips to Australia and one trip to Calcutta before its final voyage. LOCH ARD left England on March 2, 1878, under the command of Captain Gibbs, a newly married, 29 year old. She was bound for Melbourne with a crew of 37, plus 17 passengers and a load of cargo. The general cargo reflected the affluence of Melbourne at the time. On board were straw hats, umbrella, perfumes, clay pipes, pianos, clocks, confectionary, linen and candles, as well as a heavier load of railway irons, cement, lead and copper. There were items included that intended for display in the Melbourne International Exhibition in 1880. The voyage to Port Phillip was long but uneventful. At 3am on June 1, 1878, Captain Gibbs was expecting to see land and the passengers were becoming excited as they prepared to view their new homeland in the early morning. But LOCH ARD was running into a fog which greatly reduced visibility. Captain Gibbs was becoming anxious as there was no sign of land or the Cape Otway lighthouse. At 4am the fog lifted. A man aloft announced that he could see breakers. The sheer cliffs of Victoria's west coast came into view, and Captain Gibbs realised that the ship was much closer to them than expected. He ordered as much sail to be set as time would permit and then attempted to steer the vessel out to sea. On coming head on into the wind, the ship lost momentum, the sails fell limp and LOCH ARD's bow swung back. Gibbs then ordered the anchors to be released in an attempt to hold its position. The anchors sank some 50 fathoms - but did not hold. By this time LOCH ARD was among the breakers and the tall cliffs of Mutton Bird Island rose behind the ship. Just half a mile from the coast, the ship's bow was suddenly pulled around by the anchor. The captain tried to tack out to sea, but the ship struck a reef at the base of Mutton Bird Island, near Port Campbell. Waves broke over the ship and the top deck was loosened from the hull. The masts and rigging came crashing down knocking passengers and crew overboard. When a lifeboat was finally launched, it crashed into the side of LOCH ARD and capsized. Tom Pearce, who had launched the boat, managed to cling to its overturned hull and shelter beneath it. He drifted out to sea and then on the flood tide came into what is now known as LOCH ARD Gorge. He swam to shore, bruised and dazed, and found a cave in which to shelter. Some of the crew stayed below deck to shelter from the falling rigging but drowned when the ship slipped off the reef into deeper water. Eva Carmichael had raced onto deck to find out what was happening only to be confronted by towering cliffs looming above the stricken ship. In all the chaos, Captain Gibbs grabbed Eva and said, "If you are saved Eva, let my dear wife know that I died like a sailor". That was the last Eva Carmichael saw of the captain. She was swept off the ship by a huge wave. Eva saw Tom Pearce on a small rocky beach and yelled to attract his attention. He dived in and swam to the exhausted woman and dragged her to shore. He took her to the cave and broke open case of brandy which had washed up on the beach. He opened a bottle to revive the unconscious woman. A few hours later Tom scaled a cliff in search of help. He followed hoof prints and came by chance upon two men from nearby Glenample Station three and a half miles away. In a state of exhaustion, he told the men of the tragedy. Tom returned to the gorge while the two men rode back to the station to get help. By the time they reached LOCH ARD Gorge, it was cold and dark. The two shipwreck survivors were taken to Glenample Station to recover. Eva stayed at the station for six weeks before returning to Ireland, this time by steamship. In Melbourne, Tom Pearce received a hero's welcome. He was presented with the first gold medal of the Royal Humane Society of Victoria and a £1000 cheque from the Victorian Government. Concerts were performed to honour the young man's bravery and to raise money for those who lost family in the LOCH ARD disaster. Of the 54 crew members and passengers on board, only two survived: the apprentice, Tom Pearce and the young woman passenger, Eva Carmichael, who lost all of her family in the tragedy. Ten days after the LOCH ARD tragedy, salvage rights to the wreck were sold at auction for £2,120. Cargo valued at £3,000 was salvaged and placed on the beach, but most washed back into the sea when another storm developed. The wreck of LOCH ARD still lies at the base of Mutton Bird Island. Much of the cargo has now been salvaged and some was washed up into what is now known as LOCH ARD Gorge. Cargo and artefacts have also been illegally salvaged over many years before protective legislation was introduced. One of the most unlikely pieces of cargo to have survived the shipwreck was a Minton porcelain peacock - one of only seven in the world. The peacock was destined for the Melbourne International Exhibition in 1880. It had been well packed, which gave it adequate protection during the violent storm. Today, the Minton peacock can be seen at the Flagstaff Hill Maritime Museum in Warrnambool. From Australia's most dramatic shipwreck it has now become Australia's shipwreck artefact and is one of very few 'objects' on the Victorian State Heritage Register most valuable. The LOCH ARD shipwreck is of State significance – Victorian Heritage Register S 417. Flagstaff Hill’s collection of artefacts from LOCH ARD is significant for being one of the largest collections of artefacts from this shipwreck in Victoria. It is significant for its association with the shipwreck, which is on the Victorian Heritage Register (VHR S417). The collection is significant because of the relationship between the objects, as together they have a high potential to interpret the story of the LOCH ARD. The LOCH ARD collection is archaeologically significant as the remains of a large international passenger and cargo ship. The LOCH ARD collection is historically significant for representing aspects of Victoria’s shipping history and its potential to interpret sub-theme 1.5 of Victoria’s Framework of Historical Themes (living with natural processes). The collection is also historically significant for its association with the LOCH ARD, which was one of the worst and best known shipwrecks in Victoria’s history. Unrestored table spoons from the wreck of the LOCH ARD. The spoon design has a flattened fiddle-back handle, with a thin stem or shank, flared collar, and a shallow rounded bowl. The spoons metallic composition is a thin layer of brass alloy which has partially corroded back to a nickel-silver base metal. Some verdigris. Spoons are covered in large amount of concretion. Pieces of rock, glass and shell are embedded in concretion. Large piece of glass visible.10 spoons in group.flagstaff hill maritime museum, shipwreck coast, great ocean road, loch line, loch ard, mutton bird island, loch ard gorge, electroplated cutlery, loch ard shipwreck, william page and co, birmingham brass plating, table spoons