Showing 1372 items matching "east side"
-
 Wodonga & District Historical Society Inc
Functional object - Sand Scoop, North East Region Water Authority, Wodonga
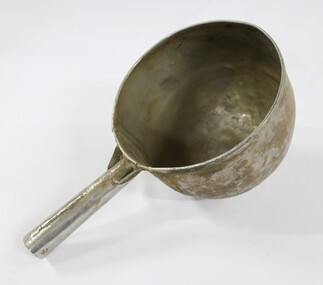
The large aluminium sand scoop was used by Wodonga Waterworks Trust and it is part of the North East Region Water Authority collection in the Wodonga Historical Society. Wodonga's drinking water and wastewater were originally managed by the Wodonga Waterworks Trust, which was established in 1897, after Wodonga became a separate shire in 1876. In 1923 a Wodonga Waterworks Trust referendum to provide funding for new infrastructure to supply more water of better quality to Wodonga was passed. This included building the Wodonga Water Tower and it was completed in 1924. It supplied water to Wodonga until 1959, when it was drained and decommissioned after the No 1 Basin on Huon Hill was completed in 1958. In 1983 the Wodonga Waterworks Trust and the Wodonga Sewerage Authority became part of the Wodonga Council, and by 1989 a filtration plant at Huon Hill was completed, which provided filtered water of improved quality to Wodonga, in accordance with the World Health Organisation’s guidelines. In 1994 the Kiewa Murray Region Water Authority took over the Wodonga Council’s water and wastewater operations, and then in 1999 the Kiewa Murray Region Water Authority combined with the Ovens Region Water Authority and became the North East Region Water Authority or NERWA. NERWA then became known as North East Water. The sand scoop has local significance as part of the North East Region Water Authority collection donated to the Wodonga Historical Society. It also has wider state significance as a rare example of the equipment used in water management in Wodonga.Large aluminium scoop with a handle soldered on one side edge. Two holes and one indent in the end of the handle.north east region water authority, nerwa, wodonga waterworks trust, north east water, n.e. water, kiewa murray region water authority, sand scoop, metal scoop -
 Wodonga & District Historical Society Inc
Functional object - Sand Scoop, North East Region Water Authority, Wodonga
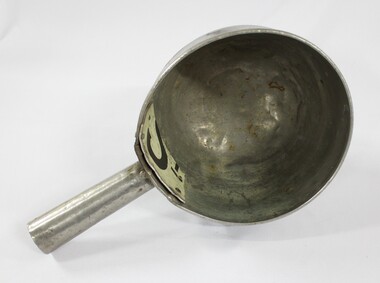
The large aluminium sand scoop was used by Wodonga Waterworks Trust and it is part of the North East Region Water Authority collection in the Wodonga Historical Society. Wodonga's drinking water and wastewater operations were originally managed by the Wodonga Waterworks Trust, which was established in 1897, after Wodonga became a separate shire in 1876. In 1923 a Wodonga Waterworks Trust referendum to provide funding for new infrastructure to supply more water of better quality to Wodonga was passed. This included building the Wodonga Water Tower and it was completed in 1924. It supplied water to Wodonga until 1959, when it was drained and decommissioned after the No 1 Basin on Huon Hill was completed in 1958. In 1983 the Wodonga Waterworks Trust and the Wodonga Sewerage Authority became part of the Wodonga Council. And by 1989 a filtration plant at Huon Hill was completed, which provided filtered water of improved quality to Wodonga, in accordance with the World Health Organisation’s guidelines. In 1994 the Kiewa Murray Region Water Authority took over the Wodonga Council’s water and wastewater operations, and then in 1999 the Kiewa Murray Region Water Authority combined with the Ovens Region Water Authority and became the North East Region Water Authority or NERWA. NERWA then became known as North East Water. The sand scoop has local significance as part of the North East Region Water Authority collection donated to the Wodonga Historical Society. It also has wider state significance as a rare example of the equipment used in water management in Wodonga.Large aluminium scoop with a handle soldered on one side edge and a repair riveted to the interior surface of the scoop where the handle is located. The repair is a piece of sheet metal, with what looks like the lower part of the letter 'S' on it.Lower part of the letter "S" on the repair riveted to the interior surface of the scoop.north east region water authority, nerwa, wodonga waterworks trust, north east water, n.e. water, kiewa murray region water authority, metal scoop, sand scoop -
 Whitehorse Historical Society Inc.
Photograph - Black and white photograph, Whitehorse Road Sign Mitcham, C1940s
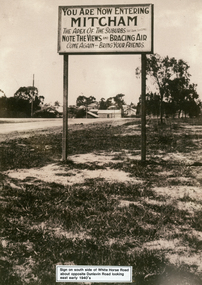
Sign on south side of Whitehorse Road opposite Dunlavin Road, Mitcham, looking east. Early 1940s. Note in 1870 the area was known as Air Hill. Center of shot shows shop on west side of what later became Alexander Street and further east house on the corner of Peel Street. These signs are very similar to those erected in nearby Vermont.advertising signs, whitehorse road, mitcham, dunlavin road -
 Lakes Entrance Historical Society
Photograph - Lakes Entrance, 1997c
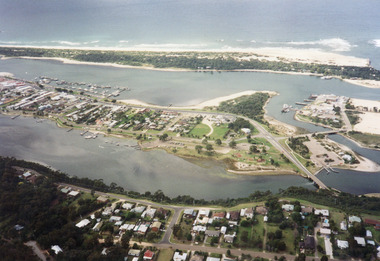
Colour print of aerial view looking south of western side of township. Shows housing on Kalimna Hill, North Arm, part of Bullock Island, Cunninghame Arm, the outer barrier and east pier of man made entrance. Lakes Entrance Victoriawaterways, township -
 Melbourne Tram Museum
Photograph - Framed Photographs, Malvern Framing Gallery, c1990
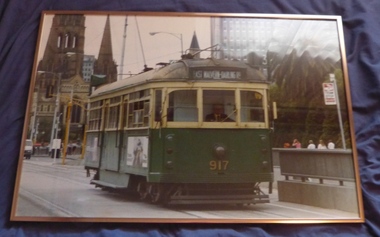
Framed photograph Malvern Driver Ron Scholten's driving W6 917 on a route, East Malvern Darling Road, route 3, in St Kilda Road, c1990. Has St Patricks Cathedral and the Gas and Fuel towers in the background. Has a tram stop sign on the right hand side of the photograph. The tram has two advertisements on the side. Photograph by David Featherston. Received with a broken sheet of glass.On rear in pencil "Photo David Featherston"trams, tramways, swanston st, st kilda rd, tram stops, tram 917 -
 Ringwood and District Historical Society
Flyer, Land Auction Brochure, Malcolm Court Estate, Ringwood East, Vic. - 1969
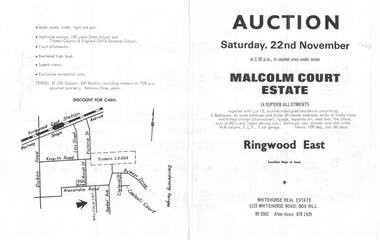
Bi-folded single sheet with black print both sides advertising Auction on Saturday, 22nd November, 1969. Details include location map, vendor terms, subdivision features and local facilities. Centre page shows allotment numbers and property dimensions. Agent - Whitehorse Real Estate, 1123 Whitehorse Road, Box Hill, (Phone) 890502, After hours 8781429. Separate copy of map with handwritten sale notations for some allotments.LP 859686 -
 Wangaratta RSL Sub Branch
Medal - Medals
Service medals ( miniature) awarded to Errol Ivan DREHER R30435 Born 30/4/1926 at Numerkah and died 17/7/2024 at Wangaratta. DREHER enlisted on the 6/5/1946 and served 20 years in the RAN as a Chief Aircraft Artificer (CAA) He served on HMAS Vengeance prior to deployment on the aircraft carrier HMAS Sydney in 1953 during the Korean War.Set of seven miniature metal medals with multi coloured stripped ribbons attached. All mounted on a large metal pin attached at rear. Australian Active Service. Medal 1945-1975 clasp Malaya United Nations Service Medal clasp Korea Australian Service Medal 1945-1975 clasp FESR/Korea/PNG Australian Defence Medal For long service and good conduct Malaysian Service Medal reverse PJM Reverse side For Service on the Far East Strategic Reserve clasp Melbournekorean war, royal australian navy, errol dreher, hmas sydney, fesr -
 Ballarat Tramway Museum
Postcard, John Phillips and Rose Stereograph Co, Bridge St (Looking East), Ballarat, c1905
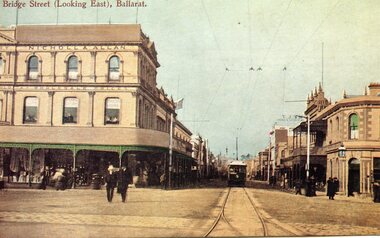
Image is an ESCo tram leaving the intersection of Grenville St. and Bridge St. and proceeding east along Bridge St. Photo taken behind junction points. Has the Nicholl & Allan building on the left side of the photo and the Bucks Head Hotel on the right. Numerous people walking around the street. Shows overhead construction in the area. Title in top left-hand corner "Bridge St. (Looking East), Ballarat. On the rear is places for stamp, address and manufacturer's name in a fancy motif "WTP". Photo taken soon after opening, no roof-mounted destination boxes. See item 9010 for a printed version. yields information of Bridge St at Grenville St, c1905B&W print, laser print and scanned images of a coloured postcard lent to the BTM by Mr. Norm DePomeroy, August 1998 and Sovereign Hill reproduction of this card contained within a scrap book. See Notes for various image holdings and history.trams, tramways, esco, sturt st, postcards, bridge st., grenville st -
 Ballarat Tramway Museum
Photograph - Illustration, WTP, Bridge St (Looking East), Ballarat, c1905
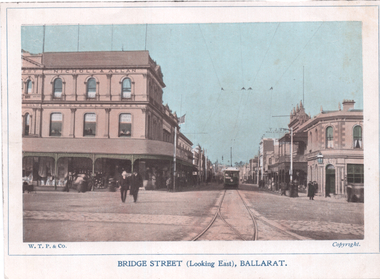
Illustration of an ESCo tram leaving the intersection of Grenville St. and Bridge St. and proceeding east along Bridge St. Photo taken behind junction points. Has the Nicholl & Allan building on the left side of the photo and the Bucks Head Hotel on the right. Numerous people walking around the street. Shows overhead construction in the area. Titled Bridge St (Looking East), Ballarat. Image by WTP&Co of Ballarat. See item 841 for postcards of this image. Yields information of Bridge St at Grenville St, c1905Colour Illustration cut from a journaltramways, trams, sturt st, esco, grenville st, bridge st -
 Bacchus Marsh & District Historical Society
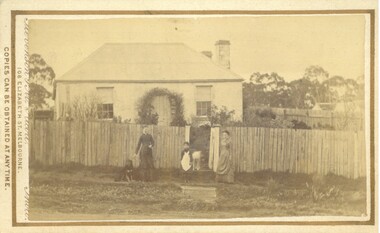
Photograph, Cottage Stamford Hill Bacchus Marsh 1883
Stamford Hill is on the western side of Bacchus Marsh. Main Street which runs in an East to West direction through the town runs directly up Stamford Hill. The precise location of the house or cottage in this image has not been identified and it appears to have been demolished. The identities of the two women and one girl in the picture are unknown.Small sepia unframed photograph on card with gold border framing photograph. Housed in the album, 'Photographs of Bacchus Marsh and District in 1883 by Stevenson and McNicoll'. The image shows a frontal view of a cottage. The cottage is behind a high timber fence but most of the cottage can be seen. Two young women are standing in front of the fence facing the camera. Standing between them is a young girl. A dog sits beside one of the women. Another dog stands in the gateway behind the girl.On the front: Stevenson & McNicoll. Photo. 108 Elizabeth St. Melbourne. COPIES CAN BE OBTAINED AT ANY TIME. On the back: LIGHT & TRUTH inscribed on a banner surmounted by a representation of the rising sun. Copies of this Portrait can be had at any time by sending the Name and Post Office Money Order or Stamps for the amount of order to STEVENSON & McNICOLL LATE BENSON & STEVENSON, Photographers. 108 Elizabeth Street, MELBOURNE stevenson and mcnicoll 1883 photographs of bacchus marsh and district, houses bacchus marsh -
 Greensborough Historical Society
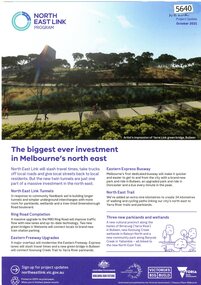
Leaflet, North East Link project update October 2021, 2021_10
... in colour both sides North East Link project update October 2021 ...Updates on North East Link project.1 sheet, 6 pages printed in colour both sidesnorth east link, metropolitan ring road, north east link tunnels -
 Eltham District Historical Society Inc
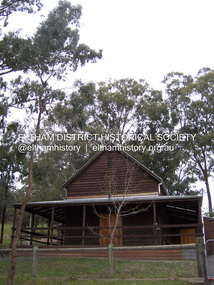
Photograph - Digital Photograph, Marguerite Marshall, Strathewen Public Hall, 20 August 2008
Strathewen Public Hall, social and spiritual centre was later lost in the Black Saturday fires 2009. The Strathewen Community decided a community hall was needed in 1901. In 1902 locals built the hall with messmate trees. It was located on the Cottlesbridge-Strathewen Road. The first function was a Grand concert and Balll attended by about 120 people. Several denominations held Church services and Sunday School services in the Hall. It survived several bushfires until after this photo was taken when it was destroyed in Black Saturday, 9 February 2009. Published: Nillumbik Now and Then / Marguerite Marshall 2008; photographs Alan King with Marguerite Marshall.; p89 Strathewen was settled late, largely because it was difficult to access.1 Early selectors found it a struggle to survive. They had to do everything themselves, from felling trees for buildings, to taking produce to market along bush tracks that they had helped cut. Small dairy farms were typical but fruit became the district’s prime produce. The first settlers east of Arthurs Creek were brothers John and Duncan Smith whose station Glen-Ard was probably operated as a sheep run. Other early settlers were the Mann family, who were to donate land for the hall, provide postal services and John Mann was an Eltham Shire councillor from 1916 to 1919.2 In 1873 James Mann, his wife Jane and their six children, settled on 207 acres (83.7) (Lang Fauld Farm) on both sides of Eagles Nest Road, from the foot of Mount Sugarloaf to the bank of the Arthurs Creek. In 1883 James took up another selection on Chads Creek. It was very hard work and at times he was well behind with his rent. However the family had a good social life, attending the Primitive Methodist Church at the Arthurs Creek Township and on New Year’s Eve throwing a party for all the locals. By 1874 James Mann’s younger brother, John, selected 311 acres (125.8ha) between Eagles Nest Road and upper Arthurs Creek. He called it Carseburn after his home parish in Scotland. Tragically in 1875 John drowned in the Yarra River, at Richmond.3 John Mann’s oldest son, also John, later purchased Duncan Smith’s land, which he named Violet Glen. He was to give one acre (0.4ha) of this land for the Strathewen Hall site. A Mann family diary written at Carseburn in 1897, tells how the district’s name was selected. Strathewen is derived from ‘strath’ meaning ‘broad mountain valley’ and from the name of Ewen H. Cameron, the local parliamentarian for almost 40 years. ‘George Brain came around to get a petition signed to get a post office up here and we had to vote for a name—Strathewen, Glen-Ard, or Headcorie’.4 It was at Carseburn that a public meeting in 1901, decided to build the Strathewen Hall on the Cottlesbridge-Strathewen Road. In 1902 the locals built the hall with messmate trees. The first function was a Grand Concert and Ball attended by around 120 people and several Protestant denominations took turns to hold church services and Sunday School there. Fortunately the hall has survived bushfires to be the town’s spiritual and social centre.5 The area continued to develop and in 1909 a post office operated somewhere at Strathewen and from around 1916 at Carseburn.6 It was not until 1914 that land was bought to establish the Strathewen State School on School Ridge Road. The residents paid £100 to build it on two acres (0.8 ha) while the Education Department contributed £30 and leased the building annually for £1. When teacher Miss Mary Golding opened the school in 1917, it had no equipment.7 But in 1921 the Education Department provided desks and a hexagonal shelter shed (now a rare style in Victoria) and took control in 1925.8 By 1917 Strathewen was booming.9 George Apted had built a coolstore in 1916, and local orchardists bought storage space until the 1950s. This allowed the area to supply the market in and out of season. Guesthouses catered for growing tourism. In the mid 1920s Mrs Eleanor Sparkes built the guest-house Singing Waters, which operated through the 1930s. Her daughter Mrs Vera McKimmie, ran it until the 1950s and the house remains in Chads Creek Road. In the Great Depression land was cleared for timber to be sold as firewood and there was small scale sawmilling. However the orchard industry diminished for several reasons including the 1939 bushfires and rapid changes in production methods. Today the Apteds still operate an orchard and farm at Glen-Ard, which straddles the border between Strathewen and Arthurs Creek. It includes the southern part of Duncan Smith’s original Glen-Ard selection.This collection of almost 130 photos about places and people within the Shire of Nillumbik, an urban and rural municipality in Melbourne's north, contributes to an understanding of the history of the Shire. Published in 2008 immediately prior to the Black Saturday bushfires of February 7, 2009, it documents sites that were impacted, and in some cases destroyed by the fires. It includes photographs taken especially for the publication, creating a unique time capsule representing the Shire in the early 21st century. It remains the most recent comprehenesive publication devoted to the Shire's history connecting local residents to the past. nillumbik now and then (marshall-king) collection, strathewan public hall -
 Melbourne Tram Museum
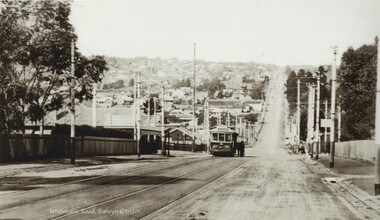
Photograph - Black and white - Whitehorse Road, Balwyn c1920's
Shows B class tram number 90, east bound in Whitehorse Road, at the intersection with Burke Road. Photo has a caption "Whitehorse Road Balwyn c1920s". Tram has the PMTT style destination board. There are a number of people standing on the right hand side of the tram. Note the shelter on the left hand side. This shelter remains in same position (2022). Tram No. 90, was built by James Moore during 1917-1918 and was sold to the Electric Supply Co of Victoria in 1931 and became Bendigo No 7.Yields information about the location, the landscape and the trams in use at the time.Black and white photograph of an outbound tram in Whitehorse Road c1920s, looking east.tramways, balwyn, whitehorse road, tram 90, shelters, pmtt, james moore, b class -
 Melbourne Tram Museum
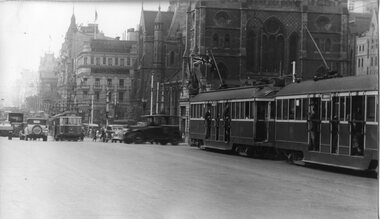
Photograph - Black and White Swanston St 1931/32
Photograph of a busy Swanston St taken from the Swanston St/ St Kilda Road overbridge at Flinders St Railway Station looking north. In the background is St Paul's Cathedral. Has W2 442 (East Coburg, Route 1), northbound, W2 586 and another W2 southbound. Note the crowded trams and people leaning on the drop bars that "closed" the tram off on the wrong or "off side" side and decorative "flower pots" in the street between Little Flinders and Collins St. Tram 442 later became the first Melbourne Restaurant tram.Demonstrates a busy streetscape and Yields information about the use of the Flinders / Swanston St in the early 1930's.Black and White photograph of Swanston St looking north from Batman Ave 1931/32Has the stamp of the "Abbotsford Photographics" on the rear and "1931/32" in inktrams, tramways, st pauls cathedral, st kilda road, swanston street, w2 class, tram 442, tram 586, route 1 -
 Melbourne Tram Museum
Slide - Colour - reproduction postcard - Bourke St - GPO
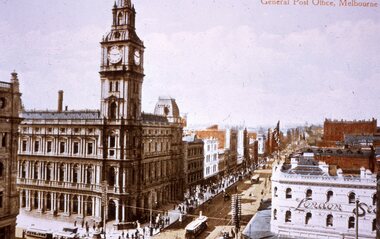
Reproduction slide of a hand coloured postcard showing the intersection of Bourke and Elizabeth Streets, featuring the General Post Office - GPO - looking east along Bourke St, prior to the construction of the Myer store. Has the London store on the bottom right hand side. There are cable trams in the view.Yields information about Bourke St prior to the construction of the Myer store and the GPO.Kodachrome cardboard duplicate slide - Colour - reproduction postcard - Bourke St - GPO c1900 "CB19" in penciltrams, tramways, cable cars, cable trams, bourke street, elizabeth sreet, london stores, gpo, post office, myer -
 Melbourne Tram Museum
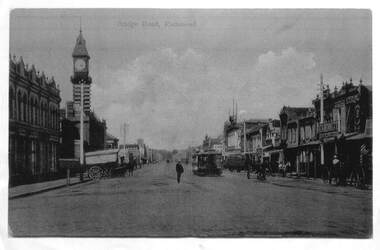
Photograph - Enlargement of a postcard, Bridge Road Richmond, c1900
The first image shows the shops on either side of Bridge Road with horse drawn carts and one cable tram. The second image from the Town Hall tower, shows two cable tram sets, the narrowing of the road. Has in the view Guddon & Selleck Auction House and Property Exchange also advertising Commercial Union Assurance Co. and George Stirling and Sons store.Yields information about Bridge Road, c1900Set of two A3 enlargements of postcards 1 - Looking east along Bridge Road from near Church St 2 - Bridge Road Richmond - from Town Hall looking westcable trams, tramways, richmond, bridge road, -
 Lakes Entrance Historical Society
Photograph - Historic House, Holding M, 2005c
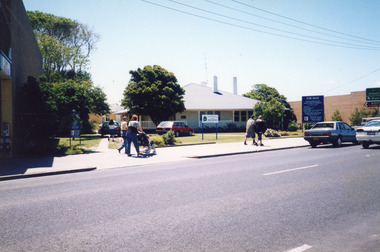
Built in 1923/24 for Mr Eric Staughton, originally named Greenacres, later Livingstone House in 1950 when purchased by Hallett Sisters. In 1996c became temporary office for East Gippsland Shire.Colour photograph of a weatherboard house situated at 545 Esplanade, showing cars parked on lawn, four people on footpath, side of Strambi Hair Salon. Lakes Entrance Victoriatownship, people, local history, houses -
 Melbourne Tram Museum
slide - Colour - Melbourne Trams, David Verrier, August 1989
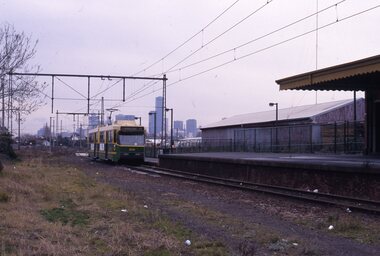
1 - B2 2014 arriving Port Melbourne - showing Exhibition Route 111 - the tram stop is on the north side of the former railway platform at this time. 2- headon photo - shows the undeveloped nature of the background. 3 - W6 996 Spencer St with A2 288 behind - both trams running route 48 - note the Outward Parcels Office building and the VR Head Office. 4 - A2 288 and Z16 - as above 5 - Z16 as above - Route 75, showing East Burwood 6 - Z57 at La Trobe University terminus, route 87 7 - Z3 113 and Z1 9, both running route 86 - Bundoora - in High St 8 - Z3 186 at Bundoora terminus, with many people at the bus stop interchange.Yields information about Melbourne tram operations in Sept 1999Set of eight white / grey plastic slides, marked "CS System" and date stamped 08/89tramways, z3 class, b2 class, port melbourne, route 109, tram 2013, route 111, spencer st, tram 288, tram 996, route 48, w6 class, a2 class, z class, tram 16, route 75, tram 113, tram 9, bundoora, high st, la trobe university, tram 186 -
 Melbourne Tram Museum
Album - Charles Craig - part 1 of 2, 1950s to 1970s
Photo - see pdf file for further information. Number Brief Description CC1 S178 at Elsternwick level crossing track works CC2 Building East Preston Depot 1955 CC3 Camberwell depot – post WW2 – lots of trams and a black cat CC4 W2 584 and SW6 958 northbound – Chapel St and Brighton Road CC5 W2 357 – southbound, Chapel St Brighton Road CC6 Pascoe Vale Road, Raceday working – note the signal CC7 The Preston Workshops - The Argus, post WW2, 223, 647 et al CC8 923 or is it 922 being built at Preston – The Argus photo - CC8A 832 being positioned onto trucks at Preston after an overhaul – Argus Photo – see also CC306 CC9 Footscray depot` CC10 W5 797 in St Kilda Road during track works – 1950s CC11 W2 457 at Kew Post Office CC12 Wellington Parade – W2 432, 492 and 337 – special event CC13 Swan St line up of trams – football? Or other special event – Sinclair’s bus on the right side. CC14 W2 630 being washed at a depot – The Argus photo CC15 Royal Park line at Flemington Road – W2 355 and W5 786 CC16 Nicholson St track construction from a tram cab CC17 T181 on tour at Gordon St CC18 T181 on Maribyrnong Bridge CC19 Ditto at River St just off bridge CC20 As for CC18 CC21 At Raleigh Rd CC22 T181 at Footscray depot CC23 Track construction, Nicholson, just north of Gertrude CC24 Commissioning overhead Bourke St tram 988 CC25 Queens Parade – 997 and 994 CC26 Swapping trolley wheel to skid – commissioning CC27 Track construction in Gertrude St CC28 985 in Queens Parade running special CC29 997 in Queens Parade CC30 1033 at North Fitzroy – AETA Special CC31 Bourke St at Elizabeth St – has passengers on board CC32 W6 985, 996 Queens Parade, Mk 3 bus 333 CC33 As above CC34 Showing construction at Nicholson & Gertrude – Bourke St CC35 W2 223 on Burnley temporary bridge – VR track expansion CC36 W5 823 – ditto CC37 Tram on old bridge prior to removal CC38 W2 433 on temporary bridge with new bridge beams and old track CC39 Looking down showing temporary single track – Swan St CC40 Tait train passing under tram bridge CC41 SW6 on single line – off loading CC42 W2 547 at City Road Junction CC43 City Road Jtn – 1969 – 596 and 771 CC44 City Road Jtn – 1969 – 596 and 771 (same as CC45 438 in Flinders St CC46 355 somewhere CC47 552 somewhere CC47A 364 at Preston Workshops? CC48 W2 334 on Traverser – Preston Workshops CC49 Wellington pade – large line up of trams, c1950 925, and 611 CC50 W2 493 Franklin st – advertising for Savings Certificates CC51 Possibly 551 with advertising for fund raising for Blind institute CC52 249 at Hawthorn – Riversdale Junction – with a Tally Ho and Village Fair Aux. board CC53 MMTB Postcard of 511 CC54 Wattle Park terminus with Single line warning sign CC55 Wattle Park Duplication CC56 36 at Domain Junction – 833 CC57 36 at Domain Junction CC58 36 at Domain Junction with 810 and 833 CC59 36 in Swanston by Flinders St Station CC60 36 in Spencer St at A’Beckett CC61 36 crossing Collins St CC62 36 crossing Collins St CC63 36 northbound in St Kilda Road with Shrine in background CC64 36 northbound in Swanston St at Flinders St CC65 Postcard – Ballarat 36 in Domain Road CC66 Postcard - Stampshow – Hawthorn Horse tram CC67 Postcard - Stampshow – Peace cable tram CC68 Postcard - 1041 and cable car set 1 at Preston CC69 Postcard - Colins & Elizabeth – greetings from old Melbourne CC70 Postcard - Cable car set at Preston CC71 Postcard - Twentyman’s cable cars CC72 Postcard - Nu-color-vue – horse tram 256 CC73 Cable car set – Market & Flinders CC74 Cable trams at Twentymans’ in their shed CC75 Cable tram track at Bourke & Spencer prior to removal CC76 Cable tram bogie at Preston Workshops – used as a dolly CC77 Cable trams at Twentymans’ CC78 Postcard - Valentines – Bourke looking west from Swanston CC79 Postcard - Rose 3938 – Bourke at Swanston – the Leviathan building CC80 Postcard - Valentines – Elizabeth St looking south from Collins – No. 19 CC81 Postcard - Rose P4765 – Bourke St Melbourne CC82 Postcard - Rose 4090 – cable tram passing Parliament house CC83 Postcard - Valentines – GPO Elizabeth St CC84 Interior of cable trailer with clothing on a set CC85 Elizabeth St looking north CC86 Cigarette card - Collins St No. 41- WD HO Wills CC87 Postcard - Rialto building with cable set CC88 Postcard - Valentines - Swanston at Flinders looking north CC89 CC90 Q 150 Hanna St – dated on rear CC91 176 turning – photo ex Alan Jungworth CC92 161 on Princes Bridge – minimum fare 4d sign and Inspector CC93 459 at Point Ormond CC94 158 at Gordon St – side on view CC95 X 217 in Swanston St CC96 X 217 in Swanston St with an East Brighton destination CC97 T177 CC98 T177 Peel St – no destination roll – being transferred? CC99 X1 462 in Glenhuntly Road to Point Ormond CC100 X1 462 in Glenhuntly Road to Elsternwick Rly Station CC101 X1 462 in Glenhuntly Road to Point Ormond CC102 Q 150 Hanna St CC103 190 at Camberwell Depot CC104 T182 at Footscray CC105 X1 466 and W2 at Footscray CC106 190 at Camberwell Depot CC107 X1 467 Barkly St Footscray CC108 X2 679 turning into William St from La Trobe St CC109 X2 677 Glenhuntly Road with Point Ormond Destination CC110 Postcard T180 CC111 Postcard format – X1 467 on a truck – see also CC178 CC112 Postcard format – X1 467 at Wantirna South CC113 Q200 and SW6 896 at Thornbury – has labels on rear CC114 T177, Ballarat Road – has labels on rear CC115 T178 at Point Ormond CC116 Postcard X1 465 and 466 CC117 Postcard – X2 676 CC118 Postcard – TMSV X2 217 CC119 810 on temporary bridging – 24-12-67 CC120 W2 575 – Queens Parade junction in, still temporary bridging, substation under construction CC121 Forming Queens Parade Junction base slab CC122 W2 596 prior to tramway works – all tracks still in position CC123 It’s a mass of reinforcing – bridging being formed CC124 Looking north with substation being built CC125 Looking east with some rather tight curves, Wellington St still in use CC126 SW6 958 ex Wellington St with all tracks and signal box and buildings. CC127 Victoria Pde at Gisborne looking east – at least 4 cars CC128 SW6 893? With dash canopy lights and SW6 862 and a man with a newspaper CC129 SW6 894 on the S curves, with tram in Wellington St CC130 Similar photo CC131 W2 564 turning into Wellington St – the concrete tracks are not that old CC132 W2 552 running out of Wellington St CC133 W5 732 from Fitzroy St into St Kilda Road with next iteration in position – very wonky CC134 W5 764 turning into Fitzroy St CC135 SW6 947 turning from Wellington St CC136 W2 586 running out of High St CC137 W2 500 turning into Wellington St CC138 W2 543 in Wellington St inbound CC139 L103 with St Kilda Junction destination, and a tower truck on right CC140 Workmen – new track in Queensway in use CC141 Ditto CC142 L103 in Queensway, and another car in bound CC143 Looking east along Wellington St which has been taken out of use. Also a MMTB Roller CC144 W5 824 and a W2 and all types of wobbly temporary track CC145 W2 354 to High St CC146 Sw6 947 on the S bends CC147 W2 500 looking north – tram on the S bends CC148 SW6 896 leaving the S bend CC149 W2 357 and a MMTB City bus with trees/gardens on the side CC150 W5 817 Elliot Ave – see also CC302 CC151 W2 552 – note the large trolley bridge CC152 W2 550 at depot or workshops CC153 1B truck CC154 SW2 432 CC155 W2 155 at Glenhuntly CC156 SW6 937 on AETA tour? CC157 X2 677 on Footscray service – Ballarat Rd? CC158 W2 641 – High St Kew? CC159 SW6 847 – Power St Hawthorn CC160 Simpson St – big line up CC161 W2 546 truck No. 1? CC162 W2s at Glenhuntly depot CC163 No. 15 truck under 899 CC164 206 and other junk at Preston Workshops CC165 W in Swanston St Melbourne – Rose series card CC166 Y1 613 Batman Ave?? or William St at Collins CC167 Tram plans CC168 X 217 Swanston St – see also 95 and 96 CC169 217 in Swanston St – same as 95 CC169A 192 in St Kilda Road at Princes bridge CC170 192 in St Kilda Road at Princes bridge CC171 Bendigo 3 arriving Malvern depot – being unloaded CC172 Ditto CC173 T180 at a depot CC174 X1 463 wheel set CC175 C30 – dog car side view – close up CC176 C30 dog car CC177 206 and 30 at Preston Workshops CC178 X1 467 on a truck – see CC111 also CC179 42 CC180 42 at a depot, no destination box CC181 W2 556 1A type truck CC182 Flinders St Station – Rose Series CC183 W7 1035 Spring – Nicholson St CC184 W7 1022 MMTB Post Card CC185 Adelaide 178 – has on rear – R. Lilburn 4/82 CC186 Adelaide 175 – has on rear – R. Lilburn 4/82 CC187 Y1 610 on AETA tour CC188 Y1 610 on AETA tour with large group – Point Ormond CC189 AETA display – has GH55-32 in pencil on rear CC190 AETA display – has GH55-29 in pencil on rear CC191 Y1 610 on AETA tour with large group – Point Ormond CC192 VR 53 at Footscray CC193 VR cars 40 and 34 at Elwood wash dock CC194 W7 1024 as the 1970 Christmas tram CC195 Geelong – loading a set of 22E trucks CC196 Geelong 10 and 23 running an AETA special CC197 Geelong – AETA special CC198 Geelong 7 at Junction CC199 Geelong 10, in the city CC200 Geelong 33 with Belmont destination CC201 Geelong 15 Eastern Park destination 29-3-1948 CC202 Geelong 23 at Railway Station – 29-3-1948 CC203 Geelong 23 at Railway Station – 29-3-1948 CC204 Geelong – loading a bogie tram CC205 Geelong – loading a bogie tram CC206 Geelong 40 – loaded on truck CC207 Geelong 40 – on jacks CC208 Geelong 40 on jacks – 19 behind CC209 Geelong 38 with two workers on either side CC210 – 214 Australian Historic Tramways stamp folder and set CC215 Bendigo 17 at depot – has dup JBS on rear CC216 Bendigo 20, 29 bogie and straight sill car at Charing Cross CC217 Bendigo one man bogie Pall Mall CC218 Bendigo – Bogie 23, other cars and welding truck at depot CC219 Bendigo 7 with Quarry Hill destination CC220 Bendigo 21 with Lake Weerona destination CC221 ESCo 18 Ballarat CC222 Ballarat bogie 22 on AETA special CC223 Ditto CC224 Ballarat 34 at Stones Corner – R Lilburn CC225 Ballarat 15 in Bridge St – R Lilburn CC226 Ballarat 40 at Gardens – R Lilburn CC227 Ballarat 37 running out of depot – R Lilburn CC228 Postcard – Valentines – Sturt St with loaded horse tram trailer CC229 AETA Geelong tram tour ticket – 29-3-1948 CC230 Postcard – Geelong – Valentine 2114 – T&G building CC231 Postcard – PMTT ! – High St Malvern CC232 Postcard – Empire – Glenferrie Road, Malvern at Wattletree Rd CC233 Postcard Y469, MMTB CC234 Postcard Z2 Spring St CC235 Postcard – Z1 MMTB CC236 Postcard – Stamp Show W1 431 CC237 Postcard – Stamp show B2005 CC238 Postcard – Stamp show W6 982 CC239 Postcard – Valentines 1264 – Johnstone Park with tram in distance CC240 Postcard – Rose 10711 – Swanston and Lonsdale – Hospital and W232 CC241 Postcard – Rose 4827 – Fitzroy St St Kilda W2 362 and 548 CC242 Postcard – Valentines – 939 – St Kilda War Memorial, W and a R? CC243 Postcard – Valentines – 572 – St Kilda War Memorial, W 413 and 140? CC244 Postcard – Valentines – 938 – Uper and Lower Esplanade – L 104 CC245 Postcard – St Kilda Rd at Princes Bridge Y1 and W CC246 Postcard – Biscay BG82 – W5 814 - CC247 Postcard – Biscay 796112 – Bourke St looking west CC248 Postcard – Biscay 796109 – Bourke St looking east CC249 Postcard – Biscay 2AUS58 – Z5 Bourke St CC250 Postcard – Biscay BG 249 – Swanston St CC251 Postcard – National View – St Kilda Rd – shrine and Prince Henrys W2 405 CC252 Postcard – Nu color vue – 11 ML 156 – St Kilda Rd CC253 Postcard – Nu color vue – 11 ML 153 – Swanston St CC254 Postcard – Nu Color vue – Collins St 442 CC255 Postcard – Pitt card – Adelaide – H 364 at Victoria St CC256 Postcard – SPER L/P 154 CC257 Postcard – BTMS – 550 CC258 Postcard – SPER – Brisbane 295 CC259 Adelaide 131 at Burnside – has R Lilburn on card, c1911 CC260 Adelaide 194 CC261 Adelaide 235, with two crew, The News photo CC262 Rockhampton, outside post office – has source of photo details CC263 Sydney – 2086 and 2062 arriving Circular Quay CC264 Sydney – P class – Pitt St? CC265 Sydney – 1610 at Circular Quay CC266 Brisbane 99 and 468 CC267 Sydney with bridge behind CC268 Steam tram Paramatta Park – 103 CC269 Sydney – Museum Station =- Elizabeth St CC270 Sydney – weed burner 137S at a loop Demonstrates the work of Charles Craig in photography and collection of prints.Assembled album in a black presentation folder of 270 photographs from the Charles Craig Collection - 86 sleeves - part 1 of 2. All photographs have been scanned and placed on the Museum's G drive. A list of all photographs with details where possible has been compiled. Victorian Provincial, Launceston, Hobart and Sydney tram photos have been transferred to other Museums, image files retained.melbourne, tramways, tramcars, trams, charles craig, st kilda junction, trackworks -
 Melbourne Tram Museum
Album - Charles Craig - part 2 of 2, 1950s to 1970s
Photo - see pdf file for further information. Number Brief Description CC271 Y1 610 and another at Camberwell depot CC272 Ditto CC273 Y1 613 at Batman Ave CC274 Y1 611 Peel St North Melbourne CC275 Y 469 Camberwell depot CC276 Ditto CC277 Postcard – L104 – MMTB CC278 L103, Hawthorn Road CC279 L103, Hawthorn Road CC280 L103 Dandenong Road CC281 L103 and w5 847 Dandenong Road CC282 L104 on Preston Workshops traverser CC283 Flinders St station with Ws CC284 Flinders St looking south along St Kilda Road to Shrine CC285 Postcard – Nu Color vue – Flinders St CC286 Postcard – Valentines – Flinders St No. 13 CC287 Postcard – Rose Series – 13595 – has been trimmed CC288 Postcard – Rose Series – 10660 – Princes Bridge and Flinders St yard CC289 Postcard – Rose but has been trimmed of Flinders St CC290 Postcard – same as CC285 CC291 SW6 914 and another car in Swanston St by Flinders St CC292 SW6 903 and bus 436 with Flinders St Station in background CC293 W5 776 at Flinders St Station CC294 W2 596 at Flinders St Station CC295 L101 and W2 Swanston St by Ian Brady CC296 Postcard - Biscay BG 250 – A 281 - CC297 W5 779 Maribyrnong River CC298 SW5 787 Queensbridge St CC299A Duplicate copy CC299 Ditto CC300 W5 812 St Kilda Junction CC301 W5 721 Carnegie? - CC302 W5 817 Elliot Ave – see also CC150 CC303 CW5 682 CC304 CW5 682 Dandenong Road CC305 SW6 855 Power St Hawthorn CC306 Argus photo same as CC8A CC307 Freight car 19 leaving South Melbourne depot CC308 Freight car 19 at South Melbourne depot CC309 Cleaner 7 CC310 W2 295 and 8 at South Melbourne Depot CC311 Cleaners 5, 8 and 7 and S or T at South Melbourne depot CC312 Freight car 17 with crew member CC313 Cleaners 5, 8 and 7 along with a tower truck and another road motor CC314 Wheel Transport car 16 at Preston CC315 Cleaner 7 CC316 Cleaner 6 Brunswick Depot R Hudson and Bob Prentice CC317 SW6 867 in Swanston at Flinders CC318 SW6 850 at Chapel and Brighton Road CC319 SW6 914 at Batman Ave CC320 SW6 963 and W5 826 in Collins St near Spencer St CC321 Sw6 923 RAAF tram CC322 Same image at 318, but better has initials T McC (Tom McCaw) CC323 Sw6 963 In Collins at Spencer St CC324 SW6 947 in Collins at Spencer St CC325 Ditto with crew CC326 SW6 850 at Preston Workshop – Argus photo CC327 SW5 843 at Swan and church, severely derailed – Herald photo CC328 SW6 886 in Victoria Parade near La Trobe CC329 SW6 948 turning from Union St into Maribyrnong Road – single curve CC330 W5 731 CC331 SW5 on a 4D – Herald WT photo CC332 Sw6 867 Swanston St with driver carrying handles etc CC333 SW6 954 – Truganini Cres CC334 SW6 915 illuminated for Christmas, the CDA father Xmas special CC335 SW6 850 on route 77 side on view CC336 Sydney R class 1845 on trailer in a busy road CC337 Sydney R class 1845 on trailer CC338 Ditto CC339 Ditto – on trailer turning from a local street CC340 MMTB Emergency van CC341 Ditto CC342 Welding truck – Hopkins and Leeds CC343 Welding truck – Hopkins and Leeds CC344 Welding truck in Hopkins St Footscray CC345 Negative – Hobart tram 103 CC346 Launceston tram CC347 Trackwork – East Kew CC348 Trackwork and a W2 East Kews CC349 SW6 892 and trackwork – East Kew CC350 W4 670 – FRONT ON CC351 W3 654 – Brunswick Depot CC352 W3 666 – St Kilda Road and High St Demonstrates the work of Charles Craig in photography and collection of prints.Assembled album in a black presentation folder of 80 photographs from the Charles Craig Collection - 31 sleeves - part 2 of 2. All photographs have been scanned and placed on the Museum's G drive. A list of all photographs with details where possible has been compiled. Victorian Provincial, Launceston, Hobart and Sydney tram photos have been transferred to other Museums, image files retained.melbourne, tramways, tramcars, trams, charles craig -
 Melbourne Tram Museum
Album - Geoff Grant Photos, Geoff Grant, mid 1950s
Photo - see pdf file for further information. Number Brief Description GAG1 51 Sandringham GAG2 50 Sandringham GAG3 50 side Sandringham GAG4 Depot Sandringham_ GAG5 426 Camberwell Depot GAG6 822 St Kilda Rd GAG7 496 St Kilda Rd GAG8 347 Caulfield GAG9 440 Princes Bridge GAG10 190 Camberwell GAG11 190 Camberwell GAG12 Ys Camberwell GAG13 Interior Camberwell Depot GAG14 921 Camberwell GAG15 613 Camberwell Depot GAG16 613 front Camberwell Depot GAG17 887 Bourke St opening_ GAG18 888 Victoria St North Richmond GAG19 888 Victoria Pde GAG20 888 887 Malvern Depot GAG21 888 887 Malvern Depot GAG22 888 Victoria Pde GAG23 1033 North Fitzroy Depot GAG24 957 1033 Bourke St GAG25 1033 Nicholson St East Brunswick GAG26 1001 East Preston Depot GAG27 980 East Preston Depot GAG28 980 Dandenong Rd GAG29 Tower wagons Bourke St at Swanston St GAG30 Tower wagons Nicholson St GAG31 988 tower wagons Nicholson St GAG32 988 tower wagons Bourke St at Russell St GAG33 Albion Tower wagon Clifton Hill GAG34 988 tower wagon Bourke St at Russell St GAG35 988 East Preston Depot GAG36 Cleaner 7 Bourke St GAG37 988 turning from Nicholson St into Victoria Pde GAG38 991 Bourke St GAG39 View down Bourke St from 988 GAG40 988 Nicholson St GAG41 988 Smith St GAG42 988 High St GAG43 988 testing overhead Bourke St GAG44 1003 Nicholson St into Gertrude St GAG45 988 Clifton Hill GAG46 988 Nicholson St GAG47 988 1003 Nicholson St GAG48 988 Bourke St looking west from Elizabeth St GAG49 988 Bourke St looking east from Swanston St GAG50 988 1003 and tower wagons Nicholson St GAG51 988 Clifton Hill GAG52 988 East Preston Depot GAG53 190 Etched saloon door window Yields infomation about VR Tramways, Bourke Street trams and AETA tours. Geoff Grant was a Herald Sun photographer.Assembled album in a black presentation folder of 53 photographs from the Geoff Grant Collection - 27 sleeves All photographs have been scanned and placed on the Museum's G drive. A list of all photographs with details where possible has been compiled. tramways, trams, sandingham, camberwell depot, bourke st, new tramways, tower wagons, tours, victoria parade, east preston, aeta tours -
 Melbourne Tram Museum
Photograph - Set of 12 - construction of King St overpass in Flinders St, 1959
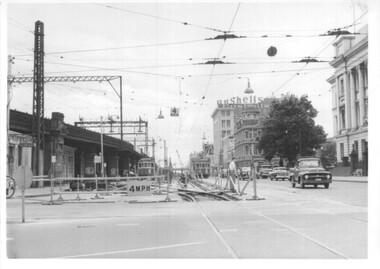
Photos show the construction of King St overpass in Flinders St which was part of the project to construct a bridge over the Yarra River and provide a new southern outlet road between the city and eventually St Kilda Junction. The overpass construction was commenced in 1959 with tramway works first commencing. It was demolished in 2005. 1 - looking west at Market St. 2 - looking east from Spencer and Flinders St with the railway viaduct behind. 3 - Tram lines diverted onto the new overpass. Note the hand-powered overhead tower on the left behind the compressor. 4 - Tracks partially diverted. 5 - Looking east at Spencer and Flinders St with a Dunlop tyre truck in the view. 6 - prior to the diversion onto the new bridge. 7 - Looking east near William St. with W2 451 (Route 48, North Balwyn) in the view. 8 - Bridge works near King St. Original tracks still in use. 9 - Looking east prior to the introduction of the temporary tracks on the south side of the new overpass. 10 - SW6 852 and a W2 on new overpass trackwork - old trackwork being demolished. 11 - Cross over at Spencer St in Flinders St, prior to change over. 12 - Looking west at Flinders and Spencer St with SW6 853 turning into Spencer St.Yields information about the construction of the King St overpass in Flinders St during 1959.Set of 12 black and white prints of the construction of the King St overpass in Flinders St.trams, tramways, flinders st, king st overpass, construction, bridges, w2 class, sw6 class, tram 451, tram 853, tram 852 -
 Bendigo Historical Society Inc.
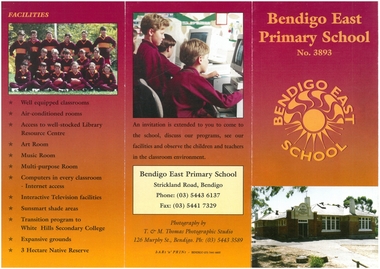
Work on paper - 1990s Advertising Brochure for Bendigo East State School
The two-sided trifold brightly coloured 1990s brochure is an advertisement for Bendigo East Primary School No.3893. It describes the school facilities, curriculum, educational enhancement program, and information about the school. The brochure contains five colour photos of students participating in school activities wearing a maroon and gold uniform. One photo shows the school building. the brochure was professionally produced by bArt'n'PRINt of Bendigo with photography by T.&M. Thomas Photographic Studio.bendigo east state school, bendigo schools, gemma starr collection -
 St Kilda Historical Society
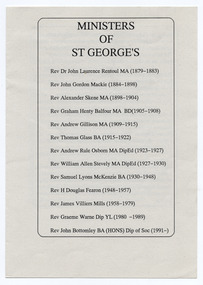
Ephemera - Pamphlet, Ministers of St George's, c1994
Pamphlet about the 13 ministers who had served at St George's Church in East St Kilda during the first 115 years of the church's existence.White paper printed in black on both sides and foldedst george's east st kilda uniting church -
 Bendigo Historical Society Inc.
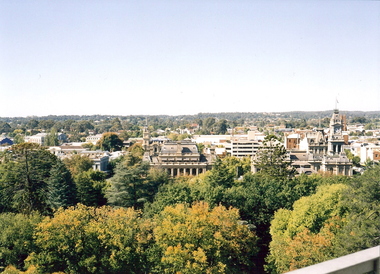
Photograph - LANDSCAPE VIEW OF BENDIGO, c2001
Color photograph. View of Bendigo looking South East from the look out tower in Rosalind Park. Former Bendigo Post Office on the right side, Courthouse in centre, Town Hall far side of Courthouse and the Shamrock Hotel on far side of Post Office. Physical description: Unmounted photo. Inscriptions/Markings: Bendigo from look out tower, Rosalind Park, April 2001.Willa, Wendybendigo, bendigo streetscape, bendigo central, post office, court house, bendigo town hall, shamrock -
 Federation University Historical Collection
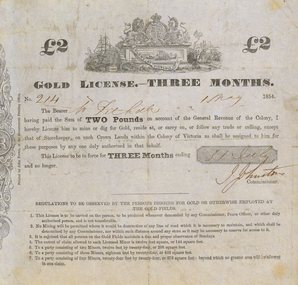
Document - Gold License, Fittnall's Gold Licenses, 1854, 1) 1 May 1854 ; .2) 16 April 1855
From 1851 the Victorian government required all men on Victorian Goldfields to carry a Gold License. The fee was one pound per month, and was payable in advance. There was agitation surrounding the gold license which was thought to be an excessive fee and did not give the bearer right to representation. On 03 December 1854 the gold diggers on the Eureka Lead fought a short battle against the army and police troopers. A few months later a new system of taxing gold diggers was introduced - the Miner's Right.The Victorian Gold Licence was issued from 1851 until early 1855. Every man on a Victorian goldfield had to carry a valid gold license, so few survived the harsh treatment of being carried around a working goldfield. There was much dissatisfaction about what was thought to be an unfair mining tax (or gold license). On 29 November 1854 Ballarat miners burnt their licenses on Bakery Hill. On 3 December 1854 the Eureka Stockade Battle took place, resulting in the Goldfields Commission. The first Miner's Right was issued in late June 1855, and in July the first Local Courts were elected by miner's right holders. The two Fitnall Gold Licenses are important because they were issued on either side of the Eureka Stockade, and are in very good condition. The Gold Licenses were donated to the Ballarat School of Mines by John Wilson in 1921. Two gold licenses issued by the Colony of Victoria. The licenses are printed onto blue paper with a Colony of Victoria logo at the top. The licenses were issued on either side of the historic Eureka Stockade in Ballarat East which took place on 03 December 1854. .1) No 219 - Made out to [H?] Fithall on 16 April 1854 and signed by Commissioner R.C. Mackenzie. The license was valid until 31 July 1854. .2) No. 214 - Made out to [H?] Fithall on 1 May 1854 and signed by Commissioner J. Johnston. The license was valid until 15 May 1855.On the backing card "Given to the School of Mines, October 6 1921, by John Wilson Errard Street, Ballarat."mining, gold license, gold licence, mining license, mining licence, mackenzie, johnston, fitnall, gold commissioner, eureka -
 Bendigo Military Museum
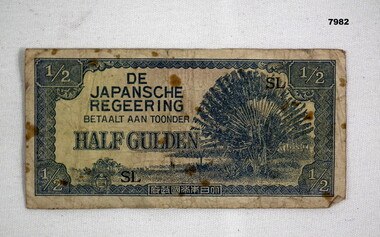
Currency - CURRENCY - INDONESIAN, Imperial Japanese Govt, c.1942
Part of the collection of "Thomas Leslie Wilkinson" 2nd AIF. Refer Cat No 7996.6 for his service history. Japanese half gulden occupation currency for Dutch East Indies (Indonesia). Blue note with image of palm bush on front. The no. 1/2 on each corner. On other side "1/2" in big numbers and Gulden.On front "De Japansche Regeering" and "Half Gulden".currency, indonesia, occupation, thomas leslie wilkinson -
 Bendigo Historical Society Inc.
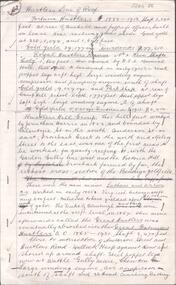
Document - Hustlers, Sheepshead and Deborah lines of reef
Albert Richardson was a mining historian who wrote widely on the mines of the Bendigo Goldfield. The park opposite the Goldmines Hotel in Marong Road, is named in his honour. Five page document, hand written by Albert Richardson on lined foolscap and edited with cross-outs and insertions, . The mines along the Hustlers line of reef and the Sheepshead line of reef are described. Mines listed on Hustlers line of reef: Fortuna Hustlers (1888 - 1913), shaft 2,240 feet at rear of Buckell and Jeffrey's offices; Royal Hustlers Reserve No. 2 - two shafts 'City" 860 feet, now covered by R.S.L. building Pall Mall, steel poppet legs 60 ft high and 'Park Shaft" at rear of Camp Hill School, 1,775 feet, steel poppet legs 60 feet high; Hustlers Hill Group first worked by Jonathan Harris in 1853 and bounded by Valentine, Anderson and Ironbark Creek to the north and Milroy Street to the east, one of first areas worked for quartz reefing. It with Garden Gully line west and Victoria Hill Ironbark, formed by far the richest cross section of the Bendigo Goldfield. Great Extended Hustlers (1865-1921) close to intersection of Anderson Street and Hustlers Road, mullock heap against road and shored up around shaft, steel poppet legs now at Wattle Gully mine, Chewton, large winding machine, air compressor south of shaft and 36 head crushing battery. Hustlers Reef (Old Hustlers) and Hustlers Reef No. 1, two shafts, main 2,210 feet, about 220 yards east of Moran Street and against Fenton Street. , No. 1 shaft 1,140 feet and about 155 yards east of Moran Street. Lansell's Comet, Lightining Hill line, 2.100 feet, on Comet Hill approx 70 yards west of Holmes Road, near Comet Creek, steel poppet legs. United Hustlers and Redan (1876-1918), main Redan, 1,830 feet about 155 yards west of Sandhurst Roead, in line with Comet Hill State School, this hill known as Redan Hill. North, or New Hustlers, once known as Agnew Hustlers, wooden poppet legs, south side, Kneebone Street, Eaglehawk. Derby line, Johnson's No. 3, South Johnson's (east shaft of Collman and Tacchi) 439 feet on west wide of Woods Street, south of Wetherall Street. Paddy's Gully Line, south to north, some shafts - Lansell's 'Sandhurst" ('Needle") Eaglehawk Road shaft 2,425 feet, about 50 yards east of Needle Loops, a brick square sided chimney with Cleopatra Needle top. British American, 789 feet, just south of Holdsworth Road. Collman and Tacchi, main shaft 2,588 feet, 60 yards west of Eaglehawk Road, California Gully. Deborah Line of Reef, The Deborah (1932-1954) shaft 2.017 feet, west of Adams Road and south of Abel Street, Quarry Hill. North Deborah (1937 - 1954) shaft 1,151 feet, Breen Street, Quarry Hill, steel poppet legs. Central Deborah (1939-1954) shaft 1,347 feet Sheepshead line of reef, Lansell's South Red, White and Blue, shaft 2,124 feet, north east of Bellevue Road and 220 yards east of Adams Road. The New Red, White and Blue Consolidated (Big Blue) main shaft 2,416 feet. Lansell's Bendigo Battery 105 head, north of 'Big Blue" on his freehold lease, commenced crushing on 24th February 1895. After closing was erected as the Showground's Industrial Hall, July 1926. North Red, White and Blue, burnt down February 1926, new company 1934, closed 1938. Document is part of the Albert Richardson Collection of Bendigo mining history. bendigo, gold mining, deborah line of reef, sheepshead line of reef, hustlers line of reef, royal hustlers reserve mine, hustlers hill group of mines, great extended hustlers, hustlers reef no. 1, lightning hill line, old comet, collman and tacchi, lansell's comet, north deborah, central deborah, dhrrpdhrsf linr og trrg, new red, white and blue consolidated mine, big blue, lansell's bendigo battery, north red, white and blue mine, albert richardson collection -
 Ringwood and District Historical Society
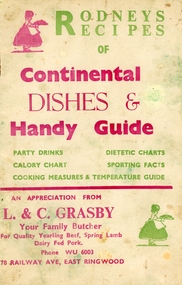
Booklet, Grasby, L. and C, Rodney's Recipes of Continental dishes and Handy Guide. From Your local Butcher (L & C Grasby, 78 Railway Avenue, East Ringwood, WU 6003) c1960, c1960
Given to customers of L. and C. Grasby, Your Family Butcher, 78, Railway Avenue, East Ringwood.Roney's Recipes of Continental Dishes and handy Guide of party drinks, calorie chart, dietetic charts, sporting facts, cooking measures and temperature guide.10 page booklet plus cream coloured covers with red and green printing on both sides. Contains recipes for various occasions, drinks, charts, cooking measures and temperature guide. Given to customers of the butcher. Covering letter from Mrs. Ives +Additional Keywords: Grasby / Ives, Mrs. Norma. All the Ives family lived at 2 Lois Street, East Ringwood until moved away, except for the eldest Ted and his daughter Lynda who lived at 4 Lois Street. -
 Lakes Entrance Historical Society
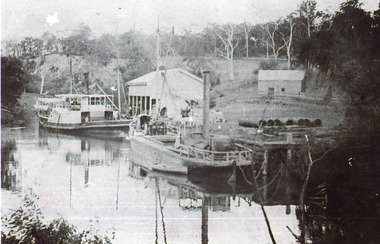
Photograph - Mossiface Wharf, 1908
Black and white photograph showing P S Tanjil left and S S Burrabogie right at Mossiface Wharf on the Tambo river. Larger open sided white shed at wharf, smaller shed further back, pipes on wharf small row boat beside stern of Burrabogie. Hillside partly cleared trees ring barked. East Gippsland Victoriaships and shipping, waterways, wharfs