Showing 20120 items
matching no 8
-
 Moorabbin Air Museum
Manual (Item) - Canberra Modifications
AAP 7214.006-100-8 -
 Queenscliffe Maritime Museum
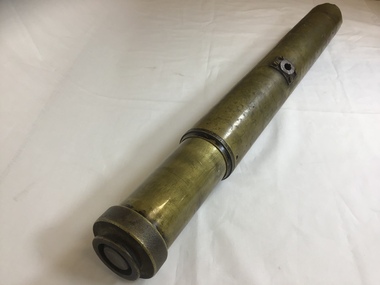
Instrument - Telescope, Gun Sighting
Gun Sighting Telescope purported to be from J5 submarineGun Sighting TelescopeG.S.Telescope x 8 - 2179gun sighting telescope, g.s.telescope, j5 -
 Kew Historical Society Inc
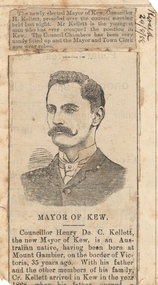
Newspaper - Newspaper Article, Cr Henry Kellett, Mayor of Kew, 1888
Sir Henry de Castres Kellett (1851-1924) the son of a hereditary baronet, was born at Mt Gambier, South Australia in 1851. His English title had been created in Ireland in 1801, but the family was originally Norman with the later branches living in England and Ireland. Sir Henry Kellett assumed the title in 1906. Henry Kellett was a prominent Kew retailer, continuing his father’s newspaper and stationery business in Bulleen Road (now High Street). At various stages, he also acted as an insurance, postal and real estate agent. He lived in Walpole Street and later at Lota Begg (now demolished) in Westbrook Street, East Kew. In 1884, Henry Kellett was elected to the Kew Borough Council and served for 40 years; a remarkable example of public service. He was elected Mayor for a single term in 1888-9. Sir Henry de Castres Kellett died in St George’s Hospital in 1924 following a tragic car accident in Cotham Road, Kew while on Council business. The vehicle, in which he was travelling with fellow councillors and the Town Clerk, collided with a tram. Sir Henry Kellett is commemorated in the naming of Kellett Reserve and Kellett Grove.Illustrated newspaper article from 1888, describing the elevation to the position of mayor of Kew by Cr Henry KellettHERALD 29/8/88sir henry de castres kellett, mayors of kew -
 Stawell Historical Society Inc
Photograph, Stawell Gas Company Manager's Residence on the Skene Lane and Clemes Street Corner
Gas Company – Stawell - Managers Residence8 Clemes Street, Stawellstawell -
 Melbourne Legacy
Photograph - Photo, President handover, 1996
Photograph of incoming President Ray Ward and immediate past President David Millie in 1996. Plus two solo photos of Ray Ward which appear to be professional photos taken for use in publications during his term as president. An article in The Answer in April 1996 has brief biographical details as he starts his term as President. And in 1997 he published a letter of farewell about his year as president.A record of the past presidents of Melbourne Legacy.Colour photo of President Ray Ward and David Millie and solo photos of Ray Ward.Printed on the back past presidents, answer, ray ward -
 Beaufort Historical Society
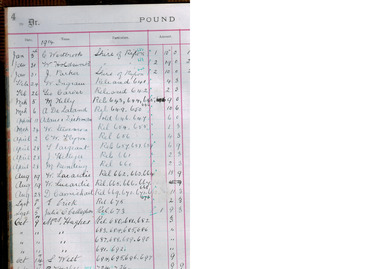
Book - Ledger, Pound Cash Book, 10 August 1910
Shire of Ripon ledger used to record payments for animals released or purchased from the pound. It records fees and/or prices along with people's names. Foolscap half bound tan calf bound ledger. Marbled end papers. Label Arnold & Jackson glued to inside front cover.B10084 10/8/10cash balance accounts book, pound, ledgers, handwriting, family history beaufort, shire of ripon -
Melbourne Tram Museum
Photograph - Dummy and staff outside Brunswick Car Shed, c1926
Photograph shows Dummy or Grip Car on run-out track outside Brunswick Car Shed in Sydney Road, Brunswick. Lined up in the foreground along the side of the Dummy are approx 20 tram crew and other staff, most in assorted uniforms with unbuttoned jackets. While the photo's reproduction is poor, the destination board reads 'H. B. Railway' (Hobson's Bay Railway) once located at the Flinders and Elizabeth Streets terminus. This early railway became part of the Victorian Railways in 1878, well before the opening of the Brunswick cable line in 1887 and this photograph c1890. Photo from C B Thomas collection.Yields information about Brunswick Car Shed and Sydney RoadBlack and white photograph with notes on rear.In ink "8" and "K McC"tramcars, tramways, cable trams, dummy, grip car, hobsons bay railway, elizabeth street, flinders street, brunswick car shed, sydney road -
 Melbourne Tram Museum
Photograph - Dummy and staff outside Brunswick Car Shed, c1890
Photograph shows Dummy or Grip Car on run-out track outside Brunswick Car Shed in Sydney Road, Brunswick. Lined up in the foreground along the side of the Dummy are approx 20 tram crew and other staff, most in assorted uniforms with unbuttoned jackets. While the photo's reproduction is poor, the destination board reads 'H. B. Railway' (Hobson's Bay Railway) once located at the Flinders and Elizabeth Streets terminus. This early railway became part of the Victorian Railways in 1878, well before the opening of the Brunswick cable line in 1887 and this photograph c1890. Photo from C B Thomas collection.Yields information about Brunswick Car Shed and Sydney RoadBlack and white photograph with notes on rear.In ink "8" and "K McC"tramcars, tramways, cable trams, dummy, grip car, hobsons bay railway, elizabeth street, flinders street, brunswick car shed, sydney road -
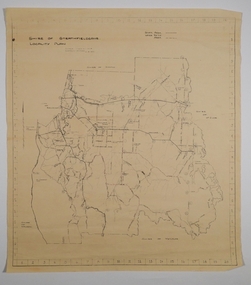
 Ringwood and District Historical Society
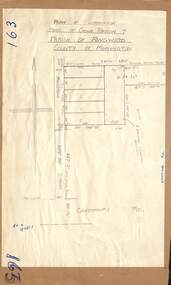
Map - Plan of Subdivision, Part of Crown Portion 7, Parish of Ringwood, County of Mornington - circa 1950
Hand-drawn map attached to light cardboard backing showing 5 residential allotments on eastern side of Maidstone Street Ringwood, north of Canterbury Road.RFK 8/11/51 -
 Clunes Museum
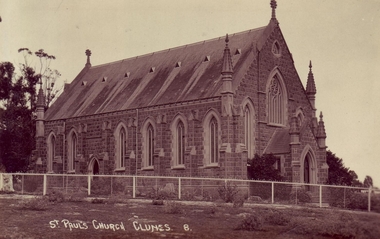
Photograph, D.S. KING, 1914
C0PY OF PHOTO OF ST. PAUL'S CHURCH. CLUNES.ST. PAUL'S CHURCH. 8.local history, document, postcard, churches - st.pauls anglican -
 Whitehorse Historical Society Inc.
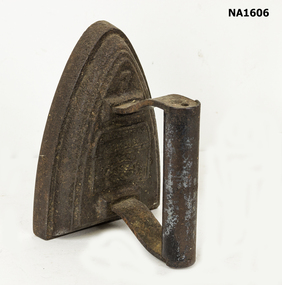
Domestic object - Flat Iron
Triangular flat iron. Some decoration on top. Straight cylindrical handle'8' 'Silvesters Patent' 'Salter'domestic items, irons -
 Ringwood RSL Sub-Branch
Memorabilia - Edged weapon, Circa WW2
Captured in PNGJapanese Arasaka Bayonet complete with scabbard and leather bayonet frog8(in a circle), 2 (in a diamond),imperial japanese army, japanese army, bayonet, japanese arasaka bayonet, world war two, wwii, ww2, second world war -
 Bendigo Historical Society Inc.
Map - CAMPBELL COLLECTION: BENDIGO AND DISTRICT MAPS, 21-8-1972
Map. Shire of Strathfieldsaye, Locality Plan. Scale I inch=1 mile. Shire of Huntly, Shire of McIvor, City of Bendigo, Shire of Marong, Shire of Maldon, Shire of Metcalfe. Lake Eppalock. Mileage markers on some roads. Melbourne to Bendigo Railway Line, Big Hill Tunnel, Mt.Herbert 1596.Axedale Township, Strathfieldsaye Township.M.Higgs 21-8-1972map, bendigo, locality plan -
 Mission to Seafarers Victoria
Photograph, "Abide With Me" - a snap during a week-evening service at Central, c. 1936
The photograph was published in the 1936 Annual Report on page 22 with the caption: "Abide With Me" - a snap during a week-evening service at Central.medium sized b & w photograph of a group of five men during a service in the St Peter the Mariner chapelstamp: 1298, handwritten numbers: wide 4 x 3, 12 - 8 5/8, st peter chapel, service, seamen, praying, mass -
Whitehorse Historical Society Inc.
Newspaper, The Courier, 1930 - 1931
The Courier: official organ of the Shire of Blackburn and Mitcham.The Courier: official organ of the Shire of Blackburn and Mitcham. Holdings: No1 Vol 1 (4 July 1930) (Facsimile produced as a memento of Blackburn Federation Day, 19 March 2000), Nos 6 - 64 (8 Aug 1930 - 25 Sep 1931) incomplete. 16 issues, photocopied from originals held. See holdings card for details.The Courier: official organ of the Shire of Blackburn and Mitcham. blackburn, mitcham, tunstall, vermont, doncaster, templestowe, warrandyte -
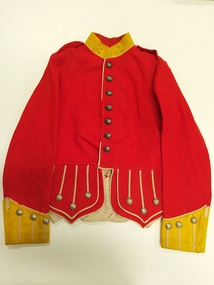 The 5th/6th Battalion Royal Victoria Regiment Historical Collection
Uniform - VSR OR scarlet doublet, c 1898-1912
Scarlet wool doublet with yellow stand collar and cuffs and Inverness skirts. Lower edge of collar, left front of doublet, cuffs and Inverness skirts all edged with white piping. Cuffs and skirts are decorated with three rows of doubled, twisted white wool braid; each row completed with a large whitemetal coloured metal "King Edward VII Australian Commonwealth" button of the period 1901-1911. Shoulder straps are scarlet wool with MISSING whitemetal 'VSR' title, a MISSING whitemetal 'letter' title, a small ERVII Australian Commonwealth button on left shoulder, and a small silver coloured metal Victorian Military Forces button on the right shoulder. Seven large buttons at front of tunic (one missing), and two at back waist. Two large brass belt hooks at side waist of doublet. Lower front skirt flaps have welt pockets lined with linen. Body of tunic lined with a white wool mixture, lightly padded around the underarms. Lower skirt flaps lined with a medium weight cream wool twill and upper smaller flaps lined with a finer cream wool twill. Sleeves lined with cream cotton twill and printed in black ink on the centre back lining is '5/8 38'. Collar lined with red wool and neck fastened with a single brass hook and eye over a black patent leather tab.Printed in black ink on the centre back lining is '5/8 38' -
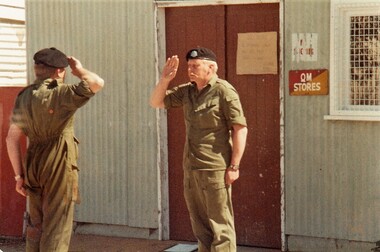 8th/13th Victorian Mounted Rifles Regimental Collection
Photograph
The 8th/13th Victorian Mounted Rifles was raised as a regiment of the Royal Australian Armoured Corps on 1 May 1948 with Headquarters in Melbourne and squadrons in Sale, Benalla/Wangaratta and Albury. In 1955 Regimental Headquarters moved to Wangaratta and a second squadron was located at Albury. The Sale squadron transferred to 4th/19th Prince of Wales’s Light Horse. In 1977 8/13 VMR Regiment was reduced to an independent squadron A Squadron 8th/13th Victorian Mounted Rifles and in 1991 was linked with 4th/19th Prince of Wales’s Light Horse forming the VMR Squadron of that regiment.Colour photograph of two officers of ' A ' Squadron 8/13 Victorian Mounted Rifles on parade at Buna Barracks Albury, 1986. Squadron Second-in-Command, Captain Peter Martin, is handing over the parade to Squadron Commander Major Ian Docking -
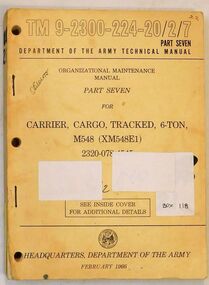 8th/13th Victorian Mounted Rifles Regimental Collection
Manual
Corporal L. Frohling served with the Tech Support Troop and later Workshop Troop of 8/13 VMR in 1970s and 1980s.Technical manuals and User Handbooks were essential equipment for Royal Australian Electrical and Mechanical Engineers (RAEME) tradesmen permanently attached to Armoured Corps regiments as Light Aid Detachments (LAD) or AFV Workshops and were responsible for repairs and maintenance of a nature beyond the expertise of AFV crewmen and just short of major rebuilds undertaken by Base Workshop detachments.Part of a collection of workshop manuals and user handbooks relating to equipment on issue to 8th/13th Victorian Mounted Rifles during the latter half of the twentieth century.Green coloured vinyl covered manual, 322 pages, bound with metal screws being Maintenance Manual Truck Cargo 2.5 Ton CL Ford D400. Publisher not stated./On front cover " L. Frohling " Ink stamps on title page " 13 April 1970." RAEME Att. 1 COD Bandiana and ' 8/13 VMR regimental Collection " -
 Flagstaff Hill Maritime Museum and Village
Plate, before 1878
This earthenware dinner plate fragment is very similar to others recovered from the wreck of the LOCH ARD. It is uncertain whether the plates were personal belongings or part of the cargo. The Asiatic Pheasant pattern is a transfer design and was the most popular design of the 19th century Victorian era. It is still being produced today. The design was produced as high quality, decorative dinnerware by the potters in the Staffordshire, England, area from the late 1830’s, but no-one is sure exactly who the original designer was. The industrial age made production of this design more affordable to the ordinary person who purchased and proudly displayed settings in their homes. The high demand for production resulted in loss of quality in both potting and design, particularly between 1860-1914 when the design reached its height of popularity, and the results were often a poor match for the earlier pieces’ quality and detail. Some engravers would make copies of the Asiatic Pheasant design (and other designs) onto copper plates and sell them to more than one pottery producer (the Copyright Act of 1842 was intended to control this very thing). Consequently the list of Makers’ Marks associated with the Asiatic Pheasant is well over 100. A single pottery factory could have several owners, all with their own Marks. These factors all make the dating of pieces difficult. Also, after 1891, pieces produced for the export were required to be stamped with “ENGLAND”, but pieces produced for the domestic market in England did not need this stamp, so early pieces and pieces produced for the domestic marked would all be without the “ENGLAND” stamp, confusing the matter. Over time the body shape of the pieces changed, the feathered, curved and fluted edges giving way to the simpler, cheaper oblong shapes. The LOCH ARD belonged to the famous Loch Line which sailed many ships from England to Australia. Built in Glasgow by Barclay, Curdle and Co. in 1873, the LOCH ARD was a three-masted square rigged iron sailing ship. The ship measured 262ft 7" (79.87m) in length, 38ft (11.58m) in width, 23ft (7m) in depth and had a gross tonnage of 1693 tons. The LOCH ARD's main mast measured a massive 150ft (45.7m) in height. LOCH ARD made three trips to Australia and one trip to Calcutta before its final voyage. LOCH ARD left England on March 2, 1878, under the command of Captain Gibbs, a newly married, 29 year old. She was bound for Melbourne with a crew of 37, plus 17 passengers and a load of cargo. The general cargo reflected the affluence of Melbourne at the time. On board were straw hats, umbrella, perfumes, clay pipes, pianos, clocks, confectionary, linen and candles, as well as a heavier load of railway irons, cement, lead and copper. There were items included that intended for display in the Melbourne International Exhibition in 1880. The voyage to Port Phillip was long but uneventful. At 3am on June 1, 1878, Captain Gibbs was expecting to see land and the passengers were becoming excited as they prepared to view their new homeland in the early morning. But LOCH ARD was running into a fog which greatly reduced visibility. Captain Gibbs was becoming anxious as there was no sign of land or the Cape Otway lighthouse. At 4am the fog lifted. A man aloft announced that he could see breakers. The sheer cliffs of Victoria's west coast came into view, and Captain Gibbs realised that the ship was much closer to them than expected. He ordered as much sail to be set as time would permit and then attempted to steer the vessel out to sea. On coming head on into the wind, the ship lost momentum, the sails fell limp and LOCH ARD's bow swung back. Gibbs then ordered the anchors to be released in an attempt to hold its position. The anchors sank some 50 fathoms - but did not hold. By this time LOCH ARD was among the breakers and the tall cliffs of Mutton Bird Island rose behind the ship. Just half a mile from the coast, the ship's bow was suddenly pulled around by the anchor. The captain tried to tack out to sea, but the ship struck a reef at the base of Mutton Bird Island, near Port Campbell. Waves broke over the ship and the top deck was loosened from the hull. The masts and rigging came crashing down knocking passengers and crew overboard. When a lifeboat was finally launched, it crashed into the side of LOCH ARD and capsized. Tom Pearce, who had launched the boat, managed to cling to its overturned hull and shelter beneath it. He drifted out to sea and then on the flood tide came into what is now known as LOCH ARD Gorge. He swam to shore, bruised and dazed, and found a cave in which to shelter. Some of the crew stayed below deck to shelter from the falling rigging but drowned when the ship slipped off the reef into deeper water. Eva Carmichael had raced onto deck to find out what was happening only to be confronted by towering cliffs looming above the stricken ship. In all the chaos, Captain Gibbs grabbed Eva and said, "If you are saved Eva, let my dear wife know that I died like a sailor". That was the last Eva Carmichael saw of the captain. She was swept off the ship by a huge wave. Eva saw Tom Pearce on a small rocky beach and yelled to attract his attention. He dived in and swam to the exhausted woman and dragged her to shore. He took her to the cave and broke open case of brandy which had washed up on the beach. He opened a bottle to revive the unconscious woman. A few hours later Tom scaled a cliff in search of help. He followed hoof prints and came by chance upon two men from nearby Glenample Station three and a half miles away. In a state of exhaustion, he told the men of the tragedy. Tom returned to the gorge while the two men rode back to the station to get help. By the time they reached LOCH ARD Gorge, it was cold and dark. The two shipwreck survivors were taken to Glenample Station to recover. Eva stayed at the station for six weeks before returning to Ireland, this time by steamship. In Melbourne, Tom Pearce received a hero's welcome. He was presented with the first gold medal of the Royal Humane Society of Victoria and a £1000 cheque from the Victorian Government. Concerts were performed to honour the young man's bravery and to raise money for those who lost family in the LOCH ARD disaster. Of the 54 crew members and passengers on board, only two survived: the apprentice, Tom Pearce and the young woman passenger, Eva Carmichael, who lost all of her family in the tragedy. Ten days after the LOCH ARD tragedy, salvage rights to the wreck were sold at auction for £2,120. Cargo valued at £3,000 was salvaged and placed on the beach, but most washed back into the sea when another storm developed. The wreck of LOCH ARD still lies at the base of Mutton Bird Island. Much of the cargo has now been salvaged and some was washed up into what is now known as LOCH ARD Gorge. Cargo and artefacts have also been illegally salvaged over many years before protective legislation was introduced. One of the most unlikely pieces of cargo to have survived the shipwreck was a Minton porcelain peacock - one of only nine in the world. The peacock was destined for the Melbourne International Exhibition in 1880. It had been well packed, which gave it adequate protection during the violent storm. Today, the Minton peacock can be seen at the Flagstaff Hill Maritime Museum in Warrnambool. From Australia's most dramatic shipwreck it has now become Australia's most valuable shipwreck artefact and is one of very few 'objects' on the Victorian State Heritage Register. [References: Flagstaff Hill Maritime Village information sheets and documents, http://www.asiaticpheasants.co.uk/index.html ]Flagstaff Hill’s collection of artefacts from LOCH ARD is significant for being one of the largest collections of artefacts from this shipwreck in Victoria. It is significant for its association with the shipwreck, which is on the Victorian Heritage Register (VHR S417). The collection is significant because of the relationship between the objects, as together they have a high potential to interpret the story of the LOCH ARD. The LOCH ARD collection is archaeologically significant as the remains of a large international passenger and cargo ship. The LOCH ARD collection is historically significant for representing aspects of Victoria’s shipping history and its potential to interpret sub-theme 1.5 of Victoria’s Framework of Historical Themes (living with natural processes). The collection is also historically significant for its association with the LOCH ARD, which was one of the worst and best known shipwrecks in Victoria’s history. Fragment of earthenware dinner plate recovered from the wreck of the Loch Ard. White glazed porcelain with blue Asiatic Pheasant design; this piece shows a pheasant. Sticker underneath has blue pen handwriting "L/58". Asiatic Pheasant Cartouche has Maker’s name (hard to decipher). Stamped underneath "0 1 2 8 1 (or 9)" Sticker underneath has blue pen handwriting "L/58". Asiatic Pheasant Cartouche has Maker’s name (hard to decipher). Stamped underneath "0 1 2 8 1 (or 9)" flagstaff hill, warrnambool, shipwrecked coast, flagstaff hill maritime museum, maritime museum, shipwreck coast, flagstaff hill maritime village, great ocean road, loch line, loch ard, captain gibbs, eva carmichael, tom pearce, glenample station, mutton bird island, loch ard gorge, dinner plate, asiatic pheasant, loch ard, plate -
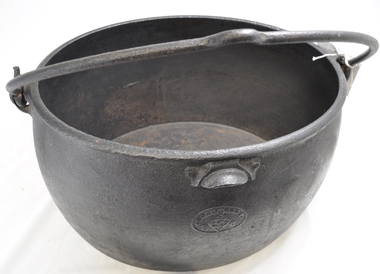 Kiewa Valley Historical Society
Pot Boiler, circa early 1900s
This cast iron "boiler" was produced by one of the largest foundries in England during the late 1700's and onwards. These products were "shipped to the far realms of the "British Empire". This source was one of the only ones available to the early settlers in Australia until the mid 1900's. The catch cry of those "early " times was "the best of British" which was ingrained into the early (Australian) settler's iron and cast iron purchasing mind set. It was not until after World War II did that mindset change, when both American and Asian based manufacturers' products were accepted by the Australian consumer. The city based consumer embraced the swing a lot earlier than the more "traditional" rural consumer. This cast iron 8 gallon "boiler" is very significant to the Kiewa Valley not only that large "boilers" were used to "boil" clothes clean, over an open flame source, but also because it demonstrates one of the most important "rural" mores founded by the "early" settlers in this region. That more was the very "close" tie to "Mother England" and the "establishment". The social and "family" values from the "English" way of life was ingrained until well past the day of the "Australian Federation". It was not until the friendly "American soldier" invasion during World War II that the "Empire" bondage was being eroded away. The transition from the good "rural war cry" of "Australia prospers off the sheep's back" was slipping away and the industrial monolith started its challenge. This change was the slowest in semi remote rural centres such as the Kiewa Valley. The "old English" values lingered on until the mid 1900's.This large (8 gallons) cast iron boiler is oval in shape and has a cast iron (swivel) carrying handle. The handle has a "bend" in the centre position to allow hook and straight type rods to facilitate the positioning of a "hot" boiler. This boiler would have been used over an open fire or placed on top of "coals". On the top rim and evenly spaced between the fixed handle joins is a slightly semi curved balancing/control lip.At the bottom (underneath) "CLARK & Co. PATENT", Below this a six star triangle with the letter "C" in the middle.. On the opposite end "BEST QUALITY" and underneath "8 Gall s"camp fire cooking utensils, hot plate, cast iron cooking and boiling appliance, drovers kitchen -
 Yarrawonga and Mulwala Pioneer Museum
Baby weighing scales, Seca
Cream painted stand with a moving sprung table top attached. On top of the table sits a woven cane basket with a wooden base. The top edge of the basket is is plaited cane and painted gold. The other cane is painted white. It is lined with a piece of white towelling on which the baby would lie. Attached on the side of the base is a notched metal bar which has a sliding metal weight so the bar will balance. It is marked with 2, 4, 6, 8 etc up to 30 lb and a smaller upper bar measures ounces. There is a framed pamphlet hanging above the scales with instructions for using the scales.Ounce measures 0, 4, 8, 12, 1 (pound) Made in Germany 24767. Triangle shape with the word Seca inside -
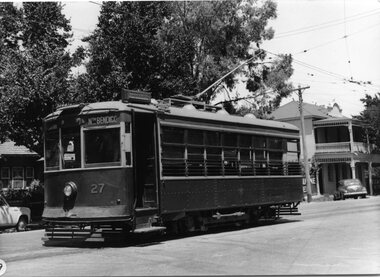 Ballarat Tramway Museum
Photograph - Black & White Photograph/s, Keith Kings, 30/01/2956 12:00:00 AM
Black and White Photograph of SEC Bendigo Birney 27 in McCrae St and Arnold St, 30/1/1956. Has destination of North Bendigo, and the hotel in the background. Photo Keith Kings, number R(q)(8) Stamp in top right hand corner and handwritten number with "K.S. Kings No. R(q)(8) Copyright reserved". In black ink "Bendigo / Birney 27 in McCrae St and Arnold St, (Now Tramways Avenue) 30/1/1956. On front of photograph in bottom left hand corner, white dot with number "19"trams, tramways, bendigo, birney, mccrae st, tram 27 -
 Ballarat Tramway Museum
Photograph - Black & White Photograph/s, Wal Jack, Easter Saturday 1941
Black and White print contained within the Wal Jack Bendigo and Geelong Album, see Reg Item 5003 for more details. Photograph of ESCo tram No. 4 (destination Eaglehawk) with No. 8 Original type., Charing Cross, Easter 1941. Photo by Wal Jack. See also Reg item 5460i4, for a copy print of this photograph - wider view. i1 - scan of print in the album i2 - rear of image i3 - scan of negative at 3200dpi added 6/6/2020. On rear in ink "T189, Bendigo Tramways / No. 4 ex MMTB, No. 8 Original type, Arnold St, Easter Saturday 1941. W. Jack Photo. trams, tramways, bendigo, esco, secv, charing cross, tram 4, tram 8 -
 8th/13th Victorian Mounted Rifles Regimental Collection
Photograph
The 8th/13th Victorian Mounted Rifles was raised as a regiment of the Royal Australian Armoured Corps on 1 May 1948 with Headquarters in Melbourne and squadrons in Sale, Benalla/Wangaratta and Albury. In 1955 Regimental Headquarters moved to Wangaratta and a second squadron was located at Albury. The Sale squadron transferred to 4th/19th Prince of Wales’s Light Horse. In 1977 8/13 VMR Regiment was reduced to an independent squadron A Squadron 8th/13th Victorian Mounted Rifles and in 1991 was linked with 4th/19th Prince of Wales’s Light Horse forming the VMR Squadron of that regiment.Black and white photograph of two servicemen at Albury Drill Hall, one in RAAF uniform and the other in 8/13 VMR uniform. Part of a collection of photographs collected during the life of the regiment and passed to the Heritage Collection when it was formalised in the early 1980s." Anzac Day Duties. John Larkin, ex F/Sgt. AG/ Alan Young." -
 8th/13th Victorian Mounted Rifles Regimental Collection
Photograph - Anzac Day Albury 64
The 8th/13th Victorian Mounted Rifles was raised as a regiment of the Royal Australian Armoured Corps on 1 May 1948 with Headquarters in Melbourne and squadrons in Sale, Benalla/Wangaratta and Albury. In 1955 Regimental Headquarters moved to Wangaratta and a second squadron was located at Albury. The Sale squadron transferred to 4th/19th Prince of Wales’s Light Horse. In 1977 8/13 VMR Regiment was reduced to an independent squadron A Squadron 8th/13th Victorian Mounted Rifles and in 1991 was linked with 4th/19th Prince of Wales’s Light Horse forming the VMR Squadron of that regiment. 6 Collection of six black and white photographs of 8/13 Victorian Mounted Rifles in the Anzac Day parade at Albury 1964. Vehicles are Ferret and White Scout cars and Humber 1 Ton Trucks. Carrying guidon is Warrant Officer W. Woolford.military, anzac, albury, vmr, parade, vehicle, humber, white, ferret, guidon -
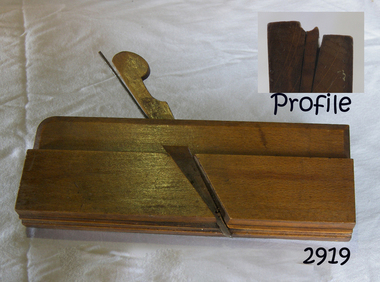 Flagstaff Hill Maritime Museum and Village
Tool - Plane, Richard Routledge, Late 19th to early 20th century
A moulding plane is a specialised plane used for making the complex shapes found in wooden mouldings that are used to decorate furniture or other wooden object. Traditionally, moulding planes were blocks of wear resistant hardwood, often beech or maple, which were worked to the shape of the intended moulding. The blade, or iron was likewise formed to the intended moulding profile and secured in the body of the plane with a wooden wedge. A traditional cabinetmakers shop might have many, perhaps hundreds, of moulding planes for the full range of work to be performed. Large crown mouldings required planes of six or more inches in width, which demanded great strength to push and often had additional peg handles on the sides, allowing the craftsman's apprentice or other worker to pull the plane ahead of the master who guided it. All we known about Richard Routledge is that he was a tool maker and retailer that operated a business at either 23 or 64 Bull St Birmingham between 1869 to sometime in the early 20th century. There are many of his tools including decorative moulding planes of all sizes and designs for sale around the world and that his tools in particular moulding planes are well sought after by collectors of vintage tools. A vintage tool made by a known maker, this item was made commercially for firms and individuals that worked in wood and needed a tool that could produce a ornamental finish to timber. The tool was used before routers and spindle moulders came into use to produce a decorative moulding for a piece of furniture, door trims etc. or other timber items that had to be accomplished by using hand tools and in particular one of these types of planes. Profiled planes came in various shapes and sizes to achieve the required decorative finish. A significant tool from the mid to late 19th century that today is sought after by collectors. It gives us a snapshot of how furniture and other decorative finishes were created on timber by the use of hand tools. Plane Moulding type size 1/8" Maker stamped R Routledge & JAS Burden (owner)flagstaff hill, warrnambool, shipwrecked-coast, flagstaff-hill, flagstaff-hill-maritime-museum, maritime-museum, shipwreck-coast, flagstaff-hill-maritime-village -
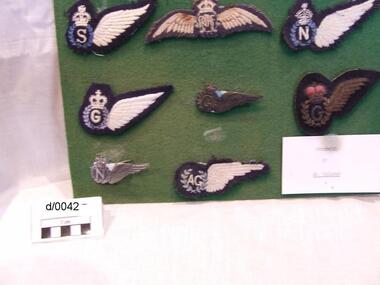 Waverley RSL Sub Branch
Cloth R.A.F insignia on board
8 Cloth uniform R.A.F badges on boardbadge, insignia -
 Lara RSL Sub Branch
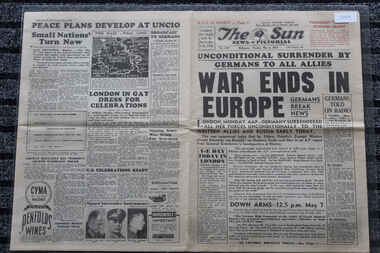
THe Sun Newspaper Dated 8/5/1945, Unconditional Surrender By Germans to All Allies - War Ends in Europe
The Sun Newspaper Dated 8/5/1945The Sun Newspaper Dated 8/5/1945Unconditional Surrender By Germans to All Allies - War Ends in Europeunconditional surrender by germans to all allies - war ends in europe -
 Lara RSL Sub Branch
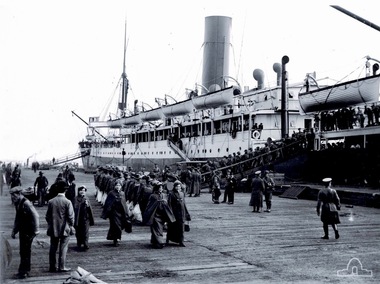
Photograph/, WW1 Nurses boarding HMAT A67 Orsova at Melbourne Pier on 12 Nov 1915
AWM Accession No: PB0339 Order No: 6189542Black and White Photograph 10.5" x 8" -
Lara RSL Sub Branch
Envelope, Eight Misc Envelopes with addresses on them
8 x Misc Envelopes with addresses on them