Showing 8760 items matching "water-pipes"
-
 University of Melbourne, Burnley Campus Archives
Photograph - Black and white print, 906/8, c. 1949
Seed raising bed being watered.seed raising beds, watering, e. m. gibson collection -
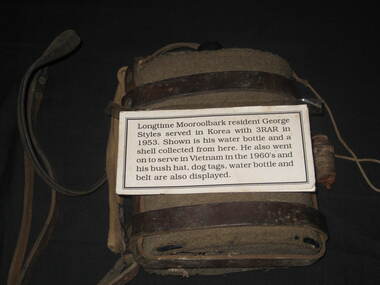 Lilydale RSL Sub Branch
Water Bottle and Carrier
Used by George Styles 3 RAR 1953 in Korea and later in Vietnam. George Styles is a long time Mooroolbark resident1903 pattern water bottle and carrier. George Styles 3RAR -
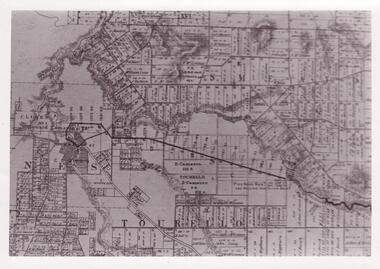 Clunes Museum
Document - MAP
PHOTOCOPY OF CLUNES TOURELLO WATER SHED.local history, photography, photographs, water supply -
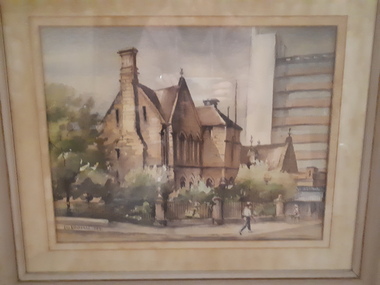 Vision Australia
Painting - Artwork, Lin Ditchfield, Sydney Industrial Blind Institution in William Street, 1971
Watercolour by Lin Ditchfield of the Royal Blind Society of New South Wales (formerly the Sydney Industrial Blind Institution) in William Street, Sydney. Built in 1880, the Edmund Blacket designed building was eventually sold in 1971. Located on the corner of William Street and Boomerang Place, the site was keenly sought by developers as the city landscape transformed into high rise office builidings, as evidenced in the background of this painting.1 water colour in beige frameLin Ditchfield 1971royal blind society of new south wales, lin ditchfield -
 Flagstaff Hill Maritime Museum and Village
Domestic object - Plate, Johnson Bros
The Process of Making Pottery Decorating, Firing, Glazing, Making, Technical There is a rhythm and flow to clay. It can’t be done all at once! Even the making process! It can take weeks to get everything done, especially if you can only work on your pottery once a week! Even though we have three hour classes, it’s often just not enough time! Here is an overview of some of the processes so you have a bit more grasp on some of the technical stuff! Step One – Design There are SO many ideas out there for making stuff in clay! From delicate porcelain jewellery, through to heavy sculptural work and everything in between. Deciding your direction is sometimes not that easy – when you first start, try everything, you will naturally gravitate to the style that you enjoy! The options and variations are endless and can get a wee bit overwhelming too! Check in with me before you start to ensure your ideas will work, what order you might do things, how you could achieve the look you are seeking and any other technical data required! Step Two – Making Clay is thixotropic. This means that as you work with it, the clay first gets sloppier and wetter, before is begins to dry in the atmosphere. For most things, you simply can’t do all parts of the project at once. An example of work order might look like: Get last weeks work out from the shelves Prepare clay for today’s work – roll your clay, prepare balls for throwing, make the first stage of a pinch pot) Clean up last week’s work and put it on the shelf for bisque firing Check that you have any glazing to do – and do enough of it that you will have time to finish your main project Do the next step of your next project – there might be a further step that can’t be complete immediately, in that case, wrap your work well and put onto the shelves. Letting your work rest for a while can really help keep your work clean and professional looking. Many things require bagging under plastic to keep it ready for work the next week – put your name on the outside of the bag so you can find your work easily. We have stickers and markers. Consider how you want to decorate your work – coloured slip can be applied at a fairly wet stage (remembering that it will make your work even wetter!). Trying to apply slip to dry clay won’t work! If you want to do sgraffito – you will need to keep the work leather hard (a state of dryness where you can still work the clay with a little effort and a little water and care). Step Three – Drying Most of the time your work can go into the rack uncovered to let it dry out for the following week. If you want to continue forming or shaping you will need to double bag your work – put your work on a suitable sized bat and put the bat in a bag so the base of the bag is under the bat, then put another bag over the top of the work and tuck the top of the bag under the bat. If you want to trim (or turn) your thrown work the following week, it should also be double bagged. If your work is large, delicate, or of uneven thicknesses, you should lightly cover your work for drying. When considering the drying process, bare in mind the weather, humidity and wind! The hotter and dryer, the faster things dry and work can dry unevenly in the shelves – this can lead to cracking – another time to lightly cover your work for drying. Step Four – Trimming and Cleaning Up Your work is dry! It is called greenware now and it is at it’s most fragile! Handle everything with two hands. I often refer to soft hands – keep everything gentle and with your fingers spread as much as possible. Try to not pick up things like plates too much, and always with both hands! Before your work can be bisque fired it should be “cleaned up”. You work won’t go into the kiln if it has sharp edges – when glazed, sharp edges turn into razor blades! Use a piece of fly wire to rub the work all over – this will scratch a little so be light handed. Use a knife or metal kidney to scrape any areas that require a bit more dynamic treatment than the fly wire offers! Finally, a very light wipe over with a slightly damp sponge can help soften and soothe all of your edges and dags! Trimming thrown work: If you are planning to trim (or turn) your thrown work (and you should be), make sure you bag it well – your work should be leather hard to almost dry for easiest trimming. Use this step to finish the work completely – use a metal kidney to polish the surface, or a slightly damp sponge to give a freshly thrown look. Wipe the sponge around the rim after trimming, and check the inside of the pot for dags! Trimming slip cast work: Usually I will trim the rims of your work on the wheel the following day to make that stage easier, however you will still need to check your work for lumps and bumps. Last but not least – check that your name is still clearly on the bottom of your work. Step Five – Bisque Firing When the work is completely dry it can go into the bisque kiln. The bisque kiln is fired to 1000°C. This process burns off the water in the clay as well as some of the chemically bound water. The structure of the clay is not altered that much at this temperature. Inside the bisque kiln, the work is stacked a little, small bowl inside a larger bowl and onto a heavy plate. Smaller items like decorations or drink coasters might get stacked several high. Consideration is paid to the weight of the stack and shape of the work. A bisque kiln can fire about one and a half times the amount of work that the glaze kiln can fire. The firing takes about 10 hours to complete the cycle and about two days to cool down. Once it has been emptied the work is placed in the glaze room ready for you to decorate! Step Six – Glazing Decorating your work with colour can be a lot of fun – and time consuming! There are three main options for surface treatment at this stage: Oxide Washes Underglazes Glazes Washes and underglazes do not “glaze” the work – It will still need a layer of glaze to fully seal the clay (washes don’t need glaze on surfaces not designed for food or liquid as they can gloss up a little on their own). Underglazes are stable colourants that turn out pretty much how they look in the jar. They can be mixed with each other to form other colours and can be used like water colours to paint onto your work. Mostly they should have a clear glaze on top to seal them. Oxides are a different species – the pink oxide (cobalt) wash turns out bright blue for instance. They don’t always need a glaze on top, and some glazes can change the colour of the wash! The glazes need no other “glaze” on top! Be careful of unknown glaze interactions – you can put any combination of glaze in a bowl or on a plate, but only a single glaze on the outside of any vertical surface! Glazes are a chemical reaction under heat. We don’t know the exact chemicals in the Mayco glazes we use. I can guess by the way they interact with each other, however, on the whole, you need to test every idea you have, and not run the test on a vertical surface! Simply put, glaze is a layer of glass like substance that bonds with the clay underneath. Clay is made of silica, alumina and water. Glaze is made of mostly silica. Silica has a melting point of 1700°C and we fire to 1240°C. The silica requires a “flux” to help it melt at the lower temperature. Fluxes can be all sorts of chemicals – a common one is calcium – calcium has a melting point of 2500°C, however, together they both melt at a much lower temperature! Colourants are metal oxides like cobalt (blue), chrome (green through black), copper (green, blue, even red!), manganese (black, purple and pink) iron (red brown), etc. Different chemicals in the glaze can have dramatic effects. for example, barium carbonate (which we don’t use) turns manganese bright pink! Other elements can turn manganese dioxide brown, blue, purple and reddish brown. Manganese dioxide is a flux in and of itself as well. So, glazes that get their black and purple colours, often interact with other glazes and RUN! Our mirror black is a good example – it mixes really well with many glazes because it fluxes them – causes them to melt faster. It will also bring out many beautiful colours in the glazes because it’s black colouring most definitely comes from manganese dioxide! Glaze chemistry is a whole subject on it’s own! We use commercial Mayco glazes on purpose – for their huge range of colour possibilities, stability, cool interactions, artistic freedom with the ability to easily brush the glazes on and ease of use. We currently have almost 50 glazes on hand! A major project is to test the interactions of all glazes with each other. That is 2,500 test tiles!!!! I’m going to make the wall behind the wheels the feature wall of pretty colours! Step Seven – Glaze (Gloss or sometimes called “Glost”) Firing Most of the time this is the final stage of making your creation (but not always!) The glaze kiln goes to 1240°C. This is called cone 6, or midrange. It is the low end of stoneware temperatures. Stoneware clays and glazes are typically fired at cone 8 – 10, that is 1260 – 1290°C. The energy requirement to go from 1240°C to 1280°C is almost a 30% more! Our clay is formulated to vitrify (mature, turn “glass-like”) at 1240°, as are our glazes. A glaze kiln take around 12 hours to reach temperature and two to three days to cool down. Sometimes a third firing process is required – this is for decoration that is added to work after the glaze firing. For example – adding precious metals and lustres. this firing temperature is usually around 600 – 800°C depending upon the techniques being used. There are many students interested in gold and silver trims – we will be doing this third type of firing soon! After firing your work will be in the student finished work shelves. Remember to pay for it before you head out the door! There is a small extra charge for using porcelain clay (it’s more than twice the price of regular clay), and for any third firing process! Once your work has been fired it can not turn back into clay for millennia – so don’t fire it if you don’t like it! Put it in the bucket for recycling. https://firebirdstudios.com.au/the-process-of-making-pottery/Ceramics have evolved over thousands of years.A white earthenware side plate with a gadroon edge. Has water marks and chips on front.‘Johnson Bros England Reg No 15587’flagstaff hill, warrnambool, shipwrecked-coast, flagstaff-hill, flagstaff-hill-maritime-museum, maritime-museum, shipwreck-coast, flagstaff-hill-maritime-village, johnson bros, ceramics, tableware -
 Kiewa Valley Historical Society
Pot Large with Tap, Circa 1950
This type of cast iron kettle was used by pioneer families, mainly rural in the early 1900's upon open fires (log). It covered rural activities that needed a constant readily available source of boiling water, in or mainly outside the kitchen of homesteads. This kettle was used in the early to late 1900's for the refreshment of stock men and farmers that had irregular "tea" breaks under sometimes hard and gruelling conditions.This kettle belonged to and was used by a Kiewa Valley, pioneer family, the Roper Family. This kettle was moved from their Kiewa Valley property to their hut built on the Bogong High Plains. The Bogong High Plains area provided Kiewa Valley cattlemen a good supply of fodder to supplement their Kiewa Valley grazing areas. This "camp draft" activity , in the high plains, could take up to six weeks.This large cast iron modified camp pot (cauldron) has a long tap connection located at the bottom end. The "tap" is made from brass and has a simple elongated "bar" control swivel at the end to control the water flow. The tap suggests that only water was heated (to a constant boil) for the replenishment of cattlemen's, or other horse rider's, tea or coffee mugs. Refreshments at a "temporary" location on the Bogong High Plains. There was a "log" hut built by the Roper family as temporary accommodation for cattlemen and other family members.Ot the flat bottom "FIRST QUALITY 2 GALLONS"camp fire cooking utensils, hot plate, cast iron cooking appliance, drovers kitchen -
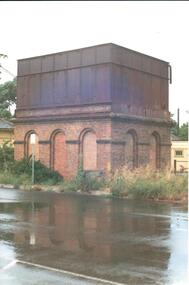 Hume City Civic Collection
Photograph, 1990-1999
The photograph is one of a series of 6 which feature the Sunbury Railway Station complex. The complex includes photographs of the railway station with the wooden pedestrian bridge which has been demolished and two photographs of the water towers. The photographs were taken before the railway land on the west side of the line was developed to make way for a supermarket complex in 2000.A view of the brick and iron water tower which is sited on the Bendigo side of the Sunbury Railway Station. The brick structure at the base has 3 arched recesses across the front and two at the side. Two of the railway buildings are visible on either side of the tower.sunbury railway station, water towers, footbridges, bridges, railways, george evans collection -
 Bendigo Historical Society Inc.
Photograph - BENDIGO ADVERTISER COLLECTION: WATER LAYING ON A ROAD AT LOCKWOOD SOUTH, 10/08/1993
Water laying on a road at Lockwood South. The water is reflecting trees and sky. Written on rear of image is Lockwood Sth 10/8/93Bill Hawkinsregion, small towns, lockwood south -
 Bendigo Historical Society Inc.
Slide - BENDIGO VIEWS, Dec 1965
Slide. Bendigo Views. The Kennington Reservoir. On the far side are trees and cars parked under them and cars at the edge of the water. There is a boat on the water.slide, bendigo, bendigo views, bendigo views -
 Lakes Entrance Historical Society
Photograph - Tambo Water Board, Lakes Post Newspaper, 1992
Black and white photograph of Greg Tong, Tambo Water Board, and Ian Zierk Geelong water Board 1992 Lakes Entrance Victoriawater resources -
 Halls Gap & Grampians Historical Society
Photograph - B/W
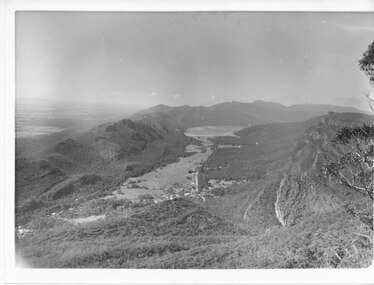
Photo has been taken from Boroka Peak/lookout, of the Fyans Valley and the township of Halls Gap. The Grampians/Dunkeld Road can be seen running North/South along the right edge of the valley and Lake Bellfield is the water at the end of the valley. Photo is typical of those taken by Forrests Commission at the timea photo of a valley, mostly cleared, flanked by two mountain ranges. A large body of water can be seen at the far end of the valley (middle of photo). Buildings and roads visible in the valley. Plains can be seen beyond the far mountain range on the left side of the scene.no.42scenery, fyans valley -
Glenelg Shire Council Cultural Collection
Photograph - Photograph - Main Breakwater Construction, n.d
Port Of Portland Authority Archivesport of portland archives, portland harbour, battery point, tug boat, transit shed -
Glenelg Shire Council Cultural Collection
Photograph - Photograph - Lee Breakwater, Portland, n.d
Port of Portland Authority Archivesport of portland archives, lee breakwater, construction, tanker berth -
Glenelg Shire Council Cultural Collection
Photograph - Photograph - Lee Breakwater, Portland, n.d
Port of Portland Authority Archivesport of portland archives, lee breakwater -
Glenelg Shire Council Cultural Collection
Photograph - Photograph - Lee Breakwater, Portland, n.d
Port of Portland Authority Archivesport of portland archives, lee breakwater, construction, workers, trade -
 Port of Echuca
Black and white photograph, 1971
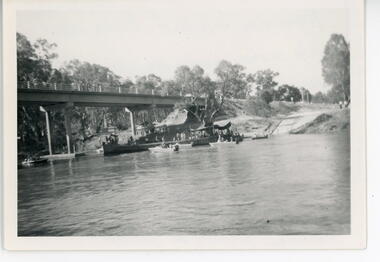
This is a photograph showing the P.S. Alexander Arbuthnot about to be removed from the water to be transported to Shepparton for restoration. The Alexander Arbuthnot was pulled off the bottom of the river at Yielma in July 1972 and taken to Shepparton via Barmah in January 1973.This photograph is significant as it shows the P.S Alexander Arbuthnot about to come out of the river, to be fully restored.A black and white photograph 13 cms X 9 cms of the P.S Alexander Arbuthnot under the Barmah Bridge, prior to being taken out of the river and taken to Shepparton.Written on the back of the photo are the following words. "Alexander Arbuthnot being moved into position under the Barmah Bridge prior to removal from the water and transported to Shepparton for restoration 1971 - 1973. The paddle screamer was previously sunk near the Victorian bank. At Newmans property at Yielma." paddle steamers, ralton, greg, shepparton, p.s alexander arbuthnot, international village shepparton, yielma -
 Kiewa Valley Historical Society
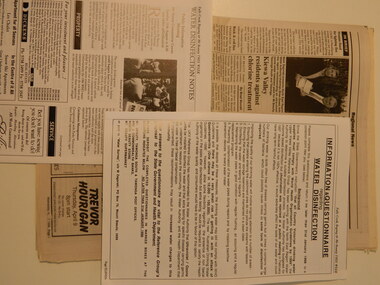
Papers - Mt Beauty Drinking Water 1997, 1997 - 1998
In 1996, the Australian Drinking Water Guidelines, instead of World Health Organisation Guidelines introduced in 1983, were introduced. The Australian guidelines allowed for some flexibility and the Upper Kiewa Community Consultative Committee supported a package proposal that included Ultra Violet/Ozone treatment. The debate was a rejection of chlorination by a public meeting in Mt Beauty in Feb. 1997.Mt Beauty residents were asked about the treatment of their drinking water at a public meeting and by an Information Questionnaire. North East Region Water Authority was involved - the debate is an example of community consultation, drinking water standards and the input of the authorities that were involved.Papers re introducing the chlorination of the water in Mt Beauty in 1997-1998. The papers consist of articles in a green folder, the newspaper "The Alpine Times" x2, the Ovens & Kiewa 'Valley Echo' and the local Falls Creek and Bogong, Mt Beauty news 'This Week' x5.drinking water, chlorination, ultra violet/ozone treatment, community consultation -
 Melbourne Water
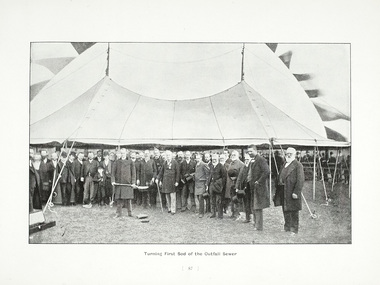
Photograph - Turning Of The First Sod, 1908
The 19th of May marks the anniversary of the turning of the first sod of the outfall sewer. In 1888, a Royal Commission into Melbourne’s public health led to an ambitious plan to construct a sewerage system of underground pipes, sewers and drains to carry sewage from homes and factories to a sewage treatment farm. The commission also supported the establishment of the Melbourne Metropolitan Board of Works (MMBW), the authority that would build the sewerage system and manage Melbourne’s water supply. This photograph is from The Melbourne and Metropolitan Board of Works Water Supply, Sewerage, and etc Photographic Views, 1908This photograph is in excellent condition and provides a detailed insight into Board personnel of the MMBW. It is of historical importance to the history of Melbourne in the turning of the very first sod.Black and white photographphotograph, mmbw, melbourne metropolitan board of works, melbourne water, historic, turniing of the first sod, book, sewerage, water -
 Greensborough Historical Society
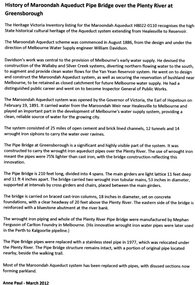
Article, Anne Paul, History of Maroondah Aqueduct Pipe Bridge over the Plenty River at Greensborough, by Anne Paul, 2012_03
The Maroondah Aqueduct pipe bridge, opened in 1891, was an important part of the system carrying water from the Maroondah Reservoir near Healesville to Melbourne. Most of the original system has been replaced by stainless steel pipes, the Greensborough section now running under the Plenty River since 1977. The original pipe bridge can still be seen over the Plenty River at Greensborough.2 p. typescriptaqueduct pipe bridge greensborough, maroondah aqueduct, melbourne water supply, anne paul -
 Bendigo Historical Society Inc.
Photograph - UPPER RESERVE LAKE, early 1900's ?
black and white photo, lake with swans in foreground, island in centre, water slide in background. Water pondage upper reserve looking west, giant water slide in background, C 1908, taken from post card. ( James Lerk 17.12.1999 )unknownplace, water, upper reserve, bendigo -
 City of Moorabbin Historical Society (Operating the Box Cottage Museum)
Personal Effects, china shaving mug / scuttle, c1950
Shaving soap scuttles are distinguished from shaving mugs by having a separate area for hot water. The hot water is for dipping a shaving brush into to make a lather with the soap which is then applied to the skin before using the razor. Vintage scuttles are often elaborately decorated. Between 1880 and 1920 is the original time period for the occupational shaving mug. Most men owned a shaving mug, either at home or at a barber shop. Mugs purchased for home use typically were purchased through local stores, had more variety in style but usually went without a name. Barber shops sold mugs with the owners’ names on them partly because they thought that shaving rash came from sharing the same soap. In reality, the rash was not a result of soap but of unsterilized razors. Transfer ; The Duryea Motor Wagon was among the first standardized automobiles and among the first powered by gasoline. Fifteen examples were built by the Duryea Motor Wagon Company of Chicopee, Massachusetts, between 1893 and 1896. Their enterprise followed the first commercially available automobile which was patented by Karl Benz on January 29, 1886, and put into production in 1888. The Duryea Motor Wagon remained in production until 1917. The Duryea brothers entered their horseless carriage in many shows and races. A china shaving mug / scuttle with a car transfer. The mug has a wide spout to hold / insert the shaving brush , a perforated tray opening at the top to hold the soap and a bulbous base for the hot water. car transfershaving equipment, safety razors, cheltenham, early settlers, moorabbin, shaving soap sticks, shaving brushes, shaving scuttles, shaving rash, infectious diseases, barber shops, -
 Wodonga & District Historical Society Inc
Memorabilia - China Souvenir Jugs Woodland Grove Wodonga, c. 1940
A wide range of small china pieces carrying scenic views of holiday destinations or key locations were a popular kind of souvenir during much of the 20th century. Several different pieces were used to depict Wodonga during this period, primarily focusing on the Woodland Grove and the Soldier Memorial. In 1924, Arthur Arnold and his father Wilhelm Arnold had established a general store in High Street, near the water tower, but in 1931–32 they moved to new premises in High Street on the corner of what is now known as Elgin Boulevard. In 1933-34 they widened the frontage of the shop and added new premises at the rear for the sale of produce. As customer debt mounted during the depression, it became difficult for Arthur and Wilhelm to re-stock the shop, so they enticed customers into paying their accounts by rewarding them with a small individual cream or milk jug upon payment. The jugs were made in Czechoslovakia and displayed the war memorial, water tower and bandstand from Woodland Grove, Wodonga. The Arnolds continued to trade until they finally closed their store in 1950. Wilhelm Arnold was a brother of J G Arnold, whose business ultimately became the present-day Arnold’s Fruit Market, Wodonga. This item has local historic and social significance as it depicts which features of the city the community valued in the past. It has artistic significance as an example of the kinds of souvenirs used widely across Australia to represent communities and the landscape.A pair of miniature white jugs with a gold rim and handle detailing. A hand-coloured transfer image fills the front side depicts Woodland Grove Wodonga, including the Soldiers' Memorial, Water Tower and RotundaBeneath the image : "WOODLAND GROVE, VIC. / With Compliments/ from/ A. Arnold & Co."wodonga, souvenirs, woodland grove, ceramics, arnolds wodonga -
Glenelg Shire Council Cultural Collection
Negative - Negative - Portland Bird Sanctuary, 1934
Negative for a black and white photograph. Portland Bird Sanctuary. Wooden post and rail fence in water. Seagulls, cormorants, sitting on it, swans in water behindzillah maschmedt, portland bird sanctuary, wildlife -
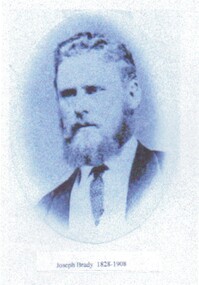 Bendigo Historical Society Inc.
Photograph - JOSEPH BRADY COLLECTION: PORTRAIT
Photocopy: Portrait of 'Joseph Brady' 1825-1908. Smaller photocopy also included. Inscriptions/Markings: Engineer responsible for water scheme (Coliban Water)person, individual, joseph brady 1828-1908 -
Port Melbourne Historical & Preservation Society
Financial record - Payment advice, Melbourne Water Supply from Borough of Sandridge Council, 1880s
Payment advice for water from Melbourne Water Supply approved by public works committee, examined by finance committee, passed for payment by Sandridge Councilsport - lawn bowls, parks and gardens, port melbourne bowling club, henry norval edwards, michael tarver quinn, local government - borough of sandridge -
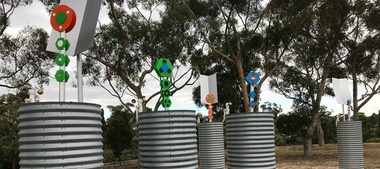 Yarra City Council
Artwork, other - Installation/Sculpture, Troy Innocent, Joel Collins, Indae Hwang, Yun Tae Nam, Drop Zone, 2011
'Drop Zone', is set in an imagined future where decreasing water availability has affected us more dramatically than anyone predicted. The water shortage has become so severe that we have to access water on a first-come first-serve basis, from military-like water ‘drop zones’, like this one, made from modified rain water tanks. These tanks function on three levels: Collected rain water causes the totem sculptures to rise and bloom; evaporation causes the totem sculptures to fall; and an anemometer (device that measures wind speed) drives a process that plays the tank like a giant drum, tuned by the amount of water contained within. This artwork envisions a future for Australia where the impact of decreasing water availability has had a more dramatic effect than any of the predictions. The shortage is so severe that military-like water ‘drop zones’, constructed of modified rainfall storage tanks have been established across the public parks of the City of Yarra for access on a first come, first serve basis. However, as the water is only replenished through rain catchment the tanks may only offer infrequent relief for the City of Yarra residents, standing as hollow reminders of the effects of inaction on the shaping of sustainable national water use.'Drop Zone' was one of three public art works installed in Yarra, in 2011, under the banner of The Environmental Public Arts Project which responded to key features of Council's Environment Strategy: 'Towards Local Sustainability 2008-2020.' The aims of this project included activating public spaces in new and creative ways through the creation of artworks which act as catalysts for further engagement and discussion around environmental themes and issues.Copyright the Artists. Ready-made corrugated water tanks arranged on a site. Situated within the tanks are small totemic sculptures that float on top of the water within the tank.Accompanying plaquesustainability, water, environment, climate change -
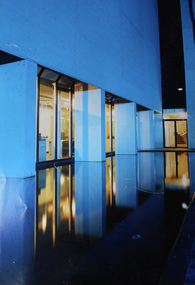 Robin Boyd Foundation
Photograph, Rupert Boyd
Rupert Boyd is a grandson of Robin and Patricia Boyd.Colour photographic print. Exterior Australian National Gallery Canberra, looking across water feature to lit interior. Sign on the windows 'The water gallery"On the back "Australian National Gallery, Canberra" photo by Rupert Boyd -
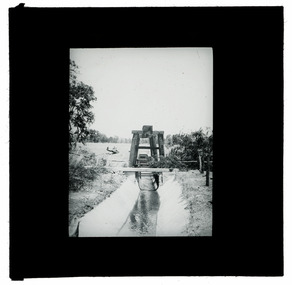 National Wool Museum
Photograph - Water Channel, J W Allen, 1900 - 1940
This item is part of a collection of seven black and white glass lantern slides previously housed together in a glass plate box. The slides are part of a greater collection of around forty three black and white glass lantern slides, along with other photographs and photo albums related to this collection. This item is associated with the New South Wales Graziers Association world tour of merino sheep 1928/9. The slides were possibly used as supporting material in presentations made by J W Allen when on tour.Black and white glass lantern slide with paper edging showing a water channel surrounded by farmland. A wooden structure is shown above the water channel.agriculture, new south wales graziers association, travel, sheep, breeding, photography, glass lantern slides, j w allen -
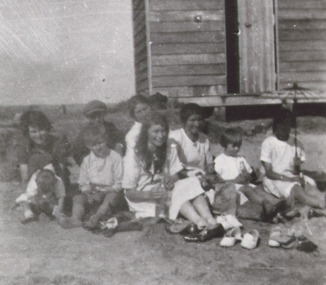 Lakes Entrance Historical Society
Photograph - Gladys and George Legg, 1925 c
nine children Gladys and George Legg named, sitting outside a hut used as a changing room at the western end of Bullock Island a favoured swimming place as the water was always clean and fresh from tidal movement Lakes Entrance Victoria. Gladys Legg - centre front. George Legg at back wearing a cap Black and white photograph of a group of nine children Gladys and George Legg named, sitting outside a hut used as a changing room at the western end of Bullock Island a favoured swimming place as the water was always clean and fresh from tidal movement Lakes Entrance Victoriaislands, people, recreation facilities, buildings -
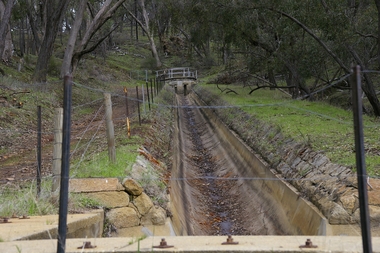 Bendigo Historical Society Inc.
Photograph - Historical Society Field Trip to the Springs at Sedgwick, Abt 2009
The Phil Wilkin Collection contains a series of 11 Items. The related items can be found by clicking on the reference link below. The following history of the Young family and their descendants who lived at the Springs is provided by Phil Wilkin. His Great Grandparents were Frances Young and August Wirth. Phil has also provided notes on the Wilkin Family and some history of the gold mining in Sedgwick. Frances Young's parents Joseph and Margaret Young owned the property called "The Old Place, Preston Vale or Wellington Flat" at Sedgwick near the Springs. Joseph Young owned and Managed the Standard Brewery which was located at Campbells Creek during the late 1800’s early 1900’s. Joseph and Margaret are buried in the Harcourt cemetery. In 1880 August Wirth lived at Mosquito Creek (Lake Eppalock, Victoria) when he married Frances Young. In 1902 they moved to part of Joseph Young's property. They milked cows and sold cattle for a living. One of their children Charles Wirth (Phil Wilkin's Grandfather) bought the land in 1935 after his parents had died. Charles Wirth was a councillor and also was president of the Shire of Strathfieldsaye. The "Old Place" was part of the property owned by members of the family. The old house at the Springs was burnt out by bushfire in January 1944 and much of the stonework was later vandalized by campers. The original Coliban Water Works were designed in 1863 by the Irish engineer Joseph Brady. The system included 70 kilometres of open water channels, aqueducts, syphons and tunnels to carry water (by gravity) from the Coliban River at Malmsbury, north to Castlemaine and Bendigo. Sedgwick is a locality in Central Victoria, Australia. It is located in the City of Greater Bendigo. Facilities include a public hall that opened in 1958 and CFA Rural fire station. It was named Upper Emu Creek until 1901 when it was renamed as Sedgwick after British geologist Adam Sedgwick.Twenty nine photos taken on a field trip by the Bendigo Historical Society to "The Springs" on the main Coliban water channel from Malmsbury to the Sandhurst Reservoir in Bendigo. The water race descends through a concrete chute, and continues sharply around the contour of the hills. Once it descended into a syphon across the gully. The are 182 photos in this series and can be found at 8683.1 to 8683.11. The series also includes photos of the surrounding farming land and the remains of an old house. There are also some notes on the pioneers of the district.history, bendigo, coliban water, joseph brady, irrigation, the springs, sedgwick